1
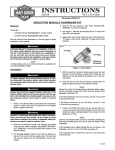
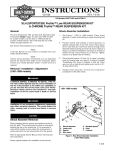
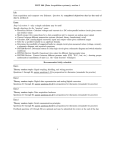
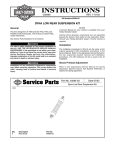
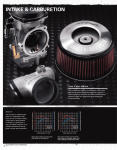
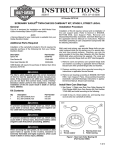
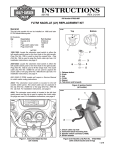
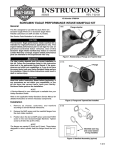
INSTRUCTIONS
REV. 5- -99
-J01619
®
Kit Numbers 31290-99A through 31296-99A, 31965-93C through 31969-93C, 3197393C, 32024-95B through 32027-95B, 32036-95C through 32039-95C and 32063-98A
BRAIDED SPARK PLUG WIRE KITS
General
Installation - Dyna Models
These kits are designed for installation on these vehicles:
1WARNING
1998 and later XL1200S
32063-98A
1986 and later XL models:
31965-93C
31966-93C
31967-93C
32036-95C
32037-95C
32038-95C
32039-95C
1999 and later DYNA GLIDE® models
31290-99A
31291-99A
31292-99A
31293-99A
31294-99A
31295-99A
31296-99A
1985 and later SOFTAIL® and 1991-1998 DYNA-GLIDE®
models:
31968-93C
31969-93C
31973-93C
32024-95B
32025-95B
32026-95B
32027-95B
Kit contents: (SOFTAIL® and DYNA-GLIDE®)
QTY
DESCRIPTION
1
Cable, Spark Plug, Long
1
Cable, Spark Plug, Short
3
Strap, Cable
1
Ground Harness
1
Clip, Adhesive Backed
31965-93C, 31292-99A and 31968-93C: red with silver stripe
31966-93C, 31291-99A and 31969-93C: silver with black stripe
31967-93B, 31290-99A and 31973-93C: gold & silver w/black
stripe
32038-95C, 31294-99A and 32026-95B: silver
32037-95C, 31295-99A and 32025-95B: red
32036-95C, 31296-99A and 32024-95B: blue
32039-95C, 31293-99A and 32027-95B: black
To avoid accidental start-up of motorcycle, and possible
personal injury, disconnect the battery cables (negative
cable first) before performing any of the following
procedures. If the positive cable should contact ground
with the negative cable installed, the resulting sparks
may cause a battery explosion which could result in
death or serious injury.
1.
1WARNING
Never disconnect a spark plug cable with the engine
running. If you disconnect a spark plug cable with the
engine running, you could receive an electric shock
from the ignition system which could cause death or
serious injury.
CAUTION
When disconnecting spark plug cables, always grasp and
pull on the rubber boot at the end of the cable . Do not pull
on the cable itself as this could damage the cable.
2.
See Figure 1. Disconnect spark plug cables from coil and
spark plugs.
d1000
Clip
Kit contents : (All XL’s except XL1200S)
QTY
DESCRIPTION
1
Cable, Spark Plug, Long
1
Cable, Spark Plug, Short
3
Strap, Cable
1
Ground Harness
1
Clip, Adhesive Backed
Front cylinder
plug cable
Kit contents for XL1200S
QTY
DESCRIPTION
2
Cable, Spark Plug, Long
2
Cable, Spark Plug, Short
6
Strap, Cable
1
Ground Harness, Left
1
Ground Harness,Right
2
Clip, Adhesive Backed
NOTE
Make note of the location of existing spark plug wires before
disconnection. Reference them when installing new wires.
Disconnect the battery cables, negative cable first.
Rear cylinder
plug cable
Coil
Coil cover
Figure 1. Dyna Spark Plug Cable Routing
3.
Remove clip from horn bracket that secures front spark
plug cable.
1 of 5
IMPORTANT NOTE
d0095x8x
Rear spark plug cable goes to the top coil terminal.
4.
5.
Connect new braided spark plug cable to ignition coil and
spark plugs. Make sure boots/caps are secured properly.
This will ensure that the connections to the plugs and coil
are protected against moisture.
Coil
Mounting
Bracket
See Figure 2. Place the clips of the ground wire harness
over the ferrules of the plug wires at the coil end.
Remove one coil mounting screw and washer.
7.
Place the ring terminal of the ground wire harness over the
screw. Ensure that the prongs of the ring terminal are
facing the washer. The washer should be on the screw
first, followed by the ring terminal.
8.
Screw
R
Spacer
F
Coil cover
For 1998 and Earlier Models:
6.
Electrical
Panel
Nut
Screw
Plug wires
Washer
i01588
Ring terminal
Replace the coil mounting screw, with the terminal, and
tighten.
Wire harness,
ground
For 1999 and Later Models:
6.
Remove one coil bracket mounting nut.
7.
Place the ring terminal of the ground harness over the
stud. Ensure that the prongs of the ring terminal are facing
the bracket.
8.
Replace the coil bracket nut and tighten.
9.
See Figure 1. Replace clip securing front cable to horn
bracket.
Clip
Figure 2. Dyna Braided Wire/Ground Wire
i01591
i01592
Wire harness,
ground
1WARNING
Always connect the positive battery cable first. If the
positive cable should contact ground with the negative
cable installed, the resulting sparks may cause a battery
explosion which could result in death or serious injury.
Clip
Ring terminal
Ignition
coil cover
10. Connect battery cables to battery, positive cable first.
Installation - Softail Models
Spark plug
cable
1WARNING
Nut plate
To avoid accidental start-up of motorcycle, and possible
personal injury, disconnect the battery cables (negative
cable first) before performing any of the following
procedures. If the positive cable should contact ground
with the negative cable installed, the resulting sparks
may cause a battery explosion which could result in
death or serious injury.
1.
Screw
Bolt
Never disconnect a spark plug cable with the engine
running. If you disconnect a spark plug cable with the
engine running, you could receive an electric shock
from the ignition system which could cause death or
serious injury.
-J01619
Lockwasher
Figure 3. Softail Spark Plug Cables
Disconnect the battery cables, negative cable first.
1WARNING
Ignition coil
CAUTION
When disconnecting spark plug cables, always grasp and
pull on the rubber boot at the end of the cable . Do not pull
on the cable itself as this could damage the cable.
2.
See Figure 3. Disconnect spark plug cables from coil and
spark plugs. Note the positions of the cables for
reassembly.
3.
Connect new braided spark plug cable to ignition coil and
spark plugs. Make sure boots/caps are secured properly.
This will ensure that the connections to the plugs and coil
are protected against moisture.
2 of 5
4.
Place the clips of the ground wire harness over the
ferrules on the coil end of the plug wires.
5.
Remove one of the screws holding the coil to the nut plate.
6.
Place the ring terminal of the ground wire harness over the
screw. Ensure that the prongs of the terminal are facing the
plate.
7.
i01594
i01593
Clip
Wire harness,
ground
Replace the screw, with the terminal, into the coil and
tighten.
Ring terminal
1WARNING
Always connect the positive battery cable first. If the
positive cable should contact ground with the negative
cable installed, the resulting sparks may cause a battery
explosion which could result in death or serious injury.
8.
Spark plug
cables
Connect battery cables to battery, positive cable first.
Ignition
coil
Installation - XLH Models (Except for
XL1200S
Clip
1WARNING
To avoid accidental start-up of motorcycle, and possible
personal injury, disconnect the battery cables (negative
cable first) before performing any of the following
procedures. If the positive cable should contact ground
with the negative cable installed, the resulting sparks
may cause a battery explosion which could result in
death or serious injury.
1.
Figure 4. XLH Spark Plug Wires
i01595
Clip
Disconnect the battery cables, negative cable first.
1WARNING
Upper engine
mount bolt
Never disconnect a spark plug cable with the engine
running. If you disconnect a spark plug cable with the
engine running, you could receive an electric shock
from the ignition system which could cause death or
serious injury.
Figure 4. XLH Braided Wire Mounting
6.
Install bolt with ring terminal and tighten to 30-35 ft-lbs (4147 Nm) torque.
7.
Mount ground wire harness wires to the frame with a clip.
CAUTION
When disconnecting spark plug cables, always grasp and
pull on the rubber boot at the end of the cable . Do not pull
on the cable itself as this could damage the cable.
2.
See Figure 4. Disconnect spark plug cables from coil and
spark plugs noting position of wires. Remove rear wire
from clip.
3.
Connect new braided spark plug cable to ignition coil and
spark plugs. Make sure boots/caps are secured properly.
This will ensure that the connections to the plugs and coil
are protected against moisture.
4.
Place the clips of the ground wire harness over the ferrules
on the coil end of the plug wires.
5.
See Figure 4. Remove upper engine mount bolt and place
ring terminal over bolt.
-J01619
1WARNING
Always connect the positive battery cable first. If the
positive cable should contact ground with the negative
cable installed, the resulting sparks may cause a battery
explosion resulting in personal injury.
8.
Connect battery cables to battery, positive cable first.
3 of 5
Installation - XL 1200S Models
i01593
i01596
1WARNING
Bracket
To avoid accidental start-up of motorcycle, and possible
personal injury, disconnect the battery cables (negative
cable first) before performing any of the following
procedures. If the positive cable should contact ground
with the negative cable installed, the resulting sparks
may cause a battery explosion which could result in
death or serious injury.
1.
Spark plug cable
Disconnect the battery cables, negative cable first.
Plug wire
retention kit
1WARNING
Clip
Never disconnect a spark plug cable with the engine
running. If you disconnect a spark plug cable with the
engine running, you could receive an electric shock
from the ignition system which could cause death or
serious injury.
Ignition coil
Wire harness,
ground
Ring terminal
1WARNING
Figure 5. XL1200S Spark Plug Cables
To avoid personal injury, do not smoke or allow open
flame or sparks anywhere in the area when working on
fuel system components. Gasoline is extremely
flammable and highly explosive. Follow all Service
Manual instructions for proper assembly and disassembly
procedures. Failure to do this could result in death or
serious injury.
2.
See Figure 6 for spark plug wire routing. Remove spark
plug wire clips indicated. These clips will be replaced with
cable straps included in kit after wires are installed.
3.
Follow routing shown in Figure 6 and install spark plug
wires. Make sure boots are seated firmly on plugs and into
the coil towers.
1.
4.
Install cable straps at positions indicated in Figure 6.
5.
See Figure 5. Place the clips of the ground wire harness
over the end ferrules of the plug wires.
Remove fuel tank following instructions in appropriate
Service Manual. Place tank in a safe location where it will
not be damaged or scratched. Set all fuel tank hardware
aside for later reinstallation.
NOTE
As there are four spark plug cables, there are two ground wire
harnesses. These two differ only in length.
IMPORTANT NOTE
When installing spark plug wires, remove only one wire at a
time and install the new braided wire that replaces it before
moving on to the next wire. As each original wire is removed,
check its length against each braided wire to find the
corresponding braided wire that matches its length exactly.
C
2
B
6.
See Figure 4. Remove upper engine mount bolt and place
both ring terminals over bolt.
1. Remove and replace
with cable strap
2. Remove and replace
with cable strap
3. Remove and replace
with cable strap
4. Remove (do not reuse)
5. Remove (do not reuse)
3
4
1
5
A
D
A
Plug Wire Lengths
(approximate)
A - 24 in.
B - 21 in.
C - 19-1/2 in.
D - 20-1/2 in.
x0110x7x
Figure 6. XL1200S Spark Plug Locations
-J01619
4 of 5
7.
Install bolt with ring terminals and tighten to 30-35 ft-lbs
(41-47 Nm) torque.
8.
Mount ground wire harness wires to the frame with a clip.
9.
Reassemble fuel tank to frame following Service Manual
procedures.
1WARNING
Always connect the positive battery cable first. If the
positive cable should contact ground with the negative
cable installed, the resulting sparks may cause a battery
explosion resulting in personal injury.
8.
Connect battery cables to battery, positive cable first.
-J01619
5 of 5