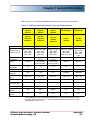
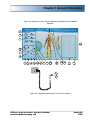
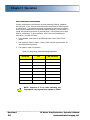
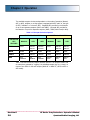
1
Q-VISION HF Series™ X-ray Generators Operator’s Manual Manual Part No. DC30-101 Revision B This manual is copyrighted and all rights are reserved. No portion of this document may be copied, photocopied, reproduced, translated, or reduced to any electronic medium or machine readable form without prior consent in writing from Quantum Medical Imaging, LLC. (QMI) Copyright© 2010 QMI Quantum Medical Imaging, LLC 2002-B Orville Drive North Ronkonkoma, NY 11779-7661 USA Phone: (631) 567-5800 Fax: (631) 567-5074 E-mail: [email protected] www.quantummedical.net Made in U.S.A. Revision History REVISION DATE TYPE OF MODIFICATION A 2/5/10 Initial Release B 5/28/10 Update for CE Page Number Rev i - iv B 1-1 to 1-14 B 2-1 to 2-20 B 3-1 to 3-38 B 4-1 to 4-24 B 5-1 to 5-8 B 6-1 to 6-6 B Page Number HF Series X-ray Generators - Operator’s Manual Quantum Medical Imaging, LLC Rev Page Number Rev Revision B i Revision History THIS PAGE INTENTIONALLY LEFT BLANK Revision B ii HF Series X-ray Generators - Operator’s Manual Quantum Medical Imaging, LLC Table of Contents CHAPTER 1 - SAFETY NOTICES GENERAL SAFETY INFORMATION ......................................................... 1-3 WARNINGS, CAUTIONS, NOTES ........................................................... 1-3 REGULATORY COMPLIANCE ................................................................. 1-5 CLASSIFICATION ........................................................................... 1-5 INTENDED USE ............................................................................. 1-6 COMPATIBILITY ............................................................................ 1-6 INTENDED OPERATOR ................................................................... 1-6 TRAINING ..................................................................................... 1-6 ACCOMPANYING DOCUMENTATION ................................................ 1-6 APPLICABLE STANDARDS ............................................................... 1-7 DISPOSAL OF BATTERIES AND ACCUMULATORS (DIRECTIVE 2006/66/EC) .............................................................. 1-8 ELECTROMAGNETIC COMPATIBILITY (EN 60601-1-2:2007/IEC 60601-1-2:2007) ........................................... 1-8 ABBREVIATION DEFINITION .............................................................. 1-14 CHAPTER 2 - GENERAL INFORMATION OVERVIEW .......................................................................................... 2-3 INTENDED USE ............................................................................. 2-4 KEY FEATURES .............................................................................. 2-4 PERFORMANCE SPECIFICATIONS ......................................................... 2-5 ELECTRIC OUTPUT DATA ............................................................... 2-9 MAIN COMPONENTS .......................................................................... 2-12 ACCESSORIES ................................................................................... 2-13 CONTROLS AND INDICATORS ............................................................ 2-13 HELP SERVICES SCREEN .................................................................... 2-19 CHAPTER 3 - OPERATION OVERVIEW .......................................................................................... 3-3 POWER ON/OFF PROCEDURES ....................................................... 3-3 Power On Procedure ................................................................ 3-3 Power Off Procedure ................................................................ 3-4 Automatic Power Standby Mode ................................................ 3-5 DAILY TUBE WARM-UP PROCEDURE ............................................... 3-6 SETTING UP TO TAKE EXPOSURES ....................................................... 3-7 RECEPTOR SELECTION .................................................................. 3-7 MODE SELECTION ......................................................................... 3-9 Manual Mode ......................................................................... 3-11 AEC Mode ............................................................................. 3-12 APR Mode ............................................................................. 3-18 TAKING AN EXPOSURE ................................................................ 3-24 HF Series X-ray Generators - Operator’s Manual Quantum Medical Imaging, LLC Revision B iii Table of Contents Exposures ..............................................................................3-25 Instantaneous Exposures ........................................................3-25 HEAT UNIT COMPUTER ................................................................3-25 FAULT MESSAGES ........................................................................3-26 HELP SCREEN FEATURES ....................................................................3-31 CHAPTER 4 - APR EDITOR OVERVIEW ......................................................................................... 4-3 ACCESSING THE APR EDIT MODE .................................................. 4-3 APR EDIT MODE ............................................................................ 4-6 Editing a View Name ................................................................ 4-6 Editing Programmable Exposure Settings ..................................4-10 Making a Back Up Copy of the APR Program File .......................4-20 Restoring APR Program from Back Up Copy ..............................4-21 CHAPTER 5 - USER MAINTENANCE OVERVIEW ......................................................................................... 5-3 USER MAINTENANCE ..................................................................... 5-3 SYSTEM SETTINGS ........................................................................ 5-4 ACCESSING SERVICE MODE ..................................................... 5-4 CHAPTER 6 - WARRANTY INFORMATION WARRANTY STATEMENT ..................................................................... 6-3 WARRANTY EXCLUSIONS ..................................................................... 6-4 BUYER’S REMEDIES ............................................................................. 6-5 WARRANTY RETURN PROCEDURE ........................................................ 6-5 EQUIPMENT IN TRANSIT ..................................................................... 6-5 VOIDING WARRANTY .......................................................................... 6-6 Revision B iv HF Series X-ray Generators - Operator’s Manual Quantum Medical Imaging, LLC Chapter 1 SAFETY NOTICES 1-1 1-2 Chapter 1 Safety Notices GENERAL SAFETY INFORMATION Quantum products are designed to meet stringent safety standards. All medical electrical equipment requires proper installation, operation, and maintenance (particularly with regard to safety). It is vital that the user read, understand, note, and where applicable, strictly observe all Warnings, Cautions, Notes and Safety markings within this document and on the equipment, and that the user strictly follow all safety directions in this manual to help ensure the safety of users and patients. Every reasonable precaution has been taken during manufacture to safeguard the health and safety of persons who will operate this equipment. The following precautions must be observed at all times. WARNINGS, CAUTIONS, NOTES The following samples show how warnings, cautions, and notes appear in this document. The text explains their intended use. WARNING Indicates injury or death is possible if the instructions are not obeyed. Instructs users to refer to documentation if displayed without warning text. CAUTION Indicates that damage to equipment is possible if the instructions are not obeyed. NOTE Notes provide advice and highlight unusual points. A note is not intended as an instruction. The purpose of safety icons, such as those shown below, is to indicate at a glance the type of caution, warning or danger. WARNING Ionizing radiation: indicates the possibility of increased levels of radiation. WARNING Dangerous voltage: indicates the presence of high voltage. WARNING Warning, hot surface. HF Series X-ray Generators - Operator’s Manual Quantum Medical Imaging, LLC Revision B 1-3 Chapter 1 Safety Notices WARNING Quantum Medical Imaging, LLC disclaims all responsibility from any injury resulting from improper application of this equipment. This equipment is sold to be used exclusively under the prescribed direction of a person who is licensed by law to operate equipment of this nature. This equipment must be used in accordance with all safety procedures described in this manual and must not be used for purposes other than those described herein. In the United States, Federal law restricts this device to sale, distribution, and use by or on order of a licensed physician. Quantum Medical Imaging, LLC cannot assume responsibility for any malfunctioning of this equipment resulting from improper operation, maintenance, or repair, or from damage or modification of its components. Failure to observe these warnings may cause serious injuries. WARNING X-rays are hazardous to both patient and operator unless established safe exposure factors and operating instructions are observed. Only qualified and authorized personnel shall operate this system. In this context, qualified means those legally permitted to operate this equipment in the jurisdiction in which the equipment is being used, and authorized means those authorized by the authority controlling the use of the equipment. Full use must be made of all radiation protection features, devices, systems, procedures and accessories. It is important that everyone having anything to do with x-radiation be properly trained and fully acquainted with the recommendations of the National Council on Radiation Protection and Measurements as published in NCRP Reports available from NCRP Publications, 7910 Woodmont Avenue, Suite 800, Bethesda, Maryland 20814-3095 (www.ncrp.com), and of the International Commission on Radiological Protection (www.icrp.org), and take adequate steps to protect against injury. WARNING X-ray equipment may cause injury if used improperly. The instructions contained in this manual must be read and followed when operating this unit. Personal radiation monitoring and protective devices are available. You are urged to use them to protect against unnecessary X-ray exposure. Revision B 1-4 HF Series X-ray Generators - Operator’s Manual Quantum Medical Imaging, LLC Chapter 1 Safety Notices REGULATORY COMPLIANCE This certified Quantum Medical Imaging, LLC medical device has been designed, manufactured, and calibrated to comply with governing Federal Regulations 21 CFR Subchapter J and the performance standards attendant thereto. Upon installation, all certified products require the filing of Form FD-2579 "Report of Assembly of a Diagnostic X-ray System" by the assembler (i.e., the installer) with the appropriate agencies; the "Installation Quality Assurance Checklist" must also be completed and properly distributed upon installation. A copy of each form (pink copy) is provided to the user. The installation report is completed by the installer and returned to Quantum Medical Imaging, LLC. Those responsible for the planning of X-ray equipment installations must be thoroughly familiar and comply completely with NCRP Report No. 49, "Structural Shielding Design and Evaluation for Medical Use of X-rays and Gamma Rays of Energies up to 10 MeV", as revised or replaced in the future. Those authorized to operate, test, participate in or supervise the operation of the equipment must be thoroughly familiar and comply completely with the currently established safe exposure factors and procedures described in publications such as Subchapter J of Title 21 of the Code of Federal Regulations, "Diagnostic X-ray Systems and Their Major Components," and NCRP Report No. 102, “Medical X-ray, Electron Beam and Gamma Ray Protection for Energies Up to 50 MeV—Equipment Design and Use” as revised or replaced in the future. Q-VISION HF Series X-ray Generators must only be used in rooms that comply with all applicable laws or regulations that have the force of law, concerning electrical safety for this type of equipment. Scheduled maintenance is essential to the assurance of continued integrity of this equipment with respect to regulatory compliance. The continuance of certified performance to the regulatory standard is incumbent upon the user's diligent conformance to recommended maintenance instructions. Do not use this equipment until you are sure that the planned maintenance program is up to date. CLASSIFICATION This product has been classified as Class I by Underwriters Laboratories, Inc. Equipment not suitable for use in the presence of a flammable anesthetic mixture with air or with oxygen or with nitrous oxide. Protection against Harmful Ingress of Water (Ordinary), enclosed equipment without protection against ingress of liquids. MEDICAL ELECTRICAL EQUIPMENT WITH RESPECT TO ELECTRIC SHOCK, FIRE, MECHANICAL HAZARDS ONLY IN ACCORDANCE WITH UL 60601-1 AND CAN/CSA C22.2 NO. 601.1 98UA HF Series X-ray Generators - Operator’s Manual Quantum Medical Imaging, LLC Revision B 1-5 Chapter 1 Safety Notices The following symbols may be used for marking on this equipment or equipment documentation: Earth (ground) Dangerous Voltage Protective Earth (ground) Attention, consult accompanying documents Power ON (part of equipment) Power OFF (part of equipment) Stand By Non-ionizing radiation Ionizing radiation Alternating current COMPATIBILITY The equipment described in this manual must only be used in combination with other equipment or components if these are expressly recognized by Quantum Medical Imaging, LLC as compatible. INTENDED OPERATOR The Q-VISION HF Series X-ray Generator is intended to be installed, used and operated only in accordance with the safety procedures given within this manual for the purpose for which it was designed. Before attempting to work with this equipment, read, understand, note and strictly observe all warnings, cautions and safety markings on the equipment. Users include those persons who actually handle the equipment and those who have authority over the equipment. TRAINING Users of Q-VISION HF Series X-ray Generator shall have received adequate training on its safe and effective use before attempting to work with the equipment. Training requirements may vary from country to country. The User shall make sure that training is received in accordance with local laws or regulations that have the force of law. Revision B 1-6 HF Series X-ray Generators - Operator’s Manual Quantum Medical Imaging, LLC Chapter 1 Safety Notices ACCOMPANYING DOCUMENTATION The documentation consists of a User manual (this document) and related documentation: • Service Manual P/N DC30-011: Contains technical and service documentation for this product, including installation and configuration instructions to be performed by qualified persons The documentation shall be kept with the system for easy reference. APPLICABLE STANDARDS Q-VISION HF Series X-ray Generators comply with the following regulatory standards: • FDA Center for Devices and Radiological Health (CDRH) - Title 21 CFR Subchapter J • • EN 60601-1: 1990 + A1:1993 + A2:1995 + A13:1996 • IEC 60601-2-7: 1998(E) • CAN/CSA-C22.2 No. 601.1-M90, 2005 (Medical Electrical Equipment, part 1: General Requirements for Safety) • UL 60601-1, 1st Edition, 2006-04-26 (Medical Electrical Equipment, part 1: General Requirements for Safety) • IEC 60601-1 Medical electrical equipment, Part 1: General requirements for safety • IEC 60601-1-2: 2007 • EC Directive 93/42/EEC for Medical Devices EU Authorized Representative: Medizintechnik Berlin GmbH Altentreptower, Strasse 59 12683 Berlin - Germany Phone: +49-302-82 4726 Fax: +49-302-82 6382 E-mail: [email protected] HF Series X-ray Generators - Operator’s Manual Quantum Medical Imaging, LLC Revision B 1-7 Chapter 1 Safety Notices DISPOSAL OF BATTERIES AND ACCUMULATORS (DIRECTIVE 2006/66/EC) In accordance with the European Directive 2006/66/EC, batteries and accumulators are labeled to indicate that they are to be collected separately and recycled at end of life. The label on the battery may also include a chemical symbol for the metal concerned in the battery (Pb for lead, Hg for mercury and Cd for cadmium). Users of batteries and accumulators must not dispose of batteries and accumulators as unsorted municipal waste, but use the collection framework available to customers for the return, recycling, and treatment of batteries and accumulators. Participation is important to minimize any potential effects of batteries and accumulators on the environment and human health due to the potential presence of hazardous substances. ELECTROMAGNETIC COMPATIBILITY (EN 60601-1-2:2007/IEC 606011-2:2007) Q-VISION HF Series X-ray Generators are intended for use in the electromagnetic environment specified below. As such, the generator must be installed and put into service according to the information provided in the accompanying Service Manual. The Q-VISION HF Series X-ray Generator complies with the requirements of applicable EMC standards. Portable and mobile RF communications equipment can affect medical electrical equipment. It is therefore recommended that the operation of equipment of this type, such as mobile telephones, cordless microphones and other similar mobile radio equipment, be restricted from the vicinity of this device. Use of accessories, transducers and cables, other than those specified in the accompanying documents, may result in increased emissions or decreased immunity of the equipment. Guidance and manufacturer's declaration - electromagnetic emissions The HF Series X-ray Generator is intended for use in the electromagnetic environment specified below. The customer or the user of the HF Series X-ray Generator should assure that it is used in such an environment. Emissions test RF emissions CISPR 11 Revision B 1-8 Compliance Group 1 Electromagnetic environment guidance The HF Series X-ray Generator uses RF energy only for their internal functions. Therefore, the RF emissions are very low and are not likely to cause any interference in nearby electronic equipment. HF Series X-ray Generators - Operator’s Manual Quantum Medical Imaging, LLC Chapter 1 Safety Notices Guidance and manufacturer's declaration - electromagnetic emissions RF emissions CISPR 11 Class A Harmonic emissions IEC 61000-3-2 Class A Voltage fluctuations/ flicker emissions IEC 61000-3-3 Complies HF Series X-ray Generators - Operator’s Manual Quantum Medical Imaging, LLC The HF Series X-ray Generator is suitable for use in all establishments other than domestic and those directly connected to the public lowvoltage power supply network that supplies buildings used for domestic purposes. Revision B 1-9 Chapter 1 Safety Notices Guidance and manufacturer's declaration - electromagnetic immunity The HF Series X-ray Generator is intended for use in the electromagnetic environment specified below. The customer or the user of the HF Series X-ray Generator should assure that it is used in such an environment. Immunity test IEC 60601 test level Compliance level Electromagnetic environment - guidance Electrostatic discharge (ESD) IEC 61000-4-2 ±6 kV contact ±8 kV air ±6 kV contact ±8 kV air Floors should be wood, concrete or ceramic tile. If floors are covered with synthetic material, the relative humidity should be at least 30%. Electrical fast transient/burst IEC 61000-4-4 ±2 kV for power supply lines ±1 kV for input/output lines ±2 kV for power supply lines ±1 kV for input/output lines Mains power quality should be that of a typical commercial or hospital environment. Surge IEC 61000-4-5 ±1 kV differential mode ±2 kV common mode ±1 kV differential mode ±2 kV common mode Mains power quality should be that of a typical commercial or hospital environment. Voltage dips, short interruption, and voltage variations on power supply input lines IEC 60601-4-11 < 5% UT (>95% dip in UT) for 0.5 cycle < 5% UT (>95% dip in UT) for 0.5 cycle 40% UT (60% dip in UT) for 5 cycles 40% UT (60% dip in UT) for 5 cycles 70% UT (30% dip in UT) < 5% UT (> 95% dip in UT) for 5 s 70% UT (30% dip in UT) < 5% UT (> 95% dip in UT) for 5 s Mains power quality should be that of a typical commercial or hospital environment. If the user of the HF Series X-ray Generator requires continued operation during power mains interruptions, it is recommended that the HF Series X-ray Generator be powered from an uninterruptible power supply or battery. 3 A/m 3 A/m Power frequency (50/60 Hz) IEC 61000-4-8 Power frequency magnetic fields should be at levels characteristic of a typical location in a typical commercial or hospital environment NOTE: UT is the A.C. mains voltage prior to application of the test level. Revision B 1-10 HF Series X-ray Generators - Operator’s Manual Quantum Medical Imaging, LLC Chapter 1 Safety Notices Guidance and manufacturer's declaration - electromagnetic immunity The HF Series X-ray Generator is intended for use in the electromagnetic environment specified below. The customer or the user of the HF Series of X-ray generators (including TechVision option) should assure that it is used in such an environment. Immunity test IEC 60601 test level Compliance level Electromagnetic environment - guidance Portable and mobile RF communications equipment should be used no closer to any part of the HF Series X-ray Generator, including cables, than the recommended separation distance calculated from the equation applicable to the frequency of the transmitter. Recommended separation distance Conducted RF IEC 61000-4-6 3 Vrms 150 kHz to 80MHz 3 Vrms Radiated RF IEC 61000-4-3 3 V/m 80 MHz to 2,5 GHz 3 V/m d 1,2 P d 1,2 P , 80 MHz to 800 MHz d 2,3 P , 800 MHz to 2,5 GHz where P is the maximum output power rating of the transmitter in watts (W) according to the transmitter manufacturer and d is the recommended separation distance in metres (m). Field strengths from fixed RF transmitters, as determined by an electromagnetic site surveya, should be less than the compliance level in each frequency range.b Interference may occur in the vicinity of equipment marked with the following symbol: HF Series X-ray Generators - Operator’s Manual Quantum Medical Imaging, LLC Revision B 1-11 Chapter 1 Safety Notices Guidance and manufacturer's declaration - electromagnetic immunity NOTE 1 At 80 MHz and 800 MHz, the higher frequency range applies. NOTE 2 These guidelines may not apply in all situations. Electromagnetic propagation is affected by absorption and reflection from structures, objects and people. a Field strengths from fixed transmitters, such as base stations for radio (cellular/cordless) telephones and land mobile radios, amateur radio, AM and FM radio broadcast and TV broadcast cannot be predicted theoretically with accuracy. To assess the electromagnetic environment due to fixed RF transmitters, an electromagnetic site survey should be considered. If the measured field strength in the location in which the HF Series X-ray Generator is used exceeds the applicable RF compliance level above, the HF Series of X-ray generators (including TechVision option) should be observed to verify normal operation. If abnormal performance is observed, additional measures may be necessary, such as re-orienting or relocating the HF Series X-ray Generator. b Over the frequency range 150 kHz to 80 kHz, field strengths should be less than 3 V/m. Revision B 1-12 HF Series X-ray Generators - Operator’s Manual Quantum Medical Imaging, LLC Chapter 1 Safety Notices Recommended separation distances between portable and mobile RF communications equipment and the HF Series of X-ray generators (including TechVision option) The HF Series X-ray Generator is intended for use in an electromagnetic environment in which radiated RF disturbances are controlled. The customer or the user of the HF Series X-ray Generator can help prevent electromagnetic interference by maintaining a minimum distance between portable and mobile RF communications equipment (transmitters) and the HF Series X-ray Generator as recommended below, according to the maximum output power of the communications equipment. Rated maximum output power of transmitter W Separation distance according to frequency of transmitter m 150 kHz to 80 MHz d 1,2 P 80 MHz to 800 MHz d 1,2 P 800 MHz to 2,5 GHz d 2,3 P 0,01 0,12 0,12 0,23 0,1 0,38 0,38 0,73 1 1,2 1,2 2,3 10 3,8 3,8 7,3 100 12 12 23 For transmitters rated at a maximum output power not listed above, the recommended separation distance d in metres (m) can be estimated using the equation applicable to the frequency of the transmitter, where P is the maximum output power rating of the transmitter in watts (W) according to the transmitter manufacturer. NOTE 1: At 80 MHz and 800 MHz, the separation distance for the higher frequency range applies. NOTE 2: These guidelines may not apply in all situations. Electromagnetic propagation is affected by absorption and reflection from structures, objects and people. HF Series X-ray Generators - Operator’s Manual Quantum Medical Imaging, LLC Revision B 1-13 Chapter 1 Safety Notices ABBREVIATION DEFINITION The following abbreviations and acronyms may be found in this document. Their definition is explained below. ADC Analog-to-digital converter AEC Automatic Exposure Control APR Anatomical Programmed Region cm Centimeters (thickness) HF High Frequency HSS High-speed starter kVp Tube voltage (kilovolts peak) LCD Liquid crystal display mA Tube current (milliampere) mAs Time-current product OCP Operator Control Panel SE Stored Energy sec Expose on time (seconds) Revision B 1-14 HF Series X-ray Generators - Operator’s Manual Quantum Medical Imaging, LLC Chapter 2 GENERAL INFORMATION 2-1 2-2 Chapter 2 General Information OVERVIEW NOTE: The user should read this manual in its entirety prior to using this equipment. It should be kept in a location near the equipment and be readily accessible to those who operate it. This document is intended to assist users in the safe and effective operation of the equipment described herein. Pay special attention to all the information described in the Safety section (refer to Chapter 1, SAFETY NOTICES). This manual is written for trained users of the Q-VISION High-Frequency (HF) Series X-ray Generator, hereinafter referred to as the HF Series X-ray Generator, and for authorized field service personnel. Quantum Medical Imaging, LLC assumes no liability for use of this document if any unauthorized changes to the content or format have been made. The HF Series X-ray Generator, includes the following models: • Model QGV-32: 32 kW, 208 - 260 VAC single-phase input configuration • Model QGV-32-SE: 32 kW, "STORED ENERGY" 115/230 VAC single-phase input configuration • • • Model QGV-32-2: 32 kW, 208 - 240 VAC three-phase input configuration Model QGV-32-3: 32 kW, 380 - 480 VAC three-phase input configuration QGV-32-5: 32 kW, 380 - 480 VAC single-phase input configurationModel QGV-40: 40 kW, 208 - 260 VAC single-phase input configuration • Model QGV-40-SE: 40 kW, "STORED ENERGY" 115/230 VAC single-phase input configuration • • • Model QGV-40-2: 40 kW, 208 - 240 VAC three-phase input configuration Model QGV-40-3: 40 kW, 380 - 480 VAC three-phase input configuration QGV-40-5: 40 kW, 380 - 480 VAC single-phase input configurationModel QGV-50-SE: 50 kW, "STORED ENERGY" 115/230 VAC single-phase input configuration Model QGV-50: 50 kW, 380 - 480 VAC three-phase input configuration • HF Series X-ray Generators - Operator’s Manual Quantum Medical Imaging, LLC Revision B 2-3 Chapter 2 General Information • • • Model QGV-50-2: 50 kW, 208 - 240 VAC three-phase input configuration Model QGV-65: 65 kW, 380 - 480 VAC three-phase input configuration Model QGV-80: 80 kW, 380 - 480 VAC three-phase input configuration This product is intended to be used and operated only in accordance with the safety procedures given within this manual for the purpose for which it was designed. The intended use is given below. Nothing stated in this manual reduces user's professional responsibilities for sound judgment and best practice. INTENDED USE The HF Series X-ray Generator is a diagnostic X-ray high-voltage generator. It is intended to supply and control the electrical energy applied to a diagnostic X-ray tube for medical/veterinary radiographic examinations. Use of the equipment for purposes other than those intended and expressly stated by the manufacturer, as well as incorrect use or operation, may relieve the manufacturer or his agent from all or some of the responsibility for resultant noncompliance, damage or injury. KEY FEATURES It is imperative that all safety procedures described in this manual be strictly adhered to in order to ensure the safety of both patient and user. The significant physical and performance characteristics of the HF Series X-ray Generators are as follows: • • • • • • • Revision B 2-4 Ultra high-frequency (up to 120 kHz) voltage waveform for highly efficient X-ray production Manual, AEC (optional), and automatic (APR) modes of operation Anatomic Programmability (APR) - pre-defined and customized technique selection Wall/table/none image receptor selection Multi-language display capability Optional pedestal/wall mount control console Compact generator cabinet design HF Series X-ray Generators - Operator’s Manual Quantum Medical Imaging, LLC Chapter 2 General Information PERFORMANCE SPECIFICATIONS Refer to Table 2-1 for performance specifications of single-phase (non-stored energy) HF Series X-ray Generators. Table 2-1. HF Series Single-Phase Generator Performance Specifications N/A Models QG-32, QG-32-5 Models QG-40, QG-40-5 (Catalog No. QGV-32) (Catalog No. QGV-40) Maximum kW N/A 32 40 mA Stations; Small Focus (S) Large Focus (L) N/A 25S, 75S, 150S 100L, 200L, 250L, 320L, 400L, 500L 25S, 75S, 150S 100L, 200L, 250L, 320L, 400L, 500L mA Accuracy N/A 5% +1mA 5% +1mA kVp Range (kVp) N/A 40-125 40-125 kVp increments (kVp/ step) N/A 1.0 1.0 kV Accuracy N/A 4% 4% 150 kVp optional N/A Yes Yes Time Range (sec.) N/A 0.001 - 6.3 0.001 - 6.3 Time Accuracy* N/A 1 mS +0.5%* 1 mS +0.5%* Minimum Exposure Time (seconds) N/A 0.001 0.001 mAs Range** N/A 0.025-600 0.025-600 High-SpeedStarter N/A No No Ripple Voltage (output) N/A 5% 5% * Time measured at 75% of the peak kVp waveform; For exposure times from 1.0 mS to 49 mS, time accuracy is 2% + 1 mS; for exposure times from 50 mS to 100 mS, time accuracy is 1% + 1 mS NOTE: AEC TECHNIQUES SHOULD HAVE EXPOSURE TIMES EXCEEDING 8 MILLISECONDS. ** mAs is tube dependent; the generator may not reach maximum mAs due to tube type. HF Series X-ray Generators - Operator’s Manual Quantum Medical Imaging, LLC Revision B 2-5 Chapter 2 General Information Refer to Table 2-2 for performance specifications of single-phase stored energy (SE) HF Series X-ray Generators. Table 2-2. HF Series Single-Phase Stored Energy Generator Performance Specifications Model QG-32-SE Model QG-40-SE Model QG-50-SE (Catalog No. QGV-32-SE) (Catalog No. QGV-40-SE) (Catalog No. QGV-50-SE) N/A 32 40 50 mA Stations; Small Focus (S) Large Focus (L) N/A 25S, 50S, 75S, 150S 100L, 160L, 200L, 250L, 320L, 400L 25S, 50S, 75S, 150S 100L, 200L, 250L, 320L, 400L, 500L 25S, 50S, 75S, 150S 100L, 200L, 250L, 320L, 400L, 500L, 600L mA Accuracy N/A 5% +1mA 5% +1mA 5% +1mA kVp Range (kVp) N/A 40-125 40-125 40-125 kVp increments (kVp/ step) N/A 1.0 1.0 1.0 kV Accuracy N/A 4% 4% 4% 150 kVp optional? N/A No No No Time Range (sec.) N/A 3 3 3 Time Accuracy* N/A 1 mS +0.5%* 1 mS +0.5%* 1 mS +0.5%* Minimum Exposure Time (seconds) N/A 0.001 0.001 0.001 mAs Range** N/A 0.025-400 0.025-400 0.025-400 High-Speed Starter N/A No No No Ripple Voltage (output) N/A 5% 5% 5% Maximum kW * Maximum exposure time is a function of kV and mAs settings and the age of the batteries; Time measured at 75% of the peak kVp waveform. For exposure times from 1.0 mS to 49 mS, time accuracy is 2% + 1 mS; for exposure times from 50 mS to 100 mS, time accuracy is 1% + 1 mS NOTE: AEC TECHNIQUES SHOULD HAVE EXPOSURE TIMES EXCEEDING 8 MILLISECONDS. ** mAs is tube dependent; the generator may not reach maximum mAs due to tube type. Revision B 2-6 HF Series X-ray Generators - Operator’s Manual Quantum Medical Imaging, LLC Chapter 2 General Information Refer to Table 2-3 for performance specifications of three-phase HF Series X-ray Generators. Table 2-3. HF Series Three-Phase Generator Performance Specifications Maximum kW mA Stations; Small Focus (S) Large Focus (L) mA Accuracy kVp Range (kVp) Model QG-32-2, QG-32-3 Model QG-40-2, QG-40-3 Model QG-50, QG-50-2 Model QG-65 Model G-80 Cat. No. QGV-32-2, QGV-32-3 Cat. No. QGV-40-2 QGV-40-3 Cat. No. QGV-50 QGV-50-2 Cat. No. QGV-65 Cat. No. QGV-80 32 40 50 65 25S, 75S, 150S 100L, 200L, 250L, 320L, 400L, 500L 25S, 75S, 150S 100L, 200L, 250L, 320L, 400L, 500L 25S, 75S, 150S 100L, 200L, 320L, 400L, 500L, 650L 25S, 75S, 150S 100L, 200L, 320L, 400L, 500L, 650L, 800 5% +1mA 5% +1mA 40-125 (40-150 with QG-150 option) 5% +1mA 40-125 (40-150 with QG-150 option) 5% +1mA 80 25S, 75S, 150S 100L, 200L, 320L, 400L, 500L, 650L, 800 5% +1mA 40-150 40-150 1.0 1.0 1.0 1.0 1.0 4% 4% 4% 4% 4% Yes Yes Yes Standard Standard 0.001 - 6.3 0.001 - 6.3 0.001 - 6. 0.001 - 6.3 0.001 - 6.3 1 mS +0.5%* 1 mS +0.5%* 1 mS +0.5%* 1 mS +0.5%* 1 mS +0.5%* 0.001 0.001 0.001 0.001 0.001 0.025-600 0.025-600 0.025-800 0.025-800 0.025-800 No Option Option Yes Yes 5% 5% 5% 5% 5% 40-125 kVp increments (kVp/step) kV Accuracy 150 kVp optional? Time Range (sec.) Time Accuracy* Minimum Exposure Time (sec.) mAs Range** High-Speed Starter*** Ripple Voltage (output) * Time measured at 75% of the peak kVp waveform; For exposure times from 1.0 mS to 49 mS, time accuracy is 2% + 1 mS; for exposure times from 50 mS to 100 mS, time accuracy is 1% + 1 mS HF Series X-ray Generators - Operator’s Manual Quantum Medical Imaging, LLC Revision B 2-7 Chapter 2 General Information ** NOTE: AEC TECHNIQUES SHOULD HAVE EXPOSURE TIMES EXCEEDING 8 MS. mAs is tube dependent; the generator may not reach maximum mAs due to tube type. In AEC mode, the mAs is limited to 600. *** High-Speed Starter Duty Cycle: are not to exceed two activations within any one minute period Revision B 2-8 HF Series X-ray Generators - Operator’s Manual Quantum Medical Imaging, LLC Chapter 2 General Information ELECTRIC OUTPUT DATA Table 2-4. Electric Output Data OUTPUT PARAMETER Nominal X-ray tube voltage and highest X-ray tube current obtainable at that voltage Maximum X-ray tube current and highest X-ray tube voltage obtainable at that current MODEL (CAT. NO.) LOADING FACTOR N/A N/A QG-32, QG-32-2, QG-32-3, QG-32-5 (QGV-32, QGV-32-2, QGV-32-3, QGV-32-5) 125 kV, 250 mA (150 kV, 200 mA with QG-150 option) QG-40, QG-40-2, QG-40-3, QG-40-5 (QGV-40, QGV-40-2, QGV-40-3, QGV-40-5) 125 kV, 320 mA (150 kV, 250 mA with QG-150 option) N/A N/A QG-32-SE (QGV-32-SE) 125 kV, 250 mA QG-40-SE (QGV-40-SE) 125 kV, 320 mA QG-50, QG-50-2 (QGV-50, QGV-50-2) 125 kV, 400 mA (150 kV, 320 mA with QG-150 option) QG-50-SE (QGV-50-SE) 125 kV, 400 mA QG-65 (QGV-65) 150 kV, 800 mA QG-80 (QGV-80) 150 kV, 800 mA N/A N/A QG-32, QG-32-2, QG-32-3, QG-32-5 (QGV-32, QGV-32-2, QGV-32-3, QGV-32-5) 500 mA, 64 kV QG-40, QG-40-2, QG-40-3, QG-40-5 (QGV-40, QGV-40-2, QGV-40-3, QG-40-5) 500 mA, 80 kV N/A N/A QG-32-SE (QGV-32-SE) 400 mA, 80 kV QG-40-SE (QGV-40-SE) 500 mA, 80 kV QG-50, QG-50-2 (QGV-50, QGV-50-2) 650 mA, 76 kV QG-50-SE (QGV-50-SE) 600 mA, 83 kV QG-65 (QGV-65) 800 mA, 81 kV QG-80 (QGV-80) 800 mA, 100 kV HF Series X-ray Generators - Operator’s Manual Quantum Medical Imaging, LLC Revision B 2-9 Chapter 2 General Information Table 2-4. Electric Output Data OUTPUT PARAMETER Combination of X-ray tube current and X-ray tube voltage resulting in highest output power (Note: All mA stations below those listed Revision B 2-10 MODEL (CAT. NO.) LOADING FACTOR N/A N/A QG-32, QG-32-2, QG-32-3, QG-32-5 (QGV-32, QGV-32-2, QGV-32-3, QGV-32-5) 320 mA, 100 kV 400 mA, 80 kV 500 mA, 64 kV QG-40, QG-40-2, QG-40-3, QG-40-5 (QGV-40, QGV-40-2, QGV-40-3, QGV-40-5) 400 mA, 100 kV 500 mA, 80 kV N/A N/A QG-32-SE (QGV-32-SE) 320 mA, 100 kV 400 mA, 80 kV QG-40-SE (QGV-40-SE) 320 mA, 125 kV 400 mA, 100 kV 500 mA, 83 kV QG-50, QG-50-2 (QGV-50, QGV-50-2) 400 mA, 125 kV 500 mA, 100 kV 650 mA, 76 kV QG-50-SE (QGV-50-SE) 400 mA, 125 kV 500 mA, 100 kV 600 mA, 83 kV QG-65 (QGV-65) 500 mA, 130 kV 650 mA, 123 kV 800 mA, 81 kV QG-80 (QGV-80) 650 mA, 123 kV 800 mA, 100 kV HF Series X-ray Generators - Operator’s Manual Quantum Medical Imaging, LLC Chapter 2 General Information Table 2-4. Electric Output Data OUTPUT PARAMETER Highest constant output power at 100 kV, 0.1 second (s) MODEL (CAT. NO.) LOADING FACTOR N/A N/A QG-32, QG-32-2, QG-32-3, QG-32-5 (QGV-32, QGV-32-2, QGV-32-3, QGV-32-5) 32 kW (320 mA, 100 kV, 0.1 s) QG-40, QG-40-2, QG-40-3, QG-40-5 (QGV-40, QGV-40-2, QGV-40-3, QGV-40-5) 40 kW (400 mA, 100 kV, 0.1 s) N/A N/A QG-32-SE (QGV-32-SE) 32 kW (320 mA, 100 kV, 0.1 s) QG-40-SE (QGV-40-SE) 40 kW (400 mA, 100 kV, 0.1 s) QG-50, QG-50-2 (QGV-50, QGV-50-2) 50 kW (500 mA, 100 kV, 0.1 s) QG-50-SE (QGV-50-SE) 50 kW (500 mA, 100 kV, 0.1 s) QG-65 (QGV-65) 65 kW (650 mA, 100 kV, 0.1 s) QG-80 (QGV-80) 80 kW (800 mA, 100 kV, 0.1 s) Nominal shortest irradiation time (AEC exposures) All models 0.008 second Lowest mAs All models 0.025 mAs (25 mA, 1.0 mS) HF Series X-ray Generators - Operator’s Manual Quantum Medical Imaging, LLC Revision B 2-11 Chapter 2 General Information MAIN COMPONENTS See Figure 2-1. The HF Series X-ray Generator is comprised of: 1 Generator Cabinet - Contains the electronics for high voltage generation and control. 2 Touchscreen Operator Console - Contains the operator control panel, which has all generator operator controls and indicators; all aspects of X-ray techniques are entered at the operator control console. The operator console is a self-contained computer, running generator control software, designed for table top (picture frame-style) mounting (item 2). An optional wall-mount is available (QVG-WM). WARNING! The Touchscreen Operator Console complies with the UL 60950/EN 60950 standard for Information Technology. This means that, although it is absolutely safe, patients may not come into direct contact with the equipment. Therefore, the console must be placed outside a radius of 1.5 meters around the patient. 3 Power/Expose Control Box: Provides the operator with a means to control power to the Generator, and provides interface of the Expose switch to the X-ray imaging system. Figure 2-1. HF Series X-ray Generator - Main Components Revision B 2-12 HF Series X-ray Generators - Operator’s Manual Quantum Medical Imaging, LLC Chapter 2 General Information CONTROL PANEL COMPLIANCE LABEL (ON REAR OF TOUCH SCREEN COMPUTER, LOWER RIGHT CORNER) GENERATOR REGULATORY MARKINGS LABEL (REFER TO CHAPTER 1 FOR MEANINGS OF SYMBOLS) Model: QGV-80 Serial No.: QGV80-XXX-XXXX Manufactured: Month Year Manufactured by: Quantum Medical Imaging, LLC 2002 Orville Drive North Ronkonkoma, NY 11779 USA GENERATOR SYSTEM LABEL X-RAY GENERATOR SYSTEM Model: QG-80 Serial No.: QG80-XXX-XXXX Manufactured by: Quantum Medical Imaging, LLC 2002 Orville Drive North Ronkonkoma, NY 11779 USA GENERATOR CABINET LABEL Complies with FDA radiation performance standards set forth in CFR 21 Subchapter J applicable at date of manufacture 380-480 100 3 PHASE Model: QG-80G Serial No.: QG80G-XXX-XXXX Manufactured: Month Year MAX. MA MAX. KVP AMP MOM. AMPS L.T. Q-VISION - GENERATOR-STBY-EXP BOX.cdr 800 150 200 (@440 VAC) <1.0 Manufactured by: Quantum Medical Imaging, LLC 2002 Orville Drive North Ronkonkoma, NY 11779 USA Figure 2-2. Generator - Label Locations ACCESSORIES Equipment described in this manual shall only be used in combination with other equipment or components if these are expressly recognized by Quantum Medical Imaging, LLC as compatible. A list of such equipment and components is available from Quantum Medical Imaging, LLC on request. CONTROLS AND INDICATORS The operator controls and indicators on the HF Series X-ray Generator are divided into two basic groups: • Generator Cabinet and Operator Console Power Switches (see Figures 2-3 and 2-4) HF Series X-ray Generators - Operator’s Manual Quantum Medical Imaging, LLC Revision B 2-13 Chapter 2 General Information • Operator Control Panel - Operator Controls and Indicators (see Figure 2-5 and refer to Table 2-5 for descriptions). Power ON/OFF Switch ON = up, OFF = down Figure 2-3. Generator Cabinet Power On/Off Switch POWER / EXPOSE CONTROL BOX AND EXPOSE BUTTON POWER ON POWER OFF POWER ON/ OFF SWITCH Revision B 2-14 HF Series X-ray Generators - Operator’s Manual Quantum Medical Imaging, LLC Chapter 2 General Information Figure 2-4. Operator Console and Power/Expose Switch Box Power ON/OFF Switches 20 16 21 18 21 22 17 19 Figure 2-5. OperatorControl Panel Touch Screen Controls HF Series X-ray Generators - Operator’s Manual Quantum Medical Imaging, LLC Revision B 2-15 Chapter 2 General Information Table 2-5. Operator Control Panel Controls and Indicators Item Symbol Function Type Description 1 Selects Manual mode of operation Control Touchscreen push button Enables manual selection of kVp, mA, mAs, and time settings for exposure. 2 Selects Automatic Exposure Control mode of operation. (Only functional if AEC option is installed.) ControlTouchscreen push button System automatically sets required mAs for achieving proper optical density with compensation for programmable film/screen speeds. 3 Selects Anatomical Programmed Regions (APR) mode of operation Control Touchscreen push button Enables technique selection from preprogrammed anatomical regions and radiographic projections. Note: When in APR Mode, pressing the AEC key on the Operator Control Panel toggles between APR/AEC mode and APR/Patient Type mode. 4 N/A LCD screen Indicator Displays all operational touchscreen elements, and supports "Help" features, such as Quick Start, and a 4step "Workflow" description. The LCD screen viewing angle is adjustable for maximum visibility. 5 N/A kVp increment/ decrement Control Touchscreen push button Adjusts the tube voltage (kVp) value from minimum of 40 kVp to maximum of 125 kVp, in 1 kVp increments (150 kVp maximum available in systems equipped with 150 kVp option). 6 N/A mA increment/ decrement Control Touchscreen push button Sets the tube current (mA) value; mA stations that are available for selection are model dependent. 7 N/A mAs/Time increment/decrement Control Touchscreen push button Adjusts the exposure time or currenttime (mAs) value. Revision B 2-16 HF Series X-ray Generators - Operator’s Manual Quantum Medical Imaging, LLC Chapter 2 General Information Item Symbol Function Type Description 8 Selects wall receptor Control Touchscreen push button Used for examinations where wall receptor and AEC are selected (AEC feature is optional); patient is positioned in front of wall receptor. Pressing this button will toggle between WALL 40" and WALL 72" settings. 9 Disables wall and table receptors Control Touchscreen push button Used for examinations where neither table nor wall image receptor is required, such as table top and off table techniques. 10 Selects table receptor Control Touchscreen push button Used for examinations where table receptor and AEC are selected (AEC feature is optional); patient is positioned on tabletop. 11 Selects AUX receptor Touchscreen Used for examinations when a typical wallstand or table bucky is not desired, such as portable digital receptor applications. 12 Selects top left ion chamber detector location Control Touchscreen push button Turns on/off ion chamber’s top left detector for AEC exposures. 13 Selects middle ion chamber detector location Control Touchscreen push button Turns on/off ion chamber’s middle detector for AEC exposures. 14 Selects top right ion chamber detector location Control Touchscreen push button Turns on/off ion chamber’s top right detector for AEC exposures. Ready Indicator Steady green, indicates generator is ready for exposure. When the following conditions occur, message appears to the left of the indicator: • tube heat limit will be exceeded by the next exposure • On stored energy systems, the batteries are re-charging, blinking stops when fully charged. • On non-stored energy systems, 400V capacitors are re-charging 15 N/A HF Series X-ray Generators - Operator’s Manual Quantum Medical Imaging, LLC Revision B 2-17 Chapter 2 General Information Item Symbol 16 17 N/A 18 19 N/A 20 21 N/A 22 Revision B 2-18 Function Type Description Prepped Indicator When the X-ray Exposure indicator is illuminated green, indicates tube rotor and filament are prepared for exposure. PREP button prepares generator for exposure; release to inhibit exposure Control Push button When pressed, initiates rotor acceleration and X-ray tube filament preheating. Exposure On Indicator During the production of X-rays, the X-ray Exposure indicator is illuminated yellow. EXPOSE button initiates exposure Control Hand switch "Dead-man" type switch (i.e., requires continuous switch activation throughout entire exposure cycle). Initiates the exposure. If preparation cycle (PREP) is not complete, initiates preparation cycle. Patient Type Selection Control Touchscreen push button Touch icon that best matches current patient physical size. Choose between small, medium, large and Pediatric Selects Anatomical Region Control Touchscreen push button (Figure/List) Activates APR mode, and allows operator to choose the anatomical region, and call View list for Region selected. Selects Help Services Screen Control Touchscreen push button Provides tutorial, workflow, error codes, technical documentation, contact information, remote service enable/disable, APR editing, and date/time settings HF Series X-ray Generators - Operator’s Manual Quantum Medical Imaging, LLC Chapter 2 General Information HELP SERVICES SCREEN Q-VISION is designed with a Help utility for operator convenience. This utility is accessed via the HELP button located in the lower right corner of the main operating screen (left). Help topics include tutorial materials for "Quick Start" in using the Q-VISION System, and an overview of the four basic steps in taking an exposure with Q-VISION, and an explanation of common error codes and warnings. Fingertip activated reference to the Operators Manual, and Service Contacts is also provided on the Help screen. Remote servicing capability is available and activated via the Help screen, and Operator level Service features, such as APR Editor and Date/Time Settings are available. Refer to Chapter 3, OPERATION for detailed information on the Help utility. HF Series X-ray Generators - Operator’s Manual Quantum Medical Imaging, LLC Revision B 2-19 Chapter 2 General Information THIS PAGE INTENTIONALLY LEFT BLANK Revision B 2-20 HF Series X-ray Generators - Operator’s Manual Quantum Medical Imaging, LLC Chapter 3 OPERATION 3-1 3-2 Chapter 3 Operation OVERVIEW This chapter provides the information necessary to operate the generator. The following operating procedures are outlined and described in detail: • Power on/off procedures • X-ray tube seasoning procedure • Operating instructions WARNING! This equipment must be operated with reasonable care. Manufacturer’s equipment recommendations described in this manual must be observed. WARNING! Do not operate the generator if water has leaked into or around the generator cabinet. Call service before applying power to the system. POWER ON/OFF PROCEDURES NOTE: On STORED ENERGY (SE) models, after long periods of non-usage, allow system to recharge batteries for approximately four hours prior to using (disable AUTO SHUTOFF for continuous charge and turn on system; refer to "Generator Timeout Setting" paragraph in this chapter for instructions). It is recommended the system be turned on at least once a week to maintain battery charge. The following procedures describe the steps necessary to perform system power on and power off (shut down). Power On Procedure 1. Verify the main circuit breaker on the generator cabinet is set to the ON position. 2. Set the Power/Expose Box rocker switch near the Operator Control Panel Touchscreen (OCP), to the on ( ) position. If the switch is already in the on position, it means the system shut itself down automatically due to inactivity (refer to "Automatic Power Stand By Mode" paragraph in this chapter). In this case, set the power on/standby switch to the standby ( ) position, wait five seconds, then set switch to the on ( ) position. HF Series X-ray Generators - Operator’s Manual Quantum Medical Imaging, LLC Revision B 3-3 Chapter 3 Operation 3. The system automatically runs a series of self-checks for approximately three to six seconds to ensure proper operation. "Quantum Medical Imaging" and the OCP software revision level appears on the display. 4. Upon successful completion of self-tests, the Manual or APR mode menu is displayed, depending on the operating mode used when the system was last shut down. Power Off Procedure For Short Periods Of Time 1. Set the Power/Expose Box rocker switch near the Operator Control Panel (OCP) to the standby ( Revision B 3-4 ) position. HF Series X-ray Generators - Operator’s Manual Quantum Medical Imaging, LLC Chapter 3 Operation 2. Ensure that the generator status indicator on the Touchscreen (OCP) is gray in color, and that the message to the left reads "Off". System is now shut down. For Long Periods Of Time 1. Set the Power/Expose Box rocker switch near the Operator Control Panel (OCP) to the standby ( ) position. 2. Locate the main circuit breaker on the generator cabinet (see Figure 2-2) and set to the OFF position. System is now shut down. 3. If shut down period is anticipated to be longer than 15 days, set the facility main power disconnect switch to the OFF position. Automatic Power Standby Mode To help save power and protect system electronics when left unattended, the generator is equipped with an automatic power-off feature that places the system in "stand by" mode (i.e., system low voltage state). After a user-defined period of inactivity (selectable from 0, 30, 60, 90, 120, 150, or 180 minute delay settings), the system will automatically enter a low power state through software control, leaving all power switches in the on position. NOTE: The power standby period must be set during generator configuration by the service technician. HF Series X-ray Generators - Operator’s Manual Quantum Medical Imaging, LLC Revision B 3-5 Chapter 3 Operation DAILY TUBE WARM-UP PROCEDURE All tube manufacturers recommend X-ray tube seasoning following installation and daily prior to use. Systems used infrequently should have the tube seasoned on a daily basis. It is important that these procedures be performed to maintain both the tube manufacturer's and Quantum Medical Imaging, LLC’s warranties. A typical daily seasoning procedure is provided below. If the system has not been used for several days, or upon installation, refer to the tube manufacturer's instructions. Proceed as follows: 1. Select MANUAL mode from the Q-VISION Operator Control Panel Touchscreen. 2. Take exposures listed in Table 3-1 using a 200L mA focal spot and allow 30seconds between exposures. 3. The system is ready for operation. Table 3-1: Daily X-ray Tube Seasoning Exposures EXPOSURE KVP TIME (SECONDS) 1 50 0.1 2 60 0.1 3 70 0.1 4 80 0.1 5 90 0.1 6 100 0.1 7 110 0.1 8 120 0.1 NOTE: "Exposure 8" X-ray Tube seasoning settings applies only to generators capable of 150kV. Revision B 3-6 HF Series X-ray Generators - Operator’s Manual Quantum Medical Imaging, LLC Chapter 3 Operation SETTING UP TO TAKE EXPOSURES Before taking an exposure, the operator must prepare the system as follows: • Select Receptor • Select Mode • Select/verify exposure factors RECEPTOR SELECTION In any operating mode, use the RECEPTOR selection keys (see Figure 3-1) to select the appropriate image receptor. Select "NONE" if not using a table or wall receptor. The currently selected receptor is indicated in the window at the bottom center of the operator control panel display screen. WALL Selects the Wall Stand Film Cabinet as the image receptor. IMAGE RECEPTOR SELECTION KEYS NONE Selects the cassette (i.e., neither Table nor Wall Stand Film Cabinet) as the image receptor. Use with “Special” exams such as cassette table top or cross table exams. TABLE Selects the Table Film Cabinet as the image receptor. AUXILLARY Selects additional image receptor(s), such as a second wall stand, or separate digital receptor, etc. (Press once select the receptor assigned as “WALL2”, press second time to select receptor assigned as “AUXILLIARY”.) Figure 3-1. Main Operating Screen - Receptor Selection HF Series X-ray Generators - Operator’s Manual Quantum Medical Imaging, LLC Revision B 3-7 Chapter 3 Operation The available receptor choices are dependent on the mode of operation (Manual, AEC, or APR), whether or not the system is equipped with AEC, and if so, the type of AEC ("standard" or "universal" AEC). Standard AEC provides for the selection of up to two separate receptors (WALL and TABLE). Universal AEC provides for the selection of up to four separate receptors (WALL, TABLE, WALL2 and/or AUX). Table 3-2. Receptor Selection Options STANDARD AEC OPTION RECEPTOR KEY PRESSED MANUAL AEC APR UNIVERSAL AEC OPTION MANUAL AEC APR WALL WALL WALL40* WALL72* WALL40* WALL72* WALL WALL40* WALL72* WALL40* WALL72* NONE NONE NONE NONE NONE NONE NONE TABLE TABLE TABLE40 TABLE40 TABLE TABLE40 TABLE40 AUX NOT ENABLED NOT ENABLED NOT ENABLED WALL2* AUX* WALL2* AUX* WALL2* AUX* Table 3-2 shows the various receptor selection options. The receptors shown with an asterisk are selected by "toggling" the indicated receptor key (e.g., there is a choice of two SID’s for the wall receptor (WALL40" or WALL72") when in AEC or APR mode). Revision B 3-8 HF Series X-ray Generators - Operator’s Manual Quantum Medical Imaging, LLC Chapter 3 Operation MODE SELECTION The generator has three operational modes: •Manual •AEC (optional) •Anatomical Programmed Regions (APR) NOTE: AEC mode can be used either as a standalone mode or in conjunction with APR mode. MODE SELECTION KEYS MODE APR AEC MANUAL This key enables the Anatomical Programmed Regions mode. This mode provides pre-programmed technique settings for up to ten (10) available anatomical regions, each containing up to ten programs for the selected region. Selects the optional Automatic Exposure Control (AEC) function. AEC uses an ion chamber to assure proper exposure times. Allows for manual selection of all technique factors/parameters without automatic system intervention. Figure 3-2. Mode Selection HF Series X-ray Generators - Operator’s Manual Quantum Medical Imaging, LLC Revision B 3-9 Chapter 3 Operation • ANATOMICAL PROGRAMMED REGIONS (APR) MODE: After a thickness measurement is entered, prior to exposure, the system automatically sets programmed X-ray techniques and exposure factors, including AEC mode (if available), bucky selection, kVp, mA, time, initial anatomical thickness, and AEC density. Pre-programmed APR settings can be modified at any time through the operator control panel, either in the actual stored program or for the current exam (i.e., temporarily). During exposure, AEC (optional) works in conjunction with APR to provide uniform, repeatable, high-quality images with the smallest variation of optical density between patients. Additionally, a "Patient Type" sub-modeselection field is provided for APR selections that are configured for manual exposure control (i.e., non-AEC). When this sub-modefeature is used is accessed, the patient type is initially set for average (i.e., typical "cm") setting. The PATIENT TYPE up/down keysselection buttons provide quick time/mAs compensation (±25% and ±50% settings) in accordance with physical characteristics of patient (i.e., muscular, thin, heavy, etc.), or exposure parameters are adjusted by selecting cm or setting individual exposure factors. NOTE: On systems equipped with AEC option, all techniques may be toggled between AEC and non-AEC modes using the AEC mode button. • AEC MODE: Automatic Exposure Control (optional) uses an ion chamber to ensure proper optical density with compensation for programmable film/ screen speeds. (If AEC option is not installed, AEC mode is inaccessible to operator.) • MANUAL MODE: enables manual selection of kVp, mA, and mAs or time settings for exposures For detailed operating instructions for each of the above modes, proceed to the required procedure (MANUAL, AEC, or APR [with or without AEC]) on the following pages. NOTE: In the sample screens that follow, displayed values are for illustrative purposes only and do not necessarily reflect valid techniques. Revision B 3-10 HF Series X-ray Generators - Operator’s Manual Quantum Medical Imaging, LLC Chapter 3 Operation Manual Mode When operating in Manual mode, all X-ray techniques and exposure factors must be set by the operator. To make manual exposure settings, see Figure 3-3 and proceed as follows: Head Cervical Spine Chest Thoraic Spine Abdomen Lumbar Spine Pelvis Sacrum/Coccyx Shoulder Upper Arm Elbow Lower Arm Hand Upper Leg Knee Lower Leg Ankle Foot MODE 1. MANUAL AEC APR MAS/TIME 2. mAs sec MAS TIME 0.100 sec 15.0 mAs Head Cervical Spine Chest Thoraic Spine Abdomen Lumbar Spine Pelvis Sacrum/Coccyx Shoulder Upper Arm Elbow Lower Arm Hand Upper Leg Knee Lower Leg Ankle Foot Head Cervical Spine Chest Thoraic Spine Abdomen Lumbar Spine Pelvis Sacrum/Coccyx Shoulder Upper Arm Elbow Lower Arm Hand Upper Leg Knee Lower Leg Ankle Foot 3. Figure 3-3. Making Manual Mode Exposure Settings 1. Press the MANUAL mode key on the operator control panel. The system displays the MANUAL MODE screen. 2. Press the MAS/TIME key to toggle display between mAs and time settings. 3. Verify exposure (technique) settings are correct. Modify technique using the KV, MA, or MAS/TIME increment/decrement keys as required. HF Series X-ray Generators - Operator’s Manual Quantum Medical Imaging, LLC Revision B 3-11 Chapter 3 Operation AEC Mode AEC exposures are available in either Manual Mode, or APR Mode of operation. When operating in AECAPR mode, the system automatically sets required mAs or time for achieving proper optical density with compensation for programmable film/screen speed. Conversely, when operating in Manual Mode, the operator must accomplish the following tasks, prior to making an exposure: • Select the desired film screen • Select AEC Mode • Select the desired ion chamber field(s) on the simulated AEC grid on the Generator Control Panel Touchscreen • Adjust the exposure parameters using the increment and decrement buttons associated with kVp, mA, and Density, on the Generator Control Panel Touchscreen Figures 3-4 through 3-7 describe the process for making an AEC exposure while operating in APR Mode: NOTE: AEC is not available while the "None" Film Screen selection is active. 1. Select the body part to be examined from the appropriate Anatomical Figures (center screen), or the Body Part List at the right side of the screen. Once the Body Part is selected, the APR button is highlighted by a frame, and the appropriate procedures are listed at the right of the Anatomical Figures. a. Select the desired procedure from the Procedures List called by the Body Part selection process. If the selected procedure is programmed for AEC, the generator control panel will be automatically configured for that specific procedure. Note that the AEC button is automatically highlighted by a colored frame indicating that it is active, and the appropriate fields on the graphic representation of the ion chamber are illuminated. Revision B 3-12 HF Series X-ray Generators - Operator’s Manual Quantum Medical Imaging, LLC Chapter 3 Operation 1. Head Head Cervical CervicalSpine Spine Chest Chest Thoraic ThoraicSpine Spine Abdomen Abdomen Lumbar LumbarSpine Spine Pelvis Pelvis Sacrum/Coccyx Sacrum/Coccyx Shoulder Shoulder Upper UpperArm Arm Elbow Elbow Lower LowerArm Arm Hand Hand Upper UpperLeg Leg Knee Knee LowerLeg Leg Lower Ankle Ankle Foot Foot Head Cervical Spine Chest Thoraic Spine Abdomen Lumbar Spine Pelvis Sacrum/Coccyx Shoulder Upper Arm Select Body Part for Examination from any of these sources. Select Desired Examination from Procedures List. Procedures programmed for AEC Exposure, automatically preset the generator control panel. Manual AEC APR Wall None Table Note that Selected APR is programmed for AEC Exposure using two Ion Chamber Fields in the Wall Bucky (Medium Patient Type is default) • APR button is highlighted with a frame (Active) • AEC button is highlighted with a frame (Active) • WALL button is highlighted with a frame (Active) Figure 3-4. AEC Mode Operation - Body Part and Procedure Selection HF Series X-ray Generators - Operator’s Manual Quantum Medical Imaging, LLC Revision B 3-13 Chapter 3 Operation CAUTION: If the operator deselects the AEC Mode button, and then reselects AEC Mode, the programmed ion chamber configuration is lost, and the system defaults to the center chamber field. The ion chambers can be manually manipulated as desired. To automatically re-establish the programmed ion chamber configuration, a different procedure should be selected, momentarily, and the desired procedure re-selected. 2. Press MAS/TIME key to choose between display of mAs or time value on AEC mode screen at end of exposure. The MAS/TIME button is always in direct opposition to the display at the top of the screen, therefore, if the operator desires to display "Post mAs" value after the exposure, the toggle button on the Generator Control, should read "sec," and conversely, if the operator desires to display "Post Time," the toggle button should read "mAs" (see Figure 3-5). NOTE: When operating in APR Mode, using a procedure that is programmed for AEC, the mAs/ Time value is replaced by Optical Density ("N") on the Generator Control Panel. Revision B 3-14 HF Series X-ray Generators - Operator’s Manual Quantum Medical Imaging, LLC Chapter 3 Operation 2. sec OR mAs Time/mAs setting toggles with each tap of the SEC or mAs button Note: The TIME/MAS button is in direct opposition to the condition shown in the screen header. The button displays which mode will be displayed at the top of the Touchscreen if the operator taps the button one time. Post Time or Post mA value shown here Figure 3-5. AEC Mode Operation - Time/mAs Display and Control HF Series X-ray Generators - Operator’s Manual Quantum Medical Imaging, LLC Revision B 3-15 Chapter 3 Operation 3. Verify the technique selections are correct. Modify technique settings using the KV and MA increment/decrement keys as required (see Figure 3-6). 3. Chest Patient Type: Medium KVp, mA, Density (N), and Patient thickness(cm) exposure settings are controlled by the Up/Down increment buttons shown. 110 kVp 400L mA N Density 32 cm Figure 3-6. AEC Mode Operation - Setting Generator Exposure Values 4. Verify AEC (film) density and receptor combination selections are correct. If necessary, modify film density and/or film/screen combination settings using the increment (up) and decrement (down) keys adjacent to each field. Refer to Figure 3-6 and Figure 3-7 respectively. Available choices are: • Revision B 3-16 AEC Density - Each step increases/decreases mAs 15% above and below nominal (N%). There are a total of eleven available steps (-75, -60, -45, -30, -15, nominal, +15, +30, +45, +60, +75) HF Series X-ray Generators - Operator’s Manual Quantum Medical Imaging, LLC Chapter 3 Operation • Film Screen - choices are WALL 72", WALL 40", TABLE 40", 100 Speed, 200 Speed, 800 Speed, and FILM/Screen7. If the Digital Receptor setting in Service Configuration Menu is enabled, an eighth option entitled "Canon Digital" will be also be selectable. (Note: These are the system default film/screen combination names, however each can be edited by user as necessary). 4. Chest Patient Type: Medium Select the desired receptor, and note that repeated taps on the WALL or TABLE button will call the various SID/Film Speed combinations programmed into each Wall or Table receptor. None Wall Table Note that AEC operation is not available in Manual or APR Mode, while the NONE receptor is selected. NAMED RECEPTORS (FOR “Wall” GROUP) Wall400 Wall200 An unlimited number of named receptors can be listed “N”. Wall100 Wall RECEPTOR GROUP BUTTON (Wall) Tap again to select second listed named receptor (Wall400) Tap again to select second listed named receptor (Wall200) Tap again to select first listed named receptor (Wall100) Tap once to select Wall Group Figure 3-7. AEC Mode Operation - Receptor Selection HF Series X-ray Generators - Operator’s Manual Quantum Medical Imaging, LLC Revision B 3-17 Chapter 3 Operation NOTE: Ensure that the appropriate receptor(i.e. WALL 40", WALL 72" or TABLE 40") is selected prior to AEC FIELD selection. 5. Select the desired ion chamber field combination using the three AEC field buttons on the operator control panel adjacent to the MAS/TIME and CM buttons. A configuration of three boxes (representing AEC chamber detectors) is depicted on the display screen. A shaded box indicates that a field is selected for use. To select a different AEC field configuration, press the left, center and right AEC FIELD select keys until the desired configuration is highlighted. There are a total of eight possible configurations. APR Mode When APR mode is selected, X-ray techniques and exposure factors are automatically set according to theyour specific programming associated with the APR routine selected. 1. Press the APR mode key on the operator control panel touchscreen. 2. Select the desired Anatomical Region. Note that the 18 available Anatomical Regions are indicated on two interactive graphic representation (a human body and spine) in the center of the Touchscreen. The graphics are coordinated with the body parts list shown at the right of the touchscreen, which can also be used to access the programmed procedures relevant to each Anatomical Region (see Figure 3-8). Revision B 3-18 HF Series X-ray Generators - Operator’s Manual Quantum Medical Imaging, LLC Chapter 3 Operation 1. MODE s a re d. ob serve APR AEC MANUAL 2. PA Chest Lateral Chest AP Chest AP Stretcher Oblique Chest Lordotic Chest AP Ribs AD PA Ribs AD Oblique Ribs AD AP Ribs BD Oblique Ribs BD Sternum RAO Sternum RAO Breathing Sternum Lateral Help Selection of the Body Part for examination can made via the anatomical figure or the Body Part List. Figure 3-8. - Accessing APR Mode and Calling Programmed Procedure HF Series X-ray Generators - Operator’s Manual Quantum Medical Imaging, LLC Revision B 3-19 Chapter 3 Operation 3. Select the desired procedure, by selecting the corresponding button in the Procedures List. The system displays the generator settings, and the ion chamber fields programmed for that specific APR (see Figure 3-9). a. On systems equipped with optional AEC: If AEC exposure control is enabled for a procedure, but the operator wants to switch to manual (non-AEC) exposure mode, press the AEC button on the generator control panel. b. To switch back to AEC mode, press the AEC button on the generator control panel once again. It should be noted that the system reverts back to the default condition (center ion chamber field active) when AEC mode is restored. 4. Verify/Select Exposure Factors - In APR mode, exposure factors (kVp, mA, and mAs/time) are pre-programmed. Displayed exposure factor values can be modified using the KV, MA, or MAS/TIME increment/decrement buttons to select the required value. The MAS/TIME button allows selection either mAs or time for display and adjustment. Revision B 3-20 HF Series X-ray Generators - Operator’s Manual Quantum Medical Imaging, LLC Chapter 3 Operation 3. APR Mode (AEC Enabled) 3a. Upon selection of body part, select the desired procedure from list. Note that ion chamber fields are illuminated on the generator control panel, as shown. PA Chest Lateral Chest AP Chest AP Stretcher Oblique Chest Lordotic Chest AP Ribs AD PA Ribs AD Oblique Ribs AD OR AP Ribs BD Oblique Ribs BD Sternum RAO Sternum RAO Breathing Sternum Lateral Help 3b. Tap AEC button to toggle Automatic Exposure Control feature ON / OFF. APR Mode (AEC Disabled) Figure 3-9. APR Mode Operation - APR Selection and AEC Enabled/Disabled HF Series X-ray Generators - Operator’s Manual Quantum Medical Imaging, LLC Revision B 3-21 Chapter 3 Operation 4 Tap the Patient Type icon desired for selected procedure. Q-Vision defaults to the Medium Patient Type any time APR mode is accessed by way of the APR button. Small If APR mode is exited to Manual Pediatric Medium mode, and then APR mode is reaccessed via the Anatomical Figure or the Body Parts List, the Patient Type defaults to its last state. Large Patient type selection pad is active with APR Mode only. Figure 3-10. APR Mode Operation - Patient Type Selection 5. AEC enabled exposures only: Verify AEC (film) density or Patient Type (non-AEC exposures only), film speed, anatomical thickness, and ion chamber field combinations selections are correct. If required, these settings may be adjusted as follows: a. The default AEC density setting may be modified using the AEC DENSITY increase (up arrow) and decrease (down arrow) keys adjacent to the Density field. Each step adjusts density up/down by 15% relative to the average setting. For Revision B 3-22 HF Series X-ray Generators - Operator’s Manual Quantum Medical Imaging, LLC Chapter 3 Operation APR manual (non-AEC) exposures, the AEC button must be deselected, which causes the generator control panel to shift from Density to the MAS/TIME. With each change in the PATIENT TYPE, AEC mode is activated and must be manually deselected if a "non-AEC" exposure is desired. Note that the "Pediatric" PATIENT TYPE disables AEC completely. Modify the patient type setting using the increase (up arrow) and decrease (down arrow) buttons on the generator control panel. b. Film Screen - choices are WALL 72", WALL 40", TABLE 40", 100 Speed, 200 Speed, 800 Speed, and FILM/Screen7. If the Digital Receptor setting in Service Configuration Menu is enabled, an eighth option entitled "Digital" will also be selectable. (Note that these are the factory default film/screen combination names. However, each can be edited as necessary by user). The Film Screens referenced above, are accessed by selecting the WALL or TABLE button repeatedly, until the desired designated Film Screen title appears over the button. NOTE: In the event "light" films are produced, verify the correct film/screen combination is selected. c. For AEC exposures (Manual Mode), select the MANUAL button, and note that the generator control panel display includes kVp, mA, TIME/MAS settings from the last exposure. The MANUAL button is framed to indicate it is active, and the film screen selection goes to the default setting (NONE). Select the desired ion chamber field combination using the three AEC field keys on the operator control panel display. Ensure that the appropriate film screen (i.e. WALL 40", WALL 72" or TABLE 40") is selected prior to AEC FIELD selection. A shaded box indicates an enabled AEC detector. To select a different AEC detector, select the desired detector field(s) until the desired configuration is achieved [highlighted field(s)]. There are seven possible combinations of AEC detector configurations. Figure 3-11. NA Figure 3-12. N/A HF Series X-ray Generators - Operator’s Manual Quantum Medical Imaging, LLC Revision B 3-23 Chapter 3 Operation TAKING AN EXPOSURE WARNING: Ionizing radiation can lead to radiation injuries if handled incorrectly. When radiation is applied, the required protective measures must be complied with. These procedures are identical for all operating modes. After verifying or adjusting techniques and exposure factors, ensure that all other X-ray exposure precautions are met. 1 1. Exposure can be made only when the "READY" icon is green. 2 2. Press and hold the PREP push button to start the tube rotor (inner actuator is depressed and held at same level as the outer actuator). The X-ray Exposure indicator will turn green. 3 3. Press both the inner and outer push buttons fully down to make an exposure. The X-ray Exposure indicator will turn yellow and an aural alarm is sounded. 4 4. Following a brief recovery period, the "READY" indicator will turn green to indicate the system is ready for next exposure. Figure 3-13. Exposure Controls Revision B 3-24 HF Series X-ray Generators - Operator’s Manual Quantum Medical Imaging, LLC Chapter 3 Operation Exposures Once the generator power is on and the Power/Control Box’s rocker switch is set to the ON position, the touchscreen (at the top) will display a green LED, and the status indicator word "Ready." Press and hold the EXPOSE key switch until the exposure is complete. The amber EXPOSE indicator will light (X-ray beam is on) and a single audible tone will sound during the exposure. Instantaneous Exposures 1. Press and hold PREP (inner-most ring on the Expose Switch) until the green PREP indicator lights. 2. Press and hold EXPOSE (outer-most ring on the Expose Switch) until the exposure is complete. The amber EXPOSE indicator will light (X-ray beam is on) and a single audible tone will be emitted during the exposure. HEAT UNIT COMPUTER Anode heat units are computed and displayed continuously on screen, thereby monitoring the dissipation of heat between exposures. (The amount of tube anode heating, expressed in thousands of heat units, is the kHU value, or expressed in thousands of Joules as the kJ value.) Built-in tube protection alerts the operator prior to a subsequent exposure until sufficient heat has dissipated from the tube to allow the next exposure without exceeding tube limits. If the heat units exceed the maximum heat limit, the READY LED will blink on and off. The READY LED will only stop blinking when the tube has cooled down sufficiently such that the heat produced by taking an exposure at the current kV, mA, and time/mAs setting will not exceed tube maximum heat unit limit. HF Series X-ray Generators - Operator’s Manual Quantum Medical Imaging, LLC Revision B 3-25 Chapter 3 Operation FAULT MESSAGES Under certain conditions the Q-VISION HF Series X-ray Generator shows a dialog box in the top center of the screen containing a message. This message informs the user that either a problem has occurred or that a requested action cannot be performed. The user must read these messages carefully. They will provide information on what to do from then on. This will be either performing an action to resolve the problem or to contact the technical service/support organization. Many minor problems can be corrected without a service technician. To clear an error message, press any key on the operator control panel, except for the PREP and EXPOSE keys. Refer to the HF Series X-ray Generators Service Manual for system faults that require the attention of a technical service/support representative. NOTE: If the READY light on the operator control panel is off or flashing, this indicates a fault has occurred. Press any key on the operator control panel to display a message describing the cause of the fault. When the system will not initiate an exposure, an audible alert will sound and a “fault message” will appear on the Operator Control Panel’s LCD screen. Revision B 3-26 HF Series X-ray Generators - Operator’s Manual Quantum Medical Imaging, LLC Chapter 3 Operation Refer to the following descriptions for assistance in interpreting the fault message: Table 3-3. Fault Messages MESSAGE/ INDICATIONS DESCRIPTION REQUIRED ACTON 400 Volt Anode Missing or incorrect anode sensing voltage (Vsense A) value returned. Call Technical Service/Support. 400 Volt Cathode Missing or incorrect cathode sensing voltage (Vsense C) value returned. Call Technical Service/Support. ADC Negative Reference Missing or incorrect positive voltage reference (Vref-) value returned. Call Technical Service/Support. ADC Negative 15 Missing or incorrect -15 VDC supply voltage. Call Technical Service/Support. ADC Positive 15 Missing or incorrect +15 VDC supply voltage. Call Technical Service/Support. ADC Positive 5 Missing or incorrect +5 VDC supply voltage. Call Technical Service/Support. ADC Positive Reference Missing or incorrect positive voltage reference (Vref+) value returned. Call Technical Service/Support. ADC Regulated Positive 24 Missing or incorrect +24 VDC supply voltage. Call Technical Service/Support. Anode Volt Indicates that there is a problem with the anode kVp circuit, high voltage transformer, or Power Driver Module. Call Technical Service/Support. Backup Applicable in AEC mode only: Backup time was reached based on current technique factors. This includes exceeding the maximum output capacity of either the X-ray tube or the X-ray generator model. 1. Increase technique factor(s). Retake exposure. 2. Verify the preset backup setting is sufficient. 3. Verify tube stand facing selected receptor. Cathode Volt The filtered cathode volts are outside of preset limits at any time. Call Technical Service/Support. HF Series X-ray Generators - Operator’s Manual Quantum Medical Imaging, LLC Revision B 3-27 Chapter 3 Operation Table 3-3. Fault Messages MESSAGE/ INDICATIONS DESCRIPTION REQUIRED ACTON Collimator Automatic collimator not responding (only appears on systems using an automatic collimator). Call Technical Service/Support. Door Entrance door to X-ray room is open. Touch the "ATTENTION" icon on the Overlay to Verify X-ray room door is closed and re-take exposure. Filament Curr Indicates a problem with the filament control regulator circuit voltage. Call Technical Service/Support. Filament Prog The filtered Filament Amps are outside of preset limits at any time. Call Technical Service/Support. Generator Limit PREP was pressed while a combination of the selected parameters is outside of the limits of the generator model or tube type. Retake exposure using allowable limits. Hold Button Exposure terminated prematurely because the EXPOSE switch was released before the exposure was completed. Re-take exposure making sure EXPOSE switch is continuously pressed throughout entire duration of exposure. HSS Detected A High Speed Starter has been detected when none is selected. Call Technical Service/Support. KVP Error 1. The anode and cathode KV are sufficiently different to cause an error. 2. The anode or cathode voltage sense is exceeding 15% of program voltage. 3. Communication between OCP Control Board A16 (AY40004S1) and Logic Board A1 (AY40-006S) was interrupted. 4. Arc in system (H.V. Transformer, X-ray tube, or highvoltage cables). 5. Faulty/missing J1 connection on KVP Control Board A2 (AY40-003S). Call Technical Service/Support. Revision B 3-28 HF Series X-ray Generators - Operator’s Manual Quantum Medical Imaging, LLC Chapter 3 Operation Table 3-3. Fault Messages MESSAGE/ INDICATIONS DESCRIPTION REQUIRED ACTON Long Prep PREP time exceeded the eighteen-seconds limit. Touch the OK button in the error dialog box to clear warning message. Re-take exposure. Lost Prep Exposure sequence disabled due to missing PREP hardware line or PREP signal interruption during PREP cycle. Call Technical Service/Support. Lost Expose Exposure terminated prematurely because EXPOSE switch was released before exposure was completed. Touch the OK button in the error dialog box to clear warning message. Re-take exposure. MA Current Indicates the exposure mA current is out of range. Call Technical Service/Support. No AEC Field Selected AEC mode has been selected without selecting a receptor (WALL or TABLE), or no AEC Field detectors are selected. 1. Verify that "NONE" is not selected on Overlay. 2. Verify that at least one Field detector is selected. No HSS Connected No High Speed Starter detected when selected. Call Technical Service/Support. Not Rotating Tube rotor or generator rotor drive/high-speed starter (HSS) unit not functioning properly. Call Technical Service/Support. Phase Missing Hardware has detected that at least one phase of a three-phase generator is not present. Call Technical Service/Support. Please Wait Operator attempted to take exposure but system not yet ready. Allow more time for system to reach its ready state before taking next exposure. Note: The system will not allow more than two highspeed tube starts within a one minute time period. HF Series X-ray Generators - Operator’s Manual Quantum Medical Imaging, LLC Revision B 3-29 Chapter 3 Operation Table 3-3. Fault Messages MESSAGE/ INDICATIONS DESCRIPTION REQUIRED ACTON Receptor Not Ready The signal on the Receptor Ready terminal of the Digital Interface Board A9 (AY40-034T) is not ready within 500 ms from the time PREP was initiated. Call Technical Service/Support. Rotor Current Tube rotor is not getting correct current to start. Call Technical Service/Support. Rotor Overrun Tube has been rotating for longer than 30 continuous seconds. Call Technical Service/Support. Rotor Temp Tube rotor is too hot. Allow tube to cool for thirty minutes and then re-take exposure. Table Bucky The table bucky has been selected but did not return the ready signal to start exposure. (This may take up to five seconds after exposure is requested.) Verify that "TABLE" receptor was not selected on Q-Rad Digital NX-DR Series Generator Control Panel with system not having table receptor. Tube Limits Backup time was reached based on current AEC technique factors exceeding tube exposure limits. Reduce technique factor(s). Re-take exposure. Wall Bucky The wall bucky has been selected but did not return the READY signal to start exposure. (This may take up to five seconds after exposure is requested.) Verify that "WALL" receptor was not selected on Q-Rad Digital NX-DR Series Generator Control Panel with system not having wall receptor. Revision B 3-30 HF Series X-ray Generators - Operator’s Manual Quantum Medical Imaging, LLC Chapter 3 Operation HELP SCREEN FEATURES The following paragraphs describe the HELP screen and the operator topics it supports. See Figure 3-14 for orientation. TAP THE “LOGIN” BUTTON AND ENTER THE PASSWORD: 3497 “Login” button changes to “Operator” when password is typed and “Enter” button is tapped Figure 3-14. Help Screen Orientation HF Series X-ray Generators - Operator’s Manual Quantum Medical Imaging, LLC Revision B 3-31 Chapter 3 Operation (1) Quick Start: Select the Quick Start button to access the tutorial describing features found on the Main operator screen. Note that the areas of the Quick Start screen which are framed in gray are "interactive", and the operator can gain access to tutorial material by tapping on the framed area. Figure 3-15. Help Screen Topics - Quick Start Tutorial Modules a. Tap area "a", and the Exposure Status Bar tutorial information is displayed, regarding Generator Status, Post mAs/Post Time, Tube Heat, Date/Time, and Exposure Indications. NOTE: To return to the Quick Start screen, from any of the interactive screens, select the BACK TO QUICK START button, or tap anywhere on the blue background field or any framed area of the current screen. b. Tap area "b", and the View Screen descriptions are displayed. c. Tap area "c", and the Anatomical Region fields are described d. Tap area "d", and Patient Type choices are described. e. Tap area "e", and the various Exposure Technique settings are defined. Revision B 3-32 HF Series X-ray Generators - Operator’s Manual Quantum Medical Imaging, LLC Chapter 3 Operation (2) Workflow: There are four steps in the typical workflow scenario, and these topics are briefly described in four different screens under the Workflow topic. The operator can select a specific step by selecting any one of the numbered steps, or the entire process can be viewed sequentially, by selecting the Next button beneath the numbered step listing (see Figure 3-16). Figure 3-16. Help Screen Topics - Workflow Description HF Series X-ray Generators - Operator’s Manual Quantum Medical Imaging, LLC Revision B 3-33 Chapter 3 Operation (3) Error Codes and Warnings: During operation, error codes are displayed in the area designated "a" in Figure 3-15. These errors are displayed in the center of the field, and replace the X-ray exposure symbol. Select the Error Codes and Warnings topic on the Help screen and a new screen describing the nature of each error is provided (see Figure 3-17). Figure 3-17. Help Screen Topics - Errors Codes and Warnings (4) Documentation: The Documentation topic provides the operator access to the Q-VISION Operator’s Manual, whenever the Operator Login Code (3497) is input on the Help screen (see Figure 3-14). Alternatively, the Q-VISION Service Manual, and the Operator’s Manual are made available to the Service Technician, whenever the appropriate Login Code is used. Bookmarks, which cause the Documentation Screen to automatically scroll to the desired topic within the selected Revision B 3-34 HF Series X-ray Generators - Operator’s Manual Quantum Medical Imaging, LLC Chapter 3 Operation manual, are presented in the panel to the left of the main screen. (5) Contact Information: Select the Contact Information topic on the Help screen, and information regarding who to contact when service is required appears (see Figure 3-18). Figure 3-18. Help Screen Topics - Contact Information HF Series X-ray Generators - Operator’s Manual Quantum Medical Imaging, LLC Revision B 3-35 Chapter 3 Operation (6) Remote Service: Select the Remote Service topic on the Help screen, and a step-by-step procedure is provided for obtaining assistance from the Service Contact via Team Viewer, a program which enables a service technician to take over control of troubleshooting and repairing non-hardware-related service issues (requires internet connectivity). The operator must contact the Service facility and establish computer network communications with the technician before remote service can begin. Figure 3-19. Help Screen Topics - Remote Service Revision B 3-36 HF Series X-ray Generators - Operator’s Manual Quantum Medical Imaging, LLC Chapter 3 Operation (7) Service: The Service topic is the last selection on the Help screen, and by selecting that topic, another screen containing two buttons (APR Editor and Date/ Time Settings) is displayed (see Figure 3-20). If either of these buttons are selected, an associated editing screen will appear. Detailed information on the operation of the APR Editor is available in Chapter 4, APR EDITOR, and detailed information on performing Date/Time Settings is available in Chapter 5, USER MAINTENANCE. Figure 3-20. Help Screen Topics - Service HF Series X-ray Generators - Operator’s Manual Quantum Medical Imaging, LLC Revision B 3-37 Chapter 3 Operation THIS PAGE INTENTIONALLY LEFT BLANK Revision B 3-38 HF Series X-ray Generators - Operator’s Manual Quantum Medical Imaging, LLC Chapter 4 APR EDITOR 4-1 4-2 Chapter 4 APR Editor OVERVIEW This chapter provides instructions for creating and editing Anatomical Programmed Region (APR) technique screens. The Q-VISION HF Series X-ray generator has the capability of recalling pre-programmed APR screens by storing an infinite number of views (techniques) in each of the 18 anatomical regions, with each view having any number of thickness (cm) selections. Any of the existing X-ray techniques can be edited to suit the individual needs of a specific application. Figure 4-1. APR Edit Mode Screen Figure 4-1 provides an overview for accessing the various APR edit mode screens. Each section of this screen is described in detail in the paragraphs that follow. ACCESSING THE APR EDIT MODE APR Edit mode is accessed through the touchscreen HELP button. To gain access to the Service Mode, password entry is required. This is to prevent unintended and/or unauthorized changes to system and/or APR screen settings. To access the APR Edit mode, proceed as follows: 1. Select the HELP button at the lower right corner of the Q-VISION touchscreen. The Help Screen is displayed, including a LOGIN button, which provides access to the password entry touch pad (see Figure 4-2). HF Series X-ray Generators - Operator’s Manual Quantum Medical Imaging, LLC Revision B 4-3 Chapter 4 APR Editor Figure 4-2. Help Screen - Login 2. Select the LOGIN button. When the ENTER PASSWORD touch pad is displayed (Figure 4-2). Enter the Operator password "3497" using the digit buttons on the touch pad, then select the Enter button. The Login button will change to read "Operator", and the seven topics marked by colored dots, and the Back To Q-VISION button are available. Note that the password touch pad can be called at anytime, by selecting the OPERATOR button. This allows Technical personnel to access service menus directly from the operator mode. 3. Select the SERVICE button, and the Service menu screen will appear, displaying the two operator-accessible topic buttons (APR EDITOR and DATE/ TIME SETTINGS (see Figure 4-3)). NOTE: The Q-VISION Help Services screen, and the functionality of its Operator accessible features is described in more detail in Chapter 5, USER MAINTENANCE. Revision B 4-4 HF Series X-ray Generators - Operator’s Manual Quantum Medical Imaging, LLC Chapter 4 APR Editor SELECT HERE TO CALL APR EDITOR SCREEN Figure 4-3. Service Screen 4. Select the APR EDITOR button on the Service Screen to call the Editor Screen (see Figure 4-4). Figure 4-4. APR Editor Screen HF Series X-ray Generators - Operator’s Manual Quantum Medical Imaging, LLC Revision B 4-5 Chapter 4 APR Editor APR EDIT MODE APR Edit mode provides editing utilities for adding, modifying, duplicating or deleting the name of a view, and for modifying the programmable exposure settings associated with a particular view. Editing a View Name Note: Figure 4-4 contains numerical references which are used when describing the respective function of the APR Editor touch screen in the instructions below. In the APR Edit Screen, select a "Anatomical Region" to edit by selecting the desired body part from the list shown in Item 1. For example, to edit the Head region select the word "Head". Note that "Views" listing (Item 2) show all views currently programmed Figure 4-5. APR Region and View Selection Revision B 4-6 HF Series X-ray Generators - Operator’s Manual Quantum Medical Imaging, LLC Chapter 4 APR Editor 1. To edit the name of the view, select the RENAME button, found beneath the "View" list. This will cause the "Rename View" keyboard to be superimposed over the APR Editor Screen (see Figure 4-6). Figure 4-6. APR Region (or View) Name Edit Screen Keyboard 2. The APR View Name Edit screen and keyboard facilitate editing of the selected View name as it appears on the APR Editor screen or, if no existing View Name has been created, it allows one to be created. Names of Views are not limited to any specific number of characters. Editing Selected View The touch screen keyboard shown in Figure 4-6 operates like any ordinary computer keyboard, except the frame of the last key selected by operator changes color, indicating that the corresponding character has been entered into the name being edited (or added). The View name selected for editing on the APR Editor screen automatically appears (with cursor flashing after the last character) in the dialog box at the top of the superimposed keyboard, once the RENAME button is selected at the bottom of the Views List. The following instructions are provided for renaming the selected View: a. To totally replace the current View’s name, select one of the Clear buttons located at the bottom of the keyboard screen. This will delete the current View name from the dialog box. HF Series X-ray Generators - Operator’s Manual Quantum Medical Imaging, LLC Revision B 4-7 Chapter 4 APR Editor b. Proceed with alpha-numeric keyboard entries for the new View name. Note that as each character is entered, that character is displayed in the dialog box at the top of the keyboard. c. Once the entry is complete, select the Enter button on the keyboard, and the keyboard will close. The new View name will be displayed in the Views listing followed by an asterisk (*), which indicates that the new View name is a new entry. Adding a New View Adding an additional View name for the current Anatomical Region is accomplished by selecting the ADD button (Figure 4-7, Item 1). The process requires that the operator begin at the APR Editor screen, and select the desired Anatomical Region. An infinite number of views can be added to the "Views" listing. The process for adding a view follows: Figure 4-7. APR Editor Screen - Add New View Revision B 4-8 HF Series X-ray Generators - Operator’s Manual Quantum Medical Imaging, LLC Chapter 4 APR Editor a. After accessing the APR Editor screen, via the Service screen, select the ADD button beneath the "Views" field (Figure 4-7, Item 1). Note that the APR Editor screen displays a gray text box (Item 2) containing the words "New View" along with a red exclamation mark at the bottom of the listing. The red exclamation mark indicates that one or more of the highlighted inputs is either out of range, or of an incorrect format. The exclamation marks will remain until the discrepancy is corrected. b. Select the Rename button (Item 3), and the "Rename Views" keyboard will be superimposed over the APR Editor screen, as shown in Figure 4-6. c. Select one of the Clear buttons on the keyboard to delete the "New View" (default) entry, and begin to input the characters that correspond with the View Name desired. Upon completing View Name input, select the Enter button on the keyboard to exit (and revert to the APR Editor screen). Note, that the added View name is highlighted, and a red exclamation mark and an asterisk are displayed to the right of the added View name. The dialog boxes (parameter settings) to the right of the Views list contain parameter value input fields, or mode selections, for which the operator must provide mode selection input or value input. Those parameters which require attention are framed in red. d. Once the correct inputs have been entered into all highlighted dialogs boxes, the red exclamation marks in the selected Anatomical Region, and associated View will be removed. The asterisks will remain, until the "New View" is saved. Note: Parameter values for all Patient Types shown in Item 5, Figure 4-7 are required for each new View. Until the appropriate values are entered, the red highlighting next to the Patient Types will remain. The operator can save a partially completed View, however, any attempt to run that View will be unsuccessful and cause error messages to be displayed. e. Save the new View by selecting the FILE menu selection (Item 4), and selecting Save or Save As if the new View is to be directed to a different folder than the default folder (see Figure 4-8). HF Series X-ray Generators - Operator’s Manual Quantum Medical Imaging, LLC Revision B 4-9 Chapter 4 APR Editor Figure 4-8. APR Editor - Saving New View Editing Programmable Exposure Settings Each procedure (view) has programmable exposure factors (settings), depending upon the method used to configure the APR. Among these programmable factors are the items shown in Figure 4-4, Items 3 through 9, and Item 14. The Q-VISION APR Editor screen automatically determines whether a changed parameter or value is compatible with the other settings as they relate to the selected Region and View. If a discrepancy is detected, it is indicated by a red exclamation mark next to the selected Anatomical Region List and its corresponding Views List. All parameters in which a discrepancy exists are encircled in red. Revision B 4-10 HF Series X-ray Generators - Operator’s Manual Quantum Medical Imaging, LLC Chapter 4 APR Editor During the process of adding to, or editing an existing View in the APR list, the operator must enter a value, or make a selection (which ever is appropriate) for any field highlighted by a red border. Other areas on the screen, depending upon "Mode" selected (Item 4) are visible but they cannot be edited. 1. Patient Type (Item 3): The area to the right of the Views List heading displays four Patient Type selections (Pediatric, Small, Medium and Large). The text for each type shown is touch sensitive. Select the desired Patient Type and note that the adjacent circle becomes highlighted. 2. Mode Selection (Item 4): Q-VISION provides the operator with the capability of establishing APR settings based upon "Standard", or cm exposure settings, when convenience of utilizing predetermined setting, based on thickness of the patient or body part is preferable. When establishing new Views, or editing existing Views, it is necessary to select a patient size (Item 3), either standard or cm mode (see Item 4), and then proceed with input of data required (sections highlighted in red) 3. Auto Correct (Item 5): The Auto Correct section of the APR Editor screen facilitates the immediate reset of current View parameter settings (Auto Correct), or the parameter settings for all of the Views in a given Region (Auto Correct All). This feature is designed to put all parameter settings within standard range for the current X-ray Tube installed in the system. 4. AEC Parameters (Item 6): This area contains controls for managing Q-VISION’s AEC option. The following features are available for establishing automatic exposure settings for selected Views in the APR Editor Refer to Figure 4-9, which is an isolated view of the AEC section of the APR Editor screen: a. Regarding the current View, automatic exposure control (AEC) can be activated/deactivated by selecting the word "On" repeatedly to toggle between on and off. AEC is on when there is a check mark displayed in the box adjacent to "On." Therefore, when that View is selected from the main operating screen the values input on the APR Editor screen will be applied to the exposure. However, AEC values for any View can be established in the APR Editor without turning the option "ON," but the result of this, during normal Q-VISION operation, is that the APR View can be called, but the AEC option will not be active. Under these circumstances, the pre-programmed AEC values can be activated from the main operator screen, by selecting AEC Mode button. b. Ion chamber fields are selected/deselected using the same technique, and similarly, a diagonal line in a box indicates HF Series X-ray Generators - Operator’s Manual Quantum Medical Imaging, LLC Revision B 4-11 Chapter 4 APR Editor that the corresponding ion field is active. A CHECKMARK IS VISIBLE IN THIS BOX WHEN AEC IS SET TO ACTIVE ANY ONE, OR ALL OF THE ION FIELDS CAN BE ACTIVE (DIAGONAL LINE) PULL-DOWN MENU REVEALS 11 THICKNESS VALUES SELECT HERE FOR MODIFY BACKUP MAS TOUCHPAD Figure 4-9. APR Editor - AEC Parameters Field c. Setting the Density value is accomplished via a pull-down menu located near the middle of the "AEC Parameters" field. Select the menu pull-down to reveal the 11 available settings. Select the desired setting to increase or decrease exposure time, ranging from Normal density to positive or negative 75% (in 15% steps). d. The Backup mAs setting is the maximum dosage allowed for the current AEC exposure. The generator output for the specific View selected will be controlled by feedback from the Ion chamber, while the "Backup mAs" setting denotes the dosage at which the exposure will be automatically terminated in the event an AEC fails. Revision B 4-12 HF Series X-ray Generators - Operator’s Manual Quantum Medical Imaging, LLC Chapter 4 APR Editor Select the Modify button (...), located immediately to the right of the red-framed parameter value field. Note that the "Modify Backup mAs touch pad" is superimposed over the APR Editor screen. Further note that the value display field is also framed with a red box. This indicates that an input is required. Enter the desired Backup mAs value using the numerical touch pad, and select the Enter button. The numerical touch ad will close, and the value entered will appear in the Backup mAs value field. Q-VISION will not permit an inappropriate value to be accepted in the APR Editor, therefore if an inappropriate value is entered, the red frame will remain around the inappropriate value, indicating further modification is required. 5. Receptor Selection (Item 7): APR views can be programmed to call a specific Receptor either the primary receptor groups (WALL, NONE, TABLE), or other "Named" receptors, assigned at the time of installation, via the APR Editor screen (see Figure 4-10). The typical Q-VISION applications utilize the WALL, NONE, and the TABLE receptors groups, however facilities for an additional receptor group (AUX) is shown, along with OTHER. OTHER is a utility used to direct the contents of APR Editor screen to another pre-programmed "Named Receptor" such as WALL1, WALL40, or TABLE1, TABLE2. To properly utilize the OTHER receptor choice, the operator would need to have prior knowledge of the specific designation of the "Named Receptor(s)" available. These "Named Receptors" generally represent different calibrations, which can be called as alternatives, depending upon the specific examination and Patient circumstances. HF Series X-ray Generators - Operator’s Manual Quantum Medical Imaging, LLC Revision B 4-13 Chapter 4 APR Editor AUX RECEPTOR NOT AVAILABLE WITH Q-VISION RECEPTOR GROUP NAMES FOR EDITING NAMED RECEPTORS MODIFY RECEPTOR KEYBOARD ACCESS BUTTON Figure 4-10. APR Editor - Receptor Field a. The operator must first decide which receptor is to receive the values being set by the current APR Editor session. b. Select the desired receptor group name to highlight the circle (make it active). c. If the receptor to be associated with the values established during the current APR Editor session is a "Named Receptor," select the button at the extreme right of the area, and using the on-screen keyboard, type the name of that receptor, then select Enter. This process will assign the parameter values, including the receptor to the selected View. Note: Named receptors are configured by service personnel. The Group Name "Wall", "None", and "Table" can have an infinite number of "Named Receptors" (and calibration) associated with each. During normal operation, these "Named Receptors" are activated when a Receptor Group button is toggled. 6. Exposure Parameters (Item 14): There are four parameter values (kVp, mA, sec, and mAs) available for editing when operating in "Standard" Mode, and the Focal Spot selection in the Exposure Parameters section. When the "cm" Mode is selected in Item 4, only mA value, and Focal Spot selection are required inputs. Revision B 4-14 HF Series X-ray Generators - Operator’s Manual Quantum Medical Imaging, LLC Chapter 4 APR Editor MODIFY KEYPAD ACCESS BUTTON FOR KVP, MA, SEC, AND MAS SELECT TEXT FOR FOCAL SPOT SELECTION Figure 4-11. APR Editor - Exposure Parameters a. When setting values for kVp, mA, sec, and mAs, select the button next to the corresponding parameter field. This will call a "Modify" touch pad for the parameter selected. b. Enter the desired value via the touch pad, and select Enter to set that value in the parameter value field. Repeat the process for each of the remaining three parameters (Standard Mode). 7. CM (Item 4): Imaging with reference to physical dimensions (thickness) is supported by Q-VISION’s CM feature. This allows the operator to quickly establish generator settings via pre-programmed APR View, wherein the operator need only determine the physical thickness of the patient or body part to be examined, and select the CM button on the Q-VISION operator control panel to set the generator values for an exposure. Utilizing this aspect of the APR Editor screen, the operator can add, delete, or edit existing cm profiles, or new views can be configured for cm exposure applications. HF Series X-ray Generators - Operator’s Manual Quantum Medical Imaging, LLC Revision B 4-15 Chapter 4 APR Editor CM STEP TABLE SELECT FOR ACCESS TO TOUCHPAD FOR VALUE INPUTS SELECT TEXT TO ENABLE/DISABLE MIN/MAX CM SELECT DELETE BUTTON TO REMOVE THIS LINE FROM CM STEP TABLE SELECT ADD BUTTON TO ENTER NEW SET POINT AND VALUES Figure 4-12. APR Editor - CM Field In the APR Editor, a minimum and maximum thickness for the body part should be established and entered into the "Min cm" and "Max cm" value boxes in the CM field at the bottom right hand side of the APR Editor screen. Note that these values can be disabled by not check marking the box next to the parameter name, however, the "Default" value is always active. Revision B 4-16 HF Series X-ray Generators - Operator’s Manual Quantum Medical Imaging, LLC Chapter 4 APR Editor The "Default" is usually set as a nominal value to provide acceptable imaging for the typical thickness and physical characteristics of the target body part. Generally, the CM mode in Q-VISION facilitates the establishment of exposure profiles within a linear interpolation of the X-ray tube’s minimum and maximum exposure capability. However by activating the "Min cm" and "Max cm" parameters by check marking the adjacent boxes on the APR Editor screen (see Figure 4-12), the interpolation is scaled accordingly, and inasmuch as the step size (resolution) for all conditions is 1cm, Q-VISION will interpolate the values in a linear fashion against the number of centimeters between the "Min cm" and "Max cm" to determine the settings for the cm selected on the Operator Control Panel. Therefore: Where the kVp value for: Min cm = 4 at 40 kVp and Max cm = 19 at 96 kVp and the difference in the min and max kVp is 56 (96 minus 40) then: The 15 steps between Min cm and Max cm will each represent 3.73 kVp (56 divided by 15) Enter parameter values for "Default cm", "Min cm", and "Max cm" via numerical touch pad, as follows (see Figure 4-12): a. The "Default cm", the "Min cm", and the "Max cm" parameter values are entered via a numerical touch pad, which is accessed by selecting the parameter modification button (...). Select the digits that correspond to the desired value, and the select the Enter button. Note that erroneous entries can be resolved via the Del (delete character last entered), or the Clr (clear entire entry) button. The Cancel button permits the operator to exit the touch pad. b. Making the "Min cm" and "Max cm" value active is accomplished by touching the gray box immediately to the left of the respective parameter name. This will cause a check mark to appear in the box, indicating that parameter value shown in the dialog is active. To the right of the "Min", "Max" and "Default" parameter settings is the CM Step Table (Item 8). This table, is based upon three value HF Series X-ray Generators - Operator’s Manual Quantum Medical Imaging, LLC Revision B 4-17 Chapter 4 APR Editor fields (kVp, sec, and mAs) for each "cm" line entry. The table not only establishes a interpolated slope between the minimum and maximum values for kVp, sec and mAs, but it also provides flexibility in setting offsets from the slope which results. Each line entry in the CM Step Table creates a new set point (defined by the number entered in the "cm" column). The corresponding generator parameter inputs (kVp, sec, or mAs), establish values that cause the slope to deviate with regard to the per-centimeter-value along the shifted segment. As described previously, with regard to "Min cm" and "Max cm," linear interpolation between the Min cm and Max cm is altered only by the input of one or more additional line entries in the CM Step Table (which generate a different slope). For example, an increase or decrease in kVp or sec at any specific cm within the full range of the X-ray tube, will result in a change in the per-centimeter-value of the exposure (a shift in the slope) as compared to the per-centimeter value established by Min cm, Max cm and Default. Adding new set points to the CM Step Table is accomplished by calling a new dialog by selecting the Add button (Item 9) located beneath the "Max cm dialog, and input of the desired generator values in the appropriate dialog boxes using the modification key (...) next to each dialog box. To delete a line in the Step Table, select the cm intended for deletion, and the line will be highlighted. Then select the Delete button to remove the highlighted cm and associated values. 8. Generator Utility (Item): At the lower right corner of the APR Editor screen is a Generator selection utility, which provides access to a generator database, containing the various Quantum generator models, and the tube and rotor options. This feature provides for the testing of parameters entered into the Editor, against the tube limits of the generators listed in the data base. The Change button calls a dialog box with three pull-downs, which contain the available Generator, Tube, and Rotor configuration for the system. The associated database contains all of the parameters necessary to fully test a procedure against a system configuration composed from the listings in the dialog box. a. Refer to Figure 4-13, and select the Change button, and note that the dialog box is superimposed over the APR Editor screen. b. Use the pull-down arrow to select the Generator Model, Tube model, and Rotor model desired, then select the Ok button. c. Revision B 4-18 Momentarily, the APR Editor screen will be populated by exclamation marks, indicating which Regions and Views are not compatible with one or more of the items chosen during the dialog box editing session. Figure 4-14 illustrates the HF Series X-ray Generators - Operator’s Manual Quantum Medical Imaging, LLC Chapter 4 APR Editor typical display when one or more of the items selected in the dialog box is not compatible with the procedures programmed. SELECT THE "CLEAR" BUTTON TO RESET ERRORS ON THE APR EDITOR SCREEN (REFER TO FIGURE 4-14) SELECT THE "CHANGE" BUTTON TO ACCESS THE GENERATOR, TUBE AND ROTOR DIALOG BOX Figure 4-13. Generator, Tube, and Rotor Selection Field Figure 4-14. APR Editor Screen - Shows Procedure Incompatibilities with Generator, Tube, and Rotor Choices (Errors are shown in Red on screen) HF Series X-ray Generators - Operator’s Manual Quantum Medical Imaging, LLC Revision B 4-19 Chapter 4 APR Editor Making a Back Up Copy of the APR Program File This procedure describes the method used to create a back up copy of the APR Program File (contains entire set of APR techniques). This is recommended in the event a problem occurs with current APR techniques or to utilize the same techniques on another generator. 1. If not already done so, access APR Edit Mode (see Figure 4-15). 2. Select Save As... from the File drop down menu. Figure 4-15. APR Editor - Saving a Copy of APR Program File Revision B 4-20 HF Series X-ray Generators - Operator’s Manual Quantum Medical Imaging, LLC Chapter 4 APR Editor 3. Navigate to your external hard drive (or destination folder) and select Save (see Figure 4-16). Figure 4-16. APR Editor - ’Save As’ Navigation Pop-Up Screen 4. The APR Program File (Quantum.QVision.AprTree.xml) is copied to the specified destination. Restoring APR Program from Back Up Copy This procedure describes the method used to restore the APR Program File (contains entire set of APR techniques) from a back up copy. Proceed as follows: 1. If not already done so, access APR Edit Mode (see Figure 4-15). HF Series X-ray Generators - Operator’s Manual Quantum Medical Imaging, LLC Revision B 4-21 Chapter 4 APR Editor 2. Select Open... from the File drop down menu. Figure 4-17. APR Editor - Restoring a Back Up APR Program File Revision B 4-22 HF Series X-ray Generators - Operator’s Manual Quantum Medical Imaging, LLC Chapter 4 APR Editor 3. Navigate to your external hard drive, select the back up APR Program File created previously using the back up copy procedure (Quantum.QVision.AprTree.xml) and select Open (see Figure 4-18). Figure 4-18. APR Editor - Restore Navigation Pop-Up Screen HF Series X-ray Generators - Operator’s Manual Quantum Medical Imaging, LLC Revision B 4-23 Chapter 4 APR Editor 4. Select Activate from the File drop down menu (see Figure 4-19). Figure 4-19. APR Editor - Activating the APR Program File 5. The back up APR Program File is now active on the system. Revision B 4-24 HF Series X-ray Generators - Operator’s Manual Quantum Medical Imaging, LLC Chapter 5 USER MAINTENANCE 5-1 5-2 Chapter 5 User Maintenance OVERVIEW This chapter is designed to assist the system user in maintaining the proper operation of the generator. Also included in this chapter are instructions for making changes to the system’s user-configurable settings, such as setting the date and time. This product has been factory tested to assure its required performance in an X-ray system. The user is responsible for performing routine maintenance and inspection procedures to ensure proper equipment operation. Aside from routine maintenance, any abnormal noise, vibration, or unusual performance should be investigated by a qualified service representative. Preventive maintenance or any repair service should be performed only by qualified service personnel. WARNING! Failure to follow manufacturer’s or service personnel’s recommendations may result in serious injury. Only qualified and authorized persons shall work on this equipment. In this context, qualified means those legally permitted to work on the equipment, and authorized means those specifically authorized by local management. Changes, additions or maintenance to the equipment carried out by persons without appropriate qualifications and training and/or using un approved spare parts may lead to serious risk of injury and damage to the equipment as well as making the warranty void. USER MAINTENANCE The system user is responsible for the basic cleanliness of the equipment. Wipe the Q-VISION front display screen surface using an absorbent cotton cloth or other soft material. Other surfaces should be cleaned using a clean cloth slightly moistened in warm soapy water (use mild soap). Never use strong cleaners, solvents, or abrasive polish on this equipment and never let liquids enter the enclosure. WARNING! Always disconnect the equipment from the main power supply prior to any cleaning. WARNING! Electric shock hazard! The Q-VISION HF Series X-ray Generator contains no user serviceable components. Do not attempt to disable these components or remove any trim covers. Refer service to qualified service personnel. HF Series X-ray Generators - Operator’s Manual Quantum Medical Imaging, LLC Revision B 5-3 Chapter 5 User Maintenance SYSTEM SETTINGS The Date/Time Settings editor is accessed via the Service screen. The following paragraphs describe the process involved in setting the time and date. ACCESSING SERVICE MODE When it becomes necessary to access the Date/Time feature, the operator must first access the Help screen from the Main operator screen, and then the Service screen. Figure 5-1 shows the seven Help topics available to the operator, including "Service." A Description of each feature of the Q-VISION Help Services screen is provided in Chapter 3, OPERATION. Note: A description of APR Editor is provided in Chapter 4, APR EDITOR. This utility is accessed via the Help screen, under the "Service" topic. Revision B 5-4 HF Series X-ray Generators - Operator’s Manual Quantum Medical Imaging, LLC Chapter 5 User Maintenance SELECT "LOGIN" BUTTON AND ENTER 3497 ON NUMERICAL TOUCH PAD ACCESS TO THE SERVICE SCREEN IS AVAILABLE BY SELECTING "SERVICE" HERE Figure 5-1. Q-VISION Help Services Screen Once the Q-VISION Help Services Screen is displayed, the operator must login to access any of the topics shown. The login is accomplished as follows: 1. Select the Login button, and note that the Enter Password touch pad appears, superimposed over the Help Services Screen. 2. Select the following numerals in the order shown "3497", and then select the Enter button 3. Select the Service button, to access the General Service screen. 4. Select the Date/Time Settings button to display the Date and Time Editing Screen (see Figure 5-2) HF Series X-ray Generators - Operator’s Manual Quantum Medical Imaging, LLC Revision B 5-5 Chapter 5 User Maintenance SELECT THESE ARROWS TO SCROLL MONTH (1) PULL-DOWN MENU FOR SELECTION OF LOCAL TIME ZONE SELECT 12-HOUR OR 24 -HOUR CLOCK SELECT 12-HOUR OR 24 -HOUR CLOCK TOGGLE AM/PM SELECT HOUR / MINUTES AND SCROLL UP/DOWN TO SET CORRECT TIME PROPOSED DATE SHOWN IN LIGHT TINT CURRENT DATE SHOWN IN DARK TINT Figure 5-2. Date and Time Editing Screen The following instructions will assist the Operator in establishing the desired Date and Time format for all Q-VISION applications. 5. Select the pull-down arrow, in the Time Zone dialog box, Item (1), and using the scroll bar at the right, scroll through the listing of time zones shown, and select the information line for the appropriate zone. This will cause the selected time zone to appear in the dialog at the top of the Date/Time Editor screen. 6. Select the desired "Time Display Mode", by selecting the 12 or 24 button, depending upon whether the Time is to be displayed so it reads like a clock (12 hours AM and 12 hours PM), or if the desired format is the 24hour clock (military time). The selected format button becomes highlighted. 7. Next, determine if Daylight Savings Time applies, and select either "On", if daylight savings is to be observed, or "Off", if not. 8. Referring to the digital clock immediately beneath the "Daylight Savings" section, select the Hour or Minute button. This will cause the selected button to be framed in white, which indicates adjustments can be made. Revision B 5-6 HF Series X-ray Generators - Operator’s Manual Quantum Medical Imaging, LLC Chapter 5 User Maintenance Using the "up" or "down" button (to the right), set the correct Hour and Minute. 9. Toggle between morning (AM) or Afternoon (PM), by selecting the button to the right of the "up" / "down" buttons. 10. The correct month is set by selecting on the arrows at either side of the month in the calendar display. The left arrow calls the previous month, while the right arrow calls the month immediately following that displayed. Select the correct date, and note that if the date selected is different than the default date, the selected date will be highlighted in blue. 11. Recheck each input, and make any adjustments necessary, and then select the Apply button to complete the Date and Time Editing screen settings. 12. To verify the new date/time setting, return to the General Service screen, by selecting the Back to Service button at the bottom of the Date and Time Editing screen, then select the Date/Time button to recall the "Date and Time" screen. The settings that were input before the Apply button was executed should be displayed. HF Series X-ray Generators - Operator’s Manual Quantum Medical Imaging, LLC Revision B 5-7 Chapter 5 User Maintenance THIS PAGE INTENTIONALLY LEFT BLANK Revision B 5-8 HF Series X-ray Generators - Operator’s Manual Quantum Medical Imaging, LLC Chapter 6 WARRANTY INFORMATION 6-1 6-2 Chapter 6 Warranty Information WARRANTY STATEMENT Quantum Medical Imaging, LLC (herein known as “QMI”) warrants to buyer that any new product manufactured by QMI will be free from defects in material and manufacturing and conform substantially to applicable specifications in effect on the date of shipment when subjected to normal, proper and intended usage by properly trained personnel. QMI will act as the sole judge in determining whether equipment or part is defective by reason of manufacture. All QMI products shall be warranted for a period of 12 months from the original installation, the date of which will be determined by a completed, returned warranty card, which must be returned to QMI headquarters within 30 days of system installation. In no case shall the warranty exceed 15 months from the date of shipment. If the warranty card is not returned to QMI, then the warranty period will begin immediately on the date of shipment (invoice date) and last for twelve months. Buyers should complete only one (1) form per system or component. WARRANTY CARD HF Series X-ray Generators - Operator’s Manual Quantum Medical Imaging, LLC Revision B 6-3 Chapter 6 Warranty Information Fill in and mail Warranty Card promptly to: Quantum Medical Imaging, LLC 2002-B Orville Drive North Ronkonkoma, NY 11779-7661 USA Any component furnished without charge to Buyer/Dealer during the warranty period to correct a warranty failure shall be warranted only to the extent of the unexpired term of the warranty of the original product. This warranty extends only to the original purchase and is not transferable unless authorized in writing by Quantum Medical Imaging, LLC. Products manufactured by parties other than QMI, where QMI acts solely as distributor or reseller, will carry their respective manufacturers’ warranties, including each of their independent terms and conditions. Warranty consideration will be given only for defective QMI products properly returned to the factory in accordance with QMI’s Returned Materials Procedure (refer to Dealer Price Book or contact QMI customer service). WARRANTY EXCLUSIONS The foregoing warranties are exclusive and in lieu of all other warranties, whether written, oral, express, implied or statutory. NO IMPLIED WARRANTY OF MERCHANTABILITY OR FITNESS FOR PARTICULAR PURPOSE SHALL APPLY. Quantum Medical Imaging, LLC (QMI) Warranty is exclusive of: 1) Failure of Buyer/Dealer to prepare the site or provide power requirements or operating environmental conditions in compliance with any applicable instructions or recommendations of QMI. 2) Failure of Buyer/Dealer to provide the proper incoming power required to support the equipment in accordance with the recommendation of QMI. 3) Any modification of product performed by a party other than QMI. 4) Combining products deemed by QMI to be incompatible. 5) Improper or extraordinary use of the Product, improper maintenance of the Product, or failure to comply with any applicable instructions or recommendations of Quantum Medical Imaging, LLC. 6) Misuse, tampering or, negligent storage/handling of the Product by Buyer, its employees, agents or contractors. 7) Fuses, glassware, high voltage cables and other items deemed by QMI to be expendable. 8) Acts of God, acts of civil or military authority, fires, floods, power failure or electrical power surges, strikes or other labor disturbances, war riots or other causes beyond the reasonable control of Quantum Medical Imaging, LLC. 9) Installation, troubleshooting or repair service are not included in this warranty. Technical service and maintenance is the responsibility of the dealer selling the equipment. 10) The Manufacturer is relieved of any responsibility for damage during shipment after the freight carrier picks up and begins transport of the unit for delivery. Revision B 6-4 HF Series X-ray Generators - Operator’s Manual Quantum Medical Imaging, LLC Chapter 6 Warranty Information BUYER’S REMEDIES If Quantum Medical Imaging LLC determines that any Product fails to meet any warranty during the applicable warranty periods, Quantum Medical Imaging, LLC shall correct any such failure as follows: A) By repairing, adjusting, or replacing any defective or non-conforming Parts or Products. B) By making available any necessary repaired or replacement parts or assemblies. Quantum Medical Imaging shall have the option to furnish either new or exchange replacement parts or assemblies. All returned parts shall become the property of Quantum Medical Imaging if said parts have been determined by QMI to be defective by reason of manufacture. The preceding Paragraphs set forth Buyer’s Remedies and Quantum Medical Imaging’s sole liability for claims based upon failure of the product to meet any warranty, whether the claim is on contract, warranty, Tort (including negligence and strict liability) or otherwise, and however instituted. And upon the expiration of the applicable warranty period, all such liability shall terminate. In no event shall Quantum Medical Imaging be liable for special or consequential damages arising out of the use or ability to use its equipment whatsoever. The warranties and remedies available to the buyer are conditioned upon all claims under this warranty being made in accordance with the aforementioned warranty statement. WARRANTY RETURN PROCEDURE A fully completed Field Returned Material Evaluation Form must be returned with any defective product or any returned item. All returns must have the Serial Number of the Equipment and/or the Specific Part, written on the Field Returned Material Evaluation Form. All freight charges resulting from Warranty Returns are the responsibility of the Buyer or Dealer. EQUIPMENT IN TRANSIT QMI cannot assume responsibility for any equipment damaged in transit. To protect the buyer/dealer, the receiver of any equipment should examine all cartons and crates carefully at time of delivery. If damage is apparent, make a notation on the delivery receipt, request an inspection by the freight carrier, and if applicable, file appropriate carrier claim. Should concealed damage be detected, immediately notify the freight carrier and request an inspection. The purchaser (dealer/customer) is fully responsible for the filing of freight damage claims to the freight carrier. Quantum Medical Imaging, LLC is not responsible for any loss or damage to products once they have been shipped from our factory. The dealer or customer is responsible for full payment to Quantum Medical Imaging, LLC for all invoices, as per our standard payment terms, regardless of freight damage or processing of an insurance claim, by the dealer or customer. HF Series X-ray Generators - Operator’s Manual Quantum Medical Imaging, LLC Revision B 6-5 Chapter 6 Warranty Information VOIDING WARRANTY Any installation, maintenance, repair, service, relocation or alteration to or of, or any other tampering with the product, performed by any person or entity other than Quantum Medical Imaging or a certified Quantum Medical Imaging dealer without the written approval of an authorized person at Quantum Medical Imaging, shall immediately void and cancel all warranties with respect to the affected product. Revision B 6-6 HF Series X-ray Generators - Operator’s Manual Quantum Medical Imaging, LLC