1
P-2-RSM:TEMPLATE
4/22/09
8:37 AM
Page 3
3.3 ATTACHING PRESSURE TUBING
Typically a Room Pressure Snubber (RPS) is installed in the
monitored room. Attach pressure tubing as follows:
1. Connect the 1/4 inch O. D. tubing from the RPS to the 4˝ x 4˝
electrical box for the RSM by pushing the 1/4 inch tube onto one
end of the barbed, male to male, tube adaptor, then push the
silicone tube (supplied) onto the other end. Thread the tubes,
with installed adaptor, through the conduit opening at the bottom
of the electrical box.
4.2 AUDIBLE ALARM
Alarm potentiometer can adjust from 0 to 85 dB. Using a
screwdriver, rotate potentiometer (on A-285 remote annunciator
PC board) clockwise to increase volume and counterclockwise
to decrease volume.
Audible Alarm
Potentiometer
2. Next push the open end of the silicone tubing onto the RSM
pressure tube header (H1) port labeled “+”. Note: The header is
an Electro-Pneumatic (EP) assembly. “+” indicates (Positive)
pressure, and “-” indicates negative or reference pressure.
3. For the most pressure stable operation, an RPS installed in
the reference pressure area is also recommended. In this case,
install the RPS in a hallway or anteroom. Attach the tube to the
RSM in the same way as in step 2, except attach the tube to the
“-” port on the pressure tube header. Tighten swivel fittings on
the assembly if they become loose.
5.0 DOOR STATUS SWITCH WIRING
4.0 ALARM RELAY OUTPUT
The Single Pole Double Throw (SPDT) relay output can be used
for remote signaling of alarm condition. A form “C” contact rated
at 1A is available. Connect to J4, P1 and P4 (See Section 13.0).
4.1 OPTIONAL REMOTE ANNUNCIATOR WIRING
Dwyer offers an optional Remote Annunciator (Dwyer Part No.
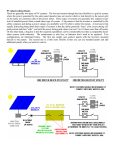
A-285). In the figure below, the remote annunciator connector is
at left, and the RSM connector is at right: Connect P1 to P2, then
connect P2 to A1 (Located on Remote Annunciator), finally
connect P3 to A2 and P4 to A3.
5.1 WIRING
Use normally open (N.O.) side of a contact switch. The RSM will
indicate the status of door position. A contact closure indicates
that the door is closed. This is a low voltage circuit (5 VDC).
Attach to connection J6 (See Section 13.0)
6.0 ELECTRICAL INSTALLATION
6.1 ANALOG OUTPUT
The RSM can be configured to have current (4 to 20 mA) or
voltage (0 to 5 or 0 to 10 VDC) outputs. Voltage output--pin 1,
Current output--pin 2, Common--pin 3. Note: No external
excitation is required.
Current Output
Voltage Output