1
REPAIR GUIDE
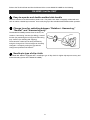
Be sure to disconnect the power cord plug from the wall outlet before conducting repair. Otherwise, the
motor may suddenly run, posing a very dangerous situation.
1. Precautions on Disassembly and Reassembly
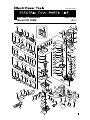
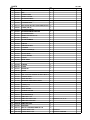
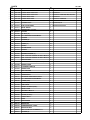
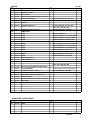
The [Bold] numbers in the descriptions below correspond to item numbers in the Parts List and exploded
view assembly diagram for the Model DH 38MS.
Disassembly
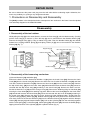
1. Disassembly of the tool retainer
While pulling the Grip [2] in the arrow direction, remove the Front Cap [1], which is fitted securely. (Forcibly
pull the Front Cap [1] to remove it.) Then the Grip [2] can be removed from the Retainer Sleeve [12].
Remove the Stopper Ring [3] by using a retainer ring puller. Then the Needle Holder [4], two Needle
Rollers D8 x 20 [13], Retainer Spring [5] and Spring Holder (A) [6] can be removed from the Retainer
Sleeve [12] (Fig. 1).
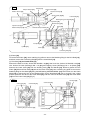
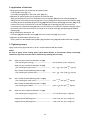
Fig. 1
Stopper Ring [3]
D8 X 20 Needle Roller [13]
Retainer Sleeve [12]
Needle Holder [4]
Front Cap [1]
Grip [2]
Spring Holder (A) [6]
Retainer Spring [5]
2. Disassembly of the hammering mechanism
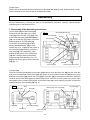
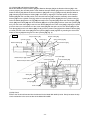
(a) Second Hammer [15] and Striker [27]
Remove the Seal Lock Hex. Socket Hd. Bolt M5 x 16 [67] from the Crank Cover [68]. Remove the Crank
Cover [68] from the Crank Case [70]. Remove the Seal Lock Hex. Socket Hd. Bolt M6 x 20 [64] and Seal
Lock Hex. Socket Hd. Bolt M6 x 45 [65]. Remove the Gear Cover [80] from the Crank Case [70]. Remove
the Slip Clutch Ass'y [49] from the Crank Case [70] beforehand because the Bevel Gear [25] cannot be
removed with the Slip Clutch Ass'y [49] remaining in the Crank Case [70]. Remove the Seal Lock Hex.
Socket Hd. Bolt M4 x 12 [32] and the Change Lever [33]. Remove the Retaining Ring for D20 Hole [35]
securing the Lever Shaft [36] with a retaining ring puller. Remove the Lever Shaft [36] from the Crank Case
[70] beforehand because the Bevel Gear [25] cannot be removed with the Lever Shaft [36] remaining in
the Crank Case [70]. Remove the Seal Lock Hex. Socket Hd. Bolt (W/Flange) M6 x 25 [8]. Then the
Cylinder Case [7], Spring Holder (B) [20], Retainer Sleeve [12] and other parts can be removed from the
main body. Remove the Second Hammer [15] from the Retainer Sleeve [12] together with the Damper
Holder [18], Damper [17] and Damper Washer [16]. Pull out the Cylinder [19] from the main body together
with the Lock Spring [21], Lock Sleeve [22], Clutch Spring [23] and Clutch [24]. Remove the Striker [27] by
tapping the end surface of the Cylinder [19] with a plastic hammer (Fig. 2).
-11-