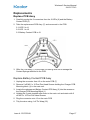
1
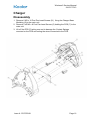
Headband & Charger
Service Manual
ALWAYS READ THE INSTRUCTIONS
Keeler Limited, Clewer Hill Road, Windsor, Berks, United Kingdom. SL4 4AA.
Tel No. +44 (0) 1 753 857177Fax No. +44 (0) 1 753 830247
Issue A 07/07/2008
2415-P-7013
Wireless 2 Service Manual
2415-P-7013
CONTENTS
Introduction
1
Service Principles
1
Precautions
3
Headband
4
Disassembly
4
Remove Control Unit
5
Open Control Unit
6
Control PCB
7
Cable Assy
8
Headband
9
Reassembly
10
Rebuild Control Unit
10
Replace Control Unit
11
Final Reassembly
12
Spares
13
Spare Parts List
Headband
Spare Parts List
Control Box
Main Unit
Charger
14
15
16
Disassembly
16
Replacements
17
Replace PCB Assy
17
Replace Battery Contact PCB Assy
17
Replace LED PCB Assy
18
Reassembly
18
Spares
19
Spare Parts List
20
Issue A 07/07/2008
Wireless 2 Service Manual
2415-P-7013
Introduction
This manual covers servicing of both the Wireless 2 Headband and Wireless 2
Charger unit..
Service Principles
Where a sub-assembly is specified the individual parts are not available as
the assembly of the sub-assembly involves the use of specific tooling, jigs and
adhesives
Issue A 07/07/2008
Page 1
Wireless 2 Service Manual
2415-P-7013
Tools Required
The tools required will be in a standard electro-mechanical toolkit.
Issue A 07/07/2008
Page 2
Wireless 2 Service Manual
2415-P-7013
Precautions
Care should be taken to carry out any repair work on a clean soft surface to
minimise damage to the outside of the unit.
Solvents should not be used for cleaning.
Anti-static precautions must be used when servicing the electronic
components in this product.
Issue A 07/07/2008
Page 3
Wireless 2 Service Manual
2415-P-7013
Headband
Disassembly
It is easier to work if the Optics Assembly and Browbar are removed by
unscrewing the 2 knobs attaching the Browbar to the Headband and
unplugging the cable from the Dimmer Block.
If the Control Unit is permanently wired to the Dimmer Block it is not
recommended to disconnect the cable but to carefully protect the Optics
Assembly whilst carrying out servicing.
The first level of disassembly is required for most repairs
Issue A 07/07/2008
Page 4
Wireless 2 Service Manual
2415-P-7013
Remove Control Unit
1. Remove 2 off M5 x 4 Pozi Pan head Screws (5) from the Clamp (4) on the
Headband
2. Using a pointed blade under the edge of the Adhesive Bezel (13) carefully
lift the Bezel off.
3. Remove 1 off No 8 x 12.7 Pan Head Screw (3) from the centre of the Knob
(12)
4. Remove the Knob (12) and Detent Plate (7)
5. Using a pointed blade under the edge of the Keeler Label (14) carefully lift
the Label off exposing the Screws holding the Control Unit to the Rear
Cover Plate (10)
6. Remove 2 off M2.5 x 25 Pozi Csk PT Screws (8) and 2 off M2.5 x 10 Pozi
Csk PT Screws (6) holding the Control Unit Assembly (2) to the Rear
Cover Plate (10).
Issue A 07/07/2008
Page 5
Wireless 2 Service Manual
2415-P-7013
Open Control Unit
1. Remove 4 off M2 x 20 Pozi Csk PT Screws (7) and 2 off 4 off M2 x 8 Pozi
Csk PT Screws (6) from the rear of the Control Unit.
2. Lift off the Front Cover Moulding (3)
Issue A 07/07/2008
Page 6
Wireless 2 Service Manual
2415-P-7013
Replacements
Control PCB
1. Remove 2 off M2 x 8 Pozi Pan Head PT Screws (5) holding the PCB (8) to
the Rear Moulding Assembly (4)
2. Remove 1 off M2 x 8 Pozi Pan Head PT Screw (5) and 1 off M2 Washer
(19) from the Cable Retainer on the Cable (12) from the Dimmer Block.
3. Lift out the PCB (8)
4. Carefully unsolder 1 off Black and 1 off Red wire leading from the Contacts
on the Rear Moulding Assembly from the PCB.
5. Carefully unsolder 10 wires from the Control PCB (8).
6. Solder the 10 wires to the replacement PCB as shown on the above
diagram ensuring that the 4 wires from the Dimmer Cableform (12) pass
through the Ferrite Bead (10) and still have the Strain Relief (1) and Tie
Wrap (9) are still in place.
7. Solder 1 off Black and 1 off Red wire from the Contacts on the Rear
Moulding Assembly to the PCB (8)
8. Fit the Tie Wrap (12) with its cable (9) to the Rear Moulding (4) using 1 off
M2 x 8 Pozi Pan Head PT Screw (5) and 1 off M2 Washer (19).
9. Ensure that the Ferrite Beads (10) are positioned under where the PCB (8)
will sit.
10. Fit the PCB (8) to the Rear Moulding using 2 off M2 x 8 Pozi Pan Head PT
Screws (5).
Issue A 07/07/2008
Page 7
Wireless 2 Service Manual
2415-P-7013
Cable Assy
1. Remove 2 off M2 x 8 Pozi Pan Head PT Screws (5) holding the PCB (8) to
the Rear Moulding Assembly (4)
2. Remove 1 off M2 x 8 Pozi Pan Head PT Screw (5) and 1 off M2 Washer
(19) from the Cable Retainer on the Cable (12) from the Dimmer Block.
3. Carefully unsolder 1 off Black and 1 off Red wire from the Contacts on the
Rear Moulding Assembly.
4. Carefully unsolder 4 wires from the Control PCB (8).
5. Fit the replacement cable assembly ensuring that
5.1. The Cable Strain Relief (1) is fitted with the battery logo facing the plug
on the Dimmer block end of the cable
5.2. Cable Retainer (12) is fitted 5 mm from the end of the cable sheath as
shown below
5.3. The Ferrite bead (10) is threaded over the 4 wires.
6. Solder the wires to the PCB as shown on the diagram above.
7. Solder 1 off Black and 1 off Red wire to the Contacts on the Rear Moulding
Assembly.
8. Fit the Cable Retainer (12) with its cable to the Rear Moulding (4) using 1
off M2 x 8 Pozi Pan Head PT Screw (5) and 1 off M2 Washer (19).
9. Fit the PCB to then Rear Moulding using 2 off M2 x 8 Pozi Pan Head PT
Screws (5).
Issue A 07/07/2008
Page 8
Wireless 2 Service Manual
2415-P-7013
Headband
1. Carefully remove the Comfort Pad (15). Double sided adhesive tape is
applied during assembly to retain the pad in place until the Control Box is
fitted.
2. Remove 1 off M4 x 25 Pozi Screw (17) from the Headband Adjuster joining
it to the Extension Bar (9)
3. It will now be possible to remove both sides of the Headband from the
Mounting Plate (10)
4. Feed both sides of the replacement Headband into the Mounting Plate.
5. Fit the Adjuster through the back of the Mounting Plate (10) and fit it to the
Extension Bar (9) with 1 off M4 x 25 Pozi Screw (17) Ensure that the
Extension Bar is fully engaged with the Adjuster.
6. Meshing of the Adjuster with the Headband will be adjusted after the
Control Box has been fitted.
Issue A 07/07/2008
Page 9
Wireless 2 Service Manual
2415-P-7013
Reassembly
Rebuild Control Unit
1. Check that the Control Unit PCB (8) is fitted and screwed down.
2. Check that the wiring in the Control Unit is correct according to the
diagram below and that all soldered joints are sound.
3. Offer the Front Moulding (3) to the Rear Moulding (4) ensuring that the
Cable Strain Relief (1) is correctly positioned in the cut-out.
4. Refit the Front Moulding (3) using 4 off M2 x 20 Csk PT screws through
the PCB end (2 at the end and 2 in the middle) and 2 off M2 x 8 Csk PT
Screws at the other end.
Issue A 07/07/2008
Page 10
Wireless 2 Service Manual
2415-P-7013
Replace Control Unit
1. Check that the Comfort Pad (15) is fitted over the Headband Rear Cover
Plate (10). If not apply 2 pieces of double sided adhesive tape (11) as
shown and fit the Comfort Pad (15) using the adhesive tape to temporarily
hold the Pad in place.
2. Offer the Control Box Assembly (2) onto the Headband Rear Cover
Plate (10) ensuring that the cable is pointing upwards.
3. Fit 2 off M2.5 x 25 Csk Pozi PT Screws (8) through the PCB side of the
Control Unit and 2 off M2.5 x 10 Csk Pozi PT Screws (6) through the
Battery side to fix the Control Unit (2) to the Headband Rear Cover
Plate (10)
4. Refit the Keeler Label (14) to the face of the Control Unit (2)
Issue A 07/07/2008
Page 11
Wireless 2 Service Manual
2415-P-7013
Final Reassembly
1. Fit the Detent Plate (7) to the front of the Control Unit ensuring that it fits
over the 2 pegs on the front of the Control Unit (2)
2. Ensure that 2 sides of the Headband are equally fitted inside the
Headband Rear Cover Plate (10) by gently pushing the Extension Bar (9)
back into the Comfort Pad (15) to disengage the Adjuster with the teeth on
the sides of the Headband.
3. Pull the sides of the Headband out as far as possible and move them
about gently until they re-engage with the Adjuster at the end of their
travel.
4. Refit the Headband Knob (12) using 1 off No 8 x 12.7 Pan Head Screw (3).
5. Carefully refit the Knob Bezel (13).
6. Refit the Strain Relief Clamp (4) over the Cable with Approx 90mm of
cable between the Clamp (4) and the plug to the Dimmer Block.
Issue A 07/07/2008
Page 12
Wireless 2 Service Manual
2415-P-7013
Spares
Spare parts can be supplied in accordance with the following list.
The parts indicated with * are only available as part of the Fixings kit.
Issue A 07/07/2008
Page 13
Wireless 2 Service Manual
2415-P-7013
Spare Parts List
Item
Headband
Main Unit
Part No
Description
1
2099-P-5010
Mk 2 Headband Assembly
3
SP70-80024
No8 x 12.7 Pan Head Screw
4
EP39-70232
Strain Relief Clamp
5
SP72-00003
M2 x 4 Pozi Pan Head Screw
6
SP72-50002
M2.5 x 10 Csk Pozi PT Screw
7
EP39-70324
Detent Plate
8
SP72-50003
M2.5 x 25 Csk Pozi PT Screw
9
EP39-70328
Extension Bar
10
EP29-59902
Headband Rear Cover Plate
12
EP39-70327
Headband Knob
13
EP39-70325
Knob Bezel
14
EP39-70317
Keeler Nameplate
15
EP39-70331
Comfort Pad
16
EP39-70344
Headband Top Knob
1299-P-7198
Fixings (Marked * above and
below)
Issue A 07/07/2008
*
*
*
*
*
*
*
*
Page 14
Wireless 2 Service Manual
2415-P-7013
Spare Parts List
Control Box
1
EP39-70316
Cable Strain Relief
3
EP29-59929
Main Housing Front Moulding
4
1299-P-7171
5
SP72-00004
Main Housing Rear Moulding
Assy
M2 x 8 Pan Head Screw
6
SP72-00001
M2 x 8 CSK PT Screw
7
SP72-00006
M2 x 20 Csk PT Screw
8
EP39-70321
Head Unit PCB
9
EP79-11115
Tie Wrap
10
EP79-10374
Ferrite Bead
12
1202-P-5832
Vantage + Cable Assy
19
WP12-01007
M2 Washer
Issue A 07/07/2008
*
*
*
*
*
*
*
Page 15
Wireless 2 Service Manual
2415-P-7013
Charger
Disassembly
1. Remove 6 M3 x 10 Pozi Pan head Screws (21) fixing the Charger Base
Moulding (8) to the main unit.
2. Remove 2 off M3 x 8 Pozi Pan head Screws (5) holding the PCB (7) to the
main unit.
3. Lift off the PCB (7) taking care not to damage the Contact Springs
mounted on the PCB and noting the wires connected to the PCB.
Issue A 07/07/2008
Page 16
Wireless 2 Service Manual
2415-P-7013
Replacements
Replace PCB Assy
1. Carefully unplug the 3 connectors from the 2 LEDs (6) and the Battery
Contact PCB (2)
2. Take the replacement PCB Assy (7) and reconnect to the PCB
2.1. LED 2 to J1
2.2. LED 1 to J2
2.3. Battery Contact PCB to J3
3. Offer the PCB Assy (7) to the main unit taking care not to damage the
Contact Springs attached to the PCB.
Replace Battery Contact PCB Assy
1. Unplug the connector from J3 on the main PCB (7)
2. Remove 2 off M2.5 x 10 Pozi Pan Head Screws holding the Charger PCB
Mounting block (1) to the main unit.
3. Locate the replacement Battery Contact PCB Assy (2) into the recess on
the Charger PCB Mounting Block (1)
4. Holding the 2 parts together offer them to the main unit and retain with 2
off M2.5 x 10 Pozi Pan Head Screws
5. Plug the connector onto J3 on the main PCB
6. Tidy the wires using 1 off Tie Wrap (22)
Issue A 07/07/2008
Page 17
Wireless 2 Service Manual
2415-P-7013
Replace LED PCB Assy
1. Unplug the appropriate connector from the main PCB
2. Remove 1 off M3 x 8 Pozi Pan Head Screw (5)
3. Remove the old LED PCB Assy (6)
4. Place the replacement LED PCB Assy (6) into position and fix with 1 off
M3 x 8 Pozi Pan Head Screw (5)
5. Tidy the wires using 1 off Tie Wrap (22)
Reassembly
1. Check that the 3 connectors J1, J2, J3 are correctly connected
2. Place the Main PCB Assy (7) onto the main unit taking care to ensure that
the Contact Springs are not damaged and move freely in their cut-outs
3. Fix the Main PCB (7) using 2 off M3 x 8 Pozi Pan Head Screw (5)
4. Fit the Base Moulding (8) using 6 off M3 x 10 Pozi Pan Head Screw (21)
Issue A 07/07/2008
Page 18
Wireless 2 Service Manual
2415-P-7013
Spares
Spare parts can be supplied in accordance with the following list.
The parts indicated with * are only available as part of the Fixings kit.
Current prices for spare parts are available from Technical Service.
Technical Service
Keeler Ltd
Clewer Hill Road
Windsor
Berks
SL4 4AA
Phone
+44 (0)1753 827110
Fax
+44 (0)1753 827114
Issue A 07/07/2008
Page 19
Wireless 2 Service Manual
2415-P-7013
Spare Parts List
Item
Part No
Description
1
EP39-70337
Charger PCB Mounting block
2
1945-P-7023
Battery Contact PCB Assy
3
EP39-70334
Keeler Nameplate
4
SP72-55086
M2.5 x 10 Pozi Pan Hd Screw
5
Sp73-00002
M3 x 8 Pozi Pan Hd PT Screw
6
1945-P-5014
Charger LED PCB Assy
7
1945-P-7021
Charger Main PCB Assy
8
EP19-70011
Charger Base Moulding
9
EP39-70335
Retaining Moulding
10
EP39-70336
Retaining Spring
11
1945-P-5015
Charger Top Assy
16
WP13-01008
M3 Plain Washer
17
SP13-05089
M3 x 5 Pozi Pan Hd PT Screw
21
SP73-00003
M3 x 10 Pozi Pan Hd PT Screw
22
EP79-40899
Cable Tie
1945-P-7020
Fixings Kit (Marked * above)
Issue A 07/07/2008
*
*
*
*
*
*
*
*
Page 20