1
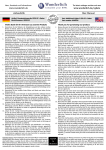
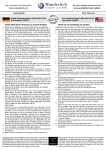
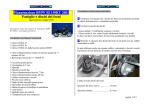
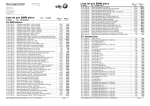
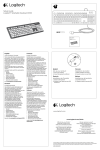
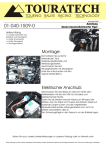
Anbauanleitung
Fitting Instructions
Istruzione
Bestell Nummer / Part Number: 8600390
R 850/1100/1150 RT "MicroFlooter" Zusatzscheinwerfer / Auxiliary Lights
Thank you for purchasing our product.
Vielen Dank für Ihr Vertrauen zu unserem Produkt.
1.
2.
3.
4.
5.
6.
7.
8.
9.
10.
11.
12.
13.
14.
Entfernen Sie Sitzbank und Spiegel (siehe auch BMW-Bedienungsanleitung Service und Technik), drehen Sie den Schnellverschluss
der hinteren Kunststoffabdeckung ¼ Umdrehung nach links (Bild
A), ziehen Sie die Abdeckung vorne aus der Steckverbindung und heben Sie diese
nach oben heraus.
Zur Demontage der Verkleidung entfernen Sie die 4 Schrauben der Bugverkleidung,
je eine Schraube hinter dem Spiegel und alle Verkleidungsschrauben (Bild A).
Jetzt die Verkleidung hinten anheben und vorne mit der Fixiernase nach unten
herrausnehmen.
Befestigen Sie das Relais mit der Originalschraube an der Ansaugrohrbefestigung
(Bild B).
Trennen Sie die Steckverbindungen im Schalterkabel, verlegen Sie die beiden
2-adrigen Kabel entlang des Verkleidungsrohrrahmen nach vorne und befestigen
Sie diese mit Kabelbindern (Bild C).
Bauen Sie nun den Schalter in die Verkleidung ein. Einbaubeispiel unter dem
Tacho (Bild D). (Bei R850RT der 1.Serie und R1100RT mit freiem Schalterplatz in
der Verkleidung kann auch Schalter Art.-Nr.: 8200095 eingebaut werden.
Verbinden Sie die Steckverbindungen zum Schalter wieder, verlegen Sie das schwarze
Kabel vom Schalter zur Standlichtfassung und ziehen Sie diese aus dem Scheinwerfer. Klemmen Sie nun mit der beiliegenden Kabelklemme das schwarze Kabel an das
grau/schwarze Kabel der Standlichtleitung (Bild E), und stecken Sie die Standlichtfassung wieder in den Scheinwerfer.
Montieren Sie die seitlichen Haltebügel lose mit Schraube M6x16, U-Scheiben und
Mutter so am Ölkühler dass die Befestigungsbohrung nach aussen sitzt (Bild F).
Entfernen Sie die Mutter M8 des Verkleidungshalters am Lenkkopf, legen Sie zur
vorhandenen U-Scheibe eine große U-Scheibe M8 bei, stecken Sie die Lampenhalterquerstrebe auf und drehen Sie die Mutter M8 mit einer großen U-Scheibe
M8 wieder auf (Bild G).
Montieren Sie die Zusatzscheinwerfer mit je zwei Schrauben M5x12, U-Scheiben
und Muttern am Halteblech (Bild H). Befestigen Sie jetzt das Halteblech mit den
Scheinwerfern seitlich mit je einer Schraube M4x12, U-Scheiben und Muttern an
den Haltebügeln und in der Mitte mit einer Schraube M5x12, U-Scheiben und
Mutter an der Lampenhalterquerstrebe (Bild I, J + K).
Schieben Sie ein passendes Stück kleinen Schrumpfschlauch über die beiden
Kabel des Scheinwerfers, ein passendes Stück großen Schrumpfschlauch über
die Zuleitung und verbinden Sie die Steckanschlüsse. Durch Erwärmung (z.B.
Heißluftfön) legt sich der Schrumpfschlauch passgenau über die
Steckanschlüsse und Leitung (Bild L).
Achtung! Brandgefahr bei offener Flamme/
Überhitzung!
Richten Sie die Scheinwerferelemente
aus und schrauben Sie alle Schrauben fest.
Befestigen Sie das rote Pluskabel am Pluspol der Batterie
und das braune Minuskabel
am Minuspol der Batterie.
Befestigen Sie alle Kabel
mit Kabelbindern am Fahrzeug, achten Sie darauf
dass die Leitungen nirgenwo scheuern oder von
beweglichen Fahrzeugteilen
gequetscht werden.
Montieren Sie alle abgebauten
Teile wieder and Motorrad.
Überprüfen Sie die ordnungsgemäße Funktion und Einstellung der
Scheinwerfer vor der ersten Fahrt!
1
2.
3.
4.
5.
6.
7.
8.
9.
10.
Remove the seat and the mirror assemblies. Please refer to the
Technical and Service Manual which was supplied with your bike
at the time of purchase. Turn the ¼-turn fasteners of the rear
covers (Image A) and remove both the left and right side covers.
Remove the fairing panels. Start with the belly pan section, remove the fasteners
as shown in (Image A) and then gently lift the panels off and set them in a safe
spot.
Attach the relay to the forward mounting point of the air intake tube (Image
B).
Unplug the switch from the supplied wiring harness. Route the two wire cable
along the faring bracket tube towards the front and attach it with cable ties
(Image C).
Install the supplied switch in a location of your choice. Image (D) shows an ideal
location. If your bike is an early model 850 RT or 1100 RT, and one of your rocker
switches is still free, you can substitute the supplied switch with an original BMW
switch, available from your BMW Dealer.
Re-connect the switch and route the black wire from the switch to the parking
light in the headlight. Pull the parking light out of its socket and connect the
black wire to the Gray/Black wire using the supplied splice connector (Image E).
Then reinsert the parking light.
Loosely mount the side mounting brackets to the oil cooler, so that the mounting
holes are toward the outside, using an M6x16 bolt, washer and nut (Image F).
Remove the M8 nut from the fairing bracket. Place one of the supplied large M8
washers onto the protruding threads over the existing washer, followed by the
light support bracket and the other large washer. Reinstall the nut and hand
tighten at this point (Image G).
Attach the Auxiliary lights to the light bracket using two M5x12 bolts, washers
and nuts per side (Image H). Secure the lights and bracket to the previously
installed mounting brackets, using one M4x12 bolt, washer and nut on each side
and one M5x12 bolt, washers and nut in the middle (Images I, J + K).
Slide a small piece of the thin shrink tubing over each light wire and a piece of
the larger shrink tubing over the main wiring. Connect the wires and position
the thin shrink tubing over the connection. Heat the shrink tubes with a heat
gun to neatly shrink it over the connection. Then repeat the same for the large
tube to cover the whole wiring/connection (Image L).
Attention: Excessive heat or open flame could cause fire/damage to wiring
or bike!!
11. Adjust the brackets and lights as needed and then tighten
all nuts and bolts securely.
12.
Disconnect the negative (-) terminal of
the battery and then the positive (+) terminal. Attach the red wire of the harness to
the positive (+) terminal of the battery
and then connect the brown wire to
the negative (-) terminal of the
battery.
13. Attach the harness in strategic locations using cable ties,
making sure that no wires are
pinched or will become chaffed
or pulled.
14. Double check your work,
making sure that all fasteners
are tight and all wires are routed
cleanly. Reinstall the fairing panels,
mirrors and seat in the reverse order of
disassembly.
Test the correct function and the alignment
of the lights before the first ride!
Metric Ruler for determining bolt sizes:
When measuring bolts, only measure the length of thread and
shaft without the bolt head. For example, M5x12 means diameter
of bolt is 5 mm, length 12 mm.
Schraubenlineal:
Das Lineal soll Ihnen bei der Identifizierung der Schrauben helfen.
Bitte bedenken Sie, daß Schrauben an Ihrer Einschraubtiefe gemessen
werden, also ohne Kopf. M5x25 = Durchmesser 5mm, Länge 25 mm
News, Shop, Downloads und Informationen: w w w . w u n d e r l i c h . d e
Alles um das Thema Navigation: w w w . n a v i g a t i o n . w u n d e r l i c h . d e
Genereller Hinweis: Unsere Anleitungen sind nach bestem Wissen erstellt
oder Zweifel haben, so wenden Sie sich bitte an Ihren BMW-Händler oder die
fahrzeugspezifische Toleranzen übernehmen können! Es kann im Einzelfall
.
The latest catalogue sections and news www.wunderlich.de/update
Fitting instructions download
w w w. w u n d e r l i c h . d e / m a n u a l s
Copyright
worden, erfolgen jedoch ohne Gewähr. Sollten Sie mit dem Anbau nicht zurecht kommen
Werkstatt Ihres Vertrauens. Bitte beachten Sie , dass wir keine Gewährleistungen für
notwendig sein, dass Produkte diesen angepasst werden müssen.
by
General note: Our fitting instructions are written to the best of our
knowledge but specifications or details may change. If you have difficulties or
have doubts with fitting this part please seek advice from your BMW Wunderlich dealer or workshop of your choice. Please note that in some cases due to vehicle
related tolerances beyond our control some products might need
adjusting to fit. We cannot warranty parts fitting in those circumstances.
Note generali: Le nostre istruzioni di montaggio sono scritte al meglio delle nostre possibilità ma dettagli o specifiche possono venire variate. Se avete difficoltà o dubbi sul
montaggio di questo accessorio vi invitiamo a rivolgervi al vostro concessionario BMW o alla vostra officina di fiducia.Prendete nota che in qualche caso per tolleranze relative
al veicolo al di fuori del nostro controllo alcuni accessori possono necessitare di aggiustamenti appropriati. In questo caso non possiamo garantire un perfetto montaggio.
1
Anbauanleitung
Fitting Instructions
Istruzione
Bestell Nummer / Part Number: 8600390
R 850/1100/1150 RT "MicroFlooter" Zusatzscheinwerfer / Auxiliary Lights
A
¼
B
C
D
E
Genereller Hinweis: Unsere Anleitungen sind nach bestem Wissen erstellt
oder Zweifel haben, so wenden Sie sich bitte an Ihren BMW-Händler oder die
fahrzeugspezifische Toleranzen übernehmen können! Es kann im Einzelfall
Copyright
Grau/Schwarz
Grey/Black
Schwarz
Black
worden, erfolgen jedoch ohne Gewähr. Sollten Sie mit dem Anbau nicht zurecht kommen
Werkstatt Ihres Vertrauens. Bitte beachten Sie , dass wir keine Gewährleistungen für
notwendig sein, dass Produkte diesen angepasst werden müssen.
by
General note: Our fitting instructions are written to the best of our
knowledge but specifications or details may change. If you have difficulties or
have doubts with fitting this part please seek advice from your BMW Wunderlich dealer or workshop of your choice. Please note that in some cases due to vehicle
related tolerances beyond our control some products might need
adjusting to fit. We cannot warranty parts fitting in those circumstances.
Note generali: Le nostre istruzioni di montaggio sono scritte al meglio delle nostre possibilità ma dettagli o specifiche possono venire variate. Se avete difficoltà o dubbi sul
montaggio di questo accessorio vi invitiamo a rivolgervi al vostro concessionario BMW o alla vostra officina di fiducia.Prendete nota che in qualche caso per tolleranze relative
al veicolo al di fuori del nostro controllo alcuni accessori possono necessitare di aggiustamenti appropriati. In questo caso non possiamo garantire un perfetto montaggio.
2
Anbauanleitung
Fitting Instructions
Istruzione
Bestell Nummer / Part Number: 8600390
R 850/1100/1150 RT "MicroFlooter" Zusatzscheinwerfer / Auxiliary Lights
F
G
H
I
M4x12
M5x12
J
L
Ø = 9.5 mm
L = ~65 mm/ 2.6"
1
Ø = 12.7 mm
L = ~180 mm/ 7"
2
4
K
3
5
M5x12
3