1
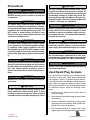
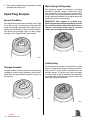
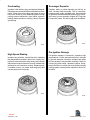
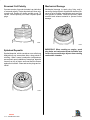
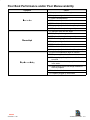
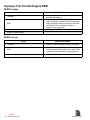
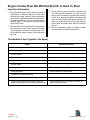
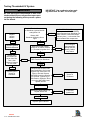
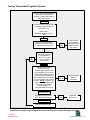
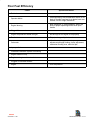
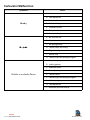
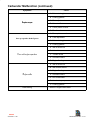
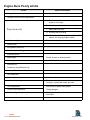
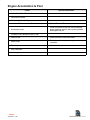
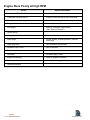
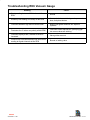
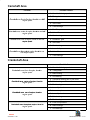
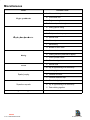
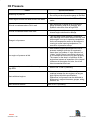
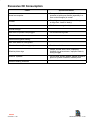
IMPORTANT INFORMATION
TROUBLESHOOTING
Index
1
C
Table of Contents
Page
Precautions . . . . . . . . . . . . . . . . . . . . . . . . . . . . . 1C-1
Used Spark Plug Analysis . . . . . . . . . . . . . . . . . 1C-1
Spark Plug Analysis . . . . . . . . . . . . . . . . . . . . . . 1C-2
Normal Condition . . . . . . . . . . . . . . . . . . . . . . 1C-2
Chipped Insulator . . . . . . . . . . . . . . . . . . . . . . 1C-2
Wet Fouling (Oil Deposits) . . . . . . . . . . . . . . 1C-3
Cold Fouling . . . . . . . . . . . . . . . . . . . . . . . . . . 1C-3
Overheating . . . . . . . . . . . . . . . . . . . . . . . . . . 1C-4
High Speed Glazing . . . . . . . . . . . . . . . . . . . . 1C-4
Scavenger Deposits . . . . . . . . . . . . . . . . . . . 1C-4
Pre-Ignition Damage . . . . . . . . . . . . . . . . . . . 1C-4
Reversed Coil Polarity . . . . . . . . . . . . . . . . . . 1C-5
Splashed Deposits . . . . . . . . . . . . . . . . . . . . . 1C-5
Mechanical Damage . . . . . . . . . . . . . . . . . . . 1C-5
Poor Boat Performance and/or Poor
Maneuverability . . . . . . . . . . . . . . . . . . . . . . . . . . 1C-6
Improper Full Throttle Engine RPM . . . . . . . . . 1C-7
RPM Too High . . . . . . . . . . . . . . . . . . . . . . . . 1C-7
RPM Too Low . . . . . . . . . . . . . . . . . . . . . . . . . 1C-7
Engine Cranks Over But Will Not Start Or
Is Hard To Start . . . . . . . . . . . . . . . . . . . . . . . . . . 1C-8
Important Information . . . . . . . . . . . . . . . . . . 1C-8
Thunderbolt IV and V Ignition
( No Spark) . . . . . . . . . . . . . . . . . . . . . . . . . . . 1C-8
Testing Thunderbolt IV System . . . . . . . . . . 1C-9
Testing Thunderbolt V Ignition System . . . 1C-10
Fuel System Rich . . . . . . . . . . . . . . . . . . . . . . . 1C-11
Fuel System Lean . . . . . . . . . . . . . . . . . . . . . . . 1C-11
Miscellaneous . . . . . . . . . . . . . . . . . . . . . . . . . . 1C-11
Engine Will Not Crank Over/Starter
Inoperative . . . . . . . . . . . . . . . . . . . . . . . . . . . . . 1C-12
Page
Charging System Inoperative . . . . . . . . . . . . . 1C-12
Noisy Alternator . . . . . . . . . . . . . . . . . . . . . . . . . 1C-13
Instrumentation Malfunction . . . . . . . . . . . . . . 1C-13
Radio Noise . . . . . . . . . . . . . . . . . . . . . . . . . . . . 1C-13
Poor Fuel Efficiency . . . . . . . . . . . . . . . . . . . . . 1C-14
Carburetor Malfunction . . . . . . . . . . . . . . . . . . . 1C-15
Carburetor Malfunction (continued) . . . . . . . . 1C-16
Engine Runs Poorly At Idle . . . . . . . . . . . . . . . 1C-17
Engine Acceleration Is Poor . . . . . . . . . . . . . . 1C-18
Engine Runs Poorly At High RPM . . . . . . . . . 1C-19
Troubleshooting With Vacuum Gauge . . . . . . 1C-20
Engine Noise . . . . . . . . . . . . . . . . . . . . . . . . . . . 1C-21
Important Information . . . . . . . . . . . . . . . . . 1C-21
Valve Cover Area . . . . . . . . . . . . . . . . . . . . . . . 1C-21
Cylinder Area . . . . . . . . . . . . . . . . . . . . . . . . . . . 1C-21
Camshaft Area . . . . . . . . . . . . . . . . . . . . . . . . . . 1C-22
Crankshaft Area . . . . . . . . . . . . . . . . . . . . . . . . . 1C-22
Miscellaneous . . . . . . . . . . . . . . . . . . . . . . . . . . 1C-23
Oil Pressure . . . . . . . . . . . . . . . . . . . . . . . . . . . . 1C-24
Low Oil Pressure . . . . . . . . . . . . . . . . . . . . . . . . 1C-25
High Oil Pressure . . . . . . . . . . . . . . . . . . . . . . . 1C-25
Excessive Oil Consumption . . . . . . . . . . . . . . . 1C-26
Water in Engine . . . . . . . . . . . . . . . . . . . . . . . . . 1C-27
Important Information . . . . . . . . . . . . . . . . . 1C-27
Water In Crankcase . . . . . . . . . . . . . . . . . . . . . 1C-27
Water On Top Pistons . . . . . . . . . . . . . . . . . . . . 1C-28
Engine Overheats (Mechanical) . . . . . . . . . . . 1C-29
Engine Overheats (Cooling System) . . . . . . . 1C-30
Insufficient Water Flow From Belt Driven
Seawater Pump . . . . . . . . . . . . . . . . . . . . . . . . . 1C-31
Power Steering . . . . . . . . . . . . . . . . . . . . . . . . . 1C-32
Poor, Erratic, or No Assist . . . . . . . . . . . . . 1C-32
Noisy Pump . . . . . . . . . . . . . . . . . . . . . . . . . . . . 1C-33
Fluid Leaks . . . . . . . . . . . . . . . . . . . . . . . . . . . . . 1C-33
Index
1C-0 - TROUBLESHOOTING
90-823226--1 996
Precautions
! WARNING
Always disconnect battery cables from battery
BEFORE working on fuel system to prevent fire
or explosion.
! WARNING
Be careful when cleaning flame arrestor and
crankcase ventilation hose; gasoline is extremely flammable and highly explosive under certain
conditions. Be sure that ignition key is OFF. DO
NOT smoke or allow sources of spark or open
flame in area when cleaning flame arrestor and
crankcase ventilation hose.
! WARNING
Be careful when changing fuel system components; gasoline is extremely flammable and highly explosive under certain conditions. Be sure
that ignition key is OFF. DO NOT smoke or allow
sources of spark or flame in the area while changing fuel filter. Wipe up any spilled fuel immediately.
! WARNING
Avoid gasoline fire or explosion. Improper installation of brass fittings or plugs into fuel pump or
fuel filter base can crack casting and/or cause a
fuel leak. Follow specific procedure, given in
Section 5A of this manual, for all fuel line connections.
! WARNING
Make sure no fuel leaks exist before closing engine hatch.
! CAUTION
DO NOT operate engine without cooling water
being supplied to water pickup holes in gear
housing, or water pump impeller will be damaged
and subsequent overheating damage may result.
! CAUTION
DO NOT operate engine without water being
supplied to seawater pickup pump on engine, or
pump impeller may be damaged and subsequent
overheating damage to engine may result. Engine may be operated with boat out of water, if instructions under “Running Engine with Boat Out
of Water,” following, are completed.
! WARNING
When running engine with boat out of water, be
certain that area in vicinity of propeller is clear
and that no person is standing nearby. As a precautionary measure, it is recommended that the
propeller be removed.
! CAUTION
DO NOT run engine above 1500 RPM, as suction
created by seawater pickup pump may collapse
water supply hose and cause engine to overheat.
! WARNING
Be sure that engine compartment is well ventilated and that no gasoline vapors are present to
prevent the possibility of a FIRE or EXPLOSION.
! WARNING
DO NOT leave helm unattended while performing
idle speed adjustment.
Used Spark Plug Analysis
Use the following illustrations for determining serviceability of spark plug. Spark plug condition also
can suggest a variety of possible engine malfunctions and, therefore, can indicate needed engine repairs. When old plugs are replaced, replace entire
set. Perform plug service only on those plugs suitable
for additional service, using the following procedures:
1. Remove any oil deposits with solvent and dry
plugs thoroughly.
2. Open electrode gap wide enough to permit cleaning and filing.
3. Remove combustion deposits from firing end of
spark plug with a plug cleaner. Blow off with compressed air to remove abrasives.
4. File electrode surfaces to restore clean, sharp
edges. Again remove filings with compressed air.
Index
90-823226--1 996
TROUBLESHOOTING - 1C-1
5. Reset gap to specifications by bending only side
electrode with proper tool.
Spark Plug Analysis
Normal Condition
Few deposits are present and probably will be light
tan or gray in color. This plug shows that plug heat
range is compatible with engine, and engine is electrically and mechanically in good running condition.
With proper plug servicing (clean, file and re-gap),
this plug can be reinstalled with good results.
Wet Fouling (Oil Deposits)
Plug becomes shorted by excessive oil entering
combustion chamber, usually in engine with many
hours of operation. Worn piston rings, cylinder walls,
valve guides or valve stem seals are causes of oil entering combustion chamber. Only engine repairs will
permanently relieve oil wet fouling.
IMPORTANT: New engines or recently overhauled engines may wet foul plugs before normal
oil control is achieved with proper break-in procedures. Such fouled plugs may be serviced
(clean, file and re-gap) and reinstalled.
72420
72420
Cold Fouling
Chipped Insulator
Chipped insulator usually results from careless plug
re-gapping. Under certain conditions, severe detonation also can split insulator firing ends. Plug must
be replaced.
Dry, black deposits indicate rich fuel mixture or weak
ignition. Clogged flame arrestor, flooding carburetor,
sticky choke or weak ignition components all are
probable causes. If, however, only one or two plugs
in set are fouled, check for sticking valves or bad ignition leads. After correcting cause, service (clean, file
and re-gap) plugs and reinstall.
72420
72421
Index
1C-2 - TROUBLESHOOTING
90-823226--1 996
Overheating
Scavenger Deposits
Insulator is dull white or gray and appears blistered.
Electrodes are eroded and there is an absence of deposits. Check that correct plug heat range is being
used. Also check for over-advanced ignition timing,
cooling system malfunction, lean fuel/air mixtures,
leaking intake manifold or sticking valves. Replace
spark plugs.
Powdery white or yellow deposits are built up on
shell, insulator and electrodes. This is normal appearance with certain branded fuels. Accumulation
on ground electrodes and shell areas may be unusually heavy, but may be easily chipped off. Plugs can
be serviced (clean, file and re-gap) and reinstalled.
72422
72421
Pre-Ignition Damage
High Speed Glazing
Insulator has yellowish, varnish-like color, indicating
that temperatures suddenly have risen, usually during hard, fast acceleration under heavy load. Normal
deposits do not get a chance to blow off. Instead, they
melt and form a conductive coating. Replace plugs.
If condition recurs, use colder heat range plug and
service plugs more frequently.
Pre-ignition damage is caused by excessive high
temperatures. Center electrode melts first, followed
by ground electrode. Normally, insulators are white
but may be dirty if plug has been misfiring. Check for
correct plug heat range, advanced ignition timing,
lean fuel mixture, incorrect fuel used, malfunctioning
cooling system, leaking intake manifold or lack of lubrication.
72421
72422
Index
90-823226--1 996
TROUBLESHOOTING - 1C-3
Reversed Coil Polarity
Mechanical Damage
Concave erosion of ground electrode is an indication
of reversed polarity. Center electrode will show only
normal wear. Engine will misfire and idle rough. To
correct, reverse primary coil leads. Replace spark
plugs.
Mechanical damage to spark plug firing end is
caused by foreign object in combustion chamber. Because of valve overlap, small objects can travel from
one cylinder to another. Check all cylinders, intake
manifold and exhaust material to prevent further
damage.
72422
Splashed Deposits
Spotted deposits, which sometimes occur after long
delayed tune-up, accumulate after a long period of
misfiring. When normal combustion temperatures
are restored, upon installation of new plugs, deposits
loosen from top of piston and head and are thrown
against hot insulator. Clean and service plugs and reinstall.
72423
IMPORTANT: When working on engine, spark
plug holes and carburetor throat should be kept
covered to prevent foreign objects from entering
combustion chamber.
72423
Index
1C-4 - TROUBLESHOOTING
90-823226--1 996
Poor Boat Performance and/or Poor Maneuverability
Symptom
Cause
A. Improper drive unit trim angle
B. Improper weight distribution
C. Boat is underpowered
B
Bow
too low
l
D. Permanent or power hook in boat bottom
E. False bottom full of water
F. Improperly adjusted trim tabs (after planes)
G. Dirty boat bottom (marine growth)
A. Improper drive unit trim angle
B. Propeller pitch too great
C. Dirty boat bottom (marine growth)
B
Bow
too high
hi h
D. Poor running engine
E. Improper weight distribution
F. Rocker in boat bottom
G. False bottom full of water
H. Improperly adjusted trim tabs (after planes)
A. Drive unit installed too high on transom
B. Dirty or rough boat bottom
C. Damaged propeller; pitch too small; diameter
too small
P
Propeller
ll ventilating
il i
D. Keel located too close to propeller or too deep
in the water
E. Water pickup or thru hull fittings located too
close to propeller
F. Hook in boat bottom
G. Propeller plugged up with weeds
Index
90-823226--1 996
TROUBLESHOOTING - 1C-5
Improper Full Throttle Engine RPM
RPM Too High
Cause
Special Information
Propeller
Damaged; pitch too low; diameter too small;
propeller hub slipping.
Boat
Water pickup or thru hull fittings mounted too
close to propeller (ventilation); keel located too
close to propeller and/or too deep in the water
(ventilation). Drive installed too high on
transom; wrong gear ratio.
Operation
Unit trimmed out too far.
Engine coupler slipping
RPM Too Low
Cause
Special Information
Propeller
Damaged; pitch too great; diameter too great.
Boat
Dirty or damaged bottom; permanent or power
hook in bottom; false bottom full of water. Drive
installed too low on transom; wrong gear ratio.
Operation
Unit trimmed in too far.
Index
1C-6 - TROUBLESHOOTING
90-823226--1 996
Engine Cranks Over But Will Not Start Or Is Hard To Start
Important Information
1. First, determine which engine system is causing
the problem. To make an engine run, basic components fuel, spark (ignition), and compression
are required. If all three components are present,
the engine should run. If any one of the three are
missing, weak, or arriving at the wrong time the
engine will not run.
2. Determine if there is fuel present by looking down
the carburetor venturi while actuating throttle.
There should be a stream of fuel coming out of
the accelerator pump nozzles if the carburetor
has fuel.
3. Check ignition system operation. Remove coil
wire from tower on distributor cap. Hold coil wire
near ground and check for spark while cranking
engine over. Repeat procedure with spark plug
wires. If there is spark at the spark plug wires, remove the spark plugs and make sure they are
correct type and heat range, and not fouled or
burned.
4. Run a compression check on engine to make
sure the engine is mechanically sound.
Thunderbolt IV and V Ignition ( No Spark)
Cause
Moisture on ignition components
Special Information
Distributor cap or spark plug wires arcing
Battery, electrical connections, damaged wiring
Ignition switch
Shift interrupter switch (Alpha One Models Only)
Shorted tachometer
Disconnect tachometer and try again
Ignition timing
Spark plugs
Fouled, burned, cracked porcelain
Spark plug wires
Faulty insulation, broken wires
Cracked or dirty distributor cap
Faulty ignition components
Check components
Engine synchronizer (if equipped) hooked up
series on purple ignition wire (dual engines only)
Synchronizers must be hooked up directly coil
terminal (parallel chute)
Index
90-823226--1 996
TROUBLESHOOTING - 1C-7
Testing Thunderbolt IV System
! WARNING
Be sure that engine compartment is well ventilated and that there are no gasoline vapors present during the following test to prevent a potential fire hazard.
IMPORTANT: Use a voltmeter when making these tests. DO NOT use a test light.
Check all Terminal Connections
at Distributor, Ignition Module
and Ignition Coil
Replace
Ignition
Module
No Spark
Battery OK?
Distributor Clamping Screw
Tight?
0 Volts
ALPHA DRIVES ONLY: Unplug shift
interrupter switch WHITE/GREEN
bullet connector from Distributor Terminal. Remove Tachometer GRAY
lead only from (–) coil terminal. Retest to isolate these components.
No Spark
Replace Ignition
Module Harness
With Key in RUN Position,
Check for 12 Volts at Positive
(+) Terminal on Ignition Coil
0 Volts
0 Volts
Check Engine
and Instrument
Wiring Harness,
Battery Cables,
Key Switch
12 Volts
Unplug WHT/
RED bullet connector from Dist.
Term., then
Check for Voltage
on This Lead
Voltage
Replace Ignition
Sensor in
Distributor
0 Volts
Check for 1-12 Volts at WHT/
RED Terminal on Distributor
12 Volts
Remove High-Tension Lead
from Distributor to Coil. Insert
a Spark Gap Tester from Coil
Tower to Ground. Remove
WHT/GRN Lead from Distributor Terminal - Ignition Key in
RUN Position. Strike the Terminal on the WHT/GRN Lead
against Ground
Spark at Coil
Replace Ignition
Sensor in
Distributor
Spark at Coil
Install New
Ignition Coil
No Spark at Coil
Substitute a New Ignition Coil.
Repeat Above Test
No Spark at Coil
Replace Ignition Module
Index
1C-8 - TROUBLESHOOTING
90-823226--1 996
Testing Thunderbolt V Ignition System
Check to ensure that tachometer
GRY lead is not shorted to
ground (–) at the tachometer or
within the harness.
No Spark
Check all Terminal Connections
at Distributor, Ignition Module
and Ignition Coil.
Battery OK?
Distributor Clamping Screw
Tight?
No Spark
With Key in RUN Position,
Check for 12 Volts at Positive
(+) Terminal on Ignition Coil
12 Volts
0
Volts
0
Volts
Check Engine
and Instrument
Wiring Harness,
Battery Cables,
Key Switch
Unplug WHT/
RED bullet connector
from Distributor.
Check for 12 volts
on lead coming
from module.
12 Volts
Reconnect WHT/RED
bullet connectors.
Remove High-Tension Lead
from Distributor to Coil. Insert
a Spark Gap Tester from Coil
Tower to Ground. Disconnect
WHT/GRN Lead from Distributor. Place Ignition Key in RUN
Position. Rapidly strike the Terminal of the WHT/GRN Lead
that comes from module,
against Ground (–).
(See “IMPORTANT” below)
Spark
at Coil
Replace Ignition
Sensor in
Distributor
No Spark at Coil
Substitute a New Ignition
Coil. Repeat Above Test
Spark
at Coil
Install New
Ignition Coil
No Spark at Coil
Replace Ignition Module
IMPORTANT: The WHT/GRN lead must be touched against ground (–) 2-3 times per second
to simulate a running engine. Repeat this test several times to ensure that spark is present.
Index
90-823226--1 996
TROUBLESHOOTING - 1C-9
Fuel System Rich
NOTE: The following fuel system diagnosis refer primarily to the carbureted engines. For additional information
pertaining to fuel injection refer to Section 5D of this manual.
Cause
Warm engine carburetor percolation
Special Information
Fuel boils out of float bowl when shut off and
warm. Floods intake manifold.
Clogged flame arrestor
Automatic choke not opening
Float adjustment
Float leaks or is saturated with fuel
Needle and seat leaking
Carburetor gaskets leaking
Excessive fuel pump pressure
Cracked or porous carburetor body
Unseats needle and seat
Fuel System Lean
Cause
Special Information
Empty fuel tank
Fuel shut-off valve closed (if equipped)
Vapor lock
Engine will not start after warm engine shut
down
Automatic choke
Stuck open, wrong adjustment
Miscellaneous
Cause
Special Information
1. Low grade or stale fuel
2. Water in fuel
Index
1C-10 - TROUBLESHOOTING
90-823226--1 996
Engine Will Not Crank Over/Starter Inoperative
Cause
Special Information
Remote control lever not in neutral position
Battery charge low; damaged wiring; loose electrical connections
Circuit breaker tripped
Blown fuse
Ignition switch
Slave solenoid
Faulty neutral start safety switch
Open circuit
Starter solenoid
Starter motor
Mechanical engine malfunction
Charging System Inoperative
Cause
Special Information
Loose or broken drive belt
Engine RPM too low on initial start
Rev engine to 1500 RPM
Loose or corroded electrical connections
Faulty battery gauge
Best way to test is to replace gauge
Battery will not accept charge
Low electrolyte or failed battery
Faulty alternator or regulator
Refer to Section 4C for complete
“Charging System” diagnosis procedures
Index
90-823226--1 996
TROUBLESHOOTING - 1C-11
Noisy Alternator
Cause
Special Information
Loose mounting bolts
Drive belt
Worn, frayed, loose
Loose drive pulley
Worn or dirty bearings
Faulty diode trio or stator
Instrumentation Malfunction
Cause
Special Information
Faulty wiring, loose or corroded terminals
Faulty key switch
Test, as outlined in Section 4D
Faulty gauge
Test, as outlined in Section 4D
Faulty sender
Test , As outlined in Section 4D
Radio Noise
Cause
Special Information
A “popping” noise that will increase with engine
RPM. Noise will stop as soon as engine is
turned off.
Ignition System - wrong spark plugs; cracked
distributor cap; cracked coil tower; leaking spark
plug wires; moisture on ignition components
“High pitched whine” in the radio
Alternator - poor brush contact on the slip rings
A “hissing or crackling” noise when instruments
are jarred with ignition on
Instrumentation - loose connections, or
antennae wire routed too close to instruments
Varying unexplained noises
Accessories - bilge pump, bilge blower; fish finder, depth locator; cabin heater motor, etc. Dis
connect one at a time until noise disappears.
Index
1C-12 - TROUBLESHOOTING
90-823226--1 996
Poor Fuel Efficiency
Cause
Special Information
Fuel leaks
Operator habits
Prolonged idling; slow acceleration; failure to cut
back on throttle once boat is on plane; boat over
loaded; uneven weight distribution
Engine laboring
Bent, damaged, or wrong propeller. Water test
boat for proper operating RPM at wide open
throttle
Clogged flame arrestor
Engine compartment sealed too tight
Not enough air for engine to run properly
Boat bottom
Dirty (marine growth), hook, rocker
Carburetor
Idle mixture settings, accelerator pump
adjustments,linkage binding, choke adjustment,
carburetor flooding over, main fuel jets
Improper fuel
Crankcase ventilation system not working
Engine needs tune-up
Engine running too cold or too hot
Plugged or restricted exhaust
Engine
Low compression
Index
90-823226--1 996
TROUBLESHOOTING - 1C-13
Carburetor Malfunction
Symptoms
Cause
A. Needle and seat
B. Float adjustment
C. Saturated float
Flooding
Fl
di
D. Gaskets leaking
E. Cracked fuel bowl
F. Fuel percolation
G. Automatic choke
A. Idle RPM too low
B. Idle mixture screws
C. Idle passages dirty
Rough
R
h idl
idle
D. Throttle valves not closing
E. Engine flooding
F. Vacuum leak
G. Throttle body heat passages plugged
A. Accelerator pump
B. Leaking gaskets
C. Automatic choke
D. Power piston or power valve
H i i or acceleration
Hesitation
l
i flflatness
E. Throttle valves
F. Throttle body heat passages plugged
G. Main metering jets
H. Float adjustment
I.
Secondary air valve wind-up
Index
1C-14 - TROUBLESHOOTING
90-823226--1 996
Carburetor Malfunction (continued)
Symptoms
Cause
A. Main metering jets
B. Leaking gaskets
C. Float adjustment
E i surges
Engine
D. Saturated float
E. Power piston or valve
F. Throttle valves
A. Power piston or valve
B. Float adjustment
L
d or lack
l k off power
Low
top speed
C. Main metering jets
D. Leaking gaskets
A. Idle RPM too low
B. Idle mixture screws
Poor
cold
P
ld engine
i operation
i
C. Throttle valves
D. Automatic choke
E. Engine flooding
A. Idle RPM too low
B. Idle mixture screws
C. Engine flooding
E i stalls
Engine
ll
D. Automatic choke
E. Dirt in carburetor
F. Accelerator pump
G. Leaking gaskets
Hard starting
Refer to “Engine Starts Hard”
Index
90-823226--1 996
TROUBLESHOOTING - 1C-15
Engine Runs Poorly At Idle
Cause
Special Information
Clogged flame arrestor
Improper idle fuel mixture adjustment
A. Problem in ignition system causing the
engine to run rough
B. Idle mixture screw adjusted incorrectly
Engine
E i floods
fl d at idle
idl
C. Bad needle and seat
D. Incorrect float level drop
E. If carburetor (2 bbl. only) has a solid needle,
replace with a spring loaded needle
Moisture on ignition components
Cap or spark plug wires arcing
Water in fuel
Low grade or stale fuel
Incorrect ignition timing
Automatic choke
Spark plugs
Fouled, burned, cracked porcelain
Spark plug wires
Insulation breakdown, wires broken
Defective coil
Cracked or dirty distributor cap
Incorrect float level
Dirty carburetor
Vacuum leak
Leak at manifold or carburetor base
Incorrect fuel pump pressure
Too low - can’t supply the carburetor
Too high - unseats the needle and seat
Low compression
Also check for blown head gasket
Loose or worn distributor
Timing changes
Water leaking into cylinders
Head gasket, exhaust manifold, cracked head or
valve seat
Loose or broken engine mounts
Index
1C-16 - TROUBLESHOOTING
90-823226--1 996
Engine Acceleration Is Poor
Cause
Special Instructions
Also refer to “Poor Boat Performance”
Idle mixture screws
Incorrect ignition timing
Incorrect distributor or amplifier advance curve
Refer to Section 4B
Accelerator pump
Check for stream of raw fuel from accelerator
pump discharge nozzle, when opening throttle
with engine shut off
Cracked or dirty distributor cap or rotor
Vacuum leak
Intake manifold or carburetor base
Spark plugs
Fouled, burned; wrong heat range; cracked
porcelain
Float adjustment
Dirty carburetor
Low compression
Index
90-823226--1 996
TROUBLESHOOTING - 1C-17
Engine Runs Poorly At High RPM
Cause
Special Information
Also refer to “Poor Boat Performance”
Crankcase overfilled with oil
Check oil level with boat at rest in the water.
Anti-siphon valve (if equipped)
Restricting fuel supply
Plugged fuel tank vent
Fuel supply
Refer to “Carburetor Malfunctions”
(See “Table of Contents”)
Ignition timing
Low grade of fuel or water in the fuel
Spark plugs
Fouled, burned, cracked porcelain, incorrect
heat range
Spark plug wires
Poor insulation, broken wires
Distributor cap or rotor
Dirty or cracked
Coil
Distributor
Excessive play in shaft
Engine overheating
Refer to “Engine Overheats”
Low compression
Worn valves, rings, cylinders, etc.
Restricted exhaust
Index
1C-18 - TROUBLESHOOTING
90-823226--1 996
Troubleshooting With Vacuum Gauge
Reading
Cause
Steady reading between 15-21 inches at idle
RPM
Normal
Extremely low reading, but steady at idle RPM
Vacuum leak; incorrect timing; underpowered
boat; faulty boat bottom
Fluctuates between high and low at idle RPM
Blown head gasket between two adjacent
cylinders
Fluctuates 4 or 5 inches very slowly at idle RPM
Carburetor needs adjustment; spark plug gap
too narrow;valves are sticking
Fluctuates rapidly at idle, steadies as RPM is
increased
Valve guides are worn
Continuously fluctuates between low and normal
reading at regular intervals at idle RPM
Burned or leaking valve
Index
90-823226--1 996
TROUBLESHOOTING - 1C-19
Engine Noise
Important Information
No definite rule or test will positively determine
source of engine noise; therefore, use the following
information only as a general guide to engine noise
diagnosis.
4. Try to isolate the noise to location in engine: front
to back, top to bottom. This can help determine
which components are at fault.
1. Use a timing light to determine if noise is timed
with engine speed or one-half engine speed.
Noises timed with engine speed are related to
crankshaft, rods, pistons, piston pins, and flywheel. Noises timed to one-half engine speed
are valve train related.
5. Sometimes noises can be caused by moving
parts coming in contact with other components.
Examples are: flywheel or coupler; exhaust flappers rattling against exhaust pipe; crankshaft
striking (pan, pan baffle, or dipstick tube); rocker
arm striking valve cover; and loose flywheel cover. In many cases if this is found to be the problem, a complete engine teardown is not necessary.
2. The use of a stethoscope can aid in locating a
noise source; however, because noise will travel
to other metal parts not involved in the problem,
caution must be exercised.
6. When noise is isolated to a certain area and component, removal and inspection will be required.
Refer to proper sections of service manual for information required for service.
3. If you believe noise is confined to one particular
cylinder, ground spark plug leads, one at a time.
If noise lessens noticeably or disappears, it is isolated to that particular cylinder.
7. If noise cannot be distinguished between engine
and drive unit, remove drive from boat. Run a water supply directly to engine. Run engine without
the drive to determine if noise is still there.
Valve Cover Area
Location
Possible Cause
A. Rocker arm striking valve cover
B. Rocker arm out of adjustment
Valve
V
l cover area,
i d to one-half
h lf engine
i
area timed
speed, noise could be confined to one cylinder
or may be found in any multitude of cylinders
C. Worn rocker arm
D. Bent push rod
E. Collapsed filter
Cylinder Area
Location
Possible Causes
A. Sticking valve
B. Carbon build-up
C. Connecting rod installed wrong
Cylinder
C
li d area, may b
be confined
fi d to one cylinder
li d
or found in more than one cylinder
cylinder, timed to
engine speed
D. Bent connecting rod
E. Piston
F. Piston rings
G. Piston pin
H. Cylinder worn
Index
1C-20 - TROUBLESHOOTING
90-823226--1 996
Camshaft Area
Location
Possible Causes
A. Crankshaft timing sprocket
B. Timing chain
i
titimed
lf
Camshaft
C
h fft area, ffrontt off engine,
i d tto one h
half
engine speed
C. Fuel Pump
D. Valve Lifter
E. Cam Bearings
A. Fuel Pump
C
h ft area, center
t off engine,
i
titimed
d tto one h
lf
Camshaft
half
engine speed
B. Valve Lifter
C. Cam bearing
Camshaft area, rear of engine, timed to one half
engine speed
A. Distributor gear
B. Valve lifter
C. Cam bearings
A. Loss of oil pressure
C
h ft area, th
h t engine,
i
titimed
d tto one
Camshaft
throughout
half engine speed
B. Valve lifters
C. Cam bearings
Crankshaft Area
Location
Possible Causes
A. Crankshaft timing sprocket
C k h f area,, ffront off engine,
Crankshaft
gi , timed
i d to
engine speed
B. Timing chain
C. Main bearing
D. Rod bearing
A. Crankshaft striking pan or pan baffle
Crankshaft area,
area center of engine,
engine timed to
engine speed
B. Main bearing
C. Rod bearing
A. Loose flywheel cover
B. Loose coupler
C k h f area,
i
i d to
Crankshaft
area rear off engine,
engine
timed
engine speed
C. Loose flywheel
D. Main bearing
E. Rod bearing
A. Loss of oil pressure
Crankshaft area,
area throughout engine,
engine timed to
engine speed
B. Main bearings
C. Rod bearings
Index
90-823226--1 996
TROUBLESHOOTING - 1C-21
Miscellaneous
Noise
Possible Cause
A. Advanced timing
B. Low octane fuel
E i spark
k kknock
k
Engine
C. Engine running hot
D. Carbon deposits in engine
A. Wrong ignition timing
B. Carburetor set too lean
C. Faulty accelerator pump
Popping
P
i through
h
h carburetor
b
D. Vacuum leak
E. Valve adjustment
F. Valve timing
G. Burned or stuck valve
A. Vacuum leak
B. Leaking exhaust (manifolds or pipes)
Hi i
Hissing
C. Loose cylinder heads
D. Blown head gasket
A. Vacuum leak
Whistle
B. Dry or tight bearing in an accessory
A. Leaking high tension lead
S k jjumping
Sparks
i
B. Cracked coil tower
C. Cracked distributor cap
A. Drive belt slipping
S
Squeaks
k or squeals
l
B. Dry or tight bearing in an accessory
C. Parts rubbing together
Rattling in exhaust pipe area
A Exhaust shutters
A.
Index
1C-22 - TROUBLESHOOTING
90-823226--1 996
Oil Pressure
Cause
Special Information
Measuring oil pressure
Use a good automotive oil pressure test gauge.
Do not rely on the oil pressure gauge in the boat.
Check engine oil level with boat at rest in the water
Oil level should be between the ADD and FULL
marks
Oil level in crankcase above FULL mark
May cause loss of engine RPM, oil pressure
gauge fluctuation, drop in oil pressure, and
hydraulic valve lifter noise at high RPM
Oil level in crankcase below ADD mark
Low oil pressure; oil pressure gauge fluctuation;
internal engine noise and/or damage
Change in oil pressure
This may be a normal condition. Oil pressure
may read high in the cooler times of the day, and
when engine is not up to operating temperature.
As the air temperature warms up and engine is
running at normal opening temperature, it is
normal for oil pressure to drop.
Low engine oil pressure at idle
With modern engines and engine oils, low oil
pressure readings at idle do not necessarily
mean there is a problem. If valve lifters do not
“clatter” (at idle), there is a sufficient volume of
oil to lubricate all internal moving parts properly.
The reason for the drop in oil pressure is that
engine heat causes an expansion of the internal
tolerances in the engine and, also, the oil will
thinout somewhat from heat.
Low engine oil pressure at idle after running at a
high RPM
Refer to No. 5 and 6, preceding
Boats with dual engines
It is not uncommon to see different oil pressure
readings between the two engines, as long as
both engines fall within specifications.
Differences in oil pressure can be attributed to
differences in engine tolerances, gauges, wiring,
senders, etc.
Boats with dual stations
Refer to No. 8. preceding
Index
90-823226--1 996
TROUBLESHOOTING - 1C-23
Low Oil Pressure
Cause
Special Information
Low oil level in crankcase
Defective oil pressure gauge and/or sender
Verify with an automotive test gauge. Refer to
Section 4D for instrument testing.
Thin or diluted oil
Oil broken down; contains water or gas; wrong
viscosity; engine running too hot or too cold;
excessive idling in cold water (condensation)
Oil pump
Relief valve stuck open; pickup tube restricted;
worn parts in oil pump; air leak on suction side of
oil pump or pickup oil tube
Oil leak can be internal or external
Oil passage plugs leaking, cracked or porous
cylinder block
Excessive bearing clearance
Cam bearings, main bearings, rod bearings
High Oil Pressure
Oil too thick
Wrong viscosity, oil full of sludge or tar
Defective oil pressure gauge and/or sender
Verify with an automotive test gauge
Clogged or restricted oil passage
Oil pump relief valve stuck closed
Index
1C-24 - TROUBLESHOOTING
90-823226--1 996
Excessive Oil Consumption
Cause
Special Information
Normal consumption.
One quart of oil consumed in 5-15 hours of
operation at wide-open-throttle (especially in a
new or rebuilt engine) is normal
Oil leaks
Clean bilge, run engine with clean white paper
on bilge floor, locate oil leak(s)
Oil too thin
Oil diluted or wrong viscosity
Oil level too high
Drain holes in cylinder head plugged
Oil will flood valve guides
Defective valve seals
Intake manifold gasket leaking
Worn valve stems or valve guides
Defective oil cooler (if so equipped)
Crack in cooler tubes
Defective piston rings
Glazed, scuffed, worn, stuck, improperly
installed; ring grooves worn; improper break-in;
wrong end gap
Defective cylinders
Out of round, scored, tapered, glazed; excessive
piston to cylinder clearance; cracked piston
Excessive bearing clearance
Index
90-823226--1 996
TROUBLESHOOTING - 1C-25
Water in Engine
Important Information
IMPORTANT: First determine location of water in
engine. This information can be of great help
when trying to determine where the water came
from and how it got into the engine. The three
most common problems are “water on top of pistons, water in crankcase oil, water in crankcase
oil and on top of pistons.”
The first step, after locating water, is to remove all the
water from the engine by removing all spark plugs
and pumping cylinders out by cranking engine over.
Next change oil and filter. Now, start engine and see
if problem can be duplicated. If problem can be duplicated, there more than likely is a mechanical problem. If the problem cannot be duplicated, the problem
is either an operator error or a problem that exists
only under certain environmental conditions.
If water is contained to cylinder(s) only, it is usually
entering through the intake system, exhaust system,
or head gasket.
If the water is contained to crankcase only, it is usually caused by a cracked or porous block, a flooded
bilge, or condensation.
If the water is located in both the cylinder(s) and the
crankcase, it is usually caused by water in the cylinders getting past the rings and valves, or complete
submersion.
Checking for rust in the intake manifold or exhaust
manifolds is a good idea. Rust in these areas will give
clues if the water entered these areas.
Water In Crankcase
Cause
Special Information
Water in boat bilge
Boat has been submerged or bilge water was
high enough to run in through dipstick tube
Water seeping past piston rings or valves
Refer to “Water in Engine” (“On Top of Pistons”)
Engine running cold
Defective thermostat, missing thermostat;
prolonged idling in cold water
Intake manifold leaking near a water passage
Cracked or porous casting
Check cylinder head, cylinder block, and intake
manifold
Index
1C-26 - TROUBLESHOOTING
90-823226--1 996
Water On Top Pistons
Cause
Special Information
Operator shut engine off at high RPM
Engine “diesels” or tries to run backwards
Engine out of tune, poor fuel, high idle RPM,
timing set too high
Rain water running into flame arrestor
Hatch cover
Spark plug misfiring
Improper combustion causes moisture in the air
to accumulate in the cylinder
Backwash through the exhaust system
Improper engine or exhaust hose installation
Cracked exhaust manifold
Improper manifold to elbow gasket installation
Loose cylinder head bolts
Blown cylinder head gasket
Check for warped cylinder head or cylinder block
Cracked valve seat
Porous or cracked casting
Check cylinder heads, cylinder block, and intake
manifold
Index
90-823226--1 996
TROUBLESHOOTING - 1C-27
Engine Overheats (Mechanical)
Cause
Special Information
Engine RPM below specifications at wideopen-throttle (engine laboring)
Damaged or wrong propeller; growth on boat
bottom;false bottom full of water
Wrong ignition timing
Timing too far advanced or retarded
Sticking distributor advance weights
Spark plug wires crossed (wrong firing order)
Lean fuel mixture
Refer to “Carburetor Malfunctions” in this section
Wrong heat range spark plugs
Exhaust restriction
Valve timing off
Jumped timing chain, or improperly installed
A blown head gasket(s) normally cannot be
detected by a compression check. Normally the
engine will run at normal temperature at low
RPM, but will overheat at speeds above 3000
RPM.
Blown head gasket(s)
Insufficient lubrication to moving parts of engine
Engines that are seawater cooled: Using a
clear plastic hose, look for air bubbles between
seawater pump and engine. If there are no
bubbles present, install clear plastic hose
between thermostat housing and manifold(s).If
air bubbles are present at a higher RPM, it is a
good indication there is a blown head gasket.
Defective oil pump, plugged oil passage, low oil
level
Index
1C-28 - TROUBLESHOOTING
90-823226--1 996
Engine Overheats (Cooling System)
Cause
IMPORTANT: The first step is to verify if the engine
is actually overheating or the temperature gauge or
sender is faulty
Special Information
IMPORTANT: Best way to test gauge or sender is
to replace them.
Loose or broken drive belt
Seawater shutoff valve partially or fully closed
(if equipped)
Clogged or improperly installed sea strainer
Loose hose connections between seawater
pickup and seawater pump inlet (models with
belt driven seawater pump only)
Pump will suck air. Pump may fail to prime or will
force air bubbles into cooling system.
Seawater inlet hose kinked or collapsed
Seawater pickup clogged
Obstruction on boat bottom causing water
turbulence
Obstruction will be in front of seawater pickup,
causing air bubbles to be forced into cooling
system
Defective thermostat
Exhaust elbow water outlet holes plugged
Insufficient seawater pump operation
Worn pump impeller
Obstruction in cooling system such as casting
flash, sand, rust, salt, etc.
Refer to water flow diagram for engine type
being serviced
Engine circulating pump defective
Also refer to “Engine Overheats (Mechanical)”
IMPORTANT: In addition to previous checks,
make the following checks if engine is equipped
with closed cooling.
Low coolant level
Antifreeze not mixed properly
Antifreeze should be mixed 50/50 or maximum
60/40 (60% antifreeze, 40% water)
Heat exchanger cores plugged
Water hoses reversed at the water distribution
block
Refer to water flow diagram in Section 6
Index
90-823226--1 996
TROUBLESHOOTING - 1C-29
Insufficient Water Flow From Belt Driven Seawater Pump
Cause
Drive belt
Special Information
Loose, worn or broken
Seawater shutoff valve partially or fully closed
Clogged or improperly installed sea strainer
Loose hose connections between seawater pickup
and seawater pump inlet
Pump will suck air, pump may fail to prime or will
force air bubbles into cooling system
Seawater inlet hose kinked or plugged
Seawater pickup plugged
Obstruction on boat bottom causing water turbulence.
Obstruction will be in front of seawater pickup,
causing air bubbles to be forced into cooling
system
Faulty seawater pump
Index
1C-30 - TROUBLESHOOTING
90-823226--1 996
Power Steering
Poor, Erratic, or No Assist
Cause
Drive belt
Special Information
Worn, broken or out of adjustment
Low fluid level
Air in system
Air leak in lines, pump, or air from installation.
Refer to Section 9A for bleeding procedure.
Leaking hoses
Refer to Section 10A for bleeding procedure.
Steering cables and/or steering helm
Cable or helm partially frozen from rust or
corrosion; cable over-lubricated; improper cable
installation.
Binding in stern drive unit
Refer to appropriate Stern Drive Service Manual
Restriction in hydraulic hoses
Causes a loss of pressure
Control valve not positioned properly, not
balanced properly, or the mounting nut is loose
Mounting bracket adjusting screw loose or
mounting tube is loose
Faulty pump
Flow control valve may be sticking
Worn piston ring or scored housing bore in cylinder.
Causes loss of pressure
Leaking valve body or loose fitting spool
Index
90-823226--1 996
TROUBLESHOOTING - 1C-31
Noisy Pump
Cause
Drive belt
Special Information
Check belt tension
Low fluid level
Air in fluid
Air leak in lines, pump, or air form installation
Faulty pump
Use stethoscope to listen for noise in pump
Restricted fluid passages
Kinks or debris in hoses or debris in passages
Stop nut adjusted improperly
Refer to appropriate Stern Drive Service Manual
Steering cables installed that do not meet BIA
standards
Refer to appropriate Stern Drive Service Manual
Fluid Leaks
Cause
Loose hose connections
Special Information
Refer to Section 10A for bleeding instructions
Damaged hose
Oil leaking from top of pump
System overfilled; fluid contains water; fluid
contains air
Cylinder piston rod seal
Faulty seals in valve
Faulty seals in o-rings in pump
Cracked or porous metal parts
Index
1C-32 - TROUBLESHOOTING
90-823226--1 996