1
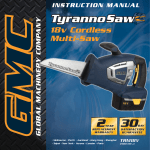
The choice of professionals Diamatic 335MC Operating manual Operating manual Version 1.0 Diamatic Utrechthaven 12 NL - 3433 PN NIEUWEGEIN Tel: 0031 (0)30 223 8630 Fax: 0031 (0)30 223 8981 [email protected] The Netherlands www.diamatic.eu [email protected] The choice of professionals EC DECLARATION OF CONFORMITY in accordance with Appendix II sub A of Directive 2006/42/EC Diamatic Utrechthaven 12 NL - 3433 PN NIEUWEGEIN Tel: 0031 (0)30 223 8630 Fax: 0031 (0)30 223 8981 [email protected] The Netherlands Declare under our sole responsibility that the machine as described below Conforms with the Health and Safety requirements of the European Directive of the machine Safety. In case of changes to the machine without our written authorization this declaration loses its validity. Model: Diamatic 335MC Serial number: XXXXB 1. satisfies the conditions set out in the Machine Directive (Directive 2006/42/EC); Low voltage directive (2006/95/EC, as last amended; EMC directive 2004/108/EC, as last amended) 2. satisfies the following harmonized standards: NEN-EN 349, NEN-EN 418, NEN-EN 294 and NEN-EN 60204 Nieuwegein 23-01-2009 www.diamatic.eu 2/12 [email protected] The choice of professionals Table of contents EC Declaration of Conformity 02 1. Introduction 04 2. Machine Description Application 04 3. Safety Safety precautions Safety regulations Safety instructions 06 4. Initial operation Checkpoints of electrical safety Checkpoints of machine safety Mounting the diamond blades Removing the diamond blades 08 5. Operating Before starting up Starting up the machine Switch off the machine 10 6. Maintenance Rebuild to scarifier 11 7. Technical data 12 www.diamatic.eu 3/12 [email protected] The choice of professionals 1. Introduction It is important that all persons who are working with or maintaining this machine must read the manual carefully and understand it fully. Keep this manual near to the machine to enable it be referred to at any time. Only authorized and trained personnel may operate this machine. 2. Machine description The Diamatic multisaw machine Diamatic 335MC is an electrical driven machine where you can mount a different quantity of saw blades underneath. By changing the pulleys and the belt, the machine can be used as a scarifier. The machine is sealed around which makes it to use almost dust free when connected to an appropriate Diamatic dust collector. Due to the fine adjustment and the possibility to lock the height adjustment, depth of cut can be set very precisely, and the same saw depth can be maintained. Application The multisaw machine is extremely suitable for removing hard top layers from soft floors or to remove the top layer from “floating” floors and/or “computer” floors. Sawing is a very fast process to remove several millimeters from a concrete floor so that it then can be polished up to the stones without using an extra scarifier. If the multisaw machine is converted to scarifier, it can be used, with the appropriate cutters, for the following applications; To roughen concrete To clean most horizontal surfaces To remove coatings To corrugate concrete surfaces To remove road markings To make non-slip surfaces The force of impact of a cutter is controlled by the depth adjustment. With the right depth adjustment, the best performance is obtained to give a desired result. With a suitable Diamatic dust collector work can be carried out without causing dust in the work area, this raises the life span of the machine and helps the health of the personnel. www.diamatic.eu 4/12 [email protected] The choice of professionals 1 2 3 4 5 6 7 8 9 10 11 12 13 14 15 Machine handle Fine adjustment saw depth Lifting eye Deadman switch Locking height adjustment Driving lever Electrical panel Hydraulic pump housing Quick lift lever Dust hose connection Treadle of drive system Motor drive system Motor sawing drum Side plate Housing www.diamatic.eu 5/12 [email protected] The choice of professionals 3. Safety Before operating the machine, the operating personnel must be familiar with the safety instructions given in this manual. Keep this manual near to the machine, so that it can always be consulted. Safety precautions The surface to be treated must be swept clean to remove stones, screws etc. Never use the machine when the surface is not clear and if there is a risk of tripping. Make sure there is not any water on the surface to be treated. Don’t get disturbed during the activities. Remove any trailing electrical cables and or dust hoses from the surface to be treated. Always switch on the dust collector. Safety regulations Persons who are not operating the machine must not be permitted to stay in the surrounding area of the machine. Don’t change anything on the machine. Always use cables which are approved and safety earthed, including extension cables. The machine is always equipped with an earthed connection, do not change this and always use earthed cables with an earthed plug. Connect the main power supply cable to an installation with an earth leakage circuit breaker. Inspect and test the electrical components regularly. The electrical components have to satisfy to the requirements which apply to these components. Always call a skilled electrician or your distributor when you have questions about the safety of the electrical components. Work on electrical equipment or operating materials may only be undertaken by a skilled electrician or by trained persons under the guidance and supervision of a skilled electrician as well as in accordance with the electrical engineering regulations. Pull out the main plug during inspections and repairing on the machine. Never operate the machine when the surface is wet. Never use the machine in the rain. It is possible to transport the machine without electrical power by pushing up the treadle (pos. 1, page 5). This operation de-clutches the drive wheels from the drive motors, in this freewheeling state make sure that the machine is only pushed on a level surface. It is very dangerous to push the machine on a grade or ramp when the treadle is in upwards position! NEVER use the Diamatic 335MC as a scarifier! The machine must be converted firstly into a Diamatic 335EHY. This is possible by changing the belt and the pulleys. (See chapter 6) www.diamatic.eu 6/12 [email protected] The choice of professionals The following sticker is placed on the machine. Meanings of these symbols are: Ear protection is obliged Safety glasses with lateral protection are obliged CE-mark on this machine Safety shoes obliged Consult the manual before operating the machine Personnel must tie back long hair and not wear loose clothing or jewellery including rings. Wear gloves and dust mask when operating the machine. Safety instructions Pull out the main plug when changing the diamond blades or during repairing operations to the machine. Make sure the machine is clean and that the handgrips are dry and free of grease and oil. The dustbin of the dust collector must be emptied regularly. Pay attention to the environment regulations. The weight of the Diamatic 335MC is 405 kilogram without diamond blades. Use preferably appropriate appliances as a lift or crane. Use the existing lifting points to lift the machine. www.diamatic.eu 7/12 [email protected] The choice of professionals 4. Initial operation Before using the machine it is of great importance to inspect the machine. It is not permitted to use the machine if the machine safety is not according the checkpoints below. Checkpoints of electrical safety Use only extension cables for extending the main cable that are sized and marked in accordance with the overall power consumption of the machine. Electrical cables must be rolled entirely off of the reels. Any damage to electric cables is not permitted Use an electrical power supply connection with an earth connection. Checkpoints of machine safety Check if: The safety functions and operating functions work correct. The diamond blades are in good condition The motor turns the right direction and if the turn direction of the diamond blades is the same as the motor direction. There is not any damage to the hydraulic and electrical components on the machine. There are not any loose nuts or bolts. There is not any damage to the dust hose and if it is connected correctly. Turn direction of the Diamatic 335MC Turn direction of the diamond blades www.diamatic.eu 8/12 [email protected] The choice of professionals Mounting the diamond blades Pull out the main plug of the machine Always wear gloves during mounting or dismounting the blades. Slide the hexagon clamp bush with the stud bolts (1) over the hexagon axle until it is about 3mm from the end of the axle. Tighten both bolts (2) very tight, It is advisable to use a locking solution such as Loctite 243 on these bolts. Assemble the spacer rings (3) and diamond blades (4) one by one over the axle until the end of the drum. There has to be at least one spacer ring between the diamond blades. Clamp all diamond blades and spacer rings together by turning 2 lock nuts (5) at the end of the tap ends (6). Make sure that there are at least 2 spacer rings at the end of the drum. Mount the side plate. A side plate which is incorrectly mounted or mounted with force will shorten the lifetime of the drum bearings. Never use the machine without a side plate or with an incorrect mounted side plate! Removing the diamond blades Pull out the main plug of the machine Loosen the bolts of the side plate and remove the side plate (7) Loosen the lock nuts (5) and remove the spacer rings and diamond blades. Turn both bolts (2) loose and remove the hexagon clamp bush (1). www.diamatic.eu 9/12 [email protected] The choice of professionals 5. Operating During operating the Diamatic 335MC, the following additional safety instructions must be followed closely. Before starting up Make sure that the diamond blades do not hit the ground. The quick lift lever must be in upper position and the fine adjustment must be turned up. Connect the Diamatic 335MC to the dust collector with the dust hose. Make sure there is a good and airtight connection. Check if the diamond blades are mounted the right way. Connect the Diamatic 335MC and the dust collector with the power supply. Make sure the right electrical connection is available for the machine. Check if both motors turn in the right direction. Starting up the machine Turn on the dust collector Put the cord of the dead man switch around the left wrist. Check if the treadle (pos. 11 page 5) of the drive system is down, and the driving lever (pos. 6 page 5) is in the neutral stand. Start the machine by pushing first the green button of the drive motor and then the green button of the sawing motor. Slowly let down the quick lift lever slowly. Turn the fine adjustment clockwise till the desired scarifying depth is reached. Lock the fine adjustment so the depth cannot change during sawing. Set the drive speed with the driving lever (pos. 6 page 5) Switch off the machine Pull the quick lift lever up and turn the fine adjustment till the drum does not hit the ground anymore. Push both red buttons on the electrical box. Wait till all turning parts have reached a standstill Switch off the dust collector. Disconnect the power supply. Pay attention that all twisting and turning machine parts have reached a standstill before inspection or maintenance duties are carried out. www.diamatic.eu 10/12 [email protected] The choice of professionals 6. Maintenance Prevent premature wear by keeping the machine as dust free as possible. Clean the machine for this reason regularly with a vacuum cleaner. Clean the machine every day with air and non-aggressive materials. Never use a high pressure water cleaner to clean the machine. Store the cleaned and dry machine in a dry and humid free room. Protect the electrical motor from moisture, heat, dust and mechanical shocks. All repair work must to be done by qualified Diamatic personnel, this to guarantee a safe and reliable machine. Any guarantee on the machine is null and void when: Non original Diamatic parts and cutters have been used Repair work is not done by qualified Diamatic personnel Changes, or add on parts, or conversions are undertaken without written permission of Diamatic Rebuild to scarifier The Diamatic 335MC can be rebuilt into a scarifier by changing the drive belt and both pulleys. Part numbers for this will be in the service manual. • Remove the belt guard (1) and lower the tension on the belt (2) by loosening the eyebolt (2) then remove the drive belt. • Loosen both taper lock bushes (4) en remove the taper locks and pulleys (5) • Make sure the distance bush (6) stays on the motor axle and both keys are still on the axles. • Slide the pulley (8) over the motor axle and mount the pulley with mounting bush (9) and the hexagon socket countersunk screw (10) • Slide the pulley (11) over the drum axle and turn on the axle nut (12) make sure that the right tools will be used for this so the nut will not be damaged. • Mount the new belt (13) and tension the belt by turning the eyebolt (2) up. The tension of the belt must be between 70 and 75Hz. • Assemble the belt guard back on to the machine. • Make sure that both rubber seals (14) and the metal strips on both sides of the machine are removed before start working with the scarifier. Work in opposite direction to build the machine back to sawing machine. www.diamatic.eu 11/12 [email protected] The choice of professionals 7. Technical data Diamatic 335MC 3x400V 12.1 kW Diamatic 335MC 3x480V 13,9 kW 3x 400V 3x 480V 50Hz 60Hz 5 pole / 32 Ampere 5 pole / 32 Ampere 24 Ampère 23 Ampère 335 mm 335 mm 3000 min-1 3600 min-1 1000 min-1 1000 min-1 1400 mm 1400 mm Width 605 mm 605 mm Height 1075 mm 1075 mm Weight 405 kg (excl. drum) 405 kg (excl. drum) Up to 95dB(A) up to 95dB(A) Ø75 mm Ø75 mm Power consumption Electrical consumption Frequency Ampèrage connection Ampèrage consumption Working width Rotation speed sawing drum Rotation speed scarifier drum Length Noise level Dust hose connection Design and specifications are subject to change without notice by Diamatic www.diamatic.eu 12/12 [email protected]