1
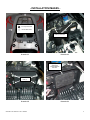
13. Place Power Connector box on top of exhaust pipe.
14. Remove only the upper most warning sticker on electrical box cover. (see illustration #8) Clean area with a nonresidual cleaner.
15. Install supplied stainless steel cradle onto outside of electrical box cover. (see illustration #8 & 9) Secure using
supplied hardware. NOTE: Install bolts (2) from inside and nuts on outside of electrical box cover. Do not over
tighten.
16. Cut a slot in the electrical box cover using a cut-off wheel or small saw. (see illustration #9) NOTE: Sand edges so
they are smooth.
17. At lower, right side of electrical box loosen zip securing wiring harness to electrical box. (see illustration #10)
18. At lower, right side of electrical box locate black electrical connector with the black and white wires. (see illustration
#10) Disconnect and install supplied cable splicer in between. (see illustration #11)
19. While holding Power Connector above exhaust pipe carefully slide electrical box cover into place so that wiring
harness fits into cut out on electrical box cover. (see illustration #12)
20. Ensure all electrical wires are in place behind cover. Finish installing cover into place and lock tabs securing cover.
21. On back of Power Connector remove adhesive backing on Dual Lock. Carefully place Power Connector into cradle
on electrical box cover. Use Power Connector to attach Dual Lock to electrical box cover. (see illustration #13)
22. At lower, right side of electrical box tighten zip tie securing wiring harness to electrical box. (see illustration #10)
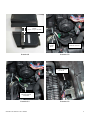
23. Inside front storage compartment remove rivets (5) securing service lid in place. NOTE: Press pin at center inward.
24. Remove service lid and locate remote control sensor. (see illustration #14)
25. Disconnect electrical connector and install supplied block-off into wiring harness connector. (see illustration #15)
NOTE: Make sure block-off ‘snaps’ into place.
26. Secure to wiring harness using supplied zip tie. (see illustration #15)
27. Replace service lid and secure using stock rivets.
28. Replace rear grab handle/seat support. Four bolts at center and three under grab handle.
29. Reconnect battery cables. NOTE: Positive (red) first. Negative (black) second.
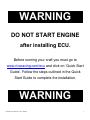
30. WARNING: Do not start engine. Before running your craft you must go to www.rivaracing.com/ecu and click on
Quick Start Guide. Follow the steps outlined in the Quick Start Guide to complete the installation.
To register your ECU, download additional maps, software updates, and more please visit the RIVA/Vi-PECECU
Manager web site at www.rivaracing.com/ecu.
Remember, the water belongs to everyone.
Please ride responsibly and respect the environment!
Technical Support
For answers to questions regarding installation or trouble shooting RIVA Performance Products contact:
RIVA Technical Support directly at (954) 247-0705 or by e-mail at [email protected].
Limited Warranty
RIVA/ViPEC ECU’s carry a 2-year limited warranty to the original purchaser. They are warranted to be free of defects in materials and workmanship under normal use and
service. Customer modified components will be void of warranty. This warranty is limited to defects in the primary components only. Finish and/or wear marks in or on
primary components are not covered under this warranty.
RIVA Racing’s liability is expressly limited to the repair or replacement of the components contained within or associated with this kit. RIVA Racing agrees to repair or at
RIVA’s option, replace any defective unit without charge, if product is returned to RIVA Racing freight prepaid within the warranty period. Any equipment returned which, in
RIVA’s opinion, has been subjected to misuse, abuse, overheating or accident shall not be covered by this warranty.
RIVA Racing shall have no liability for special, incidental or consequential damages or injury to persons or property from any cause arising from the sale, installation or use
of this product.
No other warranty, express or implied, including, but not limited to the implied warranties of merchantability and fitness for a particular purpose, applies. Various states do
not allow for the limitation of incidental or consequential damages and therefore the above exclusion or limitation may not apply to you.
Warranty does not include the expenses related to freight or transportation of parts or compensation for any inconvenience or loss of use while being repaired. A copy of
the original invoice and a Return Authorization Number (RA#) must accompany all warranty claims.
Warranted replacement parts will be returned freight collect.
Word doc. RY11840-01-C © H1 12/2/09
2