1
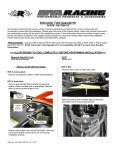
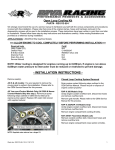
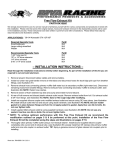
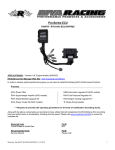
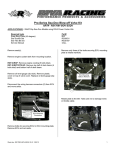
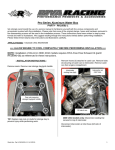
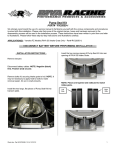
‘GEN-3’ Power Cooler PART# - RS1752-PC-I We strongly recommend the use of a service manual to familiarize yourself with the various components and procedures involved with this installation. Please note that some of the original clamps, hoses and hardware removed in the disassembly process will be used in the installation process. These instructions have been written in step-by-step format and refer to illustrations. We suggest reading through the instructions entirely before performing installation. Please follow these step-by-step instructions and illustrations carefully. APPLICATION(S): Sea-Doo models utilizing RIVA ‘GEN-2’ Power Cooler Kit and 2008~10 models utilizing OEM intercooler. ALLOW ENGINE TO COOL COMPLETELY BEFORE PERFORMING INSTALLATION Required Specialty Tools OEM Service Manual - INSTALLATION INSTRUCTIONS - Part# Please Call Remove bolts (2) and reusable clips (2) securing decorative cover to top of grab handle. RXT-X moving deck: Remove rear boarding platform. Remove rear storage buckets. RXT-X fixed deck: Remove rear access panels (2). RXP-X 260: Remove side covers (2 bolts each side). Word doc. Part # RS1752-PPC-I © H1 12/11/12 1 RXP-X 260 (continued): Remove bolts (1 at rear) and reusable clips (4 at front) securing decorative cover to outside of grab handle. Remove and save clamps: 1- Exhaust connection between water box (muffler) and exhaust outlet. 2- Supercharger to intercooler hose (discard). 3- Intercooler to throttle body hose (discard). 1 2 3 All models: Disconnect intercooler air inlet and outlet hoses from intercooler. Remove coolant overflow reservoir. Remove grab handle (6 bolts). Disconnect straps (2) securing intercooler to hull. 2013 & Newer Models: Disconnect Intercooler Vent Hose. Word doc. Part # RS1752-PPC-I © H1 12/11/12 2 Disconnect water inlet and outlet hoses from intercooler. NOTE: Mark each hose before disconnecting. Secure bilge siphon hoses (2) to Power Cooler using supplied zip tie. Connect intercooler air inlet and outlet hoses to Power Cooler. NOTE: Do not over tighten clamps. WATER OUT WATER IN 2012 & Newer Craft: Install supplied ‘T’ fitting into Power Cooler flush hose and secure with supplied 21.0 Oetikers. Connect stock 1/4” vent hose and secure with stock clamp. NOTE: Do not over tighten clamp. Flush Hose Remove intercooler. For RXT-X S3 hull models intercooler can be removed through openings at rear of craft by carefully rotating as you guide it out either side. Place supplied ‘GEN-3’ Power Cooler in hull. For RXT-X S3 hull models intercooler can be installed through openings at rear of craft by carefully rotating as you guide it in either side. Secure water inlet and outlet hoses to ‘GEN-3’ Power Cooler. WATER OUT WATER IN Ensure stock rubber pad is in place under Power Cooler. Secure Power Cooler in place using stock straps (2). Vent Hose 2008~2010 craft equipped with OEM intercooler: Follow intercooler ‘vent hose’ down to thru-hull fitting. Remove and install supplied block-off onto thru-hull fitting. Secure with stock clamp. NOTE: Do not over tighten clamp. Craft equipped with RIVA ‘GEN-2’ Power Cooler: Follow intercooler ‘vent hose’ down to ‘T’ fitting in exhaust cooling line. Replace ‘T’ fitting with supplied brass 3/8” barbed hose splicer. NOTE: Do not over tighten clamps. Vent Hose RXT-X moving deck: Replace rear storage buckets and rear boarding platform. RXT-X fixed deck: Replace rear access panels (2). RXP-X 260: Replace rear grab handle. Check bilge for tools, rags, etc. Run craft on a flush kit to check for proper operation. Word doc. Part # RS1752-PPC-I © H1 12/11/12 3 FLUSHING INSTRUCTIONS: RIVA Power Cooler must be flushed independently of motor using supplied flush kit fitting. This can be done before or after flushing motor using stock Sea•Doo flush point. Engine must be running when flushing RIVA Power Cooler. Do not over-rev engine when flushing or blowing out motor afterwards. IMPORTANT MAINTENANCE TIP: To assure optimal performance extra care must be used with flushing the cooling system after riding. After flushing craft using stock Sea-Doo flush kit you must flush the RIVA Power Cooler using the supplied flush kit. When doing so we strongly recommend the use of a salt /deposit remover such as Salt-Away® which can be purchased through RIVA Racing’s parts department. When flushing with a salt/deposit remover do not flush with fresh water afterwards. Allow salt/deposit remover to remain in cooling system. This will prevent build up of salt and/or mineral deposits from water left in cooling system that could clog intercooler core. Your Power Cooler is equipped with a sacrificial anode. This should be inspected at the beginning and end of each riding season. Replace as needed by contacting RIVA Racing’s parts department. NOTE: Apply pipe thread sealant when replacing. Do not over tighten. Remember, the water belongs to everyone. Please ride responsibly and respect the environment! Technical Support For answers to questions regarding installation or trouble shooting RIVA Performance Products contact: RIVA Technical Support directly at (954) 247-0705 or by e-mail at [email protected]. Limited Warranty RIVA ‘GEN-3’ Power Coolers carry a 90-day limited warranty to the original purchaser. They are warranted to be free of defects in materials and workmanship under normal use and service. Customer modified components will be void of warranty. This warranty is limited to defects in the primary components only. Finish and/or wear marks in or on primary components are not covered under this warranty. RIVA Racing’s liability is expressly limited to the repair or replacement of the components contained within or associated with this kit. RIVA Racing agrees to repair or at RIVA’s option, replace any defective unit without charge, if product is returned to RIVA Racing freight prepaid within the warranty period. Any equipment returned which, in RIVA’s opinion, has been subjected to misuse, abuse, overheating or accident shall not be covered by this warranty. RIVA Racing shall have no liability for special, incidental or consequential damages or injury to persons or property from any cause arising from the sale, installation or use of this product. No other warranty, express or implied, including, but not limited to the implied warranties of merchantability and fitness for a particular purpose, applies. Various states do not allow for the limitation of incidental or consequential damages and therefore the above exclusion or limitation may not apply to you. Warranty does not include the expenses related to freight or transportation of parts or compensation for any inconvenience or loss of use while being repaired. A copy of the original invoice and a Return Authorization Number (RA#) must accompany all warranty claims. Warranted replacement parts will be returned freight collect. Word doc. Part # RS1752-PPC-I © H1 12/11/12 4