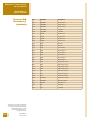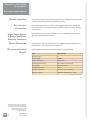
1
MAV500™ C3 and Xtreme® Service Manual Extended I/O Driver II Board Table of. Contents Physical Description......................................296 Functional Description.................................296 I/O Signals for Extended I/O Driver Board and Main Board.......297 Technical Description...................................299 Interface................................................................................................... 299 Connector PIN Description: J1...........................................................................301 Connector PIN Description: J2...........................................................................303 Connector PIN Description: J3...........................................................................305 Address Decoding.................................................................................. 308 I/O Address Map.....................................................................................................308 Interrupt Request................................................................................... 310 Mikohn Interface..................................................................................... 310 Button Switches...................................................................................... 310 Lamp Drivers........................................................................................... 311 Button Lamps/LEDs...............................................................................................311 Bill Acceptor Lamps...............................................................................................311 Animation and Light Tower Lamps.....................................................................311 Communication...................................................................................... 312 DIP Switch Banks................................................................................... 312 Hard Meters............................................................................................ 312 Door Switch Monitoring...................................................................... 313 Door Security Signal Labels.................................................................................313 Expansion I/O.......................................................................................... 313 Opto Isolation......................................................................................... 313 Power - Isolated Supplies..................................................................... 314 Battery Switchover.................................................................................................314 Reset Circuitry....................................................................................... 314 Firmware.................................................................................................. 314 This document contains confidential information that is proprietary to ATI. It may not be copied or disclosed to unauthorized parties. © 2006 Aristocrat Technologies, Inc. All rights reserved. 295 28-01186-01 10 Nov 2006 MAV500™ C3 and Xtreme® Service Manual Extended I/O Driver II Board Physical Description The Extended I/O Driver II Board (I/O driver board) is located inside the logic cage and connects directly to the backplane board via two 64-way DIN connectors and one 96-way DIN connector. Two extractors are positioned on the front edge of the I/O driver board to assist removal of the boards from the edge connectors.Soft tilts are tilt/error conditions that allow game play to continue. There are two types of soft tilts: those which must be resolved by an attendant, and those that reset themselves when the cause of the tilt is no longer present and a predetermined period of time has elapsed. Driver Board Location Functional Description The I/O driver board is a subassembly of a system. Some I/O to peripherals is achieved through the main board and some through this I/O board. The I/O driver board assists in the writing of data to various outputs, such as hard meters and light tower lamps. The board also reads data from inputs, such as the button switches. The following section indicates the allocation of I/O between the I/O driver board and the main board. The board supports the electronic gaming machine (EGM) platform detailed in this manual. This document contains confidential information that is proprietary to ATI. It may not be copied or disclosed to unauthorized parties. © 2006 Aristocrat Technologies, Inc. All rights reserved. 296 28-01186-01 10 Nov 2006 MAV500™ C3 and Xtreme® Service Manual Extended I/O Driver II Board I/O.Signals.for.. Extended.I/O. Driver.Board.and. Main.Board Description I/O Qty Name Type Location Hard Meters O 6 HM1-6 OC24 I/O Driver Button switches I 14 PBS1-14 24>TTL I/O Driver Button lamps O 14 PBL1-14 OC24 I/O Driver Optical Door Switch I O 1 1 DOPTIN DOPTOUT TTL TTL I/O Driver Main Battery Backed Logic Door Switch I O 1 1 BBLI BBLO TTL I/O Driver Animation Lamps O 3 AL1.3 OC24 I/O Driver Logic Door Security O I 1 1 LDSECO LDSECIN TTL I/O Driver Light Tower Lamps O 4 LTL1-4 OC24 I/O Driver Hopper I 2 TTL I/O Driver O 3 HOPHIGH HOPCOIN HOPTEST HOPON HOPDIR OC24 Main O O 2 2 MIKPULS MIKTX MIKTX_EN MIKRX OPTO RS422 TTL RS422 I/O Driver Mikohn This document contains confidential information that is proprietary to ATI. It may not be copied or disclosed to unauthorized parties. © 2006 Aristocrat Technologies, Inc. All rights reserved. 28-01186-01 10 Nov 2006 I 1 Expansion Serial O I 2 2 Driver Spare TTL I/O Driver Expansion Parallel I/O 4 SpareIO TTL I/O Driver Mechanical Door Switch I 1 MECHSW TTL Main Cashbox Door Switch I 1 CBOXSW TTL Main SEC Door Switch I 1 SECSW TTL Main Jackpot key switch I 1 JPSW TTL Main Audit key switch I 1 AUSW TTL Main CC-62 I 3 TTL Main O 1 CCSEN CCERROR CC_CRED CCINH Jackpot Bell O 1 JPBELL OC24 Main Solenoid Diverter O 1 SOLDIV OC24 Main Solenoid Optic I 1 SOLOPT TTL Main MAV500™ C3 and Xtreme® Service Manual Extended I/O Driver II Board I/O Signals for. Extended I/O Driver Board and Main Board (continued) This document contains confidential information that is proprietary to ATI. It may not be copied or disclosed to unauthorized parties. © 2006 Aristocrat Technologies, Inc. All rights reserved. 298 28-01186-01 10 Nov 2006 Description I/O Qty Name Type Location DUART Port 6 O I 3 3 TxD, DTR, RTS RxD, DCR, CTS TTL TTL Expanded I/O 3 3 +2 TxD, DTR, RTS RxD, DCR, CTS TTL TTL Expanded I/O BACCLIT[1..8] TTL Expanded I/O DUART Port 7 DUART Parallel O DIP SWITCH 1 I 8 DIPSW1 OC24 Expanded I/O DIP SWITCH 2 I 8 DIPSW2 TTL Expanded I/O Battery Backed Door Security I/O 6 DDOR_NC,GDOR_ NC SEC_NC DDOR_NO, GDOR_NO SEC_NO TTL/ Battery Expanded I/O MAV500™ C3 and Xtreme® Service Manual Extended I/O Driver II Board TECHNICAl. DESCRIPTION The I/O driver board requires signals in addition to those listed in Figure 1. These signals are mainly control signals, various power supply lines, and the address and data buses provided by the main board that connect to the I/O driver board via the backplane board. A functional diagram is shown below. Functional Diagram Interface All signals to the I/O driver board, including power and ground, connect via two 64-way DIN connectors (J1 and J2) and a 96-way DIN connector (J3). Figure 3 shows the approximate positioning in the logic cage of the main board (with headers P20, P22 and P21) relative to the I/O driver board (with headers J3, J1, and J2). Connector J1 includes most of the main I/O lines, such as button LEDs/lamps and switches, light tower lamp outputs, animation lamp outputs, hard meter outputs and all spare I/O lines, whether for driver outputs, simple TTL I/O, or serial communication lines. The connector also includes power for button LEDs. All control, address, and data lines enter the printed circuit board assembly (PCBA) from Connector J2. This connector has all the power and ground pins for 24V DC and VCC. The Mikohn interface, address and data lines from the main board and door security lines are on this connector. Isolated 12V is no longer required for use with the Mikohn interface section and is not implemented on the this board. This document contains confidential information that is proprietary to ATI. It may not be copied or disclosed to unauthorized parties. © 2006 Aristocrat Technologies, Inc. All rights reserved. 28-01186-01 10 Nov 2006 Connector J3 provides functions extended from the I/O driver board, namely communication ports 6 and 7, door security, bill acceptor animation lamps, and MAV500™ C3 and Xtreme® Service Manual Extended I/O Driver II Board Interface. (continued) additional access for VCC and ground. Main Board and I/O Board Connectors I/O Board Main Component Locations This document contains confidential information that is proprietary to ATI. It may not be copied or disclosed to unauthorized parties. © 2006 Aristocrat Technologies, Inc. All rights reserved. 300 28-01186-01 10 Nov 2006 MAV500™ C3 and Xtreme® Service Manual Extended I/O Driver II Board Connector.PIN.. description: J1 This document contains confidential information that is proprietary to ATI. It may not be copied or disclosed to unauthorized parties. © 2006 Aristocrat Technologies, Inc. All rights reserved. 01 28-01186-01 10 Nov 2006 PIN PIN Name Description A1 GND Ground B1 GND Ground A2 PBS1 Button switch 1 B2 PBS2 Button switch 2 A3 PBS3 Button switch 3 B3 PBS4 Button switch 4 A4 PBS5 Button switch 5 B4 PBS6 Button switch 6 A5 PBS7 Button switch 7 B5 PBS8 Button switch 8 A6 PBS9 Button switch 9 B6 PBS10 Button switch 10 A7 PBS11 Button switch 11 B7 PBS12 Button switch 12 A8 PBS13 Button switch 13 B8 PBS14 Button switch 14 A9 SPARESW1 Spare 24V Input 1 B9 SPARESW2 Spare 24V Input 2 A10 PBL1 Button lamp 1 B10 PBL2 Button lamp 2 A11 PBL3 Button lamp 3 B11 PBL4 Button lamp 4 A12 PBL5 Button lamp 5 B12 PBL6 Button lamp 6 A13 PBL7 Button lamp 7 B13 PBL8 Button lamp 8 A14 PBL9 Button lamp 9 B14 PBL10 Button lamp 10 A15 PBL11 Button lamp 11 B15 PBL12 Button lamp 12 A16 PBL13 Button lamp 13 B16 PBL14 Button lamp 14 A17 DRVSP1 Spare 24V output 1 B17 DRVSP2 Spare 24V output 2 A18 SPAREIO0 Spare TTL I/O MAV500™ C3 and Xtreme® Service Manual Extended I/O Driver II Board Connector PIN. Description: J1 (continued) This document contains confidential information that is proprietary to ATI. It may not be copied or disclosed to unauthorized parties. © 2006 Aristocrat Technologies, Inc. All rights reserved. 302 28-01186-01 10 Nov 2006 PIN PIN Name Description B18 SPAREIO1 Spare TTL I/O A19 SPAREIO2 Spare TTL I/O B19 SPAREIO3 Spare TTL I/O A20 LED_PWR +12VDC B20 LED_PWR +12VDC A21 SPRTS Spare serial B21 SPCTS Spare serial A22 SPRXD Spare serial B22 SPTXD Spare serial A23 GND Ground B23 GND Ground A24 HM1 Hard meter 1 B24 HM2 Hard meter 2 A25 HM3 Hard meter 3 B25 HM4 Hard meter 4 A26 HM5 Hard meter 5 B26 HM6 Hard meter 6 A27 LTL1 Light tower lamp 1 B27 LTL2 Light tower lamp 2 A28 LTL3 Light tower lamp 3 B28 LTL4 Light tower lamp 4 A29 AL1 Animation lamp 1 B29 AL2 Animation lamp 2 A30 AL3 Animation lamp 3 B30 HOPCOIN Hopper coin output A31 HOPHIGH Hopper Hi probe B31 DOPTIN Door optic in A32 24V +24 VDC B32 24V +24 VDC MAV500™ C3 and Xtreme® Service Manual Extended I/O Driver II Board Connector.PIN.. description: J2 This document contains confidential information that is proprietary to ATI. It may not be copied or disclosed to unauthorized parties. © 2006 Aristocrat Technologies, Inc. All rights reserved. 0 28-01186-01 10 Nov 2006 PIN PIN Name Description A1 P12VDC 12V output for coin validator B1 GND Gnd A2 VCC 5V from main board B2 VCC 5V from main board A3 LDOR_NC Logic door switch (normally closed) B3 LDOR_COM Logic door switch (common) A4 LDOR_NO Logic door switch (normally open - gnd) B4 NC A5 NEILO CPU, IL0 interrupt B5 NDACK CPU, data acknowledge A6 IRQDMON “DEMON” - Debug interrupt B6 NEIOR CPU, IO read signal A7 NEIOW CPU, IO write signal B7 NERESET CPU, external reset output A8 ECLK8M CPU, clock signal B8 GND Ground A9 24V +24V B9 24V +24V A10 NC B10 NC EA12 A11 NC CPU, address bus - bit EA11 B11 EA10 CPU, address bus A12 EA9 CPU, address bus B12 EA8 CPU, address bus A13 EA7 CPU, address bus B13 EA6 CPU, address bus A14 EA5 CPU, address bus B14 EA4 CPU, address bus A15 EA3 CPU, address bus B15 EA2 CPU, address bus A16 24V +24 VDC B16 24V +24 VDC A17 GND Ground B17 GND Ground A18 ED7 CPU, data bus MAV500™ C3 and Xtreme® Service Manual Extended I/O Driver II Board Connector PIN. Description: J2 (continued) This document contains confidential information that is proprietary to ATI. It may not be copied or disclosed to unauthorized parties. © 2006 Aristocrat Technologies, Inc. All rights reserved. 304 28-01186-01 10 Nov 2006 PIN PIN Name Description B18 ED6 CPU, data bus A19 ED5 CPU, data bus B19 ED4 CPU, data bus A20 ED3 CPU, data bus B20 ED2 CPU, data bus A21 ED1 CPU, data bus B21 ED0 CPU, data bus A22 VCC +5VDC B22 VCC +5VDC A23 GND Ground B23 GND Ground A24 NC B24 NC A25 NC B25 NC A26 EMIKP2 Data A2 B26 EMIKN2 Machine ID2 A27 NC B27 NC A28 NC B28 NC A29 NC Reserved for isolated +12VDC input return B29 NC Reserved for isolated +12VDC input A30 EMIKP1 Data A1 B30 EMIKN1 Machine ID1 A31 TXDA+ Mikohn 422 serial Comms B31 TXDA- Mikohn 422 serial Comms A32 RXDA+ Mikohn 422 serial Comms B32 RXDA- Mikohn 422 serial Comms MAV500™ C3 and Xtreme® Service Manual Extended I/O Driver II Board Connector.PIN.. description: J3 This document contains confidential information that is proprietary to ATI. It may not be copied or disclosed to unauthorized parties. © 2006 Aristocrat Technologies, Inc. All rights reserved. 0 28-01186-01 10 Nov 2006 PIN PIN Name A1 NC B1 232DTR7 C1 VCC A2 232DSR7 B2 NC C2 GND A3 NC Description COM port 7 COM Port 7 B3 NC C3 NC reserved for12VDC isolated A4 NC B4 232DTR6 C4 NC A5 232DSR6 B5 NC C5 NC A6 NC B6 NC C6 VCC A7 NC reserved for 12VDC isolated return B7 232TXD6 COM port 6 C7 GND Ground A8 232RXD6 COM port 6 B8 232RTS6 COM port 6 C8 GND Ground A9 232CTS6 COM port 6 B9 232DCD6 COM port 6 C9 NC A10 NC reserved for 12VDC isolated return B10 232TXD7 COM port 7 C10 NC A11 232RXD7 COM port 7 B11 232RTS7 COM port 7 C11 NC A12 232CTS7 COM port 7 B12 232DCD7 COM port 7 COM port 6 COM port 6 reserved for 12VDC isolated MAV500™ C3 and Xtreme® Service Manual Extended I/O Driver II Board Connector.PIN.. description: J3 (continued) This document contains confidential information that is proprietary to ATI. It may not be copied or disclosed to unauthorized parties. © 2006 Aristocrat Technologies, Inc. All rights reserved. 0 28-01186-01 10 Nov 2006 PIN PIN Name Description C12 NC reserved for 12VDC isolated A13 NC B13 NC C13 NC A14 NC B14 NC C14 NC A15 NC B15 NC C15 VCC A16 NC B16 BACCLIT8 BACC denomination lamp 8 C16 GND Ground A17 BACCLIT1 BACC denomination lamp 1 B17 BACCLIT2 BACC denomination lamp 2 C17 NC reserved for 12VDC isolated A18 BACCLIT3 BACC denomination lamp 3 B18 BACCLIT4 BACC denomination lamp 4 C18 NC 5 VDC A19 BACCLIT5 BACC denomination lamp 5 B19 BACCLIT6 BACC denomination lamp 6 C19 NC A20 BACCLIT7 B20 NC C20 NC A21 AL4 B21 NC C21 NC A22 AL5 B22 NC C22 NC A23 NC B23 NC C23 NC A24 SEC[5] BACC denomination lamp 7 Animation lamp 4 Animation lamp 5 Animation lamp 6 Drop box door switch (normally open) MAV500™ C3 and Xtreme® Service Manual Extended I/O Driver II Board Connector PIN. Description: J3 (continued) PIN PIN Name Description B24 DDOR_NC Drop box door switch (normally closed) C24 NC A25 SEC[4] B25 NC C25 NC A26 SEC[1] Game door switch (normally open) B26 GDOR_NC Game door switch (normally closed) C26 NC A27 SEC[0] Game door switch (common) C27 VCC 5VDC A28 SEC[3] SEC Door switch (normally open) B28 SEC_NC SEC Door switch (normally closed) C28 VCC 5VDC A29 SEC[2] SEC Door switch (common) B29 NC C29 GND A30 NC B30 NC Drop box door switch (common) B27 This document contains confidential information that is proprietary to ATI. It may not be copied or disclosed to unauthorized parties. © 2006 Aristocrat Technologies, Inc. All rights reserved. 307 28-01186-01 10 Nov 2006 C30 GND A31 NC B31 NC C31 GND A32 NC B32 NC C32 GND Ground Ground Ground Ground MAV500™ C3 and Xtreme® Service Manual Extended I/O Driver II Board Address.Decoding I/O.Address.Map The I/O driver board includes address decoding, which defines the address of each I/O on the board. Refer to the XP Main Board module for a description of the I/O connected directly to the main board. The addresses of all I/Os on the I/O driver board and the main board are listed below. The various signal names for main board I/O are included for completeness. Board Address MAIN BD. Read/write WR D7 DOPTOUT NWRCS1 0x3010410 D0 CCINH D2 HOPDIR D0 SOLDIV D1 JPBELL D2 HOPON D2 HOPTEST D0..D7 PBL1..8 0x3012010 D0..D7 PBL9..14 4+2 0x3012020 D0..D5 HM1..6 2x NC 0x3012030 D0..3 LTL1..4 D4..6 AL1..3 D0 LDSECO D1 GDSHRIN D2 BDSHRIN D3 DDSHRIN Parallel Port Duart Channel 6,7 BACCLIT[1..8] 0x3010450 0x3010440 I/O DRIVER 0x3012000 WR 0x3012070 0x3012380 base address Main Board 28-01186-01 10 Nov 2006 Spares 0x3010400 NWRCS4 0 Name NWRCS0 NWRCS5 This document contains confidential information that is proprietary to ATI. It may not be copied or disclosed to unauthorized parties. © 2006 Aristocrat Technologies, Inc. All rights reserved. Bit/s RD 1x NC MAV500™ C3 and Xtreme® Service Manual Extended I/O Driver II Board I/O Address Map (continued) Board Address NIOCS3 0x3010580 is base address I/O Driver Read/write Bit/s Name Error CCERROR Select CCSEN PE CCRED Busy SOLOPT P3 AUSW P4 JPSW P5 BASW P6 MECHSW P7 CBOXSW D0..7 PBS1..8 0x3012010 D0..7 PBS9..14 0x3012020 D0 GDSHRO D1 BDSHRO D2 DDSHRO D4 HOPCOIN D5 HOPHIGH D6 DOPTIN D7 LDSECIN 0x3012200 D0..D8 DIPSW1[1..8] Note: Bitmap 0x3012210 D0..D8 DIPSW2[1..8] Note: Bitmap 0x3012220 D4..D7 IRQ_CS DUART Channel 4..7 0x3012000 I/O Driver RD Comm Ports 4&5 I/O DRIVER 0x3012100 Channel A MIKOHN 0x3012140 Channel B EXP SER Rx Tx RTS CTS 0x3012180 Parallel EXP I/O 6x TTL I/O 0x3012300 Channel A base address 0x3012340 Channel B base address 309 28-01186-01 10 Nov 2006 4 + 2 EXP RD/WR Comm Ports 6&7 This document contains confidential information that is proprietary to ATI. It may not be copied or disclosed to unauthorized parties. © 2006 Aristocrat Technologies, Inc. All rights reserved. Spares VLC Rx Tx RTS CTS DTR DCD Rx Tx RTS CTS DTR DCD MAV500™ C3 and Xtreme® Service Manual Extended I/O Driver II Board Interrupt Request Mikohn Interface The following shows the interrupt request bit map for COM ports 4, 5, 6 and 7. Read only address “0x3012220” provides a quicker way to determine which channel generated the interrupt. Bit Label Description D4 INTA DUART COM port 4 – address 0x3012100 D5 INTB DUART COM port 5 – address 0x3012140 D6 INT2A DUART COM port 6 – address 0x3012300 D7 INT2B DUART COM port 7 – address 0x3012340 The I/O driver board interfaces with the Mikohn Progressive Super Controllers (CON2). The interface: Supports two separate output only Mikohn Super Controller (CON2) systems via optically coupled pulse control; each output pulse switches a minimum of 20mA. Provides a four wire, bidirectional RS422/485 port. Button Switches This document contains confidential information that is proprietary to ATI. It may not be copied or disclosed to unauthorized parties. © 2006 Aristocrat Technologies, Inc. All rights reserved. 310 28-01186-01 10 Nov 2006 Sixteen button switch inputs are included. The I/O driver board contains additional circuitry to allow a wide range of button switch voltage. Historically, Aristocrat EGMs used 24V DC for button switch voltage, but new EGMs could use a voltage as low as 5V DC. To allow backward compatibility, the button inputs accept wide range voltage levels. To maintain simplicity of the cabling, this same voltage is used to drive the lamps/LEDs. For 410771 Issue C, the voltage is set at +12V DC. The button switch outputs are filtered to reduce noise on the signals and converted to TTL level for processing. MAV500™ C3 and Xtreme® Service Manual Extended I/O Driver II Board Lamp Drivers Lamp drivers includes all button, bill acceptor entry, animation and light tower lamps. All lamps are driven by open collector transistors capable of sinking 600mA. Button Lamps/LEDs Both button lamp and LED outputs are supported in this implementation. Light emitting diodes (LEDs) can be used on new configuration EGMs. Older configurations used incandescent lamps. The I/O driver board supports both options. The LEDs are rated at 12V DC. The power for the LEDs is supplied by the driver board (LED_PWR). The I/O driver board provides the power for incandescent lamps as well. No warm up resistors are used, as warm up resistors do not improve the longevity of the light globes. Furthermore, as LEDs are used in the new EGM configurations, warm up resistors are detrimental: they cause the LEDs to remain on. All button lamp/LED outputs have transient suppression devices to provide protection from transient pulses and electrostatic discharge (ESD). Bill Acceptor Lamps Bill Acceptor Denomination The I/O driver board has eight lamp or LED outputs used to indicate the bill acceptor denomination for machines with this feature. Lamp Data Bit Label 1 to 7 D0.. D6 BACCLIT1..7 Description Available bill values - denomination lamps BACCLIT1 = highest denomination LED BACCLIT7 = lowest denomination LED 8 Animation and Light. Tower Lamps This document contains confidential information that is proprietary to ATI. It may not be copied or disclosed to unauthorized parties. © 2006 Aristocrat Technologies, Inc. All rights reserved. 311 28-01186-01 10 Nov 2006 D7 BACCLIT8 “Insert Bill” lamp Animation lamps and light tower lamps are driven in the same manner and provide for warm up resistors, though these are not intended for population. There are six animation lamps and four light tower lamps. MAV500™ C3 and Xtreme® Service Manual Extended I/O Driver II Board Communication The I/O driver board design provides four serial ports, labelled COM4 to COM7. Serial ports COM0 to COM3 are on the main board. COM4 is allocated to the Mikohn Interface as above. COM5 is an RS-232 compatible port, with RTS and CTS used as hardware handshake, or as general input or output pins. COM6 and COM7 are modem-compatible ports with full handshaking. DIP Switch Banks Two 8-bit dual in-line package (DIP) switch banks are provided. Switch settings are shown below. Switch Bank Switch No. Data Bus Bit Status Switch Position Description DIPSW1 1 to 4 D0…D3 BCD “1” = “OFF” “0” = “ON” Up to 16 denomination selections 5 D4 “1” “0” “1” = “OFF” “0” = “ON” Enable Gamble Disable Gamble 6 D5 “1” “0” “1” = “OFF” “0” = “ON” Enable tokenization Disable tokenization 7 D6 “1” “0” “1” = “OFF” “0” = “ON” Enable max bet lockout Disable max bet lockout 8 D7 “1” = “OFF” “0” = “ON” Spare 1 to 8 D0…D7 “1” = “OFF” “0” = “ON” Spare DIPSW2 Hard Meters The hard meters are driven by open collector transistors capable of sinking 600mA. The meters can be rated up to 24V DC. The board incorporates detection circuitry on each of the six meter outputs. If any of the meters is disconnected or omitted from the assembly, a flag is set in UART U6. The flag can be read via the data bus. If fewer than six meters are needed, the meter detection circuitry on each of meters four, five and six can be disabled by removing the link for each meter not required. The links are located near the DIP switch packs. This document contains confidential information that is proprietary to ATI. It may not be copied or disclosed to unauthorized parties. © 2006 Aristocrat Technologies, Inc. All rights reserved. 312 28-01186-01 10 Nov 2006 MAV500™ C3 and Xtreme® Service Manual Extended I/O Driver II Board Door Switch Monitoring Door switches are monitored by battery backed circuitry, to record the event of a door open even when power is OFF. The circuitry also records logic cage opens if the I/O driver board is removed while the power is OFF. Four switches are monitored as shown below. Each of the four registers is written with a nonzero value while power is ON. If a door is opened while power is OFF, the register is parallel loaded with a value of zero. On power ON, the register can be read. A zero value indicates that a door was opened or the board was removed. Each of the four registers operates from battery power while power is OFF. To prevent the battery discharging during the power OFF condition, register outputs are connected to a tri-state buffer also supplied by battery power. When power OFF, a logic driven circuit forces the buffer into its tri-state condition, and there is no wasted battery power from the output circuits. A VCC supply monitor prevents inadvertent clocking during power ON or power OFF. Clocking is inhibited when the supply voltage is below the monitor’s threshold, which is in the range of 4.50 to 4.75V. Door Security. Signal Labels Expansion I/O Opto Isolation This document contains confidential information that is proprietary to ATI. It may not be copied or disclosed to unauthorized parties. © 2006 Aristocrat Technologies, Inc. All rights reserved. 313 28-01186-01 10 Nov 2006 Door/Device Signal Label Logic Cage Door SECR 0 Mech Meters SECR 1 Main Door SECR 2 Drop Box Door SECR 3 In addition to the I/Os above, the “expansion” provides I/Os reserved as spare on previous model I/O driver boards, but since used to provide the additional drivers required by the later platforms available; two 24V DC driver outputs and two button switch type inputs. In addition, six expansion TTL I/Os are included. The TTL I/O lines are filtered to prevent external noise entering the board through these lines. Optical isolation is not provided for signals on COM6 and COM7. The PCB was designed with the optical components located, but not populated if optical isolation becomes a future requirement. MAV500™ C3 and Xtreme® Service Manual Extended I/O Driver II Board Power - Isolated. Supplies Battery Switchover Reset Circuitry The I/O driver board does not provide isolated signal circuits and, as a consequence, isolated power supplies are not provided. However, in the event of a future requirement for signal and supply isolation, room is provided on the PCB for two isolated supplies. Signal names are retained from the isolated supply sources once envisioned for the board: ISOL5V and ISOLGND for the Mikohn signals only, and P5VI and GNDISOL for signals on COM6 and COM7. A discrete circuitry implementation selects between battery power or power outlet derived VCC, depending on which is greater, for the circuitry that requires it. A single power-on-reset signal is provided from the main board referred to as NERESET. The signal ensures that at power ON: All lamps are OFF There is no current in the hard meter coils Both UARTs are reset The changeover from battery power to VCC is assisted by the low impedance to VCC Firmware This document contains confidential information that is proprietary to ATI. It may not be copied or disclosed to unauthorized parties. © 2006 Aristocrat Technologies, Inc. All rights reserved. 314 28-01186-01 10 Nov 2006 Two Programmable Logic Devices (PLDs) are used for address decoding. These are U46 and U52. MAV500™ C3 and Xtreme® Service Manual Communications Configuration Board Table of. Contents Physical Description......................................316 Functional Description.................................316 CCB Part Number and Configuration..............................................316 RS-232 Interface..................................................................................... 316 RS-232 Interface Signals, Channel 2....................................................................316 Connector PIN Assignment.........................317 Connector PIN Assignment.........................319 General Maintenance....................................319 This document contains confidential information that is proprietary to ATI. It may not be copied or disclosed to unauthorized parties. © 2006 Aristocrat Technologies, Inc. All rights reserved. 315 28-01186-01 10 Nov 2006 MAV500™ C3 and Xtreme® Service Manual Communications Configuration Board Physical Description Location and Access Functional Description The main board has four serial channels: 0, 1, 2 and 3. Channel 0 has a nonisolated RS-232 interface for dedicated communications with a touch screen or a Serial Keno Panel. Channels 2 and 3 are fully isolated and can be configured using the CCB. Channel 1 is dedicated for communication with the bill acceptor. Refer to the Machine Modes module of the Operator Manual for additional information. The CCB plugs into the main board via a standard 72-pin SIMM socket and converts the opto coupled UART serial and I/O signals from the main board into the desired format for external connection. There are several different CCBs to configure the communications channels for signals to suit different markets. CCB Part Number. and Configuration RS-232 Interface RS-232 Interface. Signals, Channel 2 This document contains confidential information that is proprietary to ATI. It may not be copied or disclosed to unauthorized parties. © 2006 Aristocrat Technologies, Inc. All rights reserved. 316 The Communications Configuration Board (CCB) is located within the logic cage where it connects to the main board via a 72 pin SIMM socket. The CCB configures the internal serial communications ports 2 and 3 to various communication protocols. 28-01186-01 10 Nov 2006 The following table shows the CCB part number and the associated configuration. The channel 2 and channel 3 communications signals are directed to a number of connectors on the backplane board. PCBA Number Channel 2 Channel 3 410748 RS-232 RS-232 The RS-232 interface provides RS-232 communications between the main board and a peripheral device. The channel has six I/O signals, including data. This port can run at 9600-baud rate. The following table provides the RS-232 interface signals, as configured on Channel 2. PIN Name Function I/O Description SIN2:3 Tx Input Serial data input SOUT2:3 Rx Output Serial data output CTS2:3 Control Input Active low input DSR2:3 Control Input Active low input RTS2:3 Control Output Active low output DTR2:3 Control Output Active low output MAV500™ C3 and Xtreme® Service Manual Communications Configuration Board CONNECTOR.PIN. ASSIgNMENT The following table lists the input/output signals between the CCB and the main board. PIN No PIN Name 1 Not used 2 GNDI Ground 3 CFG4 OBS BNA channel 4 Not used 5 SINA1 SIN1 OBS BNA channel 6 CFG3 RTSA1 OBS channel pullup 7 SOUTA1 SOUT1 OBS BNA channel 8 CFG6 DTR1 OBS BNA channel 9 CTSA1 CTS1 OBS BNA channel 10 CFG5 OBS channel pullup 11 DSRA1 DSR1 OBS BNA channel 12 CFG8 OBS BNA channel input 13 CFG7 +12VI output 14 CFG10 OBS BNA channel 15 IA1 OBS BNA channel 16 CFG11 +12VI output 17 CFG9 +12VI output 18 CFG12 OBS BNA channel 19 RTSA1 Output to channel 1 connector. RTS1 OBS BNA channel 20 CFG13 +12VI output 21 DTRA1 RTS1 OBS BNA channel 22 CFG14 OBS BNA channel 23 This document contains confidential information that is proprietary to ATI. It may not be copied or disclosed to unauthorized parties. © 2006 Aristocrat Technologies, Inc. All rights reserved. 1 28-01186-01 10 Nov 2006 Description Not used 24 P12VI + 12V power in 25 CFG20 GND 26 N12VI Not used 27 CFG19 RTS2 TTL 28 GNDI Ground. 29 CFG18 GND 30 CFG17 SOUT2 TTL 31 CFG16 SOUT2 OPTO BASE 32 CFG15 CCB VCC MAV500™ C3 and Xtreme® Service Manual Communications Configuration Board CONNECTOR.PIN. ASSIgNMENT (continued) PIN No PIN Name Description 33 SIN2 RS-232 input from channel 2 connector 34 CFG22 GND 35 SOUT2 RS-232 output to channel 2 connector 36 CFG29 SIN2 TTL 37 CTS2 RS-232 input from channel 2 connector 38 CFG30 GND 39 DSR2 RS-232 input from channel 2 connector 40 CFG21 DTR2 TTL 41 Not used 42 CFG31 CCB VCC 43 RTS2 RS-232 output to channel 2 connector 44 CFG32 CTS2 TTL 45 DTR2 RS-232 output to channel 2 connector 46 CFG33 CCB VCC 47 Not used 48 P12VI + 12V power in 49 CFG34 DSR2 TTL 50 GNDI Ground 51 CFG24 GND 52 Not used 53 SIN3 RS-232 input from channel 3 connector 54 CFG23 RTS3 TTL 55 SOUT3 RS-232 output to channel 3 connector 56 CFG26 GND 57 CFG25 DTR3 TTL 58 CFG28 GND 59 CTS3 RS-232 input from channel 3 connector 60 CFG27 SOUT3 TTL 61 CFG35 CCB VCC 62 CFG36 CTS2 TTL 63 DSR3 RS-232 input from channel 3 connector 64 CFG37 CCB VCC 65 This document contains confidential information that is proprietary to ATI. It may not be copied or disclosed to unauthorized parties. © 2006 Aristocrat Technologies, Inc. All rights reserved. 1 28-01186-01 10 Nov 2006 Not used 66 CFG38 DSR3 TTL 67 RTSB1 RS-232 output to channel 3 connector MAV500™ C3 and Xtreme® Service Manual Communications Configuration Board CONNECTOR.PIN. ASSIgNMENT (continued) PIN No PIN Name Description 68 CFG39 SIN3 TTL 69 DTRB1 RS-232 output to channel 3 connector 70 CFG40 GND 71 72 gENERAl. MAINTENANCE Do not attempt component level repair without access to a workshop facility. This document contains confidential information that is proprietary to ATI. It may not be copied or disclosed to unauthorized parties. © 2006 Aristocrat Technologies, Inc. All rights reserved. 1 28-01186-01 10 Nov 2006 Not used GNDI Ground No maintenance is required. However, if a communications problem is experienced and a CCB error is suspected, the following operations may be performed: Step Description 1 Remove the CCB from the SIMM socket in the manner described in the CCB Removal section in the Cabinet, Door and Top Box module. 2 Ensure that all contacts on the CCB and in the SIMM socket on the main board are clean. 3 Inspect the contact area of the CCB. The board must not be thinner than 1.19mm. The contact end must be square (not cut, edged or grooved) and the contact metal must begin no more than 0.2mm from the square end. If any of these criteria is not met, discard the board. 4 Replace the CCB as described in the CCB Replacement section in the Cabinet, Door and Top Box module. MAV500™ C3 and Xtreme® Service Manual Ticket Printers Table.of.. Contents Overview........................................................323 Machine.Conditions......................................323 Operator.Mode.Menu.Indicators.......................................................324 futurelogic.gEN2™.(PSA-66-ST2).Thermal. Ticket.Printer................................................325 Features.................................................................................................... 326 Interface Specifications......................................................................... 327 XON./.XOFF.Flow.Control................................................................................327 Serial.Communications.PCB.PIN-Outs.............................................................327 Ready/Busy.Protocol..............................................................................................328 RS-232.DIP.Switches.............................................................................................328 Printer.Removal.and.Replacement.....................................................329 Loading.Paper.......................................................................................... 330 Feeding.Paper.......................................................................................... 331 Clearing.a.Paper.Jam............................................................................. 332 Sensors..................................................................................................... 334 Paper.Out.................................................................................................................334 Paper.Low................................................................................................................334 Paper.Taken..............................................................................................................334 Drawer.Open..........................................................................................................334 Printer.Open...........................................................................................................334 Troubleshooting...................................................................................... 335 Self.Test.....................................................................................................................335 Printer.Status.LEDs................................................................................................336 Printer.Errors..........................................................................................................337 Specifications........................................................................................... 338 Ithaca®.Epic.950™.Thermal.Ticket.Printer...339 Features.................................................................................................... 340 Interface Specifications......................................................................... 341 XON./.XOFF.Flow.Control................................................................................341 Ready/Busy.Protocol..............................................................................................342 Serial.Communications.PCB.PIN-Outs.............................................................342 Printer.Mechanism.Assembly............................................................... 343 Inner.Chassis.Removal..........................................................................................343 Inner.Chassis.Replacement..................................................................................343 This document contains confidential information that is proprietary to ATI. It may not be copied or disclosed to unauthorized parties. © 2006 Aristocrat Technologies, Inc. All rights reserved. 0 28-01186-01 10 Nov 2006 MAV500™ C3 and Xtreme® Service Manual Ticket Printers Loading.Tickets....................................................................................... 344 Loading.Tickets.into.the.Ticket.Supply.Box......................................................344 Feeding.Tickets.into.the.Printer.Mechanism....................................................344 Removing.Loaded.Tickets..................................................................... 345 Unloading.Tickets.by.Opening.the.Ticket.Cover.............................................345 Unloading.Tickets.Using.the.FEED.Button........................................................345 Sensors..................................................................................................... 346 Cover.Open.Switch...............................................................................................346 Ticket.Low.Sensor.................................................................................................346 Ticket.Burst.Sensor...............................................................................................346 Top-of-Form/Ticket.Out.Sensor.........................................................................346 Ticket.Taken.Sensor...............................................................................................346 Chassis.Open.Sensor/Audible.Alarm.................................................................347 Care.and.Maintenance.......................................................................... 348 Cleaning.the.Print.Head........................................................................................348 Troubleshooting...................................................................................... 349 Self-test.Ticket.........................................................................................................349 Printing.a.Self-Test.Ticket......................................................................................349 Printer.Status.LEDs................................................................................................350 Specifications........................................................................................... 350 Custom.Tickets....................................................................................... 351 Ithaca®.Model.850.Thermal.Ticket.Printer.352 Interface Specifications......................................................................... 353 XON./.XOFF.Flow.Control................................................................................353 Ready/Busy.Protocol..............................................................................................354 Serial.Communications.PCB.PIN-Outs.............................................................354 Printer.Mechanism.Assembly............................................................... 355 Printer.Mechanism.Assembly.Removal..............................................................355 Tickets...................................................................................................... 356 Location.and.Access...............................................................................................356 Loading.and.Replacing.Tickets.............................................................................356 Replacing.Tickets.....................................................................................................357 Loading.Tickets........................................................................................................357 Removing.Loaded.Tickets.....................................................................................358 Sensors..................................................................................................... 359 Paper.Low................................................................................................................359 Top-of-Form.Sensor...............................................................................................359 Ticket.Taken.Sensor...............................................................................................359 Head-Up.Switch......................................................................................................359 Open/Close.Position.Sensor/Audible.Alarm....................................................360 This document contains confidential information that is proprietary to ATI. It may not be copied or disclosed to unauthorized parties. © 2006 Aristocrat Technologies, Inc. All rights reserved. 1 28-01186-01 10 Nov 2006 MAV500™ C3 and Xtreme® Service Manual Ticket Printers Care and Maintenance.......................................................................... 361 Cleaning the Print Head....................................................................... 361 Troubleshooting...................................................................................... 362 Printer Status LEDs................................................................................................362 Specifications........................................................................................... 363 Custom Tickets....................................................................................... 363 This document contains confidential information that is proprietary to ATI. It may not be copied or disclosed to unauthorized parties. © 2006 Aristocrat Technologies, Inc. All rights reserved. 322 28-01186-01 10 Nov 2006 MAV500™ C3 and Xtreme® Service Manual Ticket Printers OVERVIEw location.and.Access The printer is located above the main LCD monitor in the area provided for the Player Marketing Module (PMM) at the base of the top box. Access to the printer is through the top box. Removal and replacement instructions are located in the Cabinet, Door and Top Box module. Printer Location MACHINE. CONDITIONS Printer configuration options in the electronic gaming machine (EGM) are found in the Operator Mode menu. DEVICE DRIVER OPTIONS BILL ACCEPTOR TOUCH SCREEN COIN ENTRY PRINTER HOPPER ID003 (JCM) Micro Touch none Ithaca none Play 10 Lines — Press to change driver Service — Press to select next option Cashout/TakeWin — Press to select previous option Bet 3 Credits — Press to return to previous menu Audit Key — Turn off to exit “Lockup error to be acknowledged” Device Driver Options This document contains confidential information that is proprietary to ATI. It may not be copied or disclosed to unauthorized parties. © 2006 Aristocrat Technologies, Inc. All rights reserved. 28-01186-01 10 Nov 2006 MAV500™ C3 and Xtreme® Service Manual Ticket Printers Operator Mode Menu Indicators Several Operator Mode menu displays provide printer information that addresses voucher in/out history, machine status, accounting, audit and statistics data, and error and lockup information. These menus are: 2. Accounting Information 2.1 Current Meters – Main 2.2 Periodic Meters – Main 2.9 Cash Information → Voucher In Meters 2.9 Cash Information → Voucher Out Meters 3. Diagnostic Information 3.1 Security Meters (Screen 1) 3.6 Voucher In Log 3.7 Ticket/Voucher Out Log 3.14 Printer Signature Log 4. Test/Diagnostics Mode 4.9 Printer Test 5. Operator Setup/Selections 5.1 Game Machine Options 5.1 Game Machine Options → Bill/Voucher Options 5.1 Game Machine Options → Device Driver Options 5.2 Jurisdictional Settings 6. Miscellaneous 6.2 Printer CRC Seed Setup 6.7 Print Audit Tickets 7. Current Lockup This document contains confidential information that is proprietary to ATI. It may not be copied or disclosed to unauthorized parties. © 2006 Aristocrat Technologies, Inc. All rights reserved. 324 28-01186-01 10 Nov 2006 MAV500™ C3 and Xtreme® Service Manual Ticket Printers FutureLogic GEN2™. (PSA-66-ST2) Thermal Ticket Printer The FutureLogic GEN2 Ticket Printer (GEN2) is an advanced thermal printer capable of creating high quality complicated output with a minimum of development and effort. The printer supports serial and Netplex current loop interface to allow operation in any EGM. FutureLogic GEN2 Printer This document contains confidential information that is proprietary to ATI. It may not be copied or disclosed to unauthorized parties. © 2006 Aristocrat Technologies, Inc. All rights reserved. 325 28-01186-01 10 Nov 2006 MAV500™ C3 and Xtreme® Service Manual Ticket Printers Features Features in the GEN2 include: Additional information is available from the FutureLogic Operators and Technicians Manual, or from the manufacturer’s website at www. futurelogic-inc.com. Intelligent Ticket Handling (ITH™), which prevents player interference with any part of ticket production or presentation “GEN2” is a registered trademark of FutureLogic, Incorporated. Variable paper capacity with different paper trays – 300, 600 and 900 ticket capacity trays Angle or horizontal mounting of the unit Simple paper loading; no loose parts Windows® ticket/receipt development package via the TCL Editor utility Promotional printing capabilities Page mode printing with TCL printer language Line printer capability High quality laser-like san serif fonts in multiple sizes Advanced graphics printing Windows® connectivity 3-inch per second print speed 4k input buffer – in line mode Wide temperature range operation Standard and customized serial interfaces available – RS-232 and Netplex This document contains confidential information that is proprietary to ATI. It may not be copied or disclosed to unauthorized parties. © 2006 Aristocrat Technologies, Inc. All rights reserved. 326 28-01186-01 10 Nov 2006 MAV500™ C3 and Xtreme® Service Manual Ticket Printers Interface Specifications All power and communications are supplied through the Serial Communications printed circuit board (PCB) located at the rear of the printer. The interface connector is a 14 position Molex Minifit Jr® and will mate with Molex. Serial Communications Connector XON / XOFF . Flow Control XOFF XON Serial Communications PCB PIN-Outs This document contains confidential information that is proprietary to ATI. It may not be copied or disclosed to unauthorized parties. © 2006 Aristocrat Technologies, Inc. All rights reserved. 327 28-01186-01 10 Nov 2006 The RS-232 serial interface communicates using hardware and XON (DC1)/XOFF (DC3) flow control. Flow control helps ensure that the computer does not send information to the printer faster than it can print. When the printer’s buffer is approximately 50% full, it sends the ASCII code XOFF (13 Hex) to the computer to tell it to stop sending data. When there is room, the printer sends the ASCII code XON (11 Hex) to the computer to tell it to resume sending data. If the computer does not stop sending data after it receives an XOFF, the data that overflows the buffer is lost and the printer halts. The printer sends an XON code when it goes on-line to get things started. It will send an XOFF code to stop the computer from sending information if the input buffer is approximately 50%full. PIN # Function PIN # Function 1 MRESET 8 +24VDC 2 Netplex TXD 9 Modulated +24VDC 3 +12 VDC (RS-232 optional) 10 GND 4 Netplex RXD 11 RS-232 RXD 5 GND 12 RS-232 TXD 6 +24VDC 13 DTR 7 GND 14 RTS MAV500™ C3 and Xtreme® Service Manual Ticket Printers Ready/Busy Protocol RTS Protocol The RTS signal controls data transmission to the printer. It is driven high when the printer is ready to receive data and driven low when it cannot accept any more data. The host transmits data to the printer when it recognizes the state of the printer’s RTS signal is high. DTR/DSR Protocol The DTR signal controls data transmission to the printer. It is driven high when the printer is ready to receive data and driven low when it cannot accept any more data. The host transmits data to the printer when it recognizes the state of the printer’s DTR signal is high. RS-232 DIP Switches The GEN2 has a set of six dual in-line package (DIP) switches accessible through a slot at the top of the printer. Use the DIP switches to select the communications protocol. These switches must be set according to the table below for proper operation. RS-232 DIP Switches This document contains confidential information that is proprietary to ATI. It may not be copied or disclosed to unauthorized parties. © 2006 Aristocrat Technologies, Inc. All rights reserved. 328 The RS-232C interface uses the RTS/CTS, DTR/DSR, or XON/XOFF protocol. For RTS/CTS, changes in the RTS/CTS signal coordinate the information flow. For DTR/DSR, changes in the DTR/DSR signal coordinate the information flow. For XON/XOFF, data characters transmitted between the host computer control communication data flow. 28-01186-01 10 Nov 2006 Mode SW1 (Jumper 3) SW2 (Jumper 2) SW3 (Jumper 1) SW4 (Jumper 4) 9600 ON/0 ON/0 X X 38400 OFF/1 ON/0 X X 57600 OFF/1 ON/0 ON/0 X XON/XOFF X X X OFF/1 RTS X X X ON/0 MAV500™ C3 and Xtreme® Service Manual Ticket Printers Printer.Removal. and.Replacement Electronic boards and their components are sensitive to static electricity. Exercise care during all handling operations and inspections of this product to ensure product integrity. Do not handle this product out of its protective enclosure while it is not used for operations purposes unless it is otherwise protected. Discharge clothing and tools prior to touching this assembly. Whenever possible, unpack/pack this product only at EOS/ESD safe workstations. If an EOS/ ESD safe workstation is not guaranteed, it is important that the operator is electrically discharged before touching this product with hands or tools. Step Description 1 Pull the printer out of the game until it locks. 2 Remove the paper from the printer. 3 Push the front locking bar unit to unlock the sliding module from the stationary module. Slide the drawer module completely out of the stationary module. 4 Push the release bar located on the bottom of the unit; while holding in the release bar, gently pull the printer forward. Reverse the above steps to replace the printer. This document contains confidential information that is proprietary to ATI. It may not be copied or disclosed to unauthorized parties. © 2006 Aristocrat Technologies, Inc. All rights reserved. 28-01186-01 10 Nov 2006 MAV500™ C3 and Xtreme® Service Manual Ticket Printers Loading Paper Use the automatic paper-loading feature to simplify this process to two steps: putting the paper stack into the paper tray and feeding the paper to the paper loading slot of the printer. Step Description 1 Pull open the printer drawer until the paper tray is completely accessible. 2 Place the paper stack in the printer as indicated by the bank around the stack and the label on the bottom of the paper tray. 3 Feed the paper into the paper-loading slot and release it once the motor engages and the printer grasps the paper. The printer automatically pulls through a form or two, and leaves it registered at the top of the form. 4 Remove the access tickets from the printer. Loading Paper This document contains confidential information that is proprietary to ATI. It may not be copied or disclosed to unauthorized parties. © 2006 Aristocrat Technologies, Inc. All rights reserved. 330 28-01186-01 10 Nov 2006 MAV500™ C3 and Xtreme® Service Manual Ticket Printers Feeding Paper The GEN2 uses black mark indexed paper. Use the FEED button to feed paper into the GEN2. Press the FEED button to advance the paper to the top of the next form. Feeding paper This document contains confidential information that is proprietary to ATI. It may not be copied or disclosed to unauthorized parties. © 2006 Aristocrat Technologies, Inc. All rights reserved. 331 28-01186-01 10 Nov 2006 MAV500™ C3 and Xtreme® Service Manual Ticket Printers Clearing.a.. Paper.Jam Ensure that all paper paths from the entry path at the back of the paper well, through the printer, cutter, and the ticket module chute, are clear of paper or obstructions Use the platen release lever at the top of the unit This document contains confidential information that is proprietary to ATI. It may not be copied or disclosed to unauthorized parties. © 2006 Aristocrat Technologies, Inc. All rights reserved. 28-01186-01 10 Nov 2006 Step Description 1 Remove the paper from the printer. 2 Open the lid by pressing the platen release lever. The spring-loaded lid opens, exposing the paper path. MAV500™ C3 and Xtreme® Service Manual Ticket Printers Clearing a. Paper Jam (continued) This document contains confidential information that is proprietary to ATI. It may not be copied or disclosed to unauthorized parties. © 2006 Aristocrat Technologies, Inc. All rights reserved. 333 28-01186-01 10 Nov 2006 Step Description 3 Remove the jammed ticket. If necessary, access the paper path through the print mechanism by opening the mechanism release lever. 4 Once clearing the jam, reverse these steps to restore the printer to a ready state. 5 Load the paper. MAV500™ C3 and Xtreme® Service Manual Ticket Printers Sensors The GEN2 uses six primary sensors that work with the firmware to provide reliable trouble-free operation. Error conditions resulting from these sensors are indicated by the front bezel and keypad light emitting diodes (LED). Paper Out The Paper Out sensor, located in the print head, terminates print operation when the paper runs out and checks for proper form registration. The GEN2 ceases printing and feeding operations when it detects a paper out condition. Paper Low The Paper Low sensor, located in the paper well, determines when the paper stack has approximately 14 tickets remaining. The paper low status reports a paper low condition after the unit prints out 10 additional jobs. Check the true condition of the paper low status by recycling the power. A paper low condition automatically resets once a stack with a greater height is loaded. Paper low sensing occurs when the system is idle and takes a few seconds to detect the new paper level. Paper Taken The GEN2 printer incorporates a TicketBurst™ feature, which automatically bursts tickets prior to presentation to the operator. Drawer Open The Drawer Open sensor, located in the paper well, detects when the printer platen is in use. Printer Open The Printer Open censor, located in the front of the unit, detects when the printer clamshell is open. This document contains confidential information that is proprietary to ATI. It may not be copied or disclosed to unauthorized parties. © 2006 Aristocrat Technologies, Inc. All rights reserved. 334 The Paper Taken sensor, located in the chute of the GEN2 unit, determines when the customer takes a cashout ticket. 28-01186-01 10 Nov 2006 MAV500™ C3 and Xtreme® Service Manual Ticket Printers Troubleshooting Self Test Troubleshooting incorporates a self-test, printer status LEDs, and printer error descriptions and their remedies. The self test contains important information on unit configuration. This test prints a configuration if the test passes successfully. Press the FEED button during power ON, or reset to run a self test. Sample Configuration Ticket This document contains confidential information that is proprietary to ATI. It may not be copied or disclosed to unauthorized parties. © 2006 Aristocrat Technologies, Inc. All rights reserved. 335 28-01186-01 10 Nov 2006 MAV500™ C3 and Xtreme® Service Manual Ticket Printers Printer Status. LEDs The keypad LEDs report the status of the printer whenever power is ON. Each condition of the keypad LEDs is detailed below. Operator Indicators/Controls Condition This document contains confidential information that is proprietary to ATI. It may not be copied or disclosed to unauthorized parties. © 2006 Aristocrat Technologies, Inc. All rights reserved. 336 28-01186-01 10 Nov 2006 LED Ready Paper Open Fault Unit is powered OFF OFF OFF OFF OFF Unit ready Blink OFF OFF OFF Unit flushed ON ON ON ON Paper out OFF ON OFF OFF Head up or ticket module open OFF OFF ON OFF Temperature error OFF OFF OFF ON Voltage error OFF OFF OFF ON Print head error OFF OFF OFF ON Missing black index mark OFF ON OFF OFF Paper is jammed ON OFF OFF Blink MAV500™ C3 and Xtreme® Service Manual Ticket Printers Printer Errors This document contains confidential information that is proprietary to ATI. It may not be copied or disclosed to unauthorized parties. © 2006 Aristocrat Technologies, Inc. All rights reserved. 337 28-01186-01 10 Nov 2006 Most printer errors result from the printer running out of paper, or the operator opening the module lid. The following table details the possible errors and remedies for each condition. Error Description Remedy Paper out The printer does not detect paper present. Load a new paper stack. Head up or open Results from opening the head release lever, or opening the ticket module lid. Raise the blue lever on the side of the unit. Temperature The printer is in an over temperature condition. The printer automatically resumes operation after the detected head temperature reaches legal operation limits. Voltage The printer detects a power supply voltage outside the legal limits. The printer automatically resumes operation after the power supply is detected within legal limits. Print head The printer senses an internal error due to connectivity or interfacing problem with the thermal print head. The printer remains in this error state until the power is cycled or the unit is reset. If the problem persists, contact the manufacturer. Missing black index mark The paper type selected is indexed Raise the head release lever (to paper and, while feeding paper or change the paper). printing, a black mark is not seen within approximately 10-inches of the paper. Paper jam The printer detects an error in the paper path for presenting the ticket. Open the printer and inspect for a jammed ticket. MAV500™ C3 and Xtreme® Service Manual Ticket Printers Specifications This document contains confidential information that is proprietary to ATI. It may not be copied or disclosed to unauthorized parties. © 2006 Aristocrat Technologies, Inc. All rights reserved. 338 28-01186-01 10 Nov 2006 Feature Specification Print Speed 90 mm/sec. (3.5” per sec.) Print Resolution 8 dots/mm (203dpi) Printing Method Direct thermal, top coated, fanfolded and perforated Print head life 50km minimum (320,000 tickets based on US currency size) Power Requirement 24V DC @ 2.7A avg. (4.0A peak with 60% gaming ticket) Ticket Dimensions 65mm x 156mm Interface/Communications Protocol RS232C bi-directional full handshaking set Netplex USB with separate USB download port. A second serial port is available in RS232C and other three- and four-wire interfaces Printer Depth 304.8mm Weight 2.7 lbs. MAV500™ C3 and Xtreme® Service Manual Ticket Printers Ithaca® Epic 950™ Thermal Ticket Printer The Ithaca Epic 950 Ticket Printer (Epic 950) features full backward compatibility for previous users of Ithaca Series 800 printers, together with a host of new features that improves the performance of gaming operations. The Epic 950 is designed for ease of programming and ease of use in gaming operations. While supporting the full command language and macro features of the Series 800 printer, the Epic 950 introduces a new higher-level command interface which lets the operator quickly and easily integrate more layout and printing options than ever. Ithaca Epic 950 Printer This document contains confidential information that is proprietary to ATI. It may not be copied or disclosed to unauthorized parties. © 2006 Aristocrat Technologies, Inc. All rights reserved. 339 28-01186-01 10 Nov 2006 MAV500™ C3 and Xtreme® Service Manual Ticket Printers Features Features include: Additional information is available from the Epic 950 OEM Integration Manual (P/N 95-05245), or from the manufacturer’s website at www. transact-tech.com. Perforated fan folded tickets in a stack of 200, 300 or 400 tickets “Ithaca” is a registered trademark of TransAct Technologies. HotSwap QDT (Quick Disconnect Technology), a hot swappable printer mechanism design for easy service Barcode and total ticket cash-out capabilities TicketBurst – incorporating print, burst and transport zones, where the ticket is completely printed and burst before transport to operator Modular interface printed circuit board (PCB) Selections of 7.5, 10, 12, 16.5 and 20 characters per inch printing Selectable printing of normal, double-high, double-wide and double-high/ double-wide Sensors for Burst Ticket, Ticket Low, Top-of-Form/Ticket Out, Chassis Open, and Ticket Taken Cover Open switch Modular printer mechanism, ticket tray and sliding unit for easy maintenance Open ticket path for ticket jam clearing Operator interface: FEED button, status LED’s (Ready/Paper/Open/Fault) Bezel lamp connection import firmware and graphics download port Print face down Page mode printing Audible Buzzer This document contains confidential information that is proprietary to ATI. It may not be copied or disclosed to unauthorized parties. © 2006 Aristocrat Technologies, Inc. All rights reserved. 340 28-01186-01 10 Nov 2006 MAV500™ C3 and Xtreme® Service Manual Ticket Printers Interface Specifications All power and communications are supplied through the Serial Communications printed circuit board (PCB) located at the rear of the printer. The interface connector is a 14 position Molex Minifit Jr® and will mate with Molex. Serial Communications Connector XON / XOFF . Flow Control XOFF XON This document contains confidential information that is proprietary to ATI. It may not be copied or disclosed to unauthorized parties. © 2006 Aristocrat Technologies, Inc. All rights reserved. 341 28-01186-01 10 Nov 2006 The RS-232 serial interface communicates using hardware and XON (DC1)/XOFF (DC3) flow control. Flow control helps ensure that the computer does not send information to the printer faster than it can print. When the printer’s buffer is approximately 50% full, it sends the ASCII code XOFF (13 Hex) to the computer to tell it to stop sending data. When there is room, the printer sends the ASCII code XON (11 Hex) to the computer to tell it to resume sending data. If the computer does not stop sending data after it receives an XOFF, the data that overflows the buffer is lost and the printer halts. The printer sends an XON code when it goes on-line to get things started. It will send an XOFF code to stop the computer from sending information if the input buffer is approximately 50%full. MAV500™ C3 and Xtreme® Service Manual Ticket Printers Ready/Busy. Protocol The RS-232C interface uses the RTS/CTS, DTR/DSR, or XON/XOFF protocol. For RTS/CTS, changes in the RTS/CTS signal coordinate the information flow. For DTR/DSR, changes in the DTR/DSR signal coordinate the information flow. For XON/XOFF, data characters transmitted between the host computer control communication data flow. The RS-232C version of the Epic 950 offers the standard communication options configured in the flash. RTS/CTS Protocol The RTS signal controls data transmission to the printer. It is driven high when the printer is ready to receive data and driven low when it cannot accept any more data. The host transmits data to the printer when it recognizes the state of the printer’s RTS signal is high. DTR/DSR Protocol The DTR signal controls data transmission to the printer. It is driven high when the printer is ready to receive data and driven low when it cannot accept any more data. The host transmits data to the printer when it recognizes the state of the printer’s DTR signal is high. Serial Communications PCB PIN-Outs This document contains confidential information that is proprietary to ATI. It may not be copied or disclosed to unauthorized parties. © 2006 Aristocrat Technologies, Inc. All rights reserved. 342 28-01186-01 10 Nov 2006 PIN # Function I/O 1 MRESET I 2 Not connected N/C 3 +12 VDC I 4 Not connected N/C 5 GND -- 6 +24VDC -- 7 GND -- 8 +24VDC -- 9 Bezel Lamp – Switched +24VDC O 10 GND -- 11 RS-232 RXD I 12 RS-232 TXD O 13 DTR O 14 RTS O MAV500™ C3 and Xtreme® Service Manual Ticket Printers Printer Mechanism Assembly The Epic 950 uses a slider/detent/latch system with latch arms to retain the inner chassis from accidentally separating from the outer chassis. The Epic 950 opens for service by pulling on the ticket cover and pulling the inner chassis forward from the outer chassis much like a filing cabinet. If accessible, a frontmounted release lever can be pulled to disengage and slide the inner chassis. Printer Assembly Components Inner Chassis. Removal Inner Chassis Replacement This document contains confidential information that is proprietary to ATI. It may not be copied or disclosed to unauthorized parties. © 2006 Aristocrat Technologies, Inc. All rights reserved. 343 28-01186-01 10 Nov 2006 Step Description 1 Pull on the ticket cover to release the rear detents, pulling the inner chassis forward until its latches catch the forward detent slots in the outer chassis slides. 2 Pull on the release lever and pull forward on the inner chassis to disconnect from the outer chassis. Step Description 1 Align the base of the inner chassis with the outer walls of the outer chassis, seating it within the sidewalls. 2 While pulling outwards on the release lever, slide the inner chassis towards the rear of the outer chassis until it latches at the rear of the outer chassis. MAV500™ C3 and Xtreme® Service Manual Ticket Printers Loading Tickets Loading Tickets. into the Ticket Supply Box Feeding Tickets into the Printer Mechanism This document contains confidential information that is proprietary to ATI. It may not be copied or disclosed to unauthorized parties. © 2006 Aristocrat Technologies, Inc. All rights reserved. 344 28-01186-01 10 Nov 2006 When loading new ticket stacks, ensure there is power to the printer. Insert the first ticket of the stack into the printer by hand. The Epic 950’s ticket tray is integrated with a guide to direct the ticket into the printer mechanism. Once the leading ticket enters the top of form sensor, the ticket automatically feeds into the printer mechanism. Step Description 1 Load tickets into the ticket supply tray, ensuring that the black dot is positioned as shown below. 2 Orient the tickets so that the black dot is towards the leading edge of the ticket. Step Description 1 Place the tickets in the ticket tray with the proper black dot orientation. 2 Insert the leading ticket into the printer mechanism’s insertion guide area. Feed the ticket about a ½” into the mechanism; the machine automatically completes the feeding process. 3 If printer slid out from the rack, ensure that the printer is closed. The printer is ready to receive information. MAV500™ C3 and Xtreme® Service Manual Ticket Printers Removing Loaded Tickets There are two ways to remove unused tickets from the printer mechanism assembly: Lift and rotate the ticket cover backwards; this relieves pressure to the platen allowing ticket removal, and allows an opening that provides space to check the printer for ticket jams, or prepare the paper path for ticket replenishing. Use the FEED button, which feeds out tickets from within the printer mechanism. Unloading Tickets by Opening the Ticket Cover Unloading Tickets Using the FEED Button This document contains confidential information that is proprietary to ATI. It may not be copied or disclosed to unauthorized parties. © 2006 Aristocrat Technologies, Inc. All rights reserved. 345 28-01186-01 10 Nov 2006 Step Description 1 Pull the inner chassis away from the outer chassis until it stops in the open position. 2 Lift and rotate the ticket cover backwards, towards the rear of the printer. 3 Remove all tickets from the ticket path and check for any debris. 4 Remove any remaining tickets from the ticket tray. 5 Rotate the ticket cover into its original closed and latched (magnetic) position. Proceed with the ticket loading procedure. Step Description 1 Pull the printer mechanism assembly out of the slide chassis until it stops in the open position. 2 Separate the ticket currently loaded in the platen assembly from the ticket bundle. 3 Press the FEED button to eject the ticket. 4 Remove any remaining tickets from the ticket supply box. Proceed with the ticket loading procedure. MAV500™ C3 and Xtreme® Service Manual Ticket Printers Sensors The Epic 950 uses several sensors to provide feedback to the host system. All power and interface communications are handled by the communications PCB. Sensor Locations Cover Open Switch The Cover Open switch detects when the ticket cover is open, and halts printing and the ticket feeding process until the ticket cover is closed. Ticket Low Sensor A Ticket Low sensor optically senses the number of tickets remaining in the printer’s ticket bucket. The sensor detects when the number of tickets reaches below 5-10 tickets. The ticket low status is reported on the status byte, when the host issues a status request. Ticket Burst Sensor The Epic 950 printer incorporates a TicketBurst feature, which automatically bursts tickets prior to presentation to the operator. The Ticket Burst sensor detects that the ticket was separated before it was presented. Top-of-Form/Ticket Out Sensor A Top Of Form/Ticket Out sensor controls ticket loading and printing. Ticket Taken Sensor This document contains confidential information that is proprietary to ATI. It may not be copied or disclosed to unauthorized parties. © 2006 Aristocrat Technologies, Inc. All rights reserved. 346 28-01186-01 10 Nov 2006 A Ticket Taken sensor determines when customers take the printed ticket. MAV500™ C3 and Xtreme® Service Manual Ticket Printers Chassis Open Sensor/ Audible Alarm The Chassis Open sensor determines if the inner chassis is in the full-racked position. If the inner chassis is not in the fully racked position, the printer status LED blinks, indicating the printer is not ready. Audible Alarm Sensor This document contains confidential information that is proprietary to ATI. It may not be copied or disclosed to unauthorized parties. © 2006 Aristocrat Technologies, Inc. All rights reserved. 347 28-01186-01 10 Nov 2006 MAV500™ C3 and Xtreme® Service Manual Ticket Printers Care and Maintenance Cleaning the. Print Head There is no set schedule for printer maintenance. Perform appropriate maintenance as required. Use a soft brush to clean the paper dust from inside the printer and chassis area. Remove paper dust from the sensor optics. If streaking on the printed ticket is evident, the thermal print head requires cleaning. Insert a thermal-printer cleaning card into the printer channel past the print head. Cleaning Cards are available through Transact, or can be purchased direct from Enefco International Ltd at (888) 578-0141: 2.5” x 6” thermal cleaning card (box of 25) Transact Part Number 100-03322, Enefco Part Number GTP250PB This document contains confidential information that is proprietary to ATI. It may not be copied or disclosed to unauthorized parties. © 2006 Aristocrat Technologies, Inc. All rights reserved. 348 28-01186-01 10 Nov 2006 Step Description 1 Open the cover and remove all tickets from the ticket feed path; close the cover. 2 Open the cleaning card pouch and remove the cleaning card; insert the cleaning card into the feed path. The cleaning card automatically draws into the feed path. 3 Open the cover and remove the cleaning card by gently pulling it back. Repeat if necessary. 4 Properly dispose the used cleaning card. MAV500™ C3 and Xtreme® Service Manual Ticket Printers Troubleshooting Self-test Ticket Printers may print more or less information, depending on the version and revision of the printer. Printing a Self-Test Ticket Troubleshooting incorporates a self-test, printer status LEDs, and printer error descriptions and their remedies. The Epic 950 can print a pre-defined self-test ticket, to test the normal printing functionality of the unit, and create a printout of the current printer configuration. If the printer is not performing correctly, check that the unit is receiving power. The green test LED should be ON when the printer is correctly receiving power. After confirming that the printer is receiving power, check that the ticket was loaded correctly and is not jammed in the ticket path. Step Description 1 Unrack the inner chassis. 2 Open the ticket cover. Do NOT remove a currently loaded ticket. 3 Press and hold the FEED button until the Open LED goes out, then release this button. 4 Close the ticket cover; the self-test ticket automatically prints. 5 Close the inner chassis to resume normal operation. Press the ticket FEED button to advance a single ticket through the print mechanism and automatically position the ticket correctly. Ensure all connectors are firmly in place to ensure a proper signal. If the printer continues to feed tickets without stopping, check that the tickets are facing in the right direction to allow the sensor to detect the alignment marks at the top of the ticket. Sample Text Ticket This document contains confidential information that is proprietary to ATI. It may not be copied or disclosed to unauthorized parties. © 2006 Aristocrat Technologies, Inc. All rights reserved. 349 28-01186-01 10 Nov 2006 MAV500™ C3 and Xtreme® Service Manual Ticket Printers Printer Status LEDs The printer is outfitted with a light emitting diode (LED) indicator system that provides the condition of the printer by using a series of blinks to communicate the status of the printer. The following lists the different LED indications and provides a brief description. Condition Specifications This document contains confidential information that is proprietary to ATI. It may not be copied or disclosed to unauthorized parties. © 2006 Aristocrat Technologies, Inc. All rights reserved. 350 28-01186-01 10 Nov 2006 LED Ready Paper Open Fault Unit ready ON OFF OFF OFF Cover open ON OFF ON OFF Chassis open ON OFF Blink OFF Ticket out ON ON OFF OFF Ticket low ON Blink OFF OFF Temperature error Blink OFF OFF Blink Paper jam ON OFF OFF Blink RAM error 2 Blinks OFF OFF ON Checksum error 4 Blinks OFF OFF ON Feature Specification Print Speed 125 mm/sec. (5” per sec.) max. (monochrome) (in text mode) Print Resolution 203dpi x 203dpi Printing Method Fixed linear thermal head Power Requirement 24V DC ±10% 2.2 Amps max. Ticket Dimensions 65mm x 156mm Interface RS-232 bi-directional XON/XOFF Communications Protocol 9600 baud, 8 data bits, no parity, 1 start bit, 1 stop bit Bezel Dimensions 139mm x 85mm Printer Depth 284mm Weight 3.8 lbs. MAV500™ C3 and Xtreme® Service Manual Ticket Printers Custom Tickets The Ithaca Printer uses the thermal printing method. To use custom pre-printed tickets, all graphics must be compatible with thermal ink. The underside of the ticket contains indexing marks that must be clear of any graphics and disclaimer notices. The marks must be printed in black, thermal-paper-compatible, be in infrared ink, and printed with a McBeth Densitometer reading of 1.5 to 0.3. The indicator must be 3mm by 8mm and located at a distance of 3.5mm from the right side and 6mm from the top of the ticket back. The 11.5mm area in line with the black-dot / top-of-form indicator and the ticket edge must remain clear, as the ticket-out sensor reads that area while the ticket is printed and presented. Custom Tickets This document contains confidential information that is proprietary to ATI. It may not be copied or disclosed to unauthorized parties. © 2006 Aristocrat Technologies, Inc. All rights reserved. 351 28-01186-01 10 Nov 2006 MAV500™ C3 and Xtreme® Service Manual Ticket Printers Ithaca® Model 850 Thermal Ticket Printer The Ithaca Model 850 Thermal Ticket Printer (Ithaca 850) is a high-quality, highspeed (5ips) output device that provides printing of portrait and landscape text, graphics and lines. The device is used to output cash tickets that can be read by the bill acceptor. Additional information is available from the Model 850 OEM Integration Manual (P/N 85-03431), or from the manufacturer’s website at www. transact-tech.com. The Ithaca Model 850 Thermal Ticket Printer (Ithaca 850) is a high-quality, highspeed (5ips) output device that provides printing of portrait and landscape text, graphics and lines. The device is used to output cash tickets that can be read by the bill acceptor. “Ithaca” is a registered trademark of TransAct Technologies. Printer Components This document contains confidential information that is proprietary to ATI. It may not be copied or disclosed to unauthorized parties. © 2006 Aristocrat Technologies, Inc. All rights reserved. 352 28-01186-01 10 Nov 2006 MAV500™ C3 and Xtreme® Service Manual Ticket Printers Interface Specifications All power and communications are supplied through the Serial Communications printed circuit board (PCB) located at the rear of the printer. The interface connector is a 14 position Molex Minifit Jr® and will mate with Molex. Serial Communications Connector XON / XOFF . Flow Control XOFF XON This document contains confidential information that is proprietary to ATI. It may not be copied or disclosed to unauthorized parties. © 2006 Aristocrat Technologies, Inc. All rights reserved. 353 28-01186-01 10 Nov 2006 The RS-232 serial interface communicates using hardware and XON (DC1)/XOFF (DC3) flow control. Flow control helps ensure that the computer does not send information to the printer faster than it can print. When the printer’s buffer is approximately 50% full, it sends the ASCII code XOFF (13 Hex) to the computer to tell it to stop sending data. When there is room, the printer sends the ASCII code XON (11 Hex) to the computer to tell it to resume sending data. If the computer does not stop sending data after it receives an XOFF, the data that overflows the buffer is lost and the printer halts. The printer sends an XON code when it goes on-line to get things started. It will send an XOFF code to stop the computer from sending information if the input buffer is approximately 50%full. MAV500™ C3 and Xtreme® Service Manual Ticket Printers Ready/Busy Protocol The RS-232C interface uses the RTS/CTS, DTR/DSR, or XON/XOFF protocol. For RTS/CTS, changes in the RTS/CTS signal coordinate the information flow. For DTR/DSR, changes in the DTR/DSR signal coordinate the information flow. For XON/XOFF, data characters transmitted between the host computer control communication data flow. The RS-232C version of the Ithaca 850 offers the standard communication options configured in flash. RTS/CTS Protocol The RTS signal controls data transmission to the printer. It is driven high when the printer is ready to receive data and driven low when it cannot accept any more data. The host transmits data to the printer when it recognizes the state of the printer’s RTS signal is high. DTR/DSR Protocol The DTR signal controls data transmission to the printer. It is driven high when the printer is ready to receive data and driven low when it cannot accept any more data. The host transmits data to the printer when it recognizes the state of the printer’s DTR signal is high. Serial Communications PCB PIN-Outs This document contains confidential information that is proprietary to ATI. It may not be copied or disclosed to unauthorized parties. © 2006 Aristocrat Technologies, Inc. All rights reserved. 354 28-01186-01 10 Nov 2006 PIN # Function Description I/O 1 MRESET Active Low Signal – Optically Isolated Vin(H) 13 VDC Vin(L) 0.3 – 1.2 V @ 15 ma I 2 Not connected 3 +12 VDC 4 Not connected 5 GND Printer ground -- 6 +24VDC Printer voltage -- 7 GND Printer ground -- 8 +24VDC Printer voltage -- 9 Modulated +24VDC Bezel lamp power O 10 GND Printer frame -- 11 RS-232 RXD Printer receive I 12 RS-232 TXD Printer transmit O 13 DTR O 14 RTS O N/C VRESET 13VCD 150ma NOM I N/C MAV500™ C3 and Xtreme® Service Manual Ticket Printers Printer Mechanism Assembly The Ithaca 850 uses a slider/detent system with springs to retain the printer mechanism assembly from accidentally separating from the outer chassis. The Ithaca 850 opens for service by pulling the printer mechanism assembly out of the outer chassis much like a filing cabinet. Printer Assembly Components Printer Mechanism Assembly Removal Step Description 1 Pull the printer mechanism assembly forward until the slide plungers fit into the front racking retainers (detents) of the outer slide chassis. 2 Lift the front end of the printer mechanism assembly up until it is free of the retaining tab located on the front, inside area of the outer chassis. If the printer mechanism assembly is removed from the outer slide chassis, the 30-pin cable joining the printer serial communication board and the printer’s main controller board must be disconnected. This document contains confidential information that is proprietary to ATI. It may not be copied or disclosed to unauthorized parties. © 2006 Aristocrat Technologies, Inc. All rights reserved. 355 28-01186-01 10 Nov 2006 MAV500™ C3 and Xtreme® Service Manual Ticket Printers Tickets The ticket medium is a stack of 200 tickets in a perforated fan fold configuration located in a ticket bucket at the rear of the printer. The ticket is not made available to the player until it is completely printed and the customer performs the ticket separation. Tickets have alignment marks printed on the underside to enable feeding of the tickets to the correct printing position. Location and Access The ticket bucket is situated to the rear of the printer mechanism assembly. The printer mechanism assembly uses a slider/detent system with springs to retain the printer mechanism assembly from accidentally being separated from the printer chassis. Remove the printer mechanism assembly from the outer slide assembly until it is held by the front racking retainers. Loading and. Replacing Tickets To ensure the ticket is loaded correctly into the printer, the ticket stack must be properly loaded in the ticket box. The stack must be oriented so that the black dot/top of form mark of the tickets is on the leading edge of the ticket, not near the perforation of the next ticket. If the top ticket on the stack has the back facing upward, the perforation attaching the next ticket will be toward the front of the ticket supply box with the black dot/top of form indicator in the rear right corner. If the print area is facing upward, the perforation attaching the next ticket will be toward the rear of the ticket supply box. Loading Tickets Feeding Mechanism This document contains confidential information that is proprietary to ATI. It may not be copied or disclosed to unauthorized parties. © 2006 Aristocrat Technologies, Inc. All rights reserved. 356 28-01186-01 10 Nov 2006 MAV500™ C3 and Xtreme® Service Manual Ticket Printers Replacing Tickets Loading Tickets The following procedure requires the power to remain ON. This document contains confidential information that is proprietary to ATI. It may not be copied or disclosed to unauthorized parties. © 2006 Aristocrat Technologies, Inc. All rights reserved. 357 28-01186-01 10 Nov 2006 Step Description 1 Pull the printer forward to the extended position until the plastic slide plungers fit into the front racking retainers (detents) of the outer slide chassis. 2 Push the drawer into the outer slide assembly until the plastic slide plungers fit into the rear racking retainers (detents) of the outer slide assembly. 3 Insert the first ticket of a new stack into the printer feed mechanism by hand. A guide directs the ticket into the mechanism. Step Description 1 Remove the printer as previously described. 2 Grasp the first ticket and insert it between the cover-platen assembly and the print head until the ticket reaches the printer mechanism (about 12mm). 3 Continue to push gently until the printer mechanism detects the ticket and the motor pulls it into the printer channel. The printer stops feeding automatically upon sensing the alignment marks. 4 Replace the printer as previously described. MAV500™ C3 and Xtreme® Service Manual Ticket Printers Removing Loaded Tickets There are two ways to remove unused tickets from the printer mechanism assembly: Press the FEED button Release the plastic actuator latch to open the cover and platen assembly Feed Button and Actuator Latch Unloading Tickets Using the FEED Button Unloading Tickets by Opening the Platen Assembly This document contains confidential information that is proprietary to ATI. It may not be copied or disclosed to unauthorized parties. © 2006 Aristocrat Technologies, Inc. All rights reserved. 358 28-01186-01 10 Nov 2006 Step Description 1 Pull the printer mechanism assembly out of the slide chassis until it stops in the open position. 2 Separate the ticket currently loaded in the platen assembly from the ticket bundle. 3 Press the FEED button to eject the ticket. 4 Remove any remaining tickets from the ticket supply box and proceed with the ticket loading procedure. Step Description 1 Pull the printer mechanism assembly out of the slide chassis until it stops in the open position. 2 Pull the plastic actuator latch towards the front of the printer. 3 Swing the platen assembly up and towards the front of the printer. 4 Remove all tickets from the ticket path and check for any debris. 5 Press the green label to re-latch the platen assembly and proceed with the ticket loading procedure. MAV500™ C3 and Xtreme® Service Manual Ticket Printers Sensors The Ithaca 850 printer uses several sensors to provide feedback to the host system. All power and interface communications are handled by the communications printed circuit board (PCB). Sensor Locations Paper Low Top-of-Form Sensor A Top of Form sensor controls ticket loading and printing. Ticket Taken Sensor A Ticket Taken sensor determines when customers actually take the printed ticket. Head-Up Switch A Head Up Switch signals when the thermal printhead assembly is open. The Head Up Switch is located under the printhead and is not visible from the top view. This document contains confidential information that is proprietary to ATI. It may not be copied or disclosed to unauthorized parties. © 2006 Aristocrat Technologies, Inc. All rights reserved. 359 The Paper Low sensor optically senses the number of tickets remaining in the printer’s ticket bucket. The sensor detects when the number of tickets reaches below 30 to 35 tickets. The paper low status reports on the status byte, when the host issues a status requested. 28-01186-01 10 Nov 2006 MAV500™ C3 and Xtreme® Service Manual Ticket Printers Open/Close Position Sensor/Audible Alarm The Open/Close Position sensor determines if the printer mechanism assembly is in the full-racked position. If the printer mechanism assembly is not in the fully racked position, the printer status LED blinks which indicates the printer is not ready. Open/Close Position Sensor This document contains confidential information that is proprietary to ATI. It may not be copied or disclosed to unauthorized parties. © 2006 Aristocrat Technologies, Inc. All rights reserved. 360 28-01186-01 10 Nov 2006 MAV500™ C3 and Xtreme® Service Manual Ticket Printers Care and Maintenance There is no set schedule for printer maintenance. Perform appropriate maintenance as required. Cleaning the. Print Head If streaking on the printed ticket is evident, the thermal print head require cleaning. Insert a thermal-printer cleaning card into the printer channel past the print head. Cleaning Cards are available through Transact, or can be purchased direct from Enefco International Ltd at (888) 578-0141: 2.5” x 6” thermal cleaning card (box of 25) Transact Part Number 100-03322, Enefco Part Number GTP250PB. This document contains confidential information that is proprietary to ATI. It may not be copied or disclosed to unauthorized parties. © 2006 Aristocrat Technologies, Inc. All rights reserved. 361 28-01186-01 10 Nov 2006 Step Description 1 Remove all tickets from the ticket feed path. 2 Obtain a new cleaning card package, open the container pouch and remove the cleaning card. Insert the cleaning card into the ticket feed path. 3 Press and hold the FEED button when the cleaning card is drawn into the feed path. 4 Release the FEED button when the cleaning card protrudes from the bezel mouth. 5 Repeat the process if evidence of the streaking remains. Properly dispose of the used cleaning card. MAV500™ C3 and Xtreme® Service Manual Ticket Printers Troubleshooting If the printer is not performing correctly, check that the unit is receiving power. The green test LED should be ON when the printer is correctly receiving power. After confirming that the printer is receiving power, check that the ticket was loaded correctly and is not jammed in the ticket path. Press the ticket FEED button to advance a single ticket through the print mechanism and automatically position the ticket correctly. Ensure all connectors are firmly in place to ensure a proper signal. If the printer continues to feed tickets without stopping, check that the tickets are facing in the right direction to allow the sensor to detect the alignment marks at the top of the ticket. Printer Status. LEDs This document contains confidential information that is proprietary to ATI. It may not be copied or disclosed to unauthorized parties. © 2006 Aristocrat Technologies, Inc. All rights reserved. 362 28-01186-01 10 Nov 2006 The printer has an LED indicator system that provides the condition of the printer by using a series of blinks to communicate the status of the printer. The following table lists the different LED indications and provides a brief description. Condition Status LED Unit ready On Head up Medium blink Printer Mechanism Assembly is Open Medium blink Paper Out Slow blink Temperature Error Fast blink Paper Jam 4 Blinks pause RAM error 2 Blinks pause Checksum Error 5 Blinks pause MAV500™ C3 and Xtreme® Service Manual Ticket Printers Specifications Custom Tickets Feature Specification Print Speed 51mm/sec Print Resolution 8 dots per mm horizontal and vertical Printing Method Direct Thermal Print head life 25km Data Buffer 4kb Power Requirement 24V DC ±10% 1.5A max. Ticket Dimensions 65mm x 156mm Ticket Stack 58mm Interface RS-232 bi-directional XON/XOFF Communications Protocol 9600 baud, 8 data bits, no parity, 1 start bit, 1 stop bit Bezel Dimensions 139mm x 85mm Printer Depth 325mm Weight 3.41kg The Ithaca Printer uses the thermal printing method. To use custom pre-printed tickets, all graphics must be compatible with thermal ink. The underside of the ticket contains indexing marks that must be clear of any graphics and disclaimer notices. The marks must be printed in black, thermal-paper-compatible, be in infrared ink, and printed with a McBeth Densitometer reading of 1.5 to 0.3. The indicator must be 3mm by 8mm and located at a distance of 3.5mm from the right side and 6mm from the top of the ticket back. The 11.5mm area in line with the black-dot / top-of-form indicator and the ticket edge must remain clear, as the ticket-out sensor reads that area while the ticket is printed and presented. 6.00 mm 11.50 mm 3.00 mm 3.50 mm Top of Form Indicator Usable Area Custom Tickets This document contains confidential information that is proprietary to ATI. It may not be copied or disclosed to unauthorized parties. © 2006 Aristocrat Technologies, Inc. All rights reserved. 363 28-01186-01 10 Nov 2006 Keep Out Zone MAV500™ C3 and Xtreme® Service Manual Electromechanical Meters Table of. Contents General Description......................................365 Technical Description...................................366 Meters Interface..................................................................................... 367 Overcurrent Protection........................................................................ 367 Light Tower Driver & Belly Panel Door Security Interfaces.........367 Meter Detection..................................................................................... 367 Electromechanical Meters.................................................................... 367 Structure and Components.........................368 Connector PIN Assignments........................370 Connection from Backplane Board....................................................370 Connection to Pulse Interface Board................................................371 Backplane Connections to Pulse Interface Board...........................................371 Connection to Light Tower Lamps.....................................................372 General Maintenance....................................373 This document contains confidential information that is proprietary to ATI. It may not be copied or disclosed to unauthorized parties. © 2006 Aristocrat Technologies, Inc. All rights reserved. 364 28-01186-01 10 Nov 2006 MAV500™ C3 and Xtreme® Service Manual Electromechanical Meters General Description Removal and replacement instructions are located in the Cabinet, Door and Top Box module. The hard meters board assembly, attached to the underside of the player marketing module (PMM) tray, provides six electromechanical meters that can be viewed through the main door viewing window when the audit key switch is turned counter-clockwise. The meters record activity counts as required by jurisdictional authorities. Electromechanical Meters – Location This document contains confidential information that is proprietary to ATI. It may not be copied or disclosed to unauthorized parties. © 2006 Aristocrat Technologies, Inc. All rights reserved. 365 28-01186-01 10 Nov 2006 MAV500™ C3 and Xtreme® Service Manual Electromechanical Meters Technical Description The hard meters board assembly includes: A metering board, the hard meter board (HMB), with the capability to handle up to eight pulse inputs – each stored and displayed on its respective hard meter An interface board, the pulse interface board (PIB), to interface to electronic gaming machines (EGM) using a pulse output The assembly includes: Two printed circuit board assemblies (PCBA) Light pipe illumination of the meters when the audit key switch is turned Monitoring the presence of the PCBAs through a tamper switch Additional protection from a security seal attached to the assembly and the PMM tray, which includes a protective cover and base plate The following illustration shows a functional block diagram. Electromechanical Meters Board - Block Diagram This document contains confidential information that is proprietary to ATI. It may not be copied or disclosed to unauthorized parties. © 2006 Aristocrat Technologies, Inc. All rights reserved. 366 28-01186-01 10 Nov 2006 MAV500™ C3 and Xtreme® Service Manual Electromechanical Meters Meters Interface Overcurrent Protection An intelligent power driver is used for switching power ON and OFF through the meter drive outputs. The power switch incorporates built-in overcurrent sensing and protection. Light Tower Driver & Belly Panel Door Security Interfaces Connectors that form part of a cable from P2 on the backplane board drive the light tower and provide door security. Meter Detection A tamper switch monitors the presence of the HMB assembly. A security seal is also attached to the assembly and the PMM tray. Electromechanical Meters This document contains confidential information that is proprietary to ATI. It may not be copied or disclosed to unauthorized parties. © 2006 Aristocrat Technologies, Inc. All rights reserved. 367 The I/O driver board sends pulse drive signals via the backplane board to the PIB and then to the HMB to increment appropriate meters. 28-01186-01 10 Nov 2006 Specifications for the electromechanical meters are detailed below. Item Measurement Number of digits 7 Rated voltage 24V DC Power consumption 46 mA 1.1W Operating volume range 90 to 110% of rated voltage Count speed 20 CPS (standard) Allowable ripple ratio <10% Ambient temperature -25°C to +60°C (operating) Dielectric strength 1500V AC, 50/60 Hz for 1 minute MAV500™ C3 and Xtreme® Service Manual Electromechanical Meters STRUCTURE.AND. COMPONENTS The structure of HMB is shown in the Backplane Connections to Pulse Interface Board section. Details of the component layouts for the HMB and the PIB are shown in the following figures. Electromechanical Meters Board - Component Layout Electromechanical Meters Board - Component Layout This document contains confidential information that is proprietary to ATI. It may not be copied or disclosed to unauthorized parties. © 2006 Aristocrat Technologies, Inc. All rights reserved. 28-01186-01 10 Nov 2006 MAV500™ C3 and Xtreme® Service Manual Electromechanical Meters Structure and Components (continued) Pulse Interface Board - Component Layout If the machine pays out too many coins, or not enough, the machine locks up and cannot be played until the problem is resolved. This document contains confidential information that is proprietary to ATI. It may not be copied or disclosed to unauthorized parties. © 2006 Aristocrat Technologies, Inc. All rights reserved. 369 28-01186-01 10 Nov 2006 MAV500™ C3 and Xtreme® Service Manual Electromechanical Meters CONNECTOR.PIN. ASSIgNMENTS Connection.from. Backplane.Board The shaded signals (SEC_NC, SEC_NO, and SEC_COM) provide for the belly panel door batterybacked security switch. This document contains confidential information that is proprietary to ATI. It may not be copied or disclosed to unauthorized parties. © 2006 Aristocrat Technologies, Inc. All rights reserved. 0 28-01186-01 10 Nov 2006 This section details connector pin assignments for the backplane board, pulse interface board, and light tower lamps. The 24-way Minifit Junior® connector connects to a 16-way Honda Connector on the PIB, a 6-way Minifit Junior receptacle on the light tower (if equipped), and a 6way Minifit Junior Receptacle on the belly panel door security switch (if equipped). PIN Signal Function Comment 1,2,3,4, 13,14 MET24V +24V DC (input to meters board) 24V DC supply for meters 5 HM1 Signal to control hard meter no.1 (input to meters board) Pulse signal for direct connection to the meter (pulldown) 6 HM2 Signal to control hard meter no.2 (input to meters board) Pulse signal for direct connection to the meter (pulldown) 7 HM3 Signal to control hard meter no.3 (input to meters board) Pulse signal for direct connection to the meter (pulldown) 8 HM4 Signal to control hard meter no.4 (input to meters board) Pulse signal for direct connection to the meter (pulldown) 9 HM5 Signal to control hard meter no.5 (input to meters board) Pulse signal for direct connection to the meter (pulldown) 10 HM6 Signal to control hard meter no.6 (input to meters board) Pulse signal for direct connection to the meter (pulldown) 11 VCC +5V DC (input to meters board) not used on meters board 12,24 GND Ground Ground reference 15,16 LTL24V +24V DC (input to meters board) 24V DC supply for light tower 17 SEC_NC Security switch - normally closed contact Belly panel door batterybacked security 18 SEC_NO Security switch - normally open contact Belly panel door batterybacked security 19 SEC_COM Security switch - common contact Belly panel door batterybacked security 20 LTL1 Signal to control light tower lamp no.1 (input to meters board) Signal for direct connection to the light tower (pull-down) MAV500™ C3 and Xtreme® Service Manual Electromechanical Meters Connection from Backplane Board (continued) Connection to Pulse Interface Board Backplane Connections to Pulse Interface Board PIN Signal Function Comment 21 LTL2 Signal to control light tower lamp no.2 (input to meters board) Signal for direct connection to the light tower (pull-down) 22 LTL3 Signal to control light tower lamp no.3 (input to meters board) Signal for direct connection to the light tower (pull-down) 23 LTL4 Signal to control light tower lamp no.4 (input to meters board) Signal for direct connection to the light tower (pull-down) A 16-way Honda connector provides the interface to the PIB. The connector is a Minifit Junior type. PIN Signal Function Source Comment 1 HM1 Signal for hard meter No.1 Backplane P2 PIN 5 Pulse signal 2 HM2 Signal for hard meter No.2 Backplane P2 PIN 6 Pulse signal 3 HM3 Signal for hard meter No.3 Backplane P2 PIN 7 Pulse signal 4 HM4 Signal for hard meter No.4 Backplane P2 PIN 8 Pulse signal 5 HM5 Signal for hard meter No.5 Backplane P2 PIN 9 Pulse signal 6 HM6 Signal for hard meter No.6 Backplane P2 PIN 10 Pulse signal 10 MET24V +24V 24V DC supply for meters 12 VCC +5V DC 13,14 GND Ground 7,8,9,11 15,16 This document contains confidential information that is proprietary to ATI. It may not be copied or disclosed to unauthorized parties. © 2006 Aristocrat Technologies, Inc. All rights reserved. 371 28-01186-01 10 Nov 2006 Ground reference MAV500™ C3 and Xtreme® Service Manual Electromechanical Meters Connection to Light Tower Lamps This document contains confidential information that is proprietary to ATI. It may not be copied or disclosed to unauthorized parties. © 2006 Aristocrat Technologies, Inc. All rights reserved. 372 28-01186-01 10 Nov 2006 A 6-way cable header connector provides the interface to the light tower lamps. The connector is a Minifit Junior type. PIN Signal Function Comment 1,6 LTL24V +24V DC (output to tower lamps) 24V DC supply for tower lamps 2 LTL1 Signal to control light tower lamp no.1 (output from meters board) Signal for direct connection to the top lamp (pull-down) 3 LTL2 Signal to control light tower lamp no.2 (output from meters board) Signal for direct connection to the 2nd lamp (pull-down) 4 LTL3 Signal to control light tower lamp no.3 (output from meters board) Signal for direct connection to the 3rd lamp (pull-down) 5 LTL4 Signal to control light tower lamp no.4 (output from meters board) Signal for direct connection to the 4th lamp (pull-down) MAV500™ C3 and Xtreme® Service Manual Electromechanical Meters General Maintenance This document contains confidential information that is proprietary to ATI. It may not be copied or disclosed to unauthorized parties. © 2006 Aristocrat Technologies, Inc. All rights reserved. 373 28-01186-01 10 Nov 2006 For general maintenance of the electromechanical meters board: Remove any dust or dirt from external surfaces. Ensure that all connectors are in good condition and are secure. MAV500™ C3 and Xtreme® Service Manual Sound System Table of. Contents General Description......................................375 Adjusting Output Levels....................................................................... 377 Audio Input Specifications.................................................................... 377 Audio Output Specifications............................................................... 377 Technical Description............................................................................ 378 Power Requirements............................................................................. 381 Connector PIN Assignments........................382 24V Input - J1.......................................................................................... 382 24V Spare - J2......................................................................................... 382 Audio Input - J5...................................................................................... 382 Low Frequency Speaker Output - J6.................................................383 High Frequency Speaker Output - J7.................................................383 High Frequency Speaker Output - J8.................................................383 This document contains confidential information that is proprietary to ATI. It may not be copied or disclosed to unauthorized parties. © 2006 Aristocrat Technologies, Inc. All rights reserved. 374 28-01186-01 10 Nov 2006 MAV500™ C3 and Xtreme® Service Manual Sound System GeNerAl DesCrIPTIoN The sound system for the electronic gaming machine (EGM) is specially engineered to provide higher levels of audio output, improvements in sound quality, and means to adjust the output levels to meet a wide range of venue requirements. Removal and replacement instructions are located in the Cabinet, Door and Top Box module. The system consists of a low-frequency woofer module and a high-frequency sound module located approximately in line with player listening heights. Refer to the Machine Modes module of the Operator Manual for additional information. Output sound levels can be finely adjusted from the Operator Mode menus and screen displays. Sound System Components This document contains confidential information that is proprietary to ATI. It may not be copied or disclosed to unauthorized parties. © 2006 Aristocrat Technologies, Inc. All rights reserved. 375 28-01186-01 10 Nov 2006 MAV500™ C3 and Xtreme® Service Manual Sound System General Description (continued) Speaker Amplifier Assembly This document contains confidential information that is proprietary to ATI. It may not be copied or disclosed to unauthorized parties. © 2006 Aristocrat Technologies, Inc. All rights reserved. 376 28-01186-01 10 Nov 2006 MAV500™ C3 and Xtreme® Service Manual Sound System Adjusting Output Levels Refer to the Machine Modes module of the Operator Manual for additional information. Audio Input Specifications Audio Output Specifications Machine operators conduct first-line output level adjustment by using the menus in Operator Mode (audit key switch ON). The screen options and instructions are found in the Operator Mode Menu → Operator Setup/Selections [5] → Sound System Setup [5.6]. Signal Name Input Impedance Input Sensitivity Connector and Pins Line In 7K ohms 0.775V rms (2.2Vp-p) J3-T, J3-R DAC Low Level Input 7K ohms 0.750V rms (2.1Vp-p) J5-1 MKVI High Level Input 1K ohms 4.9V rms (13.8Vp-p) J5-5 MKV High Level Input 1K ohms 8.0V rms (22.6Vp-p) J5-4 Signal Name Frequency Response Output Power Connector and Pins Audio Out High Frequency 218Hz-20kHz 48W rms into 2 ohms 24W rms into 4 ohms 12W rms into 8 ohms +Out: J7-1, J8-1 -Out: J7-2, J8-2 Audio Out Low Frequency 50Hz-218Hz 24W rms into 4 ohms 12W rms into 8 ohms -Out: J6-1, J6-2, J6-3 This document contains confidential information that is proprietary to ATI. It may not be copied or disclosed to unauthorized parties. © 2006 Aristocrat Technologies, Inc. All rights reserved. 377 28-01186-01 10 Nov 2006 +Out: J6-5, J6-6, J6-7 48W rms into 2 ohms MAV500™ C3 and Xtreme® Service Manual Sound System Technical Description The amplifier operates on 24V DC with a peak current of less than 6A. A mute circuit mutes the speaker outputs for 10 seconds on power ON to minimize turn on transients. A low pass filter on the amplifier input is used for RFI suppression and a differential op-amp for common mode signal rejection. The board is single channel (mono) with a built in 2-way active crossover. The crossover frequency is 218Hz. The Adjusting Output Levels section defines power output for each of the high and low frequency outputs. Speaker outputs are short circuit protected by internal current limiting circuitry within the amplifier integrated circuits (IC). These outputs also shut down if the IC’s safe junction operating temperature is exceeded. The amplifier ICs on the printed circuit board (PCB) mount to an aluminum heatsink bracket which is riveted to the PCB. The bracket can be mounted to a suitable finned heatsink to keep the ICs within their normal operating temperature. Sound System Block Diagram This document contains confidential information that is proprietary to ATI. It may not be copied or disclosed to unauthorized parties. © 2006 Aristocrat Technologies, Inc. All rights reserved. 378 28-01186-01 10 Nov 2006 MAV500™ C3 and Xtreme® Service Manual Sound System Technical Description (continued) Audio Amplifier PCBA This document contains confidential information that is proprietary to ATI. It may not be copied or disclosed to unauthorized parties. © 2006 Aristocrat Technologies, Inc. All rights reserved. 379 28-01186-01 10 Nov 2006 MAV500™ C3 and Xtreme® Service Manual Sound System Technical Description (continued) Audio Amplifier PCBA Component Layout This document contains confidential information that is proprietary to ATI. It may not be copied or disclosed to unauthorized parties. © 2006 Aristocrat Technologies, Inc. All rights reserved. 380 28-01186-01 10 Nov 2006 Amplifier Module Block Diagram MAV500™ C3 and Xtreme® Service Manual Sound System Power Requirements This document contains confidential information that is proprietary to ATI. It may not be copied or disclosed to unauthorized parties. © 2006 Aristocrat Technologies, Inc. All rights reserved. 381 28-01186-01 10 Nov 2006 Signal Name Value Connector and Pins Input Voltage 24V DC ± 10% +24V: J1-1, J1-2 GND: J1-3, J1-4 Current <2.0A cont., 6.0A peak. Power Consumption <150W MAV500™ C3 and Xtreme® Service Manual Sound System Connector PIN Assignments This section details connector pin assignments for 24V Input, 24V Spare, Audio Input, Low Frequency Speaker Output, High Frequency Speaker Output, and High Frequency Speaker Output. 24V Input - J1 The J1 connector is used to connect 24V power input to the board. The connector is a 4-way Molex Micro-fit Male Header. 24V Spare - J2 Audio Input - J5 This document contains confidential information that is proprietary to ATI. It may not be copied or disclosed to unauthorized parties. © 2006 Aristocrat Technologies, Inc. All rights reserved. 382 28-01186-01 10 Nov 2006 PIN PIN Name Description 1 P24V +24V DC 2 P24V +24V DC 3 GND Ground 4 GND Ground The J2 connector can be used to supply auxiliary 24V power if required. The connector is a 4-way Molex Micro-fit Male Header. PIN PIN Name Description 1 P24V +24V DC 2 P24V +24V DC 3 GND Ground 4 GND Ground The J5 connector is used for the Audio Input. The connector is a 10-way Molex Micro-fit Male Header. PIN PIN Name Description 1 +IN_DAC MKVI DAC low level input signal 2 -IN_COM Signal common input 3 GND Ground 4 +IN_MK5 MKV high level signal input 5 +IN_MK6 MKVI high level signal input 6 Not Connected Not connected 7 Not Connected Not connected 8 GND Ground 9 Not Connected Not connected 10 Not Connected Not connected MAV500™ C3 and Xtreme® Service Manual Sound System Low Frequency Speaker. Output - J6 High Frequency Speaker. Output - J7 High Frequency Speaker. Output - J8 This document contains confidential information that is proprietary to ATI. It may not be copied or disclosed to unauthorized parties. © 2006 Aristocrat Technologies, Inc. All rights reserved. 383 28-01186-01 10 Nov 2006 The J6 connector is used for the Low Frequency Speaker Output. The connector is an 8-way Molex Micro-fit Male Header. PIN PIN Name Description 1 -OUT_LF Audio output low frequency negative 2 -OUT_LF Audio output low frequency negative 3 -OUT_LF Audio output low frequency negative 4 GND Ground 5 +OUT_LF Audio output low frequency positive 6 +OUT_LF Audio output low frequency positive 7 +OUT_LF Audio output low frequency positive 8 GND Ground The J7 connector is used for the high frequency speaker output. The connector is a 2-way Molex Micro-fit Male Header. PIN PIN Name Description 1 +OUT_HF Audio Output High Frequency Positive 2 -OUT_HF Audio Output High Frequency Negative The J8 connector is used for the high frequency speaker output. The connector is a 2-way Molex Micro-fit Male Header. PIN PIN Name Description 1 +OUT_HF Audio output high frequency positive 2 -OUT_HF Audio output high frequency negative MAV500™ C3 and Xtreme® Service Manual Serial Protocol Converter 2 Board Table of. Contents Basic Operation.............................................385 SPC2 LED Operation............................................................................ 386 Power ON and ......................................................................................................386 Normal Operation.................................................................................................386 One Flash.................................................................................................................386 Two Flashes..............................................................................................................386 Three Flashes...........................................................................................................386 Four Flashes.............................................................................................................386 Five Flashes...............................................................................................................386 Initialize or Clear NVSRAM................................................................. 387 SPC2 Setup and Configuration....................388 Single-Port SPC2 Configuration......................................................... 388 SPC2 Connectors (Single Port)...........................................................................389 Dual-Port SPC2 Configuration........................................................... 390 SPC2 Connectors (Dual Port).............................................................................391 This document contains confidential information that is proprietary to ATI. It may not be copied or disclosed to unauthorized parties. © 2006 Aristocrat Technologies, Inc. All rights reserved. 384 28-01186-01 10 Nov 2006 MAV500™ C3 and Xtreme® Service Manual Serial Protocol Converter 2 Board Basic Operation GAMMA refers to Gaming Machine Manufacturers Association, now referred to as Gaming Standards Association (GSA). The Serial Protocol Converter (SPC2) board converts the GAMMA used by the EGM to the current version of SAS as required. The H2 connector on the SPC2 board connects to P19 on the backplane board using an RS-232 interface. The H4 connector on the SPC2 board interfaces with the SAS RS-232 compatible device. SPC2 Board This document contains confidential information that is proprietary to ATI. It may not be copied or disclosed to unauthorized parties. © 2006 Aristocrat Technologies, Inc. All rights reserved. 385 28-01186-01 10 Nov 2006 MAV500™ C3 and Xtreme® Service Manual Serial Protocol Converter 2 Board SPC2 LED Operation When using GAMSAS2 v 02.07.04 firmware or newer, using SetChips and/or clearing game SRAM may result in a Host Disabled lockup (tilt). Re-initialize the SPC2 to clear the tilt. The LED is located at L1 near the main processor on the SPC2 board. The LED reveals the status of the board. The LED has seven flashing sequences. # of Flashes Description Flicker (10 pps*) Memory has been cleared Flash (5 pps*) Normal operation 1 – pause No communication on H2 (EGM) 2 – pause No communication on H3 (EZ-Pay, Lottery, Accounting System, etc.) 3 – pause No communication on H4 (Accounting System, Lottery, etc.) 4 – pause NVSRAM error (clear NVSRAM per the Initialize or Clear NVSRAM section below) 5 – pause Invalid EGM SAS-poll address *pps = pulses per second Power ON and Normal Operation When the SPC2 board is ON, the LED flashes a distinctive pattern, which indicates the RAM is cleared and the board is polling the EGM and the system interface board (SIB). When communication with the EGM and the SIB are established, the LED flashes continuously at approximately 5 pps, which signals that the board is operating normally. One Flash Two Flashes Three Flashes Four Flashes Refer to the Machine Modes module of the Operator Manual for additional information. Five Flashes The numbers in brackets [ ] represent the selection as it appears on-screen. This document contains confidential information that is proprietary to ATI. It may not be copied or disclosed to unauthorized parties. © 2006 Aristocrat Technologies, Inc. All rights reserved. 386 28-01186-01 10 Nov 2006 When the LED flashes once repeatedly at a slow rate, communication does not exist in port H2. When the LED flashes twice repeatedly, communication does not exist on port H3. When the LED flashes three times repeatedly, communication does not exist on port H4. When the LED flashes four times repeatedly, the non-volatile static random access memory (NVSRAM) is corrupt and needs clearing. If the EPROM was not changed, clear NVSRAM in the SPC Configuration menu [5.10]. If the EPROM was changed, refer to the Initialize or Clear NVSRAM section for details on clearing the NVSRAM. When the LED flashes five times repeatedly, the SPC2 address is not set. From the Operator Mode Menu, navigate to Operator Mode Menu → Operator Setup/ Selections [5] → SPC Configuration [5.10] to set the SPC address(es). MAV500™ C3 and Xtreme® Service Manual Serial Protocol Converter 2 Board Initialize or. Clear NVSRAM This document contains confidential information that is proprietary to ATI. It may not be copied or disclosed to unauthorized parties. © 2006 Aristocrat Technologies, Inc. All rights reserved. 387 28-01186-01 10 Nov 2006 The following procedure outlines manual clearing of the non-volatile static random access memory (NVSRAM) when clearing SPC memory in Operator Mode is unsuccessful, or when replacing an EPROM. Step Description 1 Turn the power OFF to the SPC board. 2 Connect the jumper from pin 11 to 13 of the J3 plug on the SPC2 board. 3 Turn the power ON to the SPC board; the LED flashes four times, then flash fast repeatedly. 4 Turn the power OFF to the SPC board. 5 Remove the jumper from pin 11 and 13 of plug J2 on the SPC2 board. 6 Turn the power ON to the SPC board; the LED flashes two times. Normal operation is indicated by five flashes, upon which configuration of the SPC2 can be conducted. See the Single-Port SPC2 Configuration section, or the Dual-Port SPC2 Configuration section in this module for more information. MAV500™ C3 and Xtreme® Service Manual Serial Protocol Converter 2 Board SPC2 Setup and Configuration Single-Port SPC2 Configuration The numbers in brackets [ ] represent the selection as it appears on-screen. This section provides details on the setup and configuration for the single-port and dual-port SPC2. Step Description 1 From the Operator Mode Menu, navigate to Operator Mode Menu → Operator Setup/Selections [5] → Game Machine Options [5.1]. 2 Set the Comms Protocol option to Gamma. 3 In the SPC Configuration menu [5.10] set the SPC ID Number: 4 This document contains confidential information that is proprietary to ATI. It may not be copied or disclosed to unauthorized parties. © 2006 Aristocrat Technologies, Inc. All rights reserved. 388 28-01186-01 10 Nov 2006 Step Description A Set the SPC ID Number in the SPC Configuration menu to 1. B Set the Single/Dual Port option to Single Port. C Save options and then clear the SPC 2 memory by following the on-screen cues. If step 3C is unsuccessful, initialize the NVSRAM as described in the Initialize or Clear NVSRAM section. MAV500™ C3 and Xtreme® Service Manual Serial Protocol Converter 2 Board SPC2 Connectors (Single Port) Connector(s) Description PIN(s) Description H2, H3, H4 AMP MTA100x5 (640457-5, or 640440-5 with 640642-5) 2 TXD 3 RXD 5 GND 1 +5VDC 2 GND H8 AMP MTA156x2 (644611-2) SPC2 Single Port Connectors This document contains confidential information that is proprietary to ATI. It may not be copied or disclosed to unauthorized parties. © 2006 Aristocrat Technologies, Inc. All rights reserved. 389 28-01186-01 10 Nov 2006 MAV500™ C3 and Xtreme® Service Manual Serial Protocol Converter 2 Board Dual-Port SPC2 Configuration Requires EGM firmware A4.2.1 or newer. The numbers in brackets [ ] represent the selection as it appears on-screen. Step Description 1 From the Operator Mode Menu, navigate to Operator Mode Menu → Operator Setup/Selections [5] → Game Machine Options [5.1]. 2 Set the Comms Protocol option to Gamma. 3 In the SPC Configuration menu [5.10] set the SPC ID Number: Step Description A Set the four left digits of the SPC ID Number to the appropriate address for Port 1 (H3). Do not use leading zeros as a placeholder; move cursor to position digits. Example: EZ Pay = address _427 and SAS = address 0001. Therefore, the SPC ID number = _4270001. 4 This document contains confidential information that is proprietary to ATI. It may not be copied or disclosed to unauthorized parties. © 2006 Aristocrat Technologies, Inc. All rights reserved. 390 28-01186-01 10 Nov 2006 B Set the four right digits of the SPC ID Number to the appropriate address for the system connected to Port 0 (H4). C Set the Single/Dual Port option to Dual Port. D Select the appropriate port for each of the data types listed (Handpay Mode, Validation Mode and EFT/AFT). E Save options and then clear the SPC 2 memory by following the on-screen cues. If step 3E above is unsuccessful, initialize the NVSRAM as described in the Initialize or Clear NVSRAM section. MAV500™ C3 and Xtreme® Service Manual Serial Protocol Converter 2 Board SPC2 Connectors. (Dual Port) Connector(s) Description PIN(s) Description J2, J3, J4 AMP MTA100x5 (640457-5, or 640440-5 with 640642-5) 2 TXD 3 RXD 5 GND 1 +5VDC 2 GND J8 AMP MTA156x2 (644611-2) SPC2 Dual Port Connectors This document contains confidential information that is proprietary to ATI. It may not be copied or disclosed to unauthorized parties. © 2006 Aristocrat Technologies, Inc. All rights reserved. 391 28-01186-01 10 Nov 2006 MAV500™ C3 and Xtreme® Service Manual Troubleshooting Table of. Contents Tilt/Error Conditions....................................394 Soft Tilts.................................................................................................... 394 Hard Tilts.................................................................................................. 394 Machine Lockup............................................395 Entry to the Current Lockup Screen................................................395 Indication of Conditions....................................................................... 395 No Power................................................................................................ 396 Fluorescent Tubes are not Illuminated...............................................396 Equipment is connected to the auxiliary power outlet but has no power...... 396 Machine has no power..........................................................................................396 No power-up cycle.................................................................................................396 Play Button LEDs do not Illuminate...................................................397 Main LCD Panel...................................................................................... 398 Main LCD Panel Blank...........................................................................................398 Main LCD Panel Video Image Color or Picture Incorrect............................398 Main LCD Panel Showing “No Signal Input”....................................................398 CRT Monitor........................................................................................... 399 Monitor Screen Blank............................................................................................399 Monitor Video Image Color Incorrect or Erratic............................................399 Sound........................................................................................................ 400 No Sound.................................................................................................................400 Sound Too Loud or Too Soft................................................................................400 Coin Handling System........................................................................... 401 All Coins are Going to the Cashbox and the Hopper is Empty..................401 Coins Accepted by the Coin Acceptor but not Registered as Credits; the Machine Locks Up..........................................................................................401 Coin Acceptor Fault / Coin Optic Fault Message...........................................401 Coins Continually Rejected..................................................................................402 Coins Jamming at the Top of the Hopper Chute.............................................402 Coins Jamming in the Cashbox Feed Chute.....................................................402 Coins Stacking at the Bottom of the Bowl.......................................................402 Hopper Does Not Rotate....................................................................................402 Hopper Not Working............................................................................................403 Illegal Coin Out Message on Power On............................................................403 Rejected Coins are not Falling into the Coin Tray..........................................403 Too Many Coins Dispensed and the Machine Locks Up...............................403 Yoyo Message during Machine Inactivity...........................................................403 3 Way Metering Error Message........................................................... 404 This document contains confidential information that is proprietary to ATI. It may not be copied or disclosed to unauthorized parties. © 2006 Aristocrat Technologies, Inc. All rights reserved. 392 28-01186-01 10 Nov 2006 MAV500™ C3 and Xtreme® Service Manual Troubleshooting Startup Messages..........................................405 Panic Messages..............................................406 CPU Error!.............................................................................................. 406 SRAM Error!............................................................................................ 406 Program Loading Verification Error!..................................................406 Platform Unknown................................................................................. 406 System EPROM Checksum Error!......................................................406 Market AVL Media Header Error!......................................................406 Market AVL Media Checksum Error!.................................................406 Game EPROM Not Present................................................................. 406 Game EPROM Header Error............................................................... 406 Game EPROM Checksum Error.........................................................407 AVL Media Not Present........................................................................ 407 AVL Media Header Error..................................................................... 407 AVL Media Checksum Error................................................................ 407 Game Version Incompatible................................................................. 407 String Not Found................................................................................... 407 Watchdog Reset..................................................................................... 407 Audit Mode - Turn Audit Key ON......................................................407 Bill Acceptors, Coin Acceptors and Ticket Printers...........................................................408 Bill Acceptors.......................................................................................... 408 Coin Acceptors....................................................................................... 408 Ticket Printers........................................................................................ 408 This document contains confidential information that is proprietary to ATI. It may not be copied or disclosed to unauthorized parties. © 2006 Aristocrat Technologies, Inc. All rights reserved. 393 28-01186-01 10 Nov 2006 MAV500™ C3 and Xtreme® Service Manual Troubleshooting Tilt/Error Conditions Soft Tilts Hard Tilts There are two types of error conditions detected and displayed by the EGM: “soft” tilts and “hard” tilts. Soft tilts are tilt/error conditions that allow game play to continue. There are two types of soft tilts: those which must be resolved by an attendant, and those that reset themselves when the cause of the tilt is no longer present and a predetermined period of time has elapsed. Hard tilts are routine hardware machine maintenance conditions that prevent game play and must be resolved by an attendant. Hard tilts cause error or status messages to display on-screen. External key switches, located on the outside of the machine cabinet, are used to perform various functions. The key switches are accessible without opening the main door. Hard tilt messages clear after the tilt condition is resolved and the attendant turns the key in the key switch to the center (OFF) position. Most hard tilts can be cleared by opening and closing the main door. This document contains confidential information that is proprietary to ATI. It may not be copied or disclosed to unauthorized parties. © 2006 Aristocrat Technologies, Inc. All rights reserved. 394 28-01186-01 10 Nov 2006 MAV500™ C3 and Xtreme® Service Manual Troubleshooting MACHINE. lOCKUP The EGM has an extensive self-monitoring system. When abnormal conditions are detected, the EGM automatically locks up; for example, it activates tilt mode. The presence of active lockups (otherwise referred to as tilts) is indicated by a LOCKUP ERROR TO BE ACKNOWLEDGED message at the bottom of the screen. Refer to the Machine Modes module of the Operator Manual for additional information. In tilt mode, the message area displays guidance information, and the EGM is disabled to prevent any further player interaction. Tilt mode conditions are located in the Operator Mode Current Lockup [7]. Entry.to.the.Current.. lockup.Screen Entry to the Current Lockup screen is achieved by turning the audit (operator) key switch ON (clockwise) and selecting Current Lockup [7] from the Operator Mode Menu. Indication.of.. Conditions The Current Lockup screen displays and the conditions requiring attention are highlighted by three asterisks (***) as shown below. Each lockup condition has an associated help screen that provides information on the cause of the lockup and the procedure for resetting it. The Lockup Help Displays section provides a summary of the lockup help comments. CURRENT ACTIVE LOCKUPS Cash Out Handpay Coin Reversal *** Coin Acceptor Fault Jackpot Win *** Coin Optic Fault Win Handpay Mystery Handpay Coin Diverter Fault Link Jackpot Hopper Empty Bonus Handpay Hopper Jammed Self Audit Error Hopper Disconnected 3 Way Memory Error Illegal Coin Out Game EPROMs Changed Bill Acceptor Error Game Machine Options Bill Acc. Stacker Jurisdiction Options Bill Reversal EEPROM CRC Mismatch Bill Not Credited Main Door Mismatch Signature Error Main Door Open Printer Signature Error *** Printer Disconnected *** Drop Door Open *** Logic Door Open Printer Jam/Failure Belly (BA) Door Open Paper Depleted Cashbox (Stacker) Door Open *** Progressive Discont Prog. Comm. Error Smart Reel Discont Smart Reel Movement Smart Reel Tilt Meters Disconnected Meters Faulty Battery #1 Low Battery #2 Low Touch Screen Error Out of Service Host Disable Top Screen Discont Prog. Disable CA Prog. Disable Prog. Lvl Mismatch The characters *** indicates active lockups Service — Press to select next lockup Cashout/TakeWin — Press to select previous lockup Play 5 Lines — Press to move curser left Play 10 Lines — Press to move curser right Play 25 Lines — Press to see selected lockup help Bet 3 Credits — Press to return to previous menu Audit Key — Turn off to exit “Lockup error to be acknowledged” This document contains confidential information that is proprietary to ATI. It may not be copied or disclosed to unauthorized parties. © 2006 Aristocrat Technologies, Inc. All rights reserved. 28-01186-01 10 Nov 2006 MAV500™ C3 and Xtreme® Service Manual Troubleshooting No Power Equipment is connected to the auxiliary power outlet but has no power Probable Cause(s) Auxiliary power outlet fuse is blown. Action(s) Replace auxiliary power outlet fuse. Machine has no power Condition: Power outlet switch assembly lamp is ON. Probable Cause(s) Power supply fuse blown. Action(s) Replace entire power supply assembly. No power-up cycle Fluorescent Tubes are not Illuminated Removal and replacement instructions are located in the Cabinet, Door and Top Box module. This document contains confidential information that is proprietary to ATI. It may not be copied or disclosed to unauthorized parties. © 2006 Aristocrat Technologies, Inc. All rights reserved. 396 28-01186-01 10 Nov 2006 Probable Cause(s) Defective main board. Action(s) Pull the main board and apply power to the machine. If EGM lamps and monitor turn ON, switch power OFF and replace the main board. Probable Cause(s) Defective fluorescent tube or electronic ballast. Action(s) Replace fluorescent tube or electronic ballast. Probable Cause(s) Defective power supply assembly. Action(s) Check that the power supply assembly is operating correctly. If not, replace it. Probable Cause(s) Cable and sockets. Action(s) Insure fluorescent socket is not loose or cracked, and that the tube makes good contact. MAV500™ C3 and Xtreme® Service Manual Troubleshooting Play Button LEDs do. not Illuminate Condition: Switch works in test mode. Probable Cause(s) Defective LED or assembly. Action(s) Replace LED sub-assembly. Condition: Cannot enter test mode. Probable Cause(s) Defective or incorrect I/O board. Action(s) Check the I/O board and replace if needed. Check the I/O board seating/connector. Condition: Cannot enter test mode. Removal and replacement instructions are located in the Cabinet, Door and Top Box module. This document contains confidential information that is proprietary to ATI. It may not be copied or disclosed to unauthorized parties. © 2006 Aristocrat Technologies, Inc. All rights reserved. 397 28-01186-01 10 Nov 2006 Probable Cause(s) Lamp button assembly. Action(s) Check the LED lamps for shorting 12 volt line. MAV500™ C3 and Xtreme® Service Manual Troubleshooting Main LCD Panel Main LCD Panel Blank Condition: Fluorescent lamps illuminate. Condition: The main board shows one LED steady and the other blinking. Condition: The On Screen Display (OSD) green (power) light illuminates. Probable Cause(s) Defective LCD panel. Action(s) After ensuring the cables to the monitor are in good condition, wired and connected properly, replace the LCD panel. Main LCD Panel Video Image Color or Picture Incorrect Probable Cause(s) Monitor settings are incorrect. Action(s) Restore factory settings via OSD. Probable Cause(s) Defective LCD panel. Action(s) If the condition persists, replace the LCD panel. Main LCD Panel Showing “No Signal Input” Removal and replacement instructions are located in the Cabinet, Door and Top Box module. This document contains confidential information that is proprietary to ATI. It may not be copied or disclosed to unauthorized parties. © 2006 Aristocrat Technologies, Inc. All rights reserved. 398 28-01186-01 10 Nov 2006 Probable Cause(s) LCD panel not receiving signal from the main board. Action(s) Check main board seating. Ensure the chips are inserted correctly in their respective sockets. If the condition persists, replace the main board. Probable Cause(s) Short or interruption of 5-volt main board power. Action(s) Check the SPC2 board. Turn power OFF for 5 seconds; turn power ON. If the condition persists, contact the Aristocrat Service Organization. MAV500™ C3 and Xtreme® Service Manual Troubleshooting CRT Monitor Monitor Screen Blank Probable Cause(s) The main EGM power cord is loose. Action(s) Verify that the power cord is snuggly connected. Probable Cause(s) The power supply fuse is blown. Action(s) Replace the main EGM power supply fuse. Probable Cause(s) The main board in the logic cage is loose or defective. Action(s) Verify correct seating of the main board. Replace the main board. Probable Cause(s) The monitor fuse is blown. Action(s) Replace the monitor fuse. Probable Cause(s) Defective monitor. Action(s) Replace the monitor. Monitor Video Image Color Incorrect or Erratic Removal and replacement instructions are located in the Cabinet, Door and Top Box module. This document contains confidential information that is proprietary to ATI. It may not be copied or disclosed to unauthorized parties. © 2006 Aristocrat Technologies, Inc. All rights reserved. 399 28-01186-01 10 Nov 2006 Probable Cause(s) Settings may need adjustment. Action(s) Restore factory preset parameters using OSD. Degauss using OSD. Degauss using external degaussing wand. Probable Cause(s) Defective monitor. Action(s) Replace the monitor. Probable Cause(s) The power supply is defective. Action(s) Replace the power supply. MAV500™ C3 and Xtreme® Service Manual Troubleshooting Sound No Sound Probable Cause(s) Cables and connectors Action(s) Insure cables to amplifier and speakers are in good condition, wired and connected properly. Probable Cause(s) Speakers Action(s) Remove the connectors from the speaker terminals and check that there is 2-4Ω across the speaker terminals. If not, replace the speaker. Probable Cause(s) Defective amplifier assembly. Action(s) If condition persists, replace the amplifier assembly. Probable Cause(s) Defective main board. Action(s) If condition persists, replace the main board. Sound Too Loud or Too Soft Refer to the Machine Modes module of the Operator Manual for additional information. Removal and replacement instructions are located in the Cabinet, Door and Top Box module. This document contains confidential information that is proprietary to ATI. It may not be copied or disclosed to unauthorized parties. © 2006 Aristocrat Technologies, Inc. All rights reserved. 400 28-01186-01 10 Nov 2006 Probable Cause(s) Volume control requires adjustment. Action(s) Adjust the volume setting using the sound system setup in the Operator Setup/Selection menu. Probable Cause(s) Defective speaker amplifier assembly. Action(s) If condition persists, replace the amplifier assembly. MAV500™ C3 and Xtreme® Service Manual Troubleshooting Coin.Handling.. System All Coins are Going to the Cashbox and the Hopper is Empty Probable Cause(s) Hopper probe shorted to ground. Action(s) Clear the short. Probable Cause(s) Defective coin diverter solenoid on the coin chute assembly. Action(s) Run a coin chute test to verify the solenoid has power. Verify that the solenoid has power. Verify that the coin diverter is not jammed. Verify that the hopper probe is not permanently grounded. Probable Cause(s) Coin diverter jamming. Action(s) Adjust the position of the coin diverter. Coins Accepted by the Coin Acceptor but not Registered as Credits; the Machine Locks Up Probable Cause(s) Defective harness between the coin acceptor and the backplane board. Action(s) Check that the harness is correctly seated. Probable Cause(s) Defective coin acceptor. Action(s) Replace the coin acceptor. Probable Cause(s) The photo-optic module in the comparitor is defective. Action(s) Check that the module and its connectors are secure. Replace if necessary. Coin Acceptor Fault / Coin Optic Fault Message Removal and replacement instructions are located in the Cabinet, Door and Top Box module. This document contains confidential information that is proprietary to ATI. It may not be copied or disclosed to unauthorized parties. © 2006 Aristocrat Technologies, Inc. All rights reserved. 01 28-01186-01 10 Nov 2006 Probable Cause(s) Defective harness between the coin acceptor and the backplane board. Action(s) Check that the harnesses are seated correctly and have continuity. Probable Cause(s) Coins jammed in coin acceptor. Action(s) Remove jammed coin. MAV500™ C3 and Xtreme® Service Manual Troubleshooting Coin.Handling. System. (continued) Coins Continually Rejected Probable Cause(s) The sample coin not in the correct location in the unit. Action(s) Verify that the sample coin is correctly located. Probable Cause(s) The unit is not working. Action(s) Verify that the unit has power. If yes, replace the comparitor. Probable Cause(s) Defective coin acceptor. Action(s) Replace the coin acceptor. Coins Jamming at the Top of the Hopper Chute Probable Cause(s) Coin jam at top of chute. Action(s) Rotate the disk backwards by inserting fingers through gaps in the casting and exerting finger pressure. Probable Cause(s) Coin runner is loose or not in the correct position. Action(s) Place the coin runner point as close as possible to the disk and tighten the securing nuts. Also check if the shims are damaged. Coins Jamming in the Cashbox Feed Chute Probable Cause(s) The cashbox chute is blocked or misaligned. Action(s) Unblock and/or realign the chute and tighten the fixing screws. Coins Stacking at the Bottom of the Bowl Probable Cause(s) Bottom coin slide springs broken or displaced. Action(s) Refit or replace the spring. Hopper Does Not Rotate Removal and replacement instructions are located in the Cabinet, Door and Top Box module. This document contains confidential information that is proprietary to ATI. It may not be copied or disclosed to unauthorized parties. © 2006 Aristocrat Technologies, Inc. All rights reserved. 0 28-01186-01 10 Nov 2006 Probable Cause(s) Defective harness between the hopper and the backplane board. Action(s) Check that the harness is seated correctly. Probable Cause(s) Defective hopper motor. Action(s) Replace hopper motor. MAV500™ C3 and Xtreme® Service Manual Troubleshooting Coin Handling System (continued) Hopper Not Working Probable Cause(s) No power is supplied. Action(s) Check that power is reaching the hopper. Probable Cause(s) Defective connector. Action(s) Check that each connector is not damaged and is correctly seated. Probable Cause(s) Hopper is not correctly located. Action(s) Remove and replace the hopper. Illegal Coin Out Message on Power On Probable Cause(s) Dirty hopper photo-optic detector/emitter. Action(s) Clean the hopper photo-optic detector/emitter. Probable Cause(s) Defective hopper. Action(s) Run a hopper test (see Machine Modes) to verify that the hopper motor stops when the correct number of coins is ejected. Rejected Coins are not Falling into the Coin Tray Probable Cause(s) Coins jammed in the reject chute. Action(s) Carefully clear the reject chute. Too Many Coins Dispensed and the Machine Locks Up Probable Cause(s) The coin pawl is bent or loose. Action(s) Tighten the fixing screw or replace the pawl or spring. Yoyo Message during Machine Inactivity Removal and replacement instructions are located in the Cabinet, Door and Top Box module. This document contains confidential information that is proprietary to ATI. It may not be copied or disclosed to unauthorized parties. © 2006 Aristocrat Technologies, Inc. All rights reserved. 403 28-01186-01 10 Nov 2006 Probable Cause(s) Coin jammed in the coin acceptor. Action(s) Remove jammed coin. Probable Cause(s) Defective coin acceptor. Action(s) Replace the coin acceptor. MAV500™ C3 and Xtreme® Service Manual Troubleshooting 3 Way Metering Error Message Refer to the Machine Modes module of the Operator Manual for additional information. This document contains confidential information that is proprietary to ATI. It may not be copied or disclosed to unauthorized parties. © 2006 Aristocrat Technologies, Inc. All rights reserved. 404 28-01186-01 10 Nov 2006 Probable Cause(s) Corrupt data. Inconsistent data across all three electronic audit meter sets. Action(s) Perform a memory reset (see Machine Modes). If condition persists, replace the main board. MAV500™ C3 and Xtreme® Service Manual Troubleshooting Startup . Messages Startup messages are shown as part of the normal startup procedures during which the software is loaded and the game screen is displayed. These messages are provided for “information only” purposes and simply show the progress of the startup procedures. Startup messages require no action: System EPROM checksum ok DRAM ok CPU ok SRAM ok Standard platform found USA platform found WIN32 platform found Market AVL media present Market AVL media header checksum ok Market AVL media checksum ok Game EPROM present Game EPROM header checksum ok Game EPROM checksum ok AVL media present AVL media header checksum ok AVL media checksum ok Game Version check ok Program loading verification ok \fFound 1 video chip.\n \fFound 2 video chips.\n Initialized in 3D mode.\n Using 16 bit display mode.\n Using 32 bit display mode.\n Using 16 bit textures (5-6-5 and 4-4-4-4).\n Using 32 bit textures (8-8-8-8).\n Loading resources...\n Restarting in 10 seconds... This document contains confidential information that is proprietary to ATI. It may not be copied or disclosed to unauthorized parties. © 2006 Aristocrat Technologies, Inc. All rights reserved. 405 28-01186-01 10 Nov 2006 MAV500™ C3 and Xtreme® Service Manual Troubleshooting Panic . Messages A panic message indicates that a software failure occurred. The EGM automatically resets and restarts. The event is registered in the panic log (for details, see the Machine Modes module) One from a number of different messages, for example Uninitialized Exception Vector, can display for a few seconds followed by the message WATCHDOG RESET. In all cases, the Aristocrat Service Organization should be informed. CPU Error! SRAM Error! Program Loading Verification Error! Platform Unknown System EPROM Checksum Error! Market AVL Media Header Error! Market AVL Media Checksum Error! Game EPROM. Not Present Game EPROM. Header Error This document contains confidential information that is proprietary to ATI. It may not be copied or disclosed to unauthorized parties. © 2006 Aristocrat Technologies, Inc. All rights reserved. 406 28-01186-01 10 Nov 2006 Probable Cause(s) Problem on the main board. Action(s) Technician to replace main board. Probable Cause(s) Problem on the main board. Action(s) Technician to replace main board. Probable Cause(s) Problem on the main board. Action(s) Technician to replace main board. Probable Cause(s) Problem on the interface/backplane board. Action(s) Replace the interface/backplane board. Probable Cause(s) Defective system EPROM. Action(s) Technician to replace system EPROMs. Probable Cause(s) Defective system EPROM. Action(s) Technician to replace system EPROMs. Probable Cause(s) Defective system EPROM. Action(s) Technician to replace system EPROMs. Probable Cause(s) Defective game EPROM. Action(s) Technician to replace game EPROMs. Probable Cause(s) Defective game EPROM. Action(s) Technician to replace game EPROMs. MAV500™ C3 and Xtreme® Service Manual Troubleshooting Game EPROM. Checksum Error AVL Media. Not Present AVL Media. Header Error AVL Media. Checksum Error Game Version Incompatible String Not Found Watchdog Reset Audit Mode - Turn. Audit Key ON This document contains confidential information that is proprietary to ATI. It may not be copied or disclosed to unauthorized parties. © 2006 Aristocrat Technologies, Inc. All rights reserved. 407 28-01186-01 10 Nov 2006 Probable Cause(s) Defective game EPROM. Action(s) Technician to replace game EPROMs. Probable Cause(s) Defective game EPROM. Action(s) Technician to replace game EPROMs. Probable Cause(s) Defective game EPROM. Action(s) Technician to replace game EPROMs. Probable Cause(s) Defective game EPROM. Action(s) Technician to replace game EPROMs. Probable Cause(s) Defective game EPROM. Action(s) Technician to replace game EPROMs. Probable Cause(s) Required string not in game EPROM. Action(s) Call technical support. Probable Cause(s) The EGM reset itself trying to recover from a serious error. Action(s) See panic messages above. Probable Cause(s) Audit key was turned ON when machine was powered down. Action(s) After power ON, turn audit key ON and OFF. MAV500™ C3 and Xtreme® Service Manual Troubleshooting Bill Acceptors, Coin Acceptors and Ticket Printers Bill Acceptors Troubleshooting on specific bill acceptor, coin acceptor, and ticket printer models are detailed in the Bill Acceptors, Coin Handling System, and Ticket Printers modules in this manual. Information relating to specific bill acceptor, coin acceptor, and ticket printer models is available through the manufacturer’s website as listed below. MEI Cashflow SC: www.meiglobal.com JCM® UBA™, WBA™ and Sentry™ Bezel: www.jcm-american.com Coin Acceptors Coin Mechanisms Inc., MC-62 coin comparitor: www.coinmech.com Money Controls Condor CP133S validator: www.moneycontrols.com IDX X-10 and X-20 series Xeptor: www.idxinc.com Ticket Printers FutureLogic GEN2™: www.futurelogic-inc.com Ithaca® Epic 950™ and Model 850: www.transact-tech.com This document contains confidential information that is proprietary to ATI. It may not be copied or disclosed to unauthorized parties. © 2006 Aristocrat Technologies, Inc. All rights reserved. 408 28-01186-01 10 Nov 2006 MAV500™ C3 and Xtreme® Service Manual Index Symbols +24V Auxiliary Output Connectors ............................................. 74 +24V Fluorescent Output Connectors ............................................. 74 +24V Main Output Connectors ............................................. 74 24V Input - J1 Sound System ..................................... 382 24V Spare - J2 Sound System ..................................... 382 3M Touch Systems Touch Screen ....................................... 135 3 Way Metering Error Message Troubleshooting ................................... 404 4-PIN Minifit Connector PIN Connections LCD Panel ............................................ 123 A Accepted Coins Condor ....................................................90 Access and Location Hopper ..................................................101 Power Supply ..........................................62 Additional Information ................................ 5 Address Decoding I/O Address Map ................................. 308 I/O Board ............................................. 308 Adjusting Output Levels Sound System ......................................377 Alarm Condor ....................................................91 Amendments ............................................... 8 Animation and Light Tower Lamps .........311 Anti-pullback Error Conditions JCM UBA Appendix A ........................................ 200 Anti-Pullback Mechanism Test JCM UBA ...............................................172 Appendix A Anti-pullback Error Conditions JCM UBA ........................................... 200 Bill Acceptance Test DIP Switch Settings JCM UBA ............................................201 Bill Stacker Test Error Conditions JCM UBA ........................................... 198 Cashflow Bill Acceptor Diagnostic Codes JCM UBA ............................................197 Centering Mechanism Error Conditions JCM UBA ........................................... 200 This document contains confidential information that is proprietary to ATI. It may not be copied or disclosed to unauthorized parties. © 2006 Aristocrat Technologies, Inc. All rights reserved. 0 28-01186-01 10 Nov 2006 LED Reject Codes JCM UBA ........................................... 205 Malfunction LED Error Codes JCM UBA ........................................... 203 Running Test Error Conditions JCM UBA ........................................... 199 Solenoid Mechanism Error Conditions JCM UBA ........................................... 200 Transport Motor Speed Test Error Conditions JCM UBA ........................................... 198 Assembly (Acceptor and Transport) Removal JCM UBA ...............................................163 JCM WBA.............................................. 186 Audio XP Main Board..................................... 223 Audio Amplifier PCBA Sound System ......................................379 Audio Input - J5 Sound System ..................................... 382 Audio Input Specifications Sound System ......................................377 Audio Output Specifications Sound System ......................................377 Auxiliary Output Current Protection..........68 Auxiliary Output EMC Filtering ..................68 Auxiliary Output Voltage ............................68 Auxiliary Output Current Protection ......68 Auxiliary Output EMC Filtering ...............68 Auxiliary Power Outlet Output Connectors .............................................73 Available Models Coin Handling System ............................77 B Backplane Connector Keying ................................ 258 Connector P1 - Debug..........................276 Connector P10 - BNA Lights ............... 282 Connector P11 - Buttons and Button Lamps ......................................... 283 Connector P12 - Expansion I/O.......... 284 Connector P13 - Key Switches and BNA... 285 Connector P14 - Door Distribution ..... 286 Connector P15 - Spare Power .............287 Connector P16 - Fan ............................287 Connector P17 - Power Supply ........... 288 Connector P18 - IGT SAS+ (PT95A) or Bally SDS .................................... 288 MAV500™ C3 and Xtreme® Service Manual Index This document contains confidential information that is proprietary to ATI. It may not be copied or disclosed to unauthorized parties. © 2006 Aristocrat Technologies, Inc. All rights reserved. 10 28-01186-01 10 Nov 2006 Connector P19 - Broadcast DACOM Port .. 289 Connector P2 - Light Tower/Hard Meters/ NA Security ..................................277 Connector P20 - Monitor 2 ................. 289 Connector P23 - Com2/ Com4 Mikohn .... 290 Connector P27 - Handle, Spare Switch and Com8....................................291 Connector P3 - Logic Door ...................278 Connector P32 - 24V Power ................291 Connector P33 - Speaker ................... 292 Connector P35 - 24V........................... 292 Connector P36 - 24V........................... 292 Connector P37 - 24V ........................... 293 Connector P4 - Monitor 1 ....................278 Connector P7 - Hopper/Ticket Printer 279 Connector P8 - Com6 and Com7 Spare Serial Outputs ............................ 280 Connector P9 - Switches and Com7 Spare Serial Outputs .............................281 Connectors .......................................... 259 Electrical Connections ........................ 256 Electrical Specifications...................... 294 J1 to J1 Extended I/O Driver II Board Connector ......................................... 269 J2 to J2 Extended I/O Driver Board II Connector ..........................................271 J3 to J3 on the Extended I/O Driver II Board ...........................................273 JP20 to P20 Main Board Connector .. 259 JP21 to P21 Main Board Connector .. 266 JP22 to P22 Main Board Connector .. 263 Physical Description............................ 252 Security ................................................ 255 System Connectors ............................. 255 System Overview ................................. 254 Backplane Board Removal and Replacement ...................27 Backplane Connections to Pulse Interface Board Meters ...................................................371 Backplane Connector (Comms) - P20 XP Main Board......................................241 Backplane Type 2 Board Removal and Replacement ...................27 Bashbutton LED Removal and Replacement ...................53 Basic Operation Condor ....................................................88 Diverter Solenoid and Photo-Optic Sensor 78 Hopper ..................................................100 MC-62 .....................................................81 Power Supply ..........................................64 SPC2 385 Battery Backup Circuit XP Main Board..................................... 226 Belly Door ..................................................54 Fluorescent Ballast Removal and Replacement ................57 Fluorescent Lighting ..............................57 Fluorescent Tube Removal and Replacement ................57 Belly Door Security Switch ........................16 Bill/Coupon/Voucher Entry ....................148 Bill Acceptance Test JCM UBA ............................................... 174 Bill Acceptance Test DIP Switch Settings JCM UBA Appendix A .........................................201 Bill Acceptor ...............................................30 Bill Acceptor Cage Removal and Replacement ...................30 Bill Acceptor Lamps ................................311 Bill Acceptor Removal .............................151 Bill Acceptors Installation and Machine Conditions . 144 Troubleshooting ................................... 408 Bill Jam Near the Bill Acceptor’s Entrance JCM UBA ...............................................165 Bill Jam Near the Cashbox Entrance JCM UBA ...............................................165 Bill Stacker Test Error Conditions JCM UBA Appendix A ........................................ 198 Block Diagram Power Supply ..........................................64 Brightness Adjustment Range LCD Panel ............................................ 122 Button Lamps/LEDs................................311 Button Panel .............................................. 47 Removal and Replacement ...................48 Button Switches I/O Board ..............................................310 C Cabibration In-machine Auto-calibration JCM WBA .......................................... 189 Cabinet Backplane Board....................................27 Backplane Type 2 Board ........................27 MAV500™ C3 and Xtreme® Service Manual Index This document contains confidential information that is proprietary to ATI. It may not be copied or disclosed to unauthorized parties. © 2006 Aristocrat Technologies, Inc. All rights reserved. 11 28-01186-01 10 Nov 2006 Bill Acceptor............................................30 CCB 29 Communications Configuration Board..29 Drop Box .................................................33 Extended I/O Driver II Board .................28 Hopper ....................................................32 I/O Board ................................................28 Logic Cage ..............................................24 Main Board .............................................26 Main Display Area ..................................19 Power Supply ..........................................31 XP Main Board........................................26 Cabinet, Door and Top Box Technical Description.............................15 Cabinet Components Backplane...............................................13 Bill acceptor............................................13 Cabinet assembly and security .............13 Communications configuration board ..13 CRT monitor and LCD panel ..................13 drop box ..................................................13 hopper.....................................................13 I/O driver board ......................................13 Logic cage...............................................13 XP main board ........................................13 Cable Connector CRT Monitor ..........................................113 Calibration Adjustment Procedure JCM UBA ............................................169 Auto-calibration Procedure JCM WBA .......................................... 189 In-machine Auto-calibration JCM UBA ............................................168 JCM UBA ...............................................168 JCM WBA.............................................. 189 Set Black Reference Paper JCM UBA ............................................170 Set UV Reference Paper JCM UBA ............................................170 Set White Reference Paper JCM UBA ............................................169 UBA Adjust Tool Screen JCM UBA ............................................169 Workbench Auto-calibration JCM UBA ............................................168 JCM WBA .......................................... 189 Care and Maintenance Epic 950 .............................................. 348 Ithaca 850 ............................................361 Cleaning the Print Head ...................361 Mars 152 Cashbox Removal ................................... 150 JCM UBA ...............................................162 Cashbox Removal and Replacement .... 185 JCM WBA.............................................. 185 Cashbox Replacement ........................... 150 Cashflow Bill Acceptor Diagnostic Codes JCM UBA Appendix A .........................................197 Casino Management Systems.................... 7 CCB Configuration ........................................316 Connector PIN Assignment ..................317 Functional Description .........................316 General Maintenance ..........................319 Interface ...............................................316 Interface Signals ..................................316 Location and Access ............................316 Part Number .........................................316 Physical Description.............................316 Removal and Replacement ...................29 Centering Mechanism Error Conditions JCM UBA Appendix A ........................................ 200 Centering Mechanism Test JCM UBA ...............................................173 Cleaning Condor ....................................................92 JCM UBA ......................................166, 167 JCM WBA.............................................. 188 Cleaning the Print Head Ithaca 850 ............................................361 Clearing a Paper Jam GEN2 .................................................... 332 Clearing Bill Acceptor Jams JCM UBA ...............................................165 JCM WBA...............................................187 ClearTek™ II Touch Screen ....................................... 135 Coin Acceptor Removal and Replacement ...................49 Coin Acceptors Troubleshooting ................................... 408 Coin Accept Solenoid MC-62 .....................................................85 Coin Chute Assembly General Maintenance ............................79 Coin Comparator General Maintenance ............................79 Removal and Replacement ...................49 Coin Dispensing Hopper ..................................................105 Coin Handling System ...............................49 MAV500™ C3 and Xtreme® Service Manual Index This document contains confidential information that is proprietary to ATI. It may not be copied or disclosed to unauthorized parties. © 2006 Aristocrat Technologies, Inc. All rights reserved. 1 28-01186-01 10 Nov 2006 Available Models ....................................77 Diverter Solenoid and Photo-Optic Sensor 78 Location and Access ..............................77 MC-62 .....................................................80 Overview .................................................77 Specifications .........................................77 Troubleshooting ....................................401 Coin Jamming Prevention Hopper ..................................................105 Coin Tray ....................................................58 Coin Validator General Maintenance ............................79 Removal and Replacement ...................49 Color Monitor Block Diagram CRT Monitor ..........................................113 Communication I/O Board ..............................................312 Communications Configuration Board ...316 Removal and Replacement ...................29 XP Main Board..................................... 230 Communications Configuration Board - J3 XP Main Board..................................... 234 Component Layout Meters .................................................. 368 Components CRT Monitor ......................................... 112 Hopper ..................................................103 Moveable Parts .................................103 Non-Moveable Parts .........................103 LCD Panel .............................................119 MC-62 .....................................................82 Power Supply ..........................................63 Sound System ......................................375 Condor 88 Accepted Coins.......................................90 Alarm .......................................................91 Basic Operation ......................................88 Cleaning ..................................................92 Tools/Equipment Required ................92 Connector Pinouts..................................98 Debris Flap .............................................91 Diagnostics .............................................91 Features..................................................88 Inhibit All .................................................91 Optical and Inductive Sensors ..............90 Rejected Coins .......................................90 Self Calibration .......................................91 Condor Plus Coin Validator CP133S ........88 Configuration CCB 316 Connection from Backplane Board Meters .......................................... 370, 371 Connection to Light Tower Lamps Meters ...................................................372 Connection to Pulse Interface Board Meters ...................................................371 Connector Keying Backplane............................................ 258 Connector P1 - Debug Backplane.............................................276 Connector P10 - BNA Lights Backplane............................................ 282 Connector P11 - Buttons and Button Lamps Backplane............................................ 283 Connector P12 - Expansion I/O Backplane............................................ 284 Connector P13 - Key Switches and BNA Backplane............................................ 285 Connector P14 - Door Distribution Backplane............................................ 286 Connector P15 - Spare Power Backplane.............................................287 Connector P16 - Fan Backplane.............................................287 Connector P17 - Power Supply Backplane............................................ 288 Connector P18 - IGT SAS+ (PT95A) or Bally SDS Backplane............................................ 288 Connector P19 - Broadcast DACOM Port Backplane............................................ 289 Connector P2 - Light Tower/Hard Meters/ NA Security Backplane.............................................277 Connector P20 - Monitor 2 Backplane............................................ 289 Connector P23 - Com2/ Com4 Mikohn Backplane............................................ 290 Connector P27 - Handle, Spare Switch and Com8 Backplane.............................................291 Connector P3 - Logic Door Backplane.............................................278 Connector P32 - 24V Power Backplane.............................................291 Connector P33 - Speaker Backplane............................................ 292 Connector P35 - 24V Backplane............................................ 292 Connector P36 - 24V Backplane............................................ 292 Connector P37 - 24V Backplane............................................ 293 MAV500™ C3 and Xtreme® Service Manual Index This document contains confidential information that is proprietary to ATI. It may not be copied or disclosed to unauthorized parties. © 2006 Aristocrat Technologies, Inc. All rights reserved. 1 28-01186-01 10 Nov 2006 Connector P4 - Monitor 1 Backplane.............................................278 Connector P7 - Hopper/Ticket Printer Backplane.............................................279 Connector P8 - Com6 and Com7 Spare Serial Outputs Backplane............................................ 280 Connector P9 - Switches and Com7 Spare Serial Outputs Backplane.............................................281 Connector PIN Assignment CCB 317 Connector PIN Assignments Meters ...................................................370 Sound System ..................................... 382 Connector PIN Description: J1 I/O Board ..............................................301 Connector PIN Description: J2 I/O Board ............................................. 303 Connector PIN Description: J3 I/O Board ............................................. 305 Connector Pinouts Condor ....................................................98 MC-62 .....................................................87 Connector Pinouts - Main LCD Panel LCD Panel ............................................ 125 Connector Pinouts - Top Box LCD Panel .............................................124 Connectors +24V Auxiliary Output ............................ 74 +24V Fluorescent Output ...................... 74 +24V Main Output.................................. 74 Auxiliary Power Outlet Output ................73 Backplane............................................ 259 External Power Outlet Switch ................73 LCD Panel .............................................124 Monitor Output .......................................73 Power Outlet Power ................................73 XP Main Board..................................... 233 Connectors (Dual Port) SPC2 391 Connectors (Single Port) SPC2 389 Control Signals Low Power Mode Signal......................... 71 Power Fail Signal .................................... 71 Corporate Profile ......................................... 7 CPU Core XP Main Board......................................218 CRT Monitor ......................................19, 111 Cable Connector...................................113 Color Monitor Block Diagram ..............113 Components ........................................ 112 Degaussing ...........................................111 General Description .............................111 On Screen Display ................................111 OSD Button Control Panel ...................115 Brightness .........................................116 Color...................................................116 Contrast .............................................116 Degaussing....................................... 118 Language ...........................................117 Maintenance .................................... 118 Pincushion, Trapezoid, Parallelogram, and PIN Balance .........................117 Recall .................................................117 Vertical/Horizontal Position and Size .... 117 OSD Control Panel Layout ...................114 Power Supply ........................................113 Removal and Replacement ...................19 Resolution, Temperature and Weight .111 Technical Description.......................... 112 Troubleshooting ................................... 399 Wells-Gardner .......................................111 Custom Tickets Epic 950 ...............................................351 Ithaca 850 ........................................... 363 D DC Output Voltage Current Limit .............. 71 DC Output Voltage Hold Up.......................70 DC Output Voltage Over-voltage Protection . 70 DC Output Voltage Ripple and Noise .......70 DC Output Voltages ...................................69 DC Output Volgage Current Limit .......... 71 DC Output Voltage Hold Up ...................70 DC Output Voltage Over-voltage Protection .................................................70 DC Output Voltage Ripple and Noise ....70 DC Output Voltage Tolerance ................69 External DC-DC Converter...................... 71 Shutdown................................................70 DC Output Voltage Tolerance ...................69 Debris Flap Condor ....................................................91 Degaussing CRT Monitor ..........................................111 Denomination ............................................37 Diagnostics Condor ....................................................91 DIP Switch Banks MAV500™ C3 and Xtreme® Service Manual Index I/O Board ..............................................312 DIP Switch Test JCM UBA ...............................................175 Diverter Solenoid and Photo-Optic Sensor Basic Operation ......................................78 Coin Handling System ............................78 General Maintenance ............................79 Coin Chute Assembly ..........................79 Coin Comparator .................................79 Coin Validator ......................................79 Photo-optic Sensor..............................79 Door Switch Monitoring I/O Board ..............................................313 Drop Box ....................................................33 Removal and Replacement ...................33 Dual-Port Configuration SPC2 390 E EGM 5 External View ..........................................14 General Maintenance ............................59 Internal View ...........................................15 Electrical Connections Backplane............................................ 256 Electrical Specifications Backplane............................................ 294 Electromechanical Meters ......40, 365, 367 Removal and Replacement ...................40 Electronic Gaming Machine .....................14 electronic gaming machine ........................ 5 Entry to the Current Lockup Screen Troubleshooting ................................... 395 Epic 950 ................................................. 339 Care and Maintenance ....................... 348 Custom Tickets .....................................351 Features............................................... 340 Inner Chassis Removal and Replacement 343 Interface Specifications .......................341 Loading Tickets ................................... 344 Printer Mechanism Assembly............. 343 Printer Status LEDs ............................. 350 Removing Loaded Tickets................... 345 Sensors ................................................ 346 Chassis Open Sensor/Audible Alarm..... 347 Cover Open Switch ........................... 346 Ticket Burst Sensor.......................... 346 Ticket Low Sensor ............................ 346 Ticket Taken Sensor......................... 346 This document contains confidential information that is proprietary to ATI. It may not be copied or disclosed to unauthorized parties. © 2006 Aristocrat Technologies, Inc. All rights reserved. 1 28-01186-01 10 Nov 2006 Top-of-Form/Ticket Out Sensor ....... 346 Specifications ...................................... 350 Troubleshooting ................................... 349 Expansion I/O I/O Board ..............................................313 External Battery - J10 XP Main Board..................................... 238 External DC-DC Converter ......................... 71 External I/O Expansion XP Main Board......................................224 External Power Outlet Switch Connectors .............................................73 F Fan Connector - J1 XP Main Board..................................... 233 Features Condor ....................................................88 Epic 950 .............................................. 340 GEN2 .................................................... 326 JCM UBA .............................................. 155 MC-62 .....................................................80 WBA 178 XP Main Board......................................212 Feeding Paper GEN2 .....................................................331 Firmware I/O Board ..............................................314 Fluorescent Ballast Removal and Replacement Belly Door ............................................57 Fluorescent Lighting Belly Door ...............................................57 Fluorescent Tube Removal and Replacement Belly Door ............................................57 Fluorescent Tubes are not Illuminated Troubleshooting ................................... 396 FPGA XP Main Board..................................... 222 Functional Description CCB 316 I/O Board ............................................. 296 MC-62 .....................................................84 XP Main Board......................................214 Fuse Power Supply Removal and Replacement ................31 Removal and Replacement ...................31 FutureLogic GEN2 Ticket Printer ........... 325 MAV500™ C3 and Xtreme® Service Manual Index G GEN2 Clearing a Paper Jam .......................... 332 Features............................................... 326 Feeding Paper ......................................331 Interface Specifications .......................327 Loading Paper ..................................... 330 Printer Errors ........................................337 Printer Status LEDs ............................. 336 Removal and Replacement ................ 329 Sensors ................................................ 334 Specifications ...................................... 338 Troubleshooting Self Test ............................................ 335 General Description CRT Monitor ..........................................111 Meters .................................................. 365 Sound System ......................................375 General Maintenance ...............................79 CCB 319 EGM 59 Hopper ..................................................107 Meters ...................................................373 General Sensor Test JCM UBA ............................................... 174 Greater than Hopper Payout Limit Hopper Payout Limit.............................100 H Hard Meters I/O Board ..............................................312 Hard Tilts Troubleshooting ................................... 394 High Frequency Speaker Output - J7 Sound System ..................................... 383 High Frequency Speaker Output - J8 Sound System ..................................... 383 Hopper Access and Location ............................101 Basic Operation ....................................100 Coin Dispensing ...................................105 Coin Jamming Prevention ....................105 Components .........................................103 Moveable Parts .................................103 Non-Moveable Parts .........................103 General Maintenance ..........................107 Physical Description.............................101 Removal and Replacement ...................32 Hopper Components ...............................104 Hopper Full Detection .............................105 This document contains confidential information that is proprietary to ATI. It may not be copied or disclosed to unauthorized parties. © 2006 Aristocrat Technologies, Inc. All rights reserved. 1 28-01186-01 10 Nov 2006 Hopper Interface Signals ........................106 Hopper Payout Limit Greater than Hopper Payout Limit ......100 Less than Hopper Payout Limit ...........100 How to Use this Manual .............................. 5 I I/O Address Map .................................... 308 I/O Board Address Decoding ............................... 308 Button Switches ...................................310 Communication ....................................312 Connector PIN Description: J1 ............301 Connector PIN Description: J2 ........... 303 Connector PIN Description: J3 ........... 305 DIP Switch Banks .................................312 Door Switch Monitoring .......................313 Expansion I/O .......................................313 Firmware ...............................................314 Functional Description ........................ 296 Hard Meters..........................................312 Interface .............................................. 299 Interrupt Request .................................310 Lamp Drivers ........................................311 Animation and Light Tower Lamps...311 Bill Acceptor Lamps ..........................311 Button Lamps/LEDs .........................311 Mikohn Interface ..................................310 Opto Isolation .......................................313 Physical Description............................ 296 Power - Isolated Supplies ....................314 Reset Circuitry ......................................314 Technical Description.......................... 299 I/O Data Bus XP Main Board..................................... 220 I/O Expansion Port Interrupts XP Main Board......................................221 I/O Signals for Extended I/O Driver Board and Main Board ..........................297 Image Display Settings LCD Panel ............................................ 122 Image Specifications LCD Panel .............................................121 Important Safety Information ..................... 6 Indication of Conditions Troubleshooting ................................... 395 Inductive Sensors......................................90 Inhibit All Condor ....................................................91 Initialize or Clear NVSRAM SPC2 387 MAV500™ C3 and Xtreme® Service Manual Index This document contains confidential information that is proprietary to ATI. It may not be copied or disclosed to unauthorized parties. © 2006 Aristocrat Technologies, Inc. All rights reserved. 1 28-01186-01 10 Nov 2006 Inner Chassis Removal and Replacement Epic 950 .............................................. 343 Inputs External Power Outlet Switch ................66 Inrush Current ........................................66 Main Input Hold Up Time .......................66 Power Supply Input ................................66 Inputs and Outputs Power Supply ..........................................65 Installation JCM Sentry Bezel ................................. 176 Installation and Machine Conditions JCM UBA ...............................................161 JCM WBA.............................................. 184 Mars 144 Interface CCB 316 I/O Board ............................................. 299 Meters .................................................. 367 Interface Connector JCM UBA ...............................................160 JCM WBA.............................................. 183 Mars 149 RS232 EBDS Version ...........................149 Interface Signals CCB 316 Interface Specifications Epic 950 ...............................................341 GEN2 .....................................................327 Ithaca 850 ........................................... 353 Interface with the Power Control System XP Main Board......................................231 Interrupt Request I/O Board ..............................................310 Interrupt System XP Main Board..................................... 220 Introduction ................................................. 4 XP Main Board......................................212 Ithaca 850 .............................................. 352 Care and Maintenance ........................361 Cleaning the Print Head.......................361 Custom Tickets .................................... 363 Interface Specifications ...................... 353 Loading and Replacing Tickets .......... 356 Location and Access ........................... 356 Printer Mechanism Assembly............. 355 Printer Mechanism Assembly Removal .... 355 Printer Status LEDs ............................. 362 Removing Loaded Tickets................... 358 Sensors ................................................ 359 Head-Up Switch ................................ 359 Open/Close Position Sensor/Audible Alarm .......................................... 360 Paper Low ......................................... 359 Ticket Taken Sensor......................... 359 Top-of-Form Sensor .......................... 359 Specifications ...................................... 363 Tickets.................................................. 356 Troubleshooting ................................... 362 Ithaca 850 Ticket Printer ....................... 352 Ithaca Epic 950 Ticket Printer ............... 339 J J1 to J1 Extended I/O Driver II Board Connector Backplane............................................ 269 J2 to J2 Extended I/O Driver Board II Connector Backplane.............................................271 J3 to J3 on the Extended I/O Driver II Board Backplane.............................................273 Japan Cash Machine.............................. 154 JCM Sentry Bezel .................................... 176 Installation ............................................176 Troubleshooting ....................................177 JCM UBA Anti-pullback Error Conditions Appendix A ........................................ 200 Assembly (Acceptor and Transport) Removal ...........................................163 Bill Acceptance Test DIP Switch Settings Appendix A .........................................201 Bill Jam Near the Bill Acceptor’s Entrance 165 Bill Jam Near the Cashbox Entrance ..165 Bill Stacker Test Error Conditions Appendix A ........................................ 198 Calibration ............................................168 Adjustment Procedure ......................169 In-machine Auto-calibration .............168 Set Black Reference Paper ..............170 Set UV Reference Paper ...................170 Set White Reference Paper ..............169 UBA Adjust Tool Screen ....................169 Workbench Auto-calibration .............168 Cashbox Removal.................................162 Cashflow Bill Acceptor Diagnostic Codes Appendix A .........................................197 Centering Mechanism Error Conditions Appendix A ........................................ 200 Cleaning .......................................166, 167 Clearing Bill Acceptor Jams .................165 MAV500™ C3 and Xtreme® Service Manual Index Features............................................... 155 Installation and Machine Conditions ..161 Interface Connector .............................160 LED Reject Codes Appendix A ........................................ 205 Malfunction LED Error Codes Appendix A ........................................ 203 Physical Description............................ 156 Running Test Error Conditions Appendix A ........................................ 199 Security .................................................157 Acceptor ............................................ 158 Bill/Voucher Entry ............................ 159 Cashbox ............................................ 158 Mechanics and Transport.................157 Solenoid Mechanism Error Conditions Appendix A ........................................ 200 Transport Motor Speed Test Error Conditions Appendix A ........................................ 198 Troubleshooting .................................... 171 JCM Universal Bill Acceptor ................... 154 JCM WBA Calibration ........................................... 189 Auto-calibration Procedure .............. 189 In-machine Auto-calibration ............ 189 Workbench Auto-calibration ............ 189 Removal and Replacement ................ 185 Return Codes for Tests 8 and 9 Table 1 ...............................................207 Table 2 .............................................. 208 Security ................................................ 180 Acceptor .............................................181 Bill/Voucher Entry ............................ 182 Cashbox .............................................181 Mechanics and Transport................ 180 Troubleshooting ................................... 190 Acceptor Sensor Sub-Test................ 192 Bill Receiving Test without Cashbox 195 Determining Test Results ................ 192 Initiating a Test ..................................191 Issues and Remedies ...................... 196 Transport Sensor Sub-Test .............. 194 JCM World Bill Acceptor ..........................178 JP20 to P20 Main Board Connector Backplane............................................ 259 JP21 to P21 Main Board Connector Backplane............................................ 266 JP22 to P22 Main Board Connector Backplane............................................ 263 This document contains confidential information that is proprietary to ATI. It may not be copied or disclosed to unauthorized parties. © 2006 Aristocrat Technologies, Inc. All rights reserved. 1 28-01186-01 10 Nov 2006 K Key Switches Removal and Replacement ................... 17 L Lamp Drivers Animation and Light Tower Lamps I/O Board ...........................................311 Bill Acceptor Lamps I/O Board ...........................................311 Button Lamps/LEDs I/O Board ...........................................311 I/O Board ..............................................311 Latching Belly Door ...............................................55 Main Door ...............................................45 Layout XP Main Board......................................217 LCD Panel .........................................20, 119 4-PIN Minifit Connector PIN Connections . 123 Brightness Adjustment Range............ 122 Components .........................................119 Connector Pinouts - Main LCD Panel . 125 Connector Pinouts - Top Box................124 Connectors ...........................................124 Image Display Settings ....................... 122 Image Specifications............................121 Main 133 On Screen Display Control ...................127 OSD Control ..........................................127 OSD Panel Auto Adjusting .................................. 132 Brightness ........................................ 128 Color.................................................. 129 Contrast ............................................ 129 Image Menu ..................................... 130 Vertical/Horizontal Position .................... 130 Language ...........................................131 Location and Access .........................127 No Signal Display ............................. 132 Recall ................................................ 132 Power ................................................... 123 Power Detection and Power Save Request 126 Removal and Replacement ...................20 Specifications ...................................... 120 Supported Video Timings ....................121 Sync Input Signal Characteristics ...... 120 MAV500™ C3 and Xtreme® Service Manual Index Top Box ................................................ 133 Video Input Signal Characteristics ..... 120 Wells Gardner .......................................119 LCD Power Detection Signal Definition .................................. 126 LED Diagnostic Codes Mars 153 LED Operation SPC2 386 LED Reject Codes JCM UBA Appendix A ........................................ 205 Less than Hopper Payout Limit Hopper Payout Limit.............................100 Light Tower.................................................36 Conditions...............................................37 Denomination.........................................37 Functions ................................................37 Light Tower Driver & Belly Panel Door Security Interfaces Meters .................................................. 367 Light Tower Filter Removal and Replacement ...................38 Loading and Replacing Tickets Ithaca 850 ........................................... 356 Loading Paper GEN2 .................................................... 330 Loading Tickets Epic 950 .............................................. 344 Location and Access CCB 316 Coin Handling System ............................77 Ithaca 850 ........................................... 356 Ticket Printers ..................................... 323 Locks Removal and Replacement ...................18 Logic Cage .................................................24 Removal and Replacement ...................25 Low Frequency Speaker Output - J6 Sound System ..................................... 383 Low Power Mode Signal ............................ 71 M Machine Condition Indicators ................145 Machine Conditions Ticket Printers ..................................... 323 Machine Lockup Troubleshooting ................................... 395 Machine Pay Out MC-62 .....................................................85 Main Board This document contains confidential information that is proprietary to ATI. It may not be copied or disclosed to unauthorized parties. © 2006 Aristocrat Technologies, Inc. All rights reserved. 1 28-01186-01 10 Nov 2006 Removal and Replacement ...................26 Main Display Monitors................................................110 Main Display Area CRT Monitor ............................................19 LCD Panel ...............................................20 Touch Screen ..........................................21 Main Door Belly Door ...............................................54 Button Panel ........................................... 47 Coin Handling System ............................49 Coin Tray .................................................58 Latching ..................................................45 Play Buttons............................................50 Plug Breaks ............................................43 Removal and Replacement ...................44 Main Door Components Belly door assembly and security .........13 Coin entry mechanism ...........................13 Main door assembly and security .........13 Mid trim assembly..................................13 Play buttons ............................................13 Main Door Latching Removal and Replacement ...................46 Main Door Security Switch .......................16 Main LCD Panel ...................................... 133 Troubleshooting ................................... 398 Malfunction LED Error Codes JCM UBA Appendix A ........................................ 203 Mars Bill Acceptor Removal ..........................151 Calibration ........................................... 153 Care and Maintenance ....................... 152 Cashbox Removal................................ 150 Cashbox Replacement ........................ 150 Clearing Bill Acceptor Jams .................151 Features................................................146 Interface Connector .............................149 LED Diagnostic Codes......................... 153 Physical Description.............................147 Removal and Replacement ................ 150 Security .................................................147 Acceptor Module ...............................147 Bill/Coupon/Voucher Entry ..............148 Cashbox .............................................148 Chassis ..............................................147 Mechanics and Transport.................147 Troubleshooting ................................... 153 MC-62 80 Accepted Coins.......................................81 Alarm .......................................................81 MAV500™ C3 and Xtreme® Service Manual Index This document contains confidential information that is proprietary to ATI. It may not be copied or disclosed to unauthorized parties. © 2006 Aristocrat Technologies, Inc. All rights reserved. 1 28-01186-01 10 Nov 2006 Basic Operation ......................................81 Coin Accept Solenoid .............................85 Coin Handling System ............................80 Components ...........................................82 Connector Pinouts..................................87 Features..................................................80 Machine Pay Out ....................................85 Parts List.................................................83 Photo-optic Sensor .................................85 Rejected Coins .......................................81 Replacing the Sample Coin ...................86 Scanner ..................................................84 Sensor Assembly ....................................84 MC-62 Coin Comparitor ............................80 Mechanical Details Power Supply ..........................................75 Mechanical Switch Removal and Replacement ...................16 Mechanical Switches XP Main Board..................................... 232 MEI Cashflow (Mars) ...............................146 Memory XP Main Board.............................219, 225 Memory Expansion Board - J12 XP Main Board..................................... 238 Meter Detection Meters .................................................. 367 Meters 40 Backplane Connections to Pulse Interface Board ...................................371 Component Layout .............................. 368 Connection from Backplane Board ....370, 371 Connection to Light Tower Lamps .......372 Connection to Pulse Interface Board ..371 Connector PIN Assignments ................370 General Description ............................ 365 General Maintenance ..........................373 Interface .............................................. 367 Light Tower Driver & Belly Panel Door Security Interfaces..................... 367 Meter Detection .................................. 367 Overcurrent Protection........................ 367 Pulse Interface Board ......................... 369 Removal and Replacement ...................40 Structure and Components ................ 368 Technical Description.......................... 366 Microprocessor XP Main Board......................................218 Mikohn Interface I/O Board ..............................................310 Mikohn Link Progressive Interface XP Main Board..................................... 232 Miscellaneous Connector - P22 XP Main Board......................................247 Monitor Output Connectors .............................................73 Monitor Output EMC Filtering ...................67 Monitor Output Zero Switching Monitor Output EMC Filtering ................67 Monitors Main Display .........................................110 Overview ...............................................110 Top Box .................................................110 Touch Screen ........................................110 Moveable Parts Hopper ..................................................103 N Non-Moveable Parts Hopper ..................................................103 No Power Troubleshooting ................................... 396 O Offices 8 On Screen Display CRT Monitor ..........................................111 On Screen Display Control LCD Panel .............................................127 On Screen Display Controls CRT Monitor ..........................................114 Operating Environment Power Supply ..........................................72 Operator Mode Menu Indicators ............145 Ticket Printers ......................................324 Optical and Inductive Sensors Condor ....................................................90 Inductive Sensors ..................................90 Optical Sensor ........................................90 Optical Sensor ...........................................90 Opto Isolation I/O Board ..............................................313 OSD Button Control Panel CRT Monitor ..........................................115 Brightness .........................................116 Color...................................................116 Contrast .............................................116 Degaussing....................................... 118 Language ...........................................117 Maintenance .................................... 118 Pincushion, Trapezoid, Parallelogram, MAV500™ C3 and Xtreme® Service Manual Index and PIN Balance .........................117 Recall .................................................117 Vertical/Horizontal Position and Size .... 117 OSD Control LCD Panel .............................................127 Location and Access .........................127 OSD Control Panel Layout CRT Monitor ..........................................114 OSD Controls CRT Monitor ..........................................114 OSD Panel LCD Panel Auto Adjusting .................................. 132 Brightness ........................................ 128 Color.................................................. 129 Contrast ............................................ 129 Image Menu ..................................... 130 Vertical/Horizontal Position .................... 130 Language ...........................................131 No Signal Display ............................. 132 Recall ................................................ 132 Outputs AC Monitor Output Voltage ....................67 Auxiliary Output Voltage .........................68 Control Signals ....................................... 71 DC Output Voltages ................................69 Monitor Output .......................................67 Monitor Output Zero Switching .............67 Monitor Output EMC Filtering .............67 Overcurrent Protection Meters .................................................. 367 Overview Coin Handling System ............................77 Monitors................................................110 Ticket Printers ..................................... 323 P Panic Messages Troubleshooting ................................... 406 Part Number CCB 316 Parts List MC-62 .....................................................83 PCI Mezzanine Connector - J5 XP Main Board..................................... 236 PCI Mezzanine Connector - J6 XP Main Board......................................237 Peripherals XP Main Board......................................219 This document contains confidential information that is proprietary to ATI. It may not be copied or disclosed to unauthorized parties. © 2006 Aristocrat Technologies, Inc. All rights reserved. 0 28-01186-01 10 Nov 2006 Photo-Optic Sensor MC-62 .....................................................85 Physical Description Backplane............................................ 252 CCB 316 Hopper ..................................................101 I/O Board ............................................. 296 JCM UBA .............................................. 156 Power Supply ..........................................62 WBA 179 XP Main Board......................................213 PIN Connections Cable Connector CRT Monitor .......................................113 Play Button LED Removal and Replacement ...................52 Play Button LEDs do not Illuminate Troubleshooting ....................................397 Play Button Legend (Label) Removal and Replacement ...................52 Play Buttons...............................................50 Player Marketing Module ..........................39 Removal and Replacement ...................39 Plug Breaks ...............................................43 PMM 39 Removal and Replacement ...................39 PMM Security Switch ................................16 Power LCD Panel ............................................ 123 Power - Isolated Supplies I/O Board ..............................................314 Power Detection and Power Save Request LCD Panel ............................................ 126 Power Fail Signal ....................................... 71 Power Outlet Power Connectors .............................................73 Power Requirements Sound System ......................................381 Power Supply .............................................31 Access and Location ..............................62 AC Monitor Output Voltage ....................67 Auxiliary Output Voltage .........................68 Basic Operation ......................................64 Block Diagram ........................................64 Components ...........................................63 Control Signals ....................................... 71 CRT Monitor ..........................................113 DC Output Voltages ................................69 External Power Outlet Switch ................66 Fuse Removal and Replacement ................31 Inputs and Outputs ................................65 MAV500™ C3 and Xtreme® Service Manual Index Inrush Current ........................................66 Main Input Hold Up Time .......................66 Mechanical Details ................................75 Monitor Output .......................................67 Monitor Output Zero Switching .............67 Monitor Output EMC Filtering .............67 Operating Environment ..........................72 Physical Description...............................62 Removal and Replacement ...................31 Storage Environment .............................72 Power Supply Input ...................................66 Printer Errors GEN2 .....................................................337 Printer Mechanism Assembly Epic 950 .............................................. 343 Ithaca 850 ........................................... 355 Printer Mechanism Assembly Removal Ithaca 850 ........................................... 355 Printer Status LEDs Epic 950 .............................................. 350 GEN2 .................................................... 336 Ithaca 850 ........................................... 362 Product Profile ............................................. 7 Progressive Systems ................................... 7 Proprietary Copyright Notice....................... 3 PSA-66-ST2............................................. 325 Pulse Interface Board Meters .................................................. 369 R Real Time Clock XP Main Board..................................... 226 Rejected Coins Condor ....................................................90 Removal Bill Acceptor..........................................151 Removal and Replacement Backplane Board....................................27 Backplane Type 2 Board ........................27 Bashbutton LED .....................................53 Belly Door Latching ................................56 Bill Acceptor Cage ..................................30 Button Panel ...........................................48 CCB 29 Coin Acceptor .........................................49 Coin Comparator ....................................49 Coin Tray .................................................58 Coin Validator .........................................49 Communications Configuration Board..29 CRT Monitor ............................................19 Drop Box .................................................33 This document contains confidential information that is proprietary to ATI. It may not be copied or disclosed to unauthorized parties. © 2006 Aristocrat Technologies, Inc. All rights reserved. 1 28-01186-01 10 Nov 2006 Electromechanical Meters.....................40 Fluorescent Ballast Belly Door ............................................57 Fluorescent Tube Belly Door ............................................57 GEN2 .................................................... 329 Hopper ....................................................32 I/O Board ................................................28 JCM WBA.............................................. 185 Key Switches .......................................... 17 LCD Panel ...............................................20 Light Tower Filter ....................................38 Locks .......................................................18 Logic Cage ..............................................25 Main Board .............................................26 Main Door ...............................................44 Main Door Latching................................46 Mars 150 Mechanical Switch .................................16 Meters .....................................................40 Play Button LED......................................52 Play Button Legend (Label) ...................52 Player Marketing Module .......................39 PMM 39 Power Supply ..........................................31 Fuse .....................................................31 Sound System ........................................42 Ticket Printer .......................................... 41 Top Box Bezel .........................................34 Top Box LCD Panel .................................35 Touch Screen ..........................................21 XP Main Board........................................26 Removing Loaded Tickets Epic 950 .............................................. 345 Ithaca 850 ........................................... 358 Replacing the Sample Coin MC-62 .....................................................86 Reset XP Main Board......................................224 Reset Circuitry I/O Board ..............................................314 Resolution, Temperature and Weight CRT Monitor ..........................................111 Return Codes for Tests 8 and 9 JCM WBA Table 1 ...............................................207 Table 2 .............................................. 208 Running Test JCM UBA ...............................................172 Running Test Error Conditions JCM UBA Appendix A ........................................ 199 MAV500™ C3 and Xtreme® Service Manual Index S Scanner MC-62 .....................................................84 Security ....................................................147 Acceptor JCM WBA ...........................................181 Backplane............................................ 255 Bill/Voucher Entry JCM WBA .......................................... 182 Cabinet, Door and Top Box ....................16 Cashbox JCM WBA ...........................................181 JCM UBA ...............................................157 Mechanical Switch Removal and Replacement ................16 Mechanics and Transport JCM WBA .......................................... 180 WBA 180 XP Main Board......................................227 Security and I/O Expansion Connector - P21 XP Main Board......................................244 Self Calibration Condor ....................................................91 Sensor Assembly MC-62 .....................................................84 Sensors Epic 950 .............................................. 346 Chassis Open Sensor/Audible Alarm..... 347 Cover Open Switch ........................... 346 Ticket Burst Sensor.......................... 346 Ticket Low Sensor ............................ 346 Ticket Taken Sensor......................... 346 Top-of-Form/Ticket Out Sensor ....... 346 GEN2 .................................................... 334 Drawer Open .................................... 334 Paper Low ......................................... 334 Paper Out.......................................... 334 Paper Taken ..................................... 334 Printer Open ..................................... 334 Ithaca 850 ........................................... 359 Head-Up Switch ................................ 359 Open/Close Position Sensor/Audible Alarm .......................................... 360 Paper Low ......................................... 359 Ticket Taken Sensor......................... 359 Top-of-Form Sensor .......................... 359 Serial Channels XP Main Board..................................... 230 Serial Communications Interface This document contains confidential information that is proprietary to ATI. It may not be copied or disclosed to unauthorized parties. © 2006 Aristocrat Technologies, Inc. All rights reserved. 28-01186-01 10 Nov 2006 XP Main Board......................................219 Serial Protocol Converter board ............ 385 Setup and Configuration SPC2 388 SH 4 Timers XP Main Board......................................221 Shutdown ...................................................70 Signal Definition LCD Power Detection .......................... 126 Single-Port Configuration SPC2 388 Soft Tilts Troubleshooting ................................... 394 Solenoid Mechanism Error Conditions JCM UBA Appendix A ........................................ 200 Solenoid Test JCM UBA ...............................................173 Sound Troubleshooting ................................... 400 Sound System ...........................................42 24V Input - J1 ...................................... 382 Adjusting Output Levels .......................377 Audio Amplifier PCBA ...........................379 Audio Input - J5.................................... 382 Audio Input Specifications ...................377 Audio Output Specifications ................377 Components .........................................375 Connector PIN Assignments ............... 382 General Description .............................375 High Frequency Speaker Output - J7 . 383 High Frequency Speaker Output - J8 . 383 Low Frequency Speaker Output - J6 .. 383 Power Requirements............................381 Removal and Replacement ...................42 Technical Description...........................378 SPC2 385 Basic Operation ................................... 385 Connectors (Dual Port) ........................391 Connectors (Single Port) ..................... 389 Initialize or Clear NVSRAM ..................387 LED Operation ..................................... 386 Setup and Configuration..................... 388 Single-Port Configuration .................... 388 Speaker Amplifier Assembly ...................376 Specifications Coin Handling System ............................77 Epic 950 .............................................. 350 GEN2 .................................................... 338 Ithaca 850 ........................................... 363 LCD Panel ............................................ 120 Touch Screen ........................................140 MAV500™ C3 and Xtreme® Service Manual Index SPI Bus Driver and Multiplexer Circuitry XP Main Board..................................... 229 Stacker Test JCM UBA ...............................................172 Startup Messages Troubleshooting ................................... 405 Storage Environment Power Supply ..........................................72 Structure and Components Meters .................................................. 368 Supported Video Timings LCD Panel .............................................121 Sync Input Signal Characteristics LCD Panel ............................................ 120 System Connectors Backplane............................................ 255 System Overview Backplane............................................ 254 T Technical Description Cabinet, Door and Top Box ....................15 CRT Monitor ......................................... 112 I/O Board ............................................. 299 Meters .................................................. 366 Sound System ......................................378 XP Main Board......................................216 Ticket Printer ............................................. 41 Removal and Replacement ................... 41 Ticket Printers Location and Access ........................... 323 Machine Conditions ............................ 323 Operator Mode Menu Indicators .........324 Overview .............................................. 323 Troubleshooting ................................... 408 Tickets Ithaca 850 ........................................... 356 Tilt/Error Conditions Troubleshooting ................................... 394 Tools/Equipment Required Cleaning Condor .................................................92 Condor Cleaning ...............................................92 Top Box Bezel 34 Electromechanical Meters.....................40 LCD Panel ...............................................35 Light Tower .............................................36 Meters .....................................................40 Monitors................................................110 This document contains confidential information that is proprietary to ATI. It may not be copied or disclosed to unauthorized parties. © 2006 Aristocrat Technologies, Inc. All rights reserved. 28-01186-01 10 Nov 2006 Player Marketing Module .......................39 Sound System ........................................42 Ticket Printer .......................................... 41 Top Box Bezel Removal and Replacement ...................34 Top Box Bezel (Security) Switch ...............16 Top Box Components Electromechanical meters.....................13 Light tower ..............................................13 Player marketing module.......................13 Sound system .........................................13 Top box assembly, lighting and artwork 13 Top box LCD panel .................................13 Top Box LCD Panel ................................. 133 Removel and Replacement ...................35 Top Tox Components Ticket printer ..........................................13 Top box assembly and security .............13 Touch Screen .............................................21 3M Touch Systems .............................. 135 Calibration and Test ............................ 139 ClearTek™ II ......................................... 135 Functionality ........................................ 136 Handling .............................................. 138 Interface ...............................................137 Machine Interface ............................... 136 Monitors................................................110 Operation ............................................. 135 Performance ........................................ 136 Durability .......................................... 136 Resolution and Sensitivity ............... 136 Removal and Replacement ...................21 Specifications .......................................140 Trademarks .................................................. 3 Transport Motor Speed Test JCM UBA ............................................... 171 Transport Motor Speed Test Error Conditions JCM UBA Appendix A ........................................ 198 Troubleshooting 3 Way Metering Error Message .......... 404 Anti-Pullback Mechanism Test ............172 Bill Acceptance Test ............................. 174 Bill Acceptors ....................................... 408 Centering Mechanism Test ..................173 Coin Acceptors .................................... 408 Coin Handling System ..........................401 CRT Monitor ......................................... 399 DIP Switch Test.....................................175 Entry to the Current Lockup Screen... 395 Epic 950 .............................................. 349 MAV500™ C3 and Xtreme® Service Manual Index Printing a Self-Test Ticket................. 349 Self-test Ticket................................... 349 Fluorescent Tubes are not Illuminated...... 396 General Sensor Test............................. 174 Hard Tilts.............................................. 394 Indication of Conditions....................... 395 Ithaca 850............................................ 362 JCM Sentry Bezel..................................177 JCM UBA................................................ 171 JCM WBA............................................... 190 Acceptor Sensor Sub-Test................. 192 Bill Receiving Test without Cashbox195 Determining Test Results................. 192 Initiating a Test...................................191 Issues and Remedies....................... 196 Transport Sensor Sub-Test............... 194 Machine Lockup................................... 395 Main LCD Panel.................................... 398 Mars153 No Power.............................................. 396 Panic Messages................................... 406 Play Button LEDs do not Illuminate.....397 Running Test..........................................172 Self Test GEN2.................................................. 335 Soft Tilts................................................ 394 Solenoid Test.........................................173 Sound.................................................... 400 Stacker Test...........................................172 Startup Messages................................ 405 Ticket Printers...................................... 408 Tilt/Error Conditions............................. 394 Transport Motor Speed Test................. 171 U UBA Bill Acceptor..................................... 154 User Response........................................ 425 V Video XP Main Board...................................... 223 Video Input Signal Characteristics LCD Panel............................................. 120 W Warnings, Cautions, and Notes................... 5 WBA 178 Features.................................................178 This document contains confidential information that is proprietary to ATI. It may not be copied or disclosed to unauthorized parties. © 2006 Aristocrat Technologies, Inc. All rights reserved. 424 28-01186-01 10 Nov 2006 Physical Description..............................179 Security................................................. 180 Wells-Gardner CRT Monitor...........................................111 LCD Panel..............................................119 X XP Main Board.................................218, 225 Audio..................................................... 223 Backplane Connector (Comms) - P20241 Battery Backup Circuit......................... 226 Communications Configuration Board230 Communications Configuration Board - J3 234 Connectors........................................... 233 CPU Core................................................218 External Battery - J10........................... 238 External I/O Expansion.........................224 Fan Connector - J1............................... 233 Features.................................................212 FPGA222 Functional Description..........................214 I/O Expansion Port Interrupts..............221 Interface with the Power Control System.. 231 Interrupt System................................... 220 Introduction...........................................212 Layout....................................................217 Mechanical Switches........................... 232 Memory..................................................219 Memory Expansion Board - J12.......... 238 Mikohn Link Progressive Interface..... 232 Miscellaneous Connector - P22...........247 PCI Mezzanine Connector - J5............. 236 Peripherals............................................219 Physical Description..............................213 Real Time Clock.................................... 226 Reset......................................................224 Security..................................................227 Security and I/O Expansion Connector - P21.............................................244 Serial Channels.................................... 230 Serial Communications Interface........219 SH 4 Timers...........................................221 SPI Bus Driver and Multiplexer Circuitry.... 229 Technical Description...........................216 Video..................................................... 223 MAV500™ C3 and Xtreme® Service Manual User Response Errors, omissions, or suggestions for improvement to this manual should be reported to: Aristocrat Technologies, Inc. 7230 Amigo Street Las Vegas, Nevada 89119 Attn: Technical Publications Department Tel: (800) 748-4156 Fax: (702) 270-1136 Please rate this manual: Improvement Suggestions for improvement: This document contains confidential information that is proprietary to ATI. It may not be copied or disclosed to unauthorized parties. © 2006 Aristocrat Technologies, Inc. All rights reserved. 425 28-01186-01 10 Nov 2006 □ Excellent □ Adequate □ Needs