1
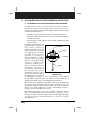
FRONT
COVER
3660
HAND PUMP
3660
© Innova 2001
Paragraph
I
II
III
IV
V
VI
VII
VIII
IX
X
XI
XII
XIII
XIV
Title
Page No.
INTRODUCTION............................................................
SAFETY PRECAUTIONS ..............................................
VEHICLE SERVICE MANUALS...................................
UNDERSTANDING VACUUM SYSTEMS ...................
AUTOMOTIVE VACUUM SYSTEMS ...........................
VACUUM MOTOR/ACTUATOR OPERATION
AND TESTING................................................................
TESTING THE PCV SYSTEM .......................................
TESTING THE EGR SYSTEM.......................................
DIAGNOSING MECHANICAL
ENGINE CONDITIONS .................................................
EXHAUST SYSTEM RESTRICTION TEST .................
FLUID EVACUATION ...................................................
BLEEDING BRAKES .....................................................
REPLACEMENT PARTS ..............................................
SERVICE PROCEDURES .............................................
1
1
2
2
4
7
8
10
13
15
16
18
20
21
WARNING: This manual includes WARNINGS and CAUTIONS
identifying procedures and practices which, if not performed
properly, may result in personal injury or equipment damage.
However, this manual DOES NOT cover all possible uses or
methods of operation for the hand pump. It is the responsibility
of the user to determine that the method of operation and/or
servicing procedure used will not jeopardize personal safety or
vehicle safety. DO NOT USE THE VACUUM PUMP, IN ANY
MANNER, ON THE HUMAN BODY.
i
3660
I.
INTRODUCTION
Congratulations. You have purchased a precision instrument
manufactured to the highest quality standards. This hand-operated
vacuum pump is a versatile tool that can be used in almost any
application where a vacuum must be generated, an existing vacuum
within a system must be measured or for fluid evacuation.
The vacuum pump is designed to aid in testing automotive vacuum
systems; testing vacuum actuated components and devices, and
bleeding brake systems.
The vacuum pump can also be used (in conjunction with a fluid
evacuation kit) as a fluid evacuation device to evacuate fluids from
various systems or locations.
II.
SAFETY PRECAUTIONS
To avoid personal injury, instrument damage and/or damage to
equipment under test, DO NOT operate the hand pump before
reading this manual. ALWAYS use extreme caution when
working on an automobile.
This manual describes common test procedures used by experienced
service personnel and technicians. Many test procedures require
precautions to avoid accidents that can result in personal injury, and/or
vehicle or equipment damage. Always read your vehicle's service
manual and follow its safety precautions before any test or service
procedure is performed.
3660
a.
When an engine is running, it produces carbon monoxide )a toxic
and poisonous gas). To prevent serious injury or death from carbon
monoxide poisoning, operate a vehicle ONLY in a well-ventilated
area.
b.
To protect your eyes from propelled objects as well as hot or caustic
liquids, always wear approved safety eye protection.
c.
When an engine is running, several engine components rotate at a
very high rate of speed (coolant fan, pulleys, fan belt etc.). To avoid
serious injury, always be conscious of moving parts and keep a safe
distance from all these items as well as other potentially moving
objects.
d.
Engine parts become extremely hot when the engine is running. To
prevent severe burns, avoid contact with hot engine parts.
e.
Before starting an engine for troubleshooting, make sure the
parking brake is engaged. Put the transmission in "park" )for
automatic transmission) or "neutral" (for manual transmission).
Block the drive wheels with a suitable blocking device.
1
III.
f.
To prevent damage to the on-board computer when taking vehicle
electrical measurements, always use a digital multimeter with at
least 10 Megohms of impedance.
g.
The vehicle's battery produces highly flammable hydrogen gas. To
prevent an explosion, keep all sparks, high temperature items and
open flames away from the battery.
h.
Don't wear loose clothing or jewelry when working on an engine.
Loose clothing can get caught on the fan, pulleys, belts, etc.
Jewelry is highly conductive to electricity, and can cause a severe
burn if it makes contact between a power source and ground.
VEHICLE SERVICE MANUALS
It is recommended that you consult the manufacturer’s service manual
for your vehicle before any test or repair procedures are performed.
Contact your local car dealership or auto parts store for availability of
these manuals. The following companies publish valuable repair
manuals.
Haynes Publications, 861 Lawrence Drive, Newbury Park, CA
91320, Phone: CA (800) 442-9637, TN (800) 242-4637
Motor Publications, 5600 Crooks Road, Suite 200, Troy, Michigan
48098, Phone (800) 426-6867
Mitchell International, 14145 Danielson Street, Poway, CA 92064,
Phone (888) 724-6742
FACTORY SOURCE (Ford, GM, Chrysler, Honda, Isuzu, Hyundai
and Subaru Service Manuals
Helm Inc., 14310 Hamilton Avenue, Highland Park, Michigan 48203,
Phone (800) 782-4356
IV.
UNDERSTANDING VACUUM SYSTEMS
In order to properly test and diagnose faults in automotive vacuum
systems, it is important to understand what vacuum is, how it is
measured, and how engines create, distribute and use vacuum.
A.
WHAT IS VACUUM?
The earth’s atmosphere (the air that we breathe) is not really empty
space, but is filled with air molecules. Vacuum is the partial or
complete absence of atmosphere (an empty space where no molecules of
any sort exist). Interstellar space is an almost a perfect vacuum.
2
3660
B.
HOW IS VACUUM MEASURED?
The earth’s atmosphere exerts a force on all surfaces it contacts. This
force is called “atmospheric pressure”. There is a direct relationship
between atmospheric pressure and vacuum. In order to understand
vacuum, we need to understand what atmospheric pressure is and how
it's measured.
Air is composed of tiny particles called molecules. Air molecules have
weight. Atmospheric pressure is defined as the force exerted by the
total weight of the air above a specific area at any elevation. At sea
level, the total weight of a column of air (air molecules) above an area
of one square inch equals 14.7 pounds (1030g/cm2). At higher
elevations there are fewer air molecules, and the weight of the air
above a comparable surface area is lower than at sea level. This is why
the air pressure at higher elevations is lower than at sea level.
Atmospheric pressure is measured using an instrument called a
Manometer/Barometer. A Manometer/Barometer is a hollow glass tube
with one end sealed and the other end immersed in a container of
mercury.
At sea level, the force of the surrounding air pressure (atmospheric
pressure) of 14.7 psi (1030g/cm2) acting on the mercury in the
container forces the mercury up the glass tube to a measured height of
30 inches (76 cm).
Vacuum can be defined as a pressure that is less than the surrounding
air pressure (atmospheric pressure). Vacuum gauges base their
readings on atmospheric pressure as indicated on a Manometer/
Barometer. The “0” indication on a vacuum gauge is calibrated to
represent "atmospheric pressure"; the “30” indication represents "zero
pressure" or a "perfect vacuum". Any reading between these two
indications (“0” and “30”) represents a pressure that is less than the
surrounding air pressure (atmospheric pressure).
C.
HOW IS VACUUM CREATED/GENERATED?
Vacuum (a low pressure area) can be created in a sealed container in
one of two ways:
3660
1.
If part of the air is removed from a sealed container, there will be
fewer air molecules per square inch inside the sealed container
than in the surrounding outside air. Fewer air molecules within a
constant area equates to a lower air pressure.
2.
If the area inside a sealed container is increased but the amount of
air inside the container stays the same. The area inside the
container will have fewer air molecules per square inch than the
surrounding outside air. Increasing area while maintaining a
constant volume of air equates to a lower air pressure.
3
V.
AUTOMOTIVE VACUUM SYSTEMS
A.
HOW AN ENGINE GENERATES VACUUM
Gasoline engines create vacuum as a byproduct of normal operating.
During engine operation, when the pistons inside the cylinders move
down on the intake stroke, the combustion chamber area (volume)
inside the cylinders is greatly increased (see Figure 1). This action
decreases the pressure inside the combustion chamber creating a
partial void or vacuum (an area with fewer air molecules per square
inch than the surrounding outside air.) A mixture of air and fuel from
the carburetor/fuel injectors and intake manifold rushes into the
cylinders through the intake valve to fill this partial void. The
continuous movement of the pistons within the cylinders creates a need
for a constant supply of air and fuel to fill the partial void created
inside the cylinders on the intake strokes. The continuous flow of air
and fuel through the intake manifold creates a low pressure (vacuum)
inside the manifold. The low pressure (vacuum) in the intake manifold
exists as long as the engine is in operation. This is how vacuum is
generated in an internal combustion (gasoline) engine.
FUEL INJECTOR
VACUUM PORT
EXHAUST
INTAKE MANIFOLD
COMBUSTION
CHAMBER
PISTON
Figure 1. Piston Intake Stroke
In a gasoline-operated engine/vehicle the vacuum that is generated in
the intake manifold is used to operate a number of vacuum-actuated or
vacuum-controlled devices.
NOTE: Diesel engines, because of their design, produce less vacuum than
gasoline engines. The vacuum produced by a diesel engine is insufficient
to operate vacuum devices. If vacuum devices are added to a diesel
system, an electrical or mechanical vacuum pump is used to operate these
devices. Regardless of how vacuum is generated, the principle of operation
of vacuum devices is the same. The hand vacuum pump can be used to
test vacuum operated devices on both gasoline and Diesel systems.
4
3660
B.
VACUUM DISTRIBUTION SYSTEMS
In order to supply vacuum from the intake manifold to the various
vacuum-operated devices found on an automobile, a vacuum
distribution system is needed. Vehicle manufacturers install vacuum
ports and/or vacuum distribution blocks in the intake manifold. Most
vacuum-operated devices are connected to these vacuum ports/vacuum
distribution blocks using vacuum hoses, lines and fittings.
NOTE: Some vacuum ports are located above the throttle plates of the
throttle body and only supply vacuum when the throttle plates open.
This type of connection is called "Ported Vacuum". On some vehicles,
emission-related devices such as EGR valves or distributor vacuum
actuators are designed to operate only when the vehicle is driven under
certain conditions. Ported vacuum is used to operate these devices.
C.
USING THE VACUUM PUMP
The vacuum pump consists essentially of a pump body, a moveable
handle, a spring-loaded piston rod, a vacuum gauge, a vacuum fitting
and a vacuum release system (see Figure 2).
GAUGE
FILTER
MAIN BODY
SPRING
PUMP HANDLE
VACUUM
PORT
PISTON ASSEMBLY
VACUUM
RELIEF
VALVE
Figure 2. Hand Vacuum Pump - Exploded View
The vacuum pump can be used in almost any application where
vacuum must be generated, or where existing vacuum within a system
must be measured. In most cases, the vacuum pump is connected
directly to the vacuum port of a component, or is connected into a
vacuum hose in the system using a tee connector. The following
paragraphs outline the basic modes of operation for the vacuum pump.
Specific uses for the vacuum pump are provided later in this manual.
3660
5
D.
APPLYING VACUUM
1.
Connect the vacuum pump's vacuum fitting to the component or
system to be tested.
2.
Squeeze and release the pump handle, and read the amount of
vacuum indicated on the vacuum gauge.
3.
Continue squeezing and releasing the pump handle until the
desired amount of vacuum is shown on the vacuum gauge.
E.
TROUBLESHOOTING VACUUM SYSTEMS
NOTE: This manual describes common general test procedures used by
service personnel and technicians. Use the test procedures described in
this manual only as a guide. Always consult the vehicle's service
manual for more detailed testing instructions and specifications before
any diagnostic test or procedure is performed.
The intake manifold is a sealed system, and the air that enters the
system must be metered to maintain a balanced air/fuel mixture. On a
gasoline engine, this metering is controlled by the throttle plates. A
leak in any part of the vacuum system, including the intake manifold,
introduces unmetered air into the intake manifold, resulting in a
leaner air/fuel mixture (too much air/not enough fuel). A lean air/fuel
mixture can result in higher combustion temperature and engine
misfires. A vacuum leak will also reduce the total amount of vacuum
available to all vacuum-operated devices, and may severely effect their
operation.
The following are some possible symptoms/results of a vacuum leak:
•
Rough or uneven idle
•
Stalling
•
Pinging or knocking
•
Burned spark plugs
•
Burned exhaust valves
•
Faulty operation of vacuum-operated devices
F.
TESTING AND CHECKING VACUUM DEVICES AND COMPONENTS
Most problems in automobile vacuum systems result from disconnected
or leaking hoses, bad connectors, defective motor diaphragms or valves.
Pinched vacuum hoses or clogged valves may also restrict vacuum flow.
The first step in checking a vacuum system is to visually check all
vacuum hoses, lines and connectors for cuts, cracks and splits. Check for
collapsed or pinched vacuum hoses. Vacuum hoses have a tendency to
deteriorate because of harsh conditions within the engine compartment.
6
3660
VI. VACUUM MOTOR/ACTUATOR OPERATION AND TESTING
A.
VACUUM MOTOR/ACTUATOR DESCRIPTION AND OPERATION
A vacuum motor/actuator is a device that uses vacuum to perform a
mechanical function. An automobile engine uses vacuum motors/
actuators to perform many functions. Typical functions performed by
vacuum motors/actuators are:
•
Opening and closing the heater and air conditioning duct doors
•
Raising the EGR valve pintle off it’s seat to recirculate exhaust gas
back into the system
•
Activating the vacuum advance unit to advance distributor spark
advance timing
A vacuum motor/actuator is a
partially sealed container (on
VACUUM PORT
most vehicles container is
cylindrical in shape). One side
SPRING
of the container is sealed, and
is equipped with a vacuum
port. The other side of the
container is covered by a
DIAPHRAM
rubber diaphragm, or a piston
a spring, with an attached
shaft or a lever. When engine
vacuum is applied to the
container's vacuum port, a
partial vacuum (lower than
LEVER
atmospheric pressure) is
created in the sealed section of
the container. As a result,
atmospheric pressure exerts a
Figure 3. Typical Vacuum
force on the side of the piston
Motor/Actuator
or diaphragm that is open to
the atmosphere, causing it to move in the direction of the applied
vacuum. This mechanical action is is utilized to activate whatever is
attached to the shaft or lever on the diaphragm (see Figure 3).
The amount of force applied by atmospheric pressure to the diaphragm
is calculated by multiplying the pressure difference between
atmospheric pressure and the pressure within the container times the
surface area of the diaphragm or piston: Atmospheric Pressure Container Pressure X Surface area = Force
The hand vacuum pump can be used to perform a wide range of tests
such as measuring the amount of vacuum in a system or device,
detecting a leak in a system or a fluctuating vacuum supply. The pump
can also be used for testing the function of a variety of vacuumoperated devices.
3660
7
B.
VACUUM MOTOR/ACTUATOR TESTING PROCEDURES
The following procedure shows how the vacuum pump might be used to
check a vacuum motor/actuator for a leaking diaphragm:
1.
Connect the vacuum pump's vacuum hose to the vacuum port of
the motor/actuator.
2.
Operate the handle to apply 8-10 inches (20-25 cm) Hg of vacuum
to the motor/actuator, as shown on the vacuum gauge.
NOTE: Consult the vehicle’s service manual for specifications.
3.
Observe the vacuum gauge for approximately one minute.
•
If the vacuum gauge reading remains steady for one minute,
the diaphragm is not leaking.
•
If the vacuum gauge reading falls, a leaking diaphragm is
indicated.
VII. TESTING THE PCV SYSTEM
A.
SYSTEM DESCRIPTION AND OPERATION
The Positive Crankcase Ventilation (PCV) system helps reduce air
pollution by aiding in the scavenging and burning of harmful engine
crankcase vapors and gases before they can enter the atmosphere. The
PCV system consists essentially of an intake filter, PCV valve and
interconnecting hoses (see Figure 4).
Fresh air is drawn through the intake filter (located in the air cleaner),
through the valve cover, and into the crankcase to be mixed with the
crankcase gases. From the crankcase the gases are drawn to the
opposite valve cover, through the PCV valve, and into the intake
manifold. The intake manifold vacuum draws these crankcase gases
where they are mixed with incoming intake air to be burned during
engine combustion.
Airflow through the PCV system adds to the airflow through the
carburetor or throttle body during engine operation. During cruising
and light acceleration, intake manifold vacuum and the pressure inside
the crankcase are relatively high. The strong manifold vacuum draws
the PCV valve plunger into the narrow end of the valve, restricting
most of the flow of gases into the intake manifold. During hard
acceleration or high speed operation (heavy load condition), low intake
manifold vacuum allows the PCV valve spring to overcome the high
crankcase pressure, pushing the plunger out of the narrow end of the
PCV valve and increasing the flow of crankcase gases into the engine
for combustion.
8
3660
TYPICAL PCV SYSTEM / PCV VALVE OPERATION
FRESH AIR
(CLOSURE)
TUBE
OIL FILLER
CAP
3
AIR CLEANER
CARB.
INT. MAN.
ROCKER COVER
PCV VALVE
CONTROLS
FLOW RATE
CRANK CASE
1
OIL SEPARATOR
FRESH AIR
FLOW
2
AIR AND
CRANKCASE
VAPOR FLOW
PCV VALVE OPERATING CONDITIONS
NORMAL
HIGH SPEED OR LOAD
HIGH VACUUM
PULLS VALVE
TOWARD TOP SEAT
FLOW
RATE
IS
LOW
BACKFIRE DURING CRANKING
BACKFIRE CAUSES
HIGH PRESSURE
IN MANIFOLD
VACUUM
IS LOW
FLOW RATE
INCREASES
SPRING
OPENS
VALVE
FARTHER
PLUNGER
SEATS TO
SEAL OFF
FROM
CRANKCASE
CRANKCASE PRESSURE
TENDS TO CLOSE VALVE
Figure 4. Typical PCV System / PCV Valve Operation
B.
TEST PROCEDURES
As a result of normal engine operation, the PCV valve may become
clogged and reduce the amount of crankcase ventilation. Reduced
ventilation can cause the formation of acids in the crankcase, and a
buildup of pressure which could force engine oil out past the engine
seals. To prevent these problems, the PCV valve should be replaced
periodically.
NOTE: A slow or rough idle can be caused by a clogged PCV valve.
Check the PCV system BEFORE adjusting engine idle.
3660
9
1.
Inspect the PCV system for worn, kinked or plugged hoses. Make
sure all hoses are properly and securely connected.
2.
Connect the hand vacuum pump to an intake manifold vacuum
port. (use the hose and a suitable adapter from the accessory kit,
as needed).
3.
Start and run the engine until it reaches normal operating
temperature.
4.
Run the engine at idle and observe the vacuum gauge.
5.
•
The vacuum gauge should indicate between 16 ~ 22 in. (41 ~
56 cm) Hg.
•
•
The gauge needle should remain steady (little or no movement).
•
Engine speed should decrease by approximately 100 RPM (as a
result of loss of air flow from the PCV system).
•
Vacuum should increase slightly (indicating vacuum flow
through the PCV system has been plugged).
Note the engine speed (RPM) and vacuum at idle.
Clamp the vacuum supply hose to the PCV valve.
•
If BOTH a decrease in engine RPM and an increase in vacuum
are not observed, replace the PCV valve and/or any damaged
or plugged hoses.
NOTE: Be sure to install the correct PCV valve for your vehicle.
Installing the wrong PCV valve can result in either excessive or
insufficient air flow through the PCV system.
5.
After replacing the PCV valve, ALWAYS readjust the engine's idle
speed and, if possible, the idle air/fuel mixture. Refer to your
vehicle's service manual for procedures.
NOTE: On some vehicles idle speed and air/fuel mixture are not
adjustable. The on-board computer makes adjustments based on
sensor inputs and engine operating conditions. ALWAYS consult
the vehicle's service manual before making any adjustments.
VIII. TESTING THE EGR SYSTEM
A.
SYSTEM OPERATION
The Exhaust Gas Recirculation (EGR) system is used to reduce Oxides
of Nitrogen (NOx) emissions. NOx is created when nitrogen and oxygen
in the atmosphere mix at temperatures above 2,500F° (1371° C).
During combustion, temperatures in the cylinders can exceed 3,500 F°
(1927° C), providing ideal conditions for the formation of NOx.
The EGR system reduces the formation of NOx by lowering the
combustion temperature. This is accomplished by recirculating exhaust
gases through an EGR valve back into the combustion chambers.
10
3660
Depending on the make, model and year of your vehicle, the EGR valve
may be controlled by one of two methods (see Figure 5):
VACUUM
PORT
SEALED
HOUSING
SPRING
INTAKE
FLOW
ACTUATING ROD
DIAPHRAGM
EGR
FLOW
THROTTLE
PLATE
EXAUST
FLOW
Figure 5. Typical EGR System Operation
•
Ported Vacuum - The EGR valve is actuated by ported vacuum
from above the carburetor's throttle plates. The amount of exhaust
gas that is recirculated back into the combustion chamber depends
on the amount of vacuum that reaches the EGR valve. At idle and
at wide open throttle a negligible amount of vacuum reaches the
valve and the valve stays closed. As the throttle plates gradually
open, vacuum reaches the valve and the valve starts to open. A low
vacuum to the EGR valve will cause the valve to open slightly. As
the vacuum to the valve increases, the EGR valve continues to
open until it is fully opened.
•
EGR Control System - The control system monitors engine
operation and modulates the amount of EGR based on engine
operating conditions such as coolant temperature, ambient air
temperature, exhaust back pressure and engine speed or load.
To improve drivability before the engine has reached normal operating
temperature, most vehicles use a thermal switching device, which
shuts off the EGR system while the engine is cold.
3660
11
B.
TROUBLESHOOTING
NOTE: EGR systems vary greatly between vehicle makes and models.
The following paragraphs provide general testing and troubleshooting
procedures for EGR systems. For specific tests for your vehicle, refer to
the manufacturer's service manual.
A defective EGR valve generally remains either fully closed or fully
open. An EGR valve which remains closed will increase NOx emissions.
An EGR valve which remains open will cause the engine to stall at idle,
to idle roughly, to lose power, or to run rough at full throttle.
An EGR valve may fail as a result of one or more of the following
causes:
12
•
Loss of vacuum or control vacuum
•
Mechanical defect (such as a ruptured diaphragm)
•
Contamination of or damage to the valve seat (restricted by carbon
buildup)
•
Restrictions in the exhaust tube
C.
TESTING EGR VACUUM/ EGR CONTROL SYSTEM
1.
Connect the vacuum pump's vacuum port to the EGR valve's
vacuum supply line (use the vacuum tee included in the accessory
kit, if necessary).
2.
Start and run the engine until it reaches normal operating
temperature.
3.
Increase engine speed to approximately 2000 ~ 2500 RPM and
observe the vacuum gauge.
•
The EGR valve vacuum supply should be at least 4 ~ 6 in. (10
~ 15 cm) Hg of vacuum.
•
If no vacuum is present, check the vacuum hoses and
connections that supply vacuum to the EGR valve for any
abnormality or defect. Repair as necessary.
•
If vacuum hoses are in good condition, test the control system
that modulates and controls the vacuum to the EGR valve .
(Control systems and testing procedures vary widely
depending on the make, year and model of the vehicle. Consult
the manufacturer's service manual for testing procedures.)
3660
D.
TESTING THE EGR VALVE DIAPHRAGM
1.
Turn the engine "off"
2.
Disconnect the vacuum hose at the EGR valve.
3.
Connect the vacuum pump to the EGR valve (use the clear hose
and adapter included in the accessory kit, as necessary).
4.
Squeeze and release the pump handle until 10 ~ 12 in. (26 ~ 30 cm)
Hg of vacuum is indicated on the gauge. Observe the vacuum
gauge for one minute minimum.
•
E.
Verify the vacuum gauge reading of 10 ~ 12 in. (26 ~ 30 cm)
Hg remains steady for at least one minute. If the vacuum
drops, the diaphragm is defective.
CHECKING EGR VALVE SEAT/RESTRICTIONS IN EXHAUST
TUBE
The only way to accurately check the EGR valve seat for contamination
or damage and the exhaust tube for restrictions is to remove the EGR
valve. Consult the manufacturer's service manual for procedures.
The EGR valve may also operate properly with the engine at normal
operating temperature, but remain open when the engine is cold. This
usually occurs when a faulty thermal switching device fails to shut off
the vacuum supply when the engine is cold.
IX. DIAGNOSING MECHANICAL ENGINE CONDITIONS
When used properly, a vacuum gauge can provide a considerable
amount of information about the internal condition of an engine.
However, it is easy to misinterpret the readings of the instrument and
thereby reach false conclusions. When using a vacuum gauge on an
engine, it is far more important to note the action and the general
location of the needle rather than the actual vacuum reading.
NOTE: Vacuum leaks or improper operation of any of the external
vacuum-operated devices (EGR valve, vacuum-operated solenoids, EVAP
system, vacuum valves, etc.) and hoses may interfere with proper engine
diagnosis by giving a false indication of current engine condition. Always
perform a preliminary check for proper operation and sealing integrity of
these devices before an engine vacuum test is performed.
3660
1.
Start and run the engine until it reaches operating temperature.
2.
Connect the vacuum gauge to the intake manifold. Whenever
possible, connect the gauge hose directly to a vacuum port on the
intake manifold in order to avoid any leaks that might exist in
other connections.
3.
Evaluate the test results.
13
NOTE: Use the following illustrations only as a guide. These drawings
are examples based on manufacturer's specifications of 18 in. (51 cm)
Hg of vacuum at idle at sea level. The idle specifications for your vehicle
may be higher or lower (as specified by the vehicle's manufacturer) than
the ones shown. The purpose of these examples is to show the action or
fluctuations of the needle, which are indicative of engine condition
1.
Normal engine (Figure 6)
An engine at idle at sea level
should show a steady needle, and a
vacuum of 15 ~ 22 in. (38 ~ 56 cm)
Hg depending on manufacturer's
specifications. Quickly opening and
closing the throttle should cause
the vacuum to momentarily drop to
below 5 in. (12 cm) Hg, followed by
a momentary rebound to approximately 25 in. (64 cm) Hg, before
returning to normal 15 ~ 22 in.
(38 ~ 56 cm) Hg.
2.
10
25
5
0
30
Figure 6
15
20
10
25
5
0
30
Figure 7
Ignition system problems or
burned, leaky and sticking
valves (Figure 8)
If the gauge needle fluctuates very
slowly over a range of approximately 2 in. (3 cm) Hg, this may be
an indication of an ignition
problem (spark plug gap, ignition
coil/cables/cap/circuit). If the
valves are burned or leaking, the
vacuum reading will drop every
time the defective valve or valves
are inoperative. An intermittent
drop indicates sticking valves.
14
20
Intake system leak, late
ignition/valve timing, or low
compression (Figure 7)
If the gauge reading at idle is
steady but much lower than normal
(5 ~ 13 in./12 ~ 25 cm Hg), this may
be an indication of intake manifold
system leak (intake gasket, carburetor base gasket, vacuum devices
or hoses, etc.). Readings of 3 ~ 8 in.
(8 ~ 20cm) Hg below normal may be
an indication of late ignition/valve
timing or worn piston rings.
3.
15
15
20
10
25
5
0
30
Figure 8
3660
4.
Leaking head gasket, worn
valve guides or weak/broken
valve springs (Figure 9)
If the gauge needle fluctuates
regularly between a high and a
low reading, the cylinder head
gasket may have a leak between
two adjacent cylinders. If the
needle vibrates rapidly at idle
speed, the intake valve guides are
probably worn.If the needle
vibrates rapidly when the engine
is accelerated, the valve springs
are weak.
X.
15
20
10
25
5
0
30
Figure 9
EXHAUST SYSTEM RESTRICTION TEST
The vacuum gauge is also a valuable tool to help in the troubleshooting
of a restricted exhaust system. An exhaust restriction usually allows
normal engine performance at idle, but causes poor performance at
higher engine speed or with the engine under load.
Use the following procedure to test for a restricted exhaust system:
NOTE: In order for this test to be accurate, make sure other engine
problems (as described in “DIAGNOSING MECHANICAL ENGINE
CONDITIONS") are repaired first, before the Exhaust System
Restriction Test is performed.
1.
Connect the vacuum pump to an intake port and start the engine.
2.
With the engine at idle, note the vacuum reading on the vacuum
gauge.
•
3.
The vacuum reading should be within manufacturer's
specifications.
While observing the vacuum gauge, slowly increase engine speed to
2500 ~ 3000 RPM. At high RPM, engine vacuum should be equal to
the vacuum reading at idle ± 3 in./8 cm Hg.
•
If the vacuum decreases to zero or close to zero at high RPM
there is probably a restriction on the exhaust system.
The most probable cause of a restricted exhaust system is a defective
Catalytic Converter or muffler. Consult the vehicle's service manual for
further testing instructions.
3660
15
XI. FLUID EVACUATION
WARNING: DO NOT USE THE HAND VACUUM PUMP TO
EVACUATE GASOLINE OR ANY OTHER HIGHLY FLAMMABLE
OR TOXIC FLUIDS.
CAUTION: Some fluids (brake fluid, oils, power steering fluid,
etc.), are very caustic (corrosive) and may damage painted
surfaces. Take precautions not to get them in contact with
painted surfaces. If you accidentally get them on a painted
surface wash them off immediately.
The hand vacuum pump is an excellent tool to evacuate almost any
type of fluid. The following are typical areas where the hand vacuum
pump can be very useful for evacuating fluids:
•
Automatic transmissions/transaxle: If the transmission is
accidentally overfilled with transmission fluid. Most vehicles are
not equipped with a drain plug, and the only way to drain excess
fluid is to remove the pan. A more effective and easier method is to
use the vacuum pump (with the fluid evacuation kit) to siphon the
extra fluid out through the filler tube.
NOTE: On some transmissions/transaxles the distance from the
top of the filler tube to the transmission oil pan is quite long. A
longer tubing (sold separately) than the one supplied with the fluid
evacuation kit may be needed to evacuate transmission fluid from
these units.
•
Power steering pump fluid: to correct an overfilled condition, to
replace the pump reservoir fluid with new power steering fluid.
•
Master cylinder: to correct an overfill condition, to replace the
master cylinder brake fluid with new fluid.
•
Differential (4WD and rear wheel drive vehicles): some 4WD
and rear wheel drive vehicles need to be serviced periodically by
changing the differential fluid, but are not equipped with a drain
plug. With the vacuum pump and the fluid evacuation kit, the fluid
can be siphoned out through the fill hole without removing the
differential cover.
•
Coolant overflow reservoir: remove coolant from overflow
reservoir, to correct an overflow condition or to change reservoir
coolant.
A.
ASSEMBLING THE FLUID EVACUATION/BRAKE BLEEDING KIT
Use the following procedure to connect the fluid evacuation/brake
bleeding kit to the vacuum pump (see Figure 10).
16
3660
JAR CAP
GAUGE HEAD
11/2 in (4cm)
tubing
JAR LID
PUMP
3.5" (9cm) TUBING
24 in (21cm) TUBING
8oz ( 240ml)
RESERVOIR
HOSE ADAPTERS
PLUG
TEE FITTING
Figure 10. Vacuum Pump Brake Bleeding
and Fluid Evacuation Accessories
1.
Attach the 3-1/2" (9 cm) length of tubing to the bottom fitting of
the reservoir jar lid.
2.
Tighten the reservoir jar lid onto the reservoir jar securely.
3.
Connect the 1-1/2" (4cm) or the 24 inch (61cm) length of tubing,
whichever is better suited for your application, between the
vacuum pump and the reservoir jar lid at the fitting marked
"PUMP".
NOTE: To reduce the possibility of drawing fluid into the vacuum
pump body, make sure that the vacuum pump is only connected to
the tubing that goes to the jar lid fitting marked "PUMP".
4.
3660
Attach a 24 inch (61cm) length of tubing to the remaining fitting
on the reservoir jar lid.
17
B.
FLUID EVACUATION PROCEDURES
1.
Assemble the fluid evacuation/brake bleeding kit as described on
page 16.
NOTE: If a large quantity of fluid is to be evacuated, it is advised
that a larger fluid reservoir jar be used. A fluid evacuation kit that
includes a 24-ounce (720 ml) reservoir jar and longer tubing is
available as an option. See page “REPLACEMENT PARTS” on
page 20 for more information.
2.
Insert the open end of the clear tubing into the item from which
fluid is going to be evacuated. (Make sure the evacuation kit is
assembled properly and the jar lid is properly tightened).
3.
Squeeze and release the pump handle, as needed, until the desired
amount of fluid is evacuated.
CAUTION: To prevent fluid from being drawn into the pump
body, only evacuate fluid until the reservoir container is
half full. When the container is half full, use the relief valve
on the pump to release the vacuum, then empty the container
and repeat the procedure until the desired amount of fluid
is evacuated.
XII. BLEEDING BRAKES
WARNING: Most Anti-Lock brake systems use a high-pressure
pump to maintain system pressure. ALWAYS observe the
following precautions when servicing Anti-Lock brake systems:
•
ALWAYS refer to the manufacturer's service manual for service
and repair procedures for your vehicle's Anti-Lock brake system.
•
ALWAYS wear safety goggles when performing servicing
procedures.
•
ALWAYS depressurize the system before adding brake fluid or
performing servicing procedures.
•
ALWAYS use manufacturer-recommended brake fluids ONLY.
•
Unless directed to by the manufacturer's service procedure,
NEVER open a bleeder valve or loosen a hydraulic line while the
system is pressurized.
A.
BLEEDING AUTOMOBILE BRAKES
CAUTION: Brake fluid is very caustic (corrosive) and will
damage painted surfaces. Take precautions to prevent brake
fluid from contacting these surfaces. If brake fluid contacts a
painted surface, wash it off immediately.
18
3660
Air in the brake system hydraulic lines can result in a "low" or "soft"
brake pedal. To remedy this problem, the air must be bled from the
hydraulic lines. The vacuum pump provides a simple and effective
method of bleeding air from the brake system.
Use the following procedure to bleed air from automobile brake lines.
NOTES:
•
Make sure all brake-bleeding nuts are clean prior to beginning the
brake bleeding procedure.
•
Bleed the brake system in the following order (for most vehicles):
a) Master cylinder: If the master cylinder needs to be bled, consult
the vehicle’s service manual and follow the manufacturer’s
instructions for procedures.
b) Combination valve bleeder screws: (if equipped);
c)
•
1.
2.
Wheel cylinders and calipers: Procedures and sequences for
bleeding wheel cylinders and calipers very widely from one
manufacturer to the next. Always consult the vehicle's service
manual and follow the manufacturer's recommendations for
the proper procedure or sequence to follow when bleeding wheel
cylinders and calipers.
Check the fluid level in the master cylinder frequently during brake
system bleeding, and top off as needed with fresh, clean brake fluid.
Assemble the fluid evacuation/brake bleeding kit as described on
page 16.
Select the appropriate bleed screw tapered adapter:
•
Tapered adapters fit inside the brake-bleeder screw, and
should be inserted tightly into the bleeder screw with a
pushing, twisting motion.
NOTE: On some bleeder screws, the clear tubing can be used
directly on the bleeder screw without an adapter. Push the tube over
the top portion of the bleeder screw, ensuring that a sealed condition
exists. If unable to achieve a sealed condition, use a tapered adapter
as described above.
3660
3.
Attach the selected adapter (if used) to the open end of the 24-inch
(61cm) piece of tubing.
4.
Remove the bleeder screw. Temporarily plug the bleeder screw hole
(use the plug supplied with the accessory kit, or similar) to prevent
the leaking of brake fluid onto the brake assembly.
5.
Wrap teflon tape on bleeder screw threads, re-install and tighten
bleeder screw on brake assembly. Take precaution not to cover the
bleed hole on the side of the bleeder screw when wrapping it with
Teflon tape.
19
NOTE: It is possible to bleed the brake system without using teflon
tape on the bleed screw threads, but, air will be drawn from around
the bleed screw threads, and it may be difficult to tell if the air is
coming from the brake system or from around the bleed screw
threads.
6.
Squeeze and release the pump handle as necessary (usually 8 ~ 12
times) to create sufficient vacuum in the reservoir jar. If the
vacuum is not holding, retighten the lid on the jar.
7.
Open the brake bleeder screw slightly (1/4 - 1/2 turn) to allow
brake fluid to enter the reservoir jar. The air that is bled from the
brake lines will appear as large, uneven bubbles in the 24-inch
(61cm) clear tubing.
8.
When the level of fluid in the reservoir jar reaches approximately
1 ~ 2 inches (2.5 ~ 5 cm), tighten the brake bleeder screw.
DISPOSE OF THE USED BRAKE FLUID PROPERLY.
9.
Repeat steps I through 8 for all remaining wheels.
XIII. REPLACEMENT PARTS
The following items are available as replacement parts or as optional
accessories:
1.
Maintenance kit
2.
Replacement gauge
3.
Replacement handle
4.
Replacement reservoir 8 oz (240 ml))
5.
Optional fluid evacuation kit (Includes a 24oz (720ml) reservoir jar
+ accessories).
6.
Replacement hose and fitting kit
For ordering information and updates visit us on the web at
www.iequus.com. See SERVICE PROCEDURES on page 21 for more
information.
20
3660
XIV. SERVICE PROCEDURES
If you have any questions, please contact your local store, distributor or
Manufacturer Department.
USA & Canada: (800) 544-4124 (7:00-4:00, Monday-Friday PST)
All others: (714) 241-6802 (7:00-4:00, Monday-Friday PST)
FAX: (714) 432-7511 (24 hr.)
THE MANUFACTURER'S ONE YEAR LIMITED WARRANTY
The Manufacturer warrants to the original purchaser that this unit is
free of defects in materials and workmanship under normal use and
maintenance for a period of one (1) year from the date of original
purchase, whether or not actual use begins on that date. User,
however, is responsible for packaging, and transportation of product to
the service center.
If the unit fails within the one (1) year period, it will be repaired or
replaced during normal working hours, at the Manufacturer's option, at
no charge, when returned prepaid to the Service Center with Proof of
Purchase. The sales receipt may be used for this purpose. All
replacement parts, whether new or re-manufactured, assume as their
warranty period only the remaining time or this warranty.
This warranty does not apply to damage caused by improper use,
accident, abuse, improper voltage, service, fire, flood, lightning, or
other acts of God, or if the product was altered or repaired by anyone
other than the Manufacturer's Service Center.
The Manufacturer, under no circumstances shall be liable for any
consequential damages for breach of any written warranty of this unit.
This warranty gives you specific rights, which vary, from state to state.
This manual is copyrighted with all rights reserved. No portion of this
document may be copied or reproduced by any means without the
express written permission of the Manufacturer. THIS WARRANTY IS
NOT TRANSFERABLE.
For Warranty service (please call before sending item in for service),
send via U.P.S. or US mail with a copy of sales receipt prepaid to:
TECHNICAL SERVICE
17291 Mt Herrmann St.
Fountain Valley, CA 92708
Attn: Service Department
NOTE: If sent by US mail, be sure to insure the shipment.
Allow 3-4 weeks service time.
3660
21
FRONT
COVER
3660
HAND PUMP
© Innova 2001
3660