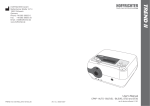
1
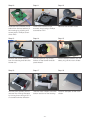
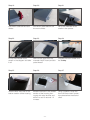
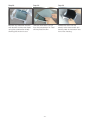
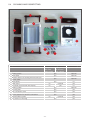
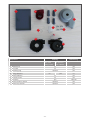
Hygiene concept Instructions for hygienic preparation Table of contents 1 Symbols used in this hygiene concept.............................................................................3 2 Safety information............................................................................................................3 3 3.1 3.1.1 3.1.2 3.2 3.3 3.4 Preparation for a patient change......................................................................................4 General information...........................................................................................................4 Reusable products............................................................................................................4 Information on bacterial filters............................................................................................4 Receipt, inspection and acceptance by the service department.........................................5 Preparation procedure 1 – Manual Preparation...................................................................5 Validated preparation procedure 2 – KR1000 (Keredusy)....................................................5 4 Exploded view drawing....................................................................................................6 5 5.1 5.1.1 5.1.2 5.1.3 5.1.4 5.2 5.2.1 5.3 5.4 5.5 5.6 5.7 5.8 5.9 5.10 5.11 Manual preparation..........................................................................................................7 Preliminary steps...............................................................................................................7 Protective agents and disinfectants....................................................................................7 Tools, measuring equipment and aids................................................................................7 Unpacking and disinfecting................................................................................................8 Checking for external damage...........................................................................................8 Checking display and display contrast...............................................................................8 Data backup......................................................................................................................8 Opening the device............................................................................................................9 Cleaning and disinfecting.................................................................................................13 Assembling the device.....................................................................................................17 Device tests....................................................................................................................17 Functional testing of the keys...........................................................................................17 Resetting counters, setting date and time........................................................................17 Restoring device settings.................................................................................................17 Checking electrical safety................................................................................................17 Final steps.......................................................................................................................18 6 6.1 6.2 6.3 6.4 Disposal.........................................................................................................................18 Device and components..................................................................................................18 Packaging.......................................................................................................................18 Batteries..........................................................................................................................18 Accessories and wear parts.............................................................................................18 7 7.1 7.2 7.3 Shipping instructions for contaminated medical technology..........................................19 Pick-up...........................................................................................................................19 Packaging for shipping....................................................................................................19 Shipping..........................................................................................................................19 -2- 1 Symbols used in this hygiene concept Important information is denoted by symbols in this hygiene concept. Be sure to follow these instructions in order to avoid accidents, personal injury and material damage. In addition, the local accident prevention regulations and general safety regulations in force in the area of use must be observed. This symbol denotes general safety instructions. Follow these instructions to avoid accidents, personal injury or material damage. This symbol denotes hazardous situations that may lead to serious injuries or death. This symbol denotes hazardous situations that may lead to moderately severe injuries. This symbol denotes situations that may lead to material damage or damage to the device. This symbol denotes information, tips and instructions for the efficient, error-free use of the device. 2 Safety information •• Before starting preparation read this hygiene concept through carefully. Also observe the user’s manual and the service manual as well as the warning and safety instructions they contain. •• For hygiene reasons, we recommend wearing disposable gloves whenever working on the device. Before further work, the surface of the device must be treated with a disinfectant. When doing so, observe the manufacturer’s safety instructions and instructions for use. •• If it is necessary to perform work without protective gloves (e.g. final assembly), hands should be disinfected with hand sanitizer before and after work. •• Upon receipt in the service department, the documents supplied together with the device must be examined. Devices contaminated with MRSA must be subjected to hygienic preparation according to the validated KR1000 (Keredusy) preparation procedure. All other devices are to be prepared according to this hygiene concept. •• Special hygiene measures are advisable when performing maintenance or repairs on devices contaminated with MRSA (methicillin-resistant Staphylococcus aureus). In this case, protective clothing such as disposable gloves, mask and disposable apron should be worn without fail. Hygienic preparation according to the validated KR1000 (Keredusy) preparation procedure must be carried out before performing any maintenance or repair. -3- 3 Preparation for a patient change The manual procedure to be used for preparation of the point 2 device for a patient change is described below. The number of preparation cycles is not limited. This procedure may only be carried out by qualified, authorized and experienced specialist personnel. Every repair, service or inspection etc. includes the preparation of devices in the form of surface disinfection. In the event of device preparation for a patient change, additional disinfection measures are necessary and are described below. This procedure must be observed without fail. Devices as well as humidifier’s of smokers are generally not acceptable for hygienic preparation by HOFFRICHTER service. 3.1 General information 3.1.1 Reusable products Reusable products (such as tubing, masks, water traps, particle filters etc.) can be disinfected according to their manufacturer’s instructions. However, these products do generally not undergo preparation at HOFFRICHTER’s service department. Products not intended for reuse and – where relevant – any other product affected by a patient change (other medical devices, other accessories, other products) must be packaged separately on return to the client and must accordingly be identified as not having undergone hygienic preparation. 3.1.2 Information on bacterial filters A bacterial filter is used with respiratory therapy devices and ventilators to filter respiratory air in order to prevent contamination of the devices. It is installed between the device and the tube system. Proper use of a bacterial filter (subject to compliance with the service time) while the device is used on the patient ensures that the device will be protected from germs on the patient’s side. It is the responsibility of the operator to assess the risk of possible contamination and decide about the necessity and method of preparation to be used on the device for a patient change. -4- 3.2 Receipt, inspection and acceptance by the service department The customer’s documents accompanying the device must be examined before commencing pre paration. It should be checked whether the dispatch instructions for MRSA-contaminated devices (see section 7 on page 19) were observed. The preparation of MRSA-contaminated devices may only be carried out by HOFFRICHTER GmbH or by other companies certified for it. Comment: In the case of devices used solely for stationary applications, the operator must draw up a separate risk assessment depending on the type and level of contamination, define the method of preparation for use on another patient and specify this in the accompanying documents. This applies in particular to cases of possible contamination with MRSA or comparable contamination of a device. 3.3 Preparation procedure 1 – Manual Preparation The manual procedure must not be used for the preparation of MRSA-contaminated devices. Hygienic preparation for a patient change may only be carried out by qualified, authorized and experienced specialist personnel. Manual preparation is described in this hygiene concept. 3.4 Validated preparation procedure 2 – KR1000 (Keredusy) The KR1000 (Keredusy) preparation procedure is suitable for the preparation of MRSA-contaminated devices. Other procedures must not be used! Hygienic preparation for a patient change according to the validated KR1000 (Keredusy) procedure may only be carried out by companies with an accordingly certified quality management system and appropriately qualified, authorized and experienced specialist personnel. The type and scale of the preparation are described in detail in “Instruction on dealing with validated respirators for the disinfection system KR1000”. The number of preparation cycles for the device is limited to 15. -5- 4 Exploded view drawing Membrane keyboard Top section of housing Display Controller circuit board Microphone cover Meander lid Acoustic hood Blower bellows Fixing element Retaining ring Blower Fixing element Fixing element Catflap Damper Damper Sealing gasket (internal) for air outlet Damper Room divider Acoustic protection plate Cover plate for DC and PC connection Air outlet Bottom section of housing PC connection cover Base (front) Filter insert Control panel base Adapter for humidifier Base (rear) Housing foot Cover for humidifier electronics guide -6- Housing foot 5 Manual preparation 5.1 Preliminary steps 5.1.1 Protective agents and disinfectants •• Hand sanitizer: e.g. Sterillium® (Bode) •• Disinfectant spray: e.g. mikrozid® AF liquid •• Surface disinfectant: e.g. mikrozid® AF Where possible, wipe disinfection is preferable to spray disinfection. 5.1.2 Tools, measuring equipment and aids •• Service manual, User’s manual •• point 2 power supply unit with mains cable •• Soft work space surface •• Different screwdrivers: –– Torx screwdriver TX-08 [1] –– Slotted screwdriver 06x3,5 [2] –– Phillips screwdriver PH0 [3] –– Phillips screwdriver PH1 [4] –– Adjustment screwdriver [7] •• point auxiliary tool (art. no. 0000 7939) [5] •• Spatula [6] •• Flow resistor, 6 mm (art. no. 0000 7302) •• Compressed air spray or stationary compressed air supply •• Multi-purpose grease or similar •• Vacuum cleaner •• Replacement kit point 2 (art. no. 0001 2501) –– Room divider [1] –– Foam cut-out [2] –– Silicone tubes [3] –– Sylomer ring [4] –– Standard filter [5] –– Blower bellows [6] –– Insert for meander lid [7] –– Catflap (flow resistor) [8] •• PC with following system requirements (minimum requirements): –– MS-Windows® 98, 2000, NT4.0, ME, XP, Server 2003, Vista or 7 –– AMD Athlon/Pentium class (x86), operating frequency > 700 MHz –– min. 192 MB RAM for MS-Windows® 98, NT4.0, ME –– min. 400 MB RAM for MS-Windows® 2000, XP, Server 2003, Vista or 7 –– min. 150 MB available hard disc space (or more depending on the desired storage capacity for patient files) –– min. 280 MB free hard drive space for the Microsoft .NET Framework 2.0 Redistributable (x86) –– 2 MB graphics card min. High Color (16 bit) -7- –– Mouse –– 1 free COM interface per device –– 1 free SD interface (only when using DATA box) •• RS232 adapter cable (Sub-D9 / RJ45, art. no. 0000 5232) •• HOFFRICHTER PC software TRENDset (art. no. 0000 7142) All tools, measuring equipment and aids possibly exposed to contamination must be cleaned after they have been used and treated with disinfectant. 5.1.3 Unpacking and disinfecting To protect against germs, the surface of the device and, where present, the humidifier must be treated with a disinfectant immediately after unpacking. 5.1.4 Checking for external damage Before starting the service, check the device and, where present, the humidifier for external damage. 5.2 Checking display and display contrast 1. Press any key. The display lights up with a brightness of 100%. 2. Check the display to see whether all characters are shown correctly and completely. 3. The background of the display is illuminated – the display should be clearly legible in daylight. 4. After 15 seconds the display fades to the basic brightness level selected in the device menu (0 - 100 %). The display should still be clearly legible. 5. If required, the display contrast can be re-adjusted via PK with the device open (see Service manual). 5.2.1 Data backup Before starting the service works, perform a data backup. 1. Connect the device to the mains power (using mains cable and power supply unit). 2. Use the RS232 adapter cable to connect the device to the PC. 3. Start the TRENDset PC software. 4. For security reasons, make sure you save the device settings (File > Save as...). 5. Print out the device settings (File > Print) and keep the printout for data recovery. -8- 5.3 Opening the device Step 1 Step 2 Step 3 If present remove both battery packs from the device. Pull the filter out and dispose thereof. Turn the device over and place it on a soft surface. Pull out all 4 housing feet. Step 4 Step 5 Step 6 Undo all 4 housing screws using the Phillips screwdriver PH1. Pull the rear base out completely and the front base out slightly. Pull the heating cable off the humidifier electronics and pull the front base out completely. Step 7 Step 8 Step 9 Turn the device over and remove the top section of the housing. Push the housing slightly outward using a screwdriver and pull the heating cable out of the top. Pull off all the cable connections from the controller circuit board. Carefully pull the silicone tubes off the pressure sensor and the microphone cover and dispose thereof. -9- Step 10 Step 11 Step 12 Separate the controller circuit board from the top section of the housing by undoing all 5 screws with a Phillips screwdriver PH0. Undo both screws on the acoustic hood using a Phillips screwdriver PH1. Remove the acoustic hood. Step 13 Step 14 Step 15 Remove the blower bellows from the housing and take the blower out. Pull the Sylomer ring off the bottom of the blower and dispose thereof. Pull the blower bellows with the safety ring off the room divider. Step 16 Step 17 Step 18 Use the point auxiliary tool to unscrew the 4 fixing elements by turning them through 90° in a counterclockwise direction. Take the room divider out of the bottom section of the housing. Pull all 4 dampers off the room divider. - 10 - Step 19 Step 20 Step 21 Pull the air outlet off the room divider. Pull the air outlet bellows off the room divider. Lift up the meander lid as shown in the picture. Step 22 Step 23 Step 24 Lift up the meander lid as shown in the diagram and take it off. Remove the insert from the meander lid (PE foam) and dispose thereof. Dispose the room divider and the Catflap. Step 25 Step 26 Step 27 Take the filter insert out of the bottom section of the housing. Moisten the foam in the bottom section of the housing thoroughly with ethyl alcohol and allow it to act for around 1-2 minutes. Using a spatula, scrap the foam off the acoustic protection plate before the alcohol dries. - 11 - Step 28 Step 29 Step 30 Moisten any adhesive remains with alcohol and remove these using the spatula after briefly allowing the alcohol to act. Take the new foam cut-out from the preparation kit. Peel off the protective film. Adhere the foam cut-out exactly onto the acoustic protection plate of the bottom section of the housing. - 12 - 5.4 Cleaning and disinfecting 2 11 5 3 6 1 12 7 8 1 4 9 Component 10 Cleaning Damp cloth Compressed with mild air and vacsoapy water uum cleaner yes Disinfecting e.g. mikrozid® AF 1 Battery packs 2 Base (rear) yes optional 3 Bottom section of housing with acoustic protection plate yes optional 4 Base (front) 5 Filter insert no optional yes 6 Controller circuit board with display no yes no 7 Heating cable yes optional 8 Housing feet yes yes 9 PC connection cover yes yes yes yes yes 10 Cover plate for DC and PC connection 11 Optional filter system no 12 Top section of housing - 13 - no optional yes optional yes yes 13 16 14 18 17 19 15 20 21 Component 13 Meander lid Cleaning Damp cloth Compressed with mild air and vac soapy water uum cleaner no 14 Air outlet no 15 Retaining ring no yes yes optional 16 Fixing elements Disinfecting e.g. mikrozid® AF yes yes no 17 Blower bellows no yes 18 Acoustic hood no yes 19 Dampers yes optional 20 Blower bottom section optional yes 21 Blower top section optional yes - 14 - Note on disinfection All air-ducting components must be treated with a disinfectant. These components are: •• Meander lid •• Blower bellows •• Catflap •• Acoustic hood •• Air outlet •• Filter insert •• Blower Carry out disinfection of all components (except blower) as follows: 1. Spray disinfectant on the components. 2. Let the disinfectant take effect in accordance with the manufacturer’s instructions. 3. Remove any surplus disinfectant with a dry, dust- and lint-free cloth. 4. Let all components air-dry completely. - 15 - Carry out disinfection of the blower as follows: Do not use disinfectants containing chlorine (“sensitive”) to disinfect the blower as chlorine attacks the surface of the housing. Step 1 Step 2 Step 3 Undo the 5 screws using a Torx screwdriver TX-08. Remove the bottom section of the blower. Cover the bearing of the blower to avoid disinfectant entering the blower. We recommend applying a little multi-grease to the bearing. Step 4 Step 5 Step 6 Hold the top section of the blower with the bearing facing downward and spray it completely with disinfectant. Allow the disinfectant to act according to the manufacturer’s instructions. Place the top section of the blower on a cloth to allow the disinfectant to run off. Spray the bottom section of the blower completely with disinfectant and allow it to act according to the manufacturer’s instructions. Remove any excess disinfectant with a dry dust-free cloth. Step 7 Step 8 Step 9 Let the components dry completely in the air. Then remove the multi-grease from the bearing using a dust-free cloth. Join the top and bottom sections of the blower together. Screw the top and bottom sections together. - 16 - 5.5 Assembling the device After cleaning and disinfection, assemble the device as per the section „Opening the device“ but in reverse order. Use all the components in the preparation kit. 5.6 Device tests Carry out the ADU test, the excess pressure calibration and the sensor test as per the point 2 Service Manual. 5.7 Functional testing of the keys 1. Check for the turbine to switch on and off properly when the ON/OFF key is pressed. 2. Check whether the menu can be operated properly using the arrow keys. 5.8 Resetting counters, setting date and time 1. Use the RS232 adapter cable to connect the device to your PC. 2. Start the TRENDset PC software and open the connected device at „Found devices“. 3. Select the view „Times and Counters“. 4. Reset the filter counter. 5. Reset the blower runtime if the blower was changed. 6. Reset the date and time if necessary. 7. Click on „Send“. 5.9 Restoring device settings 1. Select the view „Patient Data“. 2. If necessary, enter the patient data using the data backup (printout). 3. Click on „Send“ to store the settings in the device. 4. Select the view „Device Settings“. 5. If necessary, enter the patient data using the data backup (printout). 6. Click on „Send“ to store the settings in the device. 5.10 Checking electrical safety The basic point 2 device is equipped with protective insulation and does not have any exposed electrically conductive parts at the housing. As such, electrical safety testing of the device is not provided for. Electrical safety testing is only possible on the power supply unit and is performed by a device safety tester (e.g. SECUTEST SIII), which complies with the DIN EN 62353:2008 standard. The reference point is the ground conductor on the secondary side of the power supply unit (external contact). - 17 - 5.11 Final steps When all work on the device is done, a wipe disinfection of the device’s surfaces has to be performed. After completion of the preparation works, a final report has to be created. Stick a seal of approval with date and signature of the tester to a suitable place on the device. Until shipping of the prepared device, store it safe from dirt and contamination with human pathogens in a closed, tearproof PVC or PE bag. 6 Disposal Proper disposal saves natural resources and prevents harmful substances being released into the environment. 6.1 Device and components The device and its electronic components must not be disposed of with household waste. They must be disposed of at a communal collection point, via a public waste disposal authority or as per the requirements of the relevant national law. 6.2 Packaging The packaging can be disposed of with household waste, at a communal collection point or as per the requirements of the relevant national law. 6.3 Batteries Batteries must not be disposed of with household waste. They must be returned to the distributor or disposed of at a communal collection point or as per the requirements of the relevant national law. 6.4 Accessories and wear parts Disposal of accessories such as tubing, masks, filter cassettes and wear parts (e.g. sealing gaskets) and other replaced components must be carried out according to the statutory provisions in force at the area of use. This also applies to contaminated accessories. - 18 - 7 Shipping instructions for contaminated medical technology The following shipping instructions apply to contaminated medical technology which is delivered to HOFFRICHTER GmbH for processing. 7.1 Pick-up The dealer, medical technician or authorised personnel picks up the contaminated medical technology from the patient. An on-site surface disinfection of the equipment and accessories with mikrozid® liquid spray (MRSA active) takes place followed by carefully placing the objects in bags with the use of disposable gloves, mask and disposable apron. The proper disposal of disposable materials is respected. 7.2 Packaging for shipping The packaging of equipment/accessories in sterile welding foil followed by shrink wrap or packing in PVC or PE bags (tear resistant) and sealed by tape or cable tie takes place at the dealer’s or in the service departments. Power cable, ventilation equipment, user’s manual and other accessories with minimal risk of infection must be properly disposed of. Notice: „CAUTION – CONTAMINATED EQUIPMENT“ or „CAUTION – MRSA-CONTAMINATED EQUIPMENT“ must be visibly placed in the packaging. The packaging must be proper and robust and must not be contaminated. The box has to be conscientiously sealed with packing tape. 7.3 Shipping The delivery note must be on the outside of the equipment packaging. (The delivery note must contain one of the following notices: “CAUTION – CONTAMINATED EQUIPMENT’’ or “CAUTION - MRSA-CONTAMINATED EQUIPMENT’’). Shipping takes place by appropriate logistics companies. HOFFRICHTER GmbH Mettenheimer Straße 12 / 14 19061 Schwerin Germany Phone: +49 385 39925 - 0 Fax: +49 385 39925 - 25 E-mail: [email protected] Web: www.hoffrichter.de point 2 Hygiene ENG_2012-09-07_03 - 19 -