1
English version Courtesy of Takuban Motorsports LLC
Translation is not perfect. Use at your own risk.
№1201-T1017001 1 / 6
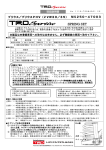
MS342−18001・MS342−18002
Rear trunk spoiler
Installation・Handling Instructions manual
Thank you for purchasing a 86 for TRD rear trunk spoiler this time. This edition is based on the
note attached described above TRD rear trunk spoiler, and the procedure for handling.
Please read before installation by all means, please execute correct mounting, handling.
In addition, please give it to you should have a copy of this manual.
This product, please attached to the vehicle after registration.
When the installation is done prior to registration, initial inspection of carry-is required.
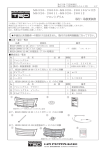
■Part・Fit list
Part number
MS342-18001-A0
MS342-18001-C0
MS342-18002-00
Paint color
Satin White Pearl(37J)
Crystal Black Silica(D4S)
Not painted(Primed goods)
Note
86
All adaptation '12.04∼
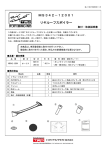
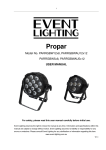
■Components list
№
Product Name
① Rear trunk spoiler
Part Number Qty
1
②
③
④
⑤
90467-06169 2
2
1
1
Nut
Cushion
Black circle seal
Black corner seal
⑥ Pattern
⑦ Mounting・Handling Instructions manual
Note
M6
Set of 5
Set of 14
1
1
This book
Below, shipped with only MS342-18002-00 (not painted set)
№
Product Name
Note
Part Number Qty
Black / gray L = 2100mm supply part number
⑧ Molding
(1ea) 76877-SP000
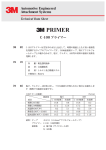
⑨ PACPrimer
1
K−500
①
②
③
④
⑤
⑥
⑦
取 付 要 領 書
型紙
Below, shipped with only MS342-18002-00 (not painted set)
⑧
⑨
3M
PACプライマー
K−500
接着促進剤
内用物重量:3.5g
火気厳禁
湿分・水分厳禁
引火性固体 危険等級Ⅲ
切り口
有効期限/LOT No:枠外に記載
English version Courtesy of Takuban Motorsports LLC
Translation is not perfect. Use at your own risk.
№1201-T1017001 2 / 6
■Note・mounting and handling
Within this manual are the following marks in order to use safely. Please observe, especially
in the mounting and handling procedure.
! W a r n ing
Not following in this content, performing incorrect installation, handling, human or
killed, seriously injured, etc.
It is written about a situation where there is a danger of serious bodily injury or death.
! C a u tion
Did not obey to this content, performing incorrect installation, handling, human or
suffered failure, product It is written for the content that may lead to property damage
and so on.
Advice
I t d e s c r i b e s i n f o rmation that you should know on where I am
w o r k i n g q u i c k l y T here are.
Confirmation
! Caution
Please make sure this product after arrival, that there is no visible damage to the body immediately, that all accessories are everything.
Please be performed in garages professional always exchange installation work of this product
Repair manual for the appropriate vehicle in accordance with (Toyota Motor Corporation issued), please work with the precautions of this instruction
! Caution manual
when installing the attention this product.
! Warning The installation work, please go after confirming that turn off the engine in a flat place by all means, the
emergency brake is applied. Precarious place In work, work in a state where the vehicle is moving will be a
significant cause of the accident.
! Warning When working in the vicinity of mufflers and engine room, please pay attention to serious injuries such as burns.
! Warning Do not alter, or modify this product. if attached to non-compliant models, it may cause damage or accident.
! Caution Because this product is designed for this specific vehicle,
I can receive as well as the inspection of the usual
vehicle inspection at the time. However, in some usage When installed in a non-compliant models, or other are
modified the portion of the other, it does not apply to that.
! Caution
A car with no history of accidents in the past, this product can be securely mounted.
! Caution
For unpainted, painting to match the skin color of the vehicle is required. Were fixed product to prevent deformation If you want to be forced drying,
(MS342-18002-00) in 70 ℃ or less not painted set please be dried.
! Caution
If you want to degrease before painting the unpainted product, you can use the white gasoline or IPA, please do
not use thinner or silicon based solvents.
! Caution
During baking, when raised above 70 ℃, cracking and deformation can occur, please pay attention to baking
temperature.
! Caution
Please do not remove any parts of the vehicle other than those specified in this guide.
! Caution
To prevent scratches when mounting the rear trunk spoiler to the vehicle and removal of vehicle parts, prepare
the protective sheet before working, Please perform on the protective sheet always work only mounted.
Also, please be careful enough not to scratch the vehicle parts for the installation work.
! Caution If the outside air temperature is below 15 ℃, the adhesive force of the double-sided tape may decrease, please
attach when heated to about 40 ℃ with a dryer.
Heat both the mounting surface and the tape unit.
! Warning During installation, please tighten each bolt sufficiently as specified torque. Looseness gradually increases when
there is slack at the time of installation, you may have a serious accident, damage caused by falling off etc..
! Warning After initial installation, bolts are likely to loosen, please re-tighten after driving for a few kilometers.
! Warning After installation, please make sure the parts of books and other products are to not interfere. If you have
interference, please consult the shop where you purchased the items. It may cause damage or malfunction to be run
as it is.
! Warning After installation if this product and the main body mounting portion is subjected to strong shock of collision,
etc., it may become damaged, deformed or fail , please stop using it immediately.
! Warning If you feel any unusual noise or vibration while driving, stop in a safe place immediately and have it inspected
by a repair shop. If you continue to drive this may cause damage to the vehicle.
! Warning This product has been designed for driving on the paved road. Please stop driving in the snow-covered roads and
bad roads, because it can cause damage to the product.
! Warning This product was designed to have sufficient strength and durability, but improper handling, storage or driving
conditions may cause damage. Please be careful when storing, installation and using the product.
! Caution When maintaining, please do not use organic solvents thinner, such as gasoline. It causes the discoloration and
deformation.
! Caution In the event of non-professional installation, there will be no response to complaints of this product or if the
vehicle body, is damaged.
Please observe the attached procedure of this document and above items.
English version Courtesy of Takuban Motorsports LLC
Translation is not perfect. Use at your own risk.
№1201-T1017001 3 / 6
■Handling unpainted goods
Before painting of (MS342-18002-00) not painted, below, have provided a work after the painting. Please perform the work according to the following procedure.
□Painting rear trunk spoiler
Figure 1 1. Paint the rear trunk spoiler ① as
shown in Figure 1.
Paint range
!
Masking range
Paint range
Caution:If you want to degrease, use
white gasoline or IPA, please
do not use thinner or silicon
based solvents.
There is a risk of melting
surface coat.
Masking range
!
Note:Do not paint the double-sided
tape
Adhesive force will decrease
Mask the corresponding taped
area.
!
Note:Bake paint at 70℃
If baked above that temperature,
cracking will occur. Please
pay careful attention to the
temperature if you want to
force-dry the part
Masking range
A-A
B-B
A
B
A
Rear trunk spoilerー①
B
Figure 2 Degreasing・primer
Application range
To match the step
That the application
Degreasing・primer
Application range
Part D
C-C
□Molding
1.Remove dirt from molding attachment point
as shown in Figure 2. You can use IPA to
degrease area, PAC primer K−5
Apply the 00 ⑨.
!
C
D
C
D
Stepped
Stepped Rear trunk spoilerー①
FIgure 3 Cross-section
Molding attached reference
Scratch Caution
Stepped reference
Paste so no gap
to note that in
inclusion
Part D
Molding⑧
Advice:After degreasing the primer,
please let it dry for at least
10 minutes.
2.While peeling off the release paper of the
double-sided tape of the molding ⑧, press
against the rear trunk spoiler ① as shown
in FIgure 3. {49N (5kgf)}
The molding ⑧ is longer than needed. Cut
off excess with scissors to fit the length.
E
!
Note:Molding⑧ is included in two
colors. Please choose the color
that best matches your paint
color.
Stepped
!
Note:If the temperature is below
15℃, the adhesion of the tape
will fail. Use a dryer or heat
gun to raise the temp to about
40℃
!
Note:When you put the equal notch
in the molding⑧, take care to
not damage the rear trunk
spoiler①
Range only Molding attached ⑧
E
D
D
Stepped
Rear trunk spoilerー①
Put the V-shaped cut in the R vertex
And affixed Molding
Molding⑧
Part E
Caution:When degreasing, please do
not use other types of solvents.
If oil content remains, it
may cause the tape comes off.
Also, please note protrusion
of the primers, because it
causes the stain.
English version Courtesy of Takuban Motorsports LLC
Translation is not perfect. Use at your own risk.
Figure 4
□Preparing to Install
Black corner seal ⑤
Hole in front of
the vehicle is not
adhered
№1201-T1017001 4 / 6
1.Remove the existing trunk spoiler if one
is already attached.
2.If holes remain, use the black circle4
so that the degreasing does not enter the
trunk seal④(5places)、Place the black
corner seal ⑤ on the square holes
(1 place left and right).
3.Remove the burr in vehicle trunk
Trunk
Black circle seal ④
Figure 5
!
Note:When removing the inner burr,
refer to the manual, If parts
are dammaged, please note loss.
!
Note:Drilling without removing the
inner burr will cause scratching
to the wiring and the like.
⑥ Pattern A
Mark mounting height
position with tape
Abutment
4.Cut out paper for Pattern A ⑥, and
attach to the trunk as shown in Figure 5.
Mark the height of the spoiler with tape.
Trunk
(1place)
⑥ Pattern A
Rear
Garnish
Figure 6
⑥ Pattern B
Trunk
Abutment
⑥ Pattern B
Rear Garnish
Marking
(1 each left and right)
Figure 7
Trunk
5.Allign pattern B ⑥ according to the
garnish as shown in Figure 5. Mark the
height position with tape (1 point).
!
Note:Paper pattern is used for RH also
So take care to prevent tearing.
Maybe make a copy of it.
6.Wrap packing tape so that it creates a
stopper on the 3mm drill bit,10mm from the
tip, to drill a pilot hole into the
marking position with the 3mm drill bit
as shown in FIG 7.
(1 each left and right)
7.Drill the holes to 10mm wide,as shown in
Figure 7. Remove the burr in hole.
(1 each left and right)
Advice:When drilling, hold the drill
perpendicular to the surface
and take care to avoid walking
or shifting.
10mm
Drill
Packing tape
!
Note:Wear protective goggles while
working.
!
Note:When you remove the burr, the
hole diameter is large, be careful
Please remove it with Li etc..
!
Note:When drilling in the trunk, take
care not to damage the wires and
the like.
Drill pilot hole 3mm,
Final hole is 10mm
(1 each left and right)
English version Courtesy of Takuban Motorsports LLC
Translation is not perfect. Use at your own risk.
№1201-T1017001 5 / 6
8.Remove dirt from the rear trunk spoiler ①
mounting portion of the trunk, as shown
in Figure 8. Spray degreaser in one
direction, white gasoline or IPA.
Figure 8
Degreasing
!
Warning:If the body coating is
applied,so as not to damage
the painting,after removal of
the compound,etc., please
perform a degreasing always.
!
Caution:Use white gasoline or IPA
When degreasing, please do
not use parts cleaner.
Oil content remains, it may
cause the tape to come off.
Figure 9
Peel backing paper
Cushion ③
9.Peel off about 30 mm from the center out,as
shown in Figure 9 and tape it on th front
side with masking tape (Three places each
left and right), the release paper of the
double-sided tape on the outer corners of
rear trunk spoiler① is peeled off
completely.
Masking tape
Peel
all
Peel
all
Peel
Rear trunk spoilerー①
backing paper
Figure 10
!
Caution:If you peel off all of the
release paper of double-sided
tape, you will not be able to
mountin the correct position.
10.Affix cushion ③ as shown in Figure 9
around the bolt of the rear trunk spoiler ①
(1 each left and right)
Trunk
Nut ②
□Attachment for
1. temporarily tighten the nut ② to secure
the rear trunk spoiler ① to the trunk.
(1 each left and right)
Rear trunk spoiler ①
Figure 11
Trunk
4
G3
2.Align the marking position to position
mounting height of the upper end of the
rear trunk spoiler ①, to match the R stop
the trunk bottom, Begin to remove tape in
numerical order as shown in the figure 11.
(each three places left and right) Once
all is released, press to promote adhesion.
{49N(5kgf)Above}
!
2G1
5
6
Rear trunk spoiler ①
!
Rear trunk spoiler ①
!
Trunk
Rear
Garnish
Rstop criteria
G-G
!
Caution:When the outside temperature
is below 15 ℃, the adhesive
force of the double-sided
tape will be reduced. Warm
up with a dryer(about 40 ℃).
Caution:If you do not peel off the
release paper of the doublesided tape in the order
instructed, it may cause a gap.
Caution:Press firmly so the tape
will seal. If pressure is
insufficient, it may cause
peeling or lifting.
Note:Do not wash for 24 hours so the
adhesive tape can dry.
English version Courtesy of Takuban Motorsports LLC
Translation is not perfect. Use at your own risk.
Figure 12
Trunk
Final tightening
№1201-T1017001 6 / 6
3.Tighten the rear trunk nuts ② that were
temporarily tightened earlier.
(1 each left and right)
4.Please clean the burr in the vehicle trunk.
! Caution:When
you restore the internal
flash, refer to the vehicle
service manual, please note
the damage to the parts.
Rear trunk spoiler ①
* This tightening of where it was temporarily tightened in Figure 10
■Inspection and notes after mounting
1.Chech that the nuts and rear trunk spoiler are securely installed.
2.Check that you did not scratch the vehicle.