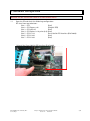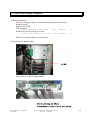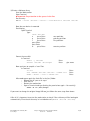
1
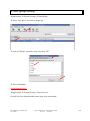
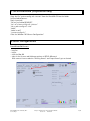
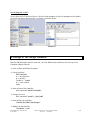
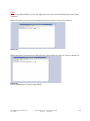
Rho700/800 7. Workstation HP xw8400 Xeon 5130 Dualcore 1. Hardware configuration ........................................................................... 2 2. Bios Setup .................................................................................................... 3 3. RED Hat Enterprise Linux WS4 U4 x86 EM64T Installation ............. 4 4. Installation Rho Software ........................................................................ 7 5. Network configuration ...........................................................................10 6. User group setting ...................................................................................11 7. NFS installation (Prepstation only) ......................................................12 8. Other configurations ...............................................................................12 9. Change of the image harddisk ..............................................................13 10. Add new image harddisk .....................................................................15 Rho700/800 Service Manual / DITServiceDept. Chapter 7 Workstation–Linux-InstallationGuide Version 2.1 - 14.04.2011 1/16 1. Hardware configuration Attention: For this step you must work on an ESD-working place!!! 1.1 Open the PC and check the following configuration: PCI slots from top to bottom: Slot 1 – PCI (free) Slot 2 – PCI Express x16 (Graphic PCB) Slot 3 – PCI x8 (x 4) (free) Slot 4 – PCI Express x 16 prime (x 8) (free) Slot 5 – PCI-X 133 Durst Hotlink PCI Interface (E1872868) Slot 6 – PCI-X 100 (free) Slot 7 – PCI-X 100 (free) Install the Durst Hotlink PCI Interface (E1872868) Rho700/800 Service Manual / DITServiceDept. Chapter 7 Workstation–Linux-InstallationGuide Version 2.1 - 14.04.2011 2/16 2. Bios Setup 2.1 Enter BIOS Setup • • 2.2 Turn on the workstation and press “F10” Select “English” as language Check the installed Hardware: File/System Information -Hewlett-Packard hp workstation xw8400 -Intel(R) Xeon(TM) CPU 5130 2GHz -Memory 2048 MB DDR2/667 MHz Dual Channel 2.3 Time/Date File /Set Time and Date Adjust the “Time and Date“- and press “F10” 2.4 Boot Order: (same order as below) -Optical Drive -Diskette Drive -USB-device -Hard drive -Broadcom Ethernet Controller To select use the arrows up / down! For accept please press “F10”! 2.5 Options Advanced/Power on Options POST Messages F9 Prompt F10 Prompt F12 Prompt F1 Prompt on recoverable errors Option ROM Prompt Remote wakeup boot source After power loss Post delay (in seconds) Setup browser mode Rho700/800 Service Manual / DITServiceDept. Enable Displayed Displayed Displayed Enable Enable local hard drive off none Enable Chapter 7 Workstation–Linux-InstallationGuide Version 2.1 - 14.04.2011 3/16 2.6 Exit BIOS Setup -Insert the first CD of the RED Hat Linux installation File/Save Changes & Exit Press “F10” to reboot 3.RED Hat Enterprise Linux WS4 U4 x86 EM64T Installation For the Linux installation you must use the Durst Rho600 Linux RedHatEnterprise V4U4 CD 1 to5!!! 3.1 Start installation After restart, the Workstation is booting from the Setup CD (If you know that you are using an working CD you can skip the CD Test) - Press “Next” at the Welcome Screen - Select “English” as language and press “Next” - Select “U.S. International” as Keyboard setting and press “Next” - Select “Install RED Hat Enterprises Linux ws” and press “Next” 3.2 Disk Partitioning - Select “Manually Partition with Disk Druid” and press “Next” - Delete all Partitions until under sda and sdb you can only read „Free Space“ Create New Partitions: To create a new Partition you have to click on “New” and do the following adjustments and afterwards press “OK”: Rho700/800 Service Manual / DITServiceDept. Chapter 7 Workstation–Linux-InstallationGuide Version 2.1 - 14.04.2011 4/16 Sda HDD: 1. Mount Point = “/boot” select “only sda” Size (MB) = 100 2. Mount Point = “/” select “only sda” Size (MB) = 54000 3. File System Type = “swap” select “only sda” Size (MB) = 6000 4. Mount Point = “/home” select “only sda” Size (MB) = select “Fill to maximum allowable size” Sdb HDD: 1. Mount Point = “/mnt/images” select “only sdb” Size (MB) = select “Fill to maximum allowable size” To finish Partitioning click on “Next” and at the Boot Loader Configuration also “Next” 3.3 Other Configurations: - Network Configuration press ”Next” - Select ”No Firewall” and set Enable SELinux to Disabled, press ”Next” - Warning – No Firewall press “Proceed” - Additional Language Support press ”Next” - Time Zone Selection: Europe/Vienna press ”Next” - Set Root Password Root Password: Digilarger Confirm: Digilarger ”Next” - Package Defaults; select “Customize the set of packages to be installed” and press ”Next” - Package Group Section, select “Miscellaneous/ Everything” and press ”Next” - About to Install press ”Next” -Required Install Media press “Continue” Rho700/800 Service Manual / DITServiceDept. Chapter 7 Workstation–Linux-InstallationGuide Version 2.1 - 14.04.2011 5/16 3.4 Copying: Now the System copies the data from the CD to the HDD, you have to change the CD and press “OK” if the information message occurs on the Monitor. (After CD5 it is necessary to put in CD1 again) 3.5 System adjustment: After copying the workstation will reboot, go on like below: - “Next” at Welcome Screen - License agreement, select “Yes, I agree the ...” and press ”Next” - Set Date and Time and go on with ”Next” - Display Settings: Configure select “Hewlett-Packard” -> “HP L1940 Flat Panel Monitor” Resolution 1280x1024 Pixel Color Depth millions of colors “Next” - Set System User: Username: Full Name: Password: Confirm Password: ”Next” durst Rho600 Operator Digilarger Digilarger - Sound Card select “Play test Sound” if you can hear the Sound press ”Next” - Additional CDs -Insert RHEL 4U4 Extras CD and press “Install” Forward Select: -Java, -Multimedia, -Misc Forward Forward Finish -Insert HP Driver CD and press “Install” Begin install Reboot later Next Finish After installing both additional CDs press “Next” and Reboot the System. Rho700/800 Service Manual / DITServiceDept. Chapter 7 Workstation–Linux-InstallationGuide Version 2.1 - 14.04.2011 6/16 3.6 Desktop adjustment Login as: User: root PW. Digilarger - rightclick on the lower Panel and Select “Delete this Panel” - pull down the upper Panel to the position of the lower ones. - rightclick on the Panel and Select “Add to Panel Workspace Switcher Add” - rightclick on the Panel and Select “Add to Panel Windows List” - rightclick on the Panel and Select “Properties”, set Panel Size to 30pixel and activate “Autohide” - remove the “!” Symbol in the lower bottom corner - click on Computer Edit Preferences Behavior and activate “Always open in browser window” - Logout and mark the line “save current setup” Login as: User: Password: Durst Digilarger Repeat the desktop adjustment as with the root-login. Change back to user root. 4. Installation Rho Software Put the Durst-Rho XX SW in the CD-drive. Do you wish to run /mnt/cdrom/autorun? Yes) *********************************************************** ******** ******* ******** Durst Software Installation ******* ******* ******* *********************************************************** Do you want to continue ( y[es],n[o] ) : y Specify Installation Directory as Subdirectory of /usr/local Default is [printsw]: Do you want to use the default install directory ( y[es],n[o] ): y Used Installation Directory is: /usr/local/printsw/ Do you want to continue ( y[es],n[o] ) : y Rho700/800 Service Manual / DITServiceDept. Chapter 7 Workstation–Linux-InstallationGuide Version 2.1 - 14.04.2011 7/16 Step 1: Install Interface Driver (not by the PrepStation) (Actual Directory: /media/cdrecorder) 2) 3) 5) 6) Install Interface Device Driver Install/Update Durst Printer Software Take over DurstPrinter.setup from old software Exit Installation Program Please select option: 2 1) Install DHL-Device (Product LAMBDA/RHO/THETA) 2) Exit Please select option: 1 Operating System Version: Kernel 2.6.9-42.EL DHL Driver RPM Kit : dhl-1.02.30-1.x86_64.rpm *************************************************** optolink/dhlinstall: line 54: [: !=: unary operator expected ****************************************************** * * * Installing driver dhl-1.02.30-1 for DHL * * * ****************************************************** Continue( y[es],n[o] ):y Installing: Loading dhl Check installation Installed: dhl-1.00.03-3 Check loaded modules dhl 21360 0 (unused) Enter any key to continue: 1) Install DHL-Device (Product LAMBDA/RHO/THETA) 2) Exit Please select option: 2 Rho700/800 Service Manual / DITServiceDept. Chapter 7 Workstation–Linux-InstallationGuide Version 2.1 - 14.04.2011 8/16 Step 2: Install/Update Durst Printer Software (Actual Directory: /mnt/cdrecorder) 2) 3) 5) 6) Install Interface Device Driver Install/Update Durst Printer Software Take over DurstPrinter.setup from old software Exit Installation Program Please select option: 3 User is: root **************************************************** Installing Durst Printer Software 1.0Rev.02 The procedure installs or updates the Durst Printer Software to version PRINTER SW 1.0 Rev. 02 The old version will be saved and can eventually be restored. Paper calibration data will be preserved. Constrast settings will be preserved. Master calibration will be resetted. Saved jobs will be cancelled. Images are not touched. **************************************************** Continue( y[es],n[o] ): y y (Actual Directory: /mnt/cdrecorder) 2) 3) 5) 6) Install Interface Device Driver Install/Update Durst Printer Software Take over DurstPrinter.setup from old software Exit Installation Program Please select option: 6 Restart the computer to activate new software Do you want to restart now (y[es] , n[o]) Y Rho700/800 Service Manual / DITServiceDept. Chapter 7 Workstation–Linux-InstallationGuide Version 2.1 - 14.04.2011 9/16 5. Network configuration Picture 13 Picture 14 1. 2. activate the “Profile” make a double click wit the mouse to open the Picture 15 Picture 16 Picture 15 IP-Address and Subnet mask are setup from factory to communicate with Caldera Grand RIP! Rho700/800 Service Manual / DITServiceDept. Chapter 7 Workstation–Linux-InstallationGuide Version 2.1 - 14.04.2011 10/16 6. User group setting Applications System Settings User& Group Select User “durst” and click on Properties click on “Groups” and select uucp, then press “OK” Close all Windows Check Security Level: Applications System Settings Security Level Firewall has to be disabled and all boxes have to be unchecked! Rho700/800 Service Manual / DITServiceDept. Chapter 7 Workstation–Linux-InstallationGuide Version 2.1 - 14.04.2011 11/16 7. NFS installation (Prepstation only) Copy the file “system-config-nfs-1.2.8.tar” from the DurstSW-CD into the folder /usr/src/redhat/sources. Open a terminal: “cd /usr/src/redhat/SOURCES” “tar –xf system-config-nfs-1.2.8.tar” “cd system-config-nfs-1.2.8” “make” “make install” “system-config-nfs” Close the Window “NFS Server Configuration” 8.Other configurations DurstPrinterSW Licence: - Log Out - Log In - start the Rho SW - takes in the Licence and Software options at SETUP General With correct Licence code the “Printing Queue” and “Input Queue” gets activated. Rho700/800 Service Manual / DITServiceDept. Chapter 7 Workstation–Linux-InstallationGuide Version 2.1 - 14.04.2011 12/16 Install program “vsftp”: On the Durst SW-CD (Utilities) there is also the vsftp-program. Install the program with a double click with the mouse and activate it as shown in picture 19+20. Picture 19 Picture 20 9.Change of the image harddisk Remove old HDD and install the new one, start the Workstation and Linux will start up in the Emergency Repair Console enter as Root with Root-Password Create partition: fdisk /dev/sdb n -> new partition p -> primary cylinder 1 - 13262 w -> write to disk ready How to format the hard disc: with command "mke2fs /dev/sdb1" Change the ext3: with command "tune2fs -j /dev/sdb1" How to label the hard disc: "e2label /dev/sdb1 /mnt/images" Reboot the workstation "shutdown -r now" Rho700/800 Service Manual / DITServiceDept. Chapter 7 Workstation–Linux-InstallationGuide Version 2.1 - 14.04.2011 13/16 Info: To open an „Editor Window” press the right button on your mouse (Desktop) and select “New Terminal”. When you want to put in a serial command, follow the steps as shown in picture 21 Picture 21 When you want to change to the “DurstPrinter.setup” follow the steps as shown in picture 22 Picture 22 End of installation!8. Change image HDD Rho700/800 Service Manual / DITServiceDept. Chapter 7 Workstation–Linux-InstallationGuide Version 2.1 - 14.04.2011 14/16 10. Add new image harddisk For SAS disks (XW8400 and Z800 workstations) 1.) Make preparations Attention: Images on printer’s hard disk (/mnt/images) will be deleted Navigate to /etc/ Open the file ‘fstab’ Find the entry: Label= /mnt/images /mnt/images ext3 Defaults 1 2 Defaults 1 2 Disable the entry by setting ‘#’ in front: # Label= /mnt/images /mnt/images ext3 SAVE the file and shutdown the workstation 2.) Installation of additional disk Connection of 3rd HD on motherboard: Rho700/800 Service Manual / DITServiceDept. Chapter 7 Workstation–Linux-InstallationGuide Version 2.1 - 14.04.2011 15/16 3.)Create a Software Array Start the Workstation Open Terminal ►Important: Pay attention to the spaces in the line Do the entry: mdadm -–create /dev/md0 --level=0 --raid-devices=2 /dev/sdb /dev/sdc Now the new device is mounted Partitioning Open Terminal Type: fdisk /dev/md0 n press Enter p press Enter 1 press Enter press Enter press Enter w press Enter new partition primary partition first partition execute partiton Format the new disk In Terminal: mke2fs –j /dev/md0 e2label /dev/md0 /mnt/images Enter Enter give name Now you have to compile a *.conf Dat. In Terminal: cd /etc echo ‘DEVICE /dev/sdb /dev/sdc’ > mdadm.conf mdadm --detail --scan >> mdadm.conf Enter Enter Enter Afterwards open again the fstab file in the /etc/ folder - Remove the ‘#’ you set in step 1 - Save the file - Restart the workstation - Open a Terminal and type (setting the permissions again – for security) chmod –R 777 /mnt/images If you want to change the original Image HD too, just follow the same steps from above. After all it is important to restart the workstation to check if the raid array will be load again automatically. If not check the entry in /etc/mdadm.conf (DEVICE /dev/sdb /dev/sdc). Rho700/800 Service Manual / DITServiceDept. Chapter 7 Workstation–Linux-InstallationGuide Version 2.1 - 14.04.2011 16/16