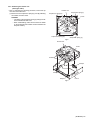
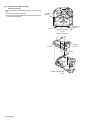
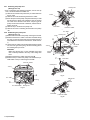
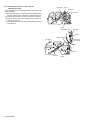
1
SERVICE MANUAL CD RECEIVER 1 2004 MA039 KD-G201, KD-G202, KD-G207 KD-G201 KD-G202 KD-G201,KD-G202 Area suffix E ----------- Continental Europe EX --------------- Central Europe KD-G207 KD-G207 Area suffix EE --------- Russian Federation KD-G201 E KD-G202 E/EX KD-G207 EE/EX STEERING CABLE RDS LINE OUT TABLE OF CONTENTS 1 2 3 4 5 PRECAUTION. . . . . . . . . . . . . . . . . . . . . . . . . . . . . . . . . . . . . . . . . . . . . . . . . . . . . . . . . . . . . . . . . . . . . . . . . 1-4 SPECIFIC SERVICE INSTRUCTIONS . . . . . . . . . . . . . . . . . . . . . . . . . . . . . . . . . . . . . . . . . . . . . . . . . . . . . . 1-6 DISASSEMBLY . . . . . . . . . . . . . . . . . . . . . . . . . . . . . . . . . . . . . . . . . . . . . . . . . . . . . . . . . . . . . . . . . . . . . . . 1-7 ADJUSTMENT . . . . . . . . . . . . . . . . . . . . . . . . . . . . . . . . . . . . . . . . . . . . . . . . . . . . . . . . . . . . . . . . . . . . . . . 1-25 TROUBLE SHOOTING . . . . . . . . . . . . . . . . . . . . . . . . . . . . . . . . . . . . . . . . . . . . . . . . . . . . . . . . . . . . . . . . . 1-26 COPYRIGHT © 2004 VICTOR COMPANY OF JAPAN, LIMITED No.MA039 2004/1 SPECIFICATION KD-G202/KD-G201 AUDIO AMPLIFIER SECTION Maximum Power Output Front 50 W per channel Rear 50 W per channel Continuous Power Output (RMS) Front 19 W per channel into 4 Ω, 40 Hz to 20 000 Hz at no more than 0.8% total harmonic distortion. Rear 19 W per channel into 4 Ω, 40 Hz to 20 000 Hz at no more than 0.8% total harmonic distortion. 4 Ω (4 Ω to 8 Ω allowance) Load Impedance Tone Control Range Bass ±10 dB at 100 Hz Treble ±10 dB at 10 kHz Frequency Response 40 Hz to 20 000 Hz Signal-to-Noise Ratio 70 dB Line-Out Level/Impedance 2.0 V/20 kΩ load (full scale) Output Impedance 1 kΩ TUNER SECTION Frequency Range FM 87.5 MHz to 108.0 MHz AM (MW) 522 kHz to 1 620 kHz (LW) 144 kHz to 279 kHz [FM Tuner] Usable Sensitivity 11.3 dBf (1.0 µV/75 Ω) 50 dB Quieting Sensitivity 16.3 dBf (1.8 µV/75 Ω) Alternate Channel Selectivity (400 kHz) 65 dB [MW Tuner] [LW Tuner] Frequency Response 40 Hz to 15 000 Hz Stereo Separation 30 dB Capture Ratio 1.5 dB Sensitivity 20 µV Selectivity 35 dB Selectivity 50 µV CD PLAYER SECTION Type Compact disc player Signal Detection System Non-contact optical pickup (semiconductor laser) Number of channels 2 channels (stereo) Frequency Response 5 Hz to 20 000 Hz Dynamic Range 96 dB Signal-to-Noise Ratio 98 dB Wow and Flutter Less than measurable limit GENERAL Power Requirement Operating Voltage DC 14.4 V (11 V to 16 V allowance) Grounding System Negative ground Allowable Operating Temperature 0ºC to +40ºC Dimensions (W × H × D) Installation Size (approx.) Panel Size (approx.) Mass (approx.) Design and specifications are subject to change without notice. 1-2 (No.MA039) 182 mm × 52 mm × 150 mm 188 mm × 58 mm × 11 mm 1.3 kg (excluding accessories) KD-G207 AUDIO AMPLIFIER SECTION Maximum Power Output Front 50 W per channel Rear 50 W per channel Continuous Power Output (RMS) Front 19 W per channel into 4 Ω, 40 Hz to 20 000 Hz at no more than 0.8% total harmonic distortion. Rear 19 W per channel into 4 Ω, 40 Hz to 20 000 Hz at no more than 0.8% total harmonic distortion. 4 Ω (4 Ω to 8 Ω allowance) Load Impedance Tone Control Range Bass ±10 dB at 100 Hz Treble ±10 dB at 10 kHz Frequency Response 40 Hz to 20 000 Hz Signal-to-Noise Ratio 70 dB Line-Out Level/Impedance 2.0 V/20 kΩ load (full scale) Output Impedance 1 kΩ TUNER SECTION Frequency Range FM1/FM2 87.5 MHz to 108.0 MHz FM3 65.00 MHz to 74.00 MHz AM (MW) 522 kHz to 1 620 kHz (LW) 144 kHz to 279 kHz [FM Tuner] Usable Sensitivity 11.3 dBf (1.0 µV/75 Ω) 50 dB Quieting Sensitivity 16.3 dBf (1.8 µV/75 Ω) Alternate Channel Selectivity (400 kHz) 65 dB [MW Tuner] [LW Tuner] Frequency Response 40 Hz to 15 000 Hz Stereo Separation 30 dB Capture Ratio 1.5 dB Sensitivity 20 µV Selectivity 35 dB Selectivity 50 µV CD PLAYER SECTION Type Compact disc player Signal Detection System Non-contact optical pickup (semiconductor laser) Number of channels 2 channels (stereo) Frequency Response 5 Hz to 20 000 Hz Dynamic Range 96 dB Signal-to-Noise Ratio 98 dB Wow and Flutter Less than measurable limit GENERAL Power Requirement Operating Voltage DC 14.4 V (11 V to 16 V allowance) Grounding System Negative ground Allowable Operating Temperature 0ºC to +40ºC Dimensions (W × H × D) Installation Size (approx.) 182 mm × 52 mm × 150 mm Panel Size (approx.) 188 mm × 58 mm × 11 mm Mass (approx.) 1.3 kg (excluding accessories) Design and specifications are subject to change without notice. (No.MA039)1-3 SECTION 3 DISASSEMBLY 3.1 Main body 3.1.1 Removing the front panel assembly (See Fig.1) (1) Push the detach button in the lower right part of the front panel assembly and remove the front panel assembly. Front panel assembly Detach button Fig.1 3.1.2 Removing the bottom cover (See Fig.2) (1) From the bottom side of the main body, release the two joints a, two joints b and joint c. Bottom cover Joint a Joint b CAUTION: Do not damage the main board when releasing the joints using a screwdriver. Joint b Joint a 3.1.3 Removing the front chassis assembly (See Fig.3) • Prior to performing the following procedures, remove the front panel assembly and bottom cover. (1) Remove the two screws A on the both sides of the main body. (2) Release the two joints d and two joints e on the both sides of the main body, then remove the front chassis assembly toward the front. Joint c Fig.2 Joint d Joint e A Joint d Joint e Front chassis Fig.3 (No.MA039)1-7 3.1.4 Removing the side panel (See Fig.4) • Prior to performing the following procedure, remove the front panel assembly as required. (1) Remove the screw B and two screws C attaching the heat sink on the left side of the main body, and remove the side panel. C B C Side panel Fig.4 3.1.5 Removing the rear bracket (See Fig.5) • Prior to performing the following procedure, remove the bottom cover. (1) Remove the three screws D, screw E and two screws F attaching the rear bracket on the back side of the main body. (2) Remove the rear bracket. 3.1.6 Removing the main board (See Figs.5 and 6) • Prior to performing the following procedures, remove the front panel assembly, bottom cover, front chassis assembly and side panel. • Remove the front chassis assembly as required. (1) Remove the three screws D attaching the rear bracket on the back side of the main body. (See fig.5.) (2) From the bottom side of the main body, remove the two screws H attaching the main board. (See fig.6.) (3) Disconnect the connector CN501 from the CD mechanism assembly and remove the main board. (See fig.6.) Reference: • Remove the rear bracket from the main body as required.(See "3.1.5 Removing the rear bracket ".) • During reassembly, before fixing the rear bracket onto the main body, insert the steering remote into the slot. (For G201 and G202) F D F D Rear bracket Insert the steering remote into the slot. Fig.5 Main board CN501 G G Fig.6 1-8 (No.MA039) E 3.1.7 Removing the CD mechanism assembly (See Fig.7) • Prior to performing the following procedure, remove the front panel assembly, bottom cover, front chassis assembly, side panel, rear bracket, main board and CD mechanism board. (1) Remove the three screws H attaching the top chassis. (2) Take out the CD mechanism assembly. (3) H CD mechanism assembly H Top chassis Fig.7 3.1.8 Removing the front board (See Figs.8 to 10) • Prior to performing the following procedure, remove the front panel assembly. (1) Remove the four screws J on the back side of the front panel assembly. (See Fig.8.) (2) Release the ten joints f attaching the rear cover to the front panel assembly. (See Fig.9.) (3) Release the joint g and take out the front board. (See Fig.10.) J J J Fig.8 Joint f Joints f Front board Joints f Joints f Fig.9 Joint g Joints f Joint f Front panel assembly Fig.10 (No.MA039)1-9 3.2 CD Mechanism Assembly 3.2.1 Removing the top cover (See Figs.1 and 2) (1) Remove the two screws A on the both side of the body. (2) Lift the front side of the top cover and move the top cover backward to release the two joints a. A Top cover Joints a A A Fig.1 Joints a Top cover Fig.2 1-10 (No.MA039) 3.2.2 Removing the connector board (See Figs.3 to 5) CAUTION: Before disconnecting the flexible wire from the pickup, solder the short-circuit point on the pickup. No observance of this instruction may cause damage of the pickup. (1) Remove the screw B fixing the connector board. (2) Solder the short-circuit point on the connector board. (3) Disconnect the flexible wire from the pickup. (4) Move the connector board in the direction of the arrow to release the two joints b. (5) Unsolder the wire on the connector board if necessary. Wires B Connector board CAUTION: Unsolder the short-circuit point after reassembling. Joints b Short-circuit point Fig.3 Pickup Short-circuit point (Soldering) Flexible wire Pickup Fig.4 Connector board B Flexible wire Frame Fig.5 (No.MA039)1-11 3.2.3 Removing the DET switch (See Figs.6 and 7) (1) Extend the two tabs c of the feed sw. holder and pull out the switch. (2) Unsolder the DET switch wire if necessary. DET switch Connector board Pickup Fig.6 Tab c DET switch DET switch wire Tab c Fig.7 1-12 (No.MA039) Feed sw. holder 3.2.4 Removing the chassis unit (See Figs.8 and 9) • Prior to performing the following procedure, remove the top cover and connector board. (1) Remove the two suspension springs (L) and (R) attaching the chassis unit to the frame. Chassis unit Suspension spring (L) Suspension spring (R) Frame CAUTION: • The shape of the suspension spring (L) and (R) are different. Handle them with care. • When reassembling, make sure that the three shafts on the underside of the chassis unit are inserted to the dampers certainly. Suspension spring (R) Suspension spring (L) Fig.8 Chassis unit Shaft Shafts Damper Damper Frame Damper Fig.9 (No.MA039)1-13 3.2.5 Removing the clamper assembly (See Figs.10 and 11) • Prior to performing the following procedure, remove the top cover. (1) Remove the clamper arm spring. (2) Move the clamper assembly in the direction of the arrow to release the two joints d. Clamper arm spring Joint d Clamper assembly Fig.10 Chassis rivet assembly Joint d Clamper arm spring Joint d Clamper assembly Joint d Chassis rivet assembly Fig.11 1-14 (No.MA039) 3.2.6 Removing the loading / feed motor assembly (See Figs.12 and 13) • Prior to performing the following procedure, remove the top cover, connector board and chassis unit. (1) Remove the screw C and move the loading / feed motor assembly in the direction of the arrow to remove it from the chassis rivet assembly. (2) Disconnect the wire from the loading / feed motor assembly if necessary. CAUTION: When reassembling, connect the wire from the loading / feed motor assembly to the flame as shown in Fig.12. Loading / feed motor assembly Fig.12 Loading / feed motor assembly C Fig.13 (No.MA039)1-15 3.2.7 Removing the pickup unit (See Figs.14 to 18) • Prior to performing the following procedure, remove the top cover, connector board and chassis unit. (1) Remove the screw D and pull out the pu. shaft holder from the pu. shaft. (2) Remove the screw E attaching the feed sw. holder. (3) Move the part e of the pickup unit upward with the pu. shaft and the feed sw. holder, then release the joint f of the feed sw. holder in the direction of the arrow. The joint g of the pickup unit and the feed rack is released, and the feed sw. holder comes off. (4) Remove the pu. shaft from the pickup unit. (5) Remove the screw F attaching the feed rack to the pickup unit. 3.2.8 Reattaching the pickup unit (See Figs.14 to 17) (1) Reattach the feed rack to the pickup unit using the screw F. (2) Reattach the feed sw. holder to the feed rack while setting the joint g to the slot of the feed rack and setting the part f of the feed rack to the switch of the feed sw. holder correctly. (3) As the feed sw. holder is temporarily attached to the pickup unit, set to the gear of the joint g and to the bending part of the chassis (joint h) at a time. CAUTION: Make sure that the part i on the underside of the feed rack is certainly inserted to the slot j of the change lock lever. (4) Reattach the feed sw. holder using the screw E. (5) Reattach the pu. shaft to the pickup unit. Reattach the pu. shaft holder to the pu. shaft using the screw D. Pickup unit Part e Feed rack Feed sw. holder Fig.15 Pu. shaft Part i Pickup unit D E Slot j Joint g Joint f Joint h Pu. shaft holder Feed sw. holder Fig.16 F Feed rack Feed sw. holder Pickup unit Joint f E Fig.17 Pu. shaft Pickup unit Joint g Joint g D Pu. shaft holder Pickup unit Fig.14 Part e Joint f Feed rack 1-16 (No.MA039) Feed sw. holder Fig.18 3.2.9 Removing the trigger arm (See Figs.19 and 20) • Prior to performing the following procedure, remove the top cover, connector board and clamper unit. (1) Turn the trigger arm in the direction of the arrow to release the joint k and pull out upward. Joint k Trigger arm CAUTION: When reassembling, insert the part m and n of the trigger arm into the part p and q at the slot of the chassis rivet assembly respectively and join the joint k at a time. Chassis rivet assembly Fig.19 Part p Trigger arm Part q Part m Part n Chassis rivet assembly Fig.20 3.2.10 Removing the top plate assembly (See Fig.21) • Prior to performing the following procedure, remove the top cover, connector board, chassis unit, and clamper assembly. (1) Remove the screw H. (2) Move the top plate assembly in the direction of the arrow to release the two joints r. (3) Unsolder the wire marked s if necessary. Top plate assembly H Joints r s Fig.21 (No.MA039)1-17 3.2.11 Removing the mode sw. / select lock arm (See Figs.22 and 23) • Prior to performing the following procedure, remove the top plate assembly. (1) Bring up the mode sw. to release from the link plate (joint t) and turn in the direction of the arrow to release the joint u. (2) Unsolder the wire of the mode sw. marked s if necessary. (3) Turn the select lock arm in the direction of the arrow to release the two joints v. (4) The select lock arm spring comes off the select lock arm at the same time. Link plate Joint t Mode sw. Select lock arm Joint u s Fig.22 Select lock arm Top plate Hook w Select lock arm Top plate Select lock arm spring Joints v Link plate Fig.23 1-18 (No.MA039) 3.2.12 Reassembling the mode sw. / select lock arm (See Figs.24 to 26) Select lock arm spring Hook w REFERENCE: Reverse the above removing procedure. (1) Reattach the select lock arm spring to the top plate and set the shorter end of the select lock arm spring to the hook w on the top plate. (2) Set the other longer end of the select lock arm spring to the boss x on the underside of the select lock arm, and join the select lock arm to the slots (joint v). Turn the select lock arm as shown in the figure. (3) Reattach the mode sw. while setting the part t to the first peak of the link plate gear, and join the joint u. Joint v Joint v Select lock arm Boss x CAUTION: When reattaching the mode sw., check if the points y and z are correctly fitted and if each part operates properly. Fig.24 Joint t Point y Link plate Point z Fig.25 Mode sw. Select lock arm Joint t Link plate Joint u Fig.26 (No.MA039)1-19 3.2.13 Removing the select arm R / link plate (See Figs.27 and 28) • Prior to performing the following procedure, remove the top plate assembly. (1) Bring up the select arm R to release from the link plate (joint a') and turn as shown in the figure to release the two joints b' and joint c'. (2) Move the link plate in the direction of the arrow to release the joint d'. Remove the link plate spring at the same time. Select arm R Link plate Joint c' Joint b' Joint r Joint b' REFERENCE: Before removing the link plate, remove the mode sw.. Joint a' Fig.27 Link plate spring Top plate Joint d' Link plate Fig.28 3.2.14 Reattaching the Select arm R / link plate (See Figs.29 and 30) REFERENCE: Reverse the above removing procedure. (1) Reattach the link plate spring. (2) Reattach the link plate to the link plate spring while joining them at joint d'. (3) Reattach the joint a' of the select arm R to the first peak of the link plate while joining the two joints b' with the slots. Then turn the select arm R as shown in the figure. The top plate is joined to the joint c'. CAUTION: When reattaching the select arm R, check if the points e' and f' are correctly fitted and if each part operates properly. Link plate spring Select arm R Joint c' Joint d' Joint b' Joint b' Joint a' Fig.29 Joint a' Link plate Point e' Point f' Fig.30 1-20 (No.MA039) 3.2.15 Removing the loading roller assembly (See Figs.31 to 33) • Prior to performing the following procedure, remove the clamper assembly and top plate assembly. (1) Push inward the loading roller assembly on the gear side and detach it upward from the slot of the joint g' of the lock arm rivet assembly. (2) Detach the loading roller assembly from the slot of the joint h' of the lock arm rivet assembly. Loading roller assembly Roller guide spring Loading roller assembly Part k' The roller guide comes off the gear section of the loading roller assembly. Remove the roller guide and the HL washer from the shaft of the loading roller assembly. (3) Remove the screw J attaching the lock arm rivet assembly. (4) Push the shaft at the joint i' of the lock arm rivet assembly inward to release the lock arm rivet assembly from the slot of the L side plate. (5) Extend the lock arm rivet assembly outward and release the joint j' from the boss of the chassis rivet assembly. The roller guide springs on both sides come off at the same time. Roller guide spring Fig.32 Chassis rivet assembly CAUTION: When reassembling, reattach the left and right roller guide springs to the lock arm rivet assembly before reattaching the lock arm rivet assembly to the chassis rivet assembly. Make sure to fit the part k' of the roller guide spring inside of the roller guide. (Refer to Fig.34.) Boss Roller guide HL washer Loading roller assembly L side plate J Roller guide spring Roller guide Joint h' Lock arm rivet assembly Part j' Roller guide spring Joint i' Fig.33 Roller guide spring Joint g' Roller guide HL washer Roller shaft assembly Loading roller assembly Roller guide spring Lock arm rivet assembly Fig.31 Loading roller Lock arm rivet assembly Roller guide spring Fig.34 (No.MA039)1-21 3.2.16 Removing the loading gear 5, 6 and 7 (See Figs.35 and 36) • Prior to performing the following procedure, remove the top cover, chassis unit, pickup unit and top plate assembly. (1) Remove the screw K attaching the loading gear bracket. The loading gear 6 and 7 come off the loading gear bracket. (2) Pull out the loading gear 5. K Loading gear bracket Loading gear 6 Loading gear 5 Loading gear 3 Fig.35 K Loading gear bracket Loading gear 6 Loading gear 5 Loading gear 7 Fig.36 1-22 (No.MA039) 3.2.17 Removing the gears (See Figs.37 to 40) • Prior to performing the following procedure, remove the top cover, chassis unit, top plate assembly and pickup unit. • Pull out the loading gear 3. (See Fig.35.) (1) Pull out the feed gear. (2) Move the loading plate assembly in the direction of the arrow to release the L side plate from the two slots m' of the chassis rivet assembly. (See Fig.37.) (3) Detach the loading plate assembly upward from the chassis rivet assembly while releasing the joint n'. Remove the slide hook and loading plate spring from the loading plate assembly. (4) Pull out the loading gear 2 and remove the change lock lever. (5) Remove the E ring and washer attaching the changer gear 2. (6) The changer gear 2, change gear spring and adjusting washer come off. (7) Remove the loading gear 1. (8) Move the change plate rivet assembly in the direction of the arrow to release from the three shafts of the chassis rivet assembly upward. (See Fig.38.) (9) Detach the loading gear plate rivet assembly from the shaft of the chassis rivet assembly upward while releasing the joint p'. (See Figs.38 and 40.) (10) Pull out the loading gear 4. Joint p' Change plate rivet assembly Shafts Loading gear 4 Loading gear plate rivet assembly Shaft Loading gear 2 Loading gear 1 E ring Chassis rivet assembly Change gear 2 Fig.38 Loading plate assembly Joint n' Slide hook Loading plate spring L side plate Slot m' Slot m' L side plate Loading plate assembly Joint n' Slot m' Chassis rivet assembly Fig.39 Slot m' E ring Washer Feed gear Chassis rivet assembly Fig.37 Change gear 2 Loading gear 1 Loading gear 2 Change gear spring Change lock lever Adjusting washer Loading gear 4 Change plate rivet assembly Chassis rivet assembly Loading gear plate rivet assembly Fig.40 (No.MA039)1-23 3.2.18 Removing the turn table / spindle motor (See Figs.41 and 42) • Prior to performing the following procedure, remove the top cover, connector board, chassis unit and clamper assembly. (1) Remove the two screws L attaching the spindle motor assembly through the slot of the turn table on top of the body. (2) Unsolder the wire on the connector board if necessary. Turn table L Fig.41 L Turn table Spindle motor Fig.42 1-24 (No.MA039) SECTION 4 ADJUSTMENT 4.1 Adjustment method Test instruments required for adjustment (1) Digital oscilloscope (100MHz) (2) AM Standard signal generator (3) FM Standard signal generator (4) Stereo modulator (5) Electric voltmeter (6) Digital tester (7) Tracking offset meter (8) Test Disc JVC :CTS-1000 (9) Extension cable for check EXTSH002-22P × 1 Standard measuring conditions Power supply voltage Load impedance Output Level DC14.4V(10.5 to 16V) 20KΩ(2 Speakers connection) Line out 2.0V (Vol. MAX) Dummy load Exclusive dummy load should be used for AM,and FM. For FM dummy load,there is a loss of 6dB between SSG output and antenna input.The loss of 6dB need not be considered since direct reading of figures are applied in this working standard. Standard volume position Balance and Bass &Treble volume : lndication"0" Loudness : OFF How to connect the extension cable for adjusting Caution: Be sure to attach the heat sink and rear bracket onto the power amplifier IC and regulator IC respectively, before supply the power. If voltage is applied without attaching these parts, the power amplifier IC and regulator IC will be destroyed by heat. Extension cable Heat sink EXTSH002-22P Rear bracket (No.MA039)1-25 SECTION 5 TROUBLE SHOOTING 5.1 Feed section Is the voltage output at IC521 pin 40 5v or 0V NO Is the wiring for IC521 pin 40 correct? YES Is 5V present at IC561 pins 3,12 and 21? NO Check CD 8V. YES YES Is 4V present at both sides of the feed motor? NO Is 6V or 2V present at IC561 pins 4 and 5? YES YES Check the feed motor connection wiring. NO Check the circuits in the vicinity of IC561 pins 8 and 9. NO Check the feed motor. 5.2 Check the vicinity of IC521. NO Check IC561. Focus section When the lens is moving: 4V Does the S-search waveform appear at IC561 pins 8 and 9? YES Check the pickup and its connections. YES 5.3 Spindle section Is the disk rotated? NO Is 4V present between IC561 pins 6 and 7? YES NO Is 4V present at IC521 pin 41? YES Does the RF signal appear at IC501 pin 19? YES NO Check IC521. YES Check the spindle motor and its wiring. NO Is the RF waveform at IC501 pin 19 distorted? NO Check the vicinity of IC561 Check the circuits in the vicinity of IC501 pin 19 or the pickup. YES Proceed to the Tracking section 5.4 Tracking section When the disc is rotated at first: Approx. 1.2V Is the tracking error signal output at IC501 pin 11? YES Check IC521. 1-26 (No.MA039) NO Check the circuits in the vicinity of IC561 pins 2 to 11. NO Check the pickup and its connections. 5.5 Signal processing section Is the sound output from both channels (L, R)? YES Normal NO No sound from either channel. NO YES Is 9V present at IC161 pin 31? NO Check the viciniyt of the IC901 audio power supply. YES Is the audio signal (including sampling output components) output to IC571 pins 1 and 7 during playback? Compare the L-ch and R-ch to locate the defctive point. NO Check IC571 and its peripheral circuits. YES Is the audio signal output at IC161 pins 3 and 30 during playback? NO Check IC161 and its peripheral circuits. YES Check the muting circuit. (No.MA039)1-27 5.6 Maintenance of laser pickup 5.7 (1) Cleaning the pick up lens Before you replace the pick up, please try to clean the lens with a alcohol soaked cotton swab. (2) Life of the laser diode When the life of the laser diode has expired, the following symptoms will appear. • The level of RF output (EFM output: amplitude of eye pattern) will be low. Is RF output 1.0 0.35Vp-p? Replacement of laser pickup Turn off the power switch and,disconnect the power cord from the ac outlet. Replace the pickup with a normal one.(Refer to "Pickup Removal" on the previous page) NO Replace it. Plug the power cord in,and turn the power on. At this time,check that the laser emits for about 3seconds and the objective lens moves up and down. Note: Do not observe the laser beam directly. YES O.K (3) Semi-fixed resistor on the APC PC board The semi-fixed resistor on the APC printed circuit board which is attached to the pickup is used to adjust the laser power.Since this adjustment should be performed to match the characteristics of the whole optical block, do not touch the semi-fixed resistor. If the laser power is lower than the specified value, the laser diode is almost worn out, and the laser pickup should be replaced. If the semi-fixed resistor is adjusted while the pickup is functioning normally, the laser pickup may be damaged due to excessive current. 1-28 (No.MA039) Play a disc. Check the eye-pattern at TP1. Finish. 5.8 16 PIN CODE DIAGRAM Black RD Green Red VI Violet BL Blue GY Gray WH 5 WH White YL Yellow GN 7 BR Brown NC 9 2 VI/BK VI 12 YL NC 11 4 GY/BK GY 3 14 NC BL/WH 13 6 WH/BK 16 BK 8 GN/BK RD 15 BK GN 1 10 BR 1 VI RR+ 2 VI/BK RR- 3 GY FR+ 4 GY/BK FR- 5 WH FL+ 6 WH/BK FL- 7 GN RL+ 8 GN/BK RL- 10 BR TEL 12 YL MEMORY MEMORY BACKUP DIRECT TO BATTERY +12Volt 13 BL/WH REMOTE 15 RD ACC 16 BK GND ACC + 12Volt GROUND Auto Antenna ACC ACC Line Rear FR Front Right FL Front Left TEL RL Rear Left GND Ground MEMORY Memory REMOTE Right ANT RR Remote Telephone Muting Backup Battery+ (No.MA039)1-29 SCHEMATIC DIAGRAMS CD RECEIVER KD-G201,KD-G202,KD-G207 CD-ROM No.SML200401 KD-G201 KD-G202 KD-G201,KD-G202 Area suffix E ----------- Continental Europe EX --------------- Central Europe KD-G207 KD-G207 Area suffix EE --------- Russian Federation KD-G201 E KD-G202 E/EX KD-G207 EE/EX STEERING CABLE RDS LINE OUT Contents Block diagram Standard schematic diagrams Printed circuit boards COPYRIGHT 2-1 2-2 to 7 2-8, 9 2004 VICTOR COMPANY OF JAPAN, LTD. No.MA039SCH 2004/1 Block diagram J1 ANT SPINDLE+ SPINDLEFEED+ FEEDTRACKING+ TRACKINGFOCUS+ FOCUS- POSITION SET PSW SWITCH SPINDLE MOTOR SW1, SW2 PICK UP FEED+ FEED- CN501 LOAD&FEED MOTOR SPINDLE+ SPINDLE- IC561 CD DRIVER CN701 CJ601 ENC1 ENC2 KEY0 KEY1 KEY2 LCDCL LCDDA LCDCE ENC1 ENC2 IC301 POWER AMP. FRONT LEFT (+) FRONT LEFT (-) FRONT RIGHT (+) FRONT RIGHT (-) REAR LEFT (+) REAR LEFT (-) REAR RIGHT (+) REAR RIGHT (-) CD.L CD.R BUS0 to BUS3 BUCK,CCE RST RDSCL RDSDA IC701 CPU IC71 RDS DETECTOR IC901 REGULATOR ONLY USED FOR KD-G201,KD-G202 EACH BLOCK CN901 CDRW SPK BATTERY IC571 CD L.P.F. STEERING ONLY USED FOR KD-G201,KD-G202 CN702 KEY0 KEY1 KEY2 IC661 LCD DRIVER IC521 DSP&DAC IC501 RF AMP S601 to S618 KEY MATRIX COM1 COM2 COM3 S1 to S52 DMO,FMO TRO,FOO LO,RO LCDCL LCDDA LCDCE SD/ST MONO SM,FM/AM SEEK/STOP ONLY USED FOR KD-G201,KD-G202 OUTLF OUTLR OUTRF OUTRR SDA SCL RFGC,RF RFRP,RFDC TEB,SEL TE,FE VF1,VF2 VT1,VT2 LD,MD TRACKING+ TRACKINGFOCUS+ FOCUS- LCD1 IC161 E.VOLUME LM VF1,VF2 VT1,VT2 MD,LD SW1, SW2 L-CH R-CH TU1 FM/AM TUNER FM/AM OSC FM VT AM VT IFC SW1,SW2,PSW J321 LINE OUT REAR L REAR R STEERING CABLE ASSY JS601 ENCODER 2-1 Standard schematic diagrams Main amplifier section (KD-G201, KD-G202) J301 QNN0519-001 R332 100 R322 100 R352 100 R342 100 IC301 TU1 QAU0313-001 LA47515 C333 0.047 Q341 2SD1781K/QR/-X C323 1/50 D321 MA111-X D341 MA111-X Q331 2SD1781K/QR/-X R245 180k 2SD601A/QR/-X R247 47k 22k R246 R243 100 R184 R194 4.7K 4.7K 330 D781 MA111-X C801 0.01 C781 220/10 POWER 4.7k 0 R734 R755 C782 22/16 1k R735 R882 47K 47k R733 UPD178078GF-664 R729 DIMOUT C881 22/16 C891 Q891 UN2211-X L901 0.1 QQR0703-001 C971 DIMIN LCDCE R728 R744 AMEO C709 R726 RDSDA 47k OSC C710 47k R752 SD/ST L702 4.7u 10K C713 C708 UNLOCK R724 0.01 15p 100P C315 100P 100P 100P C314 C312 100P C316 RL+ RL- FR+ RR- X701 C707 0 15p QAX0793-001Z C706 VDD C704 100/10 D710 MA8062/M/-X R753 47K CD8V Q904 47k C917 0.1 R902 9.1k C915 0.1 C914 100/16 C911 0.1 C910 47/16 C905 47/16 C906 0.01 C902 2.2/50 R903 4.7k C913 10/16 C903 47/16 C916 10/16 R906 20k C907 220/10 C702 0.01 R905 8.2k C912 0.01 4.7k C904 10/16 4.7k 4.7k R721 Q901 2SB709A/QR/-X Q902 UN2211-X C908 220/10 R717 R718 SQ SM R716 LEVEL R712 R714 R713 R715 KEY2 KEY1 KEY0 R711 ENC1 R719 R720 PS2 C909 220/10 10k 10k 10k 10k 10k 10k 10k 10k R754 0 2.2k SW2 LCDCE PSW I/O LCDCL LCDDA SDA ENC2 R706 2.2k R707 4.7k R705 2.2k R708 4.7k SCL INT SCK 47K R704 4.7k R710 R702 47k R703 R709 SO 2.2k SI 22K R750 R751 4.7k ILL10V QGA2006F1-02 Q903 UN2211-X C703 0.01 R722 UN2111-X CTRL VSS CN702 QAM0175-002 D902 MA111-X 1k L701 4.7u R908 10k 0.1 R907 C705 R904 5.6k R723 47k QMFZ047-150-T 0.1 DIMOUT MA8062/M/-X FL+ 0.01 X1 RR+ DIMIN CN901 QNZ0650-001 D708 C318 AN80T07 R725 D701 100P C319 IC901 D709 D707 D706 D705 D703 100P D903 MA111-X 100/10 10K AFCK IFC D704 2.2k R901 1k FMEO FR- C712 0.1 10K FL- MA8062/M/-X R727 MONO FM/AM C714 0.33 C711 0.1 MA8062/M/-X MA8062/M/-X MA8062/M/-X MA8062/M/-X MA8062/M/-X MA8062/M/-X MA8062/M/-X 2.2k R972 DIMOUT SK/ST1 D702 RB160M-30-X R971 47k KEY1 C701 100P 0.1 D972 D971 RB160M-30-X VPP RDSSCK CH.R C918 100P 47k RESET LCDDA QAM0464-002 C313 J801 QNZ0095-001 C901 QEZ0625-338 LCDCL KEY2 D308 RB160M-30-X D901 IN5401-TU-15 D783 UDZS11B-X R731 47k R730 100k SW1 REMOCON CTRL TEL-MUTE 1.2k R736 R738 R739 0 0 Q881 UN2211-X R881 4.7K ENC2 KEY0 D305 RB160M-30-X SCK D892 MA111-X IC701 R743 47k ENC1 To CJ601 (SHEET 3) LM CH.L D891 MA111-X TEL-MUTE 10K REMOCON MSW R807 100k IC801 HD74HC126FP-X R892 1k R891 47k R806 22k R805 100 R803 100k 22/16 47k R737 MUTE CDON LM CD-RW MSW CCE BUCK BUS0 BUS2 BUS1 BUS3 RST R740 100K PS2 DETACH R741 R742 47k ACC5V R808 100k R809 R810 100 C243 R732 47k 0.01 R804 100k 10k SM SK/STP C715 C306 0.022 C325 0.047 R802 100k C244 1/50 CN701 DETACH D306 RB160M-30-X D303 RB160M-30-X INT C802 0.047 Q781 UN2111-X R801 R242 1k ILL10V C305 22/16 C304 100/16 D302 RB160M-30-X POWER MUTE SI SO SDA C783 0.22 Q783 UN2111-X VMC0334-001 D304 RB160M-30-X D301 RB160M-30-X C784 1/50 Q782 UN2211-X 12k Q241 47k MA111-X R241 0.22 R59 27k UN2211-X 100P C303 47/16 C301 10/16 C302 0.022 D782 C193 R164 R191 4.7k R301 RR- R244 C242 0.047 D242 Q7 UN2211-X Q53 R57 47k C52 4700p R55 2.2k D241 RB160M-30-X R240 220 C241 C55 C51 0.47/50 R53 10k R58 47k C54 0.01 0.01 Q51 C53 0.1 R56 47k C716 R54 10k Q52 2SD601A/QR/-X 2SD601A/QR/-X R51 470 SW1 SW2 LM MSW CDON CD-RW BUS0 BUS1 BUS2 BUS3 BUCK CCE RST CD8V 330p R52 15k PSW LEVEL SQ CD.L FR- C310 0.1 RR+ I/O 100/16 270 10 270 10k R782 C194 0.01 9V CD.R C317 R166 47k R176 47k C175 0.033 R174 C192 100/10 D171 MA111-X C311 0.1 R178 27k 47k R781 MA111-X SCL RDSDA R173 2.2k CH.R R73 2.2k R72 MA111-X D161 47/16 RDSSCK C176 5600P C173 0.22 FR+ 390P C322 0.47 R172 22k R171 220k C191 C308 FL+ 0.1 D307 RB160M-30-X R165 47k R175 47k C321 R177 27k 0.22 C174 C172 8200P C181 1/50 220k R161 2.2k X71 QAX0792-001Z C342 0.47 SW5V (SHEET 2) C351 390P C320 1/50 0.22 C164 C177 4.7/50 C77 2.2/50 C71 82P AFCK SK/STP MONO SD/ST 820 R331 C162 8200P 18K R74 0 C182 1/50 C76 0.022 D71 47k R5 10k R11 10 1000P C8 R10 IFC OSC FM/AM SK/ST1 C9 220/10 R9 3.3k 100/16 C331 390P C341 390P C79 0.01 C178 4.7/50 R71 R7 4.7k D3 D4 UN2211-X FMEO AMEO R43 1k C75 560P C72 47P Q6 R168 27k TEA6320T-X 0.01 C73 47k FLC332 C167 4.7/50 47/6.3 R8 R44 33 C43 Q42 2SC3661-X Q41 2SC3661-X 1k MA111-X 1k R45 R167 27k IC71 SAA6579T-X 100 C309 0.1 RL- IC161 C74 MA111-X R42 C42 0.012 R33 1.5k 47k R6 R41 3.3K MA111-X C41 0.12 Q5 2SB624/4/-X Q32 2SD601A/QR/-X Q31 2SD601A/QR/-X R77 R341 820 0.47 Q71 UN2111-X C32 1000P C83 R82 Q74 1000P Q4 2SB709A/R/-X R343 2.2k RL+ C352 0.47 4.7/50 Q72 UN2111-X CH.L CD.L 10k R353 2.2k C168 C183 1/50 CD.R R32 1k C78 0.1 R323 2.2k R321 820 C165 0.033 2SD601A/QR/-X R4 4.7k 1k R31 R75 4.7k R333 2.2k C166 5600P C163 0.22 C184 1/50 C93 1500P R163 2.2k R162 22k C185 1/50 2SD601A/QR/-X Q2 Q3 UN2111-X C31 2.2/50 C7 10p R76 4.7k Q73 2.2k R35 C91 C81 R2 10k 0.1 R3 0 C82 0.012 UN2211-X Q1 C12 100/10 Q8 UN2211-X 1000P R1 100p C5 100 220/10 C4 C6 C3 150P C11 0.47/50 C2 0.047 MA111-X MA111-X D2 D1 R81 10k C10 1/50 C92 0.012 C13 220P 2SD601A/QR/-X R351 C186 1/50 R91 10k 18K 1/50 R92 1/50 C84 1500P C94 820 Q321 2SD1781K/QR/-X 4.7u C1 5P Q351 2SD1781K/QR/-X L1 C324 0.047 J1 QNB0100-002 Parts are safety assurance parts. When replacing those parts make sure to use the specified one. SHEET 1 2-2 MSW CD servo section (KD-G201, KD-G202) 4.7k SW2 SW2 SPINDLE+ FOCUS- 22k 22k R586 R596 C585 22k 33k FE 2k R515 10k 100 56k 0.1 R510 C510 0.1 C511 L521 C514 5p C597 FOO TRO 0.047 0.047 0.047 C531 470p C535 C541 470p R517 47u X521 R530 0 R529 0 R526 0 SEL TEB RFGC R527 100 15k R511 R528 100 R512 0.047 C533 1M 1k R514 0.047 C537 TP2 100 RFRP TP1 QAX0794-001Z 82p C513 0.01 R513 RF C512 RFGC R533 C538 C534 C536 C553 10p C540 0.01 1800P 100/6.3 C559 C508 0.01 C539 C509 100/6.3 1.5k C554 10p VREF FMO DMO FOCUS- FOCUS+ TRACKING- TRACKING+ SPINDLE- SPINDLE+ 100/10 100 R571 0.01 1.5k VCC VF2 C563 R531 R573 TRO C562 R532 1.5k CD.R C567 0.047 0.01 R572 C566 0.047 C546 100p C545 100/6.3 C544 0.01 LM FEED+ CN501 QGB2027M4-22S R569 4.7K VF1 FEED- C564 0.047 VR 47u L523 SW5V 0 IC521 CD-RW C547 0.1 C555 100/6.3 TC94A14FA IC501 TA2157FN-X C557 100P C548 100/6.3 C549 0.01 9V CD.R C530 AGND 0.033 TE RFDC FE RFRP C528 R525 C529 100/6.3 0.033 0.0068 0.01 C526 2700P R503 82k R509 R516 VF2 R504 82k 82k 820 VT2 R505 330k BUS0 BUCK C524 VT1 R506 330k BUS1 CCE 0.015 BUS2 0.01 22 LD R507 C503 100/6.3 Q521 UN2111-X L522 R538 R521 10k 47u 5.6k R524 15k CDON CD-RW R522 47k BUS0 BUS1 BUS2 BUS3 BUCK (SHEET 1) C522 100/6.3 0.01 C521 47u 1/50 C550 CCE 0.01 CDON C551 UN2211-X C556 0.1 L524 0.01 22 2SB1241/QR/-T Q522 100/10 C552 R508 Q501 C504 C502 0.01 100/6.3 C505 SW2 0.01 R523 470k R539 1.5M RST BUS3 (SHEET 1) SW1 RF 47p 4.7k 4.7k R536 R534 4.7k 4.7k R537 MD C501 R535 SEL TEB VF1 VCC PSW MSW C527 C525 CD.L LM 10k C507 RFDC VT2 820p R561 C565 0.047 0 R585 120p R582 33k C596 TRACKING- C583 R583 12k C523 TRACKING- MD GND C582 47/6.3 TRACKING+ GND VT1 18k R597 MD TRACKING+ LD VREF R581 150 4.7/25 TE FOCUS- R584 C595 47/6.3 MD FOCUS+ R575 22 VREF FOCUS+ FOCUS+ R587 VREF 22k FOCUS- 1A3G-T1 100/16 LD TRACKINGTRACKING+ CD.L 120p 3k SPINDLE+ C584 D561 150 IC561 LA6242H-X LD SW2 R519 VR SPINDLE- R568 SW1 VR R574 22 PSW PSW SPINDLE- C594 0 R595 C593 VF1 VF1 GND Q561 6.8k 12k C560 0.047 VT1 33k R593 IC571 NJM4565M-WE SW1 VT1 R592 0.001 VT2 SW1 C568 0.022 C592 4.7/25 820p VT2 18k C591 GND SPINDLE+ R591 150 C581 GND SPINDLE- R594 C561 47/6.3 R567 VCC PSW FOO 2SB1322/RS/-T VCC FMO DMO 8.2k FEED+ FEED+ 15k 8.2k R577 VF2 VF2 R564 R562 820p R565 20k 8.2k 820p FEED- FEED- R576 R566 GND FEED+ 5.1k R563 FEED- RST CD8V GND SHEET 2 2-3 LCD & Key control section (KD-G201, KD-G202) IC681 RPM7338-V4 R687 47K C681 4.7/6.3 C686 0.022 R688 47K R681 470 C687 0.022 CJ601 VMC0335-001 COM1 COM2 COM3 S1 S2 S3 S4 S5 S6 S7 S8 S9 S10 S11 S12 S13 S14 S15 S16 S17 S18 S19 S20 S21 S22 S23 S24 S25 S26 S27 S28 S29 S30 S31 S32 S33 S34 S35 S36 S37 S38 S39 S40 S41 S42 S43 S44 S45 S46 S47 S48 S49 S50 S51 S52 LCD1 100 R686 C682 0.012 10K R682 D681 MA8062/M/-X JS686 QSW0863-003 ILL10V ACC5V REMOCON ENC1 ENC2 DIMOUT LCDCL To CN701 (SHEET 1) LCDDA LCDCE S610 S609 S608 D650 R670 D631 KEY1 D633 D637 D634 S607 D642 D639 D645 D648 D641 D638 R627 0 390 390 R650 R649 S34 S33 S35 S39 S38 S37 S36 S24 C663 0.022 S23 S22 S21 S20 S19 S18 OSC LCD.CE R666 LCD.SCKR667 LCD.SO R668 R665 51K 10K 10K 10K CE CLK DATA S17 C662 680p C661 10/6.3 DIMMER R654 R648 R647 R652 R651 R646 R644 R645 R642 R643 R641 R640 S612 R639 820 S613 R638 820 S614 R637 1.2k S615 D662 UDZS5.1B-X R664 10K D651 R634 1.8k S616 KEY0 R653 R610 R633 S617 R611 R632 2.7k R612 R631 3.9k S618 R613 D630 R614 SML-310LT/MN/-X R615 S26 S25 INH 470 D646 S28 S27 S13 S14 S15 S16 S611 D649 S12 820 D647 S9 S10 S11 R606 820 D644 S7 S8 R607 D643 D640 S1 S2 R608 1.2k D636 S3 S4 S5 S6 R609 1.8k D632 820 R630 D635 S32 S31 S30 S29 S51 S52 COM1 COM2 COM3 R662 2.2K S606 180K S605 MA111-X D661 S604 R663 S603 R671 S602 S49 S50 IC661 PT6523LQ 47K S601 R661 2.2K KEY2 1K 820 D653 R601 2SB624/4/-X Q670 R672 R602 820 Q671 UN2211-X R603 1.2k D652 R604 1.8k R626 0 R605 2.7k S42 S41 S40 S48 S47 S46 S45 S44 S43 KEY0 KEY1 KEY2 SHEET 3 2-4 Main amplifier section (KD-G207) J301 QNN0519-001 R332 100 R342 100 R352 100 R322 100 IC301 LA47515 TU1 QAU0314-001 J1 QNB0100-002 C333 0.047 C323 1/50 820 Q341 2SD1781K/QR/-X D321 MA111-X Q321 2SD1781K/QR/-X 820 D341 MA111-X RL- R247 47k 22k R246 R184 R194 4.7K 4.7K C781 220/10 POWER 47k R731 R730 SW1 REMOCON TEL-MUTE CTRL 100k Q881 UN2211-X C881 22/16 Q891 UN2211-X ENC2 R729 C782 22/16 R734 4.7k R755 0 C891 0.1 IC701 UPD178078GF-665 47k C971 RDSSCK R728 47k R727 10K R744 R726 RDSDA 47k C709 100/10 C710 0.01 C314 100P 100P C319 100P C318 100P C316 100P D307 RB160M-30-X D903 MA111-X AN80T07 R752 C713 10K C708 UNLOCK R724 0.01 L702 4.7u 15p RL+ RL- FL+ FL- FR+ X701 C707 0 15p QAX0793-001Z C706 VDD 1k CTRL Q904 CD8V Q901 2SB709A/QR/-X R905 8.2k 4.7k 4.7k C917 Q902 UN2211-X R902 9.1k 47K 0.1 4.7k C915 0.1 C914 100/16 C911 0.1 C910 47/16 C905 47/16 C902 2.2/50 C906 0.01 C913 10/16 C916 10/16 C903 47/16 C907 220/10 C912 0.01 0.01 R906 20k C904 10/16 C702 C908 220/10 SQ SM LEVEL KEY2 KEY1 KEY0 R720 R721 MA8062/M/-X C909 220/10 R719 D710 R753 R903 4.7k PS2 10k 10k R717 R716 R714 R713 R715 R718 10k 10k 10k 10k 10k R711 ENC1 SW2 LCDCE PSW I/O LCDCL LCDDA SCL SDA SCK SO INT R712 47K R710 SI 10k 2.2k R754 0 R708 R707 4.7k R706 2.2k 4.7k R704 R705 2.2k 4.7k R703 47k ENC2 R709 2.2k 4.7k 22K R750 R751 R702 ILL10V CN702 QGA2006F1-02 Q903 UN2211-X C703 0.01 UN2111-X 47k D902 MA111-X QAM0175-002 C704 100/10 VSS R722 10k L701 4.7u R908 0.1 R907 C705 R904 5.6k R723 47k QMFZ047-150-T 0.1 DIMOUT C701 100P RR- X1 SD/ST FR- DIMIN 47k MA8062/M/-X 2.2k IC901 OSC CN901 QNZ0650-001 D708 R972 AMEO 10K R725 D701 2.2k R901 1k FMEO RR+ C714 0.33 C711 0.1 MA8062/M/-X FM/AM AFCK D709 D706 D707 D705 RB160M-30-X R971 DIMOUT MONO SK/ST1 MA8062/M/-X MA8062/M/-X MA8062/M/-X MA8062/M/-X MA8062/M/-X MA8062/M/-X MA8062/M/-X D703 D702 0.1 D972 D971 RB160M-30-X DIMIN RESET IFC D704 100P C313 QQR0703-001 KEY1 QAM0464-002 D308 RB160M-30-X C918 LCDCE C712 0.1 CH.R 100P L901 VPP LCDDA J801 QNZ0095-001 C901 3300/16 LCDCL KEY2 D305 RB160M-30-X D901 1N5401-TU-15 D783 UDZS11B-X R882 47K 47k R733 D892 MA111-X 1k 1.2k R735 R736 R738 0 0 10K R739 CH.L D891 MA111-X 47k R737 MUTE CDON LM MSW CD-RW CCE BUS0 BUCK RST BUS2 BUS1 BUS3 100K PS2 DETACH R740 R741 R807 100k IC801 HD74HC126FP-X R892 1k R881 4.7K LM DIMOUT KEY0 D306 RB160M-30-X R805 100 TEL-MUTE R743 47k ENC1 To CJ601 (SHEET 6) MSW R806 22k C801 0.01 R803 100k R732 47k R742 47k ACC5V R809 330 C243 22/16 SM SK/STP ILL10V D304 RB160M-30-X 10k D781 MA111-X R891 47k R808 100k R804 100k R810 100 CN701 VMC0334-001 REMOCON C317 100P C325 0.047 I/O 180k Q241 2SD601A/QR/-X R802 100k Q781 UN2111-X Q783 UN2111-X C715 0.01 INT SDA C802 0.047 GND DETACH SCK POWER R164 C193 R191 R174 SCL C783 0.22 R801 R242 1k D303 RB160M-30-X C784 1/50 Q782 UN2211-X 0.01 C244 1/50 D242 Q53 UN2211-X D302 RB160M-30-X D782 MA111-X C194 SI 12k R245 R244 0.047 MA111-X 47k R241 0.22 C241 C716 0.01 Q7 UN2211-X C242 C310 0.1 RRR782 10k MUTE RST CD8V R55 2.2k R57 47k C52 4700p R53 10k R59 27k C55 Q52 2SD601A/QR/-X C51 0.47/50 R58 47k C54 0.01 C53 0.1 D241 RB160M-30-X R240 220 FR- RR+ D301 RB160M-30-X 100/16 270 270 10 R173 2.2k R243 100 LEVEL R56 47k 330p Q51 2SD601A/QR/-X R54 10k R52 15k R51 470 C306 0.022 4.7k R301 C175 0.033 C176 5600P C172 8200P C192 100/10 D171 MA111-X MA111-X D161 R172 22k 220k R161 C173 0.22 SQ PSW SW1 SW2 LM MSW CDON CD-RW BUS0 BUS1 BUS2 BUS3 BUCK CCE C311 0.1 R178 27k R781 9V CD.L C305 22/16 C304 100/16 0.22 C174 0.47 SW5V CD.R FR+ R177 27k 47k CH.R CH.L CD.L CD.R 2.2k R73 RDSDA RDSSCK AFCK MONO SD/ST SK/STP R72 2.2k R5 47k C8 R10 IFC OSC SK/ST1 C9 220/10 FM/AM R171 220k 10k R11 10 1000P 3.3k C191 47/16 IC71 SAA6579T-X C71 82P C342 0.47 C322 1/50 C77 2.2/50 2.2k X71 QAX0792-001Z R71 D71 R7 4.7k D3 D4 C177 4.7/50 C178 4.7/50 C76 0.022 C72 47P UN2211-X R9 C182 1/50 C181 Q6 FMEO C79 0.01 0.01 C73 47k 100/16 R43 1k R8 R44 33 C43 Q42 2SC3661-X Q41 2SC3661-X 1k MA111-X 1k R45 C75 560P C74 47/6.3 MA111-X R42 C42 0.082 100 SO 47k R6 R41 1k 100P C303 IC161 R77 Q5 2SB624/4/-X MA111-X C41 0.22 FLFL+ C315 C321 390P C312 C341 390P 47/16 0 C301 C324 0.047 C351 390P C320 1/50 C331 390P 10/16 R168 27k C302 0.022 C332 0.47 Q71 UN2111-X Q32 2SD601A/QR/-X Q31 C309 0.1 C308 0.1 TEA6320T-X 2SD601A/QR/-X (SHEET 5) R167 27k C167 4.7/50 C32 1000P AMEO Q331 2SD1781K/QR/-X R331 0.22 C164 4.7/50 2SB709A/R/-X R33 1.5k R341 820 RL+ C352 0.47 Q72 UN2111-X Q4 R343 2.2k C168 C183 1/50 Q3 UN2111-X R353 2.2k R351 C162 8200P 1500P R82 C83 18K C78 0.1 R323 2.2k R321 820 C165 0.033 2SD601A/QR/-X R74 UN2211-X Q1 C184 1/50 C93 1500P R333 2.2k C166 5600P R166 47k 10k C163 0.22 R165 47k R32 1k R75 4.7k 2SD601A/QR/-X Q2 R4 4.7k 1k R31 Q74 1000P C81 C91 10p R76 4.7k R162 22k C185 1/50 R175 47k C31 2.2/50 R3 0 C82 0.012 Q73 R176 47k R35 1000P R1 100p C5 R2 10k 0.1 C10 1/50 C7 100/10 C12 100 220/10 C4 C6 C3 150P C11 0.47/50 C2 0.047 MA111-X MA111-X D2 D1 R81 10k Q8 UN2211-X R163 2.2k 2SD601A/QR/-X C1 5P C92 0.012 C13 220P C186 1/50 R91 10k 18K 1/50 1/50 R92 C94 C84 Q351 2SD1781K/QR/-X L1 4.7u Parts are safety assurance parts. When replacing those parts make sure to use the specified one. SHEET 4 2-5 MSW CD servo section (KD-G207) 4.7k VREF R561 IC571 NJM4565M-WE R586 33k C597 FOO TRO FMO DMO 100/10 C553 10p C541 C554 10p FE 1M 10k 100 56k 0.1 R510 C510 0.1 C511 L521 C514 5p 470p C533 470p R517 0 47u 0 R529 0 R526 0 SEL TEB RFGC R527 100 2k X521 R528 100 15k R511 100 R512 0.047 C534 R530 100 R514 R515 0.047 C537 TP2 R531 RFRP RF TP1 1k R532 0.01 R513 QAX0794-001Z 82p C513 RFGC R533 C512 VREF C540 0.01 1800P C539 C559 C508 0.01 100/6.3 C509 100/6.3 1.5k 0.01 R571 C546 100p C545 100/6.3 C544 0.01 VF2 0.047 C538 VCC 0.047 FOCUS- FOCUS+ TRACKING- FEED- SPINDLE- 0.01 1.5k VT2 0.047 R573 C563 C531 1.5k C562 C535 R572 TRO C567 0.047 C536 LM FEED+ R569 4.7K 47u L523 SW5V IC521 TC94A14FA CD-RW C547 0.1 C555 100/6.3 9v CD.R C548 100/6.3 C549 0.01 AGND 0.033 TE CD.L PSW C557 100P TA2157FN-X IC501 C530 RFDC FE RFRP C528 R525 C529 100/6.3 0.033 (SHEET 4) SW1 SW2 LM MSW 10k C507 0.0068 C527 0.01 C526 2700P 82k R509 R516 R504 82k 82k 820 VT2 R505 330k BUS0 BUCK C524 VT1 R506 330k BUS1 CCE 0.015 C525 4.7k 4.7k R536 R534 4.7k 4.7k R537 MD C501 R535 TE SEL VCC RFDC R503 VF2 TEB VF1 BUS2 22 LD R507 C503 100/6.3 L522 R524 BUS3 CDON 15k CD-RW R538 R521 10k 47u BUS0 BUS1 R522 47k BUS2 BUS3 BUCK (SHEET 4) 5.6k C522 100/6.3 0.01 C521 47u C556 0.1 L524 1/50 CDON C550 UN2211-X 0.01 Q522 C551 22 2SB1241/QR/-T 100/10 C552 C504 CCE R508 Q501 0.01 C502 0.01 100/6.3 C505 0.01 R523 470k R539 1.5M RST 0.01 Q521 UN2111-X RF 47p CN501 QGB2027M4-22S VF1 SPINDLE+ C564 0.047 VR C566 0.047 TRACKING+ C565 0.047 CD.R 0.001 TRACKING- MD 0 R585 120p R582 33k C560 0.047 TRACKING- C583 R583 12k C596 TRACKING+ CD.L C523 TRACKING+ 0 R595 C593 22k C582 R597 MD GND GND 18k 4.7/25 LD VT1 R581 150 C595 47/6.3 MD FOCUS+ VREF R584 FOCUS+ FOCUS+ 12k 100/16 FOCUS- VREF 33k R593 1A3G-T1 47/6.3 FOCUSTRACKING- FOCUS- Q561 SPINDLE+ SPINDLE+ C584 D561 150 LD C585 LD SW2 TRACKING+ R519 VR SPINDLE- SPINDLE- R574 22 PSW VR IC561 LA6242H-X VF1 PSW 3k SW1 VF1 R568 GND C594 22k SW2 R587 VT1 SW2 R596 VT1 22k SPINDLE+ C568 0.1 6.8k R592 120p 22k SW1 820p VT2 SW1 C592 4.7/25 C591 VT2 18k C581 GND R591 150 2SB1322/RS/-T GND SPINDLE- R594 C561 47/6.3 R567 VCC PSW FOO R575 22 VCC FMO DMO 8.2K FEED+ FEED+ 15k 8.2k 820p VF2 VF2 R564 R562 R577 820p R565 20k 8.2k 820p FEED- FEED- R576 R566 GND FEED+ 5.1k R563 FEED- RST CD8V GND SHEET 5 2-6 LCD & Key control section (KD-G207) IC681 RPM7338-V4 100 R686 C682 0.012 R687 47K C681 4.7/6.3 R688 47K C686 0.022 10K R682 D681 MA8062/M/-X JS686 QSW0863-003 R681 470 C687 0.022 CJ601 VMC0335-001 COM1 COM2 COM3 S1 S2 S3 S4 S5 S6 S7 S8 S9 S10 S11 S12 S13 S14 S15 S16 S17 S18 S19 S20 S21 S22 S23 S24 S25 S26 S27 S28 S29 S30 S31 S32 S33 S34 S35 S36 S37 S38 S39 S40 S41 S42 S43 S44 S45 S46 S47 S48 S49 S50 S51 S52 LCD1 ILL10V ACC5V REMOCON ENC1 ENC2 DIMOUT LCDCL To CN701 (SHEET 4) LCDDA LCDCE R662 2.2K S609 S608 S607 D633 D637 D642 D639 D634 D646 D645 D648 D641 D638 R627 0 390 390 R650 R649 S34 S33 S35 S39 S38 S37 S36 S24 C663 0.022 S23 S22 S21 S20 S19 S18 OSC LCD.CE R666 LCD.SCKR667 LCD.SO R668 R665 51K 10K 10K 10K CE CLK DATA S17 C662 680p C661 10/6.3 R654 R648 R653 R647 R652 R651 R646 R645 R644 R642 R643 R641 R640 S612 R639 820 S613 R638 820 S614 R637 1.2k S615 R634 1.8k S616 D662 UDZS5.1B-X R664 10K D651 R633 S617 KEY0 R632 2.7k R610 R631 3.9k S618 R611 D630 R614 R612 SML-310LT/MN/-X R615 R613 S26 S25 INH 470 S13 S14 S15 S16 S610 D635 KEY1 S28 S27 S12 S611 R670 S9 S10 S11 820 D650 S7 S8 R606 820 D649 180K R607 D647 D644 MA111-X D661 R608 1.2k D643 D640 R663 R609 1.8k D636 D632 S1 S2 D631 S3 S4 S5 S6 S606 S32 S31 S30 S29 S51 S52 COM1 COM2 COM3 DIMMER S605 R671 S604 S49 S50 IC661 PT6523LQ 47K S603 1K S602 R630 S601 R661 2.2K KEY2 D653 820 2SB624/4/-X Q670 R672 R601 Q671 UN2211-X R602 820 D652 R603 1.2k R626 0 R604 1.8k 820 R605 2.7k S42 S41 S40 S48 S47 S46 S45 S44 S43 KEY0 KEY1 KEY2 SHEET 6 2-7 Printed circuit boards Main board Main board Reverse side C913 C905 C906 C914 C911 C910 IC301 C901 D701 C513 CN702 Q501 R516 R562 R564 R517 C521 TP1 C527 L522 L524 C537 R521 R532 R537 C529 R534 R536 C548 C528 R527 R528 C533 C524 R539 R522 C523 C547 L523 R507 R508 C522 R538 C552 C538 R531 R592 R593 R575 R574 C592 R805 C242 C582 R509 R577 R566 R585 R595 R586 C351 C331 R561 Q783 D783 D561 R511 R512 R567 R563 C562 R731 R733 R732 R737 R706 R705 R708 C556 C550 R535 C549 C585 C557 C597 C512 R513 D782 R881 R781 Q891 R891 R892 D891 D892 R727 R725 R753 R741 C77 C714 C712 C77 C322 C342 R176 R166 R165 D902 C162 R162 C163 R163 C166 R194 C706 C702 R716 D710 R806 R734 R711 R72 R73 C508 Q521 Q522 C596 R525 C555 R524 2-8 CN701 C539 C545 X521 C553 C540 C541 C525 C526 L521 C554 C560 R533 R803 R810 C244 R242 R807 C243 D704 D703 D702 L521 IC801 D709 D708 D707 D706 D705 X521 C545 R246 R247 C539 R244 R245 C555 C243 C505 C509 C561 C551 C534 Q241 R174 C241 R240 CN701 Q881 RESET R728 R56 C4 C74 IC71 C244 R801 R802 X71 C711 R729 C76 C74 C585 C802 Q2 R3 X71 R717 R718 R713 R719 R720 R809 R808 R707 R71 C703 C595 R241 R526 R529 R530 C10 C71 C582 R804 L523 Q3 Q903 Q904 R908 R907 C559 R243 R754 VDD C10 C504 Q561 R582 R583 C502 TP2 C783 R164 R515 C511 C503 C563 C704 R77 C73 C75 C782 R712 C79 C564 C565 C781 VSS C72 R723 R722 C4 C501 CN501 D241 D242 R714 R715 R721 C704 C352 C916 C904 C912 C907 R175 R184 C182 R755 R730 R81 R82 C83 C93 R92 C54 R51 C716 C51 C583 R702 R703 R704 R584 C584 C581 R581 R587 R726 X1 C707 R4 C548 D161 D171 C9 R32 R57 Q51 C53 Q1 R569 R568 R565 C51 R750 C551 R740 X701 R53 Q52 R55 C52 R744 R11 R5 R751 R709 R710 IC571 C713 C701 C593 C596 C592 R594 R591 C591 C594 R596 MSW Q782 C306 C320 C566 R782 UNLOCK R752 C595 VPP R724 C708 C55 C709 C710 R58 Q53 Q71 Q72 Q7 C705 X701 C94 C561 C550 C173 R172 C172 C174 R161 R171 R42 R45 C6 R2 C78 C91 C92 R59 Q781 D781 R35 R74 C94 IC521 C546 C544 R91 R52 D71 C781 C84 C81 C709 D561 L522 R514 L524 C82 R75 Q73 IC701 R742 C782 R597 R523 C7 C8 R739 R738 C514 C510 C507 R510 IC501 Q501 C12 C11 R736 R735 C567 R519 R505 R506 R743 C522 C530 C908 C881 LM C84 C305 C784 R572 R571 R573 C183 C31 R576 C529 C909 R31 C908 C563 Q561 R882 R1 C32 R33 IC561 C509 C31 R301 C891 Q31 B12 C909 C182 C715 C183 C881 Q32 L701 L702 CN702 R503 R504 C186 C167 R173 C186 C13 C6 C164 C503 C5 C9 R76 Q74 CN501 C177 C178 C303 C185 R41 C41 C185 B1 B2 B3 B4 C323 C301 C168 C42 IC161 C901 C193 R43 L702 L701 C784 C165 C536 C535 C531 Q42 Q8 R9 Q6 R6 Q4 C168 B8 B9 C192 C191 C308 C332 R901 R191 C43 D3 D4 R7 R8 Q5 B10 IC301 C342 D304 D303 D302 D301 C319 C318 C316 C317 B14 C324 R178 R177 B7 C322 C191 C320 C505 R44 R54 R168 C177 C303 C801 PP1 C302 C304 C310 C311 C176 C194 TU1 C3 C167 C184 C181 R331 R10 PP1 C193 C178 R321 D2 D1 TU1 C3 B9 C43 C309 C918 D901 C902 L1 L1 C192 C175 C301 D341 D321 R904 C2 C352 C915 R323 C323 J1 C1 D308 C305 C315 C314 R167 C313 C312 C181 C903 C907 B8 B4 D307 PP2 Q41 R901 B13 D306 D305 C904 C332 C333 J1 R343 R333 R905 R906 Q902 Q901 B3 B1 B2 C184 C916 C902 C910 C304 C914 D901 CN901 Q351 PP2 C913 B5 Q341 R353 J801 IC901 D903 CN901 R902 R903 C903 C905 Q321 L901 B6 J301 Q331 C971 R972 L901 J301 IC901 C325 D971 D972 R971 J801 C341 C321 R352 R351 R342 R341 R332 R322 Forward side Front board Forward side Reverse side D630 R630 R672 D631 S606 Q670 IC681 Q671 R671 R646 JS686 C681 D652 C682 R645 D653 C661 R663 D661 S611 S605 CJ601 R662 D636 R608 R607 D637 R602 D638 R661 R609 S610 LCD1 D639 R664 S604 S609 R647 D681 R681 R682 R648 R649 R643 R644 D632 D633 D634 R601 D635 R650 R670 R603 S603 C662 R665 R667 R668 R666 D662 D640 R604 S602 C663 D641 R605 IC661 S601 D642 S608 D643 R606 D644 S607 R641 R642 R610 R637 S612 D645 R638 R639 S613 D651 D646 R640 R634 D653 R688 D652 IC681 JS686 D647 R611 R633 S618 S614 C687 R686 S615 R654 C686 R615 D629 R613 R631 R632 R614 D649 R612 D648 D650 S617 S616 R626 R651 R652 R687 R653 2-9 3-2 24 25 22 20 21 7 6 28 10 26 7 27 19 35 23 29 C 3 6 30 31 33 2 40 57 12 6 Front board B 36 32 39 34 13 37 46 38 44 LCD1 17 18 43 39 1 41 16 A 47 11 B 42 13 8 C 14 15 Main board 54 49 8 50 9 56 48 45 A 9 4 5 52 51 53 9 Exploded view of general assmbly and parts list Block No. M 1 M M General assembly Symbol No. Part No. Part Name Description Block No. [M][1][M][M] Symbol No. Part No. Part Name Description 1 2 3 4 5 6 7 8 9 10 11 12 13 14 15 GE10043-210A GE40135-001A GE30938-003A GE30393-002A FSMA3004-203 QYSDST2604Z FSKZ4005-001 QYSDST2606Z QYSDST2604Z QYSDST2610Z GE10079-001A FSYH4036-098 QYSDST2004M GE31033-001A FSKW4005-003 16 FSWK3002-015 17 18 19 GE31034-001A GE40156-001A GE10077-001A TOP CHASSIS EARTH PLATE SIDE PANEL BOTTOM COVER INSULATOR SCREW SCREW SCREW SCREW SCREW FRONT CHASSIS SHEET MINI SCREW LOCK LEVER TORSION SPRING COMPRESSION SPRING RLS KNOB BLIND FRONT PANEL 20 GE31031-019A FINDER ASSY 20 GE31031-020A FINDER ASSY 20 GE31031-021A FINDER ASSY 21 22 23 24 25 26 27 28 29 30 31 32 GE31027-001A GE31038-001A GE40218-002A GE31039-003A FSYH4036-053 GE31040-001A FSYH4036-069 GE31029-001A FSYH4036-069 GE20161-001A FSYH4036-069 GE31024-002A POWER BUTTON VOLUME KNOB SHEET SEL BUTTON SHEET RIM LENS SHEET D.FUNC BTN SHEET PRESET BUTTON SHEET UP/DOWN BTN 33 GE31028-001A SSM BTN 33 GE31028-003A SSM BTN 34 35 36 GE31025-001A GE31026-001A GE31032-002A 37 GE40202-003A 38 39 40 41 42 43 44 GE10078-001A VKZ4777-001 GE31021-001A GE31022-002A GE31023-001A GE40199-001A GE40199-002A SEARCH BTN EJECT BUTTON DETACH BTN COMPRESSION SPRING REAR COVER MINI SCREW LCD CASE LCD LENS LENS CASE LIGHTING SHEET LIGHTING SHEET 45 GE31080-001A NAME PLATE 45 GE31083-001A NAME PLATE 45 GE31086-001A NAME PLATE 46 QLD0289-001 LCD MODULE 46 QLD0323-001 LCD MODULE 47 QNZ0443-001 LCD CONNECTOR G201 E,G20 1EX,G 202E, G202 EX Local 48 49 50 51 52 53 54 56 57 2.6mm x 4mm(x3) (x2) 2.6mm x 6mm(x2) 2.6mm x 4mm(x3) 2.6mm x 10mm QAM0461-002 STEERING REMOTE QMFZ047-150-T GE30912-007A QYSDST2606Z QYSDST2606Z QYSDSF2606Z GE40172-004A GE40107-002A GE30854-001A FUSE REAR BRACKET SCREW SCREW SCREW IC BRACKET HEAT SINK LED HOLDER Local 15A 2.6mm x 6mm 2.6mm x 6mm 2.6mm x 6mm 2mm x 4mm(x2) G201 E,G20 1EX G202 E,G20 2EX G207 EE (x2) G201 E,G20 1EX G202 E,G20 2EX,G 207E E (x4) G201 E,G20 1EX G202 E,G20 2EX G207 EE G201 E,G20 1EX G202 E,G20 2EX,G 207E E 3-3 CD mechanism assembly and parts list Grease TNG-87 GP-501MK CFD-005Z GP-501A Block No. M B M M TN-2001-1011 111 34 74 2 72 35 26 33 31 111 111 73 C 36 85 37 15 22 29 116 25 A 19 112 23 38 B 114 61 13 27 21 24 30 11 62 A 112 32 75 D 99 76 28 38 115 83 12 D C 95 B 93 32 96 122 100 20 90 121 87 14 97 82 89 100 94 86 18 98 83 16 125 17 124 101 123 88 a 4 92 113 91 94 111 81 84 1 93 73 74 75 77 3 71 a 3-4 111 111 3 CD mechanism Block No. [M][B][M][M] Symbol No. 1 2 3 4 11 12 13 14 15 16 17 18 19 20 21 22 23 24 25 26 27 28 29 30 31 32 33 34 35 36 37 38 61 62 71 72 73 74 75 76 77 81 82 83 84 85 86 87 88 89 90 91 92 93 94 95 96 97 98 99 100 101 111 112 113 114 115 116 121 122 123 124 125 Part No. Part Name 30320101T 30320102T 30320115T 30320116T 303205505T 303205503T 303205301T 303205302T 30320502T 30320503T 30320505T 30320506T 30320507T 30320509T 30320510T 30320511T 30320513T 30320514T 30320518T 30320519T 30320520T 30320521T 30320522T 30320525T 30320526T 30320538T 30320529T 30320530T 30320531T 30320523T 30320524T 30320539T 69011614T 64180406T 303210301T 30321002T 30321003T 30321005T 30321009T 30321011T 19501403T 303211301T 303211501T 303211302T 303211502T 303211303T 30321101T 30321102T 30321103T 30321104T 30321105T 30321106T 30321107T 30321111T 30321114T 30321116T 30321117T 30321118T 30321125T 30321131T 30321133T 18211223T 9P0420031T 9P0420041T 9B0320041T 9C0117183T 9C0120203T 9C0317503T 9W0130170T 9W0513060T 9W0710070T 9E0100152T 9W0113020T FRAME TOP COVER DANPER F DANPER R CHASSIS RIVET CHANGE P. RVT A CLAMPER ASS'Y SPINDLE MOTOR A CLAMPER ARM CHANGE GEAR SPG CHANGE GEAR 2 FEED GEAR FEED RACK CHANGE LOCK RAR FEED SW HOLDER PU SHAFT HOLDER CLAMPER SUB SPG FD SUB HOLDER TOP PLATE SELECT LOCK ARM TRIGGER ARM SLIDE HOOK PU SHAFT CLAMPER ARM SPG SELECT L ARM SP SUSPENSION SP R SELECT ARM R LINK PLATE LINK PLATE SPG CUSHION F CUSHION R SUSPENSION SP L PICKUP OPT-725 DET SW ESE22 CONN PWB ASS'Y MODE SW LOAD MOTOR WIRE MODE SW WIRE SL WIRE WIRE HOLDER WIRE CLUMPER ROLLER SHAFT AS L GEAR PLATE RV LOADING PLATE A LOCK ARM RV ASS L/F MOTOR ASS'Y LOADING GEAR 1 LOADING GEAR 2 LOADING GEAR 3 LOADING GEAR 4 LOADING GEAR 5 LOADING GEAR 6 LOADING GEAR 7 ROLLER GUIDE ROLLER GUIDE SP DISC STOPPER AR DISC ST ARM SPG LD GEAR BRACKET L SIDE PLATE LOAD PLATE SPG LDG ROLLER COLLAR SCREW SCREW TAP.SCREW SCREW SCREW SCREW SCREW PW 3.5X8X0.3 HL WASHER L WASHER E RING PW 2.1X4X0.13 Description Local 3-5 Electrical parts list Main board Symbol No. Block No. [0][1][0][0] Symbol No. Part No. Part Name IC71 SAA6579T-X IC IC161 IC301 IC501 IC521 IC561 IC571 TEA6320T-X LA47515 TA2157FN-X TC94A14FA LA6242H-X NJM4565M-WE IC IC RF AMP IC CD LSI IC BTL DRIVER IC IC IC701 UPD178078GF-664 IC IC701 UPD178078GF-665 IC IC901 AN80T07 IC Q1 Q2 Q3 Q4 Q5 Q6 Q7 Q31 Q32 Q41 Q42 UN2211-X 2SD601A/QR/-X UN2111-X 2SB709A/R/-X 2SB624/4/-X UN2211-X UN2211-X 2SD601A/QR/-X 2SD601A/QR/-X 2SC3661-X 2SC3661-X TRANSISTOR TRANSISTOR TRANSISTOR TRANSISTOR TRANSISTOR TRANSISTOR TRANSISTOR TRANSISTOR TRANSISTOR TRANSISTOR TRANSISTOR Q51 2SD601A/QR/-X TRANSISTOR Q52 2SD601A/QR/-X TRANSISTOR Q53 Q71 Q73 UN2211-X UN2111-X 2SD601A/QR/-X TRANSISTOR TRANSISTOR TRANSISTOR Q74 2SD601A/QR/-X TRANSISTOR Q341 Q351 Q501 Q521 Q522 Q561 Q781 Q782 2SD1781K/QR/-X 2SD1781K/QR/-X 2SB1241/QR/-T UN2111-X UN2211-X 2SB1322/RS/-T UN2111-X UN2211-X TRANSISTOR TRANSISTOR TRANSISTOR TRANSISTOR TRANSISTOR TRANSISTOR TRANSISTOR TRANSISTOR 3-6 Description Local G201 E,G20 1EX,G 202E, G202 EX G201 E,G20 1EX,G 202E, G202 EX G207 EE G201 E,G20 1EX,G 202E, G202 EX G201 E,G20 1EX,G 202E, G202 EX G201 E,G20 1EX,G 202E, G202 EX G201 E,G20 1EX,G 202E, G202 EX G201 E,G20 1EX,G 202E, G202 EX G201 E,G20 1EX,G 202E, G202 EX Part No. Part Name Q783 Q891 Q901 Q902 UN2111-X UN2211-X 2SB709A/QR/-X UN2211-X TRANSISTOR TRANSISTOR TRANSISTOR TRANSISTOR D1 D2 D3 D4 MA111-X MA111-X MA111-X MA111-X SI DIODE SI DIODE SI DIODE SI DIODE D71 MA111-X SI DIODE D321 D341 D561 D702 D703 D704 D705 D706 D707 D781 D782 D783 D891 D892 D901 D902 D971 D972 MA111-X MA111-X 1A3G-T1 MA8062/M/-X MA8062/M/-X MA8062/M/-X MA8062/M/-X MA8062/M/-X MA8062/M/-X MA111-X MA111-X UDZS11B-X MA111-X MA111-X 1N5401-TU-15 MA111-X RB160M-30-X RB160M-30-X SI DIODE SI DIODE SI DIODE Z DIODE Z DIODE Z DIODE Z DIODE Z DIODE Z DIODE SI DIODE SI DIODE Z DIODE SI DIODE SI DIODE DIODE SI DIODE SB DIODE SB DIODE C2 C3 C4 C5 C6 C8 C9 C10 C13 C31 C32 NCB31EK-473X QEKJ1HM-474Z QEKJ1AM-227Z NDC31HJ-101X QEKJ1AM-107Z NCB31HK-102X QEKJ1AM-227Z QEKJ1HM-105Z NDC31HJ-221X QEKJ1HM-225Z NCS31HJ-102X C CAPACITOR E CAPACITOR E CAPACITOR C CAPACITOR E CAPACITOR C CAPACITOR E CAPACITOR E CAPACITOR C CAPACITOR E CAPACITOR C CAPACITOR Description Local G201 E,G20 1EX,G 202E, G202 EX 0.047uF 25V K 0.47uF 50V M 220uF 10V M 100pF 50V J 100uF 10V M 1000pF 50V K 220uF 10V M 1uF 50V M 220pF 50V J 2.2uF 50V M 1000pF 50V J C41 NCB21EK-124X C CAPACITOR 0.12uF 25V K C41 NCB21CK-224X C CAPACITOR 0.22uF 16V K C42 NCB31HK-123X C CAPACITOR 0.012uF 50V K C42 NCB31EK-823X C CAPACITOR 0.082uF 25V K C43 QEKJ1CM-107Z E CAPACITOR 100uF 16V M C51 QEKJ1HM-474Z E CAPACITOR 0.47uF 50V M C52 NCB31EK-472X C CAPACITOR 4700pF 25V K C53 NCB31EK-104X C CAPACITOR 0.1uF 25V K G201 E,G20 1EX,G 202E, G202 EX G207 EE G201 E,G20 1EX,G 202E, G202 EX G207 EE G201 E,G20 1EX,G 202E, G202 EX G201 E,G20 1EX,G 202E, G202 EX G201 E,G20 1EX,G 202E, G202 EX Symbol No. Part No. Part Name Description C54 NCB31EK-103X C CAPACITOR 0.01uF 25V K C55 NDC31HJ-331X C CAPACITOR 330pF 50V J C71 NDC31HJ-820X C CAPACITOR 82pF 50V J C72 NDC31HJ-470X C CAPACITOR 47pF 50V J C73 NCB31HK-103X C CAPACITOR 0.01uF 50V K C74 QEKJ0JM-476Z E CAPACITOR 47uF 6.3V M C75 NDC31HJ-561X C CAPACITOR 560pF 50V J C76 NCB31EK-223X C CAPACITOR 0.022uF 25V K C77 QEKJ1HM-225Z E CAPACITOR 2.2uF 50V M C78 NCB31EK-104X C CAPACITOR 0.1uF 25V K C79 NCB31EK-103X C CAPACITOR 0.01uF 25V K C81 C82 C83 C84 C91 C92 C93 C94 C162 C163 C164 C165 C166 C167 C168 C172 C173 C174 C175 NCB31HK-102X NCB31EK-123X NCB31HK-152X QEKJ1HM-105Z NCB31HK-102X NCB31EK-123X NCB31HK-152X QEKJ1HM-105Z NCB31HK-822X NCB31CK-224X NCB31CK-224X NCB31CK-333X NCB31HK-562X QEKJ1HM-475Z QEKJ1HM-475Z NCB31HK-822X NCB31CK-224X NCB31CK-224X NCB31CK-333X C CAPACITOR C CAPACITOR C CAPACITOR E CAPACITOR C CAPACITOR C CAPACITOR C CAPACITOR E CAPACITOR C CAPACITOR C CAPACITOR C CAPACITOR C CAPACITOR C CAPACITOR E CAPACITOR E CAPACITOR C CAPACITOR C CAPACITOR C CAPACITOR C CAPACITOR 1000pF 50V K 0.012uF 25V K 1500pF 50V K 1uF 50V M 1000pF 50V K 0.012uF 25V K 1500pF 50V K 1uF 50V M 8200pF 50V K 0.22uF 16V K 0.22uF 16V K 0.033uF 16V K 5600pF 50V K 4.7uF 50V M 4.7uF 50V M 8200pF 50V K 0.22uF 16V K 0.22uF 16V K 0.033uF 16V K Local Symbol No. G201 E,G20 1EX,G 202E, G202 EX G201 E,G20 1EX,G 202E, G202 EX G201 E,G20 1EX,G 202E, G202 EX G201 E,G20 1EX,G 202E, G202 EX G201 E,G20 1EX,G 202E, G202 EX G201 E,G20 1EX,G 202E, G202 EX G201 E,G20 1EX,G 202E, G202 EX G201 E,G20 1EX,G 202E, G202 EX G201 E,G20 1EX,G 202E, G202 EX G201 E,G20 1EX,G 202E, G202 EX G201 E,G20 1EX,G 202E, G202 EX C176 C177 C178 C182 C183 C185 C186 C191 C192 C193 C194 C301 C302 C303 C304 C305 C306 C308 C309 C310 C311 C312 C313 C314 C315 C316 C317 C318 C319 C320 C321 C322 C323 C331 C332 C333 C341 C342 C351 C352 C501 C502 C503 C504 C505 C507 C508 C509 C510 C511 C512 C513 C514 C521 C522 C523 C524 C525 C526 C527 C528 C529 C530 C531 C533 C534 C535 C536 C537 C538 C539 C540 C541 C544 C545 C546 C547 C548 Part No. Part Name Description NCB31HK-562X QEKJ1HM-475Z QEKJ1HM-475Z QEKJ1HM-105Z QEKJ1HM-105Z QEKJ1HM-105Z QEKJ1HM-105Z QEKJ1CM-476Z QEKJ1AM-107Z QEKJ1CM-107Z NCB31CK-103X QEKJ1CM-106Z NCB31HK-223X QERF1CM-476Z QEKJ1CM-107Z QERF1CM-226Z NCB31HK-223X NCB31EK-104X NCB31EK-104X NCB31EK-104X NCB31EK-104X NDC31HJ-101X NDC31HJ-101X NDC31HJ-101X NDC31HJ-101X NDC31HJ-101X NDC31HJ-101X NDC31HJ-101X NDC31HJ-101X QERF1HM-105Z NCS31HJ-391X QFVD1HJ-474Z QERF1HM-105Z NCS31HJ-391X QFVD1HJ-474Z NCB31EK-473X NCS31HJ-391X QFVD1HJ-474Z NCS31HJ-391X QFVD1HJ-474Z NCB31HK-103X NCB31HK-103X QEKJ0JM-107Z NCB31HK-103X QEKJ0JM-107Z NCB31HK-682X NCB31HK-103X QEKJ0JM-107Z NCB31EK-104X NCB31EK-104X NDC31HJ-820X NCB31HK-103X NDC31HJ-5R0X NCB31HK-103X QEKJ0JM-107Z NDC31HJ-470X NCB31HK-153X NCB31HK-103X NCB31HK-272X NCB31HK-103X NCB31EK-333X QEKJ0JM-107Z NCB31EK-333X NCB31EK-473X NDC31HJ-471X NDC31HJ-471X NCB31EK-473X NCB31EK-473X NCB31EK-473X NCB31EK-473X QEKJ0JM-107Z NCB31HK-103X NCB31HK-103X NCB31HK-103X QEKJ0JM-107Z NDC31HJ-101X NCB31EK-104X QEKJ0JM-107Z C CAPACITOR E CAPACITOR E CAPACITOR E CAPACITOR E CAPACITOR E CAPACITOR E CAPACITOR E CAPACITOR E CAPACITOR E CAPACITOR C CAPACITOR E CAPACITOR C CAPACITOR E CAPACITOR E CAPACITOR E CAPACITOR C CAPACITOR C CAPACITOR C CAPACITOR C CAPACITOR C CAPACITOR C CAPACITOR C CAPACITOR C CAPACITOR C CAPACITOR C CAPACITOR C CAPACITOR C CAPACITOR C CAPACITOR E CAPACITOR C CAPACITOR MF CAPACITOR E CAPACITOR C CAPACITOR MF CAPACITOR C CAPACITOR C CAPACITOR MF CAPACITOR C CAPACITOR MF CAPACITOR C CAPACITOR C CAPACITOR E CAPACITOR C CAPACITOR E CAPACITOR C CAPACITOR C CAPACITOR E CAPACITOR C CAPACITOR C CAPACITOR C CAPACITOR C CAPACITOR C CAPACITOR C CAPACITOR E CAPACITOR C CAPACITOR C CAPACITOR C CAPACITOR C CAPACITOR C CAPACITOR C CAPACITOR E CAPACITOR C CAPACITOR C CAPACITOR C CAPACITOR C CAPACITOR C CAPACITOR C CAPACITOR C CAPACITOR C CAPACITOR E CAPACITOR C CAPACITOR C CAPACITOR C CAPACITOR E CAPACITOR C CAPACITOR C CAPACITOR E CAPACITOR 5600pF 50V K 4.7uF 50V M 4.7uF 50V M 1uF 50V M 1uF 50V M 1uF 50V M 1uF 50V M 47uF 16V M 100uF 10V M 100uF 16V M 0.01uF 16V K 10uF 16V M 0.022uF 50V K 47uF 16V M 100uF 16V M 22uF 16V M 0.022uF 50V K 0.1uF 25V K 0.1uF 25V K 0.1uF 25V K 0.1uF 25V K 100pF 50V J 100pF 50V J 100pF 50V J 100pF 50V J 100pF 50V J 100pF 50V J 100pF 50V J 100pF 50V J 1uF 50V M 390pF 50V J 0.47uF 50V J 1uF 50V M 390pF 50V J 0.47uF 50V J 0.047uF 25V K 390pF 50V J 0.47uF 50V J 390pF 50V J 0.47uF 50V J 0.01uF 50V K 0.01uF 50V K 100uF 6.3V M 0.01uF 50V K 100uF 6.3V M 6800pF 50V K 0.01uF 50V K 100uF 6.3V M 0.1uF 25V K 0.1uF 25V K 82pF 50V J 0.01uF 50V K 5pF 50V J 0.01uF 50V K 100uF 6.3V M 47pF 50V J 0.015uF 50V K 0.01uF 50V K 2700pF 50V K 0.01uF 50V K 0.033uF 25V K 100uF 6.3V M 0.033uF 25V K 0.047uF 25V K 470pF 50V J 470pF 50V J 0.047uF 25V K 0.047uF 25V K 0.047uF 25V K 0.047uF 25V K 100uF 6.3V M 0.01uF 50V K 0.01uF 50V K 0.01uF 50V K 100uF 6.3V M 100pF 50V J 0.1uF 25V K 100uF 6.3V M Local 3-7 Symbol No. Part No. Part Name Description C549 C550 C551 C552 C553 C554 C555 C556 C559 C560 C561 C562 C563 C564 C565 C566 C567 C568 C581 C582 C583 C584 C585 C591 C592 C593 C594 C595 C596 C597 C703 C704 C705 C706 C707 C708 C709 C710 C711 C712 C713 C714 C715 C716 C781 C782 C783 C784 C891 C901 C902 C903 C904 C905 C906 C907 C908 C909 C910 C911 C912 C913 C914 C915 C916 C918 C971 NCB31HK-103X QEKJ1HM-105Z QEKJ1AM-107Z NCB31HK-103X NDC31HJ-100X NDC31HJ-100X QEKJ0JM-107Z NCB31EK-104X NCB31HK-182X NCB31EK-473X QEKJ0JM-476Z NCB31HK-103X QEDJ1AM-107Z NCB31EK-473X NCB31EK-473X NCB31EK-473X NCB31EK-473X NCB31EK-223X NCS31HJ-821X QEKJ1EM-475Z NDC31HJ-121X NCS31HJ-821X QEKJ0JM-476Z NCS31HJ-821X QEKJ1EM-475Z NDC31HJ-121X NCS31HJ-821X QEKJ0JM-476Z QEKJ1CM-107Z NCS31HJ-102X NCB31HK-103X QEKJ1AM-107Z NCB31EK-104X NCB31EK-104X NDC31HJ-150X NDC31HJ-150X QEKJ1AM-107Z NCB31EK-103X NCB31EK-104X NCB31EK-104X NCB31HK-103X NCB31AK-334X NCB31EK-103X NCB31EK-103X QEKJ1AM-227Z QEKJ1CM-226Z NCB31CK-224X QERF1HM-105Z NCB31EK-104X QEZ0625-338 QEKJ1HM-225Z QEKJ1CM-476Z QEKJ1CM-106Z QEKJ1CM-476Z NCB31EK-103X QEKJ1AM-227Z QEKJ1AM-227Z QEKJ1AM-227Z QEKJ1CM-476Z NCB31EK-104X NCB31HK-103X QEKJ1CM-106Z QEKJ1CM-107Z NCB31EK-104X QEKJ1CM-106Z NDC31HJ-101X NCB31EK-104X C CAPACITOR E CAPACITOR E CAPACITOR C CAPACITOR C CAPACITOR C CAPACITOR E CAPACITOR C CAPACITOR C CAPACITOR C CAPACITOR E CAPACITOR C CAPACITOR E CAPACITOR C CAPACITOR C CAPACITOR C CAPACITOR C CAPACITOR C CAPACITOR C CAPACITOR E CAPACITOR C CAPACITOR C CAPACITOR E CAPACITOR C CAPACITOR E CAPACITOR C CAPACITOR C CAPACITOR E CAPACITOR E CAPACITOR C CAPACITOR C CAPACITOR E CAPACITOR C CAPACITOR C CAPACITOR C CAPACITOR C CAPACITOR E CAPACITOR C CAPACITOR C CAPACITOR C CAPACITOR C CAPACITOR C CAPACITOR C CAPACITOR C CAPACITOR E CAPACITOR E CAPACITOR C CAPACITOR E CAPACITOR C CAPACITOR E CAPACITOR E CAPACITOR E CAPACITOR E CAPACITOR E CAPACITOR C CAPACITOR E CAPACITOR E CAPACITOR E CAPACITOR E CAPACITOR C CAPACITOR C CAPACITOR E CAPACITOR E CAPACITOR C CAPACITOR E CAPACITOR C CAPACITOR C CAPACITOR 0.01uF 50V K 1uF 50V M 100uF 10V M 0.01uF 50V K 10pF 50V J 10pF 50V J 100uF 6.3V M 0.1uF 25V K 1800pF 50V K 0.047uF 25V K 47uF 6.3V M 0.01uF 50V K 100uF 10V M 0.047uF 25V K 0.047uF 25V K 0.047uF 25V K 0.047uF 25V K 0.022uF 25V K 820pF 50V J 4.7uF 25V M 120pF 50V J 820pF 50V J 47uF 6.3V M 820pF 50V J 4.7uF 25V M 120pF 50V J 820pF 50V J 47uF 6.3V M 100uF 16V M 1000pF 50V J 0.01uF 50V K 100uF 10V M 0.1uF 25V K 0.1uF 25V K 15pF 50V J 15pF 50V J 100uF 10V M 0.01uF 25V K 0.1uF 25V K 0.1uF 25V K 0.01uF 50V K 0.33uF 10V K 0.01uF 25V K 0.01uF 25V K 220uF 10V M 22uF 16V M 0.22uF 16V K 1uF 50V M 0.1uF 25V K 3300uF 2.2uF 50V M 47uF 16V M 10uF 16V M 47uF 16V M 0.01uF 25V K 220uF 10V M 220uF 10V M 220uF 10V M 47uF 16V M 0.1uF 25V K 0.01uF 50V K 10uF 16V M 100uF 16V M 0.1uF 25V K 10uF 16V M 100pF 50V J 0.1uF 25V K R1 R2 R4 R5 R6 R7 R8 R9 R10 R11 NRSA63J-101X NRSA63J-103X NRSA63J-472X NRSA63J-473X NRSA63J-473X NRSA63J-472X NRSA63J-473X NRSA63J-332X NRS181J-100X NRSA63J-103X MG RESISTOR MG RESISTOR MG RESISTOR MG RESISTOR MG RESISTOR MG RESISTOR MG RESISTOR MG RESISTOR MG RESISTOR MG RESISTOR 100Ω 1/16W J 10kΩ 1/16W J 4.7kΩ 1/16W J 47kΩ 1/16W J 47kΩ 1/16W J 4.7kΩ 1/16W J 47kΩ 1/16W J 3.3kΩ 1/16W J 10Ω 1/8W J 10kΩ 1/16W J 3-8 Local Symbol No. R31 R32 R33 R35 Part No. Part Name Description NRSA63J-102X NRSA63J-103X NRSA63J-152X NRSA63J-102X MG RESISTOR MG RESISTOR MG RESISTOR MG RESISTOR 1kΩ 1/16W J 10kΩ 1/16W J 1.5kΩ 1/16W J 1kΩ 1/16W J R41 NRSA63J-332X MG RESISTOR 3.3kΩ 1/16W J R41 NRSA63J-102X MG RESISTOR 1kΩ 1/16W J R42 R43 R44 R45 R51 R52 NRSA63J-102X NRSA63J-102X NRSA02J-330X NRSA63J-102X NRSA63J-471X NRSA63J-153X MG RESISTOR MG RESISTOR MG RESISTOR MG RESISTOR MG RESISTOR MG RESISTOR 1kΩ 1/16W J 1kΩ 1/16W J 33Ω 1/10W J 1kΩ 1/16W J 470Ω 1/16W J 15kΩ 1/16W J R53 NRSA63J-103X MG RESISTOR 10kΩ 1/16W J R54 NRSA63J-103X MG RESISTOR 10kΩ 1/16W J R55 NRSA63J-222X MG RESISTOR 2.2kΩ 1/16W J R56 NRSA63J-473X MG RESISTOR 47kΩ 1/16W J R57 NRSA63J-473X MG RESISTOR 47kΩ 1/16W J R58 NRSA63J-473X MG RESISTOR 47kΩ 1/16W J R59 NRSA63J-273X MG RESISTOR 27kΩ 1/16W J R71 NRSA63J-222X MG RESISTOR 2.2kΩ 1/16W J R72 NRSA63J-222X MG RESISTOR 2.2kΩ 1/16W J R73 NRSA63J-222X MG RESISTOR 2.2kΩ 1/16W J R74 NRSA63J-0R0X MG RESISTOR 0Ω 1/16W J R75 NRSA63J-472X MG RESISTOR 4.7kΩ 1/16W J Local G201 E,G20 1EX,G 202E, G202 EX G207 EE G201 E,G20 1EX,G 202E, G202 EX G201 E,G20 1EX,G 202E, G202 EX G201 E,G20 1EX,G 202E, G202 EX G201 E,G20 1EX,G 202E, G202 EX G201 E,G20 1EX,G 202E, G202 EX G201 E,G20 1EX,G 202E, G202 EX G201 E,G20 1EX,G 202E, G202 EX G201 E,G20 1EX,G 202E, G202 EX G201 E,G20 1EX,G 202E, G202 EX G201 E,G20 1EX,G 202E, G202 EX G201 E,G20 1EX,G 202E, G202 EX Symbol No. Part No. Part Name Description R76 NRSA63J-472X MG RESISTOR 4.7kΩ 1/16W J R77 NRSA02J-101X MG RESISTOR 100Ω 1/10W J R81 R82 R91 R92 R162 R163 R164 R165 R166 R167 R168 R172 R173 R174 R175 R176 R177 R178 R191 R301 R341 R342 R343 R351 R352 R353 R503 R504 R505 R506 R507 R508 R509 R510 R511 R512 R513 R514 R515 R516 R517 R519 R521 R522 R523 R524 R525 R526 R527 R528 R529 R530 R531 R532 R533 R534 R535 R536 R537 R538 R539 R561 R562 R563 R564 R566 R567 NRSA63J-103X NRSA63J-183X NRSA63J-103X NRSA63J-183X NRSA63J-223X NRSA63J-222X NRSA63J-271X NRSA63J-473X NRSA63J-473X NRSA63J-273X NRSA63J-273X NRSA63J-223X NRSA63J-222X NRSA63J-271X NRSA63J-473X NRSA63J-473X NRSA63J-273X NRSA63J-273X NRS181J-100X NRSA63J-472X NRSA02J-821X NRSA02J-101X NRSA63J-222X NRSA02J-821X NRSA02J-101X NRSA63J-222X NRSA63J-823X NRSA63J-823X NRSA63J-334X NRSA63J-334X NRSA02J-220X NRSA02J-220X NRSA63J-823X NRSA63J-563X NRSA63J-103X NRSA63J-202X NRSA63J-102X NRSA63J-153X NRSA63J-101X NRSA63J-821X NRSA63J-0R0X NRSA02J-151X NRSA63J-562X NRSA63J-473X NRSA63J-474X NRSA63J-153X NRSA63J-103X NRSA63J-0R0X NRSA63J-101X NRSA63J-101X NRSA63J-0R0X NRSA63J-0R0X NRSA63J-101X NRSA63J-101X NRSA63J-105X NRSA63J-472X NRSA63J-472X NRSA63J-472X NRSA63J-472X NRSA63J-103X NRSA63J-155X NRSA63J-333X NRSA63J-822X NRSA63J-472X NRSA63J-153X NRSA02J-822X NRSA63J-682X MG RESISTOR MG RESISTOR MG RESISTOR MG RESISTOR MG RESISTOR MG RESISTOR MG RESISTOR MG RESISTOR MG RESISTOR MG RESISTOR MG RESISTOR MG RESISTOR MG RESISTOR MG RESISTOR MG RESISTOR MG RESISTOR MG RESISTOR MG RESISTOR MG RESISTOR MG RESISTOR MG RESISTOR MG RESISTOR MG RESISTOR MG RESISTOR MG RESISTOR MG RESISTOR MG RESISTOR MG RESISTOR MG RESISTOR MG RESISTOR MG RESISTOR MG RESISTOR MG RESISTOR MG RESISTOR MG RESISTOR MG RESISTOR MG RESISTOR MG RESISTOR MG RESISTOR MG RESISTOR MG RESISTOR MG RESISTOR MG RESISTOR MG RESISTOR MG RESISTOR MG RESISTOR MG RESISTOR MG RESISTOR MG RESISTOR MG RESISTOR MG RESISTOR MG RESISTOR MG RESISTOR MG RESISTOR MG RESISTOR MG RESISTOR MG RESISTOR MG RESISTOR MG RESISTOR MG RESISTOR MG RESISTOR MG RESISTOR MG RESISTOR MG RESISTOR MG RESISTOR MG RESISTOR MG RESISTOR 10kΩ 1/16W J 18kΩ 1/16W J 10kΩ 1/16W J 18kΩ 1/16W J 22kΩ 1/16W J 2.2kΩ 1/16W J 270Ω 1/16W J 47kΩ 1/16W J 47kΩ 1/16W J 27kΩ 1/16W J 27kΩ 1/16W J 22kΩ 1/16W J 2.2kΩ 1/16W J 270Ω 1/16W J 47kΩ 1/16W J 47kΩ 1/16W J 27kΩ 1/16W J 27kΩ 1/16W J 10Ω 1/8W J 4.7kΩ 1/16W J 820Ω 1/10W J 100Ω 1/10W J 2.2kΩ 1/16W J 820Ω 1/10W J 100Ω 1/10W J 2.2kΩ 1/16W J 82kΩ 1/16W J 82kΩ 1/16W J 330kΩ 1/16W J 330kΩ 1/16W J 22Ω 1/10W J 22Ω 1/10W J 82kΩ 1/16W J 56kΩ 1/16W J 10kΩ 1/16W J 2kΩ 1/16W J 1kΩ 1/16W J 15kΩ 1/16W J 100Ω 1/16W J 820Ω 1/16W J 0Ω 1/16W J 150Ω 1/10W J 5.6kΩ 1/16W J 47kΩ 1/16W J 470kΩ 1/16W J 15kΩ 1/16W J 10kΩ 1/16W J 0Ω 1/16W J 100Ω 1/16W J 100Ω 1/16W J 0Ω 1/16W J 0Ω 1/16W J 100Ω 1/16W J 100Ω 1/16W J 1MΩ 1/16W J 4.7kΩ 1/16W J 4.7kΩ 1/16W J 4.7kΩ 1/16W J 4.7kΩ 1/16W J 10kΩ 1/16W J 1.5MΩ 1/16W J 33kΩ 1/16W J 8.2kΩ 1/16W J 4.7kΩ 1/16W J 15kΩ 1/16W J 8.2kΩ 1/10W J 6.8kΩ 1/16W J Local Symbol No. G201 E,G20 1EX,G 202E, G202 EX G201 E,G20 1EX,G 202E, G202 EX R568 R569 R571 R572 R573 R574 R575 R576 R577 R581 R582 R583 R584 R585 R586 R587 R591 R592 R593 R594 R595 R596 R597 R705 R706 R708 R709 R710 R711 R712 R713 R714 R715 R717 R718 R719 R720 R721 R722 R723 R724 R725 R726 R727 R728 R729 R730 R734 R735 R736 R738 R739 R740 R741 R742 R743 R744 Part No. Part Name Description NRSA63J-302X NRSA63J-472X NRSA63J-152X NRSA63J-152X NRSA63J-152X NRS181J-220X NRS181J-220X NRSA02J-512X NRSA02J-822X NRSA63J-183X NRSA63J-333X NRSA63J-123X NRSA63J-151X NRSA63J-0R0X NRSA63J-223X NRSA63J-223X NRSA63J-183X NRSA63J-333X NRSA63J-123X NRSA63J-151X NRSA63J-0R0X NRSA63J-223X NRSA63J-223X NRSA63J-222X NRSA63J-222X NRSA63J-222X NRSA63J-473X NRSA63J-473X NRSA63J-103X NRSA63J-103X NRSA63J-103X NRSA63J-103X NRSA63J-103X NRSA63J-103X NRSA63J-103X NRSA63J-472X NRSA63J-472X NRSA63J-472X NRSA63J-473X NRSA63J-473X NRSA63J-0R0X NRSA63J-473X NRSA63J-473X NRSA63J-103X NRSA63J-473X NRSA63J-473X NRSA63J-104X NRSA63J-472X NRSA63J-102X NRSA63J-122X NRSA63J-0R0X NRSA63J-0R0X NRSA63J-104X NRSA63J-103X NRSA63J-473X NRSA63J-473X NRSA63J-103X MG RESISTOR MG RESISTOR MG RESISTOR MG RESISTOR MG RESISTOR MG RESISTOR MG RESISTOR MG RESISTOR MG RESISTOR MG RESISTOR MG RESISTOR MG RESISTOR MG RESISTOR MG RESISTOR MG RESISTOR MG RESISTOR MG RESISTOR MG RESISTOR MG RESISTOR MG RESISTOR MG RESISTOR MG RESISTOR MG RESISTOR MG RESISTOR MG RESISTOR MG RESISTOR MG RESISTOR MG RESISTOR MG RESISTOR MG RESISTOR MG RESISTOR MG RESISTOR MG RESISTOR MG RESISTOR MG RESISTOR MG RESISTOR MG RESISTOR MG RESISTOR MG RESISTOR MG RESISTOR MG RESISTOR MG RESISTOR MG RESISTOR MG RESISTOR MG RESISTOR MG RESISTOR MG RESISTOR MG RESISTOR MG RESISTOR MG RESISTOR MG RESISTOR MG RESISTOR MG RESISTOR MG RESISTOR MG RESISTOR MG RESISTOR MG RESISTOR 3kΩ 1/16W J 4.7kΩ 1/16W J 1.5kΩ 1/16W J 1.5kΩ 1/16W J 1.5kΩ 1/16W J 22Ω 1/8W J 22Ω 1/8W J 5.1kΩ 1/10W J 8.2kΩ 1/10W J 18kΩ 1/16W J 33kΩ 1/16W J 12kΩ 1/16W J 150Ω 1/16W J 0Ω 1/16W J 22kΩ 1/16W J 22kΩ 1/16W J 18kΩ 1/16W J 33kΩ 1/16W J 12kΩ 1/16W J 150Ω 1/16W J 0Ω 1/16W J 22kΩ 1/16W J 22kΩ 1/16W J 2.2kΩ 1/16W J 2.2kΩ 1/16W J 2.2kΩ 1/16W J 47kΩ 1/16W J 47kΩ 1/16W J 10kΩ 1/16W J 10kΩ 1/16W J 10kΩ 1/16W J 10kΩ 1/16W J 10kΩ 1/16W J 10kΩ 1/16W J 10kΩ 1/16W J 4.7kΩ 1/16W J 4.7kΩ 1/16W J 4.7kΩ 1/16W J 47kΩ 1/16W J 47kΩ 1/16W J 0Ω 1/16W J 47kΩ 1/16W J 47kΩ 1/16W J 10kΩ 1/16W J 47kΩ 1/16W J 47kΩ 1/16W J 100kΩ 1/16W J 4.7kΩ 1/16W J 1kΩ 1/16W J 1.2kΩ 1/16W J 0Ω 1/16W J 0Ω 1/16W J 100kΩ 1/16W J 10kΩ 1/16W J 47kΩ 1/16W J 47kΩ 1/16W J 10kΩ 1/16W J R750 NRSA63J-223X MG RESISTOR 22kΩ 1/16W J R751 NRSA63J-222X MG RESISTOR 2.2kΩ 1/16W J R752 R753 R754 R755 R782 R882 R891 R892 R901 R902 NRSA63J-103X NRSA63J-473X NRSA63J-0R0X NRSA63J-0R0X NRSA63J-103X NRSA63J-473X NRSA63J-473X NRSA63J-102X QRE142J-102X NRSA02J-912X MG RESISTOR MG RESISTOR MG RESISTOR MG RESISTOR MG RESISTOR MG RESISTOR MG RESISTOR MG RESISTOR C RESISTOR MG RESISTOR 10kΩ 1/16W J 47kΩ 1/16W J 0Ω 1/16W J 0Ω 1/16W J 10kΩ 1/16W J 47kΩ 1/16W J 47kΩ 1/16W J 1kΩ 1/16W J 1kΩ 1/4W J 9.1kΩ 1/10W J Local G201 E,G20 1EX,G 202E, G202 EX G201 E,G20 1EX,G 202E, G202 EX 3-9 Symbol No. Part No. Part Name Description R903 R905 R906 R971 R972 NRSA02J-472X NRSA02J-822X NRSA63J-203X NRS181J-222X NRS181J-222X MG RESISTOR MG RESISTOR MG RESISTOR MG RESISTOR MG RESISTOR 4.7kΩ 1/10W J 8.2kΩ 1/10W J 20kΩ 1/16W J 2.2kΩ 1/8W J 2.2kΩ 1/8W J L1 L521 L522 L523 L524 L701 L702 L901 QQL244J-4R7Z QQL244J-470Z QQL244J-470Z QQL244J-470Z QQL244J-470Z QQL244K-4R7Z QQL244K-4R7Z QQR0703-001 INDUCTIOR COIL COIL COIL COIL COIL COIL CHOKE COIL 4.7uH J 47uH J 47uH J 47uH J 47uH J 4.7uH K 4.7uH K CN501 CN701 QGB2027M4-22S VMC0334-001 CONNECTOR CONNECTOR B-B (1-22) CN702 QGA2006F1-02 CONNECTOR CN901 J1 J301 QNZ0650-001 QNB0100-002 QNN0519-001 CAR CONNECTOR CAR ANT JACK SURROUND JACK PP1 PP2 QZW0010-001 QZW0010-001 W-B (1-2) STYLE PIN QAU0313-001 TUNER TU1 QAU0314-001 TUNER X71 QAX0792-001Z CRYSTAL X521 X701 QAX0794-001Z QAX0793-001Z CRYSTAL CRYSTAL G201 E,G20 1EX,G 202E, G202 EX G201 E,G20 1EX,G 202E, G202 EX G201 E,G20 1EX,G 202E, G202 EX G201 E,G20 1EX,G 202E, G202 EX G207 EE G201 E,G20 1EX,G 202E, G202 EX STYLE PIN TU1 Local Front board Block No. [0][2][0][0] Symbol No. Part No. Part Name IC661 PT6523LQ IC Q670 Q671 2SB624/4/-X UN2211-X TRANSISTOR TRANSISTOR D630 SML-310LT/MN/-X LED D631 SML-310VT/JK/-X LED D631 LNJ308G81/1-3/X LED D632 SML-310VT/JK/-X LED 3-10 Description Symbol No. Part No. Part Name D632 LNJ308G81/1-3/X LED D633 SML-310VT/JK/-X LED D633 LNJ308G81/1-3/X LED D634 SML-310VT/JK/-X LED D634 LNJ308G81/1-3/X LED D635 SML-310VT/JK/-X LED D635 LNJ308G81/1-3/X LED D636 SML-310VT/JK/-X LED D636 LNJ308G81/1-3/X LED D637 SML-310VT/JK/-X LED D637 LNJ308G81/1-3/X LED D638 SML-310VT/JK/-X LED D638 LNJ308G81/1-3/X LED D639 SML-310VT/JK/-X LED D639 LNJ308G81/1-3/X LED D640 SML-310VT/JK/-X LED D640 LNJ308G81/1-3/X LED D641 SML-310VT/JK/-X LED D641 LNJ308G81/1-3/X LED D642 SML-310VT/JK/-X LED D642 LNJ308G81/1-3/X LED Local G201 E,G20 1EX G202 E,G20 2EX,G 207E E G201 E,G20 1EX Description Local G202 E,G20 2EX,G 207E E G201 E,G20 1EX G202 E,G20 2EX,G 207E E G201 E,G20 1EX G202 E,G20 2EX,G 207E E G201 E,G20 1EX G202 E,G20 2EX,G 207E E G201 E,G20 1EX G202 E,G20 2EX,G 207E E G201 E,G20 1EX G202 E,G20 2EX,G 207E E G201 E,G20 1EX G202 E,G20 2EX,G 207E E G201 E,G20 1EX G202 E,G20 2EX,G 207E E G201 E,G20 1EX G202 E,G20 2EX,G 207E E G201 E,G20 1EX G202 E,G20 2EX,G 207E E G201 E,G20 1EX G202 E,G20 2EX,G 207E E Symbol No. D643 Part No. Part Name SML-310VT/JK/-X LED D643 LNJ308G81/1-3/X LED D644 SML-310VT/JK/-X LED D644 LNJ308G81/1-3/X LED D645 SML-310VT/JK/-X LED D645 LNJ308G81/1-3/X LED D646 SML-310VT/JK/-X LED D646 LNJ308G81/1-3/X LED D647 SML-310VT/JK/-X LED D647 LNJ308G81/1-3/X LED D648 SML-310VT/JK/-X LED D648 LNJ308G81/1-3/X LED D649 SML-310VT/JK/-X LED D649 LNJ308G81/1-3/X LED D650 SML-310VT/JK/-X LED D650 LNJ308G81/1-3/X LED D651 SML-310VT/JK/-X LED D651 LNJ308G81/1-3/X LED D652 NSPW310BS/B2RS/ LED D652 NSPW310BS/BRS/ LED D653 NSPW310BS/B2RS/ LED Description Local G201 E,G01 EX G202 E,G20 2EX,G 207E E G201 E,G20 1EX G202 E,G20 2EX,G 207E E G201 E,G20 1EX G202 E,G20 2EX,G 207E E G201 E,G20 1EX G202 E,G20 2EX,G 207E E G201 E,G20 1EX G202 E,G20 2EX,G 207E E G201 E,G20 1EX G202 E,G20 2EX,G 207E E G201 E,G20 1EX G202 E,G20 2EX,G 207E E G201 E,G20 1EX G202 E,G20 2EX,G 207E E G201 E,G20 1EX G202 E,G20 2EX,G 207E E G201 E,G20 1EX G202 E,G20 2EX,G 207E E G201 E,G20 1EX Symbol No. Part No. Part Name Description D653 NSPW310BS/BRS/ LED D661 D662 MA111-X UDZS5.1B-X SI DIODE Z DIODE C661 C662 C663 C686 C687 NBE20JM-106X NCS31HJ-681X NCB31HK-223X NCB31HK-223X NCB31HK-223X TA E CAPACITOR C CAPACITOR C CAPACITOR C CAPACITOR C CAPACITOR 10uF 6.3V M 680pF 50V J 0.022uF 50V K 0.022uF 50V K 0.022uF 50V K R601 R602 R603 R604 R605 R606 R607 R608 R609 R610 R611 R612 R613 R614 R615 R630 R631 NRSA63J-821X NRSA63J-821X NRSA63J-122X NRSA63J-182X NRSA63J-272X NRSA63J-821X NRSA63J-821X NRSA63J-122X NRSA63J-182X NRSA63J-821X NRSA63J-821X NRSA63J-122X NRSA63J-182X NRSA63J-272X NRSA63J-392X NRSA02J-821X NRSA02J-471X MG RESISTOR MG RESISTOR MG RESISTOR MG RESISTOR MG RESISTOR MG RESISTOR MG RESISTOR MG RESISTOR MG RESISTOR MG RESISTOR MG RESISTOR MG RESISTOR MG RESISTOR MG RESISTOR MG RESISTOR MG RESISTOR MG RESISTOR 820Ω 1/16W J 820Ω 1/16W J 1.2kΩ 1/16W J 1.8kΩ 1/16W J 2.7kΩ 1/16W J 820Ω 1/16W J 820Ω 1/16W J 1.2kΩ 1/16W J 1.8kΩ 1/16W J 820Ω 1/16W J 820Ω 1/16W J 1.2kΩ 1/16W J 1.8kΩ 1/16W J 2.7kΩ 1/16W J 3.9kΩ 1/16W J 820Ω 1/10W J 470Ω 1/10W J R633 NRSA02J-681X MG RESISTOR 680Ω 1/10W J R633 NRSA02J-331X MG RESISTOR 330Ω 1/10W J R637 R639 R641 NRSA02J-821X NRSA02J-331X NRSA02J-331X MG RESISTOR MG RESISTOR MG RESISTOR 820Ω 1/10W J 330Ω 1/10W J 330Ω 1/10W J R643 NRSA02J-471X MG RESISTOR 470Ω 1/10W J R643 NRSA02J-431X MG RESISTOR 430Ω 1/10W J R645 NRSA02J-471X MG RESISTOR 470Ω 1/10W J R645 NRSA02J-431X MG RESISTOR 430Ω 1/10W J R647 NRSA02J-471X MG RESISTOR 470Ω 1/10W J R647 NRSA02J-431X MG RESISTOR 430Ω 1/10W J R649 R650 NRS181J-391X NRS181J-391X MG RESISTOR MG RESISTOR 390Ω 1/8W J 390Ω 1/8W J R651 NRSA02J-471X MG RESISTOR 470Ω 1/10W J R651 NRSA02J-431X MG RESISTOR 430Ω 1/10W J R661 R662 R663 R664 R665 R666 NRSA63J-222X NRSA63J-222X NRSA63J-184X NRSA63J-103X NRSA63J-513X NRSA63J-103X MG RESISTOR MG RESISTOR MG RESISTOR MG RESISTOR MG RESISTOR MG RESISTOR 2.2kΩ 1/16W J 2.2kΩ 1/16W J 180kΩ 1/16W J 10kΩ 1/16W J 51kΩ 1/16W J 10kΩ 1/16W J Local G202 E,G20 2EX,G 207E E G201 E,G20 1EX G202 E,G20 2EX,G 207E E G201 E,G20 1EX G202 E,G20 2EX,G 207E E G201 E,G20 1EX G202 E,G20 2EX,G 207E E G201 E,G20 1EX G202 E,G20 2EX,G 207E E G201 E,G20 1EX G202 E,G20 2EX,G 207E E 3-11 Symbol No. Part No. Part Name Description R667 R668 R670 R671 R672 R686 R687 R688 NRSA63J-103X NRSA63J-103X NRS181J-471X NRSA63J-473X NRS181J-102X NRSA63J-101X NRSA63J-473X NRSA63J-473X MG RESISTOR MG RESISTOR MG RESISTOR MG RESISTOR MG RESISTOR MG RESISTOR MG RESISTOR MG RESISTOR 10kΩ 1/16W J 10kΩ 1/16W J 470Ω 1/8W J 47kΩ 1/16W J 1kΩ 1/8W J 100Ω 1/16W J 47kΩ 1/16W J 47kΩ 1/16W J CJ601 JS686 S601 S602 S603 S604 S605 S606 S607 S608 S609 S610 S611 S612 S613 S614 S615 S616 S617 S618 VMC0335-001 QSW0863-003 NSW0124-001X NSW0124-001X NSW0124-001X NSW0124-001X NSW0124-001X NSW0124-001X NSW0124-001X NSW0124-001X NSW0124-001X NSW0124-001X NSW0124-001X NSW0124-001X NSW0124-001X NSW0124-001X NSW0124-001X NSW0124-001X NSW0124-001X NSW0124-001X PANEL CONNECTOR ROTARY ENCODER TACT SW TACT SW TACT SW TACT SW TACT SW TACT SW TACT SW TACT SW TACT SW TACT SW TACT SW TACT SW TACT SW TACT SW TACT SW TACT SW TACT SW TACT SW 3-12 Local Packing materials and accessories parts list Block No. M 3 M M (KD-G201,KD-G202) P2 A2 A3 A4 A5 A6 A7 A8 P6 A17 P1 A16 P5 P7 P3 A15 KIT:A9 A10 A11A12 A13 P6 P4 A14 P2 A1 (KD-G207) P2 A1 A2 A5 A7 A8 P6 P1 A16 P5 A17 P6 A15 P7 P3 KIT:A9 A10 A11A12 A13 P4 A14 3-14 Packing and accessories Block No. [M][3][M][M] Symbol No. Part No. Part Name A 1 GET0184-001A INSTALL MANUAL A 1 GET0179-001A INST BOOK A 2 GET0184-002A INST SHEET A 2 GET0184-003A INST SHEET A 2 GET0179-002A INSTALL MANUAL A 3 GET0184-005A INSTALL MANUAL A 4 GET0184-006A INSTALL MANUAL A 4 GET0184-007A INSTALL MANUAL A 5 BT-54013-7 WARRANTY CARD Description G201 E,G20 ENG GER FRE 1EX,G DUT 202E, G202 EX G207 ENG RUS EE G201 SPA ITA POL RUS E,G20 2E G201 SWE DAN FIN EX,G2 GRE 02EX G207 EE G201 E,G20 1EX,G 202E, G202 EX G201 E,G20 2E G201 EX,G2 02EX G201 E,G20 1EX,G 202E, G202 EX A 6 VND3050-002 IDENTITY CARD A 7 VND3046-001 SERIAL TICKET A 8 GET0208-002A DEMO MODE SHEET A 8 GET0208-001A DEMO MODE SHT VKZ4027-202 VKH4871-001SS VKZ4328-001 WNS5000Z GE40130-002A FSJB3002-00C GE20137-003A GE20135-004A QAM0175-002 PLUG NUT MOUNT BOLT LOCK NUT WASHER HOOK (x2) HARD CASE MOUNTING SLEEVE TRIM PLATE POWER CORD A10 A11 A12 SCREW PARTS KIT A9 A13 A 9 A 10 A 11 A 12 A 13 A 14 A 15 A 16 A 17 KIT SRW-200J P 1 GE31081-001A CARTON P 1 GE31084-001A CARTON P 1 GE31087-002A CARTON P 2 FSPG4002-001 POLY BAG P 2 FSPG4002-001 POLY BAG P P P P P QPA00801205 FSYH4036-068 QPC03004315P GE10070-002A QPA01003003 POLY BAG SHEET POLY BAG EPS CUSHION POLY BAG 3 4 5 6 7 Local G201 EX,G2 02EX G201 E,G20 2E,G2 07EE (x2) G201 E,G20 1EX G202 E,G20 2EX G207 EE G201 E,G20 1EX,G 202E, G202 EX G207 EE 8cm x 12cm 30cm x 43cm 10cm x 30cm 3-15