1
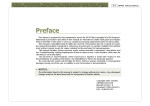
DATA PROJECTOR
VPL-ES4
VPL-EX4
REMOTE COMMANDER
RM-PJ4
SERVICE MANUAL
1st Edition
! WARNING
This manual is intended for qualified service personnel only.
To reduce the risk of electric shock, fire or injury, do not perform any servicing other than that
contained in the operating instructions unless you are qualified to do so. Refer all servicing to
qualified service personnel.
! WARNUNG
Die Anleitung ist nur für qualifiziertes Fachpersonal bestimmt.
Alle Wartungsarbeiten dürfen nur von qualifiziertem Fachpersonal ausgeführt werden. Um die
Gefahr eines elektrischen Schlages, Feuergefahr und Verletzungen zu vermeiden, sind bei
Wartungsarbeiten strikt die Angaben in der Anleitung zu befolgen. Andere als die angegeben
Wartungsarbeiten dürfen nur von Personen ausgeführt werden, die eine spezielle Befähigung
dazu besitzen.
! AVERTISSEMENT
Ce manual est destiné uniquement aux personnes compétentes en charge de l’entretien. Afin
de réduire les risques de décharge électrique, d’incendie ou de blessure n’effectuer que les
réparations indiquées dans le mode d’emploi à moins d’être qualifié pour en effectuer d’autres.
Pour toute réparation faire appel à une personne compétente uniquement.
CAUTION
RISK OF EXPLOSION IF BATTERY IS REPLACED BY INCORRECT TYPE.
DISPOSE OF USED BATTERIES ACCORDING TO THE RULE IN REGION.
VPL-ES4/EX4
Table of Contents
1. Service Information
4. Spare Parts
1-1.
Appearance Figure .......................................................... 1-1
4-1.
Notes on Repair Parts ..................................................... 4-1
1-2.
Board Locations .............................................................. 1-1
4-2.
Exploded Views .............................................................. 4-2
1-3. Disassembly .................................................................... 1-2
1-3-1.
Upper Case Assembly ........................................... 1-2
4-3.
Electrical Parts List ......................................................... 4-4
4-4.
Packing Materials & Supplied Accessories .................... 4-4
1-3-2.
Front Case Assembly and
Sub Rear Case Assembly ...................................... 1-2
1-3-3.
1-3-4.
Main Board ............................................................ 1-3
Tunnel Outlet Section ............................................ 1-4
1-3-5.
1-3-6.
Main Board Bracket Section ................................. 1-4
Lamp Power Supply .............................................. 1-5
1-3-7.
1-3-8.
Power Board .......................................................... 1-5
Optics Section ....................................................... 1-6
1-3-9.
1-3-10.
Detection Switch Board ........................................ 1-7
DC Fan .................................................................. 1-7
1-4.
5. Block Diagram
Overall ............................................................................ 5-1
6. Diagram
6-1.
Frame Schematic Diagram ............................................. 6-1
Warning on Power Connection ....................................... 1-8
2. Electrical Adjustments
2-1.
Initial Values of Adjustment Items ................................. 2-1
2-2.
Memory Structure ........................................................... 2-5
3. Troubleshooting
3-1.
Electric Troubleshooting ................................................ 3-1
3-2.
Power Board Troubleshooting ........................................ 3-3
3-2-1.
3-2-2.
VPL-ES4/EX4
No Power ............................................................... 3-3
Failure of Turn on Lamp ....................................... 3-4
1
Section 1
Service Information
1-1. Appearance Figure
1-2. Board Locations
Main
Thermal sensor
Lamp power supply
Detection switch
IR sensor
Power
VPL-ES4/EX4
1-1
1-3. Disassembly
1-3-1.
Upper Case Assembly
2 Four claws
4 Upper case assembly
3 Remove the upper case assembly from this corner with the
strong force to the extent that the upper case assembly will
not be damaged.
1 Five screws (M 3 x 6)
1-3-2. Front Case Assembly and Sub Rear Case Assembly
Remove the upper case assembly before starting the removal work.
!= Sub rear case assembly
5 Screw
(M 3)
6 Six hexagon
screws
4 Two screws
(M 3 x 6)
9 Remove the upper case assembly from this corner with the
strong force to the extent that the upper case assembly will
not be damaged.
![ Front case assembly
2 Main board
connector (J6)
0 Two claws
1 Lens cap
7 Two screws
(+K 3 x 12)
Sub rear case
assembly
!- Speaker harnesses
1-2
3 IR sensor board
connector (J1)
Sub rear case
assembly
VPL-ES4 VPL-EX4
8 Remove the upper case assembly from this corner with the
strong force to the extent that the upper case assembly will
not be damaged.
Front case assembly
VPL-ES4/EX4
1-3-3. Main Board
Remove the front case assembly and sub rear case assembly before starting the removal work.
1 five screws
(M 3 x 6)
Main board bracket section
2 Remove the main
shield in the direction
of the arrow.
Main shield
Because the harnesses has the shape of flat
cross-section, do not insert the harnesses with
excessive force. Find out the direction in
which the harnesses can be inserted easily,
and then insert the harnesses.
Note:
The fan harness has been secured by the
main board bracket with a fixing screw.
(See section 1-3-5. mein bracket)
Harnesses
J17
J16
3 Main board
Harnesses clamp section
Lamp box assembly
J22
J14 J20
J19 J21 J22
When re-assembling,
give an appropriate
amount of extra slack
of this harnesses.
J25
Main board
J24
Radiation sheet
J18
J23
J6
Main board
VPL-ES4/EX4
1-3
1-3-4. Tunnel Outlet Section
Remove the front case assembly and sub rear case assembly before starting the removal work.
1 Two tapping screws
(PAN 3 x 7)
Lamp box
assembly
J21
J21
Main board
Main board
Because the harnesses has the shape of flat
cross-section, do not insert the harnesses with
excessive force. Find out the direction in
which the harnesses can be inserted easily,
and then insert the harnesses.
2 Tunnel outlet section
Harnesses
Harnesses clamp section
1-3-5. Main Board Bracket Section
Remove the main board before starting the removal work.
2 Three tapping screws
(PAN 3 x 7)
1 Two screws
(M 3 x 6)
Power board
4 Main board bracket section
3 Screw
(M 4 x 6)
1-4
VPL-ES4/EX4
1-3-6. Lamp Power Supply
Remove the main board bracket section before starting the removal work.
9 Lamp power supply
To the main board J16
5 Screw
(+PWH 3 x 8)
B
6 Remove the lamp power supply
connector in the direction of the
arrow A.
A
8 Connector (P1)
7 Remove the lamp power supply in the
direction of the arrow B.
From the Main board CN602
(Red and Black wires)
4 Lamp
1 loosen screw.
3 Loosen two screws.
2 Lamp door
1-3-7. Power Board
Remove the main board bracket section before starting the removal work.
1 Two stand assemblies
CN701
CN603
Power board
CN701
CN603
Lamp power supply (P1)
2 Remove the power board in
the direction of the arrow.
VPL-ES4/EX4
1-5
1-3-8. Optics Section
Remove the lamp power supply and power board before starting the removal work.
1 Two tapping screws
(PAN 3 x 7)
7 Dowel
2 Two claws
A
4 Gasket
6 Two tapping screws
(PAN 3 x 7)
3 Remove the lamp box assembly in the
9 Four screws direction of the arrow A.
(+P 2.5 x 8)
0 Optucs section
5 Harness
8 Focus/Zoom adjust
assembly
Assembling Method of Optucs section and
Focus/Zoom Adjust Assembly
Phase matching
!- Rotate the Zoom dial clockwise
as shown until it is stopped.
During the assembling process,
never change the gear position
that is set by step ![.
!\ Install the Optucs section
in the Lower Case.
!= Rotate the Focus dial
counter-clockwise as
shown until it is stopped.
Focus dial
!; Install the Focus/Zoom
Adjust Assembly as shown.
![ Rotate the Focus dial
counter-clockwise as
shown until it is stopped.
!] Rotate the Focus/Zoom Adjust Assembly
counter-clockwise until it is stopped.
Lower case
!' After installation is completed, verify that the Optucs
section can rotate from the position A to the position
B smoothly.
A
B
1-6
VPL-ES4/EX4
1-3-9. Detection Switch Board
Remove the optics section before starting the removal work.
3 Two tapping screws
(PAN 3 x 7)
5 Tapping screw
(PAN 3 x 7)
6 Detection switch board
4 Duct lamp
1 Tapping screw
(PAN 3 x 7)
CN1
CN1
2 Detection switch board
1-3-10. DC Fan
Remove the optics section before starting the removal work.
1 Two tapping screws
(PAN 3 x 7)
2 Duct LCD assembly
6 Two tapping screws
(M 3 x 25)
3 Two tapping screws
(PAN 3 x 10)
5 harness
4 DC fan
7 DC fan
VPL-ES4/EX4
1-7
1-4. Warning on Power Connection
Use a proper power cord for your local power supply.
The United States,
Canada
Continental
Europe
UK, Ireland,
Australia, New Zealand
Plug type
VM0233
290B
YP-12A
COX-07
_1)
YP332
Connector type
VM0089
386A
YC-13B
COX-02
VM0310B
YC-13
Cord type
SJT
SJT
H05VV-F
H05VV-F
N13237/CO-228
VCTF
Rated Voltage/Current
10A/125V
10A/125V
10A/250V
10A/250V 10A/250V
7A/125V
Safety approval
UL/CSA
UL/CSA
VDE
VDE
DENAN
Cord length (max.)
4.5m (14 feet 9 inches)
VDE
Japan
_
(1) Use an appropriate rating plug which is applied to local regulations.
1-8
VPL-ES4/EX4
VPL-ES4/EX4
0
Off
Blue
Standard
Off
Off
Enter x 4
V Keystone
Image Flip
Background
INSTALL
Lamp Mode
SETTING
High Altitude Mode
Security Lock
Key
All information is
display only
S VIDEO
Picture Memory
INPUT A (Component/VideoGBR)
OFF
Low
High
OFF
80
50
50
50
30
Film
90
60
50
50
60
Film
*
OFF
Mid
85
55
50
50
50
Film
OFF
High
90
60
68
50
50
Film
OFF
Low
90
50
60
50
50
Film
ON
Low
75
50
58
50
30
Film
OFF
High
85
55
50
50
50
Film
OFF
High
90
60
50
50
60
Film
OFF
Mid
75
55
50
50
40
Film
OFF
Low
80
50
50
50
30
Film
*
OFF
High
90
60
68
50
40
Film
OFF
Low
90
50
60
50
40
Film
ON
Low
75
50
58
50
30
Film
OFF
High
75
55
50
50
40
Film
OFF
OFF
Low
30
Film
60
Film
High
80
50
50
90
60
50
*
OFF
Mid
40
Film
85
55
50
OFF
High
40
Film
90
60
68
n
There are some adjustment items that cannot be adjusted, depending on the input signal.
OFF
Low
40
Film
90
50
60
ON
Low
30
Film
75
50
58
OFF
High
40
Film
85
55
50
85
55
80
50
*
Standard
90
60
Game
90
50
Living
60
50
Cinema
85
55
Presentation
ON
ON
ON
ON
ON
ON
ON
Graphics Graphics Graphics Graphics Graphics Graphics Graphics
Mid
High
Low
High
Low
High
High
90
60
Natural
INPUT A (Computer), INPUT B (Computer)
PresenPresenPresenDynamic Standard Natural Game Living Cinema tation Dynamic Natural Standard Game Living Cinema tation Dynamic Standard Natural Game Living Cinema tation Dynamic
VIDEO
MemoryName
* The “Picture Mode” items in the “PICTURE SETTING” menu have their respective initial values for each input signal (PRESET MEMORY No.).
INFORMATION
On
English
Center
On
Panel Key Lock
IR Receiver
Status
MENU Language
SETTING Menu Position
Start Up Image
31
30
On
Off
Auto
Auto
Off
Front &
Rear
Off
Dot Phase
H Size
Shift
Wild Mode
Scan Conv
Adjust Signal
Volume
Contrast
Bright
Color
Hue
Sharp ness
DDE
Gamma Mode
Color Temp
Picture Mode
Adjust Picture
ItemName
Set
Memory
Smart APA
Auto Input Search
Input-A Signal Sel.
SET
Color System
SETTING Power Saving Mode
INPUT
SETTING
PICTURE
SETTING
Menu
Title
2-1. Initial Values of Adjustment Items
Section 2
Electrical Adjustments
2-1
Page
P1-1
CXD9809-page1
Item Name
TGHST Phase Hi
TGHST Phase Lo
SHSH1
TGHST Position
DEHPF On
DEHPF AAC
DEHPF TAP
DEUSC On
3D GammaSubCont
3D GammaSubBrt
DELUT SW
DEUF SW
Set
0
109
38
12
ON
ON
3
OFF
0
150
OFF
ON
P1-2
CXD9809-page2
PC Hi Gain-R
PC Hi Gain-G
PC Hi Gain-B
PC Hi Bias-R
PC Hi Bias-G
PC Hi Bias-B
PC Lo Gain-R
PC Lo Gain-G
PC Lo Gain-B
PC Lo Bias-R
PC Lo Bias-G
PC Lo Bias-B
128
128
128
0
0
0
128
70
100
0
0
0
P1-3
CXD9809-page3
Video Hi Gain-R
Video Hi Gain-G
Video Hi Gain-B
PC Mid Bias-R
Video Hi Bias-G
Video Hi Bias-B
Video Lo Gain-R
Video Lo Gain-G
Video Lo Gain-B
Video Lo Bias-R
Video Lo Bias-G
Video Lo Bias-B
128
128
128
0
0
0
128
70
100
0
0
0
2-2
R
Color
G
B
VPL-ES4/EX4
Page
P1-4
CXD9809-page4
P2
Fan Control
P3-1
CXA7005-page1
VPL-ES4/EX4
Item Name
PC Mid Gain-R
PC Mid Gain-G
PC Mid Gain-B
PC Mid Bias-R
PC Mid Bias-G
PC Mid Bias-B
Video Mid Gain-R
Video Mid Gain-G
Video Mid Gain-B
Video Mid Bias-R
Video Mid Bias-G
Video Mid Bias-B
Temperature 1
Temperature 2
Temperature 3
FanSpeed 1
FanSpeed 2
FanSpeed 3
FanSpeed 4
ManualFanSpeed
Burn-In Cycle
Burn-In Cycle On min
Burn-In Cycle Off min
Burn-In Hour
Burn-In active
Gain-R
Gain-G
Gain-B
SigCen-R
SigCen-G
SigCen-B
SidA-R
SidA-G
SidA-B
SidB-R
SidB-G
SidB-B
Set
128
90
115
0
0
0
128
75
105
0
0
0
R
Color
G
B
Display only
Display only
N/A
Display only
Display only
Display only
Display only
OFF
0
210
30
50
OFF
188
188
188
35
35
35
22
22
22
85
85
85
2-3
Page
P3-2
CXA7005-page2
P4
ADC Calibration
P5
P6
Error Count
2-4
Item Name
Bias-R Normal
Bias-G Normal
Bias-B Normal
Bias-R Flip
Bias-G Flip
Bias-B Flip
Vcom-R Normal
Vcom-G Normal
Vcom-B Normal
Vcom-R Flip
Vcom-G Flip
Vcom-B Flip
RGB Calibrate
YUV Calibrate
RGB Offset
RGB Gain
YUV Offset
YUV Gain
R Offset
G Offset
B Offset
R Gain
G Gain
B Gain
Power Saving Time
System Protect
Data Reset
Hard Reset
ROM Version
Lamp Timer
Operation Timer
Prev. Lamp Timer
SOG Threshold
Set
122
122
122
122
122
122
88
88
88
88
88
88
R
164
93
164
93
Color
G
222
105
222
105
B
164
93
164
93
164
222
164
93
105
93
10
ON
Display only
Display only
Display only
Display only
N/A
All value is display only
VPL-ES4/EX4
2-2. Memory Structure
Set memory
status
memory
Set memory
No.01
No.02
No.03
No.04
No.05
S-Video
Picture
memory
Input-A
Input-B
Component
Computer
W/B
memory
Other than
Computer
Channel
Memory
Input-A
Input-B
Input-A
Component
Input-A
Video-GBR
Video
S-Video
Common
Memory
Wide Mode
(other than computer)
Scan Converter
(Computer only)
Smart APA
(Computer only)
Volume
Auto Input Search
Input-A Signal Sel.
Color System
(Video/S-Video Only)
Speaker
Power Saving
IR Receiver
Panel Key Lock
Status
Language
Menu Position
Image Flip
Background
Lamp Mode
High Altitude
Security Lock
FLASH ROM
VPL-ES4/EX4
No.01
No.02
No.03
No.04
No.05
Video/Svideo
status
memory
No.50
No.55
No.56
No.101
No.102
Video
Set memory
Dynamic
Standard
Natural
Game
Living
Cinema
Presentation
Dynamic
Standard
Natural
Game
Living
Cinema
Presentation
Dynamic
Standard
Natural
Game
Living
Cinema
Presentation
Dynamic
Standard
Natural
Game
Living
Cinema
Presentation
Dynamic
Standard
Natural
Game
Living
Cinema
Presentation
High
Mid
Low
High
Mid
Low
Input-A/Input-B
/Component
Video
S-Video
picture
memory
Input-A
Input-B
Component
Computer
W/B memory
Other than
Computer
Channel
Memory
Input-A
Input-B
Input-A
Component
Input-A
Video-GBR
Video
S-Video
Common
Memory
Wide Mode
(other than computer)
Scan Converter
(Computer only)
Smart APA
(Computer only)
Volume
Auto Input Search
Input-A Signal Sel.
Color System
(Video/S-Video Only)
Speaker
Power Saving
IR Receiver
Panel Key Lock
Status
Language
Menu Position
Image Flip
Background
Lamp Mode
High Altitude
Security Lock
EEPROM
Status memory
No.50
No.55
No.56
No.101
No.102
Dynamic
Standard
Natural
Game
Living
Cinema
Presentation
Dynamic
Standard
Natural
Game
Living
Cinema
Presentation
Dynamic
Standard
Natural
Game
Living
Cinema
Presentation
Dynamic
Standard
Natural
Game
Living
Cinema
Presentation
Dynamic
Standard
Natural
Game
Living
Cinema
Presentation
Picture memory
High
Mid
Low
High
Mid
Low
W/B memory
Channel Memory
Common Memory
CPU RAM
2-5
Memory structure of this model consists of the followings.
1 Set memory
2 Status memory
3 Picture memory
4 Chroma memory
5 W/B memory
6 Channel memory
* The gamma memory is realized by giving offset to the Contrast and Brightness output values to the
devices in the gamma mode function.
Flow of data is described briefly. When the power plug is connected to the wall outlet for the first time
(Standby state), all data that are stored in the internal ROM are written in the NVM (non-volatile memory). When the POWER is turned ON, all the status memory data and other memory data that are required
for the present picture are selected from each memory block and expanded in the internal RAM.
When any adjustment is performed at this moment, the adjustment data (user mode items) are written in
the NVM (Service/Special Service) automatically triggered by the memory operation.
The adjustment items (W/B, Device Adjust) that can be adjusted in the Service Mode or in the Special
Service Mode, are memorized in the NVM at the time when the user performs adjustment and performs
the memory operation. Note that the factory adjustment data will be lost at this moment.
2-6
VPL-ES4/EX4
Section 3
Troubleshooting
3-1. Electric Troubleshooting
Connect the Power
System Standby?
No
1. Check the LED Message and find error.
2. Check lamp door, dust door.
3. Check the power board out voltage 5V.
4. Change main board.
Yes
Power projector
Lamp ON ?
No
1. check the Ballast power and control
signal wire.
2. Check lamp door status.
3. Check lamp status.
Yes
System shut-down
And cooling
Yes
1. Check the LED message and find error.
2. Check the Fan status or Thermal sensor
status.
3. Check the lamp door or dust door.
No
Yes
1. The picture is full-white pattern; please
check the LCD panel connector.
2. The picture is full-black pattern; please
check the LCD driver on the main board.
3. Check the system status: Is system in
burn-in mode?
No Picture ?
No
Picture quality
No good ?
No
Yes
1. The picture a little green, blue, red,
please check the LCD panel connector.
2. The picture has dust, please check the
lens.
3. The picture flicker, please alignment
again.
1
VPL-ES4/EX4
3-1
1
OSD flicker ?
Yes
Please alignment V-com again.
No
Color temp wrong ?
Yes
Please alignment color temperature again.
No
Picture has
Vertical bar ?
Yes
Check the vertical bar color and find the
LCD panel connector. Then check the pin
of connector.
Yes
1. Please check the OSD setting
2. Check the front IR board.
No
IR remote control
No good ?
No
Audio function is
No good ?
3-2
Yes
1. Check the OSD setting.
2. Check the speak wire.
VPL-ES4/EX4
3-2. Power Board Troubleshooting
3-2-1.
No Power
No Power
F601
Open?
No
Check if CN701 inserted
properly.
Yes
Replace Q601 and F601
with new ones, and then
put power board into set.
If Q601 damages again,
check if other parts are
shorted.
Yes
Check if miss to solder
any SMD type of
components.
Q601(D-S)
Short ?
No
Check if 15.25V or 12V
exist. If any voltage is
wrong, replace IC701 or
T602 with new ones.
Yes
Output
5V DC
exists ?
No
Voltage
outputs shut
down and built
repeatly ?
Yes
Check if D602 or IC602 is
broken.
if yes,replace it with now
one.
No
Check LED circuit of
main board.
VPL-ES4/EX4
Check CN701 and find
out if some points are
shorted to gound.
3-3
3-2-2.
Failure of Turn on Lamp
Failure of turn on ballast.
Check if the input
voltage of ballast is
380V DC
Yes
B
No
Lamp
Broken ?
A
Yes
Replace lamp with new
one.
No
Check main board.
No
Control
Pin (SCI) is
normal ?
Yes
Replace ballast with new
one.
3-4
VPL-ES4/EX4
B
No
Check mian board.
Check if there
is PFC_On/Off
signal.
Yes
Check if 18V
exists at c-terminal
of Q603.
No
Check Q701 IC604,
Q604, Q603 or ZD603.
And then replace broken
parts.
Yes
F602 Open ?
Yes
Replace F602 with new
one.
No
A
Yes
Q602 works
normally ?
No
Check ZD602, R655 and
R656.
VPL-ES4/EX4
3-5
Section 4
Spare Parts
4-1. Notes on Repair Parts
1. Safety Related Components Warning
w
Components marked ! are critical to safe operation.
Therefore, specified parts should be used in the case of
replacement.
[WARNHINWEIS]
Les composants identifiés par la marque ! sont
critiques pour la sécurité.
Ne les remplacer que par une pièce portant le numéro
spécifié.
2. Standardization of Parts
Some repair parts supplied by Sony differ from those
used for the unit. These are because of parts commonality and improvement.
Parts List has the present standardized repair parts.
3. Stock of Parts
Parts marked with “o” at SP (Supply Code) column of
the Spare Parts list may not be stocked. Therefore, the
delivery date will be delayed.
Items with no part number and no description are not
stocked because they are seldom required for routine
service.
4. Units for Capacitors, Inductors and Resistors
The following units are assumed in Schematic Diagrams, Electrical Parts List and Exploded Views
unless otherwise specified.
Capacitors
: μF
Inductors
: μH
Resistors
:Ω
VPL-ES4/EX4
4-1
Overall
4-2. Exploded Views
36
38
38
10
41
38
38
32
+PSW 4x8
25
9
+PWH
3x8
12
42
+PSW 3x25
20
38
6
32
32
30
3
1
32
2
13
+P 2.5x8
32
14
32
32
38
33
37
29
4
39
28
30
24
7
+K 3x12
26
+K 3x12
27
VPL-ES4
8
34
22
VPL-EX4
38
+BVTP 3x6
38
21
35
11
15
17
16
4-2
VPL-ES4/EX4
Overall
No.
Part No.
1
2
3
4
6
!
!
!
7
8
9
10
10
!
!
!
SP Description
1-576-973-11
1-576-233-51
1-576-974-11
1-789-603-11
9-885-114-11
s
s
s
s
s
FUSE, CYLINDERICAL (F602)
FUSE (H.B.C.) (F601)
THERMOSTAT
DOOR DETECTION SWITCH BOARD
FAN, DC (AXIAL FAN UNIT)
9-885-114-12
1-787-496-11
1-787-496-21
9-885-114-05
9-885-114-07
s
s
s
s
s
FAN, DC
FAN, DC
FAN, DC
MOUNTED
MOUNTED
11
12
13
14
15
1-789-543-11
1-789-544-11
9-885-114-04
9-885-114-06
9-885-113-91
s
s
s
s
s
MOUNTED CIRCUIT BOARD, IR SENSOR
MOUNTED CIRCUIT BOARD, THERMAL SENSOR
MOUNTED CIRCUIT BOARD, POWER
SPEAKER
LAMP DOOR
16
17
20
21
22
9-885-113-92
2-670-067-01
2-675-465-01
9-885-113-93
9-885-113-94
s
s
s
s
s
DOOR, FILTER
MESH FILTER
ASSY, LAMP BOX
ASSY,FOOT ADJUST RUBBER
FOOT, ADJUST
24
24
25
26
27
9-885-113-95
9-885-114-08
9-885-114-34
9-885-113-96
9-885-114-00
s
s
s
s
s
LENS CAP (VPL-ES4)
LENS CAP (VPL-EX4)
MYLAR BALLAST
LOWER CASE
ASSY, SUB REAR CASE (VPL-ES4)
27
28
28
29
29
9-885-114-33
9-885-113-97
9-885-114-09
9-885-113-98
9-885-114-10
s
s
s
s
s
ASSY,
ASSY,
ASSY,
ASSY,
ASSY,
30
32
33
34
35
2-681-547-02
2-681-550-01
2-681-552-02
2-681-553-01
9-885-114-32
s
s
s
s
s
SCREW,
SCREW,
SCREW,
SCREW,
RUBBER
36
36
37
38
39
9-885-113-90
9-885-113-99
4-672-839-11
3-918-696-11
2-580-621-01
s
s
s
s
s
ASSY, UPPER CASE (WHITE COLOR)
ASSY, UPPER CASE (BLOCK COLOR) (VPL-ES4)
HEAD, M3 FLAT
SCREW (M3X6 LOCK ACE)
SCREW, +PWH 3X10
41
42
!
!
(DC)
(DC)
CIRCUIT BOARD, MAIN (VPL-ES4)
CIRCUIT BOARD, MAIN (VPL-EX4)
SUB REAR CASE (VPL-EX4)
FRONT CASE (VPL-ES4)
FRONT CASE (VPL-EX4)
FOCUS/ZOOM ADJUST (VPL-ES4)
FOCUS/ZOOM ADJUST (VPL-EX4)
TAP PH W/FL M3*27L
TAP PAN M3*7L
EX-HE 4#-40X4+6 STLESS
TAP PAN M2*6L
PAD,ADJUST FOOT
9-885-114-02 s SWITCH,TACT
1-474-023-11 s POWER SUPPLY BLOCK (BALLAST)
7-682-903-21
7-682-954-01
7-685-645-91
7-621-262-40
7-682-250-09
s
s
s
s
s
SCREW, +PWH 3X8
SCREW, +PSW 3X25
SCREW +BVTP 3X6
SCREW, +P 2.5X8
SCREW, +K 3X12
7-682-961-01 s SCREW +PSW 4X8
VPL-ES4/EX4
4-3
4-3. Electrical Parts List
Ref. No.
or Q’ty Part No.
1pc
1pc
!
!
SP Description
1-576-233-51 s FUSE (H.B.C) (F601)
1-576-973-11 s FUSE, CYLINDERICAL (F602)
4-4. Packing Materials & Supplied
Accessories
-------------------SUPPLIED ACCESSORIES
-------------------Ref. No.
or Q’ty Part No.
SP Description
1pc
1pc
1pc
1pc
1pc
1pc
4-4
1-479-775-12
1-832-428-11
2-679-319-01
3-210-513-02
3-100-207-01
!
s
s
s
s
s
REMOTE COMMANDER (RM-PJ4)
CABLE, VGA
BAG,CARRY
CD MANUAL
GUIDE QS MANUAL
(JAPANESE, ENGLISH, FRENCH,
SPANISH, GERMAN, ITALIAN,
SIMPLIFIED CHINESE)
------------ s CORD SET, POWER
(See 1-4. Warning on Power Connection)
VPL-ES4/EX4
Overall
Overall
Section 5
Block Diagram
IR Receiver
IRR5
IRR
IRF5
IRF
IR Receiver
CLK_R
LUMA
S-Video
CHROMA
SDA
EEPROM
Video
SCL
CVBS
WP
PC-RIN1
PC-GIN1
PC-BIN1
INPUT B
INPUT A
Analog RGB
Input/Output
HSYNC2
VSYNC2
Video
Processor
&
Controller
PC-RIN
PC-GIN
PC-BIN
DG[9:0]
Audio A/B
Audio
R
LCD
Drver
RSIG[6:1]
SEN
SCLK
SDATA
RGT
HST
ENB
VCK
VST
DWN
PCG
DCK1_G
DCK1x_G
DCK2_G
DCK2x_G
HCK_G
HCKx_G
CLK_G
DCK1_R
DCK2_R
DCK1_G
DCK2_G
DCK1_B
DCK2_B
DCK[6:1]
DCLK
DHS
DVS
PRG
FRP
VD
G
LCD
Driver
GSIG[6:1]
RGTx
HST
ENB
VCK
VST
DWN
PCG
DCK1x_R
DCK2x_R
DCK1x_G
DCK2x_G
DCK1x_B
DCK2x_B
Audio
Input/Output
&
volume
control
AUDIO_SW
LCDB[11:0]
AUDIO_MUT
CLK_B
27 MHz
AUDIO_VOL1
PRG
FRP
VD
AUDIO_VOL2
AUDIO_O
AUDIO_O_
SENi
SCLKi
SDATAi
B
LCD
Driver
DCK1_B
DCK1x_B
DCK2_B
DCK2x_B
HCK_B
HCKx_B
BSIG[6:1]
LED[4:1]
RGT
HST
ENB
VCK
VST
DWN
PCG
RS232
Driver
Receiver
FG1
Fan 2
Fan 3
Fan 4
Fan4
FG4
Fan 1
Fan5
FG5
Keypad
Input
I2C_SW
FAN_SW
SDA
SCL
Fan2
FG2
Fan3
FG3
RXD
P5VC
P15VP
P12V
P5V
P15VP
P12V
P5V
P15V
Power
Control
P5VC
P135V
+3.3V
REG
P15V
P1P8V
+1.8V
REG
P5V
P2P5V
+2.5V
REG
P3P3V
+3.3V
REG
P33V
+3.3V
REG
P15VP
P2P5V
P5V
POWER_ON
Fan Control
Dust_SW
EEPROM
Dust SW
Door SW
Door_SW
LampLIT
LampEN
Eco_mode
Thermal Thermal
Sensor 1 Sensor 2
A[0:21]
D[0:15]
32.768 KHz
VPL-ES4/EX4
Power
Fail DET
PWR_fail
+3.3V
REG
V33
Ballast
Power
Switch
ROMOEn
RX.DL
LED
Driver
TXD
ROMWEn
TX.DL
B
LCD
BVCOM
BPSIG
SEN
SCLK
SDATA
Speaker
RS-232
Remote
Control
G
LCD
GVCOM
GPSIG
SEN
SCLK
SDATA
LCD_SCL
LCD_SDA
R
LCD
RVCOM
RPSIG
LCDG[11:0]
AUDIO_S
AUDIO_M
PRG
FRP
VD
RGT
RGTx
ENB
HST
VST
VCK
PCG
DWN
HCK_R
HCK_G
HCK_B
HCKx_R
HCKx_G
HCKx_B
HSYNC
VSYNC
HSYNCO
VSYNCO
AUDIO_O+
Audio out
PRG
FRP
VD
LCDRGT
LCDRGTx
LCDENB
LCDHST
LCDVST
LCDVCK
LCDPCG
LCDDWN
HCK
HCK
HCK
HCKx
HCKx
HCKx
DB[9:0]
R_OUT
G_OUT
B_OUT
Monitor
Output
LCD
Timing
Generator
DR[9:0]
HSYNC1
VSYNC1
PC-RIN2
PC-GIN2
PC-BIN2
DCK1_R
DCK1x_R
DCK2_R
DCK2x_R
HCK_R
HCKx_R
LCDR[11:0]
Reset
IC
Flash
memory
Reset
IC
5-1
5-1
P5V
+1.8V
REG
Frame
Frame
Section 6
Diagram
J6
J1
IR
SENSOR
BOARD
6-1. Frame Schematic Diagram
J5
MAIN
BOARD
CN1
DETECTION
SWITCH
BOARD
(RIGHT)
S VIDEO
INPUT
1
J14
J4
VIDEO
INPUT
CN1
DETECTION
SWITCH
BOARD
(LEFT)
J9
AUDIO
INPUT
2
J18
J8
THERMAL
SENSOR
BOARD
AUDIO A/B
INPUT
J1
J2
J23
INPUT
INPUT A
LCD R
J1
INPUT
J24
LCD G
INPUT B
3
J25
J3
LCD B
MONITOR
OUTPUT
J21
FAN2
J10
OUTPUT
FAN2
J19
AUDIO
FAN3
(REAR BOTTOM)
4
J20
J7
REMOTE
FAN4
(REAR TOP)
RS-232C
J22
FAN1(FRONT BOTTOM)
J11
J16
SPEAKER
HALOGEN
LAMP
BALLAST UNIT
5
J17
CN602
CN701
CN601
POWER BOARD
6-1
VPL-ES4/EX4
A
B
C
D
6-1
E
F
G
H
SAFETY CHECK-OUT
After correcting the original service problem,
perform the following safety checks before
releasing the set to the customer :
Check the metal trim, “metallized” knobs,
screws, and all other exposed metal parts for AC
leakage. Check leakage as described below.
LEAKAGE TEST
The AC leakage from any exposed metal part to
earth ground and from all exposed metal parts to
any exposed metal part having a return to
chassis, must not exceed 3.5 mA. Leakage
current can be measured by any one of three
methods.
1. A commercial leakage tester, such as the
Simpson 229 or RCA WT-540A. Follow the
manufacturers’ instructions to use these
instruments.
2. A battery-operated AC milliammeter. The
Data Precision 245 digital multimeter is
suitable for this job.
3. Measuring the voltage drop across a resistor
by means of a VOM or battery-operated AC
voltmeter. The “limit” indication is 5.25 V, so
analog meters must have an accurate lowvoltage scale. The Simpson 250 and Sanwa
SH-63Trd are examples of a passive VOM
that is suitable. Nearly all battery operated
digital multimeters that have a 20 V AC range
are suitable. (See Fig. A)
To Exposed Metal
Parts on Set
0.15 μF
1.5 kZ
AC
voltmeter
(5.25V)
Earth Ground
Fig A. Using an AC voltmeter to check AC leakage.
VPL-ES4/EX4
VPL-ES4 (SY)
VPL-EX4 (SY) E
9-883-627-01
Sony EMCS Corporation
Ichinomiya Tec
English
2007DR16-1
©2007