1
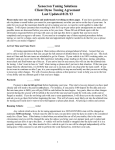
Wisdom of The Forum (OC)
Wisdom of the Forum (WOTF)
This page contains a list of un-official fixes, troubleshooting and cross references for parts from
other makes and models that will work on the 950/990. It is arrainged much like it would be if, once
in awhile, a bunch of seasoned Orange Crush enthusiasts from all over the World got together for
pizza and beer at a pub in the middle of nowhere. Someone wrote the best pearls of wisdom
discussed at these meetings on a napkin. Below are the combined "napkin" notes from many years of
these get-together's. Mind the mess.
Orange = KTM Part Number
Subject Index (click to find your subject)
Or: Use the search function in your browser
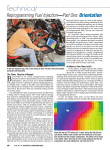
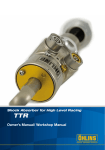
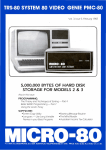
Alarm System: There are two connectors near the top of the airbox on 990 Adventures. One is a
small (white) two conductor plug that connects to a switch for the glovebox lid, and a larger dark
brown or black 14 conductor connector that plugs into the alarm module if you have one. If the bike
isn't equpped with the optional alarm, it will have a dummy plug in the big connector and the small
white connector will be empty (as shown in the image below).
(Photo by AdvPax)
Front wheel drag on the Super Enduro: A number of SE owners have reported problems with severe
front wheel drag. The cause turned out to be an improperly sized inner axle spacer. Take a look at
the thread on Advrider.com for more detail.
file:///C|/Users/John/Documents/My%20Webs/ktm950.info/how/wotf/wotf_pdf.html[4/2/2014 2:59:36 PM]
Wisdom of The Forum (OC)
Lack of an oil tank check valve in the 950 SE and SM: Due to the lower location of the dry sump oil
storage tank on the Super Enduro and Supermotard, compared to the Adventure model, these two
models have no oil tank check valve. The purpose of the valve in the Adventure is to keep the oil in
the storage tank from gravity feeding down into the engine case and submerging the engine internals
when the engine is not running. Due to the lower mounting level of the tank on the SE/SM it will only
empty about 1/2 of its contents into the engine when it is not running. This results in an oil level in
the crankcase of about 1/2 way up the clutch pack. This "extra" oil is easily removed by the oil
suction pump within the first few minutes of operation and causes no adverse effects. One
inconvenience that this does cause the mechanic servicing these engines is that the oil must be
drained before the clutch outer cover is removed to service the clutch pack, or the entire contents
of the oil tank will drain out onto the ground. With the Adventure, the oil need not be drained to
service the clutch as very little oil is carried in the crankcase at any time, due to the check valve.
One advantage of not having a check valve is that the SE/SM are not subject to it failing as has
been the case with some of the early Adventure check valves.
Noisy cam chain:
shawty950: 950/990 Cam Chain Tensioners
60036003000 TIMING-CH.TENS. HYDR.(75YM) 03
uk_mouse: Brand new tensioner length = 48.8 mm
KOTH: See uk_mouse's How-to on the cam chain HERE.
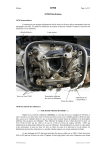
Head2Wind: How this lubrication system works:
1. high pressure pump draws oil from the tank through medium grade screen.
2. output of high pressure pump has a pressure regulator that dumps back into the case, just behind
the clutch basket, so anything that will not go through the filter or is not needed by the engine gets
relieved at this point.
3. output of pump (in parallel to pressure regulator) goes from outside to inside of the main filter,
hence the crushed pleats if filter medium is plugged.
4. passes through filter (hopefully) and into distribution system that goes to crank first, then across
to the other side. Also up to the heads and this is where the pressure sensor is... (back of the
front cylinder, just behind the cam chain tunnel).
5. discharged used lube oil dumps back to bottom sump of engine
6. suction stage of pump pulls oil out of sump of engine through course screen and returns oil to
tank.
7. and the process starts over.....
Kamanya: I have had a noisy engine since day dot. (not to mention numerous other well documented
hassles). Recently I have has some oil issues too. Twice I have been really on it for extended
periods and when I stop and do an oil level check just for peace of mind my oil level has been way
over full when I know that for hundreds of kilometres before it has been sitting where it should?
The clatter has been getting progressively worse and all the numerous threads on cam chains and
cam chain tensioners prompted me to send the bike in for a last time to try get rid of the clatter
under warranty. The noise if I try to define it sounds like cam chain clatter from both front and
rear cylinders coupled with something very faint, more of a ticking up near the front cylinder head.
Personally I was pretty sure that maybe the chains were stretched. The best they could do was
file:///C|/Users/John/Documents/My%20Webs/ktm950.info/how/wotf/wotf_pdf.html[4/2/2014 2:59:36 PM]
Wisdom of The Forum (OC)
replace the cam chain tensioners and apparently prod and poke and give the bike back with no
apparent change in noise level. The mechanic said that he had been advised to by KTM to use a
heavier oil but didn’t have any in the shop. He said he was advised to use Shell Helix 60 weight oil.
Oil developed for older engines. To me this was a cop out as all it was going to do was mask the
symptom. But what can you do?
So, off to our vacation house and yesterday I decided to go and see if I could get hold of any of
the oil he was talking about a try an oil change myself. The shop had some, so back to the bike,
checked the filters and changed the oil, put the left tank back on and started her up. At first it
sounded much better but as the temperatures bars went from zero to 4 bars the racket got worse
than before!? It really didn’t sound good at all. Even my wife who knows nothing about bikes
commented that it was very loud. I felt like taking it out on a ride and making it an insurance
problem.
After a bit of a search on the net, looking for KTM 950 and Shell helix I came across this post;
http://www.advrider.com/forums/showt...ighlight=helix
Taki had experienced exactly the same symptoms as me! This got me to thinking that I must have
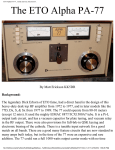
some sort of pump/oil problem and this problem had now been exasperated by the heavier oil.
Checking through the shop manual at the section on servicing the oil pumps – which would be a bitch
to get to as you have to split the cases to get to both of them – I noticed the next bit has a part
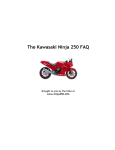
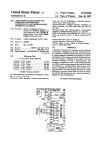
on servicing the oil bypass valve.
This valves function is to keep the oil pressure with engine at operating temperature (oil temperature
100ºC in oil tank) between min. 0,8 bar at 1500 rpm to min 2,4 bar - max 3,5 bar at 6000 rpm.
Also the spring has some tolerances;
Bypass valve Length of spring, unloaded min. 41.5 mm
Spring tension 27 mm at a load of at least 3.5 kg
NOTE: different pistons were installed starting with engine number
2-600-00773. Engines of an earlier make must be converted; see
Technical Information, Chapter 1.
As I didn't take photo's, this is the manuals shot of it. The slot below to the left is where the oil
screen goes and the major bearing above is where the clutch would be.
file:///C|/Users/John/Documents/My%20Webs/ktm950.info/how/wotf/wotf_pdf.html[4/2/2014 2:59:36 PM]
Wisdom of The Forum (OC)
Aha! So, I phoned the mechanic told him of my findings and asked him about this valve. He knew
about it and said that there was a factory order to change the piston on some of the earlier models
and that it was possible to get to the spring if the clutch cover was removed. He said that as I had
just filled the bike with new oil, instead of re-draining the oil that all I had to do was lay the bike
on its left hand side and work from there.
It requires the front exhaust header be removed and the coolant is drained before you start. Once
this is done, you don’t need to take the pump impeller off to get the clutch cover off. You don’t
need to take the outer clutch cover off either it can stay bolted to the main clutch cover. As the
bike is lying on its side getting the circlip and the washer that sits behind the spring without
dropping it into the engine is almost impossible without a shop cloth stuffed under the valve and into
where the oil screen sits.
Getting it out needs right angled pusher circlip pliers that can reach at least 3cm. You cant get the
piston out as it won't clear the case before it is completely clear of the tube it sits in. My spring
was 40.52mm. I stretched it to 47mm and put it back.
Putting it back was a mission of note mostly as there is not much space and it requires 2 more pairs
of hands. All I can say is hold the pliers tight and use the circlip and a finger to push the whole
story home. I buttoned everything back up filled the coolant and ran it up to 4 bars. It seemed to
be great and it was a lot less noisier.
I went for short 50k ride. It is much quieter, not as quiet as some I have heard but a vast
improvement on what I had before. Also the ticking has gone. But a big bonus is that it is noticeably
stronger by far. My beast is back. So, it could be that the Bypass spring gets tired and this is the
cause of a lot of the pressure hassles that manifest in a variety of ways from cam chain and
tensioner issues to over full oil tanks. I would rate the check as a 2 on a scale of 5 as to difficulty
to fix and requires the following if you lie the bike on its side;
Circlip pliers
Antifreeze
Torque wrench for the clutch cover bolts.
Shop cloth
Patience.
file:///C|/Users/John/Documents/My%20Webs/ktm950.info/how/wotf/wotf_pdf.html[4/2/2014 2:59:36 PM]
Wisdom of The Forum (OC)
The Fix: Read about kamanya's final soution and the true cause of his noisey engine. Very
interesting, albeit very rare.
Pyndon: I'm only repeating here what I have said before. Quite simply, in my mind, oil is oil. Use
whatever make you can get your hands on but just ensure that it is the correct specification. As it
happens, I have used Motorex in the bike since day one, for no other reason than I get it at a
reasonable price. I always ran 10W50 until about 60,000miles and I switched to 10W60 to try and
help a more warn engine at hot temperatures. I can almost assure you, from my past experience of
building engined over the years that the engine would have looked exactly the same inside whatever
make of oil you used, providing it as was the right specification.
In the last month I have switched all my motors to Motul as a result of a sponsorship deal and will
run that until the deal comes to an end and then I'll move onto whatever I can get cheapest, well, I
am a Yorkshireman. Like I said, oil is oil, brown and slippy!
Low Oil Pressure:
cpmodem: There are several things that can cause low oil pressure, including but not limited to (in no
particular order of importance):
Clogged oil filter and/or screens.
Sticking check valve in the oil return line.
Tear in the oil return line.
Weak bypass valve spring.
Too low a viscosity of oil.
Too large or missing clutch oil jet.
Worn out oil.
Low oil level.
Also, there is a Tech Bulletin (TB0544) that applies to certain VIN's of 2005 ADV. It refers to
oil jet plugs inside the engine case that can come loose and damage the crankshaft/conrods and
result in loss of oil pressure. You will have to have a dealer check your bike's VIN in the KTM
Dealernet. This is a rare but very serious issue that should have been done at the first service
and is not likely to be your problem, but all 2005 owners should be aware of it, IMNSHO.
Other things like worn bearings and oil pump are unlikely to be issues unless the bike has
excessive miles and/or has been abused (ie: run without an oil filter, etc.).
I suggest checking oil pressure with a gauge, rather than trusting the "idiot light."
Ignition Rotor:
KOTH: It has come to my attention that some folks are doing the Ignition Rotor Tech Bulletin and
not using the proper locking compound on the bolt threads. Loctite "Blue" is not the proper product
for the Freewheel to ignition rotor bolts (6). That is a thread locking product designed for use on
fittings that are meant to be removed fairly easily with "normal" hand tools. The freewheel to rotor
bolt threads and their mating threads in the rotor must be thoroughly degreased, and Loctite 648
"Green" applied. 648 is a Cylindrical Part Bonding Compound for parts that are meant to NOT be
removed. This is the product specified in the KTM Tech Bulletin of 10-14-2004 (0410/39/01-E).
Anything less and you "may" have problems in the future. Here is a link to a good source for Loctite
648, in case you're having trouble finding it:
http://www.greenskyadventures.com/loctite/loctiteCart.htm They are even sometimes out of the
file:///C|/Users/John/Documents/My%20Webs/ktm950.info/how/wotf/wotf_pdf.html[4/2/2014 2:59:36 PM]
Wisdom of The Forum (OC)
product, so stock up when they have it.
Also, if you remove the freewheel from the rotor for any reason, please take care to not reverse it.
The result is that the starter motor will spin, and spin, and spin (whuuuurrrrrrrrr) ... but it will not
engage the engine. 'Nuff said.
Oh, one other thing. If for some reason you didn't do the above Tech Bulletin, or it was done
improperly (ie: using the wrong Locktite product), there is an option to replacing the resulting
damaged/destroyed stator with a new part. Checkout Sakurama's article on rewinding his damaged
stator.
Drive Chain Slack:
cpmodem: Due to the differences in suspension travel of the different years and models, the amount
of slack when on the centerstand will vary. IOW, to get the right adjustment, each bike must be
measured using the "wheel spindle, swing-arm bearing bolt and the front chain-sprocket centerline"
method.
Ask two of your biggest friends to sit on the bike and compress the rear suspension to the point
where the wheel spindle, swing-arm bearing bolt and the front chain-sprocket centerline are all in
line. That is the point of maximum chain tension. Or you can compress the bike's rear end with a
ratcheting tie down. Free up and down movement at the middle of the chain's bottom run should be
about half an inch (13 mm) with the suspension compressed.
Then put your bike up on the centerstand, or sidestand if you don't have a centerstand, and
measure the slack at the midpoint in the chain with reference to the swingarm. Write this
measurement down, then you can easily check your chain without your friends in the future. Many
folks use something they will always have with them for reference, like fingers, hand, tool, block of
wood, etc. so they can make quick checks without digging out the tape measure.
Valve Shims:
kamanya: Download this Excel file: Valve Shim Calculator
paochow: Here are the part numbers for the HD shims (ed:10mm which fit the LC8 engine) for the
common sizes...
Part# Shim size (mm)
18624-01K
18625-01K
18626-01K
18627-1K
18670-01K
18628-01K
18671-01K
18629-01K
18672-01K
18630-01K
18673-01K
18631-01K
18674-01K
18632-01K
18675-01K
18638-01K
2.025
2.075
2.125
2.175
2.2
2.225
2.25
2.275
2.3
2.325
2.35
2.375
2.4
2.425
2.45
2.475
file:///C|/Users/John/Documents/My%20Webs/ktm950.info/how/wotf/wotf_pdf.html[4/2/2014 2:59:36 PM]
Wisdom of The Forum (OC)
18676-01K
18639-01K
18677-01K
18655-01K
18678-01K
18656-01K
18679-01K
18657-01K
18680-01K
18658-01K
18681-01K
18659-01K
18682-01K
18692-01K
18683-01K
18693-01K
18684-01K
18694-01K
18685-01K
18695-01K
18686-01K
2.5
2.525
2.55
2.575
2.6
2.625
2.65
2.675
2.7
2.725
2.75
2.775
2.8
2.825
2.85
2.875
2.9
2.925
2.95
2.975
3
emelgee: Aprillia also use the same size shims in their V-twins, and they do the half intervals as
well.
If you're doing yours for the first time then it's a good idea to pop the cams out and note down the
shim sizes, even if they're within spec.
Next time round just order a set 1 size down from the current sizes before you start work so
you've got them on hand to swap if needed. The clearances usually get smaller as things bed in, so
you're unlikely to need larger shims than the ones in there already.
Engine locking bolt:
Vintage Thumper: If you want the official bolt, it's 0113080802. If you want to make your own,
it's 8mm x 80mm x 1.25mm thread pitch. As Tim said, it has about a 30 degree point on one end,
and is machined for a hex key in the other. But I'm sure a regular screwdriver slot would work too.
Here's a pic...
file:///C|/Users/John/Documents/My%20Webs/ktm950.info/how/wotf/wotf_pdf.html[4/2/2014 2:59:36 PM]
Wisdom of The Forum (OC)
Speedo Re calibration:
jaydee1445: If you change the wheel size on the speedo to 19 in. the speedo will be dead on.
Change the mode to the fuel warning countdown page, then push and hold both the set and mode
buttons for 10 seconds. When the wheel size comes up change it with the mode button to 19 then
press set. Your odometer will be slightly off on the low side but the speed will be right on.
Jump Starting/Charging:
cpmodem: After mounting crash guards, some folks have found it time consuming to get to the
battery terminals on their 950's. The 990's have a handy place to connect a charger to on the right
side beneath the plastic cover above the skid plate. These parts can be added to 950's to give them
the same convenience.
Here's a parts list (you might get by with less, butt this will do the full convert) Prices as of
11/2007:
60111059000
60111097000
60111056000
60111048000
60111048020
60111048035
BATTERY CABLE 250MM 06 6.50 $6.50
GROUND CABLE 100MM06 6.50 $6.50
BRACKET STARTER RELAY 06 18.50 $18.50
POSITIVE POL EXTENSION06 7.00 $7.00
HEXAGON NUT M6 SW=13 L=20 4.50 $4.50
COVER CAP OUTER 06 4.50 $4.50
Total: $47.50
AntWare: You can start the bike by jumping across the starter relay on the lower right side, and
thus bypassing the ignition and solenoid.
Take off the right plastic engine guard, use the plastic handled screwdriver in the toolkit to jump
across the two bolts just above the #3 in the bottom picture.
Make sure the bike is in nuetral, and don't hold the screwdriver on there too long
Good luck
Battery Problems:
Head2Wind: Disconnect the positive lead and then put an amp meter in line. preferable to use a
digital meter. cheap to pick up if you don't have one. with everything turned off there should be no
current showing. disconnect the previous configuration, turn meter to DC volts and check the battery
voltage, should be near 12.7 vdc or so. if it is not, charge for about 12 hours, check voltage right
file:///C|/Users/John/Documents/My%20Webs/ktm950.info/how/wotf/wotf_pdf.html[4/2/2014 2:59:36 PM]
Wisdom of The Forum (OC)
after you take it off the charger, then about one hour after that. let it sit for a week or so
disconnected as described and then check the battery voltage again. if it has dropped significantly
then the battery that you just purchase is also toast. if it is low voltage I would connect the
battery back to the bike, attempt to start it (if not enough, then charge it) then check the running
voltage (charge voltage). it should be 13.5-14.7, if it is 15 vdc or greater then then the regulator
is not functioning correctly. if it is NOT 12.5 or better then either the regulator/rectifier is not
working correctly or the stator/alternator is on the fritz.
The only thing that I have ever found to be a load while "turned off" was a regulator/rectifier that
was faulty. granted this was not a KTM (it was a mid 80s Yamaha-typical poor electronics of the
day)
Hair: The Yuasa YTZ14S MF was built for a Honda product. Since that time the battery as been
OEM specked on other bikes. This battery is only built in Japan. Yuasausa keeps a small inventory on
hand. They don't want to stock to many of them. Because they want to keep the battery fresh. The
battery is shipped from Japan fully charged. If the battery is not cycled that is it is left to sit on
the shelf or in your bike. sulphate crystals build up on a plate. They well eventfully short out a
plate. If you battery is changed it will take and hold a charge. But it no longer has the ability to
produce a current. One of the problems that Yuasa has is that distributors and or sellers of this
battery leave them on the shelf for to long.
KOTH: Check out the chart below as a handy guide to battery condition. Take readings at the
battery terminals. Be sure to let the battery set for >2hrs before taking measurements. Note, our
950/990's OEM Yuasa is a "Sealed VRLA".
Also, be aware that ambient temperatures over 130 deg F (54 Deg C) quickly kill lead acid
batteries.
Here are links to some excellent info on batteries:
YUASA Battery Technical Manual
Also check out:
Battery FAQ
Another Battery FAQ
Finally, Understanding Electricity
file:///C|/Users/John/Documents/My%20Webs/ktm950.info/how/wotf/wotf_pdf.html[4/2/2014 2:59:36 PM]
Wisdom of The Forum (OC)
OEM 950/990 AGM Battery
cyborg: Lightweight Lithium Ion Phosphate 950/990 replacement battery:
Here: http://www.shoraipower.com/p-157-lfx18l1-bs12.aspx
AdvRider Forum Post: Shorai battery for KTM 950/990
KOTH: Here is a chart of several replacement batteries compared to the OEM:
** NOTE ** The Braille Battery has had several Bad reviews from Inmates
Activation Length Width Height CCA* Weight A/H Model
Type
Yuasa
(OEM)
YTZ14S
AGMVRLA
Factory
Interstate
FAYTZ14S
AGMVRLA
Factory
6.00"
3.44" 4.38"
230 8.6 lbs 11.2 Powersports
WPZ14S
AGMVRLA
Factory
6.00"
3.43" 4.38"
250 8.6 lbs 11.2 Koyo
YTZ14S
AGMVRLA
Factory
6.00"
3.44" 4.38"
230 8.6 lbs 11.2
6.00"
3.44" 4.38"
230 8.6 lbs 11.2
Shorai
LiFePO4
LFX18A1Prismatic
BS12
Factory
5.8"
Antigravity LiFePO4
6900
Cylindric
Factory
4.25"
2.6"
4.2"
270* 2.2 lbs 18.0 2.75" 3.75" 360* 2.4 lbs 6.9**
* Note: LiFePo4 batteries have noticeably reduced current flow at sub freezing temperatures.
Therefore, the CCA specs stated above are not realized until the battery has warmed itself up. The
manufacturer suggests turning on the ignition and lights for 4-5 minutes before starting at or below
0 deg F.
** Note: Cylindric design LiFePo4 Batteries have lower amp/hours ratings than the other batteries in
this table. Therefore "may" not be suitable for use where loads sometimes exceed alternator output
more than for a few minutes at a time, or where there is a discharge on the battery when the
engine is not running.
file:///C|/Users/John/Documents/My%20Webs/ktm950.info/how/wotf/wotf_pdf.html[4/2/2014 2:59:36 PM]
Wisdom of The Forum (OC)
For an ongoing discussion of alternate batteries go to this thread on ADVRider.com:
Battery Alternative
cholla: For the longest time I couldn't figure out what was draining my battery. When camping at
high elevations, after a cold night, I'd wake up to a dead battery. Well recently I was doing a valve
adjustment in the garage on a cold morning. When I went to pull the carbs, they were warm. It took
a few minutes to put 2 and 2 together. The carb heaters were wired to my #1 accessory outlet,
which is always hot / on. I just pulled the Acc #1 fuse as a temporary fix till I could address it. I
rewired them to my #2 accessory outlet. Now my battery is holding it's own.
trailtrick: Clock. Some speedo gauges have a bad resistor for the clock and they drag quite o be o
power.
I find this keeping a customer bike here for 2 weeks every 2-3 days the battery was dead,swap
battery same all that after check it twice for hours .
disconect the speedo for a weekend and no issue , rode it and keep it disconect for 3 weeks and no
issue we replace the unit and no more problems since theme ,9 months now
Brakes:
Kawidad: Or the front brakes are the same as the F650, using the same pads.
HellsAlien: On pulsing brakes... The pulsing is due to a warped disk or bent mounting tabs on the
hub. It only takes a couple thousanths of outness for this to become noticable. Yes, this happened
to me and I went thru 2 sets of disks & a bunch of hassle to get it right.
Get ahold of a dial indicator and adjustable base if you can, and check for axial runout of the brake
disks and of the mounting tabs on the hub. Make a jig plate from a piece of strap steel, say 1 X
1/8 X 4, with a hole that will mount to one of the axle pinch bolts. Use this for the dial mag base.
Remove the calipers for this test. I can talk you thru the minutae of doing this test so you get good
results, the devil is in the metrology details!
Axial runout is the deviation from flat plane in the direction of the axle.
This needs to be less than .001" on the hub tabs, and typically less than .002 on the disk. Measure
at disk ID, midspan and near OD.
Find the low points, note as 0 on the disk with a Sharpie, then proceed around noting as +1, +2 in
thousanths. Hopefully, you will find a warped point in the disk. A pulse is typical of a warp in a local
section of the disk that is comparable in span to the brake pad; hence the pad cannot accomodate
the outness over such a short span and it pulses back a the caliper as torque ripple on the brake and
pulsing at the lever.
Demount the disks and do similar to the hub mounting tabs. You need to know if its just the disks or
the hub too. Hopefully they will all be "0", but if not, then the wheel/hub needs to go to Woodys
(or similar) for machine work. They can machine the hub tabs on assembled wheel, and they have
done it before, a few times. I did this last month and it solved my problem.
file:///C|/Users/John/Documents/My%20Webs/ktm950.info/how/wotf/wotf_pdf.html[4/2/2014 2:59:36 PM]
Wisdom of The Forum (OC)
mcmann: If you warp a stock rotor, or need a second set for a 19" front wheel, the 990S floating
rotors work great and cost less. I just received my set of Part# 60109060000 300mm floaters
from cheapcycleparts.com ($122.91 ea).
They also fit the 950SE.
I had a slightly warped stock rotor (stock pads are too hard). I was getting some pulsing.
I added Galfer green brake pads to the front and black Galfer pads to the back (no more squealing).
I think I abused the front stock rotors because of the shrieking rear OEM pads - - - used too
much front braking.
Feels very smooth with great stopping power.
KOTH: The rear floater from the 990 will also retrofit to all 950's. Said to be a cure for the well
documented "rear brake howl." PN 60110060000
KOTH: There was a Tech Bulletin Recall on the rear master cylinder that addressed poor rear brake
performance.
Hydrolock:
WOTF: It doesn't take much liquid in the cylinder to hydolock it. Slightly more than 40cc (1.4 oz)
is all that's required to cause the big twin to lock up. To clear a hydrolock: put bike in 6th gear and
rock backwards. Fuel/water will be pushed out the opening valves. If you've thoroughly submarined
your beloved, you may have to raise the front end high enough so any water in the exhaust system
can run out. You should do this both before and after clearing the cylinders. Be sure to change the
oil and filter ASAP due to the fuel/water leaking past the rings and contaminating the oil. The filter
will swell closed and shut off oil to the bearings, etc. The air filter may have to be replaced
eventually for the engine to run properly (depending on how wet it got), but you should be able to
get back to camp by shaking out as much water as you can and re-installing.
Engine Firing Order:
KOTH: The LC8 engine's piston rods ride on a common crank journal. The cylinders are positioned 75
degrees apart, with cyl #1 being the front cylinder. The engine runs in a ccw direction (observed
from ignition rotor side) and fires as follows:
1. Slightly before (depending on the ignition advance) TDC on the compression stroke cyl #1 fires.
2. 285 degrees of crankshaft rotation later cyl #2 fires (during cyl #1's exhaust stroke).
3. 435 degrees of crankshaft rotation later cyl #1 fires During cyl #2's intake stroke), and the
cycle starts again.
Note: The coils actually fire the spark plugs each time the piston comes to TDC, but the engine only
fires when there is a compressed fuel/air mixture (ie: every other upstroke of the piston.
Cam Specs:
.040" VALVE LIFT
CAM
LOBE CENTER
LIFT (in)
STOCK KTM 990 ADVENTURE 2007/8
DURATION
file:///C|/Users/John/Documents/My%20Webs/ktm950.info/how/wotf/wotf_pdf.html[4/2/2014 2:59:36 PM]
OPEN
CLOSE
OVERLAP
Wisdom of The Forum (OC)
INTAKE
EXHAUST
0.354
0.354
103 ATDC
101 BTDC
224
223
9 BTDC
32 BBDC
35 ABDC
11 ATDC
20
STOCK KTM 950 All
INTAKE
0.386
EXHAUST
0.335
110 ATDC
109 BTDC
231
230
5 BTDC
44 BBDC
46 ABDC
6 ATDC
11
Thanks to BillyD.
LC8 Camshaft Part Numbers (EU/UK/AU models are generally 1 year earlier than USA):
950
600
600
600
600
All
36
36
36
36
Years ADV, SE, SM
010 144 CAMSHAFT
009 144 CAMSHAFT
109 144 CAMSHAFT
110 144 CAMSHAFT
990
610
610
610
610
2005 Super
36 010 044
36 009 044
36 109 044
36 110 044
Duke*
CAMSHAFT
CAMSHAFT
CAMSHAFT
CAMSHAFT
EXHAUST FRONT
INTAKE FRONT
INTAKE REAR
EXHAUST REAR (superseded by 610 36 110 100)
990
610
610
610
610
2006 Super
36 010 144
36 009 144
36 109 144
36 110 144
Duke*
CAMSHAFT
CAMSHAFT
CAMSHAFT
CAMSHAFT
EXHAUST FRONT
INTAKE FRONT
INTAKE REAR
EXHAUST REAR
990
601
601
601
601
2007-2008 ADV
36 010 000 CAMSHAFT
36 009 000 CAMSHAFT
36 109 000 CAMSHAFT
36 110 000 CAMSHAFT
EXHAUST FRONT
INTAKE FRONT
INTAKE REAR
EXHAUST REAR
EXHAUST FRONT (superseded by 600 36 010 200)
INTAKE FRONT
INTAKE FRONT
EXHAUST FRONT
file:///C|/Users/John/Documents/My%20Webs/ktm950.info/how/wotf/wotf_pdf.html[4/2/2014 2:59:36 PM]
Wisdom of The Forum (OC)
990
611
611
611
611
2009-11 ADV,SMT-R, 2007-11 Super Duke**
36 010 000 CAMSHAFT EXHAUST FRONT
36 009 000 CAMSHAFT INTAKE FRONT
36 109 000 CAMSHAFT INTAKE REAR
36 110 000 CAMSHAFT EXHAUST REAR
* Not imported into the USA
** 2009-2011 not imported into the USA
Installing LC8 Cams:
cpmodem: If everything gets FUBAR due to some SNAFU, and the cams all get removed together
for some reason. The cams' positions are marked on their ends. Use something like a chopstick,
dowel or new pencil in the open sparkplug holes to help you see when the pistons are at Top Dead
Center (TDC). You can then poke a pointed object in the locking hole and "feel" for the TDC
indentation in the crankshaft as you rotate the crankshaft CCW and watch the chopstick rise in the
sparkplug hole. Then thread the crank lock tool in to hold it at TDC while you install the cams for
that cylinder. Remember the sparkplugs fire everytime the piston approaches TDC, so the crankshaft
has no idea whether it is on TDC on the Compression soroke or TDC on the exhaust stroke. The
cams are sole determinants of that. Below is a Step-By-Step of the proceedure.
- Bring front piston to TDC and lock the crank with the crank lock tool.
- Set front Exhaust cam (EX FR) in frontmost cam journal with "dot" lined up with edge of the
gasket surface.
- Set front Intake cam (IN FR) in the cam journal next to it with "dot" lined up with edge of the
gasket surface.
- Install cam bridge on front cams and torque to spec.
- Check valve clearances with feeler gauge.
- Remove crank lock tool.
- Rotate engine CCW (as seen from left side of bike) 285 degrees until the rear cylinder comes to
TDC and lock crank.
- Set rear Exhaust cam (EX RE) in the rearmost cam journal with the "cross" lined up with the edge
of the gasket surface.
- Set rear Intake cam (IN RE) in the remaining journal with the "cross" lined up with the gasket
surface.
- Check valve clearances with feeler gauge.
- Remove crank lock tool.
- Rotate through full 720 degrees by hand to make sure nothing hits before firing up.
This proceedure is covered in detail with photos in the Valve Adjustment article elsewhere in the
HOW.
Alternate Sparkplug Tool:
Krust: If they left the wrench out of your tool kit like they did mine, and you would like to find a
wrench that works, but not pay the $70 KTM wants for a new one. You can buy a Yamaha wrench
for $14 that works great. No additional tools required. You can use the 14mm open end wrench
already in the KTM kit (assuming they didn't forget that one in your kit as well).
P/N: 5TA-2814F-00-00
file:///C|/Users/John/Documents/My%20Webs/ktm950.info/how/wotf/wotf_pdf.html[4/2/2014 2:59:36 PM]
Wisdom of The Forum (OC)
Poor running, stalling, missing, cutting out:
rumpus: Intermittent cutting out.This happened to me this summer, and I'll bet you a beer you've
got the same problem I had. The contacts in the ignition switch (which attaches to the bottom of
the ignition lock on the handlebar) become loose over time, causing and intermittent fault.
I spent about 5 weeks trying to diagnose this problem on my 950, and I tested damn near every
electrical part and connector on the bike before finding the source of the malfunction. My solution
was to remove the switch from the bike (it unscrews from the bottom of the ignition lock),
CAREFULLY and PATIENTLY disassemble the ignition switch, and gingerly stretch the springs which
push the electrical contacts together. This operation requires a little delicate persuasion of press-fit
parts, but it'll all go back together just fine if you're careful and take your time. The switch isn't
really designed to be serviced in this way, but I've had mine back together for four months now and
the problem has never resurfaced.
You can also buy the switch from KTM, but it comes as a kit with the lock and key and costs too
damn much. The good new is, if you DO buy a new switch kit, you can install only the switch itself
without the new lock and not have to use a new ignition key.
KOTH: osteo did much the same thing as above with photos. At this link elsewhere in the HOW.
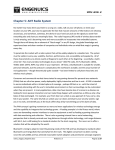
Pyndon: Had a persistant ignition cutout for over 10k miles. Finally found the problem. Check out full
post.
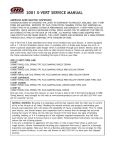
Main relay. Corroded conductor (red arrow). It should provide battery power to the adjacent fuse
holder.
(Image by Pyndon)
KOTH: Below is an image of a good Main Relay (58211058000):
The red arrow in this image points out the questionable conductor as it should look in an undamaged
condition.
file:///C|/Users/John/Documents/My%20Webs/ktm950.info/how/wotf/wotf_pdf.html[4/2/2014 2:59:36 PM]
Wisdom of The Forum (OC)
(Image by bcbiker)
WOTF: Loose (not fully seated) ignition coil(s) can cause poor running (feels like it's running on one
cylinder part of the time).
WOTF: Loose or broken connections at the battery terminals have been found to cause driveability
problems. This should be one of the first checks in any case of poor running as it is easy and costs
nothing.
cpmodem: In the case of a broken ignition switch, lost key, or broken switch wires, it is fairly
simple to "hotwire" the 950 Adventure (2003-2006). In the fuse box inside the glove box, simply
jumper the Acc1 fuse to the Ignition, Headlights, and Instruments fuses (right three). Make up the
jumper ahead of time and keep it on the bike for emergencies. Use a minimum of 2mm (14 AWG)
insulated wire for your jumper. Be sure to connect the right three first. Leave the fuses in place
and your circuits will be protected as usual. There is no additional load on any wiring as the jumper
simply replaces the ignition switch in the circuit. The branch circuits remain un-altered. Jumpering
to the other side (bottom side) will leave the circuits unprotected and may cause smoke to escape
from the wires.
file:///C|/Users/John/Documents/My%20Webs/ktm950.info/how/wotf/wotf_pdf.html[4/2/2014 2:59:36 PM]
Wisdom of The Forum (OC)
KOTH: Improper venting of the carbs can also cause poor running (usually a hesitation/miss/surge in
the midrange). ie: surging in 6th gear at ~70-75 mph. Refer to Canisterectomy for proper venting.
We've even had an Inmate with a 950 that wouldn't pull 6th beyond 4k RPM. "Fell flat on its face."
The problem was carb vents that were terminated inside the airbox (a definite NO-NO). We've seen
more problems with improper carb venting than anything else. Seems folks just can't get their heads
around the fact that simple is best. K.I.S.S.
KOTH: Vacuum leaks. Check the seal between the carbs and the intake manifold. Several folks have
reported torn carb to manifold boots causing popping back through the carbs. Use the following
procedure to install the carbs properly so as to avoid tearing or otherwise damaging the boots:
Insure the rubber grommets are in place in the bottom of the airbox, then insert the airbox
over the intake manifolds.
There are rubber tabs molded into the carb to manifold boots that align the clamps so that they
face the right way to be tightened/loosened through the access panels. Insure the clamps are
engaging the tabs.
Install the carb to manifold boots on the intake manifolds and snug up the manifold clamps.
Many folks don't loosen the carb side clamps enough. There is a lip on the carbs that has to fit
past the clamps.
Seating the rear carb first then the front seems to be the smoothest.
Nothing should have to be forced. Some have sprayed a little silicone into the rubber boot to
help the carbs slide in smoother, but if the clamps are loose enough the carbs will pop in with
very little effort without lubrication.
Watch the boots as you press down on the carbs and make sure that an edge doesn't get folded
under. That is what tears them.
Don't over tighten the clamps. Snug enough so that the clamps resist rotating when gently
pushed is all that's needed.
Also, check all vacuum lines for splits. Especially if you've had someone else do the canisterectomy,
and they didn't follow proper proceedure and plug the un-used vacuum ports in the intake manifolds
with threaded screws (m6x10, 1.0 pitch allen drive screws) and blue locktite. Symptoms are poor
idle (irratic, dying, varying) and popping during closed throttle deceleration.
KOTH: If your bike idles fine at 1400 rpm when cold but stalls at the same rpm when warmed up,
the idle circuit is too rich. Check the Idle Air Mixture Control Screws; they may be turned out too
file:///C|/Users/John/Documents/My%20Webs/ktm950.info/how/wotf/wotf_pdf.html[4/2/2014 2:59:36 PM]
Wisdom of The Forum (OC)
far. Standard setting is 2 to 2.5 turns out from "lightly" seated. If you've changed any jets,
especially the idle or air jets, you will have a different setting. If they haven't been adjusted, and
the stalling started suddenly, check for blocked air jets. They are in the top of the carb under the
air horn. The front one sometimes gets plugged with oil from the crank vent.
KOTH: For more on the subject of jetting this thread has just about everything you need: H2W
Jetting Matrix
WOTF: A pinched wiring harness in the steering stem area has been known to cause intermittent
electrical power failure. This usually manifests itself when the handlebars are turned fully one
direction or the other, but not always. Usually the only way to troubleshoot this is to remove the
protective wrap from the wire bundle and use a vom meter to buzzout each power wire from end to
end working your way toward the steering head. It usually turns out to be a broken wire hidden
beneath its own insulation.
Nillbymouth: I've read all the previous posts on electrical failures with great interest because they
all seem to describe my problem but none have yet come up with a solution for me. Until now I've
had the familiar engine cuts out, dash goes blank for a short time and then without me doing
anything it all springs back to life and doesn't repeat for several days.
So far I've:
Cleaned out the ignition switch contacts.
Checked battery terminals.
Checked 30A fuse and all contacts.
Checked ground cable attached to engine near 30A fuse.
All seem perfectly good.
Then yesterday it cut out while on a fast straight bit of road so I turned the ignition off and on
and that seemed to cure it so I thought it MUST be the ignition switch.
Today something new started to happen - when the indicators are on they intermittently flash
quickly but at least this seems to be happening all the time. This is yet another symptom that
others have experienced.
FIXED! Turned out to be a break in a wire in the loom somewhere around the headstock. I'm not
sure which wire.
mototroy: Just got a my new '07 SE 2 weeks ago. Got to take it out around town yesterday after
work for second time. Made it about 10 miles and ran into problems. The dash goes completely blank
and the engine dies while riding along. Doesn't seem to care what speed or load. Just goes dead. I
just turn the key off and back on, hit the starter and she fires right back up without a hiccup.
Sometimes it would die within 50 feet after taking off or it would last 2 or 3 miles without issue.
But everytime it's a dead dash/engine.
Fixed! ...one last repeat check turned up a poor termination of a wire/connector. The wire belonged
to the small harness coming from the on/off/start-button component on right side. That harness
plugged in to main chassis harness under the headlight mask. It was at this junction that a short
jumper wire had a bad termination. Mr. Z said he tug personnally tugged on that exact wire the
first two go- throughs, but it was the third-times-a-charm time that someone else tugged. Harder
he guesses. Anyway the wire pulled out of the connector block but the bullet stayed. After removing
the bullet, you could see it was crimped but not on any wire. The wire was barely stripped if any at
all. Contact was just butted abd was good until I started riding it and vibration took over. This was
file:///C|/Users/John/Documents/My%20Webs/ktm950.info/how/wotf/wotf_pdf.html[4/2/2014 2:59:36 PM]
Wisdom of The Forum (OC)
surley a factory goof. But after a new termination, everything checked out sano!!
KOTH: Note on the above problem and its fix: I find only one "bullet" connector behind the
headlight mask that has anything to do with the engine ignition. It is BA/BF and it supplies the
ground for the "emergency on/off switch." If the connector was not crimped properly as the above
description states, the emergency on/off switch would not function, but the engine would continue to
run. So, the mechs must have fixed something else in this area. Possibly, more likely, a short that
activated the kill switch relay. Also note that this circuit is only found on the SE.
Robin Webster: I have an 05 950 Adv and hope you can point me in the right direction. When on
rides the electricity supply cuts and the bike is a dead one! Sometimes waiting will allow it to restart
sometimes not. Off and on with the ignition switch sometimes works sometimes not. The battery is
recharged for a week and away it goes for a short time them it happens again. I went on a ride and
was 65 miles in on Saturday when the Tacho went crazy and the speedo told me I was doing 150mph!
The bike slowly ground to a halt and I had a push to the nearest dealer. He put on a new battery
and nothing when we switched on. Recharged my battery, which was strong when tested, and still
blank when switched on. No clicks or wurrs, no lights or display.
Fixed: Looks like it was the Starter Relay - put new one on at £32 and away it goes. I have forded
a few streams and got it caked in mud from time to time so it's corroded and shorted out. Only
been around the block on it, but looks like it's sorted.
KOTH: CorrosionX is your friend. I use this shit on everything. So do offshore oil rig workers and
commercial fishermen. I found out about it on a trip to Alaska.
KOTH: Another fairly rare issue that has come up on occasion is causing poor running. QA at
Mattighofen has let a few fuel tanks get installed on bikes without proper cleaning of the interior.
It seems that there is a white powdery residue left in the tanks during the manufacturing process.
The owner will notice the engine cuts out and runs rough. There will be a white powdery residue down
inside the throat of the carbs. This is a warranty issue, and KTM has covered the necessary work in
the past. The fix is to remove the tanks and flush thoroughly with a nonflammable solvent until all
residue is removed from the tanks. Then the carbs need to be cleaned thoroughly. A product like
Surfoam has worked for some, but removal and disassembly of the carbs may be necessary.
Antware: The crankcase vent dumps into the throat of the forward carb. If the oil tank was
overfilled at the pre-delivery or at the 600 mile service the front cylinder is getting oil dumped into
it causing it to feel as though it is running on one cylinder and possibly smoking out of the right pipe.
HappyGoLucky: Start her up and she runs a little rough. Give her a little throttle (she's still cold)
and backfiring starts ugly. - and I mean ugly. Let her warm up on full choke (which takes away
backfiring) and give her a blip on the throttle. Hardly any backfire. Do the same without choke serious and constant backfire, I can see sparks coming up through rear carb. Stick choke back on,
and rev it, and backfiring seems to stop.
SUCCESS!
I removed all the jets - every single last one of them, all at once
I blew compressed air through every single orifice (except my own) in the carbs
file:///C|/Users/John/Documents/My%20Webs/ktm950.info/how/wotf/wotf_pdf.html[4/2/2014 2:59:36 PM]
Wisdom of The Forum (OC)
I removed floats and reset them (rear float was set lean)
I ran a toothbrush bristle through every single jet
I removed the ACV diaphragm and gave them a clean (though they were fine, but getting rumpled
from the carb cleaner)
I oiled the choke (enrichement) cable - the rear one was moving fine, but rusty
(KOTH: Most likely a clogged Pilot jet circuit. Install a good fuel filter inline folks.)
WOTF: Fuel from the carbs or water from deep water crossings can swell the paper filter element
also, which chokes off the air flow to the carbs and causes rich running (ie: bogging, dying at idle,
poor performance, unable to get to redline).
KOTH: Note: The sidestand switch can also cause intermittent cutouts and stalls (see below).
Pyndon: Popping during overrun (decel in gear). Carb sync was way out. Read the post on ADV.
Zuber: Surging and TPS fOR 950 CARBS - The Throttle Position Sensor, TPS, sets the ignition
advance. The ignition set the advance based on Engine RPM and Throttle Position. This is called a 3D
Map, 1. RPM, 2. TPS, 3. Ign Advance.
When you turn on the ignition, the small computer in the ignition looks for a 'referance voltage' to
determine if the TPS is in range. The voltage should be 0.5-0.6 volts when the throttle is shut. You
should always have the throttle shut when turning on the ignition.
This referance voltage is set at the factory at engine idle. BUT, if the idle is turned down during
the break-in period, then the referance voltage may be wrong! You may need to reset the TPS after
the engine loosens up and the idle position is different. I've seen several 2006 950 Adventures with
a too low voltage of 0.38 v. These had a bad surge around 3000 rpm. Reseting the TPS usually
fixed it without re-jetting.
If the ignition doesn't see this voltage during start up, it may not set the advance correctly and
you'll get a surge between 2000-3800 rpm. This acts just like a lean carb condition. It can be
masked by richening up the carb low speed mixture screws or low speed jets, but you'll get poor
mileage and a weak low rpm throttle response. If the TPS is dirty or worn, you can get the same
erattic behavior.
The workshop manuals show how to set this. I'd recomend to try a resultant voltage very close to,
but below 0.6 v. Check it several times by turning off the ignition and make sure you still have the
same voltage when you turn it back on. Make sure it tracks voltage smoothly as you open/close the
throttle. Any jumps, dead spots or other flaky action means you need a new TPS.
cpmodem: The Throttle Position Sensor (TPS) on the carbureted 950 provides the ECU with the
information it needs to advance the ignition timing at idle and small throttle openings (when the
engine is receiving a lean fuel air mixture). At idle, the mixture is diluted by exhaust gases due to
valve overlap, resulting in a lean mixture. A lean state also exists at steady speeds with low throttle
openings, such as level highway cruising. A lean mixture burns more slowly, thus requiring more
advanced ignition timing in order for the combustion cycle to reach maximum cylinder pressure just
after top dead center. This results in the best efficiency and lowest exhaust gas temperatures.
When the throttle is suddenly opened fully, the mixture enriches. Since rich mixtures burn faster
than lean ones, they require less advanced ignition timing (compared to lean ones) to get the same
maximum pressure and efficiency.
With throttle position information from the TPS, and rpm info from the Pulse Generator, the ECU
file:///C|/Users/John/Documents/My%20Webs/ktm950.info/how/wotf/wotf_pdf.html[4/2/2014 2:59:36 PM]
Wisdom of The Forum (OC)
determines how much spark advance is needed to be added to the internal ignition map for peak
efficiency. If the throttle is suddenly opened fully, the computer uses the built in map (which is
based solely on rpm) and removes the extra timing advance. As rpms climb, advance increases based
on one of 2 maps available (95 ROZ and 80 ROZ). At cruising speeds with small throttle openings,
the ECU uses the TPS info to determine how much extra advance the engine needs for peak
efficiency.
If the TPS is out of calibration, the resulting ignition advance will be unsuitable for the conditions.
The result will either be too much advance for the load, which can lead to preignition and engine
damage. Or to little advance for the load which can result in inefficient combustion and high exhaust
temperatures.
If the TPS is disconnected, the ECU discovers this upon start up and defaults to one of the two
internal maps above. The result is less than optimal ignition under idle and low load conditions. WFO
throttle acceleration will be unchanged. Just idle and low load (ie steady state cruising) conditions
will be effected. Resulting in rough idle and poor throttle response at small throttle openings and
decreased mileage and higher exhaust temps during steady state cruise situations.
KOTH:
Checking the throttle sensor (950 carbed engines only. Injected engines must be checked with the
KTM diagnostic tool or TuneECU):
NOTE: The adjustment must be made in a mounted condition with the cable connected and the
ignition switched on but engine not running. Pull the fuse for the headlights to keep from discharging
the battery too much.
– Use a digital multimeter to measure the voltage between the black and yellow cables at the
connector AM 1 (under the fuse box).
! CAUTION !
SINCE YOU MUST MEASURE WITH THE CONNECTOR ATTACHED, MAKE SURE TO CAREFULLY
PUSH THE MEASURING TIPS ON THE MULTIMETER THROUGH THE SEALING FROM THE CABLE
SIDE AND NOT TO DAMAGE ANY PART OF THE CONNECTOR.
– Reading with closed throttle (neutral position): 0.5 – 0.6 volts
– Slowly open the throttle valve with the throttle grip. The measured voltage should increase
uniformly up to the full load (full throttle) reading.
– Reading with fully opened throttle grip (full throttle position):
3.6 – 3.7 volts
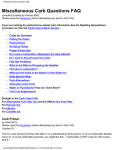
Adjusting the throttle sensor:
HINT: If you drill a small hole in the right side of the airbox directly opposite the lock screw on
the TPS, the carbs don't need to be removed to set it. You can seal the hole with a rubber plug or
file:///C|/Users/John/Documents/My%20Webs/ktm950.info/how/wotf/wotf_pdf.html[4/2/2014 2:59:36 PM]
Wisdom of The Forum (OC)
a piece of tape. See Dusty's image below.
(Image by Dusty)
– Loosen the screw on the throttle sensor (Torx head) and turn the throttle
sensor until you reach the reading for the neutral position.
– Tighten the screw on the throttle sensor.
- Double check the voltage readings, and adjust as needed until in spec.
- Replace the cover in the adjustment hole.
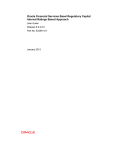
Low Octane Plug: The LC8 engine in the 950/990 KTM Adventures and Super Enduros line have an
11.5:1 compression ratio. It is designed to run on 95 RON premium fuel. The equivilent octane in
the USA is 91 octane (RON+MON)/2. KTM thoughtfully provided a wire under the seat that can be
file:///C|/Users/John/Documents/My%20Webs/ktm950.info/how/wotf/wotf_pdf.html[4/2/2014 2:59:36 PM]
Wisdom of The Forum (OC)
disconnected when the high octane stuff isn't available. It causes the ECU to select a less
aggressive ignition advance curve to prevent preignition. It is supposed to be good for down to 80
RON (77 in the USA).
KTM specifies that only one tank of low octane fuel be used at a time. ie: this is supposed to be for
emergency use only. Not for a way to run less expensive gas as a routine.
cpmodem: I extended the octane wire up to the glovebox so I don't have to remove the seat each
time I need to use it. Red Arrow in below image.
KOTH: On the 990 FI bikes, replace the fuel filter inside the left fuel tank. Be sure you also
replace the filter screen. Note: This screen clogging may also be a sign of manufacturing reside left
in the tanks (see the full story in Fuel tank residue). It comes in the kit with the round filter
61007090000 FILTER-SET FUEL PUMP.
See Dusty's photo article on replacing the 990 filters.
Be sure to have some spare fuel pump o-rings on hand as they are usually damaged during R&R of
the fuel pump.
catalina38: Link to the proper o-rings for 990 fuel pump.
Width = .118"
file:///C|/Users/John/Documents/My%20Webs/ktm950.info/how/wotf/wotf_pdf.html[4/2/2014 2:59:36 PM]
Wisdom of The Forum (OC)
Inside diameter = 2.337"
Outside diameter = 2.573"
Material = Viton
KOTH: With most jurisdictions changing over to the EPA mandated ethanol blends of gasoline, there
has been an ever increasing problem with contaminated fuel clogging fuel filters in all motor vehicles.
This is because ethanol is a good cleaner and removes all of the years worth of gunk built up in the
service station tanks and vehicle fuel systems. Ethanol also deteriorates much faster than gasoline,
leaving behind a nasty residue that clogs and wears automotive fuel systems.
If that wasn't enough, ethanol absorbs water which rusts and corrodes fuel systems and internal
combustion engines. It also attacks aluminum, rubber and some plastics and fiberglass. The 990
injected engine with its internal filters is one of those effected. The filters are there for a purpose
and are of the size they are to protect the fuel injector nozzles. There is also a small filter in the
injector itself, that will become clogged if the pump filters aren't doing their job. It is much harder
to change and requires more disassembly that changing pump filters.
KOTH: If you have just changed the fuel filters on your 990, and it won't start, check that the
wires on the fuel pump itself (inside the tank) didn't get disconnected. Thanks to kirb for this tip.
costamarques: Sometimes when my 990 adv is cold the automatic starter puts the idle at +/- 4500
rpm for about 10 s and then drops it to 1500 rpm before setting the normal idle speed.
It was the battery.
Like others, I've been having problems with the battery for the last two months or so. Since I use
the 990 on a daily basis it was only when I left it parked for 2 or three days that the battery went
dead, and I was forced to bump start it. But last week the battery problem aggravated and also the
idle one so it hit me that the two could be connected and they were. Since I installed a new battery
last Friday the problem with the idle was solved....
Hammer: Ever since I got this bike, when the tanks were filled the left one would overflow out the
front vent. At first, I went to Baja on it, and the short vent hose splashed my leg and gave me a
nasty chemical burn. I cut off part of my Camelback hose and lengthened the vent so it would dump
on the ground. It would happen anytime the fuel could heat soak, and I didn't burn off at least a
gallon as soon as I put it in.
When I rode the CDR, I stopped in Jackson, WY, got lunch, and the restaurant staff shit their
britches cause there was gas leaking on the ground under the bike.
It sat with the sun on the right tank one day and in 45F weather put a lot of gas on the ground.
I'd open the tank, and the left tank would be pressurized and overflowing. WTF?
I did a flapendectomy, problem was still there.
Then I found it. There's a check valve on the vent hose. It will let air in, but not out. If the gas
heats up, vapor pressure forces it across to the left tank, and out the vent on that side.
Removed the check valve, and it's all healed!!!
And it only took a year to track it down....
Bottom line- if you have those f'in check valves on your vent hoses- get rid of 'em!
KOTH: Folks, you need to read and follow the instructions for the Canisterectomy and if needed, the
Flappendectomy located elsewhere in the HOW.
Fuel Injection:
file:///C|/Users/John/Documents/My%20Webs/ktm950.info/how/wotf/wotf_pdf.html[4/2/2014 2:59:36 PM]
Wisdom of The Forum (OC)
These are the latest KTM factory ECU maps (as of 2/06)
KM601US0704501- US market
KM601EU603D01- European market
The following is a basic description of the 990's FI from the Repair Manual:
KOTH: Unlike the carbureted 950's, the Fuel Injected 990's only use the Secondary Air Control
file:///C|/Users/John/Documents/My%20Webs/ktm950.info/how/wotf/wotf_pdf.html[4/2/2014 2:59:36 PM]
Wisdom of The Forum (OC)
(SAS) during warm up to get the CATs up to operating temperature (Light off). The ECU handles the
emissions with info from the Lambda probes (and others) once up to temperature.
During cold start the engine requires a relatively rich mixture for smooth operation. So, the ECU
operates in open loop mode with a fixed fuel map for the first minute or two of engine operation
(depending on info from the temperature sensors) until the Lambda sensors have heated to operating
temperature. By feeding air into the exhaust (secondary air), CO and HC are oxidized through after
burning at temperatures over 600°C to form water and carbon dioxide. The resulting high
temperatures also aid in bringing the CATs up to operating temperature more quickly.
To achieve efficient warm up operation, a high secondary air flow rate must be achieved within the
first few seconds of engine startup, and the air flow rate must be maintained until oxygen sensor
control is in operation. Air flow is maintained by the Secondary Air Control (AKA SAS or SLS). Once
the lambda probes and catalytic converters have reached their operating temperatures, the solenoid
valve cuts off the secondary air flow and the ECU goes into closed loop mode (ie: ECU adjusts AFR
to maintain 14.7:1 ratio).
Air from the SAS during normal operations would result in false readings from the lambda probes.
What a can o' worms that would be to factor into the map.
I see no reason to disable the SAS on the 990's.
Lambda probes:
The lambda probes screwed into the exhaust after each cylinder measure the partial oxygen
pressure in the emission compared to the ambient air, i.e. the sensors compare the oxygen content in
the emission with the fresh air.
A lambda probe basically consists of a ceramic body coated on both sides with a platinum layer. The
platinum layer acts like an electrode. The outer layer comes into contact with the emission, the inner
layer with the ambient air. The ceramic body becomes electro-conductive from a temperature of
approx. 350º C; voltage is generated if the oxygen content between the ambient air (inner
electrode) and emission (outer electrode) varies. The higher the difference in the oxygen level, the
greater the voltage; the lambda probe voltage can lie between 0 and 1 volt in operation. Normally
the lambda probe voltage will fall between 0.2 volt for a lean combustion and approx. 0.8 volt for a
rich combustion.
NOTE:
– For lean mixtures (excess air) only part of the drawn in oxygen is required for combustion; a large
share of oxygen remains in the emission - resulting in a low lambda probe voltage.
– For rich mixtures (air deficiency) almost all of the oxygen is burned; hardly any oxygen remains in
the emission - resulting in a high lambda probe voltage.
The ideal operating temperature for a lambda probe is at approx. 600º C, although up to 950º C is
possible for short durations. To reach the operating temperature as quickly as possible, the lambda
probes used in this motorcycle are equipped with a heater switched on by the control unit.
NOTE: The ceramic body of the lambda probe is very sensitive to shock which is why it is covered
with a slotted sheet-metal sleeve.
The lambda probes used in the LC8 F.I. engines are of the zirconia narrow band type. They are not
designed to be used by the F.I. computer to achieve AF mixtures other than stoichiometric
(14.7:1). Therefore, expecting to use it for tuning the engine map for performance is not practical
file:///C|/Users/John/Documents/My%20Webs/ktm950.info/how/wotf/wotf_pdf.html[4/2/2014 2:59:36 PM]
Wisdom of The Forum (OC)
(nor possible). It is there, for all intents and purposes, only to keep the emissions in check. They
are used only for operation below ~5000 rpm.
Catalytec Converter (CAT):
KOTH: The catalytic converter is installed in the main silencer and transforms most of the main
toxic constituents into non-toxic compounds. It is designed as a three-way catalytic converter and
consists of a coiled metal support whose surface is coated with precious metals such as platinum and
rhodium; the coating only weighs 1 to 2 grams.
Similar to the lambda probe, the catalytic converter is not activated until a temperature of approx.
300º C is reached; it operates best between 400º C and 800º C. Thermal aging accelerates at a
temperature of 800º C. Much higher temperatures occur if the ignition/injection system (e.g.:
ignition faults) malfunctions, which can destroy the catalytic converter. The main constituents in the
emissions are nitrogen (N2, not involved in combustion), carbon dioxide (CO2, the result of complete
combustion) and water or steam (H2O, is bound in the fuel and released during combustion); together
they comprise approx. 90% of emitted exhaust gas and are considered harmless. The rest mainly
consists of carbon monoxide and hydrocarbon (CO and HC, both the result of incomplete combustion)
and nitrogen oxide (NOx, the result of high combustion chamber temperature); all three are toxic.
To effectively convert these 3 components into harmless carbon dioxide, water and nitrogen in the
catalytic converter, the engine must be operated close to lambda 1 (1:14.7 AFR), i.e. the efficiency
of combustion is greatest close to lambda 1. But lambda 1 is almost impossible to achieve by control
engineering, which is why the control unit continuously (several times each second) produces mixtures
alternating between lambda 0.97 (rich mixture) and 1.03 (lean mixture). Under these conditions the
voltage generated by the lambda probe varies between 0.2 volt and 0.8 volt depending on the
exhaust gas composition.
The 15 minute Idle Trick:
Superduke: It seems there's a little confusion about the so called “15 min idle trick”
If the dealer changed the mapping (maybe for a different exhaust) he had also to do the 15 min
idle run. But we don’t want to change the mapping, we only want the EFI to “re calibrate. Because
of the self learning EFI the “actual” parameters of the engine are measured and stored into the EFI
as new basic information, if you do a 15 minute idle run.There is a good information about this in a
document from KTM Sommer.
I will try to translate the most important things you have to do.
Preparation:
Enough gas in the tank !
Do it outside , not in a closed garage and somewhere in the shadow.
You need also a stop watch.
What to do:
The bike must be in a vertical position – so don’t use the side stand for the procedure.
The engine must be cold.
Start the engine and let it idle for 15 minutes.
You are not allowed to use any functions of the bike in this time.
The time must not be less then 15 minutes and not more then 16 minutes.
If the engine stops running during this time, just restart it and let it run for the rest of the time.
Dave Zuber:
The 15 minute idle tip usually misses one very important point. It does nothing without the dealer
file:///C|/Users/John/Documents/My%20Webs/ktm950.info/how/wotf/wotf_pdf.html[4/2/2014 2:59:36 PM]
Wisdom of The Forum (OC)
using the XC1 programming tool to reset the bike’s CPU. This clears out about a dozen registers and
THEN the 15 minute ‘Initialization’ will write back to these registers the learned information. Other
programming tools may reset the CPU in the future, but I know of none that do this now (Feb 2012).
KTM recommends doing an initialization when ever you change or modify components, like spark plugs,
air filters, valve adjusts, or if the bike is moved from sea level to Denver. Riding to Denver will
modify settings as you ride there. Moving it won’t.
Procedure:
Schedule a reset at a local dealer, (it should only take them 15 minutes to hook up the computer and
reset the CPU. )
Haul the bike there so it will be at room temperature.
After the reset, haul the bike home without starting it.
Do the initialization outside because of exhaust fumes.
Have enough gas in the bike.
Sitting it on the center stand is better.
Pull out the blue fuse to turn off the headlight and save electrical power.
Set a fan in front of the bike to help cool it, but the engine needs to get hot enough to start the
radiator fan.
Start the bike and let it idle for at least 15 minutes. Do not touch the throttle. Exact time is not
important.
Shut the ignition off without touching the throttle.
Re-install the fuse.
Ride it.
Engine stalls when clutch is pulled in ~5,000 RPM:
The fuel injection computer shuts off fuel to the injectors when the throttle is closed at 5k and
above. This can cause the engine to stall if the computer doesn't sense the clutch is pulled in at this
time.
Andreas Berner, KTM Factory Rep: "When you pull the clutch, do you have one or more fingers
behind the lever, and what position of the lever adjustment do you use?
Because there is an electrical switch telling the ECU that the driver pulled the clutch lever and with
the lowest position of the lever and a finger between the lever and the handlebar it is possible that
the switch is not activated!
So the ECU doesn´t know that the clutch is open and can not react by giving the engine enought fuel
for idlespeed, this can also cause a stalling engine and is very hard to detect for the dealer,
because there is simply no "failure".
KOTH: You can jumper the clutch switch and "fool" the ECU into thinking the clutch lever is pulled
in, even when it's not. This will keep the ECU from shutting off the fuel during overrun situations
and the bike will no longer suffer from this malady. A side benefit is that the throttle jerkiness so
prevelant in the 990 during off-on throttle transitions will be lessened.
Fuel Injection Tuning With TuneECU:
jetpoweredmonkey: Hey gang, on another thread, a helpful inmate pointed out a freeware EFI (ECU)
reprogrammer called TuneECU. It is 100% free to download, the link is below. To use this software,
file:///C|/Users/John/Documents/My%20Webs/ktm950.info/how/wotf/wotf_pdf.html[4/2/2014 2:59:36 PM]
Wisdom of The Forum (OC)
you will need a USB to OBD2 interface as well as a couple of connectors to build a patch cable in
order to plug it in to the KTM.
I've downloaded the software and ordered the parts to make the adapter cable (the adapter cable
goes from the USB interface to the bike). I am not a tuner, and I don't know anything about
plugging numbers into my ECU to make the bike run better, and I don't know anything about dynos. I
am also absolutely uninterested in finding more power in my 990, because it already has about 60
more HP than I have room to use, most of the time. However, it also has annoying and seemingly
random hesitations that I'd like to be rid of.
That said, I'd like to be able to play around with different maps without the hassle of taking the
bike to the dealer, and the associated hassle of opening my wallet for a five minute operation. I'm
guessing there are some other folks who probably feel the same way. What I'd like to do is collect
up some tunes for experimentation. It looks like the stock and Akro (open exhaust) map tunes are
available here and there on the 'net. Maybe others have had custom tunes built for their bikes on a
dyno (using Tuneboy or some other software). I'd love to get my hands on some of those so I can
compare maps. Whether that will end up doing me any good remains to be seen.
Some possibilities to try (maybe) - "R" tune on a standard bike - '09+ tune on an older bike.
Possible? Dunno yet.
Anyway, once I get this thing up and running, I will be game for some experimenting. I'll keep you
guys posted and if anyone wants to try out a different tune, you are welcome to swing by my place
here in Sacramento and jack in. Not OFF.
The risk here is that the upload will be unsuccessful and turn the very expensive ECU into a brick.
Somewhere I read that this can be reversed using the dealer tool, but in any case I'll do some
homework before I go flashing any bikes, including my own.
Some links:
ADVRider Thread
TuneECU
TuneECU Download Page
USB OBDII interface (or check ebay)
OBDII pigtail
KTM connector
Adjusting 990 idle: Helmet head shows us how to adjust the 990 idle screws.
Improving 990 Throttle Response: This article from the French KTM Adventure Forum describes a
method purported to be used by KTM on bikes they lend to bike test magazines. Preliminary reports
are that it removes the jerkyness from the 990's throttle response. Note this is all unsubstantiated
at this time, so you are on your own (you are anyway) with this one.
Stepper Motor Equivalent:
Bikyto: As you know, ktm only sells the whole throttle body for $1100-1300 depending of where you
get it. Most people that have eliminated all the possible issues with sensors, tps, TB sync, pressure
sensor...etc... And still have erratic idle issues, notability an idle that goes up and down or gets
stuck at a particular rpm.... Are usually left with the need to replace the stepper motor. Well, here
is the part that can replace the stepper motor on our throttle bodies for about $200 or so.
file:///C|/Users/John/Documents/My%20Webs/ktm950.info/how/wotf/wotf_pdf.html[4/2/2014 2:59:36 PM]
Wisdom of The Forum (OC)
Triumph 1050 Speed triple/1050 ST ----- part number T1241182
FI Light:
Hondahawkrider: FI light has come on.. It stays on when in gear - but blinks when it's in neutral..
It's One Long Blink - followed by 7 additional quick flashes.
aurel: According to the manual it's the error code #17 = rear lambda sensor failure.
skritikos: If you have the tank protective bars installed, check the left side clamp that connects
them to the frame. The cable for the rear lamda sensor is passing very close and it is easy to catch
it with the clamp (short circuit, or even cut it).
Hard Starting:
kelly duke 2000: Hi guys, bought a 06 950 with 13,500 miles on it. Started and ran great but never
had the valves adjusted since break in. Took the bike in and had the major service [$700.00] done.
I get it back from the shop and now hot or cold it won't start unless I crank the shit out of it and
add almost full throttle and add choke. Before the service I would choke, crank with no throttle,
and it would start within a half a second.
It was an unconnected vacuum hose under the clutch side fairing by the turn signal connector.
kdscoates: I pinched a vacuum line and she was extremly hard to start but ran good once I started
her!
eduardobibm: Same exact symtoms with my bike when I brought it used. Turned out to be a vacuum
leak. I don't know the proper technical terms but one of the lines coming out of the intake manifold
was open on one end. There are two (obviously) intakes underneather the carbs, with one small line
coming out of each side. Trace these lines and check em. You can get to this with the tanks off.
jsrider: I thought I put my cams back on wrong and had a timing problem (loud backfire; stall)-.
Turned out the grommets that sealed the airbox to the intake manifolds weren't on right.
KOTH: Back to the canister again. If you're too lazy, or stubborn to do a full Canisterectomy, when
your bike "takes a nap" on its side, the canister and carb vent lines become clogged with fuel. The
bike becomes very hard, if not impossible, to start. A temporary fix that may get you started and
back on the trail, is called a Canisterectomy Lite and invoves removing a knurled plug from the
canister drain line. Check out furndogs article for further info. Note: this trick will not fix other
problems caused by the canister, such as pressurized fuel tanks, uneven tank levels, running out of
fuel with one full tank, hydrolock, to name a few.
Starter Interlock Conundrum - 2008 990 Adventure: Follow this link to a description of Hilslamer's
starter interlock box connector discovery.
KOTH: If you have just changed the fuel filters on your 990, and it won't start, check that the
wires on the fuel pump itself (inside the tank) didn't get disconnected. Thanks kirb for this tip.
Neutral Switch Adjustment: So, the neutral light won't stay on when you are in neautral. Sometimes
if you put pressure on the lever in one direction or another with your boot, the light will come on but
goes out again when pressure is released. Sound familiar? Well, a lad over on the British KTM Forum
called "Howz" found a fix for his LC8 with this problem. Thanks to BLUE(UK) for the link:
file:///C|/Users/John/Documents/My%20Webs/ktm950.info/how/wotf/wotf_pdf.html[4/2/2014 2:59:36 PM]
Wisdom of The Forum (OC)
"How lucky am I....!!!
I took off the side stand and undid the cover to the offending item, I could see that the contacts
on the back of the cover looked a bit dirty and worn so rubbed over them lightly with a bit of wet
and dry and then sprayed with contact cleaner, put it all back, it was better but still did not engage
the neutral light all the time, so I took it apart again and had a look at the small stud (mine only
has one) that is in the barrel, I took this out and found it has a spring behind it, so I stretched the
spring just a little bit and then put it all back together again...........IT WORKS!!!"
Sidestand Bypass:
Louge: Connect green and black wires together. http://www.advrider.com/forums/showthread.php?
t=127118
KOTH: On the other side of the connector you need to tie the brown and pink wires together
KOTH: BTW, this doesn't work with the 990's or the 950 SE and SM due to the use of a HAL
effect device on these models. Neither does grounding the pink wire to chassis ground. It will simply
throw a sensor error code (ECU must see 1.0vdc min).
Sidestand: up = 2-3vdc, down = 4-5vdc
See below.
950 SE/SM and All 990's - Sidestand Bypass:
ABYSS: Install the Super Duke sidestand bypass PN 61011046044
cpmodem: Here's another option for any 950/990, including the ADV, SE and SM. A bad diode could
still strand you as these emergency bypasses don't bypass them. However, 99% of the time they will
allow you to get back to civilization with a malfunctioning safety switch/sensor, where you can do a
proper repair.
Ground the green-black wire at the connector for the gear selector switch (#2 in the photo below).
Down in front of the rotor cover on the left side of the engine). This will allow the ECU to provide
ignition to the coils no matter what gear you are in, whether the kickstand is up or down, and clutch
in or out. This will eliminate any possibility of one or more of the "safety" devices malfunctioning and
killing the ignition. It will also allow the starter to work anytime the button is pushed And your green
neutral light will stay on always. But, as I said this is not for "casual" use, but rather for
emergency situations only. Like as a quick and easy way to bypass a failed safety device when one
craps out in the boonies and you just wanna get home.
BTW, arrow #3 in the photo points to the sidestand switch connector where ABYSS's permanent fix
file:///C|/Users/John/Documents/My%20Webs/ktm950.info/how/wotf/wotf_pdf.html[4/2/2014 2:59:36 PM]
Wisdom of The Forum (OC)
is to be made.
KOTH: Another option for bypassing all of the start safety switches/sensors, that doesn't leave the
neutral light on, is to jumper the clutch switch.
On my '03 950 the connector at the clutch switch is a molded piece that is difficult to get off ,and
when you do, you find that it isn't easy to do a good job of jumpering the connectors molded inside
a piece of plastic. For a roadside/trailside fix it is simpler to do the above fix at the neutral
switch. Other models and years have different types of connectors. You'll just have to look at what
you have and decide from there.
However, a sanitary bypass can be done at the clutch switch connector further down the line at the
main wiring loom behind the headlight. You will need to remove the windscreen and headlight unit to
gain good access. Then you should see something like this image if you have and Adventure (SE, SM,
and SD are slightly different locations. See the Repair Manual):
Jumper the brown and yellow wires together. This will make the ECU think that the clutch lever is
pulled back constantly. On 950's this will have the effect of allowing you to start the bike in gear,
with the sidestand down without pulling the clutch in. On the 990's the same effect will be realized
as with the 950's. Additionally, it will effect how the ECU controls the idle speed, and it will disable
the Trailing Throttle Cutoff function.
Driving off with the sidestand down will be a real possibility, with all of the dangers associated with
that. I don't think I have to tell you how dangerous it can be if you start your bike in gear without
the clutch in, or ride off with the sidestand deployed. This (or any of the procedures described)
is/are to be used only as a last resort to keep from being eaten by bears if you breakdown in the
woods.
Electronic Power Control:
KOTH: If you have the Electronic Power Control (EPC) system on your bike (all EU spec bikes
950/990 including early '04 USA), you can disable it by snipping the two wires that tell the ECU
that the bike is in 2nd or 3rd gear. These are the gears in which the EPC limits engine acceleration
file:///C|/Users/John/Documents/My%20Webs/ktm950.info/how/wotf/wotf_pdf.html[4/2/2014 2:59:36 PM]
Wisdom of The Forum (OC)
to comply with European noise regulations. If you are not in Europe you likely don't have any noise
tests to comply with. You will still want to remove the EPC valves from the 950's as they are
subject to malfunctioning even when not connected to electrical. The connector for the gear sensor is
#2 in the above photo.
yellow-brown = 3rd gear
gray = 2nd gear
FastEddy760: Pins Removed for Gear Sensor. It is easy, and this will help take the guess work out
of the process.
1. Left side, follow wires from the gearshift and the side stand sensor (#2 in above photo).
2. Disconnect the plug, and put the side stand end to the side, it fits nicely over the flywheel
cover, and out of the way.
3. You will be working on the end with the gray, yellow/brown, and green/black wires.
4. Use a small jewelers screwdriver inserted into the plug, and a little tension on the wire, to pop
out the female leads for the gray and yellow/brown wires. Leave the green/black wire connector
alone.
5. Cover the wires with shrink tube so they wont ground out.
6. Plug back together so the neutral switch will still work.
Fuel Pumps:
ridewestKTM: Stock pump pressurizes to 2.2 psi at carbs. It draws 1 amp when running (shuts off
when fuel pressure is up). It pumps 23.4 liter/hr. It's 1.875" in diameter and 3.36" long. Has a
vent to the point case (apparently). Brown wire is ground and dark wire is positive.
One other thing, the stock pump doesn't flow thru via gravity - it takes about 1/2psi to push gas
thru it. The Facet 40105 flows easily.
Stock pump. The solenoid coil fires and pulls back a diaphragm sucking in gas, and it does so against
a spring. When pulled back the points open, so the coil is not doing anything. The spring pushes on
the diaphragm and if the carb's are not letting in the fuel it just sets there at about 2 psi. As the
carb's pass fuel the spring pushes the diaphragm and the diaphragm pushes fuel to the carbs. When
the diaphragm has fully discharged that stroke's worth, the points close to refire the coil and draw
back the diaphragm If allowed to flow fuel unrestricted it will suck and discharge 2 or 3 times a
second. But the cycle rate is determined by the usage and the constant volume per stroke.
gefr: The solutions for the fuel pump problem are the following:
1) Facet 40105, correct head pressure 3-4,5 psi, leaks through, needs added check valve. 40104
proved insufficient and 40106 floods the carbs when operating as reported by kawidad. Model 40171
could be THE solution like cpmodem suggested months ago, if it proves sufficient in keeping the
motor well fed, but its head pressure of 2 - 3,5psi is less than 40104 which is 2 - 4psi.
2) Carter , head pressure of 3 - 5,5 psi , leaks through as autostream and jsrider have reported.
Is sold by NAPA as #P74021, needs check valve. Big advantage the fitment in the OEM rubber.
More expensive than the Facet.
3) Airtex E8016S , head pressure of 2,5 - 4,0 psi , no problems have been reported, but very few
believers, so very small specimen. Price reported at $52 by John Graves or $65 according to jameng
with no flooding problems as of today. Fits in OEM rubber. The info given in jameng site is that the
Airtex is a rotational pump. It seems identical to the carter pump so they probably are identical,
both rotational and both flowing through. So they prop ably both need a check valve. Updated post.
All these solid state pumps need a filter to protect them. Cheers.
Pointman0853: The stock pump is a 'demand type'. Here is how it works. Upon start up, the pump
file:///C|/Users/John/Documents/My%20Webs/ktm950.info/how/wotf/wotf_pdf.html[4/2/2014 2:59:36 PM]
Wisdom of The Forum (OC)
cycles on for about 5 seconds, pressurizing the fuel line up to the carbs. Once the line is
pressurized, the pump stays in the 'open' position and stops working (ie: the line is pressurized, we
need no more fuel). As line pressure drops, the diaphragm in the pump collapses and the points make
contact and the cycle repeats. Repeats that is, until the points burn out as in the pics above. Or
you get it wet. Or it just decides you are now in a beautiful natural setting and it doesn't care...
it's just going to take a shite and leave your sorry ass right where you are...
The Facet 40105 is a floating piston pump. Here is how IT works. DC current is applied to an
electronic circuit that converts the DC to AC, which for those of you in Rio Linda, CA. translates to
'Alternating Current'. The Alternating Current is applied to a coil thereby creating an alternating
magnetic field. Inside of this field is a metal 'shuttle piston' that now slides back and forth. A one
way valve in the mechanism makes sure the fuel only goes up to the carbs, which is why there is a
directional arrow on the pump housing. The looseness of the shuttle piston in its bore, insures that
the pressure will not exceed a set amount. The pump just sits and buzzes fuel up to the carbs. all
day long. One moving part, Homer Simpson simple!
Class Dismissed!
Dennis Douglas, Pillar Point Avionics, Inc.: The Facet 40171 pump is the type sold by StoddardHamilton Aircraft , Inc. (360-495-8533) to serve as a transfer pump for transferring fuel from the
auxiliary tanks to the main tanks. The 40171 costs about $54 each. The Facet 40105 and 40106
are sold by numerous suppliers, including Aircraft Spruce and Specialties (800-824-1930 (west);
800-831-2949 (east)), Chief Aircraft (800-447-3408), Wicks (800-221-9425) and others and
typically used in the Zenith and other aircraft for transferring fuel from an aux tank to a header
tank. The 40105/6 pumps cost about $28 to $32 each.
Physically, the 40105 and 40106 are identical. Both Chief Aircraft and Aircraft Spruce picture
these pumps in their catalogs. The 40171 looks slightly different than the 40105 / 40106 models in
that the inlet and outlet ends of the pump are about 1/4 inch longer than the 40105 / 40106 to
accommodate the check and foot valves. (I haven't found any pictures of the 40171.) Functionally,
there is a world of difference between the 40171 and the 40105 / 40106. All three model pumps
have a "lift" capability and can draw fuel from at least 3-feet. All three move the fuel at about 0.5
gal/min, or about 30 gal/h when they are operating.
In the "OFF" state, however, the differences between the pumps become more obvious. At a 30inch head pressure, the 40105 and 40106 pumps have a forward "leak" rate or drain rate of about
15 gal/h. These pumps thus flow freely in the forward direction at about one-half the pumping
rate.... In the reverse direction, the 40105 and 40106 drain backwards at between 0.05 ga/h to
about 0.25 gal/hr, with a mean value over a dozen tests with four different pumps of about 0.1
gal/h. (As a point of reference, 0.1 gal/h is about one drop per second). Compare these numbers to
the 40171 pump, which showed no detectable leakage in the "OFF" state in either the forward or
reverse directions over several hours.
You can identify the model by looking at the mounting tab on the pump. One side of the mounting
slot will be stamped "40" and the other side will be stamped "105", 106" or "171".
KOTH: Numerous model pumps, including the 40171, are available with integrated anti-siphon or
positive shut off valves. This valve prevents the flow of fuel through the pump when the power is
disconnected. They are useful for certain applications where the pump and fuel destination are below
the level of the fuel being pumped. They cannot be used in an application where it is desired to draw
fuel through an un powered pump.
Numerous model pumps are available with integrated check valves. These valves will keep the fuel
lines full between the pump and carburetor when the power is shut off. They provide enhanced lift
file:///C|/Users/John/Documents/My%20Webs/ktm950.info/how/wotf/wotf_pdf.html[4/2/2014 2:59:36 PM]
Wisdom of The Forum (OC)
capability over the standard inlet valves.
cpmodem: No oil pressure cut off switch is required if you connect the new pump (Facet or
whatever) to the existing fuel pump wiring (black-blue and brown). The ECU controls the fuel pump
through the fuel pump relay. The ECU is also what allows the fuel pump to run for a few seconds
when the ignition switch is first turned on, butt the engine isn't running yet. Once the engine is
running, the ECU provides power to the fuel pump relay continuously. When the engine quits running,
the ECU shuts off power to the fuel pump relay, thus keeping the pump from pumping fuel and
creating a hazard in the event of a crash.
The OEM Mitsubishi pumps use a contact point interrupt mechanism to regulate its duty cycles. The
Facet 40xxx series fuel pumps run continuously as long as +12vdc is applied to their inputs. My
40171 draws 740 ma while running.
Facet's oil pressure switch warning is generic for all positive displacement electric fuel pumps 'cuz
many are installed in "non ECU controlled" systems. Also, always install a fuel filter upstream with
these type electric fuel pumps. They have precise clearances that will eventually be damaged by
crud in the fuel system.
slaw: For Facet pumps in the UK: http://www.partsforaircraft.co.uk/
12 VOLT FACET® CUBE FUEL PUMPS
PART
#
POSITIVE
MAXPOSITIVE NEGATIVE FITTING DRY CHECK
SHUTMIN GPH
LEAD
LEAD
SIZE
LIFT VALVE
OFF
PSI
40104
4. 1.5
25
N/A
.25 RING
1/8-27
INT
12
N
N
40105
4.5 3
30
N/A
.25 RING
1/8-27
INT
12
N
N
40106 7. - 4
32
N/A
.25 RING
1/8-27
INT
12
N
N
40107
10. 7
38
N/A
.25 RING
1/8-27
INT
12
N
N
40108
64.5
32
.25
BLADE
.25 RING
3/8
FLARE
12
N
N
40109
74.0
32
N/A
.25 RING
3/8-18
INT
24
Y
N
40135 7 - 4.
32
PACKARD
.25 RING
1/8-27
INT
12
N
N
40136 7 - 4.
32
PACKARD
.25 RING
1/8-27
INT
12
N
N
40137 7 - 4.
32
PACKARD
.25 RING
24
Y
N
3/8-18
file:///C|/Users/John/Documents/My%20Webs/ktm950.info/how/wotf/wotf_pdf.html[4/2/2014 2:59:36 PM]
Wisdom of The Forum (OC)
INT
40138
74.0
32
PACKARD
.25 RING
1/8-27
INT
24
Y
N
40139
4.5 2
23
PACKARD
.25 RING
1/8-27
INT
24
Y
N
40147
94.5
32
.25
BLADE
.25 RING
1/8-27
INT
24
Y
N
40148
4.5 2
24
.25
BLADE
.25 RING
1/8-27
INT
24
Y
N
40163
2.5 1.5
17
.25
BLADE
.25 RING
1/8-27
INT
24
Y
N
40166
39 25
9
175
BULLET
..
1/8-27
INT
..
Y
N
40171
3.5 2
15
PACKARD
.25 RING
1/8-27
INT
12
Y
Y
40176
53.5
19
N/A
.25 RING
1/8-27
INT
36
Y
Y
40177 2. - 1
7
N/A
.25 RING
1/8-27
INT
24
Y
Y
40178
3.5 2
15
N/A
.25 RING
1/8-27
INT
36
Y
Y
40185
11.5 9
32
N/A
.25 RING
1/8-27
INT
36
Y
N
40189
53.5
15
AMP
.25 RING
1/8-27
INT
36
Y
Y
40217
3.5 2
15
.156
BULLET
.25 RING
1/8-27
INT
36
Y
Y
40229
64.5
32
PACKARD
..
1/8-27
INT
12
N
N
40231
11.5 9
25
PACKARD
.25 RING
1/8-27
INT
84
Y
Y
40232
10. 7
34
PACKARD
..
1/8-27
INT
12
N
N
40241
3.5 2
15
.157
BULLET
.25 RING
FEMALE
FLARE
36
Y
Y
40252
1.5 1
6.5
PACKARD 1/8-27
INT
24
Y
Y
40254
41.5
25
N/A
1/8-27
INT
24
Y
N
40257
11.5 9
25
N/A
1/8-27
INT
84
Y
Y
file:///C|/Users/John/Documents/My%20Webs/ktm950.info/how/wotf/wotf_pdf.html[4/2/2014 2:59:36 PM]
Wisdom of The Forum (OC)
Servicing the OEM pump points:
Yogoi: This is what I have done. (remove, open, clean). It easy, and has worked for me.
Drop the skid plate.
Turn off fuel valve.
Pull off the two fuel lines (you can do it without cutting the clamps, but its easier to get rid of
them and put regular hose clamps on).
Unplug, and pull the pump and rubber housing down off the bike.
Unscrew the philips head and pry off the black cap (It might sealed with some type of glue).
You'll see the points. make sure there aligned and the screw that holds them is tight.
Clean them with an electrical spray.
Now the hard part is to get the black cap back on with to "O" ring seated right, and the rubber
ring that seals the hole that the wires go through (you'll see what I mean, and its ok to swear a
few times).
Connect it all back to the bike and enjoy.
Important. Make sure you route the breather tube correctly (the higher the better).
Carburetion:
Head2Wind: When I say 2.5 (which is the stock position) I am saying, thin shim/#2clip
position/thick shim. 3.0 would be #3clip position/thin shim/thick shim ("parking" the .5 shim on top
of the clip has no effect on needle position relative to the slide). In most cases when "going up one
clip on the needle" most people leave the .5 shim under so therefore are really running in a 3.5
position. In very general terms what we are trying to do is get L1 (where the taper starts) and
hopefully L2 if the needle is the correct length (and/or L3 if it is a tri tapered needle) in the best
place for "transitioning" from 100% Pilot/low circuit through to 100% Main circuit. One of the
documents that I reference a lot:
http://picasaweb.google.com/Head2Wind/SlideNeedleMarked
K2M: The problem by fixing that cruse flat spot by lifting the needle is that you introduce way to
much fuel at idle.... off idle. I'm not surprised that she bogs at altitude. She will be down on
power all over the place.
A much better way would be to change out your pilot air leak jet #80 to a #70 or #60 available
from KTM. Experiment!
Sidestand Removal:
WOTF: If you don't have a good aftermarket skidplate that protects the sidestand switch, common
wisdom is to remove the entire sidestand and mount when going offroad. The reason is that if a
hard object is struck with the exposed sidestand and/or mount it is possible to crack the engine
case. Don't go too crazy worrying about the sidestand. It is still strong enough for "normal" usage.
Its not gonna break unless it gets a pretty hard whack in just the right place. If you do a lot of
offroad with hard things that you might smash the bottom of your bike against, definitely relocate
the sidestand or install an isolation bracket and a good skid plate. Its not likely you'll damage the
engine case in any other scenario.
file:///C|/Users/John/Documents/My%20Webs/ktm950.info/how/wotf/wotf_pdf.html[4/2/2014 2:59:36 PM]
Wisdom of The Forum (OC)
Before you remove your sidestand for good take a look at this:
Tip for tire bead-breaking on the 950:
Flanny: I've been meaning to post this for some time, but keep forgetting.
I discovered a trick for breaking the bead on the tubeless scorpions...
Set the wheel down next to your buddies side stand, (A heavy bike like a GS would de very well),
and use the sidestand and bike weight to pry the tire down off the bead ...works like a charm.
If you have a 950 with a centre stand and sidestand, you can do this yourself. With the bike on the
centrestand (and the rear wheel off obviously), take out the sidestand, and use it to pry the bead
down with the weight of the bike ...piece of cake. So...no need to carry bead breakers etc.
Re-installing sidestand springs:
Arch: In the past I've used coins or washers on tough ones. Slide them into the spring's windings
one at a time to slowly expand it out. Once it's the right size and installed on the tangs, take the
coins/washers back out.
Location of the ACC wires:
WOTF: Both are bundled together and zip tied to the fairing support. You don't have to remove the
headlight assembly to access them (as in the photo). They are easily accessed by removing the right
front fairing. ACC1=always on (yellow-red). ACC2=switched with ignition (red-black). Ground wires
are also in the bundle. Later bikes will have the carb heaters connected to ACC2 (also same with
retrofitted carb heaters on the early bikes). Fused with 5amp fuse on early bikes 2003-2004.
Fused with 10 amps on all later bikes and those with carb heaters. Same size wiring (0.5mm) on all
years.
(image by hitmike)
file:///C|/Users/John/Documents/My%20Webs/ktm950.info/how/wotf/wotf_pdf.html[4/2/2014 2:59:36 PM]
Wisdom of The Forum (OC)
Tires and Suspension for Offroad:
Sheep Shagger: Spokes are the same part# between the ADV and SE front wheels, so that means
the hub's (apart from twin disk) are the same, so is the lacing / offset. So no reason why you can't
just use a SE front hoop on the Adventure.
6000907010030 RIM FRONT 2,15X21" BLACK 07 $291.99 - ADV
6300907000030 FRONT RIM 1,85X21"DIRT STAR 06 $241.99 - SE
60009071000 FRONT SPOKE M5X230.5MM 13.5 DEG $4.03 - adv/se
cpmodem: There's a little confusion (don't worry, the pros are confused too) here. The OEM springs
are rated in Newton meters per millimeter (nm/mm). Most aftermarket springs are rated in
Kilograms per millimeter (kg/mm). thus the "slight diff in numbers. You will also note that the OEM
spring is rated at 4.8 nm/mm. The aftermarket springs I use (Eibach) are rated at .52 kg/mm. note
the position of the decimal point. FWIW, the OEM springs tested .46 kg/mm when 2 years old.
Which is lower than spec. See the conversion tables at the bottom of this page.
Factory specification for fork fluid on all LC8 WP forks is SAE 5 weight. Using heavier weight oil
has minimal effect on damping with the cartidge fork valving on these forks. Also, note that
different brands fork oils vary significantly from one another. So if you're looking to tune to the
little subtleties a change in fluid weight will bring out, stick with the same brand.
James Siddall: One of the biggest issues you are likely feeling, is the dynamic imbalance caused by
the spring force difference front to rear. The softness in front with the stock setup sees it getting
low too easily, this steepens the geometry and decreases the effective trail in many situations,
leading to a nervous front feel. The weight she carries ups the stakes in this situation. The valving
in front is also light, allowing the forks to move quickly, increasing the unpredictability. What we
want is a balanced carrying of the entire load, front and rear, with enough hydraulic control to allow
these changes to happen more gradually, allowing the rider sufficient feedback and time to react and
feel comfortable. The stock setup in the rear is quite firm which aggravates the softness in the
front. Your thoughts on changing the weight distribution are all valid and sound, but with a balanced
amount of spring froce you can make the 950/990 into a far better dirt bike than it should have any
right to be.
file:///C|/Users/John/Documents/My%20Webs/ktm950.info/how/wotf/wotf_pdf.html[4/2/2014 2:59:36 PM]
Wisdom of The Forum (OC)
The key thing to consider when setting ones suspension up, is that there is an optimal spring rate, an
optimal amount of damping and an optimal amount of bleed allowed by the clickers. No one one of
these can substitute for the other. When adding spring rate only, One can safely assume the fork
will ride higher in the stroke, and less loading of the tire in this case could lead the front to feel
less planted mid corner. The upside to the increased spring rate is a cure for the lack of spring
force progression inherent in the stock setup, which leads to bad bottoming off road, and overlading
of the front on slab.
If you increase spring rate without revalving to increase rebound, you may find slowing the rebound
clicker to be the best band aid for the increased speed of return the heavier springs create. Bear in
mind it is only a band aid.
The stock setup on the 990 is fundamentally out of balance front to rear.
The adjusters are best thought of as trims to the stock setup. The clickers meter low speed oil flow
most of all, and lack the authority to make a major impact on the overall setting. This is where the
need for revalving arises. Spring balance is also off and is best addressed by adding firmer fork
springs.
Consensus opinion is the the sports settings are the best recourse for spirited riding of the stock
setup.
Fork dive, which the stock setup has an abundance of, is best mitigated by stiffer springs and more
damping. The fork oil level (airgap) has an effect, but more so deep in the stroke. It is an
effective tool to increase bottoming resistance, but more spring and hydraulic force are needed to
get the initial dive under control. The increase in spring force will get the front to ride higher in the
stroke, helping with front feel in the sand and other off road situations. The spring balance in
standard trim is quite firm in the back and quite soft in the front. Stiffer springs and valving in
front are the best way to get your balance back. The improvements are tremendous.
The shock has the same length shaft for both models. The shock travel is set by the length of the
internal top out spacer. KTM parts fiche refers to this as the rebound shim. The bike will need an
appropriate length spring and spacer to match.
Fork Projection:
James Siddall: When you make chassis changes like this, a variety of things happen, but the most
telling change when you increase the fork projection through the triple clamps is that you cause the
rake angle to steepen, and you cuase a corresponding decrease in the trail.
Why would I want to do this you wonder?
Well, when you reduce the trail, you reduce the steering effort , and sharpen the steering
response. At the same time you decrease the amount of feedback from the front tire (because you
have reduced it's self centering tendency).
This can be a positive or negative change depending on where your current setup finds you in the
window of dynamic trail.
Typically a riders experience of a bike with too little trail will be that of the front tire feeling being
a complete mystery up to the point where they tuck the front unexpectedly. Conversely a bike with
too much trail will feel like it can't possibly be leaned over far enough to draw the right arc through
a corner. The front tire will feel unloaded and will not inspire confidence either.
My personal 950 a-ha moment came riding a long slab section down highway one in Baja through the
twisty mountain passes on the sea of cortez side. I was travelling with two other washed up
roadracers and of course we are all hopelessly competetive. On the run into Mulege I struggled to
file:///C|/Users/John/Documents/My%20Webs/ktm950.info/how/wotf/wotf_pdf.html[4/2/2014 2:59:36 PM]
Wisdom of The Forum (OC)
not feel like I would ride off the side of the front tire. Overnight I pushed the forks through
15mm. A big change but enough to be sure of the direction.
Revalation. The next day I had the measure of my buddy who had had the measure of me the day
before.
Do try experimenting with projection and be methodical. You can definitely improve your setup and
suit it to your personal tastes.
Fork Springs & Damping :
MAXVERT: James Siddell who is Super Plush Suspension, and I hear they do awesome suspension
tuning on our bikes sends these fork spring lengths.
'04-'05 485mm
'05.5-'06 465mm which will fit the 990
James Siddell: The short answer is that the springs and the valving do two different and sometimes
complementary things. If you want to (over) simplify things, you could think of it as a case where
the spring force determines the position the suspension will settle to, and the damping determines
the speed it gets there.
As I've said before, increased spring force will make your 950 work better, but not as well as a
respring and revalve, because the lack of spring force is not the only problem with the stock setup.
It lacks sufficient valving to control the wheel.
If you try to compensate for a lack of damping by increasing spring force, you will end up with a
setting that has too much spring, and either rides high, or has no effective rebound control, or
both.
Unfortunately the old school solution of thicker oil was a better solution for damping rod forks, and
even they still needed modification to take advantage of that as the thicker oil increased both
rebound and compression, generally making the rebound too much before the compression came good.
In modern cartridge forks, thicker oil is a bad idea as it cavitates more easily than the thinner oils.
cjracer: The SE springs fit into the 04' "S" forks with out need to modify the hydro stop. The stop
was the same diameter as the one in my 06' "S".
With the SE .59 springs I installed a .850 spacer in the 04', my 06' took .410.
The 04 "S" took about 750cc of oil to fill up 100mm from top.
Antware: Find it impossible to hold the hydro stop up and compress the springs at the same time
while trying to get the spanner on?
Spot ties...
file:///C|/Users/John/Documents/My%20Webs/ktm950.info/how/wotf/wotf_pdf.html[4/2/2014 2:59:36 PM]
Wisdom of The Forum (OC)
Checking Race Sag:
Paul Thede, Race Tech Suspension:
Step# 1 – Extend the forks completely (raise the front wheel off the ground) and measure from the
wiper to the axle. This measurement is called “L1”.
“L1” Front Suspension extended
“L2” Rider on Board, Push Down, Let Up
“L3” Rider on Board, Pull Up, Let Down
Step #2 – Remove the bike from the stand, and put the rider on board in riding position. Get an
assistant to balance the bike from the rear, then push down on the front end and let it extend very
slowly. When the forks stop, measure the distance between the wiper and the axle. Do not bounce
the front forks. This measurement is called “L2”.
Step #3 – Lift up on the front and let it drop very slowly. When the forks stop, measure again. Do
not bounce the suspension. This measurement is called “L3”. L2 and L3 are different due to stiction
in the seals and bushings, which is higher for telescopic forks than for rear shocks.
Step #4 –Halfway between L2 and L3 is where sag would be without drag or stiction. Therefore, L2
and L3 must be averaged and subtracted from L1 to calculate true sag.
Sag = L1 – [(L2+L3)/2]
Fork Seals:
Tim McKittrick: The seals on my 950 began to weep at 6K and I was distraught- I pulled the wipers
down and wiped between the seal and the fork tube with a thin piece of plastic (actually a strip of
file:///C|/Users/John/Documents/My%20Webs/ktm950.info/how/wotf/wotf_pdf.html[4/2/2014 2:59:36 PM]
Wisdom of The Forum (OC)
trimmed 35mm film) and the leak stopped. I now clean them every 5K or so- the bike has 23000 on
it and while I have a new set of seals and all the tools at the ready I don't plan on changing them
any time soon.
Moral: clean the wipers regularly and the seals at every oil change. There is even a notation in the
owners manual to this regard- at least about pulling the wipers down and cleaning them..
James Siddall: If the seals do need changing the later seals are improved 48600399, and if you
want to change the dust wipers as well 48600400
Rear Shock:
WOTF: Once the front forks are tuned for your weight and riding style, the rear shock should be
tuned for the same. Rear race sag should be your starting point. This will help determine the proper
spring. Valving in the PDS shock can be improved to yield a much more compliant ride for improved
traction and control. For the maximum in shock compliance, consider replacing the remote reservoir
piston with a bladder. The piston adds friction and inertia loads that slow the shock's ability to
react to high speed changes such as sharp edged bumps. Many top riders report a much plusher ride
with the bladder compared to the piston. I noticed an immediate improvement in ride over concrete
expansion joints, railroad tracks, and washboard. For more info on tuning your suspension see:
Suspension Basics by James Siddell of Superplush.
Steering Head Bottom Bearing Removal Tip:
YOGOI: I pressed mine out. No problems.
I tried the "remove outer cage and tap down the inside race" trick, but it didn't work. The little lip
that you can tap on easly broke before there was any movement of the race. I had a local machine
shop press out the shaft, and off the bearing comes with it. Then I had them press the shaft back
in. It took him 1 min. it was real easy, and he didn't charge me (tiped him for good Karma). I used
the old race and to tap the new bearing on and all was good.
950 Speedo Problem:
bobhclark: On my last trip the speedo started generating random numbers, then quit altogether. I
found that the cable from the sensor had become frayed from chafing on the fender.
WOTF: Several Inmates have reported the speedo wire breaking up near the handlebar where the
protective sheath ends and the small black cable exits. The break is internal and not obvious upon
visual inspection. To check, wiggle the black wire with the ignition on and watch for random numbers
on the speedo. The three wires can also be checked for continuity with a VOM. The fix is either a
new cable (60014069050, $77 at cheapcycleparts.com), or remove the insulation and repair the
break. Be sure that the black wire is free to move without stress as the speedo cable moves up and
down with front suspension travel.
KOTH: Speaking of the speedo, jaydee1445 came up with the info to access the trip #2 rallye
functions.
"The conector is tie wraped under inst. cluster. I believe it is rectancluar with four wires:brown,
br/yellow, yellow, gr/red.
Brown wire is ground.
Brown to yellow cycles functions.
Brown to Br/yellow increments trip 2 down.
Brown to gr/red increments trip 2 up.
I found a small switch @ radio shack PN 275-1571 that looks like you could get all three to fit"
file:///C|/Users/John/Documents/My%20Webs/ktm950.info/how/wotf/wotf_pdf.html[4/2/2014 2:59:36 PM]
Wisdom of The Forum (OC)
Photo by: cjracer
Speedo/tach jumping around:
ghostdncr: A couple of days ago on my morning ride into work, I noticed my speedometer searching.
It was bouncing around from the approximate 70-75 mph I was traveling to 88, 19, 22, 45, 75, 6,
etc. in very rapid succession. It cleared up after a few minutes and life went on. It did the same
thing yesterday, but only a time or two and then settled right down. What was NOT expected was
losing my entire dash at a stoplight, along with my turn signals, brakelight, basically everything on
the third 10 amp fuse from the right in the glove box. The bike still runs like a scalded cat but
sure enough, the fuse is popped.
Fixed!: Found shorted wires at the speed sensor connector under the headlight.
KOTH: Devices on the same circuit (3rd from right) that can cause similar symptoms to above:
Speed sensor
Tach sensor
Multi-function digital speedometer
Horn
Flasher
Rear brake light-switch
Front brake light-switch
Shorts and opens in the yellow-blue wire in the main wiring harness or the red wire on the other
side of the connector in the device harness can cause erratic displays of the multi-function digital
speedometer and a possible blown 10 amp fuse at the 3rd circuit from the right in the fuse box
(labeled "horn, brakelight, speedo").
Common locations to look first:
Rear brake light switch wire harness where it passes near the right exhaust pipe close to the
rear brake master cylinder.
Check crimps at the connectors to each of the devices listed above. The factory has a known
file:///C|/Users/John/Documents/My%20Webs/ktm950.info/how/wotf/wotf_pdf.html[4/2/2014 2:59:36 PM]
Wisdom of The Forum (OC)
problem with connector installation QC.
Overheating:
Low coolant level in radiator
Poor quality coolant
Radiator fins clogged/damaged
Driving too slow or too high gear
Fan thermostat b/o
Poor quality fuel w/ hi-octane wire connected
Fan wire disconnected
Fan fuse blown
Radiator cap not holding pressure
Air in system
Water pump impeller shaft not moving/dis-engaged (ie:circlips missing)
cpmodem: My cooling system maintenance schedule:
Flush cooling system on 950 Adventures ASAP.
Replace the coolant and radiator cap every 2 years or 10,000 miles (whichever comes first) along
with a proper system flush.
Replace all hoses and clamps every 4 years or 40,000 miles (whichever comes first).
Replace thermostsat every 5 years or 50,000 miles (whichever comes first).
Note: Use distilled water as a minimum (de-ionized is the best) if you mix your own coolant or have
to add on the road.
Note2: The above miles/years are maximums and may need to be decreased in case of extreme
conditions (ie: garaged in smoggy or otherwise high ozone environments). In any case, a visual
inspection (including coolant testing) should be made at every oil change.
crwmac: In my experience with two 950's it is not uncommon for the radiator cap, even a new one,
not to allow coolant to be sucked back into the radiator as the radiator cools. What is happening in
lieu of that is that the radiator hose on the left side collapses as the coolant cools, contracts, and
creates suction. As the coolant heats back up to operating temp and expands, the hose expands
again to accommodate.
You can check to see if this is what is happening. When the bike is cold (let it sit overnight) take
the left side cover off and see if the hose is collapsed. An additional check is to see if you get a
swoosh of suction when you remove the radiator cap. If this is the case, I would try yet another
cap.
Apparently there is not much difference between the negative pressure required to collapse the hose
and the pressure required to suck coolant out of the reservoir. If the cap requires a little more
negative pressure than needed to collapse the hose, then you get a collapsed hose. You could
probably continue to operate that way as you suggest but I don't know what affect that will have on
the hose in the long run. I suppose that would weaken it. Regardless, that's just not the way it is
supposed to work.
I ride in the very HOT conditions of Texas (and Mexico, and New Mexico, and Colorado, and Utah)
:-). I have found that after a coolant change, done by the book with the front end raised, you will
still have a bit of air in the system. This bit of air doesn't cause much of a noticeable issue until
you are in the worst of hot conditions, say 90+ degrees F in desert sand. I have found that burping
the cooling system twice does the trick. I fill the coolant by the book and ride around for awhile to
get the bike heated up with the fan cycling. Then I come home, let her cool off, and raise the
file:///C|/Users/John/Documents/My%20Webs/ktm950.info/how/wotf/wotf_pdf.html[4/2/2014 2:59:36 PM]
Wisdom of The Forum (OC)
front end for another burp at the radiator bleed screw and cap. I always find a blub of air in there
on the second burp. Without the second burp, I can count on seeing six bars in the desert. With
the second burp, I never see more than five bars. I suspect that riders in cooler climates never
noitice the difference.
I too was considering how to mount a second fan before I figured this out.
Hope this helps,
uk_mouse: The water pump is driven by the balance shaft. As the balance weights have to move in
sync with the pistons, the balance shaft has to rotate at the same speed as the crank. So pump
RPM = crank RPM. 20 psi is about right, the radiator cap says "1.4 bar" on the top.
KOTH: Bleeding (burping) the Cooling System:
BobbyC: Alternative burping method - "I bled the system from the upper bleed screw at the water
pump. Then I squeezed the 1" diameter hose on the left side going into the radiator until most of
the air was pushed out. You might have to squeeze this hose 10+ times. Fill some more and close the
radiator cap. Fill the reservoir to the max line and start the bike. Run it until the fan comes on and
bleed from the bleed screw on top of the radiator. There should be very little air from this. I
thought there was still some air in the system so I went for a slow ride around town. When I got
back, there was a 1/4 of the coolant in the reservoir tank that was sucked back into the system. I
topped it off and kept an eye on it for the next few rides."
Water pump tube alignment:
Louge: I've replaced O rings twice in 2500 miles. The second time I packed the area between the O
rings with waterproof lithium grease. The grease was held under compression and worked for awhile
file:///C|/Users/John/Documents/My%20Webs/ktm950.info/how/wotf/wotf_pdf.html[4/2/2014 2:59:36 PM]
Wisdom of The Forum (OC)
before the familiar drip reappeared.
I was about to replace them again when I noticed the angle on the tube didn't align with the water
pump body. All of the O ring's tolerance is consumed due to poor alignment. The full story is
here:http://www.advrider.com/forums/showthread.php?t=138475
Water Pump Rebuild Tips:
HellsAlien:
1) suggest you drain the engine sump, pull the sump screen, then proceed with bike on sidestand. You
wont get enuff drainage to matter, half-qt depending how long bikes been sitting around. Drain
coolant first.
2) Suggest you not use lube on the OD. Heat the case and chill the brgs, work fast and they will
drop in OK. Antiseize will only transfer heat and mess up this effort. Remember the snap ring
between the brgs!
3) I don't recc dielectric grease; its for electrical connectors. I used wheel brg grease with good
results so far. More important is to get a wrap of tape over the sharp end of the shaft exactly
right so you dont cut the seal lip. Position the tape so it just covers the sharp edge. If too long it
will stay under the seal & tear off when you pull the tape. (ed. teflon plummer's tape works well)
4) No. Better to have a spare shaft snap ring, they can get mangled depending on your expertise
removing shaft & old seal.
5) Use a good fitting tool for driving the new seal in straight or use a press, preferred. The new
seal may need some antiseize to help it go in the bore, is kinda tight fit. Have fun!
Speedzter: Changed mine at 29000kms, but was showing small coolant usage for the last 6000km or
so. The shaft was lightly worn, and the seal had also worn, and had some black granular sediment
trapped between the inner and outer lip. A tell tale sign was water/oil sludge around the front
carby. No sludge on clutch cover. I think mine lasted as long because it had a coolant change very
early on due to a pump cover leak. The dealer reported there was a lot of junk in the coolant when
they drained it . I think they will last longer once the coolant is free of residue.
KOTH: The image below is of a normal used oil filter after 5000 miles in an engine with no coolant
leaking into the oil:
The image below is of a used oil filter from an engine with coolant leaking into the oil.This filter was
blocking enough oil from passing that the cam tensioners were slacking off, and the cam chains were
making noise when the oil was hot. Major engine damage was immanent, if not, had already occurred
Notice the wavy pleats:
file:///C|/Users/John/Documents/My%20Webs/ktm950.info/how/wotf/wotf_pdf.html[4/2/2014 2:59:36 PM]
Wisdom of The Forum (OC)
Note:An oil pressure gauge would have warned of this situation long before pressure had dropped
enough to hear the cam chains rattle and damage to have occurred. A Scotts stainless steel oil filter
would have prevented a coolant swollen filter from causing oil pressure to drop in the first place.
Note2: Coolant isn't the only thing that can cause a swollen paper filter element. I have seen an
overly rich carburetor (float set way too high) block a paper element in the same way. Try to
determine the cause of the swollen filter before changing out the waterpump. Loss of coolant will be
the first indication, but a leaking head gasket or inner clutch cover gasket can also allow coolant into
the oil. Does the oil have a sweet smell? Does it smell of fuel? It could even be contaminated from
deep water crossings. However, if its been 20k since your last pump rebuild chances are that's the
cause.
Blown Head Gasket:
KOTH: The head gasket performs several functions besides sealing the high pressure combustion
gasses in the combustion chamber/cylinder.
1. It seals the coolant passages as they pass from the cylinder into/out of the head.
2. It seals the oil passages as they pass from the cylinder into/out of the head.
3. It seals the camchain tunnel between the head and the cylinder.
A "blown" head gasket (especially if caused by loose head nuts) can result in a number of "seemingly"
un-related symptoms (signs). Overheating is not usually a symptom (but sometimes shows up later as
a secondary sign, usually due to low coolant level or an air bubble).
1. High pressure combustion gases can enter the cooling system and force coolant past the radiator
cap and into and overflowing the expansion tank.
2. The seal between the oil passages and the coolant passages can become compromised causing oil
and coolant contamination and possible loss of (or low) oil pressure.
3. The camchain tunnel seal can be compromised allowing:
Combustion gases to pressurize the crankcase.
Coolant to enter the crankcase and contaminate the oil.
Super Enduro Losing Coolant:
galbo950: This may seem stupid, but check the radiator cap. There is a piece of hose that joins the
overflow bottle to the top of the radiator cap. On top of the radiator cap there is a swivel
connector that the hose slides over, after a while the swivel piece becomes loose in the cap and it
slowly drains the overflow bottle. Mine did the same and I couldn't see where it was leaking coolant
until I went out and wiggled the swivel piece, when I did this I noticed that coolant was slowly
leaking out and then it evaporates as it hits the header pipe leaving no real sign, mine would drain
probably 1/4 of the bottle with each ride. Its been an issue on the SE, they replaced mine under
warranty. I recall that a few other people on this sight where having the same drama and a few did
a couple of mods to where the swivel piece joins into the radiator cap.
file:///C|/Users/John/Documents/My%20Webs/ktm950.info/how/wotf/wotf_pdf.html[4/2/2014 2:59:36 PM]
Wisdom of The Forum (OC)
Oil leaks:
cpmodem: The oil pressure switch is one possibility, however oil leaks can come from many places. It
is not always easy to determine the source as air currents many times will force oil to flow far away
from their source. A very easy way to find the source of leaks is with a UV dye kit. I have used
one to find some very difficult leaks that defied all other methods. The kits are available at most
auto parts retailers.
Do you have a UniFilter pre-filter?
Under certain conditions, excess oil in the UniFilter will migrate from the filter and run along the
edge of airbox, where the top and bottom meet,and drip down the left side of the engine when the
bike is on the sidestand, Eventually dripping down in the area of the sidestand. This sometimes looks
suspiciously like a leaky neutral switch seal.
Oil usage:
KOTF: The official KTM spec that must be exceeded before they consider an engine is using excess
oil is .5L/1000 km. See Technical Bulletin 0508 for more info. If a bad head gasket or worn rings is
to be determined, it must be done with a leakdown test. Be sure to replace the balance shaft oil
seal before digging into the engine too deeply. This is a common problem with all years of LC8s.
cpmodem: If a leakdown test indicates that the rings are not sealing, there are a few measurements
that you should make before simply installing new rings and bolting it all back together. You must
also, make sure the cylinder is not worn. A check of ring gap is the first step. If the gap is too
wide (more than .50mm) when inserted 10mm from the top of the cylinder, the cylinders need to be
measured mid bore to determine if the cylinders need to be replaced.
Size I . . . . . . . . . . . . . . . . . . . . . . . . . . . . . . .100.000 mm – 100.012 mm
Size II . . . . . . . . . . . . . . . . . . . . . . . . . . . . . . .100.013 mm – 100.025 mm
Cylinder distortion . . . . . . . . . . . . . . . . . . . . . . . . . . . . . . . . . . . . . . . . . . . .
.max. 0.05 mm
If replacing the cylinders, I would also replace the pistons. But check them anyways (even if the
cylinders are in spec), as they may be worn beyond their useful life.
Size I – 9 mm (from lower edge) . . . . . . . . . . . . .99.953 mm – 99.967 mm
Size II – 9 mm (from lower edge) . . . . . . . . . . . . .99.963 mm – 99.977 mm . . . .99.930 mm
Mounting clearance . . . . . . . . . . . . . . . . . . . . . . . .0.04 mm – 0.06 mm . . . . . . . .0.10
mm
If the cylinders are in spec and the pistons within the .10mm wear spec you can get away with new
rings. I would still have a "qualified" motorcycle machine shop "break the oil glaze" with the proper
tools and using the proper procedures/techniques. Otherwise you stand a good chance of spending all
your hard earned money and time and still having an oil burner. The Nicasil plating on the cylinder
bores is extremely hard, and very thin (.003" - .005"). It cannot be machined properly without
special tools and expertise. I recommend you not try to "recondition" the bores yourselves. Leave
this to the professionals. A new cylinder is $400.
Measuring Oil Level:
Owner's Manual Adventures: Check the engine oil level when the engine is warm (at least 4 bars on
file:///C|/Users/John/Documents/My%20Webs/ktm950.info/how/wotf/wotf_pdf.html[4/2/2014 2:59:36 PM]
Wisdom of The Forum (OC)
the
temperature indicator light up). Allow the warm engine to run idle for
approx. 1 minute and motorcycle place the motorcycle on a level surface
(not on the side stand).
Turn off the engine, unscrew the oil dipstick and wipe off with a cloth.
Screw the oil dipstick all the way back in and back out again.
The oil level should fall between the lower end of the oil dipstick (MIN) and
the MAX mark.
The oil capacity between the MIN and MAX mark is 0.5 liters (0.13 USgal).
Add more engine oil if necessary and check the engine for leakage.
Owner's Manual Super Enduros: Check the engine oil level when the engine is warm (at least 4 bars
on the temperature indicator light up). Allow the warm engine to run idle for approx. 1 minute and
place the motorcycle on a level surface (not on the side stand).
The oil level should be between the MIN and MAX marks, add engine oil if necessary.
Always check the oil level when the engine is warm. A cold engine can distort the measuring
results. Engine oil expands when heated, increasing the oil level.
9nine0: I think that we place too much importance on getting the oil level at an exact point in the
sight tube. The oil level only needs to be between the min and max marks on the sight tube. It does
not have to be exactly at the full mark nor would you want to run the oil level at this mark.
When I instructed the KTM dealers in the LC8 training classes at KTM NA, it was stressed that the
oil level should be between the min and max and never at the max level.
Think of it like max tyre pressure......
Also the LC8 engine has 2 seperate oil pumps, one that pulls from the tank and pushes it through
the engine and the other that pulls from the engine and pushes it back into the oil tank. These
pumps share a common shaft but they pump at different rates due to thier size difference.
Depending on when you turn the key off, your oil may be at a different level even though there is
the same amount of oil in the system. If the level is lower, it just means that the engine is holding
the difference in oil.
KOTH: The same principle applies to the Adventure series with their oil dip sticks. The oil level
being measured is simply the level of oil in the storage tank and has no effect (as long as it is not
empty or over full) on the amount of oil in the engine. Just keep the level between the min and max
marks.
Pressure in the oil tank and crankcase:
cpmodem:The oil tank gets a lot of air pressure from the scavenger pump as it does it's job. It
draws about 1/2 oil and 1/2 air from the engine sump and pushes it up through a tube to the right
side of the oil tank. Right below the dipstick/fill opening. There are two rubber tubes (one on each
side of the top of the oil tank) that vent the oil tank to the front cylinder's valve cover. Pressure is
thus conducted down the camchain channel to the crankcase to make up for the vacuum the
scavenger pump is trying to draw. Any remaining pressure in there (shouldn't be much if the rings
are seated properly) travels out the vent hose in the Ignition Rotor cover and into the top of the
airbox. There will be air movement to some degree in both directions as the pistons move up and
down in their bores, increasing and decreasing the air volume of the crankcase with each stroke.
A restriction anywhere in the vent tubes can cause the oil tank to become pressurized. Should be
fairly easy to isolate which one is the culprit by blowing into each one until the obstruction is found.
Same with the valve in the crankcase vent line to the airbox.
file:///C|/Users/John/Documents/My%20Webs/ktm950.info/how/wotf/wotf_pdf.html[4/2/2014 2:59:36 PM]
Wisdom of The Forum (OC)
evilkymevil: After putting in a new balance shaft seal which sits in the generater cover.
I put a catch bottle on my crankcase breather and went for a 120 km ride .
Normally it would dump approx 60 ml of oil.
It didnt spit out any oil.
This is a huge relief as it is only a $ 7 seal.
This seems to have solved my oil loss problem.
You inmates with a similar problem should try this first before stripping down the barrels for new
rings. As i was so close to doing this.
If you remove the crankcase screw on the generater cover and run the motor the amount of oil
vapor coming out is lots.
This seal is directly above this screw. So if its no longer sealing it will be forced into the crankcase
breather and into your front carby and start dribbling down your motor.
WOTF:
Balance shaft seal: 0760122050 ~$9USD
Ignition Cover gasket: 60030040100 ~$25USD
Oil Filters:
KOTH: The choices are basically paper or stainless steel mesh. The tightest bearing clearance in the
LC8 is .040mm which is 40 microns. BTW, a paper filter is rated in average particle size. Most will
pass much larger sized particles than the rating (over 300 microns in some cases). The Scotts will
stop all particles 35 micron or larger. I prefer the Scotts for this reason and for its resistance
(imperviousness) to gas and water/coolant contamination which can be critical in the LC8 due to its
design.
Hard Shifting:
Oil viscosity too thick
Worn out oil
Loose shift lever
Clutch lever out of adjustment
file:///C|/Users/John/Documents/My%20Webs/ktm950.info/how/wotf/wotf_pdf.html[4/2/2014 2:59:36 PM]
Wisdom of The Forum (OC)
Bad clutch slave
Air in clutch fluid
Clogged clutch oil jet
Worn/wrong clutch pushrod
Clutch Booster worn
Warped clutch plates
Worn clutch basket
Worn shift drum
Loose clutch inner basket nut (32mm)
Speaking of loose shift levers:
Mortimersickle: I don't know whether you have already covered this, but a couple of times now, I
have seen posts on Advrider.com saying to use Loctite 648 on the little bolt that holds on the shift
lever. The parts manual does specify 648 in the picture with the lever, but I believe it is an error.
The list of torque specs in the service manual calls for Loctite 243 for the same bolt. I believe this
is correct. Loctite 648 would probably cause the bolt to break upon removal unless first heated.
Loctite's website specifies 250C heat to remove, which might be too much to use in this situation.
http://www.advrider.com/forums/showp...6&postcount=11
Maybe people should be cautioned about this probable mistake in the parts book?
cpmodem: Have you tried adjusting the clutch lever farther from the grip? There's about 1 1/2" of
difference between min and max. You might not have enough travel to fully disengage your clutch.
Sometimes its the simple things that need to be tried first.
WOTH: Many reasons for clutch drag have been proposed over the years, but one theme seems to
be prevalent in the majority of the reports. Oil (or rather lack of it) to the clutch interior. The
purpose of the clutch oil jet is to regulate the quantity of oil that gets to the clutch plates, and
indirectly to the clutch booster surfaces. The sniggle here is that it appears that, under certain
operating conditions, once the clutch is deprived of oil for awhile (ie: a blocked oil jet), the plates
and/or other internal surfaces of the clutch and booster assembly become damaged to the point of
exhibiting shifting problem. Even after oil flow is restored. In that case, replacement of the worn
parts is needed to restore the clutch's smooth action. BTW, the clutch oil jet is listed in the
"Scheduled Maintenance" to be removed and cleaned every 15,000 km. Doing this every oil change is
an even better idea, especially if your clutch gets hard use.
KOTH: The clutch is lubricated with oil from the same passage as the transmission. After the
crankshaft, pistons, rods, camchain, cams, and transmission gears and bearings are lubed, what's
left goes to the interior of the wet clutch via the clutch oil restriction jet and through the pushrod
passage to the interior of the clutch inner hub. Some of the oil in the inner hub is used to lubricate
the sliding surfaces of the clutch booster. The remaining oil then flows through holes in the inner
hub to lubricate the friction disks and the sliding surfaces of the clutch. After which the oil is flung
out of the clutch to drain into the oil sump for pickup and return to the oil tank by the oil scavenger
pump.
The clutch oil jet (located beneath a screw plug near the countershaft sprocket and clutch slave
cylinder on the left side of the bike) size is selected to provide just the right amount of oil to the
clutch. Too small a jet size and the clutch will not be lubed adequately, resulting in rough shifting
and eventually worn clutch parts. Too large a jet and the clutch will be over lubed resulting in some
of the same symptoms as under-lubing, plus a lowering of system oil pressure and accumulation of
crankcase oil (overwhelming the scavenger pump) at idle speed.
The clutch also gets lubed with oil from the transmission via the mainshaft and countershaft roller
file:///C|/Users/John/Documents/My%20Webs/ktm950.info/how/wotf/wotf_pdf.html[4/2/2014 2:59:36 PM]
Wisdom of The Forum (OC)
bearings and to a degree from oil thrown off the counter balancer gear and pinion gear. The clutch
also runs in whatever oil is pooled in the sump.
Originally, apparently it was decided that that was enough oil for the clutch for its intended use.
After the first season of racing, it was obvious that it was not enough for racing conditions. The
Rallye bikes were having clutch problems. Amongst other things, Feliciani (Meoni's mech) and others
were putting larger and larger jets inplace of the plug to help lube the clutch better from the inside
(via the pushrod passage).
In July of 2003, KTM started installing a small jet .30mm P/N 60038029200. This was supposed to
be retrofitted to all previous models in a Tech Bulletin (0309/38/01-E) issued in September of that
year
The Mattighofen engineers were reluctant to install an oil jet at first, but they allowed for one in
the design.The oil jet selected for the 950/990 Adventure is a compromise based on the assumption
that the bike will be used mainly on the street and gravel/dirt roads. If the bike is used hard (ie:
slipping the clutch to manuver tight trails or get through rough terrain or deep sand, or racing
conditions) the clutch jet size should be increased (.40 - .50mm) and possibly some modifications to
the inner clutch hub made (AKA the Feliciani Mods) to accomodate the extra abuse. Don't go too
big; unless you're racing the bike, the 1.0 mm size Feliciani talks about for desert racing is too big
for non-racing use. Be advised that some "streetability" may be compromised even with the .40.50mm sizes (ie: hard to find neutral, clunky shifting at slow speed, etc.). Best to start small and
work your way up. Have a spare .30mm so you can go back down when you get too big.
emelgee: ... it looks like the KTM OEM jet is the same type as the Dellorto 6413. A quick ebay
search pulls up a seller offering sizes from 53 upto 172 at £2.99 each.
Moraflex: I was up on twisties this weekend and the bike only has 4800 miles on it. At the end of
the 120 mile ride I noticed the up shifting took on a slightly different feel, in that it took two
clicks to upshift one gear. Normally it's only one click. I took out the jet and sure enough, clogged!
Blowing into the jet did not unclog it so I needed something else. I didn't happen to have a .010"
wire laying around, but I did have two .005" wires which I twisted into a pair and that unclogged
the hole. Took it for a test ride and it shifts in one click.
In the future, I will buy a High "E" .008" or .010" guitar string to poke out the hole without
removing the jet. Turns it into a 10 minute job to be preformed every other month.
Why a guitar string you ask? Spring steel, wont break off and available everywhere.
Swashplate: 2005 with 22K miles, fresh oil change, jet is clear.
Symptoms: bike tries to move fwd in small surges @ stoplight/sign
hard to downshift (sometimes) while bike is in motion from 4th to 3rd to 2nd to 1st (upshifing is
fine)
Settings:
Clutch in
In first gear.
RPM @ 1500ish
The Fix: Replaced the inner steel disk that mates with the bellville spring. It had a groove worn in it
from the bellville spring. BTW, the bellville spring goes cone out, and the steel plates need to be
file:///C|/Users/John/Documents/My%20Webs/ktm950.info/how/wotf/wotf_pdf.html[4/2/2014 2:59:36 PM]
Wisdom of The Forum (OC)
installed with their rounded edges in. The outer friction disk has a different surface designed to
work with the aluminum pressure plate. The inner friction disk has a larger inner diameter. Pay
attention to the Repair Manual, and assemble the clutch EXACTLY as it describe
Pyndon: Early 950 clutch basket (the type with a metal band) upgrade/replacement. Read the post
on ADV.
Putting the Adventure Up On the Center Stand:
mcmann: I re-activated my 950 Adventure centerstand demo video (from last winter),for newbies
with 990's:
Make sure you have thick soled boots so you can push down hard on the centerstand, lift with the
rear grab rail, and use momentum. I exagerated the momentum in the try III lift. My 950 had the
19" front & 17" rear wheels on for this demo . . . should be similar to the 990? Yes, a 950S or
990s centerstand would be more difficult.
If you are having trouble deploying the center stand on your Adventure, it is possible that your bike
has:
Smaller wheels than stock
Sagging or poorly adjusted suspension
Wrong center stand for your bike
These are the centerstands manufactured for the various models of Adventure;
2003-2004 "S" Model - 6000302200030 = 379mm
2003-2004 Standard - 60003022144 = 346mm
2005-2010 Standard - 6000302240030 = 333mm
2005 "S" Model - 6000302230030 = 359mm
2006 "S" Model - 5750302210030 = 378mm
2007-2008 "S" Model - 6000302200030 = 379mm
2009-2010 "R" Model - 6000302200030 = 379mm
file:///C|/Users/John/Documents/My%20Webs/ktm950.info/how/wotf/wotf_pdf.html[4/2/2014 2:59:36 PM]
Wisdom of The Forum (OC)
These are the sidestands:
2003-2004 "S" Model - 60003023000 = 349mm
2003-2004 Standard - 60003023100 = 319mm
2005 Standard - 6000302330030 = 302mm
2006-2011 Standard - 6010302310030 = 302mm
2005 "S" Model - 60003023100 = 319mm
2006-2008 "S" Model - 6010302320030 = 349mm
2009-2011 "R" Model - 6010302320030 = 349mm
Exhaust Pipes:
ElChico: At 31,300 miles the front exhaust on my 950 has snapped off/burnt through, thought you
might like a laugh at the image - will try and up-load. Doesn't seem to let me attach the image...
The pipe has burnt through just before the first connector where the balancer pipe is.
The bike is 04 buit - 05 registered. And because I took over servicing - in order to ensure it was
done properly, it isn't covered by warranty.
The pipe is ordered: £137 + they changed the shape in 05 - can't get the 03-05 shape, so need a
new heat shield piece at £45.25. + gasket £2.39 + graphite ring - goes into the connector £5.36.
(For US $ just x by 2).
Stripped the pipe off today and it was easy, I was concerned that the exhaust studs would shear
off - a la Jap bikes.. but no prob's, one nut undid and one stud unscrewed. So I'm ready to fit the
new one, hope it lasts a bit better 'eh.
If you're bike is under warranty and you have actually ridden it you might be sensible having a good
check for cracks etc.
Cheers
Don't be tempted to wrap the exhaust pipes with anything. The wrap will hold the heat in and cause
the pipes to fail early. Check out this thread on ADVRider.
Euro Headlight (60014001000):
Below Image by Geek:
no_bmw_for_me:
1. Is the High Beam H3 or H7?
H3
file:///C|/Users/John/Documents/My%20Webs/ktm950.info/how/wotf/wotf_pdf.html[4/2/2014 2:59:36 PM]
Wisdom of The Forum (OC)
2. Are the low and high beams on together, when the high beam is turned on?
Both together.
3, Is the high beam bulb the higher or the lower bulb in the housing?
Upper bulb is the high beam
Paochow: The Euro switch (60011074000) is a direct plug in as well. I repinned a few of my wires
however..
Euro Switch standard...
1. Lights off-Brake light when actuated only
2. Parking light/Tailight only-Brake light when actuated
3. Headlight/Tailight-Brake light when actuated
Repinned Switch...
1. Lights off-Brake light when actuated only
2. Headlight/Tailight-Brake light when actuated
3. Headlight/Tailight and Aux lights-Brake light when actuated
I really didn't see the point of having the parking light running only, so the way I set it up I didn't
need to mount an aux switch. Also the way it is set up I can run HID low beam/Aux lights and use
the high beam to flash, when people seem to think my lights are to bright
Gobi Luggage:
Installation Instructions
Lil' Irv: Follow this link for a step by step tutorial for re-keying the locks on your Gobi luggage.
North American Warranty:
BillWatt: Letter from KTM North America:
You are correct, the USA model 07 990 ADV has a 12 month 12,000 mile
warranty and the 08 model has a 24 month 24,000 mile warranty regardless of where you live.
Thank you,
Name and email withheld as requested
KTM North America Customer Service Manager
Magnuson-Moss Warranty Act (USA only)
Bike Colors:
302001
302090
304603
304604
304605
TUPFLACK
TUPFLACK
TUPFLACK
TUPFLACK
TUPFLACK
SET 30 G JADE-ORANGE
SILBER 30G
LC8 BLUE
ORANGE
BLACK
Things to check before your warranty is up:
file:///C|/Users/John/Documents/My%20Webs/ktm950.info/how/wotf/wotf_pdf.html[4/2/2014 2:59:36 PM]
Wisdom of The Forum (OC)
Frame for cracks (especially around centerstand pivot)
Engine block for cracks (especially where sidestand bolts up)
Exhaust system for cracks (especially front head pipe)
Check sidestend safety switch
Front and Rear brake switches
Check clutch safety switch
Fuel tanks for leaks and proper operation of low fuel sensor
Timing chain for slack (do the tensiorer preload test)
Cylinder heads for leaks (do a leakdown test)
Cams and buckets for wear (look for spauling and pitting)
Clutch basket and clutch booster for wear
Clutch m/c and slave for leaks
Freewheel for wear
Check torque limiter on '05-'06's (If it's "klacking" at all/anytime)
Have a professional oil analysis done to check for bearing and gear wear
Check brake rotors for cracks and warpage
Check for bent or cracked rims, corroded spoke nipples, spokes
Check for oil leaks (especially pressure switch, cylinders, filter covers, oil lines, and crankcase
vent in airbox)
Check fuel pump (look for corrosion and pitting of points)
Check for signs of waterpump seal leakage (may not be covered)
Check steeringhead, wheel, and swingarm beerings (may not be covered)
All TSB's appropriate to your model year done. For example: '04: stator bolt loctite, cylinder
head nuts/washers
MISC:
cmwoody: clutch disks off a KLR250/ZX10 fit... Or a rear brake rotor off a F650 fits. Or a
Smoothbore CR needle fits in the Carbs Or Kawasaki ATV idle jets fit in there, or Minibike main
jets are our airjets Or Aprilia V60/HD V-Rod valve shims fit in our bikes. Or Aprilia countershaft
sprockets fit up with a slight modification.
gefr: clutch slave cylinder o-rings: outside diameter 27mm, thickness 1,7mm to 1,8 mm.
Fiber disks from klx 125/250 are same
Steel discs are same in Suzuki GSXR 600 '07/'08 and GSXR 750 '05/'06.
uk_mouse: .75 clutch oil jet: It's actually a Honda part (99101-GCG0750)
Atreyou: Voltage rectifier/regulator from a Yamaha 660R Raptor Quad is compatable with 950/990.
Chuckracer: Need a sparkplug socket? Go to your nearest Yamaha dealer and order: P/N: 5TA2814F-00-00
pops: The o rings for the fuel inlet elbows on the 950 carburetors:They are 1.3mm-6.3mm. from
OnlineOrings.com
It took a few weeks but i saved around $260.00 by not buying the complete gasket set from KTM
Australia
NothingClever: The OEM 950 pump is the same as used on the Kawasaki 2510 Mule. It's a plug-nplay option that doesn't require any plumbing adjustments. And as could be expected, Kawasaki asks
$135.88 which is significantly less than what KTM asks. Kawasaki p/n is 49040-1055.
file:///C|/Users/John/Documents/My%20Webs/ktm950.info/how/wotf/wotf_pdf.html[4/2/2014 2:59:36 PM]
Wisdom of The Forum (OC)
Model year differences:
KOTH: The following differences between model years are related to the actual year of manufacture
of the bike, not the year on the registration. KTM's model year runs from June to May. For
example, A true 2004 bike was manufactured between June 1, 2003 and May 31, 2004. A true
2005 bike between June 1, 2004 and May 31, 2005, etc, etc. There are were a few instances when
bikes with even earlier build dates were shipped as later year models. Whether this was due to an
effort to clean out inventory or a need to meet production demands, the latest updates should have
been done before they left the Factory. Still, it behooves the owner of such a bike to carefully go
over it to make sure all pertinent Tech Bulletins have been taken care of.
The bikes are registered in their destination countries as the year they are delivered to the dealer.
I don't know how other countries do it, but KTMNA has been known to keep bikes in their warehouse
for six months and release them to the dealers after the start of the New Year. So just cuz your
bike's registration says you have an '04, '05, '06, '07, etc. Doesn't necessarily mean you do. Many
of the differences listed below are visible upon close examination of your bike. That and the build
date from the KTM Dealer-Net are the surest way to tell the actual year of your Katoom. The
designation XXXX.5 is not used in KTM's documentation to denote actual year of build, so look for
yourself, if you really want to know (important for certain maintenance and tech Bulletins).
Differences between 2003 and 2004 Adventures (USA) (6/03-5/04):
Added black bikes and blue bikes to the line up (1/04-5/04)
Black wheels (1/04-5/04)
Color matched front fender (1/04-5/04)
Different fork legs
Different rear shock
Added carb vents to the canister system
New oil tank
New fuel pump
New crankshaft and rods
New cylinders
New oil pressure switch
New pulse generator
New ignition rotor
New clutch pushrod (600.32.054.100)
New outer clutch hub
Differences between 2004 and 2005 Adventures (USA) (6/04-5/05):
New chain slider on frame
Lower center stand and shorter sidestand (1/05-5/05)
Shorter front brake hose (1/05-5/05)
New swingarm pivot bolt
New front exhaust header (1/05-5/05)
New heat shield for front exhaust (1/05-5/05)
New fuel tank fill flanges
Carb de-icers
Lower suspension front and rear (different forks and rear shock) (1/05-5/05)
New seat (1/05-5/05)
New speedometer (1/05-5/05)
Wider rear wheel: 4.25" wide (Up from 4") (1/05-5/05)
file:///C|/Users/John/Documents/My%20Webs/ktm950.info/how/wotf/wotf_pdf.html[4/2/2014 2:59:36 PM]
Wisdom of The Forum (OC)
New rear brake caliper pistons
Splash guard under triple clamp area of frame
Splash guards on sides of triple clamp area of frame
New fan shroud (directs air away from rider)
Added a Torque limiter to the starting system (1/05-5/05)
Redesigned engine case with added cylinder oil injectors(2) (1/05-5/05)
New front sprocket chain protector
Added a main bearing retainer plate (1/05-5/05)
Added a 2nd vacuum valve to the canister system
New balancer shaft with 2 piece timing gear (1/05-5/05)
New cylinders (1/05-5/05)
New exhaust valves (1/05-5/05)
New valve buckets (intake and exhaust) (1/05-5/05)
New head nuts and added washers
New oil dipstick (10mm longer) (1/05-5/05)
New oil tank ball valve
New ECU
Added a rollover sensor
Added crankcase vent back pressure valve (1/05-5/05)
New clutch pushrod (600.32.054.300) (1/05-5/05)
Differences between 2005 and 2006 Adventures (USA) (6/05-5/06):
New steering head bearings
New frame
New swingarm
New "H" pipe clamps
New glovebox interior
New rear hub
New speedo sensor and cable
New clutch cover
New crankshaft and connecting rods
New shift drum
New clutch pushrod (600.32.054.400)
Differences between 2006 and 2007 Adventures (USA) (6/06-5/07):
Added a Dakar paint scheme to the blue "S" model
998 cc engine (2007 Super Duke Engine)
Fuel injection
New wiring harness
ABS brakes (non "S" models)
*New waterpump seal (PTFE)
*New waterpump shaft (nitride coated)
*New re-designed torque limiter, idler gear and ignition cover
*New forks
*New triple clamps
*New frame
*Silver subframe
*New plastic engine protectors
*New lower tank mount
*Silver passenger footrest brackets
*New rear shock
file:///C|/Users/John/Documents/My%20Webs/ktm950.info/how/wotf/wotf_pdf.html[4/2/2014 2:59:36 PM]
Wisdom of The Forum (OC)
*New silencer with 3-way CAT
New fuel tanks with internal HP pump
*Added thermal foil protection on plastic parts
*New front and rear rims
New floating brake rotors front and rear
*New rear brake cylinder
*Added an electric solenoid to the evaporative canister system
*New clutch slave cylinder
*Silver foot brake and shift levers
Added LC4 foot brake lever stop
New horn
*New front fender (more clearance from tire)
New battery charging terminals (accessible from right side)
Torx head fittings replace many small hex head screws
*= New for 2007 (non-asterisk is 2006 EURO/UK/AUS 990)
Differences between 2007 and 2008 Adventures (USA) (6/07-5/08):
New forks
New rear shock
New ECU (Timing Charger EFI)
New ABS module and brake hoses
New water pump rotor (thicker)
New water pump shaft (longer)
New handlebar
New inner clutch cover
New clutch slave cylinder
New oil tank
New fuel hose
Differences between 2008 and 2009 Adventures (USA) (6/08-5/09):
First year for the white (ABS)
First year for the "R" Black and white with orange frame (non-ABS long & travel suspension)
New pistons (2008 Super Duke pistons)
New camshafts (2007 Super Duke cams)
Increased horsepower ratings (106hp for ABS and 115hp for "R")
New wiring harness
New ignition lock with immobilizer
New water pump cover
New instrument panel
Black forks
New Black swingarm
Emergency flashers
New design tanktop storage box
Differences between 2009 and 2010 Adventures (USA) (6/09-5/10):
New oil pump pressure regulator
New skid plate and skid plate/fuel tank mount
New silencers
file:///C|/Users/John/Documents/My%20Webs/ktm950.info/how/wotf/wotf_pdf.html[4/2/2014 2:59:36 PM]
Wisdom of The Forum (OC)
New forks
New rear shock absorber (mono shock)
New MFSD (speedometer)
Differences between 2010 and 2011 Adventures (USA) (6/10-5/11):
Added "Dakar" model (blue, ABS, 210mm suspension, 115hp engine)
Reduced suspension travel on the "R" model by 17mm
Adventure Suspension Travel:
2003-04: 9.0" (230mm) - "S" 10.4" (265mm)
2005-06: 8.3" (210mm) - "S" 9.65" (245mm)
2007-08: 8.3" (210mm) - "S" 10.4" (265mm)
2009-10: 8.3" (210mm) - "R" 10.4" (265mm)
2011: 8.3" (210mm) - "R" 9.65" (245mm)
Adventure Seat Height:
2003-04: 34.6" (880mm) - "S" 36.0" (915mm)
2005-06: 33.8" (860mm) - "S" 35.2" (895mm)
2007-08: 33.8" (860mm) - "S" 36.0" (915mm)
2009-11: 33.8" (860mm) - "R" 36.0" (915mm)
2011: 34.65" (880mm) - "R" 35.63" (905mm)
July 2002 Motorcyclist Article on the KTM 950 Adventure (17MB pdf)
Conversions:
KOTH: Here are some useful conversions
Inch/pounds to Newton-meters, multiply by .113
Newton-meters to inch-pounds, divide by .113
Foot-pounds to Newton-meters, divide by .737
Newton-meters to foot-pounds, multiply by .737
Inches to mm, divide by .039
mm to inches, divide by 25.4
mpg to km/l, multiply by .425
km/l to mpg, 235.2 divided by km/l
Just about any other conversion you can think of:
Statman.info
Wire gauge and current info
Gearing Commander
Subject Index:
Alarm
Chain Slack
Balance Shaft Oil Seal
Battery Problems
Bead Breaking
Blown Head Gasket
Brakes
file:///C|/Users/John/Documents/My%20Webs/ktm950.info/how/wotf/wotf_pdf.html[4/2/2014 2:59:36 PM]
Wisdom of The Forum (OC)
Cam Chain Noisey
Cam Installation
Carburetor Installation
Catalytic Converter
Center Stand
Clutch Switch Bypass
Cooling System Bleeding
Crankcase Vent - Oil Mist
Electronic Power Control (EPC)
Exhaust Pipes
Fifteen Minute Idle Fix
Firing Order
Fork Projection
Fork Springs
Fuel Pump
Fuel Injection
Fuel Injection Tuning With TuneECU
Fuel Injection Pump Filter & O-rings
Hotwire Ignition
Hydrolock
Ignition Rotor
Jump Starting
Lambda Probes (O2 Sensors)
Low Octane Plug
Low Oil Pressure
Magnuson-Moss Warranty Act
Main Relay
Model year differences
Neutral Switch Bypass
Neutral Switch Repair
Oil Consumption
Oil Filters
Oil Leaks
Oil Level
Overheating
Poor Running
Pressurized Oil Tank
Race Sag
Servicing the OEM pump points
Shifting Problems
Sidestand Bypass
Sparkplug Tool
Speedo Problems
Speedometer Recalibration
Speedo Tripmaster
Starting Problems
Stalling Problems
Steering Head Bearings
Super Enduro losing Coolant
Secondary Air Control (SAS/SLS)
file:///C|/Users/John/Documents/My%20Webs/ktm950.info/how/wotf/wotf_pdf.html[4/2/2014 2:59:36 PM]
Wisdom of The Forum (OC)
Things to Check Before the Warranty Runs Out
Tires and Suspension
Throttle Position Sensor (TPS)
Waterpump and Overheating
Waterpump Rebuild Tips
Valve Shims
NOTE: If you don't see your subject in the index use the search function of your browser (usually
ctrl+F for Windows users).
Just in case someone opines that the big Adventure isn't capable in the dirt:
Or on Pavement;
I submit that, just maybe, it's the rider who is not capable. The big Katoom is eminently capable in
all respects.
Just Sayin'
KOTH: And for those of you concerned about over reving your new katoom befor the 600 miles in
the Owners Manual has passed. Consider this. Every engine is fired up and run on a test stand
before it leaves the the engine shop. They aren't dyno'd at this point, but they are run through
their full RPM range to make sure the engine is sealed properly. later after they are mated with the
chassis and the bike is totally assembled, it is warmed up and at least one full pull is made on the
chassis dyno. The bikes are then wheeled out, all fluids drained, and crated for shipment. The video
below is from a French moto magazine that toured the Matighoffen plant in 2008. Near the end you
can see them rolling a 950 Super Enduro R out of the dyno room. And a few seconds later a couple
of 990 Adventures are shown outside the dyno room with another leaving it. Disclaimer: The information contained on this page and
on this site is condensed from the combined wisdom of the members and contributors of the Orange Crush Forum. The contributions are reprinted here exactly as posted by the contributors. The spelling, syntax, grammar, etc have
purposely not been corrected in order to retain its original flavor. The contributors are from throughout the World, and English may very well not be their native language. Don't be an ass and complain about the lexicon. It is mostly
subjective, with a little objectivity thrown in for seasoning, based on the experiences of the contributors. Use this info at your own risk. The site owner is not responsible for its accuracy or validity. None of the procedures
described should be taken as recommendations by anyone. Take anything you read or hear anywhere, but especially on the World Wide Web with a very large dose of salt. The cognoscente is a skeptic.
Please bear with us as we build this site. Submissions to the HOW and
suggestions/comments are always welcome:
webmaster ktm950.info (Please add the @ where appropriate)
file:///C|/Users/John/Documents/My%20Webs/ktm950.info/how/wotf/wotf_pdf.html[4/2/2014 2:59:36 PM]