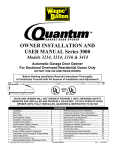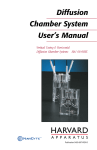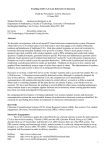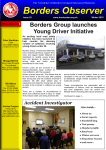
1
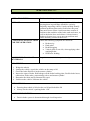
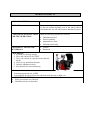
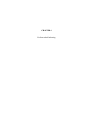
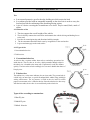
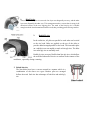
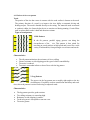
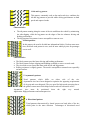
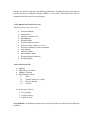
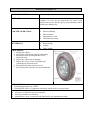
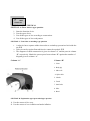
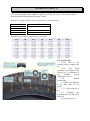
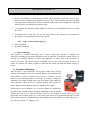
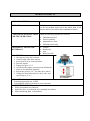
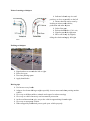
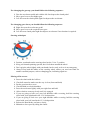
CHAPTER 2 Perform visual inspection of brake system Lesson 2.1.Perform visual inspection of brake system LEARNING GUIDE Learning Steps Resources 1. Read the Information Sheet Information Sheet 2.1 2. Read and Perform Skill Sheet 2.1: on ….. Skill sheet2.1 3. Read and Perform Operation Sheet 2.1: on ….. Operation Sheet 2.1 4. Read and Perform Job Sheet 2.1: On … Job Sheet 2.1 5. Answer Self Check 2.1 Sample Self Check 2.1 6. Compare to Model Answer 2.1 Model Answer to Self Check 2.1 If finished, proceed to lesson 1.2 After completing the activities of this learning unit you should achieve the following: INFORMATION SHEET 5.1 SKILL SHEET 2.1 SKILL TITLE: EQUIPMENT, TOOLS AND MATERIALS: PROCEDURE: OPERATION SHEET 2.1 OPERATION TITLE: Perform visual inspection of brake system PURPOSE: Brakes are the most important part of the vehicle and keeping them in good shape should be a priority. Regularly inspecting vehicle’s brake can help identify potential problems that can be fixed before they turn into major issues. Most visual inspections consist of looking at the condition of the brake pads and rotors, as well as the brake lines and calipers. Always inspect brakes at least twice a year to prevent problems and insure that they perform at their best. When the following symptoms are observed: CONDITIONS OR SITUATIONS FOR THE OPERATION: EQUIPMENT, TOOLS AND MATERIALS: Brake noisy Hard pedal Brake dragging Vehicle pulls to one side, when applying when applying brake Ineffective braking Rag, Vehicle, Jack, Lift, Ramp, wheel wedge PROCEDURE: 1. 2. 3. 4. Wedge the wheels Jack up the vehicle, or park the vehicle on the ramp or lift Check the brake fluid level in the master cylinder Inspect the signs of brake fluid leakages on the brake backing plate, flexible brake hoses, connections, brake tubes, proportioning valves and master cylinder 5. Determine the faults and recommend for repair 6. Jack down the vehicle/ lift down the vehicle PRECAUTIONS: Ensuring that vehicle is lifted on the car lift and locked the lift Always set the vehicle’s parking brake “ON” ASSESSMENT CRITERIA: Fault in brake system is determined through visual inspection JOB SHEET 2.1 JOB TITLE: Perform visual inspection of brake system READING: Service manual, information sheet and operation sheets. OBJECTIVE: Perform visual inspection of brake system according to periodic maintenance. MATERIALS REQUIRED: Rag TOOLS & EQUIPMENT REQUIRED: Vehicle, Jack, Lift, Ramp, wheel wedge PROCEDURE: ASSESSMENT CRITERIA: 1. Park the vehicle on the ramp or on the level ground 2. Inspect the brake system visually (Refer the repair manual) 3. Follow safety precautions Trainer will use the following criteria during assessment: Fault in brake system is determined through visual inspection SAMPLE OF SELF CHECK 2.3 Self Check 1.1 SECTION A: Short Answer type question SECTION B: Multiple Choice question/objective type question SECTION C: True/false or matching type question SECTION D: Explanation type/open ended type question Model Answer 1.1 Section A Section B Section C Section D MODEL ANSWER TO A SELF-CHECK 2.3 CHAPTER 4 Perform wheel alignment Lesson 4.3: Perform dynamic test drive LEARNING GUIDE Learning Steps Read the Information Sheet4.3: on predriving checks, procedures of performing dynamic test drive Resources Information Sheet4.3 Read and Perform skill sheet 4.3: preSkill sheet 4.3 driving checks and driving skill Read and Perform Operation Sheet4.3: on Operation Sheet 4.3 perform dynamic test Answer Self Check 4.3 on perform dynamic test Compare to Model Answer 4.3 on perform Model Answer to Self Check4.3 Sample Self Check 4.2 dynamic test If finished, proceed to lesson 4.4 After completing the activities of this learning unit you should achieve the following: Perform pre-driving checks Performing dynamic test drive INFORMATION SHEET 4.3 4.3.1 Types pre-driving check i. Exterior check Interior check Under the bonnet check ii. iii. Exterior check Number plates are secure and clearly visible Body for damaged and defects. Tire for correct pressure/safe tread and damage, object in thread. Wheel nuts are secure. Lights are working, high and low beam, indicators, stop light and number plate, reversing light. Wind screen, windows and mirrors are cleaned and undamaged. Wiper blades are clean and undamaged. No oil or water under the vehicle. Interior check Tools are present and functional (wheel brace, jack, jack handle, spanners, screw drivers, etc... Fire extinguisher (if fitted) Hand brake is on and gear is on neutral position. All documents, including registration certificate, road worthiness certificate. Emission certificate and insurance certificate are in place and valid. Horn, wipers and washer container are working. Seat belts are working and undamaged. Brake is working. Steering wheel is working. Under the bonnet check Check for cleanliness and leakages. Engine oil level, water transmission oil, brake fluid and battery electrolyte are full to correct level. Fan and generator belts for wear and damage. Main electrical leads for wear and damage. Check air filter and other engine components. Importance of performing pre-driving check Be satisfied that the motor vehicle is in safe operating condition: Review the last driver’s vehicle inspection report. Sign the report, only if defects or deficiencies were notes by the driver who prepared the report, to acknowledge that the driver has reviewed it and that there is a certification that the required repairs have been performed. The signature requirement does not apply to listed defects on a towed unit which is no longer part of the vehicle combination. 4.3.2 Basic Driving Procedures 1. 2. 3. 4. 5. 6. 7. Become familiar with the operation of the vehicle and its accessories. Adjust all equipment to your comfort (seat, seatbelts, mirrors, etc...) Always fasten your seatbelt. Keep your car clean and keep fire extinguishers and first aid kits readily available. Pay attention to driving and traffic conditions. Accelerate, decelerate, and turn smoothly. When driving the Principal. Signal lane changes, turns, and stops, to assist the followup car. 8. Learn the conditions of your routes, i.e. narrow bridges, construction, narrowing roadways (e.g. 3 lanes down to 2), and anything which might create a hazard. 9. When driving Follow-Up, keep your eyes on the Principal's car, anticipate unsignaled turns and stops stay close in heavy traffic, drop back slightly in light traffic, and keep alternate plan-of-action in mind. 10. Be considerate of the men working the Follow-Up car, since their lives depend on how well you operate the vehicle. 11. When the Principal's car signals a lane change, open the lane for him by blocking oncoming traffic until the change has been made. 12. Turn wide on corners to protect the exposed side of the Principal's vehicle on turns. 13. DO NOT BLUFF OTHERS! You may have the right of way, but it is not worth the risk. 14. DO NOT leave you vehicle unless directed to do so by your supervisor. 15. DO NOT engage in conversations, play commercial radios, smoke or "skirt-ogle". 16. DO NOT get of the car to open doors for either the Principal or guests. 17. DO NOT stare at the lane dividing lines or at the area directly in front of the car, since this tends to promote "Road Hypnosis". 18. DO NOT lull yourself into a false sense of security in the newer cars, because they frequently break down (at the most inopportune times!!). 19. If you are driving Follow-Up, DO NOT let another vehicle between you and the Principal's vehicle. SKILL SHEET 4.3 SKILL TITLE: EQUIPMENT, TOOLS AND MATERIALS: Perform pre-driving check and driving skill Pre-driving check list PROCEDURE: 1. Identify the vehicle that needs to perform dynamic test drive 2. Collect the appropriate pre-driving check list. 3. Park the vehicle on level ground. 4. Perform pre-driving check. 5. Drive the vehicle. OPERATION SHEET 4.3 OPERATION TITLE: Perform dynamic test drive PURPOSE: Sometimes wheel tends to wobble, and wanders. So if we do not perform dynamic test of the wheel, than it will shorten the tire life and becomes unbalanced wheel. CONDITIONS OR SITUATIONS FOR THE OPERATION: When the following symptoms are observed: Unbalanced wheel Wheel wobbling Abnormal tire wear Unbalanced steering EQUIPMENT, TOOLS AND MATERIALS: Vehicle Hand tool PROCEDURE: 1. Perform pre-driving checks 2. Drive the vehicle for ON TEST 3. Drive the vehicle at a speed of more than 60 km/hr 4. Observe any abnormal vibration 5. Identify unbalanced wheel 6. Recommend for wheel balancing PRECAUTIONS: Ensuring appropriate use of PPE Ensuring that all safety factors are followed while driving on high way ASSESSMENT CRITERIA: Safety precautions are followed. Unbalanced wheel is identified Self Check 4.3 SAMPLE OF SELF CHECK 4.3 SECTION A: Short Answer type question 1. How many types of pre-driving checks are there? 2. List the types of pre-driving check. SECTION B: Explanation type/open ended type question 1. 2. 3. 4. List all steps exterrior check. List all the steps of underbonnet check. Explain the importance of performing pre-driving check. List first ten procedure of basic driving. Model Answer 4.3 MODEL ANSWER TO A SELF-CHECK 4.3 SECTION A: Short Answer type question 1. There are three types of pre-driving checks. 2. Exterior check, Interior check and under bonnet checks. SECTION B: Explanation type/open ended type question 1. Number plates are secure and clearly visible Body for damaged and defects. Tire for correct pressure/safe tread and damage, object in thread. Wheel nuts are secure. Lights are working, high and low beam, indicators, stop light and number plate, reversing light. Wind screen, windows and mirrors are cleaned and undamaged. Wiper blades are clean and undamaged. No oil or water under the vehicle. 2. Check for cleanliness and leakages. Engine oil level, water transmission oil, brake fluid and battery electrolyte are full to correct level. Fan and generator belts for wear and damage. Main electrical leads for wear and damage. Check air filter and other engine components. 3 Be satisfied that the motor vehicle is in safe operating condition: Review the last driver’s vehicle inspection report. Sign the report, only if defects or deficiencies were notes by the driver who prepared the report, to acknowledge that the driver has reviewed it and that there is a certification that the required repairs have been performed. The signature requirement does not apply to listed defects on a towed unit which is no longer part of the vehicle combination. i. ii. iii. iv. v. Become familiar with the operation of the vehicle and its accessories. Adjust all equipment to your comfort (seat, seatbelts, mirrors, etc...) Always fasten your seatbelt. Keep your car clean and keep fire extinguishers and first aid kits readily available. Pay attention to driving and traffic conditions. 4 vi. Accelerate, decelerate, and turn smoothly. vii. When driving the Principal. Signal lane changes, turns, and stops, to assist the followup car. viii. Learn the conditions of your routes, i.e. narrow bridges, construction, narrowing roadways (e.g. 3 lanes down to 2), and anything which might create a hazard. ix. When driving Follow-Up, keep your eyes on the Principal's car, anticipate unsignaled turns and stops stay close in heavy traffic, drop back slightly in light traffic, and keep alternate plan-of-action in mind. x. Be considerate of the men working the Follow-Up car, since their lives depend on how well you operate the vehicle. Bibliography Anglin, W. H. (2007). Automotive Mechanics. New Delhi: Tata McGraw-Hill. Anglin, W. H. (2009). Automotive Mechanics. New Delhi: tata Mcgraw Hill Education. Corporation, M. M. (2002). Automatic Transmission. Mitsubishi Motor Cor[poration. Max Bohner et.al. (1989). Wuppertal: GTZ. Ontario, Q. P. (2005). CooperatParrott, P. (2000). Singh, D. K. (2009). Automobile Engineering Vol 1. Delhi: Standard Publishers Distributors. Sweeney, T. (2002). Teaching strategies to improve learning and comprehension. RMC Research Corporation. www.autocorner.ca. (2013). Retrieved from www.autocorner.ca CHAPTER 4 Perform wheel balancing Lesson 4.1: Perform inspection of abnormal tire wear LEARNING GUIDE Learning Steps Read the Information Sheet4.1: on Function of tire, types of tire, construction of tire, defects of tire wear pattern, symptoms and causes of tire wear, procedures of inspecting abnormal tire wear 1. Read and Perform skill sheet 4.1: Resources Information Sheet4.1 Skill sheet 4.1 2. Read and Perform Operation Sheet4.1: on Operation Sheet 4.1 perform inspection of abnormal tire wear 3. Answer Self Check 4.1 on perform inspection of abnormal tire wear Sample Self Check 4.1 4. Compare to Model Answer 4.1 on perform Model Answer to Self Check4.1 inspection of abnormal tire wear If finished, proceed to lesson 4.2 After completing the activities of this learning unit you should achieve the following: Explain function of tire List the types of tire Explain the construction of tire State the defects of tire wear pattern Explain the symptoms and causes of tire wear Perform inspection on abnormal tire wear INFORMATION SHEET 4.1 Tire Is an external protective gear for the tube, holding air which carries the load. Is a cushion provided with an automobile mounted on the wheel rim in order to carry the load and provide the cushioning effect absorbing flexing actions A tire is a device covering the circumference of a wheel. They're round, black, made of rubber. 4.1.1 Function of tire 1. The tires support the overall weight of the vehicle. 2. The tire directly contacts the road surface and transmits the vehicles driving and braking forces to the road. 3. Provides for cornering/turning and directional stability/strength. 4. The tires attenuate/absorb the shock cause by irregularities in the road surface. 5. It gives maximum grip on the road surface. 4.1.2 Types of tire 1. Conventional tube tires 2. Tubeless tires 1. Conventional tube tires A tube tire has a separate rubber inner tube to retain/keep pressurized air inside the tire. The tire valve or air valve, which protrudes through a hole in the wheel rim, is bonded to the inner tube. If punctured, a tube tire deflates quickly. The inner tubes of tube radial-ply tires are more durable than those of bias-ply tires. 2. Tubeless tires The tubeless tire, as the name indicates, has no inner tube. The pressurized air is held in by an inner liner, a special formulated thick rubber lining with high sealing effectiveness. The air pressure is filled in the tire itself for which purpose a non-return valve is fitted to the rim. Since the tubeless tire does away with the inner tube, the air valve is secured directly to the wheel rim Types of tire according to construction: 1. Bias-Ply tire 2. Radial Ply tire 3. Belted –bias tire 1. Bias-Ply tire These tires have the plies criss-crossed. One layer runs diagonally one way, and the other layer runs diagonally the other way. This arrangement makes a carcass that is strong in all directions because of the over lapping plies. The tread of the bias-ply tire is flexible enough to absorb shock transmitted from the road, thus providing greater driving comfort 2. Radial Ply tire In the radial tire, all piles run parallel to each other and vertical to the tire bead. Belts are applied on the top of the piles to provide added strength parallel to the bead. The innermost plies on a radial tire are not angled as much as bias ply tires. The belts in a radial ply tire are normally steel. Radial ply tires are more flexible than bias ply tires, which allow the tread and sidewall of the tire to conform to the contour of the road better, especially during cornering. 3. Belted-bias tire The bias-belted tires have a carcass wound in a manner which is a combination of the above two types. Breaker plies are arranged bellow the tread. Such tire has advantage of both bias and radial ply tire 4.1.3 Defects of tire wear pattern Tread: The portion of the tire that comes in contact with the road surface is known as the tread. The primary function of a tread is to improve the tires ability to transmit driving and braking torques. The tread is bonded directly to the casing. The materials used are natural or synthetic rubber, the former helps the tire to remain cool during running. Certain fillers such as carbon-black make it hard and abrasion resistant. Types of tread pattern 1. Rib Pattern: In the rib pattern, parallel zigzag grooves run along the circumference of the tire. This pattern is best suited for traveling on paved surfaces at high speed and is used for a wide variety of automobiles, from passenger cars to buses and trucks. Characteristics: o o o o The rib pattern minimizes the resistance of tire to rolling. Greater resistance to side slipping provides good vehicle controllability. Tire noise is reduced. Traction is somewhat inferior to that of tires with the lug pattern. 2. Lug Pattern: The grooves in the lug pattern run at roughly right angles to the tire circumference. Frequently used on construction machinery and truck tires, this tread patterns is suited for driving on unpaved roads. Characteristics: The lug pattern provides good tractions. Tire rolling resistance is somewhat high. Resistance to side slipping is smaller. Tread in lug area is susceptible to uneven wear. Tire noise greater. 3. Rib and Lug pattern: This pattern, commonly used on bus and truck tires, combines the rib and lug patterns to provide stable driving performance on both paved and unpaved roads. Characteristics: The rib pattern running along the center of the tire stabilizers the vehicle by minimizing tire side-slipping, while the lug pattern on the edges of the tire enhances driving and braking performance. The lug portion of the pattern is more susceptible to uneven wear. 4. Block pattern: In this pattern, the tread is divided into independent blocks. Used on most snow tires, the block tread pattern is now, used on some radial-ply tires for passenger cars as well. Characteristics: The block pattern provides better driving and braking performance. The block pattern reduces slipping and skidding on muddy or snow-covered roads. The tire tends to wear faster than those with the rib and lug patterns. Rolling resistance is slightly greater. The tread is susceptible to unusual wear especially on hard surface. 5. Asymmetric pattern: Tread patterns which differ on either side of the tire. Asymmetric tires have been designed to optimize the opposing requirements of dry grip and water dispersal. They are good for high speed cornering due to the greater contact area which helps reduce tread wear on outside of tire. Asymmetric tires must be positioned them the right way around. Application: High performance and motorsport tires. 6. Directional pattern: Tread patterns characterized by lateral grooves on both sides of the tire which point in the same direction. Advantages of directional tread patterns are good driving force and braking performance. In particular directional patterns provide good water dispersal meaning stability on wet roads. Directional tires must be mounted in the direction of the tread pattern. 4.1.4 Symptoms and causes of tire wear Following are the causes of tire wear: Incorrect inflation Unequal tires Incorrect rotation of tire Misalignment Wrong loading Toe-out incorrect on turn Incorrect caster, camber, or toe-in Excessive braking or violet acceleration Over loading Defective brakes Out of balance wheel Wrong steering mechanism Wrong kingpins Factors affecting tire life Inflation Maintenance of vehicle Manner of driving Miscellaneous factors: i) Heat ii) Position which tire is fitted iii) Road conditions iv) Seasons Incorrect pressure leads to: Over heating Unsafe steering Rapid tire wear Over inflation: An inflation pressure above the specification level can lead to the following problems: i. ii. iii. iv. v. The narrower tread width reduces driving stability and braking performance. Driving comforts surfers. The middle part of the tread wears more quickly. The tires ply cord layers extremely tense and prone to damage due to external impacts. Tread rubber layers are more likely to separate due to frictional heat concentrating in the center part of the tread. Under inflation: i. ii. iii. iv. v. vi. vii. Insufficient pressure can lead to its own special problems: Increase friction between the tread and the road wastes energy and consumes more fuel. Front tires become harder to steer. The tread shoulders wears more quickly. When the motion, the tire is subjected to greater flexure which sharply increases the tires internal temperature. When the inflation pressure extremely low and the vehicle is running high speeds, the tire may burst, which can be very dangerous. At high speed, the tire is more likely to generate a standing wave and experience hydroplaning. The valve may be ripped out due to tire puncture. OPERATION SHEET 4.1 OPERATION TITLE: Perform inspection of abnormal tire wear PURPOSE: Sometimes wheel tends to unbalanced, wobble and wanders. So if we do not inspect the tire, than it will shorten the tire life and also give poor performance while driving and taking turn. CONDITIONS OR SITUATIONS FOR THE OPERATION: When the following symptoms are observed: Wheel wobbling Wheel wander Abnormal tire wear Unbalanced steering EQUIPMENT, TOOLS AND MATERIALS: Jack Wheel wedge Vehicle Safety stands PROCEDURE: 1. Wedge the wheels 2. Jack up the vehicle and support with stands. 3. Rotate the wheel and inspect the tire for abnormal wear. 4. Inspect the wheel rim for damage. 5. Repeat the step no.2 to 4 and inspect the remaining tire and wheel rim. 6. Determine the faults of the tire wear. 7. Recommend the customer for wheel balancing. PRECAUTIONS: Ensuring appropriate use of PPE Ensuring that vehicle is supported with safety stands in the correct position ASSESSMENT CRITERIA: All steps are followed in correct sequence. Safety precautions are followed. Abnormal tire wear is inspected and identified as per standard procedure. Self Check 4.1 SAMPLE OF SELF CHECK 4.1 SECTION A: Short Answer type question 1. 2. 3. 4. State the function of tire. List the types of tire. List all the types of tire according to construction. List all the types of tire tread pattern. SECTION C: True/false or matching type question 1. A tube tire has a separate rubber inner tube to retain/keep pressurized air inside the tire T/F 2. Tube tire can be repaired but tubeless tire cannot be repaired. T/F 3. The diagram of radial construction is given in column “A” and the parts in column “B” respectively. Match the correct parts from column “B” against the number of diagram given in column “A”. Column “A” Column “B” 1. Liner 2. Body ply 3. Side wall 4. Nylon belt 5. Chafer 6. Tread 7. Steel belts 8. Plies 9. Bead SECTION D: Explanation type/open ended type question 1. List the causes of tire wear, 2. List the causes of over inflation and under inflation. Model Answer 4.1 MODEL ANSWER TO A SELF-CHECK 4.1 SECTION A: Short Answer type question 1. Function of tire The tires support the overall weight of the vehicle. The tire directly contacts the road surface and transmits the vehicles driving and braking forces to the road. Provides for cornering/turning and directional stability/strength. The tires attenuate/absorb the shock cause by irregularities in the road surface. It gives maximum grip on the road surface. 2.Types of tire are; Conventional tube tire Tubeless tire 3. Tire patterns: Rib pattern, Lug pattern, Block pattern, Asymmetric pattern, Directional pattern, Rib and lug pattern. 4 . Types of tire according to construction are Bias-ply tire Radial ply tire Belted bias tire SECTION B: True/false or matching type question 1. T 2. F 3. 1. Tread 2. Side wall 3. Chafer 4. Bead 5. Body Ply 6. Liner 7. Steel belts SECTION C: Explanation type/open ended type question Following are the causes of tire wear: 1. Incorrect inflation 2. Unequal tires 3. Incorrect rotation of tire 4. Misalignment 5. Wrong loading 6. Toe-out incorrect on turn 7. Incorrect caster, camber, or toe-in 8. Excessive braking or violet acceleration 9. Over loading 10. Defective brakes 11. Out of balance wheel 12. Wrong steering mechanism 13. Wrong kingpins 3. Causes of over inflation i. ii. iii. iv. v. The narrower tread width reduces driving stability and braking performance. Driving comforts surfers. The middle part of the tread wears more quickly. The tires ply cord layers extremely tense and prone to damage due to external impacts. Tread rubber layers are more likely to separate due to frictional heat concentrating in the center part of the tread. Causes of under inflation i. ii. iii. iv. v. vi. vii. Insufficient pressure can lead to its own special problems: Increase friction between the tread and the road wastes energy and consumes more fuel. Front tires become harder to steer. The tread shoulders wears more quickly. When the motion, the tire is subjected to greater flexure which sharply increases the tires internal temperature. When the inflation pressure extremely low and the vehicle is running high speeds, the tire may burst, which can be very dangerous. At high speed, the tire is more likely to generate a standing wave and experience hydroplaning. The valve may be ripped out due to tire puncture. Bibliography Anglin, W. H. (2007). Automotive Mechanics. New Delhi: Tata McGraw-Hill. Anglin, W. H. (2009). Automotive Mechanics. New Delhi: tata Mcgraw Hill Education. Corporation, M. M. (2002). Automatic Transmission. Mitsubishi Motor Cor[poration. Max Bohner et.al. (1989). Wuppertal: GTZ. Ontario, Q. P. (2005). CooperatParrott, P. (2000). Singh, D. K. (2009). Automobile Engineering Vol 1. Delhi: Standard Publishers Distributors. Sweeney, T. (2002). Teaching strategies to improve learning and comprehension. RMC Research Corporation. www.autocorner.ca. (2013). Retrieved from www.autocorner.ca CHAPTER 3 Perform wheel alignment Lesson 3.1: perform pre-alignment LEARNING GUIDE Learning Steps Read the Information Sheet 3.1: on Specification of tire pressure Read and Perform Skill Sheet 3.1: on Use of pressure gauge , Wheel bearing adjustment, Replacement of steering linkages Resources Information Sheet 3.1 Skill sheet3.1 1. Read and Perform Operation Sheet 4.1: on perform pre-alignment Operation Sheet 3.1 2. Answer Self Check 3.1 on perform prealignment Sample Self Check 3.1 3. Compare to Model Answer 3.1 of perform Model Answer to Self Check3.1 pre- alignment If finished, proceed to lesson 3.2 After completing the activities of this learning unit you should achieve the following: Interpret specification of tire pressure Perform pre-alignment INFORMATION SHEET 3.1 3.1.1 Tire pressure specification Tire pressure depends from vehicle to vehicle upon the size of tire. Tire pressure can be measured using different unit like kg/cm2 OR Psi Example: For light vehicle tire the tire pressure is specified below; Tire pressure Front Rear Tire size Rim size Kg/cm2/Psi 2.1 kg/cm2/30Psi 15/80R12 74S 4.00BX12 79161M79G0 Example of tire pressure measurement conversion Tire specification 165: This is the nominal section width of the tire 65: This mark represents the height of the sidewall as a percentage of the nominal section width(aspect ratio) R: Radial construction 14This is the diameter of the tires inner rim in inches 79: Load capacity of tire T: Indicates the maximum speed of the tire at full load. P: Passenger cars SKILL SHEET 3.1 SKILL TITLE: EQUIPMENT, TOOLS AND MATERIALS: Perform pre-alignment Vehicle Pressure gauge Inflating nozzle Air compressor Pre-load gauge PROCEDURE: 1. Collect the required tools and materials. 2. Park the vehicle on level ground 3. Measure the tire pressure 4. Inflate pressure to the specified level 5. Check the wheel bearing condition 6. Adjust wheel bearing if it is defective 7. Check all the steering linkages 8. Tighten the steering linkages securely if it is faulty OPERATION SHEET 3.1 OPERATION TITLE: Perform pre-alignment PURPOSE: Sometimes tire tends to wear due to unequal pressure, defective linkages or worn out kingpin bearing. So if we do not perform pre-alignment then the tire tends to wear unevenly CONDITIONS OR SITUATIONS FOR THE OPERATION: When the following symptoms are observed: Uneven tire wear Short tire life Defective steering linkages Hard steering Steering dragging to one side EQUIPMENT, TOOLS AND MATERIALS: Vehicle Pressure gauge Inflating nozzle Air compressor Pre-load gauge PROCEDURE: 1. Park the vehicle in a leveled ground 2. Check and correct tire pressure 3. Check and adjust wheel bearings 4. Check for wheel run out 5. Check ball joints and if they are too loose, replace them 6. Check steering linkages and make any necessary corrections 7. Check rear leaf springs for cracks, broken leaves and loose “U” bolts. Make any necessary corrections 8. Check shock absorbers and replace them if they are defective PRECAUTIONS: Ensuring that compressed air is used for the right job Ensuring that the tire pressure is checked in time to avoid over inflation ASSESSMENT CRITERIA: All steps are followed in correct sequence. Safety precautions are followed. Components for pre-alignment are checked as per standard procedure SAMPLE OF SELF CHECK 3.1 Self Check 3.1 SECTION A: Multiple Choice question/objective type questions 1. Tire pressure is measured in; a. Kg/m2/Psi b. Kg/cm3/Psi c. Kg/cm2/Psi d. Kg/cm/Psi 2. As per the tire specification (165/65R14 79T ), 14 stands for; a. Inner rim diameter in inches b. Outer diameter of tire in inches c. Overall height of the tire d. Overall diameter of tire SECTION B: Explanation type/open ended type question 1. As per example of tire 165/65R14 79T , state all notes of the tire specification MODEL ANSWER TO A SELF-CHECK 3.1 Model Answer 3.1 1. SECTION A: Multiple Choice question/objective type questions Ans 1: c Ans 2: a SECTION B: Explanation type/open ended type question Ans 1: 165: This is the nominal section width of the tire 65: This mark represents the height of the sidewall as a percentage of the nominal section width(aspect ratio) R: Radial construction 14This is the diameter of the tires inner rim in inches 79: Load capacity of tire T: Indicates the maximum speed of the tire at full load. Reference angelin, C. (1985). Automotive Mechanics. New Delhi: Tata McGraw-Hill. Anglin, W. H. (2007). Automotive Mechanics. New Delhi: Tata McGraw-Hill. Anglin, W. H. (2009). Automotive Mechanics. New Delhi: tata Mcgraw Hill Education. Corporation, M. M. (2002). Automatic Transmission. Mitsubishi Motor Cor[poration. Corporation, T. M. (2002). Fundamentals of Serviicing Vol. 2. Toyota city: Toyota Motor Corporation. James D, H. (1991). Diagnosis and rrouble Shooting of Automotive Electrical, Electronic and Computer System. London: Prentice-Hall International. Singh, D. K. (2009). Automobile Engineering Vol 1. Delhi: Standard Publishers Distributors. CHAPTER 8 Perform wheel alignment Lesson 4.2: Perform static test drive LEARNING GUIDE Learning Steps Read the Information Sheet4.2: on purpose of wheel balancing, types of wheel balancing test, procedures of performing static test drive Read and Perform skill sheet 4.2: Resources Information Sheet4.2 Skill sheet 4.2 Read and Perform Operation Sheet4.2: on Operation Sheet 4.2 perform static test drive Answer Self Check 4.2 on perform test drive Compare to Model Answer 4.2 on perform Model Answer to Self Check4.2 Sample Self Check 4.2 test drive. If finished, proceed to lesson 4.3 After completing the activities of this learning unit you should achieve the following: Explain the purpose of wheel balancing State types of wheel balancing test Perform static test drive INFORMATION SHEET 4.2 4.2.1 Purpose of wheel balancing Proper wheel balance ensures that the wheels, while spinning, do not have a heavy spot that can cause vibration and premature wear of tires, struts, shocks and other steering and suspension components. When combined with proper wheel alignment, balanced wheels ensure smooth and enjoyable driving. To eliminate any vibration which might be caused by, any mismatch between a tire and the wheel Unbalanced tires when they are on the front wheels, the vibrations are transferred through the steering wheel to the driver's hands. 4.2.2 Types of wheel balancing test Static balancing Dynamic balancing a. Static balancing: Also known as “bubble balancing” uses a fairly inexpensive machine to balance the wheel/tire assembly at rest using a bubble level as an indicator. The wheel is taken off the car and put on a “bubble” balancer to detect any imbalance. A wheel that is out of balance is heavier in section. This wheel causes the bubble in the centre of the balancer to move off centre. To balance the wheel, weights are added to the wheel rim until the bubble returns to centre. b. Dynamic balancing: Also known as "spin balancing" can be done either on or off the vehicle. The majority of tires are probably balanced on computerized spin balancers. Lack of balance shows up as, a tendency for the wheel to move off from centre or out of line, as it spins. A magnet is attached to the brake backing plate. Any movement of the magnet is sense through a short arm by a vibration pickup. This causes the strobe light to flash indicating where to attach wheel weight. If the wheel is out of balance, one or more weights are installed on the wheel rim. Another form of dynamic balancing involves shaving rubber from the tire to achieve balance. This is very helpful in cases where tires are physically out of round. However, it can involve the removal of significant amounts of tread and is more expensive than balancing with weights. Some tire chain stores offer this service, but only up to about 31” diameter tires. SKILL SHEET 4.2 SKILL TITLE: EQUIPMENT, TOOLS AND MATERIALS: Driving skill Pre-driving check list PROCEDURE: 1. Identify the vehicle that needs to test drive 2. Collect the appropriate pre-driving check list. 3. Park the vehicle on level ground. 4. Perform pre-driving check. 5. Drive the vehicle OPERATION SHEET 4.2 OPERATION TITLE: Perform static test drive PURPOSE: Sometimes wheel tends to wobble, and wanders. So if we do not perform static test of the wheel, than it will shorten the tire life and becomes unbalanced wheel. CONDITIONS OR SITUATIONS FOR THE OPERATION: When the following symptoms are observed: Unbalanced wheel Wheel wobbling Abnormal tire wear Unbalanced steering EQUIPMENT, TOOLS AND MATERIALS: Vehicle Hand tools Jack Wheel wrench PROCEDURE: 1. Jack up one of the drive wheels 2. Choke/wedge other three wheels 3. Select gear lever in neutral position 4. Start the engine 5. Engage the gear 2-3-4 6. Accelerate the engine to attain speed of 80km/hr 7. Observe for abnormal vibration 8. Repeat the process 2 to 7 for other drive wheel 9. Change the dead axle wheels to drive axle and repeat step no. 2 to 7 PRECAUTIONS: Ensuring appropriate use of PPE Ensuring that vehicle is jack up in correct position ASSESSMENT CRITERIA: Safety precautions are followed. Static test drive is performed as per standard procedures Wheel balancing fault is determined Self Check 4.2 SAMPLE OF SELF CHECK 4.2 SECTION A: Short Answer type question 1. State the purposes of wheel balancing. 2. List the types of wheel balancing test. SECTION D: Explanation type/open ended type question 1. Explain static balancing and dynamic balancing Model Answer 4.2 MODEL ANSWER TO A SELF-CHECK 4.2 SECTION A: Short Answer type question 1 Purposes of wheel balancing Proper wheel balance ensures that the wheels, while spinning, do not have a heavy spot that can cause vibration and premature wear of tires, struts, shocks and other steering and suspension components. When combined with proper wheel alignment, balanced wheels ensure smooth and enjoyable driving. To eliminate any vibration which might be caused by, any mismatch between a tire and the wheel Unbalanced tires when they are on the front wheels, the vibrations are transferred through the steering wheel to the driver's hands. 2. Types of balancing are; a. Static balancing b. Dynamic balancing SECTION C: Explanation type/open ended type question 1.a Static balancing: Also known as “bubble balancing” uses a fairly inexpensive machine to balance the wheel/tire assembly at rest using a bubble level as an indicator. The wheel is taken off the car and put on a “bubble” balancer to detect any imbalance. A wheel that is out of balance is heavier in section. This wheel causes the bubble in the centre of the balancer to move off centre. To balance the wheel, weights are added to the wheel rim until the bubble returns to centre. 1.b Dynamic balancing: Also known as "spin balancing" can be done either on or off the vehicle. The majority of tires are probably balanced on computerized spin balancers. Lack of balance shows up as, a tendency for the wheel to move off from centre or out of line, as it spins. A magnet is attached to the brake backing plate. Any movement of the magnet is sense through a short arm by a vibration pickup. This causes the strobe light to flash indicating where to attach wheel weight. If the wheel is out of balance, one or more weights are installed on the wheel rim. Another form of dynamic balancing involves shaving rubber from the tire to achieve balance. Bibliography Anglin, W. H. (2007). Automotive Mechanics. New Delhi: Tata McGraw-Hill. Anglin, W. H. (2009). Automotive Mechanics. New Delhi: tata Mcgraw Hill Education. Corporation, M. M. (2002). Automatic Transmission. Mitsubishi Motor Cor[poration. Max Bohner et.al. (1989). Wuppertal: GTZ. Ontario, Q. P. (2005). CooperatParrott, P. (2000). Singh, D. K. (2009). Automobile Engineering Vol 1. Delhi: Standard Publishers Distributors. Sweeney, T. (2002). Teaching strategies to improve learning and comprehension. RMC Research Corporation. www.autocorner.ca. (2013). Retrieved from www.autocorner.ca CHAPTER 3 Perform test drive Lesson 3.1.Perform test drive LEARNING GUIDE Learning Steps Resources 1. Read the Information Sheet 3.1.1: on Symptoms, causes and remedial measures of brake failure, 3.1.2. Driving skill Information Sheet 3.1 2. Read and Perform Skill Sheet 3.1: on ….. Skill sheet3.1 3. Read and Perform Operation Sheet 3.1: on ….. Operation Sheet 3.1 4. Read and Perform Job Sheet 3.1: On … Job Sheet 3.1 5. Answer Self Check 3.1 Sample Self Check 3.1 6. Compare to Model Answer 3.1 Model Answer to Self Check 3.1 If finished, proceed to lesson 1.2 After completing the activities of this learning unit you should achieve the following: 1. List down the Symptoms, causes and remedial measures of brake failure 2. Driving skill INFORMATION SHEET 3.1 Symptoms, causes and remedial measures of brake failure Poor (inefficient) brakes] Causes i. ii. iii. iv. v. vi. vii. viii. ix. x. xi. xii. xiii. xiv. xv. Remedies Excessive clearance between brake shoes and drum Air in hydraulic brake system New linings not bedded in Oil or grease on brake linings Badly scored brake drums Worn linings Low fluid in master cylinder Rubber cups in master and wheel cylinder damaged Worn pistons in wheel cylinder and master cylinder Leakages in brake lines Binding cables and brake expanders Shoes incorrectly centered in brake drums. Brake shoe not balanced. Excessive brake pedal free play. Excessive brake play in wheel bearing Adjust Bleed out air Reface a) Clean b) Replace oil soaked linings Skim or replace Replace Fill in fluid Replace damaged cups Replace worn pistons Remove leakage Free up and lubricate. Center properly Adjust. Adjust adjust Brake dragging Causes i. ii. iii. iv. v. vi. vii. viii. ix. x. xi. xii. xiii. Remedies Improper adjustment of brake linkages Weak pedal return spring Mineral oil in the system Weak or broken brake shoe return spring in case of one wheel dragging Adjust properly Replace Flush out system and use correct grade of fluid Replace return spring Replace Weak return spring in master cylinder Tight brake shoe anchoring pins i) Clean and lubricate ii) Replace defective parts Adjust properly Improper adjustment of brake shoes Improper adjustment of wheel bearing Swollen or distorted piston cups Restricted or damaged brake hoses or brake pipes Oil or grease soaked linings Chocked air vent in master cylinder filler caps No free play in brake pedal Adjust properly Replace Replace Replace Clean Adjust Brake judder or squeal Causes i. ii. iii. iv. v. vi. vii. viii. Remedies Grease or oil on linings Leading edge of lining picking up Improper fitting of brake lining Clean or replace oil soaked linings Chamfer the edge Fit-in properly. If damaged replace lining Brake shoe out of line Rivets on shoes touching the brake drum Worn shoe anchor pins Loose back plate Weak brake drums due to excessive grinding Align Replace lining Replace Tighten Replace Brake spongy Causes Remedies i. ii. Air in the hydraulic brake system Improper brake fluid iii. Misadjusted brake shoes Bleed out air Flush out brake system and use proper grade of fluid Adjust properly Noisy brake Causes i. ii. iii. iv. v. vi. Remedies Bent or distorted brake plate Bent or distorted brake shoes Dirty linings Loose lining rivets Improper linings Worn drums Repair or replace Replace Clean Replace Replace with genuine ones Skim or replace Vehicles pull to one side Causes i. ii. iii. iv. v. vi. vii. Redemies Unequal adjustment of brake shoes Oil or grease soaked linings of one wheel or one side Loose bake plate on one side Wheel bearing improperly adjusted Improper linings Dust and grit in drums Oval or scored drums Adjust evenly Reolace Tighten Adjust properly Replace with genuine ones Clean Skim or replace Driving skill Basic Driving Procedures 1. Become familiar with the operation of the vehicle and its accessories. 2. Adjust all equipment to your comfort (seat, seatbelts, mirrors, etc...) 3. Always fasten your seatbelt. 4. Keep your car clean and keep fire extinguishers and first aid kits readily available. 5. Pay attention to driving and traffic conditions. 6. Accelerate, decelerate, and turn smoothly. 7. When driving the Principal. Signal lane changes, turns, and stops, to assist the followup car. 8. Learn the conditions of your routes, i.e. narrow bridges, construction, narrowing roadways (e.g. 3 lanes down to 2), and anything which might create a hazard. 9. When driving Follow-Up, keep your eyes on the Principal's car, anticipate unsignaled turns and stops stay close in heavy traffic, drop back slightly in light traffic, and keep alternate plan-of-action in mind. 10. Be considerate of the men working the Follow-Up car, since their lives depend on how well you operate the vehicle. 11. When the Principal's car signals a lane change, open the lane for him by blocking oncoming traffic until the change has been made. 12. Turn wide on corners to protect the exposed side of the Principal's vehicle on turns. 13. DO NOT BLUFF OTHERS! You may have the right of way, but it is not worth the risk. 14. DO NOT leave you vehicle unless directed to do so by your supervisor. 15. DO NOT engage in conversations, play commercial radios, smoke. 16. DO NOT get of the car to open doors for either the Principal or guests. 17. DO NOT stare at the lane dividing lines or at the area directly in front of the car, since this tends to promote "Road Hypnosis". 18. DO NOT lull yourself into a false sense of security in the newer cars, because they frequently break down (at the most inopportune times!!). 19. If you are driving Follow-Up, DO NOT let another vehicle between you and the Principal's vehicle. Starting procedure Check and ensure that hand brake is on. Ensure that the gear lever is in neutral position. Adjust seat, mirror and steering wheel as appropriate. Ensure that the door is closed. Check position controls and switches. Fasten seat belt and adjust so that hand can positioned comfortably between the chest and the belt and ensure passenger do the same. Check clutch and brake pedal movement for the tension and play. Depress clutch and switch on the ignition, note that warning lights allow time for preheating in case of diesel vehicle and use choke in patrol vehicle to start the cold engine. Check that revel vent warning lights are off/indicate safe Check instrument reading. Check that there is sufficient fuel for the journey. Moving off procedure Depress the clutch with the left foot. Engage first gear, without forcing (if gear is not engaged releasing the clutch and try again). Ensure that it is safe to move the vehicle by checking mirrors for vehicles, pedestrians and other objects around your vehicles. Signal your intention to move off. Depress the accelerator gently with right foot and hold in this position. Ease clutch paddle slowly and smoothly until sound of engine change and drive has just engaged, and hold clutch steady. Look in the mirrors again and over the right shoulder to check blind sports. Ensure that the road ahead is clear. Release hand brake slowly and returned hand to steering wheel. Depress accelerator slightly to increase the engine speed and at the same time ease the clutch gradually, holding for the second, placing foot on the floor beside clutch. Gear changing procedure Know the position of gears without reference to the diagram usually imprinted on the gear lever knob or elsewhere. Hold the gear lever with the knob cupped the palm of hand, with the palm facing left for 1st and 2nd gear and to the right for 3rd, 4th and 5th gears. Return hand to the steering wheel on completing the gear change For changing the gear up, you should follow the following sequence: Ease the accelerator pedal and with the left foot depress the clutch pedal Move gear lever to next higher gear Left foot ease the clutch pedal-right foot depress the accelerator For changing gear down, you should follow the following sequence: Right foot ease the accelerator pedal Move gear lever to the required lower gear Left foot ease clutch pedal right foot depress accelerator if acceleration is required. Steering techniques Position your hands on the steering wheel on the ’10 to 2’ position Keep your thumbs pointing upward; don’t lock them around the wheel. Don’t grip the wheel tightly with your hands, but be ready to do so in an emergency Always keep both the hands on the steering wheel, unless you need one hand for another essential purpose, such as changing gear, indicating signal etc. Moving off in reverse Press the clutch with the left foot Check all around to make sure the way is clear (front and back) Put the gear into the reverse Check behind over both shoulders Press the accelerator lightly with your right foot and hold Allow clutch to come up slowly until it is engaged If you are going to look over your left shoulder while reversing, hold the steering wheel with your right hand in the 12’o’clockposition If you are going to look over your right shoulder while reversing, hold the steering wheel with your left hand in the 12’o’clockposition Release the hand brake, and move slowly. Maintain a slow speed by riding the clutch. Point of turning techniques Indicate left and stop in a safe position, as close as possible to the left Ensure that it is safe to turn by looking at mirrors and vehicles, pedestrian and other objects Select first gear Release hand brake (if it is on) Signal towards the right turn Move-off slowly by slightly riding the clutch and apply full right lock Parking techniques Signal and move towards the left or right. Select low gear. Turn into parking space. Apply hand brake. Driving tips Use horn at every bends. Adapt to low beam driving at night especially in town areas and when passing another vehicle. Give way to children, elders, animals and respect for zebra crossing. Give way to vehicle in convoy and ceremonial procession. At the road interactions, give way to the vehicles approaching from the right. Give way to emergency vehicle. When stopped by authorized person, park your vehicle properly. SKILL SHEET 3.1 SKILL TITLE: EQUIPMENT, TOOLS AND MATERIALS: PROCEDURE: OPERATION SHEET 3.1 OPERATION TITLE: Perform test drive PURPOSE: Brake is a basic element of automotive and, because of its association with personnel safety, dictates the requirement for particularly by performing test drive and evaluation of wheeled vehicle braking systems to assure dependability and effectiveness under all conditions. CONDITIONS OR SITUATIONS FOR THE OPERATION: When the following symptoms are observed: EQUIPMENT, TOOLS AND MATERIALS: Vehicle PROCEDURE: 1. 2. 3. 4. 5. 6. 7. Note the customer complaint Display the ON TEST plate Start the engine Move/drive the vehicle Trace the symptoms of brake system Determine the defective parts Recommend for repair/replace PRECAUTIONS: Fastening Safety belt Maintaining speed limit ASSESSMENT CRITERIA: Test drive is performed as required Brake failure symptoms are identified Faulty parts are identified Noisy brake Brake dragging Brake spongy Vehicle pull to one side Poor brake JOB SHEET 3.1 JOB TITLE: READING: OBJECTIVE: MATERIALS REQUIRED: TOOLS & EQUIPMENT REQUIRED: PROCEDURE: ASSESSMENT CRITERIA: Trainer will use the following criteria during assessment: . .. SAMPLE OF SELF CHECK 2.3 Self Check 1.1 SECTION A: Short Answer type question 1. State driving tips. SECTION B: Multiple Choice question/objective type question 1. Steering techniques is position your hands on the steering wheel on the: a. b. c. d. 10 to 3 position 10 to 2 position 10 to 4 position 10 to 5 position SECTION C: True/false or matching type question 1. Brake dragging is causes by improper adjustment of brake shoes. True/False 2. Spongy braking is cause by dirty lining. True/False SECTION D: Explanation type/open ended type question 1. List down the gear changing procedure with help of diagram MODEL ANSWER TO A SELF-CHECK 2.3 Model Answer 1.1 Section A Use horn at every bends. Adapt to low beam driving at night especially in town areas and when passing another vehicle. Give way to children, elders, animals and respect for zebra crossing. Give way to vehicle in convoy and ceremonial procession. At the road interactions, give way to the vehicles approaching from the right. Give way to emergency vehicle. When stopped by authorized person, park your vehicle properly. Section B 1. 10 to 2 position Section C 1. True 2. False Section D 1. Know the position of gears without reference to the diagram usually imprinted on the gear lever knob or elsewhere. 2. Hold the gear lever with the knob cupped the palm of hand, with the palm facing left for 1st and 2nd gear and to the right for 3rd, 4th and 5th gears. 3. Return hand to the steering wheel on completing the gear change CHAPTER 3 Perform test drive Lesson 3.1.Perform test drive LEARNING GUIDE Learning Steps Resources 1. Read the Information Sheet 3.1.1: on Symptoms, causes and remedial measures of brake failure, 3.1.2. Driving skill Information Sheet 3.1 2. Read and Perform Skill Sheet 3.1: on ….. Skill sheet3.1 3. Read and Perform Operation Sheet 3.1: on ….. Operation Sheet 3.1 4. Read and Perform Job Sheet 3.1: On … Job Sheet 3.1 5. Answer Self Check 3.1 Sample Self Check 3.1 6. Compare to Model Answer 3.1 Model Answer to Self Check 3.1 If finished, proceed to lesson 1.2 After completing the activities of this learning unit you should achieve the following: 1. List down the Symptoms, causes and remedial measures of brake failure 2. Driving skill INFORMATION SHEET 3.1 Symptoms, causes and remedial measures of brake failure Poor (inefficient) brakes] Causes i. ii. iii. iv. v. vi. vii. viii. ix. x. xi. xii. xiii. xiv. xv. Remedies Excessive clearance between brake shoes and drum Air in hydraulic brake system New linings not bedded in Oil or grease on brake linings Badly scored brake drums Worn linings Low fluid in master cylinder Rubber cups in master and wheel cylinder damaged Worn pistons in wheel cylinder and master cylinder Leakages in brake lines Binding cables and brake expanders Shoes incorrectly centered in brake drums. Brake shoe not balanced. Excessive brake pedal free play. Excessive brake play in wheel bearing Adjust Bleed out air Reface a) Clean b) Replace oil soaked linings Skim or replace Replace Fill in fluid Replace damaged cups Replace worn pistons Remove leakage Free up and lubricate. Center properly Adjust. Adjust adjust Brake dragging Causes i. ii. iii. iv. v. vi. vii. viii. ix. x. xi. xii. xiii. Remedies Improper adjustment of brake linkages Weak pedal return spring Mineral oil in the system Weak or broken brake shoe return spring in case of one wheel dragging Adjust properly Replace Flush out system and use correct grade of fluid Replace return spring Replace Weak return spring in master cylinder Tight brake shoe anchoring pins i) Clean and lubricate ii) Replace defective parts Adjust properly Improper adjustment of brake shoes Improper adjustment of wheel bearing Swollen or distorted piston cups Restricted or damaged brake hoses or brake pipes Oil or grease soaked linings Chocked air vent in master cylinder filler caps No free play in brake pedal Adjust properly Replace Replace Replace Clean Adjust Brake judder or squeal Causes i. ii. iii. iv. v. vi. vii. viii. Remedies Grease or oil on linings Leading edge of lining picking up Improper fitting of brake lining Clean or replace oil soaked linings Chamfer the edge Fit-in properly. If damaged replace lining Brake shoe out of line Rivets on shoes touching the brake drum Worn shoe anchor pins Loose back plate Weak brake drums due to excessive grinding Align Replace lining Replace Tighten Replace Brake spongy Causes Remedies i. ii. Air in the hydraulic brake system Improper brake fluid iii. Misadjusted brake shoes Bleed out air Flush out brake system and use proper grade of fluid Adjust properly Noisy brake Causes i. ii. iii. iv. v. vi. Remedies Bent or distorted brake plate Bent or distorted brake shoes Dirty linings Loose lining rivets Improper linings Worn drums Repair or replace Replace Clean Replace Replace with genuine ones Skim or replace Vehicles pull to one side Causes i. ii. iii. iv. v. vi. vii. Redemies Unequal adjustment of brake shoes Oil or grease soaked linings of one wheel or one side Loose bake plate on one side Wheel bearing improperly adjusted Improper linings Dust and grit in drums Oval or scored drums Adjust evenly Reolace Tighten Adjust properly Replace with genuine ones Clean Skim or replace Driving skill Basic Driving Procedures 1. Become familiar with the operation of the vehicle and its accessories. 2. Adjust all equipment to your comfort (seat, seatbelts, mirrors, etc...) 3. Always fasten your seatbelt. 4. Keep your car clean and keep fire extinguishers and first aid kits readily available. 5. Pay attention to driving and traffic conditions. 6. Accelerate, decelerate, and turn smoothly. 7. When driving the Principal. Signal lane changes, turns, and stops, to assist the followup car. 8. Learn the conditions of your routes, i.e. narrow bridges, construction, narrowing roadways (e.g. 3 lanes down to 2), and anything which might create a hazard. 9. When driving Follow-Up, keep your eyes on the Principal's car, anticipate unsignaled turns and stops stay close in heavy traffic, drop back slightly in light traffic, and keep alternate plan-of-action in mind. 10. Be considerate of the men working the Follow-Up car, since their lives depend on how well you operate the vehicle. 11. When the Principal's car signals a lane change, open the lane for him by blocking oncoming traffic until the change has been made. 12. Turn wide on corners to protect the exposed side of the Principal's vehicle on turns. 13. DO NOT BLUFF OTHERS! You may have the right of way, but it is not worth the risk. 14. DO NOT leave you vehicle unless directed to do so by your supervisor. 15. DO NOT engage in conversations, play commercial radios, smoke. 16. DO NOT get of the car to open doors for either the Principal or guests. 17. DO NOT stare at the lane dividing lines or at the area directly in front of the car, since this tends to promote "Road Hypnosis". 18. DO NOT lull yourself into a false sense of security in the newer cars, because they frequently break down (at the most inopportune times!!). 19. If you are driving Follow-Up, DO NOT let another vehicle between you and the Principal's vehicle. Starting procedure Check and ensure that hand brake is on. Ensure that the gear lever is in neutral position. Adjust seat, mirror and steering wheel as appropriate. Ensure that the door is closed. Check position controls and switches. Fasten seat belt and adjust so that hand can positioned comfortably between the chest and the belt and ensure passenger do the same. Check clutch and brake pedal movement for the tension and play. Depress clutch and switch on the ignition, note that warning lights allow time for preheating in case of diesel vehicle and use choke in patrol vehicle to start the cold engine. Check that revel vent warning lights are off/indicate safe Check instrument reading. Check that there is sufficient fuel for the journey. Moving off procedure Depress the clutch with the left foot. Engage first gear, without forcing (if gear is not engaged releasing the clutch and try again). Ensure that it is safe to move the vehicle by checking mirrors for vehicles, pedestrians and other objects around your vehicles. Signal your intention to move off. Depress the accelerator gently with right foot and hold in this position. Ease clutch paddle slowly and smoothly until sound of engine change and drive has just engaged, and hold clutch steady. Look in the mirrors again and over the right shoulder to check blind sports. Ensure that the road ahead is clear. Release hand brake slowly and returned hand to steering wheel. Depress accelerator slightly to increase the engine speed and at the same time ease the clutch gradually, holding for the second, placing foot on the floor beside clutch. Gear changing procedure Know the position of gears without reference to the diagram usually imprinted on the gear lever knob or elsewhere. Hold the gear lever with the knob cupped the palm of hand, with the palm facing left for 1st and 2nd gear and to the right for 3rd, 4th and 5th gears. Return hand to the steering wheel on completing the gear change For changing the gear up, you should follow the following sequence: Ease the accelerator pedal and with the left foot depress the clutch pedal Move gear lever to next higher gear Left foot ease the clutch pedal-right foot depress the accelerator For changing gear down, you should follow the following sequence: Right foot ease the accelerator pedal Move gear lever to the required lower gear Left foot ease clutch pedal right foot depress accelerator if acceleration is required. Steering techniques Position your hands on the steering wheel on the ’10 to 2’ position Keep your thumbs pointing upward; don’t lock them around the wheel. Don’t grip the wheel tightly with your hands, but be ready to do so in an emergency Always keep both the hands on the steering wheel, unless you need one hand for another essential purpose, such as changing gear, indicating signal etc. Moving off in reverse Press the clutch with the left foot Check all around to make sure the way is clear (front and back) Put the gear into the reverse Check behind over both shoulders Press the accelerator lightly with your right foot and hold Allow clutch to come up slowly until it is engaged If you are going to look over your left shoulder while reversing, hold the steering wheel with your right hand in the 12’o’clockposition If you are going to look over your right shoulder while reversing, hold the steering wheel with your left hand in the 12’o’clockposition Release the hand brake, and move slowly. Maintain a slow speed by riding the clutch. Point of turning techniques Indicate left and stop in a safe position, as close as possible to the left Ensure that it is safe to turn by looking at mirrors and vehicles, pedestrian and other objects Select first gear Release hand brake (if it is on) Signal towards the right turn Move-off slowly by slightly riding the clutch and apply full right lock Parking techniques Signal and move towards the left or right. Select low gear. Turn into parking space. Apply hand brake. Driving tips Use horn at every bends. Adapt to low beam driving at night especially in town areas and when passing another vehicle. Give way to children, elders, animals and respect for zebra crossing. Give way to vehicle in convoy and ceremonial procession. At the road interactions, give way to the vehicles approaching from the right. Give way to emergency vehicle. When stopped by authorized person, park your vehicle properly. SKILL SHEET 3.1 SKILL TITLE: EQUIPMENT, TOOLS AND MATERIALS: PROCEDURE: OPERATION SHEET 3.1 OPERATION TITLE: Perform test drive PURPOSE: Brake is a basic element of automotive and, because of its association with personnel safety, dictates the requirement for particularly by performing test drive and evaluation of wheeled vehicle braking systems to assure dependability and effectiveness under all conditions. CONDITIONS OR SITUATIONS FOR THE OPERATION: When the following symptoms are observed: EQUIPMENT, TOOLS AND MATERIALS: Vehicle PROCEDURE: 1. 2. 3. 4. 5. 6. 7. Note the customer complaint Display the ON TEST plate Start the engine Move/drive the vehicle Trace the symptoms of brake system Determine the defective parts Recommend for repair/replace PRECAUTIONS: Fastening Safety belt Maintaining speed limit ASSESSMENT CRITERIA: Test drive is performed as required Brake failure symptoms are identified Faulty parts are identified Noisy brake Brake dragging Brake spongy Vehicle pull to one side Poor brake JOB SHEET 3.1 JOB TITLE: READING: OBJECTIVE: MATERIALS REQUIRED: TOOLS & EQUIPMENT REQUIRED: PROCEDURE: ASSESSMENT CRITERIA: Trainer will use the following criteria during assessment: . .. SAMPLE OF SELF CHECK 2.3 Self Check 1.1 SECTION A: Short Answer type question 1. State driving tips. SECTION B: Multiple Choice question/objective type question 1. Steering techniques is position your hands on the steering wheel on the: a. b. c. d. 10 to 3 position 10 to 2 position 10 to 4 position 10 to 5 position SECTION C: True/false or matching type question 1. Brake dragging is causes by improper adjustment of brake shoes. True/False 2. Spongy braking is cause by dirty lining. True/False SECTION D: Explanation type/open ended type question 1. List down the gear changing procedure with help of diagram MODEL ANSWER TO A SELF-CHECK 2.3 Model Answer 1.1 Section A Use horn at every bends. Adapt to low beam driving at night especially in town areas and when passing another vehicle. Give way to children, elders, animals and respect for zebra crossing. Give way to vehicle in convoy and ceremonial procession. At the road interactions, give way to the vehicles approaching from the right. Give way to emergency vehicle. When stopped by authorized person, park your vehicle properly. Section B 1. 10 to 2 position Section C 1. True 2. False Section D 1. Know the position of gears without reference to the diagram usually imprinted on the gear lever knob or elsewhere. 2. Hold the gear lever with the knob cupped the palm of hand, with the palm facing left for 1st and 2nd gear and to the right for 3rd, 4th and 5th gears. 3. Return hand to the steering wheel on completing the gear change