1
PARTS LIST
Part #
Qty Description
01451
1
Spring Plate (drv front)
01452
1
Spring Plate (pass front)
01453
1
Spring Plate (drv rear)
01454
1
Spring Plate (pass rear)
01455
2
Spring Hanger
01456
2
Spring Hanger
01457
2
Link Spacer
01492
1
Driver's side spring hanger spacer
01493
1
Pass side spring hanger spacer
01499
2
Steering box drop spacer (1/4")
37-1
4
3/4" x 0.109" x 2.985 Sleeve
3625RB
8
Hanger Bushing
39-1
1
0.875 x 0.120 x 0.750 Sleeve
714
1
Bolt Pack
122120634R7
1/2" x 2-1/2" x 6-3/4" Round U-bolt
123000634R1
1/2" x 3" x 6-3/4" Round U-bolt
N12FH
16
1/2" High Nut
W12S
16
1/2" SAE flat washer
342701 1Loctite
Bolt Pack 714
Qty
4
2
5
3
18
2
2
4
6
6
1
1
1
Description
7/16"-14 x 1-1/4" bolt grade 8 yellow zinc
12mm-1.75 x 30mm bhshcs (button head
bolt) grade 5 - clear zinc
7/16"-14 x 1-1/2" bolt grade 8 yellow zinc
7/16"-14 x 2" bolt grade 8 yellow zinc
7/16" SAE flat washer thru-hardened
yellow zinc
7/16"-14 prevailing torque nut yellow zinc
12mm-1.75 Prevailing Torque Nut clear
1/4"-28 straight grease zerk
5/8"-18 prevailing torque nut clear zinc
5/8" SAE flat washer clear zinc
1/8" x 1-1/4" cotter pin clear zinc
1/4"-20 x 1-3/4" grade 5 clear zinc bolt
1/4" SAE Washer - clear zinc
INSTALLATION INSTRUCTIONS
Note: Installation of YJ specific lift springs will increase the wheel base slightly over 1”. These instructions detail installation
of spring hangers, spring plates, and related parts. Shackles and leaf springs are not included in this kit; refer to manufactures instructions for installation of these items.
Front Installation
1. Park the vehicle on a clean, flat surface and block the rear wheels for safety.
2. Raise the front of the vehicle and support with jack stands under the frame rails, behind the spring hangers.
3. Remove the wheels.
4. To aid installation of front brackets remove front bumper.
5. Support the front axle with a hydraulic jack.
6. Remove the OE shocks. Retain the shock hardware.
7. Disconnect the sway bar links from the sway bar and the spring plates. Retain the upper hardware, discard the
lower hardware. Note: The sway bar link stud at the sway bar is tapered and will require and pickle fork for
removal.
8. If installing a new dropped pitman arm, disconnect the drag link from the pitman arm. Retain hardware. Remove
the pitman arm nut and remove the pitman arm with an appropriate puller (note the indexing of the pitman arm).
Install the new pitman arm, indexed the same as the original, and fasten with the OE hardware and torque to OE
specs.
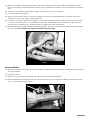
9. Disconnect the driver’s side spring u-bolts and remove along with the OE spring plate. Discard u-bolts and plate.
10. Raise the axle just off the spring. Disconnect the front shackles and rear hanger bolt. Remove the spring from the
vehicle. Discard the spring, shackles and hanger bolt.
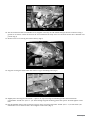
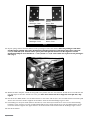
11. Remove the two bolts mounting the front shackle hanger to the frame and remove the hanger. Discard the hanger
and hardware. (Fig 1)
Page 2 124021