1
29. With the suspension unloaded and hanging, cycle the steering lock to lock while manually spinning the wheels.
Inspect the steering, suspension and drive line for proper operation and clearance. Pay close attention to the brake
lines.
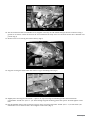
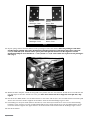
30. On narrow track models with OE wheels, adjust steering stops as necessary. (Fig 10)
31. Lower the vehicle to the ground.
32. Bounce the front of the vehicle to settle the suspension. Torque the spring hanger bolts to 90 ft-lbs. Torque the
shackle bolts to 50 ft-lbs. Torque u-bolts to 85 ft-lbs.
33. If transfer case drop kit #124000 is installed, do so at this time. Remove the three bolts on one side of the transfer
case that retain the transfer case crossmember to the frame. This will allow the crossmember to drop about one
inch. Insert the supplied spacers and fasten with the supplied 3/8” bolts and washers.
34.Reinstall bumper with OE hardware at top mounting points. Use new button head bolts at lower mounting location
(bolt pack #714) Note: Washer not required on button head side of bolt.
FIG. 10
Rear Installation
35. Block the front wheels and raise the rear of the vehicle. Support with jack stands under the frame rail just ahead of
the spring hangers.
36. Remove the wheels.
37. Support the rear axle with a hydraulic jack. Remove the shocks. Retain hardware.
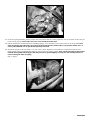
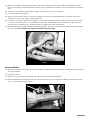
38. Remove brakeline junction block above axle tube. Install #39-1 sleeve under junction block and reattach with new
1/4” x 1-3/4” bolt and washer. (Fig 11)
FIG. 11
124021 Page 7