Download DIACOM®
Transcript
DIACOM
EFI DIAGNOS TIC SOFT WARE
for Windows 98, XP and 2000
MEFI-5 CAN
Software Update
Quick Start Guide
Version 1.5
Rinda Technologies Inc.
®
Limited Warranty
Hardware:
To the original purchaser only, Rinda Technologies, Inc. warrants the supplied hardware components to be free from defects in materials and workmanship under normal use for a period of
one (1) year from date of purchase as evidenced by a copy of the sales receipt. Rinda Technologies, Inc. makes no other express warranties on the hardware components.
The purchaser’s sole remedy in the event of a breach of warranty is expressly limited to repair of
the hardware components. Repair parts and replacement products will be provided on an exchange basis and will be either reconditioned or new. All replaced parts become property of
Rinda Technologies, Inc. This limited warranty does not cover damage to the products resulting
from misuse, accident, disaster, abuse, negligence, improper maintenance, or modification
and/or repair of the product other than by Rinda Technologies, Inc.
Software:
By installing or using the supplied PC software, you agree that Rinda Technologies, Inc. has
made no express warranties to you regarding the PC software or firmware contained in hardware products. The software/firmware is being provided to you “as is” without warranty of any
kind. Rinda Technologies disclaims all warranties with regard to the software and firmware,
express or implied, including, without limitation, any implied warranties of fitness for a particular purpose, merchantability, merchantable quality, or noninfringement of third-party rights.
Limitation of Liability
Neither Rinda Technologies, Inc. nor its authorized dealer shall be liable for any defect, indirect,
incidental, special, or consequential damages, whether in an action in contract or tort (including
negligence and strict liability), such as, but not limited to, loss of anticipated profits or benefits
resulting from the use of this product ( including its hardware, software and firmware) or any
breach of any warranty, even if Rinda Technologies or its authorized dealer has been advised of
the possibility of such damages. In no event will Rinda Technologies, Inc. or its authorized
dealer’s liability exceed the price paid for the product.
Some states or jurisdictions do not allow the exclusion or limitation of incidental or consequential damages, so the above limitation or exclusion may not apply to you.
The information presented in this manual is believed to be accurate. Responsibility for errors,
omission of information, or consequences resulting from the use of this information cannot be
assumed by Rinda Technologies, Inc. Rinda Technologies, Inc. retains all rights to make
changes to specifications at any time without notice.
Reproduction of this manual, in whole or in part, is forbidden without the express written permission of Rinda Technologies Inc. Manual contents including photographs Copyright (C) 2005
Rinda Technologies Inc. All rights reserved worldwide.
Page 2
Software License Agreement
This software end user License Agreement is a legal agreement between you and Rinda Technologies, Inc. Read it carefully before using the software. By installing and using the software, you
are confirming your acceptance of the software and agreeing to become bound by the terms of
this agreement. If you do not agree to be bound by these terms, then uninstall the software from
your computer.
1. License Grants
(a) You may install and use the Diacom software on a single desktop computer that has a Windows PC operating system (including Windows 98, 2000, NT, Me and XP); A license for the
Diacom software may not be shared, installed or used concurrently on different computers.
(b) You may make one copy of the Diacom software in machine-readable form solely for backup
purposes. You must reproduce on any such copy all copyright notices and any other proprietary
legends on the original copy of the software.
(c) Your license rights under this License Agreement are non-exclusive.
2. License Restrictions
(a) Other than as set forth in Section 1, you may not make or distribute copies of the Diacom software or electronically transfer the Diacom software from one computer to another or over a network.
(b) You may not alter, merge, modify, adapt or translate the Diacom software, or decompile,
reverse engineer, disassemble, or otherwise reduce the Diacom software to a human-perceivable
form.
(c) You may not sell, rent, lease, or sublicense the Diacom software.
(d) You may not modify the Diacom software or create derivative works based upon the Diacom
software.
(e) In the event that you fail to comply with this License Agreement, Rinda Technologies, Inc.
shall terminate the license and you must destroy all copies of the Diacom software (with all other
rights of both parties and all other provisions of this License Agreement surviving any such termination).
3. Ownership
The foregoing License Agreement gives you limited license to use the Diacom software. Rinda Technologies,
Inc. and its suppliers retain all right, title and interest, including all copyright and intellectual property rights, in
and to, the Diacom software and all copies thereof. All rights not specifically granted in this License
Agreement, including Federal and International Copyrights, are reserved by Rinda Technologies, Inc. and its
suppliers.
Page 3
1. Safety Precautions
Before attempting to use the Diacom software please read
and observe the following safety precautions:
1) Always refer to and follow the engine manufacturer’s safety
and service procedures to prevent personal injury and equipment damage.
2) Never connect or disconnect the Diacom cables with the vehicle’s ignition turned ON or while the engine is running.
3) Always stay clear of any moving or movable engine components when connecting and using the Diacom cables.
4) When working near batteries never use any device that is capable of producing a spark, high temperature or open flame.
Batteries contain sulfuric acid and produce highly explosive
gasses that may ignite. To prevent serious injury always observe this precaution along with the safety precautions provided by the engine and battery manufacturers.
5) Always test and service a running engine in a well ventilated
area.
6) Always wear approved eye protection.
Page 4
2. Welcome
Congratulation on your new Diacom marine
software update purchase! We hope you’ll enjoy
the new look and features of Diacom Marine for
Windows. This new Diacom edition offers an
extensive array of new features and also takes
advantage of the power of the Windows operating
system.
This quick start guide contains an overview of
Diacom’s main features and will assist you with the
installation process.
For more detailed information on each program
feature please refer to Diacom’s extensive Help
system.
Page 5
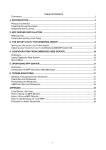
3. Contents at a Glance
1. Safety Precautions
Page 4
2. Welcome
Page 5
3. Table of Contents
Page 6
4. What’s included in the Update Package
Page 7
5. Minimum System Requirements
Page 8
6. Installing the software
Page 9
7. Connecting the cables
Page 10
8. Running Diacom Software
Page 13
9. Program Feature Highlights
Page 18
10. Service Manual Features
Page 28
Page 6
4. The Contents of your
Update Package
Diacom Installation CD
The Diacom installation CD contains the main setup program and
Diacom marine software.
The Diacom MEFI-5 update kit also
includes a CAN network adapter
plug as shown below. Additional
adapters may be available for purchase which support new system
types. Please contact Rinda Technologies for specific details.
P/N 94023 CAN Network Interface
Page 7
5. Minimum System Requirements
In order for Diacom to function correctly please be
sure that your PC meets or exceeds the following
specifications:
•
Windows 98se, XP or 2000 operating system
•
400 MHz or higher Pentium class processor
•
128 MB of RAM (Windows 98se)
•
256 MB RAM (Windows ME, XP, 2000)
•
50 MB hard disk space
•
VGA display system or better
•
CD-ROM drive
•
Internet Access (optional but recommended)
•
One serial COM or USB port
(Diacom USB cable is for Window XP and 2000 only)
*** IMPORTANT INSTALLATION AND SETUP NOTE ***
Some operating systems such as Windows XP Professional and
Windows 2000 have security features which can prevent new software
from being installed on a PC as well as prevent certain program options
from being selected. Be sure that your PC’s operating system has been
set up to allow full access during the Diacom marine installation and setup
procedure. This may require that you log on to your PC as a System
Administrator. Consult your operating system instructions for details on
this topic.
Page 8
6. Installing the Diacom
Software
1. Insert your installation CD
into your PC’s CD drive then
select the RUN option in the
Window’s Start menu. In the
RUN window press the
Browse button. A file
explorer window will open.
Locate and execute the
“setup.exe” file in the root
directory of the Diacom
installation CD.
2. Follow the Setup directions
and restart your PC if
needed. On some Windows
versions, the Diacom
installation program may
need to update a few system
files.
3. The Diacom software
should now be installed.
Page 9
7. Connecting the Diacom
Cables
Before connecting
Diacom’s communication
cable to an engine, verify
that the engine’s ignition
switch is in the OFF
position. Plug the
Diacom communication
cable (serial or USB) into
the respective connector
on your laptop.
Choose a cable adapter
compatible with the engine
you intend to troubleshoot
and connect it to the
engine’s diagnostic
connector. For example
GM MEFI-5 systems will
require the included 94023
CAN Network adapter.
You may start the Diacom
marine software from the
Windows Start Menu by
double clicking on the
Diacom program entry.
Page 10
Setting the COM Port
After Diacom’s initial
installation on your PC
you must select the
correct communication
port that the Diacom
communication cable will
be connected to. Click
on the Options menu as
shown at right.
Select the Comm tab
from the Diacom Options
window, then choose
the appropriate COM
port from the list shown
at right. If you need
additional assistance
click on the HELP button
located at the bottom of
the Options window.
*** IMPORTANT INSTALLATION AND SETUP NOTE ***
Some operating systems such as Windows XP Professional and
Windows 2000 have security features which can prevent new software
from being installed on a PC as well as prevent certain program options
from being selected. Be sure that your PC’s operating system has been
set up to allow full access during the Diacom marine installation and setup
procedure. This may require that you log on to your PC as a System
Administrator. Consult your operating system instructions for details on
this topic.
Page 11
This page intentionally left blank.
Page 12
8. Running Diacom
Brief Overview
To better understand how Diacom works, it will be helpful to note that the
program is comprised of four main sections: ECM DATA, GRAPH , CODES
and TEST sections. Each section is identified by a separate folder tab (see
the illustration below). The ECM Data section is the starting point from which
main functions like ECM selection, Linking and Data Recording are
performed (see Fig. 2 on next page). The ECM Data screen is also the
default view that Diacom will display. The Graph, Codes and Test sections
contain additional tools which will help you in the troubleshooting process.
Four main folder tabs used to switch
between the Diacom’s screens
Fig. 1
Main function toolbar from
which functions like ECM selec
tion, Linking, Recording, Data
Enlargement are performed
(Fig. 2 on next page)
Page 13
8. Running Diacom
Brief Overview
The Main Toolbar
The Main Toolbar provides quick access to the most important Diacom functions. The icons in
this toolbar will change according to the mode in which Diacom will be running (see next page).
The toolbar presented below corresponds to Diacom running in data acquisition mode (also the
default mode at startup).
ECM Selection Icon
Opens the ECM selection window from
where an ECM can be selected.
Link Icon
After selecting the ECM, press this icon to establish a communication link with the engine.
Open Record File Icon
Press this icon to open a previously saved
data file.
Start Recording Icon
This icon is used for starting a recording
session. (Diacom must be linked to an engine)
Parameter Help Icon
After pressing this icon, just double click on an engine parameter to see a brief explanation.
Data Enlarge Icon
Press this icon if you would like to enlarge a
particular engine data parameter.
Parameter Selection
This function will exchange the position of
two data parame ters in the main data
Exit Icon
Fig. 2
Page 14
8. Running Diacom
Brief Overview
The Main Toolbar in Data Preview Mode
In the Data Preview Recording Mode some icons from the toolbar will assume new functions.
For example the first two icons will be used to scroll through the recorded data.
Move Back
Displays previous recorded data screen.
Move Forward
Displays next recorded data screen.
Open Record File Icon
Press this icon to open a previously saved
data file.
View Real Time Data
Press this icon to go back to the Diacom’s main
ECM data acquisition screen.
Parameter Help Icon
After pressing this icon, just double click on
an engine parameter to see a brief explanation.
Data Enlarge Icon
Press this icon if you would like to enlarge
a particular engine data parameter.
Parameter Selection
Use this function to configure the list of displayed engine parameters..
Exit Icon
Page 15
8. Running Diacom
A Guided Tour
Step 1
Be certain that you have
selected the correct COM port
for the Diacom communication
cable. This setting is located
in the Options menu as shown
at right. The setting only
need to be set when the
program is first installed.
See page 11 for details.
Fig. 3
Step 2
Turn the engine’s ignition
switch on. From Diacom’s
main Data Screen click the
ECM selection icon (Fig. 4).
A pop up Window will appear
instructing you to select an
ECM system type.
ECM Selection Button
Fig. 4
Step 3
Select the ECM system
type matching the one
installed on the engine you
intend to troubleshoot and
then press the OK button
(Fig. 5).
Fig. 5
Page 16
8. Running Diacom
A Guided Tour
Step 4
For GM MEFI 3 ECMs
only, Diacom will display
an additional window that
lets the user select one of
several ECM data
messages (Fig. 6).
Fig. 6
Step 5
After selecting certain ECM
types, Diacom may attempt
to briefly communicate with
the ECM to determine its
version (Fig. 7).
Fig. 7
Step 6
Diacom will now display an
array of engine parameters
on its data display grid.
To start displaying live
engine data, press the Link
icon located under the
ECM selection icon (Fig.
8).
Fig. 8
Page 17
8. Running Diacom
Typical Diacom Display Screen for GM Marine EFI
Parameters
Values
Units
The ECM Data screen displays an array of engine parameters.
The first column of the each item contains the data parameter
description, the second column shows the parameter’s value
and the last column shows the unit of measure (VDC, °F, RPM,
etc.).
Page 18
9. Program Feature
Highlights
Page 23
Page 25
Real Time Graphing
Data Recording
Diacom Marine
for Windows
Page 20
Page 22
ECM Special Tests
Enlarged Data View
with Quick Graph
Page 19
9. Enlarged Data
View
The Enlarged View feature allows you to select a data item and
display it in a larger format. This feature is enabled by clicking
on the Magnify icon and then selecting the parameters you
would like to enlarge.
Quick Step Sequence
ECM Selection
Link to Engine
Page 20
Enlarge Parameter
9. Quick Graph
Right-click on an
enlarged window to
display the fly-out
menu, then select
Show Graph
The Quick Graph feature allows you to graphically view an item
shown in an enlargement window. This graph is smaller in size than
the normal graph screen and it’s intended purpose is to visually track
parameter changes. A Quick Graph screen can be displayed by right
clicking on an enlarged window and then selecting Show Graph from
the fly-out menu that appears.
Quick Step Sequence
Right Click
on enlarged
window then
select Show
ECM Selection
Link to Engine
Page 21
Enlarge Parameter
9. ECM Tests
The ECM Test menu will allow you to access special ECM
functions. The contents of this menu will change with each
ECM type and may not always be available. To access the Test
Screen just press on the Test tab then select any of the
available tests.
Quick Step Sequence
Select
Test
Folder Tab
ECM Selection
Page 22
9. Real Time
Graphing
X Axis Resolution
When communicating with an engine, Diacom allows you to
plot simultaneous graphs of up to 3 engine parameters in the
graph view. To switch to the graph screen, press the
Graph folder tab. In the Graph screen press the Parameter
..............
Selection icon and, from the parameter selection window,
select any three parameters and press OK.
Quick Step Sequence
Select
Graph
Folder Tab
ECM Selection
Link to Engine
Page 23
Select Parameters
9. Real Time Graphing
Toolbars
Graph Toolbar
in Real Time Mode
Graph Toolbar
when viewing
recorded files
Parameter
Selection
Stop
Graphing
Increase X
Resolution
Decrease X
Resolution
Resolution of the X axis can
be set to 32, 64, 128, 256
or 512 points
The Context Help Icon will
open the Diacom Help file
at the page containing
related help information.
Page 24
9. Data Recording
When a deeper analysis of an engine fault is required,
Diacom’s record capability will prove a valuable
troubleshooting tool. To start recording, first establish a
communication link with the engine’s ECM, then from the main
Diacom ECM screen, press the Record icon. The Record icon
will change its image to a Stop icon after the start of recording.
Pressing the Stop icon will bring up the File Save dialog where
the user can specify a file name for the recorded file.
Quick Step Sequence
ECM Selection
Link to Engine
Page 25
Start Recording
9. Select and Sort Data
The Parameter Selection window allows you to change the position
of the displayed data parameters in the main data list, to deselect the
items that you wouldn’t like Diacom to display in the main data grid
and to sort the items in alphabetical order. The benefit of this function
is mainly to facilitate the tracking of the parameters by grouping them
in sets that interest you the most.
Page 26
9. Select and Sort Data
Group and Sort Functions
Moving List Items
Right clicking and
HOLDING the right
mouse button down
allows you to move items
up or down in the list. Left
clicking in the check box
corresponding to a list
item selects or deselect
it.
The Sort Button
This function will
alphabetically sort all
items in the list.
The Group Button
Pressing this button will group the items in the list in checked or unchecked
sets and move the checked items to the top of the list. To group any items, first
select the items that interest you the most by left clicking in the check boxes
next to the desired parameters and then press the group button.
Page 27
10. Trouble Code View
View and Erase Trouble Codes
Erase Trouble
Codes Button
Manufacturer’s
Service Manual Access
Button
This screen will automatically display any diagnostic trouble codes (DTCs)
that Diacom detects after it establishes communication with an ECM or when a
saved Record File is loaded.
To erase the trouble codes, click on the erase trouble code button.
Quick Step Sequence
Click on the Erase Trouble Code button. A popup window
will ask you if you wish to continue, select Yes and the
trouble codes will be erased. The persistence of trouble
codes on the screen indicates that the ECM still detects a
fault.
Page 28
11. Service Manual Option
Diacom provides a feature which allows engine manufacturer’s service
information to be accessed from Diacom’s trouble code display. By clicking on
the Book icon or double-clicking on any displayed trouble code a menu will
appear allowing you to choose the proper manufacturer and then access their
electronic service information. This feature requires manufacturer’s service
information to be installed on your PC.
Quick Step Sequence
Click on the Manufacturers Service Manual button. In the
window that will open, select the manufacturer that has the
manuals already installed on your computer and click the
OK button.
Page 29
Notes
Page 30
Notes
Page 31
Rinda Technologies Inc.
4563 N. Elston Ave.
Chicago Illinois 60630
Tel.: (773) 736 6633
Fax: (773) 736 2695
www.rinda.com


