1
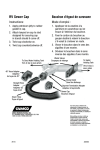
Installation & Operation Manual
CAMCO eSwitch
Programmable Limit Switch
Part No: 87C91663000000
WARNING
This is a controlled document. It is your responsibility to deliver this information to
the end user of this DE-STA-CO CAMCO product. Failure to deliver this could
result in your liability for injury to the user or damage to the machine. For copies
of this manual, call your Customer Service Representative at 800-645-5207
CAMCO eSwitch Programmable Switch
Table of Contents
Introduction................................................................................... 4
Warnings & Cautions................................................................... 4
Operating Principle....................................................................... 4
Requirements.............................................................................. 4
Specifications.............................................................................. 4
eSwitch Mounting Parts............................................................... 5
Part Numbers.............................................................................. 5
Dimensions ................................................................................. 5
Installing Software........................................................................ 6
eSwitch Application Program....................................................... 6
VCP Driver Program.................................................................... 6
eSwitch Setup ............................................................................... 7
Mount the Actuator...................................................................... 7
Mount the eSwitch to the CAMCO unit......................................... 7
Connect the 12-Pin Cable............................................................ 7
Configure the Communication (COM) port settings ...................... 8
Program the eSwitch .................................................................... 9
Program Window Features .........................................................10
Sample eSwitch configuration text file.........................................10
Example eSwitch Set Up ............................................................11
eSwitch Lights............................................................................15
DE-STA-CO
CAMCO Products
www.destco.com
888-DESTACO (888-337-8226)
www.destaco.com
3
Introduction
This service manual describes the setup and operation of the
CAMCO eSwitch. The eSwitch is a programmable multi-channel
switch used to signal rotary position for accurate timing of
component operation.
Warnings & Cautions
Statements in this manual preceded by the words WARNING or
CAUTION and printed in italics are very important. We recommend
you take special notice of these during service or repair. [see
camtronics book for example of warnings and cautions]
WARNING
Means there is a possibility of personal injury to yourself or others
CAUTION
Means there is a possibility of damage to the CAMCO product.
Operating Principle
The eSwitch communicates the rotary position of a shaft to time
various component operations. It has 8 channels (outputs) with 4
positions per channel. Each channel can be used to signal one
component.
For instance, the eSwitch is mounted on the input of a Linear Parts
Handler. Channel 1 signals the dwell positions of the Parts Handler
(home, pick dwell, place dwell) and channel 2 signals to a gripper
mounted to the parts handler when to open and close.
The eSwitch sends a signal of 24V.
Requirements
•
PC with Windows 2000 or newer and a USB port
•
USB 5-pin Mini-USB cable (similar to the cable for digital
cameras)
•
•
12-pin Power and Data Cable
24V Power Supply
Specifications
•
•
4
Maximum Shaft Operating Speed: 180 RPM
Enclosure Rating: IP66 / NEMA 4, 4x (watertight)
www.destaco.com
eSwitch Mounting Parts
Part Numbers
Description
DE-STA-CO Part No.
eSwitch
12-Pin Cable (2-meter length)*
12-Pin Cable with Stainless
Steel Nut (2-meter length) *
mini USB Cable (6-ft length)*
87C91663000000
87A92671010000
87A92671050000
Supplier Part No
-
Turck RKC12T-2
Turck RKCV12T-2
Belkin F3U138-06-GLD
87A92672010000
* Other lengths available, contact DE-STA-CO for more information
Dimensions
www.destaco.com
5
Installing Software
In order to use the eSwitch you will need to install the application
program “eSwitch” and a USB driver.
eSwitch Application Program
To install the eSwitch program run setup.exe on the CD and follow
the instructions.
VCP Driver Program
1. From the CD, run CP210x_VCP_Win_XP_S2K3_Vista_7.exe
and follow the instructions.
NOTE: The eSwitch uses a Silicon Laboratories CP2102 SingleChip USB to UART Bridge as the configuration interface
between the eSwitch and a PC.
The Virtual Communications Port (VCP) drivers are provided
royalty-free by Silicon Laboratories. The VCP drivers are
available for Windows 7, Windows 2000/XP/Server 2003/Vista,
Windows CE, Macintosh OS-X and OS-9, and Linux. A copy of
the VCP driver for Windows is included on the CD provided with
the eSwitch or from the DE-STA-CO website (www.destco.com)
The latest VCP drivers are also available at
http://www.silabs.com/products/mcu/Pages/USBtoUARTBridgeV
CPDrivers.aspx.
2. After the VCP device driver is installed, the PC should recognize
the eSwitch when it is connected and power and will
automatically assign a COM port.
Note: Once Windows has assigned a COM port to the eSwitch, it
should assign the same COM port each time the eSwitch is
reconnected to the PC. This port is usually COM6. The COM
port may then be opened and a connection made, at which point
data may be transferred. However, if the eSwitch is
disconnected or powered off, then reconnected, the program
“eSwitch” must be restarted.
The first time the eSwitch is connected to the PC and powered,
Windows will indicate it has found new hardware and will
automatically find the drive previously installed from the eSwtich
CD. The eSwitch will only be included on the hardware list when
it is powered.
6
www.destaco.com
eSwitch Setup
Mount the Actuator
If eSwitch is not already mounted
1. Drill and tap an M6 thread into the center of the timing shaft.
Screw an M6 socket head cap screw firmly into the tapped hole.
2. Mount the actuator to the socket head cap screw and secure
firmly with the provided set screw. DE-STA-CO recommends
using LOCTITE to secure the set screw.
Mount the eSwitch to the CAMCO unit
If eSwitch is not already mounted
1. Open the clear cover on the eSwitch. Attach the small eSwitch
bracket loosely to the back of the eSwitch with the (4) M3
screws and nuts
2. Attach the larger reducer bracket firmly to the gear reducer using
2 screws
3. Use the actuator (attached to the end of the unit input shaft) to
locate the eSwitch. Slide the eSwitch over the actuator, until it
hits the shoulder (this is a close fit), matching the slots in the
eSwitch bracket with the slots in the reducer bracket. Attach the
brackets together loosely with the screws and nuts provided.
4. Once the eSwitch is positioned properly relative to the actuator,
tighten all screws firmly.
Connect the 12-Pin Cable
1. Connect the 12-Pin Cable Connector to the eSwitch.
2. The other end of the 12-Pin Cable consists of loose wires and
can be connected to the input of the various devices signaled
from the eSwitch.
www.destaco.com
7
3. eSwitch Data Connector Pin Numbers
Data connector pin assignments
Output
Name
Data Connector
Pin Number
Turck Wire
Color *
+24V IN
12
VT (Violet)
COMMON
4
YE (Yellow)
OUT1
7
BU (Blue)
OUT2
6
PK (Pink)
OUT3
5
GY (Gray)
OUT4
11
BK (Black)
OUT5
3
GN (Green)
OUT6
2
BN (Brown)
OUT7
1
WH (White)
OUT8
9
OG (Orange)
-
10
TN (Tan)
-
8
RD (Red)
* Wire colors are for Turck RKC12T 12-pin cable
NOTE: All outputs must connect to COMMON to complete the
circuit.
Configure the Communication (COM) port settings
1. Connect the eSwitch to the computer with the USB cable. You
will need to provide power to the eSwitch
2. In Windows, open the Control Panel, select System and open
the Device manager.
8
www.destaco.com
3. Under “Ports,” the VCP should be shown as COM6. If it is not 6,
note the number shown.
Note: If the Com port is not 6, then you must change the text in
the file “eswitchcomport.txt” from “6” to the Com port number as
noted in step 3. This file is located in the same directory as the
program “eSwitch”.
4. Configure the communications port with the following settings:
Baud Rate 9600 bps
Data Bits 8
Parity None
Stop Bits 1
Flow Control None
Program the eSwitch
CAUTION: When programming of the eSwitch is complete, remove
the USB cable from the eSwitch and put the blue cover back on the
USB port on the eSwitch. Failure to replace the cover could result in
damage to the eSwitch.
1. Connect the switch to the computer with a USB cable and
provide power to the eSwitch
2. Run “eSwitch.exe”
www.destaco.com
9
Program Window Features
Get Values From eSwitch Pressing this button will copy the values
stored in the eSwitch to left tab of the middle two tab section.
Send Values To eSwitch Pressing this button permanently record
the timings to the eSwitch memory.
Get Values From File Pressing this button will open a file dialog box
looking for a text file containing an eSwitch configuration.
Send Values to File Pressing this button will record an eSwitch
configuration to a text file for later use.
Copy eSwitch Values to File or Edited Values Pressing this button
transfer the eSwitch values for editing.
Rotation CW / CCW Pressing this button will set the direction of
rotation of the timing shaft.
Set Current Position As Zero or Home Pressing this button set the
current position of the timing shaft as zero or home.
Update Values To Table Pressing this button send the values from
the “File or Edited Values” of the middle two tab section to the
temporary memory of the eSwitch.
Sample eSwitch configuration text file
CW
Output 1:
Output 2:
Output 3:
Output 4:
Output 5:
Output 6:
Output 7:
Output 8:
on
off
on
off
0, 90, 120, 180,
200, 270,
-1,
-1,
-1,
-1,
-1,
-1,
-1,
-1,
-1,
-1,
-1,
-1,
-1,
-1,
-1,
-1,
-1,
-1,
-1,
-1,
-1,
-1,
-1,
-1,
-1,
-1,
on
-1,
-1,
-1,
-1,
-1,
-1,
-1,
-1,
off
-1,
-1,
-1,
-1,
-1,
-1,
-1,
-1,
on
-1,
-1,
-1,
-1,
-1,
-1,
-1,
-1,
off
-1
-1
-1
-1
-1
-1
-1
-1
Note: A value of -1 indicates the sequence is not being used.
10
www.destaco.com
Example eSwitch Set Up
1. Press Get Values From eSwitch (retrieves any existing
program) or Get Values From File (for new program or program
transferred from another eSwitch)
2. Press Copy eSwitch Values to File or Edited Values. This
transfers the data so it can be edited or transferred to a file.
www.destaco.com
11
3. Confirm the timing shaft (CAMCO Unit Input Shaft) is turned to
the home position. Put it in the home position if it is not.
4. Press Set Current Position as Zero or Home to set the current
shaft position as the home (zero) point for the eSwitch
5. Verify the rotation of the timing shaft.
6. Select the correct rotation CW or CCW.
12
www.destaco.com
7. Select the Output channel to be edited
8. Change the Sequence or Sequences. Select values for degrees
of input rotation for when the channel should turn on and when it
should turn off. Each channel can have up to 4 sequence
www.destaco.com
13
9. Press Update Values To Table to update the Value table with
the new sequence values.
10. Repeat steps 7 through 9 for each channel required
11. Press Send Values To eSwitch to save the new values to the
eSwitch
14
www.destaco.com
12. Press Send Values To File to save the values to a file for
backup or for transfer to another eSwitch
13. When programming is complete, click on the “File” menu and
select “Exit”.
eSwitch Lights
RUN
8
PWR
7
6
5
4
3
2
1
Light
On
Off
RUN
eSwitch is powered but not
connected to program
eSwitch is connected to
program
PWR
eSwitch is powered
eSwitch is not powered
1–8
Channel signal is on
Channel signal is off
www.destaco.com
15
CAMCO & FERGUSON Products
1444 South Wolf Road
Wheeling, IL 60090
USA
ph: 847-459-5200
toll-free: 800-645-5200
fax: 847-459-3064
[email protected]
www.camcoindex.com
DE-STA-CO Europe
Germany
+49-6171-705-0
[email protected]
ISO 9001:2000 Registered
DE-STA-CO South America
Brazil
0800-124070
[email protected]
DE-STA-CO Headquarters
Auburn Hills, Michigan USA
248-836-6700
[email protected]
DE-STA-CO Asia
Thailand
+66-2-326-0812
[email protected]
www.destaco.com
This publication is for information purposes
only and should not be considered a binding
description of the product except if confirmed
in writing by Industrial Motion Control, LLC /
DE-STA-CO.
© DE-STA-CO 2010
All rights reserved
Printed in U.S.A.
SKU 0100-03/2009
PN 87A92669000000