1
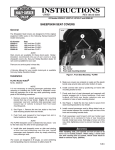
-J04034
REV. 2011-06-30
SOFTAIL SEAT KITS
4.
GENERAL
Kit Numbers
Slide the back of the seat through grab strap and hook
front tab of seat (1) into frame. Secure seat bracket to
fender with screw (8).
51397-06A, 51468-06A, 51469-06A, 51470-06A, 51801-07,
52000025
Models
For model fitment information, see the P&A Retail Catalog or
the Parts and Accessories section of www.harley-davidson.com
(English only).
After installing seat, pull upward on seat to be sure it is
locked in position. While riding, a loose seat can shift
causing loss of control, which could result in death or
serious injury. (00070b)
Kit Contents
5.
See Figure 4 and Table 1.
erman
G
.
e
.
y
n
Pull seat up to verify it is securely installed.
2006 FLSTFSE2 models require the separate purchase of
Passenger Footpegs and Passenger Footpeg Mounting Kit
(Part No. 50749-05).
1
o p. d e
Rosto
ck
is00420e
Additional Parts Required
A service manual for your model motorcycle is required for this
installation and is available from a Harley-Davidson Dealer.
2
The rider's safety depends upon the correct installation
of this kit. If the procedure is not within your capabilities
or you do not have the correct tools, have a Harley-Davidson dealer perform the installation. Improper installation
of this kit could result in death or serious injury. (00308a)
sh
w
w
1. Kit Numbers: 51470-06A, 51397-06A, 52000025
- Grab Strap Numbers: 51184-00, 52400008
2. Kit Numbers: 51468-06A, 51469-06A, 51801-07 Grab Strap Number 51176-96C
Figure 1. Grab Strap Installation Information
w.
INSTALLATION
FXST, FXSTS, and FXSTB models
1.
See the service manual and remove the stock seat and
hardware.
2.
Remove and discard the existing grab strap and mounting
hardware.
3.
Remove and discard the plug in the rear mounting position
on the fender.
4.
See Figure 2. Using the retaining nut (1), washer (2), and
cable strap (3) from the kit. Install the nut and washer in
the rear hole location on the fender. A cable strap can be
used as an installation aid.
5.
Position the retention nut (1) over the cable strap so that
the wide end of the nut rests on the eye of the cable strap.
Thread the cable up under the fender and through the rear
most fender hole. Pull up on the cable strap to hold the
nut snug against the underside of the fender.
6.
With the rib on the retention nut seated into the notch in
the fender hole, slide the retention washer (2) into place
from the rear (this will lock the retention nut in place), and
then remove the cable strap.
NOTE
When performing the following installation procedures, avoid
scratching painted surfaces (fender, tank, etc.) with tools or
metal seat tabs.
1.
Remove existing seat from motorcycle by removing screw
at rear bracket and unhooking front seat tab.
2.
See Figure 4. Remove and discard existing grab strap and
save mounting hardware from the motorcycle.
3.
See Figure 4. Install the grab strap (7) from kit with the
hardware saved in Step 2. Install the grab strap according
to Figure 1.
-J04034
n
e
2007 and Later FXSTC Models
h d o nli
Do not install these seat kits on motorcycles that are not
equipped with an appropriate grab strap and passenger
footpegs. If footpegs and grab strap are not installed,
passenger could fall from moving motorcycle or grab onto
operator, causing loss of control and death or serious
injury. (000410b)
1 of 3
7.
See Figure 4. Install the grab strap (7) from the kit using
a screw (3) and washer (4).
8.
Slide the back of the seat through the grab strap, and hook
front tab of the seat (1) into the frame. Secure the seat
bracket to the fender with screw (8).
is03279
1
2
After installing seat, pull upward on seat to be sure it is
locked in position. While riding, a loose seat can shift
causing loss of control, which could result in death or
serious injury. (00070b)
9.
Pull seat up to verify it is securely installed.
is01955
3
1. Remove stock grabstrap, and install flange nuts
onto studs
2. Accessory seat grabstrap location
2
erman
G
.
e
.
y
n
2006 FLSTFSE2 models
1
When installing a 2-up seat onto a vehicle not equipped with
passenger footpegs, install Passenger Footpeg Mounting Kit
50749-05 and passenger footpegs (purchased separately).
1. Retention nut
2. Retention washer
3. Cable strap (installation aid)
o p. d e
Rosto
ck
Figure 3. Grabstrap and flange nut installation for Fatboy
models
Figure 2. Retention Nut Installation
1.
See the service manual and follow the instructions to
remove the seat.
2.
Remove and discard the existing grab strap and mounting
hardware.
3.
See Figure 3. Install two flange nuts (1) from the kit onto
the seat mounting studs.
5.
w
w
4.
w.
Do not install these seat kits on motorcycles that are not
equipped with an appropriate grab strap and passenger
footpegs. If footpegs and grab strap are not installed,
passenger could fall from moving motorcycle or grab onto
operator, causing loss of control and death or serious
injury. (000410b)
sh
2007 and Later Fatboy Models
h d o nli
See Figure 4. Install the grab strap (7) from the kit to the
grab strap location (as shown in Figure 3) with the screw
(3), and washer (4) according to Figure 1.
Slide the back of the seat through the grab strap, and hook
front tab of the seat (1) into the slot at the rear of the fuel
tank and into the frame. Secure the seat bracket to the
fender with screw (8).
Pull seat up to verify it is securely installed.
Refer to the service manual to remove stock seat and
chrome tailpiece from the motorcycle.
2.
See Figure 4. Install the grab strap (7) from kit using parts
from the kit. See Figure 1 for the grab strap hole location.
3.
Slide the back of seat through the grab strap. Hook front
tab of seat (1) into the slot at the rear of the fuel tank, and
into the frame; secure the seat bracket to the fender with
screw (8) or fasten screw attached to bracket on seat
(51397-06).
After installing seat, pull upward on seat to be sure it is
locked in position. While riding, a loose seat can shift
causing loss of control, which could result in death or
serious injury. (00070b)
4.
-J04034
n
1.
After installing seat, pull upward on seat to be sure it is
locked in position. While riding, a loose seat can shift
causing loss of control, which could result in death or
serious injury. (00070b)
6.
e
NOTE
When performing the following installation procedures, avoid
scratching painted surfaces (fender, tank, etc.) with tools or
metal seat tabs.
Pull seat up to verify it is securely installed.
2 of 3
SERVICE PARTS
is00422
3
8
2
1
7
4
5
6
erman
G
.
e
.
y
n
Item
Rosto
ck
Figure 4. Service Parts: Softail Seats
Table 1. Service Parts Table
Description (Quantity)
Part Number
Seat (Generic style shown)
Not sold separately
2
Bracket
51467-06
o p. d e
1
3
Screw
4
Washer
5
Retention washer
6
Retention nut
7
Grab strap in 51397-06A
sh
Bracket (Kit 51397-06A)
Grab strap in 51468-06A
Grab strap in 51801-07
w
w
Grab strap in 51469-06A
w.
Grab strap in 51470-06A
Grab strap in 52000025
8
Screw, rear seat bracket
h donl
in
e
51652-97
3767B
6036
See Service Kits
See Service Kits
51184-00
51176-96C
51176-96C
51176-96C
51184-00
52400008
2952A
9
Cable tie (not shown)
10
Nut, flange (2) (not shown)
8021
11
Screw, small, flange head (2) (not shown)
3588
The following Decorative Stud Kit (3 chrome studs, and 1 backing plate) (use with kit 51801-07)
Service Kits are Seat nut kit (includes 1 retention nut, and 1 retention washer)
available:
-J04034
10039
58916-07
59768-97
3 of 3