1
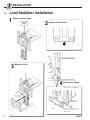
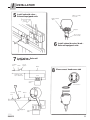
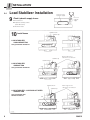
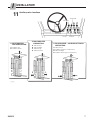
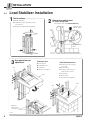
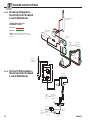
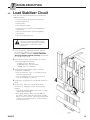
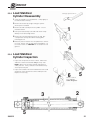
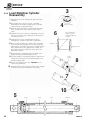
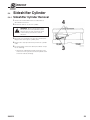
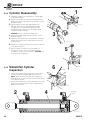
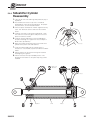
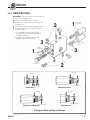
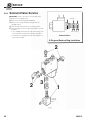
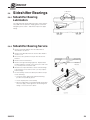
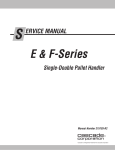
S
5.3-4
ERVICE
3
Load Stabilizer Cylinder
Reassembly
1 Lubricate all new seals and rings with petroleum jelly or
equivalent.
2 Note the direction of the U-cup seals.
4
If installed
backwards the seals will not work properly. For proper
seal placement, see illustration below.
3 Polish the piston and retainer chamfer angle with emery
cloth. This allows the seal to slide over the chamfer
easier.
6
4 Install the new seals on the piston and retainer.
Hook one
side of the seal in the groove and push it over the piston
on retainer as shown.
Install new seals.
Do not allow lower
edge of loader to
contact thread relief
chamfer.
5 Install the piston on the rod and tighten the piston
retaining nut to a torque of 43-47 ft.-lbs. (58-64 Nm).
6 Place the piston loader in the cylinder shell.
The loader
must cover all of the threads but not contact the thread
relief chamfer. The length of the stop fins can be trimmed
with a sharp knife if more engagement is needed. The
piston will not enter the shell if the loader contacts the
thread relief chamfer.
Stop Fins
Cylinder Shell
7 Apply a thick film of petroleum jelly to the inside of the
cylinder shell, piston loader and piston seals.
8 Insert the rod-piston assembly through the loader into the
Piston
Loader
cylinder shell. If resistance is encountered, tap the rod
end with a rubber mallet.
9 Remove the loader from the shell.
scratch the cylinder bore.
10
CAUTION: Do not
8
Install the retainer over the rod, then into the shell. Tighten
the retainer to a torque of 60-70 ft.-lbs. (81-95 Nm).
7
5
22
10
Piston
Rod
Shell
Retainer
204312