1
IMPORTANT
HINTS FOR REPAIRS
-
On account of the short high starting current, the
house fuse should be of a 16A-delayed type.
-
If the lift mechanism is defective or the wiring between
floor part and radiation part is interrupted, you should
contact a Philips Service Centre (repair is not possible).
-
The appliance will work in operating position only.
-
-
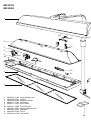
Always check if the protecting glass pane (item 7) is
fitted after a repair.
The above also applies when the housing (item 1) has
to be replaced.
-
HPA-lamps only start when they have cooled down
sufficiently.
-
Never touch a HPA-lamp with your fingers.
If necessary, clean the lamp with alcohol.
Disassembly of the radiation part:
1. Remove the 10 screws with wich the cover
(item 6) is fastened to the housing (item 1).
The cover will continue to cling to the housing.
2. Disconnect the connectors of the connecting cable
and motor.
3. Undo the other connections.
-
Colour differences may occur when new lamps are
installed. This phenomenon is characteristic of HPAlamps and disappears after a short period of use.
-
It can be established whether lamps, ballasts or
starters are defective by interchanging them.
-
After assembly the glass filter should be free from
finger prints and dust.
Clean the glass filter with alcohol, if necessary.
-
When replacing a lamp holder (item 9) 2 tubular rivets
must be drilled out.
The bracket is fastened with 2 M2.5x10 bolts.
-
Never look in the direction of the radiation part while
the lamps are on without wearing protecting goggles.
-
-
In case of insufficient cooling (e.g. when the
ventilation apertures are blocked or when the fan is
defective) the safety device (item 8) will automatically
switch off the solarium.
Once the cause of overheating has been removed and
the solarium has cooled down sufficiently, the
appliance will switch on again automatically.
-
When the appliance is a few years old, we advise you
to apply a drop of thin oil to the bearings of the fan.
Disassembly of the floor part:
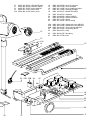
1. Remove 6 square and 3 round ornamental props
(item 16).
2. Loosen 14 visible screws by which the cover
(item 15) is fastened.
3. Pass the mains cord cover (item 23A) and the
timer cover (item 13A) through the opening
below, after the screws have been taken out.
4. Loosen the screw under the timer cover.
5. Remove the cover (item 15) in horizontal position
so that the screws will not fall out.
(As screws with varying length are used, it is not
possible to interchange them.)
-
Let the solarium cool down first (approx. 15 mins)
before closing and storing it away.
-
The wheel can be replaced after the decorative cap has
been removed by means of a small screwdriver.
-
Only move the solarium when folded.
-
In case of complaints about little or no tanning, the
output can be measured by means of a so-called LMVor HEBRU-meter.
The figures given on the tittle sheet are the minimum
values to be measured in the centre of the radiation
field after 5 mins of warming up and with the
appliance connected to the rated voltage.
PCS 66230
PCS 98 528