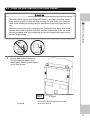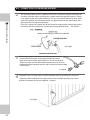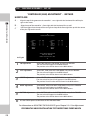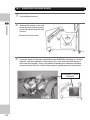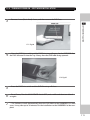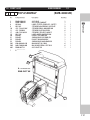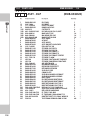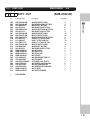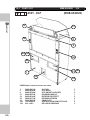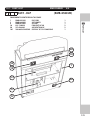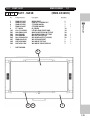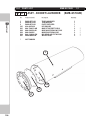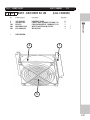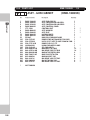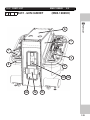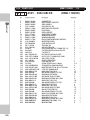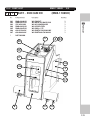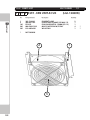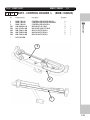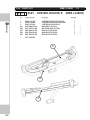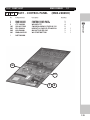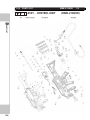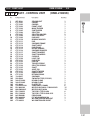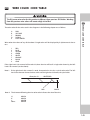
1
420-7148-01UK
RAMBO DELUXE
OWNERS MANUAL
BLOCK C, 42, BARWELL BUSINESS PARK, CHESSINGTON, SURREY. KT9 2NY
TEL: +(44)208 391 8090
FAX:+(44)208 391 8099
420-7148-01UK
SEGA AMUSEMENTS EUROPE LIMITED
INTRODUCTION
TABLE OF CONTENTS
TABLE OF CONTENTS
BEFORE USING THE PRODUCT --------------------------------------i
TABLE OF CONTENTS -------------------------------------------------- 0 ii
INTRODUCTION --------------------------------------------------------0 v
COPYRIGHT AND LICENCE PAGE --------------------------------------0 vii
1
2
HANDLING PRECAUTIONS
----------- 0
1
4
4
5
PRECAUTIONS REGARDING PRODUCT OPERATION ---------------- 0
6
0
BEF0RE OPERATION --------------------------------------------- 0
PAYING ATTENTION TO CUSTOMER DURING OPERATION -------------- 0
PARTS DESCRIPTIONS
0
------------------------------------------------ 0
ACCESSORIES
6
ASSEMBLY AND INSTALLATION
9
---------------------------------------------------------- 0 10
0
-------------------------------------- 0 13
GENERAL ASSEMBLY INFORMATION -------------------------------- 0
FIXING THE BILLBOARD AND POP ----------------------------------0
FIXING THE MAIN CABINET TO THE DPL CABINET ---------------------0
INSTALLATION AND FIXING IN PLACE -------------------------------0
CONNECTING THE POWER CABLES --------------------------------- 0
CHECKING ASSEMBLY (SET UP) ------------------------------------0
7
PRECAUTIONS WHEN MOVING THE MACHINE
8
GAME DESCRIPTION
8.1
8.2
6
8
0
5
6.1
6.2
6.3
6.4
6.5
6.6
ii
0
LIMITATION OF USE -------------------------------------------- 0
OPERATION AREA -----------------------------------------------0
3.1
3.2
4
-------------------------------------------- 0
PRECAUTIONS REGARDING INSTALLATION LOCATION
2.1
2.2
3
0
15
16
17
20
21
23
0
----------------------0 30
0
---------------------------------------------------0 32
GAME OVERVIEW -----------------------------------------------0
HINTS FOR PLAYING THE GAME ----------------------------------- 0
0
33
39
TABLE OF CONTENTS
EXPLANATION OF TEST AND DATA DISPLAY
9.1
9.2
9.3
10
CONTROL COMPONENTS -----------------------------------------------0 59
REPLACING THE MICROSWITCH ---------------------------------- 0
REPLACING THE SENSOR UNIT -----------------------------------0
REPLACING THE SOLENOID --------------------------------------0
MONITOR UNIT
11.1
11.2
11.3
11.4
11.5
11.6
12
43
44
46
47
48
49
50
54
57
58
0
10.1
10.2
10.3
11
------------------------0 41
SWITCH UNIT AND COIN METER -----------------------------------0
SYSTEM TEST MODE ---------------------------------------------0
MACHINE TEST MODE ------------------------------------------- 0
9.31 INPUT TEST ------------------------------------------- 0
9.32 OUTPUT TEST ----------------------------------------- 0
9.33 GAME ASSIGNMENTS ------------------------------------0
9.34 CONTROLLER ADJUSTMENT ----------------------------- 0
9.35 BOOK KEEPING ---------------------------------------- 0
9.36 BACKUP DATA CLEAR ----------------------------------0
9.37 INTERFERENCE PREVENTION WIRING -----------------------0
TABLE OF CONTENTS
9
0
-------------------------------------------------------- 0 67
CAUTION AND WARNING CONCERNING MONITOR SAFETY ------------- 0
CLEANING SCREEN SURFACE --------------------------------------0
ADJUSTMENT METHOD ------------------------------------------0
TR0UBLE SHOOTING -------------------------------------------- 0
REPLACING THE LAMP -------------------------------------------0
TECHNICAL SPECIFICATION -------------------------------------- 0
COIN SELECTOR AND CREDIT SETTINGS
12.1
12.2
12.3
60
64
65
67
68
69
76
77
81
0
----------------------------0 82
CLEANING THE COIN SELECTOR ----------------------------------- 0
ADJUSTING PRICE OF PLAY --------------------------------------- 0
SR3 OPTIONS - TEACH AND RUN PROGRAMMING -------------------- 0
82
84
88
0
iii
TABLE OF CONTENTS
TABLE OF CONTENTS
13
14
15
16
17
18
19
20
21
iv
FLUORESCENT TUBES AND LAMP REPLACEMENT ------------------- 0 90
0
PERIODIC INSPECTION ------------------------------------------------0 92
0
TROUBLE SHOOTING -------------------------------------------------- 0 94
15.1 TROUBLE SHOOTING - (WHEN NO ERROR MESSAGE IS SHOWN) ----------0
15.2 ERROR CODE DISPLAY -------------------------------------------0
0
GAME BOARD -----------------------------------------------------------0
16.1 REMOVING THE GAME BOARD ------------------------------------ 0
16.2 COMPOSITION OF GAME BOARD -----------------------------------0
0
LOADING GAME SOFTWARE ------------------------------------------ 0
17.1 ATTACHING THE DVD DRIVE AND KEY CHIP ------------------------- 0
17.2 TURNING POWER ON - SOFTWARE INSTALLATION -------------------- 0
0
DESIGN RELATED PARTS ----------------------------------------------0
0
PARTS LIST ------------------------------------------------------------- 0
19.1 PARTS LIST - 'DPL' ASSEMBLY -------------------------------------0
19.2 PARTS LIST - 'MAIN CABI' ASSEMBLY -------------------------------------- 0
19.3 PARTS LIST - INSTALLATION KIT ---------------------------------- 0
0
WIRING COLOUR CODE TABLE --------------------------------------- 0
0
WIRING DIAGRAM -----------------------------------------------------0
21.1 WIRING DIAGRAM D1/3 ----------------------------------------- 0
21.2 WIRING DIAGRAM D2/3 ----------------------------------------- 0
21.3 WIRING DIAGRAM D3/3 ----------------------------------------- 0
0
0
95
96
101
102
104
105
105
107
113
116
118
128
144
145
146
146
147
148
INTRODUCTION
This manual is intended to provide detailed descriptions together with all the necessary information
covering the general operation of electronic and electro-mechanical assemblies, servicing control,
spare parts, etc. for the product, “RAMBO DELUXE”
INTRODUCTION
This manual is intended for the owners, personnel and managers in charge of operation of the product.
Operate the product after carefully reading and sufficiently understanding the instructions
.
In the unlikely event that the product does not function correctly, DO NOT allow anyone other than
a technician to touch the internal system. Turn off the power to the machine, making sure to unplug
the electrical cord from the outlet, and contact the office listed below or the point of purchase for this
product.
Use of this product is unlikely to cause physical injuries or damage to property. However, points that
require special attention are indicated by bold text, the word “IMPORTANT” and the symbol below.
Indicates important information that, if ignored, may result in the mishandling of the
product and cause faulty operation or damage to the product.
SEGA AMUSEMENTS EUROPE, LTD.
Block C, 42 Barwell Business Park, Chessington, Surrey. KT9 2NY United Kingdom.
Telephone: +44 (0) 208 391 8090 e-mail: [email protected] Facsimile: +44 (0) 208 391 8099
http://www.sega-amusements.co.uk
SPECIFICATIONS
MACHINE DETAILS
Width : Depth : Height:
Weight:
Power, Current:
Voltage :
1500 mm (59.05 inches)
1839 mm
(72.40 inches)
2326 mm
(91.57 inches)
300� ������������
kg
(661.3 ����
lbs)
575 W. 220 - 230 Vac
2.5 Amps
50Hz
������������������������
Monitor Type������������
: SAMSUNG 56”
���� ���
DLP
NOTE : The contents herein described are subject to change without notice.
Definition of 'Site Maintenence Personnel or Other Qualified Individuals
INTRODUCTION
Procedures not described in this manual or marked as ‘to be carried out by site
maintenance personnel or other qualified professionals’ should not be carried out by
personnel without the necessary skill or technology. Work carried out by unqualified
persons may cause serious accidents, including electrocution.
Parts replacement, maintenance inspections and troubleshooting should be carried out by site
maintenance personnel or other qualified professionals. This manual includes directions for potentially
dangerous procedures which should only be carried out by professionals with the appropriate
specialised knowledge.
The site maintenance personnel or other qualified professionals mentioned in this manual are defined
as follows:
Site maintenance personnel:
Individuals with experience in maintaining amusement equipment, vending machines, etc., working
under the supervision of the owner/operator of this product to maintain machines within amusement
facilities or similar premises by carrying out everyday procedures such as assembly, maintenance
inspections, and replacement of units/expendable parts.
Activities to be carried out by site maintenance personnel:
Amusement equipment/vending machine assembly, maintenance inspection and replacement of units/
expendable parts.
Other qualified professionals:
Persons employed by amusement equipment manufacturers, or involved in design, production, testing
or maintenance of amusement equipment. The individual should have either graduated from technical
school or hold similar qualifications in electrical/electronics/mechanical engineering.
Activities to be carried out by other qualified professionals:
Amusement equipment/vending machine assembly, repair/adjustment of electrical/electronic/
mechanical parts.
vi
1 HANDLING PRECAUTIONS
When installing or inspecting the machine, be very careful of the following points and pay attention to
ensure that the player can enjoy the game safely.
Non-compliance with the following points or inappropriate handling running counter to the cautionary
matters herein stated can cause personal injury or damage to the machine.
1
• To avoid an electric shock or short circuit, do not plug in or unplug quickly.
• To avoid an electric shock, do not plug in or unplug with a wet hand.
• Do not expose power cords or earth wires on the surface, (floor, passage, etc.). If exposed, the
power cords and earth wires are susceptible to damage. Damaged cords and wires can cause
an electric shock or short circuit.
HANDLING PRECAUTIONS
• Before performing work, be sure to turn the power off. Performing the work without turning the
power off can cause an electric shock or short circuit. In the case work should be performed
in the status of power on, this manual always states to that effect.
• To avoid causing a fire or an electric shock, do not put things on or damage the power cords.
• When or after installing the product, do not unnecessarily pull the power cord. If damaged, the
power cord can cause a fire or an electric shock.
• In case the power cord is damaged, ask for a replacement through where the product was
purchased from or the office herein stated. Using the cord as is damaged can cause fire, an
electric shock or leakage.
• Be sure to perform grounding appropriately. Inappropriate grounding can cause an electric
shock.
• Be sure to use fuses meeting the specified rating. Using fuses exceeding the specified rating can
cause a fire or an electric shock.
• Be sure that connections such as IC BD are made properly. Insufficient insertion can cause an
electric shock.
• Specification changes, removal of equipment, conversion and/or addition, not designated by
SEGA are not permitted.
- Failure to observe this may cause a fire or an electric shock. Non-compliance with this
instruction can have a bad influence upon physical conditions of the players or the
onlookers, or result in injury during play.
- SEGA shall not be held responsible for damage, compensation for damage to a third party,
caused by specification changes not designated by SEGA.
• If work or parts replacement not indicated in this manual is carried out, an accident may occur.
If it is necessary to carry out work not indicated in this manual, be sure to have it done by the
office indicated in this manual or by the point of purchase. Also, please inquire regarding
details of the work involved.
• Be sure to perform periodic maintenance inspections herein stated.
1
HANDLING PRECAUTIONS
• For the IC board circuit inspections, only the logic tester is allowed. The use of a
multiple-purpose tester is not permitted, so be careful in this regard.
• When cleaning the CRT surfaces, use a soft and dry cloth. Do not apply chemicals such
as thinners, benzene, etc.
• Static electricity from your body may damage some electronics devices on the IC board.
Before handling the IC board, touch a grounded metallic surface so that the static
electricity can be discharged.
• Do not turn the power on and off continuously. Repeatedly turning the power on and
off may cause product malfunction or parts damage.
• Some parts are not designed and manufactured specifically for this game machine. The
manufacturers may discontinue, or change the specifications of such general-purpose
parts. If this is the case, SEGA cannot repair or replace a failed game machine whether
or not a warranty period has expired.
CONCERNING THE STICKER DISPLAY
CONCERNING THE WARNING LABELS
This SEGA product has stickers attached
describing the product manufacture No. (Serial
No.) and Electrical Specifications. It also has a
Sticker describing where to contact for repair
and for purchasing parts.
When inquiring about or asking for repairs,
mention the Serial No. and Name of Machine
indicated on the Sticker. The Serial Number
indicates the product register. Identical
machines could have different parts depending
on the date of production. Also, improvements
and modifications might have been made
after the publication of this manual. In order
to ensure you order the correct parts, mention
the Serial No. when contacting the applicable
places.
This SEGA product has warning displays on
stickers, labels and/or printed instructions
adhered/attached to or incorporated in the
places where a potentially hazardous situation
could arise. The warning displays are intended
for accident prevention for customers and
for avoiding hazardous situations relating to
maintenance and servicing work. Some portions
of the cabinet contain high voltage and may
cause accidents if touched.
When performing maintenance, be very careful
of the warning displays. It is especially important
that any complex repair and replacement work
not mentioned herein should be performed by
those technical personnel who have knowledge
of electricity and technical expertise. In order
to prevent accidents, caution any customer
ignoring the warnings to cease and desist
immediately
STICKER DISPLAY AND WARNING LABEL INFORMATION
LB1046
LABEL TESTED FOR ELEC. SAFETY
LB1102
STICKER DANGEROUS VOLTAGE 421-7988-91UKSTICKER SERIAL NUMBER UK
421-7020UK
STICKER CAUTION FORK
440-CS0186UK STICKER C EPILEPSY MULTI
LB1130
LABEL WEEE WHEELIE BIN
1
2
2
6
1
1
RMB-0550UK
16
17
18
421-7501-10
STICKER FL 40W
LB1104
STICKER CAUTION, HOT SURFACE
LB1102
STICKER DANGEROUS VOLTAGE
1
1
1
RMB-0670UK
3
LB1096
STICKER PROTECTIVE EARTH
1
RMB-4000UK
3
107
LB1096
LB1101
STICKER PROTECTIVE EARTH
STICKER WARNING BATTERY
1
1
1
HANDLING PRECAUTIONS
RMB-0000UK
8
9
10
11
17
19
2 PRECAUTIONS REGARDING INSTALLATION LOCATION
This product is an indoor game machine. Do not install it outside. Even indoors, avoid installing
in places mentioned below so as not to cause a fire, electric shock, injury and/or malfunction.
2
PRECAUTIONS REGARDING INSTALLATION LOCATION
- Places subject to rain or water leakage, or places subject to high humidity in the proximity of an indoor swimming pool and/or shower, etc.
- Places subject to direct sunlight, or places subject to high temperatures in the proximity of heating units, etc.
- Places filled with inflammable gas or vicinity of highly inflammable/volatile chemicals or hazardous matter.
- Dusty places.
- Sloped surfaces.
- Places subject to any type of violent impact.
- Vicinity of anti-disaster facilities such as fire exits and fire extinguishers.
- Areas where the temperature exceeds the applicable temperature (ambient temperature
range of 5 to 30 degrees centigrade.
2-1
LIMITATAION OF USE
Be sure to check the Electrical Specifications. Ensure that this product is compatible with the
location’ s power supply, voltage, and frequency requirements. A plate describing Electrical
Specifications is attached to the product. Non-compliance with the Electrical Specifications can
cause a fire and electric shock.
This product requires a breaker and earth mechanism as part of the location facilities. Using the
product without these can cause a fire and electric shock.
Ensure that the indoor wiring for the power supply is rated at 15 A or higher (AC single phase
100 V ~ 120 V area), and 7 A or higher (AC 220 V ~ 240 V area). Non-compliance with the
Electrical Specifications can cause a fire and electric shock.
Be sure to use an independent power supply equipped with an earth leakage breaker. Using a
power supply without an earth leakage breaker can cause an outbreak of fire if a power surge
occurs.
Putting many loads on one electrical outlet can cause generation of heat and a fire resulting
from overload.
When using an extension cord, ensure that the cord is rated at 15 A or higher (AC 100 V ~ 120
V area) and 7 A or higher (AC 220 V ~ 240 V area). Using a cord rated lower than the specified
rating can cause a fire and electric shock.
ELECTRICITY CONSUMPTION
MAX : 2.5A (AC 240V ~ 50Hz)
2-2
OPERATIONAL AREA
• Be sure to provide sufficient space specified in this manual. Do not allow objects to block the
ventilation ports. It can cause generation of heat and a fire.
• SEGA shall not be held responsible for damage or compensation for damage to a third
party, resulting from the failure to observe this instruction.
INSTALLATION SPACE
In order to transport the
machine into a building,
the minimum necessary
dimensions of the opening
(of doors, etc,) are
1.3m (W), and 2.1m (H).
2
PRECAUTIONS REGARDING INSTALLATION LOCATION
• For the operation of this machine, secure a minimum area of 2.6 m [W] x 3 m [D]. The dimensions of the base periphery are established in consideration of ventilation,
maintenance and customer passage. And if they fall and hit their head, there could be a very
serious injury. Be sure to always secure enough space as prescribed in this manual.
2-2 Fig 01
2-2 Fig 01
2-2 Fig 02
Before leaving the machine after Installation, make sure that the Castor Lift Adjusters are firmly positioned on the ground and that the machine is totaly stable.
3 PRECAUTIONS REGARDING PRODUCT OPERATION
3-1
BEFORE OPERATION
To avoid injury and trouble, be sure to pay attention to the behavior of visitors and players
3
PRECAUTION REGARDING PRODUCT OPERATION
In order to avoid accidents, check the following before starting the operation:
● To ensure maximum safety for the players and the customers, ensure that
where the product is operated has sufficient lighting to allow any warnings to be
read. Operation under insufficient lighting can cause bodily contact with each
other, hitting accident, and/or trouble between customers.
● Be sure to perform appropriate adjustment of the monitor (projector). For operation of this machine, do not leave monitor flickering or deviation as is. Failure to observe this can have a bad influence upon the players’ or the customers’ physical conditions.
● It is suggested to ensure a space allowing the players who feel sick while playing the game to take a rest.
● Do not put any heavy item on this product. Placing any heavy item on the
product can cause a falling down accident or parts damage.
● Do not climb on the product. Climbing on the product can cause
falling down accidents. To check the top portion of the product,
use a step ladder.
● When using a stepladder or stool while working, do not hold
onto the billboard carrier. Holding or hanging off this may bend
it out of shape or damage it, and could lead to a fall or an accident.
● To avoid electric shock, check that all doors
and covers are fitted correctly.
● To avoid electric shock, short circuit
and/or parts damage, do not put the
following items on or in the periphery
of the product. (Flower vases, flowerpots,
cups, water tanks, cosmetics, and
receptacles/containers/vessels containing
chemicals and water.)
● Check if all of the adjusters are in contact with the surface. If they are not, the
Cabinet can move and cause an accident.
3-1
BEFORE OPERATION
● To avoid injury, be sure to provide sufficient space by considering the potentially
crowded situation at the installation location. Insufficient installation space can
cause contact, collisions and or trouble between customers.
● During daily cleaning be sure to check the surface of the Guns and other parts that
the player touches with his hands for damage, cracks or loose screws. If a player uses
the machine while it is damaged, cracked or has a loose screw, the player may become injured.
ENSURE THAT THE TRIGGER IS FUNCTIONING PROPERLY
PRECAUTIONS REGARDING PRODUCT OPERATION
● Do not attempt to clean this product using pressurised equipment such as a jet wash
or hose. If for any reason this product becomes wet, do not use until it has completely dried.
3
ENSURE THAT THE SCREWS
ARE NOT LOOSE AND
ARE ALL PRESENT
ENSURE THAT THE CASE IS FREE
OF SCRATCHES AND CRACKS
To ensure customers enjoy playing the game, clean the Control Unit regularly. If
there is any dirt buildup, the trigger may not return properly after being pulled.
Players hold the controller with their bare hands so it is recommended that wet
towels (paper towels) be provided.
3-2
PAYING ATTENTION TO CUSTOMERS DURING OPERATION
To avoid injury and trouble, be sure to pay attention to the behavior of visitors and players.
3
● For safety reasons, do not allow any of the following people to play the game.
PRECAUTION REGARDING PRODUCT OPERATION
・Those who need assistance when walking.
・Those who have high blood pressure or heart problems.
・Those who have a neck or spinal cord problem.
・Those who have experienced muscle convulsion or loss of consciousness while
playing video games, etc.
・Those who are intoxicated or under the influence of drugs.
・Pregnant women.
・Those who are not in good health.
・Those who do not follow the attendants instructions.
・Those who cannot grasp the controller unit securely because of immobility in fingers, hands or arms.
・Persons who disregard the products warning labels.
● Even players who have never been adversely affected by light stimulus might
experience dizziness or headaches depending on their physical condition when
playing the game. Small children are especially likely to experience these symptoms.
Caution guardians of small children to keep watch on their children during play.
● Instruct those who feel sick during pay to seek medical advice or examination.
● To avoid injury from falling objects or electric shock hazard from split drinks, instruct
the player not to place drinks or heavy items on the product.
● To avoid electric shock hazard and short circuit hazard, do not allow customers to
put hand or fingers or any other extraneous matter in to the openings of the product
or small openings on or around the doors.
● To avoid falls resulting in injury, immediately stop the customer from leaning
against or climbing on the product.
● To avoid electric shock and/or short circuit hazard, do not allow customers to unplug
the power plug without a justifiable reason.
Immediately stop such violent acts as hitting and kicking the product. Such violent acts
can cause parts damage or cause the cabinet to fall over, resulting in injury.
4 PART DESCRIPTIONS
4
CANNON
LIGHTING
56 DLP
DISPLAY
Part Descriptions
BACK
DISPLAY POP
FRONT
NAME PLATE
FLAME EFFECT
LIGHTING
PLAYER 1
START
DLP DISPLAY
CABINET
PLAYER 2
START
COIN
INSERT
CONTROLLER
GUN
GUN
CONSOLE
CASH BOX
DOOR
ITEM
VIDEO CABINET
GUN CONSOLE
BILLBOARD
WHEN ASEMBLED
WIDTH (mm) DEPTH (mm) HEIGHT (mm) WEIGHT (kg)
1500
980
1450
1500
560
1272
212
1820
2025
1060
455
2310
192kg
108kg
300kg
5 ACCESSORIES
Confirm that the accessories list in the table below are present when setting up the product.
Accessories marked “Spare” in the note column are consumable items but included as spares.
TABLE 5A - ACCESSORIES
5
ACCESSORIES
DESCRIPTION OWNERS MANUAL
PT NUMBER (QTY) 420-7148-01UK (1)
NOTE This Manual
Parts not labeled with part numbers are as yet
unregistered or cannot be registered.
Be sure to handle all parts with care, as
some parts are not available for purchase as
separate items.
KEY (2)
CASHBOX DOOR
LINDBERGH RED SERVICE MANUAL
420-7032-A001 (1)
Explanation of built in Game Board
MAINS LEADS
LM1227 (1xUK)
LM1246 (1xEURO)
TAMPER PROOF SCREW WRENCH
M4 540-0006-01 (1)
SEQ
1
2
3
4
5
6
7
10
11
12
21
22
23
24
25
201
10
NUMBER
PK0455
420-7148-01UK
RMB-1001UK
509-5080
420-7032-01UK
OS1019
610-0727-5003
LM1227
LM1246
SAECE-XXX
RMB-0556UK
RMB-0557UK
RMB-0558UK
RMB-0559UK
CTF-1002UK
FAS-290034
KEY MASTER
220-5793 (J9117) (2)
For opening/closing
the doors
DESCRIPTION
BOX RMB INST KIT
OWNERS MANUAL RMB DX
STICKER INSTRUCTION MULTI RMB
SW MICRO TYPE (SS-5GL2)
LINDBERGH RED MANUAL
SELF SEAL BAG 9X12.3/4
DVD SOFT KIT RMB
UK MAINS LEAD 10A WITH PLUG
EUROLEAD 10A EUROPEAN SOCKET
DECLARATION OF CONFORMITY XXX
BILLBOARD FRONT PLATE
BILLBOARD STAY
BILLBOARD POP
POP BRKT POP HOLDER
WASHER CTF
HEX SKT LH CAP SCR STN M5X10
QUANTITY
1
1
1
2
1
2
1
1
1
1
1
1
1
1
2
2
NOTE
Spare
Spare
5 ACCESSORIES
5
ACCESSORIES
*21
RMB-0558UK
BILLBOARD FRONT PLATE
*23
RMB-0558UK
BILLBOARD POP
11
5 ACCESSORIES
Confirm that the accessories list in the table below are present when setting up the product.
Accessories marked “Spare” in the note column are consumable items but included as spares.
TABLE 5B - ACCESSORIES
5
ACCESSORIES
To order a duplicate “GAME DISC” DVD only, Please quote the following :
Part Number : 610-0726-0048 : DVD SOFT ADH
KEY CHIP (1)
CUSHION SPONGE
601-11137 (1)
Protective Material
GAME DISC (1)
DISC CASE
NOTE : The KEY CHIP has been already fitted into the LINDBERGH Game Board and the
GAME SOFTWARE has been pre-installed. Only use the “GAME DISC” DVD when necessary,
for some reason such as replacing the LINDBERGH. However to Install the Software you will require a DVD DRIVE and USB Cable (mini type). If you do not have these available, a “DVD
DRIVE KIT” has been made available for purchase from your supplier. See below for kit details.
TABLE 5C
XKT-1515-01 : DVD DRIVE KIT FOR LINDBERGH.
SERVICE MANUAL
420-6923-01 (1)
DVD DRIVE
610-0719-01-91 (1)
For software installation.
See “Chapter 17”
DVD WIRE
605-0094 (1)
For software installation.
12
6 ASSEMBLY & INSTALLATION
• Perform assembly work by following the procedure herein stated. Failure to comply
with the instructions can cause electric shock.
• Perform assembling as per this manual. Since this is a complex machine, incorrect
assembling can cause an electric shock, machine damage and/or improper
functioning as per specified performance.
• When assembling, more than one person is required. Depending on the assembly work,
there are some cases in which working by one person alone can cause personal
injury or parts damage.
6
ASSEMBLY & INSTALLATION
• This work should be carried out by site maintenance personnel or other qualified
professionals. Work performed by non-technical personnel can cause a severe
accident such as electric shock. Failing to comply with this instruction can cause a
severe accident such as electric shock to the player during operation. If no one with
proper technological expertise is available, request service from the office indicated
in this document or the point of purchase so as to ensure safety.
• Ensure that connectors are properly connected. Improper connections can cause
electric shock.
• Be careful not to damage the wires. Damaged wires may cause electric shock or short
circuit or present a risk of fire.
• Provide sufficient space so that assembling can be performed. Performing work in
places with narrow space or low ceiling may cause an accident and assembly work
to be difficult.
• To perform work safely and avoid serious accident such as the cabinet falling down, do
not perform work in places where step-like grade differences, a ditch, or slope exist.
• Do not leave power cords, ground wires or network cables in areas of heavy foot traffic.
Doing so may cause them to become damaged, possibly resulting in electric shock
and/or short circuits. When leaving wiring across a floor, always use a safety covers
to protect the wires. (Wiring diameter : Power Cables - approx 0.8, Network Cable
approx 0.5)
• The power cord for this product has a ground terminal. Make sure to use this ground
termination when plugging it into an indoor outlet. Failure to ground the product
could lead to electrocution. It can also cause malfunction.
• Do not use connectors other than those connected to and used by the game board at
the time of shipment. Do not connect wires to unused connectors. This could cause
the generation of heat or smoke, or a burnout.
• Wear appropriate work clothing so that work can be performed safely. Use gloves and
safety shoes to prevent accidents or injuries.
• When installing a wire protection cover over a floor, use a material shaped so that no
one passing by will stumble over it. Using a material that could be stumbled over
might lead to an accidental fall.
• Handle plastic parts with care. Excessive weight or pressure may cause them to break
and the broken pieces may cause injury.
• When opening/closing, attaching/removing doors or lids, be careful that your hands or
fingers etc, does not get caught in the apparatus.
13
Installation and assembly of this product should take place in the following sequence.
6-1
GENERAL ASSEMBLY INFORMATION
6-2 FITTING THE BILLBOARD AND POP
6
ASSEMBLY & INSTALLATION
14
6-3 FIXING THE GUN CONSOLE TO THE VIDEO CABINET
6-4 INSTALLATION AND SECURING IN PLACE
6-5 CONNECTING POWER CABLE AND GROUND
6-6 CHECKING ASSEMBLY (SET UP)
6-1
GENERAL ASSEMBLY INFORMATION
There are Two MAIN Assemblies plus Billboard Components supplied, that have to be
fitted together in order to complete the built of this machine :
6
ASSEMBLY & INSTALLATION
FRONT NAME
PLATE
DLP
CABINET
BILLBOARD
POP
GUN
CONSOLE
6-1 Fig 01
UNIT WHEN COMPLETE
15
6-2 FITTING THE BILLBOARD AND POP
6
ASSEMBLY & INSTALLATION
1
WORK SHOULD NOT BE UNDERTAKEN ON TOP OF THE CABINET WITHOUT
THE USE OF A SUITABLE STEP OR FOOT STOOL.
Fit and secure the Rear POP Panel to the rear of the “Rocket Tube Launchers” using 4x M8x20 BLK Hex Bolts (supplied).
6-2 Fig 01
2
Fit and secure the Front POP Panel to the rear of the “Rocket Tube Launchers” using 4x CTF-1002UK (WASHER CTF) and 4x FAS-290034 HEX SOCKET CAP SCREW M5x10 (supplied).
6-2 Fig 02
16
6-3 FIXING THE GUN CONSOLE TO THE VIDEO CABINET
1
Whenever moving the unit, manipulate the movement from either end of the
cabinet. Never push or pull the unit from the front or backside, as this can cause
the unit to topple over causing damage to the unit and possible injury to any
persons in the locality.
6
ASSEMBLY & INSTALLATION
The MAIN VIDEO Cabinet with BILLBOARD Fitted is very heavy therefore a minimum of two people are required when moving this unit. Great care should be
taken when handling or moving the DLP unit otherwise personal Injury may occur.
Position both Video Cabinet and
Gun Console in the approx area
of operation, allowing room to gain
access from all sides.
SERVICE
DOOR
6-3 Fig 02
6-3 Fig 01
Remove the SERVICE DOOR from the side
of the Gun Console.
17
6-3 FIXING THE GUN CONSOLE TO THE VIDEO CABINET
2
6
ASSEMBLY & INSTALLATION
Pass the Harness Connectors A to E
through the Harness Access Point
and position the unit close to the
DLP CABINET.
HARNESS
ACCESS
POINT
C
A
6-3 Fig 03
E
3
Locate the Connector Plate in the front
panel on the DLP Cabinet. Take the
EARTH Wire ‘E’ and securely attach
it to the EARTH POINT on the Plate.
Take the remaining four Connectors
A to D and plug them to the positions
shown on the Connector Plate.
D
B
B
A
C
D
E
EARTH POINT
VIDEO
CABLE
6-3 Fig 04
4
Take the VIDEO Cable that fitted
through the Connector Plate and
pass it through the Harness Access
Point into the Weapon Cabinet.
Once inside the Cabinet, take the
VIDEO Cable and attach it to the
Video Output Connector on the
LINDBERGH Game Box.
6-3 Fig 05
18
VIDEO
CABLE
6-3 FIXING THE GUN CONSOLE TO THE VIDEO CABINET
5
Once the wiring between the two units is complete, remove the eight fixing bolts from the DLP Cabinet and close the gap between the Weapon Cabinet and DLP Cabinet making sure that none of the interconnecting cables get trapped..
6
ASSEMBLY & INSTALLATION
6-3 Fig 06
6
When the Cabinets are together, line
up the holes in the Weapon Cabinet
bracket with the fixing holes located
in the DLP Cabinet.
Refit and tighten the eight bolts earlier
removed from the DLP Cabinet.
FIXING
FIXING
FIXING
FIXING
6-3 Fig 07
19
6-4 INSTALLATION AND SECURING IN PLACE
During Installation, make sure that all the adjusters are in contact the floor.
Otherwise the cabinet could move, causing an accident.
6
ASSEMBLY & INSTALLATION
.
RAMBO Deluxe consists of two Main Base Units : Main Video Cabinet and Gun Console.
6-4 Fig 01 - Shows the location of the Castors (C) and Fixing Adjusters (A).
During the installation of each unit, the Fixing Adjustment should be performed to ensure
that the units are stable.
A
A
C
VIDEO UNIT
C
‘A’ = Adjuster Locations
‘C’ = Castor Positions
C
C
A
A
C
C
6-4 Fig 1
GUN CONSOLE
C
A
20
6-4- Fig 02 - Showing the correct details for Adjustment.
C
A
6-5 CONNECTION OF POWER AND GROUND
• Use the power supply equipped with an earth leakage breaker. Use of power supply
without such a breaker could result in fire if there is a current leakage.
• Do not expose the power cords. If these are exposed, customers could stumble over
them, for instance, and easily damage them. Additionally, if these lines are damaged, there could be a risk of electrical shock or short circuit. Set these lines at locations where they will not interfere with customer traffic, or attach covers to them.
• After laying out the power cord on the floor, be sure to always protect it. If the power
cord is left exposed, it can easily be damaged, resulting in electrical shock.
• This product comes complete with POWER CORDS for the UK and EUROPEAN destinations, be sure to use the power cords supplied. If a power cord is to be replaced, be
sure to replace it with the same specification as the one provided.
6
ASSEMBLY & INSTALLATION
• This product MUST be EARTHED. Ensure that the unit is properly connected to the INDOOR GROUND. Without proper grounding, customers could be electrocuted,
product operation may not always be stable, and also introducing a risk of fire.
If grounding has been established with the ground wire inside the power cord, do not
perform grounding with the AC unit ground terminal. Conversely, if the AC unit ground
terminal has been used for grounding, do not establish ground with the ground wire in
the power cord. Otherwise there could be faulty or erroneous operations.
When using the product’ s AC Ground Terminal, use a ground wire
with a circular terminal as shown in the illustration, and establish
the ground securely. Avoid indiscriminate grounding operations
such as the use of a wire with only the sleeve peeled off.
1
Confirm that the MAINS SWITCH is set to OFF
21
6-5 CONNECTION OF POWER AND GROUND
2
6
.
ASSEMBLY & INSTALLATION
The accessory power cord has a ground wire inside it. Connect the power cord to the AC
unit then insert the power cord plug into a “power outlet with ground terminal.” If there
is no “power outlet with ground terminal,” be sure to establish ground by some other
means; for example, by connecting the AC unit ground terminal to a ground wire with a
ground mechanism prepared separately.
If you use a conversion adapter sold on the market to supply power, connect the ground
wire terminal of the adapter to a “securely grounded ground terminal.” <For Taiwan>
6-5 Fig 03
3
When using a ground wire made available separately, connect one end of the wire to the AC unit ground terminal and the opposite end to an indoor ground terminal. The AC unit ground
terminal is a bolt-and-nut combination. Remove the nut and pass the bolt through the ground terminal, then secure the nut to the bolt.
<For Taiwan>
6-5 Fig 04
4
The power cord is laid out indoors. Protect the power cord by attaching wire cover to it. If ground will be established with a ground wire made available separately, lay out the
ground wire indoors and have it protected. <Taiwan>
6-5 Fig 05
22
6-6
CHECKING ASSEMBLY - SET UP
THE MACHINE COMES WITH PRE-INSTALLED SOFTWARE, WHICH ALLOWS YOU TO GO
STRAIGHT INTO CHECKING ASSEMBLY - SET UP. HOWEVER IF THERE IS A REQUIREMENT
TO RE-INSTALL SOFT WARE FOR ANY REASON - SEE “CHAPTER 17” FOR DETAILS.
SYSTEM TEST MENU
The System Test Menu can be used to check the information or the operation of the LINDBERGH
Board, adjust Monitor Colour, and perform Coin Credits settings
1
Press the TEST Button after powering up the machine and the following SYSTEM TEST MENU will
be displayed. .
PLAYER 1
6
ASSEMBLY & INSTALLATION
The Installation ‘TEST MODE’ ensures that the assembly has been made correctly and
the IC BD is satisfactory (refer to Chapter 9).
Refer to the LINDBERGH Service manual for details on “SYSTEM TEST MODE” and “Chapter 9-3. GAME TEST MODE” for details on the |Game Test.
SYSTEM TEST MENU
SYSTEM INFORMATION
STORAGE INFORMATION
JVC TEST
MONITOR TEST
SPEAKER TEST
COIN ASSIGNMENTS
CLOCK SETTING
NETWORK SETTING
GAME TEST MODE
-> EXIT
SELECT WITH SERVICE AND PRESS TEST
2
Use the SERVICE Button to move the Cursor to the desired option, and press TEST to action the
Option selected.
3
After completing the Initial SYSTEM TEST MENU set up, advance to the GAME TEST MENU and
complete the following checks described in this chapter.
SYSTEM INFORMATION - STORAGE INFORMATION -
JVS TEST -
MONITOR TEST -
SPEAKER TEST -
COIN ASSIGNMENTS -
CLOCK SETTINGS -
NETWORK SETTINGS -
GAME TEST MODE -
EXIT -
See LINDBERGH Manual CH 4-A
See LINDBERGH Manual CH 4-B
See LINDBERGH Manual CH 4-C
This Chapter Section A
This Chapter Section B
This Chapter Section C
This Chapter Section D
This Chapter Section E
Advance to the GAME TEST MODE Menu
Exit the SYSTEM TEST MENU and return to GAME
23
6-6
6
A
ASSEMBLY & INSTALLATION
CHECKING ASSEMBLY - SET UP
• DISPLAY TEST
When the ‘MONITOR TEST’ is selected from the ‘System Test Menu Screen’ a screen to test the CRT Monitor will be displayed. Though the DISPLAY is pre-adjusted at the time of shipment from the factory, view the test screen to determine whether or not adjustment is necessary. If so refer to Chapter 9 and adjust the display.
6-6 Fig 01
MONITOR TEST 2/2
6-6 Fig 02
PRESS TEST TO EXIT
24
6-6
B
CHECKING ASSEMBLY - SET UP
• SPEAKER TEST
When selected from the ‘System Test Menu’ the SPEAKER TEST Menu will be displayed.
6-6 Fig 03
Use the SERVICE button
to step to the speaker
required to be checked
and then press the TEST
Button to change their
respective settings from
OFF to ON or ON to OFF.
PLAYER 1
SPEAKER TEST (ON BOARD)
RIGHT SPEAKER
LEFT SPEAKER
REAR RIGHT SPEAKER
REAR LEFT SPEAKER
CENTER SPEAKER
WOOFER SPEAKER
OFF
OFF
OFF
OFF
OFF
OFF
When set in ON position
the selected Speaker will
emit a TEST Sound.
It is possible to set more
than one Speaker ON at
the same time.
Some of these options may not be displayed depending on the type of game fitted.
On this model only the RIGHT SPEAKER and LEFT SPEAKER are used, which are located
either side of the Screen.
Move the Cursor to EXIT and press TEST to return to the SYSTEM TEST MENU.
C
->
EXIT
6
ASSEMBLY & INSTALLATION
SELECT WITH SERVICE AND PRESS TEST
• COIN ASSIGNMENTS
When selected from the ‘System Test Menu’ the COIN ASSIGNMENT Menu is displayed.
6-6 Fig 04
Use the SERVICE button
to Select the Option and
then press the TEST to
change the settings. For
this GAME the following
should be selected.
COIN CHUTE TYPE
Set - COMMON
SERVICE TYPE
Set - COMMON
PLAYER 1
COIN ASSIGNMENTS
COIN CHUTE TYPE
SERVICE TYPE
->
COMMON
COMMON
COIN CHUTE 1 - COIN TO CREDIT RATE
COIN CHUTE 2 - COIN TO CREDIT RATE
DETAIL SETTING
GAME COST SETTING
EXIT
SELECT WITH SERVICE AND PRESS TEST
For Information on the other Settings, Refer to the LINDBERGH Manual CH4-F.
Move the Cursor to EXIT and press TEST to return to the SYSTEM TEST MENU.
25
6-6
D
6
ASSEMBLY & INSTALLATION
CHECKING ASSEMBLY - SET UP
• CLOCK SETTING
When selected from the ‘System Test Menu’ the CLOCK SETTING Menu will be displayed.
6-6 Fig 05
Use the SERVICE button
to move the Cursor to the
Category that you wish
to change then press the
TEST Button to INCREASE
the VALUE
Holding the TEST down
will cause the VALUE to
Continuously Increase.
Any changes made will
come into effect when
you EXIT from the routine.
PLAYER 1
CLOCK SETTING
2006 / 2 / 2 (THU)
->
12:00:00
YEAR
MONTH
DAY
HOUR
MINUTE
SECOND
EXIT
SELECT WITH SERVICE AND PRESS TEST
Move the Cursor to EXIT and press TEST to return to the SYSTEM TEST MENU.
E
• NETWORK SETTING
When selected from the ‘System Test Menu’ the NETWORK SETTING Menu is displayed.
6-6 Fig 06
PLAYER 1
Use NETWORK SETTING
to determine Network
Set Up or to TEST the Network.
->
NETWORK SETTING
NETWORK TYPE
MAIN NETWORK
NETWORK TEST
EXIT
MAIN
There is no need to alter
these settings for a Game
that does not use a Network
SELECT WITH SERVICE AND PRESS TEST
26
For Information for other Network Settings, Refer to the LINDBERGH Manual CH4-H.
Move the Cursor to EXIT and press TEST to return to the SYSTEM TEST MENU.
6-6
F
• GAME TEST MODE
To complete the Installation, select the GAME TEST MODE and complete the following
TESTS
• INPUT TEST
When the ‘INPUT TEST’ is selected from the System Test Menu Screen’ a screen to test the Games Switches will be displayed.
6-6 Fig 07
Flip each of the switches
shown, if the display to the
right of the switch changes to ‘ON’ or indicates a
change in value, the switch
and the wiring are operational.
Aim and Fire this GUN at
the Screen, the Controller
X and Controller Y position
values are given to show
the Sight position.
2
PLAYER 1
INPUT TEST
START
CONTROLLER TRIGGER
CONTROLLER BUTTON
CONTROLLER X
CONTROLLER Y
SCREEN IN
SERVICE
TEST
PLAYER 1
OFF
OFF
OFF
**
**
OUT
PLAYER 2
OFF
OFF
OFF
**
**
OUT
OFF
OFF
6
ASSEMBLY & INSTALLATION
1
CHECKING ASSEMBLY - SET UP
PRESS TEST AND SERVICE BUTTONS TO EXIT
For information on Calibrating the ‘GUN SIGHT’ go to Chapter 9-3-4, Gun Adjustment
• OUTPUT TEST
When the ‘OUTPUT TEST’ is
selected from the System
Test Menu Screen’ a screen
to test the Games Lamps will
be displayed.
Use the SERVICE button to
step to the output required
to be checked and then
press the Test Button.
If the output selected lamp
illuminates, the wiring and
lamp are both operational.
6-6 Fig 08
PLAYER 1
OUTPUT TEST
START 1 LAMP
START 2 LAMP
LEFT LAMP
RIGHT LAMP
->
OFF
OFF
OFF
OFF
EXIT
SELECT WITH SERVICE BUTTON
AND PRESS TEST BUTTON
27
6-6
CHECKING ASSEMBLY - SET UP
‘CONTROLLER (GUN) ADJUSTMENT’ - METHOD HOW TO AIM
6
ASSEMBLY & INSTALLATION
A -
Align the top of the groove on the controller’ s rear sight with the horizontal line of the plus sign on the screen.
B -
Align the top of the controller’ s front sight with the horizontal line as well.
C -
Pull the trigger when the top of the rear sight and top of the front sight line up with the center of the plus sign on the screen.
+
PLAYER 1
CONTROLLER ADJUSTMENT
PLAYER 1
->
+
TOP
LEFT
CENTER X
Y
RIGHT
BOTTOM
DEFAULT
CANCEL
CHECK
PLAYER 2
OLD
**
**
**
**
**
**
NEW
**
**
**
**
**
**
->
+
TOP
LEFT
CENTER X
Y
RIGHT
BOTTOM
DEFAULT
CANCEL
CHECK
OLD
**
**
**
**
**
**
NEW
**
**
**
**
**
**
+
SELECT WITH START BUTTON
AND PULL TRIGGER
6-6 Fig 09
.
1 Select TOP, AIM at the TOP MARK, and pull the TRIGGER. The new value will appear in the NEW column.
The previous value will be shown in the OLD column. Select LEFT, AIM at the LEFT SIDE MARK, and pull the TRIGGER. The new value will appear in the NEW column. The previous value will be shown in the OLD column. 3
CENTER adjustment
Select CENTER, AIM at the CENTRE MARK, and pull the TRIGGER.
The new values for X and Y will appear in the NEW column. The previous X and Y values will be shown in the OLD column. ..
4
5
RIGHT adjustment
Select RIGHT, AIM at the RIGHT SIDE MARK, and pull the TRIGGER
The new value will appear in the NEW column. The previous value will be shown in the OLD column.. BOTTOM adjustment Select BOTTOM, AIM at the BOTTOM MARK, and pull the TRIGGER.
The new value will appear in the NEW column. The previous value will be shown in the OLD column.
Use the CHECK option to CHECK the DETECTION POSITIONS
6
28
+
TOP adjustment
LEFT adjustment
2
PRESS TEST BUTTON TO EXIT
For information on ADJUSTING THE GUN SIGHTS go to Chapter 9-3-4 Gun Adjustment
PERFORM THE ABOVE INSTALLATION TEST INSPECTIONS EVERY MONTH
6-6
CHECKING ASSEMBLY - SET UP
SETTINGS AT TIME OF INSTALLATION
Using “TEST MODE” Set, Adjust and Confirm the following settings shown below.
1
• COIN ASSIGNMENTS
2
• NETWORK SETTING
6
ASSEMBLY & INSTALLATION
Refer to the “LINDBERGH Service Manual” for details on the “SYSTEM TEST MODE”
and “Chapter 4-F GAME TEST” for the “GAME TEST MODE.”
Set up the Coin Settings under - COIN ASSIGNMENTS
COIN CHUTE TYPE -
COMMON
SERVICE TYPE
-
COMMON
Select the MAIN NETWORK and set it up in the following manner:
DHCP
-
DISABLE
There is no need to set a specific value for the IP address. Leave the display IP address as is and exit the settings.
29
7 PRECAUTIONS WHEN MOVING THE MACHINE
7
● Always disconnect the power cable before moving the product. If it is moved with
the power cable connected, the cable could be damaged, causing fire or electric
shock.
PRECAUTIONS WHEN MOVING THE MACHINE
● To move the unit over the floor, pull in the adjustors and have the casters contact
the floor. While moving the unit, be careful that the casters do not roll over the
power cord or the ground wire. If cord or wire is damaged, there could be electrical
shocks and/or short circuits.
● When crossing a sloped or stepped area, disconnect the PTV from the Main Cabinet.
If you tilt them while connected together, the connection points may be damaged
and personnel could be injured.
● When lifting the cabinet up steps, you must hold it by the designated handles or by
the bottom surface. Lifting it by any other area may lead to damage or dis-figuration
to that part or surrounding parts due to the weight of the cabinet and could also
lead to injury of personnel.
● When tilting the cabinet to move it across a sloped or stepped area, always use at
least two people. Attempting such an operation alone can lead to accident or injury.
● When moving the components separately, take care concerning the direction you
push the DLP and Controller Cabinet in. These elements may fall over, causing
damage or an accident.
● When detached always keep the cabinet on a level surface and make sure that it
does not to lean in either direction whilst working on it. Danger of the Cabinet
falling over and causing Unit Damage and possible injury of personnel.
● When moving the cabinet, do not hold, push or pull the Control Units. This may
disfigure or damage them.
● If you need to move components through a narrow or low door and the only way to
get the separated components through is to turn them on their side, or if a separation
method other than those described in this manual is required, either make a request
to the office listed in this document or the place of purchase to perform the operation
or contact them regarding how to perform it. Carelessly turning the components onto
their side or separating them in ways other than those depicted in this manual may
lead to unrepairable damage.
● Do not use the Controller Holders to move the cabinet, in doing so may damage or
disfigure them.
30
● Due to the poor stability of the VIDEO Cabinet when ‘NOT’ Connected to the GUN
CONSOLE , moving this unit should NOT be undertaken single handed, a minimum
of two persons are required. ‘
● Before attempting to move
the machine, make sure
that the MAIN VOLTAGE
Supply is removed.
7
PRECAUTIONS WHEN MOVING THE MACHINE
● When moving it, manipulate the movement from either end of the Unit’ DO NOT’
under any circumstances Push of Pull the unit from either the Front or Rear sides,
as this may result in the unit falling over and causing Damage to the unit and
possible serious injury to persons in the locality.
● Always raise the Adjusters
up as high as they will go.
● Never attempt to move a
machine unaided.
● Be aware of the Space you
are working in, it may be
necessary to remove some
of the Assemblies in order
to complete the move.
RAISE THE ADJUSTERS AS HIGH AS POSSIBLE
● HEIGHT PROBLEM
To remove the Billboard
POP go to Chapter 6-2
See 6-2 Fig02
● WIDTH PROBLEM
To remove the Gun Console
go to Chapter 6-3 and work
Sections - 6 > 5 > 4 > 3.
31
8 GAME DESCRIPTION
The following explanations apply when the product is functioning satisfactory.
Should the be any actions different from the following contents, some sort of fault may have
occurred. Immediately look into the cause of the fault and eliminate the cause thereof to ensure
satisfactory operation.
8
Game Description
8-1
GAME OVERVIEW
1
CREDIT
2
START
3
GAME SCREEN
4
RELOAD
5
RAGE MODE
6
DEFENCE
7
ITEMS
8
TASKS
9
BATTLE WITH THE BOSSES
10
GAME OVER
11
ADDITIONAL PLAYER
12
CONTINUE PLAY
13
TOP 10 - NAME ENTRY
8-2 HINTS FOR PLAYING THE GAME
SIX TOP HINTS GIVEN TO PLAY THE GAME
32
8-1
1
GAME OVERVIEW
2
Which start button you press will determine which side you will play on. Once you press the
start button, the game will begin.
3
Once the game starts, the video demonstration will play, followed by the stage title, and then
it will go to the actual game.
GAME SCREEN
8
Game Description
When you insert coins, they will be counted in the credit display at the bottom of the screen.
When you insert enough coins for a game, the message at the bottom will change from “INSERT
COIN (S)” to “PRESS START BUTTON,” and the start buttons on either side will flash.
Up to 9 credits can be counted at once. Coins inserted after 9 credits are recorded will not be
counted or returned. However, the number of coins inserted will be counted in the data display and the coin meter
(8-1 Fig 01)
The LIFE, AMMO REMAINING, RAGE GAUGE and MEDALS of the player playing on the left (Player 1) are shown at the bottom left of the screen, while those of the player playing on the right (Player 2) are shown at the bottom right of the screen. When no players are playing, the number of CREDITS are displayed.
A :
B :
C :
D :
E :
AMMO REMAINING
RAGE GAUGE
MEDAL
LIFE
CREDITS.
A
B
E
C
D
33
8-1
4
8
Game Description
5
GAME OVERVIEW
RELOAD
(8 -1 Fig 02) When the player fires all AMMO REMAINING, the Gun will be EMPTY, and the “RELOAD” message will appear on the screen. The player can then reload the weapon by aiming it outside
the screen. The player can reload this way even if there are still bullets left. The weapon is also
reloaded automatically once a certain period of time has passed. A : RELOAD
A
(8-1 Fig 03)
RAGE MODE
The player enters RAGE MODE after pressing the RAGE MODE activation button. The player can use RAGE MODE for a set amount of time depending on the level displayed in the RAGE GAUGE. When RAGE MODE is activated, the power of the bullets and the automatic firing speed increase. If it is activated when the RAGE GAUGE is on MAX, the player will become invincible for a brief period of time. A : RAGE ACTIVATION BUTTON
A NOTE: The Rage Gauge fills up quicker when the player defeats enemies efficiently. The gauge also fills when the player is hit by an enemy attack or through items.
34
8-1
6
GAME OVERVIEW
DEFENCE
Players can defend themselves from enemy hand grenades and missiles by shooting them down.
Items sometimes appear when the player shoots wooden boxes and drums in the background. The player can acquire the items by shooting them. The items fill the RAGE GAUGE, increase the
player’ s Medals or recover LIFE.
FIRST AID KIT - LARGE
FIRST AID KIT - SMALL
Adds 2 to the LIFE Total
Adds 1 to the LIFE Tota
However, it will not increase the number of LIFE past the MAX
(See 9-3-4 for details on the MAX LIFE setting.)
DOUBLE MEDAL
SINGLE MEDAL
Adds 2 to the MEDAL Total
Adds 1to the MEDAL Total
.
The more medals a player collects, the higher the grade at the end of the stage.
Medals are obtained by completing tasks or shooting items.
RAMBO’ S HEADBAND
Fills the RAGE GAUGE completely. 7
Game Description
ITEMS
8
35
8-1
8
8
GAME OVERVIEW
TASKS
Game Description
As the game progresses, Rambo is faced with various tasks, such as defeating enemies with
a knife or running away from bombs dropped from the air. Follow the on-screen instructions
to complete the task
.
The instructions will vary depending on the task, such as shooting a target within a designated
time limit or pressing the START button repeatedly. If the player fails at the task, the player’ s
health may be damaged, possibly to the point of losing LIFE, or the player may be diverted to a path of the game where a large number of enemies appear and launch a massive attack. A
36
8-1
9
GAME OVERVIEW
BATTLES WITH THE BOSSES
A unique boss awaits the player at the end of each stage. The way to defeat them varies and will be revealed in the form of on-screen instructions.
Game Description
A: INSTRUCTIONS
A
The boss’ s life gauge will decrease when the player attacks according to the instructions. The player defeats the boss by successfully carrying out all of the instructions.
When the boss begins an attack, sometimes a cancel gauge will appear. The boss’ s attack can then be avoided by forcing the cancel gauge down to zero.
A :
B :
BOSS’ S LIFE GAUGE
BOSS’ S CANCEL GAUGE
8
A
B
37
8-1
10
8
GAME OVERVIEW
GAME OVER
If both players run out of LIFE, the game will END.
LIFE is shown as FIRST AID Kits.
Game Description
11
ADDITIONAL PLAYER
If you want to join the game during play, insert coins and press the START button at any time.
If there are enough credits remaining to play again, the START button on the side with no one
playing will continue to flash. Joined the game by pressing the flashing START button.
12
13
CONTINUED PLAY
When all LIFE is lost, the CONTINUE message will be displayed. If you wish to CONTINUE, insert
the required number of coins and press the START button again. If there are enough credits remaining to CONTINUE, you can join again by pressing the START button
.
TOP 10 NAME ENTRY
If your total points are within the TOP 10 after completing all the stages in the game, you will
be able to enter your name.
38
8-2 HINTS FOR PLAYING THE GAME
1
Aim and shoot at the weapons
If you shoot the enemies’ weapons, they can be defeated with a single shot. Even the large
enemies with lots of strength can be quickly eliminated if you aim at their weapons
3
Defeat enemies with SUPERSHOTS!
When you defeat enemy with a SUPERSHOT, your Rage Gauge will fill quicker, and you will
receive a higher grade at the end of the stage. There are three types of SUPERSHOTS: CRACK
SHOTS, which are when you shoot an enemy’ s weapon, FAST SHOTS, which are when you defeat an enemy soon after he appears on the screen, and HEROIC SHOTS, which are when you
defeat an enemy soon after he/she appears on the screen by shooting his weapon. You’ ll get
through the game like a pro by making these SUPERSHOTS in succession.
4
Game Description
2
8
Complete the tasks!
Various tasks will arise within the stages. If you fail at a task, your health may be damaged or
you may be diverted to a more difficult path. Successfully completing the tasks is the key to
better performance.
.
If you are low on LIFE, shoot items that will give you more! When you are hit by enemy attacks, you will lose LIFE, but there are items within the stage that can increase your LIFE. You will also get more LIFE based on your performance after you clear a stage. Play often to improve your skills at getting more LIFE. Note that you will not be able to increase your LIFE past the MAX. (See 9-3-4 for details on the MAX LIFE setting.)
5 Make effective use of RAGE MODE!
If you press the RAGE MODE activation button when you have something in your RAGE GAUGE,
you will enter RAGE MODE for the amount of time corresponding to what is left in your RAGE
GAUGE. While in RAGE MODE, the power of your bullets and the automatic firing speed will
increase, and you will not need to reload. Use RAGE MODE if you get surrounded by a large
number of enemies or come up against an enemy that you are not good at defeating. If you
enter RAGE MODE after filling your RAGE GAUGE completely, you will be invincible. You can fill
your RAGE GAUGE quicker by defeating your enemies with SUPERSHOTS. The gauge will also fill
when you are hit by enemy fire or acquire items. 6
Follow the instructions for defeating bosses carefully!
The way to defeat the boss varies for each stage. Some of them can be defeated by hitting a
target with a single shot, while others have to be shot with a large number of bullets within a
certain amount of time. Remember the way to defeat them and fight them accordingly.
39
NOTES ON THE GAME
8
Game Description
40
9 EXPLANATION OF TEST AND DATA DISPLAY
Never touch places other than those specified. Touching places not specified can cause
electric shock and short circuit accidents.
TEST MODE
Be careful that a finger or hand does not get caught when opening/closing the coin
chute door.
9
• When you enter the Test Mode, fractional coin and bonus adder data is erased.
• Adjust the sound to the optimum volume, taking into consideration the
environmental requirements of the installation location.
• Removing the Coin Meter circuitry renders the game inoperable.
41
9 TEST MODE
Perform periodic tests and data checks using the TEST and SERVICE buttons inside the cabinet. Follow
the instructions in this chapter to conduct checks when the game machine is first installed, when
money is being collected, or when the game machine does not operate properly.
9
TEST MODE
Shown below are the tests and screens to be used for different problems.
This product uses a LINDBERGH game board and a DVD DRIVE. In the system, a different game can be
played by putting a different DVD ROM in the DVD DRIVE.
For this reason, the product’ s Test Mode consists of two modes: a System Test Mode for systems in
which coin settings, for instance, are made for products that use the same system, and the Game Test
Mode for setting of difficulty level, etc., and for input/output test of operational units used exclusively
with this product.
9 TABLE 01 EXPLANATION OF TEST MODE
ITEMS
INSTALLATION OF MACHINE
DESCRIPTION
REFERENCE
SECTIONS
1. Confirm that the Information Display
Screen appears in normal fashion.
S/M Chapter 4
Chapter 9
2.
S/M Chapter 4,
Chapter 9
Check each Input equipment in the
INPUT TEST mode.
3. Check each Output equipment in the
OUTPUT TEST mode.
S/M Chapter 4,
Chapter 9
1. Check Settings.
S/M Chapter 4,
Chapter 9
2. To test each Input equipment in the
INPUT TEST mode.
S/M Chapter 4,
Chapter 9
3. To test each Output equipment in the
OUTPUT TEST mode.
S/M Chapter 4,
6Chapter 9
1. To check each Input equipment in the
INPUT TEST mode.
S/M Chapter 4,
Chapter 95
2. Adjust or replace each Input equipment.
and examine the mechanical operation
of each device.
Chapter 10,
MONITOR
In the Monitor Adjustment mode, check to
see if Monitor (Projector) adjustments are
appropriate.
S/M Chapter 4,
chapter 11
IC BOARD
1. Information Display Screen
S/M Chapter 4
2. SPEAKER TEST
S/M Chapter 4
Check such data as game play time and
histogram to adjust the difficulty level, etc.
9-3-7
PERIODIC MAINTENANCE
CONTROL SYSTEM
DATA CHECK
NOTE: “S/M” in the table denotes LINDBERGH service manual, which is provided separately.
42
9-1 SWITCH UNIT AND COIN METER
The SWITCH UNIT AND COIN METER Panel is located behind the Coin Mech Door.
Unlock and open the coin chute door. Inside is a switch unit.
Allows access to the machines ‘TEST MODE’ routine.
TEST BUTTON :
B
C
Becomes the button to confirm selections in Test Mode
SERVICE BUTTON : Gives credits without registering on the coin meter.
Becomes the button to select items in Test Mode.
VOLUME CONTROL : Adjusts sound volume of the Left and Right Speakers located inside the Monitor Cabinet. Turn Clockwise to increase the Volume
9
TEST MODE
A
CREDIT AND SERVICE PANEL
LOCATION - BEHIND THE COIN MECH DOOR
CREDIT
METER
EXCEL
CREDIT BOARD
VOLUME CONTROL
SERVICE BUTTON
TEST BUTTON
E
CREDIT METER :
Records the Total Number of Games Played resulting from Coins being Inserted for Play.
43
9-2 SYSTEM TEST MODE
9
TEST MODE
● The details of changes to Test Mode settings are saved when you exit from Test
Mode by selecting EXIT from the system Test Mode menu. Be careful because if the
power is turned off before that point, changes to the settings will be lost.
● Use with the specified settings. If settings other than those specified are used,
inappropriate operations or malfunction may occur.
● Go to BOOKKEEPING in GAME TEST MODE to access this product’ s data.
● Read the LINDBERGH RED EX service manual that comes with the product for details
on the System Test Mode. However, you should perform the settings for this product
according to the manual you are reading.
In the System Test Mode, the main activities include checking LINDBERGH RED EX information and
actions and the setting of coin/credit. Also, a screen appears for checking screen adjustments. For
details, see the LINDBERGH RED EX service manual, which is provided with the product.
Use the following settings with this product. If the settings are not as specified, error messages might
appear and operations might not be normal.
NOTE : If you proceed to the game screen using different settings, you will get an “Error 200” message
on the screen. If that happens, go back to the SYSTEM TEST MENU and change the settings to the
following:
COIN ASSIGNMENTS :
COIN CHUTE TYPE (Type of Coin Chute used)
-
SERVICE TYPE
(Type of Service Button used) -
COMMON
COMMON
• When changing the game configuration, changes will not take effect until the Game
Test Mode properly after configuration changes. Be sure to exit the Game Test Mode
properly after configuration changes.
• Do not configure the game in ways not described in this text. It is possible that the
game will not function properly.
44
9-2 SYSTEM TEST MODE
9-2
‘SYSTEM
TEST MODE’ Menu
PLAYER 1
SYSTEM TEST MENU
JVS TEST
MONITOR TEST
SPEAKER TEST (ON BOARD)
COIN ASSIGNMENTS
CLOCK SETTING
TEST MODE
SYSTEM INFORMATION
STORAGE INFORMATION
9
NETWORK SETTING
->
9-2 Fig 01
1
2
3
4
5
GAME TEST MODE
EXIT
SELECT WITH SERVICE AND PRESS TEST
When the TEST Button is pressed, the System Test Menu Screen (SYSTEM TEST MENU) appears.
Use the SERVICE Button to move the cursor to the desired test item.
Press the TEST Button to confirm selection of the item.
When testing and checking are completed, select EXIT and press the TEST Button. The System
Test Menu Screen reappears.
When all tests are completed, select EXIT and press the TEST Button. The Game Screen
reappears.
45
9-3 GAME TEST MODE
9-3
‘GAME
TEST MODE’ Menu
9
TEST MODE
When changes to the Game Configuration are made, they will not take effect unless
the Game Test Mode is exited properly. If this exit routine is not completed correctly,
the Game Configuration will remain unchanged.
Do not configure the game in ways not described in this text. It is possible that the
game will not function properly.
1
2
Select GAME TEST MODE from the System Test Menu GAME TEST MENU
Screen to display the Game
PLAYER 1
Test Mode Menu
.
INPUT TEST
OUTPUT TEST
Use the SERVICE Button to GAME ASSIGNMENTS
move the cursor to the desired CONTROLLER ADJUSTMENT
BOOKKEEPING
test item. BACKUP DATA CLEAR
Press the TEST Button
-> EXIT
to enter the selected item.
3
After the test is complete, move SELECT
WITH
SERVICE
BUTTON
the cursor to EXIT and press the AND
PRESS
TEST
BUTTON
TEST Button to return to the GAME TEST Menu Screen.
9-3 Fig 01
The following is available to be checked during the GAME TEST MODE :
9-3-1 INPUT TEST
Test each Input.
9-3-2 OUTPUT TEST
Test each Output.
9-3-3GAME ASSIGNMENTS
Adjust Game Settings.
9-3-4 CONTROLLER ADJUSTMENT
Adjust the Gun Aim Settings.
9-3-5 BOOK KEEPING
View Game Backup Data.
9-3-6 BACKUP DATA CLEAR
Clear Game Backup Data.
9-3-7 EXITGo back to the System Test Menu.
4 5 During the GAME TEST MODE, select EXIT and pressing the TEST Button to step back to the
SYSTEM TEST MENU, selecting EXIT and pressing the TEST Button again will exit the routine
and the GAME SCREEN reappears.
46
9-3 GAME TEST MODE
9-3-1
‘INPUT
TEST MODE’ Menu
Select INPUT TEST to display the following screen and check the status of input devices.
This test should be used periodically to check that each input device is functioning correctly.
9
INPUT TEST
START
CONTROLLER TRIGGER
CONTROLLER BUTTON
CONTROLLER X
CONTROLLER Y
SCREEN IN
SERVICE
TEST
9-3-1 Fig 01
PLAYER 1
OFF
OFF
OFF
**
**
OUT
PLAYER 2
OFF
OFF
OFF
**
**
OUT
OFF
OFF
TEST MODE
PLAYER 1
PRESS TEST AND SERVICE BUTTONS TO EXIT
Use the SERVICE Button to Select the Input to be tested and the TEST Button to action the test. - PLAYER 1 refers to the Gun on the LEFT, - PLAYER 2 refers to the Gun on the RIGHT
1
2
3
4
5
6
7
8
9
START - This will say ON when the START buttons are being pressed and OFF when they are
released
CONTROLLER TRIGGER - This will say ON when the triggers on the controllers are being pulled
and OFF when they are released. CONTROLLER BUTTON - This will say ON when the buttons on the controllers are being pressed
and OFF when they are released.
CONTROLLER X - This shows the aim location for the X direction on the controllers. .
CONTROLLER Y- This shows the aim location for the Y direction on the controllers.
SCREEN IN - This will say IN when the controllers are aimed inside the screen and OUT when
they are aimed outside the screen. SERVICE - This will say ON when the SERVICE button is being pressed and OFF when it is
released.
TEST - This will say ON when the TEST button is being pressed and OFF when it is released.
When all checks are completed, press the TEST Button and the SERVICE Button simultaneously.
The GAME TEST MODE screen reappears.
47
9-3 GAME TEST MODE
9-3-2
‘OUTPUT TEST MODE’ Menu
Select OUTPUT TEST to display the following screen and check the status of each lamp.
This test should be used periodically to check that each output device is functioning correctly.
9
TEST MODE
PLAYER 1
OUTPUT TEST
START 1 LAMP
START 2 LAMP
LEFT LAMP
RIGHT LAMP
->
9-3-2 Fig 01
1
2
3
OFF
OFF
OFF
OFF
EXIT
SELECT WITH SERVICE BUTTON
AND PRESS TEST BUTTON
Press the SERVICE Button and move the cursor to select the output device to be Tested.
When the TEST Button is pressed, the Output next to the cursor is tested and the device
operates. Confirm that the output device behaves in compliance with manipulations.
START1 LAMP This will say ON when you select START1 LAMP and press the TEST button. The Player 1 START button on the cabinet will then light up.
Press the TEST button again to turn it OFF.
START2 LAMP This will say ON when you select START2 LAMP and press the TEST button. The Player 2 START button on the cabinet will then light up. Press the TEST button again to turn it OFF. 4
LEFT LAMP When you select LEFT LAMP and press the TEST button, the number will change
sequentially, and the LEFT LAMP on the cabinet will flash on/off or light according to that
number. Press the TEST button again to turn it OFF. RIGHT LAMP When you select RIGHT LAMP and press the TEST button, the number will change sequentially, and the RIGHT LAMP on the cabinet will flash on/off or light according
to that number. Press the TEST button again to turn it OFF
Move the arrow to EXIT and press the TEST Button to return to the GAME TEST Menu Screen.
5
6
7
48
9-3 GAME TEST MODE
9-3-3
‘GAME
ASSIGNMENTS’ Select GAME ASSIGNMENTS’ to display the following screen and check the GAME SETTINGS.
This test should be used periodically to check that each output device is functioning correctly.
9
PLAYER 1
GAME
ASSIGNMENTS
DIFFICULTY
NORMAL
LIFE SETTING
INITIAL LIFE
MAX LIFE
FREE CONTINUE LIFE
ADVERTISE SOUND
->
*
*
TEST MODE
GAME
*
ON
EXIT
SELECT
AND
WITH
SERVICE
BUTTON
PRESS
TEST
BUTTON
Press the SERVICE Button to step the Arrow around to select the function required,
then press the TEST Button to gain entry.
1 2
3
4
5
6
GAME DIFFICULTY
Set the level of difficulty to one of five levels ; VERY EASY -> MEDIUM EASY ->NORMAL -> MEDIUM HARD -> VERY HARD.
LIFE SETTING - INITIAL LIFE
The number of lives the player will start the game with, can
be set between 1 and 9. However, it cannot be set higher than the MAX LIFE setting when the
MAX LIFE setting is lower than 9.
LIFE SETTING - MAX LIFE
The maximum number of lives a player may have. can be set
between 1 and 9.
LIFE SETTING - FREE CONTINUE LIFE The number of LIFE the player will have to CONTINUE.
Can be set between 0 and 4. The total value for INITIAL LIFE and FREE CONTINUE LIFE cannot
exceed the MAX LIFE setting.
ADVERTISE SOUND Set the sound level for the advertisements to one of five levels : “ON” -> “7/10” -> “5/10” -> “3/10” -> “OFF.” The closer you get to OFF, the lower the volume.
When all setting adjustments are completed, select EXIT and press the TEST Button. The GAME
TEST MODE screen reappears.
49
9-3 GAME TEST MODE
9-3-4
‘CONTROLLER
(GUN) ADJUSTMENT’ - GENERAL +
PLAYER 1
CONTROLLER ADJUSTMENT
9
TEST MODE
PLAYER 1
->
+
TOP
LEFT
CENTER X
Y
RIGHT
BOTTOM
DEFAULT
CANCEL
CHECK
PLAYER 2
OLD
**
**
**
**
**
**
NEW
**
**
**
**
**
**
->
+
TOP
LEFT
CENTER X
Y
RIGHT
BOTTOM
DEFAULT
CANCEL
CHECK
OLD
**
**
**
**
**
**
NEW
**
**
**
**
**
**
+
SELECT WITH START BUTTON
AND PULL TRIGGER
PRESS TEST BUTTON TO EXIT
+
TO ADJUST THE CONTROLLER CALIBRATION :
Use the Player 1 START Button to move the cursor when setting up the Left Hand Controller.
Use the Player 2 START Button to move the cursor when setting up the Right Hand Controller.
1 2
3
4
5
6
7
Press each player START button and move the cursor to select an item, then press the TEST Button to test the item. TOP
Sets the TOP correction value for the UP and DOWN direction. LEFT Sets the LEFT side correction value for the LEFT and RIGHT direction.. CENTER Sets the center correction value.
CENTER X is for the LEFT and RIGHT direction, and
CENTER Y is for the UP and DOWN direction. RIGHT
Sets the RIGHT side correction value for the LEFT and RIGHT direction.
8
BOTTOM
Sets the BOTTOM correction value for the UP and DOWN direction. DEFAULT
Sets the value for the player detection position to the default setting. CANCEL
Returns the values to the previous settings.
CHECK
Checks the detection position. When all setting adjustments are completed, select EXIT and press the TEST Button. The GAME
TEST MODE screen reappears.
9
10
50
9-3 GAME TEST MODE
9-3-4
‘CONTROLLER
(GUN) ADJUSTMENT’ - METHOD HOW TO AIM
Align the top of the groove on the controller’ s rear sight with the horizontal line of the plus sign on the screen.
B -
Align the top of the controller’ s front sight with the horizontal line as well.
C -
Pull the trigger when the top of the rear sight and top of the front sight line up with the center of the plus sign on the screen.
9
TEST MODE
A -
+
PLAYER 1
CONTROLLER ADJUSTMENT
PLAYER 1
->
+
TOP
LEFT
CENTER X
Y
RIGHT
BOTTOM
PLAYER 2
OLD
**
**
**
**
**
**
NEW
**
**
**
**
**
**
DEFAULT
CANCEL
CHECK
->
+
TOP
LEFT
CENTER X
Y
RIGHT
BOTTOM
DEFAULT
CANCEL
CHECK
OLD
**
**
**
**
**
**
NEW
**
**
**
**
**
**
+
SELECT WITH START BUTTON
AND PULL TRIGGER
PRESS TEST BUTTON TO EXIT
+
.
1 TOP adjustment
LEFT adjustment
Select TOP, AIM at the TOP MARK, and pull the TRIGGER. The new value will appear in the NEW column.
The previous value will be shown in the OLD column. Select LEFT, AIM at the LEFT SIDE MARK, and pull the TRIGGER. The new value will appear in the NEW column. The previous value will be shown in the OLD column. 3
CENTER adjustment
Select CENTER, AIM at the CENTRE MARK, and pull the TRIGGER.
The new values for X and Y will appear in the NEW column. The previous X and Y values will be shown in the OLD column. ..
4
5
RIGHT adjustment
Select RIGHT, AIM at the RIGHT SIDE MARK, and pull the TRIGGER
The new value will appear in the NEW column. The previous value will be shown in the OLD column.. BOTTOM adjustment Select BOTTOM, AIM at the BOTTOM MARK, and pull the TRIGGER.
The new value will appear in the NEW column. The previous value will be shown in the OLD column.
Use the CHECK option to CHECK the DETECTION POSITIONS
2
6
51
9-3 GAME TEST MODE
9-3-4
‘CONTROLLER
(GUN) ADJUSTMENT’ - DEFAULT 9
TEST MODE
+
PLAYER 1
CONTROLLER ADJUSTMENT
PLAYER 1
+
TOP
LEFT
CENTER X
Y
RIGHT
BOTTOM
->
PLAYER 2
OLD
**
**
**
**
**
**
NEW
**
**
**
**
**
**
DEFAULT
CANCEL
CHECK
+
TOP
LEFT
CENTER X
Y
RIGHT
BOTTOM
->
DEFAULT
CANCEL
CHECK
OLD
**
**
**
**
**
**
NEW
**
**
**
**
**
**
+
SELECT WITH START BUTTON
AND PULL TRIGGER
PRESS TEST BUTTON TO EXIT
+
EXPLANATION OF DEFAULT
Sets the value for the player detection position to the default.
1 2
3
52
Pull the trigger on the controller after selecting DEFAULT on the CONTROLLER ADJUSTMENT
screen to set the detection position to the default settings. Use the CHECK option to check the detection position. When all checks are completed, press the TEST Button. The GAME TEST MODE screen reappears
after saving the setting data
9-3 GAME TEST MODE
9-3-4
‘CONTROLLER
(GUN) ADJUSTMENT’ - CHECK PLAYER 1
MARK
9
TEST MODE
+
PLAYER 1
CONTROLLER ADJUSTMENT
PLAYER 1
TOP
LEFT
CENTER X
Y
RIGHT
BOTTOM
+
->
PLAYER 2
OLD
**
**
**
**
**
**
DEFAULT
CANCEL
CHECK
NEW
**
**
**
**
**
**
TOP
LEFT
CENTER X
Y
RIGHT
BOTTOM
+
->
DEFAULT
CANCEL
CHECK
SELECT WITH START BUTTON
AND PULL TRIGGER
PRESS TEST BUTTON TO EXIT
+
OLD
**
**
**
**
**
**
NEW
**
**
**
**
**
**
+
PLAYER 2
MARK
EXPLANATION OF CHECK
Checks the detection position of the controller.
PLAYER 1 Gun Cross
This is displayed when the control unit is pointed at the screen.
PLAYER 2 Gun Cross
This is displayed when the control unit is pointed at the screen.
1 Select CHECK on the CONTROLLER ADJUSTMENT screen to check the detection position. 2
3
If you point the Controller at the Screen, the GUN MARK (cross hairs) for each of the players
will be shown on the screen. Use this screen to check whether or not the detection position
is correct.
When all checks are completed, press the TEST Button. The GAME TEST MODE screen reappears
after saving the setting data
53
9-3 GAME TEST MODE
9-3-5
‘BOOK-KEEPING’ (ONE) 9
TEST MODE
Selecting ‘BOOKKEEPING’ from the GAME TEST MENU will display GAME OPERATION DATA.
This Data is displayed over a series of three screens, and pressing the Test Button will advance
to the next Screen. Pressing the Test Button on the third screen will EXIT the BOOKKEEPING
Mode and return the Display to the GAME TEST MENU.
BOOK KEEPING
PLAYER 1
COIN 1
1 / 3
IN
*
COIN 2 IN
TOTAL COINS
*
*
COIN CREDITS
*
SERVICE CREDITS
TOTAL CREDITS
*
*
PRESS TEST BUTTON TO CONTINUE
1 BOOK KEEPING
(Screen 1/3) - COINS and CREDIT
Displays information on the following :
COIN 1 IN
- Records the number of GAMES PLAYED against the inserted Coin Value.
COIN 2 IN
-
TOTAL COINS -
Not fitted as standard.
(If fitted, it operates the same as COIN 1 IN)
Records the TOTAL GAMES PLAYED from all Coins Inserted. COIN CREDIT
54
-
Records the number of Credits entered by the COINS IN.
SERVICE CREDIT-
Records the number of Credits entered by the SERVICE Button.
TOTAL CREDITS -
Records the TOTAL NUMBER OF CREDITS that were entered..
9-3 GAME TEST MODE
9-3-5
‘BOOK-KEEPING’
(TWO) Press ‘TEST’ Button to advance to the next Screen - BOOK-KEEPING 1/2.
9
BOOK KEEPING
TEST MODE
PLAYER 1
2 / 3
NUMBER OF GAMES
*
FIRST PLAY
CONTINUE PLAY
TOTAL TIME
*
*
****D **H **M **S
PLAY TIME
AVERAGE PLAY TIME
LONGEST PLAY TIME
****D **H **M **S
**M **S
**M **S
SHORTEST PLAY TIME
**M **S
PRESS TEST BUTTON TO CONTINUE
2 BOOK KEEPING
(Screen 2/3) - GAME TIMINGS
Displays information on the following :
NUMBER OF GAMES
Total number of games played by Player 1 and Player 2.
FIRST PLAY
Total number of first time plays by Player 1 and Player 2.
CONTINUE PLAY
Total number of times Player 1 and Player 2 opted to continue.
TOTAL TIME
Amount of time the cabinet has been in operation.
(Does not count TEST MODE)
PLAY TIME
Amount of time game has been played.
AVERAGE PLAY TIME
Average play time for one game.
LONGEST PLAY TIME
Longest play time for one game
SHORTEST PLAY TIME Shortest play time for one game.
In the above Table the following will apply : * = THE NUMBER
D = DAYS
H = HOURS
M = MINUTES
S = SECONDS
55
9-3 GAME TEST MODE
9-3-5
‘BOOK-KEEPING’
(THREE) Press ‘TEST’ Button to advance to the next Screen - BOOK-KEEPING 3/3.
9
TEST MODE
BOOK KEEPING
PLAYER 1
3 / 3
TIME HISTGRAM
0M00S
0M30S
1M00S
1M30S
2M00S
2M30S
3M00S
3M30S
4M00S
4M30S
5M00S
5M30S
6M00S
6M30S
7M00S
7M30S
8M00S
8M30S
9M00S
9M30S
OVER
~
0M29S
~
0M59S
~
1M29S
~
1M59S
~
2M29S
~
2M59S
~
3M29S
~
3M59S
~
4M29S
~
4M59S
~
5M29S
~
5M59S
~
6M29S
~
6M59S
~
7M29S
~
7M59S
~
8M29S
~
8M59S
~
9M29S
~
9M59S
~ 10M00S
*
*
*
*
*
*
*
*
*
*
*
*
*
*
*
*
*
*
*
*
*
PRESS TEST BUTTON TO EXIT
3 BOOK KEEPING
(Screen 3/3) - TIME HISTOGRAM
The GAME HISTOGRAM displays how many times a play ended within certain time intervals.
Use this as a reference when determining settings such as difficulty level.
This displays PLAY TIMES on a scale from 0M00S to 9M59S based on 30-second intervals.
All play times ten minutes or over are included in the item OVER 10M00S
In the above Table the following will apply : 56
M = MINUTES
S = SECONDS
Press ‘TEST’ Button to Exit BOOK-KEEPING 3/3 and Return to the GAME TEST MENU.
9-3 GAME TEST MODE
9-3-6
‘BACK
UP DATA CLEAR’ 1 9
TEST MODE
Press the ‘SERVICE’ Button to select ‘BACKUP DATA CLEAR’ from the GAME TEST MENU and then press the TEST Button, to gain entry to the ‘BACKUP DATA CLEAR’ Menu
Press the ‘SERVICE’ Button to select ‘YES’ followed by the TEST Button, will automatically CLEAR the BACK UP DATA and reset all readings to ‘0’ The BACK UP DATA Screen will change to the
‘COMPLETED’ Screen to confirm that the Data is Cleared. Pressing the TEST Button will EXIT the BACK UP DATA CLEAR routine and Return the Screen to the GAME TEST Menu.
2 Press the ‘SERVICE’ Button to select ‘NO’ followed by the TEST Button, will automatically EXIT
the BACKUP DATA CLEAR and return the Machine to the GAME TEST Menu without changing
any of the DATA Records. BACKUP DATA CLEAR MENU - Screen
BACKUP
BACKUP DATA CLEAR
PLAYER 1
->
YES
(CLEAR)
NO
(CANCEL)
SELECT
AND
WITH
SERVICE
BUTTON
PRESS
TEST
BUTTON
DATA COMPLETED - Screen
PLAYER 1
BACKUP DATA CLEAR
COMPLETED
PRESS TEST BUTTON TO EXIT
57
9-3 GAME TEST MODE
9-3-7
‘INTERFERENCE PREVENTION WIRING’
9
TEST MODE
• “Store maintenance man” or “Engineer” must be doing of this work. When it
works by there are neither knowledge nor a technology, it causes the breakdown.
• Please work after cutting the power on/off switch without fail. It causes the electric shock and the short-circuit accident.
• Please do not damage wiring. When wiring is damaged, it causes the electric
shock and the short-circuit accident.
When the game machines of a same or similar type are installed side by side, their sensors
may interfere with each other. To reject the interference, follow the procedure below. The
following game machines employ a same or similar type of sensor. If interference happens
to the sensors, operation of the games may be mutually disturbed.
●
THE HOUSE OF THE DEAD 2, U/R type, DX type and Super DX type
●
DEATH CRIMSON, U/R type and DX type
●
THE LOST WORLD, U/R type, DX type and Super DX type
●
BRAVE FIRE FIGHTERS
●
CONFIDENTIAL MISSION, U/R type and DX type
●
SHAKATTO TAMBOURINE
●
LUPIN THE 3RD THE SHOOTING, U/R type and DX type
●
THE MAZE OF THE KINGS, U/R type and DX type
●
THE HOUSE OF THE DEAD 3, U/R type and DX type
●
VIRTUA COP 3, U/R type and DX type
●
GHOST SQUAD, U/R type and DX type
●
THE HOUSE OF THE DEAD 4, SPECIAL, U/R type and DX type
●
2 SPICY, U/R type
58
1.
Please turn off power.
2.
The coin door is opened. The wire with the tag of "FREQ" is a prevention of getting entangled wire
3.
Please display the game machine that connects the prevention of getting entangled wire and the game machine that pulled out the wire alternately when the same kind of game machine is arranged and set up. Please keep the removed wire safe.
10 CONTROL UNIT
● When working with the product, be sure to turn the power off. Working with the
power on may cause an electric shock or short circuit.
10
short circuit or present a risk of fire.
● Do not touch any parts that are not specified in these directions. Touching unspecified
locations may lead to electric shock or cause short circuits.
● This work should be performed by site maintenance personnel or other skilled
CONTROL UNIT
● Be careful not to damage the wires. Damaged wires may cause an electric shock,
professionals. Work performed by non-technical personnel can cause a severe
accident such as an electric shock.
● Exercise due caution in performing soldering procedures. If soldering iron is
handled carelessly, there could be fires or burns.
● Proceed very carefully when heating thermal contraction tube. Careless operations
can result in fires or burns.
● When fastening plastic parts, be careful not to tighten screws and nuts excessively.
Otherwise parts may be damaged, resulting in injuries from fragments, etc.
● Be careful not to get hand or finger caught when removing or attaching the parts.
● Disconnection and connection of connectors will be performed within the narrow
cabinet space. Take due care not to scratch or otherwise injure yourself.
● After adjusting or replacing a microswitch, always check ON/OFF function of the switch on the input test screen of the test mode. 59
10.1 HOW TO REPLACE THE MICROSWITCH
10
If the operability of the Control Unit is unsatisfactory, or if settings on the test mode
calibration screen are ineffective, the problem could be a defective mechanism, displacement
of the position where sensor or microswitch has been fastened, or malfunctioning of the
sensor or microswitch. Carry out the following procedure to replace Control Unit sensor or
microswitch.
CONTROL UNIT
To replace the Gun Controls internal components, first separate the left shell (Cover L) from
right shell (Cover R). The controls internal components are mounted on the right shell, so
work with the gun lying on its right side. To replace the Shot Selector button microswitch, first
remove the Shot Selector button from the right shell.
1
Turn off the power.
2
Remove the 15 screws to separate the two shells.
10-1 Fig 1
10-1 Fig 2
60
10.1 HOW TO REPLACE THE MICROSWITCH
3 5
10
CONTROL UNIT
4
With the right side shell lying flat, carefully lift the left shell from the right shell. 10-1 Fig
3
Remove the microswitch to be replaced from cover R. There are a total of three microswitches.
10-1 Fig 4
Remove the soldering to take out the microswitch.
10-1 Fig 5
61
10.1 HOW TO REPLACE THE MICROSWITCH
6
10
CONTROL UNIT
Solder the new microswitch in place to reconstruct the gun controller. When performing this step, verify the points listed below before reattaching Cover L and Cover R. •
The wires and connectors are laid out correctly in Cover R.
•
The bearing holder is securely in place when the pad assembly spring is compressed.
•
The selector is laid out horizontally.
•
The selector joint and selector spring are properly set. 10-1 Fig 6
10-1 Fig 7
62
10.1 HOW TO REPLACE THE MICROSWITCH
7
10
CONTROL UNIT
8
Operate the TRIGGER, SHOT SELECTOR and ACTION buttons to make sure that the microswitches turn ON/OFF correctly. 10-1
Fig 8
After replacement, perform an INPUT TEST, referring to the instruction in the “GAME TEST MODE”
63
10-2 REPLACING THE SENSOR UNIT
1
10
Follow the instructions 1 to 3 of “Replacing the Microswitch” to remove the Cover L ('10-1')
CONTROL UNIT
2
Remove the connector to replace the sensor unit.
10-2 Fig 1
3
Replace the sensor unit, refit the connector and re-attach the unit into the Right hand cover. 4
Reassemble the gun paying particular attention to the placement of components listed in 10-1 Fig 7, and attach Cover R while being careful of each of these parts.
After replacement, perform the GUN ADJUSTMENT set up, referring to the instructions in
“Game Test Mode”
5
64
10-3 REPLACING THE SOLENOID
1
Remove the 2 pin connector, wire and 4 screws to remove the solenoid assembly.
10-3 Fig 1
3
10
CONTROL UNIT
2
Follow the instructions 1 to 3 of “Replacing the Microswitch” to remove the Cover L ('10-1')
Remove the 8 screws and replace the solenoid.
65
10-3 REPLACING THE SOLENOID
4
10
CONTROL UNIT
5
Secure the solenoid assembly with 4 screws and replace the connector. When doing this, make
sure not to damage the wiring. Reassemble the gun paying particular attention to the placement of components listed in 10-1 Fig 7, and attach Cover R while being careful of each of these parts.
After replacement, perform the OUTPUT TEST, sequence referring to the instructions in “GAME TEST MODE”
6
66
11 MONITOR (56” DLP)
11-1 SAFETY PRECAUTIONS WHEN HANDLING THE MONITOR
11
● If smoke or a strange odor appears, immediately unplug the power cable from
the power source.
Continuing to use the product may cause a fire or an electric shock. Ensure
that smoke is no longer emitted, and contact the point of purchase.
● If nothing displays on the screen, immediately unplug the power cable from the
power source.
MONITOR - 'DLP' DISPLAY
Responding to breakdown or abnormality
Continuing to use the product may cause a fire or an electric shock. Contact
the point of purchase and request an inspection.
● If water or a foreign object enters the monitor’s interior, immediately unplug the
power cable from the power source.
Continuing to use the product may cause a fire or an electric shock. Contact
the point of purchase and request an inspection.
● If the monitor is dropped or the cabinet is damaged, immediately unplug the
power cable from the power source.
Continuing to use the product may cause a fire or an electric shock. Contact
the point of purchase and request an inspection.
During operation
● Do not repair, reconstruct, or disassemble the monitor.
The monitor’s interior contains high voltage parts. A fire or an electric shock
could result.
For inspections, adjustments, and repair of the monitor’s interior, request work
from the point of purchase.
● Do not insert foreign objects.
If metal objects or flammable materials such as paper are inserted into the
interior through ventilation openings or other apertures, an electric shock could
result.
● In the event of a thunder storm, do not touch the product or the power cable.
An electric shock could result.
● Make sure to perform appropriate adjustments. Do not operate the product
when the screen is flickering, distorted, or experiencing other abnormalities.
Images from an improperly adjusted screen could cause players and other
customers to experience dizziness, headaches, and other ailments.
67
11-2 CLEANING THE SCREEN SURFACE
11
● Use a soft, dry cloth (flannel-type) to wipe away dirt. Do not use materials such
as coarse mesh gauze.
MONITOR - 'DLP' DISPLAY
● Alcohol (ethanol) is the recommended solvent for removing dirt. When using a
cleaning agent, follow the precautions below.
- Dilute neutral cleaning agents for home use with water. Soak a soft cloth in
the solution, and wring it thoroughly before wiping the screen.
- Do not use abrasive cleaning agents or powders, or cleaning agents containing bleach.
- Do not use alkaline cleaning agents such as glass cleaners, or solvents such
as thinners.
● Do not scrub or scratch the screen surface with abrasive materials such as
brushes or scrub brushes.
CLEAN THE SCREEN SURFACE ONCE A WEEK.
68
11-3 ADJUSTMENT METHOD
Remote Control
You can use the remote control up to a distance of about 23 feet from the TV.
1
POWER
2
TV
3
NUMERIC BUTTONS
4
5
6
7
Turns the TV on and off.
Selects the TV mode directly.
Press to change the channel.
Press to select additional channels
(digital and analog) being broadcast
by the same station. For example,
to select channel “54-3”, press “54”,
” and “3”.
then press “
MUTE
Press to temporarily cut off the
sound.
&
*
CH LIST
Used to display Channel Lists on the
screen.
9
TOOLS
0
UP▲ / DOWN▼ / LEFT◄ /
RIGHT► / ENTER
Use to quickly select frequently used
functions.
a
RETURN
b
EXIT
c
MTS
d
DMA (Digital Media Adapter)
Press to display information on the
TV screen.
CC
$
E.MODE
Controls the caption decoder.
Press to select the preset display
and sound modes for sports, cinema
and games.
Displays the main on-screen menu.
This function enables you to view
and play photo and music files from
an external USB device. (Refer to
pages 70 (Photo) and 79 (Music))
Returns to the previous menu.
Press to exit the menu.
Press to choose stereo, mono or
Separate Audio Program (SAP
broadcast).
Use this when connecting a
Samsung DMA device through an
HDMI interface and switching to
DMA mode.
For more information on the
operating procedures, refer to the
user manual of the DMA.
This button is available when
“Anynet(HDMI-CEC)” is “On”.
@ COLOR BUTTONS
#
CH
Press to change channels.
W.LINK (WISELINK)
INFO
Use these button in the CH LIST and
W.LINK.
Tunes to the previous channel.
)
Use to select on-screen menu items
and change menu values.
!
PRE-CH
MENU
Press to increase or decrease the
volume.
SOURCE
ON/OFF
Press to backlight the buttons on the
remote.
This function is convenient for using
at night or when the room is dark.
(Using the remote control with the
light button set to On will reduce the
battery usage time.)
(
VOL
Press to display and select the
available video sources.
8
^
11
MONITOR - 'DLP' DISPLAY
All adjustment values are set accurately at the time of shipping from the factory.
Do not readjust these values needlessly or apply adjustments not specified in this
manual. The display may not appear properly if the values are incorrect.
e
P.SIZE
f
FAV.CH
Picture size selection.
Press to switch to your favorite
channels.
% Use these buttons in the DMA,
W.LINK and Anynet+ modes. (
: This remote can be used to control
recording on Samsung recorders
with the Anynet+ feature)
The performance of the remote control may be affected by bright light.
English - 9
69
11-3 ADJUSTMENT METHOD
11
CHANGING THE PICTURE STANDARD
You can select the type of picture which best corresponds to your viewing requirements.
Picture
1
B : Press the ENTER button to select Mode.
Press the ▲ or ▼ button to select Dynamic,
Standard, or Movie. Press the ENTER button.
: Standard
Contrast
Brightness
Sharpness
Color
Tint (G/R)
Detailed Settings
Picture Options
: 80
: 45
: 50
: 50
: G50/R50
►
C : Press the EXIT button to exit.
• Dynamic :
Select the picture for high-definition in bright room.
• Standard :
Select the picture for the optimum display in the normal
environment.
Picture
MONITOR - 'DLP' DISPLAY
A : Press the MENU button to display the menu.
Press the ENTER button to select Picture.
Mode
• Movie :
Select the picture for viewing movies in a dark room.
2
CUSTOMIZING
Mode
: Dynamic
Contrast
Brightness
Sharpness
Color
Tint (G/R)
Detailed Settings
Picture Options
Standard
: 100
Movie
: 45
: 50
: 50
: G50/R50
THE PICTURE SETTINGS
B : Press either the ▲ or ▼ buttons to select Contrast,
Brightness, Sharpness, Color, or Tint (G/R), then
press the ENTER button.
C : Press the < or > button to decrease or increase
the value of a particular item.
Picture
A : Press the MENU button to display the menu.
Press the ENTER button to select Picture.
Mode
:Standard
Contrast
: 80
Brightness
: 45
Sharpness
: 50
Color
: 50
Tint (G/R)
: G50/R50
►
Detailed Settings
Picture Options
D : Press the ENTER button.
E : Press the EXIT button to exit.
Contrast
• Contrast : Adjusts the 'Contrast' level of the picture.
• Brightness : Adjusts the 'Brightness' level of the picture.
Move
Adjust
Enter
• Sharpness : Adjusts the 'Edge Definition' of the picture.
• Colour : Adjusts the 'Colour Saturation' of the picture.
• Tint(G/R) : Adjusts the 'Colour Tint' of the picture by compensating the red and green colour.
• When you make changes to Contrast, Brightness, Sharpness, Colour, or Tint (G/R) the OSD will be
adjusted accordingly.
• When in PC mode, Tint(G/R), Sharpness and Color are not available.
• Each adjusted setting will be stored separately according to its input mode.
70
80
Return
11-3 ADJUSTMENT METHOD
3
ACTIVATING DETAILED SETTINGS
Picture
Allow you to make even more precise picture settings, to
activate Detail Settings :
Color
: 50
Tint (G/R)
: G50/R50
Detailed Settings
►
11
Picture Options
A : Press the MENU button to display the menu.
Press the ENTER button to select Picture.
MONITOR - 'DLP' DISPLAY
Picture Reset
B : Press the ENTER button to select Mode.
Press the ▲ or ▼ button to select Standard or Movie,
then press the ENTER button.
C : Press the ▲ or ▼ button to select Detailed Settings,
then press the ENTER button.
4
ACTIVATING BLACK ADJUST
You can select the black level on the screen to adjust the
screen depth.
Detailed Settings
Black Adjust
: Off
►
Dynamic Contrast
: Low
Gamma
: +1
A : Press the ▲ or ▼ button to select Black Adjust, then
press the ENTER button.
White Balance
:0
Flesh Tone
:0
B : Press the ▲ or ▼ button to select Off, Low, Medium
or High, then press the ENTER button.
Edge Enhancement
: On
xvYCC
: Off
•
•
•
•
Move
Off : Turns off the black adjustment function.
Low : Sets the black color depth to low.
Medium : Sets the black color depth to medium.
High : Sets the black color depth to high.
Enter
Off
Low
Medium
: Low
High
Black Adjust
Move
5
ACTIVATING DYNAMIC CONTRAST
You can adjust the screen contrast so that the optimal
contrast is provided.
A : Press the ▲ or ▼ button to select Dynamic Contrast,
then press the ENTER button.
B ; Press the ▲ or ▼ button to select Off, Low, Medium
or High, then press the ENTER button.
• Off : Turns off the dynamic contrast adjustment function.
• Low : Sets the dynamic contrast to low.
• Medium : Sets the dynamic contrast to medium.
• High : Sets the dynamic contrast to high.
Return
Enter
Return
Detailed Settings
Black Adjust
: Off
Dynamic Contrast
: Low
Gamma
: +1
White Balance
:0
Flesh Tone
:0
Edge Enhancement
: On
xvYCC
: Off
Move
Enter
►
Return
Off
Dynamic Contrast
Move
Low
Medium
: Low
High
Enter
Return
71
11-3 ADJUSTMENT METHOD
6
11
ACTIVATING GAMMA
MONITOR - 'DLP' DISPLAY
You can adjust the Primary Color (Red, Green, Blue)
Intensity. (-3 ~ +3)
:
A : Press the ▲ or ▼ button to select Gamma, then press
the ENTER button
B : Press the < or > button to decrease or increase the value
and press the ENTER button.
Detailed Settings
Black Adjust
: Off
Dynamic Contrast
: Low
Gamma
: +1
White Balance
:0
Flesh Tone
:0
Edge Enhancement
: On
xvYCC
: Off
Move
►
Enter
Return
Gamma
: +1
+1
:0
:0
Adjust
7
ACTIVATING WHITE BALANCE
Enter
Detailed Settings
Black Adjust
: Off
Dynamic Contrast
: Low
Gamma
: +1
A : Press the ▲ or ▼ button to select White Balance, then
press the ENTER button.
White Balance
:0
Flesh Tone
:0
B : Press the < or > button to decrease or increase the value
of a particular item. (-10~+10) then press the ENTER button.
Edge Enhancement
: On
xvYCC
: Off
You can adjust the color temperature for more natural
picture colors.
Move
Changing the adjustment value will refresh the adjusted
screen.
Return
►
Enter
Return
White Balance
0
Adjust
72
Enter
Return
11-3 ADJUSTMENT METHOD
10
PICTURE OPTIONS
Activating Picture Options
Tint (G/R)
: G50/R50
Detailed Settings
Picture
11
CONFIGURING
MONITOR - 'DLP' DISPLAY
A : Press the MENU button to display the menu.
Press the ENTER button to select Picture.
Picture Options
►
Picture Reset
B : Press the ▲ or ▼ button to select Picture Options,
then press the ENTER button
.
C : Press the ▲ or ▼ button to select a particular item
and press the ENTER button.
D : When you are satisfied with your setting,
press the ENTER button.
11
ADJUSTING
THE SCREEN POSITION
You can adjust the horizontal and vertical position
of the screen.
Picture Options
Color Tone
: Cool1
Size
: 16:9
Position
A : From the above Menu press the ▲ or ▼ button to
select Picture Options, then press the ENTER button..
►
Digital NR
: Auto
DNle
: Off
HDMI Black Level
: Normal
Film Mode
: Off
Move
Enter
Return
Enter
Return
Position
B : Press the ▲ or ▼ button to select Posion, then
press the ENTER button.
Adjust
74
11-3 ADJUSTMENT METHOD
12
RESETTING
THE PICTURE
Picture Options
Picture
Resetting the Picture Settings to the Factory Defaults.
Detailed Settings
Picture Reset
►
MONITOR - 'DLP' DISPLAY
A : To select the desired picture Mode, follow the
Changing the Picture Standard, Instructions
(SECTION 1 - This Chapter).
11
B : Press the ▲ or ▼ button to select Picture Reset,
then press the ENTER button.
Detailed Settings
Picture Options
D : Press the EXIT button to exit.
Picture
C : Press the < or > button to select OK or Cancel
then press the ENTER button.
Picture Reset
OK
Cancel
►
Each Mode can be reset individually.
FOR ADDITIONAL INFORMATION ON DLP ADJUSTMENT OR SERVICE, PLEASE CONSULT THE SAMSUNG - SERIES 650 DLP TV USER MANUAL SUPPLIED WITH THIS MACHINE.
75
11-4 TROUBLESHOOTING
11-1 TABLE 01 - TROUBLESHOOTING TABLE : DLP DISPLAY
PROBLEMS
11
POSSIBLE SOLUTION
MONITOR - 'DLP' DISPLAY
Remote control malfunctions
Replace the remote control batteries.
Clean the upper edge of the remote control (transmission window).
Check the battery terminals.
Press the TV button to put your remote control in the TV mode.
Make sure the remote has batteries.
Check the “+” and “-” ends of the batteries are inserted correctly.
No picture
Make sure the TV is plugged in.
Check the Video Cable connection
Picture rolls vertically.
Check all connections
The TV operates erratically
Unplug the TV for 30 seconds, then try operating it again.
The TV won’ t turn on.
Make sure the wall outlet is working
The image is too light or too dark. Adjust the Brightness and Contrast.
Screen is black and power
indicator light blinks steadily.
Check Power and Signal Cable.
The TV is using its power management system.
Press the Source button on the panel or remote control.
Turn the TV off and on.
The “Resets all settings to the
This appears when you press and hold the EXIT button for a while.
default values” message appears. the product settings are reset to the factory defaults
DLP CONNECTOR INFORMATION
MAINS
SUPPLY
VIDEO
CABLE
76
11-5 LAMP REPLACEMENT PROCEDURE
• To prevent electric shock or fire hazards, only perform this operation after turning off
the main power switch and removing the power cord from the socket.
• Make sure the lamp is firmly in place. If the lamp is loose then it will become a fire
hazard, and it also may not operate.
• The lamp becomes very hot during use and remains hot for a while afterwards.
Attempting to change the lamp before it has sufficiently cooled may lead to burns
and other injuries.
11
MONITOR - 'DLP' DISPLAY
• Never put anything metal or flammable in to the interior of the DLP. Using it with such
objects inside the cabinet may lead to an electric shock or fire hazard.
• If the lamp shatters, fragments of the glass will remain inside the lamp Never shake
a shattered lamp or hold/place one higher than eye level. Doing so could lead to a
serious accident.
• Never touch the lamp directly as this can impair the life expectancy. Always wear
surgical gloves if handling the lamp.
• When opening the rear panel or lamp cover to change the lamp, do not touch or
remove any parts that are unrelated to the lamp changing process. Doing so may
lead to injury and could also harm the efficient working of the product
• Do not remove any screws other than those specified below. Doing so could harm the
efficient working of the product..
Always perform the lamp changing operation with the power turned off.
Once you have inserted a new lamp, only apply power to the DLP once the lamp
exchange cover is in place.
77
11-5 LAMP REPLACEMENT PROCEDURE
REPLACING THE LAMP
11
Why do I need to replace the lamp?
The lamp used in a DLP TV has a limited lifespan. For the best screen quality it needs to be replaced
periodically. After replacing the lamp, the screen quality will be bright and clear as new.
MONITOR - 'DLP' DISPLAY
When do I need to replace it?
• It should be replaced when the screen becomes darker, less clear or when all three LEDs on the
front (STAND BY/TEMP, LAMP, and TIMER) are flashing.
Check before lamp replacement
• The lamp must be the same code number and type.
• The lamp type is indicated on the right side of the TV. It is also indicated on the lamp case.
• After checking the code number for the lamp, give the code number to the store where you purchased the TV or to a Samsung Service Center.
Caution
• Replace with the correct code numbered(BP96-01653) lamp to avoid damage to the TV.
• Turn the power off and wait for 30 minutes before replacing the lamp as it will be hot.
• Do not touch the glass part of the lamp with your bare hands or insert any foreign object inside the cover as it may cause poor screen quality, electric shock or fire.
• Do not place the old lamp near flammable objects or within the reach of children.
• Be sure to connect this TV directly to an AC wall outlet. If the TV’ s AC plug is connected to a cable box or other source, it will not allow for proper cool down time.
• For replacement, you will need a 5.91-Inch screwdriver and a pair of gloves.
1
2
3
78
Make sure that the DLP Unit is isolated from the Mains Supply.
Remove the Back Service Door on the DLP Cabinet. Using a screwdriver, remove the fixing screws holding the cover in
place,.
11-5 LAMP REPLACEMENT PROCEDURE
4
Remove the Lamp Cover.
11
Push the clip and pull down the Lamp Cover.
MONITOR - 'DLP' DISPLAY
5
79
11-5 LAMP REPLACEMENT PROCEDURE
6
Separate the Lamp from the engine by
holding the handle and pulling it out.
11
MONITOR - 'DLP' DISPLAY
7
8
80
Replacing the Lamp.
• Be sure the replacement Lamp is the same type.
• After replacing the lamp, align the
lamp cover with the groove and secure
the screws • The TV will not turn on if the lamp cover is not correctly closed (as this
will activate the protective circuit).
Re-Assembling the Unit.
Once the Lamp as been replaced, rebuilt the Unit in the reverse order.
11-6 TECHNICAL SPECIFICATION
SAMSUNG DLP - SERIES 650 TECHNICAL SPECIFICATION
11
Model Name Screen Size (Diagonal) 56 inch
PC Resolution 1920 x 1080 @ 60 Hz
Sound (Output) 10W X 2
Dimension (W x H x D) 50.4 x 34.9 x 14.0 inches
HL56A650C1F
(1281 x 887 x 356 mm)
Weight 60.6 lbs (27.5 kg)
Environmental Considerations
Operating Temperature
50 ° F to 104 ° F (10 ° C to 40 ° C)
Operating Humidity
10% to 80%, non-condensing
Storage Temperature
-4 ° F to 113 ° F (-20 ° C to 45 ° C
Storage Humidity
5% to 95%, non-condensing
MONITOR - 'DLP' DISPLAY
The descriptions and characteristics in these owner’ s instructions are given for information purposes
only and are subject to modification without notice.are subject to modification without notice.
This device is a Class B digital apparatus.
Design and specifications are subject to change without prior notice.
For the power supply and Power Consumption, refer to the label attached to the product.
81
12 COIN HANDLING
Handling the Coin Jam
If the coin is not rejected when the REJECT button is pressed, open the coin chute door and open the
selector gate. After removing the jammed coin, put a normal coin in and check to see that the selector
correctly functions.
12
COIN HANDLING
12-1 CLEANING THE COIN SELECTOR
● Remove and clean smears by using a soft cloth dipped in water or diluted chemical
detergent and then squeezed dry.
●
Never apply machine oil, etc. to the Coin Selector.
● After cleaning the Coin Selector, insert a regular coin in the normal working status
and ensure that the selector correctly functions.
The Coin Selector should be cleaned once every 3 months.
When cleaning, follow the procedure below:
1
2
3
Turn the power for the machine OFF. Open the coin chute door.
Remove the Coin Selector from the coin chute door.
Open the gate and dust off by using a soft brush (made
of wool, etc.).
GATE
FIG. 12 a
82
12-1 CLEANING THE COIN SELECTOR
4
Remove and clean smears by using a soft cloth dipped in water or diluted chemical detergent
and then squeezed dry.
5
Remove the CRADLE.
When removing the retaining ring (E ring), be
very careful so as not to bend the rotary shaft.
12
COIN HANDLING
CRADLE
FIG. 12b
6
Remove stain from the rotary shaft and shaft receiving portions by wiping off with a soft cloth,
etc.
7
After wiping off as per previous step, further apply a dry cloth, etc. to cause the Coin Selector to
dry completely.
Coin Insertion Test
Once every month, when performing the Coin SW Test,
simultaneously check the following:
�����������������������������������������
Does the Coin Meter count satisfactorily?
Does the coin drop into the cashbox correctly?
Is the coin rejected when inserted while keeping the
REJECT Button pressed down?
Insert a coin while keeping the
REJECT Button pressed down
and check if it is rejected.
FIG. 12 c
83
12-2 ADJUSTING THE PRICE OF PLAY
This product comes equipped with a Money Controls SR3 Coin Acceptor. To adjust the price
of play ALL credit setting are adjusted via the EXCEL CREDIT BOARD.
12
IMPORTANT!
COIN HANDLING
The CREDIT SETTINGS within the SYSTEM TEST MODE must be set to 1 coin 1 credit to allow
the CREDIT BOARD to function correctly.
The EXCEL CREDIT board houses 2 DIL Switches. These allow the operator to select the price
of play, type of coin acceptor and region.
EXCEL Credit Board
SERVICE BUTTON
DIL SW3 - (REGIONAL SETINGS)
STATUS LED
CN3
CH1
I/O CONNECTOR (TO HOST)
DIL SW 1 (CREDIT SETTINGS)
CN5
CH2
84
DIL SW3 (Regional Settings)
Adjust these switches to specify the type of Coin Acceptor used and currency. Default = SW1 & SW2 ON - SR3 in parallel made, Sterling.
SERVICE BUTTON
Provides a service credit when pressed.
Status LED
Flashes when functioning.
O/I Connector
Inputs and Outputs to and from host.
CN5
To secondary SR3 Coin Acceptor.
CH2
To secondary Coin Acceptor (Mars, NRI, ect.)
DIL SW1 (credit settings)
Adjust to required price of pay.
CH1
To primary Coin Acceptor (Mars, Nri, ect.)
CN3
To primary SR3 Coin Acceptor.
COIN HANDLING
• Set SW 3 on the VTS /Excel board as shown in the table above corresponding to the country required. • For Germany (DM), France (Fr) & Switzerland (SFr), use the appropriate existing setting shown above (from another country) that
matches the coin ratios programmed into your coin mech. • Set SW 1 according to the option settings found in the relevant Price of Play Settings Table on the following pages. Note: These switch settings are under constant review and may change due to world currency updates. REGIONAL AND ACCEPTOR SETTINGS (SW3)
12
85
STERLING PRICE OF PLAY SETTINGS (SW1)
12
COIN HANDLING
86
EURO PRICE OF PLAY SETTINGS (SW1)
12
COIN HANDLING
87
12-3 SR3 OPTIONS - TEACH AND RUN PROGRAMMING
SELECTING STERLING / EURO OPTION
12
The SR3 coin acceptor (supplied) is programmed to accept UK Sterling and the Euro. Factory setting is
for the UK Sterling. If the configuration needs to change to the Euro, then please follow the instructions
below for changing over to the Euro and visa versa.
COIN HANDLING
BANK SELECT
This function allows you to enable both or individual select banks of coins via switches 7 and 8 on the 8
way DIL switch.
This enables the selection of 2 different currencies, one in each bank, or 12 coins/tokens in both banks
from the same country.
To enable/disable the banks set the switches as show below.
Both Banks ON (enabled) - Sterling and Euro’s
Bank 1 ON (enabled) and Bank 2 OFF (disabled) - Sterling ONLY
Bank 1 OFF (disabled) and Bank 2 ON (enabled) - Euro’s ONLY
Please remove power from the SR3 before changing the status on the DIP SW.
88
12-3 SR3 OPTIONS - TEACH AND RUN PROGRAMMING
TEACH AND RUN PROGRAMMING (SR3)
If the machine is positioned in location where only tokens are used, then the SR3 Coin Acceptor can be
programmed to accept and credit special coins/tokens.
12
Table 1: Teach & Run Programming Bank 1.
Coin Number
1
2
3
4
5
6
SW1
off
off
off
off
off
off
SW2
off
off
off
ON
ON
ON
SW3
off
ON
ON
off
off
ON
SW4
ON
off
ON
off
ON
off
SW5
ON
ON
ON
ON
ON
ON
SW6
off
off
off
off
off
off
SW4
ON
off
ON
off
ON
off
SW5
ON
ON
ON
ON
ON
ON
SW6
off
off
off
off
off
off
COIN HANDLING
Please follow the instructions below to enable and program the TEACH & RUN facility.
Bank 2
Table 2: Teach & Run Programming Bank 2
Coin Number
7
8
9
10
11
12
SW1
off
ON
ON
ON
ON
ON
SW2
ON
off
off
off
off
ON
SW3
ON
off
off
ON
ON
off
Teach and Run EXAMPLE. (To teach coin channel 12 for £1)
Switch off the power to the SR3 and set the Program DIL switches to:-
MSB
SW1
ON
SW2
SW3
ON
OFF
LSB
SW4
OFF
TOTAL
SW5
SW6
12
ON
OFF
Switch on the power to the SR3.
Press the reject lever within 20 seconds. The LED will turn RED.
Start entering £1 coins until the LED flashes GREEN, typically after 8 to 10 insertions.
NOTE: If the LED turns GREEN after the 1st coin, then the Teach & Run is DISABLED.
Press the reject lever and the LED will turn GREEN. The coin channel has now been
programmed.
SET ALL SWITCHES TO THE OFF POSITION.
89
13 FLUORESCENT LAMP REPLACEMENT
• When working with the product, be sure to turn the power off. Working with the
power on may cause an electric shock or short circuit.
13
LAMP REPLACEMENT
• There is danger that hot lamps can cause burns. Exercise due caution when
replacing lamps.
• Use lamps of the specified ratings. Using lamps with different ratings may cause
fires or damage.
• Such things as deteriorated insulation in lighting fixtures can cause a short circuit
and/or smoke. Make sure there are no abnormalities. For example, check if you can
smell anything burning, if any sockets have been discolored and if the lamp has to
be replaced frequently.
• Be careful when handling parts made of plastic or glass, for example be careful not to tighten screws excessively. If such parts are damaged, injuries could be caused by fragments, cracks, etc.
• To perform the operation safely and accurately you must use a safe, steady step or footstool. Working without this may lead to a fall and possible injury.
• When performing the fluorescent lamp replacement, do not hold onto the Billboard
carrier (the round pipe section). Holding or hanging off this may bend it out of
shape or damage it, and could lead to a fall or an accident.
PLEASE WEAR PROTECTIVE CLOTHING / EQUIPMENT WHEN CHANGING
FLUORESCENT LAMPS. PROTECTIVE GLOVES AND EYE WEAR ARE
RECOMMENDED
90
• Do not attempt to remove the fluorescent lamp whilst the machine is powered up.
Always disconnect the machine from the main power supply before changing the lamp.
1
2
Follow the instructions below to safely replace the fluorescent lamp. Always replace the lamp with one of the same type and specification.
• Turn the POWER OFF
• Use a Stool or Step when working on Top of the Cabinet. Remove the three screws from the top of the Billboard Box.
• Remove the Fluorescent Tube cover plateto reveal the Fluorescent Lamp.
FIXING
SCREW
3
FIXING
SCREW
FIXING
SCREW
• Remove the Fluorescent Tube 'B' , by carefully un-clipping from the two Terry Clips 'A' then disconnect the flying lead connector from either end of the tube. • Carefully remove the Fluorescent Tube.
A
B
A
4
• Replace the Fluorescent Tube for one of the same type.
Part No.
390-5695-40-GUK
FL TUBE 40W 1200x38MM T12
5
• Rebuild the Billboard by following steps 1 > 3 in reverse order
13
LAMP REPLACEMENT
91
14 PERIODIC INSPECTION
In order to maintain the performance of this product and operate it safely, inspect the following items
routinely and perform maintenance.
The players come in direct contact with the GUN (controller). You should therefore make an effort to
clean the Gun often and provide hand wipes, etc. for the amenity of the players.
14
PERIODIC INSPECTION
• Once a year, check to see if power cords are damaged, the plug is securely inserted,
dust is accumulated between the socket outlet and the power plug, etc. Using the
product with accumulated dust in the interior may cause fire or electric shock.
• Never use a water jet, etc. to clean the inside and outside of the cabinet. If wetness
occurs for any reason, do not use the product until it has completely dried.
• Once a year, request the office shown on this manual or the dealer from whom the
product was originally purchased to perform the internal cleaning. Using the product
with accumulated dust in the interior may cause fire or other accidents.
92
Note that you are liable for the cost of cleaning the interior parts.
•
There is the danger of accidents involving electrical shorts circuits or fire caused by
factors such as the deterioration of insulation in electrical and electronic equipment
over time. Check that there are no abnormalities such as odors from burning.
14-1 PERIODIC INSPECTION TABLE
The items listed below require periodic check and maintenance to retain the performance of this
machine and to ensure safe business operation.
When handling the controller, the player will be in direct contact with it. In order to always allow the
player to enjoy the game, be sure to clean it regularly. Also, it is advisable to provide wet tissue, etc.
available for player use.
DESCRIPTION
PERIOD
REFERENCE
CABINET
Confirm that adjusters contact floor
Daily
Chapter 3
MONITOR - PROJECTOR
Screen Cleaning
Weekly
Chapter 11
Check Screen Adjustments
Monthly
Chapter 11
Cleaning, Looking for Damage
Daily
Sight Adjustment
Weekly
Chapter 9
Individual Test
Monthly
SM-Chapter 4
Confirm settings
Monthly
Chapter 9
Coin insertion test
Monthly
Chapter 12
Selector cleaning
Every 3 months
Chapter 12
FLUORESCENT LIGHT
Inspection of Lighting Fixtures
Ass appropriate
Chapter 13
POWER CABLES
Inspection, Cleaning
1 year
Last page
CABINET INTERIOR
Cleaning
1 year
Last page
CABINET SURFACES
Cleaning
As appropriate
See below
CONTROL UNIT (GUN)
GAME BOARD
COIN SELECTOR
PERIODIC INSPECTION
ITEMS
14
SM-Chapter 4 - Referred to in the above table is the LINDBERGH Service Manual, which is provided
separately.
Cleaning the Cabinet Surfaces
When the cabinet surfaces are badly soiled, remove stains with a soft cloth dipped in water or diluted
(with water) chemical detergent and squeezed dry. To avoid damaging surface finish, do not use such
solvents as thinner, benzine, etc. other than ethyl alcohol, or abrasives, bleaching agent and chemical
dust cloth
Some general-purpose household, kitchen and furniture cleaning products may contain strong solvents
that degrade plastic components, coatings, and print. Before using any cleaning product, read the
product's cautionary notes carefully and test the product first on a small area that is not highly visible.
.
93
15 TROUBLESHOOTING
15
●The work described below should be carried out by the site maintenance personnel
or other qualified professional. Work carried out by personnel without the necessary
skill or technology can cause accident.
TROUBLESHOOTING
●If no improvements can be noted even after the following measures have been taken,
disengage the power and contact the point of purchase or the office indicated in
these instructions. If the power is left on while there is an abnormality, a fire, electric
shock or other serious accident can occur.
●When working with the product, be sure to turn the power ‘OFF’ . Working with the
power ‘ON’ may cause an electric shock or short circuit.
●Be careful not to damage the wires. Damaged wires may cause an electric shock,
short circuit or present a risk of fire.
●If problems other than those covered in this manual arise, or if no improvements
can be noted after measures given in this manual have been taken, do not take
measures indiscriminately. Cut off the power immediately and contact the office
shown in this manual or the dealer from whom the product was originally purchased.
Indiscriminate countermeasures could lead to unforeseeable accidents. They could
also result in permanent damages.
●If an error message is displayed, have the problem looked at by a store maintenance
person or a technician. Unless the problem is addressed by someone with specialized
knowledge or skills, there could be electrical shock, short circuits or fire. If there are
no store maintenance people or technicians, or moving mechanisms are involved, cut
off the power immediately and contact the office shown in this manual or the dealer
from whom the product was originally purchased.
●Once the reason that the breaker or circuit protector activated has been removed,
restore the breaker or circuit protector to its original condition. If the product is used
while the reason for activation has not yet been removed, heat and/or fire could be
generated.
An Error Message indicates an error with the Game Board. Check the separate
LINDBERGH Service Manual for more details.
94
15-1 TROUBLE NOT RELATED TO THE GAME BOARD
If a problem has occurred, first inspect the connection of the wiring connectors.
15-1 TABLE 01 - TROUBLESHOOTING TABLE
PROBLEMS
CAUSE
Incorrect power source/voltage.
Make sure that the power
supply/voltage are correct.
Loose FUSE or wire around the
AC Power line and harness.
Check Fuses, AC Power harness,
wiring and connectors.
The Projector does not project an The VGA cable may not be fitted
image
correctly.
No sound output.
The Control Unit (GUN) does not
appear to be operating correctly
Check the VGA connection at
both Lindbergh and at the PTV,
ensure that the 2 thumbscrews
are secure at each end.
15
Volume is not adjusted properly. Adjust the volume.
(See Chapter 9.)
Board or Amplifier malfunction.
The Control Unit (GUN) does not
target correctly.
Firmly insert the plug into the
Power Outlet.
TROUBLESHOOTING
When the main SW is turned ON, The power is not ON.
the machine is not activated.
COUNTERMEASURES
Check by performing a speaker
test. (See Chapter 9.)
Due to external or environmental Perform the Gun Adjustment in
factors the targeting is off.
the Test Mode. (See Chapter 9.)
LED Board malfunction
Check that the LED lights up. If
not does not light up, replace it.
Sensor may be faulty
Replace the Optic Sensor.
LED Board and Cover are
contaminated
Clean off soiled surface.
Fuse on the Sensor Unit has
blown due to a momentary
Electrical Overload
Fix the source of the Overload,
then replace the Fuse.
A fault with the Microswitch
Check ON/OFF function in the
Input Test, and if not working
exchange the Microswitch
A fault with the LED Board
Check that the LEDs are ON.
If not exchange them.
The Sensor Unit is Broken
Exchange the Sensor Unit
The lights in the cabinet does not The fluorescent light is dead.
come on.
Exchange the fluorescent light.
(See Chapter 13.)
95
15-2 ERROR DISPLAY
15
• If an error is displayed, have the site maintenance personnel or other qualified
individuals resolve it. If someone without specialized or technical knowledge
attempts to rectify the problem, electric shock, short circuits or fire may result.
TROUBLESHOOTING
If there is no site maintenance personnel or other qualified individuals available, turn
off the power and contact your retailer or the office listed in this manual.
• If a problem not described in this manual and the LINDBERGH service manual occurs,
or the resolution to a problem described in this manual is not effective, do not make
further attempts to resolve the problem yourself. Immediately turn off the power and
contact your retailer or the office listed in this manual. Any unguided attempts to
solve such problems may lead to a serious accident.
This product displays the following messages when it detects an error. Read the error description and
follow the steps indicated. Refer to the LINDBERGH Service Manual for details on error messages
displayed with the LINDBERGH Logo.
If an error number or message not listed below appears, cease using the product
immediately and send the LINDBERGH board in for repairs.
The LINDBERGH board is equipped to display various errors on-screen to help solve any problems. If an
error is displayed the game cannot be used. Use the following table of causes and resolutions to solve
the problem.
Error 1
DISPLAY
CAUSE
COUNTERMEASURES
96
Game Program Not Found.
The key chip is not connected.
Check that the key chip is connected correctly. Check that the key chip
from a different system is not inserted.
Error 2
DISPLAY
CAUSE
COUNTERMEASURES
Game Program Not Available.
The key chip is not supported.
Send the LINDBERGH board in for repair with the key chip still in place.
Error 5
DISPLAY
CAUSE
COUNTERMEASURES
Wrong Region.
The game is for a foreign region.
Use a domestic game.
Error 6
DISPLAY
CAUSE
COUNTERMEASURES
I/O Device Not Found.
The LINDBERGH board’ s I/O board cannot be found.
Send the LINDBERGH board in for repair with the key chip still in place.
15-2 ERROR DISPLAY
Graphic Card Not Found.
The LINDBERGH board’ s graphics card cannot be found.
Send the LINDBERGH board in for repair with the key chip still in place.
Error 8
DISPLAY
CAUSE
COUNTERMEASURES
Sound Card Not Found.
The LINDBERGH board’ s sound card cannot be found.
Send the LINDBERGH board in for repair with the key chip still in place.
Error 9
DISPLAY
CAUSE
COUNTERMEASURES
System Memory Not Enough.
The LINDBERGH board does not have enough memory.
Send the LINDBERGH board in for repair with the key chip still in place.
Error 10
DISPLAY
CAUSE
COUNTERMEASURES
Unexpected Game Program Failure.
The game program crashed due to an unexpected error.
Turn the power off and then restart.
Error 11
DISPLAY
JVS I/O board is not connected to main board.
CAUSE
(1) The I/O board is not connected.
(2) Unreliable connection between the main board and the I/O board.
COUNTERMEASURES
(1) Connect the I/O board to the main board. Verify that the power cable
is connected to I/O board.
(2) Reconnect or replace the JVS cable that connects the I/O board to the
main board.
Error 12
DISPLAY
CAUSE
COUNTERMEASURES
JVS I/O board does not fulfill the game spec.
The correct I/O board is not connected.
Use an I/O board that provides the proper input/output for the game.
Error 15
DISPLAY
CAUSE
Game Program Not Found.
The key chip is not connected.
COUNTERMEASURES
Error 21
DISPLAY
CAUSE
COUNTERMEASURES
15
TROUBLESHOOTING
Error 7
DISPLAY
CAUSE
COUNTERMEASURES
Check that the key chip is connected correctly. Check that the key chip
from a different system is not inserted.
Game Program Not Found on Game Disk.
There is no program image on the game disk.
Check that a game disk corresponding to the key chip is inserted into the drive.
Error 22
DISPLAY
CAUSE
COUNTERMEASURES
Game Program Not Found on Device.
There is no game image on the game installer device.
Perform a reinstall from the game disk.
Error 24
DISPLAY
CAUSE
COUNTERMEASURES
DVD Drive Not Found.
The DVD drive cannot be found.
Connect the DVD drive.
97
15-2 ERROR DISPLAY
15
TROUBLESHOOTING
Error 25
DISPLAY
CAUSE
COUNTERMEASURES
Game Disk Not Found.
The game disk cannot be found.
Insert the game disk.
Error 26
DISPLAY
CAUSE
COUNTERMEASURES
Storage Device Not Found.
The program installer device cannot be found.
Send the LINDBERGH board in for repair with the key chip still in place.
Error 27
DISPLAY
CAUSE
COUNTERMEASURES
Storage Device is Not Acceptable.
The program installer device does not have enough space.
Send the LINDBERGH board in for repair with the key chip still in place.
Error 28
DISPLAY
CAUSE
This Game Disk is Not Acceptable.
The game disk cannot be read correctly.
COUNTERMEASURES
Error 29
DISPLAY
CAUSE
COUNTERMEASURES
Cannot Control DVD Drive.
The DVD drive cannot be controlled.
The DVD drive may be damaged.
Error 31
DISPLAY
CAUSE
COUNTERMEASURES
Storage Device Not Enough.
The program installer device does not have enough space.
Send the LINDBERGH board in for repair with the key chip still in place.
Error 32
DISPLAY
CAUSE
Installing Game Program Failed.
Transfer of the program failed.
COUNTERMEASURES
98
Exchange the game disk for a proper game disk. Check that the game
disk is not scratched, damaged or dirty.
Check that the DVD drive is connected correctly. Check that the game
disk is not scratched, damaged or dirty.
Error 33
DISPLAY
CAUSE
COUNTERMEASURES
Storage Device is Not Acceptable.
The program installer device cannot be found.
Send the LINDBERGH board in for repair with the key chip still in place.
Error 34
DISPLAY
CAUSE
COUNTERMEASURES
Storage Device Not Found.
The program installer device cannot be found.
Send the LINDBERGH board in for repair with the key chip still in place.
Error 35
DISPLAY
CAUSE
COUNTERMEASURES
Storage Device is Not Acceptable.
The program installer device does not have enough space.
Send the LINDBERGH board in for repair with the key chip still in place.
15-2 ERROR DISPLAY
Error 36
DISPLAY
CAUSE
COUNTERMEASURES
15
Verifying Game Program Failed.
CAUSE
The program image is unverified due to the program image not
existing on the game disk or server.
COUNTERMEASURES
Check that the correct game disk is inserted.
Error 41
DISPLAY
CAUSE
COUNTERMEASURES
Error 42
DISPLAY
CAUSE
COUNTERMEASURES
Error 43
DISPLAY
CAUSE
COUNTERMEASURES
Error 44
DISPLAY
CAUSE
COUNTERMEASURES
Server Not Respond.
The server is not responding.
TROUBLESHOOTING
Error 37
DISPLAY
Storage Device May be Broken.
The program installer device is broken.
Send the LINDBERGH board in for repair with the key chip still in place.
Check the network settings.
Set IP Address and other settings.
Check that the network cable has not been pulled out.
Server Mount Failed.
The server directory is could not be reached.
Check the network settings.
Set IP Address and other settings.
Check that the network cable has not been pulled out.
IP Address Not Assigned.
An IP Address could not be obtained from the DHCP server.
Check the network settings.
Check that the network cable has not been pulled out.
Check that the DHCP server is running.
Game Program Not Found on Server.
No program image on the network server.
Check that the game title, place on the network server, and the key
chip correspond to each other.
Error 51
DISPLAY
CAUSE
COUNTERMEASURES
Wrong Resolution Setting.
The game does not support the current resolution settings.
Change the DIP SW to the correct settings and restart.
Error 52
DISPLAY
CAUSE
COUNTERMEASURES
Wrong Horizontal/Vertical Setting.
The monitor horizontal/vertical settings are incorrect.
Change the DIP SW to the correct settings and restart.
99
NOTES
15
TROUBLESHOOTING
100
16 GAME BOARD
● When working with the product, be sure to turn the power off. Working with the power on may cause an electric shock or short circuit.
● Do not use this product with connectors other than those that were connected
and used with the game board at the time of shipping. Do not carelessly connect wires to connectors that were not used at the time of shipping, as this may cause overheating, smoke or fire damage
16
GAME BOARD
● Be careful not to damage the wires. Damaged wires may cause an electric shock,
short circuit or present a risk of fire.
● When returning the game board after making repairs or replacements, make sure that there are no errors in the connection of connectors. Erroneous connections can lead to electrical shock, short circuits or fires.
● When connecting a connector, check the direction carefully. Connectors must be connected in only one direction. If indiscriminate loads are applied in making connections, the connector or its terminal fixtures could be damaged, resulting in electrical shock, short circuits or fires..
In this product, setting changes are made during the test mode. The game board need
not be operated. Use the game board, etc. as is with the same setting made at the
time of shipment so as not to cause electric shock and malfunctioning.
Static electricity from your body may damage some electronics devices on the IC
board. Before handling the IC board, touch a grounded metallic surface so that the
static electricity can be discharged..
● When a Game Board is to be replaced, put the old Game Board with anomaly into a special box for the replacement of Game Boards. If the special box is not available or it as been damaged, arrange to obtain a box with the following Part Number : 601-11691 / CARTON BOX LBG.
● For replacement or repair, pack the board and send it without disassembling it Order for servicing might not be accepted if any part of the Game Board has been removed. If any part is removed, a service fee will be charged even if the warranty period has not expired.
● DO NOT REMOVE THE KEY CHIP FROM THE BOARD BEFORE SENDING THE BOARD FOR SERVICING
101
16-1 REMOVING THE GAME BOARD
1
16
GAME BOARD
2
Remove the security screws and
unlock the Service Door located
on the Left Hand side of the Gun
Console.
Remove the Service Door. LOCK
SECURITY
SCREWS
Locate the group of Connectors fitted above the LINDBERGH Game Board. Carefully
separate each pair connectors, releasing the Clip - Lock that holds both halves of the connectors together. Always disconnect by holding the connectors moulding and never pull on the wire, as this can damage wiring and connector terminations..
3
CONNECTION
POINT
102
Switch off the main unit.
16-1 REMOVING THE GAME BOARD
3
Check that all Connectors at the Connection Point have been disconnected, and that
the Wiring Harness attached to the CABINET is separated from the Wiring Harness attached to the MAIN BOARD ASSEMBLY,
Remove the VIDEO CABLE from the LINDBERGH Game Board.
Remove the two Fixing Screws securing the Main Board Assembly in place. Tilt the Main Board outwards and lift it from the fixing guide at the bottom and remove it fron the Cabinet.
With the Main Board removed
from the cabinet, disconnect
the Wiring Harness from the
LINDBERGH Game Board. Remove the four fixing screws
one located on each corner of the LINDBERGH.
GAME BOARD
4
16
CONNECTION
POINT
FIXING
FIXING
SCREW
SCREW
FIXING
SCREW
LINDBERGH
GAME BOARD
103
16-2 COMPOSITION OF GAME BOARD
16
GAME BOARD
104
● With the key chip inserted into it, this board serves as a special-purpose game board
for the product.
● Use with the dip switches (DIP SW) on the board at the prescribed settings. If settings do not match the product, an error message will be displayed. In some cases,
the game cannot be started.
17 SOFTWARE INSTALLATION
17-1 ATTACHING THE DVD DRIVE AND KEY CHIP
• Be careful not to damage the DVD wire by getting it caught between object, etc.
Doing so may cause a short circuit or fire.
17
SOFTWARE INSTALLATION
• When connecting the DVD wire connector, check the orientation carefully and connect
securely. The connector must be connected in the proper direction. If it is connected
in the wrong direction or indiscriminately at an incline so that if a load is applied,
the connector or its terminal pins could break, possibly causing a short circuit or fire.
• The KEY CHIP is a precision device. It can be damaged by heat, impact and static electricity. exercise caution in handling this equipment.
• The KEY CHIP must be used as a set with the DVD-ROM disc included in the package.
• Prepare the separately sold DVD Drive and the DVD Wire (2M) supplied with this product.
Connect the LINDBERGH (Game Board) and the DVD drive with the DVD wire in order to
install software.
• For your Safety and to prevent Malfunction, do this before plugging in the power cord.
1
Remove the Service Door on the Left Hand side of the Gun Console to reveal the
2
Remove the ‘KEY CHIP’ from the ‘DVD’ Software Kit, and insert the Key Chip into
LINDBERGH Game Board.
the ‘LINDBERGH’ . At this point, make sure to insert the Key Chip in the right
direction and pushed all of the way in. At this time also attach the ‘IDENTITY
STICKER’ to the Lindbergh.
105
17-1 ATTACHING THE DVD DRIVE AND KEY CHIP
the DVD Wire (2 Metres) to the LINDBERGH connect the connector on
3 Connect
the side with the LINDBERGH tag. The ‘USB MINI A’ can be connected to any of
17
the ports 1 - 4.
(See below)
SOFTWARE INSTALLATION
NH 6 PIN
CONNECTOR
USB
MINI A
LINDBERGH
GAME BOARD
106
17-2 TURNING POWER ON - SOFTWARE INSTALLATION
• Be careful not to damage the DVD wire by getting it caught between objects, etc.
Doing so may cause a short circuit or fire.
• If you look directly at the laser beam in the DVD DRIVE, you could suffer vision
impairment. Do not look inside the DVD DRIVE.
17
SOFTWARE INSTALLATION
• The following explanation assumes that the product has been assembled properly
as explained above. If there is an error or if the product operates in a manner other
than as indicated below, cut off the power supply immediately. Failure to do so may
result in a fire or electrical shock.
• Do not use or store the DVD Drive or DVD Wire in any of the following locations, as
this may result in serious damage.
- Anywhere which may vibrate or shock the equipment.
- In direct sunlight.
- In damp or dusty places.
- In places with a sharp change in temperature.
- Close to anything that gives of heat. (Heater etc.)
- Close to anything with a strong magnetic field. (magnets, monitors, speakers radio, etc)
- Anywhere that is likely to get wet.
- Anywhere with a slope or incline.
- Anywhere with corrosive in the air. (Chlorine, hydrogen sulfide, ammonia, sulphur dioxide etc)
- Anywhere with strong static electricity.
[ Do not use in these locations ]
- Close to anything that is highly retentive of heat. (carpets, sponge, cardboard, etc.)
- Anywhere that blocks the DVD air vent.
• The DVD is a delicate piece of equipment. Avoid the following.
- Dropping or shaking it violently,
- Getting water or liquids on top of it.
- Placing small or large items on top of it
- Drinking of smoking close to the DVD Drive.
• Do not turn off the power to the DVD when it’ s Access Lamp is on or flashing, as this
could cause damage to the device.
• Do not allow any foreign objects, such as liquids, metals, or smoke inside the DVD
drive.
107
17-2 TURNING POWER ON - SOFTWARE INSTALLATION
17
• Use a soft dry cloth to wipe off any dirt or marks on the DVD Drive.
SOFTWARE INSTALLATION
- If you need to use a cleaning agent, always use a “neutral” agent diluted in water.
- Never use products or cleaning agent containing benzene, alcohol, thinners, etc.
• Do not touch the LENS inside the DVD Drive. Doing so may prevent it from reading
accurately.
• The chip components on the IC board can be damaged by electrostatic discharge
from the human body, before handling an IC board always neutralize any static
charge in the body by touching grounded metal surface.
• Some parts are not designed and manufactured specifically for the Software Kit .
Manufactures may discontinue, or change the specification of such general purpose
parts. In which case, SEGA cannot repair or replace a failed component whether of
not the warranty period has expired.
HANDLING THE DVD-ROM DISC
• Do not use a DVD with a damaged Face. This may cause a malfunction.
• Insert the DVD ROM into the DVD Drive with the label facing upwards.
• Do not get finger prints or dust particles on the disc. Contaminated discs may lower
audio and video quality, and may result in read malfunctions.
• When cleaning the disc, do not use volatile chemicals (benzene, thinners, cleaning
sprays, or antistatic agents, etc.).
• Do not use a cracked, warped, or damaged disc.
• Do not attach papers or seals onto the disc to avoid scratching it.
• Do not use a disc with signs of peeled seals, tape, etc
• If such a disc is placed the DVD ROM Drive, malfunctions, such as the inability to
remove the disc from the drive, may result.
• When cleaning a contaminated disc, use a soft cloth that has been soaked in water
and squeezed. After wiping, remove any remaining moisture with a clean dry cloth.
(See 6-5 Fig 01)
• When handling a Disc be careful not to contaminate it with your fingerprints.
108
17-2 TURNING POWER ON - SOFTWARE INSTALLATION
HANDLING THE DISC
• To clean a disc, wipe it with a soft cloth, from the centre outwards.
17-2 Fig 01
2
17
SOFTWARE INSTALLATION
1
• When handling a disc, using both hands, put your thumbs and forefingers on the op-
posite sides of the disc.
17-2 Fig 02
3
• Placing the DVD ROM into the DVD Drive, with one hand, put your forefinger into the centre hole while placing your thumb and middle finger on opposite sides of the disc.
When inserting a DVD ROM into the Drive make sure
that the label is facing upwards.
17-2 Fig 03
109
17-2 TURNING POWER ON - SOFTWARE INSTALLATION
17
SOFTWARE INSTALLATION
• The software is not installed on the game board (LINDBERGH RED) when the power
supply is engaged, so the “Error 22” message is not a malfunction.
However, if there is another error display, or if there is no video output at all, there
might have been an error in product assembly, wiring connections might be faulty, or
the LINDBERGH RED might not be functioning properly.
• After the power supply is engaged, wait for “Error 22” message to be displayed.
If the product is indiscriminately operated in any way beforehand, there could be
unexpected problems or malfunctions, as well as damage to parts.
• Once “Error 22” is displayed, set the DVD-ROM in the DVD DRIVE and re-engage the
power supply. Installation takes place.
• After the power supply is engaged, the DVD DRIVE tray will not come out for about 30
seconds even if you press the switch. This is due to DVD DRIVE initialization.
• The DVD DRIVE tray can come out or return only while the power supply is engaged.
The tray cannot be opened or closed while the power is off.
• Even after the software has been installed, store the DVD software kit, DVD DRIVE and
DVD wire in a secure location.
• If for any reason installation cannot be completed, an error is displayed. Refer to the
service manual and take corrective action.
SOFTWARE INSTALLATION
Take out the DVD Software Kit provided.
110
1
• Switch ON the MAIN POWER Switch on the AC Unit.
2
• The LINDBERGH starts up and an image appears on the screen (However, this may take several minutes depending on the type of display used), then an ERROR will occur.
Check that it is “ERROR 22” and proceed to the next operation. If it’ s not “ERROR 22” take corrective measures as indicated in the LINDBERGH Service Manual.
17-2 TURNING POWER ON - SOFTWARE INSTALLATION
3
• Remove 1 urea (Resin Head) Screw, and then remove the DVD Case.
17
SOFTWARE INSTALLATION
17-2 Fig 04
4
• Press the DVD Drive switch and the DVD Drive tray will open. Set the DVD ROM from
the DVD Software Kit into the Tray. Always have the DVD label facing upwards.
17-2 Fig 05
5
• Press the DVD Drive switch and the DVD Drive tray will close
6
• Reset Power, Turn the MAIN POWER Switch OFF, wait a while and then turn it back 7
• The Software installs Automatically from the DVD ROM to the LINDBERGH, In some
on again.
cases, it may take up to 30 minutes for the installation to the LINDBERGH to be complete.
111
17-2 TURNING POWER ON - SOFTWARE INSTALLATION
17
8
• After the software installation, the Game Image will appear automatically.
SOFTWARE INSTALLATION
GAME IMAGE
17-2 Fig 06
9
• Press the DVD Drive switch to open the tray, and remove the DVD ROM.
• Press the DVD Drive switch again to close the tray, When the power is off, the tray 10 can
not be moved.
11 • Set the MAIN POWER Switch OFF’
12 • Remove the DVD Wire (2m) from the DVD DRIVE.
13 the steps in reverse order to detach the DVD Wire (2m) from the cabinet.
• Refer to steps 1-13 in “6-3 ATTACHING THE DVD DRIVE AND KEY CHIP” and follow • Attach the DVD Drive case lid and fasten it with 1 urea (Resin Head) Screw. Store 14 the
DVD Drive and DVD Software Kit at a location where there is no dustor cigarette smoke.
• Turn ON the MAIN POWER Switch on the AC unit. When the Game Image appears, 15 installation
is complete.
(See 6-5 Fig 06)
112
18 DESIGN-RELATED PARTS
For the warning display stickers, refer to Section 1.
18
DESIGN - RELATED PARTS
No.
Number
Description
A
B
RMB-0556UK
RMB-0558UK
BILLBOARD FRONT PLATE
BILLBOARD POP
C
D
E
F
G
H
RMB-0511UK
RMB-0512UK
RMB-0513UK
RMB-0514UK
RMB-0515UK
RMB-0516UK
I
J
K
L
M
Quantity
Assembly
1
1
RMB-INST-DX / 21
RMB-INST-DX / 23
STICKER - DLP SIDE L
STICKER - DLP SIDE R
STICKER - DLP FRONT L
STICKER - DLP FRONT R
STICKER - DLP FRONT CENTRE
PLAQUE - FLAMES
1
1
1
1
1
2
RMB-0500UK / 11
RMB-0500UK / 12
RMB-0500UK / 13
RMB-0500UK / 14
RMB-0500UK / 15
RMB-0500UK
RMB-0535UK
RMB-0536UK
STICKER - MASK L
STICKER - MASK R
1
1
RMB-0503UK / 6
RMB-0503UK / 7
RMB-1116UK
RMB-2002UK
RMB-1001UK
PLAQUE - CONTROLLER RAMBO
STICKER - CONTROL PANEL
STICKER - INSTRUCTIONS
2
1
RMB-1100UK
RMB-1100UK
RMB-1100UK
113
18 DESIGN RELATED PARTS
18
DESIGN - RELATED PARTS
B
C
D
A
I
G
M
114
J
L
H
H
E
F
K
K
18 DESIGN RELATED PARTS
18
A
I
D
DESIGN - RELATED PARTS
B
J
M
L
H
G
F
K
115
19 PARTS LIST
BRAKEDOWN ON ALL SUB ASSEMBLIES
RAMBO DELUXE - ASSY STRUCTURE
'A'
19
1
RMB-0000UK
'B'
1
TOP ASSY RAMBO DX
RMB-0500UK
'C'
2
ASSY DLP
'D'
RMB-0550UK
ASSY BILLBOARD BOX
PARTS LIST
3
RMB-0660UK
ASSY XMFR
4
RMB-0670UK
AC UNIT
5
2
RMB-1000UK
RMB-0530UK
2
RMB-0540UK
ASSY MASK
x2
ASSY SENSOR
4
LGJ-1340UK
6
RMB-0570UK
x2
ASSY ROCKET LAUNCHER
10
LGJ-1340UK
x2
FAN UNIT AC UK
1
RMB-1100UK
ASSY GUN CABINET
ASSY SUB CABI DX
4
FAN UNIT AC UK
RMB-1300UK
ASSY CONTROL HOLDER L
5
RMB-1320UK
ASSY CONTROL HOLDER R
6
RMB-2000UK
ASSY CONTROL PANEL
7
CTF-2100
x2
CONTROL UNIT
8
RMB-4000UK
ASSY MAIN BD
9
RMB-4100UK
ASSY ELEC
401
RMB-INST-D
ASSY INST DX
116
A
JPT-2030
SENSOR UNIT
19 PARTS LIST
A B C D
1
RMB-0000UK TOP ASSEMBLY
(RMB-0000UK)
-----
No.
Component Part
Description
1
2
8
9
10
11
17
19
20
21
22
23
201
202
401
RMB-0500UK
RMB-1000UK
LB1046
LB1102
421-7988-91UK
421-7020UK
440-CS0186UK
LB1130
PK0451
PK0452
PK0453
PK0454
030-000840-SB
060-F00800-0B
RMB-INST-D
ASSY DLP
ASSY GUN CABINET
LABEL TESTED FOR ELEC. SAFETY
STICKER DANGEROUS VOLTAGE
STICKER SERIAL NUMBER UK
STICKER CAUTION FORK
STICKER C EPILEPSY MULTI
LABEL WEEE WHEELIE BIN
PALLET DLP RMB DX
SHRINK BAG DLP RMB DX
PALLET MAIN RMB DX
SHRINK BAG MAIN RMB DX
M8X40 BLT W/S BLK
M8 WSHR FORM A FLT BLK
ASSY INST DX
------------------------------ ---------------------
Quantity
---------------
1
1
1
2
2
6
1
1
1
1
1
1
6
6
1
*
*
*
*
*
*
*
*
*
*
*
*
*
19
PARTS LIST
*
NOT SHOWN
1/1
A
A
A - For Details See
RMB-INST UK
2
1
117
19-1 PARTS LIST
A B C D
1 1
19
PARTS LIST
-----
No.
Component Part
Description
1
*2
*3
*4
*101
*102
*201
*202
*203
3
4
5
6
10
11
12
13
14
15
16
17 18
20
21
22
23
24
25
26
27
28
29
30
31
32
101
102
103
104
105
106
107
RMB-0501UK
ARC-1006
117-5233UK
RMB-0502UK
MA1019
601-5699UK13-01
030-000816
060-S00800
029-B00625-0B
RMB-0660UK
RMB-0670UK
RMB-0530UK
RMB-0570UK
LGJ-1340UK
RMB-0511UK
RMB-0512UK
RMB-0513UK
RMB-0514UK
RMB-0515UK
421-7501-10
LB1104
LB1120
253-5460-01
RMB-0552UK
RMB-0516UK
RMB-0517UK
RMB-0518UK
RMB-0505UK
RMB-0553UK
RMB-0554UK
RMB-0504UK
RMB-0506UK
RMB-0507UK
RMB-0509UK
RMB-0510UK
200-6056-SMGSNG
130-04030-E
838-14851
390-5695-40-CUK
390-5695-40-GUK
280-A01264-WX
290194
DLP CABI
LEG BRKT
PLATE LEG BRKT
DOOR BACK DLP
CASTOR 75
LEG ADJ M16X130 1L/NUT
M8X16 BLT PAS
M8 WSHR SPR PAS
M6X25 SKT BH BLK
ASSY XMFR
AC UNIT
ASSY MASK
ASSY ROCKET LAUNCHER
FAN UNIT AC UK
STICKER, DLP SIDE L
STICKER, DLP SIDE R
STICKER, DLP FRONT L
STICKER, DLP FRONT R
STICKER, DLP FRONT CENTRE
STICKER, FL 40W
STICKER, CAUTION HOT SURFACE
STICKER, DANGEROUS VOLTAGE
AIR VENT BLACK
BILLBOARD BOX LID
DIFFUSER FIRE EFFECT
RETAINER DIFFUSER
SASH DLP SIDE
CONN PLATE
SASH BILLBOARD LID FRONT
SASH BILLBOARD LID REAR
BRKT JOINT
DLP RETAINING BRKT REAR
DLP RETAINING BRKT FRONT
BRKT RETAINING DLP TOP L
BRKT RETAINING DLP TOP R
DISPLAY 56" DLP SAMSUNG
SPKR ELIP 4OHM 30W VIS DX4x6P
RED LED BD 40EA RMB
FL TRAY 110V 40W
FL TUBE 40W 1200x38MM T12
ROUTER TWIST D12 SO6.4 WOOD X
TAPE FOAM 25MM X 6MM X 12M
------------------------------ ---------------------
1/4
(RMB-0500UK)
118
ASSY - DLP
RMB-0500UK Quantity
---------------
1
4
8
1
4
4
16
16
16
1
1
1
2
2
1
1
1
1
1
1
1
1
2
1
2
2
2
1
1
1
4
1
1
1
1
1
2
2
1
1
4
60
*
*
*
*
*
*
*
*
*
*
*
*
*
*
*
*
*
*
*
*
*
*
*
*
*
19-1 PARTS LIST
A B C D
1 1
ASSY - DLP
RMB-0500UK (RMB-0500UK)
-----
No.
Component Part
Description
201
202
203
204
205
206
207
208
209
210
211
212
213
214
215
301
302
303
304
305
306
307
308
309
310
311
312
000-T00630-0B
060-F00600-0B
030-000830-S
068-852216
000-P00425-W
068-441616
000-T00420-0B
000-T00412-0B
000-P00420-W
012-P03516
012-P00325
012-P03512-F
000-T00416-0B
030-000620-S
068-652016
RMB-60006UK
RMB-60007UK
RMB-60035UK
RMB-60036UK
LGJ-60036UK
SRS-60020UK
600-7009-3000UK
600-9100-44K
SRS-65016UK
600-9250-44K
RMB-60009UK
RMB-60049UK
M6X30 MSCR TH BLK
M6 WSHR FORM A FLT BLK
M8X30 BLT W/S PAS
M8 WSHR 22OD FLT PAS
M4X25 MSCR PAN W/FS PAS
M4 WSHR 16OD FLT PAS
M4X20 MSCR TH BLK
M4X12 MSCR TH BLK
M4X20 MSCR PAN W/FS PAS
N6X5/8" S/TAP PAN PAS
N4X1" S/TAP PAN PAS
N6X1/2" S/TAP FLG PAS
M4X16 MSCR TH BLK
M6X20 BLT W/S PAS
M6 WSHR 20OD FLT PAS
WH AC MAIN
WH DLP AC IN
WH SPK & LED
WH LED BD
WH BILLBOARD FAN AC
WH SPEAKER ASSY RGB CA D SUB 15
WH EARTH 100CM M4 M4
WH AC GAME BOARD
WH EARTH 250CM M4 M4
WH FL UNIT
WH AC BILLBOARD
*
NOT SHOWN
------------------------------ ---------------------
2/4
Quantity
---------------
*
*
*
*
*
*
*
*
*
*
*
*
*
*
*
*
*
*
*
*
*
*
*
*
*
*
*
19
PARTS LIST
3
3
6
6
4
4
12
28
4
8
12
4
16
4
4
1
1
1
1
3
2
1
2
1
1
1
1
119
19-1 PARTS LIST
A B C D
RMB-0500UK ASSY - DLP
1 1
3/4
(RMB-0500UK)
19
PARTS LIST
6
21
6
102
5
22 103
102
23
22 103
1
25
120
23
COMPONENTS IDENTIFIED ON THIS PAGE
1
5
6
21
22
23
25
102
103
RMB-0501UK
RMB-0530UK
RMB-0570UK
RMB-0552UK
RMB-0516UK
RMB-0517UK
RMB-0505UK
130-04030-E
838-14851
DLP CABI
ASSY MASK
ASSY ROCKET LAUNCHER
BILLBOARD BOX LID
DIFFUSER FIRE EFFECT
RETAINER DIFFUSER
CONN PLATE
SPKR ELIP 4OHM 30W VIS DX4x6P
RED LED BD 40EA RMB
1
1
2
1
2
2
1
2
2
19-1 PARTS LIST
A B C D
1 1
RMB-0500UK ASSY - DLP
COMPONENTS IDENTIFIED ON THIS PAGE
1
3
4
10
20
101
RMB-0501UK
RMB-0660UK
RMB-0670UK
LGJ-1340UK
253-5460-01
200-6056-SMGSNG
(RMB-0500UK)
DLP CABI
ASSY XMFR
AC UNIT
FAN UNIT AC UK
AIR VENT BLACK
DISPLAY 56" DLP SAMSUNG
1
1
1
2
2
1
19
PARTS LIST
4/4
20
10
20
10
101
1
20
3
4
121
19-1 PARTS LIST
A B C D
1 1 3
19
ASSY - XMFR PARTS LIST
-----
No.
Component Part
Description
1
101
102
201
202
203
301
ADH-4201UK
560-LBGH-01UK
838-14551-02UK
000-P00416-W
068-441616
050-F00400
RMB-60044UK
WOODEN BASE TRANS BD
TRANSFORMER 100V
AC DISTRIBUTION BD
M4X16 MSCR PAN W/FS PAS
M4 WSHR 16OD FLT PAS
M4 NUT FLG SER PASEARTH
WH EARTH XFMR
------------------------------ ---------------------
1/2
(RMB-0660UK)
*
NOT SHOWN
122
RMB-0660UK Quantity
---------------
1
1
1
4
4
4
1
*
*
*
*
19-1 PARTS LIST
A B C D
1 1 3
RMB-0660UK ASSY - XMFR 2/2
(RMB-0660UK)
19
PARTS LIST
101
102
1
123
19-1 PARTS LIST
A B C D
1 1 4
19
RMB-0670UK ASSY - AC UNIT (RMB-0670UK)
PARTS LIST
-----
No.
Component Part
Description
1
3
101
102
103
107
201
203
301
HOD-1021UK
LB1096
EP1382
SW1109
EP1302
310-5029-D508
000-P00308
050-F00400
TFF-60001UK
AC BRKT UK
STICKER PROTECTIVE EARTH
FILTER SCHAFFNER FN682-10/06
SW ROCKER
IEC INLET FUSED
HEAT SHRINK SLEEVING 50.8DIA
M3X8 MSCR PAN PAS
M4 NUT FLG SER PAS
WH AC IN
*
NOT SHOWN
------------------------------ ---------------------
Quantity
---------------
1
1
1
1
1
4
4
2
1
107
101
1
102
103
124
1/1
*
*
*
19-1 PARTS LIST
A B C D
1 1 5
RMB-0530UK ASSY - MASK (RMB-0530UK)
-----
No.
Component Part
Description
1
3
6
7
8
101
201
202
204
205
301
302
303
RMB-0531UK
RMB-0532UK
RMB-0535UK
RMB-0536UK
PT-1082X
838-13145R02
000-P00410-W
060-F00400
050-U00300
068-330808-PN
RMB-60041UK
HDF-65010UK
HDF-65011UK
MASK BASE
PROTECT SCREEN DLP
STICKER MASK L
STICKER MASK R
IR COVER
LED BD GUN SENSE HOD M4X10 MSCR PAN W/FS PAS
M4 WSHR FORM A FLT PAS
M3 NUT NYLOK PAS
M3 WSHR 8OD FLT NYLON
WH LED MASK EXT
WH MASK EXT 2 62
WH MASK SENSE LINK 62
*
NOT SHOWN
------------------------------ ---------------------
1/1
Quantity
---------------
*
*
19
PARTS LIST
1
1
1
1
10
10
20
16
20
20
1
2
7
*
*
*
*
*
*
3
8 101
1
125
19-1 PARTS LIST
A B C D
1 1 6
19
RMB-0570UK ASSY - ROCKET LAUNCHER
PARTS LIST
-----
No.
Component Part
Description
1
2
3
101
201
202
203
204
301
RMB-0571UK
RMB-0572UK
RMB-0573UK
838-0013UK
008-T00412-0B
000-P00310-W
000-P00325
068-330808-PN
RMB-60045UK
TUBE LAUNCHER
TUBE NOZZLE
PLATE DIFFUSER
LED GUN BD
M4X12 TMP PRF TH BLK
M3X10 MSCR PAN W/S PAS
M3X25 MSCR PAN PAS
M3 WSHR 8OD FLT NYLON
WH LED GUN
*
NOT SHOWN 1
101
3
2
126
(RMB-0570UK)
------------------------------ ---------------------
1/1
Quantity
---------------
1
1
1
1
3 3
3
3
2
*
*
*
*
*
19-1 PARTS LIST
A B C D
1 1 10
LGJ-1340UK ASSY - FAN UNIT AC UK
(LGJ-1340UK)
-----
No.
Component Part
Description
1
2
101
201
301
105-5340-01
260-0011-02
FN1012
000-P00312-W
LGJ-60036UK
FAN BRKT LONG
FAN AC100V 50-60HZ (SP100A-112
FAN GUARD METAL 120MM (FG-12)
M3X12 MSCR PAN W/FS PAS
WH AC FAN
*
NOT SHOWN
2
Quantity
---------------
2
1
1
4
1 19
*
*
PARTS LIST
------------------------------ ---------------------
1/1
1
3
127
19-2 PARTS LIST
A B C D
1 2
19
ASSY - GUN CABINET PARTS LIST
-----
No.
Component Part
Description
1
4
5
6
7
8
9
12
13
22
101
102
103
104
105
201
202
203
204
205
206
207
208
RMB-1100UK
RMB-1300UK
RMB-1320UK
RMB-2000UK
CTF-2100
RMB-4000UK
RMB-4100UK
RMB-1004UK
RMB-1005UK
PP1087
220-5374-01
220-5574UK
220-5727-01B
LM1006LOR
220-5610-02
030-000830-SB
068-852216-0B
008-B00830-0B
000-T00412-0C
032-000430
068-441616
050-U00800
068-852216
ASSY SUB CABI DX
ASSY CONTROLLER HOLDER L
ASSY CONTROLLER HOLDER R
ASSY CONTROL PANEL
CONTROL UNIT
ASSY MAIN BD
ASSY ELEC
LOCKING HASP
BRKT PADLOCK
BOX CASH FOR MINI DOOR
DOOR DFMD W/FR&LOCK C120 UNIV
LOCK (J9117) KEY TO LIKE 22MM W CAM
DOOR CASH H.S. STS
LOOM COIN MECH LAMP
SR3 COIN MECH
M8X30 BLT W/S BLK
M8 WSHR 22OD FLT BLK
M8X30 TMP PRF BH BLK
M4X12 MSCR TH CRM
M4X30 W/BLT PAS
M4 WSHR 16OD FLT PAS
M8 NUT NYLOK PAS
M8 WSHR 22OD FLT PAS
*
NOT SHOWN
------------------------------ ---------------------
1/2
(RMB-1000UK)
128
RMB-1000UK Quantity
---------------
1
1
1
1
2
1
1
1
1
1
1
1
1
1
1
12
16
4
8
4
4
4
4
*
*
*
*
*
*
*
*
*
*
*
*
*
19-2 PARTS LIST
A B C D
1 2
RMB-1000UK ASSY - GUN CABINET 2/2
(RMB-1000UK)
19
PARTS LIST
6
1
7
7
4
5
101 105
103
12
13
129
19-2 PARTS LIST
A B C D
1 2 1
19
PARTS LIST
130
RMB-1100UK ASSY - SUB CABI DX
(RMB-1100UK)
-----
No.
Component Part
Description
1
2
3
4
5
8
9
15
17
18
19
20
30
32
34
36
101
102
103
104
106
107
108
109
110
111
112
201
202
203
204
205
206
207
208
209
210
211
212
213
214
215
216
217
218
RMB-1101UK
RMB-1102UK
RMB-1103UK
LGJ-1340UK
RMB-1118UK
RMB-1106UK
RMB-1107UK
CTF-1113UK
RMB-1115UK
RMB-1116UK
RMB-1117UK
LCA-2040UK
DUT-0302UK
DP-1167UK
253-5460-01
FN1012
MA1007
MA1019
601-5699UK-01
220-5575-280UK
838-14548-01UK
EP-1380-01
220-5643UK
OS1230
280-L007006PM
280-A01013-PM
390-8300-WHT-UK
030-000616-SB
060-F00600
000-T00440-0B
068-441616-0B
000-P00420-W
030-000835-S
060-F00800
030-000635-S
030-000645-SB
068-652016-0B
050-F00400
060-F00400
000-P00412-W
000-T00430-0B
030-000630-S
000-P00308-W
030-000830-S
050-H01600
CABINET DX
BRKT FRONT SUPPORT
SIDE DOOR R
FAN UNIT AC UK
BRKT SWITCH HOLDER
FOOT BASE
PIPE SUPPORT
JOINT BRKT LOWER
WINDOW HOLDER
WINDOW RAMBO
ENCLOSURE WINDOW LIGHTING
INVERTER COVER
COIN PATH PLATE
TNG LKG UK
AIR VENT BLACK
FAN GUARD METAL 120MM (FG-12)
CASTOR SWIVEL 63mm NYLON
CASTOR 75
LEG ADJ M16X100 1L/NUT
LOCK (J9117) 28MM W/O CAM
SW & VOL CTL BD
EXCELL CREDIT BD
COIN METER 12V
FOAM STRIP 2mm X 10mm
STANDOFF 6.4MM HOLE PM
ROUTER TWIST D10 SO12.7 PAN M
CCFL KIT 300MM WHT
M6X16 BLT W/S BLK
M6 WSHR FORM A FLT PAS
M4X40 MSCR TH BLK
M4 WSHR 16OD FLT BLK
M4X20 MSCR PAN W/FS PAS
M8X35 BLT W/S PAS
M8 WSHR FORM A FLT PAS
M6X35 BLT W/S PAS
M6X45 BLT W/S BLK
M6 WSHR 20OD FLT BLK
M4 NUT FLG SER PAS
M4 WSHR FORM A FLT PAS
M4X12 MSCR PAN W/FS PAS
M4X30 MSCR TH BLK
M6X30 BLT W/S PAS
M4X20 MSCR PAN W/FS PAS
M8X30 BLT W/S PAS 218
M16 NUT PAS
------------------------------ ---------------------
1/2
Quantity
---------------
1
1
1
1
1
1
1
3
2
2
2
2
1
1
2
2
2
2
2
1
1
1
1
2.4
4
4
4
12
24
2
2
9
10
13
4
8
12
12
12
12
4
8
3
8
2
*
*
*
*
*
*
*
*
*
*
*
*
*
*
*
*
*
*
*
*
*
*
*
*
*
*
*
*
*
*
19-2 PARTS LIST
A B C D
1 2 1
RMB-1100UK ASSY - SUB CABI DX
(RMB-1100UK)
-----
No.
Component Part
Description
301
302
303
304
305
306
307
RMB-60048UK
RMB-60011UK
SRS-65016UK
RMB-60031UK
RMB-60047UK
600-9150-45K
600-9080-44K
WH FAN EXT
WH MASK LED BASE CABI
WH AC GAME BOARD
WH LED BD EXTN
WH COIN + VTS
WH EARTH 150CM M4 M5
WH EARTH 80 CM M4 M4
*
NOT SHOWN
------------------------------ ---------------------
Quantity
---------------
1
1
1
1
1
1
1
19
PARTS LIST
9
20
2/2
4 34
19
2
104
106
3
18
30
17
8
1
101
103
131
19-2 PARTS LIST
LGJ-1340UK A B C D
1 2 1 4 ASSY - FAN UNIT AC UK
19
PARTS LIST
-----
No.
Component Part
Description
1
2
101
201
301
105-5340-01
260-0011-02
FN1012
000-P00312-W
LGJ-60036UK
FAN BRKT LONG
FAN AC100V 50-60HZ (SP100A-112
FAN GUARD METAL 120MM (FG-12)
M3X12 MSCR PAN W/FS PAS
WH AC FAN
*
NOT SHOWN
2
Quantity
---------------
1
3
132
(LGJ-1340UK)
------------------------------ ---------------------
1/1
2
1
1
4
1
*
*
19-2 PARTS LIST
A B C D
1 2 4
RMB-1300UK ASSY - CONTROL HOLDER L
(RMB-1300UK)
-----
No.
Component Part
Description
1
2
3
201
202
203
204
205
RMB-1301UK
RMB-1302UK
RMB-1303UK
030-000620-SB
068-652016-0B
000-T00616-0B
000-T00630-0B
000-T00410-0B
CONTROLLER HOLDER BASE L
CONTROLLER HOLDER SUPPORT
CONTROLLER HOLDER L
M6X20 BLT W/S BLK
M6 WSHR 20OD FLT BLK
M6X16 MSCR TH BLK
M6X30 MSCR TH BLK
M4X10 MSCR TH BLK
*
NOT SHOWN
------------------------------ ---------------------
1/1
Quantity
---------------
19
*
*
*
*
*
PARTS LIST
1
1
1
4
7
1
2
7
3
2
1
133
19-2 PARTS LIST
A B C D
1 2 5
19
RMB-1320UK ASSY - CONTROL HOLDER R
PARTS LIST
-----
No.
Component Part
Description
1
2
3
201
202
203
204
205
RMB-1321UK
RMB-1302UK
RMB-1323UK
030-000620-SB
068-652016-0B
000-T00616-0B
000-T00630-0B
000-T00410-0B
CONTROLLER HOLDER BASE R
CONTROLLER HOLDER SUPPORT
CONTROLLER HOLDER R
M6X20 BLT W/S BLK
M6 WSHR 20OD FLT BLK
M6X16 MSCR TH BLK
M6X30 MSCR TH BLK
M4X10 MSCR TH BLK
*
NOT SHOWN
3
2
1
134
(RMB-1320UK)
------------------------------ ---------------------
1/1
Quantity
---------------
1
1
1
4
7
1
2
7
*
*
*
*
*
19-2 PARTS LIST
A B C D
1 2 6
RMB-2000UK ASSY - CONTROL PANEL
(RMB-2000UK)
-----
No.
Component Part
Description
1
2
3
101
201
202
301
RMB-2001UK
RMB-2002UK
CTF-1002UK
509-6217-RW
FAS-290034
050-F00400
RMB-60037UK
CONTROL PANEL BASE
CONTROL PANEL COVER
WASHER CTF
SW OBSA-60UM-R-1FLED-W-12V
HEX SKT LH CAP SCR STN M5X10
M4 NUT FLG SER PAS
WH START BUTTON
*
NOT SHOWN
Quantity
---------------
1
1
4
2
4
1
1
*
*
*
*
19
PARTS LIST
------------------------------ ---------------------
1/1
101
101
1
2
135
19-2 PARTS LIST
A B C D
1 2 7
19
PARTS LIST
136
No.
-----
RMB-2100UK ASSY - CONTROL UNIT
Component Part
(RMB-2100UK)
Description
------------------------------ ---------------------
1/2
Quantity
---------------
19-2 PARTS LIST
RMB-2100UK A B C D
1 2 7 A ASSY - CONTROL UNIT (RMB-2100UK)
-----
No.
Component Part
Description
1
2
3
4
5
6
7
8
9
10
11
12
13
14
15
16
17
18
19
20
21
22
23
24
25
26
27
28
29
30
101
102
103
104
105
106
201
202
203
204
205
206
301
302
JPT-2030
CTF-2101
CTF-2102
CTF-2103
CTF-2104
CTF-2105
CTF-2106
CTF-2107
CTF-2108
CTF-2109
CTF-2110
CTF-2111
CTF-2112
CTF-2113
CTF-2114
CTF-2115
CTF-2116
CTF-2117
CTF-2118
CTF-2119
CTF-2120
CTF-2121
CTF-2122
CTF-2123
CTF-2124
CTF-2125
CTF-2126
CTF-2127
CTF-2128
CTF-2129
124-5097
509-5080
280-5124-04
280-5124-05
601-0460
310-5029-D20
FAS-000100
000-P00306-S
FAS-120029
FAS-120030
065-E00400
FAS-600020
CTF-60032
CTF-60033
SENSOR UNIT
COVER L
COVER R
FRONT SIGHT
MAIN TRIGGER
SUB TRIGGER
SELECTOR
SELECTOR HOLDER
SELECTOR JOINT
PAD BASE
BEARING HOLDER
PAD
SOLENOID FRAME
SHAFT JOINT
PAD FRAME
RECOIL DAMPER
SOLENOID DAMPER
SHAFT DAMPER F
SHAFT DAMPER R
CAP BASE
LIGHT CAP
PAD BEZEL
PAD PIN
TRIGGER SPRING
SELECTOR SPRING
SHAFT
JOINT PIN
SHAFT STOPPER
DAMPER BASE
RETURN SPRING
SOLENOID
SW MICRO TYPE (SS-5GL2)
NYLON CLAMP
NYLON CLAMP
PLASTIC TIE
SUMITUBE F D 20MM
MSCR PH W/SMALL FS BLK M3X12
MSCR PH W/S M3X6
TAP SCR P-TITE PH 4X8
TAP SCR P-TITE PH BLK 4X12
E RING 4MM
FLT WSHR NORM A M8
WH CONTROLLER MAIN EXT
WH CONTROLLER SW EXT
------------------------------ ---------------------
2/2
Quantity
---------------
19
PARTS LIST
1
1
1
1
1
1
2
2
1
1
2
1
1
1
1
1
1
1
1
1
1
1
1
2
1
1
1
1
1
1
1
3
1
2
5
6
15
12
8
3
2
1
1
1
137
19-2 PARTS LIST
A B C D
1 2 8
19
ASSY - MAIN BOARD PARTS LIST
-----
No.
Component Part
Description
1
2
3
5
107
102
103
104
105
106
108
110
111
112
201
202
204
301
302
303
304
305
306
307
308
309
310
RMB-4001UK
845-0001D-12
CFB-4003-01UK
LB1111
LB1101
400-050-012-01
400-050-024-01
400-075-024-01
838-14515-A0191
ADH-1002UK
400-5457-300UK
OS1011
280-A01264-WX
280-A02064-WX
000-P00416-W
012-P03512-F
012-P03506-F
RMB-60012UK
RMB-60013UK
RMB-60014UK
RMB-60018UK
RMB-60023UK
RMB-60042UK
600-7361-0300UK
600-7360-0300UK
600-7141-100UK
RMB-60051UK
WOODEN BASE MAIN
ASSY CASE LBJ L 1GB W/S EX
EARTH PLATE STICKER PLEASE RECYCLE
STICKER WARNING BATTERY
PSU 12VDC 50W MW LPS-50-12
PSU 24VDC 50W MW LPS-50-24
PSU 24VDC 75W MW LPS-75-24
SOUND AMP ANALOG IN
BRKT PWR
PSU ATX 300W
PCB FEET RICHCO LCBS-L-5-01
ROUTER TWIST D12 SO6.4 WOOD X
ROUTER TWIST D20 SO6.4 WOOD X
M4X16 MSCR PAN W/FS PAS
N6X1/2" S/TAP FLG PAS
N6X1/4" S/TAP FLG PAS
WH SPEAKER ELEC BD
WH AC ELEC BD
WH 24V DC ELEC BD
WH AUDIO ELEC BD
WH 5V/12V DC MAIN BD
WH VOLUME
WH PSU LGBH B
WH PSU LGBH A
CABLE JVS TYPE A-B 2
WH DC 24V
*
NOT SHOWN
------------------------------ ---------------------
1/2
(RMB-4000UK)
138
RMB-4000UK Quantity
---------------
1
1
1
1
1
1
1
1
1
1
1
16
6
7
4
2
16
1
1
1
1
1
1
1
1
1
1
*
*
*
*
*
*
*
*
*
*
*
*
*
*
*
*
*
*
19-2 PARTS LIST
A B C D
1 2 8
RMB-4000UK ASSY - MAIN BOARD 2/2
(RMB-4000UK)
19
2
108 106
PARTS LIST
1
105
3
104
102
103
139
19-2 PARTS LIST
A B C D
1 2 9
19
ASSY - ELEC
PARTS LIST
-----
No.
Component Part
Description
1
101
102
103
105
201
301
302
303
304
305
RMB-4101UK
837-14572
838-14465R
839-1243R
280-A01264-WX
012-P00325
RMB-60015UK
RMB-60017UK
RMB-60019UK
RMB-60043UK
GE-60013UK
WOODEN BASE ELEC
I/O CONTROL BD 3 FOR JVS COM
IC BD GUN SENCE NEW EDIT DX
FUSE BD CTF
ROUTER TWIST D12 SO6.4 WOOD X
N4X1" S/TAP PAN PAS
WH I/O ELEC BD
WH LED I/O BASE
WH DC I/O BASE
WH SENSE I/O BD
WH SENSOR FREQ
*
NOT SH0WN
------------------------------ ---------------------
1/2
(RMB-4100UK)
140
RMB-4100UK Quantity
---------------
1
1
1
1
15
12
1
1
1
1
1
*
*
*
*
*
*
*
19-2 PARTS LIST
A B C D
1 2 9
ASSY - ELEC
RMB-4100UK 2/2
(RMB-4100UK)
19
PARTS LIST
101
102
103
1
141
19-3 PARTS LIST
A B ASSY - INST DX
1 401
19
RMB-INST DX 1/2
(RMB-INST DX)
PARTS LIST
-----
No.
Component Part
Description
1
2
3
4
5
6
7
10
11
12
21
22
23
24
25
26
27
201
202
203
204
PK0455
420-7148-01UK
RMB-1001UK
509-5080
420-7032-01UK
OS1019
610-0727-5003
LM1227
LM1246
SAECE-XXX
RMB-0556UK
RMB-0557UK
RMB-0558UK
RMB-0559UK
CTF-1002UK
RMB-0567UK
CTF-0562UK
FAS-290034
030-000820-SB
068-852216-0B
000-T00416-0B
BOX RMB INST KIT
OWNERS MANUAL RMB DX
STICKER INSTRUCTION MULTI RMB
SW MICRO TYPE (SS-5GL2)
LINDBERGH RED MANUAL
SELF SEAL BAG 9X12.3/4
DVD SOFT KIT RMB
UK MAINS LEAD 10A WITH PLUG
EUROLEAD 10A EUROPEAN SOCKET
DECLARATION OF CONFORMITY XXX
BILLBOARD FRONT PLATE
BILLBOARD STAY LH
BILLBOARD POP
POP BRKT POP HOLDER
WASHER CTF
BILLBOARD STAY RH
POP HOLDER
HEX SKT LH CAP SCR STN M5X10
M8X20 BLT W/S BLK
M8 WSHR 22OD FLT BLK
M4X16 MSCR TH BLK
*
NOT SHOWN
------------------------------ ---------------------
142
3
STICKER INSTRUCTION MULTI RMB KIT
1
2
3
4
5
6
STICKER INSTRUCTION MULTI RMB
STICKER INSTRUCTION MULTI RMB
STICKER INSTRUCTION MULTI RMB
STICKER INSTRUCTION MULTI RMB
STICKER INSTRUCTION MULTI RMB
STICKER INSTRUCTION MULTI RMB
ENG
FRE
GER
ITA
SPA
RUS
Quantity
---------------
1
1
1
2
1
2
1
1
1
1
1
1
1
1
4
1
1
2
6
6
3
*
*
*
*
*
*
*
*
*
*
*
*
*
*
*
*
19-3 PARTS LIST
A B 1 401
RMB-INST DX 2/2
ASSY - INST DX
(RMB-INST DX)
19
PARTS LIST
24
23
22
21
26
24
22
26
143
NOTES
19
PARTS LIST
144
20 WIWIRE COLOR CODE TABLE
The DC power wire color for this product is different from previous SEGA titles. Working
from the previous wire colors will create a high risk of fire.
A
B
C
D
E
PINK
SKY BLUE
BROWN
PURPLE
LIGHT GREEN
Wires other than those of any of the above 5 single colors will be displayed by 2 alphanumeric characters.
WIRE COLOUR CODE TABLE
The color codes for the wires used in the diagrams in the following chapter are as follows.
20
1
RED
2
BLUE
3
YELLOW
4GREEN
5
WHITE
7
ORANGE
8
BLACK
9GRAY
If the right-hand side numeral of the code is 0, then the wire will be of a single color shown by the lefthand side numeral (see the above).
Note 1: If the right-hand side numeral is not 0, that particular wire has a spiral color code. The lefthand side character shows the base color and the right-hand side one, the spiral color.
<Example> 51………WHITE/RED
RED
WHITE
Note 2: The character following the wire color code indicates the size of the wire.
U : K : L : None : AWG16
AWG18
AWG20
AWG22
145
(D-1/3)
21
WIRING DIAGRAMS
146
(D-2/3)
21
WIRING DIAGRAMS
147
(D-3/3)
21
WIRING DIAGRAMS
148
SEGA AMUSEMENT EUROPE LTD
WEEE Statement.
The WEEE (Waste of Electrical and Electronic Equipment) directive places an obligation on
all EU based manufacturers and importers of Electrical and Electronic Equipment to take
back products at the end of their useful life. Sega Amusements Europe Ltd accepts its
responsibility to finance the cost of treatment and recovery of redundant WEEE in
accordance with the specified WEEE recycling requirements.
The symbol shown below will be on all products manufactured from 13th August 2005 which
indicates this product must not be disposed of with other normal waste. Instead, it is the
user’s responsibility to dispose of their waste equipment by arranging to return it to a
designated collection point for the recycling of waste electrical and electronic equipment, or
by returning it to SEGA Amusements Europe Ltd for reprocessing.
For more information about where you can send your waste equipment for recycling contact
your local authority office or SEGA Amusements Europe UK sales office.
REGISTERED IN ENGLAND REGISTERED NO. 1711515
REGISTERED OFFICE: SUITE 3A, OAKS HOUSE, 12/22, WEST STREET, EPSOM, SURREY KT18 7RG