1
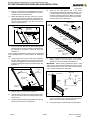
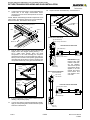
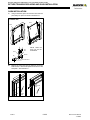
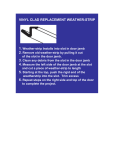
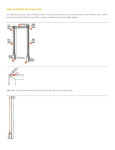
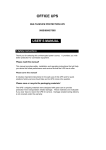
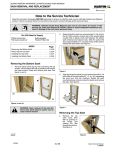
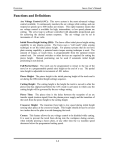
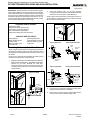
SLIDING WINDOWS HARDWARE- CLAD ULTIMATE DOUBLE HUNG PICTURE/TRANSOM REGLAZING AND SASH INSTALLATION IMPORTANT: These instructions serve two purposes, reglazing and sash installation. You may find that your new Clad Ultimate Double Hung Picture unit frame and sash were shipped loose due to size, therefore it will be necessary to install in the field. Refer to Steps 21 and 22 of these instructions. If you only use these instructions for field installation of the sash, we ask that you please retain them for future usage. 2. Using the linoleum knife, cut the vinyl retainers securing the sash to the frame. Start with the head jamb and then move to the jambs. See illustration 2. NOTE: When removing the heavy sash from the frame it is very important to have the assistance of another individual. Be very careful of broken glass. STANDARD PARTS SHIPPED Sash Replacement glass Replacement V1297 weather strip Replacement V130 sash retainers Two- sided adhesive glazing tape Replacement V946 sash clad connectors Linoleum knife YOU WILL NEED TO SUPPLY Safety glasses Glass handling gloves Rubber mallet Silicone sealant w/gun Linoleum knife Jamb Silicone glazing knife Glass handling arm guards Stiff putty knife or pry bar Utility knife Picture Jamb Detail Head jamb Removing Stationary Sash From Frame NOTE: If the wood sash stop connecting barb(s) remain(s) in the frame kerf it will be necessary to remove. Exercise care in removing the connecting barb(s) from the frame kerf as it will be reused. NOTE: If your unit has an Interior Shade, the header receiver needs to be removed prior to sash removal. 1. Picture Head Jamb Detail Jamb Vinyl sash retainer Sash stile Vinyl sash retainer Begin by removing the wood sash stops with a stiff putty knife as shown in illustration 1. Start with the head jamb, followed by the stiles. Reinstall into sash stop. Transoms will also require the removal of the sill filler and foam before sash can be removed from the frame. See illustration 1. Transom Jamb Detail Transom Head Jamb Detail Transom Sill Detail Putty knife Head jamb stop Jamb Sash stile Vinyl sash retainer Weather strip Sash Sill filler Head jamb Vinyl sash retainer Sash rail 2 Foam 3. Pry the sash out of the frame using the stiff putty knife. Grasp the sash and lift out of the frame. 4. Place picture or transom sash on a flat surface with the interior of the sash up (cladding facing down). Sash Putty knife Side stop 1 11708576 04/2014 5.2.30 Marvin Service Manual 11708609 SLIDING WINDOWS HARDWARE- CLAD ULTIMATE DOUBLE HUNG PICTURE/TRANSOM REGLAZING AND SASH INSTALLATION 5. Remove vinyl retainers and weatherstrip from the sash perimeter. Save bottom rail weatherstrip for use later. Discard all others. See illustration 3. 6. Before attempting this next step, make sure you have your glass gloves and arm guards on. Slide the silicone glazing knife between the glass rabbet and glass. Push knife around the perimeter of the glass to loosen the silicone. See illustration 3. Vinyl retainers 12. Apply the two sided glazing tape to the metal components along the length of the rails and stiles. Trim to proper length. Leave the protective tape covering on the glass surface side at this time. Make sure the tape is cut to proper length and square at the corners where the joints will meet. See illustration 5. Plastic backing Adhesive glazing tape Glass rabbet Sash interior glass rabbet Glass rabbet Exterior sash cladding Stile cladding Glazing knife Adhesive glazing tape Approx. 1 3 7. Turn the sash over. Now slide the silicone glazing knife between glass and exterior cladding. Push knife around the perimeter of the glass to loosen the tape. See illustration 4. Rail cladding Adhesive glazing tape NOTE: Cladding component removal must be accomplished in the following sequence: Top and bottom rail, followed by stiles. 8. Using a putty knife or pry bar, insert the nose between the tape and the glass and pry upward until the metal cladding disengages from the sash cladding connector. Follow the appropriate sequence described earlier. See illustration 4. Glazing knife Tape to edge of miter cut 5 13. Place a continuous bead of silicone on the interior glazing rabbet of the wood sash. Avoid excess application of silicone sealant. See illustration 6. IMPORTANT: Before placing replacement glass in sash make sure the colored sticker indicating the Low E II surface will be facing the interior of the sash. Also ensure the spacer rivet is oriented toward the top of the sash. Exterior sash cladding Stile Stile profile Glass rabbet Silicone bead Stiff putty knife or pry bar Glass rabbet Silicone bead Bottom rail cladding 4 9. 10. 11. Bottom rail Remove sash clad connectors and discard. Carefully remove the broken or damaged glass. Make sure you note the location of the setting blocks as they will be reused. Scrape the silicone from the glazing rabbet and glazing tape residue from the clad components. 04/2014 6 14. Reposition setting blocks to their original locations. Using an assistant, place glass in sash ensuring the glass surface is oriented as described above. 15. Press glass firmly into silicone bed around perimeter. 5.2.31 Marvin Service Manual 11708609 SLIDING WINDOWS HARDWARE- CLAD ULTIMATE DOUBLE HUNG PICTURE/TRANSOM REGLAZING AND SASH INSTALLATION 16. 20. Cut the sash clad connectors 2I less in length than the overall stile or rail length measurement. Press connectors into kerf around sash perimeter as shown in illustration 7. Replace bottom rail weatherstrip. See illustration 9. Top rail vinyl sash retainer NOTE: Before reassembling the metal components on the glass surface, the following sequences must be followed Start with the stiles, then bottom rail and top rail. Stile weatherstrip Vinyl cladding connector Stile Glass Approx. 1I Vertical Picture Sash Detail Bottom rail Top rail weatherstrip Top rail vinyl sash retainer Approx. 1I Horizontal Picture Sash Detail 7 Stile weatherstrip 17. Fold the ends of the protective glazing tape backing slightly toward the daylight opening leaving 1- 2I (25- 51) visible when applied. Apply the metal components to the sash following the sequence mentioned previously, do not push all the way down yet. When you are sure of the correct position, grasp the tails of the tape and pull as shown to remove. Push the clad components down firmly on the glass. See illustration 8. Stile vinyl sash retainer Glazing tape backing Bottom rail weatherstrip Top rail cladding Stile cladding Vertical Transom Sash Detail Top rail weatherstrip Top rail vinyl sash retainer Glass IMPORTANT: Apply transom stile sash retainer to kerf nearest the cladding. The transom top rail sash retainer will be applied to the kerf nearest the interior sash surface. This only applies to transom units. Exposed glazing tape backing Horizontal Transom Sash Detail Bottom rail cladding Stile vinyl sash retainer Stile cladding 8 Stile weatherstrip 18. It may be necessary to use a rubber mallet to seat the cladding components properly. 19. Cut new vinyl retainers and sash weatherstrip to length. Apply to corresponding kerfs of sash stiles and top rails as shown in illustration 9. 9 04/2014 5.2.32 Bottom rail weatherstrip Marvin Service Manual 11708609 SLIDING WINDOWS HARDWARE- CLAD ULTIMATE DOUBLE HUNG PICTURE/TRANSOM REGLAZING AND SASH INSTALLATION SASH INSTALLATION 21. Using an assistant, place the sash into the frame and press firmly into place as shown in illustration 10. INTERIOR VIEW Sash Sash Sill kerf Sash NOTE: Some unit sizes may not use sill brackets. Sill liner Sill Sill bracket 10 22. Replace the sash stops with the attached connecting barbs to frame. Start with the jambs first and then do the head jamb. See illustration 11. Head jamb stop Jamb stop 11 04/2014 5.2.33 Marvin Service Manual 11708609