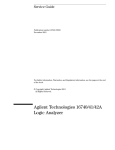
1
Service Guide Agilent Technologies 16522A 200 M Vectors/s Pattern Generator (16700-series version) A Service Guide Publication number 16522-97008 First edition, August 2000 For Safety information, Warranties, and Regulatory information, see the pages at the end of the book. Copyright (c) 2000 Agilent Technologies All Rights Reserved. Agilent Technologies 16522A 200 M Vectors/s Pattern Generator (16700-series version) The Agilent 16522A pattern generator module is an expandable stimulus tool designed for the 16700-Series Logic Analysis System. The 16522A provides digital design teams the ability to emulate missing devices and to functionally test prototypes. Key Characteristics Some of the key characteristics of the Agilent Technologies 16522A are as follows: Output Channel: 20 channels at 200 MHz clock; 40 channels at 100MHz clock. Memory Depth: 258,048 of vectors. Logic Level (data pods): TTL, 3-state TTL/3.3v, 3-state TTL/CMOS, ECL terminated, ECL unterminated, and differential ECL (without pod). Data Inputs: 3-bit pattern level sensing (clock pod). Clock Output: Synchronized to output data, delay of 11 ns in 9 steps (clock pod). Clock Input: DC to 200 MHz (clock pod). Internal Clock Period: Programmable from 5 ns to 250 µs in a 1, 2, 2.5, 4, 5, 8 sequence. External Clock Period: DC to 200 MHz. External Clock Duty Cycle: 2 ns minimum high time. Maximum Number of “IF condition” blocks at 50 MHz clock: 1 Maximum Number of Different Macros: 100 Maximum Number of Lines in a Macro: 1024 Maximum Number of Macro Invocations: 1,000 Maximum Number of Repeat Loop Invocations: 1,000 Maximum Number of “Wait” Event Patterns: 4 Service Strategy The service strategy for this instrument is the replacement of defective assemblies. This service guide contains information for finding a defective assembly by testing and servicing the Agilent 16522A pattern generator module. The module can be returned to Agilent Technologies for all service work, including troubleshooting. Contact your nearest Agilent Technologies Sales Office for more details. 2 Application This service guide applies to the Agilent 16522A pattern generator module installed in the 16700-series logic analysis system mainframes running operating system version A.02.00. The Agilent 16522A uses operating system version A.01.00 or higher. The Agilent 16522A Pattern Generator 3 In This Book This book is the service guide for the Agilent 16522A 200 M Vectors/s Pattern Generator module. Place this service guide in the 3-ring binder supplied with your 16700-Series Logic Analysis System Service Manual. This service guide has eight chapters. Chapter 1 contains information about the module and includes accessories for the module, specifications and characteristics of the module, and a list of the equipment required for servicing the module. Chapter 2 tells how to prepare the module for use. Chapter 3 gives instructions on how to test the performance of the module. Chapter 4 contains calibration instructions for the module. Chapter 5 contains self-tests and flowcharts for troubleshooting the module. Chapter 6 tells how to replace the module and assemblies of the module and how to return them to Agilent Technologies. Chapter 7 lists replaceable parts, shows an exploded view, and gives ordering information. Chapter 8 explains how the pattern generator works and what the self-tests are checking. 4 Contents In This Book 4 1 General Information Accessories 8 Environmental Characteristics 8 Recommended Test Equipment 9 2 Preparing for Use To inspect the module 13 To prepare the mainframe 14 To configure a one-card module 15 To configure a multi-card module 16 To install the module 20 To turn on the system 22 To test the module 22 To clean the module 23 3 Testing Performance Perform the power-up tests 27 To perform the self-tests 28 4 Calibrating 5 Troubleshooting To use the flowcharts 32 To run the self-tests 35 To verify pattern output 36 To exit the test system 38 5 Contents 6 Replacing Assemblies To remove the module 41 To replace the circuit board To replace the module 43 To return assemblies 45 41 7 Replaceable Parts Replaceable Parts Ordering 48 16522A Replacement Parts 49 Exploded View 50 8 Theory of Operation Block-Level Theory 52 Self-Tests Description 53 6 1 Accessories 8 Environmental Characteristics 8 Recommended Test Equipment 9 General Information This chapter lists the accessories, the characteristics, and the recommended test equipment. Chapter 1: General Information Accessories Accessories The following accessories are supplied with the 16522A pattern generator module. $FFHVVRULHV6XSSOLHG $JLOHQW3DUW1XPEHU 4W\ 5,%%21&$%/(,'&/,3 '$7$287387&$%/(6 &/2&.&$%/( ,17(5&211(&7&$%/( Environmental Characteristics &ORFN3UREHV 0D[LPXP,QSXW9ROWDJH 9&$7,&$7, &DWHJRU\,VHFRQGDU\SRZHUOLQHLVRODWHGFLUFXLWV 2SHUDWLQJ(QYLURQPHQW 7HPSHUDWXUH +XPLGLW\ $OWLWXGH 9LEUDWLRQ ,QVWUXPHQW&WR&)WR) 3UREHOHDGVHWVDQGFDEOHV&WR&)WR) ,QVWUXPHQWSUREHOHDGVHWVDQGFDEOHVXSWRUHODWLYHKXPLGLW\DW &) 7RPIW 2SHUDWLQJ5DQGRPYLEUDWLRQWR+]PLQXWHVSHUD[LV≈JUPV 1RQRSHUDWLQJ5DQGRPYLEUDWLRQWR+]PLQXWHVSHUD[LV≈J UPVDQGVZHSWVLQHUHVRQDQWVHDUFKWR+]JSHDN PLQXWHUHVRQDQWGZHOODWUHVRQDQFHVSHUD[LV 2SHUDWLQJSRZHUVXSSOLHGE\PDLQIUDPH ,QGRRUXVHRQO\ 3ROOXWLRQ'HJUHH 8 Chapter 1: General Information Recommended Test Equipment Recommended Test Equipment Equipment Required (TXLSPHQW &ULWLFDO6SHFLILFDWLRQV 5HFRPPHQGHG 0RGHO3DUW 8VH 2VFLOORVFRSH ≥ 0+]%DQGZLGWK $ 7 3UREH 0+]%DQGZLGWK $ 2XWSXW'DWD3RG QRVXEVWLWXWH $VHULHV $ $GMXVWPHQW3 3HUIRUPDQFH7HVWV7 7URXEOHVKRRWLQJ ,QVWUXFWLRQVIRUPDNLQJWKHVHWHVWFRQQHFWRUVDUHLQFKDSWHU´7HVWLQJ3HUIRUPDQFHµ 9 Chapter 1: General Information Recommended Test Equipment 10 2 To inspect the module 13 To prepare the mainframe 14 To configure a one-card module 15 To configure a multi-card module 16 To install the module 20 To turn on the system 22 To test the module 22 To clean the module 23 Preparing for Use This chapter gives you instructions for preparing the module for use. Chapter 2: Preparing for Use Power Requirements All power supplies required for operating the pattern generator are supplied through the backplane connector in the mainframe. Operating Environment The operating environment is listed in chapter 1. Note the non-condensing humidity limitation. Condensation within the instrument can cause poor operation or malfunction. Provide protection against internal condensation. The pattern generator module will operate at all specifications within the temperature and humidity range given in chapter 1. However, reliability is enhanced when operating the module within the following ranges: Temperature: +20 °C to +35 °C (+68 °F to +95 °F) Humidity: 20% to 80% non-condensing Storage Store or ship the pattern generator in environments within the following limits: • Temperature: -40 °C to +75 °C (-40 °F to +167 °F) • Humidity: Up to 90% at 65 °C • Altitude: Up to 15,300 meters (50,000 feet) Protect the module from temperature extremes which cause condensation on the instrument. 12 Chapter 2: Preparing for Use To inspect the module To inspect the module 1 Inspect the shipping container for damage. If the shipping container or cushioning material is damaged, keep them until you have checked the contents of the shipment and checked the instrument mechanically and electrically. 2 Check the supplied accessories. Accessories supplied with the module are listed in chapter 1, "Accessories Supplied." 3 Inspect the product for physical damage. Check the module and the supplied accessories for obvious physical or mechanical defects. If you find any defects, contact your nearest Agilent Technologies Sales Office. Arrangements for repair or replacement are made, at Agilent Technologies option, without waiting for a claim settlement. 13 Chapter 2: Preparing for Use To prepare the mainframe To prepare the mainframe CAUTION 7XUQRIIWKHPDLQIUDPHSRZHUEHIRUHUHPRYLQJUHSODFLQJRULQVWDOOLQJWKHPRGXOH CAUTION (OHFWURVWDWLFGLVFKDUJHFDQGDPDJHHOHFWURQLFFRPSRQHQWV8VHJURXQGHGZULVWVWUDSV DQGPDWVZKHQSHUIRUPLQJDQ\VHUYLFHWRWKLVPRGXOH 1 Remove power from the instrument. a b c d e Exit all logic analysis sessions. In the session manager, select Shutdown. At the query, select Power Down. When the “OK to power down” message appears, turn the instrument off. Disconnect the power cord. Disconnect any input or output connections. 2 Plan your module configuration. If you are installing a one-card module, use any available slot in the mainframe. If you are installing a multi-card module, use adjacent slots in the mainframe. 3 Loosen the thumb screws. Cards or filler panels below the slots intended for installation do not have to be removed. Starting from the top, loosen the thumb screws on filler panels and cards that need to be moved. 4 Starting from the top, pull the cards and filler panels that need to be moved halfway out. CAUTION $OOPXOWLFDUGPRGXOHVZLOOEHFDEOHGWRJHWKHU3XOOWKHVHFDUGVRXWWRJHWKHU 5 Remove the cards and filler panels. Remove the cards or filler panels that are in the slots intended for the module installation. Push all other cards into the card cage, but not completely in. This is to get them out of the way for installing the module. Some modules for the logic analysis system require calibration if you move them to a different slot. For calibration information, refer to the manuals for the individual modules. 14 Chapter 2: Preparing for Use To configure a one-card module To configure a one-card module CAUTION • When shipped separately, the module is configured as a one-card module. The cables should be connected as shown in the figure. • To configure a multicard module into one-card modules, remove the cables connecting the cards. Then connect the free end of the 2x10 cable to the connector labeled "Master Output" (J8) on each card (see figure below). ,I\RXSXOORQWKHIOH[LEOHULEERQSDUWRIWKH[FDEOH\RXPLJKWGDPDJHWKHFDEOH DVVHPEO\8VLQJ\RXUWKXPEDQGILQJHUJUDVSWKHHQGVRIWKHFDEOHFRQQHFWRU$SSO\ SUHVVXUHWRWKHHQGVRIWKHFDEOHFRQQHFWRUWRGLVHQJDJHWKHPHWDOORFNLQJWDEVRIWKH FRQQHFWRUIURPWKHFDEOHVRFNHWRQWKHERDUG7KHQSXOOWKHFRQQHFWRUIURPWKHFDEOH VRFNHW 15 Chapter 2: Preparing for Use To configure a multi-card module To configure a multi-card module 1 Plan the configuration. Multicard modules can only be connected as shown in the illustration. Select the card that will be the master card, and set the remaining cards aside. 16 Chapter 2: Preparing for Use To configure a multi-card module 2 On the expander card, disconnect the end of the 2x10 cable that is plugged into the connector labeled “Master Output.” CAUTION ,I\RXSXOORQWKHIOH[LEOHULEERQSDUWRIWKH[FDEOH\RXPLJKWGDPDJHWKHFDEOH DVVHPEO\ Using you thumb and finger, grasp the ends of the cable connector. Apply pressure to the ends of the cable connector to disengage the metal locking tabs of the connector from the cable socket on the board. Then, pull the connector from the cable socket. 17 Chapter 2: Preparing for Use To configure a multi-card module 3 Place the master card on top of any expander cards that are under the master card. Feed the free end of the 2x10 cables of the expander cards through the cable access holes to the master card. Plug the 2x10 cables into J9 (bottom-most expander in a five-card configuration) and J10 (expander that is next to the master card) on the master card. The illustration below shows the bottom three cards of a five-card configuration. 18 Chapter 2: Preparing for Use To configure a multi-card module 4 Place the remaining expander cards on top of the master board. Feed the free end of the 2x10 cables of the expander cards through the access holes to the master card. Plug the 2x10 cables into J11 (expander that is next to the master card) and J12 (top-most expander in a four or five-card configuration) on the expander cards. 19 Chapter 2: Preparing for Use To install the module To install the module 1 Slide the cards above the slots for the module about halfway out of the mainframe. 2 With the probe cables facing away from the instrument, slide the module approximately halfway into the mainframe. 3 Slide the complete module into the mainframe, but not completely in. Each card in the instrument is firmly seated and tightened one at a time in step 5. 4 Position all cards and filler panels so that the endplates overlap. 20 Chapter 2: Preparing for Use To install the module 5 Seat the cards and tighten the thumbscrews. Starting with the bottom card, firmly seat the cards into the backplane connector of the mainframe. Keep applying pressure to the center of the card endplate while tightening the thumbscrews finger-tight. Repeat this for all cards and filler panels starting at the bottom and moving to the top. CAUTION &RUUHFWDLUFLUFXODWLRQNHHSVWKHLQVWUXPHQWIURPRYHUKHDWLQJ)RUFRUUHFWDLU FLUFXODWLRQILOOHUSDQHOVPXVWEHLQVWDOOHGLQDOOXQXVHGFDUGVORWV.HHSDQ\H[WUDILOOHU SDQHOVIRUIXWXUHXVH 21 Chapter 2: Preparing for Use To turn on the system To turn on the system 1 Connect the power cable to the mainframe. 2 Turn on the instrument power switch. When you turn on the instrument power switch, the instrument performs powerup tests that check mainframe circuitry. After the powerup tests are complete, the screen will look similar to the sample screen below. To test the module The pattern generator module does not require an operational accuracy calibration, full calibration, or adjustment. After installing the module, you can test and use the module. • If you require a test to initially accept the operation, perform the self-tests in chapter 3. • If the module does not operate correctly, go to the beginning of chapter 5, “Troubleshooting”. 22 Chapter 2: Preparing for Use To clean the module To clean the module • With the mainframe turned off and unplugged, use mild detergent and water to clean the rear panel. • Do not attempt to clean the module circuit board. 23 Chapter 2: Preparing for Use To clean the module 24 3 Perform the power-up tests 27 To perform the self-tests 28 Testing Performance Chapter 3: Testing Performance To ensure the logic analysis system is operating correctly, you can perform software tests (self-tests) on the system. Directions for performing the software tests are given in this chapter. This chapter normally tells you how to test the performance of the logic analysis system against the specifications listed in chapter 1. Because there are no specifications for the 16522A, there are no performance verification tests. Self-Tests There are two types of self-tests: self-tests that automatically run at power-up, and self-tests that you select on the screen. For descriptions of the tests, refer to chapter 8 “Theory of Operation.” Perform the self-tests as an acceptable test when receiving the logic analysis system or when the logic analysis system is repaired. If a test fails, refer to chapter 5, “Troubleshooting.” 26 Chapter 3: Testing Performance Perform the power-up tests The logic analysis system automatically performs power-up tests when you apply power to the instrument. Any errors are reported in the boot dialogue. Serious errors will interrupt the boot process. The power-up tests are designed to complement the instrument on-line Self Tests. Tests that are performed during power-up are not repeated in the Self Tests. The monitor (16700 only), keyboard and mouse must be connected to the mainframe to observe the results of the power-up tests. NOTE The 16700A does not require a monitor or keyboard. The 16702B does not require a mouse, keyboard, or monitor. 1 Disconnect all inputs and exit all logic analysis sessions. In the Session Manager, select Shutdown. In the window, select Powerdown. 2 When the “OK to power down” message appears, turn off the power switch. 3 After a few seconds, turn the power switch back on. Observe the boot dialogue for the following: • ensure all of the installed memory is recognized • any error messages • interrupt of the boot process with or without error message A complete transcript of the boot dialogue is in Chapter 8, “Theory of Operation”. 4 During initialization, check for any failures. If an error or an interrupt occurs, refer to Chapter 5, “Troubleshooting”. 27 Chapter 3: Testing Performance To perform the self-tests The self-tests verify the correct operation of the logic analysis system. Self-tests can be performed all at once or one at a time. While testing the performance of the logic analysis system, run the self-tests all at once. 1 Launch the Self-Tests a In the System Window, select the System Admin icon. b In the System Administration window, select Self-Test... c In the query pop-up, choose Yes to exit the current session. The Self-Test closes down the current session because the test algorithms leave the system in an unknown state. Re-launching a session at the end of the tests will ensure the system is properly initialized. 2 In the Self-Test window choose Test All. When the tests are finished, the Status will change to TEST passed or TEST failed. You can find detailed information about the test results in the Status Message field of the SelfTest window. The System CPU Board tests returns Untested because the CPU tests require user action. To test the CPU Board, select CPU Board, then choose each test individually. For more information on tests that are not executed, refer to Chapter 8, “Troubleshooting.” 3 Select Quit to exit the Test menu. 4 In the Session Manager, select Start Session This Display to re-launch a logic analysis session. 28 4 Calibrating This chapter gives you instructions for calibrating the pattern generator. Chapter 4: Calibrating Calibration Strategy The 16522A pattern generator does not require an operational accuracy calibration. 30 5 To use the flowcharts" on page 32 To verify pattern output" on page 36 To exit the test system" on page 38 Troubleshooting This chapter helps you troubleshoot the module to find defective assemblies. Chapter 5: Troubleshooting To use the flowcharts The troubleshooting section consists of flowcharts, self-test instructions, and a cable test. If you suspect a problem, start at the top of the first flowchart. During the troubleshooting instructions, the flowcharts will direct you to perform the selftests or the cable test. The service strategy for this instrument is the replacement of defective assemblies. This module can be returned to Agilent for all service work, including troubleshooting. Contact your nearest Agilent Technologies Sales Office for more details. CAUTION (OHFWURVWDWLFGLVFKDUJHFDQGDPDJHHOHFWURQLFFRPSRQHQWV8VHJURXQGHGZULVWVWUDSV DQGPDWVZKHQ\RXSHUIRUPDQ\VHUYLFHWRWKLVLQVWUXPHQWRUWRWKHFDUGVLQLW To use the flowcharts Flowcharts are the primary tool used to isolate defective assemblies. The flowcharts refer to other tests to help isolate the trouble. The circled numbers on the charts indicate connections with the other flowcharts. Start your troubleshooting at the top of the first flowchart. 32 Chapter 5: Troubleshooting To use the flowcharts Start 1 Apply Power Does the display show the module config correctly? No Yes Are ALL cards properly seated in the mainframe? Yes No Remove power and properly seat all cards in the mainframe. Do the procedure To run the self tests in Chapter 3 on the suspect module. Does the module self-test pass? 2x10 cable(s) faulty or not installed correctly on circuit board(s). Check 2x10 cable(s) Refer to Chapter 2. No Yes Are expander boards installed? Yes Remove power from the mainframe. No 2x10 cable(s) faulty or not installed correctly on circuit board(s). Check 2x10 cable(s) Refer to Chapter 2. Yes Are 2x10 cables properly seated? No Exit the Self Test and start a logic analyzer session. Remove power, replace defective board. Reapply power and re-run module self-tests. Reseat 2x10 cable(s) 2 Troubleshooting Flowchart 1 33 Chapter 5: Troubleshooting To use the flowcharts 2 Is the user problem still present? Yes Perform procedure "To verify the pattern output" on suspect pod. No End Does pattern output test pass? Yes The module is functioning properly. Done No Replace pod with known good pod and repeat procedure. Does pattern output test pass? Yes Replace suspect pod. No Replace cable with known good cable and repeat procedure. Does the pattern output test pass? No Replace defective board. Troubleshooting Flowchart 2 34 Yes Replace suspect cable. Chapter 5: Troubleshooting To run the self-tests To run the self-tests Self-tests identify the correct operation of major, functional subsystems of the module. You can run all self-tests without accessing the module. If a self-test fails, the troubleshooting flowcharts instruct you to change a part of the module. To run the self-tests: 1 In the System window, select System Admin. 2 In the System Administration window, select the Admin tab, then select SelfTest. At the Test Query window, select Yes. The tests can be run individually, or all the tests can be run by selecting Test All at the bottom of the Self Test window. Note that if Test All is selected, system tests requiring user action will not be run. For more information, refer to Chapter 8 in the mainframe service manual. 3 In the Self Test window under the System tab, select System CPU Board. 4 Run the floppy drive test. a In the Self Test: System CPU Board window, select Floppy Drive Test. b Insert a DOS-formatted disk with 300KB of available space in the mainframe floppy drive. c In the Test Query window, select OK The Test Query window instructs you to insert the disk into the disk drive. the other System CPU Board tests require similar user action to successfully run the test. 5 In the Self Test: System CPU Board window, select Close to close the window. 6 In the Self Test window, select PCI Board. Select Test All to run all PCI board tests. 7 In the Self Test window, select Master Frame tab. Select the 16522A module to be tested, then select Test All to run all the module tests. The module test status should indicate PASSED (see screen on next page). 35 Chapter 5: Troubleshooting To verify pattern output Refer to Chapter 8 in the mainframe service manual for more information on system tests that are not executed. To verify pattern output NOTE: Before doing this procedure, the Self-Tests must be launched. Do steps 1 and 2 in the previous procedure “To run the self-tests.” Equipment Required Equipment Critical Specification Recommended Model/Part Oscilloscope > 500 MHz Bandwidth 54820A Probe 500 MHz Bandwidth 1160A Output Data Pod no substitute 10460A-series 1 Connect one of the 10460-series data pods the end of the pattern generator Pod 1 cable. 2 Start the test pattern output. a In the Self Test window, select the Master Frame tab. b Under the Master Frame tab, select the 16522A module to be tested. 36 Chapter 5: Troubleshooting To verify pattern output c In the 16522A Self Test window, select checkerboard 50M. 3 Using an oscilloscope, verify the existence of logic-level transitions by touching the oscilloscope probe to each channel of Data Pod 1 and doing an Autoscale. The signal levels that appear on the oscilloscope display should correspond with the logic levels represented by the 10460-series pod being used. 4 Repeat step 3 for each of the remaining data pods. 5 Connect one of the 10460-series clock pods to the end of the pattern generator clock cable. 6 Using the oscilloscope as in step 3, verify the existence of logic-level transitions by touching the oscilloscope probe to each clock output of the clock pod. 37 Chapter 5: Troubleshooting To exit the test system 7 In the pattern generator Output Patterns menu, select the Stop icon, then select Close to exit the 16522A Self Test window. To exit the test system To exit the test system 1 Select Close to close any module or system test windows. 2 In the Self Test window, select Quit. 3 In the session manager window, select Start Session to launch a new logic analyzer session. 38 6 To remove the module 41 To replace the circuit board 41 To replace the module 43 To return assemblies 45 Replacing Assemblies This chapter contains the instructions for removing and replacing the pattern generator module and the circuit board of the module, as well as the instructions for returning assemblies. Chapter 6: Replacing Assemblies CAUTION 7XUQRIIWKHLQVWUXPHQWEHIRUHLQVWDOOLQJUHPRYLQJRUUHSODFLQJDPRGXOHLQWKH LQVWUXPHQW Tools Required • A T10 TORX screwdriver, to remove screws connecting the probe cables and screws connecting the back panel. • A 1/4-inch hollow-shaft nutdriver, to remove the nut holding the cable to the module panel insert. 40 Chapter 6: Replacing Assemblies To remove the module To remove the module CAUTION (OHFWURVWDWLFGLVFKDUJHFDQGDPDJHHOHFWURQLFFRPSRQHQWV8VHJURXQGHGZULVWVWUDSV DQGPDWVZKHQSHUIRUPLQJDQ\VHUYLFHWRWKLVPRGXOH 1 Remove power from the instrument. a b c d Exit all logic analysis sessions. In the session manager, select Shutdown. At the query, select Power Down. When the “OK to power down” message appears, turn the instrument off. Disconnect the power cord. 2 Loosen the thumb screws. Starting from the top, loosen the thumb screws on the filler panels and cards located above the module and the thumb screws of the module. 3 Starting from the top, pull the cards and filler panels located above the module half-way out. 4 If the module consists of a single card, pull the card completely out. If the module consists of multiple cards, pull all cards completely out. 5 Push all other cards into the card cage, but not completely in. This is to get them out of the way for removing and replacing the module. 6 If the module consist of a single card, replace the faulty card. If the module consists of multiple cards, remove the 2x10 cables from J9, J10, J11, and J12 from the master card. Remove the faulty card from the module. To replace the circuit board 1 Remove power from the mainframe. 41 Chapter 6: Replacing Assemblies To replace the circuit board 2 Remove the 16522A module from the mainframe. 3 Remove the three screws that secure the cable clamp to the rear panel. 4 If you are replacing a single cable, unplug the cable and continue with “To install the cables” on page 42. 5 If you are replacing the circuit board, unplug all cables from the board. Continue with “To replace the circuit board.” To replace the circuit board 1 Remove the cables (use procedure above). 2 Remove four screws attaching the ground spring and rear panel to the circuit board, then remove the back panel and ground spring. 3 Replace the faulty circuit board with a new circuit board. On the circuit board, make sure the 20-pin ribbon cable is connected between J7 and J8. 4 Position the ground spring and back panel on the back edge of the replacement circuit board. Install four screws to connect the back panel and ground spring to the circuit board. 5 Continue with “To install the cables.” To install the cables 1 Plug the five data cables and the clock cable in the appropriate connectors on the circuit board. If a single cable is being replaced, plug the cable in the appropriate connector. 42 Chapter 6: Replacing Assemblies To replace the module Note that the clock cable is connected to J6 on the 16522A board. 2 Position the cables on the rear panel so the cable clamp can be properly installed on the rear panel. 3 Install three screws that secure the cable clamp onto the rear panel. 4 Install the 16522A module into the mainframe. To replace the module 1 If the module consists of one card, go to step 2. If the module consists of more than one card, connect the cables together in a master/ expander configuration. Follow the procedure “To configure a multi-card module” in chapter 2. 2 Slide the cards above the slots for the module about halfway out of the mainframe. 3 With the probe cables facing away from the instrument, slide the module approximately halfway into the mainframe. 4 Slide the complete module into the mainframe, but not completely in. Each card in the instrument is firmly seated and tightened one at a time in step 6. 43 Chapter 6: Replacing Assemblies To replace the module 5 Position all cards and filler panels so that the endplates overlap. 6 Seat the cards and tighten the thumbscrews. Starting with the bottom card, firmly seat the cards into the backplane connector of the mainframe. Keep applying pressure to the center of the card endplate while tightening the thumbscrews finger-tight. Repeat this for all cards and filler panels starting at the bottom and moving to the top. CAUTION &RUUHFWDLUFLUFXODWLRQNHHSVWKHLQVWUXPHQWIURPRYHUKHDWLQJ)RUFRUUHFWDLU FLUFXODWLRQILOOHUSDQHOVPXVWEHLQVWDOOHGLQDOOXQXVHGFDUGVORWV.HHSDQ\H[WUDILOOHU SDQHOVIRUIXWXUHXVH 44 Chapter 6: Replacing Assemblies To return assemblies To return assemblies Before shipping the module to Agilent, contact your nearest Agilent Technologies Sales Office for additional details. 1 Write the following information on a tag and attach it to the module. • Name and address of owner • Model number • Serial number • Description of service required or failure indications 2 Remove accessories from the module. Only return accessories to Agilent if they are associated with the failure symptoms. 3 Package the module. You can use either the original shipping containers, or order materials from an Agilent sales office. CAUTION )RUSURWHFWLRQDJDLQVWHOHFWURVWDWLFGLVFKDUJHSDFNDJHWKHPRGXOHLQHOHFWURVWDWLF PDWHULDO 4 Seal the shipping container securely, and mark it FRAGILE. 45 Chapter 6: Replacing Assemblies To return assemblies 46 7 Replaceable Parts Ordering 48 16522A Replacement Parts 49 Exploded View 50 Replaceable Parts This chapter contains information for identifying and ordering replaceable parts for your module. Chapter 7: Replaceable Parts Replaceable Parts Ordering Replaceable Parts Ordering Parts listed To order a part on the list of replaceable parts, quote the Agilent Technologies part number, indicate the quantity desired, and address the order to the nearest Agilent Technologies Sales Office. Parts not listed To order a part not on the list of replaceable parts, include the model number and serial number of the module, a description of the part (including its function), and the number of parts required. Address the order to your nearest Agilent Technologies Sales Office. Direct mail order system To order using the direct mail order system, contact your nearest Agilent Technologies Sales Office. Within the USA, Agilent Technologies can supply parts through a direct mail order system. The advantages to the system are direct ordering and shipment from the Agilent Part Center in Mountain View, California. There is no maximum or minimum on any mail order. (There is a minimum amount for parts ordered through a local Agilent Technologies Sales Office when the orders require billing and invoicing.) Transportation costs are prepaid (there is a small handling charge for each order) and no invoices. In order for Agilent Technologies to provide these advantages, a check or money order must accompany each order. Mail order forms and specific ordering information are available through your local Agilent Technologies Sales Office. Addresses and telephone numbers are located in a separate document shipped with the 16700-series Logic Analysis System Service Manual. Exchange assemblies Some assemblies are part of an exchange program with Agilent Technologies. The exchange program allows you to exchange a faulty assembly with one that has been repaired and performance verified by Agilent Technologies. After you receive the exchange assembly, return the defective assembly to Agilent Technologies. A United States customer has 30 days to return the defective assembly. If you do not return the defective assembly within the 30 days, Agilent Technologies will charge you an additional amount. This amount is the difference in price between a new assembly and that of the exchange assembly. For orders not originating in the United States, contact your nearest Agilent Technologies Sales Office for information. 48 Chapter 7: Replaceable Parts 16522A Replacement Parts 16522A Replacement Parts 16522 Replaceable Parts Ref Des. Part Number A1 16522-69501 A1 16522-66501 1 Circuit board assembly H1 0510-0684 2 Retaining ring H2 0515-0430 3 Machine screw H3 0515-0665 4 MSPH M2X14 T10 H4 16500-22401 2 Rear panel screw MP1 16500-41201 7 Ribbon cable ID clip MP2 16500-29101 1 Ground Spring MP3 16510-40501 1 Rear panel MP4 16510-40502 1 Cable clamp MP5 01650-94309 1 Probe label MP6 16522-94301 1 ID label W1 16522-61601 5 Data Cable (J1-J5) W2 16522-61602 1 Clock cable (J6) W3 16522-61603 1 Interconnect cable Qty Description Rebuilt circuit board 49 Chapter 7: Replaceable Parts Exploded View Exploded View Exploded view of the 16522A pattern generator. 50 8 Block-Level Theory 52 Self-Tests Description 53 Theory of Operation This chapter presents the theory of operation for the pattern generator module and describes the self-tests. Chapter 8: Theory of Operation Block-Level Theory The information in this chapter is to help you understand how the module operates and what the self-tests are testing. This information is not intended for component-level repair. Block-Level Theory The 16522 Pattern Generator Instruction Memory. The instruction memory holds the programmable vector flow information and is paced in parallel with the data memory. User-programmable instructions are stored in instruction memory and control the pattern flow output. Data Memory. Consisting of six 4Mx16 DRAM ICs and RAM addressing circuitry, the data memory stores the desired pattern that appears at the module output. The RAM addressing circuitry is merely a counter which addresses the pattern locations in data memory. When the end of the vector listing is reached, the addressing circuitry is loaded from the loop register with the address of the first vector of the listing to provide an uninterrupted vector loop. The RAM output is sent to the output driver circuit where the patterns are presented into a logic configuration usable by the output pods. 52 Chapter 8: Theory of Operation Self-Tests Description Output Driver. The output driver circuit is made up of a series of FIFO queues, latch/ logic drivers, and multiplexers. The FIFO queue stabilizes and pipelines the pattern flow between data memory and the latch/logic drivers. The latch/logic drivers direct the pattern to multiplexers at ECL voltage levels. The multiplexers, one per channel, direct the programmed data patterns to the output channels. The single-ended ECL-level signals are converted to differential signals, which are routed to the output cables and to the pods. Note that the differential ECL output signal of the pattern generator modules not suited to directly drive ECL circuitry. Clock Circuit. The clock circuit paces the instruction memory, data memory, and the FIFO pattern queue and multiplexers in the output driver according to the desired data rate. Two phase-locked loops drive the clock circuit according to the user-selected data rate. The output of the multiplexer, which represents the user-selected clocking rate, is distributed to the above listed subcircuits on both the master board and all expander boards that are configured with the master board. The output of the clock select multiplexer is also distributed to an external clock out circuit. The clock signal is routed to a bank of external clock delay select multiplexer. The output of this multiplexer, which represents the desired clock delay, is directed to the external clock out pin on the clock pod. Consequently either the internal clock or external clock is redirected to the clock out pin with a user-selected clock delay. CPU Interface. The CPU interface is a single programmable logic device (PLD) which interprets the Agilent 16700-series mainframe backplane logic and translates the logic into signals to drive and program the pattern generator module. Pod. The Clock or Date Pod converts the differential output ECL signal to logic levels of interest. Because the output of the pattern generator module cannot directly drive ECL circuitry, the Clock and Data Pod is required to interface the pattern generator with the system under test. Self-Tests Description The self-tests for the pattern generator identify the correct operation of major functional areas in the module. Address Counter Test. The Address Counter Test contains four subtests (tests 1-4) that check the functionality of the column and row address counters for module RAM. The four subtests use each of the four loop registers to perform the test. The first step of the test is to load memory using the current loop register with a specific pattern for the address counter. Memory is loaded with 0x0000 except at predetermined RAM row and column positions, which are loaded with 0xFFFF. The current loop register is used to set the address for the 0xFFFF loading. The loop register is also used to reset the addresses back to zero for starting the stepping process. After memory has been loaded the clock is stepped through all possible RAM addresses checking for the correct data at each address. 53 Chapter 8: Theory of Operation Self-Tests Description Passing the Address Counter Test implies that each RAM memory locations can be accessed by the RAM addressing circuitry while under control of the clocking circuit. Passing the test also implies that the loop registers are operating correctly. Diagnostic Integer Value This test check the counters of the entire module so the diagnostic integer will be valid for the master card and all expander-configured cards. The returned integer for a particular card has the following format: Bit# 15 14, 13, 12, 11, 10, 9, 8, 7, 6, 5, 4, 3, 2, 1, 0 Row/Col Fail row Failed RAM Bit 15 is used to flag where the value of the fail row bits (6-14) came from. If the failing row value was less than 511 bit 15 is set to zero. If the failing row was greater 511 bit 15 is set to one. The failed row bits (6-14) contain a value from 0 to 255. Bits 0-5 contain the failure code for the six RAMs on the board. Bits 0-4 contain the failure code for the RAM for pods 1-5, and bit 5 contains the failure code for the RAM used for instructions. A one in the bit position indicates that that ram provided incorrect information. Clock Test. The Clock Test checks that the internal clock sources are functioning by verifying the presence of a given clock source. The test toggles each clock source in the following fashion. First the board is stopped and outputs are disabled. Module RAM is loaded with zeros, then the module is placed in the respective mode for the given clock and the clock source is selected. The module is then started and the main status checked to see that the pipeline is running. The board will then be stopped and the status checked to see that the pipeline did stop. Passing the Clock Test implies that the module internal clock sources are functioning properly, and that the other dependent subcircuits of the module respond to the clock signal. Diagnostic Integer Value This test is only valid for signals on the master board of the configuration. The values returned from the expanders will be zero. The integer returned will have the following bit format: Bit# 15, 14, 13, 12 11, 10, 9, 8 7, 6, 5, 4 3, 2, 1, 0 200M clk 100M clk 50M clk PLD clk Each nibble of the output corresponds to one of the clock sources. The bit pattern of each nibble has the following definition: 0 - passed 1 - failed to run 2 - failed to stop 3 - failed to both run and stop 54 Chapter 8: Theory of Operation Self-Tests Description If Instruction Test. This test checks the functionality of the if branching. Instruction memory is loaded with a wait on event ‘a’ instruction in the non-if branch of memory and a break instruction in the if branch. The first pass of the test sets the branch pattern to a never branch condition. The module is started and a wait is begun for the vectors to get to the wait instruction. The hardware should stop on the wait instruction, not the break. The main status is checked to verify this stop condition. The second pass of the test sets the branch pattern to always branch. Again the module is started and a wait is begun. In this case the break instruction should be the stop condition. Passing the If Instruction Test implies that CPU addressing RAM addressing, and the instruction decoder of the module respond properly to user commands. Diagnostic Integer Value This test is only valid for signals on the master board of the configuration. The values returned from any expansion cards will be zero. The integer returned will have the following bit format: Bit# 15, 14, 13, 12, 11, 10, 9, 8, 7, 6, 5, 4 3, 2, 1, 0 unused Test Mode The Test Mode bit positions have the following meaning: 0 - passed 1 - failed to stop on wait in non-if branch 2 - took if branch on no branch event 4 - failed to stop on break in if branch 8 - took non-if branch on any branch event RAM Test. The RAM Test does a first order check of the functionality of module RAM. The first pass of the test will load the entire RAM with 0x0000. The software will step the clock enough times to output one page worth of data. At each clock a test read port for each RAM IC in the module will be checked and verified for all 0’s. The second pass of the test will load all the RAMS with 0xFFFF and then check using the same technique as in the first pass, verifying for all F’s. The third pass loads memory with an alternating 0x5555 and 0xAAAA checkerboard pattern. Again the test checks the data in the same fashion as in the first pass. Passing the RAM Test implies that each memory location in module RAM can store a logic 1 or 0. Passing the test also implies that the CPU interface is functioning and can properly affect control over the memory and memory addressing. Diagnostic Integer Value This test checks the RAM of the entire module so the diagnostic integer will be valid for the master card and all expander-configured cards. The returned integer for a particular 55 Chapter 8: Theory of Operation Self-Tests Description card has the following format: Bit# 15,14 13, 12, 11, 10, 9, 8, 7, 6 5, 4, 3, 2, 1, 0 Test 1 Fail row Failed test Bits 14,15 contain the test that failed where the value is the following: 1 - failed all zeros test 2 - failed all ones test 3 - failed alternating test Bits 6-13 contain the row of the page that failed. Bits 0-5 contain the failure code for the six RAM ICs on the board. Bits 0-4 contain the failure code for the RAMs for pod 1-5, and bit 5 contains the failure code for the RAM used for instructions. A one in the bit position indicates that that RAM provided incorrect information. Wait Test. This test checks the functionality of the wait command in the instruction memory and the status register that reads the wait. The test is performed on each of the four event registers. The current wait event being tested is loaded on the first page of memory and a break instruction is loaded on the third page of memory. The first pass of the test places a wait on no event in the event register. The hardware is started and a wait is begun for the vectors to hit the break instruction on the third page. The main status is checked to see that the hardware is stopped by the break instruction. The second pass of the test places a wait on any condition in the event register. Again the hardware is started wait is begun. On this pass the hardware should be stopped by the wait condition and not by the break condition. The final pass clears the current wait condition using the hardware wait clear command. The module should run from current wait to the break condition and once again stop. Diagnostic Integer Value This test is only valid for signals on the master board of the configuration. The values returned from any expansion cards will be zero. The integer returned will have the following bit format: Bit# 15, 14, 13, 12 11, 10, 9, 8 7, 6, 5, 4 3, 2, 1, 0 Event D Event C Event B Event A Each nibble corresponds to the event register being tested. The value of the nibble for the event register has the following definition: 0 - passed 1 - failed to stop on break with no event wait 2 - stopped on wait with setting of no event 3 - failed to stop on break or wait with wait any event 4 - failed to stop on wait with wait any event 5 - failed to clear wait 6 - stopped on false break condition 56 Chapter 8: Theory of Operation Self-Tests Description It should be noted that the value returned will be the last error encountered. Instruction Interrupt Test. This test checks the functionality of the break command in the instruction memory and the status register that reads the break. On the first pass of this test, instruction memory is loaded with zeros (NOP). The module is run and the main status register polled to see that the hardware is running. If the hardware is stopped the test fails. The second pass of the test places the break instruction on the next to last vector in memory. Again the hardware is started and the status is read. This time the module should stop or the test fails. Passing the Instruction Interrupt Test implies that CPU addressing, RAM addressing, and the instruction decoder of the module respond properly to user commands. Diagnostic Integer Value This test is only valid for signals on the master board of the configuration. The values returned from any expansion cards will be zero. The integer returned will have the following bit formula: Bit# 15, 14, 13, 12, 11, 10, 9, 8, 7, 6, 5, 4 3, 2, 1, 0 unused Test Mode The Test Mode bit positions have the following meaning: 0 - passed 1 - stopped without break 2 - failed to stop from software 4 - failed to stop with break 8 - stopped by something other than break Output Patterns for testing with an external logic analyzer or oscilloscope. The performance test will set up two predefined patterns for examining the module from an external analyzer or scope. This allows the user to check the output pipeline for functionality and also helps to perform a quick check of all bit locations in the data VRAMS. The data is output based on the frequency mode chosen by the user: 50MHz Mode - 20.000 ns period Either a checkerboard pattern (alternating “1” and “0” across the output channels) or a walking “1” pattern is available. 57 Chapter 8: Theory of Operation Self-Tests Description 58 Index A accessories, 8 assemblies exchange, 48 return, 45 remove, 41 replace, 43 test, 22 multi-card module, 16 configure, 16 B block-level theory, 52 O one-card module configure, 15 operating environment, 12 C calibrating see also testing performance calibration, 29–30 strategy, 30 characteristics, 2 environmental, 8 circuit board replace, 41 clean module, 23 configure multi-card module, 16 one-card module, 15 E environment characteristics, 8 operating, 12 equipment test, 9 exchange assemblies, 48 exit test system, 38 F flowcharts, 32 G general information, 7–9 I install module, 20 M mainframe operating system, 32 prepare, 14 module clean, 23 inspect, 13 install, 20 troubleshooting, 31–38 P power requirements, 12 system, 22 test, 27 preparing for use, 11–23 R replace circuit board, 41 module, 43 replaceable parts, 47–50 replacing assemblies, 39–45 return assemblies, 45 S self-test description, 53 storage, 12 system test, 38 turn on, 22 T test equipment, 9 module, 22 multi-card module, 26 one-card module, 26 power, 27 self, 26, 28 system, 38 test and clock synchronization circuit, 53 testing performance, 25–28 equipment, 9 theory of operation, 51–57 tools required, 40 59 Index 60 © Copyright Agilent Technologies 2000 All Rights Reserved. Reproduction, adaptation, or translation without prior written permission is prohibited, except as allowed under the copyright laws. Restricted Rights Legend. Use, duplication or disclosure by the U.S. Government is subject to restrictions as set forth in subparagraph (c) (1) (ii) of the Rights in Technical Data and Computer Software clause at DFARS 252.227-7013 for DOD agencies, and subparagraphs (c) (1) and (c) (2) of the Commercial Computer Software Restricted Rights clause at FAR 52.227-19 for other agencies. Agilent Technologies 3000 Hanover Street Palo Alto, California 94304 U.S.A. Document Warranty The information contained in this document is subject to change without notice. Agilent Technologies makes no warranty of any kind with regard to this material, including, but not limited to, the implied warranties of merchantability or fitness for a particular purpose. Agilent Technologies shall not be liable for errors contained herein or for damages in connection with the furnishing, performance, or use of this material. Safety This apparatus has been designed and tested in accordance with IEC Publication 1010, Safety Requirements for Measuring Apparatus, and has been supplied in a safe condition. This is a Safety Class I instrument (provided with terminal for protective earthing). Before applying power, verify that the correct safety precautions are taken (see the following warnings). In addition, note the external markings on the instrument that are described under “Safety Symbols." Agilent Technologies P.O. Box 2197 1900 Garden of the Gods Road Colorado Springs, CO 80901 Warning Safety Symbols • Before turning on the instrument, you must connect the protective earth terminal of the instrument to the protective conductor of the (mains) power cord. The mains plug shall only be inserted in a socket outlet provided with a protective earth contact. You must not negate the protective action by using an extension cord (power cable) without a protective conductor (grounding). Grounding one conductor of a two-conductor outlet is not sufficient protection. • Only fuses with the required rated current, voltage, and specified type (normal blow, time delay, etc.) should be used. Do not use repaired fuses or short-circuited fuseholders. To do so could cause a shock or fire hazard. • Service instructions are for trained service personnel. To avoid dangerous electric shock, do not perform any service unless qualified to do so. Do not attempt internal service or adjustment unless another person, capable of rendering first aid and resuscitation, is present. • If you energize this instrument by an auto transformer (for voltage reduction), make sure the common terminal is connected to the earth terminal of the power source. • Whenever it is likely that the ground protection is impaired, you must make the instrument inoperative and secure it against any unintended operation. • Do not operate the instrument in the presence of flammable gasses or fumes. Operation of any electrical instrument in such an environment constitutes a definite safety hazard. • Do not install substitute parts or perform any unauthorized modification to the instrument. • Capacitors inside the instrument may retain a charge even if the instrument is disconnected from its source of supply. Instruction manual symbol: the product is marked with this symbol when it is necessary for you to refer to the instruction manual in order to protect against damage to the product. Hazardous voltage symbol. Earth terminal symbol: Used to indicate a circuit common connected to grounded chassis. WA RN I NG The Warning sign denotes a hazard. It calls attention to a procedure, practice, or the like, which, if not correctly performed or adhered to, could result in personal injury. Do not proceed beyond a Warning sign until the indicated conditions are fully understood and met. CAU T ION The Caution sign denotes a hazard. It calls attention to an operating procedure, practice, or the like, which, if not correctly performed or adhered to, could result in damage to or destruction of part or all of the product. Do not proceed beyond a Caution symbol until the indicated conditions are fully understood or met. Product Warranty This Agilent Technologies product has a warranty against defects in material and workmanship for a period of one year from date of shipment. During the warranty period, Agilent Technologies will, at its option, either repair or replace products that prove to be defective. For warranty service or repair, this product must be returned to a service facility designated by Agilent Technologies. For products returned to Agilent Technologies for warranty service, the Buyer shall prepay shipping charges to Agilent Technologies and Agilent Technologies shall pay shipping charges to return the product to the Buyer. However, the Buyer shall pay all shipping charges, duties, and taxes for products returned to Agilent Technologies from another country. Agilent Technologies warrants that its software and firmware designated by Agilent Technologies for use with an instrument will execute its programming instructions when properly installed on that instrument. Agilent Technologies does not warrant that the operation of the instrument software, or firmware will be uninterrupted or error free. Limitation of Warranty The foregoing warranty shall not apply to defects resulting from improper or inadequate maintenance by the Buyer, Buyer-supplied software or interfacing, unauthorized modification or misuse, operation outside of the environmental specifications for the product, or improper site preparation or maintenance. No other warranty is expressed or implied. Agilent Technologies specifically disclaims the implied warranties of merchantability or fitness for a particular purpose. Exclusive Remedies The remedies provided herein are the buyer’s sole and exclusive remedies. Agilent Technologies shall not be liable for any direct, indirect, special, incidental, or consequential damages, whether based on contract, tort, or any other legal theory. Assistance Product maintenance agreements and other customer assistance agreements are available for Agilent Technologies products. For any assistance, contact your nearest Agilent Technologies Sales Office. Certification Agilent Technologies certifies that this product met its published specifications at the time of shipment from the factory. Agilent Technologies further certifies that its calibration measurements are traceable to the United States National Institute of Standards and Technology, to the extent allowed by the Institute’s calibration facility, and to the calibration facilities of other International Standards Organization members. About this edition This is the Agilent 16522A Pattern Generator Service Guide. Publication number 16522-97008, August 2000 Printed in USA. New editions are complete revisions of the manual. Many product updates do not require manual changes; and, conversely, manual corrections may be done without accompanying product changes. Therefore, do not expect a one-to-one correspondence between product updates and manual updates.