1
C3110
User’s Guide
Security Operations
2014. 11
Ver. 1.02
Contents
1
2
Security
1.1
Introduction ..................................................................................................................................... 1-2
Compliance with the ISO15408 Standard ......................................................................................... 1-2
Operating Precautions ....................................................................................................................... 1-2
INSTALLATION CHECKLIST.............................................................................................................. 1-3
1.2
Security Functions .......................................................................................................................... 1-4
Check Count Clear Conditions .......................................................................................................... 1-4
1.3
1.4
Data to be Protected ...................................................................................................................... 1-5
Precautions for Operation Control ................................................................................................ 1-6
Roles and Requirements of the Administrator ................................................................................... 1-6
Password Usage Requirements ........................................................................................................ 1-6
Network Connection Requirements for the Machine......................................................................... 1-6
Security function operation setting operating requirements.............................................................. 1-6
Operation and control of the machine ............................................................................................... 1-7
Machine Maintenance Control ........................................................................................................... 1-7
Operating conditions for the IC card and IC card reader .................................................................. 1-7
IC card owner requirements .............................................................................................................. 1-8
1.5
Miscellaneous.................................................................................................................................. 1-9
Password Rules ................................................................................................................................. 1-9
Precautions for Use of Various Types of Applications....................................................................... 1-9
Encrypting communications ............................................................................................................ 1-10
IPP printing ...................................................................................................................................... 1-10
Items of Data Cleared by Data Erase Function................................................................................ 1-11
HDD Format ..................................................................................................................................... 1-12
Upgrading of the firmware ............................................................................................................... 1-12
Software used in the machine ......................................................................................................... 1-12
Administrator Operations
2.1
Accessing the Administrator Settings .......................................................................................... 2-2
Accessing the Administrator Settings................................................................................................ 2-2
2.2
Enhancing the Security Function................................................................................................... 2-5
Setting the Enhanced Security Mode ................................................................................................ 2-7
2.3
Setting the Authentication Method ............................................................................................... 2-8
Setting the Authentication Method .................................................................................................... 2-8
2.4
ID & Print Setting Function............................................................................................................. 2-9
Setting the ID & Print.......................................................................................................................... 2-9
2.5
System Auto Reset Function ....................................................................................................... 2-10
Setting the System Auto Reset function .......................................................................................... 2-10
2.6
User Setting Function ................................................................................................................... 2-12
Making user setting.......................................................................................................................... 2-12
2.7
Changing the Administrator Password....................................................................................... 2-14
Changing the Administrator Password ............................................................................................ 2-14
2.8
2.8.1
2.8.2
2.9
2.9.1
2.9.2
2.10
2.10.1
2.10.2
2.10.3
Protecting Data in the HDD.......................................................................................................... 2-15
Setting the Encryption Key (encryption word) ................................................................................. 2-15
Deleting the encryption key ............................................................................................................. 2-17
Erasing data when the machine is to be discarded or use of a leased machine is
terminated...................................................................................................................................... 2-18
Setting the Overwrite All Data.......................................................................................................... 2-18
Setting the RESTORE ALL ............................................................................................................... 2-20
SSL Setting Function .................................................................................................................... 2-21
Device Certificate Setting ................................................................................................................ 2-21
SSL Setting ...................................................................................................................................... 2-23
Removing a Certificate..................................................................................................................... 2-24
bizhub C3110
Contents-1
3
4
2.11
2.11.1
2.11.2
2.11.3
2.11.4
2.12
SNMP Setting Function ................................................................................................................ 2-25
Changing the auth-password and priv-password ........................................................................... 2-25
SNMP access authentication function............................................................................................. 2-26
SNMP v3 setting function ................................................................................................................ 2-26
SNMP network setting function ....................................................................................................... 2-26
Accessing the Scan to HDD file................................................................................................... 2-27
Accessing the image file .................................................................................................................. 2-27
2.13
2.13.1
2.13.2
2.14
TCP/IP Setting Function ............................................................................................................... 2-29
Setting the IP Address ..................................................................................................................... 2-29
Registering the DNS Server ............................................................................................................. 2-29
SMB Setting Function ................................................................................................................... 2-30
Making the SMB Setting .................................................................................................................. 2-30
2.15
Rendezvous (Bonjour) Setting Function ..................................................................................... 2-31
Making the Rendezvous (Bonjour) Setting....................................................................................... 2-31
User Operations
3.1
3.1.1
3.2
3.2.1
3.2.2
3.3
User Authentication Function ........................................................................................................ 3-2
Performing user authentication.......................................................................................................... 3-3
ID & Print Function .......................................................................................................................... 3-6
Registering ID & Print files ................................................................................................................. 3-6
Accessing the ID & Print file............................................................................................................... 3-8
Change Password Function ........................................................................................................... 3-9
Performing Change Password ........................................................................................................... 3-9
3.4
3.4.1
3.4.2
3.5
3.5.1
3.5.2
Secured Job Function................................................................................................................... 3-10
Registering Secured Job files .......................................................................................................... 3-10
Accessing the Secured Job file ....................................................................................................... 3-12
Scan to HDD Function .................................................................................................................. 3-14
Registering image files..................................................................................................................... 3-14
Accessing the image file .................................................................................................................. 3-16
Application Software
4.1
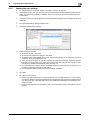
PageScope Data Administrator ..................................................................................................... 4-2
Precautions during backup or restore ............................................................................................... 4-2
4.1.1
4.1.2
4.1.3
4.2
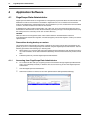
Accessing from PageScope Data Administrator ............................................................................... 4-2
Making the user settings.................................................................................................................... 4-4
Setting the IC card information.......................................................................................................... 4-5
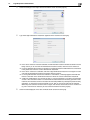
TWAIN driver.................................................................................................................................... 4-7
Accessing from the TWAIN driver...................................................................................................... 4-7
bizhub C3110
Contents-2
1
Security
1.1
Introduction
1
Security
1.1
Introduction
1
Thank you for purchasing our product.
This User's Guide contains the operating procedures and precautions to be used when using the security
functions offered by the bizhub C3110 machine. To ensure the best possible performance and effective use
of the machine, read this manual thoroughly before using the security functions. The Administrator of the machine should keep this manual for ready reference. The manual should be of great help in finding solutions to
operating problems and questions.
This User's Guide (Ver. 1.02) covers the following.
TOE Name
bizhub C3110/ineo+ 3110 Control Software
Controller Firmware
A6DT30G0116-999
Compliance with the ISO15408 Standard
When the Enhanced Security Mode on this machine is set to [ON], more enhanced security functions are
available.
The security functions offered by the bizhub C3110 machine comply with ISO/IEC15408 (level: EAL3).
Operating Precautions
The machine gives an alarm message or an alarm sound (peep) when a wrong operation is performed or a
wrong entry is made during operation of the machine. (No "peep" alarm sound is issued if a specific sound
setting in Sound Setting of Accessibility Setting is set to [OFF].) If the alarm message or alarm sound is given,
perform the correct operation or make the correct entry according to the instructions given by the message
or other means.
The Administrator of the machine should not leave the machine with the setting screen left displayed after
the access to that mode is completed or in the middle of the mode. If it is absolutely necessary to leave the
machine, the Administrator of the machine should log off from the mode.
The Administrator of the machine should make sure that each individual general user logs off from the current
mode whenever the access to that mode is completed or if the user leaves the machine in the middle of the
mode with the mode screen left displayed.
NOTICE
This machine permits duplicate login operations performed by the service engineer, the Administrator of the
machine, and the user.
The Administrator of the machine should make sure that, when the service engineer changes the settings, neither the Administrator of the machine nor the user performs the login operation.
The Administrator of the machine should make sure that no user is allowed to perform the login operation when the Administrator of the machine changes or deletes user information or user data.
To prevent settings of the machine from being duplicated, the Administrator of the machine should not
attempt to change the settings in a condition of having logged onto a mode simultaneously from the
control panel and the client PC.
bizhub C3110
1-2
1.1
Introduction
1
INSTALLATION CHECKLIST
This Installation Checklist contains items that are to be check by the Service Engineer installing this machine.
The Service Engineer should check the following items, then explain each checked item to the Administrator
of the machine.
To Service Engineer
Make sure that each of these items is properly carried out by checking the box on the right of each item.
1.
Perform the following steps before installing this machine.
Check with the Administrator to determine if the security functions of this machine should
be enhanced. If the functions should be enhanced, check the following.
If the security functions are not to be enhanced, quit the operation without checking the following.
I swear that I would never disclose information as it relates to the settings of this machine
to anybody, or perform malicious or intentional act during setup and service procedures for
the machine.
When giving a copy of the User's Guide, explain the following to the administrator
A digital signature is assigned to the data certified by ISO15408. To ensure integrity of the
file, have the administrator of the machine confirm the digital signature using the property
of the provided data file in the user's PC environment.
When giving the User’s Guide Security Operations to the Administrator of the machine,
check that the User’s Guide is the security-compatible version and explain to the Administrator that it is security-compatible.
2.
After this machine is installed, refer to the Service Manual and perform the following steps.
Check that the Firmware version of [Controller F/W] and [Boot F/W] checked with the Service Manual match the values shown in the Firmware Version screen.
If the version of the [Controller F/W] does not match, explain to the Administrator of the machine that the firmware requires rewriting and rewrite the firmware.
If the version of the [Boot F/W] does not match, suspend the installation procedure and
contact Konica Minolta.
Set the CE Password.
3.
After this machine is installed, refer to this User’s Guide and perform the following steps.
Check that the Administrator Password has been set by the Administrator of the machine.
Check that the Encryption Key has been set by the administrator of the machine.
Check that User Authentication has been set to [Device] by the Administrator of the machine.
Check that Authentication Device Settings has been set to [Card Authentication + Password] by the administrator of the machine.
Check that the self-signed certificate for SSL communications has been registered by the
Administrator of the machine.
Check that Password Rules has been set to [ON] by the Administrator of the machine.
Let the Administrator of the machine set Enhanced Security Mode to [ON].
Explain to the administrator that the settings for the security functions for this machine have
been specified.
When the above steps have been properly carried out, the Service Engineer should make a copy of this page
and give the original of this page to the Administrator of the machine. The copy should be kept at the corresponding Service Representative for filing.
Product Name
Company Name
User Division Name
Person in charge
Customer (Administrator of Machine)
Service Representative
bizhub C3110
-
1-3
1.2
1.2
Security Functions
1
Security Functions
Setting the Enhanced Security Mode to [ON] will validate the security function of this machine. For details of
the settings of different security functions to be changed by turning [ON] the Enhanced Security Mode, see
page 2-5.
Setting the Enhanced Security Mode to [ON] will enhance the authentication function. Access control is then
provided through password authentication for any access to the Administrator Settings, User Authentication
mode, and Secured Job file. Access is thereby granted only to the authenticated user.
A password that can be set must meet the requirements of the Password Rules. The machine does not accept setting of an easily decipherable password. For details of the Password Rules, see page 1-9.
If a wrong password has been entered three cumulative times during password authentication, the machine
determines that it is unauthorized access through Prohibited Functions When Authentication Error, prohibiting any further entry of the password. By prohibiting the password entry operation, the machine prevents unauthorized use or removal of data, thereby ensuring secured used of the machine. This function is not,
however, governed by authentication by the ISO15408.
When the machine is to be discarded, or use of a leased machine is terminated at the end of the leasing contract, the data erase function overwrites and erases all data stored in all spaces of the HDD. The function also
resets all passwords saved in the memory area on the MFP board to factory settings, preventing leak of data.
For details of items to be cleared by data erase function, see page 1-11.
Check Count Clear Conditions
The following are the conditions for clearing or resetting the check count of the number of wrong entries at
the time of authentication.
NOTICE
The check count is cleared or reset by restarting the machine. If there is any user who frequently turns ON
and OFF the machine, warn him or her of the fact or take necessary steps.
<Administrator Settings>
Authentication of Administrator Settings is successful.
The machine is restarted
<User Authentication Mode>
User Authentication mode is successful.
The machine is restarted
<Secured Job>
Authentication of Secured Job is successful.
The machine is restarted
<SNMP Password (auth-password, priv-password)>
Authentication of SNMP is successful.
The machine is restarted
bizhub C3110
1-4
1.3
1.3
Data to be Protected
1
Data to be Protected
The underlying concept of this machine toward security is "to protect data that can be disclosed against the
intention of users."
The following types of image files that have been stored in the machine and made available for use by its
users are protected while the machine is being used.
Image files stored in the HDD by Secured Job
Image files stored as "Personal" in the HDD by Scan to HDD
Image files stored in the HDD by ID & Print
The following data are also counted among the assets to be protected:
Password
–
User passwords and Secured Job passwords stored in the HDD, and Administrator passwords and
SNMP passwords stored in the memory area on the MFP board
Encryption Key
–
Encryption Key to be registered in the memory area on the MFP board
User identification information
–
User identification information stored in the HDD
IC card information
–
User IC card information stored in the HDD
Trusted channel setting data
–
Trusted channel setting data stored in the memory area on the MFP board
The following types of data stored in the HDD and memory area on the MFP board are protected when use
of a leased machine is terminated at the end of the leasing contract, the machine is to be discarded.
Image files stored in the HDD by Secured Job
Image files stored as "Personal" in the HDD by Scan to HDD
Image files stored in the HDD by ID & Print
Image files of a job in the queue
Any image files stored in the HDD data space other than the Secured Job files, files stored as "Personal"
by Scan to HDD, and ID & Print files.
Data files left in the HDD data space, used as image files and not deleted through the general deletion
operation
Temporary data files generated during print image file processing
Administrator passwords, SNMP passwords, Encryption Key, trusted channel setting data, and machine setting data stored in the memory area on the MFP board
User identification information, user IC card information, User passwords, and Secured Job passwords
stored in the HDD
This machine offers the SSL function as a data protection method to ensure confidentiality of images (Scan
to HDD files) transmitted and received over the network.
When transmitting and receiving highly confidential image data (Secured Job files, Scan to HDD files, ID &
Print files) among different pieces of IT equipment within an office LAN, the machine carries out communications with the correct destination via reliable paths or through anti-sniffing measures, assuming an office environment that responds to most stringent security requirements.
NOTICE
Secured Job files and ID & Print files transmitted from the client PC to the machine are not encrypted. To
protect the Secured Job files and ID & Print files, take necessary anti-sniffing measures, including installation
of cryptographic communications equipment or a sniffing detector.
Setting the Enhanced Security Mode to [ON] causes the data to be protected to be registered on the HDD
and the data space on the SSD to be formatted. Because no data to be protected exists on the SSD,
performing [Overwrite All Data] or [SSD Format] available from [SSD Settings] does not delete data to be
protected.
bizhub C3110
1-5
1.4
1.4
Precautions for Operation Control
1
Precautions for Operation Control
This machine and the data handled by this machine should be used in an office environment that meets the
following conditions.
Roles and Requirements of the Administrator
The Administrator should take full responsibility for controlling the machine, thereby ensuring that no improper operations are performed.
<To Achieve Effective Security>
A single individual person who is capable of taking full responsibility for controlling the machine should
be appointed as the Administrator to make sure that no improper operations are performed.
When a DNS server or a WebDAV server is to be used, the Administrator of the machine should periodically check that the corresponding administrator of the server appropriately manages the server to
allow no settings to be changed without permission.
Password Usage Requirements
The Administrator must control the Administrator Password, auth-password, and priv-password appropriately so that they may not be leaked. These passwords should not be ones that can be easily guessed. The user,
on the other hand, should control the Secured Job Password and User Password appropriately so that they
may not be leaked. Again, these passwords should not be ones that can be easily guessed.
<To Achieve Effective Security>
Make absolutely sure that only the Administrator knows the Administrator Password, auth-password,
and priv-password.
The Administrator must change the Administrator Password, auth-password, and priv-password at
regular intervals.
The Administrator should make sure that any number that can easily be guessed from birthdays, employee identification numbers, and the like is not set for the Administrator Password, auth-password,
and priv-password.
If a User Password has been changed, the Administrator should have the corresponding user change
the password as soon as possible.
If the Administrator Password has been changed by the Service Engineer, the Administrator should
change the Administrator Password as soon as possible.
The Administrator should have users ensure that the passwords set for the User Authentication and Secured Job are known only by the user concerned.
The Administrator should have users change the passwords set for the User Authentication at regular
intervals.
The Administrator should make sure that any user does not set any number that can easily be guessed
from birthdays, employee identification numbers, and the like for the passwords set for the User Authentication and Secured Job.
Upon change of the Administrators, the old Administrator of the machine should promptly have the new
one change the Administrator password.
Network Connection Requirements for the Machine
If the LAN is to be connected to an outside network, no unauthorized attempt to establish connection from
the external network should be permitted.
<To Achieve Effective Security>
If the LAN, in which the machine is installed, is connected to an outside network, install a firewall or
similar network device to block any access to the machine from the outside network and make the necessary settings.
Provide an appropriate network control at all times to make sure that no other copying machine is connected without prior notice to the office LAN to which this machine is connected.
Security function operation setting operating requirements
The Administrator should make sure of correct operation control so that the machine is used with the Enhanced Security Mode set to [ON].
bizhub C3110
1-6
1.4
Precautions for Operation Control
1
Operation and control of the machine
The Administrator of the machine should perform the following operation control.
The Administrator of the machine should log off from the Administrator Settings whenever the operation
in the Administrator Settings is completed. The Administrator of the machine should also make sure
that each individual user logs off from the User Authentication mode after the operation in the User Authentication mode is completed, including operation of the Secured Job file.
The Administrator of the machine should appropriately control the device certificate (SSL certificate)
registered in the machine.
The administrator of the machine disables the following functions and operates and manages the machine
under a condition in which those functions are disabled.
Function Name
Setting Procedure
USB Memory Print Function
Using [Administrator Settings] ö [System Settings] ö [Folder Settings]
ö [External Memory Function Settings], set [Print Document] to [OFF].
SSL/TLS Version
Start the PageScope Web Connection and, using [Security] ö [PKI Settings] ö [SSL/TLS Settings] of the administrator mode, cancel the selection of [SSL 3.0] of [SSL/TLS Version].
Machine Maintenance Control
The Administrator of the machine should perform the following maintenance control activities.
Provide adequate control over the machine to ensure that only the Service Engineer is able to perform
physical service operations on the machine.
Provide adequate control over the machine to ensure that any physical service operations performed
on the machine by the Service Engineer are overseen by the Administrator of the machine.
Some options require that Enhanced Security Mode be turned [OFF] before they can be used on the
machine. If you are not sure whether a particular option to be additionally purchased is fully operational
with the Enhanced Security Mode turned [ON], contact your Service Representative.
Operating conditions for the IC card and IC card reader
The machine supports the following types of IC card and IC card reader.
IC card type
IC card reader
Type A
AU-201, SCL-010
Felica IDm
AU-201, SCL-010
HID Prox
AU-201H (North America only)
Operate the IC card reader under the following conditions.
Be sure to use the IC card reader provided by the Service Representative. For details, contact your Service Representative.
To use the IC card reader, it is necessary to install the loadable driver in the machine. For details, contact your Service Representative.
Only one IC card reader can be connected to the machine.
No guarantee is given for correct operation, if the IC card reader is not connected to the machine when
the machine is turned ON or if it is removed and reinserted with the machine turned ON.
Even if the IC card reader supports two or more types of IC cards, only one type of IC card can be used
for authentication. No guarantee is given for correct operation, if authentication is performed by using
two or more types of IC cards.
No guarantee is given for correct operation in authentication with two or more types of IC cards simultaneously read by the IC card reader.
SCL-010 is not covered by certification of ISO15408.
bizhub C3110
1-7
1.4
Precautions for Operation Control
1
IC card owner requirements
The Administrator of the machine should make sure that operating rules that specify the following operations
exist within the organization and that the operations are implemented according to the rules.
The person responsible within the organization that uses the machine should distribute the IC card issued for use by the organization to a specific person who is authorized to own the IC card.
The person responsible within the organization that uses the machine should prohibit the user from
transferring or lending the IC card to any third person and make sure that the user reports any lost IC
card.
If only the IC card is used for user authentication, the person responsible within the organization that
uses the machine should make sure that only the authorized IC cards are used.
bizhub C3110
1-8
1.5
1.5
Miscellaneous
1
Miscellaneous
Password Rules
According to certain Password Rules, registration of a password consisting of a string of a single character
or change of a password to one consisting of a string of a single character is rejected for the Administrator
Password, User Password, Secured Job Password, and SNMP Password. For the Administrator Password,
User Password, and SNMP Password, the same password as that currently set is not accepted.
Study the following table for more details of the number of digits and characters that can be used for each
password.
NOTICE
Before setting the Enhanced Security Mode, be sure to enable the Password Rules. The Password Rules can
be turned on by selecting [ON] for [Password Rules] that can be accessed from the message window as follows: [UTILITY] ö [Admin Settings] ö [Security Settings] ö [Security Details].
Types of passwords
No. of digits
Characters
User Password
8 to 64 digits
•
•
•
Administrator Password
8 digits
•
•
•
Secured Job Password
8 digits
•
•
•
SNMP Password
• auth-password
• priv-password
8 to 32 digits
•
•
•
Numeric characters: 0 to 9
Alpha characters: upper and lower case letters
Symbols: !, #, $, %, &, ’, (, ), *, ,, -, ., /, :, ;, <, =, >,
?, @, [, \, ], ^, _, `, {, |, }, ~, +
Selectable from among a total of 93 characters
• A "SPACE" and "”" cannot be used
Numeric characters: 0 to 9
Alpha characters: upper and lower case letters
Symbols: !, #, $, %, &, ’, (, ), *, ,, -, ., /, :, ;, <, =, >,
?, @, [, \, ], ^, _, `, {, |, }, ~, +, SPACE
Selectable from among a total of 94 characters
• "”" cannot be used
Numeric characters: 0 to 9
Alpha characters: upper and lower case letters
Symbols: !, #, $, %, &, ’, (, ), *, ,, -, ., /, :, ;, <, =, >,
?, @, [, \, ], ^, _, `, {, |, }, ~, SPACE
Selectable from among a total of 93 characters
• "+" and "”" cannot be used
Numeric characters: 0 to 9
Alpha characters: upper and lower case letters
Symbols: !, $, %, &, (, ), *, ,, -, ., /, :, ;, <, =, >, ?, @,
[, ], ^, _, `, {, |, }, ~, +
Selectable from among a total of 90 characters
• A "SPACE", "”", "#", "’", and "\" cannot be used
Precautions for Use of Various Types of Applications
Comply with the following requirements when using various types of applications.
When PageScope Web Connection or an application of various other types is used, the password control function of the application stores the password that has been entered in your PC. If you want the
password not stored, disable the password control function of the application.
When using the PageScope Web Connection or an application of various other types, use one that
shows "*" or "●" for the password entered. Do not use a function, if any, that directly shows on the
screen the password entered.
When using the PageScope Web Connection or an application of various other types, make settings so
that cache files are not saved on the web browser.
Do not access any other site once you have logged onto the machine with the PageScope Web Connection. Accessing any other site or a link included in e-mail, in particular, can lead to execution of an
unintended type of operation. Whenever access to any other site is necessary, be sure first to log off
from the machine through the PageScope Web Connection.
Using the same password a number of times increases the risk of spoofing.
If a web browser such as Internet Explorer is used on the client PC side, "TLS v1" should be used for
the SSL setting.
PageScope Direct Print cannot be used if the Enhanced Security Mode is set to [ON].
Optional applications not described in this User’s Guide are not covered by certification of ISO15408.
bizhub C3110
1-9
1.5
Miscellaneous
1
Encrypting communications
The following are the cryptographic algorithms of key exchange and communications encryption systems
supported in generation of encryption keys.
TLS_RSA_WITH_3DES_EDE_CBC_SHA
TLS_RSA_WITH_AES_128_CBC_SHA
TLS_DHE_RSA_WITH_3DES_EDE_CBC_SHA
TLS_DHE_RSA_WITH_AES_256_CBC_SHA
NOTICE
The Administrator of the machine should make sure that SSL encryption communication is not performed
with the SSL set in SSL v3.
Do not use an SSL certificate that is electronically signed by MD5, as an increased risk results of data to be
protected being tampered with or leaked.
To eliminate the risk of the data to be protected being tampered with or leaked, refer to the recommended
ciphers list disclosed by, for example, NIST and CRYPTREC and use the appropriate cryptographic technique.
Use the following browsers to ensure SSL encryption communication with appropriate strength. Use of any
of the following browsers achieves SSL encryption communication that ensures confidentiality of the image
data transmitted and received.
For Windows
Microsoft Internet Explorer 8 or later
Mozilla Firefox 18 or later
For Mac OS
Mozilla Firefox 18 or later
On Linux
Mozilla Firefox 18 or later
IPP printing
IPP (Internet Printing Protocol) is a function that allows Secured Job and image data stored in HDD to be
printed via the Internet by using the HTTP (HyperText Transfer Protocol) of the TCP/IP Protocol. IPPS (IPP
over SSL/TLS) is the type of IPP that performs the SSL encryption communication.
<Installing printer driver>
To perform IPP printing, the printer driver must be installed. From "Add Printer Wizard", type the IP address
of this machine in the following format in the "URL" field.
To set IPP printing:
Type "http://<IP address of the machine>/ipp"
To set IPPS printing:
<In Windows XP/Server 2003>
Type "https://<IP address of the machine>/ipp"
<In Windows Vista/7/Server 2008/Server 2008 R2/Server 2012>
Type "https://[host name].[domain name]/ipp"
For [Host Name] and [Domain Name], specify the names set with the DNS server.
<Registering the certificate in Windows Vista or later>
Windows Vista or later, which offers enhanced security functions, gives a certificate error message if the SSL
certificate is one that is not issued by a certification body. In such cases, it becomes necessary to register
the certificate of this machine as that issued by a reliable party for the computer account.
First, register Host Name and IP address of this machine in the DNS server in advance. Then, in TCP/IP Settings of PageScope Web Connection, set the DNS Host Name and DNS Default Domain Name registered
with the DNS server.
It should also be noted that, for the certificate to be imported, a certificate for SSL encryption communication
should be registered in PageScope Web Connection and exported in advance as the certificate including the
public key.
bizhub C3110
1-10
1.5
Miscellaneous
1
1
From "Continue to this website," call the PageScope Web Connection window to the screen.
2
Click "Certificate Error" to display the certificate. Then, click "Install Certificate" to install the certificate.
3
Display the physical stores. Then, deploy the certificate, which has earlier been exported, in "Local
Computer" of "Trusted Root Certification Authorities" to thereby import the certificate.
Items of Data Cleared by Data Erase Function
The data erase function clears the following items of data.
NOTICE
Perform "RESTORE ALL" from the control panel of the machine, and not via the network.
The encryption key is not deleted even if RESTORE ALL or Overwrite All Data is performed. For the detailed
deleting procedure, see page 2-17.
Items of Data Cleared
Description
Method
Enhanced Security Mode
Set to [OFF]
Overwrite All Data
HDD Format
RESTORE ALL
User registration data
Deletes all user-related data that has been
registered
Overwrite All Data
HDD Format
IC card registration data
Deletes all IC card-related data that has
been registered
Overwrite All Data
HDD Format
Secured Job Password/file
Deletes all Secured Job-related information and files saved
Overwrite All Data
HDD Format
Scan to HDD file
Deletes all files stored as "Personal" by
Scan to HDD
Overwrite All Data
HDD Format
ID & Print file
Deletes all ID & Print files
Overwrite All Data
HDD Format
Image files
•
Overwrite All Data
HDD Format
•
•
•
bizhub C3110
Image files saved other than the Secured Job files, files stored as "Personal" by Scan to HDD, and ID & Print files
Image files of jobs in job queue state
Remainder data files, used as image
files and not deleted through only the
general deletion operation
Temporary data files generated during
print image file processing
Administrator Password
Clears the currently set password, resetting it to the factory setting
RESTORE ALL
SNMP Password
Clears the currently set password, resetting it to the factory setting (MAC address)
RESTORE ALL
SSL certificate
Deletes the currently set SSL certificate
Overwrite All Data
HDD Format
RESTORE ALL
Network Setting
Clears the currently set network settings
(DNS Server setting, IP Address setting,
NetBIOS setting, and Rendezvous (Bonjour) setting), resetting it to the factory setting
RESTORE ALL
Machine setting data
Deletes the machine setting data
RESTORE ALL
Trusted channel setting data
Deletes the trusted channel setting data
RESTORE ALL
1-11
1.5
Miscellaneous
1
HDD Format
Execute HDD format when, for example, to initialize the HDD (to be reset to the default state) or when the
HDD is replaced with a referent one. Executing HDD format deletes data saved in the machine’s HDD.
For details of items that are cleared by HDD Format, see page 1-11.
HDD formatting turns [OFF] the Enhanced Security Mode. So, it must be turned [ON] again. For details
of settings, see page 2-5.
Upgrading of the firmware
If upgrading of the firmware has been performed by the service engineer, the Administrator of the machine
must execute [RESTORE ALL]. Execute [RESTORE ALL] after the firmware has been upgraded. For details of
the execution of [RESTORE ALL], see page 2-20.
For details of items of data to be cleared by [RESTORE ALL], see page 1-11.
The execution of [RESTORE ALL] will turn [OFF] the Enhanced Security Mode. So, it must be turned
[ON] again. For details of settings, see page 2-5.
Software used in the machine
The following lists the types of software and their versions used for the ISO15408 evaluation for this machine.
The user should appropriately manage the software used with the machine on his or her own responsibility.
bizhub C3110
Software
Version, etc.
OS (Operating System)
Windows 7 Professional SP1
Internet Explorer
Ver. 10
Mozilla Firefox
Ver. 27.0.1
Printer Driver
KONICA MINOLTA C3110
• PCL6 Ver. 1.0.0.0
• XPS Ver. 1.0.1.0
PageScope Data Administrator
with Device Set-Up and Utilities
Ver. 1.0.06000.03221
PageScope Data Administrator
(plug-in)
Ver. 4.1.25000.12271
TWAIN Driver
Ver. 1.0.1.0
IC card reader driver
AU-201_V2.1.02000 (for AU-201)
AU-201H_V2.1.00000 (for AU-201H)
1-12
2
Administrator Operations
2.1
Accessing the Administrator Settings
2
Administrator Operations
2.1
Accessing the Administrator Settings
2
This machine implements authentication of the user of the Administrator Settings function through the 8-digit
Administrator Password that verifies the identity as the Administrator of the person who accesses the function. During the authentication procedure, the Administrator Password entered for the authentication purpose
appears as "*" or "●" on the display. A failure in authentication as a result of the entry of a wrong password
is counted as unauthorized access.
NOTICE
Make sure that none of the general users of the machine will know the Administrator Password.
If the Administrator Password is forgotten, it must be set again by the Service Engineer. Contact your Service
Representative.
Accessing the Administrator Settings
The machine does not accept access to the Administrator Settings under any of the following conditions.
Wait for some while before attempting to gain access to the Administrator Settings again.
There is a job being executed by the machine.
There is a reserved job (timer TX, fax redial waiting, etc.) in the machine.
Immediately after the power switch has been turned ON.
A malfunction code is displayed on the machine.
<From the Control Panel>
0
Do not leave the machine with the setting screen of Administrator Settings left shown on the display. If
it is absolutely necessary to leave the machine, be sure first to log off from the Administrator Settings.
1
On the main screen, press the + or , key to select [UTILITY], then press the Select key.
2
Press the + or , key to select [Admin Settings], then press the Select key.
3
Enter the 8-digit Administrator Password from the keypad.
% Press the
key to switch the input mode between alphabet and numeric.
% Press the Back key to delete the entered characters one by one.
% Hold down the Back key to clear all the entered characters.
4
Press the Select key.
% If a wrong Administrator Password is entered, a message that tells that the authentication has failed
appears. Enter the correct Administrator Password.
bizhub C3110
2-2
2.1
Accessing the Administrator Settings
2
% A failure in authentication as a result of the entry of a wrong password is counted as unauthorized
access. If the cumulative number of unauthorized accesses reaches three during operation of the
machine, the machine is set into an access lock state and prohibits any subsequent password entry
operations. To cancel the access lock state, turn off, then on, the power switch of the machine.
When the power switch is turned off, then on again, wait at least 10 seconds to turn it on after turning it off. This interval is necessary to ensure that the machine functions properly.
5
bizhub C3110
Press the Stop/Reset key to log off from the Administrator Settings.
2-3
2.1
Accessing the Administrator Settings
2
<From PageScope Web Connection>
0
0
If an attempt is made to log on to the Administrator Mode while a job is being executed, the machine
gives a message that tells that it is now impossible to log on to the Administrator Mode. Click [OK] and
try logging on to the Administrator Mode after the execution of the job is completed.
Do not leave the machine with the Administrator Mode setting screen left shown on the display. If it is
absolutely necessary to leave the machine, be sure first to log off from the Administrator Mode.
1
Start the Web browser.
2
Enter the IP address of the machine in the address bar.
3
Press the [Enter] key to start PageScope Web Connection.
4
Click the Administrator radio button and [Log in].
5
Enter the 8-digit Administrator Password in the password box.
% When accessing the Administrator Mode using the PageScope Web Connection, enter the same
Administrator Password as that for the machine.
6
Click [OK].
% If a wrong Administrator Password is entered, a message that tells that the authentication has failed
appears. Enter the correct Administrator Password.
% A failure in authentication as a result of the entry of a wrong password is counted as unauthorized
access. If the cumulative number of unauthorized accesses reaches three during operation of the
machine, the machine is set into an access lock state and prohibits any subsequent password entry
operations. To cancel the access lock state, turn off, then on, the power switch of the machine.
When the power switch is turned off, then on again, wait at least 10 seconds to turn it on after turning it off. This interval is necessary to ensure that the machine functions properly.
7
bizhub C3110
Click [Log out]. This allows you to log off from the Administrator Mode.
2-4
2.2
2.2
Enhancing the Security Function
2
Enhancing the Security Function
When access to the machine by the Administrator of the machine through the Administrator Settings from
the control panel is authenticated, the machine enables setting of the Enhanced Security Mode that allows
settings for enhancing each of different security functions to be converted all at once.
In the Enhanced Security Mode, the machine allows selection of whether to use the Enhanced Security Mode
or not. When the Enhanced Security Mode is set to [ON], the security function is enhanced by automatically
setting such functions as that which determines whether each password meets predetermined requirements.
The following settings must first be made before the Enhanced Security Mode is set to [ON].
Settings to be Made in Advance
Description
Administrator Password
An 8-digit password that meets the Password Rules.
The factory setting is "12345678."
Encryption Key
Set the Encryption Key.
User Authentication
Set to [Device].
Authentication Device Settings
Set to [Card Authentication + Password].
Certificate for SSL
Register the self-signed certificate for SSL communications.
Password Rules
Set to [ON].
Setting the Enhanced Security Mode to [ON] changes the setting values of the following functions.
Function Name
Factory Setting
When Enhanced Security Mode is set to [ON]
Public Access
Restrict
Restrict (not to be changed)
Print without Authentication
Restrict
Restrict (not to be changed)
User Name List
OFF
OFF (not to be changed)
SSL
OFF
ON (not to be changed)
SSL Encryption Strength
AES-256, 3DES,
RC4-128,
DES, RC4-40
AES-256, 3DES (not to be changed to one containing
strength lower than AES/3DES)
FTP Server
Enable
Disable
(Selection can be made between [Enable] and [Disable])
SNMPv1/v2c
Read/Write enabled
Only Read is enabled (not to be changed)
SNMP v3 Security Level
and auth-password/privpassword
(SNMP v3 Write User)
auth-password/
priv-password
auth-password/priv-password
(Selection can be made between [auth-password] and
[auth-password/priv-password])
Administrator Password
Change Via Network
(Pagescope Web Connection)
Enabled
Restrict
Telnet
Enable
Disable (not to be changed)
NOTICE
When Password Rules is set to [ON] the characters and the number of digits used for each password are
restricted. For details of the Password Rules, see page 1-9.
Turning ON the Enhanced Security Mode does not enable the ID & Print function. Enable the function manually to protect image files. For details of the ID & Print function, see page 2-9.
bizhub C3110
2-5
2.2
Enhancing the Security Function
2
The Enhanced Security Mode is set to [OFF], if the Administrator of the machine executes any of the following
functions. Set the Enhanced Security Mode to [ON] again.
[HDD Format] is executed.
[Overwrite All Data] is executed.
[RESTORE ALL] of [Initialize] is executed.
[RESTORE NETWORK] of [Initialize] is executed.
[RESTORE PRINTER] of [Initialize] is executed.
bizhub C3110
2-6
2.2
Enhancing the Security Function
2
Setting the Enhanced Security Mode
0
0
0
For the procedure to call the Administrator Settings on the display, see page 2-2.
Do not leave the machine with the setting screen of Administrator Settings left shown on the display. If
it is absolutely necessary to leave the machine, be sure first to log off from the Administrator Settings.
The Enhanced Security Mode is factory-set to [OFF]. Be sure to turn [ON] the Enhanced Security Mode
so as to enable the security function of the machine.
1
Call the Administrator Settings on the display from the control panel.
2
Press the + or , key to select [Security Settings], then press the Select key.
3
Press the + or , key to select [EnhancedSecurityMd], then press the Select key.
4
Press the + or , key to select [ON], then press the Select key.
The machine restarts automatically.
% [ON] can be selected only if the Administrator of the machine has made the necessary settings beforehand. For details of the necessary settings, see page 2-5.
% If the Enhanced Security Mode is properly set to [ON], a key icon appears at the portion enclosed
by a red frame of the screen, indicating that the machine is in the Enhanced Security Mode.
bizhub C3110
2-7
2.3
2.3
Setting the Authentication Method
2
Setting the Authentication Method
When access to the machine by the Administrator of the machine through the Administrator Settings is authenticated, the machine enables setting of the user authentication.
If [Device] is selected, the authentication function of this machine can be used.
If [Device] is selected, the IC card function can be set. The IC card function uses an IC card reader connected
to the machine and reads the IC card with the IC card reader to perform user authentication.
NOTICE
If Enhanced Security Mode is set to [ON], Authentication Method should be set to [Device] and Authentication
Device Settings should be set to [Card Authentication + Password].
Setting the Authentication Method
0
0
For the procedure to access the Administrator Mode, see page 2-2.
Do not leave the machine with the Administrator Mode setting screen left shown on the display. If it is
absolutely necessary to leave the machine, be sure first to log off from the Administrator Mode.
1
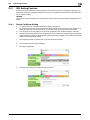
Start PageScope Web Connection and access the Administrator Mode.
2
Click the [Security] tab.
3
Select [Device] from the User Authentication pull-down menu, and click [Apply].
4
Click [General Settings] from the [Authentication Device Settings] menu and select [Card Authentication
+ Password].
5
bizhub C3110
Authentication Method
Description
Card Authentication
Uses an IC card for authentication.
Card Authentication
+ Password
Uses an IC card placed on the IC card reader and entry of a user
password for authentication.
If Enhanced Security Mode is set to [ON], configure this setting.
Click [Apply].
2-8
2.4
2.4
ID & Print Setting Function
2
ID & Print Setting Function
When access to the machine by the Administrator of the machine through the Administrator Settings is authenticated, the machine enables setting of the operation of the ID & Print function.
The ID & Print function temporarily stores print data transmitted from the PC in the HDD of the machine and,
after user authentication is successful in this machine, automatically prints the print data of the user in question.
NOTICE
The Administrator must first make User Authentication settings before setting the ID & Print function. For details of the User Authentication, see page 2-8.
Setting the ID & Print
0
0
For the procedure to access the Administrator Mode, see page 2-2.
Do not leave the machine with the Administrator Mode setting screen left shown on the display. If it is
absolutely necessary to leave the machine, be sure first to log off from the Administrator Mode.
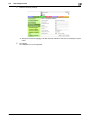
1
Start PageScope Web Connection and access the Administrator Mode.
2
Click the [Security] tab and [ID & Print Settings].
3
Select [Enable] from the pull-down menu of [ID & Print].
% If [Enable] is set, the document is stored as ID & Print file even if [Print] is selected on the printer
driver side.
% Even if [Disable] is set, the document is stored as ID & Print file if [ID & Print] is selected on the printer
driver side.
4
bizhub C3110
Click [Apply].
2-9
2.5
2.5
System Auto Reset Function
2
System Auto Reset Function
When access to the machine by the Administrator of the machine through the Administrator Settings from
the control panel is authenticated, the machine enables setting of the operation of the system auto reset function.
If no operations are performed for a predetermined period of time during access to the Administrator Settings
or user mode (during setting of User Authentication) from the control panel, the system auto reset function
automatically causes the user to log off from the mode.
The predetermined period of time, after which the system auto reset function is activated, can be selected
from among nine values between 1 min. and 9 min. System auto reset can also be set to [OFF]. If no operations are performed for 1 min. even with system auto reset set to [OFF], the function causes the user to log
off from the mode automatically.
Reference
Processing of a specific job, however, takes precedence over the system auto reset function. That is,
even if a predetermined period of time elapses during which no operations are performed, once the processing of the specific job has been started, the system auto reset function does not cause the user to
log off from the mode. The user logs off from the mode after the lapse of a predetermined period of time
after the processing of the specific job is completed.
Setting the System Auto Reset function
0
0
For the procedure to call the Administrator Settings on the display, see page 2-2.
Do not leave the machine with the setting screen of Administrator Settings left shown on the display. If
it is absolutely necessary to leave the machine, be sure first to log off from the Administrator Settings.
1
Call the Administrator Settings on the display from the control panel.
2
Press the + or , key to select [System Settings], then press the Select key.
3
Press the + or , key to select [Reset Settings], then press the Select key.
4
Press the + or , key to select [System auto reset], then press the Select key.
bizhub C3110
2-10
2.5
System Auto Reset Function
5
Press the + or , key to select [ON/OFF], then press the Select key.
6
Press the + or , key to select [ON], then press the Select key.
2
% If no operations are performed for 1 min. even with system auto reset set to [OFF], the function is
activated to cause the user to log off from the mode automatically.
7
Press the + or , key to select [Reset Time], then press the Select key.
8
Press the + or , key or use the keypad to enter the period of time (1 min. to 9 min.) after which system
auto reset is activated.
% The time for system auto reset can be set to a value between 1 min. and 9 min., variable in 1-min.
increments.
9
bizhub C3110
Press the Select key.
2-11
2.6
2.6
User Setting Function
2
User Setting Function
When access to the machine by the Administrator of the machine through the Administrator Settings is authenticated, the machine enables registration of the users who can use the machine. It also enables operations for deleting a user and changing a User Password.
User Registration allows the User Name, User Password, and other user information to be registered for enabling access to, or operation of, the machine. Up to 1,000 different users can be registered. User Registration allows identification and authentication of each individual user, thereby preventing unauthorized use of
the machine. A User Password may consist of 8 to 64 digits. The password entered is displayed as "*" or "●."
Reference
If a user name is changed when [Device] is set for the authentication method, the image file owned by
the user in question before the change are deleted.
Making user setting
0
0
0
For the procedure to access the Administrator Mode, see page 2-2.
Do not leave the machine with the Administrator Mode setting screen left shown on the display. If it is
absolutely necessary to leave the machine, be sure first to log off from the Administrator Mode.
If a user has been registered, promptly notify the user in question of the registration and have him or
her change the password.
1
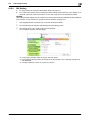
Start PageScope Web Connection and access the Administrator Mode.
2
Click the [Security] tab and [User List].
3
Click [New Registration].
% To change a User Password, click [Edit] and select the "Change Password" check box. Then, enter
the new User Password.
4
Make the necessary settings.
% A User Name that already exists cannot be redundantly registered.
% Click [Cancel] to go back to the previous screen.
5
Click [Apply].
% If the entered User Password does not meet the requirements of the Password Rules, a message
that tells that the entered User Password cannot be used appears. Enter the correct User Password.
For details of the Password Rules, see page 1-9.
bizhub C3110
2-12
2.6
User Setting Function
6
2
Check the message that tells that the setting has been completed. Then, click [OK].
% To delete a previously registered user, click [Delete] in step 3. Check the contents of registration on
the confirmation screen and click [OK] if the user is to be deleted. If a user is deleted, the image files
owned by that specific user are deleted.
bizhub C3110
2-13
2.7
2.7
Changing the Administrator Password
2
Changing the Administrator Password
When access to the machine by the Administrator of the machine through the Administrator Settings from
the control panel is authenticated, the machine enables the operation of changing the Administrator Password required for accessing the Administrator Settings.
The Administrator Password entered for the authentication purpose appears as "*" on the display.
Changing the Administrator Password
0
0
For the procedure to call the Security Settings screen on the display, see steps 1 through 2 of page 2-7.
Do not leave the machine with the setting screen of Administrator Settings left shown on the display. If
it is absolutely necessary to leave the machine, be sure first to log off from the Administrator Settings.
1
Call the Security Settings screen on the display from the control panel.
2
Press the + or , key to select [Admin. Password], then press the Select key.
3
Enter the new 8-digit Administrator Password from the keypad, and press the Select key.
% If the entered Administrator Password does not meet the Password Rules, a message that tells that
the entered Administrator Password cannot be used appears. Enter the correct Administrator Password. For details of the Password Rules, see page page 1-9.
% Press the
key to switch the input mode between alphabet and numeric.
% Press the Back key to delete the entered characters one by one.
% Hold down the Back key to clear all the entered characters.
4
To prevent entry of a wrong Administrator Password, enter the new 8-digit Administrator Password
once again, and press the Select key.
% If the entered Administrator Password does not match, a message that tells that the Administrator
Password does not match appears. Enter the correct Administrator Password.
% Press the
key to switch the input mode between alphabet and numeric.
% Press the Back key to delete the entered characters one by one.
% Hold down the Back key to clear all the entered characters.
bizhub C3110
2-14
2.8
2.8
Protecting Data in the HDD
2
Protecting Data in the HDD
When access to the machine by the administrator of the machine through the Administrator Settings from the
control panel is authenticated, the machine enables the operation for setting and deleting the Encryption Key.
By setting the Encryption Key, the data stored in the HDD is encrypted, thereby protecting the data in the
HDD. The Encryption Key entered is displayed as "*."
NOTICE
If the HDD develops a fault, call your Service Representative.
The following shows setting conditions for the Encryption Key. Perform settings for the Encryption Key fitting
these conditions.
No. of digits
Characters
20 digits
•
•
•
Numeric characters: 0 to 9
Alpha characters: upper and lower case letters
Symbols: !, ", #, $, %, &, ', (, ), *, ,, -, ., /, :, ;, <, =, >, ?, @, [, \, ], ^, _, `, {, |, }, ~, +,
SPACE
Selectable from among a total of 95 characters
An Encryption Key consisting of identical characters only cannot be registered.
Reference
When an Encryption Key (encryption word) is set using HDD Encryption Setting, an Encryption Key with
a key length of 256 bits is generated. The generated encryption key is used to encrypt or decrypt data
through AES encryption algorithm.
2.8.1
Setting the Encryption Key (encryption word)
0
0
0
0
0
0
0
For the procedure to call the Security Settings screen on the display, see steps 1 through 2 of page 2-7.
Do not leave the machine with the setting screen of Administrator Settings left shown on the display. If
it is absolutely necessary to leave the machine, be sure first to log off from the Administrator Settings.
To prevent data from leaking as a result of reinstallation of the HDD on another machine, a unique value
that varies from one machine to another must be set for the encryption key.
Do not set any number that can easily be guessed from birthdays, employee identification numbers,
and the like for the Encryption Key.
Make sure that nobody but the administrator of the machine comes to know the Encryption Key.
If only the Encryption Key is to be set while the machine is being used without setting the Encryption
Key (not covered by certification of ISO15408), the Service Engineer must perform some setting procedures in advance. For details, contact your Service Representative.
Executing HDD Format erases data in the HDD. It is recommended that important data should be saved
in a backup medium in advance. Execution of HDD Format will also reset the setting values of different
functions to the default values. Set the Enhanced Security Mode to [ON] again.
1
Call the Security Settings screen on the display from the control panel.
2
Press the + or , key to select [HDD Settings], then press the Select key.
bizhub C3110
2-15
2.8
Protecting Data in the HDD
3
Press the + or , key to select [HDD EncryptSetting], then press the Select key.
4
Press the + or , key to select [ON], then press the Select key.
5
A confirmation message appears. Press the Select key.
2
% Changing the setting of HDD Encryption Setting (switching between ON and OFF) will format the
HDD. For details of items that are cleared by HDD Format, see page 1-11.
6
Enter the 20 digits Encryption Key from the keypad, and press the Select key.
The machine restarts automatically.
% If the entered Encryption Key does not meet the setting requirements, a message that tells that the
entered Encryption Key cannot be used appears. Enter the correct Encryption Key.
% Press the
key to switch the input mode between alphabet and numeric.
% Press the Back key to delete the entered characters one by one.
% Hold down the Back key to clear all the entered characters.
bizhub C3110
2-16
2.8
2.8.2
Protecting Data in the HDD
2
Deleting the encryption key
0
0
For the procedure to call the HDD Encryption Setting screen on the display, see steps 1 through 3 of
page 2-15.
Do not leave the machine with the setting screen of Administrator Settings left shown on the display. If
it is absolutely necessary to leave the machine, be sure first to log off from the Administrator Settings.
The encryption key cannot be deleted with the Enhanced Security Mode set to [ON].
1
Call the HDD Encryption Setting screen on the display from the control panel.
2
Press the + or , key to select [OFF], then press the Select key.
3
A confirmation message appears. Press the Select key.
The machine restarts automatically.
0
% Changing the setting of HDD Encryption Setting (switching between ON and OFF) will format the
HDD. For details of items that are cleared by HDD Format, see page 1-11.
bizhub C3110
2-17
2.9
2.9
Erasing data when the machine is to be discarded or use of a leased machine is terminated
2
Erasing data when the machine is to be discarded or use of a
leased machine is terminated
When access to the machine by the Administrator of the machine through the Administrator Settings from
the control panel is authenticated, the machine enables setting of the operations of the Overwrite All Data
and RESTORE ALL functions.
When the machine is to be discarded or use of a leased machine is terminated at the end of the leasing contract, be sure to erase all data to prevent data left in the machine from leaking. Different methods of erase
apply depending on the data space. See the table below for more details.
Data space
Erase method
HDD, Memory area on the MFP board
Overwrite All Data
Memory area on the MFP board
RESTORE ALL
NOTICE
Perform erase operations for all of HDD and memory area on the MFP board.
When erase operations are performed, make sure that the operation is normally terminated for data in each
of the three different data spaces. If an error occurs during execution of the erase operations, contact your
Service Representative for appropriate action.
The Enhanced Security Mode is set to [OFF], if Overwrite All Data or RESTORE ALL is executed.
The encryption key is registered in the memory area on the MFP board, but is not deleted even if RESTORE
ALL or Overwrite All Data is performed. After RESTORE ALL or Overwrite All Data is performed, the encryption key must be deleted manually. For details, see page 2-17.
2.9.1
Setting the Overwrite All Data
The HDD Overwrite Method offers the choice of eight different modes, [Mode 1] through [Mode 8]. Overwrite
All Data takes about less than one hour in [Mode 1] at the minimum and about 9 hours in [Mode 8] at the
maximum.
Mode
Description
Mode 1
Overwrites once with "0x00".
Mode 2
Overwrites with "random numbers" ö "random numbers" ö "0x00".
Mode 3
Overwrites with "0x00" ö "0xff" ö "random numbers" ö verifies.
Mode 4
Overwrites with "random numbers" ö "0x00" ö "0xff".
Mode 5
Overwrites with "0x00" ö "0xff" ö "0x00" ö "0xff".
Mode 6
Overwrites with "0x00" ö "0xff" ö "0x00" ö "0xff" ö "0x00" ö "0xff" ö "random numbers".
Mode 7
Overwrites with "0x00" ö "0xff" ö "0x00" ö "0xff" ö "0x00" ö "0xff" ö "0xaa".
Mode 8
Overwrites with "0x00" ö "0xff" ö "0x00" ö "0xff" ö "0x00" ö "0xff" ö "0xaa" ö verifies.
0
0
0
For the procedure to call the Security Settings screen on the display, see steps 1 through 2 of page 2-7.
Do not leave the machine with the setting screen of Administrator Settings left shown on the display. If
it is absolutely necessary to leave the machine, be sure first to log off from the Administrator Settings.
For details of items that are cleared, see page 1-11.
1
Call the Security Settings screen on the display from the control panel.
2
Press the + or , key to select [HDD Settings], then press the Select key.
bizhub C3110
2-18
2.9
Erasing data when the machine is to be discarded or use of a leased machine is terminated
3
Press the + or , key to select [Overwrite All Data], then press the Select key.
4
Press the + or , key to select [HDD Overwrite Meth], then press the Select key.
5
Press the + or , key to select the desired mode, then press the Select key.
6
Press the + or , key to select [Start], then press the Select key.
7
A confirmation message appears. Press the Select key.
2
% Do not turn off the power switch of the machine during execution of Overwrite All Data. If the power
switch is inadvertently turned off during the execution of Overwrite All Data and the machine, as a
result, fails to recognize the HDD or develops other fault, contact your Service Representative.
bizhub C3110
2-19
2.9
2.9.2
Erasing data when the machine is to be discarded or use of a leased machine is terminated
2
Setting the RESTORE ALL
The memory area on the MFP board is initialized and reset to the default state.
NOTICE
Perform "RESTORE ALL" from the control panel of the machine, and not via the network.
0
0
0
For the procedure to call the Security Settings on the display, see steps 1 through 2of page 2-7.
Do not leave the machine with the setting screen of Administrator Settings left shown on the display. If
it is absolutely necessary to leave the machine, be sure first to log off from the Administrator Settings.
For details of items that are cleared, see page 1-11.
1
Call the Security Settings on the display from the control panel.
2
Press the + or , key to select [Security Details], then press the Select key.
3
Press the + or , key to select [Initialize], then press the Select key.
4
Press the + or , key to select [RESOTRE ALL], then press the Select key.
5
Press the + or , key to select [ON], then press the Select key.
The machine restarts automatically.
% Do not turn off the power switch of the machine during execution of RESTORE ALL. If the power
switch is inadvertently turned off during the execution of RESTORE ALL and the machine, as a result, develops a fault, contact your Service Representative.
bizhub C3110
2-20
2.10
2.10
SSL Setting Function
2
SSL Setting Function
When access to the machine by the Administrator of the machine through the Administrator Settings is authenticated, the machine enables the setting of encryption of image data transmitted and received between
the PC and the machine.
NOTICE
Do not use any invalid certificate, as an increased risk results of data to be protected being tampered with or
leaked.
2.10.1
Device Certificate Setting
0
0
0
0
For the procedure to access the Administrator Mode, see page 2-2.
Do not leave the machine with the Administrator Mode setting screen left shown on the display. If it is
absolutely necessary to leave the machine, be sure first to log off from the Administrator Mode.
The key length set for the public key of the server generated in SSL certificate setting is 1024 bits.
The Enhanced Security Mode is not turned [OFF] even if the validity of the certificate expires during the
Enhanced Security Mode. The Administrator of the machine should register a new certificate before the
validity of the old certificate expires.
1
Start PageScope Web Connection and access the Administrator Mode.
2
Click the [Security] tab and [PKI Settings].
3
Click [New Registration].
4
Select [Create a Self-signed Certificate] and click [Next].
bizhub C3110
2-21
2.10
SSL Setting Function
5
2
Make the necessary settings.
% Settings are all cleared if [Apply] is clicked with data entered for each item not meeting the requirements.
6
bizhub C3110
Click [Apply].
The certificate can now be registered.
2-22
2.10
2.10.2
SSL Setting Function
2
SSL Setting
0
0
For the procedure to access the Administrator Mode, see page 2-2.
Do not leave the machine with the Administrator Mode setting screen left shown on the display. If it is
absolutely necessary to leave the machine, be sure first to log off from the Administrator Mode.
NOTICE
When making the SSL Setting, be sure to make sure in advance that the device certificate has been registered
in the machine. For the procedure to register the device certificate, see page 2-21.
1
Start PageScope Web Connection and access the Administrator Mode.
2
Click the [Security] tab and [SSL/TLS Settings] from [PKI Settings] menu.
3
Click the pull-down menu of [SSL/TLS] and select [Enable].
Set "Encryption Strength" and click [Apply].
% For encryption strength, select the strong "AES-256, 3DES."
% In the Enhanced Security Mode, the setting cannot be changed to one containing strength lower
than AES/3DES.
% Cancel the selection of "SSL 3.0" of SSL/TLS Version.
bizhub C3110
2-23
2.10
2.10.3
SSL Setting Function
2
Removing a Certificate
0
0
0
For the procedure to access the Administrator Mode, see page 2-2.
Do not leave the machine with the Administrator Mode setting screen left shown on the display. If it is
absolutely necessary to leave the machine, be sure first to log off from the Administrator Mode.
In the Enhanced Security Mode, no certificates can be removed.
1
Start PageScope Web Connection and access the Administrator Mode.
2
Click the [Security] tab and [PKI Settings].
3
Click [Edit].
4
Select [Delete a Certificate] and click [Next].
5
Click [OK].
bizhub C3110
2-24
2.11
2.11
SNMP Setting Function
2
SNMP Setting Function
When access to the machine by the Administrator of the machine through the Administrator Settings is authenticated, the machine enables changing of the SNMP v3 Write User Password (auth-password, priv-password) required for accessing the MIB object over the network using the SNMP from the PC.
Each of the auth-password and priv-password can consist of 8 to 32 digits. The password entered for the
authentication purpose appears as "●" on the display.
2.11.1
Changing the auth-password and priv-password
0
0
For the procedure to access the Administrator Mode, see page 2-2.
Do not leave the machine with the Administrator Mode setting screen left shown on the display. If it is
absolutely necessary to leave the machine, be sure first to log off from the Administrator Mode.
1
Start PageScope Web Connection and access the Administrator Mode.
2
Click the [Network] tab and [SNMP Settings].
3
Click the [Change Password] check box and enter the auth-password and priv-password in the boxes
marked by the rectangle, that is, the Write side SNMP v3 Setting.
% The default setting of auth-password and priv-password is the MAC address set in the machine.
4
Click [Apply].
% If the entered auth-password or priv-password does not meet the requirements of the Password
Rules, a message that tells that the entered auth-password or priv-password cannot be used appears. Enter the correct auth-password or priv-password. For details of the Password Rules, see
page 1-9.
bizhub C3110
2-25
2.11
2.11.2
SNMP Setting Function
2
SNMP access authentication function
If the settings of the Administrator mode are to be changed using SNMP from the PC, the user attempting to
gain access is authenticated to be the Administrator of the machine by using the Write User Name and SNMP
Password (auth-password, priv-password) of the SNMP v3 Write settings made in this machine.
Operation of the network setting function and the SNMP password change function of the security control
functions that can be used over the network using SNMP is granted to the Administrator who is identified by
a matching SNMP password for the Write User Name.
Reference
If [auth-password] has been selected for Security Level, hashing is used for the authentication information (auth-password) to be transmitted. The machine allows you to select either HMAC-MD5 or HMACSHA1 for hashing.
If [auth-password/priv-password] has been selected for Security Level, the authentication information
(auth-password/priv-password) and data (object ID that specifies the object to be changed, value to be
set, etc.) to be transmitted are used for hashing and encryption. The machine allows you to select either
CBC-DES or CBC-AES for encryption.
For accessing the MIB, use the MIB browser corresponding to the above encryption algorithm.
2.11.3
SNMP v3 setting function
The Administrator who has been authenticated through SNMP access authentication from the PC is allowed
to operate the SNMP password change function.
For the auth-password and priv-password, enter the password that meets the requirements of the Password
Rules. For details of the Password Rules, see page 1-9.
To change the setting, specify the corresponding object ID. See the table below for the setting items.
2.11.4
Setting Item
Object ID
Write User Name
1.3.6.1.4.1.18334.1.1.2.1.5.6.4.2.1.2.2
auth-password
1.3.6.1.4.1.18334.1.1.2.1.5.6.4.2.1.3.2
priv-password
1.3.6.1.4.1.18334.1.1.2.1.5.6.4.2.1.4.2
Security Level
1.3.6.1.4.1.18334.1.1.2.1.5.6.4.2.1.5.2
SNMP network setting function
The Administrator who has been authenticated through SNMP access authentication from the PC is allowed
to operate the network setting function. To change the setting, specify the corresponding object ID. See the
table below for the setting items.
Setting Item
IP address setting
bizhub C3110
Object ID
IP Address
1.3.6.1.4.1.18334.1.1.2.1.5.7.1.1.1.3.1
BOOT Protocol use setting
1.3.6.1.4.1.18334.1.1.2.1.5.7.1.1.1.6.1
BOOT Protocol Type
1.3.6.1.4.1.18334.1.1.2.1.5.7.1.1.1.7.1
DNS server address setting
1.3.6.1.4.1.18334.1.1.2.1.5.7.1.2.1.3.1.1
Rendezvous (Bonjour) setting
1.3.6.1.4.1.18334.1.1.2.1.5.9.2.1.3.1.1
NetBIOS setting
1.3.6.1.4.1.18334.1.1.2.1.5.10.1.1.4.1
2-26
2.12
2.12
Accessing the Scan to HDD file
2
Accessing the Scan to HDD file
When access to the machine by the Administrator of the machine through the Administrator Settings is authenticated, the machine enables controls of the Scan to HDD files.
Scan to HDD stores the image file scanned by the machine in the HDD together with user information. The
image file can be stored as "Public" or "Personal". The Administrator of the machine can access the machine
from the PC to view a list of image files stored in the HDD or back them up (or download them).
NOTICE
The image files stored as "Personal" are protected. The Administrator of the machine should instruct the user
to use "Personal" when saving highly confidential files.
Accessing the image file
0
0
For the procedure to access the Administrator Mode, see page 2-2.
Do not leave the machine with the setting screen of Administrator Mode left shown on the display. If it
is absolutely necessary to leave the machine, be sure first to log off from the Administrator Mode.
1
Start PageScope Web Connection and access the Administrator Mode.
2
Click the [Storage] tab and click [View] of the User Name by which the desired document is stored.
3
A list appears showing image files saved in the HDD.
To back up (download) a file, click [Copy] of the file in question.
% If [Delete] is selected, a confirmation message appears. Click [OK] to delete the specified file.
bizhub C3110
2-27
2.12
Accessing the Scan to HDD file
4
2
Select [Save] to back up (download) the image file in the PC.
% The backed up (downloaded) file is not deleted from the machine.
bizhub C3110
2-28
2.13
2.13
TCP/IP Setting Function
2
TCP/IP Setting Function
When access to the machine by the Administrator of the machine through the Administrator Settings is authenticated, the machine enables setting of the IP Address and registration of the DNS Server.
2.13.1
Setting the IP Address
<From the Control Panel>
0
0
For the procedure to call the Administrator Settings on the display, see page 2-2.
Do not leave the machine with the setting screen of Administrator Settings left shown on the display. If
it is absolutely necessary to leave the machine, be sure first to log off from the Administrator Settings.
1
Call the Administrator Settings on the display from the control panel.
2
Press the + or , key to select [ETHERNET], then press the Select key.
3
Press the + or , key to select [TCP/IP], then press the Select key.
4
Press the + or , key to select [IPv4 Settings], then press the Select key.
5
Press the + or , key to select [IP ADDRESS], then press the Select key.
6
Use the keypad to set the IP Address.
7
Press the Select key.
<From PageScope Web Connection>
0
0
For the procedure to access the Administrator Mode, see page 2-2.
Do not leave the machine with the Administrator Mode setting screen left shown on the display. If it is
absolutely necessary to leave the machine, be sure first to log off from the Administrator Mode.
1
Start PageScope Web Connection and access the Administrator Mode.
2
Click the [Network] tab and [IPv4 Settings] from [TCP/IP Settings] menu.
3
Clear the Auto IP check box.
4
Enter the IP Address in the IP Address box.
% If Auto IP is selected from the IP Address Setting Method in step 3, select the means with which to
acquire the IP Address automatically, including DHCP, BootP, ARP/PING, and Auto IP setting, and
click the check box.
5
2.13.2
Click [Apply].
Registering the DNS Server
0
0
For the procedure to access the Administrator Mode, see page 2-2.
Do not leave the machine with the Administrator Mode setting screen left shown on the display. If it is
absolutely necessary to leave the machine, be sure first to log off from the Administrator Mode.
1
Start PageScope Web Connection and access the Administrator Mode.
2
Click the [Network] tab and [DNS Settings] from [TCP/IP Settings] menu.
3
Enter the address in the DNS Server box.
4
Make the necessary settings.
5
Click [Apply].
bizhub C3110
2-29
2.14
2.14
SMB Setting Function
2
SMB Setting Function
When access to the machine by the Administrator of the machine through the Administrator Settings is authenticated, the machine enables making of the SMB Settings.
Making the SMB Setting
0
0
For the procedure to access the Administrator Mode, see page 2-2.
Do not leave the machine with the Administrator Mode setting screen left shown on the display. If it is
absolutely necessary to leave the machine, be sure first to log off from the Administrator Mode.
1
Start PageScope Web Connection and access the Administrator Mode.
2
Click the [Network] tab and [SMB Settings].
3
Make the necessary settings.
4
Click [Apply].
bizhub C3110
2-30
2.15
2.15
Rendezvous (Bonjour) Setting Function
2
Rendezvous (Bonjour) Setting Function
When access to the machine by the Administrator of the machine through the Admin Settings is authenticated, the machine enables making of the Rendezvous (Bonjour) Settings.
Making the Rendezvous (Bonjour) Setting
<From the Control Panel>
0
0
For the procedure to call the ETHERNET screen on the display, see steps 1 through 2 of page 2-29.
Do not leave the machine with the setting screen of Administrator Settings left shown on the display. If
it is absolutely necessary to leave the machine, be sure first to log off from the Administrator Settings.
1
Call the ETHERNET screen on the display from the control panel.
2
Press the + or , key to select [BONJOUR], then press the Select key.
3
Press the + or , key to select [ENABLE], then press the Select key.
<From PageScope Web Connection>
0
0
For the procedure to access the Administrator Mode, see page 2-2.
Do not leave the machine with the Admin Mode setting screen left shown on the display. If it is absolutely necessary to leave the machine, be sure first to log off from the Admin Mode.
1
Start PageScope Web Connection and access the Admin Mode.
2
Click the [Network] tab and [Bonjour Settings].
3
Make the necessary settings.
4
Click [Apply].
bizhub C3110
2-31
3
User Operations
3.1
User Authentication Function
3
3
User Operations
3.1
User Authentication Function
When [Device] is set for Authentication Method of the Administrator Settings, the User Authentication function implements authentication of the user of this machine before he or she actually uses it through the User
Password that consists of 8 to 64 digits. During the authentication procedure, the User Password entered for
the authentication purpose appears as "●" on the display. A failure in authentication as a result of the entry
of a wrong password is counted as unauthorized access.
The entry of a wrong password is counted as unauthorized access, even if it is not likely that the assets to be
protected will be affected during user authentication operations via application software. For detailed operating procedures, see the corresponding user’s guide.
NOTICE
Before operating the machine, the user him/herself should change the User Password from that registered
by the Administrator of the machine. For details of changing the User Password, see page 3-9. For more details of User Name and User Password, ask the Administrator of the machine.
If the User Password is changed by the Administrator of the machine during operation of this machine, the
user him/herself should immediately change the User Password.
Make absolutely sure that your User Password is not known by any other users.
If the IC card function has been set by the Administrator of the machine, authentication using the IC card can
be performed.
Authentication Method
Description
Card Authentication
Uses an IC card for authentication.
Card Authentication + Password
Uses an IC card placed on the IC card reader and entry of a user
password for authentication.
If Enhanced Security Mode is set to [ON], configure this setting.
Reference
If authentication is to be performed by using the IC card, the Administrator of the machine should set
the IC card function and information recorded on the IC card be registered in the machine in advance.
For more details, contact the Administrator of the machine.
Authentication using the IC card is enabled only when [Device] is selected.
Authentication using the IC card is disabled, if it is performed from a device other than this machine,
such as printing from PageScope Web Connection or printer driver.
bizhub C3110
3-2
3.1
3.1.1
User Authentication Function
3
Performing user authentication
<From the Control Panel>
0
Do not leave the machine while you are in the user operation mode. If it is absolutely necessary to leave
the machine, be sure first to log off from the user operation mode.
1
Check that the login screen is displayed.
% The screen as shown below appears if the ID & Print function has been set.
If the ID & Print function is yet to be set, [Print/Login] is not available on the screen even with an ID
& Print file is saved in the machine.
In this case, log onto the machine through the ordinary procedure, select the desired file from [ID &
Print] and have it printed. For details of how to access the ID & Print file, see page 3-8.
2
Place the IC card on the IC card reader.
% If an ID & Print file has been saved, select [Login] or [Print/Login] and then place the IC card on the
IC card reader.
3
Login Method
Description
[Login]
Only the ordinary login procedure is applicable and no ID & Print files
are printed.
[Print/Login]
Prints only the ID & Print file of the corresponding user. The user operation mode screen is not called to the screen.
Enter the 8-to-64-digit User Password from the keypad.
% Press the
key to switch the input mode between alphabet and numeric.
% Press the Back key to delete the entered characters one by one.
% Hold down the Back key to clear all the entered characters.
bizhub C3110
3-3
3.1
User Authentication Function
4
3
Press the Select key.
% If a wrong User Password is entered, a message that tells that the authentication has failed appears.
Enter the correct User Password.
% A failure in authentication as a result of the entry of a wrong password is counted as unauthorized
access. If the cumulative number of unauthorized accesses reaches three during operation of the
machine, the machine is set into an access lock state and prohibits any subsequent password entry
operations. To cancel the access lock state, turn off, then on, the power switch of the machine.
When the power switch is turned off, then on again, wait at least 10 seconds to turn it on after turning it off. This interval is necessary to ensure that the machine functions properly.
% If there are two or more ID & Print files involved, all of them will be printed. To select and print only
a desired file, select [Login], select the desired file from [ID & Print], and have it printed. For the detailed procedure to access the ID & Print files, see page 3-8.
% If the ID & Print file is not saved even with the ID & Print function set, you log on to the machine
through the ordinary procedure regardless of whether [Login] or [Print/Login] is selected.
5
bizhub C3110
Hold down the Access key to log off.
3-4
3.1
User Authentication Function
3
<From PageScope Web Connection>
0
Do not leave the machine while you are in the user operation mode. If it is absolutely necessary to leave
the machine, be sure first to log off from the user operation mode.
1
Start the Web browser.
2
Enter the IP address of the machine in the address bar.
3
Press the [Enter] key to start PageScope Web Connection.
4
Click the Registered User radio button and enter the User Name and User Password.
5
Click [Log in].
% If a wrong User Password is entered, a message that tells that the authentication has failed appears.
Enter the correct User Password.
% A failure in authentication as a result of the entry of a wrong password is counted as unauthorized
access. If the cumulative number of unauthorized accesses reaches three during operation of the
machine, the machine is set into an access lock state and prohibits any subsequent password entry
operations. To cancel the access lock state, turn off, then on, the power switch of the machine.
When the power switch is turned off, then on again, wait at least 10 seconds to turn it on after turning it off. This interval is necessary to ensure that the machine functions properly.
6
bizhub C3110
Click [Log out] to log off from the user operation mode.
3-5
3.2
3.2
ID & Print Function
3
ID & Print Function
For all users who have been authenticated through User Authentication, the machine enables all users who
have been authenticated through user authentication to register and access ID & Print files.
After authentication by a user from the control panel is successful with the ID & Print function set in the machine by the Administrator of the machine, the user can automatically print his or her print data saved in the
HDD of the machine. Because printing occurs after user authentication is performed via the control panel of
this machine, it is suitable for printing highly confidential documents.
Reference
If the Administrator of the machine sets the ID & Print function, a file is saved as an ID & Print file even
if [Print] is selected on the printer driver side.
Even if the Administrator of the machine does not set the ID & Print function, a file is saved as an ID &
Print file if [ID & Print] is selected on the printer driver side.
If the Administrator of the machine sets the ID & Print function, a direct print file from PageScope Web
Connection is also saved as an ID & Print file.
3.2.1
Registering ID & Print files
1
Click [Properties] in the Print dialog box to show the Printing Preference window.
2
Click the [Basic] tab.
3
Select [ID & Print] in [Job Retention].
4
Click [Authentication/Account Track].
bizhub C3110
3-6
3.2
ID & Print Function
5
3
Enter the user name and password and then click [OK].
% If the user password does not correspond to the user name entered, the ID & Print file is discarded
without being registered.
% If an attempt is made to print or save a file by specifying a user name that contains ["] (a double
quotation mark), a login error results and the machine cancels the print job.
% A failure in authentication as a result of the entry of a wrong password is counted as unauthorized
access. If the cumulative number of unauthorized accesses reaches three during operation of the
machine, the machine is set into an access lock state and prohibits any subsequent password entry
operations. To cancel the access lock state, turn off, then on, the power switch of the machine.
When the power switch is turned off, then on again, wait at least 10 seconds to turn it on after turning it off. This interval is necessary to ensure that the machine functions properly.
6
bizhub C3110
Print the document.
3-7
3.2
3.2.2
ID & Print Function
3
Accessing the ID & Print file
0
0
For the logon procedure, see page 3-2.
Do not leave the machine while you are in the user operation mode. If it is absolutely necessary to leave
the machine, be sure first to log off from the user operation mode.
1
Log on to the user operation mode through User Authentication from the control panel.
2
On the main screen, press the + or , key to select [USB/HDD], then press the Select key.
3
Press the + or , key to select [ID & Print], then press the Select key.
4
Press the + or , key to select [Login User], then press the Select key.
5
Press the + or , key to select the job name, then press the Start key to start printing.
% The ID & Print file is automatically deleted as soon as the printing is normally terminated.
% Select the job name and press the Stop/Reset key to delete the selected job.
bizhub C3110
3-8
3.3
3.3
Change Password Function
3
Change Password Function
When [Device] is set for Authentication Method of User Authentication, the machine permits each of all users
who have been authenticated through User Authentication to change his or her User Password.
The User Password entered is displayed as "●."
Performing Change Password
0
0
0
0
0
For the logon procedure, see page 3-2.
Do not leave the machine while you are in the user operation mode. If it is absolutely necessary to leave
the machine, be sure first to log off from the user operation mode.
Change the user password at regular intervals.
Make absolutely sure that nobody but you may know your user password.
Do not set any number that can easily be guessed from birthday, employee identification number, and
the like for the user password.
1
Log on to the user operation mode through User Authentication from the PageScope Web Connection.
2
Click the [System] tab and [Authentication].
3
Enter the currently registered User Password and a new User Password. Then, to make sure that you
have entered the correct new password, enter the new User Password once again.
4
Click [Apply].
% If a wrong User Password is entered in the "Current Password" box, a message that tells that the
User Password does not match appears. Enter the correct User Password.
% If the entered User Password in the "New Password" box does not meet the requirements of the
Password Rules, a message that tells that the entered User Password cannot be used appears. Enter the correct User Password. For details of the Password Rules, see page 1-9.
% If the entered User Password in the "New Password" box and "Retype New Password" box does
not match, a message that tells that the User Password does not match appears. Enter the correct
User Password.
bizhub C3110
3-9
3.4
3.4
Secured Job Function
3
Secured Job Function
The Secured Job function allows a Secured Job file specified by a corresponding password from the PC to
be used in the condition registered in the machine.
To access a Secured Job file, authentication is performed through an 8-digit password that verifies an authenticated user of the Secured Job file. The password entered is displayed as "*." A failure in authentication
as a result of the entry of a wrong password is counted as unauthorized access.
NOTICE
Turning OFF/ON the power switch of this machine deletes the secured job file registered on this machine.
3.4.1
Registering Secured Job files
0
0
0
The Secured Job password must consist of 8 digits and meet the requirements of the Password Rules.
For details of the Password Rules, see page 1-9.
Make absolutely sure that nobody but you may know your Secured Job password.
Do not set any number that can easily be guessed from birthday, employee identification number, and
the like for the Secured Job password.
1
Click [Properties] in the Print dialog box to show the Printing Preference window.
2
Click the [Basic] tab.
3
Select [Secured Job] in [Job Retention].
4
Enter the 8-digit Secured Job Password in the Password box.
5
Click [OK].
6
Click [Authentication/Account Track].
bizhub C3110
3-10
3.4
Secured Job Function
7
3
Enter the user name and password, and then click [OK].
% If the user password does not correspond to the user name entered, the Secured Job file is discarded without being registered.
% If an attempt is made to print or save a file by specifying a user name that contains ["] (a double
quotation mark), a login error results and the machine cancels the print job.
% A failure in authentication as a result of the entry of a wrong password is counted as unauthorized
access. If the cumulative number of unauthorized accesses reaches three during operation of the
machine, the machine is set into an access lock state and prohibits any subsequent password entry
operations. To cancel the access lock state, turn off, then on, the power switch of the machine.
When the power switch is turned off, then on again, wait at least 10 seconds to turn it on after turning it off. This interval is necessary to ensure that the machine functions properly.
8
bizhub C3110
Print the document.
3-11
3.4
3.4.2
Secured Job Function
3
Accessing the Secured Job file
0
0
0
For the logon procedure, see page 3-2.
Do not leave the machine while you are in the user operation mode. If it is absolutely necessary to leave
the machine, be sure first to log off from the user operation mode.
Enter the Secured Job password through the printer driver on the PC side. The password entered is
displayed as "*."
1
Log on to the user operation mode through User Authentication from the control panel.
2
On the main screen, press the + or , key to select [USB/HDD], then press the Select key.
3
Press the + or , key to select [PROOF/PRINT MENU], then press the Select key.
4
Press the + or , key to select the user name, then press the Select key.
% The name of the user of the PC from which the Secured Job file has been sent appears.
5
Press the + or , key to select the job name, then press the Select key.
% To delete the job, select the job name and press the Stop/Reset key. The secured job password
input screen will be displayed, so enter the secured job password to delete the job.
bizhub C3110
3-12
3.4
Secured Job Function
6
Enter the 8-digit Secured Job Password from the keypad.
%
%
%
%
7
3
For the Secured Job Password, enter the 8-digit one set on the printer driver side.
Press the
key to switch the input mode between alphabet and numeric.
Press the Back key to delete the entered characters one by one.
Hold down the Back key to clear all the entered characters.
Press the Select key.
% If a wrong Secured Job Password is entered, a message that tells that the authentication has failed
appears. Enter the correct Secured Job Password.
% A failure in authentication as a result of the entry of a wrong password is counted as unauthorized
access. If the cumulative number of unauthorized accesses reaches three during operation of the
machine, the machine is set into an access lock state and prohibits any subsequent password entry
operations. To cancel the access lock state, turn off, then on, the power switch of the machine.
When the power switch is turned off, then on again, wait at least 10 seconds to turn it on after turning it off. This interval is necessary to ensure that the machine functions properly.
8
Check the details of the file and press the Select key.
% The Secured Job file is automatically deleted as soon as the printing is normally terminated.
bizhub C3110
3-13
3.5
3.5
Scan to HDD Function
3
Scan to HDD Function
For all users who have been authenticated through User Authentication, the machine enables the operation
of Scan to HDD function. It also enables operations for acquiring and printing image files stored in the HDD.
Scan to HDD stores the image file scanned by the machine in the HDD together with user information. The
image file can be stored as "Public" or "Personal". The stored image file can be accessed from the PC
through authentication of the user name and password.
Encryption communication using the SSL/TLS protocol is performed when the image file is downloaded from
the machine to the PC, so that the data is protected.
3.5.1
Registering image files
0
0
For the logon procedure, see page 3-2.
Do not leave the machine while you are in the user operation mode. If it is absolutely necessary to leave
the machine, be sure first to log off from the user operation mode.
1
Log on to the user operation mode through User Authentication from the control panel.
2
Press the Scan key.
3
Press the + or , key to select [SCAN TO], then press the Select key.
4
Press the + or , key to select [Scan to HDD], then press the Select key.
5
Press the + or , key to select [Save Document], then press the Select key.
bizhub C3110
3-14
3.5
Scan to HDD Function
3
6
Press the + or , key to select [Save Folder], then press the Select key.
7
Press the + or , key to select the destination to which the file is to be saved, then press the Select key.
% The image file stored in [Personal] is protected. Select [Personal] whenever saving a highly confidential file.
8
Press the + or , key to select [Document Name], then press the Select key.
9
Check the file name to be saved and press the Start key.
bizhub C3110
3-15
3.5
3.5.2
Scan to HDD Function
3
Accessing the image file
0
0
For the logon procedure, see page 3-2.
Do not leave the machine while you are in the user operation mode. If it is absolutely necessary to leave
the machine, be sure first to log off from the user operation mode.
1
Log on to the user operation mode through User Authentication from the PageScope Web Connection.
2
Click the [Storage] tab and click [View] of the User Name by which the desired file is stored.
3
Click [Copy] of the desired file.
% If [Delete] is selected, a confirmation message appears. Click [OK] to delete the specified file.
4
Select [Open] or [Save] to execute the desired function.
% The downloaded file is not deleted from the machine.
bizhub C3110
3-16
4
Application Software
4.1
PageScope Data Administrator
4
Application Software
4.1
PageScope Data Administrator
4
PageScope Data Administrator is an application for management purpose that allows the authentication and
destination functions of the machine to be edited or registered from a PC connected over the network.
It allows the authentication and destination list to be downloaded in your PC, the data in the list to be edited
on the PC, and then the data to be written in the machine.
A destination list of file formats including XML, CSV, TAB, LDIF, and Lotus Notes Structured Text can be
downloaded. A destination list can also be downloaded by searching through or browsing destinations using
the LDAP protocol for a directory server such as Active Directory.
NOTICE
Make sure that none of the general users of the machine will know the Administrator Password.
If the Administrator Password is forgotten, it must be set again by the Service Engineer. Contact your Service
Representative.
Precautions during backup or restore
This machine allows authentication information, address list, and other types of data to be backed up (exported) in your PC or restored (imported) in the machine using the PageScope Data Administrator. Use the
following precautions when backing up or restoring data.
When backing up or restoring data using the PageScope Data Administrator with the Enhanced Security mode turned ON, do not restore data that is backed up when the Enhanced Security mode is turned
OFF.
Edit backup data only with the PageScope Data Administrator.
4.1.1
Accessing from PageScope Data Administrator
0
Do not leave the site while you are gaining access to the machine through PageScope Data Administrator. If it is absolutely necessary to leave the site, be sure first to log off from the PageScope Data
Administrator.
1
Start the PageScope Data Administrator.
2
Select this machine from Device List and click [Authentication Settings/Address Settings].
bizhub C3110
4-2
4.1
PageScope Data Administrator
3
Check the settings on the Import device information screen and click [Import].
4
Type the 8-digit Administrator Password registered in the machine and click [OK].
4
% If the "Save" check box has been selected, the Administrator Password entered is stored in the PC
being used. If you do not want the Administrator Password stored, clear the "Save" check box.
% If a wrong Administrator Password is entered, a message appears that tells that there is a mismatch
in the passwords. Enter the correct Administrator Password.
% If the "Save" check box is selected, enter the 8-digit Administrator Password once again to make
sure that the Administrator Password has been entered correctly.
% If a wrong Administrator Password is entered for confirmation, a message appears that tells that
there is a mismatch in the Administrator Password. Enter the correct Administrator Password.
% A failure in authentication as a result of the entry of a wrong password is counted as unauthorized
access. If the cumulative number of unauthorized accesses reaches three during operation of the
machine, the machine is set into an access lock state and prohibits any subsequent password entry
operations. To cancel the access lock state, turn off, then on, the power switch of the machine.
When the power switch is turned off, then on again, wait at least 10 seconds to turn it on after turning it off. This interval is necessary to ensure that the machine functions properly.
5
bizhub C3110
Check the data displayed on the SSL certificate check screen and click [Yes].
4-3
4.1
4.1.2
PageScope Data Administrator
4
Making the user settings
0
0
For the procedure to access the machine, see steps 1 through 5 of page 4-2.
Do not leave the site while you are gaining access to the machine through PageScope Data Administrator. If it is absolutely necessary to leave the site, be sure first to log off from the PageScope Data
Administrator.
1
Access the machine through [Authentication Settings/Address Settings] mode of PageScope Data Administrator.
2
Click the Authentication settings expand button.
3
Click [User authentication settings].
4
Select the desired function.
% To register the user, click [Add].
% To change data registered for the user, click [Edit].
% To delete the user, click [Delete] and a screen appears that prompts you to confirm the execution
of deletion. Click [Yes] to delete the user.
% If the User Password does not meet the requirements of the Password Rules, a message appears
that tells that this particular User Password cannot be used. Click [OK] and enter the correct User
Password. For details of the Password Rules, see page 1-9.
% If the User Name has not been entered, a message appears that tells that the User Name is yet to
be entered. Click [OK] and enter the User Name.
% A User Name that already exists cannot be redundantly registered.
5
Click [OK].
6
Click [Export to the device].
% If there is a job being executed or a reserved job (timer TX, fax redial waiting, etc.) in the machine,
the machine displays a message that tells that the write operation has not been successful because
of a device lock error. Click [OK] and wait for some while before attempting to execute [Export to
the device] again.
% If a previously registered user is deleted in step 4, the image files owned by that specific user are
deleted.
bizhub C3110
4-4
4.1
4.1.3
PageScope Data Administrator
4
Setting the IC card information
0
0
0
The IC card driver (USB driver) of the IC card reader and the IC card plug-in must be installed in the PC
of the Administrator of the machine in advance. For details, refer to the User’s Guide furnished with the
machine.
For the procedure to access the machine, see steps 1 through 5 of page 4-2.
Do not leave the site while you are gaining access to the machine through PageScope Data Administrator. If it is absolutely necessary to leave the site, be sure first to log off from the PageScope Data
Administrator.
1
Access the machine through [Authentication Settings/Address Settings] mode of PageScope Data Administrator.
2
Click the Authentication settings expand button.
3
Select [User authentication settings] and click [Add].
% To set a registered user, after selecting the user click [Edit] and go to step 6.
4
Click [OK].
5
Enter the user name and password, and select the [IC card authentication] tab.
bizhub C3110
4-5
4.1
PageScope Data Administrator
6
4
Place the IC card on the IC card reader, and click [Start reading].
% To delete a previously registered IC card information, click [Delete].
% A card ID may be registered through direct input. Select the [Input the card ID directly] radio button
and then input the card ID.
% The types of IC card that permit direct input are "Type A" and "Felica IDm".
7
Click [OK].
8
Click [Export to the device].
9
Click [Write].
10
Click [OK].
bizhub C3110
4-6
4.2
4.2
TWAIN driver
4
TWAIN driver
The TWAIN driver, which is to be installed in the PC of a general user, is a TWAIN driver used exclusively for
allowing the machine to be recognized as a TWAIN device. It allows the image data read by the machine to
be captured in the image processing application of the PC.
When an attempt is made to gain access to the machine through the TWAIN driver, the user is authenticated
to be an authorized user by using an 8-to-64-digit User Password and an 8-digit User Box Password. During
the authentication procedure, the User Password entered for the authentication purpose appears as "*" on
the display. A failure in authentication as a result of the entry of a wrong password is counted as unauthorized
access.
Accessing from the TWAIN driver
0
Do not leave the site while you are gaining access to the machine through the TWAIN driver. If it is absolutely necessary to leave the site, be sure first to log off from the TWAIN driver.
1
Start the image processing application.
2
From the [File] menu, click [Read], and then select [KONICA MINOLTA C3110 TWAIN].
3
Select the "Login as the Registered user" radio button and enter the User Name and the 8-to-64-digit
User Password.
4
Click [OK].
% If a wrong User Password is entered, a message that tells that the authentication has failed appears.
Enter the correct User Password.
% A failure in authentication as a result of the entry of a wrong password is counted as unauthorized
access. If the cumulative number of unauthorized accesses reaches three during operation of the
machine, the machine is set into an access lock state and prohibits any subsequent password entry
operations. To cancel the access lock state, turn off, then on, the power switch of the machine.
When the power switch is turned off, then on again, wait at least 10 seconds to turn it on after turning it off. This interval is necessary to ensure that the machine functions properly.
5
bizhub C3110
Make the necessary settings and capture the image.
4-7
http://konicaminolta.com
A6DT-9571B-00
© 2014