1
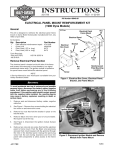
Isolator Installation
b0702xsb
CAUTION
4
Isolator bolts must be tightened within 30 minutes of
applying LOCTITE THREADLOCKER. Failure to tighten
bolts within 30 minutes may cause LOCTITE to set.
1.
a.
2.
1
See Figure 4. Prepare isolator hardware for installation.
Place isolator shim (5) next to swingarm mount
block.
b.
Insert new rubber isolators (3) in place. Align metal
pin on frame (4) and hole in isolator.
c.
At this time, apply LOCTITE THREADLOCKER 262
(red) (Part No. 94759-99) to isolator bolt threads (1)
and LOCTITE ANTI-SEIZE to bottom of isolator bolt
head.
Lower floor hoist and guide frame over swingarm mount
block.
5
2
1.
2.
3.
4.
5.
3
Isolator bolt
Washer
Isolator, revision B
Frame mounted locating pin
Shim
Figure 4. Isolator Assembly After Installing Kit
CAUTION
●
Use caution when installing isolator bolts. Bolts may
be easily cross threaded.
●
Observe seam on rubber isolator after isolator bolt is
tightened. If seam twists, apply more LOCTITE ANTISEIZE to underside of isolator bolt heads.
●
Do not overtighten isolator bolts. Too much torque
may lead to premature isolator failure.
3.
As frame lowers, install isolator bolts.
a.
Place washer (2) over isolator bolt. Install assembly
through isolators and into the swingarm mount
block.
b.
Tighten to 100-110 ft-lbs (135.6-149.1 Nm).
c.
See Figure 5. After tightening isolator bolts, verify
that seam on isolators is perpendicular to swingarm
mount block. If seam is not perpendicular loosen
isolator hardware and realign.
4.
Install tie bars and chassis ground strap. Tighten tie bar
hardware to 30-33 ft-lbs (40.7-44.7 Nm).
5.
Install carburetor, air cleaner assembly and exhaust system. This includes installing right side fairing lower on
S2T/S3T models.
6.
Reconnect all disconnected wires except battery cables.
7.
Install shift linkage and left rider footrest.
8.
Attach oil tank hoses and fill lubrication system. Consult
a service manual for oil type and amount.
9.
Install new cable straps around wiring and oil lines as
needed.
b0674x2x
Isolator
Seam
Straight seam
(correct)
Twisted seam
(incorrect)
Figure 5. Isolator Alignment
3 of 4