1
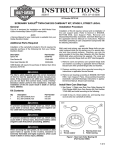
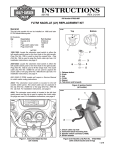
5
SERVICE BULLETIN
B-026INT
October 6, 1999
FUEL FILTER BRACKET RETROFIT (JAPAN ONLY)
GENERAL
It has come to the attention of Buell Distribution Corporation
that a certain number of 2000 Model X1 and S3/T model
Buell motorcycles were shipped to the Japanese market with
the incorrect fuel filter bracket. This bracket must be replaced
with the correct bracket before the motorcycle is sold. Failure
to replace the fuel filter bracket will affect the clearance
between the fuel hose and the cooling fan and will affect the
safe operation of the motorcycle. The purpose of this service
bulletin is to provide service instructions and to provide credit
information on this procedure.
Motorcycles built after August 16, 1999 will already have the
new fuel filter bracket installed. See below for VIN breakdown
of vehicles that are not equipped with the new fuel filter
bracket from the factory:
●
●
This S3/S3T Fuel Filter Upgrade kit (Part No. 91445-99Y)
includes the following:
●
(1) Bracket, Fuel Filter Support
●
(4) Hose Clamps
●
(2) Wire Ties
●
(1) Fuel Filter
KIT INSTALLATION
Lightning X1 Models
X1 World: prior to VIN 4MZSS11J5Y3200619
S3/S3T World: prior to VIN 4MZFS11J2Y3100009
NOTE
Perform the following procedures according to the guidelines
given in the service manual for the model being serviced.
VEHICLES INVOLVED
Select 2000 Model Year X1 and S3/S3T Models shipped to
Harley-Davidson Japan.
DEALER ACTION
Replace the fuel filter bracket on all affected 2000 Model Year
X1 and S3/S3T Models.
The following kits have been developed for replacement of
the fuel filter bracket on the 1999-2000 model year Buell
motorcycles indicated.
●
X1 Models: Fuel Filter Bracket Upgrade Kit (Part No.
91436-99Y).
●
S3/S3T Models: Fuel Filter Bracket Upgrade Kit (Part
No. 91445-99Y).
NOTE:
The instructions that follow are the same as those provided in
the instruction sheets (-J01748 and -J01784) that came with
the kits. This bulletin is provided to address credit procedures
for replacement of the fuel filter brackets.
Vehicles beyond the warranty period will not require a prior
authorization. See CREDIT PROCEDURES.
1WARNING
To prevent accidental start-up of vehicle and possible
personal injury, always disconnect the negative battery
cable when working on a motorcycle. If the positive cable
should contact ground with the negative cable installed,
the resulting sparks may cause a battery explosion,
which could result in death or serious injury.
1.
Disconnect negative battery cable from battery.
1WARNING
The gasoline in the fuel supply line downstream of the
fuel pump is under high pressure (49 psi [338 kPa]). To
avoid an uncontrolled discharge or spray of gasoline,
always purge the system of high pressure gas before
removing fuel tank. Gasoline is extremely flammable and
highly explosive. Inadequate safety precautions could
result in death or serious injury.
This X1 Fuel Filter Upgrade kit (Part No. 91436-99Y) includes
the following:
CAUTION
●
(1) Bracket, Fuel Filter Support
●
(4) Hose Clamps
Use caution when removing fuel tank to avoid cosmetic
damage to fuel tank cover.
●
(2) Wire Ties
2.
●
(1) Fuel Filter
ROUTING
SERVICE
MANAGER
SALES
MANAGER
PARTS
MANAGER
LEAD
TECHNICIAN
Purge the fuel line and remove the fuel tank. See appropriate service manual, Section 4 for procedures.
TECHNICIAN
NO. 1
TECHNICIAN
NO. 2
TECHNICIAN
NO. 3
INITIAL HERE
©1999 Buell Distribution Corporation
TECHNICIAN
NO. 4
RETURN
THIS TO:
1WARNING
6882
A small amount of gasoline will drain from the fuel line
when the filter is removed. Thoroughly wipe up any spilt
fuel immediately. Dispose of rags in a suitable manner.
Gasoline is extremely flammable and highly explosive.
Inadequate safety precautions could result in death or
serious injury.
3.
Remove fuel filter and fuel lines. Discard filter and fuel
lines, but retain sheathing.
Fuel Tank
Fuel
Outlet
Fuel Fitting
Nut
CAUTION
Do not rotate fuel fitting by rotating the fitting nut. Damage to fuel pump connection may occur.
4.
See Figure 1. Rotate the fuel outlet approximately 180°
by tightening the fuel outlet into the fuel fitting nut, while
securely holding the nut. The fitting should point toward
the rear of the motorcycle (opposite of the way shown).
CAUTION
Figure 1. Fuel Outlet Fitting
i01799
Be sure to push the fuel line all the way onto the fuel rail
connection. Position hose clamp on straight section of
fitting, clear of barb, and properly tighten the clamp.
5.
See Figure 2. Cut a piece of bulk fuel line (Part No.
63521-95) to 10-1/2 in. (266.7 mm). Attach fuel line, with
a hose clamp, to the fuel rail and tighten clamp. Slide the
sheathing onto the hose and route hose as shown.
6.
See Figure 3. Using the wire ties, attach the fuel filter to
the bracket with the filter’s ridge on the middle slot of the
bracket. Verify that the flow arrow on the filter is pointing
towards front of vehicle.
Fuel Line
Sheathing
CAUTION
●
Ensure that the hose is not contacting any sharp
engine, frame or harness component. If it does the
hose could be damaged.
●
Be sure to push the fuel line all the way onto the fuel
fitting. Position hose clamp on straight section of fitting, clear of barb, and properly tighten the clamp.
7.
Slide a hose clamp on the 10-1/2 in. (266.7 mm) hose,
attach the discharge fitting of the filter onto the hose and
tighten the clamp. Ensure that it is not contacting any
sharp engine, frame or harness components.
8.
See Figure 4. Remove the rear cylinder head bolt and
washer. Discard washer.
9.
Figure 2. Fuel Line Routing
Fuel
FuelHose
Hose
10-1/2
10-1/2in.
in.
Hose Clamp
Fuel Filter
Wire Ties
Install the fuel filter and bracket onto the bolt. Apply
LOCTITE THREADLOCKER 262 (red) to the three bottom threads of the bolt.
10. Reinstall the bolt into the cylinder head and torque to 3033 ft-lbs (40.7-44.7 Nm).
CAUTION
Be sure to push the fuel line all the way onto the fuel fitting. Position hose clamp on straight section of fitting,
clear of barb, and properly tighten the clamp.
2 of 5
Bracket
Barb
Straight section
of fitting
i01800
Figure 3. Filter Mounted to Bracket (X1 Shown)
B-026INT
11. See Figure 5. Cut a piece of bulk fuel line (Part No.
63521-95) to 7 in. (177.8 mm). Attach the line to the fuel
tank fuel outlet fitting with a hose clamp and tighten
clamp.
i01801
Filter Arrow
Direction
12. Slide a hose clamp onto the 7 in. (177.8 mm) hose,
attach the hose to the filter’s inlet fitting and tighten
clamp. Route hose as shown in Figure 5.
Bracket
13. Install fuel tank. See Section 4 of appropriate service
manual for procedure.
14. Reconnect the fuel pump. See Section 4 of appropriate
service manual for procedure.
Rear Cylinder
Head Bolt
1WARNING
After installing seat, pull upward on front of seat to be
sure it is locked in position. If seat is loose, it could shift
during vehicle operation resulting in loss of control of
vehicle and death or serious injury.
Figure 4. Clamp Mounting
15. Install seat and reconnect the negative battery cable.
CAUTION
i01802
Ensure that the hose is not contacting any sharp engine,
frame or harness component. If it does, the hose could
be damaged.
Fuel
Outlet
16. Check that the 7 in. (177.8 mm) hose is not contacting
any sharp engine, frame or harness components.
Hose Clamp
17. Fill fuel tank. Turn ignition ON and listen for fuel pump
activation.
18. Start vehicle and verify that it idles well and that there
are no fuel leaks.
Thunderbolt S3/S3T Models
1WARNING
To prevent accidental startup of the motorcycle and possible personal injury, always disconnect the negative
battery cable when working on a motorcycle. If the positive cable should contact ground with the negative cable
installed, the resulting sparks may cause a battery explosion which could result in death or serious injury.
1.
Disconnect negative battery cable.
1WARNING
The gasoline in the fuel supply line downstream of the
fuel pump is under high pressure (49 psi [338 kPa]). To
avoid an uncontrolled discharge or spray of gasoline,
always purge the system of high pressure gasoline
before removing fuel tank. Gasoline is extremely flammable and highly explosive. Inadequate safety precautions
could result in death or serious injury.
2.
See the applicable Service Manual. Purge the fuel line.
3.
Remove the seat.
NOTE
The original fuel tank mounting parts for the S3 models were
recalled (campaign number 0814). If the new parts are not on
your vehicle, perform the recall together with this upgrade.
Per the recall, the procedure for removing and installing the
fuel tank has been modified. Refer to the procedures in the
recall bulletin instead of those in the Service Manual.
B-026INT
Fuel Hose
7 in.
Fuel
FuelFilter
Filter
Figure 5. Fuel Tank to Filter
er
Fuel Hose
10-1/2 in.
i01818
Hose Clamp
Fuel Filter
Wire Ties
Bracket
Barb
Straight section
of fitting
Figure 6. Filter Mounted to Bracket (S3 Shown)
3 of 5
4.
5.
Remove bolt, top mounting plate and top retention plate
from fuel tank rear mount. Lift tank and remove lower
retention plate and lower mounting plate.
A small amount of gasoline will drain from the fuel supply fitting and fuel line when removed. Thoroughly wipe
up any spilled fuel immediately. Dispose of rags in a suitable manner. Gasoline is extremely flammable and highly
explosive. Inadequate safety precautions could result in
death or serious injury.
Prop fuel tank against frame to gain access to fuel supply fitting. Wrap shop towel around the fuel supply fitting
and remove fuel line.
CAUTION
Use caution when removing fuel tank. If tank should contact other chassis parts, tank finish may be damaged.
7.
Remove fuel tank from frame.
1WARNING
A small amount of gasoline will drain from the fuel line
when the filter is removed. Thoroughly wipe up any
spilled fuel immediately. Dispose of rags in a suitable
manner. Gasoline is extremely flammable and highly
explosive. Inadequate safety precautions could result in
death or serious injury.
8.
See applicable Service Manual and remove the fuel filter
and fuel lines. Discard filter and fuel lines but retain
sheathing.
CAUTION
Do not rotate fuel fitting by rotating the fitting nut. Damage to the fuel pump connection may occur.
9.
●
Ensure that the hose is not contacting any sharp
engine, frame or harness component. If it does the
hose could be damaged.
●
Be sure to push the fuel line all the way onto the fuel
fitting. Position hose clamp on straight section of fitting, clear of barb, and properly tighten the clamp.
Disconnect hose from vapor vent valve.
1WARNING
6.
CAUTION
See Figure 1. Rotate the fuel outlet approximately 180°
by tightening the fuel outlet into the fuel fitting nut, while
securely holding the nut. The fitting should point toward
the rear of the motorcycle (opposite of the way shown).
CAUTION
Be sure to push the fuel line all the way onto the fuel rail
connection. Position hose clamp on straight section of
fitting, clear of barb, and properly tighten the clamp.
10. See Figure 2. Cut a piece of bulk fuel line (Part No.
63521-95) to 10-1/2 in. (266.7 mm). Attach fuel line, with
a hose clamp, to the fuel rail and tighten clamp. Slide the
sheathing onto the hose and route hose as shown.
11. See Figure 6. Using the wire ties, attach the fuel filter to
the bracket with the filter’s ridge on the middle slot of the
bracket. Verify that the flow arrow on the filter is pointing
towards front of vehicle.
4 of 5
12. Slide a hose clamp on the 10-1/2 in. (266.7 mm) hose,
attach the discharge fitting of the filter onto the hose and
tighten the clamp. Ensure that it is not contacting any
sharp engine, frame or harness components.
13. See Figure 4. Remove the rear cylinder head bolt and
washer. Discard washer.
14. Install the fuel filter bracket onto the bolt. Apply LOCTITE
THREADLOCKER 262 (red) to the three bottom threads
of the bolt.
15. Reinstall the bolt into the cylinder head and torque to 3033 ft-lbs (40.7-44.7 Nm).
CAUTION
Be sure to push the fuel line all the way onto the fuel fitting. Position hose clamp on straight section of fitting,
clear of barb, and properly tighten the clamp.
16. See Figure 5. Cut a piece of bulk fuel line (Part No.
63521-95) to 7 in. (177.8 mm). Attach the line to the fuel
tank fuel outlet fitting with a hose clamp and tighten
clamp.
17. Prop fuel tank against frame. Slide a hose clamp onto
the 7 in. (177.8 mm) hose, attach the hose to the filter’s
inlet fitting and tighten clamp. Route hose as shown in
Figure 5.
18. Install fuel tank. See appropriate service manual or recall
#0814 for procedure.
19. Reconnect the fuel pump. See appropriate service manual, Section 4 for procedure.
1WARNING
After installing seat, pull upward on front of seat to be
sure it is locked in position. If seat is loose, it could shift
during vehicle operation resulting in loss of control of
vehicle and death or serious injury
20. Install seat and reconnect the negative battery cable.
CAUTION
Ensure that the hose is not contacting any sharp engine,
frame or harness component. If it does the hose could be
damaged.
21. Check that the 7 in. (177.8 mm) hose is not contacting
any sharp engine, frame or harness components.
22. Fill fuel tank. Turn ignition ON and listen for fuel pump
activation.
23. Start the vehicle and verify that it idles well and that there
are no fuel leaks.
B-026INT
CREDIT PROCEDURES
After servicing each vehicle, file a warranty claim referencing
Service Bulletin B-026INT in the “Description of Repair” or
“Comments” section of the claim. Fill in the rest of the claim as
follows:
Claim Type
BMC, BGW*
Event 1
Qty
0
Event 1, Additional
(Replacement)
Qty
1
1
Part Description
Problem Part
No.
91445-99Y (S3)
91436-99Y (X1)
Fuel Filter Upgrade Kit
Primary Labor Code
Time: (includes 0.2
administrative time)
Problem Part
No.
62343-99Y
3517
hr
1.0 (X1 Models)
0.9 (S3/S3T Models)
Customer Concern Code
9203
Condition Code
9102
*Use BMC if vehicle is still within factory warranty period; use
BGW if vehicle is beyond factory warranty period. Vehicles
beyond factory warranty period do not require prior authorization for this product program.
NOTE
If additional parts such as cable straps are required, list them
under Event 1, Additional Parts.
After processing of the claim form, you will be credited for the
labor. No credit will be issued for parts as they were sent no
charge.
B-026INT
5 of 5