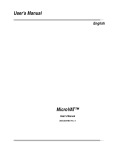
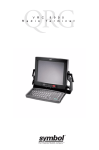
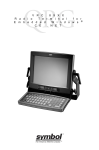
1
Model:
EEEA135A
North Carolina
OBIS Setup Instructions
Page:
1 of 37
Installation Instructions
INSTALLATION MUST BE PERFORMED
BY
QUALIFIED EQUISERV PERSONNEL ONLY
INSTALLATION OVERVIEW:______________________________________________
The following Installation Instructions will provide you with the procedures necessary to complete the final
assembly of the OBIS. These instructions will also provide you with a checkout procedure to ensure that
the final assembly is completely functional.
PARTS & ACCESSORIES LIST: ___________________________________________
PART NUMBER
1-12906A
3-03306A20
6-03722A
6-04122A
6-04222A
8-01010A
8-6419
EAA0293E04B
EAA0293L14A
EAE0032L52A
EAS2052E02A
EAS2052E07A
EAZ0005L00A
EAZ0008L02A
EEEH103A
EESP304A
MT2500-509A
TEEEA135A0
ZEEEA135A
DESCRIPTION
Screws, 8-32x.38
Printer, OkiData B4250
Modem Cable
Cable, Null Modem
Cable, OBDII Extension
Paper
Bushing
Unit Stand Assembly
Computer
OBDII Code Reader
Bracket, Scanner
Bracket, Lead Hanger
QC Questionnaire
Warranty Sheet
Bar Code Scanner
Snap-Link Package
DB9 to DB25 Serial Port Adapter
Installation Instructions
Operator’s Manual, North Carolina
QTY
16
1
1
1
1
1
1
1
1
1
1
7
1
1
1
1
1
1
1
REQUIRED TOOLS: _____________________________________________________
•
•
225 Key (Obtained from Technical Support)
2.5mm Allen Wrench
TEEEA135A0 (4/25/2005) REV S.
Page 2 of 37
HARDWARE INSTALLATION INSTRUCTIONS:_______________________________
1. Carefully unpack all the items listed in the “Parts & Accessories List” above. Identify each piece
to ensure that it is included and set aside for assembly in the next steps.
2. Once the packaging has been removed from the unit, push it to the spot where you will work on it.
LOCK THE CASTERS!
3. Remove the six retaining screws from the computer compartment rear panel. Using a 225 key
unlock and remove the computer compartment rear panel and set it aside.
4. Using the key shipped with the cabinet, unlock and open the front computer compartment door.
5. Standing in front of the unit, locate the storage compartment just below the computer
compartment. Locate the ends to the computer hold down straps in this area. Open the
computer hold down straps so they are as big as possible but still connected. Move these straps
out of the way so the computer can be slide into this compartment without sliding it on top of the
straps.
6. Look in the top of the computer compartment you will find a power strip. Ensure all power cords
are fully seated in this power strip as once the computer is in this is hard to check.
7. If not already done, completely unpack the computer from its packaging. Discard the power cord
and modem cable that comes with the computer.
8. Locate the Product Key number on the top of the computer. Write this number on the front of the
Dell Computer User’s Manual, as it will be used later.
9. Place the computer product literature and software in the Unit’s Storage Compartment.
10. Slide ¾ of the computer in from the rear of the analyzer, such that the rear of the computer is
facing the rear of the unit. While sliding the computer in, place the front and rear straps over the
top of the computer. Once the computer is ¾ the way in place the foam block on top of the
computer, with the thicker side of the block on the left if viewed from the rear, about 4” from the
front.
11. Once the computer is in tighten the straps. To tighten the straps pull on the loose end of the
strap below the computer compartment. These straps do not have to be extremely tight, snug is
enough.
12. Referring to Figure 1 and 2, attach the following cables to the computer.
•
Power Connector
Video Connector
2 USB Connectors
•
Keyboard Connector
Mouse Connector
9pin DB Connector to Com 1
Figure 2, Video Hookup
Figure 1, Computer Hookups
13. Run 8 inches of the phone cord (6-03722A) through the side of computer compartment.
TEEEA135A0 (4/25/2005) REV S.
Page 3 of 37
14. Place the Heyco Bushing (8-6419) on the cord at this point. Using Heyco Pliers push the bushing
into the hole.
15. Plug the end of the phone cord, now in the computer compartment, into the jack on the rear of the
computer (the modem card) with a picture of the connector on it. Not the jack with the picture of
the telephone.
16. Fully extend the Keyboard Drawer by lifting up on the Drawer Latches. The latches are the cone
shaped silver knobs on the front top corners of the unit.
17. Place the Keyboard and Mouse in the Keyboard Drawer.
18. Attach the Keyboard and Mouse PS2 Connectors to their respective connectors on the rear of the
Keyboard Drawer.
19. Unpack the Monitor, if it is not already done.
20. Discard the power cord with the monitor, and place the monitor product literature in the Unit’s
Storage Compartment.
21. Install the monitor base according to the literature with the monitor.
NOTE:
FOR INSTALLING DELL E771P AND DELL E772P COLOR MONITOR GOTO LINE 22
FOR INSTALLING DELL E773S COLOR MONITOR GOT TO LINE 30.
22. Locate the Monitor Mounting Bracket on the top of the unit. Locate the four inner thumbscrews
that are on the bottom of the bracket. Screw these thumb screws all the way up so all of the
threads of the screw are poking through the top of the sheet metal.
23. Using a 2.5mm Allen Wrench remove the right side right Allen screw from the front bracket and
loosen the left side Allen Screw. Swing open the front bracket.
24. Place the monitor on the unit top and slide it into the cup in the rear bracket.
25. Slide the front bracket closed and replace the Allen Screw. Push the front bracket as far back as
it will go to ensure that the monitor is snug between the two brackets. Tighten both Allen Screws.
26. Now screw the inner thumbscrews down to hold the monitor base to the unit.
27. Attach the AC Power Cable, coming out of the unit’s top to the Monitor.
28. Attach the Video Data Cable, coming out of the unit’s top to the monitor.
29. Secure the extra monitor Video Cable with the straps below the unit’s top.
NOTE:
INSTALLATION COMPLETE FOR DELL E771P AND DELL E772P COLOR MONITORS;
GOTO LINE 39.
30. Locate the Monitor Mounting Bracket on the top of the unit. Using a 2.5mm Allen Wrench remove
the right side and left side Allen screw from the front bracket. Remove the front bracket. Repeat
these steps for the rear bracket.
31. Locate the inner thumbscrews that are on the bottom of the front and rear brackets. Unscrew
these thumb screws all the way till they are removed. Partially screw two thumbscrews only in
the front Monitor Mounting Bracket in the inner holes from the topside of Monitor Mounting
Bracket. Place the balance of the six thumbscrews in a safe place in the storage cabinet.
32. Attach the rear Monitor Mounting Bracket using an Allen screw on the right side and left side
using 2.5mm Allen Wrench. Note: There are no thumbscrews installed on the rear Monitor
Mounting Bracket.
33. Place the monitor on the unit top and slide it into the cup in the rear bracket
34. Install the front bracket using the Allen Screws. Do not tighten the Allen Screws all the way.
Push the front bracket as far back as it will go to ensure that the monitor is snug between the two
brackets. Tighten both Allen Screws.
35. Locate the two inner thumbscrews. Now screw the inner thumbscrews down to hold the monitor
base to the unit.
36. Attach the AC Power Cable, coming out of the unit’s top to the Monitor.
TEEEA135A0 (4/25/2005) REV S.
Page 4 of 37
37. Attach the Video Data Cable, coming out of the unit’s top to the monitor.
38. Secure the extra monitor Video Cable with the straps below the unit’s top.
NOTE:
INSTALLATION COMPLETE FOR DELL E773S COLOR MONITOR; GOTO LINE 39
39. Unpack the Printer (3-03306A20), if it is not already done.
40. Referring to the Printer Literature install the printer’s toner cartridge.
41. Place the Printer’s Product Literature and in the Unit’s Storage Compartment. Leave the CD out,
as it will be needed to load the printer drivers later.
42. Place the Printer on the top of the unit next to the monitor.
43. Attach the Printer’s Power Cable, coming out of the unit’s top, to the Printer.
44. Attach the Printer’s USB Data Cable, coming out of the unit’s top, to the Printer.
45. Ensure the Printer’s Power Switch is in the on (I) position.
46. Load 100 sheets of paper (8-01010A) into the printer.
47. Referring to Figure 3, mount the Bar Code Scanner Bracket
(EAS2052E02A) using two screws (1-12906A).
48. Unpack the Bar Code Scanner (EEEH102A), if it is not already done.
49. Throw away all literature that comes with the Bar Code Scanner.
50. Attach one end of the Bar Code Scanner Cable to the Bar Code
Scanner Head. To install the interface cable for the 2D (Two
Figure 3, Scanner Bracket
Dimensional) Bar Code Scanner (DS3408-SF20005) loosen the two
screws on the cable clamp at the bottom of the digital scanner and
gently pull the clamp away from the bottom of the digital scanner. Open the clamp and plug the
interface cable modular connector into the cable interface port on the bottom of the digital
scanner handle. Gently tug the cable to ensure the connector is properly secured. Close the
clamp, push it back into place and tighten the screws on the clamp to secure the cable into the
bottom of the digital scanner. To install the cable on the yellow, 2D Bar Code Scanner
(P304PRO-I000 or I100) insert the cable and twist into place in the Scanner Head.
51. Attach the other end of the cable to the rear panel connector port labeled “COM H”.
52. Locate the 6” Null Modem Cable (6-04122A) in the kit.
53. Attach one end of the Null Modem Cable to “COM L”. Secure the cable using the screws in the
connector.
54. Locate the OBDII Reader (EAE0032L52A) in the kit. Referring to figure 4, locate the label on the
OBDII Reader that indicates which end connects towards the Vehicle and which end connects
towards the Analyzer.
55. Connect the end of the OBDII Reader labeled “To Analyzer” to the end of the cable installed in
the step 53.
56. Locate and attach the 15’, OBDII Extension Cable (6-04222A), to the other end of the OBDII
Reader labeled “To Vehicle”. Secure using the screws contained within the connector of the
vehicle.
TEEEA135A0 (4/25/2005) REV S.
Page 5 of 37
Figure 4, OBDII Reader Label
56. Attach the DB9 to DB25 Serial Port Adapter to the connector on the rear panel labeled “COM I”.
57. Locate the Remote Control (7009E9321-30). Remove the rear cover from the remote control.
Place the two batteries in the Remote Control, being careful of polarity. Place the rear cover back
on the Remote Control and secure with the four screws.
58. Place the Remote Control in the Keyboard Drawer.
59. Attach the Unit’s Power Cord to the outlet on the rear of the Unit.
60. Re-attach the computer rear panel using the six that were removed in step 3. Lock the
compartment.
61. Referring to Figure 5, mount the Storage Brackets using the screws provided.
Figure 5, Storage Bracket Mounting
HARDWARE SETUP COMPLETE
TEEEA135A0 (4/25/2005) REV S.
Page 6 of 37
BIOS SETUP: __________________________________________________________
1. Power up the unit by placing the power switch on the rear panel to the (I) position.
2. Power up the computer by pressing the On/Off switch on the front of the computer.
3. While the analyzer is booting press <F2> to enter the BIOS Setup. If Windows is displayed then you
must shut down Windows and restart the computer to try again.
4. The analyzer may prompt for a BIOS Password. If so, enter the password and press y.
5. Once in the BIOS Main Menu, cursor down to the “Boot Sequence” option and press y.
6. Ensure that the Boot Sequence is setup to CD-ROM, Hard Drive and Diskette. If it is not, highlight
each device and press the or key to move it to the correct position. Press y when completed.
7. Once back at the BIOS Main Menu use the cursor to highlight “System Security” and press y.
8. Cursor down until “Chassis Intrusion” is highlighted. Press q to set Chassis Intrusion to “Enabled”.
9. Highlight “Setup Password” and press y.
NOTE:
IN THE NEXT STEP ENSURE THE PROPER PASSWORD IS TYPED IN. IF THE
PASSWORD IS DIFFERENT AND IS NOT KNOWN THEN THE COMPUTER WILL NEED
TO BE REPLACED.
10. When prompted to enter a Setup Password type 5=7) and press y.
11. To confirm the Setup Password once again type 5=7) and press y.
12. Once back at the BIOS Main Menu highlight “Power Management“, then AC Power Recovery” and
press q to set the AC Power Recovery to “On”.
13. Press <ESC> to exit the BIOS. When prompted highlight “Save Changes and Exit” and press y.
14. The analyzer will now reboot.
15. Again attempt to access the computer by pressing <F2>. Ensure that the computer now requires you
to enter the password to access the BIOS and ensure that “RZTF1” works.
NOTE:
ALSO ENSURE THAT THE COMPUTER DOES NOT REQUIRE A PASSWORD TO
ENTER WINDOWS. IF IT DOES, THE WRONG SECURITY PASSWORD HAS BEEN SET.
RETURN TO THE BIOS AND DISABLE THE SYSTEM PASSWORD BY PRESSING
ENTER FOR THE PASSWORD AND SET THE SETUP PASSWORD AS INDICATED
ABOVE.
TEEEA135A0 (4/25/2005) REV S.
Page 7 of 37
SETTING UP WINDOWS 2000® SOFTWARE: ________________________________
NOTE:
FOR RE-IMAGING THE HARD DISK ON THE GX-150 COMPUTER USE THE SOFTWARE INCLUDED WITH
THE EAK0252L21A KIT.
NOTE:
FOR RE-IMAGING THE HARD DISK ON THE GX-260 COMPUTER USE THE SOFTWARE INCLUDED WITH
THE EAK0252L22A KIT
NOTE:
FOR RE-IMAGING THE HARD DISK ON THE GX-270 COMPUTER USE THE SOFTWARE INCLUDED WITH
THE EAK0252L23A KIT.
NOTE:
ENSURE THE COMMUNICATIONS BOX IS POWER UP BY OPENING THE STORAGE COMPARTMENT
DOOR AND ENSURING THE FAN IS RUNNING. IF IT IS NOT POWER IT UP NOW.
1.
Identify the computer as a GX-150 or a GX-260 or a GX-270 before starting this procedure.
2.
Turn On the analyzer.
3.
Press <F12> when the Dell logo appears during boot up.
4.
Next, you should see a "Boot Device Menu".
5.
Use one of the following:
•
For GX-150 insert the GX-150 Dell OBIS (Re)Image Utility Floppy Disk (3-11226BUSD2) into the
floppy drive and insert the GX-150 Dell OBIS (Re)Image Utility CD (3-11226CUSC3) Disk 1 of 2
into the DVD-ROM drive.
•
For GX-260 insert the GX-260 Dell OBIS (Re)Image Utility floppy disk (3-35426BUSD1) into the
floppy drive and insert the GX-260 Dell OBIS (Re)Image Utility CD (3-35426CUSC2) i Disk 1 of 2
into the DVD-ROM drive.
•
For GX-270 insert the GX-270 Dell OBIS (Re)Image Utility Floppy Disk (3-38626BUSD1) into the
floppy drive and insert the GX-270 Dell OBIS (Re)Image Utility CD (3-38626EUSC4) Disk 1 of 2
into the DVD-ROM drive.
6. Press <2> (for GX-260 or GX-150) or Press <3> (for GX-270), to highlight "Diskette Drive" and
then press <ENTER>.
7. When text appears on the screen, press the <Space Bar> key each time when prompted to
"Strike a key when ready….." to advance through the license agreement.
8. Select “Continue” on the Power EZ-Restore screen.
9. Select “Yes” on the Warning window to continue.
10. EZ-Restore will start to load the software to the hard drive, and then:
•
For GX-150 "Insert media 2 containing file “Y:\GX150OS.002” into drive Y”. pop up window
will appear, remove the GX-150 Dell OBIS (Re)Image Utility CD (3-11226CUSC3) 1 of 2 and
insert GX-150 Dell OBIS (Re)Image Utility CD (3-11226CUSC4) 2 of 2 into the DVD-ROM Drive.
•
For GX-260 "Insert media 2 containing file “Y:\GX260OS.002” into drive Y”. pop up window
will appear, remove the GX-260 Dell OBIS (Re)Image Utility CD (3-35426CUSC2) 1 of 2 and
insert GX-260 Dell OBIS (Re)Image Utility CD (3-35426CUSC3) 2 of 2 into the DVD-ROM Drive.
•
For GX-270 "Insert media 2 containing file “Y:\GX270OS.002” into drive Y”. pop up window
will appear, remove the GX-270 Dell OBIS (Re)Image Utility CD (3-38626EUSC4) 1 of 2 and
insert GX-270 Dell OBIS (Re)Image Utility CD (3-38626EUSC5) 2 of 2 into the DVD-ROM Drive.
11. Select "OK" and the CD will continue to load to the hard drive.
12.
NOTE:
THIS WILL TAKE APPROXIMATELY 10 MINUTES TO LOAD.
13. When the "Reboot" window or an A:\ prompt is displayed, remove the OBIS (Re)Image Utility Floppy
Disk from the floppy drive and remove the OBIS (Re)Image Utility CD from the DVD-ROM drive.
TEEEA135A0 (4/25/2005) REV S.
Page 8 of 37
14. Select “Reboot” or Reset the computer to reboot up to Windows 2000.
15. Next, click on the “OK” button to log on as the "Administrator". Do not use a password!
16. If for some reason Windows Plug and Play does not automatically go through on its own, you may
have to select “OK” or “Next” and then select the CD-ROM device or the path of
C:\DRIVERS\OBIS DRIVERS to tell it the location of the drivers it is looking for. You may have to
repeat this process for each driver.
Refer to the table below for list of drivers:
Devices
NOTE:
Where to find the Driver
Okidata B4200 Printer Drivers
Okidata Printer Driver CD (included with the Printer)
Rocket Port USB to Serial Hub Drivers
C:\Drivers\OBIS Drivers
Moxa NPORT 1240 USB to Serial Hub Drivers
C:\Drivers\OBIS Drivers or Moxa USB Serial Hub
Driver Part #: 3-39226AUSD1
IR Port Drivers
C:\Drivers\OBIS Drivers
IF YOUR UNIT HAS A B4250 PRINTER INSTALLED FOLLOW THE INSTRUCTIONS ON THE FOLLOWING
PAGES. IF NOT SKIP TO STEP 17 ON PAGE 12.
TEEEA135A0 (4/25/2005) REV S.
Page 9 of 37
Setting up the OKI B4250 PRINTER on OBIS:________________________________
Installing the B4250 Printer Driver
NOTE:
IF WINDOWS PLUG AND PLAY FINDS THE NEW PRINTER, CLICK ON THE CANCEL BUTTON AND CLOSE
THE WINDOW THEN FOLLOW THE PROCEDURE BELOW.
1. Select Start ⇒ Settings ⇒ Printers. Double click on the “ADD PRINTER” icon. The “Welcome to
the Add Printer Wizard” will be displayed as shown in Figure1. Click on <NEXT> to continue.
Figure 1, Add Printer Wizard
2. The second page of the “ADD PRINTER WIZARD” will be displayed, as shown in Figure 2. Click on
“LOCAL PRINTER”. Unclick the “Automatically detect and install my Plug and Play printer”.
Click on <NEXT> to continue.
Figure 2, Local or Network Printer
TEEEA135A0 (4/25/2005) REV S.
Page 10 of 37
3. The third page of the “ADD PRINTER WIZARD” will be displayed as shown in Figure 3. Click on
“Use the following port”. Next, scroll down through the list of available ports until “USB001” is
highlighted. Then click on <NEXT> to continue
Figure 3, Printer Port
4. The fourth page of the “ADD PRINTER WIZARD” will be displayed as shown in Figure 4. Click on
<HAVE DISK>. This will bring up the “INSTALL FROM DISK” splash screen.
Figure 4,Printer Manufacturer
5. Place the “OKIDATA B4250 Installation Software” CD ROM disk in the DVD-ROM drive of the
computer. Wait 10 seconds for the Drive to read the disk.
6. In the “Copy manufacturer’s file from:” field, Go to Browse and click on
D:\Drivers\B4250\English\ Win2k_xp\ directory and select the B42503e.Inf file and click on Open.
7. In the “INSTALL FROM DISK” splash screen click on <OK>.
8. At the Name your Printer Prompt click <NEXT>.
9. Highlight “Do Not Share this Printer” and click <NEXT>.
10. When prompted “Do You Want To Print a Test Page?” click <YES> and then <NEXT>.
11. Next, click on <FINISH> and then <OK> if the page printed correctly.
12. Remove the “OKIDATA B4250 Installation Software” CD-ROM disks from the DVD-ROM Drive and
places it in the Unit’s Storage Compartment.
TEEEA135A0 (4/25/2005) REV S.
Page 11 of 37
INSTALLING THE B4250 STATUS MONITOR
1. First you must uninstall the B4200 status monitor by going to Start→ Settings → Control Panel.
2. Double click on "Add Remove Programs".
3. Scroll down the list of software until you get to the OKI B4200 program.
4. Click on "Change/Remove". It will ask you if you want to confirm file deletion. Click on <Yes>
and it will uninstall. Click on "OK" when completed.
5. Close the Add/Remove Programs window by clicking on the X in the upper right hand corner of
the window.
6. Next, go to Start→ Run → Browse. Browse to your DVD-ROM drive where the CD is inserted,
and double-click on Install.exe. Click <OK>.
7. The License Agreement appears. Click <Next> if you accept the terms.
8. Select your Language. Then select the Printers Model number (B4250) from the list, and click on
Continue.
9. The software Installation screen should appear. Click on " Status Monitor".
10. Install Shield Wizard appears. Click <Next>.
11. Follow the on-screen instructions until it is completely loaded.
12. The Status Monitor can be accessed by going to Start→ Programs → Okidata → B4250 and
maximizing the Status Monitor window.
13. For more information on how to use the status monitor, refer to the OBIS Service Manual
B4250 PRINTER INSTALLATION COMPLETE
TEEEA135A0 (4/25/2005) REV S.
Page 12 of 37
17. After Windows is done installing the drivers for the hardware it finds, it should come up with a window
telling you to restart your computer for the settings to take effect. You should then click on "Yes",
when it asks you "Do you want to Restart your computer now?"
18. After Windows reboots back up, click on the “OK” button to log on as the "Administrator". Do not use
a password!
19. Click on the “START” button in the bottom left hand corner of the screen.
20. Next click on “Programs”, then “Accessories” and then “Command Prompt”. This will bring up a
DOS Box on the screen.
21. In the DOS Box type FRQYHUW(IV17)6as shown in Figure 6.
22. The information as shown in Figure 6 will be displayed. Type < and press y.
23. You will now be at a C\> prompt. Type (;,7and press y.
Figure 5, NTFS Disk On Key
24. Right Click on the “Desktop”.
25. Click on “Properties”
26. Click on the “Screen Saver” tab
27. Click on the “Power” button.
28. From the “Power Schemes” windows select “Always On”
29. Click on “Apply” button.
30. Close the “Display Properties” window by clicking on “X” located in the top right corner of the
“Display Properties’ window.
TEEEA135A0 (4/25/2005) REV S.
Page 13 of 37
1.
2.
3.
4.
5.
6.
7.
CHECKING THE INSTALLATION:
Right click on “My Computer” icon on Windows 2000 Desktop
Click on “Properties”
Click on the “Hardware” folder tab
Click on “Device Manager” button
Click on the “+” sign next to Ports.
Compare your device settings with the figures 8 or 9.
Note that the COMM values might no be the same as you see in the figures 8 or 9, but the labels for the COMM
PORTS should be identical.
NOTE:
ENSURE THERE ARE NO YELLOW (!) OR (?) OR RED (X) CHECK MARKS (ERRORS) IN THE DEVICE
MANAGER (SEE FIGURES 8, 9 BELOW).
Figure 8
Comm Port Labels should read:
COM C (Gas Gap Tester) (COMXX)
COM E (Dynamometer) (COMXX)
COM H (Barcode Reader) (COMXX)
COM L (OBDII Key) (COMXX)
Figure 9
8. Write the COMXX values assigned to Gas Cap Tester, Barcode Reader and OBDII Key.
9. Close this dialog by clicking on the X in the upper right hand corner.
NOTE:
ONCE THE PROCEDURE IS COMPLETE STORE ALL THE PRODUCT LITERATURE,
DISKS AND CD’S, IN THE COMPARTMENT UNDER THE COMPUTER.
FROM THE WINDOWS 2000 MAIN MENU CLICK ON “START”, THEN “SHUTDOWN . . .” NEXT SELECT “RESTART”
AND CLICK ON “OK”. THIS WILL REBOOT THE COMPUTER.
WINDOWS 2000 SETUP COMPLETE
TEEEA135A0 (4/25/2005) REV S.
Page 14 of 37
BAR CODE SCANNER SETUP:____________________________________________
Once the analyzer has booted and Bar Code Scanner has power scan the following codes to program the
respective yellow Bar Code Scanner. For programming the and setting up the yellow Bar Code Scanner
(DS3408-SF20005) scan the 14 Bar Codes on page 14 in order. For programming the and setting up the
yellow, 1D Bar Code Scanner (P302FZY-I000) scan the 18 Bar Codes on page 17 in order. Once all
codes are scanned the Bar Code Scanner is ready for operation
NOTE:
THE BAR CODE SCANNER WILL NOT WORK IF THE WRONG CODES ARE SCANNED. IDENTIFY THE BAR
CODE SCANNER AND CHOOSE THE CORRECT PROGRAMMING CODES.
DS3408-SF20005
P302FZY-I000
The following are the codes for programming the yellow, 2D (Two Dimensional) Bar Code
Scanner (DS3408-SF20005).
1. Set Scanner to Defaults: Scan Code 1:
SET DEFAULT
2. Set Scan <Prefix> <Data> <Suffix>: Scan Code 2
PREFIX DATA SUFFIX
3. Set Scan Prefix: Scan Code 3
SCAN PREFIX
TEEEA135A0 (4/25/2005) REV S.
Page 15 of 37
4. Set Scan Prefix Setup for Cntrl “B” (STX=1002): Scan Code 4
PROGRAMMING NUMERIC CODE 1
5. Set Scan Prefix Setup for Cntrl “B” (STX=1002):: Scan Code 5
PROGRAMMING NUMERIC CODE 0
6. Set Scan Prefix Setup for Cntrl “B” (STX=1002):: Scan Code 6
PROGRAMMING NUMERIC CODE 0
7. Set Scan Prefix Setup for Cntrl “B” (STX=1002):: Scan Code 7
PROGRAMMING NUMERIC CODE 2
8. Set Scan Suffix: Scan Code 8
SCAN SUFFIX
TEEEA135A0 (4/25/2005) REV S.
Page 16 of 37
9.
Set Scan Suffix Setup for Cntrl “C” (ETX=1003): Scan Code 9
PROGRAMMING NUMERIC CODE 1
10.
Set Scan Suffix Setup for Cntrl “C” (ETX=1003): Scan Code 10
PROGRAMMING NUMERIC CODE 0
11. Set Scan Suffix Setup for Cntrl “C” (ETX=1003): Scan Code 11
PROGRAMMING NUMERIC CODE 0
12. Set Scan Suffix Setup for Cntrl “C” (ETX=1003): Scan Code 12
PROGRAMMING NUMERIC CODE 3
13. Set Scan Parity: Scan Code 13
EVEN PROGRAMMING CODE
TEEEA135A0 (4/25/2005) REV S.
Page 17 of 37
14. Set Scan 7 Bits: Scan Code 14
SEVEN BIT PROGRAMMING CODE
The following are the codes for programming the yellow, 1D Bar Code Scanner
(P302FZY-I000).
Set Scanner to Defaults: Scan Code 1:
Set Scan Options: Scan Code 2:
Set Scan <Prefix> <Data> <Suffix>: Scan Code 3
Set Scan Enter: Scan Code 4
TEEEA135A0 (4/25/2005) REV S.
Page 18 of 37
Set Scan Prefix Scan Code 5
Set Scan Prefix Setup for Cntrl “B” (STX=1002): Scan Code 6
Set Scan Prefix Setup for Cntrl “B” (STX=1002): Scan Code 7
Set Scan Prefix Setup for Cntrl “B” (STX=1002): Scan Code 8
TEEEA135A0 (4/25/2005) REV S.
Page 19 of 37
Set Scan Prefix Setup for Cntrl “B” (STX=1002): Scan Code 9
Set Scan Sufix: Scan Code 10
Set Scan Sufix Setup for Cntrl “C” (ETX=1003): Scan Code 11
Set Scan Sufix Setup for Cntrl “C” (ETX=1003): Scan Code 12
Set Scan Sufix Setup for Cntrl “C” (ETX=1003): Scan Code 13
TEEEA135A0 (4/25/2005) REV S.
Page 20 of 37
Set Scan Sufix Setup for Cntrl “C” (ETX=1003): Scan Code 14
Set Scan Parity Even: Scan Code 15
Set Scan 7 Bits: Scan Code 16
Set Scan Enable No Read: Scan Code 17
Set Scan Baud Rate 9600: Scan Code 18
BAR CODE SCANNER SETUP COMPLETE
TEEEA135A0 (4/25/2005) REV S.
Page 21 of 37
SETTING UP NC OBIS SOFTWARE: _______________________________________
NOTE:
IF THE TESTER HAS A PREVIOUS VERSION OF OBIS SOFTWARE INSTALLED,
CONTINUE TO STEP 4 ON PAGE 19.
1. If the tester does NOT have a previous version of OBIS installed (initial setup), Power Up the
Analyzer and complete the following steps: If it does skip to step 4 on page 14.
a. Log on as “Administrator”.
b. Place OBIS CD-ROM in drive.
c.
From the desktop double click the “My Computer” icon.
d. Double click on the Drive “D” icon.
e. Double click on the “NC OBDII” folder.
f.
Double click on the file: setup.exe. Setup.exe is the Icon with the computer.
g. Follow the prompts on the screen to install the software.
h. When prompted for the Serial #, use NC obis 2003.
i.
Reboot after installation.
2. The Logon box will have OBIS as the user, leave the password blank and click <OK>. Enter
OBIS as the user if it is not there.
3. Setup customer: “After the following is complete the State will need to put the unit in Service”
a. From the Main Menu select 5, Service Menu.
b. Enter the current Widows Daily Access Code and press <F10> to continue.
c.
From the Service Menu Select 5, Date and Time.
d. Ensure date and time are set correct. If not, adjust time or date for accuracy. Press
<OK>.
e. From the Service Menu select “State Audit Functions”. In the State Audit Functions
Menu select “Install New Data Disk”.
f.
From the Install New Data Disk screen, select “Initialize”
g. From the State Audit Functions, select Network Initialization / Comm. Update.
h. Enter VID Phone Number press <TAB>.
i.
Enter VID Username (Obtained from DMV), then press <TAB>.
j.
Enter VID Password (Obtained from DMV), then press <F10>.
k.
From the State Audit Functions Menu select 4, Update Station and Inspector
Information.
l.
Enter, using the drop down box, the County the analyzer is located in,
m. Enter the Station Number (Obtained from the DMV) press <TAB>. Enter the Analyzer
Serial Number press <F10>. The Analyzer Serial Number is entered as SZ followed by
the actual unit serial number numeric digits.
n. Return to the Main Menu. Select “Station Menu”. Enter access code 67$7,21.
o. Select 2, Data File/Lockout Status Refresh.
p. Contact the State to finish setting up Analyzer.
NC OBIS SOFTWARE SETUP COMPLETE
TEEEA135A0 (4/25/2005) REV S.
Page 22 of 37
4. If tester has a previous version of OBIS software installed, it must be removed. Power Up the
Analyzer and complete the following steps:
5.
Prior to uninstalling software a “Data File Refresh” should be performed to insure that no offline
inspections are stored on the tester.
i. From the Main Menu select 3, Station Menu.
ii. Select 2, Data File / Lockout Status Refresh and follow prompts.
b. Reboot to sign-on screen and type Equiserv for the user name; enter Equ iserv for the
password. Note: This is case sensitive.
c.
Click on “START” in the lower left of the display.
d. Select “SETTINGS” and “CONTROL PANEL”.
e. Double click on “ADD/REMOVE PROGRAMS”.
f.
Scroll down to NC OBDII ANALYZER and select it.
g. Click on the “REMOVE” button and then the “YES” button to confirm.
h. From the CONTROL PANEL (steps c and d) select “USERS AND PASSWORDS”.
i.
Select user “PC” and click “REMOVE.”
j.
Select “EQUISERV” and click “REMOVE.”
k.
Select “OBIS” and click “REMOVE.” The click “OK” to finish user removals.
a. From desktop double click “My Computer”.
b. Double click on “Drive C”.
c.
Highlight “NCASDATA” by single clicking on the NCASDATA folder. Delete this folder by
pressing the “Delete” key.
d. Highlight “NCWDATA” by single clicking on the NCWDATA folder. Delete this folder by
pressing the “Delete” key.
e. Double click on “documents and settings”. Highlight “PC” by single clicking on the PC
folder. Delete this folder by pressing the “Delete” key.
f.
Highlight “OBIS” by single clicking on the OBIS folder. Delete this folder by pressing the
“Delete” key.
g. Highlight “Equiserv” by single clicking on the Equiserv folder. Delete this folder by
pressing the “Delete” key.
h. Return to the root “C:” directory by pressing the back key.
i.
Double click on the “Program files”. If Windows doesn’t display the files in this folder,
click on “show files”.
j.
Highlight “Snap-on Diagnostics” by single clicking on the “Snap-on Diagnostics” folder.
Delete this folder by pressing the “Delete” key.
k.
All previous versions and associated files should now be removed.
l.
After any old version of OBIS is removed go back to instruction 1 and install the software.
OLD SOFTWARE REMOVAL
COMPLETE
PROCEED TO STEP 1 ON
PAGE 21 FOR SOFTWARE
INSTALL!
TEEEA135A0 (4/25/2005) REV S.
Page 23 of 37
SNAP-LINK SOFTWARE INSTALLATION: ___________________________________
1. Reboot the analyzer.
2. From the Windows Login screen log in as Equiserv as the User ID and enter Equiserv as the
password. Note the User ID and Password are Case Sensitive.
3. Follow the on-screen prompts and the instructions in the Snap-Link Manual starting on page 2. Do
not change the destination folders, instead let the software install with the defaults.
4. After the installation is complete reboot to the OBIS Software Inspection Menu. Locate the Snap-Link
Menu and select it.
5. When the Snap-Link program appears enter the Shop Information.
6. Next enter the Registration number off the CD.
7. You must configure the COMM and Baud Rate. Reference Page 7 of the Snap-Link Book to set the
settings as follows:
a. SCANNER
i.
COM 1
ii.
Baud Rate 4800
b. VANTAGE
i.
c.
COM 1
MICROVAT
i.
COM 1
8. The SNAP-LINK connects to the Scanner, through COMM I on the rear of the OBIS, using the
Adapter (MT2500-509A) provided.
9. The MICROVAT will need an ACT-IR220L and an Infrared Adapter.
SNAP-LINK SETUP COMPLETE
TEEEA135A0 (4/25/2005) REV S.
Page 24 of 37
TROUBLESHOOTING: ___________________________________________________
This section addresses device issues and problems. This section is developed to assist in troubleshooting
external devices attached to the Analyzer.
PRINTER MALFUNCTIONS
PROBLEM
VERY LIGHT PRINT
CAUSE
TONER CARTRIDGE
SOLUTION
1. CHECK IF TONER IS INSTALLED CORRECTLY
2. CHECK IF THE SEALING TAPE ON THE TONER
CARTRIDGE HAS BEEN REMOVED
3. USE RECOMMENDED PAPER.
4. CLEAN LED ARRAY
5. REPLACE TONER
ERROR LIGHT
BLINKING
PAPER JAM
6. CLEAR THE PAPER JAM BY REMOVING THE
LAMMED PAPER. TURN PAPER OVER IN TRAY
(NOTE ARROW ON PAPER PACKAGE). INSTALL
PAPER PRINT SIDE DOWN IN TRAY. PAGES CURL
EXCESSIVELY DUE TO HUMIDITY CAUSING PAPER
JAM
USE RECOMMENDED PAPER.
ERROR LIGHT
BLINKING
LOW PAPER OR PAPER TRAY
NOT SET TO CORRECT PAPER
SIZE
7.
8. ADD PAPER AND ADJUST TRAY FOR PAPER SIZE
OF 8.5X11
9. ADJUST TRAY FOR THE CORRECT PAPER SIZE
OF 8.5X11. MAKE SURE THAT THE PAPER SIZE
SETTING LOCKING MECHANISM IS NOT BROKEN
OR DAMAGED AND DOES NOT MOVE AFTER IT IS
SET TO THE CORRECT SIZE.
ERROR LIGHT
BLINKING
LOW TONER OR TONER
CARTRIDGE NOT INSTALLED
•
•
INSTALL TONER CARTRIDGE CORRECTLY.
REPLACE TONER CARTRIDGE.
VERIFY THAT THE PAPER TRAY IS INSERTED
CORRECTLY, REMOVE THE PAPER TRAY AND
REINSTALL IT. CHECK THE FRONT COVER IF IT IS
CLOSED ALL THE WAY. OPEN THE FRONT COVER
AND SANP IT SHUT.
LOG ON AS PC
1. DOUBLE CLICK ON THE PRINT MANANGER
ICON (RIGHT BOTTOM CORNER)
2. CHECK PRINTER STATUS
3. CORRECT THE REPORTED PROBLEM IN
CORRECTLY
ERROR LIGHT
BLINKING
PAPER TRAY NOT INSERTED
PROPERLY OR FRONT COVER
NOT CLOSED PROPERLY
•
ERROR LIGHT
BLINKING
CAUSE UNKNOWN
•
PRINT MANAGER
CLOSE ALL WINDOWS AND EXIT FROM PC
LOG ON AS OBIS
VERIFY THE PRINTER IS WORKING.
BLANK SHEETS
IMAGE DRUM CARTRIDGE NOT
PRINTED
PROPERLY INSTALLED
PRINTS BAD
CHARACTERS AND
EXTRA PAGES
PRINTER SOFTWARE NOT SETUP
CORRECTLY
•
•
4.
5.
6.
REINSTALL IMAGE DRUM CARTRIDGE.
LOG IN AS PC
1. CLICK ON START
2. CLICK ON SETTINGS
TEEEA135A0 (4/25/2005) REV S.
Page 25 of 37
3.
4.
5.
6.
NO POWER,
PRINTER DOES NOT
INITIALIZE
BAD POWER SUPPLY OR LOOSE
POWER OR USB CONNECTIONS
CLICK ON PRINTERS
VERIFY THAT THE CORRECT PRINTER ICON
IS THERE AND IS SET TO BE THE DEFAULT
PRINTER OTHERWISE REISINSTALL THE
PRINTER DRIVER USING THE OKIDATA
B4200 PRINTER DRIVER CD RECEIVED WITH
THE PRINTER. FOR INSTALLING THE
PRINTER DRIVERS PLACE THE CD IN THE
DVD DRIVE, WAIT FOR THE INSTALL MENU
TO BE DISPLAYED ON THE SCREEN. SELECT
INSTALL AND FOLLOW SCREEN
INSTRUCTIONS.
VERIFY THAT THE PRINTER IS SETUP AS THE
DEFAULT PRINTER
LOG OUT AS PC AND LOGIN AS OBIS AND
VERIFY THAT PRINTER PRINTS THE
REQUIRED REPORTS CORRECTLY.
•
CHECK THE PRINTER POWER CORD FROM THE
PRINTER TO THE COMPUTER AND VERIFY THAT IT
IS PROPERLY CONNECTED. CHECK PRINTER
POWER SWITCH, SHOULD BE IN THE ON
POSITION. CHECK USB CONNECTION FROM THE
PRINTER TO THE BACK OF THE COMPUTER AND
VERIFY THAT IT IS CONNECTED SECURELY
•
REPLACE PRINTER
BAR CODE SCANNER MALFUCTIONS
PROBLEM
DOES NOT SCAN
CAUSE
BAR CODE READER NOT
CODES
PROGRAMMED CORRECTLY
USING THE SETUP SHEET INCLUDED IN THE INSTALLATION
INSTRUCTIONS TEEEA136A0 REV E.
BAR CODE READER LENS DIRTY •
USE A GLASS CLEANER AND A CLEAN CLOTH OR PAPER
TOWEL TO CLEAN THE BAR CODE READER LENS
VERIFY THAT THE BAR CODE READER IS CONNECTED TO
THE COMM PORT “H”
BAR CODE READER NOT
•
•
CONNECTED TO THE CORRECT
COMM PORT
WRONG BAR CODE SCANNER
OR CABLE
COMM PORTS NOT SET UP
CORRECTLY IN SOFTWARE OR
BAD COMMUNCIATIONS PORT
“H”
SOLUTION
REPROGRAM THE 2D YELLOW BAR CODE SCANNER
•
VERIFY THE PART NUMBER FOR THE BAR CODE SCANNER
AND THE CABLE, REFER TO PAGE 14 FOR PART NUMBERS
•
VERIFY THAT THE SCANNER CABLE HAS BLACK BREAKER
ON IT, IF NOT REPALCE THE CABLE WITH THE CORRECT
ONE.
1.
TO VERIFY THAT THE COMM PORTS ARE SET UP
CORRECTLY IN SOFTWARE PERFORM THE FOLLOWING
STEPS
•
•
•
EXIT FROM THE OBIS PROGRAM
LOG IN AS EQUISERV
RIGHT CLICK ON “MY COMPUTER” ICON ON
TEEEA135A0 (4/25/2005) REV S.
Page 26 of 37
WINDOWS 2000 DESKTOP
SELECT PROPERTIES FROM MENU BY LEFT CLICK OF
THE MOUSE
• LEFT CLICK ON THE HARDWARE FOLDER TAB
• CLICK ON DEVICE MANAGER BUTTON
• EXPAND PORTS (COM & LPT) PROPERTIES BY
CLICKING ON “+” SIGN NEXT TO THE LABEL.
• VERIFY WITH THE PICTURES BELOW FOR COMM
PORT LABELS. NOTE THAT THE VALUE FOR COM
NUMBERS CAN BE DIFFERENT, EXAMPLE: COM H
(BARCODE READER) (COM6) COULD ALSO READ
COM H (BARCODE READER) (COM8)
ENSURE THERE ARE NO YELLOW (!) OR (?) OR RED (X)
CHECK MARKS (ERRORS) IN THE DEVICE MANAGER (SEE
FIGURE BELOW).
•
OR
TEEEA135A0 (4/25/2005) REV S.
Page 27 of 37
1. IF THE COMM PORTS ASSIGNMENT ARE CORRECT
PROCEED TO THE NEXT STEP OTHERWISE USING THE
CORRECT RE(IMAGE) PROCEDURE AND SOFTWARE
REINSTALL THE SOFTWARE.
1.
2.
3.
4.
5.
6.
7.
8.
9.
10.
11.
12.
13.
LOG OUT AND LOGIN BACK AS OBIS
FROM THE MAIN MENU SELECT “SERVICE MENU” (1).
ENTER DAILY SERVICE CODE AND PRESS F10.
SELECT “DIAGNOSTIC MENU” (2).
SELECT” LOOPBACK TEST”.
FROM THE “SERIAL PORT” DROP-DOWN WINDOW SELECT
COMM PORT H FOR TEST.
ATTACH APPROPRIATE LOOPBACK ADAPTER TO THE
PORT UNDER TEST AT THE REAR CONNECTOR PANEL
(LOOPBACK ADAPTERS WILL ONLY FIT INTO APPROPRAITE
CONNECTORS).
SELECT “START”. VERIFY CORRECT LOOPBACK
RESPONSE IN THE “TEST STATUS” WINDOW
RX/TX=PASS
RTS/CTS= PASS
DTR/DSR=PASS
IF THE TEST RESULTS ARE NOT AS EXPECTED PROCEED
TO THE NEXT STEP OTHERWISE REPLACE SCANNER
CABLE AND/OR SCANNER HEAD.
CHECK FOR +12 VOLTS ACROSS THE PINS OF J9 (BAR
CODE SCANNER POWER). IF +12 VOLTS IS NOT
PRESENT, CHANGE THE CONTROLLER BOARD.
IF +12 VOLTS IS PRESENT AT THE CONTROLLER BOARD,
CHECK FOR THE +12 VOLTS AT THE BACK PANEL
CONNECTORS COM H (PINS 7 AND 25, BAR
CODE SCANNER)
IF +12 VOLTS IS NOT PRESENT, REPAIR OR REPLACE
EFFECTED HARNESS OR TROUBLESHOOT REPLACE
COMMUNCIATION BOX. IF +12 VOLTS IS PRESENT,
REPLACE SCANNER CABLE AND/OR SCANNER HEAD
OBDII MALFUNCTIONS
PROBLEM
NO OBD II
COMMUNICATIONS
CAUSE
SOLUTION
WRONG OBD II KEY, COMM
1. VERIFY THE SNAP-ON OBD II KEY PART NUMBER. THE
PORTS NOT SET UP CORRECTLY
CORRECT PART NUMBER IS: EAE0032L52A
2. TO VERIFY THAT THE COMM PORTS ARE SET UP
IN SOFTWARE OR BAD
CORRECTLY IN SOFTWARE PERFORM THE FOLLOWING
COMMUNCIATIONS PORT “L”
STEPS
•
•
•
•
EXIT FROM THE OBIS PROGRAM
LOG IN AS EQUISERV
RIGHT CLICK ON “MY COMPUTER” ICON ON
WINDOWS 2000 DESKTOP
SELECT PROPERTIES FROM MENU BY LEFT CLICK OF
THE MOUSE
TEEEA135A0 (4/25/2005) REV S.
Page 28 of 37
•
•
•
LEFT CLICK ON THE HARDWARE FOLDER TAB
CLICK ON DEVICE MANAGER BUTTON
EXPAND PORTS (COM & LPT) PROPERTIES BY
CLICKING ON “+” SIGN NEXT TO THE LABEL.
• VERIFY WITH THE PICTURES BELOW FOR COMM
PORT LABELS. NOTE THAT THE VALUE FOR COM
NUMBERS CAN BE DIFFERENT, EXAMPLE: COM L
(OBDII KEY) (COM7) COULD ALSO READ COM L
(OBDII KEY) (COM8)
ENSURE THERE ARE NO YELLOW (!) OR (?) OR RED (X)
CHECK MARKS (ERRORS) IN THE DEVICE MANAGER (SEE
FIGURE BELOW).
OR
2. IF THE COMM PORTS ASSIGNMENT ARE CORRECT
PROCEED TO THE NEXT STEP OTHERWISE USING THE
TEEEA135A0 (4/25/2005) REV S.
Page 29 of 37
CORRECT RE(IMAGE) PROCEDURE AND SOFTWARE
REINSTALL THE SOFTWARE.
14. LOG OUT AND LOGIN BACK AS OBIS
15. FROM THE MAIN MENU SELECT “SERVICE MENU” (1).
16. ENTER DAILY SERVICE CODE AND PRESS F10.
17. SELECT “DIAGNOSTIC MENU” (2).
18. CLICK ON “OBD II COMMUNICATION TEST” (NUMBER 2)
19. FOLLOW THE DIRECTIONS ON THE SCREEN
20. ALLOW FOR THE DATA FIELDS TO FILL IN. THE DATA
DISPLAYED WILL DIFFER FROM VEHICLE TO VEHICLE; WE
ARE ONLY CONCERNED THAT DATA IS APPEARING. IF
21. IF THE TEST RESULTS ARE NOT AS EXPECTED PROCEED
TO THE NEXT STEP
22. CHECK FOR +12 VOLTS ACROSS THE PINS OF J9 (BAR
CODE SCANNER POWER). IF +12 VOLTS IS NOT
PRESENT, CHANGE THE CONTROLLER BOARD.
23. IF +12 VOLTS IS PRESENT AT THE CONTROLLER BOARD,
CHECK FOR THE +12 VOLTS AT THE BACK PANEL
CONNECTORS COM H (PINS 7 AND 25, BAR
24. CODE SCANNER)
25. IF +12 VOLTS IS NOT PRESENT, REPAIR OR REPLACE
EFFECTED HARNESS OR TROUBLESHOOT REPLACE
COMMUNCIATION BOX. IF +12 VOLTS IS PRESENT,
REPLACE THE OBD II KEY AND CONNECTING CABLE.
VID COMMUNICATIONS MALFUCTIONS
PROBLEM
NO
COMMUNICATION
WITH VID
CAUSE
NO DIALTONE, BAD
TELEPHONE LINE, BAD
TELEPHONE JACK, INCORRECT
ANALYZER PHONE NUMBER,
INCORRECT VID PHONE
NUMBER OR BAD MODEM
SOLUTION
1. FROM THE MAIN MENU SELECT “MANUFACTURER’S
TECHNICIAN MENU” (5).
2. ENTER DAILY SERVICE CODE AND PRESS F10.
3. SELECT “DIAGNOSTIC MENU” (2).
4. FROM THE “DIAGNOSTIC MENU” SELECT ”NETWORK
COMMUNICATION DIAGNOSTICS”
5. FROM THE “NETWORK COMMUNICATION DIAGNOSTICS”
SELECT “DIALTONE TEST”
6. YOU WILL HEAR A DIALTONE AND WILL RETURN BACK TO
“NETWORK COMMUNICATION DIAGNOSTICS” MENU PAGE,
IF THERE IS NO DIALTONE CHECK PHONE LINE
CONNECTION AND THE TELEPHONE WIRE. REPLACE
7.
8.
9.
10.
11.
TELEPHONE WIRE AND OR TRY ANOTHER TELEPHONE
LINE. IF THE DIALTONE TEST IS OKAY, VERIFY THE VID
PHONE NUMBER AND ANALYZER PHONE NUMBER BY
DOING THE FOLLOWING STEPS:
CLICK ON “MANUFACTURERS TECHNICIAN MENU”
(NUMBER 5)
ENTER THE ACCESS CODE, PRESS F10 TO CONTINUE
CLICK ON “STATE FUNCTIONS” (NUMBER 3)
CLICK ON “UPDATE STATION INFORMATION”
VERIFY AND CORRECT AS NECESSARY THE VID PHONE
TEEEA135A0 (4/25/2005) REV S.
Page 30 of 37
NUMBER AND THE ANALYZER PHONE NUMBER IF BOTHE
ARE CORRECT THEN PERFORM THE NEXT STEP.
12. FROM THE MAIN MENU SELECT “MANUFACTURER’S
TECHNICIAN MENU” (5).
13. ENTER DAILY SERVICE CODE AND PRESS F10.
14. SELECT “DIAGNOSTIC MENU” (2).
15. FROM THE “DIAGNOSTIC MENU” SELECT ”NETWORK
COMMUNICATION DIAGNOSTICS”
16. FROM THE “NETWORK COMMUNICATION DIAGNOSTICS”
SELECT “MODEM DIAGNOSTICS”
17. VERIFY THAT THE COMPUTER IS CONNECTED USING A
TELEPHONE LINE TO A TELEPHONE JACK
A SUCCESSFUL MODEM TEST WILL RETURN BACK TO
“NETWORK COMMUNICATION DIAGNOSTICS” MENU PAGE, IF
THE MODEM IS BAD OR NOT WORKING COMMUNICATION
ERROR WILL BE REPORTED. REPLACE COMPUTER.
GAS CAP TESTER MALFUNCTIONS
PROBLEM
CANNOT
CALIBRATE GAS
CAP TESTER
CAUSE
SOFTWARE POWER SWITCH
OFF, COMM PORTS NOT SET UP
CORRECTLY IN SOFTWARE OR
BAD COMMUNCIATIONS PORT
“C”
SOLUTION
1.
TO VERIFY THAT THE COMM PORTS ARE SET UP
CORRECTLY IN SOFTWARE PERFORM THE FOLLOWING
STEPS
•
•
•
EXIT FROM THE OBIS PROGRAM
LOG IN AS EQUISERV
RIGHT CLICK ON “MY COMPUTER” ICON ON
WINDOWS 2000 DESKTOP
• SELECT PROPERTIES FROM MENU BY LEFT CLICK OF
THE MOUSE
• LEFT CLICK ON THE HARDWARE FOLDER TAB
• CLICK ON DEVICE MANAGER BUTTON
• EXPAND PORTS (COM & LPT) PROPERTIES BY
CLICKING ON “+” SIGN NEXT TO THE LABEL.
• VERIFY WITH THE PICTURES BELOW FOR COMM
PORT LABELS. NOTE THAT THE VALUE FOR COM
NUMBERS CAN BE DIFFERENT, EXAMPLE: COM C
(GAS CAP TESTER) (COM4) COULD ALSO READ
COM C (GAS CAP TESTER) (COM8)
ENSURE THERE ARE NO YELLOW (!) OR (?) OR RED (X)
CHECK MARKS (ERRORS) IN THE DEVICE MANAGER (SEE
FIGURE BELOW).
TEEEA135A0 (4/25/2005) REV S.
Page 31 of 37
OR
•
2.
3.
4.
5.
6.
7.
8.
IF THE COMM PORTS ASSIGNMENT ARE
CORRECT PROCEED TO THE NEXT STEP
OTHERWISE USING THE CORRECT RE(IMAGE)
PROCEDURE AND SOFTWARE REINSTALL THE
SOFTWARE.
LOG OUT AND LOGIN BACK AS OBIS
FROM THE MAIN MENU SELECT “MANUFACTURER’S
TECHNICIAN MENU” (5).
ENTER DAILY SERVICE CODE AND PRESS F10.
SELECT “DIAGNOSTIC MENU” (2).
FROM THE “DIAGNOSTIC MENU” SELECT ”SWITCH TEST”.
ATTACH THE 7 PIN, CPC LOOPBACK ADAPTER TO THE
FUEL CAP TESTER CONNECTOR (C)
SELECT THE “POWER #1” BUTTON (POWER TO PORT C).
RESELECTING THIS BUTTON SHOULD TOGGLE THE LED
ON THE LOOPBACK ADAPTER ON AND OFF. IF THE TEST
TEEEA135A0 (4/25/2005) REV S.
Page 32 of 37
FAILS REPLACE THE CONNECTING CABLE AND OR GAS
CAP TESTER OTHERWISWE CONTINUE TO THE NEXT STEP.
9. FROM THE MAIN MENU SELECT “SERVICE MENU” (1).
10. ENTER DAILY SERVICE CODE AND PRESS F10.
11. SELECT “DIAGNOSTIC MENU” (2).
12. SELECT” LOOPBACK TEST”.
13. FROM THE “SERIAL PORT” DROP-DOWN WINDOW SELECT
COMM PORT C FOR TEST.
14. ATTACH APPROPRIATE LOOPBACK ADAPTER TO THE
PORT UNDER TEST AT THE REAR CONNECTOR PANEL
(LOOPBACK ADAPTERS WILL ONLY FIT INTO APPROPRAITE
CONNECTORS).
15. SELECT “START”. VERIFY CORRECT LOOPBACK
RESPONSE IN THE “TEST STATUS” WINDOW
RX/TX=PASS
RTS/CTS= PASS
DTR/DSR=PASS
16. IF THE TEST RESULTS ARE NOT AS EXPECTED PROCEED
TO THE NEXT STEP OTHERWISE REPLACE THE
CONNECTING CABLE REPLACE THE CONNECTING CABLE
AND OR GAS CAP TESTER
17. CHECK FOR +12 VOLTS ACROSS THE PINS OF J9 (BAR
CODE SCANNER POWER). IF +12 VOLTS IS NOT
PRESENT, CHANGE THE CONTROLLER BOARD.
18. IF +12 VOLTS IS PRESENT AT THE CONTROLLER BOARD,
CHECK FOR THE +12 VOLTS AT THE BACK PANEL
CONNECTORS COM C
19. IF +12 VOLTS IS NOT PRESENT, REPAIR OR REPLACE
EFFECTED HARNESS OR TROUBLESHOOT REPLACE
COMMUNCIATION BOX. IF +12 VOLTS IS PRESENT,
REPLACE THE CONNECTING CABLE REPLACE THE
CONNECTING CABLE AND OR GAS CAP TESTER
COMPUTER TEST
1.
2.
3.
Place the DELL Diagnostic CD in the CD-ROM drive and reboot the computer.
During the initialization (blue DELL screen) press the F12 key to select the Boot Device Menu.
NOTE SOME OF THE FOLLOWING STEPS HAVE TIMES, IN SECONDS, AT THE BEGINNING
OF THE STEP. THESE ARE TIMED STEPS AND A CHOICE MUST BE MADE BEFORE THE TIMER
RUNS OUT, OR THE DEFAULT WILL BE SELECTED.
4.
At the Boot Device Menu select the “IDE CD-ROM Device”, then press Enter.
TEEEA135A0 (4/25/2005) REV S.
Page 33 of 37
5.
6.
7.
(8 seconds) From the Boot Menu press 2 to select “Boot from the CD-ROM”.
(28 seconds) Press 1 then Enter to select “Run DELL Diagnostics”.
From the black and white Dell Diagnostics Menu press 1 to select “Dell 32-bit Diagnostics for
Resource CD for: OptiPlex GX …. (150 or 260 or 270)”.
8.
After various modules load the following menu will be displayed:
MAIN MENU- SERVICE TAG XXXXXX
Express Test
Extended Test
Custom Test
Symptom Test
9.
Click on “Express Test”.
NOTE: THE SCREEN MAY TURN BLACK FOR SHORT PERIODS DURING TESTING. B. THE
TESTS WILL TAKE ABOUT 7 MINUTES TO COMPLETE.
10.
Upon completion of the tests the computer will indicate either failures or that no faults were found.
If one or more failures were detected, the operator is prompted to select Ok to view the results.
11.
If a fault is detected (or if no fault is detected, but you still suspect a particular area) you may select
the option of “Custom Test” by clicking on the “custom Test button from the Menu. This will allow the
user to test a individual device for more advanced testing.
12.
Press <ESC> key to exit, or close the Diagnostic Menu by clicking on the box with an X in the
upper right hand corner of the active window.
COMM PORT ASSIGNMENT VERIFICATION:
1. Log into Windows as the Equiserv user.
2. Inspect the current port settings by:
3. Enter the system registry by clicking ”Start”,””Run”. Type REGEDIT and press <Enter>. Navigate to the
following as shown in Figure 1. HKEY_LOCAL_MACHINE\Software\Snap-on Diagnostics\Emissions
Analyzer\Peripherals.
TEEEA135A0 (4/25/2005) REV S.
Page 34 of 37
Figure 1, Registry Editor
10. Verify barcode scanner by clicking on “Barcode Scanner” and double clicking on “CommPort”. You should
see the following dialog, as shown in Figure 2.
Figure 2, Edit DWord Value
11. Verify the Gas Cap Tester by clicking on “Gas Cap Tester” and double clicking on “CommPort”. You
should see the following dialog as shown in Figure 3.
Figure 3, Edit DWord Value
12. Verify OBDII Key by clicking on “OBDII” and double clicking on “CommPort”. You should see the following
dialog as shown in Figure 4.
TEEEA135A0 (4/25/2005) REV S.
Page 35 of 37
Figure 4, Edit DWord Value
13. Close Registry.
TEEEA135A0 (4/25/2005) REV S.
Page 36 of 37
DIAGNOSTICS TESTS
The Diagnostics Test is used for diagnosing and troubleshooting device related problems.
LOOPBACK TEST
The Loopback Test is used for testing the COMM Ports on the Communication Box. The test verifies that
the COMM Ports are working correctly. Tools needed: set of 3 Loopback Adapters
SNAP-ON PART #: EAE0030L10A
SNAP-ON PART #: EAE0027L05A
SNAP-ON PART #: EAE0027L04A
1.
2.
3.
4.
5.
6.
From the Main Menu select “Manufacturer’s Technician Menu” (5).
Enter daily Service Code and press <F10>.
Select “Diagnostic Menu” (5).
From the “Diagnostic Menu” select” Loopback Test”.
From the “Serial Port” drop-down window select the desired port for test.
Attach appropriate Loopback Adapter to the port under test at the rear Connector Panel
(Loopback adapters will only fit into appropriate connectors).
7. Select “Start”. Verify correct Loopback response in the “Test Status” window with the table
below.
NOTE IF LOOPBACK RESULTS DO NOT MATCH EXPECTED RESULTS IN THE ABOVE TABLE
PROCEED TO TROUBLESHOOTING.
LOOPBACK TEST COMPLETE
SWITCH TEST
The Switch Test is used to test the Fuel Cap Tester Power. Tools needed: one Loopback Adapter
SNAP-ON PART #: EAE0030L10A
1.
2.
3.
4.
5.
6.
From the Main Menu select “Manufacturer’s Technician Menu” (5).
Enter daily Service Code and press <F10>.
Select “Diagnostic Menu” (5).
From the “Diagnostic Menu” select ”Switch Test”.
Attach the 7 Pin, CPC Loopback Adapter to the Fuel Cap Tester Connector (C)
Select the “Power #1” button (power to port C). Reselecting this button should toggle the LED
on the Loopback Adapter ON and OFF.
NOTE IF LOOPBACK RESULTS DO NOT MATCH EXPECTED RESULTS, PROCEED TO
TROUBLESHOOTING.
SWITCH TEST COMPLETE
TEEEA135A0 (4/25/2005) REV S.
Page 37 of 37
DIALTONE TEST
The Dialtone test confirms that the computer is connected to a good phone line via a good telephone cable.
1. From the Main Menu select “Manufacturer’s Technician Menu” (5).
2. Enter daily Service Code and press <F10>.
3. Select “Diagnostic Menu” (5).
4. From the “Diagnostic Menu” select ”Network Communication Diagnostics”
5. From the “Network Communication Diagnostics” select “Dialtone Check” (2)
6. You will hear a Dialtone and will return back to “Network Communication Diagnostics”
menu page, if there is no Dialtone check phone line connection and the telephone wire.
Replace telephone wire and or try another telephone line.
DIALTONE TEST COMPLETE
MODEM TEST
The Modem test confirms that the modem inside the Computer is functional.
NOTE: BEFORE DOING THE MODEM TEST A DIALTONE TEST NEEDS TO BE PERFORMED.
1. From the Main Menu select “Manufacturer’s Technician Menu” (5).
2. Enter daily Service Code and press <F10>.
3. Select “Diagnostic Menu” (5).
4. From the “Diagnostic Menu” select ”Network Communication Diagnostics”
5. From the “Network Communication Diagnostics” select “Modem Diagnostics”(1)
6. Verify that the Computer is connected using a telephone line to a telephone jack
7. A successful modem test will return back to “Network Communication Diagnostics” menu
page, if the modem is bad or not working communication error will be reported. Replace
Computer.
MODEM TEST COMPLETE
OBDII TEST
The OBDII test is used for verifying the Communication between the Analyzer and Vehicle.
1. From the Main Menu select “Manufacturer’s Technician Menu” (5).
2. Enter daily Service Code and press <F10>.
3. Select “Diagnostic Menu” (5).
4. With the OBD II Reader connected to its cable (and the cable connected to Port L) connect the
vehicle end of the OBD II Reader to an OBD II equipped vehicle.
5. Turn the ignition on.
6. From the “Diagnostic Menu” select ”OBDII Test” (1)
7. Allow a second or two for the data fields to fill in. The data displayed will differ from vehicle to
vehicle; we are only concerned that data is appearing.
NOTE:
IF AFTER SEVERAL SECONDS THE SCREEN DISPLAYS “ERROR OPENING OBD II”,
THEN TEST ANOTHER VEHICLE OR PROCEED TO TROUBLESHOOTING.
OBDII TEST COMPLETE
TEEEA135A0 (4/25/2005) REV S.