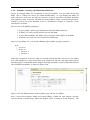
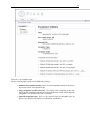
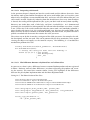
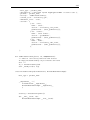
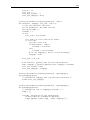
1
The Definitive Guide to Plone
First Edition
16th May 2005
1
Table of Contents
1 Chapter 1
1.1 Introducing Plone
1.1.1
1.1.2
1.1.3
1.1.4
What Is a Content Management System?
Do You Want a Content Management System?
Introducing Plone’s Features
Getting Involved in Plone’s Development
2 Chapter 2
2.1 Installing Plone
2.1.1
2.1.2
2.1.3
2.1.4
Installing Plone on Windows
Installing Plone on Mac OS X, Unix, and Linux
Installing from Source
Configuring the Web Server
3 Chapter 3
3.1 Adding and Editing Content
3.1.1
3.1.2
3.1.3
3.1.4
3.1.5
3.1.6
3.1.7
3.1.8
Joining a Site
Enabling Cookies
Setting Up Your Folder and Preferences
Adding and Editing Documents
Adding and Editing Other Types of Content
Organizing Content
Discussing and Finding Content
Example: Creating the Plone Book Web Site
4 Chapter 4
4.1 Making Simple Customizations
4.1.1 Administering Sites
4.1.2 Using the ZMI
4.1.3 Customizing Plone’s Look and Feel
5 Chapter 5
5.1 Introducing Basic Plone Templating
5.1.1 Understanding the Underlying Templating Machinery
5.1.2 Using the Zope Page Templates System
5.1.3 Understanding the Page Template Basic Syntax
6 Chapter 6
6.1 Introducing Advanced Plone Templating and Scripting
2
6.1.1
6.1.2
6.1.3
6.1.4
Understanding Advanced Plone Templating
Scripting Plone with Python
Useful Tips
Using Forms
7 Chapter 7
7.1 Customizing the Look and Feel of Plone
7.1.1
7.1.2
7.1.3
7.1.4
Introducing Plone Skins
Customizing Skins
Making New Skins and Layers
Case Study: Examining the NASA Skin
8 Chapter 8
8.1 Managing Workflow
8.1.1
8.1.2
8.1.3
8.1.4
What Is Workflow?
Understanding Workflow in Plone
Adding and Editing Workflow
Common Tasks and Examples
9 Chapter 9
9.1 Setting Up Security and Users
9.1.1
9.1.2
9.1.3
9.1.4
9.1.5
Administering Users
User Registration Tools
Setting Permissions
Scripting Users
Integrating Plone with Other Services
10 Chapter 10
10.1 Integrating with Other Systems
10.1.1
10.1.2
10.1.3
10.1.4
Open-Source Licensing
Installing Plone Products
Using a Different Web Server
Integrating Plone with the File System
11 Chapter 11
11.1 Manipulating and Categorizing Content Types
11.1.1 An Overview of Content Types
11.1.2 Searching and Categorizing Content
12 Chapter 12
12.1 Writing a Product in Python
3
12.1.1 Writing a Custom Content Type
12.1.2 Writing a Custom Tool
12.1.3 Adding Some User Interface Elements
13 Chapter 13
13.1 Developing with Archetypes
13.1.1
13.1.2
13.1.3
13.1.4
13.1.5
13.1.6
13.1.7
Introducing Archetypes
Putting Together the Rest of the Content Type
Archetypes based Development
Setting Up a Content Type
Setting Up a Transformation on Windows
Testing the Content Type
Making a Content Type Persist in a Relational Database
14 Chapter 14
14.1 Administering and Scaling Plone
14.1.1 Administering a Plone Site
14.1.2 Improving Plone Performance
14.1.3 Using Zope Enterprise Objects
1 Chapter 1
1.1 Introducing Plone
A company without a Web site is unthinkable—and most companies and organizations have
more than one site. Whether it’s an external site for communicating with clients, an intranet
for employees to use, or a site for direct client communication and feedback, all Web sites have
a common problem—how to manage the content on them. This is a challenge that can often
cost organizations large amounts of time and effort. Producing a powerful yet flexible system
for these sites that meets ever-changing requirements while growing to meet your company’s
emerging needs isn’t easy.
No matter what the requirements for your Web site are or the amount of content or users,
Plone is a user-friendly, powerful solution that lets you easily add and edit any type of content
through the Web, produce navigation and searches for that content, and apply security and
workflow to that content.
Plone enables you to put together almost any Web site and easily update it. This lets you
build content-rich sites quickly so you can gain a competitive advantage. Finally, probably the
best things about this system are that it’s free and it’s open source. With its large and impressive feature set, it’s comparable, if not better than, many closed-source content management
systems that cost hundreds of thousands of dollars.
Mike Sugarbaker says the following when reporting on the
Content Management Conference (OSCOM) in 2002 for the
(http://www.mindjack.com/events/oscom.html):
Open Source
Mindjack site
“I won’t do the complete rundown of all the ’competing’ open-source content management
frameworks. I’ll cut to the chase: The winner is Plone. This ’productized’ take on the six-yearold web application framework Zope was the package with the most tools, the most professionalism, the most traction, and, above all, the most buzz.”
You can find the Plone Web site at http://www.plone.org, as shown in Figure 1-1. To try Plone
easily, a demonstration site is available at http://demo.plone.org. There you can quickly and
easily add and edit content through the Web. Specifically, you can add events, upload pictures,
add documents, and process them all through the framework that Plone provides.
4
5
Figure 1-1. The Plone Web site
1.1.1 What Is a Content Management System?
One simple definition for a Content Management System (CMS) is that it’s a system for managing content. This is a rather unhelpful definition, so I’ll break it down into smaller parts for
a fuller explanation. I’ll start with a broad definition of content: Content is a unit of data with
some extra information attached to it. That piece of data could be a Web page, information
about an upcoming event, a Microsoft Word document, an image, a movie clip, or any piece of
data that has meaning to the organization deploying the system.
6
All these items are called content, and they all share similar attributes, such as the need to be
added or edited by certain users and be published in various ways. A system called workflow
controls these attributes. Workflow is logic defined by the organization’s business rules, and it
describes a system for managing the content.
Historically there has been a difference between document management systems and CMSs,
but mostly these two systems have converged. The essential difference is the items being
managed; it’s often considered that content is any unit of information, and a document refers to
something that’s created and edited by humans using software such as Microsoft Office. Take,
for example, a book: A book contains many units of data and may require management slightly
different from that required by content. However, in most cases, this is a small difference, and
products such as Plone are able to manage the small units of a larger piece of content and
reassemble them.
With the ubiquitousness of the Web, many CMSs are now classified as Web CMSs, either because they have a Web-based interface or because they focus on a Web-based delivery system
over the Internet or an intranet. Plone provides a Web management interface and Web-based
delivery system.
The following is one definition of a CMS (http://www.contentmanager.eu.com/history.htm):
A CMS is a tool that enables a variety of (centralized) technical and (decentralized)
nontechnical staff to create, edit, manage and finally publish a variety of content
(such as text, graphics, video, and so on) whilst being constrained by a centralized
set of rules, process, and workflows that ensure a coherent, validated Web site
appearance.
1.1.2 Do You Want a Content Management System?
Although not the only advantage of a CMS, the most obvious benefit of a CMS is coordinating
a Web site easily. Take a situation where one person, a Webmaster, coordinates a Web site,
either an intranet or an external site. Content comes from users in a variety of formats, and
the Webmaster turns these into usable Web pages by converting them to Hypertext Markup
Language (HTML). If a user has to change those pages, then the user sends the changes to the
Webmaster, who changes the pages, and so on.
This presents many problems for the organization, the biggest being that all content
is flowing through one person - an obvious bottleneck. That one person can do
only so much work, and if that person is sick or leaves the company, a great deal of
productivity is lost in finding a replacement. The publishing process can be quite
frustrating as e-mails fly between the Webmaster and the user trying to get content
published.
What’s needed is a system that does the following:
Separates the content of a page from the presentation: If the actual content is
separate from the presentation method, then the content author doesn’t need to
know any HTML or how the page is delivered. In fact, one piece of content could
7
have many different templates applied to it, including formats other than HTML,
such as Portable Document Format (PDF), or Scalable Vector Graphics (SVG). When
you want to change the look and feel of the site, you have to change only that one
template rather than all the content.
Allows certain users to add and edit content: If specified users can add and edit
content easily, then there’s no need to send content to the Webmaster or Web team.
Instead, the user who wants to create a page can do so and edit it as much as
necessary.
Applies rules to whom can publish what and when: Your business rules might
not want just anybody publishing content on your Web site; for example, people in
marketing would be able to publish to the press release part of the site and not to
the engineering section.
Can apply business rules to content: If a person from marketing creates a press
release, somebody in legal might need to review that document. In this case, the
document will be passed through a review process that ensures it won’t go live until
these reviews are done.
Can search and index information intelligently: Since the CMS can keep track
of structured information about the content (such as author’s name, publication
date, modification dates, categories, and so on), it can produce listings of content
by author, recent content, and so on. It can also provide searching capabilities that
are much smarter and more useful than just a simple textual search.
Although this example portrays paybacks that are more significant for large organizations,
organizations of all levels benefit from this approach. In fact, typically small organizations
that don’t employ a full-time Webmaster can be one of the key beneficiaries of such a system.
By installing a CMS, you can resolve all these issues and more.
The key factor of any CMS is that it provides a clear separation of the key elements in it:
security, workflow, templates, and so on. For example, the templates presenting an item are
separate from the content. This allows you to easily modify the presentation.
1.1.3 Introducing Plone’s Features
Plone is open source, licensed under the General Public License (GPL), which is a common
open-source license that allows anyone to use the source for free. For more information about
the GPL, go to the Free Software Foundation Web site at http://ww.gnu.org. You can examine
any aspect of Plone’s code and alter it to fit your application. There are no licensing fees to
pay, there’s no license that will expire, and all the code is visible. This open-source philosophy
means that Plone already has a large user base and legion of developers, usability experts,
translators, technical writers, and graphic designers who are able to work on Plone. By choosing Plone, you’re not locked into one company; rather, nearly a dozen companies offer different
Plone services.
8
1.1.3.1 Packaging
Plone maintains easy installers for Windows, Linux, and Mac. Other third-party products and
add-ons also come with the installers. Maintaining quality releases of these products makes
installation and management easy. Also, each new release maintains migration paths and
updates so that your Plone site will keep working and stay up-to-date.
1.1.3.2 Internationalization
The whole Plone user interface is translated into more than 20 languages, including Korean,
Japanese, French, Spanish, and German. Inserting your own translation is easy (see Chapter
4).
1.1.3.3 Usability
Plone offers an excellent user experience that provides high levels of usability and accessibility.
This isn’t just a matter of presenting pretty HTML but instead goes to the core of Plone. Plone
provides an interface that’s compatible with the industry and government standard WAI-AAA
and U.S. Section 508. This allows sites built with Plone to be used by people with vision
disabilities. In addition, this provides the unexpected but related benefit that your page may
index better in search engines such as Google.
1.1.3.4 Skinnable
Plone separates the content from the actual templates used to present the content, often called
skins. The skins are written in the excellent HTML templating system, Zope Page Templates,
and a large amount of Cascading Style Sheets (CSS). With little knowledge of Plone, you can
apply multiple skins, achieve multiple looks, and totally customize your Web site’s appearance.
1.1.3.5 Registration and Personalization
Plone features a complete user registration system. Users register with a Plone site using their
own username, password, and any other information you might want to add about the user.
You can then personalize the whole user interface for that user. In addition, with add-ons, you
can use information you already have about users, coming from many places, such as relational
databases, Lightweight Directory Access Protocol (LDAP), Active Directory, and more. Chapter
8 covers how to register and configure users.
1.1.3.6 Workflow and Security
Workflow controls the logic of processing content through the site. You can configure this logic
through the Web using graphical tools. Site administrators can make sites as complex or as
simple as they’d like; for example, you can add notification tools such as sending e-mails or
instant messages to users. Chapter 8 covers workflow in great detail.
9
For every item of content in a Plone site, you can set up access control lists to decide who has
access to that item and how they’ll be able to interact with it. Will they be able to edit it, view
it, or comment on it? All this is configurable through the Web (see Chapter 9).
1.1.3.7 Extensible
Since Plone is open source, it can be easily altered. You can change and configure almost any
aspect of Plone to suit your needs. Countless packages and tools for Plone provide a wide array of options for smaller sites and for large-scale enterprises. Repositories of free add-ons for
Plone are available at http://www.plone.org. With development tools such as Archetypes (covered in Chapter 13), you can generate and alter Plone code easily through the Web or using
Unified Modeling Language (UML) tools. Chapter 10 covers integration of Plone with enterprise solutions such as LDAP, Apache, Microsoft Internet Information Services (IIS), Macromedia Dreamweaver, and so on.
1.1.3.8 Content Customization
Users of a Plone site can add all manner of content, but the data added isn’t limited or constrained. Plone developers can create their own content types so that almost any type of
content can be managed; the only limit is your own imagination. In Chapters 11 and 12,
I’ll discuss how to customize the content types. Chapter 13 will introduce Archetypes, which
is a very powerful system for generating content types that don’t require programming; for
instance, you can generate new types of content from UML tools.
1.1.3.9 Documentation
The Plone project maintains documentation, including this book, which is published under the
Creative Commons license. The best starting place for the community documentation is at
http://www.plone.org/documentation.
1.1.3.10 Community
One of the best things about Plone is the community of developers and companies that supports and develops Plone. With more than 60 developers involved to some degree in the project
around the world, it’s almost always possible to find a Plone developer online who is willing
and able to help you. Alan Runyan, Alexander Limi, and Vidar Andersen started Plone; however, it quickly grew into a thriving open-source project as more developers became involved.
The contributions from these developers form the Plone product that’s now available.
1.1.3.10.1 Example Plone Sites
Many Plone sites exist; some are obvious because of their looks, and some aren’t. The following
is just a small sample of the more diverse sites:
10
Plone (*http://www.plone.org*) Plone Demo Site (*http://demo.plone.org*) Zope.org
(*http://www.zope.org*) Liquidnet (*http://www.liquidnet.com*) Design Science Toys
(*http://www.dstoys.com*) Give Kids the World (*http://www.gktw.org*) Propane
(*http://www.usepropane.com*) Maestro Headquarters (*http://mars.telascience.org*)
More Plone sites are available at http://www.plone.org/about/sites, including sites that provide
a quite different user interface. Without knowing about the development of these sites, it
would in fact be hard to tell that these sites use Plone.
1.1.4 Getting Involved in Plone’s Development
Although Plone has an impressive list of features, its list of ’wants’ even more impressive. For
this reason, the project is always on the lookout for new people willing to contribute time for
the project.
Fortunately, because Plone is focused on the end user, there’s a need for a very broad spectrum
of disciplines. Volunteers in a range of areas, rather than just coders or Web developers,
are welcomed. Plone needs user interface developers, usability experts, graphic designers,
translators, writers, and testers. You can find the current development status on the Plone Web
site at http://plone.org/development, and the best way to get involved is to join the mailing
lists or join the developers on an Internet Relay Chat (IRC) channel.
Plone is built on top of Zope and the Content Management Framework (CMF). To understand
Plone, you have to understand Zope and the CMF as the underlying architecture. For this
reason, I’ll explain these two items and how they integrate with Plone in this section.
Zope is a powerful and flexible open-source Web application server developed
by Zope Corporation (http://www.zope.org). Originally, Zope was developed as
a stand-alone CMS, but over time it didn’t satisfy the needs of its users. Then
Zope Corporation developed the CMF an open-source project. The CMF provides
developers with the tools necessary to create complex CMSs; it enables workflow,
provides site skinning, and offers other functions.
The CMF is a framework for a system; in other words, it provides the tools for developers to
build a product, rather than just providing an out-of-the-box system that users can use immediately. Plone takes this and many other features and improves upon them to provide the user
with a high-quality product. Plone is a layer on top of the CMF, which is an application running
on top of Zope. Understanding the CMF is key to understanding Plone. Most administration
functions require the use of Zope’s administration interface, and developing Plone requires an
understanding of Zope and its objects.
This book doesn’t go into depth about Zope; rather, it gives you enough information
to complete tasks in Plone. Just reading this book will give you enough information
to customize and modify almost anything you want in Plone. For more information on
Zope, I recommend The Zope Book. Originally published by New Riders, it has since
been placed online and is updated by community members. It’s available free online at
http://www.zope.org/Documentation/Books/ZopeBook/2_6Edition.
Both Zope and the CMF are key technologies that Plone needs; without them, Plone wouldn’t
exist. The Plone team owes a great deal of thanks to everyone at Zope Corporation for having
11
the vision to create and then offer both Zope and the CMF as open source. The list of people
I’d like to thank there and in the CMF communities is long. Thank you, everyone involved.
Zope is written in Python, a powerful object-oriented, open-source programming language
comparable to Perl or Tcl. Knowledge of Python isn’t required to use Plone or even to do some
basic administration; however, customizing products and scripting Plone does require some
Python.
Tommy Burnette, a senior technical director at Industrial Light Magic, says this about Python
(http://www.python.org/Quotes.html):
Python plays a key role in our production pipeline. Without it a project the size of
Star Wars: Episode II
If you plan to do anything sophisticated with Plone, take a day or two to learn the basics of
Python. Not only will this allow you to customize Plone substantially, but it’ll also familiarize
you with objects and how they interact in the Plone environment. Teaching you Python is
outside the scope of this book; instead, I assume you have a basic knowledge of Python. That
fundamental knowledge of Python will be enough to get you through this book and allow you
to customize the Plone installation easily.
Fortunately, Python is an easy programming language to learn; on average, it takes an experienced programmer a day to become productive in it. New programmers take a little longer. If
you’re installing Plone using the Windows or Mac installers, then the correct version of Python
will be included. To download Python as separate product, for almost any operating system,
go to http://www.python.org.
The best way to master Python is to try it from the command Python interpreter. If you have a
Windows installation of Plone, there’s a link for the Pythonwin, a Python Integrated Development Environment (IDE) already in the Start menu; go to Start - Programs - Plone - Pythonwin
(see Figure 1-2).
12
Figure 1-2. The Python prompt on Windows
On Linux and Mac OS X, usually typing python will start the Python interpreter:
$ python
Pyython 2.3.2 (#1, Oct 6 2003, 10:07:16)
[GCC 3.2.2 20030222 (Red Hat Linux 3.2.2-5)] on linux2
Type "help", "copyright", "credits" or "license" for more information.
>>>
Since Python is an interpreted language, instead of the whole Python script being compiled
and run, you can just send lines of code to the interpreter as you write them. This makes the
interpreter an amazingly useful place for testing and debugging code. In the interpreter, each
line waiting for input is prefixed with >>>.
For example, the simplest ’Hello, World” program is as follows:
>>> print "Hello, world!"
Hello, world!
>>>
To exit the interpreter, press Ctrl+D (press the D key while holding down Ctrl) on Linux
or press Ctrl+Z on Windows. (You’ll also use this later for more advanced Zope and Plone
interaction.) You can execute normal Python scripts by passing them to the interpreter; for
example, given the following script called hello.py:
13
print "Hello, world!"
you can run this using the following command:
$ python hello.py
Hello, world!
The Python Web site at http://www.python.org has excellent documentation, especially the
tutorial. Also, the following books provide a good overview of Python:
• *Dive Into Python* (Apress,2004): Based on Mark Pilgrim’s popular Webbased tutorial, this books treats readers to a fast-paced introduction to the
Python language. This is a great book geared toward experienced programmers.
• *Learning Python*, Second Edition (O’Reilly, 2003): This book covers version 2.3 of Python and provides a good overview of Python and all the new
features. This is good for relatively new programmers.
• *Practical Python* (Apress, August 2002): This highly practical introduction to Python offers insight into the language’s array of features. The reader
can immediately put this knowledge into practice, following along with the
creation of ten interesting projects, including a Web-based bulletin board and
a Graphical User Interface–based file-sharing application.
• *Python Essential Reference*, Second Edition* *(Sams, 2001): A reference book that provides a great overview of all the key libraries and functions.
This is an excellent book for experienced programmers.
This book uses the following conventions:
• Italics: New terms are italicized. (Appendix C contains an extensive glossary
that defines all acronyms.) Also, links that appear in the user interface are
italicized.
• Bold: If there are instructions within the text that include something you
should type on your keyboard, these words are in bold.
• Code font: A monospaced font indicates filenames, folder paths, code, variables, and Uniform Resource Locators (URLs).
This book contains lots of screen shots of Zope, Python, and Plone. Since Plone is a rapidly
developing product, the screen shots might vary slightly from the version of software you’re
using; these changes should be minor and shouldn’t affect your understanding of the system.
For this book, the following versions of software are used; although this book is specifically
written with these versions in mind, all the software should work on these and later versions
for some time to come.
Plone 2.0 was the most recently released version of Plone at the time of writing. This is the
second major release of the software, and it provides many new features over 1.0, including
group user management, a new interface, and an improved Zope distribution. It’s strongly
14
suggested you start any new projects in 2.0 or later, rather than using the earlier versions of
Plone.
Version 2.0 of Plone has the following dependencies: Zope 2.7, CMF 1.4.2, and Python 2.3.3.
All of the code examples in this book have been specifically designed not to be dependent upon
these versions or a particular operating system. However, there may be situations where this
isn’t the case; I apologize for any inconvenience.
Originally, a group of Plone users keen to produce quality documentation came up with the
idea of this book. We released the first version of that book on the Plone Web site as an opensource documentation project. All the content added to the Plone Web site was under the open
publication license.
Growing interest in Plone made a commercial book more feasible, and in the summer of
2003, Apress and I started this book. I used some of the material from the old book with
the original owners’ permissions. With the change to Plone 2, I added a large amount of
new material. This book is now published under the Creative Commons license, which allows for the reuse of this work as long as the original author is attributed. However, you may
not use this work for commercial purposes. For more information, see the license online at
http://creativecommons.org/licenses/by-nc-sa/1.0/.
2 Chapter 2
2.1 Installing Plone
This chapter explains how to install Plone on a variety of platforms and set the basic configuration options for Plone. If you want to try Plone really quickly, then your best bet is to go to
the live demonstration site at http://demo.plone.org; you can try adding and editing content
immediately without installing anything.
Unlike the other chapters, reading this chapter from one end to the other may not make the
most sense. Instead, I’ve broken this chapter down by operating system, so you can read only
the sections you need to in order to install Plone. Plone will install on any of the platforms
that Zope supports: Windows, Mac OS X, Linux, most Unix platforms, and Solaris.
For a Plone server, a high-performance computer will obviously make Plone perform better.
Plone is a complicated system that requires processing power and memory. In general, it’s
recommended you don’t go into production with a machine slower than 2GHz with less than
1GB of Random Access Memory (RAM) if you’re serving a large Web site. It works fine with
setups as low as 500MHz and 64MB of memory for more modest sites, however. For advanced
information about the performance, caching, and acceleration of Plone, see Chapter 14. For
a base installation of Plone, you’ll need about 50MB of hard drive space. If you already have
installations of Zope or Python, then this will be a great deal less; you’ll need about 2MB. You
must also account for the Plone object database, which can grow to almost any size depending
upon the amount of data you store.
To use Plone, you need a Web browser that can access the server. If users want to log into
your site, then they must have cookies enabled. JavaScript isn’t required but will provide a
richer user experience. Because of the large amount of Cascading Style Sheets (CSS) in Plone,
modern browsers will see the correct Plone interface in a richer, more attractive way; however,
it should be quite functional in any reasonable browser.
I recommend any of the following browsers:
• Microsoft Internet Explorer 5.5 and later
• Netscape 7.0 and later
• Mozilla 1.0 and later
• Opera 7.0 and later
• Konqueror 3.0 and later
• Safari 1.0 and later
15
16
Plone also is fully functional in the following browsers but may look different from the original
Plone:
• Netscape 4.*x*
• Microsoft Internet Explorer 5.0
• Microsoft Internet Explorer 4.0
• Konqueror 2.*x*
• Lynx (text-based)
• w3m (text-based)
• AWeb
• Links (text-based, with optional graphics)
• Any browser that handles a basic set of Hypertext Markup Language (HTML)
and form input cookies, including most mobile/Personal Digital Assistant
(PDA) browsers
2.1.1 Installing Plone on Windows
By far the easiest way to install Plone is to use the Plone Windows installer, which automates
the installation of Plone on Windows. The installation includes extra packages and options,
a Hypertext Transfer Protocol (HTTP)–loaded database, the setup of services, and Python for
Windows packages. You can download this installer from http://www.plone.org/download.
2.1.1.1 Using the Installer
The installer has been tested on Windows 9*x*, ME, NT 3.51+, 2000, and XP, but it should
also work on other Windows versions. It’s recommended you have administrator access on the
computer you want to install on since the installer will try to set up as a service and install
settings into the Windows Registry. If you already have Zope or Python installed, you may
want to install the source separately to save hard drive space.
Before installing Plone, you should make note of any current Web servers you have running.
For example, later versions of Windows automatically install and start Microsoft Internet Information Services (IIS), which listens to port 80. The installer starts Plone on ports 80 and 8080.
To test if something is using port 80 already, the easiest way to test is by opening a browser
to http://127.0.0.1/ and seeing if it finds a page. You can either disable that Web server or
change the ports for Plone; see ’Configuring the Web Server” later in this chapter. If you want
to run Plone behind IIS or run both Plone and IIS on the same server at the same time, then
see Chapter 14 for more information. At the moment, however, it’s easiest to just disable that
Web server.
Once you’ve downloaded the installer, double-click the installer to begin (see Figure 2-1).
17
Figure 2-1. The start of the Plone installer
The installer goes through the usual steps for installing software; click Next to
continue the setup or Cancel to exit. The Plone installer lets you choose a location
to install the software; the default is c:Program FilesPlone 2 (see Figure 2-2).
Figure 2-2. Selecting a directory
When you get to the password screen, as shown in Figure 2-3, you must enter a username and
a password. This will create a user for you, and this will make the Plone site in that user’s
name. Often people create one user called admin or similar for this role. You’ll need this
18
username and password later, so remember it; however, if you do lose this password, you can
enter a new one later.
Figure 2-3. Entering a username and password
The installation takes about five minutes, depending upon the speed of your computer. The
installation performs a few tasks at the end of the installation, such as compiling all the Python
files and setting up the database. When the installation has finished, a message displays to let
you know that it’s done (see Figure 2-4).
Figure 2-4. Final setup screen
19
To start Plone, access the Plone controller by going to Start - Programs TRA Plone TRA Plone.
The controller is an application that provides a nice user interface for starting and stopping
Plone. It begins with the Status page, which lets you easily start or stop your Plone installation
(see Figure 2-5).
Figure 2-5. Plone isn’t running.
As shown in Figure 2-5, the screen displays the status of your Plone installation. Plone doesn’t
start automatically; you’ll have to click Start to start Plone. Once you’ve clicked this, you may
have to wait a minute as it completes the startup process (see Figure 2-6).
20
Figure 2-6. Plone is now running.
When Plone has started, you can access the Plone site by clicking the View Plone button. This
starts a browser and accesses the Plone site; you should then see the Plone welcome page.
Note that the address in the browser is http://localhost/; this is the address to access your
Plone site. Clicking the Zope Management Interface button starts a browser and accesses the
management interface; the address in the browser for this is http://localhost::8080/manage,
which gives you access to the underlying application server. When you click the Manage button
and access Plone, it’ll ask you for your username and password. This is the username and
password you added in the installer.
The controller will know whether you’ve installed Plone as a service or not as a service. If
Plone has been installed as a Windows service, then you can stop and start Plone using the
standard service management screens and commands. If it hasn’t been installed as Windows
service, you’ll see a little icon appear in the task bar. At this point if you want to edit content,
move on to Chapter 3.
2.1.1.2 Configuring the Server on Windows
The configuration for Plone is contained in a text file that you can edit to configure your Plone
instance. You can change the ports Plone listens to, the log files used, and a whole host of
options. On Windows some of the key features are available through the controller and the
Graphical User Interface (GUI). If you want to alter some of the other configuration options,
refer to Appendix A for a full list of configuration options. To access the controller, select Start
- Programs - Plone - Plone; this will start the controller.
As discussed earlier, the first page you’ll see is the Status page, which allows you to stop or
start Plone. On the left of the controller are a few other screens that I’ll now discuss.
2.1.1.2.1 Changing the Ports
The Ports choice, as shown in Figure 2-7, allows you to specify the ports that Plone listens to for
incoming connections such as HTTP, File Transfer Protocol (FTP), and Web-based Distributed
Authoring and Versioning (WebDAV).
21
Figure 2-7. The Ports page displays the ports on which Plone is running
As mentioned when installing Plone, you’ll want to ensure that no other server is listening to
the same port as Plone servers such as II:S, Apache, and Personal Web Server (PWS) could
be listening to port 80. At the time of writing, only the Plone HTTP and Zope Management
HTTP ports are enabled; to enable them, you have to go into a text file to configure them. The
following are the four fields on the Ports page:
Plone HTTP: This field specifies the port to access Plone for the user. The default
is port 80, the standard default for a Web server. Although this port isn’t required,
without it you won’t be able to access Plone with a Web browser. If this port is
enabled and Plone is running, the View Plone button is enabled on the Status page.
Zope Management HTTP: This field specifies the port to access Plone as the manager. The default is port 8080. This port gives you access to Zope Management
Interface (ZMI) for the root of Zope. You can still get to this through the HTTP
port; however, it’s easier and more convenient to have a separate port. If this port
is enabled and Plone is running, the Manage Plone button is enabled on the Status
page.
FTP Access: This field specifies the port to access Plone via FTP. The default is
blank, meaning that this isn’t enabled; if you want to enable this, the usual port is
21. You can use FTP to transfer large files to and from Plone.
WebDAV Source: This field specifies the port to access Plone via WebDAV. The
default is blank, meaning that this isn’t enabled; if you want to enable this, the
usual port is 8081. (WebDAV is a protocol for remotely authoring content in Plone.
With WebDAV, you’re able to perform tasks such as mapping your Plone server to a
Windows drive letter.)
22
2.1.1.2.2 Using the Emergency User Page
Chapter 9 covers the Emergency User page, but, put briefly, it allows you to get emergency
access to your system should you forget your username or password.
2.1.1.2.3 Starting Plone in Debug Mode
Up to this point, you’ve started and stopped Plone in production mode. This is the fastest way
to run Plone and is recommended. For developing add-ons in Plone or debugging problems,
you’ll need to start Plone in debug mode. This mode is the recommended way of running Plone
when you’re developing products and skins, as you’ll do in later chapters. This method isn’t
the default because you’ll note that Plone is about ten times slower than normal.
To start Plone in debug mode, select Start - Programs - Plone - Plone (Debug Mode), and
a command prompt will appear; all the log information will be printed to this window (see
Figure 2-8).
Figure 2-8. Running Plone from the command line
To test that Plone is running, start a browser and go to http://localhost/; if Plone is installed
successfully, you’ll see the Plone welcome screen.
2.1.2 Installing Plone on Mac OS X, Unix, and Linux
The installations for Mac OS X, Unix, and Linux are different, but the configurations are similar.
Specific packages exist for different operating systems, including Mac OS X, Debian, Gentoo,
FreeBSD, OpenBSD, and RPM Package Managers (RPMs) for Red Hat, SuSE, and Mandrake.
In the following sections, I’ll cover some of the more popular: Mac OS X, Red Hat, and Debian.
For information about your specific operating system, consult the installation instructions for
the specific installation system.
23
2.1.2.1 Installing on Mac OS X
The installer automates the installation of Plone on Mac OS X and has been tested on version 10.2.3 and later. You’ll need administrator access on the computer on which you want
to install. You can download this installer from http://ww.plone.org/download. Once you’ve
downloaded the installer, double-click the installer to decompress the archive, and double-click
the resulting installer package to begin the install. You should see the screen shown in Figure
2-9.
Figure 2-9. Authorizing the installation using your Mac OS X password
Enter your Mac OS X account password to authorize the installation; your account must have
administrator privileges to do this. If your account doesn’t have administrator privileges, log
out and log back in as someone who does and then relaunch the installer. You may want to
move the installer package to /Users/Shared before you log out so you can access it from the
other account. Once the installation is authorized, you’ll see the screen shown in Figure 2-10.
24
Figure 2-10. Welcome to the installer.
The installer goes through the usual steps for installing software. Click the Continue and Go
Back buttons at the bottom as necessary; most of the steps are self-explanatory. However,
when presented with the choice of volumes to install Plone on, you must choose the partition
on which Mac OS X is installed (see Figure 2-11).
::image:: img/3294f0211.png
Figure 2-11. Choosing the boot volume
The installation takes about five minutes, depending upon the speed of your computer. When
the installation has finished, Plone isn’t started by default. The ReadMe.rtf file in /Applications/Plone contains a lot of useful information about running and managing your Plone installation, including how to start Plone. For example, running the following command will
start Plone:
sudo /Library/StartupItems/Plone/Plone start
To test whether Plone has worked, use a browser to go to http://localhost:9090/; you should
see the Plone welcome page. Also in that ReadMe file you’ll find the username and password
that Plone has set up for you to access the server.
25
2.1.2.2 Installing Using an RPM
RPMs are available for the Red Hat, Mandrake, and SuSE distributions. You can download
the latest packages from http://www.plone.org/download. The RPM requires that Python 2.3 is
installed. To find out which version of Python you have, run the following command in a shell:
$ python -V
Python 2.3.2
In this case, Python 2.3.2 is installed; if you don’t have this, RPMs for Python are available
from the Python Web site at http://www.python.org. After downloading the files, install using the standard rpm command; fortunately, the Plone installation prints some really useful
information. For example:
[root@lappi i386]# rpm -ivh Plone2-2.0.0rh-2.i386.rpm
Preparing... ###########################################
[100%]
Making group plone (not altered if already exists).
Making user plone.
~ 1:Plone2 ###########################################
[100%]
Creating initial ’main’ instance...
Instance created. Listening on 127.0.0.1:8080, initial user: ’plone’
with password: ’plone’.
Setup of initial database in ’main’ instance...
/usr/lib/plone2/lib/python/AccessControl/Owned.py:79:
DeprecationWarning: Owned.getOwner(1) is deprecated; please use
getOwnerTuple() instead.
~ DeprecationWarning)
Created initial database content.
look at /etc/plone2/main/zope.conf.
Run then "/etc/rc.d/init.d/plone2 start" to start Plone2.
you may create new Plone instances with mkploneinstance.
As shown in the previous output, to start Plone, run the following:
/etc/rc.d/init.d/plone2 start
To test that Plone is working, use a browser to go to http://localhost:8080/; you should see
the Plone welcome page. The username plone* and the password *plone have been created for
you*.*
2.1.2.3 Installing on Debian Linux
Plone is a standard package in Debian and moves through the standard release process, so
you’ll want to either get the stable or get the unstable version of Plone, depending upon how
your Debian installation is configured. To install Plone, simple use Debian’s apt system to get
the package. This is an example installation:
26
agmweb:/home/andy# apt-get install plone
Reading Package Lists... Done
Building Dependency Tree... Done
The following extra packages will be installed:
zope zope-cmf zope-cmfcalendar zope-cmfcore zope-cmfdefault
zope-cmfplone zope-cmftopic zope-cmfworkflow
zope-formulator zopectl
Suggested packages:
zope-cmfwiki python-unit zope-devguide zope-book
Recommended packages:
zope-cmfforum zope-localizer
The following NEW packages will be installed:
plone zope zope-cmf zope-cmfcalendar zope-cmfcore zope-cmfdefault
zope-cmfplone zope-cmftopic zope-cmfworkflow
zope-formulator zopectl
0 upgraded, 11 newly installed, 0 to remove and 49 not upgraded.
Need to get 4743kB of archives.
After unpacking 24.9MB of additional disk space will be used.
Do you want to continue? [Y/n]
Press Y to continue and install all the required packages. To start and stop Zope, an install
script has been created in the init.d directory, called zope. To start Plone, run the following:
/etc/init.d/zope start
The Debian installer starts Zope on the nonstandard port 9673. Since the Debian installer
is quite unusual, it’s recommended that you read the documentation for the packages at
/usr/share/doc/zope and /usr/share/doc/zope-cmfplone.
2.1.3 Installing from Source
As an alternative to using an installer or package, you can install from the source tarball. If
you’re familiar with installing from source, it’s actually rather simple but does require familiarity with basic tools such as tar. The following sections demonstrate how to install it on
Linux.
This installation assumes you’re familiar with basic operations such as ’untarring” files and
moving files. This requires a working Zope installation.
NOTE To install Zope, see the Zope installation instructions in the
doc/INSTALL.txt file of your Zope download.
For more information, see
http://zope.org/Documentation/Books/ZopeBook/2_6Edition/InstallingZope.stx).
Follow these steps to install Plone:
1. Download Plone 2 from http://www.plone.org/download, and select the
tarball file.
27
2. Unzip the archive using the following: tar xzf CMFPlone2.0.tar.gz
3. You’ll find that a directory has been created called CMFPlone-xxx, where
xxx is the version (for example, CMFPlone-2.0).
4. Move the contents of that directory into your Zope installation’s Product
directory. For example, if the Zope Products directory is in /var/zope,
then do this: mv CMFPlone2.0/ /var/zope/Products*
After completing this installation, restart Zope. Once Zope has restarted, access Zope by opening a browser and going to http://localhost:8080/manage. You’ll need a username and password for this (for example, the username and password you gave during the Zope installation).
In the ZMI, there’s a drop-down list of products you can add located in the top-right corner.
Ensure that Plone Site is one of the options. If so, your installation is complete (see Figure
2-12).
Figure 2-12. Plone Site in the drop-down list
2.1.3.1 Installing from CVS
Concurrent Versioning System (CVS) access is recommended only for experienced users and developers.
You can find current CVS access information at
http://ww.plone.org/development/cvs. The current CVS checkout command is as follows:
cvs -d:pserver:[email protected]:/cvsroot/plone login
cvs -d:pserver:[email protected]:/cvsroot/plone co CMFPlone
Plone 2 has a whole host of other dependencies (such as DCWorkflow, Formulator, Group User
Folder, and so on) that aren’t in Plone CVS, meaning users will have to go and find all these
dependencies. When you start Plone, it’ll print any errors regarding packages not found. For
example:
28
2003-11-21T12:23:11 ERROR(200) Plone Dependency
CMFActionIcons not found. Please download it from http://cvs.zope.org/Products/
2.1.3.2 Adding a Plone Site
Once you’ve installed Plone from source, you need to create an instance of Plone. To do
this, you’ll need to log into the ZMI and add a Plone site. You can access this by going
to the Uniform Resource Locator (URL) for the management interface, which is normally
http://localhost:8080/manage (this port will change depending upon your installation). You’ll
need a manager’s username and password for access to the ZMI; this password is created
during the Zope installation.
NOTE If you’ve forgotten the password for Plone that was created in the installation, don’t panic. You can create a new one; see Chapter 9 for more information.
You add all objects via the drop-down list in the top-right corner, as shown in Figure 2-12.
Scroll down the list until you find Plone Site, and click Add.
After selecting the option Plone Site, a form will display that prompts for some more information (see Figure 2-13):
• Id: This is the unique ID of the Plone site (for example, enter Plone
or Site).
• Title: This is the title of the Plone site (for example, enter My Portal).
• Membership source: For the moment, leave this as the default option, Create a New User Folder in the Portal. This allows you to have
user authentication somewhere other than the portal (see Chapter 9
for more information).
• Description: This is a description of the portal that members will
see in e-mails, (for example, enter A site all about the exciting
new widget technology). Don’t worry too much about this; you
can always change this later in the portal’s properties.
29
Figure 2-13. Adding a Plone site
After clicking Add Plone Site, a Plone site will be created. This may take a minute or two on
slower machines because a great deal of processing occurs. The screen will then redirect you
to the Plone welcome page.
2.1.4 Configuring the Web Server
Once Plone has been installed, you may want to configure the Plone site so that it runs on a
different port, has FTP capabilities, logs to a different file, and so on. This section covers these
basic setup issues. Note that you aren’t configuring the Plone sites themselves; you’re altering
the configuration of the underlying Web server.
NOTE If you’ve installed on Windows using the Windows installer, then most of this
configuration is provided through a nice user interface program; see ’Configuring
the Server on Windows” earlier in this chapter.
NOTE If you’ve installed using Mac OS X or the Windows installer, then you’ll find
one extra file (plone.conf), which contains port definitions used in the main Zope
configuration file.
30
Zope 2.7 creates a configuration file inside each instance installed. All the configuration for the
server is located in that one file. A full list of the configuration options is available in Appendix
A. To find the configuration file, look for a file called zope.conf located in the etc folder of your
Plone installation. Some installers (Windows and Mac OS X, for example) create a second
configuration file called plone.conf that contains Plone-specific configuration options. If your
installation contains a plone.conf file, then use that configuration file to make changes; they’ll
be included in the main configuration file.
The configuration file is extremely verbose and contains a great deal of useful comments and
examples. If you’re familiar with Unix configuration files such as Apache, then you’ll find the
Zope configuration file familiar. To alter Zope configuration, open the configuration in a text
editor, and change the lines as needed; after altering the configuration, you’ll need to restart
Zope.
It’s possible to run Plone 2.0 with a version of Zope prior to 2.7; however, Zope 2.7 offers
increased stability and new features, including easier configuration. If you’re using a version
of Zope prior to 2.7, you’ll need to read the documentation on how to change the configuration.
2.1.4.1 Adjusting the Ports
To change a port, add the address lines for that port. For example, to run Plone on port 80
instead of the default, change the following bold line in zope.conf:
<http-server>
# valid keys are "address" and "force-connection-close"
address 8080
# force-connection-close on
</http-server>
to the following:
<http-server>
# valid keys are "address" and "force-connection-close"
address 80
# force-connection-close on
</http-server>
If you used the Windows or Mac OS X installer, then you’ll find these port definitions in
plone.conf. These values are then imported into the main configuration file. So, on a Mac
to change the port, you’ll edit plone.conf from this:
## PLONE_WEBSERVER_PORT
## -------------------## This is the port you will access your Plone site from. Set this to a port
## number above 1024 not used for any other server on your computer.
%define PLONE_WEBSERVER_PORT 8080
to the following:
%define PLONE_WEBSERVER_PORT 80
31
2.1.4.2 Using the Debug Mode
By default in Zope 2.7 debug mode is enabled. Note that Plone runs significantly slower in
debug mode, approximately 10-20 times slower. To turn this off, add the following line to the
configuration file:
debug-mode off
To make the out-of-the-box experience more impressive for Windows users (debug mode slows
Plone down on Windows even more than on Linux), it ships with debug mode off already.
If you have a Plone site running and want to know if debug mode is running, go to portal_migration in the ZMI and look at the variables listed there; this will tell you if debug mode
is enabled.
2.1.4.3 Using Logs
By default there are two logs in Plone: an access log that you can produce site statistics from
and an event log that contains debug information about Plone products. The event log is the
place to find errors and messages in Plone. The default configuration looks like the following:
<eventlog>
level all
<logfile>
path $INSTANCE/log/event.log
level INFO
</logfile>
</eventlog>
<logger access>
level WARN
<logfile>
path $INSTANCE/log/Z2.log
format %(message)s
</logfile>
</logger>
This is where you can change the path to the file by defining a new file. The values that are
logged are based upon a level sent with error messages; more serious messages are sent with
higher levels. By default, only information and the previous message are sent to the log, but
that value could be one of the following: CRITICAL, ERROR, WARN, INFO, DEBUG, and ALL. If
you wanted to log only errors, then you’d change level INFO to level ERROR.
3 Chapter 3
3.1 Adding and Editing Content
Adding and editing content is a simplification of the sheer power that Plone has available to
leverage. Creating content-rich and feature-rich Web pages with Plone is an absolute breeze.
If you have Plone installed locally, then this chapter shows you how Plone works straight out
of the box. However, if you don’t have Plone installed, then don’t worry; you can try Plone
online by going to http://demo.plone.org.
Before you can alter or edit a Plone site, you need to log into a Plone site. If you installed
Plone, you should have the username and password that came with the installation. This user
has the role of an administrator user, which allows you to log in and alter any content. Most
users of a Plone site will join the site and log in through the login process described in the
’Joining a Site’ section. Users can, of course, view a Plone site without logging in, but they
won’t be able to add or edit content.
In this chapter, I’ll go through the steps a user takes to create content on a Plone site. First, I’ll
cover how to join the site and log in. Once you’ve accomplished this, I’ll cover how to create
and then edit a document. Finally, I’ll show how you can search and publish this content. In
short, this chapter covers how to use Plone.
3.1.1 Joining a Site
When you join a Plone site, you create an account on the server. That account gives you the
right as a member to add content such as images, documents, and so forth. To join a site, click
the join link in the top-right corner of the Web site (see Figure 3-1).
Figure 3-1. Clicking the join link in the top-right corner of the page
This will take you to a registration form that you’ll have to complete (see Figure 3-2). Because
this is the first Plone form you’ve encountered, take note of the following:
• Some fields are required; a little red box next to the text indicates
the required fields.
32
33
• For most fields, some grayed-out help text beneath the field name
indicates what you should enter.
Figure 3-2. The registration page
NOTE Because many of the Plone pages are quite large, the figures in this book
have been cropped to show only the key parts (in this case, the form) and not the
Plone logo or the footer. These elements are still there, but they’re superfluous.
34
To complete the form, complete the fields that are reasonably obvious. The values of the fields
are as follows:
Full Name: Enter your full name. This field is optional.
User Name: Enter the username you want to use. Most people choose an alphanumeric value without spaces, such as bob or jane97. This username will be used
throughout the Web site to refer to you. This field is required.
E-mail: A valid e-mail address is required. This will allow the site administrator
to contact you and to send a password to you. You can change this e-mail address
later by editing your member preferences. This field is required.
Password and Confirm Password: This is the password you want to use; it must
be more than four characters and can contain letters, numbers, and the underscore
(_) character. Passwords are case sensitive (in other words, SomePassword isn’t the
same as somepassword). These fields are required.
Send a mail with the password: Check this box if you’d like your password sent
to the e-mail address you provided. This field is optional.
Once you’ve completed this form, click Register to submit your information. If you’ve made
any errors on this form, then you’ll see a message at the top and the key fields that have an
error highlighted. In Figure 3-3 I entered a password but didn’t enter a value for the Confirm
Password field. Again, this is the standard way that Plone forms will show errors to you.
35
Figure 3-3. Errors on a form
If you’ve completed the form correctly, then you’ll be given the option of logging in immediately. Click the Log In button to log in. You’ll see the page shown in Figure 3-4.
36
Figure 3-4. After registering
If you already have a username and password or are returning to a site you’ve previously
joined, then you can enter your name and password in the boxes in the left column of the site
and click the Log In button.
3.1.2 Enabling Cookies
To log into a Plone site, you must have cookies enabled. If you access a Plone site and try to log
in with cookies disabled, you’ll get a friendly message telling you that cookies must be enabled
with a link to more information. To enable cookies, perform the following steps, depending on
your browser.
Internet Explorer 6.x
1. Select Tools > Internet Options.
2. Click the Privacy tab at the top of the screen.
3. Move the slider to Medium, and click OK.
Internet Explorer 5.x
1. Select Tools > Internet Options.
2. Click the Security tab at the top of the screen.
37
3. Click Custom Level, and scroll down to the Cookies section.
4. Set Allow Per-Session Cookies to Enable, and click OK.
Internet Explorer 4.x
1. Select View > Internet Options.
2. Click the Security tab at the top of the screen.
3. Click Custom Level, and scroll down to the Cookies section.
4. Select Always Accept Cookies or Prompt Before Accepting Cookies, and click
OK.
Mozilla 1.x
1. Select Edit > Preferences.
2. Find Privacy & Security in the menu on the left. If there’s a plus sign (+) to
the left of Privacy & Security, click it.
3. Select Cookies under Advanced.
4. Select Enable Cookies for the Originating Web Site Only or Enable All Cookies,
and click OK.
Opera
1. Press F12.
2. Click Enable Cookies.
Netscape Navigator 6.x
1. Select Edit > Preferences.
2. Find Privacy & Security in the menu on the left. If there’s a triangle pointing
to the right next to Privacy & Security, click it.
3. Select Cookies under Privacy & Security.
4. Select Enable Cookies for the Originating Web Site Only or Enable All Cookies,
and click OK.
If you forget your password at some point, you can get it sent to the e-mail address provided
when you registered with the Plone site. To have your password mailed to you, click the
Forgot your password? link located in the left column of the Web site. This will bring up the
forgotten password form, as shown in Figure 3-5; enter your login name, and a password will
be e-mailed to you.
38
Figure 3-5. Getting a forgotten password
Unfortunately, if you have no longer access to that e-mail account, or you can’t even remember
the username, you’ll have to contact a site administrator. Using the techniques discussed in
Chapter 9, the administrator can change your e-mail and find your user account. Once logged
in to the Plone site, you’ll see a log out link in the upper-right corner. When your work is
finished, it’s good practice to log out of Plone site, especially if you’re accessing it from a
computer that’s likely to be used by other people.
3.1.3 Setting Up Your Folder and Preferences
After you’ve logged in, the member bar in the top-right corner will change to represent the
options available to you as a member of the site (see Figure 3-6).
39
Figure 3-6. Your personal choices in the top-right corner have changed.
One of these options is that each member has a folder created for them when they join a site.
This folder is set up with particular security so only that member (and administrators) can add
and edit the content in that folder. To access your personal folder, click the my folder link in the
personal bar in the upper-right corner of the site. In the upper-right corner you’ll also see a my
preferences link; clicking this will open a list of personalization options. You’ll see two choices
at the moment; you can change your password, or you can go to the personal preferences and
change key preferences in your site.
The change password form allows you to change your password. To complete the form, give
your current password and the new password twice. After you’ve changed your password, the
change will be immediate. You don’t have to log in again; just remember your new password
when you return.
The personal preferences form allows you to set a number of preferences that change how you
see the site. These preferences are stored on the server so they’re retained between uses of the
site (see Figure 3-7).
40
Figure 3-7. Changing preferences
The options are as follows:
Full name: This is the full name you gave when you registered with the site.
E-mail: This is the e-mail address associated with your membership and is used
a number of places in a Plone site. Most important, if you lose or forget your
password, this is the address to which the system will send it.
41
Content editor: When editing complex content, you may want the help of an
editor. If your site administrator has made one available, you can select it here. It
will then be used when you click the edit tab of an object. If you’re unsure, leave
this as the default.
Listed status: This property specifies whether your profile will show up on the
members tab and when someone searches the members listing.
Editing of Short Names: Objects have an ID or Short Name property that’s used for
the internal representation of the content object. This also shows up in the item’s
Web address and the item’s Uniform Resource Locator (URL). By default these look
something like News_Item.2002-11-16.4102, but you could make it much simpler,
such as november_news, by changing the Short Name value.
NOTE When you change an object’s name value, anything that references the older
name will no longer be valid and will result in the page not being found. It’s best
not to change the name value after you submit an object for review or link to it
from elsewhere. For this reason, I recommend setting this option to No.
Portrait: In larger organizations and in community Web sites, it’s useful to see
pictures of other members. The Portrait field allows you to upload a picture of
yourself. The picture should be 75 by 100 pixels.
Once you’ve made the desired changes, click the Save button to commit the changes. Now that
you’ve logged in, it’s time to start adding and editing content.
3.1.4 Adding and Editing Documents
As mentioned, now that you’re a site member, a folder has been created for you where you
can store content. Of course, you can add content to any folder that the site administrator has
given you the right to do so, but by default every user can add content to their member folder.
Each type of content you can add is distinct, and you can edit and view it in different ways.
For this reason, Plone references each type of content differently; for example, you can add
images, links, documents, and so on. Out of the box, Plone provides the following content
types:
• Document: This is an item that presents some static information to the user.
This is the most common type of content added and most closely represents a
typical Web page.
• News item: This is a document that’s to be shown under the news tab (for
example, a press release).
• Link: This is a link to another item, which may be internal or external to
another Web site.
• Image: This is an image, such as a .gif or .jpeg file.
• Event: This is an upcoming event, meeting, conference, or other event.
• Folder: This is like a folder on a hard drive; this is a folder for putting content
into so that it’s easy to find later.
42
• Topic: This is a grouping of other content. This is essentially a saved search
criteria that you can reuse later. Only privileged site users can add topics.
• File: This is another piece of content such as a movie, sound clip, text file,
spreadsheet, compressed file, or anything else you’d like to upload.
I’ll go through each of these items using the document as an example, showing in detail how
to add and edit documents easily and quickly. Using these basic content types, I’ll show you
how to build a dynamic site through a browser, without doing any programming.
Actually, you have many ways of adding and editing content in a Plone site than just through a
Web browser. Access via File Transfer Protocol (FTP), via Web-based Distributed Authoring and
Versioning (WebDAV), or via scripts is all possible. I’ll discuss how to set these up in Chapter
10 and just deal with the Web browser interface for now. In Chapters 11 to 13 of this book, I’ll
discuss how to make new custom content types that you can tailor to a particular site’s needs.
3.1.4.1 Understanding the Document Content Types
Rather than detailing how to add and edit all the different types of content available, I’ll
cover adding one type of content, a document, in detail. After adding and editing a few of
these documents, the approach to adding content should be second nature, and editing other
content will be easy.
A document is a page of content, usually a self-contained piece of text. Although all items
added to Plone are accessible as Web pages, if there’s one content type you could think of as
a Web page, this is it. The default home page for a Plone site that you’ve seen already - the
now-famous Welcome to Plone page - is one example of a document (see Figure 3-8).
43
Figure 3-8. Welcome to Plone, a simple document
3.1.4.2 Adding a Document
You have two ways to add any piece of content using a Web browser. First, ensure you’re
logged in, because only logged-in users can add content. Second, select the my folder link from
the top-right navigation bar. This will take you to your home folder, an area that you control.
44
If you’re able to add content to a folder, then the folder will show up with the green border
around the top (see Figure 3-9).
Figure 3-9. My content
If the green border doesn’t appear, then you won’t be able to add content; this border contains
the actions you can perform in the current location. In Figure 3-9, you can see that the page
shows the contents of the folder, because that’s the highlighted tab. Other tabs appear such as
view, sharing, and properties for more advanced options. In the top-right corner of the green
border, you’ll see an Add New Item drop-down menu and a State drop-down menu. Click the
Add New Item menu to open a drop-down list of items to add (see Figure 3-10).
45
Figure 3-10. Adding a document from the green drop-down menu
To add a new document, select Document. Alternatively, if you look in the body of the page,
you can see another Add New Item drop-down box. Again, click the down arrow to open a list
of items that can be added and then select the item you’d like to add (see Figure 3-11).
Figure 3-11. Adding a document from the main folder’s content menu
Using the Add New Item list from the green border is a handy menu since it’s available most
of the time.
NOTE **If you’re familiar with Zope, you should never, never, never add content from the Zope Management Interface (ZMI). Depending upon how you’ve
installed Plone, you may have already seen the ZMI and used it for customizing and developing Plone through the Web. However, adding content through
the ZMI will create content items that are incomplete and don’t ***Begin Sidebar*
3.1.4.3 Understanding Where to Add Content
The easiest place to add content at the beginning is in the user’s member folder, accessible by clicking the my folder link. Although this is useful, it’s probably not the best approach for a long-term solution. Most noticeably it creates long URLs (for example, /Members/andy/Docum....). It also means your content isn’t accurately reflected in the navigation
tree.
As you’ll see later, a few solutions exist for this; the most common solution is to make a folder
and give certain users the right to access it. For example, that folder may be Help or News. The
’Using Folder” section later in this chapter discusses adding folders, and Chapter 9 discusses
using group workspaces and security.
3.1.4.4 Editing a Document
Once you’ve clicked to add a document, you’ll be taken directly to the edit page with a message telling you that the document has been created. If this doesn’t happen, you can click a
document and then click the edit tab. Again, you’ll see that the edit tab becomes highlighted
in green (see Figure 3-12).
46
Figure 3-12. Editing a document
Now you can edit the document in your Web browser, using the form provided. If you look at
the URL in the address bar of your browser, you’ll note that a short name for the object has
been created for you, something such as Document.2003-12-29.43787. The following is a list
of the fields and their meanings:
Short name: The short name will become part of the document’s URL, so keep the
name short and descriptive, preferably without spaces. Keeping to these rules will
make URLs easier to read. For example, use something such as audit-report-2003.
If you don’t provide a name, Plone will create one for you.
47
NOTE This field won’t appear if you selected No for the short names in your preferences page.
Title: This is the title for the item, and it’ll be shown throughout the site (for
example, at the top of the page, in the search interface, in the title of the browser,
and so on). This field is required.
Description: This is a short lead-in to the document, usually about 20 words to
introduce the document and provide a teaser for the remainder of the document.
This is useful for pages that show summaries of documents, such as search results
and folder contents.
Body text: This contains the body of the document. The format for the content is
set using the Format field (described next).
Format: You have three choices for the format of body content: Structured Text,
HTML, and Plain Text. These types of text are discussed in the ’Choosing a Text
Format” sidebar; if you’re unsure, leave this field alone and type the body text as
usual.
Upload document: If you do have your document as a file on your computer, you
can upload it instead of typing the content into the Body Text field. Use the Upload
button at the bottom of the page to select a file. The contents of an uploaded file
will replace any content in the Body Text field.
Once you’ve finished editing your document, click the Save button to commit your changes.
You’ll be returned to the view tab where you can see how the document will be shown to users
(see Figure 3-13); to edit it again, click the edit tab.
48
Figure 3-13. Saving the content will take you to the view tab.
If you don’t provide the correct input on the edit form, when you save the document you’ll
be returned to the edit page, and your errors will be highlighted. At this point your changes
haven’t been applied—you must correct the mistakes and click Save again before the changes
will be committed. The view tab shown in Figure 3-13 shows the document you’ve created.
You’ll see that the title, description, and content are all shown in slightly different styles. At
the bottom of the page is a byline that contains information about the author of the document,
including the date the page was created.
You’ll note that if you go back to folder contents after saving your changes, you’ll see two
documents in your folder: the existing one that’s created for you and the new one you’ve just
added. You can edit either of these documents by clicking them to open the view tab, which
allows you to select the edit tab.
49
3.1.4.5 Choosing a Text Format
As mentioned previously, you can edit the document content in at least three formats: structured text, HTML, and plain text. This rather confusing state of affairs is brought about by
trying to produce easy systems for users to write rich marked-up content in plain text without
having to use fancy editors.
Unfortunately, in most cases, this really doesn’t work; training is required to understand the
formatting. Structured text requires quite a bit of understanding in itself because it has a frustrating syntax and doesn’t internationalize well. If I had to pick one format that I’d recommend
over all the others, I’d pick HTML because it’s widely understood, and you can use What You
See Is What You Get (WYSIWYG) editors such as Epoz to produce it.
*HTML* HTML is the most standard format; if a document is entered as HTML, it will be
rendered in the same format. This HTML shouldn’t be a complete page but rather a snippet.
For example:
<p>Here is a sample in <i>HTML</i> for a demonstration.</p>
Ideally the HTML should also be valid Extensible HTML (XHTML) to comply with the rest of
the Plone system; if it’s not, your pages don’t comply with Web standards. Entering text as
XHTML isn’t for the faint of heart, so in Chapter 9, you’ll see how into integrate rich-editing
tools into Plone that allow users to easily write content in XHTML. The following screen shot
shows Plone using Epoz so users don’t have to understand HTML:
*Plain Text* Plain text is simple. It does no major conversion or manipulation of the text
entered; it’s just plain text. The only modification made is that new lines are converted into
HTML when rendered so that new lines appear in the Web browser. No other altering happens.
For example:
Here is a sample in plain text for a demonstration
*Structured Text* Structured text is a system for writing plain-text documents in a particular
format, which can then be interpreted in different ways. For example, if a piece of text needs
to be highlighted, then it can written as italics; this will then be shown as italics. This series of
rules means that a user can write a page that contains formatting information easily. For a full
list of structured text rules and examples, please see Appendix A. The following is a sample of
structured text:
Here is a sample in *structured text* for a demonstration
50
3.1.4.6 Setting Document Metadata
Any piece of content can have any number of properties assigned to it. These properties are
known as metadata and provide information such as keywords, copyrights, and contributors of
an item.
This entire set of properties is optional and is usually used only if there are special requirements
for this piece of content, especially since this information isn’t normally shown to the person
viewing the content. So the main reason for entering this data is to add information for tasks
such as searching or categorizing the content.
You can access properties on an object by selecting the green properties tab. This properties
form has the following fields, which are common to all content types:
Allow Discussion: This lets this document be discussed by users who have the
right to do so. If the value is left as default, it’ll use the sitewide policy for that
content type.
Keywords: Each item can have keywords assigned to it to enable grouping and
sorting of the items. For example, an article about recent events in politics may
have the keywords politics and prime minister. Keywords are flexible, and you can
use any keyword from the given list. By default there are no keywords in the Plone
system; site administrators may add new keywords so that other users can select
them.
Effective Date: The effective date is the first day a piece of content should be
available. You can specify this date by entering the values in the form or clicking
the little calendar icon, which opens a calendar, and picking a date (see Figure
3-14).
Figure 3-14. Entering an effective date
Expiration Date: The expiration date is the last day a piece of content should be
available. Usually the Effective Date and Expiration Date fields are left blank.
Format: This is the Multipurpose Internet Mail Extensions (MIME) type of the
item. The term MIME type refers to a computer definition of the type of content
51
(for example, application/msword or image/jpeg). This is set at a default value; if
you’re unsure about this field, just ignore it.
Language: This is the language in which the document is written; the default is
English.
Copyright: This is the copyright information for the content, which is usually
blank.
Contributors: This includes the names of the people outside the Plone system who
contributed to the object. Each person’s name should be on its own line.
After completing the values for this form, click Save to commit the changes. As stated, usually
you won’t need to edit the values on this tab. Editing the contents of this tab is usually based
upon the requirements for your site and the type of site you’re building.
3.1.4.7 What Are Effective and Expiration Dates?
Any item in the Plone system can have effective and expiration dates if the person editing the
content wants. Both of these are optional, and leaving the fields blank will ensure that these
values aren’t set.
One example of an item that may have an effective date is a press release. In the ideal world,
the news item is crafted, prepared, and reviewed in Plone. However, suppose the news item
has to go live on the Web site at midnight, but that’s exactly when you plan to be sleeping.
Not a problem—give the press release an effective date and a time of midnight. Up until the
effective date, it won’t be visible in the calendar, in navigation, in searches, or in pages that
use a search as the listing under the news tab. However, anybody who knows about the press
release will be able to access the page directly. Once the effective date has passed, the item
will appear in all the aforementioned places and be live to the world.
The effect is similar with expiration dates. If you have a special offer that stops being effective
on a particular day, then you could set an expiration date of that day. After that, date it
wouldn’t appear in calendar, navigation, searches, and so on.
The effective and expiration dates don’t actually change the state of the item in workflow (see
Chapter 7 for more information on workflow); rather, they just change where it displays. You
can also set effective and expiration dates on the state tab, which you’ll learn about in the next
section.
3.1.4.8 Publishing Your Document
When a document is created, it’s given an initial state, called visible. By default, content isn’t
automatically published and available to the world; instead, others can view your content, but
it doesn’t show up in searches or the navigation tree. This is a useful state because you can
point other users to this content, but because it won’t show up in navigation or searches, it’s
not visible unless users know about it.
At any point in time, each item of content in your Plone site is in a particular state. This state
describes its permissions and roles within the Plone site. By having items in different states, it’s
52
possible to apply different security to each item of content. For example, sometimes an item
may take a week or two to prepare and involve multiple revisions. Eventually you’ll want to
publish the content so that it’s visible for all users and shows up in the navigation and search.
You can publish the content using the State drop-down menu located at the top right of the
main navigation (see Figure 3-15).
Figure 3-15. State drop-down menu
To publish an object, select Submit from the drop-down menu. By default you can’t directly
publish content, but you can submit it for review. When an item is submitted for review, it
moves into the review state. This is an intermediary state between visible and published. It
allows for the review of content by users of your site with the reviewer role, before it goes live
for the entire world to see. After you’ve submitted the content, you’ll notice that the content is
now in the review state by looking at the box in the top-right corner. You’ll also notice that in
Figure 3-16, there’s no longer an edit tab.
Figure 3-16. The content has been submitted for review, the state has changed to pending, and
the edit tab is no longer an option.
NOTE If you’re logged in as a manager, then you’ll note there will be one extra option in the
drop-down publishing list called Publish. This lets you put content straight into the published
state with no intermediate step.
In the workflow drop-down list in the top-right corner, there’s also an option for Advanced,
which opens the state form for changing the status of an object. This form is the same as
clicking the state tab. It has the following fields:
Effective Date: This is the same as the Effective Date field in the properties (see
the ’Setting Document Metadata’ action).
Expiration Date: This is the same as the Expiration Date field in the properties
(see the ’Setting Document Metadata’ section).
Comments: This includes any comments you want to make for this change in state
that will be recorded in history. For example, you could enter First draft; Bob,
please see second paragraph.
53
Change State: These mirror the choices available in the drop-down menu. For example, the options are Publish, Submit, and so on. One further option, No Change,
is available if no change is necessary.
Select the change of state you’d like to occur, and click Save to commit the changes.
3.1.4.8.1 What Are the Workflow States?
At this point you may be asking yourself what this workflow thing is and what the states mean.
Workflow, as discussed in Chapter 7, is the ability to apply different states to the content. The
following are the default states:
Visible: Content is created in the visible state. All users can find visible content
through the search function and can access it directly by visiting the object URL.
Visible content doesn’t show up in the navigation tree. Visible content is editable
by their owners and site managers.
Pending: Pending content includes items that have been submitted for publishing
by site members. From a user standpoint, pending content behaves like content in
the visible state. The difference between the two types is that pending items are
flagged for review; site reviewers are prompted to publish or reject pending items.
Pending items are editable only by managers and reviewers.
Published: Published items are visible to all site visitors. They appear in search
results and the navigation tree. They may also appear in other areas specific to
that type (news items, for example, also appear when you click the news tab).
Published items are editable only by managers, but owners can retract them for
editing (retracting reverts an item to the public draft state).
Private: Items in the private state are visible and editable only by their owners and
others with manager access to the folder in which they exist. They won’t appear in
search results or on the navigation tree for other users. Private items are editable
by managers.
3.1.4.8.2 How Does Content Get Reviewed?
If you’re a reviewer, then in the right column of the home page you’ll see a new review list
when you first log in. This is a list of the items that have been submitted for review and need
reviewing by you or another reviewer (see Figure 3-17).
54
Figure 3-17. The review list
The review list will appear on the right when you log in as a user with the review role and
there are items to review. In my case, I logged in as admin, which was the user created
during my install process. You can tell you’re logged in because your name will appear in the
member bar. The review list gives a list of items to review - in this case, you need to review
the test document. Click the document to open the item. At this point you essentially have the
following choices for this item:
Reject it: Reject it by selecting Reject from the drop-down choices. This will move
the content back into the visible state and assumes that as a reviewer you’re unhappy with it. Usually you may want to click the Advanced option to open the
comments form and add some comments stating why you’re rejecting it.
Approve it: Approve it by selecting Publish; this will change the content into the
published state. This will make the content publicly available.
Do nothing: Leave it by doing nothing. This leaves the content in limbo but sometimes happens when you need to check information or talk to others. Eventually
you should return to do something with this content because it’ll continue to show
up in your list of items until you make one of the previous actions.
Edit it: Edit it, and then perform one of the previous actions. As the reviewer, you
can make any change you’d like to do, so feel free to change the content by using
the edit tab.
Once you’ve moved content out of the review state by publishing or retracting it, it will no
longer show up in the review list. Of course, this assumes you do have someone as a reviewer
for your site; this usually (although not necessarily) is also the user who created the Plone site
as an administrator. In Chapter 8, I’ll discuss how to add and edit users and give some users
the review role.
3.1.4.8.3 How Do You Edit a Published Document?
Once a document has been published, it must be retracted to be edited. To do this, select
Retract from the workflow drop-down menu, which will move the item back into the visible
state. Once it has returned to the visible state, you can reedit it and placed it back into the
review queue.
This step, although a little annoying, is necessary to ensure that all content goes through a
review step. For example, you have to ensure that any edits made to a page are appropriate by
reviewing the content. Users with the manager role can edit the content at any time, so they
can quickly go in and fix a typo without having to go through the review step. It’s assumed
that users with a manager role are trustworthy! If you’re a manager, as defined in Chapter 9,
you can go to any piece of content and will see the edit tab. At that point, click Edit to alter
the document and make your changes.
55
3.1.4.9 Sharing Your Document
This allows you to assign more rights to other users or groups of users of the system to your
document. This is an advanced feature and is covered in more detail in Chapter 9.
3.1.5 Adding and Editing Other Types of Content
I’ve just covered how to add and edit documents in detail. All the other content types are
similar. They all have the same or similar actions to edit; it’s just the forms and the data in
them that change. In the following sections, I’ll cover some of these other types of content. All
the following types of content use the same workflow process, so they need to be published in
the same manner as documents.
3.1.5.1 Adding and Editing Images
Images are graphical pieces of content; you add them by selecting Image from the drop-down
list. When you add an image, the name of the content changes to the file of the image. So, if
you upload an image called photo.gif, it’ll be accessible in Plone as photo.gif. When adding or
uploading a new image, you can select the image from your hard drive by clicking the Browse
button and selecting the file (see Figure 3-18).
56
Figure 3-18. Uploading an image
It’s common for image filenames to end with an extension such as .gif, .jpg, .jpeg, .png, or
.pict. You can display images inside Plone on a Web page without having to download them
to the local computer if the type of the image uploaded is viewable in the user’s Web browser.
The most common image types are .gif, .jpg, and .png, which are visible on almost computer
system. Figure 3-19 shows an image of the Plone logo.
57
Figure 3-19. Viewing the image
You can’t edit images directly; instead, you can edit the image on your hard drive using any
program, such as Adobe Photoshop or GNU Image Manipulation Program (GIMP). Once complete, clicking the edit tab allows you upload your new image into Plone. If you do a lot of
image manipulation, you can refer to Chapter 10, which covers External Editor, a tool that lets
you edit images using a program without having to upload and download them.
3.1.5.2 Adding and Editing Files
A file is any arbitrary file that can be uploaded from your hard drive. To add a file, select File*
from the drop-down list. On the edit tab, you’ll see an Upload button that lets you pick the file
from your hard drive. This could be any sort of item, including a plain-text file, a Microsoft Word
document, a Microsoft Excel spreadsheet, an executable program, an Adobe Acrobat document,
and so on. When you add a file, the name of the item in Plone changes to the name of the file
uploaded. So, if you upload a file called *book.pdf, it’ll be accessible in Plone as book.pdf. Figure
3-20 shows a plain-text file.
58
Figure 3-20. Adding a plain-text file
If the file is recognized as being text, then the contents of the file are shown in the Web page
and are editable through the edit tab. Otherwise, the file is downloadable, and users must
download it to their local hard drive and edit it there. Afterward they can upload it to the
system. You’ll note that a file object also has an extra download tab that lets you directly
download the file.
59
3.1.5.3 Adding and Editing Events
An event can be something that will happen in the future or something that happened in past.
You can add events to Plone, and they show up on the calendar. To add an event, select Event
from the drop-down list. An event has more information than most Plone objects; however,
most of it is self-explanatory (see Figure 3-21).
Figure 3-21. Adding an event
As usual, the only required field is Title; however, if you want the event to show up in the
calendar, then you must provide a start and end time. Events can span multiple days or be in
60
the past—as long as the start date is before the end date. To enter a date, select the appropriate
dates from the drop-down menu, or click the little date icon to open a graphical date picker.
Once the event is published, it’ll show up in the calendar. Moving a mouse over the item in the
calendar will show the start and end dates for the event, as well as the event’s title (see Figure
3-22).
Figure 3-22. Viewing events in the calendar
3.1.5.4 Adding and Editing Links
Link content types are the primary way for users to share links. These URLs can be resources
on the Internet or an intranet, an internal resource, or anything to which the users have access.
To add a link, select Link from the drop-down menu.
If you’re going to link to an Internet resource, you should preface your link with the suitable
protocol (for example, http://). For instance, if I was visiting an interesting page on the BBC’s
Web site and wanted to share this, I could add a link. The value of the URL will be the text in
the address bar (for example, http://news.bbc.co.uk), as shown in Figure 3-23.
61
Figure 3-23. Adding a link
3.1.5.5 Adding and News Items
News items are commonly used in Web sites to display news that’s of interest to the reader.
Actually, a news item contains the same information as a document. The only real difference is
that a news item will show up when a visitor clicks the news tab (once the item is published),
as shown in Figure 3-24.
62
Figure 3-24. A list of news items
If I wanted to write a Web page that was going to be relevant for a long period of time, such
as directions to my company’s office, I’d use a document. If I wanted a page that detailed my
exciting new product and drew attention to it, I’d use a news item. That news item would be
visible under the news tab, and as new things happened, it’d slowly move down the page.
63
3.1.6 Organizing Content
So far you’ve seen how to add and edit content in a Plone site, but without clear organization,
this can become a mess quite quickly. You have two main ways of organizing content: folders
and topics. A folder is the simplest and most powerful mechanism for organizing content and
works just like a folder or a directory on a computer’s hard drive. A folder can contain any
item of content; content can be copied and pasted between folders, and of course folders can
contain other folders.
To organize content that’s spread all over a site, a more sophisticated and less-used tool called
a topic is available. A topic searches your Plone site and finds all objects that match a certain
criteria, allowing you to group lots of disparate content.
3.1.6.1 Using Folders
A folder is just like a folder or a directory on a hard drive, except that the folder and its
contents exist inside Plone. You use a folder the same way; when you need to categorize
content or make things a little clearer, you can group items and place them in a folder. To add
a folder to your site, select Folder from the drop-down list. This will add a folder and take you
to the edit properties page for that form. A folder has just three rather simple attributes that a
user can edit: Name, Title, and Description. I’ve discussed all these attributes for documents,
and nothing is different for folders.
Folders have two green tabs that represent slightly different views: contents and view. Actually,
you may have already noticed that there’s a contents tab accessible from any piece of content
that you’ve added to the site; for example, when you were editing a document, the contents
tab was there. That contents tab will always take you to the contents for that folder.
3.1.6.1.1 Viewing the Contents of a Folder
The folder has the concept of a default page, which is a page that will be shown to the user
when they view a folder. It’s a concept taken from Web sites where viewing a folder on a
Web site shows a default page if one is present; often that default page’s name is index.htm
or index.html. If a folder has a default page, then clicking the view tab will show that default
page. If the folder doesn’t have a default page, then it’ll show a folder listing of all the content
in that folder. When looking for a default page to display, Plone looks through the folder for
content with a certain name and shows this item. The page name is usually index.html or
index_html; however, the site administrator can add or alter these names.
This contents view of a folder allows a user to perform a variety of tasks, such as move content,
rename it, delete it, publish it, and change the order it’s listed. As shown in Figure 3-25, you’ll
also see a simple table of the folder contents. Each row of the table shows the title of the
content (plus an icon), the type, its size, when it was last modified, its current workflow
status, and order selectors. On the left is a checkbox to select the items you want to change
and a series of options across the bottom: Rename, Cut, Copy, Delete, and Change Status.
These functions are all pretty self-explanatory, and you can apply them to multiple objects at
once by clicking several checkboxes.
64
Figure 3-25. Contents of a folder after I’ve added some of the content types described in this
chapter
For example, to quickly rename a piece of content, click that item’s checkbox and then click
Rename. This will open the rename form and allow you to rename the title of each item in that
list. Click Save to have the changes take effect. The Cut and Copy buttons allow you to copy
or move content between different folders. The Delete button allows you to delete the item
from Plone. Just like on your hard drive, if you copy, move, or delete a folder, all the contents
of the folder will also be moved, copied, or deleted.
A new feature in Plone 2 is the ability to change the default order of items in a folder. By
default, items in a folder will display in the order the items were added. If one item is more
important and needs to be moved to the top, use the arrows on the right side of the table to
move the item. The following features will appear in the folder contents only when certain
things happen:
• If the content has an expiration date set and it has expired, you’ll see the word
expired appear in red next to the item.
• If the server has External Editor installed, you can click the pencil to edit in
External Editor (this is covered in Chapter 10).
• If the content is locked, you’ll see a lock icon appear next to the content.
65
3.1.6.1.2 Publishing a Folder
Folders have a much simpler workflow than documents. Earlier in this chapter you saw how to
publish content to make it publicly visible because this allows users to create and edit content
as much as possible before pushing it live. However, folders are a little different because they
contain content but don’t have any content of their own. For this reason, folders have no
review state. Anyone can directly publish or make private folders, so there are three states:
private, visible, and published.
After adding a folder, select Publish from the drop-down list. Then it’ll show up in the navigation. As per the earlier rules for workflow, if you don’t publish a folder, it won’t show up in the
navigation.
3.1.6.2 Using Topics
A topic allows you to collect content from disparate places throughout a Plone site and provide
it in one location. Topics work by creating a criterion that’s common to all the objects you’d like
to gather. This criterion could be all images or all news items with Plone in the text. Because
topics are a rather complicated type of content, only managers can add them initially. If you
can’t see Topic in the list of items to add, then you don’t have the permission to do so.
To add a topic, select Topic from the drop-down list. After adding the topic, you can create key
criteria on the criteria tab. The list of criteria and types is available in the drop-down box at the
bottom of the page. This is a rather confusing list; I won’t try to discuss it here. Unfortunately,
what those terms are and what they mean is based heavily on the underlying technology, such
as catalog indexes and object attributes. For this reason, Chapter 11 covers this in detail.
For example, to create a topic that shows all the images, you need to add a criterion that
searches for content based on portal_type. For this, select a field name of portal_type, select
String Criterion, and then click Add. These criteria will be added to the top of the page; in the
field to the right of portal_type, enter Image, and then click Save. You now have criteria for
your topic that will show all content that’s an image. Returning to the view tab, you can now
see all the images on a site.
As stated, topics are quite complicated, have a rather unfriendly interface, and are recommended for only advanced users. Many people have found topics useful, which is why they’re
still available in Plone; however, a more user-friendly system will be developed in the future.
3.1.7 Discussing and Finding Content
Adding and editing content in Plone is much more useful if people can find and then discuss the
content. The primary ways users find content is through searching and navigation. Fortunately,
Plone automatically sets up searching and navigation for the users, so it’s easy to find the
content you’ve added.
66
3.1.7.1 Adding Comments to Content
Feedback from users is a vital part of any Web site. By allowing users to add comments, you
ensure that users can give feedback, correct typographical errors, or otherwise discuss the
content. You can discuss almost any piece of content in Plone; folders and topics are the only
exceptions.
You can enable discussions in one of two ways. First, the owner of the content (otherwise
known as the person who created it) turns on the discussion feature by clicking the properties
tab of the object and selecting Enabled under the Allow Discussion on This Item header, as
shown in Figure 3-26. Second, the default option applies the policy for that type of content
as defined by the site administrator; setting this option is described for the administrator in
Chapter 10.
Figure 3-26. Enabling discussions
Once discussions are enabled, click the Add Comment button to discuss the content, which
opens a form for adding the comment (see Figure 3-27).
67
Figure 3-27. Adding a comment to a piece of content
Enter the subject of the comment and the text of the comment. The text is entered as plain
text, so just type away as usual. Comments don’t go through any workflow, so comments show
up as soon as they’ve been added. Once a comment has been entered, it can be replied to,
forming a threaded list of comments on an item. Further, comments will be entered in the
catalog so they can be searched.
NOTE Administrators logged in as managers can remove any replies or entire threads. Disabling replies doesn’t remove the comments; it just stops them being shown, so reenabling
comments will show the existing comments again.
3.1.7.2 Searching for Content
Plone contains a powerful search engine system based on Zope’s ZCatalog. This search engine
allows content to be cataloged in multiple ways and to be queried efficiently and quickly.
Chapter 10 covers the internals of how this works and how it can be queried.
When you’re searching for content, the content will be shown to a user if it’s one of the two
states: published or visible. At the top of your Plone site a search box provides an easy way to
do simple textual searches in the same way as a search engine (see Figure 3-28). For example,
enter Tuesday to find all content that contains the word Tuesday. A result of all matching
content will display; click the title to get to the content.
68
Figure 3-28. A search for Tuesday on Plone.org
The search provides a quite sophisticated search, with features similar to most search engines.
You can make this simple query quite complex. For example, you can use the following options:
Globbing: You can use an asterisk to signify any letters. For example, entering
Tues* matches Tuesday and Tuesdays. You can’t use the asterisk at the beginning of
a word, though.
Single wildcards: You can use a question mark anywhere to signify one letter.
For example, entering ro?e matches rope, rote, role, and so on. You can’t use the
question mark at the beginning of a word, though.
And: You can use the word and to signify that both terms on either side of the and
must exist. For example, entering Rome and Tuesday will return a result of when
both those words are in the content.
Or: You can use the word or to signify that either terms can exist. For example,
entering Rome or Tuesday will return a result of when either of those words are
in the content.
Not: You can use the word not to return results where the word isn’t present; a
prefix of and is required. For example, entering welcome and not page would
return matches for pages that contained welcome, but not page.
Phrases: Phrases are grouped with double quotes (’ ”) and signify several words
one after the other. For example, entering ’welcome page” matches This welcome
page is used to introduce you to the Plone Content Management System, but not
Welcome to the front page of my Web site.
Not phrase: You can specify a phrase with a minus (-) prefix. For example, entering
welcome -’welcome page” matches all pages with welcome in them, but not ones
that match the phrase welcome page.
69
NOTE All searches are case insensitive.
Large sites may have a lot of results, so only 20 results display at a time. To page through the
results, navigation bars will appear at the top and the bottom of the search result pages. The
values on an object used in a search are its title, description, and body text (if the content type
has any—for example, news items and documents).
3.1.7.3 Performing an Advanced Search
You can narrow down the search results by using an advanced search, which is accessible via
the search results of a standard search. In old Plone sites, a search tab brought users to this
page; you can reenable this tab if you want, as covered in Chapter 4. The advanced search
form enables a user to query content using a number of attributes, including title, keywords,
description, review state, creation date, content type, and even author, as well as the search
text (as used in the quick search available from the top-right corner), as shown in Figure 3-29.
Figure 3-29. Advanced search
Although the search text field searches both the title and description, you may want to search
the description or title only. For that reason, these fields are presented on the advanced search
form. You can’t search the title and description using the wildcards, globbing, or any of the
advanced search options. Any search result will match the input (if given) of all the fields; the
results will be an intersection of all the terms.
70
3.1.8 Example: Creating the Plone Book Web Site
To give an example Plone site and provide a series of examples, I set up a Web site for this
book. This is a Plone site with a few minor modifications. As I go through the book, I’ll
make references to the site and add new features as they’re covered in the book, including
new templates, skins, and so on. The Web site for this book is at http://plone-book.agmweb.ca;
initially I set this site up on Windows server, as described in Chapter 2. However, I later
transferred it to Linux.
The site serves the following purposes:
• It gives people a place to get information about the book and buy it.
• It allows easy access to the software used in the book.
• It gives code examples and allows users to interact with samples in the book.
• It contains any errata or issues found after publication.
Once I set up a Plone site, I created the following basic folder and page structure:
Home
|_ Software
|_ Chapters
|_ Chapter 1
|_ Chapter 2
...
To do this, I logged in as the user who was created with the installer—in my case, the admin
user. After logging in, I went to the home page, clicked the edit tab, and wrote some text for
the home page. I created links to the Chapters and Software folders. Then I clicked the contents
tab and added two folders, as shown in Figure 3-30.
Figure 3-30. The folder contents with my home page and the new folders
Next, I went to the Chapters folder and started adding a folder for each chapter. Because
I haven’t made a default page, Plone will happily create a listing of all the chapters. The
71
description for each chapter is the name of the chapter (for example, Introducing to Plone and
This Book), and the short name is the chapter number—this will keep my URLs nice and short
(for example, /Chapters/3). I’ve left everything in the visible state, so after this, it’s just a
matter of adding content.
4 Chapter 4
4.1 Making Simple Customizations
After you’ve figured out how to add and edit content, you’ll want to start customizing your
site. This chapter explains how to perform simple customizations in Plone using the options
available to administrators. Performing the customizations in this chapter requires a user to be
logged in with the manager role, as discussed in Chapter 2.
These customizations are all configuration options you can make through the Web. Rather than
explain all these parts in detail, this chapter gives an overview of many subjects and explains
how to accomplish certain tasks while showing some of the under-the-hood machinery. These
topics are then expanded and explained in later chapters throughout the book.
The first and most useful place to look is the Plone control panel, which offers a variety of
options for the site administrator. All the parts of a Plone site are designed to be easily changed
and customized; the blue tabs you can see across the top of the page are easy to add and
remove. Other examples are the boxes in the left and right columns, which are called portlets.
Plone comes with several portlets, and you can easily choose where to display certain portlets.
Finally, this chapter shows how to customize Cascading Style Sheets (CSS) and images in
Plone. CSS affects everything in a Plone site. In fact, as you’ll see in this chapter, CSS determines all the colors, all the positioning, and a lot of the images you see. If you have the ability
to change the CSS code, then you can change almost the entire look and feel of your Plone
site. All the options covered in this chapter show you the large degree of control you have over
your Plone site.
4.1.1 Administering Sites
The first place site administrators should visit is the Plone control panel. This is the way to
access some of the administration functions of a site, including the name and description of
your Plone site, user and group administration, and any errors that occur within your site.
The term control panel is common, so don’t confuse it with the Zope Management Interface
(ZMI) control panel that shows the low-level ZMI options. The Plone control panel is an
ongoing attempt to provide a more user-friendly interface for the functions provided in the
ZMI. Since the project is ongoing, it’s hard to predict what functionality will be available in the
future. Instead, I recommend you go to the control panel and see what functions are currently
available; if you can’t complete your task there, then you’ll have to go to the ZMI.
72
73
To access the control panel, log into Plone as a user with the manager role. If you don’t have
a user with that role and are an administrator of the site, see Chapter 9 for more information
on how to do this. If you aren’t the administrator of a site and want this level of access, ask
your site administrator. To access the control panel, click plone setup at the top of the page (see
Figure 4-1).
Figure 4-1. Accessing the control panel
This opens the control panel (see Figure 4-2).
Figure 4-2. Plone control panel
The following functions are available in the control panel:
74
• Add/Remove Products: Clicking this link allows you to automate the installation products (covered in detail in Chapter 10).
• Error Log: Clicking this link accesses the log of errors that have occurred in
the Plone site.
• Mail Settings: Clicking this link allows you to alter the Simple Mail Transfer
Protocol (SMTP) server Plone uses to send e-mail.
• Portal Settings: Clicking this link allows you to alter portal settings (discussed
in the ’Changing the Title, Description, and E-Mail Addresses” section of this
chapter).
• Skins: Clicking this link allows you to set the current skin (discussed in Chapter 7).
• Users and Groups Administration: Clicking this link allows you to alter users
and groups (discussed in Chapter 8).
• Zope Management Interface: Clicking this link takes you to the ZMI.
Throughout the rest of the book, I reference the Plone control panel if the current feature is
accessible from there; however, the remainder of book uses the ZMI for altering properties.
4.1.2 Using the ZMI
The ZMI is the basic interface that gives you access to Plone’s underlying Zope interface. Before
Plone existed, the ZMI was the main way to access, edit, and manage a Zope site and its
content. This was originally the Web interface for the content management system. Of course,
nowadays Zope isn’t really an out-of-the-box content management system but instead is an
application that sits under a system such as Plone. After quickly playing with the ZMI, you’ll
see why it isn’t suited as an interface to a content management system.
One thing the ZMI does provide is a simple interface to the underlying Plone and Zope infrastructure. You can find many of the basic features mentioned in this chapter through Plone, but
you’ll need to use the ZMI eventually. If you haven’t gone to the ZMI before, then you’ll find
that there are a few simple ways to get there; the easiest way is to log in as a user with the
manager role, click plone setup, and then click Zope Management Interface. You’ll note that the
address of the ZMI is the uniform resource locator (URL) of your Plone site with /manage on
the end of it. The ZMI for your Plone site should look like this:
75
You may have a problem with virtual hosting, which occurs with the Windows and Mac installers. Virtual hosting is the ability to have the Plone site as the root object rather than the
root of your Zope instance. For more information on virtual hosting, see Chapter 10. So, to
get to the root, you need to access the manage port. On Windows, select Start - Plone - Plone
- Manage Root. You’ll note that this sets the address to http://localhost:8080/manage. For
information on virtual hosting with your installation, see the specific documentation.
You’ll need to get to the root of your Zope installation for two reasons. First, you’ll need to
get to the Zope control panel. Second, you’ll need to get to the root of your Plone site to
make, rename, and copy Plone sites. The Zope control panel gives you database information
and access to products and other add-ons (you’ll need access to this for Chapter 10), as shown
here:
TIP When dealing with the ZMI, I find having two different browsers open helpful. For example, I use Mozilla and Firefox. Besides, as a site administrator, it’s always a good idea to have
two different browsers to test that your changes work in more than one browser.
76
4.1.2.1 Changing the Title, Description, and E-Mail Addresses
The title, description, and e-mail addresses are stored in a Plone site as properties on an object
inside Plone. You can access these fields by clicking the Portal Settings link in the Plone control
panel (see Figure 4-3).
Figure 4-3. Portal options
The portal settings are as follows:
• Portal title: This is the title of the site that will appear in the title for browsers,
breadcrumbs, navigation, e-mails, and so on. The default is Portal.
77
• Portal description: This is the description for the portal, which is currently
used only in syndication.
• Portal From’ name: This field is related to various functions, such as a lost
password or the ’send-to-a-friend” function. Plone sends the e-mail messages
with this name attached. The default is Portal Administrator.
• Portal From’ address: This is the address used for the e-mails that Plone
sends. The default is postmaster@localhost.
• Default Language: This is the default language that’s given in the properties
of an object.
• Password policy: New users have two options; they can either enter a password or enter a password that’s then e-mailed to them. Although in both cases
they have to enter an e-mail address, the latter choice ensures that the e-mail
address they enter is valid.
• Enable External Editor Feature: This will turn on External Editor, which is
an advanced editing tool. It requires that External Editor be installed on the
user’s computer. Chapter 10 covers this in more detail.
After selecting the options you want, click Save to commit the changes. All the changes on this
form will occur immediately.
4.1.2.2 Setting Up a Mail Server
Plone will send e-mail using the MailHost object, which provides an interface to an SMTP
server and allows the developer to write forms and tools that send e-mails. The ’send-to-afriend” function and the mailing of a forgotten password use the settings configured here.
The default configuration is for a mail server on the localhost at port 25. If the SMTP server is
located elsewhere in the network, then you can access the form by clicking plone setup and then
clicking Mail Settings. Then change the mail server and the port to suit your configuration. On
my network, the mail server is at monty.clearwind.ca on port 1025, so I set the server as shown
in Figure 4-4; however, in most cases, you won’t need to change this.
78
Figure 4-4. Setting up the mail server
NOTE The MailHost object is a Zope object accessible in the ZMI. This object doesn’t currently
allow for authentication with the server. If this is needed, change the settings on the server.
4.1.2.3 Logging Errors
The error log catches errors that may occur in a Plone site; these are features such as Page Not
Found (404) errors, unauthorized errors, and so on. This isn’t designed to trap errors from
forms. For instance, if somebody doesn’t enter a required field in a form, then this won’t be
reported; this isn’t an error since it’s captured by the validation framework. This error log is
designed to catch internal server errors that may occur.
From the Plone interface, click plone setup and then click Error Log to see the errors reported
by the Plone site. Click the exception in the list (if there’s one reported) to see the error. Figure
4-5 shows an error that occurred when incorrectly filling out the mail settings form. It’s a long
page that includes a complete Python traceback and the incoming request.
79
Figure 4-5. An example error
On the error log form you’ll see the following settings:
• Number of exceptions to keep: These are the exceptions to keep in the active
log on the screen. The default is 20.
• Copy exceptions to the event log: This copies each exception to the filebased log file. Not doing this means that no permanent record will be kept for
exceptions. The default is that this is selected.
• Ignored exception types: This is a list (one per line) of exception types to
ignore. The default is Unauthorized, NotFound, and Redirect.
80
You can log each exception and view it on the screen. This means if a user is visiting your
site and an error occurs, then you can go to the error log and see what occurred. The three
components of an error are the error type (which is the type of the error), the error value
(which is a string explaining when an error occurs), and the traceback. These first two items
are shown to a user on a standard error page (see Figure 4-6).
81
Figure 4-6. An example error message
So, when a user reports an error, the report will often include a message with the error name
and a value in it. If user isn’t allowed to do something and an Unauthorized error is raised
or a Page Not Found (404) is triggered, then you’ll get a custom error page rather than the
82
standard page shown in Figure 4-6. The following standard error types occur:
• Unauthorized: This occurs when a user doesn’t have the right to perform a
function.
• NotFound: This occurs when the item a user is trying to access doesn’t exist.
• Redirect: This is an error that can raise a Hypertext Transfer Protocol (HTTP)
redirect.
• AttributeError: When an object doesn’t have this attribute, this error is raised.
• ValueError: This occurs when a value given is incorrect and isn’t caught correctly by the validation or other framework.
4.1.3 Customizing Plone’s Look and Feel
The following sections describe the other customizations you can make to a site; almost of all
these require access to the ZMI.
4.1.3.1 Understanding Portlets
On a Plone site, you’ll see three columns to a page by default: the left, middle, and right
columns. The middle column contains the content for the object being currently viewed. This
is where most of the user functionality is for adding and editing content, completing forms,
and so on. The left and right columns contain a series of boxes that display information. Each
of these boxes is called a portlet. A variable determines which portlets display at a particular
point in time. The best way to understand these portlets is to look at the default portlets that
ship with a Plone site. You can find the parameters for the portlets in the portal object. To
access this, go to the ZMI, ensure you’re on the root Plone site, and click the properties tab.
This opens a list of properties, including left_slots, right_slots, and document_action_slots (see
Figure 4-7).
NOTE In earlier versions of Plone, the portlets were called slots. This is a common
term that conflicts with the page template term slot, so it was changed to portlets
for version 2. In certain places in the code and in the text, you may see the term
slot used. In these contexts, the words slot and portlet are synonymous.
83
Figure 4-7. The default portlet properties
The left_slots properties refer to portlets shown on the left of the page, and the right_slots
properties list the portlets shown on the right of the page. The portlets are shown in the order,
from top to bottom, that they’re listed in the properties; notice that each portlet is on a new
line. However, most portlets have some code to ensure that the portlet displays only if it makes
sense. For example, a login portlet is pointless to show if the user is already logged in. In this
case, the login portlet is included in the list of portlet but will show up only when needed.
Each portlet value is actually a special value called a Template Attribute Languages Expression
Syntax (TALES) path expression (Chapter 5 covers this in detail). Site developers can add their
own portlets to a site by creating simple macros and page templates. The default portlets are
as follows:
84
left_slots: This includes the navigation, login, and related portlets.
right_slots: This includes the review, news, events, recently published, and calendar portlets. All the available portlets aren’t configured in Plone by default. The
following sections describe portlet slot in Plone. Each section describes the portlet
and shows what it looks like. Then I give the path expression that you need to add
to the slots property so it’ll show up in your Plone site.
For
example,
to
show
the
calendar
portlet
on
left
side,
enter
here/portlet_calendar/macros/portlet in the left_slots property, and click Save Changes. If
you want to remove it from the right_slots property, then you could remove the same line from
the right_slots property and click Save Changes.
4.1.3.1.1 Calendar
The calendar portlet is one of the default portlets that displays the calendar on the right of
the Plone page. This portlet shows published events for that month in a little calendar. The
calendar portlet will appear regardless if there are events to show in the calendar. You can
further configure the calendar using the portal_calendar tool in the ZMI (see Figure 4-8).
Figure 4-8. Calendar portlet
The expression to add is here/portlet_calendar/macros/portlet.
4.1.3.1.2 Events
The events portlet displays a list of the upcoming published events. If you have this item in
the portlet list, it won’t show up unless there are some published events to display (see Figure
4-9).
Figure 4-9. Events portlet
The expression to add is here/portlet_events/macros/portlet.
85
4.1.3.1.3 Favorites
In the top-right corner of a Plone document, you’ll see a Plone icon. A user can click this logo
to add a favorite. A favorite is similar to the concept of a bookmark or link to the page to which
you want to return; however, this favorite is stored on the Plone site. Figure 4-10 shows the
icon to add a favorite.
Figure 4-10. The icon to add in a favorite
The favorites are added to the user’s home folder, and they display in the favorites portlet along
with a link to organize them (see Figure 4-11). The favorites that are shown are particular to
the favorites that user has saved, so even if you have this item in the portlet list, it won’t show
up unless the user has some favorites.
Figure 4-11. Favorites portlet
The expression to add is here/portlet_favorites/macros/portlet.
4.1.3.1.4 Login
The login portlet displays the login form so a user can log in using their username and password. If they’ve forgotten their password, they have an option to get their password e-mailed
to them. Even if you have this item in the portlet list, however, it won’t show if the user is
already logged in (see Figure 4-12).
86
Figure 4-12. Login portlet
The expression to add is here/portlet_login/macros/portlet.
4.1.3.1.5 Navigation
The navigation portlet shows a simple tree of the folders in the current position in the form of
a tree. It provides a powerful and simple navigation tool. The navigation portlet is extremely
customizable; you can alter it by clicking portal_properties and then clicking navtree_properties
inside the ZMI, which is covered in the ’Altering the Navigation Portlet“ section (see Figure
4-13).
Figure 4-13. Navigation portlet
The expression to add is here/portlet_navigation/macros/portlet.
4.1.3.1.6 News
The news portlet lists all the recent news items, with links to them (see Figure 4-14). Even
if you have this item in the portlet list, it won’t show up unless there are some news items
published. The news items on a site are also available by clicking the news tab.
87
Figure 4-14. News portlet
The expression to add is here/portlet_news/macros/portlet.
4.1.3.1.7 Recent
The recent portlet lists the recently published items on the site since the last time you logged
in (see Figure 4-15). If there are no such items, it’ll still display.
Figure 4-15. Recent portlet
The expression to add is here/portlet_recent/macros/portlet.
4.1.3.1.8 Related
The related portlet shows a list of items that are related to the item you’re currently viewing,
as determined by the keywords on that item. If a related item is a link to another Web site,
88
then it’ll show up in a separate list of external resources. Even if you have this item in the list
of portlets, it won’t display unless there are some related items (see Figure 4-16).
Figure 4-16. Related portlet
The expression to add is here/portlet_related/macros/portlet.
4.1.3.1.9 Review
The review portlet displays a list of items that are in the review state and are waiting to be
reviewed. This is shown only if the user logged in has the reviewer role and there are items
awaiting review (see Figure 4-17).
Figure 4-17. Review portlet
The expression to add is here/portlet_review/macros/portlet.
4.1.3.1.10 Book Web Site: Altering Slots
For the Plone book site, most of the slots on the right side made no sense. This book has no
events, so the calendar and event slots weren’t needed. I expect new things to be added to
the site, but really they’ll be minimal once the site is complete. So I decided to remove all the
right slots for my site. I did this by going to the portal root object in the ZMI and clicking the
Properties object. Then I deleted right slots. The navigation, login, and related portlets, which
normally occur on the left side, are all useful to me, so I kept those.
Here’s how the portlet properties for the Plone book site look at this point:
89
4.1.3.1.11 Having Different Portlets in Different Parts of Your Site
The underlying Zope database of Plone provides a feature called acquisition. In its simplest
form, this means when looking up an item, such as right_slots, Plone finds the closest object
that contains the property. So, when looking for what portlets to show in the right column,
normally Plone finds the root object and lists those.
That’s why you can change the properties in the root portal object to change the whole site.
You may notice that if you click the my folder link and go to your personal folder, there’s no
calendar. If you click Members and then click Properties in the ZMI, you’ll see that there’s an
entry for right_slots. The entry for that folder is an empty list. When the Plone site goes
looking for a value to show for the right column’s portlets, it moves up the folder hierarchy
until it reaches the Members folder. There it finds the right_slots value and uses that. Since the
value of right_slot in the Members folder is empty whenever you’re viewing content located in
Members, the right slot will be empty.
By adding and removing properties from folders through the ZMI, site administrators can customize exactly what portlets appear on their sites. The properties tab is fortunately reasonably
straightforward. You just select the item in the ZMI and then click Properties. To add a left or
right slots property, use the add form at the bottom of the form and ensure that the property
type is list.
4.1.3.2 Altering the Navigation Portlet
Of all the portlets covered, probably the most useful and the most asked about is the navigation
portlet. Specifically, how can you alter the navigation portlet and the way that it’s displayed?
The navigation portlet is list of current folders and documents in the navigation slot. You can
alter the navigation slot by changing the code; however, you can make many changes through
the ZMI. The biggest thing to remember is that only published objects will be shown in the
navigation tree to members and anonymous users. To alter the navigation tree properties,
click portal_properties and then click navtree_properties in the ZMI.
The following is an abridged list of the options available:
• showMyUserFolderOnly: This displays only the user folder of the user logged
in. So when the Members folder is being shown in the navigation, it won’t
show every Members folder. This is selected by default.
90
• showFolderishSiblingsOnly: Only folders in parent folders will display if this
is selected; otherwise, it will show all content. This is selected by default.
• showFolderishChildrenOnly: When this is enabled on a folder, it shows only
folders in the same folder rather than all the other types of content. Selecting this option effectively shows you all the contents of the folder currently
viewed. This is selected by default.
• roleSeeUnpublishedContent: As mentioned, content is shown only if published to members and anonymous users. Add more roles to this list, with
each role on a new line, to have nonpublished content display. This is undesirable if the user doesn’t actually have access anyway.
• croppingLength: This determines how many characters of the names to show
in the navigation tree. The default is 256.
• idsnotToList: This is the item IDs not to show. Place each ID on a separate
line. The default is None.
Make any changes to that form, and then click Save Changes. The order of the items in the
navigation tree is determined by the order of the items in the folder contents form. As shown
in Chapter 3, using the up and down arrows, users can change this order to suit their own
needs.
4.1.3.3 Book Web Site: Altering the Navigation Tree
For most Web sites I prefer a fuller navigation tree than the one provided by default. So, I went
to the navigation tree options and deselected showFolderishChildrenOnly and showFolderishSiblingsOnly. This made the contents show up nicely; for example, here’s the software folder
with just a few items selected:
4.1.3.4 Altering the Date Formats
Throughout the portlets and the whole site, Plone presents dates in a consistent format that
are editable using formats set internally. Whenever a date is shown in Plone, it calls one of
two formats. You can find these formats by accessing the ZMI, clicking portal_properties, and
clicking site_properties. These are the formats:
91
• localTimeFormat: This is the time format to use for dates that should appear
in a short format in Plone.
• localLongTimeFormat: This is the time format to use for dates that should
appear in a long format in Plone, showing seconds.
The format for the date is based on Python’s time format module. The reference for the formats
are at http://www.python.org/doc/current/lib/module-time.html. For the short date, the default
value is %Y-%m-%d, which means year-month-day as decimal numbers (for example, 2003-1026). For long date, the default value is %Y-%m-%d %I:%M %p, which means year-month-day
hours:minutes am/pm (for example, 2003-10-26 07:32 PM).
The following is a quick summary of the options available:
•
•
•
•
•
•
•
•
•
•
•
•
%a: Locale’s abbreviated weekday name (for example, Mon)
%A: Locale’s full weekday name (for example, Monday)
%b: Locale’s abbreviated month name (for example, Jan)
%B: Locale’s full month name (for example, January)
%d: Day of the month as a decimal number
%H: Hour (24-hour clock) as a decimal number
%I: Hour (12-hour clock) as a decimal number
%m: Month as a decimal number
%M: Minute as a decimal number
%S: Second as a decimal number
%y: Year without century as a decimal number
%Y: Year with century as a decimal number
If you want to include the day name in the short date, it’s a simple matter of
changing the short date format to read %A, %b. %d, %y. This produces Thursday,
Oct. 24, 02. These dates are used in the boxes on the left and right of the screen,
in the search results, in the content byline, and so on.
4.1.3.5 Adding Keywords and Event Types
One of the tools in Plone, portal_metadata, allows the site administrator to define some of the
metadata elements. Plone uses the metadata defined in the portal_metadata tool in several
places.
For example, when you add an event, you’re given a list of possible types of events. You can
add to this list by clicking portal_metadata, clicking elements, and then clicking subject in the
ZMI. You’ll see a vocabulary for events that lists the subjects for that content type. It’s a simple
matter of adding or editing that list, one item per line, to have the relevant event types. These
event types will then appear in the forms for adding and editing events.
Another use of portal_metadata is the selection of keywords available on a site. On the form
at portal_metadata/elements/subject, you’ll also see a vocabulary form for a content type of
<default>. If you add items to the Vocabulary field of that page and click Update, you’ll add
these to the list of available keywords for every content type.
92
If you want keywords to appear for, say, only documents, then use the add form at the bottom
of the page. Select a content type, and add some vocabulary, one value for each line. These
will then become keywords that users can select for that piece of content only.
If you’re logged in as a user with the manager or reviewer role, clicking the properties tab of
an object in the Plone interface will display a New Keywords box for the addition of ad-hoc
keywords. These keywords won’t appear in the portal_metadata vocabulary but will appear on
all types of content for other users to enter.
4.1.3.6 Changing the Default Page
As discussed in Chapter 3, when a user is viewing a folder, the default page for that folder is
shown if present. In the old versions of Zope and Plone, the name for that default page was
index_html. You’ll see these a lot in Plone sites, where Web site addresses often have index_html
on the end. If you made this filename an extension that’s more commonly recognized as
index.html, then it’d be easier to edit using editing programs and Web site tools.
In Plone you can define a list of pages that will be looked up to be rendered as the default page
(see Figure 4-18). The default pages are index_html, index.html, index.htm, and FrontPage.
You set the list of pages in portal_properties/site_properties/default_page property, one name
per line. When the default page is looked for, Plone will look for each page in that list, starting
with the first until it finds one that matches. Further, if you’d like to change the value for a
folder only, you can access the folder through the ZMI, click the properties tab, and then add a
new list property called default_page.
93
Figure 4-18. Making index.asp the first default page
4.1.3.7 How Can You Make the News Items List the Default Page?
Exactly how this works involves knowing the underlying machinery a little too much. For now,
go to your portal root and click Properties. Then you need to go to the bottom of the page,
complete the add new property form with the following information, and then click the Add
button:
For the Name field: default_page For the Value field: news For the Type field:
lines
Now return to your Plone site. Instead of the standard home page, you’ll see the news page.
The news tab will still show you the news, as well, but in the following sections I’ll show how
to remove that.
4.1.3.8 Altering the Site Tabs
In a Plone site various tabs refer to different sections or parts of a site. Using tabs is a familiar
concept in Web site design and is common in sites such as Amazon, MSN, and Plone sites.
94
Two main types of tabs exist: portal tabs and content tabs. The portal tabs are blue and appear
at the top of the Plone site. The default ones are home, news, and members. The following
sections show how to customize these. The content tabs are green and appear when an item
can be edited. The content tabs, as the name suggests, are related to content. Chapter 11
covers how to alter these tabs. The tabs you see in a Plone site are formed by a collection
of actions, so to understand how to modify these tabs, you’ll take a quick look at actions in
general.
4.1.3.8.1 Introducing Actions
In Plone certain people can perform certain tasks at different times in different parts of the
site. These various tasks are called actions. Plone translates them into tabs, links, and other
elements. They’re a highly configurable way of providing navigational elements for a site.
Each action has the following properties that can be configured in the ZMI. Exactly where
you configure them depends upon where the action is stored. The following is a list of the
properties for a default action:
Name: This is a user-friendly name for the action. This name is often used in the
user interface. For example, when the action is used as a tab, this value is the text
in the tab.
Id: This is a unique ID for the action.
Actions: This is the action that’s to be performed. For example, when the action is
used as a tab, this action is used as the link. This field is a TALES expression (see
Chapter 5 for more information).
Condition: This is a condition that has to occur in order for the action to be used.
For example, when used as tab, if this condition is met, the tab will appear. This
field is a TALES expression (see Chapter 5 for more information).
Permission: This is the permission the user has to have in order to have this action.
This permission has to be met in order for the action to be used (see Chapter 9 for
more information on security).
Category: This categorizes the actions. In Plone this distinguishes the actions so
they’re used in different sections of the user interface. For portal tabs, the category
value is portal_tabs.
Visible: This indicates if the category is active. Since actions usually relate to visual
elements, the term visible is used.
4.1.3.8.2 Introducing the Top Tabs
In the following sections, you’ll alter the portal tabs in two different ways as an example. You’ll
change the home tab to say welcome, and you’ll move the members tab to the left of the news
tab. The actions for the portal tabs are stored in the portal_actions tool, so to alter these, click
portal_actions in the ZMI. As shown in Figure 4-19, this will open a large list of portal actions
present by default. Some of these actions will seem familiar in that they represent parts of the
Plone site.
95
Figure 4-19. The portal actions for your Plone site
Scroll through the actions until you find the Home item, and change the Name field to welcome. Then scroll down to the bottom of the page, and click Save. Returning to the Plone
interface, you’ll now notice that it says welcome on the tab.
The order of the tabs from left to right on the page is set by the order from top to bottom in
the list of actions. So, to move the tabs, it’s a matter of checking the tab and then scrolling
to the bottom of the page to the Move Up and Move Down buttons. It’s a little tedious, but
by repeatedly checking the actions and then using the up and down buttons, you can alter the
order. Do this, and you’ll note that the tabs now appear in a different order on your Plone site.
96
4.1.3.8.3 Why Is the Text in Lowercase?
Plone changes the case for many features, such as tabs, to lowercase in the style sheet. To
turn off this option, you can alter the style sheet, which is discussed later in this chapter in the
’Changing Images and CSS” section.
4.1.3.8.3.1 Book Web Site: Adding a New Tab
A nice navigation helper is to add a tab or remove one in the portal tabs. So, in this sidebar,
you’ll add a tab that points to the Software folder, and you’ll remove the news and members
tabs (which in my site is pointless). Return to the ZMI, and click portal_actions. Scroll to the
bottom of the form to the add form. I filled out the form with the following values:
• name: Software
• id: software_tab
• action: string:$portal_url/Software
• permission: View
• category: portal_tabs
• visible: selected
Further, I found the actions for news and members and deselected Visible (not forgetting to
hit Save, of course). Returning to the Plone interface, you’ll now see those new tabs. The key
value here is Action, which is a TALES expression. These are discussed fully in Chapter 5. The
Action value points to the URL of the folder you’re pointing to; in my case, it’s Software and is
in the root of my Plone site. Hence, the expression is string:$portal_url/Software.
4.1.3.8.4 Altering the Icons for a Document
If you’re looking at a list of links or options in a Plone site, then chances are that a series of
actions are producing that list. If it’s not actions, then it’s code, but many of the key features
of the Plone interface are generated dynamically from settings in the ZMI. Two other examples
of actions are the document actions and site actions.
The site actions appear in the top-right corner and are links to change the size of the text.
These links could be anything but just happen to reference some client-side script functions.
These links are again configured in portal_actions and are just actions that have a different
category. If you look through the actions in portal_actions, you’ll see these three actions at the
bottom of the page. They have the category site_actions. If you want to remove them, just
uncheck the Visible option. The icons come from the portal_actionicons tool, which is another
simple tool that maps the icon to the action. Looking in portal_actionicons, you’ll see a match
for normal_text of site_actions that matches up an icon (see Figure 4-20).
97
Figure 4-20. Site actions
Similarly, document actions are in portal_actions and have the category document_actions. You
can again edit the order, icons, and text and add or remove icons from the interface all through
editing those actions.
4.1.3.9 Changing Images and CSS
The look and feel of a Plone site is a big subject that takes three chapters of its own, Chapters
5-7. The following sections cover the basics and, rather than trying to explain everything, just
show how to quickly make a few changes.
A skin is a series of CSS, images, templates, and scripts that come together to form a look and
feel for the user. The idea of a skin is that you can change the skin and hence change the look
and feel of a site without having to change the content.
4.1.3.9.1 Changing the Skin
You can change the default skin for a site using the portal skin form, which is accessible from
the control panel. You can represent a Plone site in a few different ways by applying different
colors, style sheets, and templates to a site.
98
The portal skin form provides the following three choices:
• Default skin: This is the default skin to show to a user when they access the
site. There is only one skin that’s given by default, which is Plone Default.
• Skin flexibility: This sets whether you’re going to allow users the choice of
choosing their skin. If this is enabled, a user can go to their preferences and
choose a new skin. This is enabled by default.
• Skin cookie persistence: If a user can select a skin, then select this to have
the cookie last indefinitely. This means that a user will always see this skin
when logging into a site. This is disabled by default.
Select the changes you’d like to make, and click Save to commit the changes. To improve
performance sites, use image and style sheet caching. To ensure that you’re seeing the new
skin as it should be, clear your browser’s cache (on Internet Explorer, pressing Ctrl+F5 will do
this).
4.1.3.9.2 Setting a Different Logo
Changing the logo of a Plone site from the Plone logo is a simple operation, but the steps can
get a little confusing, so you should following them carefully.
First, access the ZMI, click portal_skins, click plone_images, and then click logo.jpg. This will
open the page for that object. It should look something like Figure 4-21.
99
Figure 4-21. The default logo
This object represents the logo as it’s used in Zope. In Figure 4-21 you can clearly see information about the image, its size, its type, and its location on the file system. In the middle of
the page is the Customize button; click it. This will create a copy of the object called logo.jpg
in the custom folder (see Figure 4-22).
NOTE If at this point you get an error message about a bad request, return to portal_skins/custom, and you’ll see an object called logo.jpg. Click that object. There can be
only one object called logo.jpg in the custom folder, and the error is warning you that this
procedure has been performed already. If you want to customize the original object (in other
words, repeat these steps), you’ll have to delete the object inside custom.
Figure 4-22. The customized image
This page may look similar to the previous page shown in Figure 4-21, but there are a couple of
differences. First, if you look in the top-left corner of the page, you’ll see that the meta_type and
location of this object has changed. No longer are you in portal_skins/plone_images/logo.jpg;
rather, you’re in portal_skins/custom/logo.jpg. Second, you’ll now see a Browse button that lets
you select an image and upload it, meaning you can change this image. Click that button to
find your new image, and click Save to commit the changes. In Figure 4-23, I’ll add a Canadian
Plone logo as an example.
100
Figure 4-23. The Canadian Plone logo
Now return to the Plone interface, and you’ll see that the image has changed. To ensure you’re
seeing the new image, clear your browser’s cache (on Internet Explorer, pressing Ctrl+F5 will
do this).
4.1.3.9.3 What If Your New Image Isn’t in JPG Format?
Zope doesn’t base the Multipurpose Internet Mail Extensions (MIME) type on the extension
but rather on the content. So, you can upload a GIF image into logo.jpg, and it’ll still work
since the correct MIME type of image/gif is applied. However, you may want to rename the
image to logo.gif or logo.png to be less confusing.
4.1.3.9.4 Changing the CSS Code
CSS determines the majority of the look and feel of your site, including the tabs, the images,
the boxes, and the overall layout. The fact that Plone’s CSS is totally customizable means that
from a few style sheets users can completely customize many aspects of a site.
101
Again, Chapter 7 covers what all the elements do; in this section, I’ll quickly show you how to
change the CSS code for a Plone site. First, access the ZMI, click portal_skins, click plone_styles,
and then click ploneCustom.css. This opens the page for that object. This style sheet is actually straightforward; in fact, it’s empty. Plone is using the cascading property of CSS. Because
the Hypertext Markup Language (HTML) for Plone first imports plone.css and then ploneCustom.css, any changes to the latter overrides the standard style sheet. Why is this a good thing?
It means you can make small incremental changes to ploneCustom.css without breaking or
altering the core style sheet.
So, to customize the ploneCustom.css object, click portal_skins, click plone_styles, and then click
ploneCustom.css. Next, click the Customize button. Again, this object has been customized,
and instead of being at portal_skins/plone_styles/ploneCustom.css, you’ll notice you’re now at
portal_skins/custom/ploneCustom.css. Because file objects can now be edited through the Web,
you can directly edit the style sheet through the Web.
As an example, make the background have an image in the middle of it (this isn’t necessarily
the best user interface, but it’s a clear example of how to customize the CSS code). First, you
need to upload an image to Plone. To do this, click portal_skins, click custom, click the Add
button, and then select Image, as shown in Figure 4-24.
Figure 4-24. Adding the new image
For the file I chose an image I found on the Web (which is also available on the Plone book
Web site), but you could choose any image you have. Make sure that the ID of the image is
background.gif, as shown in Figure 4-25.
102
Figure 4-25. Checking the new image
Second, you need to change the CSS code to point to the new image. You’ve already customized the CSS code, so return to portal_skins/custom/ploneCustom.css and change the text
from this:
/* DELETE THIS LINE AND PUT YOUR CUSTOM STUFF HERE */
to the following:
body {
background-image: url(background.jpg);
background-repeat: no-repeat;
background-position: center;
}
Click Save Changes to commit changes to this file. Then return to the Plone interface. If all
went well, you should see the new image (see Figure 4-26).
103
Figure 4-26. The new background image
5 Chapter 5
5.1 Introducing Basic Plone Templating
Plone puts together three layers of technology to create a page. Python and page templates
create some Hypertext Markup Language (HTML), which is sent to the browser. There, some
Cascading Style Sheets (CSS) render the nice page with which you’re now familiar. Those two
first elements, the Python code and the page templates, are the main areas of discussion in this
chapter and Chapter 6.
To understand how to generate and then edit a Plone template, you have to first learn about
some key underlying concepts. Some of these concepts are particularly unique to Plone, and
although they provide great advantages, it does take some time to get used to them.
In this chapter, I’ll start by covering object publishing. I’ll explain how to interact with objects
inside Plone. Then I’ll explain how to build expressions. Once you’re familiar with those two
concepts, I’ll cover how Plone pages are actually put together. At the end of the chapter, you’ll
create a new page inside your Plone site that uses the techniques you’ve learned so far.
This chapter will make more sense if you’re familiar with Python. However, at each stage
I’ll explain the concept behind the code, so even if you don’t understand Python, you should
be fine. The rest of the book references the Template Attribute Language Expression Syntax
(TALES) and Script (Python) objects, so you should take the time to get familiar with them in
this chapter. You should have a head start: I already introduced TALES in the previous chapter
because it’s used for generating portlets and actions.
5.1.1 Understanding the Underlying Templating Machinery
Diving straight into how Plone templating works would likely leave you confused, so I’ll start
by going through the underlying templating machinery. In an ideal world, this is something
you shouldn’t have to worry about, but in practice I’ve found that it’s the first block people hit
when trying to learn to use Plone.
Plone is rather unique in that everything in Plone is an object. If you’re unfamiliar with the
concept of an object, there isn’t much to know; an object is just a ’thing” that encapsulates some
behavior. Each object has methods that you can call on the object. One example is a computer
mouse. A computer mouse could have methods such as move, click, and right-click.
In Plone, a document is an object of a particular type. All this means is that the document
isn’t just a static bit of text; instead, it’s something a little more complicated and far more
104
105
useful. A document in Plone has a description method, for example, that will give you the
description that the user added. When using the templating system, you’ll see in more detail
that everything is an object. You’ll look first at some of the basic principles of object publishing.
5.1.1.1 Introducing Object Publishing
In Plone, you’re actually publishing objects that are located in Zope; most of them are objects
that are persisted in the object database. The concept is more complicated than standard
Common Gateway Interface (CGI) environments, where a script is executed and passed a
series of request variables. Everything in Plone is an object, everything in Zope is an object,
and everything in Python is an object. Until now I’ve tried to avoid using the word object;
instead I’ve used words such as template, script, and item, but all of these are really objects—
just ones that behave differently.
When you request a Uniform Resource Locator (URL) from Plone, an object in the
environment is called. Plone does this by translating the URL into a path. So, if the
URL is /Plone/login_form, what Plone is going to do is break that URL down into
a path and look up each of those objects in the database. It’s going find the Plone
object and then a login_form object inside the Plone object. Looking up this path is
called traversal; essentially, Zope traverses across those objects and then calls the
last one in the path.
When Zope calls the login_form object, the object is executed in its context. The term context
is something you’ll hear a lot of in Plone. It’s merely the current context of the object being
executed. In this case, it’s /Plone. The context changes a lot as you move through a Plone
site. If you called the URL /Plone/Members/login_form in a browser, then the context would
be /Plone/Members.
As mentioned, traversal is how you can programmatically access objects in Plone in the same
manner as you do in a URL. This is similar to accessing items in a file system—if you wanted to
access a picture in My Documents on Windows, you’d enter a directory such as c:Documents
and SettingsandymMy DocumentsMy Portrait.jpg. You could access an object in Plone by
entering Members/andy/My Portrait.jpg. This would work if you had a series of folders and
objects that looked like the following:
Members
|_ andy
|_ My Portrait.jpg
In the file system version, you go through the computer’s hard drive directory by directory. In
Plone, the same thing happens; it’s just that Members and andy are objects.
One catch is that Zope is case sensitive. In Windows, you can type My Portrait.jpg or my
portrait.jpg. That won’t work in Plone, however; you have to provide the same case as the
object ID. For this reason, it’s recommended that you try to keep all URLs lowercase so your
users have less chance of making a mistake.
Plone and Zope have added a twist, called acquisition, to this whole publishing system. The
concept behind acquisition is one of containment: Objects are situated inside other objects
106
called containers. In the previous example, the andy object is a container inside the Members container inside the Plone site container (which in turn is inside the Zope application
container).
In a standard object-oriented environment, an object inherits behavior from its parent. In
Plone and Zope, an object also inherits behavior from its container. An object goes through a
container hierarchy to figure out how to get these behaviors.
So, take the example of accessing Members/andy/My Portrait.jpg. What if the object Some
Image.jpg didn’t exist in the andy folder but instead exists higher up in the hierarchy? Well,
acquisition would find it for you. Take the following hierarchy:
Members
|_ andy
|_ My Portrait.jpg
In this case, if you executed the URL, Plone would traverse to andy and then try to find My
Portrait.jpg*—but, sure enough, it doesn’t exist in the container. So, it’d look in the containment
hierarchy, which is the *Members folder, and it finds and returns My Portrait.jpg. The result is
that the user will see the image, just like usual.
However, if you compare this to the earlier example where the image was contained in the
andy folder, you’d find that the following key differences exist:
• First, the context is the same, even though the object is in a different place.
Context is based on the location from where the object is called.
• Second, the container is different, and the container of My Portrait.jpg is now
different. It’s Members, not andy.
So, what’s the point of all this? Well, you can now put an object in the root of a Plone site, and
any object can get to it because it’s looked up through acquisition.
Although this probably makes sense, acquisition can be quite complicated, especially looking through the context hierarchy (which can occur). If you want to learn more about
it, you can read Zope lead developer Jim Fulton’s excellent discussion of acquisition at
http://www.zope.org/Members/jim/Info/IPC8/AcquisitionAlgebra/index.html.
5.1.1.2 Introducing Template Expressions
Before diving into the Zope Page Templates system, you must understand TALES. Often in an
application you need to write expressions that can be evaluated dynamically. These aren’t
scripts; rather, they’re one liners simple expressions that can do something simple and easy in
one line of code.
An expression is evaluated with a series of local variables passed into it. These variables are
determined by what’s calling the expression. Workflow passes one set of variables in, and
the Zope Page Templates system passes another. For the moment, I’ll use examples that have
context. Remember, as discussed, the context is the context in which an object is requested.
107
So far you’ve seen some TALES expressions, such as string:${portal_url}/Software. However,
this is merely one example of a wide range of expressions. The main use of TALES is in Zope
Page Templates, the HTML generation system for Plone. Although its name may suggest it’s
suitable only in templates, many tools in Plone use this syntax to provide simple expressions,
such as actions, workflow, and security. Different kinds of expressions exist, and I’ll run through
them one by one.
5.1.1.2.1 Using Path Expressions
The path expression is the default and most commonly used expression. Unlike all the other
expressions, it doesn’t require a prefix to denote the expression type. The expression comprises
one or more paths. Each path is separated by the pipe symbol (|). Each path is a series of
variables separated by forward slashes (/). The following are some simple examples:
context/message
context/folderA/title
context/Members/andy/My Portrait.jpg
When the expression is evaluated, the path is split on the forward slashes. It then starts at the
leftmost value and traverses to find that object, method, or value. It then places that object
on the current stack and moves onto the next value; it repeats that process until it reaches the
end of the expression or can’t find a matching value. If the object it finds is a Python dictionary
or mapping object, it’ll call that value of the dictionary. One nice feature of a path expression
in that the only restricted character is /, so names can contain spaces and periods and still be
evaluated.
When the end is reached, it’ll call that object (if it can be called). If it’s a noncallable object,
it’ll get the object’s string value, and this is what will be returned. If at any time there’s an
error in this lookup (the most common being that the requested attribute doesn’t exist), then
it’ll move onto the alternate expression, if there is one. You can specify an alternate expression
by separating it with a pipe symbol.
For example:
context/folderA/title|context/folderB/title
The previous example will render folderA’s title if it exists or folderB’s title if the first one doesn’t
exist. It’ll repeat this process for each expression, until there are no more expressions or until
one of them evaluates successfully.
5.1.1.2.2 Using Not Expressions
A not expression has the prefix not: at the beginning and simply inverses the evaluation of
the TALES expression that follows the prefix. Because the Zope Page Templates system doesn’t
have an if statement, you can use this to test for the opposite of a previous condition.
For example:
not: context/message|nothing
108
5.1.1.2.3 Using Nocall Expression
By default, when a path expression reaches the last item in the path sequence, it calls the item,
if possible. The nocall: prefix prevents this from happening. A nocall expression is rarely used
in Plone, but it does have occasional uses. For example, you can use it to reference another
object but not render it. Here’s an example:
nocall: context/someImage
5.1.1.2.4 Using String Expressions
String expressions allow you to mix up text and variables into one expression. All string
expressions start with the string: prefix. This is a useful function, and you’ll see it used quite a
bit. The text can contain anything that’s legally allowed inside an attribute, which essentially
includes alphanumeric characters plus spaces. Contained inside the text can be variables,
prefixed with a dollar sign ($). Here are some examples:
string: This is some long string
string: This is the $title
In the latter example, the variable $title is evaluated. The variable can actually be any path
expression. If the variable contains /, then the variable has to be wrapped with {} to signify
the start and end of the expression.
For example:
string: This is the ${context/someImage/title}.
If a dollar sign in the text needs to be escaped, use another dollar sign immediately before the
dollar sign you need to escape.
For example:
string: In $$US it costs ${context/myThing/cost}.
5.1.1.2.5 Using Python Expressions
Python expressions evaluate a line of Python code. All Python expressions start with a python:
prefix and contain one line of Python.
For example:
python: 1 + 2
The Python code is evaluated using the same security model that a Script (Python) object uses,
as discussed in Chapter 6. For these reasons, Python should be simple and limited to presentation functionality, such as formatting strings and numbers or performing simple conditions.
Further, almost all the other TALES expressions mentioned can be wrapped in Python and
called. The following are the expressions:
109
• path(string): Evaluates a path expression
• string(string): Evaluates a string expression
• exists(string): Evaluates a string expression
• nocall(string): Evaluates a nocall expression
For example, the following code:
python: path(’context/Members’)
is equivalent to the following:
context/Members
A few convenience functions have also been added to assist developers. The test function takes
three parameters: a statement to evaluate and the true and false conditions. The statement is
evaluated, and the appropriate value is returned. For example:
python: test(1 - 1, 0, 1)
The same_type function takes two variables and compares if they’re the same. For example:
python: same_type(something, ’’)
Some developers discourage using Python inside the Zope Page Templates system because it
means adding logic in the presentation templates. Often, as a developer, for each piece of
Python added, it can be useful to ask yourself if that piece of code would be better factored
out and placed in a separate Script (Python) object. This doesn’t mean you should move every
piece of Python out—just think about it before adding anything.
5.1.1.2.6 Book Web Site: Revisiting Actions
In Chapter 4, you added an action for pointing to the software part of the site so it appeared as
a portal tab. In that action, you added in the string expression string: ${portal_url}/Software.
This may make a bit more sense now that I’ve explained the variable portal_url. This is the
URL to your portal, which may vary depending upon if you’re using virtual hosting. It does
this by using acquisition to acquire the portal_url object and insert the resulting value into the
string. The result is that you’ll always get an absolute link to the Software folder.
5.1.1.2.7 Gotcha: Mixing Python and Strings
I’ve seen newcomers mixing up Python and strings a few times. All the expressions are different. In other words, you can’t place path-like expressions inside a Python expression. For
example, the expression python: here/Members/absolute_url + ”/danae“ doesn’t make sense.
The entire expression is interpreted as Python, so Plone will try to divide one thing by another,
and you’ll get errors. This is an ideal situation to use a string expression (which lets you do
variable substitution), so the variable contain a path expression. So, you could use string:
${here/Members/absolute_url}/danae.
110
5.1.2 Using the Zope Page Templates System
Now that you understand object publishing and expressions, you can get into the real meat of
the system, Zope Page Templates. This is the templating system that Plone uses for generating
HTML.
Many HTML generation systems are available, and some of the better known are JavaServer
Pages, Active Server Pages, and PHP. To users of the other systems, the Zope Page Templates
system at first looks rather odd, but quickly you’ll see it’s an extremely powerful system.
The simplest template looks something like the following:
<p tal:content="here/message">The title</p>
If the value of message resolved to Hello, World! then the following would be output when the
template was rendered:
<p>Hello, World!</p>
For a moment I’ll gloss over a few of the finer points and show what has happened here.
A standard paragraph was written in HTML, yet the content of that paragraph isn’t the text
shown in the output. To the opening paragraph tag, a tal:content attribute was added, and
the here/message expression was written for that attribute. The content of the paragraph was
output, however, as the value of the message variable (in this case, Hello, World!).
At run time, the template is evaluated, and the tal:content attribute is called. The tal part stands
for Template Attribute Language and has a range of commands, including content. You’ll see all
these commands later; with them, you can do almost anything you want to do the HTML tags.
You can create loops, alter tags, alter attributes, remove tags, and so on. Before the template
runs, this will show up as valid Extensible HTML (XHTML) and will show up in an editor as a
paragraph with that text.
All these page templates are valid XHTML. This is a standard for HTML and is valid Extensible
Markup Language (XML) code. This means you must follow these rules:
• All tags must be lowercase.
• Attributes must always be quoted (for example, <input type=”checkbox“
checked=”1“ />).
• Empty elements must be terminated (for example, <br />, not <br>).
To define a page as XHTML, you must give a DOCTYPE declaration and use the XML namespace
set in the html tag. Plone uses the following declaration at the top of every page:
<!DOCTYPE html PUBLIC "-//W3C//DTD XHTML 1.0 Transitional//EN"
"http://www.w3.org/TR/xhtml1/DTD/xhtml1-transitional.dtd">
<html xmlns="http://www.w3.org/1999/xhtml" xml:lang="en" lang="en">
For
more
information
on
http://www.w3.org/TR/xhtml1/#xhtml.
the
XHTML
specification,
go
to
111
5.1.2.1 Another HTML Generation System?
In the first few years of the Web, programmers were the prime creators of HTML. Programmers
rapidly threw together systems to generate HTML programmatically so they could get on with
their real jobs. With tools such as Perl’s CGI modules, programmers could write complicated
server-side code for content.
However, soon everybody was generating content, and the process had to be made easier. This
brought about the wave of escape coding languages. These languages used a special kind of
HTML markup that was processed to produce output. As mentioned, some of the most popular
are Active Server Pages, JavaServer Pages, and even whole languages based on the concept,
such as PHP. Zope followed this trend with Document Template Markup Language (DTML).
These systems take HTML and intersperse it with custom tags such as <% .. %> or <dtml-...
/>. This system was popular because it was easy to understand, and users who already knew
basic HTML could grasp the idea of a few more tags. Designers could ignore the content of
these tags and let the programmers deal with them. Programmers could alter the relevant code
parts without upsetting the content.
However, these systems have the following problems:
• The HTML templates can be hard to scale as more and more content gets
added to the script. Pages quickly become huge and hard to manage.
• Logic and content aren’t neatly separated. They can be separated with some
of these systems; however, the ability to intersperse any HTML with a piece of
programming code is too easy. Often, content, presentation, and logic become
one large, entangled mess.
• Pages can’t be easily edited. Often pages or templates come with the note ”just
leave these bits alone...“cause editing them would break the code. What You
See Is What You Get (WYSIWYG) editors can be set to not alter some tags, but
they can easily break others. In large organizations, users with different roles
all have to edit the same page.
• It can be hard to see a default result. Take, for example, a database query
that shows the result in a table. How can a designer see how that would look
without actually running the code?
For these reasons, the Zope Page Templates system was created. Page templates present a novel
approach; instead of providing another method of escape coding, code is added to existing tag
attributes. Not only is the Zope Page Templates system free and open source, it doesn’t require
Zope. Currently, versions of the system exist in Python, Perl, and Java.
5.1.2.2 Introducing Page Templates and Content
As you’re now aware, Plone is a content management system where users add content to a
Plone site through the Web. Those content objects are stored inside Plone and then rendered
back to the world using page templates.
Returning to the earlier example of accessing /Members/andy/My Portrait.jpg, I’ll now discuss
what actually happens to the content in Plone. First, Plone finds and calls the My Portrait.jpg
112
object; it’s called because there’s no specific method being called on the object. When a content
type is called, a certain template is located and rendered. The context for that template will
be the image you want to access, and the template will be the one for that image.
If a different action was being called on the image, such as /Members/andy/My Portrait/image_edit, then the action image_edit would be looked up for that object, and the corresponding template would be returned. Chapter 11 discusses how this works in more detail.
So, in all the templates in Plone, you’ll see a referral to here or context. This is the context of
the content being accessed. In a template, you can now say context/something or other, and
this will be the something or other looked up relative to the piece of content, not the template.
You’ll now create your first template in Plone.
5.1.2.3 Creating Your First Page Template
The standard way to create a page template is through the Zope Management Interface (ZMI).
Unfortunately, because it means editing the template through a text area in a Web browser, the
ZMI is also the most painful to use as a developer. The text area provides limited functionality
compared with most editors; it’s lacking features such as line numbers, syntax highlighting,
and so on. In Chapter 9, I show you how to use External Editor to edit content; this allows
you to edit Web site content in local editors such as Macromedia Dreamweaver or Emacs. In
Chapter 6, I show you how to make Plone read page templates off a hard drive as files, and
then you can use any tool you’d like.
To create a template, go to the ZMI, click portal_skins, click custom, and then select Page
Template from the drop-down box (see Figure 5-1). Click Add, and you’ll see the page shown
in Figure 5-2.
Figure 5-1. Selecting the Page Template option
113
Figure 5-2. Adding a page template
Enter test for the page template’s ID. Then click the Add and Edit button, which takes you
to management screen (see Figure 5-3). You can then edit this template through the Web by
using the text area and clicking Save Changes to commit your changes.
Figure 5-3. Editing a page template
NOTE Before Plone 2, all the page templates passed through the variable here, which is equivalent to context. If you see here in any code in a page template, it means context. The new
context variable was added to be clearer and bring the page templates in line with Script
(Python) objects.
After clicking Save Changes, the page template will be compiled. If you’ve made any errors in
the template, you’ll see them highlighted at the top of the page. Figure 5-4 shows an error with
an h1 tag that isn’t closed. (As previously mentioned, page templates must be valid XHTML.)
114
Figure 5-4. Page template error
Once you’ve saved the page template successfully, you can click the Test tab to see the rendered
value of the template. In Figure 5-5, you’ll see that the heading has been replaced with the ID
of the template, and the main paragraph now includes the ID of the template.
Figure 5-5. Generating the page
The management screen for a page template also has the following important features:
Title: This is the title for this template, and it’s optional. If you change this in
the previous example, for instance, after clicking Test, you’ll note that the resulting
HTML has changed.
Content-Type: This is the content type for this template; it’s usually text/html.
Browse HTML source: This will render the template unprocessed as HTML. This
is how the template would appear if it were loaded into an HTML editor.
Test: This will process and render the template.
Expand macros when editing: This checkbox will try to expand macros. I recommend leaving this unchecked most of the time. Macros are an advanced feature
and are discussed in Chapter 6.
115
Now that you’ve created a page template, you’ll make a few modifications to it. This will
demonstrate the topics covered so far in this chapter. For example, if you want your page
template to demonstrate 1+2, you could add the following line to your page template:
<p>1+2 = <em tal:content="python: 1+2" /></p>
Then click the Test tab to see if it works. You should see the following:
1+2 = 3
To see an example of a path traversal, print the logo of your Plone site. You can include an
expression in the logo of your Plone site by adding the following to your page template:
<p tal:replace="structure context/logo.jpg" />
This will create the appropriate HTML for the image and show it on the page.
5.1.3 Understanding the Page Template Basic Syntax
Now that you’ve seen how to make a page template, I’ll explain the basic syntax of it. You
can break the syntax of page templates into a few different components, which I’ll cover in the
following sections.
5.1.3.1 Introducing Built-in Variables
You’ve seen the expression syntax, so now you’ll learn about the variables that are passed to it
when you render a page template. All of the following happen in the context of accessing the
image Some Image.jpg in the Members/andy folder, called with the URL /Members/andy/Some
Image.jpg:
container: This is the container in which the template is located. With Plone
this is usually the portal_skins folder. You should avoid using a container because
portal_skins can do unexpected things to the meaning of container (for example, a
reference to the andy folder).
context: This is the context in which the template is being executed. In Plone this
is the object being viewed if you’re viewing a portal object (for example, a reference
to the Some Image.jpg object).
default: Some statements have particular default behavior. This is noted in each
of the statements, and this variable is a pointer to that behavior.
here: This is equivalent to context.
loop: This is equivalent to repeat.
modules: This is a container for imported modules. For example, modules/string/atoi is the atoi function of the Python string module. This includes
116
all the modules that are safe to import into the Zope Page Templates system. For
more information, see ’Scripting Plone with Python” in Chapter 6.
nothing: This is the equivalent of Python’s None.
options: These are the options passed to a template, which occurs when the template is called from a script or other method, not through the Web.
repeat: This is the repeated element; see the tal:repeat element in the ’Introducing
TAL Statement Syntax” section of this chapter.
request: This is the incoming request from the client (all the values from the incoming request are visible using the following test context script). All the GET and
POST parameters are marshaled into a dictionary for easy access. Here are some
examples:
request/HTTP_USER_AGENT: the users browser
request/REMOTE_ADDRR: the users browser
request/someMessage: the value of some message, in the query string
root: This is the root Zope object. For example, root/Control_Panel gives you the
control panel for Zope.
template: This is this template being called. For example, template/id is the ID of
the template being rendered.
traverse_subpath: This contains a list of the elements still to be traversed. This is
an advanced variable, and it’s recommend you understand traversal and acquisition
before using this.
user: This is the current user object. For example, user/getUserName is the username of the current user.
CONTEXTS: This is a list of most of these values.
NOTE: With the exception of CONTEXTS, any of these variables can be redefined in a tal:define
statement if the user wants. However, this can be confusing for anyone using the code and
isn’t recommended.
The test_context page template shows all the values of these variables, plus the locations of
some of the objects (see Listing 5-1). It can be useful for debugging and explaining the variables. Add it as a page template called test_context, and then click Test to see the results.
Listing 5-1. test_context
<html>
<head />
<body>
<h1>Debug information</h1>
<h2>CONTEXTS</h2>
<ul>
<tal:block
tal:repeat="item CONTEXTS">
<li
117
tal:condition="python: item != ’request’"
tal:define="context CONTEXTS;">
<b tal:content="item" />
<span tal:replace="python: context[item]" />
</li>
</tal:block>
</ul>
<h2>REQUEST</h2>
<p tal:replace="structure request" />
</body>
</html>
The test_context page template will produce the output shown in Figure 5-6.
118
Figure 5-6. An example of all the default variables in a script
5.1.3.2 Introducing TAL Statement Syntax
The Template Attribute Language (TAL) provides all the basic building blocks for dynamic
presentation. TAL defines eight statements: attributes, condition, content, define, omit-tag, onerror, repeat, and replace.
Since page templates are valid XML, all TAL attributes must be lowercase. Further, each element can have each statement only once. In the following examples, I’ve inserted new lines in
119
the elements to increase legibility; this is perfectly valid code and quite common in the Plone
source. However, this is optional and isn’t required.
5.1.3.2.1 tal:attributes: Changing an Element’s Attributes
The tal:attributes allows you to replace one or more attribute of an element. A statement
contains the attribute to be changed, separated by a space from the statement. For example:
<a href="#"
tal:attributes="href context/absolute_url">
Link to here
</a>
This will change the href attribute of the link to the result of here/absolute_url. The href attribute has already been defined on this element, so if a designer opens this page, the designer
will see a valid element (although the link may not make sense until the page is processed).
Some example output is as follows:
<a href="http://plone.org/Members/andy/book">Link to here</a>
Since each element can have multiple attributes, tal:attributes allows you to alter one or more
attributes simultaneously by having multiple statements. To change multiple attributes at once,
separate statements with a semicolon (;). If the attribute or statement contains a semicolon,
you can escape this with another semicolon immediately after it appears (;;). For example, to
change both the href and title element, do the following:
<a href="#"
tal:attributes="href context/absolute_url;
title context/title_or_id">Link</a>
The example output is as follows:
<a href="http://plone.org/Members/andy/book" title="Plone Book">Link</a>
The tal:attributes and tal:replace tag are mutually exclusive since replace eliminates the element. If the Zope Page Templates system detects this, it’ll raise a warning, and it’ll ignore the
tal:attributes tag. If the expression evaluates to default, then no change will be made. For
example:
<a href="#"
tal:attributes="href
python:request.get(’message’, default)">
Link</a>
In this example, I’m using the get function on the request object. If the incoming request to
the page has the message variable, then the first value will be used, which is message. If the
message variable isn’t present, then the second value, default, will be used. Hence, only by
passing the message parameter will a change take place.
120
5.1.3.2.2 tal:condition: Evaluating Conditions
The tal:condition statement allows a condition to be tested before rendering the element. For
example:
<p tal:condition="request/message">
There’s a message
</p>
<p tal:condition="not: request/message">
No message
</p>
Here, the paragraph with the text for a message will be rendered only if the request variable
has an attribute and it resolves to true (ie: the length of message is greater than zero). Being
able to test for a condition is pointless if the opposite condition can’t be tested for; this is
what the not expression allows. The not: prefix inverts the statement, so not: request/message
resolves to true if the request variable message resolves to false (ie: the length of message is
zero). In this case the request variable, message will still need to exist.
In TAL, the following evaluates to false:
• The number zero
• Any float or complex that evaluates to zero (for example, 0.0)
• Strings of zero characters (for example, ”“)
• An empty list or tuple
• An empty dictionary
• Python’s None value
• TALES’s nothing value
The following evaluates to true:
• The default value
• Any number other than zero
• Strings that aren’t empty
• Strings that are just spaces (for example, ” “)
• Anything else
5.1.3.2.3 tal:content: Adding Text
The tal:content statement is probably the most commonly used statement in a page template.
This statement is also one of the simplest, replacing the content of an element with the value
specified. For example:
<i tal:content="context/title_or_id">Some title</i>
121
The example output is as follows:
<i>The title</i>
This will replace the text Some title with the value of the expression context/title_or_id. If the
text to be placed contains HTML elements, those elements will be escaped. By default, the
text to be replaced is HTML escaped; the structure prefix will allow the HTML to be entered
without the elements being escaped. For example:
<i tal:content="structure here/title_or_id">Do not escape HTML</i>
If the element with the tal:content attributes contains other elements, then all those elements
will be replaced. The tal:content and tal:replace tags are mutually exclusive; they can’t both
be placed on the same element, and an error will be raised if this is attempted. If the value is
default, the content is unchanged.
5.1.3.2.4 tal:define: Defining Variables
The tal:define statement allows variables to be created and reused within the template. For
example:
<p tal:define="title here/title_or_id">
... <i tal:content="title">The title</i> ...
</p>
In this example, the variable title is created and assigned the result of here/title_or_id; later the
variable title is used in a tal:content statement. By default the variable is created only locally
within the scope of the current element. So, in the previous example, only elements within
the paragraph tag can use the title variable. You can redefine the variable anywhere within the
statement or reuse it in other elements as many times as needed.
To create a variable to be used globally, you can use the prefix global. This will allow access to
the variable anywhere within the template, not just within the defining element. For example:
<p tal:define="global title string:Foo bar">
... <i tal:content="title">The title</i> ...
</p>
<i tal:content="title">We still have a title</i>
Furthermore, Plone defines a large number of global definitions so that users can easily use
them in their scripts. As with any such definitions, they’re subject to change, so you should
use them carefully. These defines mean a large number of global variables are available. For
example, to get the title of your Plone site, you can just call the following:
<p tal:content="portal_title" />
You can find these defines in the ZMI by clicking portal_skins, clicking plone_templates, and
then clicking global_defines. You can find a full list of all the defines, and an explanation of
them, in Appendix A.
122
5.1.3.2.5 tal:omit-tag: Removing Elements
The tal:omit-tag is rather unusual. It allows the removal of a tag. Because the Zope Page
Templates system requires the use of HTML tags, complicated pages can often need lots of
elements and can result in extra tags being added. For this statement, the tag is removed,
which just leaves the content of the tags. For example:
<p tal:omit-tag="">This is some text</p>
The output is as follows:
This is some text
In this example, the text This is some text will be rendered; however, the tag won’t be rendered.
Optionally, the tal:omit-tag statement can take an expression as an argument. If that expression
evaluates to false, then the tal:omit-tag doesn’t happen. For example, this does nothing:
<p tal:omit-tag="nothing">This is some text</p>
One alternative to using tal:omit-tag is using the tal namespace, as discussed in the ’Useful
Tips” section of Chapter 6.
5.1.3.2.6 tal:on-error: Performing Error Handling
The tal:on-error statement provides a method to handle errors. It acts rather like tal:content
because it causes the content of the tag to replaced, but it’s triggered only when an error
occurs.
The following is an example:
<p
tal:content="request/message"
tal:on-error="string: No message">Message</p>
If there’s an error evaluating the request/message expression here, then the on-error attribute
will be activated. This causes the contents of the tag to be replaced with the text No message.
Unfortunately, the on-error statement is rather limited. The tag can’t distinguish between
different errors and allows only one expression to be evaluated and used. This limitation is by
design so that the tag won’t be overused. Error handling should really be handled in the logic
of your application.
Fortunately, for all expressions, you can supply alternatives in the statement if the first part
of the statement evaluates to something other than true or false (in other words, if an error is
raised). Each alternative is separated by the pipe character (|), and multiple alternatives can
appear in a statement. If you’re relying on variables from the incoming request, then always
add a |nothing to the end to ensure that an attribute error isn’t raised.
For example:
123
<p
tal:content="request/message"
tal:condition="request/message|nothing">
There’s a message
</p>
<p tal:condition="not: request/message|nothing">
No message
</p>
This second example is more verbose but desirable for a couple of reasons:
• The designer is able to see the positive and negative condition.
• You can handle a more complicated error condition than just printing a string.
5.1.3.2.7 tal:repeat: Performing Looping
The tal:repeat allows looping through objects and is one of the more complicated statements.
A statement contains the value to be assigned for each iteration of the results, separated by a
space from the results being iterated through.
Here’s an example of looping:
<table>
<tr tal:repeat="row context/portal_catalog">
<td tal:content="row/Title">Title</td>
</tr>
</table>
In this example, the expression here/portal_catalog returns a list of results. Because the repeat
starts on the table’s row tag, for each row in the list of results, a new row in the table will be
created. Rather like tal:define, each iteration of the results is assigned to a local variable (in
this case, row). This example will show one row for every item in the list of results.
You can access some useful variables from the repeat statement, such as the number of the
current iteration. You can access these through the repeat variable, which gets added to the
namespace. For example, to access the current number, you use the following:
<table>
<tr tal:repeat="row context/portal_catalog">
<td tal:content="repeat/row/number">1</td>
<td tal:content="row/Title">Title</td>
</tr>
</table>
The full list of variables available in repeat is as follows:
• index*:* This is the iteration number, starting from zero.
124
•
– *number*:* This is the iteration number, starting from one.
•
– *even*:* This is true for an even-indexed iteration (for example, 0, 2, 4,
...).
•
– *odd*:* This is true for an odd-indexed iteration (for example, 1, 3, 5,
...).
• start*:* This is true for the first iteration.
• end*:* This is true for the last iteration.
•
– *length*:* This is the total number of iterations.
• letter*:* This is the iteration number as a lowercase letter (for example, a*–*z, aa*–*az, ba*–*bz, ..., za*–*zz, aaa*–*aaz, and so on),
starting from one.
•
– *Letter*: This is the uppercase version of letter.*
•
– *roman*: This is the number as a lowercase Roman numeral (*i, ii, iii, iv,
v, and so on), starting from one.
Two other values are available in the repeat namespace that are rather unusual and rarely used,
first and last. These two variables allow you to store information about data in the iteration.
By using the value you want to store in an expression, a Boolean value will be returned. For
the variable first, true indicates that this the first time the value has occurred in the iteration.
Likewise, for the variable last, true indicates that this is the last time the value has occurred in
the iteration.
Here’s an example of this:
<ul>
<li tal:repeat="val context/objectValues">
First: <i tal:content="repeat/val/first/meta_type" />,
Last: <i tal:content="repeat/val/last/meta_type" />:
<b tal:content="val/meta_type" />,
<b tal:content="val/title_or_id" />
</li>
</ul>
5.1.3.2.8 tal:replace: Adding Text
The tal:replace statement is similar to tal:content with one difference—it removes the entire
tag.
For example:
<p tal:replace="context/title_or_id">Some title</p>
This will render the result of the expression context/title_or_id but will remove the paragraph
tags from the result. This is equivalent to the following:
125
<p
tal:content="here/title_or_id"
tal:omit-tag="">Some title</p>
If the element with the tal:replace statement contains other elements, then all those elements
will be replaced. You can’t use the tal:replace statement with tal:attributes or tal:content;
they’re mutually exclusive, and an error will be raised if you place both on the same element.
5.1.3.3 Introducing Execution Order
The order that TAL attributes are written isn’t the order in which they’re executed because
they’re really XML elements (and XML doesn’t care about attribute order). The order in which
they’re executed is as follows:
define condition repeat content replace attributes omit-tag You can’t use the content and replace
statements on the same element because they’re mutually exclusive. Using the attributes statement on the same element as a replace or an omit-tag is meaningless since the attributes are
removed. The on-error tag isn’t mentioned because it’ll be used when the first error occurs in
any of the previous elements.
5.1.3.4 Example: Displaying User Information
To illustrate the points you’ve learned so far, you’ll now create a page template that performs
a simple task: displaying information about a user in the system.
In this example, a company is using Plone internally as an intranet. Each employee is registered
in Plone and given a login; however, there’s no simple page that shows employees or how to
contact them. You’ll create a simple user information page that shows a user’s e-mail address,
home page, picture, and when they last logged in.
The first prototype of this page is easily accomplished with TAL, TALES, and a bit of knowledge
of the basic Content Management Framework (CMF) tools. Unfortunately, because the Application Programming Interfaces (APIs) are rather convoluted for those tools, some of this code
is a little longer than it should be. At this stage, don’t worry too much about the API of those
tools; these will be covered in Chapter 9. If you just take the API for granted for the moment,
you can concentrate on the TAL.
First, you need to create a page template; click portal_skins, click custom, add a page template,
and give it the ID user_info. Second, you’ll edit it as follows. For a full listing of this page
template, please see Appendix A. Examining the full listing, you’ll see that it starts with HTML
and body tags.
For, convenience you’ll put the main definitions in a div tag:
<div
tal:omit-tag=""
tal:define="
userName request/userName|nothing;
userObj python: here.portal_membership.getMemberById(userName);
126
getPortrait nocall: here/portal_membership/getPersonalPortrait;
getFolder nocall: here/portal_membership/getHomeFolder
">
In this div tag there are four defines: one to get the username passed in through the request
object and another to translate that username into a user object. The last two defines ensure
that you have a valid reference to the methods that give you user pictures and folders; these
again are convenient because they make later code simpler. Making a div tag or other tag such
as this that contains a series of defines is quite a common pattern in the Zope Page Templates
system. It simply makes the code cleaner.
Next, you do two simple conditions to check that you have a user:
<p tal:condition="not: userName">
No username selected.
</p>
<p tal:condition="not: userObj">
That username does not exist.
</p>
If no username is given in the request, then the expression request/username|nothing will result
in a userName that’s nothing and hence fail the simple test. Further, if the username isn’t valid,
the userObj will result in None, and error messages will be printed for both these conditions.
Now you’re ready to actually process the user:
<table tal:condition="userObj">
<tr>
<td>
<img src=""
tal:replace="structure python: getPortrait(userName)" />
</td>
Since you can only show the user if one is found, you’ll ensure that there’s a simple condition on
this table, tal:condition=”userObj“. To show a user’s picture, you’ll use the getPortrait method
defined early. This function returns the entire tag, so the structure tag ensures the whole image
is rendered correctly. Next, you want to show a few properties such as name and email. The
following shows one of these options, getting the home folder:
<li
tal:define="home python: getFolder(userName)"
tal:condition="home">
<a href=""
tal:attributes="href home/absolute_url"
>Home folder</a>
</li>
First, you use a define to get the folder and assign this the variable home. In a Plone site,
creating a home folder for a user is optional, so you have to be sure that if you’re linking to a
127
folder, it exists. Fortunately, because of the TAL execution order, the define comes before the
condition. Following this, you show a link to the folder using the absolute_url attribute of a
folder.
The page template goes through a few more lines of finding other useful and exciting properties
to show the user. As with most things in Plone, the key is finding the correct API calls and then
processing the output accordingly.
Finally, the page ends by closing all the relevant tags. If all goes well, you should able to call the
page by accessing the URL http://yoursite/user_info?userName=[someuser] where someuser is
a username that exists in your Plone site.
At the moment, this page template is pretty limited. Only a user with the manager role can
view this page, it can show only one member at a time, and the information for the user is
rather thin. In Chapter 6, I’ll show how to expand this example and add some component
reusability, as well as the ability to translate the text into other languages.
6 Chapter 6
6.1 Introducing Advanced Plone Templating and Scripting
The previous chapter covered how the Zope Page Templates system works. To understand page
templates, Chapter 5 also covered the object hierarchy, acquisition, and Template Attribute
Language Expression Syntax (TALES). Using the code from the previous chapter, you were
able to generate dynamic Web pages. The chapter also showed an example page template that
plugged the code together, covered the building blocks of the templating system in Plone, and
provided the key information you’ll need in order to use Plone.
It’s now time to move onto some of the more advanced features of page templates and templating in Plone in general. First, I’ll introduce the Macro Expansion Template Attribute Language
(METAL) and Internationalization (I18N) namespaces. Like the TAL namespace, these provide functionality to the site developer. For those itching to know exactly how a Plone page is
plugged together, the ’Hooking Into Plone Using METAL” section provides many of the answers.
Up until now I’ve shown how you can use simple Python expressions in page templates. Of
course, sometimes a one-line Python expression isn’t enough. So in the ’Scripting Plone with
Python” section, I’ll show you can take Python to the next level and increase the power of your
scripting.
Finally, I’ll cover a common example, showing how to put together a form in Plone. This
example demonstrates concepts learned in the previous chapters and ties it all together while
showing you exactly how Plone handles forms.
6.1.1 Understanding Advanced Plone Templating
One of the nice elements of page templates is that different functions are clearly separated into
different namespaces. In the previous chapter, you looked at the TAL namespace. That’s not
the only namespace that page templates provide; two other namespaces are key to Plone.
The first is METAL. As the rather long name suggests, it’s similar to TAL in that it’s an attribute
language and inserts itself into element attributes. However, its primary aim is to ensure that
you can reuse chunks of other page template code. It does this using the slot and macro
functions.
The second is I18N, which allows you to translate the content of page templates. This is used
in Plone to localize the interface of Plone into more than 30 languages and for many users is
one of the key features of Plone. As you’ll see, the ability to localize text is of interest to all
users, even those building a monolingual site. You’ll start with METAL.
128
129
6.1.1.1 Hooking Into Plone Using METAL
So far you’ve seen how to use TAL to dynamically create parts of pages. However, this really
doesn’t let you do a great deal of complex templating. There really isn’t a mechanism to put a
standard header on top of every page, other than using a TAL statement. METAL is a method
of allowing preprocessing of the templates and provides some more powerful functions than
TAL. All METAL functions start with the metal: prefix.
6.1.1.1.1 metal:define-macro
The metal:define-macro command allows you to define an element to reference from another
template. The name of the referenced chunk is the name of the macro. The following is an
example that defines boxA as a piece you want to use elsewhere:
<div metal:define-macro="boxA">
...
</div>
That div element is now a macro that can be referenced from other templates. The macro
refers only to the part of the page referenced by the element, which, in this case, is the div
tag. So, it’s common to use multiple macro:defines in one page and for the page to be a valid
Hypertext Markup Language (HTML) page, like so:
<html xmlns:tal="http://xml.zope.org/namespaces/tal"
xmlns:metal="http://xml.zope.org/namespaces/metal"
i18n:domain="plone">
<body>
<div metal:define-macro="boxA">
...
</div>
<div metal:define-macro="boxB">
...
</div>
</body>
</html>
Corresponding with the earlier goals of page templates, this page is a valid HTML page that
can be edited by a designer. When the macro is called, the HTML outside the div tags will be
discarded.
6.1.1.1.2 metal:use-macro
The metal:use-macro command uses a macro that has been defined using the define-macro.
When a template defines a macro using the define-macro command, it’s accessible to other
templates through a macros property. For example, if you want to pull the portlet macro out of
the portlet_login template, you can do the following:
130
<div metal:use-macro="context/portlet_login/macros/portlet">
The about slot will go here
</div>
This will fetch the macro and insert the result in its place. As shown, the use-macro command
takes a path expression that points to the template and then to the specific macro in the
template.
6.1.1.1.3 Example: Using the use-macro and define-macro Macros
As an example of this, the following is a template called time_template. This template shows
the date and time on the current Plone server. This is quite a useful function to have, so you
can wrap this in a macro to be reused. This is the example page template containing the
define-macro:
<html>
<body>
<div metal:define-macro="time">
<div tal:content="context/ZopeTime">
The time
</div>
</div>
</body>
</html>
If your template is called time_template, then you can reference this macro in another template.
You can now reference this macro in multiple templates. This is an example template:
<html>
<body>
<div metal:use-macro="context/time_template/macros/time">
If there is a message then the macro will display i here.
</div>
</body>
</html>
When this template is rendered, the HTML produced by Plone looks like this:
<html>
<body>
<div>
<div>2004/04/15 17:18:18.312 GMT-7</div>
</div>
</body>
</html>
131
6.1.1.1.4 metal:define-slot
A slot is a section of a macro that the template author expects to be overridden by another
template. You could think of it as a hole in your page template that you’re expecting something
else to fill in. All define-slot commands must be contained within a define-macro. For example:
<div metal:define-macro="master">
<div metal:define-slot="main">
...
</div>
</div>
6.1.1.1.5 metal:fill-slot
This completes a slot that has been defined with the define-slot command. A fill-slot must be
defined with a use-macro command. When the define- macro part is called, the macro will
attempt fill in all the define slots with the appropriate fill-slots. Here’s an example fill-slot:
<div metal:use-macro="master">
<div metal:fill-slot="main">
The main slot will go here
</div>
</div>
6.1.1.1.6 Example: Using Macros and Slots
Returning to the previous example, you’ll now enhance it a little. If you wanted to put a
custom message at the beginning of the time, then you’d add a slot at the beginning of the
time_template, inside the define-macro. The slot is called time and is as follows:
<html>
<body>
<div metal:define-macro="time">
<div metal:define-slot="msg">Time slot</div>
<div tal:content="context/ZopeTime">
The time
</div>
</div>
</body>
</html>
Now, in the calling page template, you can call the fill-slot:
<html>
<body>
<div metal:use-macro="context/time_template/macros/time">
132
<div metal:fill-slot="msg">The time is:</div>
If there is a message then the macro will display i here.
</div>
</body>
</html>
The end result is that you’ll see the time-slot filled in as follows:
<html>
<body>
<div>
<div>The time is: </div>
<div>2004/04/15 17:18:18.312 GMT-7</div>
</div>
</body>
</html>
6.1.1.1.7 How Plone Uses Macros and Slots
Both macros and slots are similar inasmuch as they both extract content from another template and insert content, but they do this differently. The difference comes in how they’re
used: Macros are elements of a template that are explicitly called, but slots are like holes in a
template that you expect other templates to fill in for you. For example, in Plone’s case, the
portlets such as the calendar, navigation, and so on are macros that are explicitly called.
In fact, if in the Zope Management Interface (ZMI) you look at the file by clicking portal_skins,
clicking plone_templates, and then clicking main_template, you’ll see that the entire page consists of macros and slots. At this stage, it’s probably a little confusing, but when called, it runs
through a series of macros and pulls everything together. This allows a user to easily change
any part of a Plone site by overriding that macro, as you’ll see in the next chapter. For example:
...
<div metal:use-macro="here/global_siteactions/macros/site_actions">
Site-wide actions (Contact, Sitemap, Help, Style Switcher etc)
</div>
<div metal:use-macro="here/global_searchbox/macros/quick_search">
The quicksearch box, normally placed at the top right
</div>
...
Continuing to scroll down through main_template, you’ll encounter some define slots. Briefly
I’ll recap how a page in Plone is rendered. When an object is shown, a template for that view
of that content is shown. When you view an image, the template image_view is shown, and
that template controls how the image is shown. To do this task, the image template fills the
main slot. If you look in the image_view template, you’ll see the following code defined in that
template:
133
<div metal:fill-slot="main">
...
</div>
If you jump back to the main_template, you’ll see that it contains a define-slot definition for the
slot main:
<metal:bodytext metal:define-slot="main" tal:content="nothing">
Page body text
</metal:bodytext>
Each type of content has a different template, and each template defines how they’ll use the
main slot differently. So, then each content type has its own particular look and feel from the
templates. Just one element is missing in the equation. Somehow when you called image_view,
the template knew it should use main_template. In the image_view template, you use the macro
from the main_template. This is defined in the following HTML:
<html xmlns="http://www.w3.org/1999/xhtml" xml:lang="en-US"
lang="en-US"
metal:use-macro="here/main_template/macros/master"
i18n:domain="plone">
In this case, the main_template has the main slot filled in by the slot defined as main in the
template being rendered. The following is a timeline of how the page is built for viewing an
image:
image_view main_template image_view main_template define-slot=”main“ fill-slot image_view
fill-slot main_template main_template This allows Plone to be flexible in terms of how each
page is defined. For example, main_template defines just more than that one slot; there’s also
a slot for inserting Cascading Style Sheets (CSS) code:
<metal:cssslot fill-slot="css_slot">
<metal:cssslot define-slot="css_slot" />
</metal:cssslot>
If a view needed a custom set of CSS, you could define this slot in the view, and it’d be filled in
when rendering. Some of the macros in main_template define slots in them as well and then
fill them back in the main_template so that if you really wanted, you could also fill in those
slots. That’s an advanced technique, however, so you’ll want to ensure you have the basics
down before going down that road.
6.1.1.2 Introducing Internationalization
Plone is always striving to maintain a large number of high-quality translations. The fact that
Plone provides an accessible user interface in more than 30 languages is a key selling point for
Plone. This also means that I18N is a key feature of the templates. To facilitate this, the I18N
namespace is an extra namespace such as TAL or METAL that has specific statements.
134
This section details what users need to know in regard to the templates. In a template you can
add an i18n tag to an element that will allow the translation of an attribute or its contents.
Six statements exist: attributes, data, domain, source, target, and translate. The basic pattern
is to wrap the piece of text you want to translate and add the appropriate i18n attributes. For
example, if you want to translate the following:
<i>Some text</i>
it would become like so:
<i i18n:translate="some_text_label">Some text</i>
Each localization provides a translation of Some text, and the translation tool looks up a translation for a user. When performing the translation, each string to be translated must have
a unique message ID that identifies the item to be translated. For example, a string such as
Search may have a message ID of search_widget_label. The message ID allows the string to be
identified uniquely and the translation to be repeated.
6.1.1.2.1 i18n:translate
This translates the contents of an element, with an optional message ID passed as a statement.
For example, the following will create a message ID of title_string:
<h1 i18n:translate="title_string">This is a title</h1>
This example is for a piece of text that’s static and doesn’t change. However, in some situations,
the piece of text could be taken from a database or an object and is dynamic. By leaving the
translate statement blank, the message ID is composed of the value in the field. In the following
example, if the title returned by the path expression here/title was Alice in Wonderland, then
that title would be passed to the translation tool. If no translation exists, the original value
will be inserted:
<h1
tal:content="here/title"
i18n:translate="">
This is a title.
</h1>
The translation command is probably one of most common i18n tags you’ll use, and you’ll see
it throughout the Plone templates. It not only enables you to translate static parts of your site,
such as form labels, help messages, and descriptions, but also the more dynamic parts of your
site that could change more often, such as page titles.
135
6.1.1.2.2 i18n:domain
This sets the domain for the translation. To prevent conflict, each site can have multiple
domains or groups for translations; for example, there may be one domain for Plone and one
for your custom application. Plone uses the domain plone, which is usually the default domain
in Plone:
<body i18n:domain="plone">
You shouldn’t have to use this tag much; however, if you’re writing a custom application, you
may find it useful to have a domain that doesn’t conflict with other domains.
6.1.1.2.3 Ii8n:source
This sets the source language for the text about to be translated. It isn’t used in Plone:
<p i18n:source="en" i18n:translate="">Some text</p>
6.1.1.2.4 i18n:name
This provides a way of preserving elements in a larger block of text so that the block of text can
be reordered. In many languages, not only are the words changed but also the order. If you
have to translate a whole paragraph or sentence that contains smaller chunks that shouldn’t
be translated, then they can be passed through:
<p i18n:translate="book_message">
The
<span
tal:omit-tag=""
tal:content="book/color"
i18n:name="age">Blue</span>
Book
</p>
This will produce the following message string:
The {color} Book
If the target language required these to be in a different order, these could then be moved
around and still have the dynamic content inserted into the correct place. In French, this
would need to be translated as so:
Le Livre {color}
6.1.1.2.5 i18n:target
This sets the target language for the text about to be translated. It isn’t used in Plone.
136
6.1.1.2.6 i18n:attributes
This allows the translation of attributes within an element, rather than the content. For example, an image tag has the alt attribute, which shows an alternate representation of the image:
<img
href="/someimage.jpg"
alt="Some text"
i18n:attributes="alt alternate_image_label" />
Multiple attributes should be separated with a semicolon, just like tal:attributes work.
6.1.1.2.7 i18n:data
This provides a way of translating something other than strings. An example is a DateTime
object. An i18n:data statement requires a matching i18n:translate statement so that a valid
message ID is available. For example:
<span i18n:data="here/currentTime"
i18n:translate="timefmt"
i18n:name="time">2:32 pm</span>... beep!
6.1.1.2.8 Translation Service
Now that I’ve covered the tags, I’ll cover the mechanism for performing the translation. By
default Plone comes with an I18N mechanism. This allows you to internationalize the user
interface so that messages, tabs, and forms can all be translated. At this stage, this doesn’t
cover the actual content that users add. If you add a document in English and view the page
asking for it in French, you’ll get the English document with French text around the outside
(see Figure 6-1).
137
Figure 6-1. Plone.org in French
Plone reads the HTTP headers that a browser sends to the client requesting a language. If your
browser is in English, then you won’t see much.
To change the language settings in Internet Explorer, do the following:
Once you’ve done this, pick your favorite Plone site and visit it in your browser.
The translations for Plone are handled through a tool called Placeless Translation Service
(PTS). You can locate the PTS tool in the Zope control panel; at the bottom of the page you’ll
see an option for Placeless Translation Service. Click this, and it’ll open all the translations
that exist. These translations are read in from the file system; click a translation to see the
138
information about the language, such as the translator, the encoding, and the path to the file.
All the files are actually stored in the i18n directory of the CMFPlone directory.
Translations are handled using two files for a translation, a .po and a .mo file. For example,
plone-de.po contains the translations for German (de is the code for German). The .mo file is
the ’compiled” version of the .po file and is used by Plone for performance. You never need
to look at the .mo file, so you can just ignore it. The .po is the file you can edit to change a
translation. If you open that file in a text editor, you’ll see a series of lines starting with the
text msgid or msgstr. Above the msgid is actually the code where the i18n command occurs, so
you can see which bit of a page you’re translating. For example:
#: from plone_forms/content_status_history.pt
#.
<input attributes="tabindex tabindex/next;" value="Apply"
class="context" name="workflow_action_submit" type="submit" />
#.
#: from plone_forms/personalize_form.pt
#.
<input attributes="tabindex tabindex/next;" tabindex=""
value="Apply" class="context" type="submit" />
#.
msgid "Apply"
msgstr "Anwenden"
In the two parts of the previous page templates, the word Apply will be translated into Anwenden for German users. What gets translated is determined by the i18n tags that have been
inserted into the page templates, as you saw earlier. If you want to change that translation or
add your own variation, then merely change the .po file. If no msgstr is found, then the default
English translation is found. Once you’ve made that change, restart Plone. When this happens,
Plone will recompile that file into the .mo version, and your translation will be updated.
For Plone, the default translation is always to use the English translation file if no language is
given or no translation is available. In fact, the plone-en.po file is blank, so no translation will
be available. Therefore, Plone does the final fallback, does no translation, and shows the text
in the page template. The text in all page templates is in English since most developers speak
English. The long and short of this is that there’s no English translation.
Therefore, you can make a new translation by copying the plone.pot file into a new file of
the name plone-xx.po. The value of xx should match the country code of your translation.
You can find a list of language codes at http://www.unicode.org/onlinedat/languages.html.
Once you’ve started the translation, set the values at the top, including the language code,
and start translating away. If you’ve done a new language file, then the Plone I18N
team will happily accept it and help you complete it. The Plone team mailing list is at
http://sourceforge.net/mailarchive/forum.php?forum_id=11647
Translating the content that people add is actually quite a tricky task and something that Plone
is working toward, but currently it hasn’t completely ironed out. The favorite approach at
the moment is to use two products, PloneLanguageTool and i18nLayer, both of which can be
found on SourceForge (http://sf.net/projects/collective). However, both of these are for more
experienced developers to fully understand and integrate; I hope something like this will be in
the next release of the book.
139
6.1.1.3 Example: Displaying Multiple User Information
In Chapter 5 you used simple TAL commands to show a user’s information in more detail. That
template has a few drawbacks; one of them is that it shows only one user at a time. You’ve
seen that a simple tal:repeat can enable you to repeat content, but you’ll now use a macro to
make this page more modular.
You’ll change the user_info page template so that it lists every page member in the site. Instead
of looking for a username being passed in the request, you’ll use the function listMembers,
which returns a list of every member on the site:
<div metal:fill-slot="main">
<tal:block
tal:define="
getPortrait nocall: here/portal_membership/getPersonalPortrait;
getFolder nocall: here/portal_membership/getHomeFolder
">
<table>
<tr tal:repeat="userObj here/portal_membership/listMembers">
<metal:block
metal:use-macro="here/user_section/macros/userSection" />
</tr>
</table>
</tal:block>
</div>
You’ll note that the code for user_info is now a great deal shorter. The member returned
by listMembers is passed in to tal:repeat. For each member, there will be a table row and
then a macro to show information to the user. In that table row, the locally defined variable
userObj now contains the user information. Of course, you now need to make a macro called
userSection in a page template, so you’ll create a page template called user_section as referenced
in the macro. This template contains all the code that was between the table’s row tags. Again,
you can find a full listing for this page template in Appendix B:
<div metal:define-macro="userSection"
tal:define="userName userObj/getUserName">
...
The only real change is that the use-macro in the main template has to be removed and a new
macro defined so that this macro can be defined. Because the username is no longer explicitly
passed, you need to get the username from the user object by using the getUserName method.
To test the resulting page, go to http://yoursite/user_info, and you should see a list of users.
The page now is user-friendly, showing multiple users on one page. The code is more modular,
rendering the user’s information in a separate macro that can be altered independently. This
page is still not perfect but will be improved in later chapters.
140
6.1.1.4 Example: Creating a New Portlet with Google Ads
In Chapter 4 you saw how to easily edit portlets in a Plone site; adding your own portlet isn’t
much harder. To write your own slot, you need to make a new page template with a macro
inside it. Then a TALES expression that points to macro will be added to the list of portlet,
rendering the portlet to the page.
The basic template for a portlet is as follows:
<div metal:define-macro="portlet">
<div class="portlet">
<!-- Enter code here -->
</div>
</div>
All you need to do is insert some suitable code into the portlet. Google set up a text-based
advertising system in 2003 that places text on your site. The ads are based upon what Google
thinks your site is about, based on the search results for your site. The Google system is
available at http://www.google.com/adsense. To display ads (and get paid for them), you’ll
have to register with Google. On the Google Web site, it’ll ask you to pick some colors and
style. Since you’ll put this in a slot, I recommend the ’skyscraper” size—tall and thin. Make a
copy of the JavaScript that the site produces.
Next, you have to create a portlet:
portal_skins/custom googleAds googleBox <!-- Enter code here --> The end result should be
something like Listing 6-1; however, your version will have a valid value for google_ad_client,
rather than yourUniqueValue. That value tells Google which site ordered this ad and who to
pay. Curiously enough, if you don’t have a valid value there, Google will still happily show the
ads but not pay you!
Listing 6-1. Displaying Ads from Google
<div metal:define-macro="portlet">
<div class="portlet">
<script type="text/javascript"><!-google_ad_client = "yourUniqueValue";
google_ad_width = 120;
google_ad_height = 600;
google_ad_format = "120x600_as";
//--></script>
<script type="text/javascript"
src="http://pagead2.googlesyndication.com/pagead/show_ads.js">
</script>
</div>
</div>
To then include this on your site, as detailed in Chapter 4, add the following portlet to your
list of portlets:
141
here/googleAds/macros/portlet
6.1.2 Scripting Plone with Python
At least four different levels in Plone exist for creating logic. The simplest level for using
Python in Plone is the Python TALES expression I discussed in the previous chapter. However,
a Python expression allows you to do only one line of code; often you’ll want to do something
more complicated.
Even more common is the problem that you really don’t want to cram all the logic into the
template. Placing logic in your template is a bad idea in general; any time you can move
anything that isn’t explicitly presentation logic out of the template, you’ve saved yourself a
headache. Separating logic and presentation allows you to easily allow different people to
work on different parts of the project, and it improves code reuse. The other layers of adding
scripting Plone happen roughly in the following order:
• Template attribute expressions: These provide expressions and a way of
inserting little snippets of logic or simple paths in many places.
• Script (Python) objects: These are simple scripts that execute in Plone in a
restricted environment.
• External method objects: These are more complicated modules that don’t
execute in restricted environments.
• Python products: This is the key source that the CMF and Plone is written
in; this offers access to everything in Plone. Python products are an advanced
subject and are covered in Chapter 14.
After an expression, the next level of complexity is Script (Python) object. This object allows
for multiple lines of Python code, and you can call it from an expression. When you call a
Script (Python) object, you’re incurring a small amount of extra overhead as Plone makes a
switch into that object. However, that overhead is minimal because there’s a trade-off between
clarity, separation, and performance. My advice is to put as much logic into Python as possible
and keep page templates as simple and as clean as possible. It’s easy to move it back later if
there’s a performance hit, but at least you’ll understand what’s happening later.
6.1.2.1 Using Script (Python) Objects
A Script (Python) object is may you might traditionally think of in Plone as a script. It’s
a snippet of Python that you can write and then call from other templates or through the
Web directly. Plone actually has a large number of these scripts for performing various key
functions. A Script (Python) is halfway between an expression and an external method in
terms of power.
To add a Script (Python) object, go to the ZMI, select Script (Python) from the drop-down
menu, and click Add, as shown in Figure 6-2.
142
Figure 6-2. Adding in a Script (Python) object
Give the script an ID such as test_py and then click Add and Edit. This will open the edit page
for the Script (Python) object, which looks like Figure 6-3.
143
Figure 6-3. Editing a Script (Python) object
You can edit the script directly through the Web. If you make a syntax error, you’ll be told
about it after you’ve clicked Save Changes, as shown in Figure 6-4.
144
Figure 6-4. A deliberate indentation error in the Script (Python) object
If your Script (Python) has no errors, you can click the Test tab to see what the output is. In
this case, the sample is rather boring; it prints the following text:
This is the Script (Python) "test_py" in
http://gloin:8080/Plone/portal_skins/custom
A script also has the following options:
Title: The edit form has a Title option, which is for you to give the script a title.
This will show up in the ZMI, so it’ll be easier to remember what it does.
145
Parameter List: This is a list of parameters that the script takes, such as variableA
or variableB=None. In fact, this is a standard list of parameters you’d expect in
a standard Python function. Some parameters are already defined for you in this
object, however; you can see them by clicking the Bindings tab. In that tab, you’ll
see a list of the variables already bound into the object, which should have familiar
names by now.
The following are the variables bound to the script that are accessible from a Script (Python)
object:
• context: This is the object on which the script is being called.
• container: This is the containing object for this script.
• script: This is the Script (Python) object itself; the equivalent in Zope Page
Templates is template.
• namespace: This is for when this script is called from Document Template
Markup Language (DTML), which is something that doesn’t happen in Plone.
• traverse_subpath: This is the Uniform Resource Locator (URL) path after the
script’s name, which is an advanced feature.
I’ll now show a simple example that ties these topics into the Zope Page Templates system,
using the example I gave of a Python expression in the previous chapter that adds two numbers.
As you saw, you could make a page template for this that looks like the following:
<p>1 + 2 = <em tal:content="python: 1 + 2" /></p>
The equivalent using a Script (Python) object looks like the following. Change the test_py
script to the following line:
return 1+2
As you saw at the beginning of the previous chapter, you call an object by giving its path as an
expression. So, in a page template, you can now do the following:
<p>1 + 2 = <em tal:content="here/test_py" /></p>
The object test_py is acquired in the path expression and called, and it then returns the Python
back to the template and prints. You’ve now called a script from your template! This is obviously a rather simple example, but my point is that there’s a great deal you can do in a Script
(Python) object that you just can’t do in a page template.
In a Script (Python) object, you can specify the title, parameters, and bindings setting by using
the ## notation at the top of a script. When you save a script with that bit of text at the
top, Plone will remove that line and instead change the appropriate value on the object. This
syntax is used a lot in the Script (Python) object in this book to ensure that you have the right
title and parameters. So, you could rewrite the previous script as follows:
##title=Returns 1+2
##parameters=
return 1+2
146
6.1.2.1.1 Scripting Plone
Scripting Plone is a rather complicated subject because as soon as you’re able to script Plone,
you have to take into account the Application Programming Interface (API) of all the objects
and tools you may want to use. Explaining APIs is beyond the scope of this book; instead, I’ll
demonstrate how to do some simple tasks using Script (Python) objects. Once you’re comfortable with them, I’ll describe more API-specific functions.
Page templates can loop through Python dictionaries and lists quite nicely. But often you don’t
have data in one of these convenient formats, so you need to jump into a Script (Python)
object, format the data nicely, and then pass it back to the page template.
The most convenient data format is a list of dictionaries, which lets you combine the power of
a tal:repeat and a path expression in one function. As an example, you’ll see a function that
takes a list of objects. Each of these objects is actually an object in a folder. For each of those
objects, you’ll see the object if it has been updated in the last five days. Listing 6-2 shows a
useful little portlet I put together for a site that wanted to locate this type of information and
then highlight exactly those items.
Listing 6-2. Returning Objects Up to Five Days Old
##title=recentlyChanged
##parameters=objects
from DateTime import DateTime
now = DateTime()
difference = 5 # as in 5 days
result = []
for object in objects:
diff = now - object.bobobase_modification_time()
if diff < difference:
dct = {"object":object,"diff":int(diff)}
result.append(dct)
return result
In this Script (Python) object I’ve introduced a couple of new concepts. First, you import Zope’s
DateTime module using the import function. The DateTime module, covered in Appendix C, is
a module to provide access to dates. It’s pretty simple, but if you make a new DateTime object
with no parameters, then you’ll get the current date and time; this is the now variable. When
you subtract two DateTime objects, you’ll get the number of days. You can compare that to the
difference a user wants to monitor and, if it’s longer, add it to the result list. The result of this
is a list of dictionary objects, which looks like Listing 6-3.
Listing 6-3. The Result of Listing 6-2
[
{
147
’diff’: 1,
’object’: <PloneFolder instance at 02C0C110>
},
{
l
’diff’: 4,
’object’: <PloneFolder instance at 02FE3321>
},
...
So now that you have the results in the right order, you need a page template that will pass in
the list of objects and process the results. An example of this is as follows:
<ul>
<li tal:repeat="updated python: context.updateScript(context.contentValues())">
This template has a tal:repeat call at the top that calls the script (in this case, called updateScript). Into that function it passes one value, a list of contentValues from the current context. Previously you called the Script (Python) object using a path expression; you could do
that here as context/updateScript. However, you can’t pass parameters through to the script
being called in that syntax, so you make a Python expression instead, which is python: context.updateScript(). The contentValues function returns a list of all content objects in a folder.
Next, look at the code for each iteration:
<a href="#"
tal:attributes="href updated/object/absolute_url"
tal:content="updated/object/title_or_id">
The title of the item</a>
<em tal:content="updated/diff" /> days ago
</li>
</ul>
As shown, you can loop through this list of values, and you can then use path expressions to
access first the repeated value (updated), then the object (object), and then a method of that
object (title_or_id). This is an example of taking complicated logic processing and passing it
off to a Script (Python) object.
6.1.2.1.2 Restricted Python
I’ve mentioned several times that Script (Python) objects and Python TAL expressions all run in
restricted Python mode. Restricted Python is an environment that has some functions removed.
These functions may potentially be dangerous in a Web environment such as Plone. The original reasoning is that you may have untrusted (but authenticated) users writing Python on your
site. If you open an account at one of the many free Web hosts for Zope, you’ll find you can do
this. However, if you have given people the right to do that, you don’t want them to get access
to certain things such as the file system.
In restricted Python, some common Python functions have been removed for security reasons—
most notably, dir and open aren’t available. This means that, as with Script (Python) objects,
148
they can’t be introspected, and access is limited to the file system. A few Python modules are
available to the user. Most of these are for experienced developers; for more information, see
the relevant documentation or module code:
• string:
This
is
the
Python
(http://python.org/doc/current/lib/module-string.html).
string
module
• random:
This
is
the
Python
random
(http://python.org/doc/current/lib/module-random.html).
module
• whrandom: This is the Python whrandom module. You should mostly use
random now (http://python.org/doc/current/lib/module-whrandom.html).
• math:
This
is
the
Python
(http://python.org/doc/current/lib/module-math.html).
math
module
• DateTime: This is Zope’s own DateTime module.
• sequence: This is a Zope module for easily sorting sequences.
• ZTUtils: This is a Zope module that provides various utilities.
• AccessControl: This gives access to Zope’s Access module.
• Products.PythonScripts.standard: This gives access to the standard stringprocessing functions of DTML such as html_quote, thousands_commas, and so
on.
If you want to import a module that isn’t in the previous list, then you can
find excellent instructions in the PythonScript module.
You’ll find them at
Zope/lib/python/Products/PythonScripts/module_access_examples.py.
However, a more
simple method is available to you—using an external method.
6.1.2.2 Using External Method Objects
An external method is a Python module written on the file system and then accessed in Plone.
Because it’s written on the file system, it doesn’t run in restricted Python mode, and therefore
it conforms to the standard Plone security settings.
This means you can write a script that does anything you want and then call it from a page
template. Common tasks include opening and closing files, accessing other processes or executables, and performing tasks in Plone or Zope that you simply can’t perform in any other
way. For obvious reasons, when you’re writing a script that can do this, you need to be sure you
aren’t doing anything dangerous, such as reading the password file to your server or deleting
a file you don’t want to delete.
To add an external method, you go to the file system of your instance home and find the
Extensions directory. In that directory, add a new Python script file; for example, Figure 6-5
shows that I added test.py to a directory on my Windows computer.
149
Figure 6-5. A new external method, test.py
You can now open test.py and edit it to your heart’s content, writing any Python code you want.
The only catch is that you must have an entry function that takes at least one argument, self.
This argument is the external method object in Plone that you’ll be adding shortly. The following is an example entry function that reads the README.txt file out of the same Extensions
directory and spits it back to the user (you’ll have to change the path to point to your file):
def readFile(self):
fh = open(r’c:\Program Files\Plone\Data\Extensions\README.txt’, ’rb’)
data = fh.read()
return data
Now that you’ve done that, you need to map an external method to this script. This is a Zope
object, so return to the ZMI, click portal_skins,* and then click custom*. Finally, select External
Method from the Add New Items drop-down list. When you add an external method, you need
to give the name of the module (without the .py) and the entry function, so in this case the
add form looks like Figure 6-6.
150
Figure 6-6. The newly added external method
After clicking Save Changes, you can hit the Test tab to see what happens when it runs. In
this case, you should get a line or two of text. Since you have the External Method module
in Plone, you can access it from a page template in the same way as any other object. A path
expression to here/test_external would do the trick in this case. For example:
<h1>README.txt</h1>
<p tal:content="here/test_external" />
The real power is that you can pass code off to the unrestricted Python mode and from there
to any function you want, without having to worry about security. Although this may seem like
a cool function, external methods aren’t used a great deal in Plone because complicated logic
is usually moved into a Product object, and simple logic is kept in a Script (Python) object. If
you find yourself using External Method objects a lot, consider one of the tools discussed in
Chapter 12.
6.1.3 Useful Tips
Because page templates are valid Extensible Markup Language (XML) and can be used independently of Zope or Plone, you have several useful scripts for cleaning up page template code
and performing syntax checks. These are additional tools and checks; Zope actually performs
151
all the necessary checks when you upload a page template. For a project such as Plone, it can
be useful to run automatic checks on your code or verify it locally before committing changes.
To run these checks, you’ll need to be able to edit these tools locally and have Python installed
on your computer. For more information on External Editor, a method for editing remote code
locally, see Chapter 10.
6.1.3.1 Introducing XML Namespaces
Page templates use XML namespaces to generate code. Programmers can use the rules of XML
namespaces to make life easier. At the top of a page template, you’ll see a declaration of the
namespace in the starting tag:
<html xmlns="http://www.w3.org/1999/xhtml"...
This sets the default namespace to Extensible HTML (XHTML). For any containing element,
if no namespace is defined, it uses that default namespace. For example, you know the next
element is XHTML because it has no prefix:
<body>
Normally for TAL and METAL elements and attributes, you have been adding the prefix tal:
and metal: to define the namespace. The following code is something that should be familiar
by now:
<span tal:omit-tag="" tal:content="python: 1+2" />
This will render 3. However, the following is an alternative:
<tal:number content="python: 1+2" />
By using the tal: prefix on the element, you’ve defined the default namespace for this whole
element as tal. If no other prefix is given, the tal namespace is used. In the example, using
span tags, the default namespace is XHTML, so you have to specifically define the tal: prefix
when using the Content tab.
Note that the element name is descriptive and can be anything not already defined
the tal namespace (for example, content or replace). Because tal:number isn’t a
valid XHTML element, the actual tag won’t display, but the content will—making
the omit-tag unnecessary. This technique is used a lot in Plone to make code that’s
smaller, simpler to debug, and more semantic.
152
6.1.3.2 Introducing Tidying Code
HTML Tidy is an excellent tool for testing and cleaning up HTML code that can perform a few
useful tasks. Versions of HTML Tidy exist for all operating systems; you can download it from
http://tidy.sourceforge.net. For Windows users, find the appropriate download for your version
of Windows, unzip the tidy.zip file, and place the tidy.exe in your PATH (usually your Windows
directory, such as C:up WINNT).
HTML Tidy can tell you if there are any XHTML errors in your page template. For these
purposes, one flag can make a difference: -xml. This tells HTML Tidy to process the file as XML
and report any XML errors. Given the example ’bad” template shown in Listing 6-4, you can
see a few errors. Not only is the code not indented, but it’s missing closing elements and has
invalid nesting.
Listing 6-4. An Example Broken Page Template: bad_template.pt
<!DOCTYPE html PUBLIC "-//W3C//DTD XHTML 1.0 Transitional//EN"
"http://www.w3.org/TR/xhtml1/DTD/xhtml1-transitional.dtd">
<html xmlns="http://www.w3.org/1999/xhtml">
<head>
<title></title>
</head>
<body>
<p>
<div>
This is bad HTML,
XHTML or XML...<a tal:contents="string: someUrl"></a>
</p>
<img>
Further it isnt indented!
</body>
</html>
If you run Listing 6-4 through HTML Tidy, you’ll see the errors in the template and get nicely
indented code, as shown in Listing 6-5.
Listing 6-5. The Output from HTML Tidy
$ tidy -q -i bad_template.pt
line 11 column 1 - Warning: <img> element not empty or not closed
line 10 column 1 - Warning: missing </div>
line 10 column 39 - Warning: <a> proprietary attribute "tal:contents"
line 11 column 1 - Warning: <img> lacks "alt" attribute
line 11 column 1 - Warning: <img> lacks "src" attribute
line 9 column 1 - Warning: trimming empty <p>
<!DOCTYPE html PUBLIC "-//W3C//DTD XHTML 1.0 Strict//EN"
"http://www.w3.org/TR/xhtml1/DTD/xhtml1-strict.dtd">
<html xmlns="http://www.w3.org/1999/xhtml">
153
<head>
<meta name="generator" content=
"HTML Tidy for Linux/x86 (vers 1st August 2003), see www.w3.org" />
<title></title>
</head>
<body>
<div>
This is bad HTML, XHTML or XML...<a tal:contents=
"string: someUrl"></a> <img />Further it isnt indented!
</div>
</body>
</html>
The complaints about proprietary attributes can be a little annoying. To check that your page
template is valid XML, pass the -xml flag. The output is less verbose and just points out the
missing tags:
$ tidy -q -xml bad_template.pt
line 15 column 1 - Error: unexpected </body> in <img>
line 16 column 1 - Error: unexpected </html> in <img>
6.1.3.3 Conducting Syntax Checks
When you edit a page template in the ZMI, Zope performs a syntax check on the document
for things such as invalid tags. If a tag is invalid, an error will be shown on the template
while you’re editing it through the Web. If, like me (and as I demonstrate in Chapter 7), you
write most of your page templates on the file system, then a simple syntax check for a page
template is really useful. Listing 6-6 is a Python script that resides on your file system and runs
independently from Zope.
To run this, you must have a Python interpreter, and the Python module PageTemplate must be
importable. To make PageTemplate importable to your Python interpreter, you must add the
Products directory of your Zope installation to your Python path. You have several ways to do
this (covered in Appendix B).
Listing 6-6. Error Checking Page Templates
#!/usr/bin/python
from Products.PageTemplates.PageTemplate import PageTemplate
import sys
def test(file):
raw_data = open(file, ’r’).read()
pt = PageTemplate()
pt.write(raw_data)
if pt._v_errors:
154
print "*** Error in:", file
for error in pt._v_errors[1:]:
print error
if __name__==’__main__’:
if len(sys.argv) < 2:
print "python check.py file [files...]"
sys.exit(1)
else:
for arg in sys.argv[1:]:
test(arg)
For every file passed through to the script, the ZMI will compile the page template and see if
there are any TAL errors. Taking the bad_template.pt file from Listing 6-4, you’ll get an error:
$ python zpt.py /tmp/bad_template.pt
*** Error in: /tmp/bad_template.pt
TAL.TALDefs.TALError: bad TAL attribute: ’contents’, at line 10, column 39
In this case, it has picked up on the incorrect spelling of tal:content as tal:contents. This error
is something HTML Tidy doesn’t catch. Unfortunately, the processing stops at the first syntax
error. If there are multiple errors, only the first is picked up, meaning sometimes you have to
check the syntax several times.
6.1.4 Using Forms
Forms are an integral part of any site, and almost everyone needs to create a method for
creating and altering forms in your Plone site. With the form framework in Plone, you can
change the validation that process forms have, where they take the user to, and so on. This
framework isn’t just specifically designed for stand-alone forms that perform a simple task,
such as request a password, login, and so on. The framework also works for all content types
for tasks such as editing a content type, which I’ll cover later in this book in Chapters 11–13.
All basic forms have at least two components that you’ve already seen so far: a Page Template
object to show the form to the user, and a Script (Python) object to parse the results and
perform some action on the results.
The form controller framework in Plone introduces a few new object types that are equivalent
to the types you’ve seen in this chapter. These are the Controller Page Template object, the
Controller Script (Python) object, and the Controller Validator object. These new objects have
their equivalent objects, as shown in Table 6-1. These new objects have more properties and
act in slightly different ways than the equivalent objects.
Table 6-1. New Object Types That the Controller Provides
Object Type
Equivalent Zope Object
Controller Filesystem Page Template
Page Template
155
Object Type
Equivalent Zope Object
Controller Python Script
Controller Validator
Python Script
Python Script
To add one of these objects using the ZMI, go to the drop-down box, and select the name.
The form controller framework creates a sequence of events for a form that a user can then
define. The following is the sequence of events when executing a form:
When this sequence of events occurs, a state object is passed around, which contains information about the status of the object, the success of any validations, and any message that are to
be passed.
The following sections run through these steps to show how a form can be validated, and then
I’ll show a full example in the ’E-Mail Example: Sending E-Mail to a Webmaster” section.
6.1.4.1 Creating a Sample Form and Associated Scripts
The beginning of this process is a form. Although this is actually a Controller Page Template
object, it’s written using standard TAL code. To add one, select Controller Page Template from
the now-familiar drop-down box and give it an ID of test_cpt.
A form in Plone is actually a rather lengthy piece of code if you want to utilize all the options
available to you. This piece of code is reproduced in full in Appendix B and is the code used in
the later example:
<form method="post"
tal:define="errors options/state/getErrors"
tal:attributes="action template/id;">
...
<input type="hidden" name="form.submitted" value="1" />
</form>
Looking at this code, you should note that to work in the framework, a few minor differences
exist between this and what you may consider a standard form. First, the form is set up to submit to itself; this isn’t *optional. Second, a special hidden variable exists called *form.submitted.
The Controller Page Template object checks the request variable for the value form.submitted
to see if the form has been submitted. If, instead, it has just been accessed—for example, via
a link—this isn’t *optional. At the beginning of the form, you set the variable errors. The *errors
dictionary comes from the state object that’s passed into the templates. The state object is a
common object to all the templates and scripts in this system.
6.1.4.1.1 Creating Validators
Once the user clicks the Submit button on your form, the data will be run through the validators
and be validated. Validators are optional. Data doesn’t need to be validated, but of course any
156
application should do that as appropriate. The Validator tab for a Controller Page Template
object gives you a link to the possible validators.
A validation script is the same as a normal Script (Python) object that has one extra variable,
state. The state variable is how you can pass results of the validation. Listing 6-7 shows a
simple validation script for checking to see if you’ve been given a number.
Listing 6-7. Validating That a Number Has Been Provided
##title=A validation script to check we have a number
##parameters=
num = context.REQUEST.get(’num’, None)
try:
int(num)
except ValueError:
state.setError("num", "Not a number", new_status="failure")
except TypeError:
state.setError("num", "No number given.", new_status="failure")
if state.getErrors():
state.set(portal_status_message="Please correct the errors.")
return state
This state object contains basic information about what has happened during the validation
chain. The state object stores the errors for each field, the status, and any other values. For
example, if the number given can’t be turned into an integer, you set the status to failure and
give an error message for the field using the setError method. Later this error message will be
shown for the field. At the end of the script, any errors returned so far are retrieved via the
getErrors method.
To add the previous script, click portal_skins, click custom, and select Controller Validator from
the drop-down box. Give it an ID of test_validator. You can now return to the Validation tab
of your Controller Page Template object and add a pointer to this validation script, as shown
in Figure 6-7.
157
Figure 6-7. Adding the test_validator to the Controller Page Template object
You have a couple of choices for a validation. In the example I’ve ignored them since they
aren’t relevant, but the following is a list of the options:
contextType: This is the type of the context object, if any, that template is executed
in. This is a shortcut to the content type of the context object. If you wanted only
this validation to occur on a link, then you could set this value to Link.
button: This is the button, if any, that’s clicked to submit the form. You could have
different buttons on a form (for example, a Submit and a Cancel button). Each of
these buttons could then map to a different action; clicking Cancel would take you
to one place, and clicking Submit would take you to another.
158
validators: This is a comma-separated list of validators, which are Controller Validator objects that the template will acquire. In the previous example, you used the
validator ID of test_validator.
NOTE When writing validation scripts, use Controller Validator objects instead of Script
(Python) objects. Controller Validator objects are just like ordinary Script (Python) objects
with the addition of a ZMI Actions tab.
6.1.4.1.2 Specifying Actions
Actions are the ending actions after the validators have been run, and they depend upon the
status that’s returned by the validators. The Actions tab for a Controller Page Template object
shows all the actions for the page template in question. You can specify actions with the same
kind of specialization options as described previously via a Web form, as shown in Figure 6-8.
Figure 6-8. Adding an action
You have the following four choices for the actual resulting action:
159
redirect_to: This redirects to the URL specified in the argument (a TALES expression). The URL can be either absolute or relative.
redirect_to_action: This redirect to the action specified in the argument (a TALES
expression) for the current content object (for example, string:view). At this stage
I haven’t covered actions yet, but each content object has actions such as view and
edit. Chapter 11 covers actions for an object.
traverse_to: This traverses to the URL specified in the argument (a TALES expression). The URL can be either absolute or be relative.
traverse_to_action: This traverses to the action specified in the argument (a TALES
expression) for the current content object (for example, string:view).
One example of this is if the completion of the form is a success, you traverse to a Controller
Python Script object that you’ve written that processes the result of the form. If the page is a
failure, you traverse back to the template and show them the error.
The difference between a redirect and a traversal is that the redirect is an HTTP redirect sent to
the user’s browser. The browser processes it and then sends the user off to the next page. Thus,
the redirect actions lose all the values passed in the original request. If you need to examine
the contents of the original form, then this isn’t the best approach. Instead, I recommend the
traversal to options. The result is the same; it’s just that the traverse option does this all on the
server. Doing this preserves the request variables and allows you to examine this in scripts.
6.1.4.2 E-Mail Example: Sending E-Mail to the Webmaster
You’ll now see a real example and spend the rest of this chapter building it. A common requirement is a custom form that sends e-mail to the Webmaster. You’ll build this type of form
in the following sections. The complete scripts, page template, and assorted code are available
in Appendix B. If you really don’t want to type all this in, you can see this example online at
the book’s Web site; it’s also downloadable as a compressed file from the Plone book Web site
(http://plone-book.agmweb.ca) and the Apress Web site (http://www.apress.com), so you can
just install it and try it. This example has just two fields in the form: the e-mail of the person
submitting the form and some comments from that person. For this form, the e-mail of the
person will be required so you can respond to their comments.
6.1.4.2.1 Building the Form
The form is the largest and most complicated part of this procedure, mostly because there’s
so much work that has to be done to support error handling. This form is a Controller Page
Template object called feedbackForm. To ensure that it’s wrapped in the main template, I’ll
start the form in the standard method:
<html
xmlns="http://www.w3.org/1999/xhtml"
xml:lang="en-US"
lang="en-US"
160
i18n:domain="plone"
metal:use-macro="here/main_template/macros/master">
<body>
<div metal:fill-slot="main"
tal:define="errors options/state/getErrors;">
One addition here is errors options/state/getErrors, which will place any and all errors into the
errors local variable for later use.
Because of the requirement for the form to post back to itself, you set this action in TAL, with
the expression template/id. This path will pull out the ID of the template and insert it into the
action, so this path will always work, even if you rename the template. Note that you’re also
adding the i18n tags you saw earlier to ensure that this form can be localized:
<form method="post"
tal:attributes="action template/id;">
<legend i18n:translate="legend_feedback_form">
Website Feedback
</legend>
The following is the start of the row for the e-mail address. You’ll define a variable here
called error_email_address that’s set to an error string if there’s a suitable string in the errors
dictionaries. That error value will be generated by the validator should there be an error:
<div class="field"
tal:attributes="class python:test(error_email_address,
’field error’, ’field’)">
tal:define="error_email_address errors/email_address|nothing;">
The following is the label for the e-mail address field. In this label you’ll include a div for the
help text. The span element will become the now-familiar red dot next to the label so that the
user knows it’s required:
<label i18n:translate="label_email_address">Your email address</label>
<span class="fieldRequired" title="Required">(Required)</span>
<div class="formHelp"
i18n:translate="label_email_address_help">
Enter your email address.
</div>
Next you’ll add the actual element:
<div tal:condition="error_email_address">
<tal:block i18n:translate=""
content="error_email_address">Error
</tal:block>
</div>
161
<input type="text" name="email_address"
tal:attributes="tabindex tabindex/next;
value request/email_address|nothing" />
</div>
At the top of this block, you test to see if there’s an error. If there is, the class for the element
changed to be the field error* class; this class will show a nice orange box around the field. Next,
if an error has occurred for this field (as you’ve already tested for), the corresponding message
will be displayed. Finally, you’ll show the form element, and if there’s a value for *email_address
already in the request, you’ll populate the form element with that value.
The tabindex is a useful tool in Plone. It contains a sequential number that’s incremented for
each element, and each time it sets a new HTML tabindex value for each element in a form.
This is a nice user interface feature; it means each form element can be safely moved around
without having to worry about remembering the tabindex numbers because that’ll happen
automatically.
That’s a lot of work for one element, but it’s mostly boilerplate code; you can easily copy or
change it. You can find the remainder of the form in Appendix B.
6.1.4.2.2 Creating a Validator
In the example you have only one required element (the e-mail), so it’s a simple piece of
Python called validEmail.vpy that does the work. The contents of this script are as follows:
email = context.REQUEST.get(’email_address’, None)
if not email:
state.setError(’email_address’, ’Email is required’,
new_status=’failure’)
if state.getErrors():
state.set(portal_status_message=’Please correct the errors.’)
return state
If no e-mail address can be found, this script adds an error to the dictionary of errors with the
key of email_address and a message. This key is used in the page template to see if an error
occurred on that particular field.
6.1.4.2.3 Processing the Script
This example has a simple e-mail script that gets the values (which are already validated) and
forms an e-mail out of them. This is a Controller Python Script object; it’s just like a standard
Script (Python) object except that it has a state variable, and, like the Controller Page Template,
you can give it actions for when it succeeds:
mhost = context.MailHost
emailAddress = context.REQUEST.get(’email_address’)
administratorEmailAddress = context.email_from_address
162
comments = context.REQUEST.get(’comments’)
# the message format, %s will be filled in from data
message = """
From: %s
To: %s
Subject: Website Feedback
%s
URL: %s """
# format the message
message = message % (
emailAddress,
administratorEmailAddress,
comments,
context.absolute_url())
mhost.send(message)
You’ve now seen a simple script for sending e-mail. This is a common script that you’ll see
again and again. Basically, the MailHost object in Plone will take an e-mail as a string, as long
as it conforms to the Request for Comment (RFC) specification for e-mail that has From and To
addresses.
In this e-mail, you take the administrator address you specified in the portal setup and send
the e-mail to that person. The only extra part in this script is the addition of setting the state.
This will set a message that provides some feedback to the user:
screenMsg = "Comments sent, thank you."
state.setKwargs( {’portal_status_message’:screenMsg} )
return state
6.1.4.2.4 Binding the Three Parts Together
At the moment, however, three separate entities exist: a form, a validator, and an action script.
These need to be tied together to form the chain, so you’ll return to the Controller Template
object. Click the Validator tab, and enter a new validator that points to the validEmail script.
You’ll also add a success action if the processing is correct to traverse to the sendEmail script
(Expression: ’string:sendEmail’)n the sendEmail script, you can now add another traversal back
to feedbackForm (Expression: ’string:feedBackForm’) so that after sendEmail happens correctly,
the user will be sent back to the original page.
NOTE A much more complete e-mail validation script appears in Plone called validate_emailaddr, which checks that the e-mail is in the right format. If you want to use this
script instead, you can point the validator to this script.
163
That’s it you’re done! You should now be able to test the form on the book’s Web site. To make
it even easier, I made a Feedback tab, which points to the feedbackForm template, and from
there you can now give feedback to me about this book!
7 Chapter 7
7.1 Customizing the Look and Feel of Plone
Over the previous two chapters I’ve covered some of the core components of Plone’s user
interface, including Script (Python) objects and page templates. It’s now time to cover exactly
how you construct the look and feel of a Plone site. This chapter includes the objects from
previous chapters and introduces some new ones.
To start, I’ll cover all the key definitions and Plone elements that comprise a site. I’ll define
terms you may have already heard of, such as skins and layers. Then I’ll cover customizing the
Plone user interface, concentrating on the power that Cascading Style Sheets (CSS) bring to
the site developer. I’ll run through the key variables and show how you can change them. I’ll
then revisit the customization of logos and skin elements, pulling together all the topics I’ve
briefly covered over the past three chapters.
Then, I’ll show how to make a new skin and explain the techniques for developing all this on
the file system.
Finally, I’ll finish this chapter with an example site. Specifically, I’ll show the Maestro site,
which was used by NASA to distribute data about the Mars rovers. This is a high-traffic Web
site built in Plone, and the skin provides an excellent case study for customizing a site. This
real-life example of how you can customize and modify a Plone site will enable you to do the
same on your own.
7.1.1 Introducing Plone Skins
When a document displays in Plone, the content of that document displays in the now-familiar
Plone green and blue interface. A skin determines exactly how that document displays to
the user, including the images and styles surrounding the content. A skin groups elements,
wrapping that piece of content, and presents them in a certain manner.
To generate the representation that a user sees, a skin has many elements, including the static
items, such as images, and the dynamic pieces, such as scripts. In the previous chapter, the
feedback form was an example of adding a few elements to a skin to create new elements of
a skin. That example contained logic in the format of a Python (Script) object and new pages
in the format of page templates. You added those elements to the skin so that a user could
interact with the form.
164
165
You can use as much or as little of an existing skin as you want to assemble a new skin with
Plone. You can make the skin from minor tweaks or major changes, as you can see on community sites such as http://www.zopezen.org and http://www.zopera.org. Each Plone site must
have at least one skin, which will be used as the default, but it can have as many skins as the
site developer wants. A user may optionally flip between skins, should the site developer want
to allow the user to do so, although I’ve found this is rarely the case.
The default Plone skin is the one you see on a Plone site such as http://www.plone.org, with
the familiar blue and green interface. But Plone doesn’t have to look at all like, or be even
vaguely recognizable as, a Plone site; its look is entirely up to you. Take, for example, the
list of sites available at http://www.plone.org/about/sites; these sites each provide a different
and custom experience for the user. In most cases, these sites can easily flip between skins and
provide different looks for users. Other sites use the power and flexibility of the Plone interface
internally for creating and editing content while providing a totally different look to external
users.
I’ve seen many questions on mailing lists such as, does Plone have to look like a Plone site? Can
it look one way to one user and another way to another user? Can it look like my corporate
site? The answer to all of these questions is ”yes“: the only limit is your imagination (and the
amount of time you can spend on customizing your site).
7.1.1.1 Using Layers Within a Skin
A skin is divided into logical collections of templates and scripts called layers. Altering these
individual collections allows a user to easily add components to a skin or remove them. The
layers are represented in a skin by a hierarchical list of folders. Each layer matches a name of
a folder, and each folder contains the skin elements.
For example, a skin can have the following layers:
custom, gruf, plone_ecmascript, plone_wysiwyg ...
The order of the layers in that list is the key factor to how Plone finds the elements. When an
element, such as logo.jpg, is requested from the skin, the skin looks through the layers to find
the element. The skin starts by looking at the first layer assigned to that skin (in this example,
custom). If the skin can’t find the element in the first layer, it moves to the second layer (in
this example, gruf). It continues looking through the list of layers until it finds the element for
which it’s looking. If it can’t find the element, then a 404 error is raised and returned to the
browser.
A similar concept is the use of the PATH environment variable in most systems. When entering
a command or looking for a program, the operating system looks through the directories on
the file system as specified in the PATH environment variable. A similar approach happens for
layers, where the layers are looked through in order to find that element.
By allowing higher layers to take precedence over lower layers, developers and administrators
now have the ability to customize and manipulate their site through the layers. If you don’t
like a particular element of a Plone skin, then by moving that element up a layer, you can
custom the result. You can sort your skins and layers in Plone with the portal_skins tool, which
I’ll cover next.
166
7.1.1.2 Managing Skins with the portal_skins Tool
You use the portal_skins tool in Plone to define the skin and layers behavior. The portal_skins
tool also provides a service and application programming interface (API) for creating and using
skins.
To access the portal_skins tool, go to the Zope Management Interface (ZMI) and click portal_skins. You’ll see two key screens in the ZMI; the first, the Contents tab, shows all the
folders and file system directory views (FSDVs) located within this tool (see Figure 7-1).
Figure 7-1. The contents of the portal_skins tool in a standard Plone installation
167
All of the folders and file system directory views on the Contents tab aren’t layers by default,
but now you can turn them into layers. Further, the second important screen, the Properties
tab, shows all the skins and layers you’ve defined in your Plone site (see Figure 7-2).
Figure 7-2. The skins and layers in a standard Plone installation
As Figure 7-2 shows, the list of these layers is quite long. Although this may seem intimidating,
this hefty number of layers gives the developer a large degree of flexibility and reuse. Each
skin displays on the left, with a text area to the right displaying all the layers within that skin.
As I mentioned earlier, Plone searches the layers from the top to the bottom to locate elements.
Each layer is the name of a folder or FSDV from the Contents tab. In Figure 7-2, you can see a
plone_ecmascript directory, and in Figure 7-1 you can see the matching FSDV object.
An FSDV is a new object that provides a useful ability in Plone; it allows direct access to skin
elements that are defined on the file system instead of from the Zope object database as usual.
FSDVs make development and customization easier. By reading objects directly from the file
system, it’s much easier for developers to write and edit the code that produces the site. When
you install Plone, the skin is written onto the file system. When you customize an object, you
make a local copy inside your Plone database. Using an FSDV allows you to maintain clean
separation between code you’ve downloaded from the Web and code that has been customized
in your local instance.
168
Plone 2 ships with two skins, Plone Default and Plone Tableless. Plone Default uses tables to
render the main body flanked by two table cells on either side, containing the left and right
slots. For browser compatibility, this is the default setup. However, if you switch to Plone
Tableless, then you’ll get a skin that looks the same, except there are no tables used to produce
the page, which gives you, as the site developer, more flexibility. At the time of writing, the
Plone Tableless skin can be a little problematic on some browsers, such as Internet Explorer. I
hope in the future that the Plone Tableless skin will become the default.
To change the skin, scroll to the bottom of the form where you see the Default Skin value and
select the default skin from the list of choices. If you select the Skin Flexibility option, then
users will be able to choose their own skin from the my preferences section.
Returning to the Contents tab of the portal_skins tool, you can see that some of the foldersfor example, custom-are standard folders that exist in Zope. These have the normal folder
icon. Others-for example, plone_images-are FSDVs that point to areas of the file system. These
have the folder icon with a green lock inside it. This lock indicates that you can’t add or edit
elements in an FSDV through the Web; you can do it only through the file system.
To see where the files for an FSDV reside on your hard drive, click the Properties tab of the
FSDV. For example, from the Contents tab of the portal_skins tool, click Properties, and it
will list the file system path of CMFPlone/skins/plone_images. This path is the location of
this directory on the file system relative to the instance home you specified in the installation
process. Because you can see files through the Web in the FSDV or on the file system, you can
access them for reading either way. Because viewing files through a file system is generally
more friendly and easy to do, I’ll refer to a file as a path in the file system, which can be
accessed using familiar tools.
7.1.2 Customizing Skins
You’ve seen how skins and layers interact. Now you’ll see how you can customize a Plone
site. I’ll start by returning to the example in Chapter 4, where you learned how to customize
the logo. Using your new knowledge of how skins work, you’ll be able to follow along and
customize the skin. Then I’ll move onto showing the power of the Plone CSS and how you can
customize it. Finally, I’ll cover the main template you saw in earlier chapters and go through
all the elements of it.
7.1.2.1 Customizing the Logo, Revisited
In Chapter 4 you learned how to customize the logo in the top-left corner of a Plone site, but I
skipped over what was actually happening. The section revisits that example.
The logo.jpg image is the image that appears in the top-left corner of every page. You’ll now
look at what happens when a browser tries to render this page. Once Plone receives the request
for that image, it looks through the layers to find logo.jpg. In a default site, this is the item in
plone_images, called logo.jpg. Because this is an FSDV, as I mentioned earlier, you’re unable to
alter the image through the Web. To guard your site against future changes, you don’t want to
be able to change it on the file system either. Instead, take a closer look at what the Customize
169
button does. If you look at that button again, you can see that there is, to the left of that
button, a drop-down list of folders in the contents of the portal_skins tool.
NOTE The folders listed are ones that exist inside the Zope database. FSDVs aren’t included in
the drop-down list; by default, it shows only folders.
Clicking the Customize button makes a local copy of the item in the folder selected in the dropdown box. By default that folder is the custom folder, so now you have a copy in the custom
folder. When Plone looks up the item, logo.jpg, it will access the version in the custom folder.
Looking again at the layers for the Plone Default skin, the custom folder is the topmost layer of
the skin. Hence, when logo.jpg is called, it will find the image in the custom layer. This is why
the new logo.jpg is rendered.
Placing customized items into the custom folder is the quickest way to start tweaking your
Plone site. The custom folder is a standard Plone folder, so you can put as many items in there
as you want in order to override earlier elements.
7.1.2.2 Introducing Plone’s Cascading Style Sheets
The visual representation of a Plone site in a browser is put together almost entirely using CSS.
Perhaps the easiest way to see exactly what the CSS does for a Plone site is to compare Figures
7-3 and 7-4. The first shows Plone with style sheets, and the second shows Plone without any
style sheets.
170
Figure 7-3. Plone with style sheets
171
Figure 7-4. Plone without style sheets
TIP If you want to reproduce this, turn off style sheets in your browser. Internet Explorer
doesn’t let you easily do this, but Firefox (http://www.mozilla.org/products/firefox/), the
Mozilla-based open-source browser, lets you easily do this. In Firefox, select Tools - Web Developer - Disable - Disable Styles. With a large number of CSS and other developer tools, Firefox
is the browser of choice for many Plone developers.
The difference is striking to say the least. CSS provides not only the visual representation of
pages but also the layout. By changing the CSS, you can change this visual representation and
layout on a Plone site (within the constraints of CSS).
Having the presentation of Plone produced by CSS is an impressive achievement
172
used by many talented user interface developers. The following are some of the
benefits of having a CSS layout:
• CSS provides a layer of separation between the presentation and the
templates that generate the presentation.
• You can make a large number of changes without having to touch
the underlying templates. All that’s needed is an experienced CSS
developer.
• CSS makes the site faster by sending smaller files. Each Hypertext
Markup Language (HTML) file is smaller since the layout for the site
isn’t contained in HTML markup but in the CSS, which can then be
cached.
• CSS allows you to customize the look and feel without breaking underlying accessibility work.
7.1.2.2.1 Code Layers
When a Plone page is rendered, at least three layers of code create a page. For the example of
the tabs that appear across the top of a Plone site, this is how they’re assembled:
So rather than asking yourself, how can I customize the tabs? you need to consider exactly
what customization you want to perform. This could mean changing the CSS, the HTML, the
data, or the underlying tabs. The general rules are as follows:
In fact, Plone is so customizable, on so many levels, that it’s easy to worry about which bit to
customize. To make sure that future Plone template changes don’t compromise your application’s design, try not to customize the templates. Instead, I recommend you try the CSS or the
actions first. This way, when the templates change in future versions of Plone, there will be
less chance of a problem.
7.1.2.3 Customizing the Font, Colors, and Spacing
The actual style sheet that does most of the work, plone.css, has a number of variables
in it populated using Dynamic HTML (DTML). I do not cover DTML in this book; this is
probably the only use of it in Plone, so if you don’t already know DTML, I recommend
you avoid learning it, if possible! The Zope Page Templates system will give you everything you need. Excellent online references do exist for DTML for Zope, however; refer to
http://zope.org/Documentation/Books/ZopeBook/2_6Edition/DTML.stx.
The DTML syntax for this style sheet is actually pretty simple; each variable relates to a corresponding attribute in a property sheet. To access this property sheet, click portal_skins,
plone_styles, and then base_properties. In Figure 7-5, you can see how this file looks in the
ZMI.
173
Figure 7-5. The base properties for the style sheet
For example, dtml-fontColor; locates the variable fontColor and places it in the style sheet, so
the fontColor here will be black. Now you can see where that variable is referenced in the
plone.css file. To access the CSS file, click portal_skins, portal_skins, and then plone.css. In
this file you can see that mainFontColor is referenced in quite a few places; for example, it’s
referenced in the main body of a page, like so:
body {
font: dtml-fontBaseSize; <dtml-var fontFamily>;
background-color: dtml-backgroundColor;;
174
color: dtml-fontColor;;
margin: 0;
padding: 0;
}
You could keep reading through the style sheet, if you really wanted, but changing the variable
is always a quick way to see exactly what it affects.
Returning to the ZMI, click portal_skins, click plone_styles, click base_properties, and then click
the Customize button. As you’ve seen, this will create an object in the ZMI that you can customize. This time the customized object is actually a folder that has the properties contained
in the folder. To access the properties you’ve just customized, click portal_skins, click custom,
and then click base_properties. Next, select the Properties tab (see Figure 7-6).
175
Figure 7-6. The properties of the folder
This property list allows you to change the properties of mainColor to something different,
for example, red or #cc9900. Change the value of that property, and click Save Changes.
Returning to the Plone site, you should now see the nice, new color.
In Chapter 4 you saw an example where, to change a tab on the top of a page, users could
change the actions. Although you may type an action with an uppercase first character (such as
Members), it then displays in lowercase letters on the Web page. This because CSS transforms
the text to lowercase because of the textTransform property in the property sheet. To stop this
transformation, change the property for textTransform to none.
In the style sheet, properties are defined for all the colors, spacing, and fonts that are used in
176
a Plone site. Table 7-1 describes all the parameters.
Table 7-1. CSS Properties
Variable Name
Description
logoName
fontFamily
fontBaseSize
fontColor
backgroundColor
linkColor
linkActiveColor
linkVisitedColor
borderWidth
borderStyle
borderStyleAnnotations
globalBorderColor
globalBackgroundColor
The filename of the portal logo
The font family used for all text that isn’t a header
The base font size from which everything is calculated
The main font color
The background color
The color used on normal links
The color used on active links
The color used on visited links
The width of most borders in Plone
The style of the border lines (usually solid)
The style of border lines on comments, and so on
The border color used on the main tabs, the portlets, and so on
The background color for the selected tabs, portlet headings, and
so on
globalFontColor
The color of the font in the tabs and in portlet headings
headingFontFamily
The font family for h1, h2, h3, h4, h5, and h6 headlines
headingFontBaseSize
The base size used when calculating the different headline sizes
contentViewBorderColor The tabs’ border color on the Contents tab
contentViewBackgroundColor
The content view tabs’ background color on the Contents tab
contentViewFontColor The font color used in the tabs on the Contents tab
textTransform
Whether to lowercase text in portlets, tabs, and so on
evenRowBackgroundColor
The background color of even rows in listings
oddRowBackgroundColorThe background color of even rows in listings
notifyBorderColor
The border color of notification elements eg: status message and
the calendar
notifyBackgroundColor The background color of notification elements
helpBackgroundColor The background color of the calendar pop-up widget
discreetColor
The color of the credits, document byline, form help
portalMinWidth
The minimum width of the portal
columnOneWidth
The width of the left column
columnTwoWidth
The width of the right column
7.1.2.4 Customizing the CSS
If you have small customizations, place them in ploneCustom.css. This is a second style sheet
that’s loaded after plone.css. By using the cascading functionality of style sheets, you can apply
any changes to ploneCustom.css to the overall style sheet.
177
For example, to change the byline that appears on the bottom of every page, simply change
ploneCustom.css. Again, access that file through the ZMI, and then click Customize. This will
create a copy of that style sheet in the custom folder. To alter the byline, move it to the left side
of the page and make it bold, as shown in Figure 7-7.
Figure 7-7. The new bold byline on the left
You do this by adding the following:
div.documentByLine {
text-align: left;
font-weight: bold;
}
Here you’ve set two attributes for the byline element: text-align and font-weight. Note that
you haven’t changed any other attributes of the byline element; the remaining attributes are
inherited from the original style sheet. With a few simple lines of CSS, you’ve changed the site
and made sure that other changes to Plone won’t affect your site. Changing ploneCustom.css is
the best bet for small changes.
By using different style sheets, you can use Plone to provide a different look to different clients.
Often Web sites have a Click for Printable Page button that shows a simpler page, without much
formatting. Plone alleviates this problem by providing a separate style sheet; when a browser
prints the page, that style sheet formats the page. All the alternate style sheets are included
at the top of a page; you can find them by clicking portal_skins, clicking plone_templates, and
then clicking header.pt.
NOTE One style sheet that’s a little unusual is the projection style sheet. It’s supported only by
Opera, and when the browser is used in full-screen mode, headings turn into separate pages
and a presentation-like interface displays.
178
7.1.2.5 Customizing the Main Template
As you saw in the previous chapter, to get the Plone look and feel on a page, you need to use
the master macro from the main_template. Every Plone page uses this macro and then fills
in the appropriate slots. By taking a look at the main template in detail, you can see how
a Plone page is constructed in a page template and then see exactly how you can customize
those individual page elements.
If you look at the main Plone page, you’ll see a number of elements in that page. Figure 7-8
shows a Plone page with all the key user interface elements marked. Table 7-2 describes each
of the elements and their purpose. For each element in Figure 7-8, you’ll find a corresponding
number in the table.
179
Figure 7-8. All the main elements in the Plone user interface
Table 7-2. User Interface Elements
180
Name
Description
1
2
3
4
Site logo
Search form
Portal tabs
Personal bar
5
6
Breadcrumbs
Left slot
7
Content tabs
8
Content drop-down lists
9
Document actions
10
11
12
13
Byline
Right slo
Footer
Colophon
Shows the top logo.
Shows the search form.
Shows the tabs across the top of the site.
Shows the personal information for that user such as login
and my folder.
Shows the location of the current content.
Determines where portlets added to the left_slot property display.
Shows the actions with the category content_tabs for that
piece of content.
Shows some drop-down menus for this content, workflow and
new content types.
Shows the actions for this particular piece of content: printing
or e-mail.
Shows a description of the content and its author.
This is where portlets added to the right_slot property display.
Shows information at the bottom of the page.
Shows more information below the footer.
No.
I haven’t covered one section of this template: the content. All the text from Welcome to Plone
down to The Plone Team is content added and edited by the users. This is the main slot in the
page template, which is filled in by a the particular content type or page template, as you’ve
seen. Chapter 6 covered using slots; in that chapter, I showed how, by using the main slot, you
can ensure content appears inside a Plone page.
So, given these components of your Plone page, how do you customize a particular part? The
answer is to find the matching part of the main_template, see which part it calls, and then
customize that. For this reason, I’ll cover the main template in detail.
At first glance, the main template looks quite long and complicated, but it’s mostly all macros,
and its main purpose is simply to pull content from other areas. You can find the main template
by clicking portal_skins, clicking* plone_templates*, and then clicking* main_template*.
The philosophy behind the main template is that a user shouldn’t have to alter the actual
configuration of the template, unless there are major changes planned. Because the main
template pulls all the content from other places inside Plone, you can alter the assembled page
by customizing those individual elements. This means you can alter just the sections you’d like
to change rather than altering the whole template.
The main template uses Extensible Markup Language (XML) namespaces heavily to present
the simplest possible metal code. For example:
<metal:headslot define-slot="head_slot" />
<!-- A slot where you can insert elements in the header from a template -->
181
Here, the name of the tag isn’t a standard Extensible HTML (XHTML) element; instead, it uses
the metal: prefix to define a namespace as metal:headslot. This has the following advantages:
• The element headslot is semantic, in that it describes the element. It’s easy to
spot that this is the slot for adding anything you may want to add to the head
of your page.
• Attributes in that element use the namespace in the element if not otherwise
declared; so, instead of metal:fill-slot, you can just use fill-slot.
• The actual tag isn’t a valid XHTML tag, so it won’t display. However, if the
rendering of the tag generates any valid XHTML, that XHTML will display.
When a macro is used, the content in the calling template is removed, so it’s possible to place
comments in the calling template as text inside the macro. For example:
<div metal:use-macro="here/global_searchbox/macros/quick_search">
The quicksearch box, normally placed at the top right
</div>
Because of the comment, it’s easy to determine that this macro refers to the search box in the
top-right corner of a site (element 2 in Figure 7-8). To see the macro, find the script named
global_searchbox and the quick_search macro contained within it. The main template continues
through main macros, pulling information from different templates and scripts, and builds the
page as it goes.
After this section, the main template reaches the main content of the page, which is the object
being rendered. In Chapter 6 I explained the difference between a slot and a macro; recall that
a template defines slots that are then filled by the content. Really there’s only one slot of any
importance for content, and I’ve mentioned it many times: the main slot.
One common pattern in Plone that may be confusing is how to define a slot inside a fill slot.
For example, the following is the definition for the css_slot:
<metal:cssslot fill-slot="css_slot">
<!-- A slot where you can insert CSS from a template -->
<metal:cssslot define-slot="css_slot" />
</metal:cssslot>
This design pattern looks a little odd, but it defines the slot and then re-creates the fill slot. If
you look at the main template carefully, those slots are actually inside the header use-macro,
so the header macro may fill this slot. But you also want the end template to fill the slot, so for
this reason the slot is redefined. This means one slot can now be filled in two places, which is
a useful technique for changing the templates.
Scanning down through the rest of main template, you’ll reach the left and right columns, the
footers, and the colophon. Note that the left column may appear before the main content of
a page (if your language reads from left to right anyway), but the style sheet moves it there.
This ensures that if you visit the site in a text-only browser, the main content appears first, not
after all the navigation options.
182
Table 7-3 describes the macros and slots in the main template.
Table 7-3. Main Template Macros and Slots
183
Name
Description
Slot or Macro
Cache headers
Sets the Hypertext Transfer Protocol
(HTTP) cache headers for the content.
Allows content to add to the head element of a page.
Allows content to add custom CSS for
the page.
Allows content to add custom
JavaScript to the page.
The site actions allow you to have a
series of actions above the search. By
default these allow you to change the
font size.
The quick search box show in the topright corner.
The (normally blue) portal tabs that
are normally at the top left. The actual tabs shown are determined by actions. This determines how the tabs
are rendered in HTML.
The personal bar in the top right: login, logout, and so on.
The path breadcrumbs that start with
”You are here.“
The (normally green) tabs across the
top of content. This will show only if
the content is editable by the current
user. The actual tabs shown are determined by actions. This determines
how the tabs are rendered in HTML.
The little drop-down actions in the
top-right corner of the context bar.
A message shown whenever something changes.
The header on a piece of content.
The main part of a piece of content.
The bottom part of a piece of content
where the comments on an object will
appear.
Macro:
cacheheaders
global_cache_settings
Head slot
CSS slot
JavaScript head
slot
Site actions
Quick search
Portal tabs
Personal bar
Path bar
Content views
Content actions
Portal
status
message
Header
Main
Sub
in
Slot: head_slot
Slot: css_slot
Slot: javascript_head_slot
Macro:
site_actions
global_siteactions
in
Macro:
quick_search
global_searchbox
Macro:
portal_tabs
global_sections
in
in
Macro:
personal_bar
in
global_personalbar
Macro: path_bar in global_pathbar
Macro:
content_views
global_contentviews
in
Macro:
content_actions
global_contentviews
Macro:
portal_message
global_statusmessage
Slot: header
Slot: main
Slot: sub
in
in
184
Name
Description
Slot or Macro
Left portlets
The slots or portlets show on the left
of a page. There are a few definitions
here: column-one-slot is the whole left
column, and portlets-one-slot is then
the slot. If neither of these slots is defined, it calls the macro.
The slots or portlets show on the right
of a page. See the left portlets.
Copyright and other message.
Miscellaneous messages for the bottom.
Macro:
portlets_fetcher
Right portlets
Footer
Colophon
left_column
Macro:
right_column
portlets_fetcher
Macro: portal_footer in footer
Macro: colophon in colophon
in
in
Armed with this information, it’s now a matter of customizing the macro or the slot to change
the look and feel of the page. Again, it’s recommended not to actually customize the main
template itself but to instead customize the parts that the main template calls. The next section
shows a few example customizations you can make to Plone.
7.1.2.6 Examining Example Customization Snippets
The following sections show some examples that demonstrate simple customizations you can
do to your Plone site. Some solutions provide one or two different ways of performing the
same task.
7.1.2.7 Removing a Block
One rather neat trick is to be able to easily remove a block from the user interface such as the
path bar or the search box. You have two ways to do this; the most obvious is to customize
the macro that displays the element. For example, to remove the breadcrumbs, you could click
portal_skins, click plone_templates, click global_pathbar, and then turn off the element in the
page template level; for example, you can change the following:
<div metal:define-macro="path_bar"
id="pathBar"
tal:define="breadcrumbs python:here.breadcrumbs(here);
portal_url portal_url|here/portal_url">
To this, add the following line of code:
<div metal:define-macro="path_bar"
id="portal-breadcrumbs"
tal:condition="nothing"
tal:define="breadcrumbs python:here.breadcrumbs(here);
portal_url portal_url|here/portal_url">
185
This means customizing a page template, which isn’t a problem at all and is by now something
with which you should be familiar. The slightly different approach is that you can hide elements at the CSS level. This still means the item is rendered and HTML is generated, but it’s
then turned off for the client-they can’t see it. Because the generation of the HTML still occurs,
this is a suboptimal solution, but it’s a neat trick.
Most elements in Plone have a unique Document Object Model (DOM) element ID; for example, in the case of the breadcrumbs, it’s portal-breadcrumbs, as you can see in the previous
code. To stop showing the portal-breadcrumbs, simply add the following to ploneCustom.css:
#portal-breadcrumbs {
display: none;
}
7.1.2.8 Changing Portal Tabs
I’ve already shown you how you can change the text of the portal tabs if you change the
actions. They’re displayed using the style sheet, not using tables (although users may initially
think so). Looking at Table 7-3, you can see that the code for the portal tabs is portalTabs. To
make the border of the nonselected tabs dotted, you can simply change the ploneCustom style
sheet to the following:
#portal-globalnav li a {
border: 1px dotted;
}
The tabs are a series of HTML list (li) and anchor (a) elements, so by changing the CSS for
these elements, you can change the tabs’ appearance. Later in the ”Case Study: Examining the
NASA Skin“ section I’ll show how to change these tabs into images.
By using CSS you can also move any element’s location with the position attribute. Next, move
your tabs to the top of the screen, above the logo and search box. To do this, you use the
absolute value of the position, which lets you define the position by using the left, right, top,
and bottom attributes. Add the following to your ploneCustom style sheet to place the portal
tabs at the top of your Plone site:
#portal-globalnav {
position: absolute;
top: 0em;
}
This is a powerful technique for moving elements. You have multiple options for positioning
the elements, including relative positioning, but that takes a little work with CSS to get the
positioning just right.
186
7.1.2.9 Moving the Left and Right Slots
I discussed the left and right slots in Chapter 4, and I’ve shown you how to add a new slot
to the list of slots. You may have noticed that the terms left and right slots can be a little
misleading. The default is to show the slots in those positions, but it’s easy to move them.
NOTE This works only when you’re using the Plone Tableless skin. This isn’t the default setting,
so you’ll have to change the skin in the portal_skins tool, as discussed earlier in the ”Managing
Skins with the portal_skins Tool*.
For example, if you wanted to move the left portlets to the right side of the page, then you
could do this by changing ploneCustom.css to the following:
#portal-column-one {
float: right;
}
#portal-column-content {
float: left;
}
This moves the leftmost column to the right and pushes the main section to the left.
7.1.2.10 Hiding Help in Forms
If you wanted to hide the help in all the forms, you couldn’t realistically change all the templates. But you could employ a similar tactic to hiding the path bar-and just set display: none
for the form elements. The following has the desired effect of not placing the input element
on a new line:
div.formHelp {
display: none;
}
Figure 7-9 shows the feedback page without breadcrumbs, with the help hidden, with dotted
tabs, and with the left slot moved to the right of the page, all changed with only a few lines of
CSS.
187
Figure 7-9. The combined effect of some of the examples
7.1.2.11 How Do You Find Element X?
As I’ve shown, the templates, scripts, and images contained in the skins directory of a Plone
installation create a Plone skin. Many files live in that directory, so going through every file
would be long and counterproductive when those files change. Instead, it’s useful to understand some basic techniques for finding the elements you want to alter.
Bear in mind at which level you want to customize the element. As noted earlier, you have
three levels for rendering an object. If you want to change the visual representation, or its
placement, then the chances are that you can change the CSS and do no further work.
If CSS isn’t sufficient, then your next best bet is to search through the templates. For example,
suppose you want to change the text that appears on the page when a user logs in, or you want
188
to change the entire page. In this example, you’ll alter the page shown in Figure 7-10 to make
it a script that does something unusual.
Figure 7-10. The “You are now logged in” page
Some clues exist to find this template so you can alter it; I’ll run through each of them in turn
now.
189
7.1.2.12 Searching by Using the URL
The Uniform Resource Locator (URL) to a page translates to a series of objects in Plone that
are traversed. In Figure 7-11, I’ve traversed to the login_success page. In this case, the final
part of the URL is login_success, as you can see in the address bar in Figure 7-11. When an
object is loaded into an FSDV, the extension is stripped off, so you’re looking for a template or
script that starts with login_success.
Figure 7-11. Searching for an ID
In Zope you can perform this search by going to the portal_skins tool and clicking the Find tab.
Once there, enter login_success in the with ids field. Leave all the other settings the same,
190
and click the Find button. Sure enough, you’ll find the login_success template.
You can also conduct this search on the file system, depending upon your operating system
and the tools available. The quickest way to find this file in Linux is to go to your CMFPlone
directory and do the following:
$ cd skins
$ find -name ’login_success*’ -print
./plone_forms/login_success.pt
On Windows, open the CMFPlone folder in Windows Explorer and click the Search tab. Then
enter the name of the file as login_success, and click Search. This should give you a list of
likely files.
This search should provide the result, CMFPlone/plone_forms/login_success.pt. If you perform the same search in the ZMI, you click portal_skins, click plone_forms, and then click
login_success.
7.1.2.13 Searching for a Piece of Text
A rather crude approach that’s somewhat successful is to do a full-text search on the code to
find the element that renders the page. For example, looking at the page in Figure 7-12, you
can see that it contains the text Notice that the top. The simplest way to find the bit that renders
that text is to search for it.
191
Figure 7-12. Searching for text
In Zope you can also perform this search by going to the portal_skins tool and clicking the Find
tab. Once there, enter Notice that the top in the containing field. Leave all the other settings
the same, and click the Find button. Sure enough, you’ll find the login_success template.
You can also conduct this search on the file system, depending upon your operating system
and the tools available. The quickest way to find this file in Linux is to go to your CMFPlone
directory and do the following:
$ grep -ri "Notice that the top" *
plone_forms/login_success.pt: Notice that the top
192
On Windows, open the CMFPlone folder in Windows Explorer and click the Search* tab. Then
enter the contents of the file as **Notice that the top*, and click Search. This should give you a list
of likely files. Using this rather crude technique, you’ve been given a template, login_success,
that renders the message back to the user.
This technique has the following issues:
• Beware of lowercasing the content in CSS; always make your searches case
insensitive (the default in Windows). It’s annoying to search for home when
it’s Home in the template and it’s lowercased in CSS.
• If you’re trying to do this in a language other than English, the content may
have been localized, causing the search to fail.
• Occasionally there may not be searchable text that will match up; in this case,
looking up via URL is the recommended approach.
7.1.3 Making New Skins and Layers
So far I’ve talked about customizing the existing skin. The process for making a whole new
skin or a new layer isn’t actually that different. I’ll cover one key point, putting your templates
and scripts on the file system.
Making templates and scripts on the file system and creating new skins and layers are definitely the best way to go for long-term maintainability and flexibility. Not only is creating
skin elements much easier in familiar tools on the file system, but it also allows you to easily
redistribute your code. Writing on the file system is the style of choice for almost all Plone
developers, with minor modifications in the custom directory if needed.
7.1.3.1 Making a New Skin
As you’ve seen, a skin is actually nothing more than a collection of layers. For my new skin, I
wanted to place all my custom code in one place, so I went to the portal_skins tool, added a
new folder, and gave it the ID of custom_chrome.
Then, to add a new skin, you have to click portal_skins, select the Properties tab, and add a
new skin under the text Add a new skin. You’ll need to enter a series of layers that you want to
set up for this skin. In this example, I added a new skin called Custom Chrome and a series of
layers, as shown in Figure 7-13.
193
Figure 7-13. Adding the Custom Chrome skin
Then I added the layers for the skin. In this case, the skin didn’t have a layer called
custom in it; instead it had a folder called custom_chrome. You now have two skins
that use two layers and two folders. Any objects added to the custom_chrome folder
will affect that skin, not the Plone Default skin.
7.1.3.2 Using Multiple Skins
As mentioned, a standard Plone site has two skins, Plone Default and Plone Tableless. In the
previous section, I added a new skin, Custom Chrome. As I discussed in Chapter 4, you can
194
set the default skin using the Plone interface. Click plone setup, and then click the Portal Skin
button. This mirrors the choices available in the ZMI after clicking portal_skins, selecting the
Properties tab, and scrolling to the bottom of the page.
You have one more option, though: REQUEST *variable name*. This is the request variable
that will contain the user’s skin information. This is plone_skin by default, which is the cookie
name. But it can also be passed through other request variables such as the query string. It’s
available only through the ZMI.
You can also set skins programatically. This allows developers to show different skins to different users depending upon certain business or site logic. For example, if a user is writing
content for a site, they may see the standard Plone skin. If they’re an anonymous user, then
they can see a totally different skin. Rather than letting the user choose, the site is making that
decision. If you really want, you could base the skin on the folder they’re accessing; however,
that approach can lead to confusion, so I don’t recommend it.
To change the skin, add a Script (Python) object called setSkin in the root of your Plone site.
Then add the following code:
##title=Skin changing script
##parameters=
req = context.REQUEST
if req[’SERVER_URL’].find(’internal.somesite.org’) > -1:
context.changeSkin("Plone Default")
context.changeSkin("Custom Chrome")
The actual logic for determining the skin will depend upon the site’s business rules. In this case
anyone accessing http://internal.somesite.org will get the Plone Default skin, and anyone accessing http://external.somesite.org will get the Custom Chrome skin. Unfortunately, one catch
is that you can’t determine the skin on the security level of the user (for example, authenticated users see one skin, and managers see another). This rather obvious need isn’t possible
at the time of writing, without severely hacking a Plone site.
NOTE Basing the skin on untrusted client information is common practice but not completely
secure because you’re trusting the information from the client. Making sure this is secure
depends on your particular network settings. In most cases, you can handle this easily at the
firewall or using a proxy server such as Apache, which could be configured to block all external
requests to http://internal.somesite.org. I discuss integration with Apache in Chapter 10.
To activate this code, assign an access rule to this object. This means that each time this Plone
site is accessed, this Script (Python) object will be executed. Each time the script is run, the
skin will be set according to the script. To assign a rule to this script, select Set Access Rule
from the drop-down menu and then enter the name of your Python (Script) object. Now test
by visiting your site, and see what skin you get.
You do have to be careful with access rules because they occur on every invocation of that
folder (or Plone site); you have to ensure that they’re correct and that nothing bad can happen
in them. If you’ve accidentally written a bad or incorrect Script (Python) object and can’t even
get access back into the ZMI to fix it, then you can turn off access rules by restarting Plone
with the following environment variable:
195
SUPPRESS_ACCESSRULE = 1
Appendix B explains how to set environment variables if you’re unfamiliar with this process.
7.1.3.3 Making a New Skin on the File System
Throughout these chapters I’ve been using the ZMI. But what most Plone developers use for
any serious work is the file system. Making a skin on the file system is actually easy.
Go to the instance home directory of your Plone installation. Inside the Products directory,
make a new directory; the name of this directory is the name of the product, so the convention is something short, with no spaces or underscores and mixed case. PloneBookExample,
CMFPlone, and PloneSilverCity are all examples. Inside that folder, make a new file called
__init__.py and a directory called skins. In the __init__.py file, you need to add the following
two lines:
from Products.CMFCore import DirectoryView
DirectoryView.registerDirectory(’skins’, globals())
Next, restart Plone, and then click portal_skins to add an FSDV*.* This will open a list of
the registered directories. Scroll down until you find the one that matches the directory you
registered; this will be the name of the directory with /skins on the end. Enter an ID that
makes sense, and click Add. You now have an empty directory where you can go to add layers
of your skin.
7.1.3.4 Debugging Skins
Another reason I’ve repeatedly been using the ZMI with you, rather than the file system, is that
it gives feedback about errors and gets you comfortable with placing objects inside others. A
further positive feature about using the ZMI is that changes are instantaneous. If you change
an object and then refresh, you see the change immediately (assuming you have no cache).
This isn’t the case with the file system. If you change something in the file system, it isn’t
updated in Plone. This is for performance reasons. Plone has no way of knowing you made
that change, so it must update the Zope cached copy of that object. Without getting into file
system notification trickery, a Plone site has two states: production and debug mode. When
Plone is in debug mode, it checks all the directories, finds files that have changed, and then
updates Plone. This means you can make a change, and it will appear immediately. When run
in production mode, however, your changes will not happen until you refresh the skin (see
Chapter 11) or you restart Zope.
For obvious reasons, if you’re developing skins in Plone, then running in debug mode is the way
to go. Chapter 2 showed you how to change the configuration for Plone so that it runs in debug
mode. As a quick recap, open the zope.conf file inside the etc directory of your installation and
ensure the debug-mode directive is set to on.
196
7.1.3.5 Using File System Objects
The FSDVs allow the mapping of only those Zope objects that have been specifically configured
to be used in this manner. It determines the Zope object based on the extension of the filename.
The contents of that file are the contents of one attribute of the object-usually the main content,
such as the binary contents of an image, or the text contents of the template.
To create an object in your empty FSDV, just go to the skins directory and start adding files that
match the objects you want to make. Once the file is loaded into Zope as a Zope object, that
extension is stripped off. For example, some_template.pt becomes a file system page template
with the ID some_template. Table 7-4 describes the extensions.
Table 7-4. Extensions
Extensions
Object Type
Equivalent Zope Object
.pt, .zpt, .html, .htm
.cpt
Filesystem Page Template
Controller Filesystem Page Template
Filesystem Script (Python)
Controller Python Script
Controller Validator
Filesystem File
Filesystem File
Filesystem Image
Filesystem Properties Object
Filesystem Z SQL Method
Filesystem DTML Method
Page Template
Controller Page Template
Script (Python)
Controller Python Script
Controller Validator
File
File
Image
Folder with Properties
ZSQL Method
DTML Method
.py
.cpy
.vpy
.doc, .pdf, .swf, .jar
.cab, .ico, .js, .css
.gif, .jpg, .jpeg, .png
.props
.zsql
.dtml
So, to get an image in your directory view, dump in a .gif or .jpeg file. If you want a Script
(Python) object, then add a file ending in .py.
7.1.3.6 Setting File System Object Metadata
Extra content for an object such as title, security, or cache is stored in a separate file. That file
is given the same filename as the original file, with .metadata added to the end. If the original
file is logo.jpg, for example, then the metadata will be contained in logo.jpg.metadata.
The metadata file is in the Windows .ini format of key = value pairs. This format has been
extended to contain information about forms for the Form Controller object, which you’ll see
in the next section. All the choices, even the presence of this file, are optional. The following
is a sample file:
[default]
title = Test object
197
cache = RAMCache
proxy = Manager
[security]
Access contents information = 1:Manager,Anonymous
The following are the values you can set in that file:
title: This is the title that’s applied to the object in the ZMI and in Plone; this will
show up in the Plone templates.
cache: This is the ID of the cache object in which you’d like the object to be cached.
By default Plone comes with two cache objects: a RAM Cache Manager and a HTTP
Cache Manager. Chapter 14 discusses the function of these two objects.
proxy: This is the proxy role you’d like to apply to this object. See Chapter 9 for
more information.
security: This is the security area, which allows multiple lines of security settings.
The key contains the name of the permission. The right side contains the acquisition setting, followed by the roles delimited by commas. For example, View =
0:Manager means only users with the member and manager role can see an object,
and security settings aren’t acquired for that permission.
7.1.3.7 Using Validators in the File System
To specify validators on the file system, add the validator to the .metadata file. The validator
section of the .metadata file would look like this:
[validators]
validators = validate_script1, validate_script2
This will run the two validation scripts: validate_script1 and validate_script2, in that order. A
validation script will examine the data and add errors to the form controller state if there’s a
problem.
The contextType and button options need a slightly different syntax. Validations are run on the
context being executed-for example, a document or image. You could have a different validator
execute for the document and for the image. For example, to have a different validator script
run when this is invoked as a document, add the following line:
validators.Document = validate_script2
You can vary the validator depending on the button clicked on the form by appending the
name of the button in the form to the left side of the validator. The name of the button must
begin with form.button. For example:
<input type="submit" name="form.button.button1" value="First" />
198
The metadata file would then look like the following:
validators..button1 = validate_script1
The .. is a space for the context type, so if, as previously, you wanted this to occur for button1
on a document, then the metadata file would look like the following:
validators.Document.button1 = validate_script5
7.1.3.8 Using Actions in the File System
Like validators, you can specify actions in the .metadata file. The syntax for the actions section
of your file would look like this:
[actions]
action.success = traverse_to:string:script1
In the previous example, when the form is submitted and the validation scripts return a status
of success, the traverse to action is called with the argument string:script1. That argument is
actually an expression. The default action for the failure status is to reload the current form.
The form will have access to all the error messages via the state object in its options.
Again, you can specify a particular action on a particular context; for example, to specify an
action for success when on a document, you can do the following:
action.success.Documnent = traverse_to:string:document_script
Again, you can specify the action for the following button:
<input type="submit" name="form.button.button1" value="Button" />
by adding the following to the .metadata file:
action.success..button1 = traverse_to:string:script1
This example has no explicit context given, so it’s valid for any type of context.
*start sidebar*
7.1.3.8.1 Finding Example File System Skins and the Book Examples
All the examples in this book have been collected in a skin for you to install. You can find this
on the Plone book Web site at http://plone-book.agmweb.ca/Software/PloneBookExamples and
on the Apress book Web site at http://www.apress.com. It’s available as a .zip file of the skin;
after you’ve downloaded and unzipped it, you’ll find there’s a file structure similar to the one
mentioned earlier.
199
You have an __init__.py file and skins directory. In the skins directory you’ll find a series of
page templates, Controller Validator objects, and all the matching metadata files. If you want
to install this, then copy the PloneBookExamples folder into the Products directory of your
instance home. Restart Plone, and then click plone setup. Select Add/Remove Products,* and
you’ll see an entry for *PloneBookExamples; check it, and then click install. You’ve now installed
the templates and can go to feedbackForm and get the page template you saw in the previous
chapter.
What the install procedure did was automate the process of adding an FSDV and then added
a layer to each skin. If you click portal_skins and then select the Properties tab, you’ll see that
the new layer plone_book_examples has been added.
*end sidebar*
7.1.4 Case Study: Examining the NASA Skin
In January 2004 two NASA probes landed on Mars: Spirit and Opportunity. These remotecontrolled robots scoured the surface of Mars, returning pictures and analysis of the surface.
The probes were a great success, returning stunning pictures of the surface of Mars that thrilled
the world.
One small part of this cog was a Web site at http://mars.telascience.org. This site published a
program called Maestro. To quote the Web site, its purpose was the following:
You can download a scaled-down version of the program that NASA scientists use to
operate Spirit and Opportunity. Updates are also available for Maestro that contain
real data from Mars that you can add to your copy of Maestro.
Turning to Plone, the group responsible for this site developed a site that looks great quickly
and easily. In this case, a large number of community members and volunteers helped the
members of the Maestro team develop the site. Figure 7-14 shows the working Plone site.
200
Figure 7-14. The Maestro site
You’ll probably recognize some similar signs of a Plone site: the tabs across the top, the personal bar in the top-right corner, and the usual breadcrumbs. Other than that, the site looks
quite different from the standard Plone site. In the following sections, I’ll step through exactly
how this was done. Well, actually, it’s quite simple because most of the look and feel was put
together using CSS. There were little to no changes other than changes to the custom style
sheet and some new images.
You’ll first look at the non-CSS changes to the site, which are changes to some of the templates
and properties.
7.1.4.1 Removing the Portlets and Some of the Main Elements
The site has no portlets. These have been removed because in this site there aren’t any that
are relevant. Instead, news appears on the home page. To remove these portlets from your
site, go to the root of the Plone site and click Properties. In the form fields next to left_slots
and right_slots, delete all the values.
In the Maestro site, a few elements have been removed. Sometimes I’ve found that this the
best thing to do for features that just aren’t needed in a site. It can be a little hard to squeeze
every user interface element into a Plone site, but really you don’t always have to do that;
201
instead, just remove the elements you don’t need. A few elements here have been removed:
the site actions, the search box, the footer, and the colophon.
To accomplish this, those templates that produced the code were customized and then altered
so they rendered nothing. For example, to remove the search box, in the ZMI click portal_skins,
click plone_templates, and then click global_searchbox. Next, click the Customize button. Then
change the template to the following:
<html
xmlns="http://www.w3.org/1999/xhtml"
xml:lang="en" lang="en"
i18n:domain="plone">
<body>
<div id="portal-searchbox"
metal:define-macro="quick_search"
tal:condition="nothing">
Nothing to see here.
</div>
</body>
</html>
This is the technique I showed earlier for removing elements; just set tal:condition on the
macro element to ensure that the condition is false.
7.1.4.2 Customizing the Colors
You set the base colors for the site in the base_properties object. This object has been customized, and the colors changed to the following colors (unless mentioned, all the other items
are the same):
linkColor: #776a44
globalBorderColor: #776a44
globalBackgroundColor: #e0d3ad
globalFontColor: #776a44
The color change I most noticed is globalBackgroundColor, which affects the colors of the
personal bar and has changed from blue to brownish. These minor colors changes will alter
the base style sheet so that it matches the images and overall look and feel nicely.
7.1.4.3 Creating the Style Sheet
The big part of this site is the style sheet, which is reproduced in full in Appendix B. Here I’ll
highlight some of the main parts of the style sheet. This style sheet is based on ploneCustom.css,
which was customized in the custom folder. Then, some of the elements of the Web page were
overridden in the new ploneCustom.css file.
First, the entire background for the body is set to the color #343434.
202
body {
background: #343434;
}
Second, the actual content of a Plone page, the part that you can edit, is contained in one class
called documentContent. Because the background color of the documentContent element is set
to white in the main plone.css file, the background of the text is white and produces the white
area in the middle of the screen.
Next, the image of the satellite and robot at the top of the Web site is one large image. You
place it at the top using CSS. The code for this is as follows:
#portal-top {
background: url("http://mars.telascience.org/header.jpg") transparent no-repeat;
padding: 162px 0 0 0;
position: relative;
}
This CSS code sets the parameters for the element that has the ID of portal-top. If you look at
the HTML code for a Plone site, you’ll see the portal-top element at the top of the page, just
below the body element. By setting the background for that image to the URL of the image
in question, you can have the image appear. The image is 162 pixels high, which is why the
padding for the top of the #portal-top element is set to 162px. If you don’t do this, then all the
items below will be pushed up, overriding the image.
The header image is 677 pixels wide, and you’ll note that the text in the page fits cleanly
underneath the image, rather than spilling out to the left or right. You can do this by setting
the value for the element to 680px. The visual-portal-wrapper HTML element is actually just
below the body, and it sets the width for the entire page body. The code for this is as follows:
#visual-portal-wrapper {
width: 680px;
margin: 1em auto 0 auto;
}
This sets the width for all the pages to be a fixed width, which is fine as long as you make
sure the width is smaller than the industry-standard 800-pixel width. No matter how big the
user makes the browser window, the main part of the page will never grow beyond those 680
pixels, ensuring it matches nicely with the image.
Probably the other obvious changes are the tabs at the top of the page, which are now images
instead of just the standard Plone boxes. Three images make up the tabs at the top of the page:
a spacer between tab, the left part of the tab, and the right part of the tab. By putting these
three images together, you get the effect of the tab. Figure 7-15 shows these three images.
203
Figure 7-15. The three images that combine to make the tab
For editing the CSS, remember that each of the tabs is really a list item containing a link
inside an element with the ID portal-globalnav. To set up the background spacer between each
tab, the skin first sets the background for the entire element. Again, note that by setting the
height of the image to 21 pixels, the same size as the image, you’ve ensured that there’s the
appropriate space for the image. The code is as follows:
#portal-globalnav {
background: url("http://mars.telascience.org/listspacer.gif") transparent;
padding: 0;
height: 21px;
border: 0;
margin: 0 0 1px 6px;
clear: both;
}
To set the image at the left end of the tab, you use the start image. You set the start image by
setting the value on the li element, rather than the anchor element, like so:
#portal-globalnav li {
display: block;
float: left;
height: 21px;
background: url("/liststart.gif") transparent no-repeat;
padding: 0 0 0 33px;
margin: 0 0.5em 0 0;
}
Finally, you set the right part of the tab by adding an image to the anchor element. You do this
by altering the anchor element inside the tab. The following code shows where you set the
background image to be the right part:
#portal-globalnav li a {
display: block;
float: left;
height: 21px;
background: url("/listitem.gif") transparent right top;
padding: 0 33px 0 0;
border: 0;
line-height: 2em;
color: black;
font-size: 90%;
margin: 0;
}
Now, you’ve replaced the rather standard-looking Plone tabs with great-looking buttons.
204
7.1.4.4 Creating the Splash Page
This page has one other key element. The front page of the site is a splash page, which shows
a nice graphic and invites the user to enter. You can add this by going into the ZMI and
removing the index_html object that’s normally there. Once removed, create a new file called
index_html. In that file, create custom code to make the home page, including a custom CSS.
The main element of that is one image, placed there by the following CSS:
div {
background: url(/splash.jpg) transparent no-repeat;
width: 260px;
height: 335px;
position: absolute;
...
}
The remaining CSS handles the placing of the text and links within that image. This page has
no Plone elements at all; it’s static HTML.
7.1.4.5 Conclusion
This looks like a reasonably complex site, with relatively simple CSS that does most of the hard
work. By using CSS you’ve changed Plone’s look and feel without having to know a great deal
about Plone beyond the HTML. Also, by ensuring that the images are placed using CSS, you
maintained key accessibility functions.
Thank you to NASA and all the people involved from the Plone community for helping with
this site and case study. These include but are not limited to John Graham, Alma Ong, Joe
Geldart, Michael Zeltner, and Tom Croucher.
8 Chapter 8
8.1 Managing Workflow
One of Plone’s many strengths is the workflow component. Workflow fits into one of the core
themes of content management, which is the separation of logic, content, and presentation.
This chapter therefore covers Plone’s workflow in detail.
The chapter starts by covering some key definitions related to workflow, as well as the key tools
involved, so that you can begin to conceptualize workflows. Once these concepts are clear, I
then discuss how to add and edit your own workflows.
Throughout this chapter, I reference simple changes you can make to the workflow that comes
straight out of the box with Plone. I also provide a series of examples to help you perform tasks
such as creating notifications, moving content, and so on. Finally, I show some of the more
advanced features of workflow development and some of the useful tools that are available.
8.1.1 What Is Workflow?
Workflow is a chain of actions or events that occurs on something to achieve an objective.
Workflow often expresses business rules that may exist. Every business has different rules
and policies about tasks that must happen within that company. Examples of this include the
following:
• Before an employee’s time sheet is approved, it must be viewed and acknowledged by a supervisor.
• In a widget factory, for each widget assembled, users must be notified of the
order and any change in the state of the widget as it passes through the factory.
• Before a Web page is published on a Web site, it must be approved by marketing, approved by the Webmaster, and translated by a linguist.
Workflow separates the logic of these business rules and standardizes the concept of thinking
about these changes. By having separate logic, it’s now easy for businesses to change the
application to fit their business and their business rules. Often applications try to enforce a
workflow on a business because the workflow is hard-coded into the application.
205
206
8.1.2 Understanding Workflow in Plone
Plone’s workflow tool provides certain features and limitations that are key to understanding
workflow in Plone. The workflow product used in Plone is DCWorkflow, which is an opensource product released by Zope Corporation. Other workflow systems are available, and
some of them are being incorporated into Plone, such as OpenFlow (http://www.openflow.it).
However, for the moment, DCWorkflow is powerful and simple enough to provide all the
functionality most users will need.
DCWorkflow assumes there’s one object in the system that’s the target of the workflow-for
example, one piece of content or one widget. It further assumes that all objects of the same
type go through the same workflow. By repurposing content (see Chapter 11 for more on this),
you can have similar content use different workflows.
Since the DCWorkflow system is included in Plone, there’s nothing extra to install. It’s represented in the Zope Management Interface (ZMI) by the portal_workflow object.
8.1.2.1 Conceptualizing a Workflow
Before explaining a workflow, I’ll explain a few simple pieces of terminology: states and transitions.
A state is information about an item of content at a particular moment in time. Examples of
states are private, public, pending, and draft. All workflows have at least one starting state
in which all the content starts. The workflow will then move the content through a series of
states, either by user interaction or by some automation process. When the content reaches an
end state, it’ll remain in that state for a long time (usually forever). Content may reach one or
more different end states in the process of a workflow.
For that piece of content to move from one state to another, a transition is needed. A transition
connects a starting state and an ending state. A transition can have lots of different features
associated with it, as you’ll see later, but for the moment, you just need to know that a transition moves content between two states. Usually a transition is triggered by some external
force, such as a user clicking a button on a Web page or a script interacting with a page.
Visualizing a workflow, especially when talking about something as nebulous as content, can
be a little confusing. Thinking about an everyday occurrence will help. In this case, the
following example shows the workflow of my credit card bill, which I have the joy of getting
every month:
1. The credit card company prepares a bill and mails it to me.
2. I get the bill and put it on my desk. Sometimes the bill sits on my desk for
quite a while as I wait for the end of month. Occasionally I have to query
people about certain expenditures, such as “What were those clothes you
bought?”
3. Any serious queries or questions then go back to the credit card company,
perhaps causing a new bill to be created (although this happens quite
rarely).
207
4. Usually at the end of the month, when I do all the accounting, I then pay
the bill.
From this, then, you can come up with some states. Looking at the previous steps, you’ll
see you really have no need to create different states for receiving the bill, which includes
opening it and putting it on my desk. Similarly, you don’t need to bother with every review
that happens. Although these are all valid steps that take place, trying to make a workflow
for every state would be too cumbersome. Instead, you can summarize the workflow with the
following states:
• Draft: The credit card bill has been prepared and sent to me.
• Review: The credit card bill has been received and is on my desk, being reviewed.
• Paid: The credit card bill has been paid, put in my filing cabinet, and forgotten
about forever.
Now that you’ve come up with the states, you can think of the changes that need to occur. For
each of these states, you’ll have at least one transition that occurs to move the bill from one
state to another:
• Post: The bank sends the credit card bill.
• Pay: I pay the credit card bill.
• Reject: Something is wrong on the bill, and it isn’t approved.
Figure 8-1 shows this set of transitions and states. In the figure, boxes represent states, with
the state written in them. Arrows represent the transitions from one state to the next, with the
name of the transition in italics.
Figure 8-1. A simple state machine for paying credit card bills
You’ve now extracted this business process of paying a credit card bill into a workflow. The next
step is to think about roles and security for this credit card bill. This workflow now contains
the business logic for an application for processing credit cards.
8.1.2.2 Understanding Roles and Security in Workflow
In any complicated system, you’ll have users of all roles and groups. These roles give Plone a
large amount of flexibility with security, but they also can make it more complicated. Chapter
208
9 covers security, local roles, and groups, but this section covers some key points about how
these topics relate to workflow.
When a piece of content moves from one workflow state to another, the workflow process can
change the security settings on that content. The security settings determine what user can
perform what action on what piece of content. By manipulating the security settings through
workflow, you can cause the security to change on a piece of content through its life cycle.
Users from static systems or Zope often get confused because in Zope, all pieces of content
have the same security settings throughout their life cycle.
Returning to the credit card example, you can infer the security settings for the credit card bill.
One way to represent this is to produce a table that expands the security in general terms for
the transitions that can occur at each of the various states, as shown in Table 8-1.
Table 8-1. The Transitions and Entities That Can Make Them
State
Draft
Review
Paid
Me
Bank
Pay
Post
Reject
At this stage in Table 8-1, you’ve seen the transitions and who can make them. You haven’t
thought about the access that each user has to perform an action on an object at each point.
For example, at which point can someone edit the bill, and when can it be viewed? These are
called actions in Plone terminology, as shown in Table 8-2. I hope that only I have access to my
own credit card statements! Likewise, at any stage, the bank is able to view the credit card bill
and answer queries on it.
Table 8-2. The Actions and Entities That Can Make Them
State
Draft
Review
Paid
Me
Bank
View
View
View, Edit
View
View
Actually, as it turns out, I can’t edit my credit card bill; only the bank can. I can send back my
credit bill by rejecting it, but the bank is unlikely to want my edits. In this situation, assume
the bank is the owner of the credit card bill. This demonstrates a concept called ownership. I
may have several credit card bills from several banks, and in each case you can think of the
bank as the owner. Each bank owns its own credit card bills, but Bank A isn’t the owner of
Bank B’s bill. Table 8-3 combines the transitions and actions, changing the terms Me and Bank
to Payee and Owner, respectively.
Table 8-3. The Transitions and Actions Combined, plus the Roles of People
State
Draft
Payee
Owner
Post, View, Edit
209
State
Payee
Owner
Review
Paid
Pay, Reject, View
View
View
View
Of course, this is a rather contrived example, but it illustrates how you can apply
workflow to basic states. More transitions can occur here-for instance, I’d be more
than happy for someone else to pay my credit card bill for me-but that’s so unlikely
that you shouldn’t add it to the workflow or security.
Before showing how to create and edit workflows, I’ll now show you the default workflows
that ship with Plone.
8.1.2.3 Introducing Plone Workflows
Plone ships with a set of default workflows for your Plone site. These workflows provide a
logical way of moving content through a Plone site. A standard Plone site ships with two
workflows: the default workflow and the folder workflow. The following sections present each
of these in turn.
8.1.2.3.1 Default Workflow
Chapter 3 covered the default workflow and the default settings when publishing content. I
discussed the security and settings for each state in the workflow. However, a picture is worth
a thousand words, so Figure 8-2 shows the workflow state.
210
Figure 8-2. The default workflow for content that comes with Plone
Figure 8-2 shows the main states and the transitions. This figure has a gray dotted line that
represents a sort of security divider. To the left of the line is where owners of the content
usually interact with the content. To the right of the line is where reviewers usually interact
with the content.
NOTE The owner of the content is the person who created the content originally.
An owner is one particular member of a Plone site. Although many members exist
in a Plone site, only one person can be the owner of a piece of content in a Plone
site. Because the owner role is calculated when an object is created, the owner role
is special.
Just like with the credit card example, an associated set of permissions exists for the default
workflow. Table 8-4 outlines all the permissions and the states.
Table 8-4. The Default Workflow Permissions
State
Anonymous
Authenticated
Owner
Manager
Reviewer
Pending
Private
View
View
View
Edit
Edit
Edit
Edit
View
211
State
Anonymous
Authenticated
Owner
Manager
Reviewer
Published
Visible
View
View
View
View
View
Edit
Edit
Edit
View
View
View refers to the following permissions: Access Contents Information and View
Edit refers to the following permission: Modify Portal Content
As you can see from Table 8-4, by default only when content is in the private state is it truly
hidden from everyone else. When content is in the published state, only the manager can edit
it. Later in the “Editing Permissions” section, I’ll show you how to change these permissions
easily through the Web.
8.1.2.3.2 Folder Workflow
I also discussed the folder workflow in Chapter 3, when I covered publishing content with you.
However, as I noted in that chapter, no pending state exists for folders. Instead, you have a
slightly simpler workflow, as shown in Figure 8-3.
Figure 8-3. The folder workflow for content that comes with Plone
212
8.1.2.3.3 Other Workflows
Numerous workflows are available to a Plone site, including private workflow, community
workflow, one-step publication workflow, and so on. ZopeZen comes with a workflow, and
PloneCollectorNG also comes with a workflow. DCWorkflow comes with four workflows.
Currently, two workflows come in the PloneWorkflows product in the collective project on
SourceForge (http://sf.net/projects/collective): the community workflow and one-step publication workflow. The community workflow is similar to the Plone workflow, with a few changes.
The one-step publication workflow has two states: private and published.
At the moment, you have no easy way to install and uninstall workflows, and you have no
real easy way to transition content between one state and another. For example, if you install
the one-step publication workflow into an existing state, you also need to fix the states for all
objects and move them into one of the new states. In this case, it’s probably simple-everything
in a published state should stay as it is, and everything else should move into the private state.
8.1.3 Adding and Editing Workflow
Now that I’ve discussed the default workflow, I come to the key point that’s probably most on
your mind: How can you change the defaults? Well, as with most of Plone, you can add, edit,
and delete all workflow through the ZMI. The tool that controls workflow is portal_workflow.
In the following sections, I cover how workflows are assigned and then go through all the
settings for a workflow in detail.
8.1.3.1 Setting Workflows to a Content Type
After clicking portal_workflow, you’ll see a list of workflow assignments. A feature of DCWorkflow is that each content type has one and only one workflow assigned to it; Figure 8-4 shows
these assignments.
213
Figure 8-4. The list of workflow by type
On this page you’ll see a list of each content type and the workflow that has been applied
to it. If a workflow isn’t specified (in other words, the value is blank), then no workflow is
applied. As an example, the default for the Portal Site type is blank. You really don’t want to
try transitioning the Plone site itself, just the objects in it. If the value is (Default), the default
workflow at the bottom of the page is applied to that content type. In Figure 8-4, for topic and
folders, the folder_workflow workflow is used, and for all other content types, plone_workflow
214
is applied. The names of the workflow refer to the name of workflow objects imported or
created inside the workflow tool. For more information on the workflows available, select the
Contents tab. This opens a list of workflows that have been loaded into the system, as shown
in Figure 8-5.
Figure 8-5. Workflows available
You can add workflows by clicking the Add Workflow button. This opens a list of the workflows
available; to create a workflow, select a workflow type and enter a workflow name. To create
workflow that’s empty but that’s configurable through the Web, select dc_workflow and enter
an appropriate name; for example, enter my_workflow.
8.1.3.2 Editing a Workflow
From the Contents tab, you can click a workflow to access the management screens for that
workflow: all the states, transitions, and associated features. The series of tabs across the top
of the page outlines the functionality of a workflow quite well: States, Transitions, Variables,
Worklists, Scripts, and Permissions. I’ll run through each of these tabs and some of the other
options available. Unless otherwise mentioned, all the following tabs are accessible from this
main workflow page.
Creating or editing workflow can require lots of clicking and can be a little confusing. If you’re
a developer keen on using the file system, then you can do all this from Python if you want-I
cover this for you later in this chapter in the “Writing a Workflow in Python” section.
215
8.1.3.2.1 Setting the Initial State
To set the initial state, go to the States tab and check out the states available; next to one of
the states you’ll see an asterisk, as shown in Figure 8-6.
Figure 8-6. Setting the initial state for this workflow
You set the initial state for your workflow on this page by checking the box next to the state and
then clicking Set Initial State. All content that uses this workflow will be created with an initial
state. Any content that has already been created will remain in its initial state; changing the
state afterward won’t change that state. You can set only one initial state for each workflow.
8.1.3.2.1.1 How Can You Set the Initial State As Private?
On some sites it may make sense for content to not show up at all or be accessible to users
other than administrators and owners only after it has been completed. The best way to do this
is to set the default state for the object to something that provides this security-for example,
private. In the private state, only reviewers, managers, and owners can actually see the item.
To set the default state to private in the ZMI, click portal_workflow, and select the Contents tab.
Next, click plone_workflow, select the States tab, and then select the default state by checking
216
the box next to visible. Finally, click the Save Changes button. New content will now be in the
private state and not accessible to the general public.
8.1.3.2.2 Editing States
The States tab lists the states that are present in this workflow. At the beginning of this chapter,
I explained that a state represents an object at a particular point in time. Each state has an ID
that’s unique; this is usually a simple verb such as pending or published. To add a state, enter
an ID and click Add at the bottom of the page.
You’ll also see the following options:
Title: The title of the state is displayed in your Plone site and is a user-friendly
version of the state.
Description: The description of the state is a long description of the state. This
isn’t currently shown to users but may be in the future.
Possible transitions: This lists all the possible transitions that can occur from the
state. This list will show only if you actually have a transition in the system. Simply
select the transitions that need to occur on this state. By selecting a transition for
this state, you’re selecting the start point for this transition to be this state.
To alter a state, enter the changes and then click Save to commit the changes. The Permissions
tab will open with the permissions that will be applied to an object while it’s in this state. This
may mean changing the permissions on an object when it transitions into that state. The form
is rather self-explanatory; to enable an anonymous user to view the object, check the boxes
that correspond to View and Anonymous and click Save, as shown in Figure 8-7.
217
Figure 8-7. State permissions page
If you change the permissions for a particular workflow state, you’ve created an issue that
needs resolving. Any existing content in that state won’t have the new workflow permissions
set on it. The content will have the old workflow permissions, and you’ll need to update them.
When you’ve finished making all your changes, go to the root workflow page and click Update
Security Settings, as shown in Figure 8-4. Performing that update may take a while depending
upon the number of objects to be altered.
The Variables tab allows you to assign a value to a variable when the object is in this state.
The workflow determines the list of variables available to each state. For more information on
these, see the “Editing Variables” section.
8.1.3.2.3 Editing Transitions
The Transitions tab lists the transitions that will occur in this workflow. In the beginning of this
chapter, I showed you how a transition represents the changes that will occur to the object.
Each transition has a few variables that are shown on the summary page. To add a transition,
enter an ID and click Add at the bottom of the page, as shown in Figure 8-8.
218
Figure 8-8. Transition details page
If you now click a transition, you’ll open the following details for that transition:
Title: This is the title for this transition.
Description: This is the detailed description for this transition.
Destination state: This is the state that will be the target for this transition. The
initial source state is defined by assigning the transition to the state.
219
Trigger type: This indicates how the transition will be triggered. Automatic means
that this will happen as soon as it moves into this state. Initiated by user action is
the most common choice and means a user has enacted the transition by clicking a
link.
Script (before): This runs this script before this transition occurs.
Script (after): This runs this script after this transition occurs.
Guard: This is the security for this state (explained shortly).
Display in actions box: This is how this transition will be displayed in Plone.
Entering a value here also ensures that the transition will be entered as an action.
You can then get this transition as an action by querying for actions.
Of these values, the destination state is quite interesting. Although I’ve already mentioned that
transitions normally change state, this isn’t required. Because each transition can run scripts
and write something into the history, it can be useful sometimes not to change state. For an
example of this, see the “Using Workflow to Track Changes” section later in this chapter. If
your transition does change the state, then select the new state as the destination state.
A transition can have multiple starting points but only one destination; if you need multiple
destinations, you’ll have to make multiple transitions. You can specify scripts to run before or
after this transition. Two common examples are moving an object in workflow and sending an
e-mail notification. The “Common Tasks and Examples” section covers both of these examples.
Before any transition can be executed, a security guard checks the entire transition to ensure
that the user running the transition has the right to do so. The guard has the following three
components:
Permission(s): These are the required permissions. Multiple permissions should
have a semicolon (;) to separate them.
Role(s): These are the required roles. Multiple roles should have a semicolon (;)
to separate them.
Expression: This is a workflow expression. For more information on this, see
the “Editing Workflow Expressions” section later in this chapter. For each value
specified, the guard must evaluate as true before continuing. If a test of any of the
values fail, then the transition won’t execute. Usually you’ll find most guards have
only one or two values specified.
8.1.3.2.4 Editing Variables
The Variables tab lists the variables that will be created and changed in the workflow. I haven’t
discussed variables much with you up to this point; instead, I’ve focused on states and transitions. This section covers variables.
It isn’t always possible, and I don’t recommend that you try, to encapsulate all the information
you’ll need in a workflow within just states and transitions. Instead, you can use variables to
store some workflow-related information. For example, in the credit card bill example, the bill
could be paid by several methods (Internet banking, check, and so on). You could store the
220
amount method ($100, for example) in a variable. Should the bill be rejected or altered, that
amount would be updated. The point of a variable is to have something that changes between
each state and transition.
So, returning to the main workflow page, click the Variables tab to get a list of all the variables.
To add a variable, enter a variable* ID and click Add at the bottom of the page. To determine
what state an object is in at any time, DCWorkflow stores the current state in a variable on the
object. The default name of that variable is *review_state.
NOTE If you need to change this because it conflicts with another name, you can
do so at the bottom of that page. However, doing this will cause all your current
objects to lose their state, so be careful about changing that value.
Each workflow variable has the following properties:
• Description: This is the variable description.
• Make available to catalog: These variables will be placed in a list exposable
to the catalog. This doesn’t add indexes or metadata to the catalog; you still
have to do that manually.
• Store in workflow: This determines if the information is to be stored in the
workflow or on the object.
• Variable update mode: This determines when to update the variable.
• Default value: This determines a default value as a string.
• Default expression: This is the default value as an expression. If this is
present, it’ll be used instead of default value (for more information, see the
“Editing Workflow Expressions” section later in this chapter).
• Info. guard: These are security settings for accessing this variable. These
guard settings are similar to the guard settings for a transition; however, the
guard occurs when accessing the variable here.
8.1.3.2.5 Editing Worklists
The Worklists tab provides access to all the worklists that are assigned in this workflow. A
worklist is a method of querying the workflow for information about the numbers of objects in
that workflow. For example, I’d like to be able to easily ask the workflow for all the outstanding
credit card bills I have.
To add a worklist, enter an ID and click Add. Each worklist has the following properties:
• Description: This is a description of the worklist.
• Cataloged variable matches: This is the value that the worklist must match
to be added in this worklist. The variable matched is the workflow state variable given in the variables list (the default variable name for this variable is
review_state).
221
• Display in actions box: This is information to display on the user interface.
Entering a value here also ensures that the transition will be entered as an
action. You can then get this transition as an action by querying for actions.
• Guard: This is a guard for accessing this worklist.
Returning to the credit card example, if I wanted to know all the credit card bills that need
reviewing by me, then I could place this information in a worklist. First, the variable review_state would contain the current state for each item. All the credit card bills that need
reviewing would be in the review state. Second, I’d add a worklist called review_queue, and
the value for variable would be pending. I could now ask the worklist for all the items in the
review_queue.
Although a worklist is a convenient way of storing this information, Plone doesn’t use them.
Instead, Plone uses ZCatalog directly to query objects that are workflowed. Since the DCWorkflow worklist uses the catalog tool, the end result is the same.
8.1.3.2.6 Editing Scripts
The Scripts tab lists the scripts that are available this workflow. This list is actually a standard
folder in the ZMI, and you can add almost anything there. Since the main reason you’d want
to do this would be to add a script to perform advanced handling of transitions, you should
add only Script (Python) objects here.
To add a script from the Scripts tab, select Script (Python) from the Add drop-down menu,
and give the script an ID. The script is passed one and only one object, which is the base
workflow expression object; for more information on this object, see the “Editing Workflow
Scripts” section later in this chapter. For example, if you need to access the actual object in the
workflow, you can use a Python script such as the following:
##parameters=state_change
obj = state_change.object
What happens in this script is up to the developer-you can run almost anything here. You
can trigger events, and you can access other workflows and transitions. For some example
scripts, see the “Sending E-Mail Notifications” and “Moving Objects” sections later in this chapter. When the script executes, it will execute as the user who initiated the transition. You could
assign proxy roles on the script if it needs to happen as someone else. Returning to the transitions, you can assign this script to any number of transitions in the script (after) and script
(before) settings. You can run the script either before or after a transition.
8.1.3.2.7 Editing Permissions
The Permissions tab lists the permissions that are managed by this workflow. You’ve seen these
permissions already when examining the states. You set the list of permissions manageable in
those states in this tab. To add a new permission, select the permission from the drop-down
box and select Add.
222
8.1.3.2.7.1 How Can You Edit a Published Document?
Well, you can’t edit a published document in the default workflow unless you have the manager
role. If you allow the owner of the document to edit it, then you really should review it again.
However, this seems to be a common request and is a trivial thing to change. In the ZMI, click
portal_workflow, and select the Contents tab. Then click plone_workflow, and select the States
tab. Finally, click published and then select the Permissions tab. Check the box that corresponds
to allowing the owner to modify portal content.
*Insert 3294s0801.tif*
Click Save Changes to save your permissions. Because you’ve updated the security settings,
you’ll have to click portal_workflow, select the Contents tab, and click Update security settings.
This will update all the objects in your site and ensure that your permissions have been applied
to existing objects. Now owners can edit their documents while they’re in the published state.
8.1.3.2.8 Editing Workflow Scripts
Scripts are an opportunity for the developer to perform some logic upon a transition. That
logic can be almost anything you want. You could be checking that some conditions have been
performed (for example, is the document spell checked?) or that some special actions have
been performed. When the object is transitioned, the script will be called.
When a script is called, one extra parameter is passed to that script. That extra parameter
provides access to all sorts of transition-related elements and attributes. That parameter is
called the state_change parameter, and it has the following attributes:
status: This is the workflow status.
object: This is the object being transitioned in the workflow.
workflow: This is the current workflow object for the object being transitioned.
transition: This is the current transition object being executed.
old_state: This is original state of the object.
new_state: This is destination state of the object.
kwargs: These are keyword arguments passed to the doActionFor method.
getHistory: This is a method that takes no parameters and returns a copy of the
object’s workflow history.
getPortal: This is a method that takes no parameters and returns the root Plone
object.
ObjectDeleted(folder): This tells workflow that the object being transitioned has
been deleted; it takes the object to which you’d like to return the user. Pass to
the exception the folder you’d like the user to be redirected to (see the “Moving
Objects” section later in this chapter).
ObjectMoved(newObject, newObject): This tells workflow that the object being
transitioned has moved. Pass to the exception the folder you’d like the user to be
redirected to (see the “Moving Objects” section later in the next chapter).
223
getDateTime: This is a method that takes no parameters and returns the DateTime
object that relates to the transition.
For example, to find out what state is being transitioned to and when, the following is a Script
(Python) object that will tell you just that information. This script logs the information about
the transition into the log file:
##parameters=state_change
st = ’From %s to %s on %s’ % (
state_change.old_state,
state_change.new_state,
state_change.getDateTime())
context.plone_log(st)
TIP When you’re writing a Script (Python) object, you may need to print to the log file to help
with debugging. A script called plone_log does this, which takes a string and passes it to Plone’s
logging functions. Hence, calling context.plone_log is a useful tool for debugging.
When assigning a script to a transition, you have two choices: before and after. As the names
suggest, a script that’s set assigned to before runs prior to the transition running. This is suitable
for scripts that may check if something should happen prior to the transition running, such as
testing that another dependent object or page has been uploaded or there are no spelling
errors. The script assigned to after runs once the transition completes-although if at any time
an uncaught exception is raised on a script, this will cause the transition to fail, the object to
remain in its original state, and the exception to display to the user.
8.1.3.2.9 Editing Workflow Expressions
Throughout this chapter you’ve seen values that can be expressed as workflow expressions.
For example, the value assigned to a variable is the result of a workflow expression. This
expression is nothing special; it’s merely a Template Attribute Language (TAL) expression with
a few different variables available. You already learned about TAL expressions in Chapter 5, so
you should be familiar with these expression and all their options, such as Python, string, and
path expressions.
Unlike the standard TAL expression, a few extra parameters are passed through to the namespace, relating to the particular workflow. The namespace for a workflow expression contains
the following:
• here: This is the object being transitioned in the workflow.
• container: This is the container of the object being transitioned in the workflow.
• state_change: This is the state change object referenced in the “Editing Workflow Scripts” section.
• transition:
This is
state_change.transition.
the
transition
being
executed,
identical
• status: This is the original state, identical to state_change.old_state.
to
224
• workflow: This is the workflow for this object.
• scripts: These are the scripts available in this workflow.
• user: This is the user executing this transition.
8.1.4 Common Tasks and Examples
I’ll now present some common tasks you can achieve easily using workflow. When a user
causes a workflow transition, this transition runs using that specific user’s account. In many
of these examples, a normal user may not have the correct permissions to perform the task.
For example, members don’t normally have the right to access the list of members unless this
permission has been explicitly given to them.
To solve this permission issue, where noted, some of the following Script (Python) objects have
been given a slightly different role. To set a proxy role on a script, access the Proxy tab on an
object and then select the user to run the script, as shown in Figure 8-9.
Figure 8-9. Setting proxy settings on a script
You would, of course, make sure your scripts executed with the minimum roles needed, depending exactly upon what your script does.
8.1.4.1 Introducing Workflow Expressions
The following are some useful examples of workflow expressions that can be used in various
places.
225
To get the comments, or an empty string, with this transition, use the following:
python:state_change.kwargs.get(’comment’, ’’)
To obtain the title of the folder that the object is in, use this:
container/Title
To test if the old state is review state, use this:
python: state_change.old_state == ’review’
To get the user executing this transition, use this:
user/getId
So if you wanted to track who the last user to transition an object was, you could add a last
user variable into the workflow. You do this by going to the workflow and clicking the Variables
tab. Then add the variable last_user. If you set the Default expr variable to user/getId, each
time the object changed, that value would be stored for you.
8.1.4.2 Using Workflow to Track Changes
For one particular application a client of mine wanted to keep track of every time an item was
edited and any reasons for that edit so that when auditing the item later, there would be a
comment for each change. Thanks to workflow, this was quite easy to achieve.
In this case, the workflow had only one state-but actually this will work for almost any workflow. To this one workflow, a transition was added called edit. That transition didn’t actually
change the object’s state; the destination state for that transition was (Remain in state), meaning no change occurred.
When an object is edited, a method is called to perform the change. For example, when
a document is edited, the method called is document_edit.cpy. You can find that script by
clicking portal_skins, clicking plone_form_scripts, and clicking document_edit. All that’s needed
is to add one line to that script before the last line:
context.portal_workflow.doActionFor(new_context,
’edit’, comment=’’)
The doActionFor method of portal_workflow performs the transition given (in this case, edit) for
the object passed in (in this case, context). Each time the object is edited, that edit transition
will fire. That will cause a line to be added to the comments list showing who edited the object,
when it was added, and any comments associated with it.
When an object is edited, there are actually no comments, so to be a little more advanced,
you’d have to modify the document’s edit template to include a comments field. You could
then access this comments list by going to the State tab, where the list of changes displays at
the bottom.
226
8.1.4.3 Moving Objects
One useful ability is moving an object during the workflow. For example, you could move all
press releases into a folder called Press Release each time you publish one. Content could be
created and edited anywhere and then on publishing moved into that folder. The example
script in Listing 8-1 moves the object being workflowed into the Members folder. To add this
script, go into the workflow tool in the ZMI, and select the Scripts tab. Then select Script
(Python) from the drop-down box. Give the new object the name moveObject, and then enter
Listing 8-1 into this script.
Listing 8-1. Moving an Object
##parameters=state_change
# get the object and its ID
obj = state_change.object
id = obj.getId()
# get the src folder and the destination folder
dstFldr = context.portal_url.Members
srcFldr = obj.aq_parent
# perform the move
objs = srcFldr.manage_cutObjects([id,])
dstFldr.manage_pasteObjects(objs)
# get the new object
new_obj = dstFldr[id]
# pass new_obj to the error, *twice*
raise state_change.ObjectMoved(new_obj, new_obj)
You need to do a few more things; first, assign this script to a transition. I’d normally use such
a script in the publish transition. To do this, go to that transition and assign the value of script
(after) to moveObject.
Second, one other small problem exists: This script moves objects into the Members folder.
You’ll probably have a better destination in mind, of course. To perform such a move, a user
has to have the appropriate rights to move objects between these folders. Normally, only a
manager can move objects into the Members folder. So you need to give the script the proxy
role of manager. You can do this by clicking Scripts, clicking moveObject, and selecting the
Proxy tab. Assign the role of manager to this script. You can find more information about
security and local roles in Chapter 9.
Looking at the code, first the script gets the object and the object’s ID from the transition
namespace. Then it gets the source and destination folders. Then it utilizes Zope’s ObjectManager Application Programming Interface (API) to perform the copy and paste. You could, of
course, determine these folders programmatically-perhaps based on the user performing the
transaction or on the type of content being moved. Finally, you get the object and pass it to an
exception ObjectMoved.
227
The ObjectMoved exception is a special exception to DCWorkflow. By passing the new object
twice as parameters into the exception, the new object will be passed up to the Plone front
end. This is critical so that when the user is sent to the object in response to the change, it’s to
the new location of the object, not the old one. Of course, you may want to write a function
that moves the function back after rejecting the object, perhaps to the member’s home folder.
Another special case, and a more unusual one, is to delete an object in workflow. Usually
deleting an object is an action from the containing object, so it’s unusual to see in workflow.
For this task, you can raise an ObjectDeleted exception. Listing 8-2 shows the script to perform
a delete.
Listing 8-2. Deleting an Object
##parameters=state_change
# get the object
obj = state_change.object
id = obj.getId()
# get the parent folder, delete the object
srcFldr = obj.aq_parent
srcFldr.manage_delObjects([id,])
# raise the object deleted method and pass
# the folder you want to return to
raise state_change.ObjectDeleted(srcFldr)
You could call this script deleteObject and successfully delete objects in the workflow. Again, by
ensuring the error is raised, Plone will know what to do; in this case, it takes the user to the
folder containing that object.
8.1.4.4 Sending E-Mail Notifications
If you have a Web site that a user doesn’t visit regularly, then putting information on the site
about what has to be reviewed and when is rather pointless. You can turn workflow into
a rudimentary notification system by using it to send e-mails to the users. The notification
channel of e-mail is just one simple example; this could also be an instant message, a text
message delivered to a phone, and so on. I’ll leave other options to your imagination.
In this example, you’ll send e-mail via the MailHost object on the server to every user who has
the reviewer role in the system, telling them about a new item that has been submitted for
review. This is actually a more complicated script than the ones I’ve shown you so far, since it
runs through a few steps: defining the variables, finding the account name of every reviewer,
finding an e-mail, and sending an e-mail. Listing 8-3 shows the script.
Listing 8-3. Sending an E-Mail Notification
##parameters=state_change
# the objects we need
228
object = state_change.object
mship = context.portal_membership
mhost = context.MailHost
administratorEmailAddress = context.email_from_address
# the message format, %s will be filled in from data
message = """
From: %s
To: %s
Subject: New item submitted for approval - %s
%s
URL: %s
"""
This sets up the message and objects you need. Apart from the object being transitioned, you’ll
also need a reference to the membership tool portal_membership and the Simple Mail Transfer
Protocol (SMTP) server via MailHost. The message is easily configurable to send an e-mail in
any format you like.
You then use the listMembers method of the portal_membership object to get a list of members.
For each member, you can then see if the reviewer role is in the list of roles for that user by
calling the getRoles method:
for user in mship.listMembers():
if "Reviewer" in mship.getMemberById(user.id).getRoles():
The astute reader will note that looping through every member in a Plone site could be a little
slow if you have thousands of users. In the next chapter, you’ll modify this script to pull the
list of users from a specific group.
There’s no point in sending an e-mail if you don’t have a user’s e-mail address, so you check
here that there’s a valid e-mail first. Now all that’s left is to format the e-mail and send it.
For this you can use Python’s string replacement functionality and pass in four parameters
that correspond to the %s in the message variable set at the beginning of the script. After this
replacement, the msg variable will contain the e-mail you want to send. To send the e-mail,
simply call the send method of the MailHost and pass through the e-mail string:
if user.email:
msg = message % (
administratorEmailAddress,
user.email,
object.TitleOrId(),
object.Description(),
object.absolute_url()
)
mhost.send(msg)
229
This will result in the following e-mail being sent:
From: [email protected]
To: [email protected]
Subject: New item submitted for approval - Plone’s great
We all know Plone is a great product, but with the newest release
it’s gotten even better...
URL: http://agmweb.ca/Members/andym/News_Item_123
Appendix B shows the full listing for this script.
8.1.4.5 Using PloneCollectorNG
PloneCollectorNG is a bug tracker that’s available for Plone. You’ll find many other issue trackers out there, but this is the one I use and recommend for Plone. In fact, writing an issue tracker
seems to be a common thing for developers to do. One of the really nice things about workflow
is that it enables your users to significantly change the way an application works. As a developer, developing products hooking into DCWorkflow allows your application to remain flexible.
You can find PloneCollectorNG at http://www.zope.org/Members/ajung/PloneCollectorNG.
The product adds a series of content types during installation; one of them is PloneIssueNG,
which is an issue (or bug report). Rather than hard-coding exactly how the issue moves through
the database, a separate workflow is assigned to the issue. That workflow contains appropriate
states, transitions, variables, and worklists.
At any stage you can find out what state an object is in by calling the getInfoFor method of
portal_workflow. This useful method accepts an object and the variable to be looked up. In
PloneCollectorNG’s workflow, that variable is called state, and in Plone workflow, it’s called
review_state. For example, to find the state for an object, you use this:
portal_workflow.getInfoFor(obj, "review_state")
You can find possible states for an object by examining the state’s object directly from the
workflow, like so:
portal_workflow[’pcng_workflow’].states._mapping.keys()
The result of this is that if your user wants to have a simple issue-tracking system, then modifying this workflow through the Web is relatively trivial (if, when the application was developed,
the workflow tools have been considered). Compare this to another popular bug-tracking
system, Bugzilla, where changing a state or a transition requires hours and hours of a Perl
programmer’s time to find all the hard-coded references to a bug’s state.
8.1.4.6 Distributing and Writing Workflow
If you’ve got a great workflow for your application, you have a couple of different ways to write
and distribute workflow. The following sections close the discussion of workflow by presenting
a couple of these options.
230
8.1.4.6.1 Writing Through the ZMI
Probably the simplest but most laborious way to write workflow is to use the ZMI. Although
the ZMI drives many people crazy, it’s a simple way to set up the options. Unfortunately, once
you’ve started writing through the ZMI, you’re stuck in that paradigm. In other words, there’s
no easy to edit or alter that workflow on the file system. I discussed editing a workflow through
the Web with you earlier in this chapter, of course.
To export a workflow from the ZMI, click portal_workflow and select the Contents tab. Select
the created workflows you’d like to export by checking the boxes on the left of the ZMI, and
then click import/export. At the top part of the export page, select Download to local machine,
and click export. A file with extension .zexp will be created that can be saved and redistributed.
Selecting XML Format will provide a file in Extensible Markup Language (XML) format with
an .xml extension.
If you’re provided a workflow in a the .zexp or .xml format, then importing the workflow into
your Plone is straightforward. Place that file in the import directory of Zope on the file system.
This can be the instance home directory or the Zope directory.
Then click portal_workflow, select the Contents tab, and click import/export. At the bottom
part of the page, you’ll see a small form that takes an import filename. Enter the name of the
filename there, and leave Take ownership of imported objects selected. Click the Import button
to import the workflow. The workflow will now be imported and given the name specified in
the export.
8.1.4.6.2 Writing a Workflow in Python
Using Python is probably the favorite way of programmers to write a workflow, since it can all
be done in Python and easily distributed. First, make a Python module on the file system. At
the top of the file, import the appropriate tools, as follows:
from Products.CMFCore.WorkflowTool import addWorkflowFactory
from Products.DCWorkflow.DCWorkflow import DCWorkflowDefinition
Second, make a function that creates the workflow. Appendix A lists the API for writing a
workflow in a little more detail. But you could just cheat and look at all the great examples
available in the PloneWorkflow’s project in the collective (http://sf.net/projects/collective), or
even the ones contained in Plone. For example:
def sample(id):
""" Sample workflow """
ob = DCWorkflowDefinition(id)
ob.states.addState(’private’)
ob.states.addState(’public’)
# add transitions
return ob
Finally, register the workflow in the system, like so:
231
addWorkflowFactory(sample,
id=’sample_workflow’,
title=’Sample workflow’)
This script will need to be as part of a product installation. Chapter 12 covers writing and
installing products.
Now, of course, a shortcut is available, which is called DCWorkflowDump. This will take the
code from the ZMI and dump it into a Python module for you. You can find the source code
for DCWorkflowDump in the collective at http://sf.net/projects/collective, but you can also find
a zip file of the code on the Plone book Web site at http://plone-book.agmweb.ca.
To install DCWorkflowDump, unzip the file and copy the directory called DCWorkflowDump into
the Products directory of your Plone installation. To check that you’re in the right directory,
your Products directory should also contain a directory for DCWorkflow, among other things.
Then restart your Plone instance.
Once you’ve restarted Plone, go to the particular workflow in the ZMI, and you’ll notice a new
tab called dump. Click that page to get the dump screen, and then click Dump it! to dump the
workflow to the screen. This will take your workflow and format it in Python for you. Save
that file to your product, and you now have a Python file you can manipulate. This product is
a great tool because it allows you to create the workflow in the ZMI and then distribute and
alter it through Python.
9 Chapter 9
9.1 Setting Up Security and Users
Plone has a powerful and fine-grained security model. It provides a myriad of options for
security at all levels so each object can have custom security for a user, a role, a group, and so
on.
To put this chapter in context, I’d like to share this interesting quote with you:
Security is hard.
Jim Fulton, chief Zope architect
The security for Plone is so powerful and multifaceted that it can be quite hard to debug and
manage. But perhaps no other part of a Plone site is as important as getting security right. A
security breach in your site is probably the most serious blunder you can make, and for this
reason, I cover Plone security quite comprehensively.
In this chapter I first cover all the user terminology and key interfaces with which your users
will interact. Then I show how to add and edit users and groups through the Plone interface.
I then step through the key tools and Application Programming Interfaces (APIs) that manage
users and their security. Then I cover using Python tools to script changes to users and their
properties. Finally, I cover server security and expand user authentication, providing a detailed
example on how to incorporate users from a Lightweight Directory Access Protocol (LDAP)
server.
9.1.1 Administering Users
One of the most common tasks you’ll need to do as an administrator of a Plone site is to
deal with the members of your site. Administration usually involves recovering passwords and
changing member settings. You can perform quite a few simple tasks through the Web, but
of course the best friend to any administrator is a scripting language such as Python to make
changes en masse. If you have a large number of users, the ’Scripting Users? section later in
this chapter will be of particular interest to you.
9.1.1.1 Users, Roles, and Groups
Some of the key concepts in Plone are users, roles, and groups. Before I show you how to edit
these, I’ll cover in more detail exactly what these are.
232
233
9.1.1.1.1 Users
Each person visiting a Plone site is referred to as a user. The user may or may not be authenticated by Plone, and users who are not authenticated are called anonymous users. Users who
are authenticated are logged into an existing user account. If they don’t have an account, then
usually they can create their own account.
Anonymous users are the lowest level of users in that they usually have the most restrictions.
Once users log in, they gain the roles their accounts give them. A user is identified by a short
identifier, for example, andym. By default, no users are created for you in Plone, except for the
one added to Zope by the installer to give you administrator access. The name of that user is
whatever you set up in the installer, usually admin.
9.1.1.1.2 Roles
A Plone site has a series of roles; a role is a logical categorization of users. Instead of setting
every user’s permissions individually, each role is assigned permissions individually. Every user
can be assigned zero to many roles; for example, a user can be a member and a manager. Each
role is identified by a simple name, for example: Member.
A Plone site has five predefined roles, split into two groups: assignable roles and not-assignable
roles. Assignable roles are roles you can give to users so that when they log in, they have this
role. Not-assignable roles are roles you don’t grant specifically to a user but that occur within
a Plone site. For example, you don’t assign the anonymous role to a user.
The following are the not-assignable roles:
Anonymous: This is a user who hasn’t logged into the site. This could be a user
who has no account or one who has merely not logged in yet.
Authenticated: This role refers to any user who is logged into the site, whatever
their role. By definition a user is either anonymous or authenticated; the two are
mutually exclusive. Because the authenticated user doesn’t provide much in the
way of granularity, it isn’t recommended for most applications.
The following are the assignable roles:
Owner: This is a special role given to users when they create an object. It applies
to a user for that object only; the information is stored on the object. You don’t
normally explicitly assign someone as an owner. Plone does that for you.
Members: This the default role for a user who has joined your site. Anyone who
joins using the join button in the Plone interface has this role.
Reviewer: This is a user with more permissions than a member but less than a
manager. Reviewers are users who can edit or review content entered by a member;
they can’t change the site’s configuration or alter a user account.
Manager: Managers can do almost anything to a Plone site, so you should give this
role only to trusted developers and administrators. A manager can delete or edit
content, remove users, alter a site’s configuration, and even delete your Plone site.
234
9.1.1.1.3 Groups
Groups are a different concept from roles. Roles imply that a user has different permissions
from someone with a different role, but a group is a logical categorization of users. For example, the marketing department may be one group, and the engineering department may be
another group. Each user can belong to zero to many groups. Groups are optional; you don’t
need to use them, but the Plone team found them useful enough to integrate them.
Site developers can use the groups in anyway they choose, such as to group a department or
a certain class of users. For most users using Plone for the first time, I recommend leaving
groups unchanged; by default no groups are created for you.
NOTE You implement groups using Group User Folder (GRUF). The groups aren’t
part of Zope but are an extra tool for Plone. GRUF was developed and contributed
by Ingeniweb.
9.1.1.2 Sharing Tab
When I discussed publishing documents in Chapter 3, I skipped past the Sharing tab because
it’s a more advanced feature you may not always want to use. The Sharing tab is an action in
portal_actions, so if you don’t want it to appear, go to that tool in the Zope Management Interface (ZMI) and uncheck the visible option. However, the Sharing tab is quite useful because it
lets you give different local roles on an object in Plone to users or groups.
If you’ve got a piece of content you’ve added to a Plone site and you want another person to
be able to edit it, then you need to give them more permissions for that one object. This is
called a local role, and it allows you to give a user expanded rights on an item. If I write a
document in Plone, I become the owner of that document and gain certain rights. If I wanted
to collaborate on this document with my colleague Ralph, prior to publishing, then I need to
give Ralph more permissions so he can edit that document. To do this, I go to the Sharing tab
and give Ralph more permissions.
NOTE You can assign local roles on a folder or document basis. If you give users a
local role on a folder, then they get that local role for every object in that folder.
The Sharing tab appears only in places where you have the rights to alter sharing—your folder
being one such place. Click my folder, and then click sharing. Figure 9-1 shows the form for
the Sharing tab. It has three main components; you can assign a user to have a local role on
this object, you can assign a group to have a local role on this object, and you can see who has
certain roles already.
235
Figure 9-1. Accessing the Sharing tab
To find a user to assign a role to, enter a search term (such as Gavin), which opens a list of
users that match your search criteria; you can then click the user and select the role from the
drop-down list. For example, in Figure 9-2, I’m giving Gavin the owner role on this folder.
236
Figure 9-2. Assigning a role to a user
In my earlier example, I wanted to assign rights to an individual user, but that can be annoying
with large numbers of users...unless you’ve assigned them to groups. If I wanted to allow the
whole marketing team to edit my document, I could do so. To get the groups available, just
click View groups, which opens a list of groups for this site, and you can assign a local role to a
group. In Figure 9-3 I’m giving Development the owner role on this folder.
237
Figure 9-3. Assigning a role to a group
Finally, in Figure 9-4, you can see which users and groups have the roles for this page and then
remove them if you want. Once you’ve given someone else local roles on an object, you allow
them to access the Sharing tab. Then nothing is stopping them from removing roles for you
from the content.
238
Figure 9-4. Viewing and removing roles
9.1.1.3 Administering Through the Web
Using the Plone interface you can easily modify the user that’s assigned to certain groups, alter
user information, add groups, and so on. You can do most of this through the Plone control
panel; just click plone setup and then select Users and Groups Administration. You’ll see two
tabs: Users and Groups.
Click the Users tab to access the list of users in the system. The form is rather self-explanatory:
you can remove a user, reset a password (resetting the password sends the user an e-mail
anyway), or change an e-mail all from this form, as shown in Figure 9-5.
239
Figure 9-5. Editing users
By clicking a user, you can access the preferences form for that user, make any changes, and
then click Save. To add a new user, click add new user. This opens the form to register the user
and allows you to edit the data for that user. Because the number of users in a site can become
quite large, the data will be batched in the familiar Plone manner. You can enter a search
string, which will search through all the users to find matching names and e-mail addresses.
You can add, edit, and remove groups by clicking the Groups tab. To add a group, click the Add
New Group button. This opens a form for a group; the only required field is Title, which should
be a short, descriptive name for the group; usually a group is directly related to a business or
240
site activity.
Now that you’ve added a group and have some users, you can match users and groups. Again,
you can do this using the Plone control panel. You can either click a user and give that user
some groups or click a group and put users into that group.
9.1.1.3.1 When to Use Groups?
Using groups is optional, and you may not ever choose to use them. One strong use of groups,
however, is to make a workspace. In a basic Plone site, users can add and edit content in their
own folder; each item of content in that folder is thus owned by the person who created it. But
this really doesn’t scale too well; after all, the whole point is that you want a few people to be
able to edit a document and share it, of course!
This is where groups and workspaces come in. Just like there’s a folder for members that
contains all the user folders for members, there’s also a folder called GroupWorkspaces. This
is created by default whenever a group is added, and in that folder is another folder for each
group. So, if you add a group called Marketing, you’ll be able to find a folder at GroupWorkspaces/Marketing. Any user in the Marketing group will have the right to add, edit, and
delete content in the Marketing workspace; in other words, you now have a folder for that
group. This is the same as adding a group and then assigning a local role for that group to that
folder.
This is just one example of how useful a group can be; another is using groups in workflow. In
the previous chapter I discussed workflow and how you can send an e-mail to certain people
when something happens. If a member of the Marketing group added an item, for instance,
then you can send an e-mail to all the users of that group, rather than just everyone. The
’Calculating the Other Users in a Group? section shows how you to do this.
On the Plone Web site, for example, the users are in development groups that are responsible
for parts of Plone, such as the release team and the documentation team.
9.1.1.3.2 Administering Groups
You can administer groups in two ways from the Plone control panel. You can either go to
a user and click the groups for that user or go to a group and click the users for that group.
Either way you can easily add and remove the groups for a user. To add a user to a group,
however, go to the user search page and click a user; then click the Groups tab, which will
show the groups for that user. For example, Figure 9-6 shows the groups for the user andym.
241
Figure 9-6. Groups for this user
To add the user to a new group, select the checkbox for the group and then click add user to
selected groups.
Likewise, you can remove a user from a group by checking the box next to the group and
then clicking remove selected groups. You’ll see a similar interface for group management if you
click plone setup, select User and Groups Administration, and click groups. Click a group, and
then click group members; you’ll get a list of the members in that group, and you can add and
remove members from there.
242
9.1.1.3.3 Giving Groups Roles
So you’ve seen that users can have roles but also that groups can have roles. This may seem a
little odd to you, but think, for example, of a group of supervisors that needs to be able to do
anything to the content added by one of their staff members. To do this in a site, they’ll need
to have the reviewer role. To set up a group of supervisors, click plone setup, select User and
Groups Administration, click groups, and then click add new group. Give that group the name
Supervisor and complete the form. On the next form, you get a list of the groups and the
roles assigned to them. To assign the reviewer role to this group, select the checkboxes that
correspond to the reviewer role for that group, as shown in Figure 9-7.
Figure 9-7. Setting up reviewer role for the Supervisor group
You’ve made it easy to give out the reviewer role to users, and you can now manage and administer the reviewers through the Plone interface. Furthermore, it’s easy to programmatically
calculate the reviewers because you can examine the group and get a list of its members.
The idea of groups having roles is actually a minor paradigm shift from standard Zope development, since in that scenario you’re used to individual users being assigned roles. You can
still do that in Plone, of course, but assigning roles to a group is easy in Plone.
NOTE By definition, when the permission for a user on an object is calculated, a
few factors are taken into account. First, the roles assigned to a user are calculated.
Second, the roles a user gets from its groups are calculated. This gives a total set
of roles that a user may have.
243
9.1.2 User Registration Tools
Before users are members of your site, they must register with your site. Users can register
themselves quite easily by clicking the join link in the top-right corner of a Plone site. I covered
this in detail at the beginning of Chapter 3, where I showed you how users can join and register
for a site. The registration process for users is actually pretty straightforward, but quite a
few options are available. This process is controlled by three key tools: portal_registration,
portal_memberdata, and portal_membership. The following sections present these three tools
now.
9.1.2.1 Portal Registration
The portal_registration tool is an action provider and provides one key action in Plone: joining.
Clicking this link will open the join form. By default, any user (anonymous included) that
hasn’t already logged in can click this link to join.
When users register using the join form, they’ll get two simple options for a Plone site: to either
validate e-mail or not validate it. The only true way to validate an e-mail is to send an e-mail
to the address and see if an appropriate response is returned. By default, e-mail validation
is turned off; that is, when a user registers, by default they provide their name, e-mail, and
password in Plone. They can then log in and use the site as usual. This is the form you’ve
seen in Chapter 3. If e-mail validation is turned on, however, then users can give only a name,
username, and e-mail, as shown in Figure 9-8.
244
Figure 9-8. Registering a user with e-mail validation turned on
After clicking the link in the e-mail, they’ll then be taken to a login screen, and the registration
process can continue as normal.
To enable validation in the Plone interface, click plone setup and select Portal Settings. Under
Password Policy, select Generate and e-mail members’ initial password and click Save to commit
the changes.
If you’d like to view or edit the e-mail users get, then you can edit the page template that
generates it. You can find the template by clicking plone_skins, clicking plone_templates, and
then clicking registered_notify_template.
*Begin Sidebar*
If you want to add any other actions for users, before they join, this is the best place to add
them. For example, if you wanted to add a page that outlined a privacy policy, this could be a
245
good place. To do this, first add the page and all the information you want to contain in that
policy. It would make sense to make the ID of the page something useful, such as privacy.html,
and put it in the root of your Plone site.
In the ZMI, go to portal_registration and add a new action with the following information:
Name: Privacy
Id: privacy
Action: string: ${portal_url}/privacy.html
Condition: not: member
Permission: Add portal member
Category: user
Visible: selected
You’ll now get the privacy link to your privacy page, if aren’t logged in. By making the category
user, you’ll ensure it appears in the personal bar.
*End Sidebar*
9.1.2.2 Portal Member Data
The portal_memberdata tool holds the member data for each user. A Plone user has a series
of options, such as skins, the time last logged in, What You See Is What You Get (WYSIWYG)
editor, and so on. When a user joins a site, a default record in portal_memberdata is created.
You set the actual properties created in that record in this tool; click portal_memberdata, and
select Properties to see the default set of properties. In Plone these are the following:
• e-mail: This is the user’s e-mail address.
• portal_skin: This is deprecated; ignore this property.
• listed: Show this user in the Members directory (Boolean). By default this is
enabled.
• login_time: This is the date the user logged in for this session.
• last_login_time: This is the date of the last time the user logged in.
• fullname: This is a user’s full name.
• error_log_update: This is used by the error log form; ignore this property.
• formtooltips: In old versions of Plone, there were options for displaying form
help. This is now no longer relevant, so ignore it.
• visible_ids: This shows the IDs (or names) for objects. By enabling this, the
first field on the edit form for each content type is Name, and by changing this
users can rename objects. By default this is enabled.
• wysiwyg_editor: This is the editor to use in forms.
You can add or remove items from this list using the Zope interface. However, adding or
removing elements from here doesn’t automatically make the user interface form that users
246
actually edit. In Chapter 3 you saw that by clicking my preferences, users can access and alter
most of these properties. If you want to alter these preferences, then you’ll have to customize
that form. The values given for these fields are the default values for a newly registered user;
for example, by default all members are listed in the Members tab, unless users explicitly
decide otherwise.
So, for example, if you wanted all members not to be listed on the search by default, then you
need to change the setting in this form. In the portal_memberdata form, find the listed property
and uncheck the value in the form. Then click Save Changes, and all new users will no longer
be selected.
The portal_groupdata tool contains the corresponding data for groups. The default properties
for a group are as follows:
• title: A title for the group
• description: A description for the group
• email: An e-mail address
• listed: Whether to list the group to users
These tools store the user and group data on these tools and not in the main acl_users folder.
If you want to move user information between Plone servers, then you’ll need to move these
tools as well; just moving the acl_users folder isn’t enough. You can do this by importing and
exporting these tools; however, before you import into the new Plone site, you must delete the
existing tool, or an error will be raised.
9.1.2.3 Portal Membership
The portal_membership tool handles a few more properties; specifically, it matches the member
data with the members. Accessing portal_membership from the ZMI gives a large number of
options; the following are the most important:
• Set members folder: This is the folder to put member folders into. This folder
must exist. By default this is Member.
• Control creation of member areas: By default, a member area for each user
is created when joining. That creation is optional, however. Uncheck Turn
folder creation off to disable this. The default is that it’s on.
Under the Actions tab you’ll find a whole series of actions that relate to users when they’re
logged in, such my favorites, my preferences, and so on. These all have the category user so that
the actions will appear in the top-right corner.
The portal_groups tool provides similar tools to portal_membership, but for groups. Likewise,
when a group is created, a group workspace is created where all members of that group can
add and edit content.
247
9.1.2.4 Useful APIs
The portal_membership tool has one of most commonly used set of API functions. Often you’ll
want to find out key information such as the currently logged in user, whether the user is
anonymous, and so on. The portal_membership tool provides you with these methods; the
following are some of the most important:
• isAnonymousUser(): This returns true if the user is anonymous.
• getAuthenticatedMember(): This returns the currently logged-in user
wrapped with portal_metadata properties. If no user is logged in, it returns a
special nobody user with null mappings for portal_metadata properties.
• listMemberIds(): This returns the IDs for all the users.
• listMembers(): This returns all the user objects.
• getMemberById(id): This returns the user object for a given ID.
• getHomeFolder(id=None): This returns the home folder for a given ID. The
ID is optional and if not provided gives the current member’s home folder.
• getHomeUrl(id=None): This returns a URL to the member’s home folder.
The ID is optional and if not provided gives the current members home folder’s
URL.
The user returned by these functions is ’wrapped? in the data from the portal_memberdata tool
so that the properties are attributes of the user object. So, for example, the following is a little
Script (Python) object to get the e-mail address for the user Bob:
##parameters=
u = context.portal_membership.getMemberById("andy")
return u.email
9.1.2.5 Cookie Authentication
By default Plone uses cookie authentication for its users, meaning that users must have cookies
turned on in their browser to log in. This authentication is provided in a Plone site by the
cookie_authentication object, which contains the necessary functionality for users to log in. If
you really want to use Hypertext Transfer Protocol (HTTP) authentication, then you can simply
remove this object; however, I really don’t recommend it, because HTTP authentication isn’t
good for most sites.
This object provides the following items that you can edit from the ZMI:
• Authentication cookie name: This is the name of the cookie that will be used
to persist user authentication. It does this by persisting a token for the user,
which preserves a user’s login. The default is __ac.
• User name form variable: This is the name of the variable in the login form
that will contain the username. The default is __ac_name.
248
• User password form variable: This is the name of the variable in the login
form that will contain the password. The default is __ac_password.
• User name persistence form variable: This is the name of the variable
in the login form that will contain the persistence token. The default is
__ac_persistent.
• Login page ID: If a user needs to log in, this is the page that they will be sent
to in order to complete the login. The default is require_login.
• Logout page ID: If a user is to be logged out, then they will be sent to a nice
page with a message. The page is this ID. The default is logged_out.
• Failed authorization page ID: When the authorization fails, this is the page
that will show. By default, this is blank, as Plone does something different.
• Use cookie paths to limit scope: This sets the cookie to be local to the current
folder and all folders below this. Leave this at the default of blank so that
you’ll authenticate for the entire site, regardless of where you actually click
login.
To change the cookie that’s being used, rather than the default, just change the value in this
form and click Save. However, let me warn you that if you change the name of the cookie,
all the existing cookies on your users’ computers will be ignored, and they’ll all have to log in
again. If you wanted a different login page, then you could either customize the require_login
page template or change the value of that variable.
9.1.2.6 The Actual User Folder
You can get access to the actual user folder for a Plone site by clicking the acl_users folder
in the ZMI. This opens the Group User Folder (GRUF) interface, which gives you a variety of
options.
The GRUF interface is actually quite similar to the user options you have through the Plone
control panel. You can add and edit users and groups through a pretty straightforward interface. Clicking Users and Groups will allow you to edit these items. If you click the Contents
tab, you’ll get a choice of users or groups; click Users and then click acl_users. Finally you’ll
get to the actual user folder for a user. This looks like the standard user folder. You’ll see a list
of users, and to edit a user, you just click the username, as shown in Figure 9-9.
249
Figure 9-9. Editing the user record
From here you can alter a user’s password or the roles. You’ll note that at this point the group
Management is actually represented as a role to ensure that no name collisions occur. The
name is mangled to be group_Management. If you wanted to make this user a member of this
group, then you could do so here. There isn’t much you can do here, though, that you can’t do
at the highest level, so I wouldn’t go down to this level unless you have to do something such
as change the password or set a domain.
9.1.3 Setting Permissions
I’ve now covered users, roles, and groups with you, but there’s more; the lowest level of
settings for security is a permission. As the name suggests, giving a user a permission means
giving them the ability to do something, such as view an object, add a document, get a listing
250
of the contents of a folder, and so on. Each permission is identified uniquely by a meaningful
name such as View, Add portal content, or List folder contents.
Permissions aren’t applied to an individual user, but to a role. Each role gains particular permissions, and then the user gains those particular roles. You can find all the security settings
for Zope in the ZMI on the Security tab. This includes the Plone site, the Zope root, all the
objects and content inside a Plone site, and the skins. When clicking the Security tab, you’ll
see all the permissions and the roles that map to them in a grid, as shown in Figure 9-10.
Figure 9-10. Security settings
In Figure 9-10 you can see that this object has a series of security settings. This is displayed
as a grid of checkboxes; on the left are the permissions in alphabetical order, and across the
251
top are the roles again in alphabetical order. This page is rather large and cumbersome, so
there are two useful shortcuts. Click the permission to get all the roles for that permission; for
example, Figure 9-11 shows the settings for the Access future portal content permission.
Figure 9-11. Settings for a permission
And you can click a role to get all the settings for that role, which is much easier than a long
list, as shown in Figure 9-12.
252
Figure 9-12. Settings for the reviewer role
For all these permissions, it’s a simple matter of checking the boxes for the permissions you
want or selecting the options in the select box and clicking Save. When the Acquire Permission
setting is checked, security settings for this permission will be acquired; when it’s unchecked,
permissions will not acquired. Acquisition is the ability of an object to search the object hierarchy to find permissions and then combine them for the overall permission.
NOTE The permissions page will turn on the security for the manager user for you;
locking out your manager user would be really bad, so it’s good for this to be on by
default.
Now take a look at the Access contents information permission. In the ZMI, go to the root Plone
253
object and click the Security tab. The default setting for this permission is that no roles are
enabled; that is, the settings for each user are blank. However, the Acquire Settings option
is checked, meaning you have to look in the parent objects in the hierarchy to determine this
object’s permissions. Go now to the root Zope folder, and click the Security tab. This opens the
list of permissions for the root folder, and sure enough there are some settings for the Access
contents information permission in this folder; namely, the anonymous and manager roles have
this permission.
Since permissions are acquired, all subfolders will also acquire these permission settings. This
means the Plone site and every object in the Plone site will have these permissions. Therefore,
if you want to set a security permission for the whole site, all you have to do is configure the
permission in the root Plone, and most of objects will acquire those permissions.
NOTE The exception is workflowed objects, which specifically turn off acquisition.
This is covered in the ’Security and Workflow? section later in this chapter.
You can set permissions on any object in Zope through the ZMI. This may be the Zope root, a
Plone site, a folder such as the Members folder, or even a piece of content. Each object has it
own set of permissions, but not all objects have the same choice of permissions. For example,
the Add... permission is provided on all folders. But since these permissions don’t make sense
to a nonfolderish object (by definition, an object must be a folder to have items added to it),
they aren’t present.
Any product or piece of Python code in your Zope site can define its own security permission,
so it can be a little difficult to define exactly what a permission lets you do. Table 9-1 describes
some of the key permissions and what they do.
Table 9-1. Common Plone Permissions
Permission
Description
Access contents information
This permission allows access to an object, without necessarily viewing the object. For example, a user may want to
see the object’s title in a list of results, even though the user
can’t view the contents of that file.
There are numerous add permissions, each relating to the
type of object a user may like to add. For a normal Plone
site, all the permissions are grouped together as Add portal
content.
This gives the ability to join a Plone site and get a user account.
This gives the right to copy or move an object. Although
users may have this right, they still need to have the permission to paste the object into a destination.
This gives the right to delete an object. In standard Zope,
this permission is checked on the folder; on Plone this check
is made on each object.
This gets a list of the contents of a folder; this doesn’t check
if you have right to view the actual object listed.
Add. . .
Add portal member
Copy or Move
Delete objects
List folder contents
254
Permission
Description
List portal members
This gives the right to see a list of members in the site and
search through the members.
This is a catch-all permission for any changes to an object,
such as changing the content, its keywords, or other properties. This permission applies to nearly all objects.
This gives the right to change your password in a Plone site.
This gives the right to change your properties in a Plone site.
This allows a user to view the object in question. View
doesn’t just mean only HTML views but also File Transfer
Protocol (FTP), WebDAV, and other forms of access.
Modify portal content
Set own password
Set own properties
View
9.1.3.1 Adding a Role
Placing users in roles means you have to find a compatible set of permissions for each role so
that grouping the permissions makes sense. This isn’t always possible. Sometimes a certain
user may need something different from similar users.
However, from a development point of view, the fewer and simpler you can keep the roles,
the easier it will be. It’s not too complicated, but an initial urge to create a role for every
conceivable security option is a really bad idea. You’ll get yourself into a total mess quickly.
Instead I urge you to leave the number of roles sparse and keep them generic to the entire site.
To add a role, go to the root Plone folder, click the Security tab, and scroll down to the bottom
(it’s a long way). At the bottom is a simple form to add more roles or remove a role. Add the
name of the new role, and click Add Role.
9.1.3.2 Performing Common Tasks
You can set some security options quickly and easily to perform regular tasks. Before you make
a lot of security settings changes, however, I urge you to back up your Plone site. I show you
how to do this in Chapter 14.
9.1.3.2.1 Stopping Users Joining Your Site
To stop users from joining your site, you set the Add portal member permission in the root of
your Zope for anonymous users. You can either deselect this for anonymous users there or go
to your Plone site and turn off the Acquire Permission setting.
9.1.3.2.2 Stopping Users Searching Your Site
To stop users from searching your site, you set the Search ZCatalog permission to anonymous
users in the root of a Plone site. So, change the permission there by deselecting Anonymous or
any other user.
255
9.1.3.2.3 Stopping Anonymous Users from Accessing Your Site Altogether
Ah, well, stopping anonymous users from accessing your site is a little tricky because it’s quite
complicated to remove anonymous access to your site completely; users still need to be able
to access your site to be able to log in! What you really want, in this situation, is to be able to
restrict access to your content. You can do this be restricting the permissions on your workflow.
9.1.3.3 Security and Workflow
As I pointed out in Chapter 7, workflow manages the security of each object in the workflow.
It does this by changing the actual permissions on an object. I’ve just shown you how to view
the security settings for each object, so you can now see how the security settings for objects in
one state can be different from the security settings of an object in another state. If you click
portal_workflow, select the Contents tab, click plone_workflow, and then select the States tab,
you’ll see all the states available. Click a state, and then select Permissions, and you’ll see the
permissions for that state, as shown in Figure 9-13.
Figure 9-13. The permissions for the published state
As you can see, when an object is moved into the published state, anonymous users will be
allowed the Access contents information and View permissions. This means people can view the
content. You’ll note that members or owners can’t edit their own content because they don’t
256
have that permission. The permissions applied by workflow are set on the Permissions tab,
where you can set all the permissions that will be managed by the workflow.
After you’ve changed the security settings, you need to go to the plone_workflow
tool and click Update security settings; otherwise, the object’s security and the workflow will be different.
NOTE Because the permissions change when the object is transitioned, any other
permission changes to the object you may make through the ZMI are removed if
(and only if) those permissions are managed by the workflow. For this reason, you
should always resist the urge to make minor tweaks to the security of content types
in the ZMI; stick to changing the Plone site object and the workflow.
9.1.3.3.1 Guards
All the transitions have a guard on them that lets the administrator select the permissions
allowed before a user can perform the transition. When checking if a user can perform the
transition, it will check in the following order: check the permissions, check the roles, and
then check the expression. If any of these checks pass, then the transition will be run.
The following are all the settings for a guard:
• Permission: This is a list of any of the acceptable permissions separated by
semicolons (;)—for example, Review portal content; Modify portal content.
• Roles: This is a list of roles that are acceptable roles for this transition separated by semicolons (for example, Manager; Reviewer).
• Expression: This is a workflow Template Attribute Language Expression Syntax (TALES) expression that will let you come up with a custom condition.
For example, the following transition will occur only if this is in folder called
Members; it’s not really a permission, but it’s a neat trick:
python: if ’Members’ in state_object.getPhysicalPath()
NOTE: getPhysicalPath is a method of all objects in Zope that returns the location inside the
Zope object hierarchy, ignoring any virtual hosting that may occur.
9.1.3.4 Proxy Roles
In the previous chapter I disscused some neat methods of notifying users and moving content
around when content is workflowed. When this happens, the script is executed as the user
performs the workflow transaction. In this case, your script may do something your user may
or may not have the right to do. For example, you may not want to allow a user to add anything
to a folder called public, except for workflow. This is a problem; you need to ensure the script
can be executed with a higher role.
A proxy role is something your users won’t interact with or know about, but it’s a method for
you to get around this problem. For example, say you want a user to be able to pick a user
257
from all the other users in a site. You don’t want to give the user the right to view all users,
just list the users in this particular context. To execute the script, a user will need the List
portal members permission to be able to get a list of members, but you don’t want to give this
to anonymous users.
The script that executes that command will need to be given a higher proxy role, probably
Member. To do this, go to the script in the ZMI, click the Proxy tab, and click Member. If this
script is based on the file system, then this information can be added in the metadata file. For
example, the .metadata file would have the following line: proxy = Member. Now this script
would be executed as a member, solving your security problem!
9.1.4 Scripting Users
So, you’ve got a whole bunch of users in your Plone site. . . now you’ll need some scripts on
that site to aid in the administration of the users. After a few hundred users, it can be really
hard to make changes through the Web, so the following sections give a few example scripts
that perform some important tasks.
9.1.4.1 Registering Users in Bulk
If you have a large number of users to register, then you need a script to import them. These
users could be from any system you’re upgrading to Plone. However, if you already have users
in an external source such as LDAP, a relational database, or other source, you could integrate
directly with that source.
For now, take a bunch of users in a comma-separated file, with the following content: username, full name, e-mail, and groups. In this example, you’ll run through that list, add each
user with those settings, and then change their properties so that they will have the correct
settings. The .csv file will therefore look something like the following:
"User Name", "Full Name", "Email", "Groups"
"Andy", "Andy Mckay", "[email protected]", "Systems,Sales,Development"
...
A .csv file is a file of comma-separated values, and it can be created and edited in most spreadsheet programs, such as Microsoft Excel or OpenOffice.org. You can then export the file as a
comma-separated file and finally import it into Plone. Because this requires lots of methods
that are restricted, you’ll need to make this an external method:
# An external method to import user
import csv
# the full path to your csv file
fileName = "/var/zope.zeo/Extensions/test.csv"
def importUsers(self):
reader = csv.reader(open(fileName, "r"))
258
pr = self.portal_registration
pg = self.portal_groups
out = []
# if your csv file contains a header line that
# explains the contents of each column
ignoreLine = 1
This is just the setup code; in other words, it sets up all the variables you’ll use in this script. At
the beginning, you import the csv module, which is a module that ships with Python 2.3 and
provides fast parsing of .csv files. The .csv file is in the variable fileName, which is a full path to
the file; if you make it a relative path, Plone may end up looking in the wrong place. As you
saw earlier, self is passed to the method, and from that you can get to the two tools needed:
portal_registration to provide access to the registration API and portal_groups to provide access
to the groups API:
for row in reader:
if ignoreLine:
ignoreLine = 0
continue
# check we have exactly 4 items
assert len(row) == 4
id, name, email, groups = row
groups = groups.split(’,’)
# make a password
password = pr.generatePassword()
Next you loop through each row and get the ID, name, e-mail, and groups. Then you make
a random password by calling generatePassword. This generates a random six-character password composed of uppercase and lowercase characters and numbers. If you wanted to base
the ID or password on provided information, such as the username or e-mail, then this is the
opportunity to do that. In this case, I’ve entered each group in the same field, separated by a
comma (for example, “Sales,Marketing”). Therefore, I need to split that into a list of individual
names, like so:
try:
# add in member
pr.addMember(id = id,
password = password,
roles = ["Member",],
properties = {
’fullname’: name,
’username’: id,
’email’: email,
}
259
)
# groups are separated by commas
for groupId in groups:
group = pg.getGroupById(groupId)
group.addMember(id)
out.append("Added user %s" % id)
except ValueError, msg:
# if we skipped this user for a reason, tell the person
out.append("Skipped %s, reason: %s" % (id, msg))
# return something
return "\n".join(out)
Given that you now have all the user information you need to register the user, you can perform
the actual registration. You do this by calling the addMember function, which is a function of
portal_registration and which registers the user. A dictionary of key/value pairs, such as e-mail
and name, is passed through to the function. Then, for each group you call getGroupById to
get the group and call addMember on the group. As the name suggests, this will register the
user with that group. When you’re done, it’s a matter of printing something out to the person
running the import.
To run this on your site, you’ll need to put this into the Extensions directory of your Plone
server and call it import_users_with_groups.py. Then you’ll need to manually add the groups
that you’ll have for your site; this script doesn’t create the groups for you. Then prepare the
.csv file; if you have your users stored in some other system, you’ll need to find some way to
get them into this format. Change the filename in the script to point to your filename. Next,
add an external method to your Plone site, with the following values:
• ID: import_users_with_groups
• Module name: import_users_with_groups
• Function name: importUsers
Once you’ve added this external method, click Test to run the method, and you’ll get the result!
9.1.4.2 Changing User Settings
If you install a new product or make a new setting, it can be necessary to change user metadata
in bulk. For example, if you install a new WYSIWYG editor and want this to be default for every
user, then two things need to occur:
• Change the default setting for every new user. To do this, click portal_metadata and select the Properties tab. Set the default there, and all new
users will get this value.
• Alter the settings for every existing user, which can be done only with the
following external method:
260
def fixUsers(self):
pm = self.portal_membership
members = pm.listMemberIds()
out = []
for member in members:
# now get the actual member
m = pm.getMemberById(member)
# get the editor property for that member
p = m.getProperty(’wysiwyg_editor’, None)
out.append("%s %s" % (p, member))
if p is not None and p != ’Epoz’:
m.setMemberProperties({’wysiwyg_editor’: ’Epoz’,})
out.append("Changed property for %s" % member)
return "\n".join(out)
Put this code in a Python module in the Extensions directory of your Plone instance. Call
the module fixUserScript.py. Then in the ZMI, add an external method with the following
parameters:
• ID: fixUsers
• Module name: fixUserScript
• Function name: fixUsers
Click the Test tab to run the code. It’ll run through every member in your site and set the
value for the WYSIWYG editor to “Epoz”. It does this by first getting a list of every member;
there’s a method on portal_membership called listMemberIds that does this for you. For each
of the members, it examines the property used by Plone to determine the editor (in this case,
the wysiwyg_editor property). If that property isn’t “Epoz”, then it calls setMemberProperties to
change it.
This is a useful way to loop through all your members. Then using the setMemberProperties
and getProperty methods, you can examine or alter any of the member properties that a user
may have.
9.1.4.3 Calculating the Other Users in a Group
I discussed earlier with you the possibility of sending an e-mail to all the people in a workgroup
for an object. You could add this to workflow, but first you need a script to do that. This
example uses a couple of functions to get at the users. The following is the getGroupUsers
script, which takes an object and returns a list of users:
##parameters=object=None
# object is the object to find all the members of the same group for
users = []
261
# get the creator
userName = object.Creator()
user = context.portal_membership.getMemberById(userName)
pg = context.portal_groups
# loop through the groups the user is in
for group in user.getGroups():
group = pg.getGroupById(group)
# loop through the users in each of those groups
for user in group.getGroupUsers():
if user not in users and user != userName:
users.append(user)
return users
In this script, you’re given an object, so you need to find the creator of that object by calling
the method Creator. Once you have that user, you can call getGroups, and a method of the user
object lists all the names of all the groups a user is in. After that, you get each of those groups,
and from that list you get the usernames for a group. So, finally, you have each username.
Now for each of those users, you want only users who aren’t duplicates or aren’t the original
person who made the change to the object. The user list will contain all the other users in the
same groups as the person who owned the object.
You could plug this into your workflow e-mail notification script from Chapter 7 to
enhance it. For example, for the workflow e-mail notification script, you may recall
that you did the following:
for user in mship.listMembers():
if "Reviewer" in mship.getMemberById(user.id).getRoles():
This loops through every user and checks if they have the membership role. The previous script was called getGroupUsers and placed in the portal_skins/custom folder. This
means you can access it through the context namespace through acquisition; in short, context.getGroupUsers(object) will return you the users:
users = context.getGroupUsers(object)
for id in users:
user = mship.getMemberById(id)
Now you’re sending an e-mail to everyone in the group instead of all reviewers!
9.1.4.4 User Information in Page Templates
In Chapter 6, you made a page template that allowed a user to give feedback to the site
administrator through a form. In that form, an input box allowed a user to type in an e-mail
262
address, which you then validated. However, if a user is logged in and you know the e-mail
address, then it’d be nice to fill it in automatically for the user.
The existing code for the input box is as follows:
<input type="text" name="email_address"
tal:attributes="tabindex tabindex/next;
value request/email_address|nothing" />
Now, if a value for e-mail exists in the request from an earlier attempt at filling out the form,
then you should show that. If not, then you can see if an e-mail address exists for the current
user. The following changes to the form will ensure that the e-mail address is filled in:
<input type="text" name="email_address"
tal:define="user context/portal_membership/getAuthenticatedMember;
email user/email|nothing"
tal:attributes="tabindex tabindex/next;
value request/email_address|email|nothing" />
9.1.4.5 Debugging and Understanding Security
I’ve found that security is not only one of the hardest parts of Plone to understand, but it’s one
of the hardest to debug and test. Because the model is granular and complicated, it can be
extremely difficult to find why and where an error occurs. Sometimes the error message or
information given is hard to decipher or is hard to find any information about at all.
Testing security is also slightly harder because in sites with lots of roles, you should do a full
regression test with each of those users in each of the situations. Because of the cost involved,
though, people often don’t do these full regression tests. Furthermore, having a bug in security
is probably the worst thing that can occur on a site if it leaks confidential information. Plone
will let you do whatever you want; it will happily let you shoot yourself in the foot, so be
careful!
9.1.4.5.1 VerboseSecurity
VerboseSecurity is an add-on product included by default with the installers. You can also
download VerboseSecurity from http://hathaway.freezope.org/Software/VerboseSecurity. As the
name suggests, it provides a detailed error message when you can’t do something in Plone
because you aren’t authorized. If you have given too lax of security settings, this product won’t
help you, though.
VerboseSecurity can run on a Plone server without causing a performance hit, so you can
happily run this on your production and development server. There might be a minor bit of
extra overhead caused when someone isn’t allowed to perform something and an error is raised
and the new security modules kicks in.
However, since the error message is detailed, you won’t want to expose this to users. It explains
far more about your system than a user should ever know! It’ll never reveal passwords—just
263
information about the users, roles, and permissions. Of course, your production server will
always be working perfectly, so there will be no need to install it on your production server.
The original implementation of the permission-checking routines were written in Python. As
the API stabilized, and the developers realized the overhead that security caused, it was rewritten in C. By default, the faster C implementation is running, but this means that VerboseSecurity can’t patch the permission module to be more verbose. I’ve rarely had to turn to this level
of detail, though; usually I’ve found I can get enough information already. However, if you
need more information, you’ll need to run Plone with the following environment variable:
ZOPE_SECURITY_POLICY=PYTHON
To get VerboseSecurity to work, all you need to do is ensure that VerboseSecurity is in your
Products directory (for more details on this, see Chapter 10) and then restart Plone. Go to the
cookie_authentication object, which is the list of options for your site authentication, and in the
form, change the option for login_page from require_login to empty, as shown in Figure 9-14.
264
Figure 9-14. Changing the login settings for your site
Now you can go and re-create the circumstances for the error you’d like to debug. Remember
to log in as the user who got the error. This is where it’s handy to have two different browsers
accessing your Plone site: one for administering, one for testing. When the error occurs, an
HTTP authentication dialog will pop up on the screen. At that point, hit Cancel, and you
should now get a detailed error message, such as that shown in Figure 9-15.
265
Figure 9-15. A nice detailed error message
The message is rather long and self-explanatory. At this point I normally pop into the other
browser and examine the permissions settings for the objects involved to see what the cause
may be.
9.1.4.5.2 Common Problems
A couple of problems are easy to spot when dealing with Plone. The first one is unrelated
specifically to Plone but worth repeating: Check that the user who can create the error is the
one you think it is. Often I’ve heard people say, ’Works in one browser and not in the other.?
This is usually because when you’ve switched browsers, you’ve also switched users.
Continuing with the obvious, double-check that your user has the role you expect it to have.
This may mean going to acl_users, seeing what user role they have, and double-checking it’s
the one you expect. Next, think of any groups that a user may be in. Again, looking at acl_users
will tell you this because users can get extra roles in a group. Finally, remember that a user’s
266
role can also be altered by local roles on folders or objects; this is a little harder to narrow
down because there’s no easy to way to tell what folder or objects have local roles.
Once you’re sure who the user is and the role they have on an object, you’ll be able to see what
the permissions for an object actually are. As you’ve seen, two similar objects (for example,
two documents) can have different permission and different roles. The user who creates the
document will have the owner role for that document, and another user will just have the
member role on it. Because workflow changes the permissions on a document as it moves
through workflow states, this will also change the permissions.
9.1.4.5.3 Locking Down Plone
There isn’t really an easy way to do this since there really is no concept of a ’locked-down?
site. However, the basic principle is that users should be able to do the minimum they need
to do and nothing more—so you may want to double-check the default settings and remove
those security settings they don’t need.
For the really paranoid, you can also start removing features from the User Interface (UI)
to stop users going wandering by modifying the Cascading Style Sheets (CSS). Of course,
remember that just removing the tab for an action or denying access to a page template isn’t
enough if a user could still, say, edit a document. With knowledge of Plone, they could go and
run the page from a script or other malicious mechanism. Often in Plone you’ll find that if you
try hard enough, you can get to the edit page of a document you’re viewing by hacking the
uniform resource locator (URL). However, you won’t actually be able to edit the page; you’ll
just be able to call up the edit form.
If your server is running in the wild without restricted access, then ensure that you’re running
another Web server in front of Zope’s ZServer. As I discuss in Chapter 10, the ZServer that
comes in the package is a simple implementation without all the checks and security a real
Web server needs. Consider proxies, if possible, for other Zope services such as FTP and
WebDAV if you’re going to let untrusted users at these services (this isn’t normally the case).
9.1.5 Integrating Plone with Other Services
The following sections cover security outside of a Plone instance (for example, all the security
settings you need to actually run Plone on a server). Then I cover using Plone with LDAP so
that you can have users from an external server be used in Plone.
9.1.5.1 Security on Your Server
I’ve covered the security of users within the Plone system, but there’s one other important
issue: the security and setup of your Plone server within your operating system. As with any
Web application, getting the security right for your server before exposing it to the world is
critical. The install process for Zope 2.7 is pretty good and gets most of this right for you, but
there are a few things to note, which I’ll present to you now.
267
9.1.5.1.1 User Running Zope
You should ensure that the user running Zope has the minimum amount of security needed to
complete the task. The user running Zope will need to be read and write to all Zope directories
on the file system. The user will need to write the directories that contain the logs and database
of your Zope instance; those are the var and log directories of your Zope instance.
The best way to do this on Linux is to add a dedicated user account called, say, plone, that
will handle this; you can then limit the access of that user in the unlikely event of Plone being
hacked.
On Linux, if you want to have Plone bind to low-numbered ports (below 1024) such as 21 or
80, then you’ll normally need to run Plone as root. It’ll bind to these ports as root and then
change to another effective user. To do this, you must specify a value for effective-user in the
configuration file, zope.conf. It’ll then do the bind and change to that user; an example of this
is effective-user zope. The best alternative isn’t to do this at all but instead to run Zope on a
high port such as 8080; you can then protect that port at the firewall and use Apache or other
Web server to run on port 80 and proxy through to port 8080. Chapter 10 covers more about
this topic.
The equivalent on Windows is the user who runs the service; by default, this is the LocalSystem
account. Again, you can change the user that Plone runs as. If you’re trying to run Plone on
a Windows computer that doesn’t have services (which I don’t recommend or support), then
Plone will be running locally as the user who started the server manually.
Some products may require the installation of extra software that provides features such as
image manipulation, document conversion, and so on. If you’ve installed any of these tools,
then bear in mind that they may require a bit of work so that they’ll interact with your Plone
site successfully. For example, I installed pdftohtml on Windows for Portable Document Format
(PDF) conversion, but for the command to be read, I had to run the service as a user with more
privileges so Zope could interact with this software. In this case, since the server was behind a
firewall, this wasn’t a problem.
9.1.5.1.2 Getting Emergency Access
If you’ve got a Plone site but can’t access the ZMI because you don’t know or have forgotten
the password, then you can get an emergency access account. To do this, you need to have file
system access to the instance of your Plone site. If you don’t have this, you’ll need to find some
way to do this first.
To do this, go to the root of your instance and call the zpasswd.py script. You’ll find this script
in your Zope directory (in ZOPE_HOME). On my computer the script zpasswd.py is located in
/opt/Zope-2.7/bin/zpasswd.py. So, to create a password, you’d do the following:
$ cd /var/zope
$ python /opt/Zope-2.7/bin/zpasswd.py access
Username: emergency
Password:
268
Verify password:
Please choose a format from:
SHA - SHA-1 hashed password
CRYPT - UNIX-style crypt password
CLEARTEXT - no protection.
Encoding: SHA
Domain restrictions:
This will create a file access in your Zope instance. Now restart Zope, and log into the ZMI
using that username and password entered in that script. This user has a special meaning in
Plone and is called the emergency user. Once you’ve logged in as an emergency user, you can’t
create objects, but you can now create a new user for yourself and log in as that user. For
security reasons, you should then delete the access file.
9.1.5.1.3 Getting Emergency Access on Windows
The Windows installation of Plone features a Graphical User Interface (GUI) application for
easily getting emergency access. Select Start - Program Files - Plone - Plone, and click the
Emergency User option. This allows you to create a new user, alter the current emergency
user’s password, or remove any emergency user, as shown in Figure 9-16.
Figure 9-16. Creating a new emergency user
To create a new user, click Create User. In the pop-up dialog box, add a username and password. This will create a file that contains the username and password on the file system.
269
Similarly, clicking Change Password will alter that user’s password. After adding or altering
a password, you’ll need to restart Zope. To restart Plone, go to the Control tab, click Stop,
and then click Start. Next, click Manage Root, and give the username and password you just
entered. You’ll be logged in as the emergency user, which means you can’t create objects, but
you can now create a new user for yourself and log in as that user.
9.1.5.2 Using External Authentication Systems
Plone stores all its users inside the Zope object database in a separate user list, as you saw in
Chapter 8. As ever, this isn’t perfect, and at some point you may want to use another service
to authenticate your users. The most common alternative system is LDAP or Microsoft’s Active
Directory, which communicates using LDAP.
However, you may actually want to integrate with another application that stores its users in
a relational database. At the time of writing, ActiveState’s ASPN site uses Zope for all the
content, but users can authenticate by using Microsoft’s Passport system. Actually installing
extra user authentication schemes is pretty straightforward thanks to excellent work by many
developers. In the process of setting this up, I found that the hardest part was building the
software and setting up the integration between systems.
CAUTION In the next section, you’ll be playing around with the acl_users folders
inside a Plone site. Never delete or alter the acl_users folder in the root of your Zope
instance. If you do that and your user folder breaks for some reason (the server
goes down, for example), your entire site will be blocked, and you’ll no longer be
able to get any access, even as an administrator. Make sure you change only the
user folder in the Plone site!
9.1.5.2.1 Using LDAP
First, you need to set up an LDAP server, or something that communicates with LDAP, such as
Active Directory (although apparently Active Directory has a few of quirks). In this example,
I installed openLDAP on my Red Hat server and on my Windows server. For Windows, you’ll
find a precompiled version at http://www.zope.org/Members/volkerw/LdapWin32. I tested it
for Python 2.3.
Download and unzip the file, and then place the
FilesPlonePythonlibsite-packages. Then install LDAPUserFolder.
contents
inside
c:Program
On Linux, you can find the openLDAP downloads at http://www.openldap.org/. The tested
version includes the RPMs 2.0.27-2.8.0 and 2.0.27-2.8.0. After building this by following the
instructions, I went to http://python-ldap.sourceforge.net/, downloaded the appropriate Python
LDAP libraries, and built those. In my case, the tested version was 2.0.0pre05-1.i386.rpm.
Make sure you use the same Python interpreter you’re using to run Plone.
After you’ve gone through those particular hoops, you need to make sure the _ldap.so module
is importable by Python. The easiest way to test this is to run the following:
$ python -c "import _ldap"
270
If you get no error messages, then it imported correctly.
If you do get errors, then you’ll have to retrace your steps. Then go and get LDAPUserFolder from
http://www.dataflake.org/software/ldapuserfolder. The tested version was 2.1 beta 2. Download the file, untar it, and move it into the Products directory of your Zope installation. For
example:
$ tar -zxf LDAPUserFolder-2_1beta2.tgz
$ mv LDAPUserFolder /var/zope/Products
Now restart Plone, go to the control panel, and ensure that it shows up correctly in the Products
page of the control panel. I provide more details on this in Chapter 10.
Next, in Plone you should be able to click acl_users, click Sources, and then scroll down to the
Users source #1 option. Then select LDAPUserFolder, and check I’m sure, as shown in Figure
9-17. This will create a new user folder and replace the existing one, so make sure you aren’t
about to lose anything critical. In fact, now is a good time to do a backup. Then click OK.
Figure 9-17. Adding an LDAPUserFolder
In the LDAPUserFolder settings, add the settings that match your existing LDAP settings. You
should now be able to click the Users tab and search for users that already exist in your LDAP
directory.
271
9.1.5.2.2 Relational Databases and Others
An excellent user folder replacement is called exUserFolder, which stands for
extensible user folder.
This one is easy to install; just download it from
http://prdownloads.sourceforge.net/exuserfolder/exUserFolder-0_20_0.tgz, do the usual unzip
dance, and copy it into your Products folder. Again, after restarting Plone, you should be able
to click acl_users, select Sources, and then scroll down to the Users source #1 option. Then
select exUserFolder, and check I’m sure.
Actually, exUserFolder will authenticate against the following:
• Radius
• SMB
• LDAP
• Relational databases
To do this, you’ll need to install the specific database adapter for the relational database;
fortunately, adapters for all the major databases are covered. For more information, you
can find excellent information in the exUserFolder directories with ReadMe files on almost every subject. The Zope book covers setting up access to a relational database at
http://zope.org/Documentation/Books/ZopeBook/2_6Edition/RelationalDatabases.stx.
10 Chapter 10
10.1 Integrating with Other Systems
Integration is a huge issue in any enterprise that has a large number of other systems already
in place. Because Plone is an open-source project, it has a lot of products, add-ons, skins,
and tools that provide extra functionality for free. That’s right—often these extra products are
given away to anyone who wants them. Additionally, as an open-source language, Python has
a whole host of free, excellent products (often called packages). Most of these products don’t
directly affect Plone, though. In other words, they don’t give functionality to Plone out of the
box—that’s what Plone products do. However, people often ask, ’Can Plone do X?” The answer
is often, ’Yes, if Python can do it.”
The following are some of the most popular Python products:
• Python Imaging Library (PIL): This allows you to manipulate, convert, and
analyze images (http://www.pythonware.com/products/pil/).
• ReportLab:
This allows you to create Portable Document Format
(PDF) files dynamically with images, graphs, and other goodies
(http://www.reportlab.org/).
• Windows extensions:
This gives an interface to all the Windows Application Programming Interfaces (APIs); for example, it
offers the ability to use Component Object Model (COM) objects
(http://sourceforge.net/projects/pywin32/).
• Pygame: This is a framework that allows users to write games in Python.
People have used it in Plone to get access to the media layer interfaces it
provides for creating images or sounds (http://www.pygame.org/).
• OpenOffice.org bindings: This provides bindings so that you can
do almost anything to OpenOffice.org documents, even parsing Microsoft Office documents, for example—as you’ll see in Chapter 13
(http://udk.openoffice.org/python/python-bridge.html).
• mxTidy:
This package locates and corrects problems in Hypertext Markup Language (HTML) files, including page templates
(http://www.egenix.com/files/python/mxTidy.html).
These excellent add-ons usually have graphical installers for Windows that allow you to step
through the installation. If you aren’t using Windows, then the distutils module for Python
272
273
offers a simple command-line interface for installing any of these products. As ever, the real
key to installing anything is to read the instructions contained in the download. This chapter
focuses on installing products that provide extra functionality to Plone. You’ll find a directory
of Python packages at http://www.python.org/pypi.
10.1.1 Open-Source Licensing
Most open-source packages are released with a particular license that describes how the package may be used. Before you use any third-party code, you should check the license to see if
it’s compatible with your needs.
Plone is licensed under the General Public License (GPL), which you can find at
http://www.gnu.org/copyleft/gpl.html and inside the LICENSE.txt file of your Plone installation. If you’re the developer of a Plone Web site, then you can happily create and develop
Web sites without any issue. Users of your Web site will never have to worry about the license
for the code; they just use the Web site normally. As with most licenses, the license limits the
redistribution and sale of other people’s code.
Usually licenses are easy to read and understand, but if you’re unsure, you should probably
have a qualified legal professional look at the license. I’ll limit myself to describing the main
licenses that exist in the Zope world and point you to where you can find more information:
Zope
Public
License
http://zope.org/Resources/ZPL
Python
License
http://http://www.python.org/2.3/license.html GPL http://www.gnu.org/copyleft/gpl.html
Lesser GPL http://www.gnu.org/copyleft/lesser.html
10.1.2 Installing Plone Products
A product is a module to install into Plone that provides more functionality to Plone. Although
the name product implies a cost, that isn’t the case—most products are free and open source.
The term product actually describes something written on the file system and distributed for
other Plone sites to use.
Installing a product generally involves the following two steps:
1. Installing it so that it’s registered inside Zope
2. Installing it into each Plone instance that wants to use it
The large variety of add-ons available means that it’s pretty hard to give any hard and fast
rules about what exactly needs to be done to install them. As I’ll repeatedly point out in this
chapter, always read the product’s installation files, which will usually explain how to install
the product. If you do need further help, contact a mailing list or the product author for more
information; however, ensure that you’ve read the instructions first.
When you’re installing products, remember that you’re installing code that could be incomplete
and has no warranty on the quality. The nature of open source is that people tend to write
products and then leave them as they move onto other projects. In an ideal world, before you
install anything, you’d take the time to have someone you trust read through it line by line. In
reality, you can’t do this. Still, most products are pretty good. Just be careful to test products
before you install them into your million-dollar site.
274
10.1.2.1 Finding Products
Finding the right products to meet your needs is probably the hardest part about integration.
The Zope.org Web site contains many products created and uploaded by users. You can find
these products primarily at http://www.zope.org/Products, but if you look at the home page
of Zope.org, you’ll see product announcements on the right side of the page. Some of these
products are Plone related, and others are Zope, Content Management Framework (CMF), or
Python related.
The other main area to find products is in the Collective project at SourceForge
(http://sf.net/projects/collective). The products in the Collective project reside in SourceForge’s
Concurrent Versioning System (CVS). Although products often get released as tarballs, CVS
access is the best way to see the products there.
At this time, no comprehensive product directory exists for Plone products or their
state. (I hope one will be online at Plone.org by the time this book is published.)
As products are released, people tend to put packages on the Files page, but the best
bet is to look in the CVS. You can find a visual view of all the available files at
http://cvs.sourceforge.net/viewcvs.py/collective/.
One final CVS repository that contains useful code is Zope Corporation’s CVS repository. Almost
all code that’s made public is placed in this CVS repository. If you’re looking for the source to
Zope 2, then this is also the place to go. The Products directory contains all the products
(http://cvs.zope.org/Products/). You can find more information on how to check out code at
http://dev.zope.org/CVS/ReadOnlyAccess.
10.1.2.2 What Is CVS?
CVS is a system for maintaining control over source code. Most development happens in a
source code control system, such as CVS or one of its many similar competing products, such
as Subversion, Perforce, BitKeeper, and so on.
Checking files out of CVS is simple, and most Unix and Linux users will be familiar with using
CVS from the command line. To check out all the products in the collective to your computer
(this may take a while), do the following:
cvs -d:pserver:[email protected]:/cvsroot/collective login
Supply a blank password and continue with the following command:
cvs -z3 -d:pserver:[email protected]:/cvsroot/collective co *.*
Most of the Plone development team using Windows uses TortoiseCVS, which hooks directly
into the Windows Explorer shell - m Explorer you can right-click to check in and check out
code. For more information on TortoiseCVS, visit http://www.tortoisecvs.org.
275
10.1.2.3 Installing in Zope
Once you’ve found and downloaded a suitable product, you need to install it. You’ll first need
to install it into Zope so that Zope can recognize the new product. To do this, you need to find
the area that contains all the existing products. To find the directories, go to the control panel
in the Zope Management Interface (ZMI). There you’ll see a list of the directories for your
Plone instance. If you have a value for INSTANCE_HOME, then your Products directory will be
located in that directory. If you don’t have a value for INSTANCE_HOME, you’ll find the Products
directory inside SOFTWARE_HOME. It’s worth noting that almost all methods of installing
Plone create INSTANCE_HOME for you. As shown in Figure 10-1, my INSTANCE_HOME is
/var/book, so my Products directory is /var/book/Products.
Figure 10-1. Locating your Products directory
276
To do the Zope part of the install, take the downloaded product, decompress it, and place it
inside the Products directory for your server. Actually doing that is a little tricky and depends
greatly upon how the product you’re trying to install is packaged. To show this in more detail,
the following section explains how to install an example product, CMFExternalFile, which itself
is covered in the ’Managing a File in Plone” section.
One of the nice things about CMFExternalFile is that it actually comes in two parts, with two
downloads. First, you have the Zope-specific code called ExternalFile. If you ever wanted to
use this product outside of Plone, in plain Zope, you could do so. Second, you have the Ploneand CMF-specific code called CMFExternalFile. Most products don’t need two installs; they
come self-contained as one product.
10.1.2.3.1 Performing an Example Installation on Windows
First,
you’ll
need
to
download
the
product
from
Zope.org
at
http://zope.org/Members/arielpartners/ExternalFile/1.2.0/ExternalFile-1-2-0.zip and save
it to your computer.
Second, unzip the file. For this you could use WinZip, which you can find on most Windows
computers these days (I prefer 7-Zip, which is available from http://www.7-zip.org/).
After unzipping, you’ll get a directory called ExternalFile. Inside that directory is the product
directory (see Figure 10-2). You can tell this because inside that directory is a whole bunch of
Python files and text files, including INSTALL.txt and README.txt, which contain information
about how to do the install.
277
Figure 10-2. The ExternalFile directory contents
Next, move the ExternalFile folder (not its contents) into your Products directory. In Windows
that directory is located at c:Program FilesPlone 2DataProducts. In that directory you’ll see a
series of other directories including CMFPlone, CMFCore, and so on. The directory ExternalFile
should now be one of those directories. You can now skip to testing the installation in the
server.
10.1.2.3.2 Performing an Example Installation on Unix
First,
you’ll
need
to
download
the
product
from
Zope.org
at
http://zope.org/Members/arielpartners/ExternalFile/1.2.0/ExternalFile-1-2-0.zip and save
it to your computer. Second, unzip the file; most Unix systems have an unzip program already
installed. If so, execute the following commands:
$ unzip ExternalFile-1-2-0.zip
278
Archive: ExternalFile-1-2-0.zip
creating: ExternalFile/CVS/
...
After unzipping, you’ll get the directory ExternalFile. You know that the ExternalFile directory
is the product directory because inside that directory is a whole bunch of Python files and text
files, including INSTALL.txt and README.txt, which contain information about how to install.
Now move the ExternalFile folder (not its contents) into the Products directory. This command
will depend upon the configuration of your server, but in my case this is as follows:
$ mv ExternalFile /var/zope/Products
10.1.2.3.3 Testing the Installation in the Server
After installing a product, you’ll need to restart Plone for the products to be registered in Plone.
Once you’ve restarted your server, go to the ZMI and access the Product Management screen
of the Zope control panel. This screen will list all the products installed on the server. If you
installed the product successfully, you’ll see that it’s now listed, as shown in Figure 10-3.
279
Figure 10-3. Correctly installed products
Incidentally, you have three things that could go wrong at this point. First, if nothing shows up
in the management interface, then you’ve placed the directory in the wrong place. To correct
this, double-check the installation instructions and the location of your Products directory, as
explained earlier.
Second, you could get a ’broken” icon appearing in the product list; this means the product
was attempted to be registered in Zope, but an error occurred. Click the broken icon to get a
traceback, which will tell you the error and should give you a chance to fix it.
Finally, if you’ve been unable to access the management interface after restarting, it could be
that you have a more serious problem. Zope wasn’t able to start because Plone found a serious
280
error. To find out what the problem is, start Plone from the command line in debug mode, and
a traceback will print to the screen.
10.1.2.4 Installing in Plone
Now that you’ve correctly installed into Zope, the next step is easy.
To completely install CMFExternalFile, you’ll now need to install the CMFExternalFile product
(http://prdownloads.sourceforge.net/collective/CMFExternalFile.0.5.zip?download) the same
way you installed ExternalFile. You’ll also have to restart Plone.
You have to install CMFExternalFile into each Plone instance. Not all Plone products require
this, but most do. The only real way to tell is to read the installation instructions. If you see
anything about ’install in the standard CMF way” or ’in your Plone instance make an external
method,” then you need to complete this step.
Fortunately, you can actually disregard the instructions to make an external method because
Plone has a much simpler way to do this. In Plone, click plone setup and then click Add/Remove
Products. You’ll see a list of products that are installed on your server and that need configuring
in Plone. Simply click the check box next to the product (in this case, CMFExternalFile), and
click install, as shown in Figure 10-4.
281
Figure 10-4. A list of products available to the user
Just like that, the product will be installed. Well, it may be—if there’s an error, then it won’t
show up in the installed products list. You may be able to solve the problem by reading the
log, so click the link next to the name of the product to get a log. This installation is a service
provided by the portal_quickinstaller tool contained inside Zope. For a look at what this product
actually does, skip to the ’Integrating Plone with the File System” section.
282
10.1.3 Using a Different Web Server
If you’re in an organization that already serves Web sites, then you’ll likely have a Web server
platform that you use. Virtual hosting is the ability to server multiple Web sites on one server,
differentiating sites based upon their Internet Protocol (IP) address or name. It allows one
initial server, such as Apache, to pass requests to one or more Plone instances.
Virtual hosting is usually achieved by proxying, although using a proxy server is a desirable
approach with Plone no matter how many sites are hosted. A proxy server sits between a
client and a server and forwards requests from the client and the server. A proxy server should
be transparent to the user. In Chapter 14, I’ll show you how you can use proxy servers to
dramatically increase Plone’s performance.
Although Plone uses Zope’s underlying Web server, ZServer works just fine—it’s not a complete,
industry-strength Web server that should be exposed to the world. The server has several issues
regarding possible Denial of Service (DOS) attacks; however, these are obscure and hard-tofind items within ZServer. No known attacks have been performed against ZServer that exploit
these issues, but perhaps this is because of its relative obscurity in the real world. ZServer isn’t
specifically designed to be an industry-strength server, and since it’s feature complete, it’s no
longer being developed. By keeping a server such as Apache up-to-date, you’re ensuring that
a robust secure server is facing the world. Of course, if you’re developing an intranet or other
application with trusted users, this may not be an issue.
Figure 10-5 shows how such a setup would exist; the figure doesn’t show actual computers,
just services. A request would normally come from the Internet to the firewall and then go to
Apache and then to Plone. It could be that these are all different boxes. The essential point is
that there should be no access to Plone from untrusted users except through a proxy.
283
Figure 10-5. How virtual hosting works
Putting a Web server, such as Apache, in front of Plone provides a whole host of useful services
that ZServer doesn’t have. For example, Apache can provide the following: Uniform Resource
Locator (URL) rewriting, Secure Sockets Layer (SSL) support, caching, content deflation, virtual hosting, proxying to other Web services, incoming request sanitation, and so on. The
most commonly asked question is how to change a URL from http://localhost:8080/Plone into
something more friendly such as http://yoursite.com. This is called URL rewriting. Whilst a
proxying server isn’t required for this, it’s much easier with one.
A favorite method for proxying to Plone is to use an Hypertext Transfer Protocol (HTTP) proxy.
Apache achieves this using the mod_proxy module. When a request for a page comes into the
proxying server, it performs various functions. Then a new request is created and sent to the
ZServer. That response is passed back to the server and then onto the client. Of course, this all
transparent to the client, which just makes requests as normal to a server.
NOTE The old way to connect Apache to Plone is via Fast CGI or Persistent CGI. These are
harder to configure and actually slower when running. Although lots of old documentation
exists on these subjects, more efficient solutions now exist, and I don’t recommend these methods.
284
10.1.3.1 Configuring Plone
Before configuring your proxy Web server, you need to configure Plone. Since only one server
can connect to a port at once, alter Plone so that it’s listening to a high-numbered port. Usually
this port would be something that’s blocked at the firewall and isn’t accessible from the outside.
Example ports are 8080, 9090, 9673, and so on. Chapter 2 provides information about how to
change the ports on which your Plone server runs.
Next, you probably want to perform URL rewriting to change the URL of your site. Because
the Plone object lives inside the Zope Object Database (ZODB) and has an ID, it’s accessed by
putting that ID in the URL, such as http://localhost:8080/Plone. To make this friendlier, you
need to translate the request to the Web server from http://yoursite.com into a request for a
correct object inside Zope. You have two slightly different ways to do this, based upon your
requirements. If you’re using a proxy Web server or basing sites upon domain names, then you
can use a Virtual Host Monster (VHM). This is a friendly and powerful object that will make
your life so much easier, so I fully recommend using it. You need only one VHM in the root
of a Zope instance. The VHM object sits at the root of a Zope site and intercepts all incoming
requests; it then alters the request so that the request goes to the part of Zope that you want.
To create a VHM, in the ZMI, go to the root of your Zope and select Virtual Host Monster from
the Add drop-down box; in the form that opens, enter an ID. For example, enter vhm (the
actual ID doesn’t matter).
At this point, if you’re using a proxy Web server in front of Plone, continue to the configuration
for that Web server in the ’Configuring the Proxy Server” section.
This next step is necessary only if you aren’t using a proxy Web server. Click the VHM object you
added in the ZMI, and then select the Mappings tab, which will present a list of the available
mappings for hosts on this object. The mapping takes an incoming request and maps it to
Plone, with the following syntax:
host/path
where host is the hostname being mapped and path is the actual path to the object in Zope.
For example:
www.somesite.com/Plone
To ensure that all variations on the name are mapped to the path, you can use wildcards in the
mapping. For example, the following maps all subdomains of somesite.com:
*.somesite.com/Plone
To add this mapping, go to the Mapping tab, enter each mapping on a new line, and click Save.
This means you’ll no longer be able to access the root of your Zope site using the addresses
you’ve mapped. Fortunately, you can still access the root of your Zope server using an IP
address; this will still work because the mapping isn’t applied to numeric addresses. Figure
10-6 shows how Figure 10-5 changes when you access the server through the IP directly and
bypass the rewriting.
285
Figure 10-6. Virtual hosting with access to root
You’ve now mapped a named domain such as somesite.com to point to a particular Plone instance. If an incoming request is sent looking for that site name, it will be forwarded to the
Plone instance.
10.1.3.2 Configuring the Proxy Server
Now that you’ve added your VHM into Plone, it’s time to configure the proxy server. But proxy
server configuration depends upon the actual server you’re using. The following sections cover
the specifics for each server. However, to get virtual hosting to work, you’ll have to pass a URL
to Plone that the VHM object understands.
It’s worth noting that there’s one other advantage of virtual hosting using a proxy server. You
do all the configuration of the domains outside of Plone in the proxy server. This means your
system administrator can now administer and use a familiar tool, without having to worry
about Plone.
Proxying works by taking an incoming request and manipulating it so that a request with a
special URL is sent to Plone. That request will be manipulated and contains all the information
Plone needs to know to produce a response. When that response is produced and sent back to
the requesting person, all the URLs have to point to your site correctly. This will ensure that
links within your pages are all correct.
A URL has the following three main components:
286
• The IP or hostname and port for the server on which Plone resides
• The IP or hostname for where Plone is meant to be residing so that all links in
resulting documents have the correct URL
• The actual object in Zope to access and the URL passed to it
This information is passed to Plone by transforming the URL into one big, complicated URL of
the following format (line breaks have been added to make this clearer):
http://[URL to server]:[port]
/VirtualHostBase/[protocol]/[URL]:[port]
/[path to virtual host root]
/VirtualHostRoot/[actual URL]
Take the following example:
• Plone is on a box at the IP address 192.168.2.1 on port 8080. Note that the IP
address is one that the proxy server can access; it’s not the IP address to the
outside world—the proxy server handles that.
• Plone should appear to be at www.mysite.com on port 80.
• The actual Plone object is at /Plone.
• The incoming request is for /Members/andym.
This translates into the following long URL:
http://192.168.2.1:8080 ~CCC
/VirtualHostBase/http/www.mysite.com:80/Plone ~CCC
/VirtualHostRoot/Members/andym
The point of doing this is that when the VHM object sees that URL, it knows exactly what to
do with it. It munges it and sends the request to the Plone object. Obviously, the actual page
fragment (/Members/andym) will be different for each request and needs to be calculated. But
if you know what you’re aiming for, you can now configure your server.
10.1.3.2.1 Configuring Apache
Apache is probably the most popular choice for placing in front of Plone, and it’s available for
all Linux, Unix, and Windows platforms (http://httpd.apache.org/). After installing Apache,
you need to pass requests onto Plone by using HTTP proxies.
For configuring Apache, you’ll need to access Apache’s configuration files; where they are
depend upon your installation of Apache, so consult the Apache documentation. In Windows,
the configuration is accessible from the Start menu. In Linux, you can usually find the Apache
configuration in the /etc directory at /etc/apache/httpd.conf or /etc/apache2/httpd.conf. To
alter these files, you’ll usually need you to gain root or privileged user access.
287
NOTE This example uses Apache 2, but all these commands are backward compatible with
earlier versions, such as Apache 1.3.2. However, some earlier versions of Apache (before
1.3.2) are known to have issues with cookies.
The easiest way to rewrite a URL in Apache is to use the built-in rewrite and proxy modules.
This means enabling Apache’s mod_rewrite and mod_proxy modules. In Apache, each site is
usually contained within a virtual host directory that starts with the following:
<VirtualHost *:80>
ServerName yoursite.com
# other configuration options
All you need to do is enable rewrites and add the rewrite rule, like so:
RewriteEngine On
RewriteRule ^/(.*) http://192.168.2.1:8080 ~CCC
/VirtualHostBase/http/www.mysite.com:80/Plone ~CCC
/VirtualHostRoot/$1 [L,P] ~CCC
</VirtualHost>
The key rewrite rule here takes any request string passed to it and appends it to the end of
your hard-coded rewrite rule. The [L,P] tells Apache that this is the last rewrite rule, and it
should proxy to the server given. After doing this, you’ll need to restart Apache to update the
configuration. You can find more information about rewriting in the mod_rewrite documentation at http://httpd.apache.org/docs-2.0/misc/rewriteguide.html. Note that in this case you’ve
placed the rewrite rule information inside a virtual host directive. You could have multiple
such virtual hosts in Apache so that PHP, Perl, and Java sites all sit side by side on one server.
10.1.3.2.2 Squid
For its powerful caching and configuration options, Squid is a popular choice for users. Squid
is available for Unix, and there are Windows builds using cygwin available. Although I haven’t
tested the Windows version specifically, people who have report that it works well. You can
find the downloads at http://www.squid-cache.org/. These notes cover the latest stable version
at the time of writing, which is version 2.5.
Installing Squid from the source distribution is quite simple. After downloading, the following
commands install Squid:
$ tar -xvf squid-2.5.STABLE3.tar.gz
$ cd squid-2.5.STABLE3
$ ./configure --prefix=/usr/local/squid
...
$ make all
...
$ make install
...
288
Unfortunately, Squid doesn’t have a rewrite rule that allows you to alter incoming requests
before proxying. Squid Guard (http://www.squidguard.org) can do this job, though. I tested
the 1.2.0 version. After downloading, the following commands perform the install:
$ tar -zxvf squidGuard-1.2.0.tar.gz
$ cd squidGuard-1.2.0
$ ./configure
...
$ make
...
$ make install
...
Now both Squid and SquidGuard are ready to go; however, both configuration files still need
setting up. You can find the Squid configuration file at /etc/squid.conf. It’s a long configuration
file that fortunately explains in great detail all the options. The following are the essential
options to set:
http_port 80
httpd_accel_host virtual
httpd_accel_port 0
http_access allow all
http_access allow localhost
These last two lines are security rules for allowing access from browsers. Because this was
tested behind a firewall, these are lax rules. If you’re running Squid externally, you should
read up on access rules in detail. The easiest way to secure this is to change http_access allow
all to http_access deny all. Finally, add the following line to the configuration file:
redirect_program /usr/bin/squidGuard -c /etc/squid/squidGuard.conf
This sets up the redirect through Squid Guard using the configuration file at
/etc/squid/squidGuard.conf. SquidGuard doesn’t come with a configuration file, but a standard one that uses the virtual host configuration looks like the following:
dbhome /var/lib/squidguard/db
logdir /var/log/squid
acl {
default {
redirect http://192.168.2.1:8080 ~CCC
/VirtualHostBase/http/www.agmweb.ca:80 ~CCC
/Plone/VirtualHostRoot/%p ~CCC
}
}
Finally, Squid has the configuration you need to redirect traffic so that the host monster understands it. Incoming requests will be handled by Squid and then passed to Plone.
289
10.1.3.2.3 Microsoft Internet Information Services
Using Internet Information Services (IIS) isn’t my preferred server of choice; however, many
companies use IIS, so I’ve included this section. Unfortunately, IIS can’t perform proxying in
the same way as Squid and Apache; you need a separate plug-in. Just before this book was
published, a free proxy was written called IIS2Zope that provides this functionality. However, I haven’t had chance to try it in a high-performance site. For more information, see
http://zope.org/Members/freshlogic/index_html.
Instead, I’ll cover a solution that’s simple to set up and free. Earlier Zope users recommended
PCGI, but over the years this has been slow and complicated to install. By using Microsoft’s
ASP language and some IIS properties, you have a quicker solution. It’s called ASP 404 and
does the redirect through Microsoft’s ASP programming language.
From http://www.zope.org/Members/hiperlogica/ASP404, download the latest version. I tested
ASP404_1-0-b2.zip. Unzip the downloaded file, and you’ll find a file, default.asp, inside it.
Take that file and put it in the root of the site you want to proxy; on my server, that’s
c:inetpubwwwroot.
Next, you need to configure that script with the appropriate information for the location of
your Plone site. You have to open the script in a simple text editor and change two lines that
contain the variables for the site configuration. Specifically, change line 18 from this:
zopeAddress = "http://127.0.0.1:8080"
to the address of the destination server. In this example, it’s as follows:
zopeAddress = "http://192.168.2.1:8080"
Then change line 27 from this:
zopePath = "/"
to the ID of the Plone object, like so:
zopePath = "/Plone"
Save the file, and close the editor. Finally, you need to tell IIS to speak to Plone; this is where
you have to use a bit of trickery. Open the Internet Services Manager, usually found somewhere
in the Windows Control Panel. Find the site you want to proxy and access the sites properties,
as shown in Figure 10-7.
290
Figure 10-7. Accessing a site’s properties
In the properties, select the Custom Errors tab, and scroll down until you find the error for
404. Double-click the 404 error and alter it as follows:
• Message Type: URL
• URL: /default.asp
Figure 10-8 shows the settings.
Figure 10-8. Setting up the redirect for 404
Save the changes by clicking OK. At this point, your list of errors should look like the list of
errors in Figure 10-9. If this is the case, then you should be set up correctly. Access IIS through
the browser and bingo—you’ll see Plone.
291
Figure 10-9. The error list
What’s happened here is that you’re capturing the error for when an item can’t be found in
IIS. The ASP script you installed then reads the request and forwards it to Plone. It takes the
response and passes it back to IIS and down the line back to the browser. This means you’ve
added a simple proxy program to IIS.
You have a few key concerns here, though. The first is that a page can’t be found in order for
the proxy to occur; otherwise the script will not be triggered. This is good and bad. You can
add folders and images to IIS, and they will be served out instead of Plone if the names match
the request from the browser. Second, the incoming request is parsed and sent on; this gets a
little confusing in several situations with all the possible HTTP request configurations. You’ll
also find that all your Plone requests are actually logged as 404 errors, by IIS, which confuses
log file analysis tools.
Overall, this setup has worked for most people who’ve used it, but whether it’s an enterprise
solution that could cope with every situation is unlikely. However, it provides a strong base for
people to work with and develop.
10.1.3.2.4 Debugging Proxy Servers
Once you’ve set the server up and restarted everything, you’ll want to test the server by using
your browser to visit the site. After doing this a few times, you can use the following tips for
when things don’t seem to quite work as they should:
Testing the site: The golden rule of debugging proxy servers is to always test the
site by logging in and using your proxy server. You can do this by accessing the
IP and port of your Plone server directly. In the case of the previous example, you
can access the site by going to http://192.168.2.1:8080/Plone, and you’ve circumvented the proxy server completely. If you don’t have any problems accessing and
logging into Plone this way but do when you try through the proxy server, chances
292
are any errors are occurring in the proxy’s server side. Some older versions of
Apache 1.3 do give problems with cookies when logging in, so you should upgrade
to the latest 1.3 version.
Checking the URL: Double-check that your proxy server is sending the right URL,
which can be quite long and complicated. Break it down by the forward slashes to
examine each part. Remember that for Plone to return the correct URL, it must be
passed the correct values. So you have to ensure that the /[protocol]/[URL]:[port]
section is correct. If your site is using SSL, for example, ensure your protocol part
is https, not http.
10.1.4 Integrating Plone with the File System
Integrating Plone with the file system may sound a little odd, but I’m talking about enabling
the use of content on the file system with Plone. Of course, Plone already exists as a series of
files that’s installed and run on the file system. However, all content in a Plone site is stored
in the ZODB, but many people tell me they want to store and serve their content from the file
system directly.
Actually, a lot of people look at Zope and Plone, see little folder icons, and assume they directly
relate to the folders and items on the file system. However, this is really not the case. If you
were using a relational database, as most Content Management Systems (CMSs) do, would
you still want to do this? Many people jump into this thinking it’s a problem, but the following
are reasons why you’d want to do this:
You have lots of really large pieces of content: Plone can manage really large
files without a lot of problems. Databases of more than 10 gigabytes aren’t uncommon and work just fine. If you’re getting really large pieces of content (for
example, one client I work for uses Plone to manage its DVDs—the actual content
of the DVDs, that is), then take a look at CMFExternalFile and Apache. For really
large stuff, using Apache or another service to serve your content is a good way to
go.
You want to manage content using programs that read from the file system,
such as Microsoft Word: You can use External Editor to edit content stored in a
Plone site using your local programs. If you have Microsoft Word installed, you
can upload a Microsoft Word document and then edit it in Microsoft Word on your
computer.
You’re sick of editing code through the Web in little text areas: Again, look first
at External Editor. Second, why are you doing work through the Web anyway? As
I demonstrated in Chapter 7, you can write all skins and CSS templates on the file
system.
You can use my file system tools on the content: Well, you can mount Plone
via File Transfer Protocol (FTP) and WebDAV. Both of these provide file system–like
interfaces that work with Plone.
You want to back up the content easily: In Chapter 14 I show how to back up
and administer Plone and how to do simple incremental backups. An alternative
storage called Directory Storage can handle this http://dirstorage.sf.net.
293
You want to use CVS/Subversion/BitKeeper or some other source control system on the content: Ah, that makes sense but, unfortunately, isn’t fully integrated
yet. In future versions, one tentatively called Plone 3, this may be fully integrated.
With these points in mind, you’ll now look at various ways you could serve content that exists
on the file system through Plone.
10.1.4.1 Using the Proxying Web Server
So you’ve set up the Web server as described earlier in this chapter. At the risk of repeating
myself, that Web server is better at serving plain content than Plone ever will be. If you have
a large number of downloads, simply put them in a directory on your server that won’t be
proxying to Plone and then link to them from Plone. The users will just click the link and
download as usual.
Doing this in IIS is easy because IIS first automatically checks to see if the file exists before
raising the 404 error. Apache requires only two extra lines in the configuration, highlighted in
the following code in bold:
<VirtualHost *:80>
ServerName yoursite.com
# other configuration options
DocumentRoot /var/downloads
RewriteEngine On
RewriteRule ^/download(.*) - [L]
RewriteRule ^/(.*) http://192.168.2.1:8080 ~CCC
/VirtualHostBase/http/www.mysite.com:80 ~CCC
/Plone/VirtualHostRoot/$1 [L,P]
</VirtualHost>
In this example, you’ll put the content in /var/downloads, and the URLs to the downloadable
through Apache content will all start with /download.
The rewrite engine will see that the URL starts with /download and then not apply any change
to it—that’s what the dash (-) means. By specifying the [L] at the end of the line, no more
rewrite rules will apply, so the proxy doesn’t occur and Apache carries on like usual, serving
the file.
This trick is useful if you want to host other services in the same virtual host. In one site I host—
Mailman, a mailing list manager—all the Mailman URLs start with /mailman and /pipermail.
After setting up Mailman correctly and doing all the configuration, I added the following two
lines to the configuration so that it’d work nicely:
RewriteRule ^/mailman(.*) - [L]
RewriteRule ^/pipermail(.*) - [L]
Again, the only catch here is that you can’t add objects to Plone where the names may conflict
with your rules, such as adding folders with similar names. For example, mailman, pipermail,
294
or download in this example would be forbidden because users could never view those objects.
You could use this method to restrict access to certain parts of your site, but I recommend using
security within Plone for this. At this point, Plone isn’t actually managing content, so it has no
security, workflow, or metadata. The content is entirely outside of Plone. This may be a good
solution, though.
10.1.4.2 Managing a File in Plone
CMFExternalFile is a product that allows you to manage content from within Plone and still
have the core content on the file system. If you installed ExternalFile and CMFExternal earlier
in the chapter, then you’re all set. If not, return to the earlier ’Installing Plone Products” section.
After installing these, return to your Plone interface. You’ll note that if you go to Plone, you
can now add a new content type called External File. You add the External File type in the
same way as a normal file, as I described in Chapter 3. In fact, if you dig into the program
code, you’ll note that it uses the same templates.
However, you’ll notice one small difference here. The file has actually been added to the file
system. It’s placed in a new directory located in the var directory of your Plone installation. If
you aren’t sure where this is, go to the control panel and look for the directory listed by the
instance home; my var directory is located in /var/zope/var. Inside that directory is a directory
called externalfiles. In this directory, all the files you upload into Plone will be created. If you
look in that directory, you should find the file you uploaded.
What you’ve got now is a hybrid storage solution that stores the file on the file system and
the metadata about the object (description, keywords, and such) in Plone. This is better than
the Web server–only solution because it allows the content to have security, metadata, and so
on. If you really wanted, by configuring your Web server correctly, you could have the content
served by Apache by reading the directory from the externalfiles directory.
10.1.4.3 FTP Access into Plone
Using FTP is one good way to put and get content so that you can edit it without having to
use a browser. To enable FTP in Plone, ensure that it’s enabled in the server. Returning to
Chapter 2, you can see how to add and edit services like this. In short, make sure your Zope
configuration file, zope.conf, has the following in it:
<ftp-server>
address 21
</ftp-server>
NOTE If you’re going to have your server use port 21, you must ensure that nothing else is
listening to that port. Furthermore, for most Unix systems, you’ll need to start your service as
root so that it has permissions to connect to the low-numbered port. To do this, you’ll need
to set the effective user in your Zope configuration file. See the ’Setting Up Security on Your
Server” section in Chapter 9.
Next, you’ll need an FTP client to access the server. If you’re on Windows, then you can just
use Internet Explorer by entering the address of the server in the address bar. For example,
295
set the address to the path of your Zope server (such as ftp://localhost:8021/), and you’ll get
access to the objects in your site, as shown in Figure 10-10.
Figure 10-10. FTP access in Internet Explorer
If you need a username and password to access the server, then you’ll need to add them to the
URL in the following format: ftp://user:password@localhost:8021/. Many other FTP clients
are available that will allow you to have a more sophisticated interface if you’d like. Many FTP
clients are available in Linux, for the command line, or with GUIs, such as gFTP and Konqueror.
296
10.1.4.4 WebDAV Access into Plone
WebDAV is a system for authoring content in systems such as Plone using HTTP. This allows you
to map a Plone server as a file system. To enable this, you’ll have to edit the Zope configuration
file as I detailed in Chapter 2 so that the zope.conf file has the following in it:
<webdav-source-server>
address 1980
</webdav-source-server>
In Windows, the WebDrive program is available at http://www.webdrive.com/. A free trial is
available, so you can give it a try. After installing WebDrive, add a connection to the Plone
server, and then all you need to do then is access your Plone directly from the file system by
going to Windows Explorer, as shown in Figure 10-11.
Figure 10-11. Accessing your Plone contents using WebDrive
For Unix, you can get Cadaver (http://www.webdav.org/cadaver), which is a full-featured
command-line client. After installing Cadaver, you can connect to a Plone site from the command line. For example:
cadaver http://192.168.2.1:8080/Members/Plone
10.1.4.5 Editing Content with Rich Editors
Editing content in a text area is a really bad way to force users to write and edit content—
something I’ve commented on several times. Some editors provide a solution for this.
297
One is Epoz, which allows users to edit and alter documents directly in the browser without
having to know HTML. If you have lots of users entering content, then installing Epoz allows
your users to alter HTML content without having to actually understand HTML. For really
advanced editing, you could use External Editor, which would allow you to edit content in a
local program such as Microsoft Word.
10.1.4.5.1 Browser WYSIWYG Editor
You can find the tested version of Epoz 0.7.4 at http://zope.org/Members/mjablonski/Epoz/0.7.4.
Epoz requires a modern browser, which most Plone users will need anyway. The required
browsers are Internet Explorer 5.5+, Mozilla 1.3.1+, and Netscape 7.1+.
Download and install Epoz as usual; after installing, you’ll need to change your personal Plone
preferences so that you can use Epoz. Log into Plone, click my preferences, and select Personal
Preferences. On the preferences page, open the Content Editor drop-down list, select the Epoz
option, and then click Save to commit your changes.
Now you’ve chosen your editor, go to a document (any document will do) and click the Edit
tab. You’ll note that the Body text field has now changed significantly into a rich editor. The
editor should be pretty self-explanatory to you, with familiar buttons such as B for bold, I for
italics, and so on (see Figure 10-12).
298
Figure 10-12. Editing a document in Epoz
10.1.4.5.2 External Editor
External Editor is a tool you can use on all sorts of Plone content, templates, and code. It allows
you to edit Plone objects stored on a Plone site locally in programs of your choice. For example,
you can edit a Microsoft Word document stored on your Plone site locally in Microsoft Word.
When you save the document, it’s automatically sent to Plone.
External Editor comes with the Plone installer packages and sets up automatically on the server.
The application is unusual in that it has two components: one for the server and one for each
client that wants to use the product.
299
Installing the server product isn’t necessary if you used an installer to install
your Plone site.
If this isn’t the case, the server-side product is available at
http://zope.org/Members/Caseman/ExternalEditor. Install the product in the standard way I
discussed at the beginning of this chapter, and then restart your Zope.
Then, in Plone, log in as the administrator, click plone setup, and then select Portal Configuration. Select the Enable External Editor option to make sure you can edit objects with this
tool.
For every computer accessing the Plone site, you’ll need to install this product on the client
computer. Just like you’d install Flash or QuickTime in your browser, you install the client-side
External Editor code. This is manageable in intranets or on your computer but can be a little
harder for a public site.
For Windows 2000 and XP, download the executable Windows installer named zopeedit-win320.7.1.exe. Double-click the installer, and the graphical install will proceed. You just need to
select all the defaults. This will set up the options for Internet Explorer. To verify that this has
worked, do the following:
Figure 10-13. File type configuration on Windows
For Unix, download the tarball named zopeedit-0.7-src.tar.gz.
You’ll need to then
unpack and run the setup as detailed in the Unix installation instructions at
300
http://zope.org/Members/Caseman/ExternalEditor/install-unix. The following is an example
with version 0.7:
$ tar -zxf zopeedit-0.7.1-src.tgz
$ cd zopeedit-0.7.1-src
$ python setup.py install
...
After you’ve installed the client, you’ll need to configure each browser you want to use. Instructions for Konqueror, Galeon, and other browsers are available online at Zope.org. The
following are the step-by-step configuration instructions for Mozilla:
Zope Editor application/x-zope-edit External Editor opens an editor based on the contents
of a configuration file. To have an editor of your choice invoked, alter that file. You can find it
under different names in the following places, depending on your setup:
• On Windows, if you installed Plone using an installer, you can find this file at
c:Program FilesPloneZopepwizopeedit.ini.
• On Windows, if you used the stand-alone External Editor installer, you can
find this file in the directory you installed External Editor to; by default this is
c:Program FilesZopeExternalEditorzopeedit.ini.
• On Unix, this file will be called .zope-external-edit and located in the home
directory of the user running the program, for example, /home/andy/.zopeexternal-edit. It’s in the home directory of the user because each user may
have different settings.
This file contains a mapping of extensions and the editor invoked; to change the editor for
page templates, for example, find the following lines that have meta-type:Page-Template:
[meta-type:Page Template]
extension=.pt
For example, you can use Scite, a free text editor. To use this editor for page templates, you’d
have to change the file to read as follows:
[meta-type:Page Template]
extension=.pt
editor=scite
For External Editor to work, each invocation of the editor must open a separate process. This
means that the External Editor client program can monitor that process to see when it’s finished. This causes problems for some editors that try to open multiple files in the same process.
For example, to load VIM in KDE, you must run a separate shell as follows:
editor=konsole -e vim
301
10.1.4.5.3 Editing a Word Document
Editing a Microsoft Word document is actually really easy to set up; all you need is Microsoft
Word installed on your local computer. Upload your Microsoft Word document to Plone as
a standard file and then view the file in Plone. Click the little pencil icon in the top-right
corner of your page. Microsoft Word will open on your computer, and the document from the
server will display. You can now edit the content as much as you want, and clicking Save will
automatically save the file into Plone.
10.1.4.5.4 Editing Page Templates Through External Editor
To create a page template, use the ZMI. Sure enough, when viewing the folder containing the
page template, you’ll see an extra pencil icon to the right of the object. Clicking the pencil
will activate External Editor and open the page template in the editor you’ve selected. All you
need to do is find a good editor for editing the page templates. Since page templates are just
Extensible HTML (XHTML), I use a simple editor that supports Extensible Markup Language
(XML). The following sections discuss two example editors: Dreamweaver and HTML-Kit.
10.1.4.5.5 Dreamweaver MX
Change the [meta-type:Page Template] part of the configuration file to point to Dreamweaver.
For example, in my installation this is as follows:
[meta-type:Page Template]
extension=.pt
editor=C:\Program Files\Macromedia\Dreamweaver MX\Dreamweaver.exe
Clicking the pencil icon to edit in External Editor now opens it directly in Dreamweaver, as
shown in Figure 10-14. Unfortunately, Dreamweaver will not open in each file in a separate
instance, which means you can edit only one file at a time.
302
Figure 10-14. Editing page templates in Dreamweaver
10.1.4.5.6 HTML-Kit
HTML-Kit is a free and powerful HTML editor and is the favorite of many Plone developers.
To use HTML-Kit with External Editor, alter your configuration file to point to HTML-Kit. For
example, in my installation this is as follows:
[meta-type:Page Template]
extension=.pt
editor=C:\Program Files\Chami\HTML-Kit\Bin\HTMLKit.exe
Clicking the pencil icon to edit in External Editor now opens it directly in HTML-Kit. You can
also edit a setting to open each file in a separate process; select Edit - Preferences - Startup,
and check Limit to a single HTML-Kit instance. Each file will now open a new process.
11 Chapter 11
11.1 Manipulating and Categorizing Content Types
Throughout the book I’ve shown you how to add content to your site, and I’ve discussed the
content types that come with Plone, such as documents, images, and so on. So far, however,
you’ve been restricted to just these content types and the ones provided as products that you
can find on the Internet. But the most powerful part of Plone is the core topic of this chapter:
manipulating these content types.
In this chapter, I compare and contrast the different object types in Plone. This provides some
insight into development tactics for your own projects. Then I cover the content types and
how they’re registered inside Plone. This registration provides the basis for customizing the
types into the format you’d like. Then I move onto content categorization and searching - tasks
you’ll want to know how to perform. Armed with this knowledge, you’ll be able to make key
decisions about how to develop your site and create new content types.
So, I’ll now whet your appetite about manipulating content types. Once you can customize an
entirely new content type, you can have users adding and editing almost anything you want!
Some of the examples include the following:
• Users can upload an image of a cell culture that’s dissected and manipulated
using imaging libraries and is then presented to the user in a certain format.
• Users can upload an MP3 audio file, extract the title and artist from the audio
file, and place it inside Plone.
• You can build an entire e-commerce store, letting Plone users add items such
as clothes for sale, including information such as shipping costs, dimensions,
and warranty.
• Users can upload a Microsoft Word document and then manipulate it so that
certain parts of it are blanked out. Users with a low security setting can see
only those documents with blanked-out parts.
All these options and more are available to you in Plone! You really have few limits. This is
why Plone is probably one of the most extensible and flexible frameworks available. The only
real limit is your ability to program Python (or being able to afford someone to do it for you).
In this chapter, I thus cover content types in detail, including how to register and manipulate
them through the Web. Although the following parts don’t specifically require knowledge of
303
304
Python, I recommend you at least become acquainted with it. I also include in this chapter
information about the forms and how to validate them.
This chapter is required reading for anyone who wants to develop their own content types, no
matter if they do it through the Web or in Python, because the chapter covers the areas needed
to understand content type registration.
The next chapter will continue this journey—I’ll take you into the really gory details of using
Python to write content types. After that you’ll use Archetypes to do the same thing with a
tenth of the effort and then do some really cool and advanced stuff with Archetypes. But right
now, you’ll get straight into content types, from the top!
11.1.1 An Overview of Content Types
To begin with, I’ve been using certain terms throughout this book. The explanations I’ve given
have been a little superficial, and it’s time for me to expand on these to improve your understanding of them. The following are important concepts:
Content type: This is a type of content registered in a Plone site. Usually, but
not always, a content type is something that can be added and edited through the
Plone interface by users of the given security. In Plone it’s recommended to separate
content types such as documents, files, and images. This separation of content into
different types is a basic Plone concept.
Item and object: These terms refer to the actual instance of something, and they’re
overloaded terms, so their definitions normally depend upon their context. So far
in this book, I’ve used these terms to refer to a particular instance of a content type,
such as one particular document or image. From now on, I’ll use the specific term,
content type, to refer to actual content types.
Tool: A tool is a service that sits inside a Plone site. There will be only one instance
of each tool in a Plone site. In itself, the tool doesn’t do anything, and external users
of the application will never know how many tools exist or what they do. However,
content types or requests that the users make will interact with the tools. You’ve
already seen some key tools—*portal_workflow*, portal_skins, and portal_actions,
for example.
Zope object: This is an object that lives inside Zope. It can be accessed through the
Zope Management Interface (ZMI) and provides functionality for users. However,
it isn’t something that’s accessed or controlled by Plone. If you go to a Plone site
and access the ZMI, you’ll see a large number of these objects in the ZMI. Tools are
one such object, the Plone site is another, and the cache managers are another. A
great deal of overlap exists between these objects; for example, Plone has an image
content type, and Zope has an image object. The two do similar tasks and work in
a similar way, but only one can be accessed through Plone.
NOTE Although everything inside a Plone site in the Zope Object Database (ZODB) is a Zope
object, I use this term to describe objects that aren’t tools or instances of a content type.
305
11.1.1.1 When to Make Content Types
So, you’re building your killer application in Plone that’s going to bring you fame and fortune.
How do you structure it, and what do you build? Well, this depends upon what you’re building,
and you’ve factored out development so far. The following questions may help you decide:
Are you just changing skins and simple behaviors, such as portlets? You can
do almost anything you want, except write a tool or a content type in a skin. You
can change all the Cascading Style Sheets (CSS), templates, and scripts that come
with a Plone site if you really wanted to do so.
Will members of your site add multiple copies of this item? If yes, then you
probably want to write a content type.
Is this a service that other content types could use? If yes, then you probably
want to write a tool.
Will you want multiple copies of something but don’t want members of your
site to be able to add and edit it? If yes, then you probably want a Zope object.
However, you may want to rethink exactly what you’re doing.
What usually happens is that an application is broken down into several bits: one or two tools
and one or two content types. Chapter 12 covers writing a content type that takes source code,
such as a snippet of Python, and then syntax highlights the code. If you needed that syntax
highlighting in other places, then you could turn it into a tool that multiple content types could
use. In short, tools are the best way to add functionality to a site rather than to any particular
content type.
The definition for creating a content type is usually dictated by the requirement that users need
to add, edit, and control these objects. It can be tempting to start creating a content type for
every type of object, but as with all development, you need to be careful. Would it possible to
use one content type instead of two, with only minor differences? Knowing how to configure
this will come from experience, but the next few chapters will certainly help.
11.1.1.2 Content Type Configuration
So, your Plone site contains content types, but how does the Plone site know how they’re
configured? The answer is that for each content type, its attributes, methods, security, and
skins are all defined on the file system in Python and associated code. This information is
enough for Plone to understand how to use the product. The only exception to this, as you’ve
seen, is workflow, which is normally defined externally from the content type. Some products
have their own workflow that’s added to the content type for its behavior.
Chapter 10 showed you how content types are installed in Plone through a two step-process:
First, the product is installed in Zope. Second, the content type is installed in each Plone
instance. The second step installs information about the content type, which is taken from the
file system and then installed into your Plone site.
Why is this a two-stage process? In the second stage, a local copy of the product in your Plone
site is made, and now you can change how the content behaves for you. Want a document
306
object to have different tabs at the top? Want a document object to be manipulated differently,
look differently, and even be called something completely different? No problem—you can
now change your instance of Plone through the Web.
This approach is the same as it is for portal_skins, where you can customize a skin in your
local instance. When changes occur in the product and you install a new version of Plone,
those changes will affect the file system. But you can now download and install those changes;
because you’ve customized it in your database, you’ll keep the customized version.
Each content type in Plone will have a setting in the portal_types tool. Although each content
type in the portal_types tool has only one setting, that type can have an unlimited number of
actual objects in your database. The configuration is looked up when needed, so if you change
the configuration, you’ll update all the objects of that type in the database.
11.1.1.3 Content Type Registration in the portal_types Tool
To access the registration information, go to the portal_types tool in the ZMI. You’ll be presented
with a list of all the content types registered in this Plone site. Most of these content types are
recognizable as something you’d add through the Plone interface with a few exceptions, such
as Plone Site, TempFolder, and so on.
Each of these objects is an instance of factory type information, which is the name for a particular type of configuration. Click any of these objects to access the type’s information; for
example, when you click an event, you get the local copy of the information about the content
type. You can alter this through the Web to change your configuration. The following are the
values in that form:
• Title: This is a title for the content type.
• Description: This is the description that appears for this content type. This
is used if you go to folder contents and click add without selecting a content
type to add—a list of all the content types and their descriptions will appear.
• Icon: This is the ID of the icon that’s used for this content type.
• Product metatype: This is the metatype for this content type. This matches
up the Plone content type with a Zope metatype.
• Product name: This is the product name where this metatype is defined.
• Product factory method: This is the method that’s called by the product
factory to create this piece of content.
• Initial view name: This isn’t used in Plone.
• Implicitly addable: This indicates whether this content can be added to
Plone. If this is selected, then it’ll be addable, unless explicitly specified otherwise.
• Filter content types: If this content type is a folder, then enable this to filter
the content types that can be added by users to this object.
• Allowed content types: If this content type can contain other items and Filter
content types is enabled, only the types of content specified in this list will be
allowed.
307
• Allow discussion: This sets the default status for discussions for all types
of content. If this is enabled, then users will be able to discuss the content.
Which users will be able to do this is based on the permission Discuss content.
You’ll now look at some of the aspects of this registration information in a bit more detail,
including some examples.
11.1.1.3.1 How Do You Change the Icon for a Content Type?
As an example, if you don’t like the icon that appears for a content type, then it’s a pretty
simple matter of uploading a new image and then making sure that the value for the icon is
set in the form described previously. Icons work best if they have a transparent background
and are 16 pixels wide and 16 pixels high.
Click portal_skins, click custom,* and add a new image. Then in the *portal_types tool, set the
value for the icon to be the same as the ID of the object uploaded. To test that the icon has
changed, go to the Plone interface and look for where the object may appear; for example, do
a search or look in the content add form.
11.1.1.3.2 Actions
When you’re looking at the content type configuration in portal_types, you’ll see an Actions
tab. These are the actions that can be performed on the content type. You briefly looked at
actions in Chapter 4, which contains a detailed list of what the Actions tab contains.
action As you’ve seen, actions are stored on tool objects. Many of the tools contain actions, but
you really don’t have a great way to search for the location of an action. If you want to change
a particular action on your Plone site, you have to find the tool that stores it.
Once you’ve found that action, you can then customize as much as you’d like. For instance,
if you want to add a new action as a green tab for a document, you have to go and find the
correct place. Luckily, the following tips help you find an action:
• If you’re looking at an action on a piece of content such as view or edit, then
it’s on the particular content type in the portal_types tool.
• If you’re looking at an action for the site, then it’s in the portal_action tool.
• If you can’t find it so far, look in a related tool; for example, joining and
logging in are in portal_membership.
• If you can’t find the action you’re looking for after trying the previous tips,
go to portal_actions to see the list of tools and look through all the action
providers.
Plone looks up the actions for content types in the following manner:
• For an object, all the actions are queried.
• For each action, the conditions, permissions, and visible properties are checked;
if they pass, then the action will be returned.
308
• Each action will be shown in the user interface, usually in the form of tabs at
the top of the content or the top of site.
• The URL for this action is the URL of the object with the actual Action appended to the end.
For example, on a document at http://localhost.com/Plone/Document123, the URL for an edit
would be http://localhost.com/Plone/Document123/document_edit_form.You should notice an
important security issue here—the values for the conditions, permissions, and visible properties
relate to showing the action in the list of actions. This means if users really wanted, they could
alter the URL and go to http://localhost.com/Plone/Document123/document_edit_form even if
the action permissions didn’t allow this. For this reason, you should always have permissions
on the actual actions that will be performed. If you were a user who could view an object but
couldn’t edit it, you could still alter the URL to get to the document edit form. No real harm
has been done yet, because once you submitted it, the security would be rechecked and you’d
be denied permission.
Normally actions are used as tabs in Plone, but since they can be called programmatically, they
could be used in any way. To call an action programmatically, you call the listFilteredActionsFor
method of the portal_actions tool. Given an object, this will return to you a Python dictionary
keyed on category for all the actions for an object:
actions = context.portal_actions.listFilteredActionsFor(object)
This gives you the following:
{’site_actions’: [
{’category’: ’site_actions’, ’name’: ’Small Text’,
’url’: "javascript:setActiveStyleSheet(’Small Text’, 1);",
’visible’: 1, ’id’: ’small_text’,
’permissions’: (’View’,)
},
... and so on
The green tabs at the top are a combination of two categories: object and object_tabs. The
actions returned from the method are a Python dictionary whose keys are the groupings of the
category for that action. So, to get just the actions object for one category—for example, all
actions in the object category—you could just access that key of the dictionary. For example,
actions[“object”] will give you a list of all these actions:
{’category’: ’object’,
’name’: ’Contents’,
’url’: ’ http://localhost:8080/Plone/folder_contents’,
’visible’: 1,
’id’: ’folderContents’,
’permissions’: (’List folder contents’,)},
... and so on
309
You’ll note that as long as you provide the object you’re examining, it goes to the portal_types
tool and finds all the actions for your particular portal_type, as well as any other actions that
may be relevant.
If you wanted to add a new tab for a content type, all you need to do is go to portal_types,
click the content type, and select the Actions tab. Then add your action. If the action were to
appear as a green tab for the content type, then you’d have to ensure you made the category
object_tabs.
11.1.1.3.3 Other Objects in the portal_types Tool
Looking at the portal_types tool, you’ll probably notice you can add other object types to the
folder such as DTML Method, External Method, Script (Python), and Scriptable Type Information. The first three of these options are present to provide support for the last option in the
list, Scriptable Type Information.
Scriptable Type Information lets you define a type but create your own constructor permissions
and construction script through the Web, instead of having them defined for you. If the default
permission for a content type isn’t sufficient, this may be an option. Although it’s a usefulsounding option, I’ve never seen a good use for Scriptable Type Information over the standard
factory-based type information, so don’t worry about it.
11.1.1.4 Storing Content Type Information on the File System
You’ve now seen how this information is stored in Zope, but it does of course come from somewhere on the file system. This information is normally stored on the product in a dictionary,
usually called factory-based type information. Listing 11-1 shows the factory information about
Folder, which is a product that shows folders in Plone. This was taken from PloneFolder.py file
located in the CMFPlone directory.
Listing 11-1. Factory-Based Type Information
factory_type_information = {
’id’:’Folder’,
’meta_type’:’Plone Folder’,
’description’:"""\
Plone folders can define custom ’view’ actions,\
or will behave like directory listings without one defined.""",
’icon’:’folder_icon.gif’,
’product’:’CMFPlone’,
’factory’:’addPloneFolder’,
’filter_content_types’:0,
’immediate_view’:’folder_listing’,
’actions’:
( {
’id’:’view’,
’name’:’View’,
’action’:’string:${folder_url}/’,
’permissions’:
(CMFCorePermissions.View,),
’category’:’folder’,
}
...
)
}
310
The Python dictionary closely maps the forms you saw in the Plone interface; for example,
’meta_type’: ’Plone Folder’ is the product’s meta_type and will appear in that field. The actions
appear as a list of dictionaries for each action, and it’s again straightforward with key/value
pairings for all the properties of an action. I just showed the first action here, View, but by now
this information should be familiar to you.
11.1.1.5 Creating a New Content Type from an Existing Type
Repurposing is taking the information for an existing content type and creating multiple,
slightly different copies of the same type. If you wanted to make a type that was almost
the same as a news item, but not quite, then repurposing may be a quick and simple option.
The one big drawback of this approach is that you can’t really change much beyond the actions,
the skins, and some of content type settings. So before you proceed down this path, please be
aware that you’re limited to these points; you can’t add new fields or attributes, for example.
I’ve seen many e-mails on the mailing list saying, ’I’ve done this much, but now I want to
change the attributes of my press release.” So consider this a warning: You can’t! If you want
to do more, check out writing content types in the next two chapters.
Say you wanted to make a press release type that’s like a news item but it does the following:
• It has the name Press Release in the drop-down list.
• It has a different icon.
• It has a different workflow from a news item.
• It has a different view.
• It keeps the same data structure as a news item.
• It retains the news item type.
Well, in this case, repurposing a content type is ideal. For this example, take the factory-based
type information for a news item, load it into the portal_types tool, and then call it a press
release. This will allow you to reuse all the existing code and information while giving you
new options. In the ZMI, access portal_types and complete the following steps:
Factory-based Type Information Press Release, Use default type information This is now an
instance of the configuration for a news item, but it’s called Press Release. What advantage
does this give you? Well, you now have another type of object that can be added through the
Web by a user. This gives the users of your site a really easy way to distinguish between a
news item and a press release, without mucking around with keywords or metadata. It will
also show up in searches and all other places as a press release. You can now change the
configuration for the press release, and this will leave the configuration for the news item
intact.
Changing the icon was discussed earlier in this chapter—simply upload the image into your
custom directory and then alter the Icon property in the portal_types page for a press release.
If you go to portal_workflow, you can see that each content type has its own workflow. Because
this is now a new content type, you can change the workflow for press releases only. Perhaps
press releases require an extra stage of review or, when published, send e-mails to certain
311
users. You can now make a new workflow, as I described in Chapter 8, and assign it to your
press release.
Adding a new view means customizing the newsitem_view page template and renaming it to
something meaningful such as pressrelease_view. You may want to alter that file to add some
information about the company at the bottom of the page. For example:
<h2>About ACME Widget Company</h2>
<p>Our company is the prime maker of widgets in the world. Founded
in 1980 we’ve been providing excellent widgets to all parts of the
globe. For more marketing information, please contact: Joe Bloggs,
marketing director.</p>
After you’ve saved your changes to your new page template, return to the settings for the
press release in portal_types and go to the Actions page. Change the action for viewing a press
release from pointing to newsitem_view to pointing to pressrelease_view. Now whenever you
view a press release, that view page will display, as shown in Figure 11-1.
Figure 11-1. An example Python script uploaded into Plone
312
In this case I’ve added a Press Release object, and the footer about ACME Company is in the
template, so users don’t need to remember to type this in every time.
11.1.1.6 Creating a Scripting Object
Once an object is registered in the portal_types tool, you can then create the object in your
Plone site. You can also script the creation of the object programmatically. This is useful for
making objects based on certain other factors or creating objects en masse. Plone has two
useful Script (Python) objects for this:
generateUniqueId: This creates a new unique ID for the type of object, for example, Folder.2003-12-19.7359814582. It’s unique only to the folder it’s created in; if
you create a lot of objects quickly, then it’s possible that they couldn’t be unique.
For most normal usage, this is good enough.
invokeFactory: This takes an ID and a type name. This will create an object of the
type given and give it the ID specified.
You’ll make an example script that creates a folder and a default page in that folder, and
into that default page you’ll put some specific content. If this sounds familiar, this is what
happens when you join a site and a home folder is created for you. The type names match
the registration inside the portal_types tool, so if you wanted to create a folder and inside that
create a document, you’d need to pass the parameters Folder and Document to the invokeFactory
script.
Listing 11-2 shows a script that gets a unique ID and that creates a folder based on that ID. It
will then step inside the folder and create a new document.
Listing 11-2. Getting an ID and Creating a Folder
##title=Create
##parameters=
# create with a random id
newId = context.generateUniqueId(’Folder’)
# create a object of type Folder
context.invokeFactory(id=newId, type_name=’Folder’)
newFolder = getattr(context, newId)
# create a new Document type
newFolder.invokeFactory(id=’index.html’, type_name=’Document’)
# get the new page
newPage = getattr(newFolder, ’index.html’)
newPage.edit(’html’, ’<p>This is the default page.</p>’)
# return something back to the calling script
return "Done"
313
If you add this as a Script (Python) object and test it by using the Test tab, you’ll get a folder
made for you. One interesting thing to note is that this creates the folder and document in the
current context, wherever the context object may be.
11.1.1.7 Content Type Registry
I’ve shown you a variety of ways to access Plone, including File Transfer Protocol (FTP) and
WebDAV. When Plone receives a piece of content from one of these sources, it has to deal
with the content in an appropriate manner. This negotiation is performed by the content
type registry, which is visible in the ZMI as the content_type_registry tool. If you visit the
content_type_registry tool in Zope, you’ll probably be dazzled by yet another badly designed
form in the ZMI. . . but don’t let that put you off!
When a piece of content is added to Plone via FTP or WebDAV, the rules in the registry are
executed from the top to the bottom, until a match is made. The match is based on the criteria
in that rule, and when met, the appropriate content type for that rule is created. The following
are the four different types of criteria:
major_minor: This takes the two parts (either side of the forward slash) of
the Multipurpose Internet Mail Extensions (MIME) type of the incoming file and
matches against them. If you leave either part blank, then it will match everything.
For example, a major_minor of image * (that’s one empty space on the end) matches
*image/jpeg, image/gif, image/png, and so on.
extension: This matches the filename extension; each extension is separated by a
space. So, for example, doc pdf matches invoices.doc and report.pdf.
mimetype_regex: This performs a regular expression match on the MIME type.
For example, _*,^j* matches image/jpeg, image/jpg, application/java, and so on.
name_regex: This performs a regular expression match on the filename. For example, ^Invoice will match Invoice-123.pdf but not Not_an_Invoice-123.pdf.
To add a type, in the form at the bottom of the page, enter the name of the rule and the type
from the drop-down and click Add. This will create a rule at the bottom of the page and allow
you to enter a pattern that matches the type of rule you created and select the content type
you want to create from the drop-down list. You can then click Up and Down to move your
item up and down, respectively, to increase its importance.
As an example, I recently bought a digital camera. Because the Plone Windows installer has
CMFPhoto and PIL all set up, it seemed a way to dump my pictures into an online photo album
with minimum ease. First, I enabled the FTP server, and then I went to content type registry
and made a new rule, based on extension that maps image/jpeg to the photo content type.
I then moved the rule up above the existing rule for images. Then all I had to do was drag
and drop the photographs into my FTP client, and they were automatically loaded into Plone,
thumbnailed, and displayed.
314
11.1.2 Searching and Categorizing Content
You’ve seen how you can search for content in Plone, but I’ll now go into detail and show how
the underlying categorization and searching of content occurs. The main tool that stores all this
information is a tool called the portal_catalog, which is a slightly different and extended version
of the underlying ZCatalog tool. You’ll find an excellent online reference to the ZCatalog at
http://zope.org/Documentation/Books/ZopeBook/2_6Edition/SearchingZCatalog.stx.
The catalog provides three key elements to a Plone site: It creates indexes of content, it holds
metadata about the content in the index, and it provides a search interface to quickly examine
the content of your Plone site. Of all the different objects present in your Zope site, only the
actual instances of your content types are cataloged. Zope objects, tools, and other objects
aren’t placed in the catalog. For this reason, the catalog tool is closely tied to the content types
and their usage. You can access the catalog by accessing the portal_catalog tool in the ZMI.
11.1.2.1 Indexing Content
The first part of the catalog’s job is to build indexes of the content. An index primarily provides
a method for quickly and efficiently searching the content. For this reason, the content of
the index isn’t designed to be clear or make sense; it’s designed rather for fast and efficient
searching. When you search in a Plone site, you search the indexes, and the catalog will return
matching result sets for that query.
An index queries a Plone object for a particular value, a method, or an attribute, and then
it indexes whatever that object returns for that query. How it actually indexes the content
depends upon the type of the index. Table 11-1 lists all the indexes that come with Plone.
Table 11-1. Available Index Types
Name
Description
DateIndex
This is designed to index dates, and it lets you do searches based on
dates and times.
This is a more efficient implementation of DateIndex for cases where you
have two dates, such as start and end dates and doing lots of searches
in those dates.
This treats every result automatically and allows you to search on whatever the index may contain. It matches any search that matches the
index.
This takes a sequence of keywords and splits them into separate words.
This will return a result if any of the keywords in the index match the
given query. This is ideal for searching subjects or keywords on objects.
This indexes the path of an object, such as /Members/jane/myDocument,
as a list of the objects. This allows you to query the catalog for all the
contents of Members without having to ask the folder. A Path index will
return everything below the Members folder.
This is an old text index that takes text, splits it up, and indexes that.
See ZCTextIndex.
DateIndexRange
FieldIndex
KeywordIndex
PathIndex
TextIndex
315
Name
Description
TopicIndex
This builds up predefined result sets at cataloging time. This is useful
for often-repeated queries.
This is a new index that provides full-text searching capabilities efficiently on pieces of text. It supports a large number of features, discussed in detail later.
ZCTextIndex
You can see what indexes are defined in a catalog by clicking portal_catalog and selecting the
Indexes tab. This will give you a list of all the indexes defined in your Plone site. The columns
are the name of the index, the type, the number of hits, and when the index was last modified.
The types of indexes were briefly covered previously, but Table 11-2 describes what all the
default indexes are in a Plone site.
Table 11-2. Default Indexes That Are Set Up in Plone
Name
Type
Creator
FieldIndex
Description
This is the username of the person who created the
object.
Date
FieldIndex
This is the effective date; if not present, it’s the last
modified date.
Description
TextIndex
The description field.
SearchableText
ZCTextIndex
The description, title, and body of the object as one
searchable lump of text.
Subject
KeywordIndex The keywords for an item.
Title
TextIndex
Item’s title.
Type
FieldIndex
The portal type as defined in the portal_types tool.
allowedRolesAndUsers KeywordIndex Who can view this content; this is an efficient way to
examine this so you can filter the search results.
created
FieldIndex
When the item was created.
effective
FieldIndex
When the item will become effective.
end
FieldIndex
For events only, when the event will end.
expires
FieldIndex
When the item will expire and no longer be viewable.
getId
FieldIndex
The ID for an item.
id
FieldIndex
Same as getId
in_reply_to
FieldIndex
For discussions, gives the item to which this comment
is responding.
meta_type
FieldIndex
The underlying metatype of the item.
modified
FieldIndex
When the item was last modified.
path
PathIndex
The path to the item.
portal_type
FieldIndex
Same as Type
review_state
FieldIndex
The state of the object in workflow.
start
FieldIndex
For events only, when the event will start.
316
If you’re ever unsure of the contents of an index, then you can see the contents of the indexes
in the ZMI. Click portal_catalog and select Catalog, and this will list every object cataloged at
this time. Click an object, and a window will pop up with the contents of the index and the
metadata. The metadata comes first so scroll down to see the indexes.
To add, remove, or alter the indexes, return to the Indexes tab. Use the usual Add drop-down
box to add a new index or remove an index. If you want to run a reindex of a particular index,
then select the indexes in the left and click the reindex button. If you add an index to the
catalog, it isn’t populated, meaning you then need to click the reindex button to ensure that
there’s some content in your index.
NOTE If you have a large site, this indexing can be quite time and processor consuming, so
you may want to avoid doing this during peak load times.
11.1.2.2 Metadata
When the catalog returns a result, it doesn’t return to you the object; instead, it returns the
metadata stored in the catalog. This metadata is a series of fields or columns for each value
on the object. Likewise, a set list of columns for a Plone site are created, as described in Table
11-3.
Table 11-3. Default Metadata That’s Set Up in Plone
Name
Description
CreationDate
Creator
Date
Description
EffectiveDate
ExpiresDate
ModificationDate
Subject
Title
Type
created
effective
end
expires
getIcon
getId
getRemoteUrl
id
location
meta_type
modified
The date when the object was created.
The username of the person creating the object.
This is the effective date; if not present, it’s the last modified date.
The description field.
The effective date.
The expires date.
The modification date.
The keywords on an object.
The object’s title.
The object’s portal_type.
Same as CreationDate.
Same as EffectiveDate.
For events only, when the event will end.
When the object will expire.
The objects icon.
The object’s ID.
Only used for links; this is the URL pointed to by the link.
Same as getId.
For events only, where the event will take place.
The object’s meta_type.
When the object was modified.
317
Name
Description
portal_type
review_state
start
The object’s portal_type.
The state of the object in workflow.
For events only, when the event will start.
11.1.2.3 How an Object Is Indexed
Content types are indexed automatically because they inherit from a class called PortalContent,
which inherits from a class called CMFCatalogAware. The CMFCatalogAware class handles all
the code to ensure that when you add, edit, cut, copy, delete, or rename an object, the catalog
(and also workflow) are kept up-to-date. Essentially the object is passed to the catalog, and
the appropriate instruction for the catalog is called (index, remove from index, and so on).
The catalog then runs through each index and for each index queries the object by looking for
attributes or methods on the object. For most indexes, the attribute or method looked up is the
same name as the index. For the index name Title, it would look for an attribute or method
named Title and populate the index with the result. It then repeats the process with each of
the metadata columns.
Two exceptions to this process are the FieldIndex and TopicIndex types. When you add a FieldIndex, you can specify that the index examines a different value than the name of the index. For
example, you could make an index with the ID getVersion, which looks at the value of version.
As you’ll see later, some indexes have advantages over others, so it can be useful to have two
different indexes pointing to the same value.
TopicIndex is a different type of index in that it builds up a series of sets at the time the content
is indexed. If you wanted to do a lot of searches for all images, then you could add a search
for o.portal_type == ’Image’. To do this, you need to create a TopicIndex and then click the
index from the Indexes tab; you can even add multiple expressions to build up an index. At
this time, TopicIndex indexes aren’t used anywhere in Plone.
11.1.2.3.1 How Do You Reindex All the Content on Your Plone Site?
If you’ve made a large number of code-level changes, put in a new product, renamed or moved
your root Plone object, then you may need to reindex all the content on your site. In the ZMI,
click portal_catalog, click Advanced, and click Update Catalog. This will run the process of
updating your catalog.
CAUTION This is an even more intensive task than reindexing just one index, and it can take
a long time and use a lot of memory and processing power if you have a large database.
11.1.2.3.1.1 Relational Databases vs. Plone
The development of content types in Plone is slightly different from developing using a relational database. A common development paradigm these days is LAMP—a combination of
Linux, Apache, MySQL, and PHP or Perl. In this paradigm, data is stored in a table in the
318
database, and a scripting language provides the application layer to pull the content out of the
database and put it into templates. You search the content by sending queries to the database
in SQL, using SELECT statements.
Plone does this differently with the use of an object database. Any content item can contain
any attributes of any type, and the underlying object database takes care of persisting those
attributes in the database. For searching, all the objects are then indexed in the portal_catalog
tool. You have to specifically tell the catalog exactly what attributes you’d like to index. Instead
of doing SQL calls, you’d instead use the catalog to examine the indexes.
This difference can be confusing in the development stage, especially since relationships between objects aren’t created and maintained as they would be in a relational database application. Instead, there are two common ways to maintain a reference: using a catalog to
maintain the relationship through keywords or other values or using a folder to group content.
Archetypes, which I’ll discuss in Chapter 13, allows you maintain relationships easily. It does
so through the catalog.
11.1.2.4 Searching the Catalog
Of course, the biggest question is how to search the catalog and use the results. The first of
these tasks depends upon the indexes, so I cover each of the indexes and show how to search
them. The second of these tasks involves manipulating the results, so I then show you how to
do this.
All of the following examples are in Python because this is the best way to search a catalog. I
also show a quick example of how to hook this into a page template. I fully recommend using
Python for manipulating the catalog because it really is the best place to do things, allowing
you the best flexibility without having to worry about the syntax.
In general, you achieve searching by calling the method searchResults on the portal_catalog
object and passing through a series of keyword parameters. A couple of reserved keywords
exist, but the rest are mapped directly to the indexes of the same name. So if you wanted to
search the SearchableText index, you’d pass through to the search method a keyword parameter
for SearchableText. The reserved keywords are as follows:
• sort_on: This is the index to sort the results on, assuming that the index
allows sorting (full-text indexes don’t allow sorting).
• sort_order: This is reverse or descending; if not specified, the default is ascending.
• sort_limit: This is an optimization hint to make sorting a little quicker.
So, a general search for all items that mention Plone and are published in Date order looks
something like this:
context.portal_catalog.searchResults(
review_state = "published",
SearchableText = "Plone",
sort_order="Date"
)
319
The search will return the intersection of the index results, so this will find all items that
mention Plone and are published. You can’t do searches that are the union of results; however,
you could do multiple results and then add the results together, but this is a rather unusual
case, though.
TIP If you do a search with no values, then the entire contents of the catalog are returned. By
default, all searches add values for effective and end dates, ensuring that you see content only
between these times, unless the user calling the search has the Access inactive portal content
permission.
11.1.2.4.1 Searching a Field or Date Index
To search a FieldIndex, pass through the value of the field. Any hits that match will be returned;
for example, to search for all the image’s in a site, use the following:
results = context.portal_catalog.searchResults(
Type = "Image"
)
A field index can take a range of objects as well, and the index will attempt to find all the
values in-between by performing a comparison of the values. This range could be between
two dates, two numbers, or two strings—it really depends upon the value of FieldIndex. You
do this by passing a dictionary to the index, rather than just a string. The dictionary should
contain two values: a list called query, which contains the values to be tested, and a range,
which defines a range of the values. The range is a string of one of the following:
• min: Anything larger than the smallest item
• max: Anything smaller than the largest item
• minmax: Anything smaller than the largest and bigger than the smallest
For example, to find all events that have a start time bigger than now (in other words, anything
in the future), use the following:
from DateTime import DateTime
now = DateTime()
results = context.portal_catalog.searchResults(
Type = "Event"
end = { "query": [now,],
"range": "min" }
)
To search on a range, such as all news items in December, you’d need to calculate the start and
end dates for the month. From those dates, you can then construct the following query:
from DateTime import DateTime
start = DateTime(’2004/12/01’)
320
end = DateTime(’2004/12/31’)
results = context.portal_catalog.searchResults(
Type = "News Item",
created = { "query": [start, end],
"range": "minmax" }
)
Date indexes work in the same manner as field indexes, and often you’ll see dates placed inside
field indexes, which works just fine.
11.1.2.4.2 Searching a KeywordIndex
By default, a KeywordIndex returns all the values that match in the keyword index. Subject is
the only KeywordIndex; this is the keyword that a user has assigned to an object through the
Properties tab of the Plone interface. To search for all items with the keyword Africa, use this:
results = context.portal_catalog.searchResults(
Subject = "Africa"
)
Similar to a FieldIndex, a KeywordIndex can be passed a more complicated query, with several
objects and an and/or operator (or is the default). This would allow you to find all objects that
have almost any combination of keywords. To find all objects that have the subject Africa and
sun, use the following:
results = context.portal_catalog.searchResults(
Subject = { "query": ["Africa", "sun"],
"operator": "and" }
)
11.1.2.4.3 Searching a PathIndex
A path index allows you to search for all objects in a certain path. It will return every object
below a current location, so if you ask for all objects in Members, it’ll return everything in
everybody’s home directories. For example, for all objects that have Members in their path, use
this:
results = context.portal_catalog.searchResults(
path = "/Plone/Members"
)
If you want to further restrict this, you can do so by passing through a level parameter that
sets where you expect the value to be. The level is a number representing its position in
the path, from the left when splitting it up by forward slashes. For example, in the previous
code, Plone is level 0, Members is level 1, and so on. Similarly to KeywordIndex, you can pass
through an and/or operator. To get all objects in the /Plone/Members/danae folder and the
/Plone/testing/danae folder, use the following:
321
results = context.portal_catalog.searchResults(
path = { "query": ["danae"],
"level" : 2 }
)
11.1.2.4.4 Searching a ZCText Index
ZCTextIndex is the most complicated of all indexes and takes a whole host of options. Each
ZCTextIndex requires a lexicon; fortunately, Plone creates and configures all this out of the box.
If you click portal_catalog, select the Contents tab, and click plone_lexicon, you can see the
default configuration of the lexicon. Clicking the Query tab will show you all the words that
are in the lexicon built out of your Plone site content.
The ZCTextIndex is searched using the format I described in Chapter 3. It takes similar terms
to the searching that you can use on Google or other search engines. At its most basic, you can
search for any term (note that this is case insensitive), like so:
results = context.portal_catalog.searchResults(
SearchableText = "space"
)
But you can also search for all of the following:
• Globbing: Use an asterisk to signify any letters. For example, tues*
matches tuesday and tuesdays. You can’t use the asterisk at the beginning of a word, though.
• Single wildcards: Use a question mark to signify one letter. For
example, ro?e matches rope, rote, role, and so on. You can’t use the
question mark at the beginning of a word.
• And: Using and signifies that both terms on other side of it must
exist. For example, rome and tuesday will return only a result with
both those words are in the content.
• Or: Using or signifies that either terms can exist. For example, rome
or tuesday will return a result if either of those words are in the
content.
• Not: Using not returns results where this isn’t present (a prefix and is
required). For example, welcome and not page would return matches
for pages that contained welcome, but not page.
• Phrases: You can group phrases with double quotes (“) and signify several words one after the other. For example: ”welcome page“
matches This welcome page is used to introduce you to the Plone Content Management System, but not Welcome to the front page of. . . .
• Not phrase: You can specify a phrase with a minus (-) prefix. For
example, welcome -”welcome page“ matches all pages with welcome
in them, but not ones that match the phrase welcome page.
TIP If you perform a search with no text, then no results are returned.
322
11.1.2.4.5 Using the Results
So you’ve got some results, now what do you do with them? The first thing a lot of people
do is look at the results and assume that it’s a list of the objects that were cataloged. Well, it
isn’t; rather, it’s a series of ’catalog brains.” These brains are actually lazy objects that contain
the metadata columns defined earlier. You can access any of these columns as if it were an
attribute. For example, to print all the IDs of result objects, use the following:
results = context.portal_catalog.searchResults()
for result in results:
print result.getId
return printed
In this example, getId is the name of a metadata column, so it’ll display the value for getId that
the catalog had for that object. If you try to just access a value that doesn’t exist as a metadata
column, then you’ll get an AttributeError. The following are a few methods available from a
brain that are useful:
• getPath: This returns the physical path for this object inside Zope.
• getURL: This returns the URL for this object with virtual hosting applied.
• getObject: This returns the actual object.
• getRID: This is a unique ID for the object in the catalog, and it changes each
time the object is uncataloged. It’s for internal purposes only.
So, if you wanted to get the object for each result, you can do so, as you’ll see in the following
example. However, there’s a reason the catalog doesn’t do this—it’s expensive (in terms of
computation) because it involves waking up an object from the database (and all the objects
in-between) and making lots of security checks. If you can try to make your metadata contain
the right information, you’ll have a much faster application. Obviously, sometimes metadata
can’t contain everything, but it’s worth considering in the design. To get each object, use the
following:
results = context.portal_catalog.searchResults()
for result in results:
object = result.getObject()
print object
return printed
Since you have a Python list of these brains, it’s now straightforward to manipulate the results
in a manner that you see fit. To find out how many results were returned, you can just call the
len function on the list, like so:
results = context.portal_catalog.searchResults()
print "Number of results", len(results)
return printed
323
NOTE: len is a Python function that tells you the length of an item.
To get just the first ten items, use a Python slice, like so:
results = context.portal_catalog.searchResults()
return results[:10]
To do further filtering, you could manually filter the whole list, like so:
results = context.portal_catalog.searchResults()
for result in results[:10]:
# Title returns a string so we can use the find method of
# a string to look for occurence of a word
if result.Title.find("Plone") > -1:
print result.Title
return printed
To get a random object from the catalog, use the random module, like so:
import random
results = context.portal_catalog.searchResults()
r = random.choice(results)
object = r.getObject()
return object
11.1.2.5 Tying It All Together: Making a Search Form
In the previous discussion, I showed you how to get some results out of the catalog, and I used
Script (Python) objects to demonstrate that. But you’re probably asking yourself, how can I do
this from a page template?
I’ll start at the other end and first assume you have the results from a catalog query and
loop through them in a page template using tal:repeat. This is how a lot of portlets are put
together—the published and events portlets both just do queries and then show the results.
Those portlets embed the query in a page template either by calling it directly:
<div tal:define="results python: here.portal_catalog.searchResults(Type="Event")">
or by calling a separate Script (Python) object that returns the results. For example, in the
following, the script is called getCatalogResults:
##parameters=
kw = {}
# enter your query into the kw dictionary
return context.portal_catalog(**kw)
In a page template, you’d get the results in the following manner:
324
<div tal:define="results here/getCatalogResults">
After doing this, you need to loop through the results using the standard tal:repeat syntax. You
can access each metadata column directly in the Template Attribute Language (TAL) by making
a path expression to the column. So, given a brain, you could get the title from the metadata
by calling result/Title. Listing 11-3 shows an example page that loops through the contents of
getCatalogResults and displays each item in a simple unordered list.
Listing 11-3. Looping Through getCatalogResults
<html xmlns="http://www.w3.org/1999/xhtml" xml:lang="en-US"
lang="en-US"
metal:use-macro="here/main_template/macros/master"
i18n:domain="plone">
<body>
<div metal:fill-slot="main">
<ul tal:define="results here/getCatalogResults">
<li tal:repeat="result results">
<a href=""
tal:attributes="href result/getURL"
tal:content="result/Title" />
<span tal:replace="result/Description" />
</li>
</ul>
</div>
</body>
</html>
One property of the searchResults method is that if you don’t pass any parameters to the function, it’ll look them up from the incoming request. So if you wanted to allow a form to post
parameters to your results, then all you have to do is change the previous results line to the
following:
<ul tal:define="
results python: here.portal_catalog.searchResults(REQUEST=request)
">
Now you can redo your query and append any index to the URL. For example, if you called
this page template testResults and appended ?Type=Document to the end of the URL of your
browser, only the documents in your site would appear. Since you can pass in almost any
request values, you can set up a search form that would pass this information through to the
search form. This is what the search and advanced search pages do; you’ll note that if you
go to a Plone site and search for beer in the search box, your URL will now have ?SearchableText=beer.
So, Listing 11-4 shows a form to call your page template.
Listing 11-4. A Form to Call Your Template
325
<html xmlns="http://www.w3.org/1999/xhtml" xml:lang="en-US"
lang="en-US"
metal:use-macro="here/main_template/macros/master"
i18n:domain="plone">
<body>
<div metal:fill-slot="main">
<p>Select a content type to search for</p>
<form method="post" action="testResults">
<select name="Type">
<option
tal:repeat="value python:here.portal_catalog.uniqueValuesFor(’Type’)"
tal:content="value" />
</select>
<br />
<input type="submit" class="context">
</form>
</div>
</body>
</html>
This script uses a method called uniqueValuesFor on the catalog, which will return all the
unique values that exist for an index. This lets you perform a task such as populating a little
drop-down box in a form, which is a pretty useful thing to have.
At this point, it becomes an exercise in HTML and page templates to make the pages as complicated as you’d like. Of course, the best place to look for all this is in the actual templates of
Plone, which give lines upon lines of great examples. All the portlets you’re familiar with in
Plone (such as the calendar, events, related, and so on) are all built using catalog queries to
determine what to show.
In this chapter, I’ve provided you with an overview of ways to develop a Plone site and how
content types work in your site. I demonstrated how a content type is constructed and then
referenced through the catalog. This is a key development methodology in Plone.
In the next chapter, I’ll show how to develop a new content type pretty much from scratch.
You’ll see how you can integrate that new content type with the catalog register in the portal_types tool.
12 Chapter 12
12.1 Writing a Product in Python
Writing a product for Plone allows you to do almost anything you’d like to do with Plone.
Using Python to write content types or tools is the best way to provide ultimate flexibility. If
you have a burning need for Plone to do something specific and it isn’t covered elsewhere, then
this is your opportunity to add this feature by writing a product. This could be storing some
type of content specific to your company or some manipulation unique to you. In the previous
chapter, I showed how you can customize a content type. This customization can take you
only so far, though; you can’t actually add new attributes to your content type, for example.
Instead, you’ll probably want to write your own content type.
In this chapter, I run through two examples: a content type and a tool. Both of these examples
will be relatively straightforward but will get you ready for the next chapter, where I’ll show
you how to use Archetypes, a framework for Plone that allows you to generate content types
quickly and simply with a minimal amount of code.
Specifically, I create a custom content type in Plone and step through all the code used to
create this content type. It’s a quite interesting content type—it uses several building blocks
it pulls from a third-party C module and incorporates them into your Plone site. I show how
to create the content type initially and then add permissions, search integration, new user
interface elements, and installation scripts. Finally, I cover how to create a Plone tool, which
is a way to add new tools to a site. Both of the examples in this chapter are available online
for you to download, install, and study. Also, Appendix B lists all the code.
12.1.1 Writing a Custom Content Type
For the Plone book Web site (http://plone-book.agmweb.ca), I wanted to be able to show the
code from this book online. I could’ve taken the code and simply placed it into documents, but
that code would just show up without syntax highlighting. Also, all the whitespace in Python
would have been removed. For a great product such as Plone, I needed something that looked
good. So I needed a content type that would take code, syntax highlight it nicely, and allow
users to easily view it online. Figure 12-1 shows the sample finished product.
326
327
Figure 12-1. An example Python script uploaded into Plone
From this design, you can extrapolate a few requirements for this product. Specifically, this
product will have the following attributes:
• ID: Each piece of code will have a unique ID. This attribute is required.
• Title: Each piece of code should have a title. This attribute is required.
• Description: Each piece of code should have a description describing what it
should do. This attribute is optional.
• Source code: Each piece of code will have one source code attribute that
contains the source for that content type. This will be optional, but making it
required is reasonable.
328
• Language: This is the language for the source code—for example, Perl,
Python, Hypertext Markup Language (HTML), and so on.
Of course, the content type should interact with Plone so that you can use the power of Plone.
You’ll need to ensure that the product can be searched, can interact with security, can interact
with workflow, and is correctly persisted. Further, it’d be nice if users could upload scripts
directly from their hard drives rather than trying to cut and paste into a text area.
When investigating this code, I needed to find a simple way to turn code into HTML. This
is pretty easy to do for a language with simple syntax such as Python (in fact, Python can
’lex” its own code), but really you want to be able to do this for multiple languages, such as
HTML (page templates), JavaScript, Cascading Style Sheets (CSS), and so on. Fortunately, the
SilverCity module does this already and is available from SourceForge (http://silvercity.sf.net/).
It uses C libraries from the Scintilla text editor to lex the code. Without having to worry too
much implementation, the upshot is that it’ll happily spit out syntax-highlighted HTML for
nearly a dozen programming languages.
Looking at the list of requirements, you’ll see that they’re pretty straightforward. In fact, the
ID, title, and description are all defined in the Dublin Core implementation in Plone. So you
have to worry only about the source code and language. Plone requires an ID and a title, and
it really helps to have a description.
12.1.1.1 Starting the Content Type
Now that you have an idea of the content type you’ll create in this chapter, you can start
building it by writing Python on the file system. This content type is also a product, so you
create a new directory in your product directory. The name of the directory you’ll create is
the name of the product that Zope will import, so choose your name wisely. I toyed with the
idea of calling the product SourceCode or PloneSourceCode but decided those would be too
confusing (they could also mean that the product is the actual source code for Plone). Instead,
PloneSilverCity seemed to be a nice name that gave credit to its origins and was sufficiently
obscure that no one would confuse it with something else.
After creating the directory, I usually add a few files and directories that I’ll need. Every
package needs an __init__.py file in it. The name of this file comes from Python and indicates
that this directory is a Python package and hence importable. When the package is imported,
Zope executes this file. Inside that file, you’ll insert the product registration code so that the
product will be registered with Zope.
Being user friendly, you can also add a few text files such as readme.txt, install.txt, and so on.
One other text file that’s also useful to add is refresh.txt. This file lets you hook into Zope’s
Refresh module and lets you dynamically reload the product as you write it. This is mindbogglingly useful for your first few steps in writing a class, and I’ll show how to configure this
in Zope later.
At the moment, you have a directory called PloneSilverCity in the product directory that contains the following files, all empty: readme.txt, refresh.txt, install.txt, and __init__.py. This is
now a valid Python package that does absolutely nothing (but not for long).
329
12.1.1.2 Developing with ZClasses
You’re creating the content type using Python, but you’ve probably heard about ZClasses in
other documentation or on the Internet. ZClasses are an existing framework in Zope 2 for
developing classes through the Web. Many people have developed and distributed ZClasses
successfully, and there can be a role for them for rapid development. However, I really don’t
recommend them. It’s hard to develop them using existing tools, place them in source code,
distribute them, and so on. Almost everyone I’ve talked to about ZClasses agrees that it’s worth
the effort to learn how to develop with Python, and I’ve seen more than one presentation that
has ZClasses in the list of mistakes people have made.
If you do see documentation or other information relating to ZClasses, then I really recommend
resisting the temptation to use it. For this reason, there’s no mention of developing using
ZClasses. If you’re looking for a quick way to develop, then take a look at Archetypes, which is
a slightly different approach.
12.1.1.3 Integrating SilverCity
Before you get too far into the Zope code, it may be useful to figure out how to use SilverCity.
In any software development, writing layers that allow testing at atomic layers is absolutely
vital. For this reason, you should start by making sure that you can use SilverCity from a
Python module. If that works, you then simply have to add the Zope layer.
So, look into SilverCity for a moment. First, you have to install SilverCity; fortunately,
this module corresponds to the install instructions for Python modules as outlined in Chapter 10. To install on Windows, download the file SilverCity-0.9.5.win32-py2.3.exe from
http://silvercity.sf.net and run the graphical installer. To install on Linux, download the file
SilverCity-0.9.5.tar.gz from http://silvercity.sf.net and save it to disk. Then unpack it and run
the setup.py program. For example:
$ tar -zxf SilverCity-0.9.2.tgz
$ cd SilverCity-0.9.2
$ python setup.py install
...
After doing this, you can quickly test that it works from the following Python prompt in Windows or Linux:
$ python
Python 2.3.2 (#1, Oct 6 2003, 10:07:16)
[GCC 3.2.2 20030222 (Red Hat Linux 3.2.2-5)] on linux2
Type "help", "copyright", "credits" or "license" for more information.
>>> import SilverCity
>>>
This means SilverCity has been successfully installed. If you don’t get a similar result and can’t
import SilverCity, stop and solve this issue first; otherwise nothing else will run.
330
Now you need to figure out the Application Programming Interface (API) for this module; being lazy, I went and read an example script located in PySilverCity/Scripts called
source2html.py. This script does exactly what you want: It spits out HTML for a given piece of
code. A really cheeky way to see this in operation is to feed this script to itself, like so:
$python source2html.py source2html.py --generator=python
<?xml version="1.0" encoding="utf-8"?>
<!DOCTYPE html PUBLIC "-//W3C//DTD XHTML 1.0 Transitional//EN"
"http://www.w3.org/TR/xhtml1/DTD/xhtml1-transitional.dtd">
<html xmlns="http://www.w3.org/1999/xhtml">
<head>
<title>source2html.py</title>
<meta http-equiv="Content-Type" content="text/html; charset=utf-8" />
<link
rel="stylesheet"
href="default.css" />
</head>
...
This means you just need to look at this API and alter it slightly. Add a module called source.py
in the PloneSilverCity directory. In this you’ll write the code that will provide the interface to
the library; this new module contains no Zope-specific or Plone-specific code at this point. This
module has three main modules: it’ll tell you all the possible languages you can use, it’ll take
some text and return the correct parser, and finally it’ll actually perform the translation.
First, add the following create_generator function, which gives you the correct parser:
from SilverCity import LanguageInfo
from StringIO import StringIO
def create_generator(source_file_name=None, generator_name=None):
""" Make a generator from the given information
about the object, such as its source and type """
if generator_name:
return LanguageInfo.find_generator_by_name(generator_name)()
else:
if source_file_name:
h = LanguageInfo.guess_language_for_file(source_file_name)
return h.get_default_html_generator()()
else:
raise ValueError, "Unknown file type, cannot create lexer"
Second, when you’re in Plone, you need to be able to figure out exactly what languages are
available so you can show them to the users. Write the following function to return that list,
and call it list_generators:
def list_generators():
331
""" This returns a list of generators, a generator
is a valid language, so these are things like perl,
python, xml etc..."""
lexers = LanguageInfo.get_generator_names()
return lexers
Finally, the generate_html function takes a source file as a string, an optional generator, and an
optional filename. SilverCity requires a file such as buffer to write the content out, so you can
use Python’s StringIO module to accomplish this. The following is the generate_html function:
def generate_html(source_file, generator=None, source_file_name=None):
""" From the source make a generator
and then make the html """
# SilverCity requires a file like object
target_file = StringIO()
generator = create_generator(source_file_name, generator)
generator.generate_html(target_file, source_file)
# return the html back
return target_file.getvalue(), generator.name
You’ll note that this calls the create_generator function you wrote earlier to figure out the
correct generator for this language. That’s all the code you need to able to generate the HTML
for a file. I haven’t gotten into any of the specifics of actually lexing through the source or
producing the HTML; the SilverCity library does this all for you. To reiterate the earlier point,
in this module you have no reference to Zope or Plone; this module is completely independent.
The actual details of this module aren’t necessary to know, as long as you understand you’re
importing a third-party library.
It’s traditional in Python scripts to put in at least one piece of test code. You could write a
complete unit test suite, but that’s outside of the current topic. Instead, you’ll add a little bit
of code to test two things: that this works and the languages that are available, like so:
if __name__ == "__main__":
import sys
myself = sys.argv[0]
file = open(myself, ’r’).read()
print generate_html(file, generator="python")
print list_generators()
If you run this script, it’ll open itself and feed that into the HTML syntax highlighter. A bunch
of HTML will be spit out. You could just place this in the Zope-specific module you’re about to
write; however, having it all in a separate script makes it easy to test and alter later.
12.1.1.4 Writing the Class
A content type in Plone is just an object that has some particular attributes and some particular
base classes. You don’t even need to worry about reading and writing from the database—that’s
332
all handled by the Persistencebase classes. For the moment, create a module called PloneSilverCity.py in the package.
First, import the source.py module you wrote a few moments ago. That’s one simple line
because the module is in the same package. The line to import the functions is as follows:
from source import generate_html, list_generators
Second, you’ll need a PloneSilverCity class that allows you to encapsulate the functionality you
need. You need to worry about the following four attributes on this class:
• id: This stores the unique ID of this instance of the PloneSilverCity class.
• _raw: This stores the raw source code in the class.
• _raw_as_html: This stores the source code after it has been lexed into HTML.
• _raw_language: This stores the language of this source code.
For each of these attributes, you’ll write an accessor, which is a function that returns the value
of that attribute so that rather than calling the attribute, you call the accessor function. An
example accessor function is getLanguage, which returns the value of the language. Writing
an accessor is usually a good idea, especially because you’ll apply security to these accessor
methods later. In Zope, any method or attribute that begins within an underscore isn’t available
to Web-based methods such as page templates or Script (Python) objects. A good practice is to
start all your attributes with an underscore and then put security on the accessing method.
Listing 12-1 shows the basic class.
Listing 12-1. The Basic Python Class
class PloneSilverCity:
def __init__(self, id):
self.id = id
self._raw = ""
self._raw_as_html = ""
self._raw_language = None
def getLanguage(self):
""" Returns the language this code has been lexed with """
return self._raw_language
def getRawCode(self):
""" Returns the raw code """
return self._raw
def getHTMLCode(self):
""" Returns the html code """
return self._raw_as_html
def getLanguages(self):
333
""" Returns the list of languages available """
langs = []
for name, description in list_generators():
langs.append( {’name’:name, ’value’:description} )
langs.sort()
return langs
You’ll have to add one other method, which is an edit method that allows you to upload a file
or a string. This one method will read the file and see if there’s anything in the file; if there
is, then it will be read and a filename determined. Then the code, language, and filename will
be passed to the generate function. You’ll store all this in the attributes mentioned earlier, as
shown in Listing 12-2.
Listing 12-2. The Method for Handling Edits
def edit(self, language, raw_code, file=""):
""" The edit function, that sets
all our parameters, and turns the code
into pretty HTML """
filename = ""
if file:
file_code = file.read()
# if there is a file and it’s not blank...
if file_code:
raw_code = file_code
if hasattr(file, "name"):
filename = file.name
else:
filename = file.filename
# set the language to None so set by SilverCity
language = None
self._raw = raw_code
# our function, generate_html does the hard work here
html, language = generate_html(raw_code, language, filename)
self._raw_as_html = html
self._raw_language = language
NOTE Well-versed Python developers may raise an issue with using file.name and file.filename.
Zope file objects have an attribute called filename, which represents the filename, while in
Python the attribute is called name. This code will then work in straight Python or Zope.
So now you have a Python class that encapsulates the object. At this point, you should be
able to run this from the Python prompt quite easily and test that it does what you want. For
example:
$ python
334
Python 2.3.2 (#1, Oct 6 2003, 10:07:16)
[GCC 3.2.2 20030222 (Red Hat Linux 3.2.2-5)] on linux2
Type "help", "copyright", "credits" or "license" for more information.
>>> from PloneSilverCity import PloneSilverCity
>>> p = PloneSilverCity("test.py")
>>> p.edit("python", "print ’hello world’")
>>> p.getRawCode()
"print ’hello world’"
>>> p.getHTMLCode()
’<span class="p_word">print</span>
<span class="p_default">nbsp;</span>
<span class="p_character">\’hellonbsp;world\’</span>’
>>> p.getLanguage()
’python’
12.1.1.5 Turning the Package into a Product
Now you have a simple package, but this isn’t yet a Plone product. You have to initialize it with
Plone. This means adding extra information to the PloneSilverCity.py module. Specifically, you
need to add a factory function. Using a factory is a well-known pattern in object-oriented
design, and it defines how an object will be created. So, to the PloneSilverCity.py module, add
the following constructor to the module:
def addPloneSilverCity(self, id, REQUEST=None):
""" This is our factory function and creates
an empty PloneSilverCity object """
obj = PloneSilverCity(id)
self._setObject(id, obj)
The addPloneSilverCity function isn’t part of the PloneSilverCity class. As a constructor for the
class, it’s placed in the module outside the class. This function is the first Plone-specific function. Three parameters are passed to the method: the self object, the ID string for the object,
and REQUEST. The self object is actually the context you’ve seen before, just by a different
name. Since the objects will always be created inside folder, self will refer to the folder in
which this object will be created. This function creates an instance of PloneSilverCity called
obj and passes it to the _setObject method of the folder. The _setObject method is particular to
Zope; it instantiates the object in the database and registers the object in the containing folder.
Next, add the factory type information covered in Chapter 11 (this is your first chance to create
it yourself). The factory type information contains all the information about the content type
in a dictionary; this information is loaded into portal_types when the product is installed into
your Plone instance. This information will mirror what you saw in earlier, where you altered
factory type information through the Web.
Before building the factory information, I usually create a configuration file that contains all
the repeated variables for the product. This file is called config.py, and in there you put the
names of the product, the name of its layer in the skins, and the name as it will appear to the
user, like so:
335
product_name = "Source Code"
plone_product_name = "PloneSilverCity"
layer_name = "silvercity"
layer_location = "PloneSilverCity/skins"
Then you can set up the factory type information and use these strings. For example, the ID
will be Source Code since this is shown in Plone to the users. The actions section of the type
information is a tuple of dictionaries of all the actions that can occur with this object. When
this factory is loaded into Plone, the Actions tab inside the portal_types tool will be populated
with this content. Each of those actions has a corresponding method, template, or script that
will be called; most of these directly correspond to page templates, which I discuss later in this
section.
As you know by now, an action is something that users can do to an item in the Plone database.
Thinking of this example application, users can do two obvious things to the source code. They
can view it and see the nicely highlighted code, and they can edit the item and upload some
source code. Actually, Plone requires that there’s one action called view and one called edit, so
these two fit nicely. You also want a third action—it’s nice to be able to download the source
in its original form. With languages such as Python where the formatting is key, this is really
useful. This action points directly to getRawCode, which is the method for getting the raw code
back again.
Each action has a permission associated, as shown in Listing 12-3 (I show exactly
where that comes from later in this section).
Listing 12-3. The Factory Type Information and Actions
factory_type_information = {
’id’: plone_product_name,
’meta_type’: product_name,
’description’: (’Provides syntax highlighted HTML of source code.’),
’product’: product_name,
’factory’: ’addPloneSilverCity’,
’content_icon’: ’silvercity.gif’,
’immediate_view’: ’view’,
’actions’: (
{’id’: ’view’,
’name’: ’View’,
’action’: ’silvercity_view_form’,
’permissions’: (view_permission,)},
{’id’: ’edit’,
’name’: ’Edit’,
’action’: ’silvercity_edit_form’,
’permissions’: (edit_permission,)},
{’id’: ’source’,
’name’: ’Source’,
’action’: ’getRawCode’,
’permissions’: (view_permission,)},
336
),
}
NOTE At this point, the product can’t be imported from the Python prompt because the code
is incomplete.
12.1.1.5.1 Setting Up Permissions
A fundamental concept when dealing with Web sites is that everything and everybody is untrusted. Before any property is accessed or any method is called, you must first check if the
party wanting to perform an action is allowed to do so. In most systems, three permissions
exist: the permission to add an item, the permission to delete an item, and the permission to
edit an item. One other permission applies to Plone: the right to view an item through the Web
(or other protocol). The containing folder handles deleting, which is a permission handed out
in Plone to the containing folder. If you can delete anything in the folder, you can then also
delete the content type you’re adding here.
This leaves you with three permissions to worry about. It’s normal to use the ones that come
with the CMFCore package: Add portal content, Modify portal content, and View. Returning to
the config file, you can add the permissions you need, like so:
from Products.CMFCore import CMFCorePermissions
add_permission = CMFCorePermissions.AddPortalContent
edit_permission = CMFCorePermissions.ModifyPortalContent
view_permission = CMFCorePermissions.View
This means the add_permission variable references the permission imported from CMFCorePermissions. There’s nothing magical about the permissions—each permission is just a string. Using the built-in permission is convenient and understandable for your users. Plone is already
configured to allow the right person to add content using the Add portal content permission.
Further, the default workflow is defined to use and alter these permissions. These permissions
were the ones you added to the factory type information.
If you wanted to make your own permission, you could do so quite easily. Suppose you wanted
the Add. . . permission to be Add Source Code and have its own permission. Then you’d change
the file to read as follows:
add_permission = "Add Source Code"
After importing the product, you’d have a new permission in the Security tab matching that
Add Source Code permission. Why would you want to do this? Well, using a permission
that everyone else uses is convenient. However, it may be that you want more granularity or
different security. For this reason, you can just create your own security settings.
337
12.1.1.5.2 Completing the Initialization
Now you need to set up the initialization of the product. You do this in the __init__.py module
so that when Zope reads this file at startup, it’ll complete the initialization of the product, as
shown in Listing 12-4.
Listing 12-4. The __init__.py Module
import PloneSilverCity
from Products.CMFCore import utils
from Products.CMFCore.DirectoryView import registerDirectory
from config import product_name, add_permission
contentConstructors = (PloneSilverCity.addPloneSilverCity,)
contentClasses = (PloneSilverCity.PloneSilverCity,)
contentFTI = (PloneSilverCity.factory_type_information,)
registerDirectory(’skins’, globals())
def initialize(context):
product = utils.ContentInit(product_name,
content_types = contentClasses,
permission = add_permission,
extra_constructors = contentConstructors,
fti = contentFTI)
product.initialize(context)
What’s happening in this code? Well, actually not that much—it’s just a little verbose. First,
you make references to the classes and constructors that are going to be used in contentClasses
and contentConstructors. These map to the factory function for creating the objects and the
actual class. These are then passed into the ContentInit function, inside initialize, which is a
special function that’s called during the product initialization. ContentInit does all the work to
set up the product within Plone. The parameters to this function are as follows:
• product_name: This is the name of the product, as defined in the config file
(in this case, PloneSilverCity).
• content_types: This is the tuple of classes that this product defines; usually
this is just one class, but it may be more.
• permission: This is the permission that’s needed to create an instance of this
object; in this case, it’s the add_permission variable I’ve defined in config.py*.*
• fti: This stands for factory type information and is the dictionary of factory
type information you defined in the PloneSilverCity.py module for the content.
338
12.1.1.6 Altering the Product Modules
Now you can return to the PloneSilverCity.py module and complete the task of turning this into
a Plone product. At the start of the module, you’ll create the import statements. These import
statements pull various Plone initialization requirements from various locations, as follows:
from
from
from
from
Globals import InitializeClass
AccessControl import ClassSecurityInfo
Products.CMFDefault.DublinCore import DefaultDublinCoreImpl
Products.CMFCore.PortalContent import PortalContent
These imports provide the base functionality for the product and are common across most
content types. The definitions of imports are as follows:
InitializeClass: This function initializes the class and applies all the security declarations that it’ll have. You specify those security declarations by using the ClassSecurityInfo class.
ClassSecurityInfo: This class provides a series of security methods that will allow
you to restrict access to methods of the content type.
DefaultDublinCoreImpl: This class provides an implementation of Dublin Core
metadata. Chapter 11 covered Dublin Core; this gives an object all the Dublin Core
attributes and methods to access them such as Title, Description, Creator, and so
on.
PortalContent: This provides the base class for all content in a Plone site and some
of the key attributes it needs. Using this base class gives the object a whole host
of functionality such as making the object persist inside the database, cataloging
the object for searching inside the portal_catalog object, and making it registerable
with the portal_types tool.
You’ll also need to import the configuration variables and permissions as well. So that takes
the following two lines:
from config import plone_product_name, product_name
from config import add_permission, edit_permission, view_permission
Returning to the class, you have to add two base classes to make it fully Plone compatible:
PortalContent and DefaultDublinCoreImpl. You also need to give the class a meta_type. Each
product in Zope has a unique meta_type:
class PloneSilverCity(PortalContent, DefaultDublinCoreImpl):
meta_type = product_name
One requirement of Plone is that it knows what base classes the content type implements.
Other parts of the application will need to know what classes are implemented. So, explicitly
state what classes the content type implements, like so:
339
__implements__ = (
PortalContent.__implements__,
DefaultDublinCoreImpl.__implements__
)
12.1.1.6.1 Adding Security to the Class
If you’ve already decided to give the actions security, you also need to apply this security to
the class. In an object-publishing environment such as Plone, anyone can call any method of
the class through the Web, unless it begins with an underscore. This is obviously bad, and you
need to protect all your methods.
To do this inside the class, make an instance of the ClassSecurityInfo class. You do this with the
following line:
security = ClassSecurityInfo()
This security object provides an interface into Zope security machinery. You can then apply
methods to the object. My favorite method for doing this is to add a line applying the security
directly above the method. This way it’s easy to remember where the security is applied, and
you won’t forget to update it later, if you need to do so. The declareProtected method takes the
permission and the method name to protect the edit method. So that only people who actually
have the edit permission can call it, you do the following:
security.declareProtected(edit_permission, "edit")
Repeat this for each method, giving the appropriate permission and method name. The only
one that needs to be protected is __init__ because this begins with an underscore. To apply all
this security, you must initialize the class. Without doing this one step, all the security further
declared won’t be applied, and your object will be public.
In other words, don’t forget this line:
InitializeClass(PloneSilverCity)
The API for ClassSecurityInfo provides the following methods for the class:
• declarePublic: This takes a list of names. All the names are declared publicly
accessible for all users through restricted code and through the Web.
• declarePrivate: This takes a list of names. All the names are private and can’t
be accessed through restricted code.
• declareProtected: This takes a permission and any number of names. All the
names can be accessed only with the permission given.
• declareObjectPublic: This sets the entire object as publicly accessible.
• declareObjectPrivate: This sets the entire object to private and inaccessible
to restricted code.
With these methods it’s possible to set almost any security you’d like. However, I’ve almost
always found that explicitly setting the protection of each method with a permission has been
sufficient.
340
12.1.1.6.2 Integrating with Search
In the previous chapter I showed you how the search works and the indexes that exist. Since
the indexes work against Dublin Core objects and you’ve used Dublin Core as a base class, your
object’s title, description, creator, modification date, and so on, will all be indexed for you—no
extra work is needed. Further, by inheriting from the PortalContent class every time the object
is altered, the catalog will be updated for you; again, you don’t need to worry about anything.
However, one index does need a little help, and that’s SearchableText. As I demonstrated
previously, the SearchableText index provides the full-text index that Plone uses when a search
is run. It’d be nice if the search would also index the source code, so if somebody uploaded a
piece of code with import in it, the search would pick it up. Because the catalog looks at the
object and tries to find an attribute or method matching the index name, all you need to do is
provide a method with that name that returns the value you want.
The easiest way to do this is to make a string out of the fields you want—for example, the title,
the description, and the raw code. This can be protected by the View permission, since anyone
viewing the object can happily see the contents anyway. The following is a SearchableText
method that performs this task:
security.declareProtected(view_permission, "SearchableText")
def SearchableText(self):
""" Used by the catalog for basic full text indexing """
return "%s %s %s" % ( self.Title()
, self.Description()
, self._raw
)
12.1.1.6.3 The Difference Between a Python Class and a Plone Class
As you can see, there’s quite a difference between a normal Python product and one registered
in Plone. However, most of those differences are about registering the product and asserting the security. The actual class remains similar. Listing 12-5 highlights all the differences
between the pure Python implementation and the Plone implementation.
Listing 12-5. The Plone Version of the Class
from
from
from
from
Globals import InitializeClass**
AccessControl import ClassSecurityInfo
Products.CMFDefault.DublinCore import DefaultDublinCoreImpl
Products.CMFCore.PortalContent import PortalContent
from config import plone_product_name, product_name
from config import add_permission, edit_permission, view_permission
from source import generate_html, list_generators
factory_type_information = {
’id’: plone_product_name,
341
’meta_type’: product_name,
’description’: (’Provides syntax highlighted HTML of source code.’),
’product’: product_name,
’factory’: ’addPloneSilverCity’,
’content_icon’: ’silvercity.gif’,
’immediate_view’: ’view’,
’actions’: (
{’id’: ’view’,
’name’: ’View’,
’action’: ’silvercity_view_form’,
’permissions’: (view_permission,)},
{’id’: ’source’,
’name’: ’View source’,
’action’: ’getRawCode’,
’permissions’: (view_permission,)},
{’id’: ’edit’,
’name’: ’Edit’,
’action’: ’silvercity_edit_form’,
’permissions’: (edit_permission,)},
),
}
def addPloneSilverCity(self, id, REQUEST=None):
""" This is our factory function and creates
an empty PloneSilverCity object inside our Plone
site """
obj = PloneSilverCity(id)
self._setObject(id, obj)
class PloneSilverCity(PortalContent, DefaultDublinCoreImpl):
meta_type = product_name
__implements__ = (
PortalContent.__implements__,
DefaultDublinCoreImpl.__implements__
)
security = ClassSecurityInfo()
def __init__(self, id):
DefaultDublinCoreImpl.__init__(self)
342
self.id = id
self._raw = ""
self._raw_as_html = ""
self._raw_language = None
security.declareProtected(edit_permission, "edit")
def edit(self, language, raw_code, file=""):
""" The edit function, that sets
all our parameters, and turns the code
into pretty HTML """
filename = ""
if file:
file_code = file.read()
# if there is a file and its not blank...
if file_code:
raw_code = file_code
if hasattr(file, "name"):
filename = file.name
else:
filename = file.filename
# set the language to None so set by SilverCity
language = None
self._raw = raw_code
# our function, generate_html does the hard work here
html, language = generate_html(raw_code, language, filename)
self._raw_as_html = html
self._raw_language = language
security.declareProtected(view_permission, "getLanguage")
def getLanguage(self):
""" Returns the language that code has been lexed with """
return self._raw_language
security.declareProtected(view_permission, "getLanguages")
def getLanguages(self):
""" Returns the list of languages available """
langs = []
for name, description in list_generators():
# these names are normally in uppercase
langs.append( {’name’:lang, ’value’:language } )
343
langs.sort()
return langs
security.declareProtected(view_permission, "getRawCode")
def getRawCode(self):
""" Returns the raw code """
return self._raw
security.declareProtected(view_permission, "getHTMLCode")
def getHTMLCode(self):
""" Returns the html code """
return self._raw_as_html
security.declareProtected(view_permission, "SearchableText")
def SearchableText(self):
""" Used by the catalog for basic full text indexing """
return "%s %s %s" % ( self.Title()
, self.Description()
, self._raw
)
InitializeClass(PloneSilverCity)
12.1.1.7 Adding Skins
So now that you’ve got the main code, you have two things left to do: build the skins and
create an installation method. The skins are actually one of the easier parts because so much
of the work has been done already in the Plone framework. I covered skins in detail in earlier
chapters, where I discussed how to make a skin for the Plone site on the file system. Each
product that needs to provide custom User Interface (UI) does so by making its own File
System Directory View (FSDV), so you’ll do the same again here.
The skins are placed in the skins directory of the product. This directory name is defined in
the __init__.py file where you register the directory using the registerDirectory function. If you
wanted to change the name, make sure to register it—you can register as many directories as
you like, but it’s recursive and will register everything in and below that registered directory.
344
The easiest of all your jobs for this product is to add an icon for the object that will appear in
Plone. The name of this icon is already defined in the factory type information with the line
’content_icon’: ’silvercity.gif’, so all you have to do is add an icon to the skins directory called
silvercity.gif. This icon will display whenever you see the object in the Plone user interface.
When SilverCity lexes a file, it outputs HTML using CSS tags, so you have ensure that the
particular CSS file is available. For this product you simply copy the CSS out of the SilverCity
product and place it in the skins directory with the name silvercity.css.
These two items are now done. Next, you actually have to write the view and edit pages. Previously I discussed how this is similar to a document, so when you’re looking for view and edit
pages, the best place to look is the pages for a document. Those pages are document_view.pt
and document_edit_form.cpt and are located in the CMFPlone/skins/plone_content directory.
12.1.1.7.1 Making the View Page
To alter the view page, you take the view page for a document, copy it into your product’s
skins directory, and rename it to silvercity_view.pt. There’s no point in re-creating the entire
page when the view page is so similar; all you need to do is to make two minor changes.
As mentioned, SilverCity spits out HTML where all the code has been highlighted using CSS
and you have a custom style sheet. You need to make sure that the view page inserts that CSS,
and the main template has a slot for CSS called css_slot. To put the custom CSS file into that
slot, you just have to provide a value for it. For example:
<metal:cssslot fill-slot="css_slot">
<link
rel="stylesheet"
href=""
tal:attributes="href string:$portal_url/silvercity.css" />
</metal:cssslot>
Here you’re referencing a CSS file called silvercity.css. That file is located in the skins directory,
and you’ll be accessing it from the skin when it’s rendered. The original document shows a
property called cookedBody, which is an attribute of a document. I removed that part of the
code and instead inserted the code. As you’ve seen by now, the function getHTMLCode returns
the HTML, so all you have to do is the following:
<div id="bodyContent">
<div tal:replace="structure here/getHTMLCode" />
</div>
If you want to change anything else specific in this page template, now is your opportunity.
It could be nice to show the language that it was written in, to show an icon, or to change
history, for example.
345
12.1.1.7.2 Making the Edit Page
Like the view page, you can take the edit page, copy it into the skin, and rename it to silvercity_edit_form.cpt. The biggest problem is that the edit form is designed to be used with
a What You See Is What You Get (WYSIWYG) editor such as Epoz. Until a good WYSIWYG
editor for source code is available for Web browsers, you’ll have to turn this off because you
can’t write SQL in an HTML editor.
This is quite a lengthy change of the page template—remember, you can get this off the Web
site. In this template, remove all mentions of the editors and replace them with a simple text
area. Keep the name of the HTML field the same because there’s no real need to change it.
Also, leaving it the same means it plays nicely with the script for handling the form later. A
document has at the bottom a series of selections for the format, which are normally items such
as Plain Text, HTML, and so on. You’ll replace this with a drop-down box for all the languages
that the main SilverCity library has available. The getLanguages method written earlier returns
a list of all the languages. Each item is a dictionary that contains the value (for example, CPP)
and a nice name (for example, C or C++).
Listing 12-6 loops through the getLanguages method written earlier. You can also define a
variable for the current language so that as it loops through the languages, you can highlight
the current language.
Listing 12-6. Adding a Drop-Down List for Selecting the Language
<div class="field">
<label
for="language"
i18n:translate="label_silvercity_language">
Language</label>
<div class="formHelp" i18n:translate="help_silvercity_language">
Select the name of the language that you are adding
</div>
<select name="text_format"
tal:define="l here/getLanguage">
<option tal:repeat="item here/getLanguages"
tal:content="item/name"
tal:attributes="value item/value;
selected python:test(item[’value’] == l, 1, 0)" />
</select>
</div>
When the edit page gets submitted, you need to set up the validators and actions to do something with the form. The validation should check that a valid title and a valid ID have been
given. To the silvercity_edit.cpt.metadata file, add the following:
[validators]
validators..Save = validate_id,validate_title
validators..Cancel =
346
Where did those validations come from? Well, I was cheeky and again looked at the validations
for a document. That calls three validations, but you need only two of them. By checking
what that validation evaluated to, you can see which ones are needed and which ones aren’t.
You’ll find all the validations in plone_skins/plone_form_scripts, and the object name starts with
validation.
So now you need the action, so take the edit script for a document (document_edit.cpy) and
copy it into SilverCity. Mostly the script is just fine, so you can keep it with one modification.
Change the messages to Source code instead of Document. Listing 12-7 shows the edit script.
Listing 12-7. The Edit Script
##parameters=text_format, text, file=’’, SafteyBelt=’’, ~CCC
title=’’, description=’’, id=’’
##title=Edit a document
filename=getattr(file,’filename’, ’’)
if file and filename:
# if there is no id, use the filename as the id
if not id:
id = filename[max( filename.rfind(’/’)
, filename.rfind(’\\’)
, filename.rfind(’:’) )+1:]
file.seek(0)
# if there is no id specified, keep the current one
if not id:
id = context.getId()
new_context = context.portal_factory.doCreate(context, id)
new_context.edit( text_format
, text
, file
, safety_belt=SafetyBelt )
from Products.CMFPlone import transaction_note
transaction_note(’Edited source code %s at %s’ % ~CCC
(new_context.title_or_id(), new_context.absolute_url()) ~CCC
)
new_context.plone_utils.contentEdit(
,
,
,
new_context
id=id
title=title
description=description )
return state.set(context=new_context, ~CCC
portal_status_message=’Source code changes saved.’)
The script does a few things. First, it gets the filename if one exists; if no ID is given, then the
347
ID is set to that filename. This means if a user uploads library.c, the ID for that object will be
library.c. Second, it tells portal_factory to create an object (see the ’Portal Factory” sidebar for
more information on what that means). Then it calls the edit method on the object (something
you wrote earlier), and it calls contentEdit on the plone_utils tool. Without looking into the
depths of the plone_utils tool, contentEdit takes the keywords given, and if the class implements
Dublin Core, then it will change those attributes. Since you set up the __implements__ attribute
earlier, the edit method in Listing 12-7 will do the work for you. Any changes to title, ID, or
description will be changed in the object.
12.1.1.8 Portal Factory
One problem exists with the way objects are created. Before you can even get to the edit form,
you have to create an object. Then the edit form for that object will display. In practice, people
accidentally create objects, get to the edit form, and then realize it was the wrong type. This
is annoying and leaves spare objects lying around in your database. It’s like creating a file on
the file system, realizing it’s wrong, and then leaving it there.
To solve this, the portal_factory tool allows you to temporarily create objects. It’ll create a
temporary object and then let you edit it. Only once you’ve clicked the edit button will your
object be created. To assign an object to portal_factory, go to the portal_factory tool, and in
the form select all the content types for which you’d like to use this tool. The only catch is that
you must ensure your edit scripts correctly integrate with the tool, as shown in this example.
12.1.1.9 Installing the Product into Plone
You have a standard way for installing a product into Plone you go to the Plone control panel
and click the product to install it. That script uses the portal_quickinstaller tool to do the
installation. For this product to work, you need to expose functionality that the tool can read.
After all, you want as many people to use the product as possible. If you’re writing something
that’s for internal use only and you’re never going to distribute to anyone else, you can skip
this stage. But you’ll need to do these steps by hand anyway, and it’s always better to have a
script for the installation.
NOTE Quick Installer makes an external method of this install function and runs it
for you behind the scenes. It performs a few other tasks, as well. This means you
could make an external method to do this if you wanted. That’s why the installation
instructions for many products tell you to create an external method.
To integrate with the Quick Installer, you need to make a specific module called Install.py
in the Extensions directory. That module has to contain a function called install. The Quick
Installer tool runs the install function, and the output is placed in a file on the server. The
install method has to install the product into the portal types, so add an FSDV that points to
the skins directory, and add this new directory to the skin layers.
Now import the functions and set up the variables as usual. You have to import the factory_type_information from the product so that you can use it in the script, as shown in Listing
12-8.
348
Listing 12-8. The Start of the Installation Function
from
from
from
from
Products.CMFCore.TypesTool import ContentFactoryMetadata
Products.CMFCore.DirectoryView import createDirectoryView
Products.CMFCore.utils import getToolByName
Products.PloneSilverCity.PloneSilverCity import factory_type_information
from Products.PloneSilverCity.config import plone_product_name, product_name
from Products.PloneSilverCity.config import layer_name, layer_location
def install(self):
""" Install this product """
After this, everything is generic and could be run on any product—unless of course you want
it to do something special on the installation. To add your product to the portal_types tool, you
first check that your product isn’t already registered. It could be that someone has registered
another product of the same name. For this you’ll call the manage_addTypeInformation method,
as shown in Listing 12-9.
Listing 12-9. Remainder of the Installation Function
out = []
typesTool = getToolByName(self, ’portal_types’)
skinsTool = getToolByName(self, ’portal_skins’)
if id not in typesTool.objectIds():
typesTool.manage_addTypeInformation(
add_meta_type = factory_type_information[’meta_type’],
id = factory_type_information[’id’]
)
out.append(’Registered with the types tool’)
else:
out.append(’Object "%s" already existed in the types tool’ % (id))
Next you need to add an FSDV to the skins directory. Again, the first thing you check is that
you don’t already have one; then you add the directory view with the following:
if skinname not in skinsTool.objectIds():
createDirectoryView(skinsTool, skinlocation, skinname)
out.append(’Added "%s" directory view to portal_skins’ % skinname)
Finally, you loop through all the skins and add your new FSDV to each of the skins. This is a
generic function; each skin is listed as string with each layer separated by commas. All you
have to do is split the string up and insert your new skin after the layer named custom, as
shown in Listing 12-10.
Listing 12-10. Setting the Skin in the Installation Method
349
skins = skinsTool.getSkinSelections()
for skin in skins:
path = skinsTool.getSkinPath(skin)
path = [ p.strip() for p in path.split(’,’) ]
if skinname not in path:
path.insert(path.index(’custom’)+1, skinname)
path = ", ".join(path)
skinsTool.addSkinSelection(skin, path)
out.append(’Added "%s" to "%s" skins’ % (skinname, skin))
else:
out.append(’Skipping "%s" skin’ % skin)
return "\n".join(out)
That’s it. Your product is now ready to run.
12.1.1.10 Testing the Product
To test, restart your Plone instance so that it’ll read the product directory in. If you haven’t
already developed your product in the appropriate products folder, then place it there now as
part of your standard installation process. If there are any problems with your product, then
Zope may start, but the product may show up as broken in the control panel.
Then install into Plone using the Add/Remove Products page in the Plone control panel. Now
you should be able to go to a folder and add a source code object. The icon will be your icon
in the skin, and the name is what you defined in the file system. After adding this, you’ll get
the edit page. Note that the URL now has silvercity_edit_form on the end and shows the nicely
altered edit form.
You could add some code, select a language, and click Save, or you could upload a file from
your computer. After clicking Save, you’ll be taken back to the view function, and, sure enough,
the code will be shown with the syntax highlighted.
This product is a little example of how simple writing a product in Plone is. Although it has
been a lot of pages, most of it has been setting up the infrastructure and the skins. One of the
first things people do is compare this to other Web scripting languages such as PHP. You have
to remember that by having your code in Plone, you’ve achieved quite a few things without
having to rewrite them. Specifically, you’ve achieved the following:
•
•
•
•
Full-text searching of the content
Integration with the workflow
Integration with portal membership and authentication
Persistence through the Plone database without having to write SQL or do
other work
Further, it really does let your complete product scale later. For example, if you need a bugtracking system, drop in the Collector product, and if you need a photo management product,
drop in CMFPhoto. By utilizing the framework, you can give your overall site a great deal of
flexibility and scalability.
350
Although this product is a little cheeky by using lots of existing code, it demonstrates quite a few key functions of writing a product in Plone.
12.1.1.11 Debugging Development
If you’re developing your own product, then two things will happen to you at some point
(unless you have so much Zen that you should be writing the Zope core code): your product
will break, and you’ll need to debug it.
During development, you may want to try importing the product into the Python prompt to
see how it works. Unfortunately, you’ll probably get an error. This is because when you do this
import, you’ll get a cascade of Zope-related imports. You can cope with some of this but not
all of it. One of the common problems is that you’ll get the following error:
Traceback (most recent call last):
File "<stdin>", line 1, in ?
File "PloneSilverCity/__init__.py", line 1, in ?
import PloneSilverCity
File "PloneSilverCity/PloneSilverCity.py", line 4, in ?
from Globals import InitializeClass
File "/opt/Zope-2.7/lib/python/Globals.py", line 23, in ?
import Acquisition, ComputedAttribute, App.PersistentExtra, os
File "/opt/Zope-2.7/lib/python/App/PersistentExtra.py", line 15, in ?
from Persistence import Persistent
ImportError: cannot import name Persistent
You can solve this by making sure that before you import PloneSilverCity you import Zope and
run the startup method. To be able to import Zope, you must have the directory containing
Zope in your path; on my computer, this is /opt/Zope-2.7/lib/python. However, you’ll then run
across errors trying to import CMFCore if you have an instance home configured, which you
probably will.
The easiest way to import PloneSilverCity is to run Zope from the command line in debug mode
using zopectl. This will open a Python prompt that will let you access the Zope database directly
from Python. Chapter 14 covers this in more detail, but it can be done easily now (assuming
your Zope isn’t currently running). You can find the zopectl script in the bin directory of your
Zope instance; for example, on my computer, this is /var/zope/bin. Listing 12-11 shows an
example running zopectl with PloneSilverCity.
NOTE At the time of writing, zopectl doesn’t work on Windows. However, on Linux,
it’s a convenient way to test your code. Unfortunately, using zopectl requires locking
the Zope Object Database (ZODB) and, unless you’re running ZEO (something I’ll
discuss in Chapter 14), can’t be done while Zope is running.
Listing 12-11. Debugging the Product Using Zope
$ cd /var/zope/bin
$ ./zopectl debug
351
Starting debugger (the name "app" is bound to the top-level Zope object)
>>> from PloneSilverCity.PloneSilverCity import PloneSilverCity
>>> p = PloneSilverCity("test")
>>> p.edit("python", "import test")
>>> p.getRawCode()
’import test’
>>> p
<PloneSilverCity at test>
When your product breaks, you’ll get a traceback to one of two places, either the error log page
or one of the event logs. If you’ve really broken it, then Plone won’t start; this normally happens
when an import fails. If that’s the case, then Plone will just not start at all. I recommend
starting Plone from the command line, be it Windows or Linux. Having the console output of
that error will give you an immediate output of the error. For example, Listing 12-12 shows
what happens when you try to run Plone SilverCity with a deliberate error in the import.
Listing 12-12. An Example Error on Startup
$ bin/runzope
-----2003-12-19T17:44:05 INFO(0) ZServer HTTP server started at Fri Dec 19 17:44:05 2003
Hostname: laptop
Port: 8080
-----2003-12-19T17:44:05 INFO(0) ZServer FTP server started at Fri Dec 19 17:44:05
2003
Hostname: basil.agmweb.ca
Port: 8021
-----2003-12-19T17:44:16 ERROR(200) Zope Could not import Products.PloneSilverCity
Traceback (most recent call last):
File "/opt/Zope-2.7/lib/python/OFS/Application.py", line 533, in import_product
product=__import__(pname, global_dict, global_dict, silly)
File "/var/zope.zeo/Products/PloneSilverCity/__init__.py", line 1, in ?
import PloneSilverCity
File "/var/zope.zeo/Products/PloneSilverCity/PloneSilverCity.py", line 1
import ThisModuleDoesNotExist
^
ImportError: No module named ThismoduleDoesNotExist
At this point, Zope stops; you’ll have to fix this import before starting again. This is probably
the easiest error to fix but will likely occur only when you install that a whiz-bang new product
off the Internet only to find it has a dozen dependencies.
The next kind of error that can occur is a programming or logic error, which occurs inside the
code. Suppose your product adds two numbers together, but one of them is a string (this is
an error in Python). An error will be raised, which Plone will report back to the user interface
with an error value and error type. At this point, you should click plone setup and click Error
Log to see the traceback, find the bug, and fix the issue.
352
If you change something in a product, the change doesn’t get reflected in Python right away;
you need to use a product called Refresh to force that change. This is an amazingly useful
tool for new developers, and you enable it by having a file called refresh.txt in your Products
directory. You’ll note that PloneSilverCity has one. Next, in the ZMI, select Control Panel,
select Products, select PloneSilverCity (or your product name), and click the Refresh tab. If
your product has a refresh.txt file, you can click the Refresh button. Plone will then dynamically
reload your product with all the new code. If you’re running Zope in debug mode, then you
can set the product to dynamically check every time it’s run, rather than having to come back
to this screen each time.
Unfortunately, everything with refresh isn’t all rosy. It does do some rather ’interesting” things
behind the scenes to Python to enable this to happen. In fact, the Refresh product can produce
unexpected results in your product—nothing that restarting Zope won’t fix, though. Relatively
simple products that just do data manipulation will be fine, but some products aren’t. Chances
are if you’re just starting out, your products will be simple, and you’ll be fine.
Finally, if it something goes wrong and you can’t figure it out, you’ll need to pull out a debugger.
You have so many ways to debug Zope that I’ll just discuss the one I use the most—the Python
debugger. You can call the Python debugger by adding the following line to a piece of code:
import pdb; pdb.set_trace()
TIP: It’s uncommon in Python to put two lines into one by using a semicolon, but here it’s
handy so that when you come to delete or comment it out later, you have only one line to
comment.
That will cause a breakpoint in the code execution, and Zope will stop processing and open
the debugger. This is why you really want to run Plone from a console when developing.
This doesn’t work with a service or a daemon because there’s no console to which to connect.
Now if you re-create your problem, you’ll be dropped into the Python debugger, and you can
debug your product. For example, in my now fixed-up and correctly importing PloneSilverCity,
I added the following pdb trace function to the getLanguages method:
def getLanguages(self):
""" Returns the list of languages available """
import pdb; pdb.set_trace()
langs = []
...
Now when you run Plone and connect to the skin (something you’ll add a moment), this
function will be called, and, sure enough, on the console you started Zope with, you’ll see the
following:
--Return-> /var/tmp/python2.3-2.3.2-root/usr/lib/python2.3/pdb.py(992)set_trace()->None
-> Pdb().set_trace()
(Pdb)
You can type help to get a list of help options. The two main choices are n for next and s for
steppng into an item. For example:
353
(Pdb) n
> /var/zope.zeo/Products/PloneSilverCity/PloneSilverCity.py(97)getLanguages()
-> langs = []
(Pdb) n
> /var/zope.zeo/Products/PloneSilverCity/PloneSilverCity.py(99)getLanguages()
-> for value, description in list_generators():
(Pdb) langs
[]
For more information on the debugger, I recommend the online documentation at the Python
Web site (http://python.org/doc/current/lib/module-pdb.html). You have other ways to debug Zope, such as using ZEO to get an interpreter, for example. Chapter 14 covers using
ZEO. Integrated developer environments such as Wing (http://wingide.com/wingide) or Komodo (http://www.activestate.com/Products/Komodo) can remotely debug Zope instances and
have nice graphical interfaces.
12.1.2 Writing a Custom Tool
Writing a tool is simpler than writing a content type, mostly because there’s little to do in terms
of registering the product and because the user interface is simple. For an example, I use simple
statistics tool on my ZopeZen Web site (http://www.zopezen.org) for giving information about
the amount of content, number of users, and so on. This simple tool prints a few numbers that
interest me as a manager of the site. Figure 12-2 shows my ZopeZen stats.
354
Figure 12-2. PloneStats on ZopeZen
These are Web site statistics—I can get those by parsing the Web logs for my Plone server.
Tools—such as Analog, Webalizer, WebTrends, and so on—can happily parse your Plone or
Apache Web logs for you. Again, you can find the entire code for this project in the Collective
at http://sf.net/projects/collective in the PloneStats package.
12.1.2.1 Starting the Tool
You should place the tool in a product directory the same way you did with the content type—
by making a directory inside the instance home product directory. Into that folder add the
refresh.txt, install.txt, readme.txt, and __init__.py files.
In that directory, the main module is called stats.py, which contains all the code for creating
the stats. Again, I’ll cover how the module looks without any extra Zope code. However, since
you’re directly plugging into the other Plone tools, running outside of Zope will make little
sense.
Listing 12-13 shows the start of the tool. This is a simple version that has two methods: one to
355
return the number of content types by type and by workflow state and the other for users that
returns the total number of users in the site.
Listing 12-13. The Basic Stats Object
class Stats:
def getContentTypes(self):
""" Returns the number of documents by type """
pc = getToolByName(self, "portal_catalog")
# call the catalog and loop through the records
results = pc()
numbers = {"total":len(results),"bytype":{},"bystate":{}}
for result in results:
# set the number for the type
ctype = str(result.Type)
num = numbers["bytype"].get(ctype, 0)
num += 1
numbers["bytype"][ctype] = num
# set the number for the state
state = str(result.review_state)
num = numbers["bystate"].get(state, 0)
num += 1
numbers["bystate"][state] = num
return numbers
def getUserCount(self):
""" The number of users """
pm = getToolByName(self, "portal_membership")
count = len(pm.listMemberIds())
return count
12.1.2.2 Turning the Package into a Tool
To turn the package into a tool, you have to do the same process for the content type. In other
words, you have to register the tool in the __init__.py module. Just like in the content type
example, make a config.py file that contains all the configurations. The config.py file looks like
this:
from Products.CMFCore import CMFCorePermissions
view_permission = CMFCorePermissions.ManagePortal
product_name = "PloneStats"
unique_id = "plone_stats"
The security for this product is simpler, but that’s because the product is quite simple—all
it does is interact with other tools and produce some statistics. There’s nothing for users to
356
add, edit, delete, or otherwise interact with. This means you have really only one permission,
ManagePortal, which is the permission to actually manage Plone’s configuration and is usually
given only to managers. For this purpose, this means only managers can go into the ZMI and
see the information the tool provides. You could quite easily add a nice-looking skin for the
Plone control panel or a portlet that displays this information in your site if you wanted.
Returning to __init__.py, add the initialization code for the tool. There’s a special initialization
script for tools, called ToolInit. In this tool, the __init__.py file looks like this:
from Products.CMFCore import utils
from stats import Stats
from config import product_name
tools = (stats.Stats,)
def initialize(context):
init = utils.ToolInit( product_name,
tools = tools,
product_name = product_name,
icon=’tool.gif’
)
init.initialize(context)
The ToolInit function can take multiple tools; in this case, you have only one tool. If you have
multiple tools, you can have only one product name and icon to show in the ZMI. This is all
that’s needed to register the tool. Now you have to complete the main module to turn it into
an actual tool object.
12.1.2.3 Altering the Tool Code
Next, add the code to the class to turn into a tool. Like the content type, this is just a matter of
adding security inheriting from the correct base classes, like so:
from Globals import InitializeClass
from OFS.SimpleItem import SimpleItem
from AccessControl import ClassSecurityInfo
from Products.CMFCore.utils import UniqueObject, getToolByName
The SimpleItem class is the default base class for a simple (not a folder) object in Zope. Actually,
all content types inherit from a class that, somewhere in its class hierarchy, inherits from
SimpleItem; it’s just that you don’t need all the extra attributes those other classes provide.
UniqueObject ensures that there will be one and only one instance of this object inside your
Plone site and that it can’t be renamed or moved around. This means your object will always
be available.
Next, you import the variables from the config file as usual. By assigning the ID of your object,
you ensure that the tool will have the ID of whatever unique_id is in the config file—in this
357
case, plone_stats. The two base classes for the tool are the UniqueObject and SimpleItem classes,
which are the minimum it needs. For example:
from config import view_permission, product_name, unique_id
class Stats(UniqueObject, SimpleItem):
""" Prints out statistics for a Plone site """
meta_type = product_name
id = unique_id
Next, you need to set up the security, and again you’ll use the ClassSecurityInfo class to set
explicit permissions on the methods. For example:
security = ClassSecurityInfo()
security.declareProtected(view_permission, ’getContentTypes’)
def getContentTypes(self):
...
12.1.3 Adding Some User Interface Elements
The main code is complete, so it’d be nice to show some response to the user when they click
the tool in the ZMI, such as giving an example of how to use the product. For this, you’ll alter
the ZMI so that you can display something.
Specifically, you write a page template that does what you want it to do. In this example, this
is a simple page template that hooks into the ZMI. The ZMI is an unsophisticated user interface
that just spits back Web pages to the user, so no fancy macros or slots render the page. All you
need to do is write a HTML and add the following:
<span tal:replace="structure here/manage_tabs" />
This one tal:replace function gets the management tabs and makes them appear at the top of
the page. My ZMI page loops through the two methods of the plone_stats tool and spits out the
results for the user, as shown in Listing 12-14.
Listing 12-14. A Page to Show in the Management Interface
<html>
<body>
<span tal:replace="structure here/manage_tabs" />
<p>Statistics for this Plone site.</p>
<h3>Content Types</h3>
<span tal:define="numbers here/getContentTypes">
<p>
Total count: <i tal:replace="numbers/total" /><br />
358
Content types by type:
</p>
<span tal:repeat="type python:numbers[’bytype’].keys()">
<ul>
<li>
<span tal:replace="type" />:
<i tal:replace="python: numbers[’bytype’][type]" />
</li>
</ul>
</span>
<p>Content types by state:</p>
<span tal:repeat="type python:numbers[’bystate’].keys()">
<ul>
<li>
<span tal:replace="type" />:
<i tal:replace="python: numbers[’bystate’][type]" />
</li>
</ul>
</span>
</span>
<h3>Users</h3>
<p>
User count: <i tal:replace="here/getUserCount" />
</p>
</body>
</html>
This is called output.pt and placed inside the www directory. You don’t have to use a separate
directory, but doing so makes it easier to remember.
The last step is to hook this up into the ZMI for your product. You do this by returning to the
Stats class and adding the following (first import a PageTemplateFile class that can handle the
template from the file system):
from Products.PageTemplates.PageTemplateFile import PageTemplateFile
Then you register the page template as a method for the product that can be accessed. In the
following, the method outputPage can now be called through the Web, and the matching page
template is returned:
outputPage = PageTemplateFile(’www/output.pt’, globals())
security.declareProtected(view_permission, ’outputPage’)
359
Finally, the tabs at the top of the ZMI are determined by a tuple called manage_options that
maintains a list of all the tabs to be shown on a page. You need to insert the new management
page in there, so you do the following:
manage_options = (
{’label’:’output’, ’action’:’outputPage’},
) + SimpleItem.manage_options
12.1.3.1 Testing the Tool
Now that the tool is done, you can test that it works. First, restart your Plone instance so that
it’ll read the product directory in and register your new tool. Second, access the ZMI and go
to the Add drop-down box in the top-right corner. You’ll notice that PloneStats is now in the
drop-down list, so select this option and click Add. The next form will list the tools available
in the PloneStats product; in this case, just one appears, as shown in Figure 12-3.
Figure 12-3. Adding the tool
Select the tool, and click Add. To test that the tool works, click it. You should see a series of
statistics, as you saw earlier on ZopeZen.
This tool is simple because I’m really not sure what presentation people want; if I make a
standard reporting tool, then you can use it as you want. Some ideas that spring to mind are a
page in the control panel, a little portlet box, a Portable Document Format (PDF) that contains
pretty graphs and is e-mailed to the manager, or an API that’s an external reporting tool, such
as Crystal Reports could use. At this point, I’ll wait and see what happens in the future.
13 Chapter 13
13.1 Developing with Archetypes
Archetypes is a framework for automating the development of products in Plone. Once a description has been written for a content type in Python, Archetypes handles almost everything
else, including creating view and edit forms for the developer. This allows you to develop content types quickly and with a minimum amount of code. The less code written means a lower
probability of bugs, less code to maintain as Plone changes, a quick development cycle, and
generally lower costs.
Because the entire product is based upon this object description, it allows you to use tools to
generate that product. For example, ArchGenXML, which I’ll cover later, allows you to generate
a product in a Unified Modeling Language (UML) tool. You can then take the output of the UML
model and pass it through ArchGenXML to have a product instantly appear in Plone; you don’t
actually have to write any code. If you found that writing the product in Python in Chapter 12
was a little too much like hard work, then this chapter is something you’ll appreciate.
This doesn’t mean Archetypes is right for every product; sometimes I’ve found Archetypes to
be a little too much. For example, in one case my content type had one field, but about 16
different permutations on the data on that field were presented, which meant little of the
existing Archetypes framework was used. That was an extreme case, however. Most of the
time you’ll find Archetypes is exactly what you need.
Several people complain that Archetypes makes life a little too easy for developers, and of
course it’s hard to charge people much for work that can take ten minutes. Personally I’ve
never had a problem with this, and Archetypes has gotten me out of many sticky situations
when all of a sudden the specification changes from four content types to fourteen.
One anecdote I’ve heard concerns a Web site development company. When the company visits
clients, it takes along a programmer. As the client describes its needs, the programmer furiously
types away into Archetypes. Before the meeting is finished, they can demonstrate a quick
prototype of the working product to the client.
Overall, most of the Plone development team has adopted Archetypes as the way to develop
products, so it has a great deal of mind share and really has become the standard for Plone
development. Some of Archetypes’ other key features are as follows:
• It automatically creates view and edit pages, so you don’t actually have to
write any page template code.
360
361
• It maintains unique object IDs. Every object you create will have a unique ID
that users can’t change. This means you can always find an object, even if it
has moved.
• It creates references between objects. Each object can have any number of
relations to any other objects. For example, you could have any number of
link objects attached to a news item.
• It has standard security setup. All the security work is done for you, so if you
want the default setup, you don’t have to change anything.
• It has alternate storage options, such as storing your data in relational
database instead of Zope’s standard database.
• It has data transformation capabilities, such as changing Microsoft Word in
Hypertext Markup Language (HTML), for example.
Archetypes isn’t just Plone specific but can also be used in other Zope frameworks such as
the Content Management Framework (CMF); however, at the moment it’s used mostly by
Plone. Eventually, when Plone moves to Zope 3, it’s planned that the Archetypes and Zope 3
schemas will converge. So using Archetypes is a good way to future-proof your product so it’s
compatible with future Plone versions.
In this chapter, then, I run through building new content types with Archetypes. This chapter
really pulls together all the information you’ve learned over the last few chapters and runs
quite quickly through some basic concepts. After showing how to install Archetypes, I take you
through how to create a basic content type.
13.1.1 Introducing Archetypes
Archetypes comes in the installers and packages for Plone, so chances are you’ll
already have Archetypes installed in your distribution. If you’re unsure if this is the
case, you should be able to see Archetypes in the Products part of the ZMI control
panel. In these examples, I’ve tested Plone with Archetypes version 1.2.5-rc4. If
you’ve got Archetypes installed, skip to the ’Developing with Archetypes” section.
To install Archetypes, you’ll need to go the Web site at http://sf.net/projects/archetypes, click
Files, and get the latest Archetypes release. In my example, this is archetypes-1.2.5-rc4.tgz.
You’ll need to unzip it, like so:
$ tar -zxf archetypes-1.2.5-rc4.tgz
$ cd archetypes-1.2.5-rc4l
At this point you’ll need to decide what to install. The minimum to install is the Archetypes
directory and the generator and validation modules. To install these modules, move them
into the Products directory of your instance home. Again, in my case, this is /var/zope, so my
command is as follows:
$ mv Archetypes /var/zope/Products
$ mv generator /var/zope/Products
$ mv validation /var/zope/Products
362
ArchExample and ArchGenXML are both optional, and you don’t need them for Plone to work;
however, I cover both of these as examples in this chapter, so you’ll probably want to install
them.
To install ArchExample, move the ArchExample product into the Products directory of your
instance home, like so:
$ cd ..
$ mv ArchExample /var/zope/Products
If you want to use ArchGenXML, you don’t need to install it anywhere in particular, so place it
in any directory where you won’t forget it. I usually just place it into the Products directory of
my instance home along with everything else. It doesn’t do any harm there, and I won’t forget
it. For example:
$ mv ArchGenXML /var/zope/Products
As stated in the ArchGenXML documentation, ArchGenXML does require PyXML to be installed.
Again, if you used an installer such as the Windows or Mac installer, this was already included
for you. If not, then go to http://pyxml.sf.net and download the package. In my case, the latest
package was 0.8.3, so after downloading, I ran the following:
$ tar -xvf PyXML-0.8.3.tar.gz
$ cd PyXML-0.8.3
$ python setup.py install
NOTE: Usually, installing in this manner requires root privileges on Unix to install into the
Python directories.
Now that you have everything set up and installed, you’ll see some of the examples.
13.1.1.1 Diving Into Archetypes
A whole bunch of great examples are available for Archetypes, so rather than constructing one for the book, I show ArchExample, which comes with the Archetypes
installation. This adds a content type called article to give a rough example of the
power of Archetypes.
Article.py contains the main product code. You’ll see that the code looks quite different from
previous examples. It contains schemas
StringField("blurb",
searchable = 1,
widget = TextAreaWidget(),
),
363
This piece of code denotes that you have an attribute on the content type called blurb, that it’s
a string, and that it’s going to be shown as an HTML text area. I discuss all the options for
fields and widgets in a moment. For now, take a look at the content type in Plone. In Figure
13-1, I’ve added the blurb content type.
Figure 13-1. The blurb part of the content type
With just those four lines of code, you’ve added a field to your content type. The standard form
elements that you’d expect in Plone are present; if you edit something and come back later, the
old value is shown, errors are handled gracefully, and so on. As a demonstration of how easy
it is to modify, change the label in the form to appear as Article Blurb, and change the field to
be required. To do this, make the following changes:
StringField("blurb",
required = 1,
searchable = 1,
widget = TextAreaWidget(label="Article Blurb"
),
Here you’ve added the required = 1 parameter, which makes this field required, and a label
parameter. If you restart Plone and add a new article, the user interface has now changed to
reflect the new schema. The field is now called Article Blurb
364
Figure 13-2. The Article Blurb part of the content type
This isn’t just a cosmetic change; the change reflects the alteration of the underlying schema,
and this is the real power of Archetypes. Just comparing this to writing products in Python,
you can see that all the drudgery has been removed from writing a product. It’s like this: If
you can define a schema, you can throw together an archetype in absolutely no time. Once
you’ve done that, you can edit it easily and have the changes take effect.
If you do make any of these changes to try the following examples, you’ll have to restart Plone.
Only then will all the new changes be loaded and properly registered. For more information
on this, see the ’Developing with Archetypes” section later in this chapter.
13.1.1.2 Explaining Schemas, Fields, and Widgets
Merriam-Webster’s dictionary definition of a schema is as follows:
schema:
In Archetypes terms, a schema
Each field has one widget defined. A widget
Figure 13-3 shows the relationship between schemas, fields, and widgets.
365
Figure 13-3. The relationship between schemas, fields, and widgets
13.1.1.2.1 Schemas and the BaseSchema
To create a schema, pass the fields you’d like in the schema object as a tuple of
fields. For example, the article schema has three fields: group, blurb, and body.
The following code starts the schema:
Schema((
StringField(’group’,
vocabulary=ARTICLE_GROUPS,
widget=SelectionWidget(),
),
# other fields here
)
It’s possible to add schemas together to get a summation of more than one schema. This is
exactly what ArchExample actually does: it adds the schema defined in the content type to a
schema called BaseSchema.
The BaseSchema contains the two elements every Plone content type should have, a title and
an ID. The title is required so that something can display in the user interface, and the ID, or
short name, corresponds to the standard Plone conventions for a naming scheme. The two
366
schemas are simply added together to create one bigger schema. In ArchExample, you do this
by adding the schema for the content type to the already existing BaseSchema. For example:
schema = BaseSchema + Schema((
StringField(’group’,
vocabulary=ARTICLE_GROUPS,
widget=SelectionWidget(),
),
...
It’s worth noting that the items are returned from queries of the schema in the order they’re
added to the schema. This means you can rearrange the order that elements appear in the user
interface by moving the fields around in the schema. That’s also why the BaseSchema is added
at the beginning so that the ID and title fields will appear at the top of the view and edit page,
rather than at the bottom.
13.1.1.2.2 Fields
So far you’ve seen the StringField field, which is a common field that represents
a string on your content type. A number of fields are available in Archetypes, as
described in Table 13-1. Over time, more fields are being added, and if you need
to, it’s possible to create your own.
Each field has a default widget that will be used, unless you specify one. In the blurb example
earlier, I specified a TextAreaWidget. (Widgets are covered in the next section.) All these fields
are imported from the Archetypes public module; for example:
from Products.Archetypes.public import BooleanField
All fields are instantiated the same way—by creating a field and passing in the one required
parameter for the field: name. You can optionally pass in any number of keyword parameters
as needed. For instance:
from Products.Archetypes.public import IntegerField
# a simple field for age
age = IntegerField(’age’)
Table 13-1. Fields Available in Archetypes
Name
Type
BooleanFieldBoolean
values
DateTimeField
Date and
time objects
Default
Widget
Description
ComputedWidget
Simple storage of true or false for a field.
CalendarWidget
For storing dates and times.
367
Name
Type
Default
Widget
FileField
Files
FileWidget Storage for large chunks of data such as plain-text files, Microsoft Word documents, and so on.
DecimalWidget
For storing numerical data with fixed points.
FixedPointField
Fixedpoint
numbers
FloatField Floats
ImageField Image
IntegerFieldInteger
LinesField Lists
PhotoField Image
ReferenceField
Reference
StringField String
TextField
String
Description
DecimalWidget
For storing numerical data with floating points.
ImageWidget
Stores an image and allows dynamic resizing of the image.
StringWidget
For storing numerical data as integers.
LinesWidgetA list of data such as keywords.
PhotoWidgetSame as an image field but has more default image sizes.
ReferenceWidget
Contains a reference between this object and another.
StringWidget
A string field optimized for smaller strings—say, fewer than
100 words.
TextWidget A string field optimized for larger strings—say, larger than
100 words. The string can also be transformed into multiple
formats.
Each of the fields has attributes you can assign to the field. You’ve already seen at least two:
the name and the widget attributes. The name attribute is the only required parameter to a
field and should be unique, lowercase, and without spaces or periods. The name attribute is
going to be used internally only, so sticking to this naming rule is important. All the other
values are optional. Table 13-2 describes the attributes.
Table 13-2. Field Attributes
Name Description
accessor
The name of the method to get the value of
the field, so you could change how this field
is retrieved Any method name (for example,
specialGetMethod)
defaultThe default value for the field.
default_method
A string for obtaining a value for the field;
one is created for you by default if you don’t
define one.
edit_accessor
The name of a method to get the raw value
of a field.
enforceVocabulary
If enabled, you won’t accept anything outside the vocabulary.
Possible Values
See the ’Overriding Default Methods”
section later in this chapter.
Should be appropriate to the field.
Any string (for example, getSpecialDescription). See the ’Overriding Default
Methods” section later in this chapter.
Any method name (for example, rawGetMethod). See the ’Overriding Default
Methods” section later in this chapter.
True or False.
368
index If you want this field to be placed in its own
catalog index, then specify the type of index
here as a string. If you append :schema onto
the end of the schema, then this will also be
added as a metadata column.
name A unique name for this field.
mode The read and write mode of field, as a string;
the default is to be read and write.
multiValued
If this field can have multiple values, this is
useful for things such as drop-down lists.
mutator
The name of the method to alter the value of
the field, so you could change how this field
is set.
primary
If True on a field, then this will be the field
that responds to File Transfer Protocol (FTP)
and WebDAV requests. There can be only
field that does this; if multiple are defined,
the first one in the schema will be used. You
normally do this for the main body attribute.
required
Specifies that some value for this field required.
schemata
Place the field into the grouping of other
fields called schematas
default
metadata
user_information
searchable
A boolean that specifies if this field will be
added to the searchable text and can be used
in the searches.
validators
The validations that will be performed on
the field as a tuple of strings; it starts at first
and validates against each validation.
vocabulary
A list of values that a user can choose from,
for example, the values to show in a dropdown list.
storageWhere to store the value; the default is Attribute Storage, which stores the field as an
attribute of the object.
The name of any index, such as KeywordIndex or KeywordIndex:schema.
Any string, lowercase conforming to
standard Python variable rules (for example, description, user_name, or coffee_bag_6).
For read only: r, for write only: w, for
read and write: rw.
True or False.
Any method name (for example, specialSetMethod). See ’Overriding Default
Methods” later in this chapter.
True or False.
True or False.
True or False.
Any validator; see the ’Validations of Input” section later.
List of strings (for example, [”Green“,
”Red“, ”Blue“]).
Any valid storage object such as AttributeStorage or SQLStorage. You can
find these in the Archetypes Application
Programming Interface (API). For more
information, see the ’Storing Your Content in a SQL Database” section later in
this database.
369
widgetThe widget that will be used to display this
field.
Any widget object.
Now that I’ve covered the default fields and attributes, it’s time to move onto the actual widgets
that are available.
13.1.1.2.3 Widgets
A widget contains the information about how the object will be represented visually. The view of an attribute displayed is often closely related to the type of the
attribute; however, you have options for the display—a string could be selected in
many ways. Given the set of widgets, the widget object can be almost anything. You
can import any of the widgets from the Archetypes public module. For example:
from Products.Archetypes.public import BooleanWidget
All widgets are instantiated the same way—by creating a widget and passing in keyword parameters as needed. For example:
from Products.Archetypes.public import IntegerField
from Products.Archetypes.public import IntegerWidget
# a simple field for age
age = IntegerField(’age’,
widget=IntegerWidget(label="Your age")
)
Widgets can also have extra attributes, depending upon the type of widget. In most cases,
these extra attributes correspond directly to HTML attributes; for example, on a StringWidget,
you can set a size attribute. This will produce the appropriate HTML widget with the HTML
size attribute set. So to have input that’s 20 characters wide, you’d create the following widget:
bankAccountNumber = StringField(’bank’,
widget=StringWidget(
label="Bank account number",
size=20)
)
Table 13-3 describes all the widgets available to you in Archetypes.
Table 13-3. The Available Widgets
Name
Description
BooleanWidget
Shows two checkboxes for the
possible values.
Other Attributes
370
Name
Description
CalendarWidget Returns a set of input boxes with
a link to a helper pop-up box so
that a user can select a date.
ComputedWidgetReturns the computed value as
HTML.
DecimalWidget A simple HTML input box for a
string.
EpozWidget
An HTML Epoz widget that
shows the Epoz rich-text editor
for the content.
FileWidget
Displays an HTML file element
for users to upload files.
IdWidget
A simple HTML input box that’s
used for rendering autogenerated IDs.
ImageWidget
Shows and allows the editing of
images.
IntegerWidget
A simple HTML input box for a
string.
KeywordWidget This displays a list of keywords
from the catalog in a complicated
widget, such as the one in the
Properties tab on a normal object.
LabelWidgets
Used to display labels on forms;
no values or form elements.
LinesWidget
Displays a text area that users
can enter values.
MultiSelectionWidget
A selection widget; by default it’s
an HTML select widget.
PasswordWidget An HTML password element.
RichWidget
Allows the input of a file in multiple formats that are then transformed. See ’Transforming Data’
later in this chapter for more information.
ReferenceWidget Shows an HTML select element
of a list of possible references.
Other Attributes
size
You can provide format, rows, mode, and
cols (for columns)
You can provide a display_threshold that
allows you to set the size of an image; if
it’s below this size, the image will display
in the Web page.
size
rows and columns
format, which can be one of select or
checkbox
You can provide rows, cols *(columns),
and *format.
371
Name
Description
SelectionWidget Shows a selection widget. If
it’s flex (the default), then if the
number of choices is more than
four, a select element is used;
otherwise a radio button is used.
StringWidget
A simple HTML input box for a
string
TextAreaWidget A text area widget that allows
the uploading of the content in
multiple formats
Other Attributes
format, which can be one of flex, select, or
radio.
size and maxlength.
You can provide allowed_content_types,
which is a list of strings; each string represents a meta_type of the type of content
uploaded.
For each of the widgets listed in Table 13-3, Table 13-4 describes all the attributes that are
common to all widgets. You’ve already seen the label attribute, which sets the description on
your widget. In conjunction with the extra attributes for each widget, you have a complete set
of widget attributes.
Table 13-4. Possible Values for the Widgets
Description
Name
Possible Values
label The label that will appear in the user interface with this
field.
modes
The modes that this widget will be shown in; by default
there are two modes: view and edit.
populate
If this is enabled, the view and edit fields will be populated. Usually this enabled, but for fields such as a password field, this shouldn’t be the case. Usually this is true
by default.
postback
If this is enabled, then when an error is raised, the field
is repopulated; for fields such as a password field, this
shouldn’t be the case. Usually this is true by default.
visibleIf the attribute should be visible in the user interface.
This is a dictionary mapping the view mode to a string,
describing the visibility. Choices are visible, hidden
(shown in an HTML hidden form value), invisible (not
shown at all).
Any string, for example, Start
Date for a field start_date.
A list of modes as strings; by
default it’s (”view“, ”edit“).
True or False
True or False
For example, {’view’: ’visible’,
’edit’: ’hidden’ } means that
the view will show, but the
edit page will hide the value.
372
13.1.1.3 Some Example Field and Widget Combinations
This section contains some useful combinations that seem to be commonly used
and that you may find as useful examples. For this example, make a drop-down
list of your favorite fruits. You’ll define the vocabulary attribute as a list of strings.
Each of the values in the list is a string of the fruit type; hence, the field type is a
StringField. Because you’re defining the widget as a SelectionWidget, it’ll show up
as a drop-down list, like so:
StringField(’fruit’
vocabulary = ["Apple", "Orange", "Mano", "Banana"],
widget = SelectionWidget(label = "Favourite Fruit")
)
The ImageField is a useful one for creating and maintaining images in a Plone site. To have a
nice simple field that users can upload images into, use the following:
ImageField(’portrait’,
widget = ImageWidget(label = "My picture"),
)
The following is quite a complicated content type. Most content types will have one main field
that can take data. If you think of the basic document type, you’ll notice a body field that you
enter and edit. This one body field is the main text of the content type. So for this standard
field, you’ll have only a few attributes that should be added.
First, you’ll want this field to be searchable, so you should set the searchable attribute. Second,
you’ll want this field to respond to FTP and WebDAV requests, so you must set the primary
attribute (you can find more information on this in the sidebar ’The Primary Field: Marshaling
and Responding to FTP and WebDAV”). You’ll want multiple content types to be uploaded, so
for this reason you set some allowable_content_types. Then, of course, you need to know how
to show the field, so for that you set the default_output_type. This then gives you the following
field:
TextField(’body’
searchable = 1,
primary = 1,
default_output_types = ’text/html’,
allowable_content_types = (’text/plain’,
’text/structured’,
’text/restructured’,
’text/html’),
widget = RichWidget(label = ’Body’),
)
373
13.1.1.4 The Primary Field: Marhsaling and Responding to FTP and WebDAV
Plone is an object-oriented system where an object has many attributes and can’t simply be
represented as a plain file. Unfortunately, most the existing protocols such as FTP and WebDAV
treat content in exactly this manner. So there needs to be some way to translate between the
two, and the primary field does this. By setting the primary field on an object, this field will
become the one that’s sent and received by these protocols—rather than the entire object.
This is an imperfect solution to a tricky problem, of course. If you’ve used FTP or External
Editor on a file, you’ll know that it tries to solve this by placing a number of lines at the top
of the page containing key/value pairs for metadata on the object. This is another attempt to
solve the same problem.
To set up primary field marshaling, you need to add the following to your schema: marshall=some_marshaller(). Currently, there are only two marshalers: a PrimaryFieldMarshaller,
which takes the whole content and places into your object, and an RFC822Marshaller. This
second marshaler handles the content for field name/value pairs as used in e-mail. For this
chapter’s purposes, I’ll use the PrimaryFieldMarshaller to handle content with External Editor.
13.1.1.5 Validations of Input
Although the forms handle the content and some basic errors, such as omitted
content, quite well, you’ll probably want some more sophisticated error handling.
You can make a series of validations to test that the content in your content type is
correct. For example, if you have an integer field, you’ll probably want to test that
the data they’ve added is what it’s meant to be.
To do this, you can add a validation parameter to the field. To test that your IntegerField really
is an integer, for example, you’d do this:
from Products.Archetypes.public import IntegerField
from Products.Archetypes.public import IntegerWidget
# a simple field for age
age = IntegerField(’age’,
validators=("isInt"),
widget=IntegerWidget(label="Your age")
)
Where did isInt come from? Well, isInt is the name of a validator registered in the validation
framework. Only a few are in there, but they’re quite useful; Table 13-5 describes them.
For the exact details of some of these, I recommend reading the code and looking at the
regular expressions—you can find these in the validation/validators/__init__.py module in your
Products directory:
Table 13-5. Available Validations
Name
Description
374
isDecimal
This validates that the string is a decimal, including positive and negative, exponentials, and so on.
isInt
This validates that it’s an integer.
isPrintable
This validates that this is a letter or a number.
isSSN
This validates that it’s nine numbers (the length of a U.S. Social Security number).
isUSPhoneNumber
This validates that it’s ten numbers and is optional.
isInternationalPhoneNumber
This validates that it’s at least one number and is optional.
isZipCode
This validates that it’s five or nine numbers.
isURL
This validates that the input starts with http://, ftp://, or https://.
isEmail
This validates that this conforms to the standard e-mail syntax.
You can also register your own validations. A validator is actually a simple class that implements the ivalidator interface. Two are already done: a RegexValidator that verifies a regular
expression and a RangeValidator that verifies a range of values. To register a new validator
that checks that a user is between, say, 0 and 150 years old (seems reasonable), you’d add the
following to your content type in the Python module, before creating the field:
from validation.validators.validator import RangeValidator
from validation import validation
# the RangeValidator takes a name for the validator
# and a start and end value
validAge = RangeValidator("validAge", 0, 150)
validation.register(validAge)
Then you can change your validator to the following:
validators=("isInt","validAge"),
First, the code will check that you have a valid integer; second, it’ll check that the integer is
within the range of sensible ages. If you wanted to add a totally new validator that did something other than a regular expression or range validation, you’d need to add a new validation
system. For this example, make a validation that a date is between two values. In the following
example, this is called DateRangeValidator and will return a boolean value if the given date fits
between the two given dates. This could be useful to assert that a vacation is within the school
holidays.
So, now define a new validator called DateRangeValidator in the validators module. This will
allow you to register date ranges to assert that the given date falls in the middle. To do
this, you’ll use the Zope DateTime object (which is covered in more detail in Appendix A).
A validator is simple—it’s a class that has a name and will respond to the __call__ method
by checking the date. The following is the DateRangeValidator class, which was added to the
validators module:
375
from DateTime import DateTime
class DateRangeValidator:
__implements__ = (ivalidator,)
def __init__(self, name):
self.name = name
def __call__(self, value, *args, **kwargs):
min, max = args[:2]
if not isinstance(value, DateTime):
value = DateTime(value)
return min < value and value < max
After restarting Zope, you can now register a new validation, like so:
from validation.validators.validator import DateRangeValidator
from validation import validation
from DateTime import DateTime
christmas = DateRangeValidator("ChristmasHolidays",
DateTime(’12/18/2004’),
DateTime(’01/09/2005’),)
validation.register(christmas)
Then you can create a validator in your schema in the following manner:
validators=("christmas",)
13.1.1.6 Overriding Views and Actions in the Base Class
Archetypes creates default views and actions for you based on a standard set of
requirements that will suit many needs. The actions are view, edit, and properties,
of course; references is another action you’ll look at it a moment. You won’t find
any view or edit page templates for the object; those are generated automatically
for you by Archetypes. However, you can override them.
I expect that in most cases you’ll want to override the view method and provide one of your
own; the default is basic and isn’t aimed at being a perfect page (of course, being a Plone page,
it’s better than your average content management system). However, you may have specific
needs that relate to the content; perhaps it’s a matter of presenting your content in a certain
way.
Archetypes actually creates a class for each content type. Much in the same way that you
created a class for the source code type in the previous chapter, you can create a base class for
your archetype. This base class is called BaseContent and is available in the public module of
376
Archetypes for importing. This BaseContent class defines all the things that Archetypes needs
to know. Making this class provides you with an opportunity to override almost anything you
want in the class.
As I now show, there are two parts to this. First, you make an action that’s to be used by the
factory type information; in Archetypes you do this by assigning the actions attribute of the
class. For example:
from Products.Archetypes.public import BaseContent
class Article(BaseContent):
# other stuff
actions = ({ ’id’: ’view’,
’name’: ’View’,
’action’: ’string:${object_url}/article_view’,
’permissions’: (CMFCorePermissions.View,)
},)
Second, you need to create a page template for the actual view of the object called article_view.
This string defines a page template that the content type will locate in the skin for this product.
In this case, you’ll find the matching page template on the file system in the skins/archexample
directory of ArchExample. You can also find a copy of this page template in Appendix B. This
can be as simple or as complicated a page template as you’d like.
You have to restart Plone for the changes to take effect. In this case, you’re changing an action
that’s installed into the portal_types tool whenever the product is installed. For this reason, if
you do change this action, you’ll need to reinstall the product. To do this in the Plone interface,
click plone setup
All the elements in the factory type information can be overridden by creating an attribute of
that name on the object. To override the content_icon setting, you’d make an attribute called
content_item. For example:
class SomeProduct(BaseContent):
""" Some product """
content_icon = "some_icon.gif"
13.1.1.7 Overriding the Default Methods
In Table 13-2, I mentioned the option of overriding some of the default methods
that occur on content types, such as accessor and mutator. This is an advanced
option that allows you to manipulate the way fields are edited.
Just as with the source code project in the last chapter, you access these attributes or fields
using accessors and mutator methods. Some default methods are available for you. If your
field name is blurb, then these methods will be getBlurb and setBlurb. The term get
However, you may want to do something different in the accessor or mutator. Suppose you
wanted to filter the value of a field, such as always correcting the spelling of your company
377
name or changing the value of some other fields when a certain field changes. Then you could
do so by overriding the default methods. In the following example, you’ll make a new method
called getSpecialBlurb that takes the blurb someone has entered and manipulates it before
returning to the client. In this case, you’re replacing the text Perl
getSpecialBlurb Article
class Article(BaseContent):
def getSpecialBlurb(self):
""" The view for an article """
blurb = self.getField(’blurb’).get(self)
blurb = blurb.replace(’Perl’, ’Python’)
return blurb
You’ll also need to change your field so that it uses this method:
StringField(’blurb’,
searchable=1,
widget=TextAreaWidget(),
accessor="getSpecialBlurb",
),
In this example, anytime the blurb field is accessed in a view or edit page, for example, the
value of getSpecialBlurb is returned. Archetypes knows to access that method because the name
of the method is defined as a string value passed to the accessor parameter. There’s one bit
of trickery involved—to access the raw value of the attribute, you need to get the field and
then call the get method. This is the rather confusing blurb = self.getField(’blurb’).get(self) line.
The pattern of getting the field and then calling a method on it is actually quite common in
Archetypes.
The practical upshot of this is that now, no matter when or how a person types in the word
Perl
13.1.2 Putting Together the Rest of the Content Type
I’ve now covered all the main elements of the content type. Listing 13-1 shows all
the code together. You’ll note that the rest of the code is more compact than the
Python product because Archetypes does so much work for you.
Listing 13-1. Article.py
from
from
from
from
from
from
Products.ArchExample.config import ARTICLE_GROUPS
Products.Archetypes.public import BaseSchema, Schema
Products.Archetypes.public import StringField, TextField
Products.Archetypes.public import SelectionWidget, TextAreaWidget
Products.Archetypes.public import RichWidget
Products.Archetypes.public import BaseContent, registerType
378
from Products.Archetypes.Marshall import PrimaryFieldMarshaller
from Products.CMFCore import CMFCorePermissions
from config import PROJECTNAME
schema = BaseSchema + Schema((
StringField(’group’,
vocabulary=ARTICLE_GROUPS,
widget=SelectionWidget(),
),
StringField(’blurb’,
searchable=1,
widget=TextAreaWidget(),
),
TextField(’body’,
searchable=1,
required=1,
primary=1,
default_output_type=’text/html’,
allowable_content_types=(’text/plain’,
’text/structured’,
’text/restructured’,
’text/html’,
’application/msword’),
widget=RichWidget(label=’Body’),
),
),
marshall=PrimaryFieldMarshaller(),
)
class Article(BaseContent):
"""This is a sample article; it has an overridden view for show,
but this is purely optional
"""
schema = schema
actions = ({
’id’: ’view’,
’name’: ’View’,
’action’: ’string:${object_url}/article_view’,
’permissions’: (CMFCorePermissions.View,)
},)
registerType(Article, PROJECTNAME)
Apart from a bunch of imports at the top and the schema, I’ve covered all the contents of this
code, with one exception: registerType. This function registers your object with the product.
379
Each product can have multiple content types, so this function takes the object and the name
of the project. In this case, the name of the project is imported from the configuration file,
as you saw earlier. The configuration file, config.py, contains similar variables for the product
configuration, as shown in Listing 13-2.
Listing 13-2. The Configuration File for ArchExample
from Products.CMFCore.CMFCorePermissions import AddPortalContent
from Products.Archetypes.public import DisplayList
ADD_CONTENT_PERMISSION = AddPortalContent
PROJECTNAME = "ArchExample"
SKINS_DIR = ’skins’
GLOBALS = globals()
ARTICLE_GROUPS = DisplayList((
(’headline’, ’Headline’),
(’bulletin’, ’Special Bulletin’),
(’column’, ’Weekly Column’),
(’editorial’, ’Editorial’),
(’release’, ’Press Release’),
))
The variable ARTICLE_GROUPS is a tuple of a tuple of strings for use in the group widget. You
could just use a simple tuple of strings, but in this case the example is using the DisplayList
class, which is a chance to show a different value to the user from what will be put in the form.
In this case, the HTML for ArticleGroups is displayed in an HTML select element, like so:
<option value="headline">Headline</option>
<option value="bulletin">Special Bulletin</option>
...
One other unusual insight is the use of globals function—this is a Python built-in function that
contains all the global symbols. This calculates the path to the skins directory on the file system
so that you can make a file system directory view of the skin for the skins tool. The product
initialization function, __init__.py, is also much simpler. With one new inclusion, the process
and list type functions look like this:
from Products.Archetypes.public import process_types, listTypes
content_types, constructors, ftis = process_types(
listTypes(PROJECTNAME),
PROJECTNAME)
The listTypes function is an Archetypes utility that will return all the types you’ve previously
registered. This is then passed into the process_types function, which in turn returns you all
380
the content types, constructors, and factory type information objects. These are all the same
items you registered in the Python product; it’s just that this utility function makes it all a little
easier.
Finally, you have the installation function in the Extensions install.py. This script is now embarrassingly small because all the work you’ve done previously is handled by two utility functions,
installTypes and install_subskin. The term subskin
Listing 13-3. Installation Script
from Products.Archetypes.public import listTypes
from Products.Archetypes.Extensions.utils import installTypes,
install_subskin
from Products.ArchExample.config import PROJECTNAME, GLOBALS
from StringIO import StringIO
def install(self):
out = StringIO()
installTypes(self, out, listTypes(PROJECTNAME), PROJECTNAME)
install_subskin(self, out, GLOBALS)
out.write("Successfully installed %s." % PROJECTNAME)
return out.getvalue()
The full version of ArchExample is available from the Plone Book Web site at http://plonebook.agmweb.ca, and you should be able to drop this and run it on your site. As you’ve seen,
this content type is quick and easy to develop and easy to alter, without having to write lots of
code.
13.1.3 Archetypes based Development
This section provides some more in-depth coverage on some of Archetypes’ more
advanced features. These features will provide some useful tools for the development of your content types. This will include making references, creating new
widgets, and transforming content.
For this chapter, it’s important to recognize how the changes you’ll make can be carried through
to Plone. As you’ve seen in the past, you have different stages in your product setup. When
you change your product, it helps to know the steps you need to take.
If you change something in a skin, then just running in debug mode will ensure that the
changes are propagated. If you change something that’s passed onto the portal_actions tool
such as actions or icon, then you need to restart Plone and reinstall the product through
Add/Remove Products.
If you change a schema, then you just need to restart Plone, and all new instances of your class
in Plone will be updated. However, what about all the old instances of the product? Fortunately, Archetypes has provided a dynamic update tool that goes through all the old instances
of your product and updates them to the new schema. In the ZMI, click archetype_tool
381
13.1.3.1 Using Unique IDs
The concept of unique IDs is simple but something that was missing in Zope. Originally Zope developers assumed using the path to an object would do; unfortunately,
this has shown to be inadequate. As a simple example, consider what happens
when someone moves the location of a document—your unique reference to that
document has been lost. A unique ID is a truly useful tool to have. Archetypes
creates a unique ID on every object it creates and saves it for you on the object. It
also saves it in a separate catalog for you called uid_catalog.
You can see the uid_catalog in the ZMI, and it’s like the portal_catalog object except it’s missing
a little bit of extra Application Programming Interface (API) wrapping and all the indexes that
the former contains. It’s pretty simple to get an object now by going through this catalog. All
you have to do is search the catalog for your object. For example, the following Script (Python)
object can pull any registered object, provided you know its UID:
##paramaters=objectId
results = context.uid_catalog(UID=objectId)
return results[0].getObject()
But where this really is useful is in references between existing objects. Say you want to
reference one or more separate images with your article. These images could be images uploaded by other users at another date, perhaps part of an image database. If those images are
Archetypes objects, then you could add a field to your article schema that reads as follows:
ReferenceField("images"
allowed_types=("Archetype Images",),
multivalued=1,
),
The user will now get a drop-down box of all the Archetype Image objects and be able to choose
them. Behind the scenes it’s making a reference of that object’s UID through the catalog. You’ll
find an excellent example on references in a product called ACME in the Archetypes CVS
repository at http://sf.net/projects/archetypes.
13.1.3.2 Altering Widgets
A commonly asked question is, why does this widget do this? Another is, why
does this widget look like this? Often the answer is something like, Because it
does—now go and write your own. Since widgets are what the client sees, these
requirements are often client driven.
All the widgets are represented as page template macros on the file system. So it’s pretty
simple to alter widgets or make your own. If you click portal_skins
portal_skins Actually, the term macro
382
The view macro displays on the view page and is a read-only, user-friendly view of the item.
The edit macro is the one shown on the edit page, and it’s the macro where a user edits
the data. The search macro is called when you’re assembling search pages for the code; it
sometimes looks like the edit macro, although it may not. A string field may be edited as a
string field and viewed as a string, but it’s searched using a drop-down box to select from all
the options available.
So, in the example product, assume you have a string field that’s a person’s e-mail address,
and you want to show this is a clickable e-mail link. For this you’ll make a new macro. In this
case, you don’t need to actually override the edit and search macros—it’s just a string after all.
So, make a new a page template called email_widget.pt, as follows, which you’ll place in the
skin of your product:
<html xmlns:tal="http://xml.zope.org/namespaces/tal"
xmlns:metal="http://xml.zope.org/namespaces/metal"
i18n:domain="plone">
<body>
<div metal:define-macro="edit">
<div metal:use-macro="here/widgets/string/macros/edit" />
</div>
<div metal:define-macro="search">
<div metal:use-macro="here/widgets/string/macros/search" />
</div>
For the view, you need to make the string show as a mailto link, which is just the following
simple adjustment:
<div class="field" metal:define-macro="view">
<a href="#" tal:attributes="href string:mailto:${accessor}"
tal:content="accessor">email</a>
</div>
</body>
</html>
Now that you’ve defined a page template that contains your code, you can simply reference
the name of the template as the macro in your widget. In the following code, you define the
e-mail field and a StringWidget as normal. You then change your macro to use your nice new
email_template macro, like so:
StringField(’email’,
validators = (’isEmail’,),
widget = StringWidget(
label=’Email’,
macro=’email_template’
)
)
383
At this point you’re just changing the macro of an existing widget. Making an entirely new
widget is just a matter of defining a new widget and then registering it. All widgets share the
same base class. The following is a new module called EmailWidget.py that’s placed inside the
ArchExample directory. It creates a new widget and then registers it into the registry. Note that
the macro property of the widget (highlighted) is set to the value of the template:
from Products.Archetypes.Widget import TypesWidget
from Products.Archetypes.Registry import registerWidget
class EmailWidget(TypesWidget):
_properties = TypesWidget._properties.copy()
_properties.update({
’macro’ : "email_template",
’size’ : ’30’,
’maxlength’ : ’255’,
})
registerWidget(EmailWidget,
title=’String’,
description=’Renders a clickable email field’,
used_for=(’Products.Archetypes.Field.StringField’,)
)
To include this in your article, you can now directly import the EmailWidget and use without
having to explicitly define the macro, like so:
from EmailWidget import EmailWidget
StringField(’email’,
validators = (’isEmail’,),
widget = EmailWidget(
label=’Email’,
)
)
13.1.3.3 Developing Folderish Objects
You’ve already worked with folderish objects a lot in Plone, but you may not have
known it. A folderish object is one that exhibits similar characteristics to a folder
or directory, namely, that it can contain separate individual objects. There really
is nothing special about a folderish object—just that it inherits from a certain base
class to provide its properties, and new content can be added to it.
Folderish objects are useful for you to make for several reasons. They provide a simple way
to create collections of disparate objects in one location. They also allow users to manage the
contents using the standard Plone user interface, without you having to do anything. Generally,
384
it’s best to keep the folder quite simple, and the logic should be on your objects and in the
objects’ workflow. However, some exceptions to that always exist, and a classic example is
the family of collectors, CMFCollector and PloneCollector both of which are quite complicated
collector objects that provide logic for a bunch of collector issues.
The easiest way again to make a folderish object is to use Archetypes. You’ve seen that there’s a
BaseContent type that handles all the work needed to create a nonfolderish object. Well, there’s
also a BaseFolder content type that contains everything for creating a folder. Futher, you’ll find
a special schema for folders, since folderish object also usually have a description. To make a
folderish type, just ensure that you change your base classes and your schema. For example,
possibly the simplest folder is as follows:
from Products.Archetypes.public import BaseFolder, BaseFolderSchema
schema = BaseFolderSchema
class SimpleFolder(BaseFolder):
"""A simple folderish archetype"""
schema = schema
registerType(SimpleFolder)
If you’re going to store a huge amount of content in a folder, then a folder tends to become
inefficient at about 100 objects. That’s a rather arbitrary figure that should be taken with a
pinch of salt; normal folderish objects are designed to be fast for small numbers of object. If
you wanted, you could use a binary tree folder, which stores the objects internally in a more
efficient binary tree, rather than a Python dictionary. To use this, just import BaseBTreeFolder
and BaseBTreeFolderSchema and use these in your object instead. As far as developing a product
is concerned, they work just the same, but unless you put a lot of data into them, you wouldn’t
likely notice any difference. I’ve stored more than 100,000 objects in BTreeFolder, and it’s
always responded well.
13.1.3.4 Handling Microsoft Office Content
Handling Microsoft Office content such as Word and Excel documents is a bane that
all content management systems face at some point. However, this is really the case
for every type of content—Microsoft Office, OpenOffice.org, Portable Document
Format (PDF), images, and so on. Using these content forms on Web sites usually
causes a few problems; this is well known, of course. Editing is clumsy because
clicking a document causes you to download it or, even worse, open it in your
browser. When you’ve finished, you have to upload back up to the Web site, which
can normally mean clicking around a bit to get back to it. When the content is
online, the contents aren’t searchable because they aren’t in a plain-text format the
catalog can understand. Further, you can’t view the content online because again
it isn’t in a Web-friendly format.
You have a couple of solutions for solving the first problem of editing content. If again you
assume most of your users are using Windows, then using WebDAV can be tricky for you
385
because Microsoft’s Web folder implementation is of questionable quality. Instead, External
Editor fulfills this function quite well—if Plone can tell External Editor that this is a Word file,
it’ll open in Word.
As for the rest, well, Archetypes has a built-in transformation package, called Portal Transforms, that handles the transformation of content types. This can take a file in a certain format
and transform it into HTML, which will then be cataloged, and the HTML will display to the
user in the user interface. It does this by using an external transformation process to transform
the data and read the results. For example, if you’re using Windows (on the server), then Portal Transforms will take the uploaded Word document and start a Component Object Model
(COM) object that transforms it.
This all happens behind the scenes for you; all you have to worry about is ensuring that any
requirements for your transforms are installed and operational. You can do lots of different
types of transforms, and there’s more than one way to transform the data.
The OpenOffice.org suite provides excellent transformation of Microsoft content, so if you’re
running on a non-Microsoft platform, this is an excellent way to transform that content. I’ve
also used wvWare (http://wvware.sourceforge.net/) quite successfully as another way of transforming content. All these options are available to you; however, they aren’t trivial to set up.
Once they’re set up, of course, people usually report getting higher-quality transformations
than when using a Microsoft server.
I recommend thinking first about exactly what you want to transform and then taking a look
at the Portal Transforms source code to see if you can find a transformation that will do the job
for you.
13.1.4 Setting Up a Content Type
You’ll now create a simple content type for handling Microsoft Word documents,
probably the most common type of content you’ll have to handle. For this example,
I did the transformation on Windows. However, if you can set up an alternative
system, most of the following worked on Linux. In this case, the easiest thing to
do is to use Windows to install your Plone instance. This creates an install with all
the Win32 API modules installed and working. I had Microsoft Office installed on
the server. Then you need to make a content type to handle the example, called
WordExample. Essentially one field in the schema handles the content so that the
schema looks like the following:
schema = BaseSchema + Schema((
TextField(’body’,
searchable=1,
required=1,
primary=1,
default_output_type=’text/html’,
allowable_content_types=(’application/msword’,),
widget=RichWidget(label=’Body’),
),
),
386
marshall=PrimaryFieldMarshaller(),
)
The only difference is that you’ve added a Multipurpose Internet Mail Extensions (MIME) type
for the Word document, application/msword. For each of content types to be transformed, add
the MIME type into allowable_content_types. For example, if you wanted to handle Word and
PDF documents, you’d have the following line:
allowable_content_types=(’application/msword’,’application/pdf’),
This content type is about as simple as you can get at this point. But you could plug more
stuff into this into the content type—such as a description or more properties. If you’re doing
a lot of work, then it’d conceivably be possible even to pull the metadata information from the
Word document and place it as metadata inside Plone.
13.1.5 Setting Up a Transformation on Windows
The transformation should be set up for you automatically inside the portal_transforms tool. There isn’t really a lot to look at in the tool; it merely provides
a list of the transforms that are available. A transformation has a list of incoming
MIME types that it’ll transform (such as application/msword) and the output that
will be produced (such as text/html). Each transformation is a module on the file
system; in this case, you can find it in PortalTransforms/transforms/word_to_html.
For that transformation to work, though, you must run a utility to generate the COM bindings
for Python. To do this, select Start - Plone - Pythonwin and then select Tools - COM Makepy
Utility. This lists all the COM interfaces available; if you have Office installed, you’ll see an entry for Word somewhere in the list. On my particular Windows server, this is called Microsoft
Word 9.0 Object Library (8.1). Select that option, and click OK. Pythonwin will now generate the appropriate information. Once you’ve done this, you’ll get a message back regarding
’Generating to.. . . ”
You can now close Pythonwin and restart Plone.
13.1.6 Testing the Content Type
To test your content type, you’ll need to restart Plone, ensure that the product is
registered as usual, and install it using the Add/Remove Products screen. To add
a new Word document, go to the Plone interface and in the drop-down box select
Word Document; it’s pretty obvious since you’ll also see a little Word logo.
Next, select your file from the file system, and click Save to upload your file. Once this has
been done, the file will be uploaded, and you’ll be taken to the view page. This may take a little
bit longer than you expect—it has to upload the document to the server and then perform the
transformation. But you’ll be taken to the view page for your content type, and sure enough
it’ll be shown in HTML, as shown in Figure 13-4.
387
Figure 13-4. The uploaded file
Now that it’s uploaded, you’ll want to edit it; for this, your best bet is to use External Editor.
If you have External Editor installed on your local client, click the pencil icon in the top-right
corner, and the file will open in Word, as shown in Figure 13-5. You can now alter and edit your
Word document. Each time you save the file, it will be loaded back into Plone and transformed.
388
Figure 13-5. The document loaded into Word
TIP
http://sf.net/projects/archetypes http://www.logilab.org/projects/portaltransforms/documentation
13.1.6.1 Going Further: Writing Content Types in a UML Diagram
So you have a complicated content type and the idea of writing it manually is
boring? Well, never fear, because ArchGenXML is here! This is a neat product that
allows you to write your content in a UML graphical modeling tool and develop a
product straight from that.
Phillip Auspberg developed ArchGenXML, and Jens Klein has provided some excellent documention. With kind permission, I’ll reproduce some of those diagrams here.
The UML modeling tool must support a standard Extensible Markup Language (XML) generation system called XML Metadata Interchange (XMI). This tool has been tested with the
following programs:
• ObjectDomain (commercial, with a free demo for 30 classes) from
http://www.objectdomain.com
389
• ArgoUML (free) from http://argouml.tigris.org
• Poseidon (commercial, based on ArgoUML) from http://www.gentleware.com
• Sybase
Powerdesigner
http://www.sybase.com
(commercial,
demo
download)
from
There are slightly different export properties for each of these, but if you take a look in the
ArchGenXML samples, you’ll see example outputs from the UML tools. Figure 13-6 shows a
class project that shows a few objects: room, person project, resource, and task. There are
relationships between all these objects, and there’s even Python code specified on some of the
objects.
Figure 13-6. A complex ArchGenXML example
The quickest way to test this is to go into the ArchGenXML folder on your file system that you
kept around from the original install and then change into the examples folder. In that folder
you’ll see the mkdemo script. To run it, just type ./mkdemo
python ../ArchGenXML.py outline.zargo outline_argo
You then need to copy the product folder created (for example, outline_argo) into your Products directory and restart your Zope instance. If you take a peek inside the outline_argo directory, you’ll see that everything has been created for you—the entire directory and all the
relevant product initialization. Click plone setup, select Add/Remove Products, and install the
outline_argo product. You can now add an outline object that has all the schema defined in the
UML.
390
That’s about as rapid development as you can get, and there are many, many options inside
ArchGenXML for defining abstract classes, code fragments, and so on. Furthermore, generating
code this way easily allows you to make changes and have great documentation. The only real
drawback is a lack of round-tripping
http://plone.org/documentation/archetypes/ArchetypesDeveloperGuide/index_html#archgenxmlgenerating-archetypes-using-uml
13.1.6.2 Storing Your Content in a SQL Database
For almost all of this book, the content you’ve seen has been stored in the Zope
object database. I’ve shown you how to store content on the file system, but a
commonly asked question is, How do you store it in a relational database? Placing
it inside a relational database is often a good thing to do if the following are true:
• Your structure is rigid, and the schema doesn’t change often (although Archetypes mitigates this aspect).
• You have other applications that can or do access the relational
database.
• There are tools or other requirements that are already fulfilled by a
relational database.
• You have a large amount of repetitive data that’s updated often.
In more a traditional CGI environment, you’d probably write some SQL statements for pulling
the content out of a relational database. You can do this if you really want to by using ZSQL methods. These are useful for many situations and are covered in great detail
in the Zope Book and several other books, but they can’t be used to directly store content. A ZSQL method stores SQL statements and makes queries into your relational database
based upon those queries. This is great if you want to make simple queries into relational database, but it doesn’t persist Python classes or content types, and it really isn’t
the Plone way of thinking. You’ll find an excellent chapter in the Zope Book on this at
http://zope.org/Documentation/Books/ZopeBook/2_6Edition/RelationalDatabases.stx.
SQLStorage uses the fact that Archetypes provides an extra layer on top of normal objects to
allow for special persistence mechanisms. Zope provides many different relational database
adapters, and SQLStorage plugs into those. Currently there are two adapters, Postgres and
MySQL. However, if the database supports standard SQL, then there’s no reason one of these
existing SQLStorage formats can’t be used. If you find that your database adapter needs to do
something different, then it wouldn’t be difficult to alter the SQL statements inside SQLStorage
so it worked with another database.
13.1.7 Making a Content Type Persist in a Relational Database
To persist the data, you must set up a relational database and make a Zope
connection to it. In this case, I’ll use Postgres, mainly because I already have
a Postgres database for other work available but also because Postgres is good
391
database for all levels of users. To connect Zope to Postgres, psycopg and ZPsycopg are probably to hardest to pronounce but most commonly used and best supported. You’ll also find Debian packages and even Windows packages available
from http://initd.org/software/psycopg.
Install your database adapter, and make a database connection from your Zope site to
your relational database. Again, this is covered in great detail in the Zope Book at
http://zope.org/Documentation/Books/ZopeBook/2_6Edition/RelationalDatabases.stx. But the
short answer is go to the ZMI, add the database connection from the drop-down menu, and
then enter the configuration to point to your relational database. If you’re connecting as a
certain user to your relational database, you need to make sure that the user has the privilege
ability to create, insert, update, and delete tables. The create and delete privileges will be
needed only during the debugging phase as you add and remove schemas and objects. Once
your development has settled down or you move to production, this won’t be necessary.
Next, in the ZMI click archetypes_tool and select Connections. This allows you to map the content type to the database adapter type. The easiest way is to map the default to your database
connection. If you wanted, you could of course map specific types to different databases. Now
you’ll change the schema to use the new storage. For this you need to import the appropriate
storage class from SQLStorage (in this case, PostgreSQLStorage).
Then you need to set the storage parameter on the fields you want to store in the relational
database. At this point, you’ll note that you can put as many or as few fields inside the relational database as you want—you could have all the fields in the database or just some. Either
way there will be content stored inside your Plone database, but at the least it’ll be an object
that has an ID. Anyway, in the example schema, you have two fields: an integer (age) and a
string (email), as shown in Listing 13-4.
Listing 13-4. A Content Type Using SQLStorage
from
from
from
from
from
from
Products.Archetypes.public import BaseSchema, Schema
Products.Archetypes.public import BaseContent, registerType
Products.Archetypes.public import IntegerField, StringField
Products.Archetypes.public import IntegerWidget, StringWidget
Products.Archetypes.SQLStorage import PostgreSQLStorage
config import PROJECTNAME
schema = BaseSchema + Schema((
IntegerField(’age’,
validators=("isInt",),
storage = PostgreSQLStorage(),
widget=IntegerWidget(label="Your age"),
),
StringField(’email’,
validators = ("isEmail",),
392
index = "TextIndex",
storage = PostgresSQLStorage(),
widget = StringWidget(label=’Email’,)
),
))
class PersonSQL(BaseContent):
"""Our person object"""
schema = schema
registerType(PersonSQL, PROJECTNAME)
Finally, restart Plone and register your content type in your Plone site. You’re now ready to
test it. If you create a PersonSQL object, everything should proceed as normal and as expected
for the content type. But of course the real test is if you look at your database.
You’ll see that in the database you have a new table called personsql, and in that table you’ll
find four columns: uid, parentuid, age, and email. Using psql you can see this:
db=# \d
List of relations
Schema |
Name
|
Type
| Owner
--------+--------------------------+----------+------public | personsql
| table
| www-data
...
db=# \d personsql
Table "public.personsql"
Column
| Type | Modifiers
-----------+------+----------uid
| text | not null
parentuid | text |
age
| int |
email
| text |
Indexes: personsql_pkey primary key btree (uid)
The column for age has been created as an int, and the column for email has been created
as text. These are mappings created inside SQLStorage; you could change these mappings to
more appropriate ones if you so desired. The uid column is the unique ID for your object inside
Plone. The parentuid is the uid of the parent object. These are all the unique IDs for Archetypes
that I’ve already mentioned. For example:
db=# SELECT * FROM personsql;
uid
| parentuid | age | email
---------------------------+-----------+-----+------------------PersonSQL.2003-07-23.4935 |
| 30 | [email protected]
393
That’s it—your data is being persisted inside your relational database. No SQL needs to be written, and you can have all the advantages a relational database brings! Joel Burton has written
an excellent how-to article on SQLStorage at http://plone.sourceforge.net/archetypes/sqlstoragehowto.html. With kind permission, some parts of this section are based on Joel’s document.
14 Chapter 14
14.1 Administering and Scaling Plone
This chapter covers the tasks you have to worry about once you’ve built your site and are using
it. I start by covering the administration of a Plone site, which is actually quite straightforward.
Next, I cover what files to back up, including when and how to back them up. I also cover
upgrades to Plone.
Then, I cover performance and show techniques for finding the hotspots. Once you’ve found
those spots, I cover common problems. Then I go into the main technique for making your
Plone site really fast and scalable: caching. When it comes to performance, you’ll definitely
need to know how to scale your server outward using multiple processes and how to cope with
high-cost requests. For this you’ll need Zope Enterprise Objects (ZEO), which is covered at the
end of this chapter.
14.1.1 Administering a Plone Site
As it turns out, the administration of a Plone site is quite simple; you need to perform only a
few tasks, which are common to all services. The tasks are as follows:
• You should back up the database regularly.
• You should pack the database regularly.
• You should back up and rotate the log files.
You should perform these actions regularly to maintain your site. In enterprises, you’ll usually
often have standard tools for backing up and rotating logs; these tools are all easy to integrate
since Plone data is all contained as files on the file system.
14.1.1.1 Backing Up Your Plone Site
You should run backups regularly on a Plone site; most people run backups nightly. Your
application needs should determine the schedule for backups. If large amounts of data are
written into your data, then perhaps more frequent backups are necessary. In the case of a
smaller site with less content, a less frequent schedule such as once a week may be more
suitable.
394
395
In a standard Plone site, only one file needs backing up: the Zope database where all the
content for the Plone site resides. You can find this file by accessing the Zope Management
Interface (ZMI) control panel, selecting Database Management,
Data.fs var You can use your own scripts or tools for backing up or use a tool from Zope. As an
example of the first option, Listing 14-1 shows a Linux bash script I use to back up a Zope site.
Listing 14-1. Bash Script for Backing Up
#!/bin/bash
# script to copy, gzip, and then copy Zope databases
# to remote server
# make up a filename
fn=‘uuidgen‘.fs
# copy it locally, you’ll want to change the
# path
cp /var/zope.test/var/Data.fs /tmp/$fn
# gzip the file up
gzip /tmp/$fn
# scp over to my backup server and then remove
# the temporary file
# change the destination file
scp /tmp/$fn.gz [email protected]:~/Zope
rm /tmp/$fn.gz
For the second of these choices, a Python script called repozo.py is available in the
Zope Object Database (ZODB) for backing up.
You can find this script online at
http://cvs.zope.org/ZODB3/Tools/repozo.py. It works quite happily on Windows and Linux.
This script can do a whole host of things such as full backups, incremental backups, and
database restores.
To back up a database with this script, you first need to make a directory to store the backups;
in the following examples, this directory is /home/backups. However, this location is up to you.
To do a complete backup of a database, run the following:
$ python repozo.py -B -F -v -r /home/backups -f /var/zope.test/var/Data.fs
looking for files b/w last full backup and 2003-11-21-18-33-17...
no files found
doing a full backup
writing full backup: 3601549 bytes to /home/backups/2003-11-21-18-33-17.fs
To run an incremental backup, just omit the -F (full) flag. The script will compare the current
ZODB with the last backup and only back up the differences. If no updates have occurred, then
no backup will occur. The following is an example backup after making a change in Plone:
$ python repozo.py -B -v -r /home/backups -f /var/zope.test/var/Data.fs
looking for files b/w last full backup and 2003-11-21-18-39-09...
files needed to recover state as of 2003-11-21-18-39-09:
/home/backups/2003-11-21-18-33-17.fs
396
repository state: 3601549 bytes, md5: ab9e46bcdf52641ad6f71db62a9da333
current state
: 3624968 bytes, md5: 73c871bbe2528e152342abea9e25ab27
backed up state : 3601549 bytes, md5: ab9e46bcdf52641ad6f71db62a9da333
doing incremental, starting at: 3601549
writing incremental: 23419 bytes to /home/backups/2003-11-21-18-39-11.deltafs
At this point, you now have one full backup and one incremental. The same script now can do
a recovery of this data. To do this, pass the -R (recovery) option and -o specifying the output
file, like so:
$ python repozo.py -R -v -r /home/backups -o /var/zope.test/var/Data.fs
looking for files b/w last full backup and 2003-11-21-18-50-21...
files needed to recover state as of 2003-11-21-18-50-21:
/home/backups/2003-11-21-18-33-17.fs
/home/backups/2003-11-21-18-39-11.deltafs
Recovering file to /var/zope.test/var/Data.fs
Recovered 3624968 bytes, md5: 73c871bbe2528e152342abea9e25ab27
For a full list of options, run repozo.py with the -h command. This prints a full set of instructions.
Logs exist in the log directory of your instance home by default, and there are two log files:
an access log file and an event log file. You set the location of these logs in the configuration
file that you looked at in Chapter 2. z2.log logs all incoming requests, and event.log logs all
errors. These log files should be backed up regularly, along with any proxy server log files such
as those that Apache or Internet Information Services (IIS) produces.
You should regularly back up code, templates, and custom products that reside outside the
ZODB. Even if you have these in source control, such as Concurrent Versioning System (CVS),
backing them up to make a valid snapshot of your installation never hurts.
If you have content, other databases, or other data that doesn’t reside in the ZODB, this should
form part of the backup plan, depending upon how often it changes. This could include data
in relational databases and content on the file system. All of these are created by the site
developer and don’t exist in a standard ’out-of-the-box” Plone site. If you’re upgrading Zope or
Plone, it may be prudent to make a backup of all the files involved, including Zope and Plone,
so that if the upgrade fails for some reason, a full restoration is possible.
14.1.1.2 Packing the ZODB
The ZODB records every change to every object in the system. Each time an object changes, a
new copy is appended to the end of the ZODB file. That file is the Data.fs file I discussed in the
previous section. If the database has large pieces of content or has a large number of changes,
then this can cause the ZODB to really grow.
A large ZODB isn’t a problem—it works just fine, and startup times are similar (unless the
index has been removed). Pack times will get longer the larger the database is, and it does
make sense to occasionally go and remove those old copies of objects that are no longer used
to make the database smaller. It’s key to remember that all you’re doing when you’re packing
is cleaning your existing database and throwing out some old copies.
397
14.1.1.2.1 The Old 2GB Limit on Databases
A problem exists with older versions of Python (before Python 2.1 on Unix and before Python
2.2 on Windows), which weren’t capable of large file support. When the ZODB reaches 2
gigabytes (GB), the Plone site dies and can’t be restarted. To test if you’re running a Python
version that has large file support, open a file in Python and see if its size is reported as an
integer or a long, like so:
>>> import os
>>> from stat import ST_SIZE
>>> type(os.stat(’/tmp/test.txt’)[ST_SIZE])
<type ’long’>
This Python has large file support enabled and can support files larger than 2GB. If an integer is
reported, then you’ll need to upgrade your Python version or recompile with large file support
enabled (again, enabled in new version by default). If you try to compile Plone with a version
of Zope that doesn’t have large file support, you’ll get an error, like so:
andy@thorin:/tmp/Zope-2.7.0-b3$ ./configure
Configuring Zope installation
...
This Python interpreter does not have have ’large file support’ enabled.
If this is the case, then you’ll need to go and fix your Python installation. You can find more details about this at http://www.python.org/doc/current/lib/posix-large-files.html. If you’re happy
with just limiting to 2GB, then you can pass the --ignore-largefile option to the configure script.
If you’re limited to a 2GB database, then you’ll need to pack more regularly.
14.1.1.2.2 Cleaning up the database is called packing
Packing can be intensive, and when its process is run, it’s in a separate thread, so although
it will affect a site’s speed, it will still be able to respond to requests. To pack sites and keep
Plone running at peak performance, see the ’Using ZEO” section later in this chapter. To run a
pack, access the ZMI control panel, select Database Management, and click main
398
Figure 14-1. Packing a database
Enter the number of days you’d like to keep objects for, and click Pack. For example, setting
the number of days at zero (the default) will remove all revisions of objects. Again, it doesn’t
delete the object itself, just those old copies. A more common setting is something such as
seven, which will remove revisions older than one week. By making a setting appropriate with
your backup schedule, you can ensure that you’ll keep a copy of every object. The pack will
take a bit of time and processing power depending upon the size of your ZODB. Plone will still
work, albeit slower, so you may want to use ZEO to do this.
14.1.1.3 Upgrading Plone
Plone is continually being updated and improved, so new versions of Plone come out quite
regularly. Before you upgrade to a new version of Plone, though, check that you actually need
it. Quite often releases have minor changes or changes that may not be relevant. Each release
has a change list, accessible from the download page. It’s always worth reviewing this list to
see if the upgrade is worthwhile.
After performing your backup, download the upgrade. Probably the easiest way to perform
an upgrade is to repeat the same steps you performed on the installation. For example, if you
installed using the Windows installer, download the new installer and run the install again. If
you installed from source or a Debian package, repeat those steps. The upgrade steps are as
follows:
1. Download the relevant upgrade.
399
2. Stop Plone.
3. Back up (as described previously).
4. Install the upgrade.
5. Start Plone.
At this point I recommend actually starting Plone in debug mode. On Windows, you can do
this by selecting Start - Plone - Plone Debug. On Linux you can do this using the runzope script
inside the bin directory of your instance home, like so:
bin/runzope -X "debug-mode=on"
By running this in debug mode, you’ll directly see any errors that may have occurred during
the upgrade to the new version. If you’re happy with this, you can now proceed onto the next
step, migration.
For each Plone site you have, access the ZMI and access the portal_migration tool in your Plone
site. It will have a bright-red exclamation mark next to it, indicating that the site isn’t
The migration will attempt to make those changes for you. Until you run this migration it’s
possible that your Plone site may be broken. Depending upon what needs to be done in the
migration, this may take some time. To perform a migration, follow these steps:
1. From portal_migration, click the Migrate tab.
2. Click the upgrade button. This may take some time, especially on large
sites or if a large upgrade is necessary.
3. The result of the migration, a rather lengthy message, will display on
the screen. If the final message is “End of upgrade path, migration has
finished,” then the migration was successful. Any error messages will be
highlighted in red.
Repeat this process for each Plone site within your Zope instance. If you’re then happy with
the migrated site, stop running Plone in debug mode. Restart Plone in your usual manner, and
carry on using as normal.
14.1.2 Improving Plone Performance
So you’ve written a wonderful Web site, millions of visitors come to the site, and it just isn’t
quite performing as fast as you’d like. Well, Plone is designed out of the box to be feature rich,
not fast, since speed is greatly dependent on the application in question. But many techniques
can make Plone really fast, and you can easily scale Plone. In the following sections, I cover
how to figure out the slow parts of your site and then show you methods to improve it.
400
14.1.2.1 Benchmarking a Plone Site
Before you try optimizing a site, the key task is to get a numeric value of the performance of
the site. Users will often give feedback such as ’it’s too slow” or ’takes too long to load.” These
comments are next to useless for a developer; you need to be able to quantify the speed so you
can know how fast it is now and how fast you need to make it. Only then can you begin to do
the optimization.
For getting a benchmark, you can use a tool called ab, or Apache Bench. This is a tool that
comes with the Apache server. If you have Apache 1.3 or later installed on Linux, ab is included.
On Windows it’s included with the Apache 2 release. Running ab is straightforward—just pass
the uniform resource locator (URL) you want to test, like so:
ab http://localhost/
The ab tool will output some information first about the site you tested, like so:
Benchmarking localhost (be patient).....done
Server Software:
Zope/(unreleased
Server Hostname:
localhost
Server Port:
80
Document Path:
Document Length:
/
20594 bytes
Then it’ll output some aggregate statistics, like so:
Concurrency Level:
Time taken for tests:
Complete requests:
Failed requests:
Write errors:
Total transferred:
HTML transferred:
Requests per second:
Time per request:
Time per request:
Transfer rate:
1
0.771151 seconds
1
0
0
20933 bytes
20594 bytes
1.30 [#/sec] (mean)
771.151 [ms] (mean)
771.151 [ms] (mean, across all concurrent requests)
25.94 [Kbytes/sec] received
This tells you how long the request took, the number of errors, and the time it took to get a
request, which is probably the key statistic. The most useful value to reference is usually the
Requests per second, Requests per second, which in this example is 1.30 [#/sec]. The ab tool
provides some more statistics that give information on how long it took to connect, process,
and get a result for each request. For example:
Connection Times (ms)
min mean[+/-sd] median
Connect:
0
0
0.0
0
max
0
401
Processing:
Waiting:
Total:
770
766
770
770
766
770
0.0
0.0
0.0
770
766
770
770
766
770
This last piece of information is useful and includes the time taken to get a connection. Since
my server is on the same computer as the client, this is quite short. This test demonstrates that
it took 1.30 seconds to complete a request. Of course, that hasn’t really tested the server much
at all. When testing, you’ll probably want to hit the server with a few concurrent requests to
simulate the real world a little more. You can do this by specifying the number of requests and
the concurrency by using the -c (concurrent threads) and -n (number of requests) options. For
example:
ab -n 20 -c 4 http://localhost/
This sends a total of 20 requests over four concurrent threads. The end result is a slightly
different request per second of 1.78 seconds. For more information on all the options available,
please see the Apache Bench manual at http://httpd.apache.org/docs/programs/ab.html.
One advantage of using ab is that you aren’t actually assembling the pages on the client; they’re
just being downloaded and then thrown away. If you have a page that has lots of scripts or
features big images, the time it takes for a client to assemble that page into something the
user can understand won’t be included. A classic example of this is that in the old Netscape
browser, a large number of tables can slow down or even crash Netscape. This wouldn’t be
evident using ab, which gives you a more independent number with which to work.
14.1.2.2 Lies, Damned Lies, and Benchmark Numbers
At this point, you may be concerned about these numbers. They seem to indicate a very slow
site. In these examples, my machine is a Toshiba laptop with 1.8 gigahertz (GHz) Celeron
processor, 256 megabytes (MB) of Random Access Memory (RAM), Red Hat Linux 9.0, and a
beta version of Plone 2. Furthermore, Plone is running in debug mode at the same time as
KDE, OpenOffice.org, Instant Messenger, and several other development tools, including the
actual benchmarking tool. This means Plone is nowhere near optimized or running in an ideal
environment. A similar test on a faster server yielded results around 20 requests per second.
The key point is that creating an objective number for site performance allows you to measure
the success of your optimizations. Developers can perform tweaks and then test again to
compare the ’before” and ’after” numbers. If it’s possible, you should run performance tests
against a machine as similar to the production server as possible to get sensible numbers.
For this chapter it isn’t important that a site can produce X requests per second; instead, it’s
important that a change be able to produce a significant increase in performance.
Also, remember that numbers about how fast a certain part of your site is are pretty meaningless in isolation. You must take into account how often the page is visited, users’ expectations
at that point, and realistic requirements. Micromeasuring just one part of a site can be useful
to track down a certain issue, but it may not make your site much faster. As with most things,
you need a sensible approach to optimizations.
402
14.1.2.3 Production Mode vs. Debug Mode
One of the biggest speed killers for Plone is to run your site in debug mode. When running in
debug mode, each and every template, script, and object in the portal_skins tool is compared
against the file system to see if it’s up-to-date. This check happens with
To find out if your site is running in debug mode, in the ZMI access the portal_migration object
in your Plone site. At the bottom of the page will be a list of information, including Debug
Mode status. To change this, alter the configuration file, as discussed in Chapter 2.
14.1.2.4 Other Reasons for Slow Performance
A server may be running slowly for reasons outside of Plone. If you’re running optimization,
you should always take a look at these considerations first, since these will provide quick speed
improvements for little cost.
14.1.2.4.1 Processor Usage
If you’re running a great number of applications, or just some intensive ones, then this will
limit the amount of processor time available to Plone. Assembling pages in Plone can take a
lot of Central Processing Unit (CPU) power. When an application is bound by the amount of
processing power it has available, it’s called CPU bound.
To find out how much load the server is under in Linux, use the top command. In Windows,
the Task Manager (accessible by pressing Ctrl+Alt+Del) will give you similar statistics. The
recommended speed of your CPU depends upon the size and traffic load your Plone server will
be under, but a 2GHz processor is a good starting point.
14.1.2.4.2 Amount of memory
Zope likes to use a great deal of memory as objects are loaded from the ZODB. Of all the key
features, giving a Zope server more memory is probably the best thing you can do.
To find out how much load the server is under in Linux, use the top command. In Windows,
the Task Manager (accessible by pressing Ctrl+Alt+Del) will give you similar statistics. The
recommended amount of memory depends upon the size and traffic load your Plone server
will be under, but a 512MB processor is a good starting point. If you can afford more memory,
it’s recommended.
You can make a few tweaks to the memory parameters in Plone by increasing the target number
of objects in the cache. By default, Plone ships with 400 objects in the cache. For a site, you
could increase this to 5,000, as shown in Figure 14-2. Although this increases memory usage,
this will also
403
Figure 14-2. Changing the cache parameters in the control panel
Further, the fewer threads Zope uses, the less potential memory usage will occur. Although
Zope is multithreaded, most of the time only one Zope thread will actually be used. Reducing
the number of threads to three provides a more memory-efficient server. Instead of trying to
run a large number of threads, it’s recommended to run ZEO clients to serve more requests.
The ’Zope Enterprise Objects” section covers this in more detail.
14.1.2.4.3 Network Connection
The network connection can be critical to the performance of any application—you’re only as
fast as the slowest connection between you and the client. When you’re optimizing a Plone
site, take into account the amount of time needed to connect. If it takes two seconds to actually
connect, optimizing code is rather pointless.
Here again, the ab tool can help. When running a benchmark of Plone.org from British
Columbia (the server is located in Texas), you can see in the following output that the median wait for connections over the network was 125 milliseconds:
Connection Times (ms)
min mean[+/-sd] median
Connect:
90 133 40.2
125
Processing:
511 1103 400.2
1113
Waiting:
202 310 110.3
293
Total:
601 1236 411.2
1211
max
211
1846
565
2043
The server may also have a limit on the number of connections or on traveling through internal
firewalls. When a process is bound by the time it takes to do an Input/Output (I/O) process
such as this, it’s called I/O bound.
404
14.1.2.4.4 Your Application
It could, of course, be that your application is actually causing the slowdown. The examples
from service companies about clients with problems are numerous (and probably exaggerated). Some of better-known examples include the following:
• Copied code from a Web site that had a sleep call buried deep in the system,
which caused the script to pause for a few seconds. A code review by someone
spotted this and removed the offending line.
• Multiple relational database lookups, such as more than a dozen on one page.
A more intelligent design combined the lookups and allowed for caching.
• A script that pulled information from the ZODB by waking up every object
inside the database. Using the catalog (covered in Chapter 10) made performance much faster.
• A query that gets all the records in a database, but then shows only 100 on a
page at a time, discarding the other 99,900. This was solved by writing the
SQL statements in more efficient manner.
Before jumping to conclusions about what’s causing the problem, it’s worth profiling the site
to determine where the bottleneck is.
14.1.2.5 Profiling Plone
Since you can quantify the time taken to produce pages, you can now attempt to optimize.
However, the first problem is finding where to optimize.
Please note that if you enable all three of these profiling tools, you’ll find that your Plone site
really starts to slow down (by a significant magnitude). Each of these profilers exacts a toll on
performance for the number of hooks it has to install. You should always uninstall or turn off
these profilers after using them to ensure that your site is running at maximum efficiency. Also,
if you enable all three of these profilers, you’ll start to profile the profilers (and that’s when
things start to get confusing). I recommend you start with Call Profiler. Then turn on each of
the other profilers in turn, turning off the preview profiler, until you have enough information.
14.1.2.5.1 Call Profiler
This Zope product takes a request, such as getting a front page, and reports the objects that were used and how long was taken by each. You can find Call Profiler at
http://zope.org/Members/richard/CallProfiler. Despite comments on the download page, the
product isn’t integrated into Zope 2.6. Install the product in the standard way, and then restart
your Zope.
To enable Call Profiler, go to the ZMI control panel and select Call Profiler. The product works
by installing hooks into an object so that when the object is accessed, the amount of time spent
on rendering the object can be measured. This means Call Profiler will be activated only on
objects you choose to monitor, as shown in Figure 14-3. For a standard Plone installation,
405
you’ll need to monitor Filesystem Script (Python) and Filesystem Page Template. Call Profiler
doesn’t remember these settings between Zope restarts, which means a simple restart will turn
off the hooks and leave you ready to deploy.
Figure 14-3. Call Profiler with the file system hooks selected
Once the objects to monitor have been selected, access the URL you want to monitor. The
easiest way to access the URL to be tested is to run the ab tool mentioned earlier; however,
using a Web browser will work just fine. In this case, if you’re profiling the home page on
localhost, then run the following:
ab -n 20 -c 4 http://localhost/
This will cause 20 requests to be made to Plone. Once complete, you can access the timing of
those requests. Returning to the Call Profiler interface, you’ll three tabs across the top of the
Call Profiler tool: Results, Results by URL, and Aggregates. Since multiple requests have been
run, select the Aggregates tab, which is the easiest to understand. In the list of pages called
will be the URL tested. Click that link to view the results for that URL. You should now see
something like Figure 14-4.
406
Figure 14-4. The results of the profile
In this example, you’ll see the elements that Call Profiler is able to detect. Unfortunately, the
results can be a little complicated to decipher. At first glance, the results add up to more than
100 percent. In this case, document_view takes 71.1 percent of the processing time. However,
this is misleading because values below that figure relate to document_view, not the whole
page. In this example, for the whole page, everything before browserDefault takes 19.9 percent
of the request. Then it moves into document_view, and you see the percentages for that part.
So in this case, going from toLocalizedTime to getPreviousMonth takes 23.3 percent of the time
taken to render document_view.
14.1.2.5.2 Page Template Profiler
Page Template Profiler works only with the Zope Page Templates system. In a similar way
to Call Profiler, it reports how long was spent enacting each call inside a page template.
Since in the previous example you saw that most of the time is spent in one page template
(document_view), you may find it instructive to see how the time is spent in that template.
You can find Page Template Profiler at http://zope.org/Members/guido_w/PTProfiler. Install
the product, and then restart Zope. To deinstall Page Template Profiler, you’ll have to remove
it from your Products directory when you’ve finished profiling.
Once installed, go to the Zope root in the ZMI and select PT Profile Viewer from the Add
drop-down box. Complete the creation form, giving a unique value for ID (enter PTProfiler, for
example), and then click Add. Now repeat calling the page you want to measure by running
the ab tool or accessing the page in a browser. Access the Page Template Profiler object just
added, and you’ll see a result for the request just run. Click it to get more details, as shown in
Figure 14-5.
407
Figure 14-5. Page Template Profiler results
In this case, you can see that on my site that calendarBox is taking 0.7321 seconds to call each
time it’s being called. Since the entire page is taking 1.9 seconds, you can assume this is an
area I could optimize.
14.1.2.5.3 Python Profiler
The Python Profiler provides very low-level timing information and is normally used for more
complex debugging of underlying code. It gives you a detailed report of the amount of time
spent in various areas of Python code. This isn’t something you’d normally use while profiling
a site; however, for completeness, I’ll describe it in this section.
To activate the Python Profiler, you need to add a variable to the configuration file. In the
zope.conf file of your etc directory, enable the publisher-profile-file command. To do this, define a
file to which it’ll write. On Windows this could be c:zope.output; on Linux it’s /tmp/zope.output.
Add the following line on Linux:
publisher-profile-file /tmp/zope.output
Then restart Plone, but it will run very slowly. If you’re running a large number of requests and
want to examine the results, then the file specified in the environment variable will contain
output of the data. As in previous examples, call the page that’s being profiled using the ab tool
or a Web browser. Then access the control panel through the ZMI, select Debug Info, and then
select the Profiling tab; you’ll get output from the Python Profiler, as shown in Figure 14-6.
408
Figure 14-6. Python Profiler results
As you can see in Figure 14-6 that the output shows the gory details of what takes time. I’ve
rarely had to use this.
14.1.2.6 Simple Optimization Tricks
After looking at quite a lot of Plone, the Plone development team has come up with the following optimization tricks.
14.1.2.6.1 Limit Name Lookup
Overdoing name lookups is a common mistake; the solution is to define a variable locally. In
the following example, Plone has to perform lookup for portal_url on each repetition of the
loop:
<tal:block
tal:repeat="result here/portal_catalog">
<a href=""
tal:attributes="href here/portal_url/getPortalUrl">Home</a>
...
</tal:block>
But it’d be faster to use a *tal:define*, like so:
<tal:block
tal:repeat="result here/portal_catalog"
tal:define="url here/portal_url/getPortalUrl>
<a href=""
409
tal:attributes="href url">Home</a>
...
</tal:block>
As already stated, Plone defines a large number of global defines. By using those definitions,
a developer can reduce the number of traversals. You can find a full list of all these defines in
Appendix A.
14.1.2.6.2 Security Checks and Traversal
Whenever an object, an object’s attributes, or an object’s methods are accessed, a security
check is performed. Although each security check isn’t that expensive, a large number of
security checks can really add up.
This is especially true when you traverse to an object, for example, to
here/folderA/folderB/object. In this case, Zope will be doing security checks on each of
those folders and then on the object. If the information can be accessed without doing that
traversal each time, you’ll find a performance gain. Another way to avoid doing security
checks is to write code in Products on the file system. Code in Products is considered trusted
code, is subject to fewer checks, and is hence faster.
14.1.2.6.3 The ZCatalog
The ZCatalog is an efficient binary tree of data about objects. You should use it (in most
situations) when getting a list of objects, such as search results, providing summaries, finding
objects, and so on. When the catalog returns a set of results that accesses a series of lightweight
objects (called brains), accessing these brains doesn’t mean doing traversal to the object or
performing any security checks.
14.1.2.6.4 Too Many Features
This may seem obvious, but Plone ships with lots of features you may not necessarily need. For
example, both the calendar and navigation portlet take up a large number of resources yet are
generally of limited use. Turning these features off if not needed will increase performance.
14.1.2.6.5 Is Optimization Worth It?
Before you start any optimization, you should perform a simple cost-benefit analysis to see if
the optimization is worth performing.
For example, say you have a page that takes 0.5 seconds to generate. Of that page, on script
takes 10 percent of the time to generate. If you’re able to double the speed of that one script,
that will shave only 0.025 seconds off the execution of that page. In this case, the benefit to
performing the optimization is small because there are some basic costs such as the cost of
a developer to do the analysis, the cost of testing to check it works, and possibly changes to
documentation.
410
Performing this work also creates substantial risk. Changing code can break or introduce
bugs into the application. Given agile programming methodologies, though, these could be
minimized. Further, a programmer may not be able to complete the speed increase or may
make it slower.
You have alternatives to optimizing code; for example, you could install more memory or
hardware if the application is bound by one of these constraints. Although many programmers
think that throwing hardware at a solution is a lazy option, it can be an extremely cost-effective
solution. Introducing new hardware is low risk, can bring a large speed gain, and often cost
less than a programmer.
Further, you can really scale your server by caching or adding more computers and separating
the load. These techniques form the rest of the chapter.
14.1.2.7 Caching of Content
So now that you’ve found the slow parts of your application, you’ll turn to the main tool to
increase performance: caching. Caching
When talking about caching, I’m talking about two things that can be cached: content and
skins. Content is the data entered by the user into content types. Skins refer to anything
in portal_skins and can be templates, scripts, images, or files. These two types are cached
differently.
I like to think of caching in terms of the amount of control I’ll have over the caching mechanism.
In other words, the closer to the client that caching is performed, the faster the response will
be but also the less control I will have over that cache. This in fact includes the possibility that
there may be no cache at all. Figure 14-7 illustrates caching between a client and a server.
411
Figure 14-7. Caches between a client and a server
The user’s browser cache is the fastest place to cache things, but you have no idea if a user will
actually have caching turned on in their browser. Next come the intermediate caches of proxy
servers; keep in mind this could be your proxy server (which you should have control over) or
an Internet service provider (ISP) proxy. Finally, there are the server caching options.
In the following sections, I’ll discuss the following caching mechanisms:
• Caching skin elements using the Accelerated HTTP Cache Manager
• Caching of code using the RAM Cache Manager
• Caching of content added by users via the Caching Policy Manager
I’ll then discuss how to use Apache and Squid, two commonly used external servers that provide a whole host of high-performance configuration options.
412
14.1.2.8 Caching Skins
Hypertext Transfer Protocol (HTTP) allows you to set HTTP headers for caching. When a
response returns with these headers, it’s the responsibility of the proxies between the client
and the server to cache the object according to these headers. In Figure 14-7, this could be
any of the caches from the server cache down. This proxy can be a Web server that you control
on the server, such as Apache, or a proxy that the ISP controls. As I’ll discuss, this makes a
powerful tool when combined with Apache or Squid.
This caching can also include the browser if it’s set to use caching (the default for Internet
Explorer). However, if a browser does a refresh on a page, the browser sends the Pragma:
no-cache header, which forces proxies to also reload their copy.
Caching in this manner applies to the entire response, so it can be risky if you try applying
this to a whole page. This is most commonly used with images, style sheets, JavaScript, or
pages that don’t change a great deal. Images used repeatedly in your pages for making nice
elements, such as rounded corners or background images, are ideal for this.
By default, Plone creates an Accelerated HTTP Cache Manager called HTTPCache in the root of
your Plone site. Accessing this object through the ZMI will bring up the management options
for the cache. The following are all reasonable defaults, and nothing needs to be changed
initially:
• Title
• Interval
• Cache anonymous connections only
• Notify URLs (via PURGE)
To see how the Accelerated HTTP Cache Manager works, the following is an example based
on a test object, an image called test.gif. To see what headers are returned, you need to test
the headers being returned. For this you can use a simple Python script called header.py. You
can find this script in Appendix B. On Linux the wget command also does the same thing if you
pass -S, although it will still download the file for you. For example:
wget -S http://www.agmweb.ca
First, the following are the headers returned for test.gif before
[andy@basil scripts]$ ./header.py http://localhost:8080/test.gif GET
Accept-Ranges: bytes
Connection: close
Content-Length: 2541
Content-Type: image/gif
Date: Wed, 03 Sep 2003 23:55:38 GMT
Etag:
Last-Modified: Wed, 03 Sep 2003 23:54:27 GMT
Server: Zope/(unreleased version, python 2.2.2, linux2) ZServer/1.1
413
After adding the image to the cache, you’ll recheck the HTTP headers using the script again.
You’ll find that there are two new headers. For example:
[andy@basil scripts]$ ./header.py http://localhost:8080/test.gif GET
...
Cache-Control: max-age=3600
Expires: Thu, 04 Sep 2003 00:56:03 GMT on 2.2.2, linux2) Zserver/1.1
NOTE: Unfortunately, Zope 2 doesn’t conform to the Request for Comments (RFC) regarding HEAD requests. Instead of sending the full set of headers when a HEAD request is sent,
the values from the cache manager are missing. When testing, you should always send GET
requests.
For more information on the HTTP headers and how they relate to caching, see RFC 2616 at
http://www.w3.org/Protocols/rfc2616/rfc2616-sec14.html
The Accelerated HTTP Cache Manager caches an entire response, which works well for static
items. However, the normal Plone page consists of personalized elements, such as the calendar,
the personal navigation bar, and so on. In this situation, you need to be able to cache just part
of the page, and this is where RAM Cache Manager comes in handy.
RAM Cache Manager will cache the output of an object in RAM so that on the next occurrence
of that script, it’ll be pulled from the cache. Repeated invocations of that object will cause
the output to be pulled from the cache until the cache expires. The point of this manager is
that you’re really avoiding recomputing complicated or large calculations every time; instead,
you’re storing the result and reusing. This Cache Manager won’t cache images or files. It won’t
stop users trying to configure the cache to do so, but it has no effect on these objects.
By default, Plone creates a RAM Manager called RAMCache in the root of your Plone site.
Accessing this object through the ZMI will open the management options for the cache. The
following are all reasonable defaults, and nothing needs to be changed initially:
• Title: This is the title of the cache manager and is optional.
• REQUEST variables: These are the variables that form the condition for the
cache. This is a powerful option that allows the cache to be based upon the
user variables. For example, if an item to be cached requires that it should be
cached differently for each user, or in different languages, you can enter the
REQUEST variables you’d like to cache here.
• Threshold entries: This is the maximum number of entries that can be stored
in the cache. If the cache is taking up too much RAM, lower this value.
• Maximum age of a cache entry: This is the amount of time (in seconds) this
object will stay in the cache.
• Cleanup interval: This is how often the cache gets cleaned.
Because the requests for the object actually reach Zope, this does nothing to reduce network
traffic; it just causes Zope to render the result quicker. Selecting the Statistics tab in the ZMI
will report statistics on exactly how many hits were returned by the cache and how many were
passed onto the object. If too many hits are being passed on to the object, you may consider
altering the cache configuration by having fewer REQUEST variables or increasing the time
spent in the cache.
414
14.1.2.9 Assigning Caches
To add an object that’s on the file system to the cache, simply specify the name of the cache
in the .metadata file for that object. (Chapter 7 discussed using .metadata files.) Plone already
does this on a large number of images, on CSS, and on JavaScript. For example, plone_skins
/plone_images/pdf_icon.gif.metadata reads as follows:
[default]
title=Pdf icon
cache=HTTPCache
This signifies that the image will be cached using the HTTPCache. Most objects on the file
system would be more suitable for adding to the HTTPCache, rather than the RAMCache.
14.1.2.10 Caching Content Types
Caching content types is a little trickier and requires using the Caching Policy Manager. Plone
installs this tool by default, and you can find it in the root of the Plone instance with the ID
caching_policy_manager.
Before you can cache any content, you must alter the cache settings for templates inside Plone.
By default Plone emits headers for content that turns off any caching at all. If you don’t do
the following, the rest of this section won’t work. If you click portal_skins and then click
plone_templates, you’ll find the page template global_cache_settings. This is used on every page
that uses the main Plone template. The template currently looks like the following:
<metal:cacheheaders define-macro="cacheheaders">
<metal:block tal:define="dummy python:request.RESPONSE.setHeader
’Content-Type’, ’text/html;;charset=%s’ % charset)" />
<metal:block tal:define="dummy python:request.RESPONSE.setHeader
(’Content-Language’, lang)" />
<metal:block tal:define="dummy python:request.RESPONSE.setHeader
(’Expires’, ’Sat, 1 Jan 2000 00:00:00 GMT’)" />
<metal:block tal:define="dummy python:request.RESPONSE.setHeader
(’Pragma’, ’no-cache’)" />
</metal:cacheheaders>
~CCC
~CCC
~CCC
~CCC
This will mean that nothing is cached because the HTTP headers Pragma: no-cache and Expires
have been set. To disable this and make sure you can cache selectively, customize this template and remove the Pragma and Expires directives. Your template should now look like the
following:
<metal:cacheheaders define-macro="cacheheaders">
<metal:block tal:define="dummy python:request.RESPONSE.setHeader ~CCC
’Content-Type’, ’text/html;;charset=%s’ % charset)" />
<metal:block tal:define="dummy python:request.RESPONSE.setHeader ~CCC
(’Content-Language’, lang)" />
</metal:cacheheaders>
415
Once you’ve done this, you can continue to cache selectively using the caching_policy_manager.
Access the tool via the ZMI, and you’ll see the following options:
• Policy ID: This is a unique ID for a policy, used internally only.
• Predicate: This is a TALES expression for matching the content. The variable
content contains the object being rendered.
• Mod. Time: This is a TALES expression that evaluates and returns a value from
the object to use for calculating the modification time. The variable content
contains the object being rendered.
• Max age (secs): This is how long to set the cache header for.
• Vary: This varies the header to send (you’ll learn more about this later in the
”Using Squid“ section). Note: Unfortunately Vary did not make into CMF 1.4
(and hence Plone 2.0.x) and is in CMF 1.5. If you’d like to use this tag, then
install the Caching Policy Manager with Vary tag available at http://plonebook.agmweb.ca/Software
• No-cache: This sends the no-cache HTTP header.
• No-store: This sends the no-store HTTP header.
• Must-revalidate: This sends the must-revalidate HTTP header
The following is a sample policy that would cache all images on the site:
• Policy ID: Images
• Predicate: python:content.portal_type==’Image’
• Max age (secs): 3600
Leave all the other fields blank, and select Add to add this policy. The caching_policy_manager
will now looks something like Figure 14-8.
Figure 14-8. The caching_policy_manager with the Images policy added
To test this correctly, you’ll need to add an image into your site through the Plone interface.
Images will get sent with the appropriate headers if you call the view:
416
~/header.py http://localhost/test.gif/view GET
Cache-Control: max-age=3600
Connection: close
Content-Language:
Content-Length: 19810
Content-Type: text/html;charset=utf-8
Date: Fri, 05 Sep 2003 18:42:44 GMT
Etag:
Expires: Fri, 05 Sep 2003 19:42:44 GMT
Last-Modified: Fri, 05 Sep 2003 18:33:41 GMT
Pragma: no-cache
Server: Zope/(unreleased version, python 2.2.2, linux2) ZServer/1.1
As expected, the Last-Modified and Expires headers are now being sent. By altering predicates
and adding multiple policies, you can build up a rather sophisticated caching system. For
complicated rules, you can, pass the handling off to a Script (Python) object if you so desire.
For example, if the predicate is as follows:
python: content.myCachingRules(content)
then add a Script (Python) called myCachingRules to calculate those rules. For example:
##parameters=content
# cache all files, images and anything
# thats published
if content.portal_type in [’File’, ’Image’]:
return 1
if content.portal_workflow.getInfoFor(content, ’review_state’) in [’published’,]:
return 1
In this script you’re caching all files and images, and anything that’s in the published state, by
setting the HTTP headers through the Caching Policy Manager.
14.1.2.11 Example: Caching on ZopeZen.org
When developing the site http://www.zopezen.org, there was one major problem. The main
page of ZopeZen, which lists the posts and the number of replies, is expensive to generate. In
Plone, there’s no easy way to efficiently calculate from the catalog the number of discussion
replies to an item.
This is an ideal situation for the RAM Cache Manager. Since the traffic that adds news items or
posts is quite small, perhaps one or two or day, it seems reasonable that within any 30-minute
period, the front page won’t change greatly. The function that gets the news and the replies
is called getNewsAndReplies, and it performs the task of getting all the data needed for the
index_html template.
The index_html template has elements that are specific to the user; for example, the login box
on the left shows users what options they have. This means that using the Accelerated HTTP
417
Cache Manager or caching the whole template using the RAM Cache Manager wouldn’t work.
This would cause users to see others users’ options.
Instead, the ZopeZen skin caches the getNewsAndReplies Script (Python) object by adding it to
the RAM Cache Manager. Doing so ensures that the majority of the expensive work rendering
the page is cached. Since the news items will be same for every user, there’s no point in
caching based on any REQUEST variables, so AUTHENTICATED_USER was removed from the
list of REQUEST variables for the cache. Profiling the front page reveals that without the cache
it can produce 1.06 requests per second. With the caching, the site can produce 4.96 requests
per second, which is a significant difference for a minor change.
14.1.2.12 Using Caching Servers
Since you can now send cache headers according to sophisticated rules, you can now use another server to cache requests for Plone. As fast as Zope is, it’ll never be faster than Apache,
Squid, or IIS for serving out content. These servers can serve static and cached content quickly
and simply. Partly it’s because these servers are written in C, but it’s also because they do less
work for each request. There are no security checks, database lookups, or language negotiations to be performed. Also, since you’ve read Chapter 10, you’ll also already have a proxy
server installed.
14.1.2.12.1 Using Apache
Apache is the standard open-source Web server. The following sections document techniques
using Apache 2.0 server on Linux. With only minor syntax modification, most of these tips
work on 1.3. For more information on different Apache servers and platforms, please see the
excellent Apache documentation at http://www.apache.org.
The ability to deflate or gzip your pages is useful for saving bandwidth. Before a page is sent
by the server, it will be sent down the wire, where the client will decompress the page. This
makes pages quicker to download and incurs fewer bandwidth charges for the site’s owner
since the files are smaller. First, enable the mod_deflate module. This will depend upon your
particular setup. For example, on Linux, do the following:
LoadModule cache_module modules/mod_deflate
Second, just add the following to your server configuration to deflate all Hypertext Markup
Language (HTML), Extensible Markup Language (XML), and plain text:
AddOutputFilterByType DEFLATE text/html text/xml text/plain
Some clients handle the deflation slightly differently, so it’s worth reading the
mod_deflate documentation for more detailed examples (http://httpd.apache.org/docs2.0/mod/mod_deflate.html).
In previous sections you’ve seen how you can send expiration headers by manipulating tools
in Plone. Apache can also send these headers easily using the ExpiresActive directive; this is
an alternative to using the various Plone tools. To set the expires headers to be 24 hours from
now for all images, for example, you can add the following to your Apache site configuration:
418
ExpiresActive
ExpiresByType
ExpiresByType
ExpiresByType
On
image/gif "access plus 1 day"
image/png "access plus 1 day"
image/jpeg "access plus 1 day"
You can find more information
2.1/mod/mod_expires.html.
on
mod_expires
at
http://httpd.apache.org/docs-
Apache comes with several systems that can perform caching for you. The standard Apache
module mod_cache has two caching modes: memory and disk. This will cache all page requests given a set of parameters for a given amount of time. To set up a disk cache in the
/tmp/apache_cache folder, add the following to the site configuration:
CacheRoot /tmp/apache_cache
CacheEnable disk /
CacheSize 256
CacheDirLevels 5
CacheDirLength 3
Unfortunately, proving that Apache is actually caching the content can be a little hard; perhaps the simplest approach is to test it by watching the z2.log in Plone and seeing if it’s
being hit. You can find more information on mod_cache at http://httpd.apache.org/docs2.0/mod/mod_cache.html.
14.1.2.12.2 Using Squid
Squid is an open-source proxy server that’s used commonly with Zope. It enables you to
accelerate Zope by caching content that’s produced inside Squid so that multiple requests are
handled by Squid, not Zope. Again, since Squid doesn’t render dynamic content and is written
in C, it can respond far more quickly. In Chapter 10 I covered installing Squid and using it
as a proxy. If you’re going to use Squid to accelerate Plone, then please see that chapter for
information on setting up Squid as a proxy.
As you’ve seen earlier in this chapter, you can put almost any information you want in HTTP
headers using the Caching Policy Manager and the Accelerated HTTP Cache Manager. Now
Squid will act in a similar manner to a browser cache. When a request comes for a page, if
those cache headers are present, Squid will cache the page. Repeated hits will cause Squid to
return the page, not Plone.
It’s relatively simple to tell if a page has been cached. Squid will add an X-Cache header to the
response. Using the header.py script, you can see if the page has been successfully cached. A
HIT means that a cached copy was found in Squid and returned; if no copy was found in the
cache and Plone was queried, a MISS is reported. For example:
X-Cache: HIT from www.agmweb.ca
Squid shows impressive numbers in testing in the development environment, accelerating the
view of a Plone page that’s cached from about 2 requests per second to more than 25 requests
per second. On fast servers, users have reported speeds of more than 200 requests per second
with relative ease.
419
14.1.2.12.2.1 Cleaning Squid Caches
When a user edits an object, it changes in Plone; however, because this object is cached in an
earlier state, the cache contains an old version. Users accessing the site will get the old version
rather than the new version. With caches under your control (such as Squid), you can send
PURGE commands to the caching server to tell it to remove the objects from the cache.
For the Accelerated HTTP Cache Manager, add the URLs of the caches to the Notify URLs (via
PURGE). An example is as follows:
http://192.168.1.1:80/example.org
In this example, the IP is the address of the cache, and the domain is the site to be purged. For
Squid to run the PURGE directive, you must ensure that Squid is configured. If Squid was on
localhost, this would be as follows:
acl PURGE method purge
http_access allow localhost
http_access allow purge localhost
http_access deny purge
http_access deny all
The Caching Policy Manager currently has no PURGE mechanism, however the Collective has
a new tool called CMFSquidTool that does this work for you. It watches for changes on content
and when that occurs sends a purge to a Squid cache for you. I haven’t tried this new tool yet,
but it’s definitely worth a look if you’re using Squid.
14.1.2.12.3 Avoiding Having to Clean Squid Caches
The best way to avoid cleaning caches is to be more selective on the caching. Both the Caching
Policy Manager and the RAM Cache Manager provide methods for being selective about what
to return from a cache.
Both the Caching Policy Manager and Squid support the Vary tag. If a Vary tag is specified,
Squid will extract the headers specified in the Vary tag from the request. Those headers are
then checked against the cache—if they match, the page is returned from the cache. If they
don’t, the request is passed on down the chain to Plone.
As an example, in the Caching Policy Manager the Vary tag has the value of Accept-Language.
When a request comes into Squid, the page will be cached according to the Accept-Language
setting in that request header. When a user requests a page with a different setting, a new
page will be returned. This means you can cache the pages based upon language.
The least aggressive value for Vary is *, which will cache any request that’s the same as any
other request. Different requests are passed straight on to Plone. Although this is the least
aggressive caching system, it does ensure that the user will see only up-to-date content.
The RAM Cache Manager REQUEST methods are the same concept as Vary except the tool
accepts a list of Zope request variables. The result of a cache lookup is then based upon those
420
variables. The default value is AUTHENTICATED_USER, which means that each authenticated
users will see their own versions of the cache. Nonregistered users (anonymous) will all see
the same content.
14.1.3 Using Zope Enterprise Objects
The final key to scaling and administering Plone is using Zope Enterprise Objects (ZEO). This
is a key tool in so many areas of Plone for development and production. Many people think it
should be the default setup for Plone, and it may be one day soon. For the moment, however,
ZEO comes with Plone on Linux but isn’t installed. It also works in Windows but isn’t fully
supported with services or easy installs.
In a standard Plone installation, there’s one instance of Plone talking to one instance of the
ZODB. While that one instance of Plone is accessing the ZODB, it’s locked and no other process
can access it. This limits the scale of the site and creates a single point of failure. In a the world
of relational databases, this would be equivalent to only one process being able to access your
database.
ZEO breaks this linkage and separates the access of the ZODB (called the ZEO server
Figure 14-9. A standard ZEO setup
Because multiple processes are able to connect to a ZODB, you’re now able to have several
copies of Plone. In essence you can now have two or three Plone instances that all share the
same content. Not only does this mean you can spread the load of your site over
Finally, one minor point is that restart times for a ZEO client are very quick. The cost of having
to load up the databases has been removed, which means you can restart Plone sites quickly.
421
14.1.3.1 Installing ZEO
ZEO is included with Zope 2.7, the version of Zope supported by this book. In earlier version
of Zope, it was distributed separately. At the moment there’s no easy way to install ZEO on
Windows—the mkzeoinstance script doesn’t work. ZEO itself works just fine, but you’ll have to
read the ZEO source to see how to do this. Further, zopectl doesn’t work on Windows, meaning
the following examples don’t work.
14.1.3.1.1 Linux
To create a ZEO server, use the mkzeoinstance script located in the /opt/Zope-2.7/bin directory.
This assumes that Zope is already installed, as described in Chapter 2. The script takes the
following parameters:
• Directory: This is the directory in which to create the ZEO server instance.
• Host: This is the host and port for the server to listen on, in the format
host:port. The port will be the port that ZEO clients connect to and should
be protected by a firewall, since ZEO provides no security against unauthorized access. These are optional. The default port is 9999.
• User and password: This is the default user and password for the server in the
format user:password and is optional.
For example, the following will install ZEO at /var/zeo on the default port:
cd /opt/Zope-2.7/bin
./mkzeoinstance /var/zeo
This has created a new database with all the appropriate configuration. This database is a
new location, but this is fine. If you want to move an existing Zope installation to ZEO, then
you’ll need to stop the running Zope and then move the database from your old installation to
the new ZEO directory. In my case, that means moving the Data.fs file from /var/zope/var to
/var/zeo/var.
Next you’ll need to alter the configuration of your Zope instance. To do this, open the zope.conf
in etc and enter the following information:
# ZEO client storage:
#
<zodb_db main>
mount-point /
<zeoclient>
server localhost:9999
storage 1
name zeostorage
var $INSTANCE/var
</zeoclient>
</zodb_db>
422
In the previous code you’re setting the port and the server where the ZEO Server can be found.
You’ll also need to comment out the existing map to the local database. This is should look like
the following:
#<zodb_db main>
#
# Main FileStorage database
#
<filestorage>
#
path $INSTANCE/var/Data.fs
#
</filestorage>
#
mount-point /
#</zodb_db>
To test that this works, first start the ZEO server. This may require more permissions than the
user you installed it as:
$ cd /var/zeo/bin
$ ./zeoctl start
daemon process started, pid=29316
The ZEO daemon has successfully started. Now fire up a Zope client, and try to connect to it,
like so:
$ cd /var/zope/bin
$ ./zopectl start
daemon process started, pid=29338
This means things are good to go, and you can now access your Plone as usual.
14.1.3.2 Using ZEO Clients
In this configuration, the ZODB is accessed via the ZEO server, and each Zope instance is a ZEO
client. Multiple ZEO clients can be connected to the server. There’s no need for the client and
server to be on the same computer, as long as the client can make a connection to the server. If
the clients are on the same computer, each client will need to bind to different HTTP and FTP
ports to avoid conflict with each other.
When your client starts, it’ll connect to the storage specified in your configuration instead of
the standard local storage. One common requirement is to allow a second computer to run
intensive tasks, such as updating the catalog, packing the database, or performing complex
lookups, without causing the other client’s performance to degrade. This is actually easy to do
using the zopectl function:
$ cd /var/zope/bin
$ ./zopectl debug
Starting debugger (the name "app" is bound to the top-level Zope object)
To pack the database, you’d then do the following:
423
>>> app.Control_Panel.Database.manage_pack(days=0)
Because you’re running on a ZEO client, you have to tell the server that a change has been
made and the caches have been updated. To complete the transaction, do this:
>>> get_transaction().commit()
>>> app._p_jar.close()
This is actually a useful thing to do if you’re running a high-performance site and need to pack
the database. The site will run a little slower when the transaction is committed, but most of
the hard work will happen on the client that’s performing the pack. This could be a totally
separate machine from your site and is an excellent way to distribute the load.
For debugging, getting to this prompt is extremely useful, as you can now examine the objects
inside that app object. You’ll find that they match the objects you see in the ZMI. For example:
>>> app.objectIds()
[’acl_users’, ’Control_Panel’, ’temp_folder’,...
What’s the API for that app object? You can use the built-in dir function in Python to examine
the object and even use the __doc__ method to see the comment strings contained there in,
like so:
$dir(app)
>>> dir(app)
[’COPY’, ’COPY__roles__’, ’Control_Panel’, ’DELETE’,...
>>> app.valid_roles.__doc__
’Return list of valid roles’
One
good
example
of
a
ZEO
based
application
is
CMFNewsFeed
(http://sf.net/projects/collective). This connects to Plone using a ZEO client. That separate client then goes and collects all the news feeds it can find and inserts the data into the
site. By doing all the collection and cataloging in a separate process, this ensures that the
main site’s performance isn’t degraded.
ZEO is an indispensable tool for developers. It allows you to interact programmatically with
your server while it’s running. If at this point you’re still confused about Plone and the object
database, then for experienced programmers ZEO is normally an eye-opener.
14.1.3.3 Load Balancing and Failover
Although ZEO provides the ability to run Plone on many servers, it doesn’t provide any load
balancing for the user. Load balancing is the act of sending incoming requests to different
servers and spreading out the load of producing pages. Sophisticated tools test to see if the
server is up before sending it a request.
You have hardware and software options for load balancing. For example, Squid can
perform dynamic failover. Pound is one example load balancer; you can find it at
http://www.apsis.ch/pound/index.html.
424
The Internet Cache Protocol (ICP) is a protocol that Squid can use to check that a
Plone site is running prior to forwarding a request to it. In highly dynamic sites,
this can be a necessity.
You can find more information about ICP and Zope at
http://www.zope.org/Members/htrd/icp/intro.