1
4=
INVIVO PULSE OXIMETER
TM
~@IT\Y7D©®
ffiYA]~[{iJlliJ ~ ~
~ INVIVO RESEARCH INC.
"
12601 RESEARCH PARKWAY· ORLANDO. FLORIDA 32826
InvivoPulseOx.imeter
Mode145()OMRI
S.crviceManual
MANUAL BY:
Uoyd L Shoemaker
Technical Publications
EDITED BY:
Tom W. Foshee
Director of Quality Assurance
IRI PN# 9522
Release 2, 7/93
ECN # 3567
©1993
INVrYO
1:::!~~F::i:::::::i·"~"··1IIlIIIIIIl1!!!~::!::f~~~TEn
>.t.
.............
12601 Research Parkway
Orlando,FL 32826
1-800-331:'3220
TABLE OF CONTENTS
Paragraph Number
Page Number
1. OPERATION OF TIlE PUlSE OXIMETER . . . . . . . . . . . . . . . . . . . . . . . . . . . . . . . . ..
1.1 Introduction........................................................
1.2 Controls and Indicators. . . . . . . . . . . . . . . . . . . . . . . . . . . . . . . . . . . . . . . . . . . . . ..
1.3 MRI Stand-Alone Pulse Oximeters .....................................
1.4 Using the Monitor. . . . . . . . . . . . . . . . . . . . . . . . . . . . . . . . . . . . . . . . . . . . . . . . . ..
1.5 System Operation Review ............................................
1.6 Alarms and Messages . . . . . . . . . . . . . . . . . . . . . . . . . . . . . . . . . . . . . . . . . . . . . . . .
1.7 Options Menus .....................................................
I-I
11
1-5
1-7
1-7
I-II
1-12
1-19
2. TIlEORY OF OPERATION .............. ................................
2.1 Introduction........................................................
2.2 AB 17A Display Board ........................ ......................
2.3 AB 17B Processor Board . . . . . . . . . . . . . . . . . . . . . . . . . . . . . . . . . . . . . . . . . . . . ..
2.4 AB17CI Analog Board ...............................................
2.S ABI8A Power Supply Board ..........................................
2-1
2-1
2-1
2-2
2-S
2-11
w
3. MAINTENANCE ....................................................... 3-1
3.1 Disassembly and General Service Precautions. ............................ 3-1
3.2 Adjustment and Verification. . . . . . . . . . . .. . ............................ 3-2
A. REFERENCE DRAWINGS. . . . . . . . . . . . . . . . . . . . . . . . . . . . . . . . . . . . . . . . . . . . . . .. A-I
B. SETIlNG TIlE INTERFACE OPTIONS ...................................... B-1
B.I Setting the Analog Options ............................................. B-1
B.2 Setting the RS-232 Protocol Options ..................................... B-2
B.3 Setting the RS-232 Communications Options .................. . .......... B-3
B.4 1/0 Connection Pinouts. . . . . . . . . . . . . . . . . . . . . . . . . . . . .. . ................ B-S
C. SOFIWARE REVISION ................................................... C-I
C.l Obtaining Service . . . . . . . . . . . . . . . . . . . . . . . . . . . . . . . . . . . . . . . . . . . . . . . . . .. C-l
C.2 Software Revision History ............................................. C-I
LIST OF FIGURES
Figure Number
1-1
1-2
1-3
1-4
2-1
Page Number
Blood Oxygen Saturation Formula. . . . . . . . . . . . . . . . . . . .
. . . . . . . . . ..
Pulse Strength Formula. . . . . . . . . . . . . . . . . . . . . . . . . .. ..... .............
4500 MRI Pulse Oximeter Front Panel ..................................
4500 MRI Pulse Oximeter Back Panel . . . . . . . . . . . . . . . . . . . . . . . . . . . . . . . . . ..
Blood Oxygen Saturation Formula. . . . . . . . . . . . . . . . . . . . . . . . . . . . . . . . . . . . ..
1-2
1-3
1-5
1-7
2-1
LIST OF TABLES
Table Number
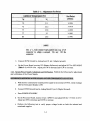
3-1
Page Number
Adjustment Set Point
3-3
LIST OF DRAWINGS
Drawing Number
197D372
194D543
194B542
185B149
194D554
185D153
94C346
85DI07
194D555
85D154
194D556
185D155
197B427
59C084
159B133
94B367
194B568
C94C624
C97B432
C94C586
C85B167
Page Number
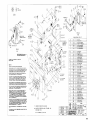
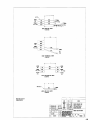
3109-1 Process and Instructions (Packing) ............................. A-2
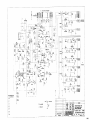
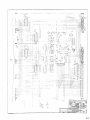
4500MRI Pulse Oximeter Assembly ................................. A-3
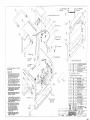
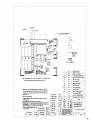
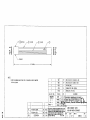
Power Interconnect Assembly AB40 ................................. A-5
Power Interconnect Assembly AB40, Schematic . . . . . . . . . . . . . . . . . . . . . . . . A-6
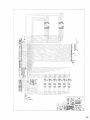
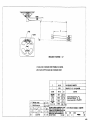
Power Switcher Assembly AB18A .................................. A-7
Power Switcher Assembly AB18A, Schematic ......................... A-8
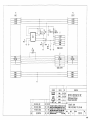
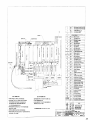
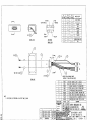
Display Assembly AB 17A ......................................... A-9
Display Assembly AB17A, Schematic .............................. A-IO
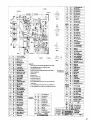
Processor Assembly AB 17B I . . .. ............... ................. A-II
Processor Assembly ABI7B, Schematic ............................. A-I2
Analog Assembly ABl7CI ....................................... A-I4
Analog Assembly ABI7CI, Schematic ............................ A-I5
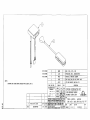
Dual Fiber Optic Finger Sensor 9397 . . . . . . . . . . . . . . . . . . . . . . . . . . . . . . .. A-I7
Oximeter Cable Assemblies . ................................... . A-I8
Cable Assembly AC216 .......................................... A-I9
Speaker Assembly AS72 ...... ........ . ....................... A-20
Universal Battery Holder AS03A . . . . . . . . . . . . . . . . . . . . . . . . . . . . . . . .. . A-21
Junction Box Subassembly, MRI Dual Fiber Optic ....... . . . . . . . . . . . . .. A-22
Cable Assembly, MRI Dual Fiber Optic Sensor AC206 ................. A-23
MRI SAT/C0 2 Power Interconnect Assembly AB50 .................. " A-24
MRI SAT/C02 Power Interconnect Schematic AB50 ................ .. A-25
11
PRECAUTIONS
Do not place the probe on the same limb with an inflated blood pressure cuff. Cuff inflation could
result in inaccurate readings and false alarm violations.
The monitor is not intended for use in the presence of flammable anesthetics. AN EXPLOSION
HAZARD EXISTS.
Never immerse the unit in any fluid or attempt to clean it with liquid cleaning agents. AN
ELECIRICAL HAZARD EXISTS.
Do not use a monitor that has failed to respond as described herein. Refer to qualified service
personne1. No repair should be undertaken or attempted by anyone not having a thorough
understanding ofthe repair of pulse oximeters. Federal law in the U.S.A. and Canada restricts this
device to sale by or on the order of a licensed medical practitioner.
Pulse Oximeters require detection of valid pulse to correctly determine saturation and rate values.
This monitor incorporates both audible and visual pulse indicators. The pulse bar on the 4500 MRI
or the pulse waveform on the Omni-Trak screen should be used as an indication of interference.
Normal (noise free) signals will cause a smooth rhythmic pulse bar or waveform pattern.
Excessive noise can cause erroneous readings.
The 4500 Pulse Oximeter is calibrated to read arterial hemoglobin oxygen saturation of functional
hemoglobin (saturation ofhemoglobin functionally available for transporting oxygen in the arteries).
Significant levels of dy sfunctional hemoglobins such as carboxy hemoglobin or methemoglobin may
affect the accuracy of the measurement. Also, cardiogreen and other intravascular dyes may,
depending on concentration, affect the accuracy of the measurement.
Sensor should be shielded from excessive extraneous incident light sources. Such extraneous light
can cause reading error or pulse detection failure.
Frequent medical attention to sensor site for possible pressure tissue necrosis should be given during
longer term monitoring sessions. Special care should be exercised when tape is used to secure the
sensor, as the stretch memory property of most tapes can easily apply unintended levels of pressure
to the mounting site.
III
The Model 3109-1 4500 MRI Oximeter draws power from the Omni-Trak 3100 system but also has
its own power "On" button. Alarms may be set locally on the oximeter or the Omni-Trak, but the
settings are independent of each other. The 3109-3 is stand alone and are powered by a wall outlet
transformer.
Glass fiber sensor cable is fragile. The Optic Sensor cable should never be flexed or bent at extreme
angles to avoid breaking fiber optic strands within the cable. Use proper care to not pinch or step on
cable. Take extreme care to loop cable neatly for storage, all bends in cable should have larger than
a three (3) inch radius.
Finally, as with all items placed in the bore, assure that cable runs straight out the bore and at least
4 inches from any other cable. The patient's finger or toe should not pin the sensor close to the side
of the bore. Be sure to inspect all equipment for damage before and after each use.
USER RESPONSmILITY
This product will perform in conformity with the description thereof contained in this operating
manual and accompanying labels and/or inserts, when assembled, operated, maintained, and repaired
in accordance with the instructions provided.
This product must be checked periodically for proper operation. A defective or questionable product
should not be used. Parts that are broken, missing, plainly worn, distorted, or contaminated should
be replaced immediately.
Should such repair or replacement become necessary, Invivo Research Incorporated (IRI)
recommends that a telephone call or written request for service be made to the factory or nearest
service center. IRI's toll free number is: (800) 331 - 3220, ask for Technical Assistance.
This product or any of its parts should not be repaired other than in accordance with written
instructions provided by IRI or altered without the prior written approval of IRI.
The user of the product shall have the sole responsibility for any malfunction which results from
improper use, faulty maintenance, improper repair, damage, or alteration by anyone other than IRI
or IRI authorized service personnel.
IV
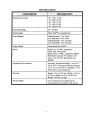
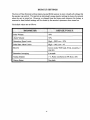
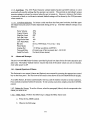
SPECIFICATIONS
i.·• • • • ••·· · \
······fiA.Rt\Mt~Er<········
~:::~
•••••••••••••••••••••••••••
...............
tr:::<::: : ;.:,:- .,".".
·····SpE(jtEi~i\ri()~ • .• • ..<i< •.. . . .
Saturation Accuracy
100 - 90%, ±2.0%
90 - 80%, ±2.2%
80 - 70%,±2.5%
70 - 60%, ±2.8%
60 - 50%, ±3.3%
Pulse Rate Range
20 - 250 bpm
Pulse Display
Pulse-Trak™ moving light bar
Alarm Ranges
High Saturation: 70 to 100%
Low Saturation: 50 to 100%
High Pulse Rate: 50 to 250 bpm
Low Pulse Rate: 40 to ISO bpm
Alarm Modes
Latched and Non-latched
Power
System: 14-24 VDC, supplied by
Omni-Trak 3100 system.
Stand-Alone: ISVDC, supplied by HE28A
Wall Outlet mounted AC Adapter (120
VAC). For 240 VAC applications use
HE28B.
Operational Environment
Operating Temperature Range: 10 to 44° C
(50 to 110° F). Storage Temperature Range:
-18 to 52° C (0 to 125° F). Humidity: 10 to
90% relative, non-condensing
Physical
Height: 3.25 m. (S.25 cm.) Width: 6.625 m.
(16.8 cm.) Depth: 10.25 m. (26.03 cm.)
Weight: 5.6Ibs. (2.54 kg.)
RS-232 Modes
Invivo Format (Invivo Research) for
communications with Omni-Trak system.
v
DEFAULT SETTINGS
The Invivo Pulse Oximeter utilizes battery-backed RAM memory to store virtually all settings that
the operator can control. This permits an individual's unique monitor settings to always be restored
when the unit is turned on. However, as shipped from the factory and whenever the battery is
removed or dead, default settings will be chosen by the monitor's processor when turned on.
The default values are as follows:
).• • · •. ···.ir .• <15AAAMETER .<.• . «
••••••••• : .....•.•..•••.. ····••· • ·. . . D~i?Au~TyA.ulni
.......................
Pulse Volume
40%
Alarm Volume
50%
Saturation Alarm Limits
High
Off; Low = 85%
Pulse Rate Alarm Limits
High
160; Low = 45
RS-232
Invivo mode, 9600 baud, 8 bits, no parity, 2
stop bits
Saturation Averaging
6 seconds
Analog Outputs
1 V, Pulse waveform on CPR Sync. off)
Alarms Status
Non-latch
VI
SECTION 1
OPERATION OF THE PULSE OXIMETER
This section provides a brief overview of the Pulse Oximeter, provides information on the controls
and indicators of the Pulse Oximeter and provides instructions on the operation of the Pulse
Oximeter.
1.
OPERATION OF mE PUlSE OXIMETER
1.1
Introduction
Noninvasive oximetry for the measurement of arterial blood oxygen saturation was first described
by Matthes in 1935. Pulse oximetry provides information about the oxygen status in the blood by
using a continuous, noninvasive method of measuring the arterial oxygen levels. A Pulse Oximeter
is essentially a multiple-wavelength plethysmograph.
1.1.1 Functional Application. Preoperative Sa02 monitoring helps to establish a patient's fitness
for anesthesia by determining oxygenation levels. This application is particularly valuable to the
assessment of patients with respiratory dysfunction. Noninvasive pulse oximetry allows the
clinician to follow rapid changes in oxygenation without the physiological trauma of arterial
puncture and cannulation. In surgery, mechanical ventilator adjustments (such as changes in
inspired oxygen fraction and the use of positive end-expiratory pressure) may be guided by oxygen
saturation measurements after an acceptable level of alveolar ventilation is determined from blood
gases.
1.1.2 Brief Description of Invivo 4500 MRI Pulse Oximeter. Invivo's 4500 MRI Pulse Oximeter
uses a fiberoptic cabling system and remote, shielded photodetector housing with its finger sensor.
The Pulse Oximeter is housed in its own 6 1/ 2 " X 3 1/ 2" X 10" aluminum case with local LED display
of Sa02 and Pulse Rate. The Pulse Oximeter is mounted in the Magnet room but must not be placed
within 5 feet of magnet's bore. When in system configuration (3109-1), the oximeter connects to
the OMNI -Trak 3100 cabling and power system. The central Omni-Trak MRI unit displays Sa0 2 ,
pulse rate, and waveform information. Patient connection is accomplished using a specially
designed fiber-optic sensor system mounted in a standard OxiClip finger sensor. When in
Stand-Alone configuration the oximeter (3109-3) is powered by a wall outlet transformer.
1.1.3 Theory of Operation. The Invivo 4500 Pulse Oximeter determines the patient's arterial blood
oxygen saturation (Sa0 2) by measuring the absorption of two selected wavelengths of light. The
light generated in the sensor (probe) passes through the blood and tissue and is converted into
electronic signals by a photo detector in the sensor.
1-1
Blood hemoglobin exists in two principal forms (each of which absorbs light at known
wavelengths):
1. Hb0 2 (oxygenated, with O2 molecules loosely bound)
2. Hb (reduced, with no molecules bound)
By passing light from two LEDs (a red
wavelength of light at 660 nanometers {RED}
and an infrared wavelength of light at 940
nanometers {IR}) through a pulsating arterial
site, the difference in absorption characteristics
between Hb0 2 and Hb (the ratio of
oxyhemoglobin to hemoglobin) can be isolated.
These variations form the basis of
mathematical calculations to determine the
presence of hemoglobin carrying oxygen
compared to hemoglobin without oxygen (See
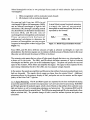
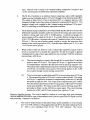
Arterial blood oxygen functional saturation
is simply the ratio of oxygenated
hemoglobin to total hemoglobin, and can be
expressed by the formula:
Figure 1-1: Blood Oxygen Saturation Formula
Figure 1-1).
Since Hb0 2 and Hb allow different amounts of light at selected wavelengths to reach the
photo detector, the electronic signals vary in relation to both the amount of blood present in the tissue
(the pulse waveform) and the amount ofHb02 in the blood.
The oximeter probe passes the two colors of light signals through the tissue very close together, to
a photo cell in the probe. The Hb0 2 and Hb absorb different amounts of light at selected
wavelengths and thereby give rise to the fundamental signal. The photo cell passes the received
signal to the oximeter, which filters and amplifies this signal. The signal is then separated by the
same timing relationship that drive the LEDs, into two separate voltage channels.
In the monitor, the signals are amplified, and filtered so that artifacts from motion and ambient room
light are discarded. The signals which remain are those from the arterial blood. Additional
processing allows for the numeric display of 8a02 and pulse rate on the monitor and the signal
quality on the Pulse-Trak™ light bar.
1.1.4 Signal Processing. The IR and RED signals are separated by the time multiplexed analog
circuits then passed to the oximeter's microprocessor via A to D converter for processing. Both RED
and IR light generate the pulsatile signal, which is then filtered so that artifacts from ambient room
light and motion as well as nonpulsating substance are factored out. The remaining RED and IR
signals are derived from the arterial blood. The RED pulse amplitude and IR pulse amplitude is then
used to calculate Sa0 2 The pulsatile change of both is used for artifact rejection and pulse rate
calculation.
1-2
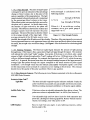
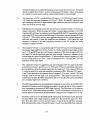
1.1.4.2 Pulse Strength. The pulse strength signal
Pulse Strength is calculated in the
is designed to give an indication of the percentage
following manner:
change in blood volume, due to the pulse of the
patient, regardless of skin pigmentation. The light
Strength of IR Pulse
signal returned to the probe photo cell is modulated
A+K
In
by the percentage blood volume in the tissue.
Avg. Strength of IR Pulse
When blood rushes into tissue the light received by
the photo cel1 is reduced. As blood drains away,
Where A + K are arbitrary scaling
the intensity of light received by the photo cell
constants, set to gi ve pul se gauge a
increases. The difference between the weakest and
range from 0 to 31.
strongest signals received represent the pulse
amplitude. The size of the pulse is directly related
to the average strength of the input light. If the
Figure 1-2: Pulse Strength Fonnula
average strength of the IR light source were
doubled, the strength of the IR pulse would also double. Therefore, if the sensing probe were moved
from a pigmented tissue to a non-pigmented tissue, (all other tissue and blood related values staying
the same), the strength value would not change. See Figure 1-2 for the formula for calculating pulse
strength.
1.1.4.3 Reading Variations. The Received Light Signal indicates the amount of light passing
through tissue. If the tissue is thin, a great deal of light will pass through the region. The oximeter
will indicate this with a high "Light" reading. Conversely, if the tissue is very thick, only a small
amount of light will pass through and the "Light" reading will be low. Different areas of the body
will give different strength readings. For example, the finger may read 12 or 20, while the ear may
read 0 or 3. In general, thin tissue areas show low strength readings because of the large amount of
average ]ight that passes through the region compared to the small amount of pulse signal
modulation. Low strength values may also indicate unacceptably weak pulse signals. Low levels
on thin tissue areas are not as much of a concern as a low reading on thick tissue. The clinician
should review the quality of the pulse waveform if there is any question.
1.1.5 Pulse Oximeter Features. The following is a list of features contained in the Invivo Research
4500 MRI Pulse Oximeter:
Exclusive Pulse-Trak™
light Bar:
The most clinically-responsive pulse indicator available. Tracks the
pulse waveform so accurately you can actually see the dicortic notch,
thereby providing increased confidence in the pulse signal validity.
Audible Pulse Tone:
Pulse tone volume is selectable independent from alarm volume. The
pulse tone volume is adjustable from 0 to 100% (See Section 3).
Alanns:
User adjustable high and low alarm limits for both saturation and
pulse rate. Latching/non-latching capability. Battery-backed memory
retains your settings, even when power is off.
LED Displays:
Easy to read from any angle, in any lighting situation, unlike
hard-to-read LCDs.
1-3
Battery-Backed Memory:
Remembers your monitor settings even when power is off.
Sensor:
The Sensor is made up of a fiberoptic cabling system. This
exclusive Invivo sensor design makes the 4500 MRI Pulse Oximeter
the only available monitor with no imaging interference and no
inhibition of Sa0 2 , pulse rate and pulse waveform during MRI
scanning.
Peripheral Gating:
The gating output signal from the Omni-Trak is controlled by the
Heart Rate source, which is selected from the ECG menu on the
Omni-Trak. Select Sa02 as heart rate source to peripheral gate from
the 4500 MRI. When used with the Omni-Trak system, optionally
gated signals may be routed to the scanning equipment directly from
the Stand Alone or System Ready revisions without the entire OmniTrak system. In the case of G.B. 5x systems, use the 9xxx or 9xxy
OxiGate cable. For other scanners consult Invivo directly.
1.1.6 Fiber Optic Sensor. The sensor is made with a fiberoptic cabling system for relocating the
photodetector to a remote shielded housing mounted on the 4500 MRI pulse oximeter. This
exclusive Invivo design makes the 4500 MRI Pulse Oximeter the only available monitor with no
imaging interference and no inhibition of Sa02 , pulse rate and pulse waveform during MRI
scanning.
..,
-,
..
','
,,','
...
',.-
,
_.'.'.
·········.CAfnl0N(
•··.·(jl~s • • hber.·sehsbr.cabl~·.igfr~i·le .• • the·OP~ic • ~en~r • •cable .•ShOuld·.llevet···be• ·fle"'~d.· 6r ••.
..l)entit~xtfeme:mg1e$to~Void~tealcih8fib¢tSp#~Sttar..~~with~qthec~blg:Vsepropet
• ·.car~·.t().n()lpihdi()FcrUsh··th~~a$le.·l'ak.~~~r~ilie~i¥tQloopca~len¢~H1Y.T()r·.st()r~g~•• ·•
~rb¢ridsiiticijbleshbuldha\Telarg~rthml.a~hr~e(3)inthradius. •. .. ........ ..
1-4
1.2
Controls MId Indicators
08
o
~
INVIVO 4500 MRI
NJEIDE1BI fDllI8IlElIfJIWICf . .
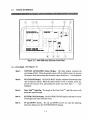
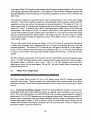
Figure 1-3. 4500 MRI Pulse Oximeter Front Panel
1.2.1 Front PaneL (See Figure 1-3):
Item 1:
OXYGEN SATIJRATION (saOl ) Display. The Sa02 display indicates the
percentage ofSa0 2. When the patient sensor is off, or artifact, noise, etc. prevent
the monitor from determining the saturation value, three bars (---) are displayed.
Item 2:
PULSE RATE Display. The PULSE RATE display indicates the detected pulse
rate in beats per minute. When the patient sensor is off, or artifact, noise, etc.
prevent the monitor from determining the pulse rate, three bars ( - - - ) are
displayed.
Item 3:
Pulse-TmkTM Light Bar. The height of the Pulse-Trak ™ Light Bar varies with
pulse and signal strength.
Item 4:
SYSTEM STATUS Disp]ay. The SYSTEM STATUS display indicates a variety
of messages and menu selection items.
Item 5:
UP and DOWN Arrows. The Up and DOWN arrows are used for adjusting
selections displayed in the SYSTEM STATUS display.
1-5
Item 6:
CANCEL Control. The CANCEL control silences an alarm tone for 60 seconds,
or can be used to inhibit the alarm sound for 60 seconds (see paragraph 1.6:
Alarms and Messages). Also returns SYSTEM STATUS display to normal mode
when a menu selection has been made.
Item 7:
POWER/STANDBY Control. The POWER/STANDBY control turns power on.
Monitor must be connected to the 3100 MRI monitoring system with 3100 power
on, or (in Stand Alone) the HE2gA AC Power Adapter must be connected to the
1/0 port.
Item 8:
RECHARGE Indicator. The RECHARGE Indicator illuminates when 3100
power is on and monitor is connected to 3100 MRI monitoring system, or (in
Stand Alone) when the HE2gA AC Power Adapter is connected to the I/O port.
Item 9:
ALARMS Control. The ALARMS control selects a variety of items from the
Alarms menu.
Item 10:
OPTIONS Control. The OPTIONS control selects a variety of items from the
Options menu which are shown in the SYSTEM STATUS display.
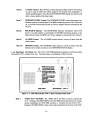
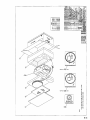
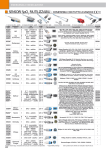
1.2.2 Rear Panel. (See Figure 1-4): The 3109-1 4500 MRI back panel contains two 1/0 ports while
the model 3109-3 contains only one. The following is a description of the 1/0 ports:
&
,
•
WARNING! Shock bmrd ,resent
Do not remove cover. ReIer an
IIM&il, to qualined pll1OllDeI.
CAUTION! Do not aUemptta adjust
tIIis Mnft wiIIIIIlllferillllll selVa
manual first.
DANGER! Explosion halm Hned
ill Ie presence 01 FLAMMABLE
ANESTHETICS.
80
00
00
00
08
80
00
WARNING! Slightly Magnetic. ro be
Dud outside IIIlRI .... befllnd
1500 Gauss linl.
®
80
00
00
00
88
00
00
§8 .
§8
,
'
I_~
PATENTS PENDING
INYlVO RESEARCH INC.
~ ;I
u
IWJE II U.S.A.
Figure 1-4. 4500 MRI (Model 3109-1) Pulse Oximeter Back Panel
Item 1:
t'1HRU OUT" 110 PORT. The "THRU OUT" 1/0 Port is used to connect the
3103-1 (Omega 1400 MRI NlBP) to the 3100 MRI monitoring system. In normal
system installation the 4500 MRI oximeter is mounted on top of the 3103-1
(Omega 1400 MRI NIBP) via the velcro strips attached to the bottom of the 4500
1-6
MRI oximeter, then the short (IRI# AC 203) cable connects from the THRU
OUT connector of the 4500 MRI to the 110 port of the 1400 MRI NIBP.
Hem 2:
''IN'' VO PORI: The "IN" 110 PORT performs two functions:
a. In system configuration (3109-1), the "IN" I/O Port is used to connect the
4500 MRI oximeter to the 3100 MRI monitoring system via cable from
junction box in magnet room.
b. In Stand-Alone configuration (3109-3 {non-system ready}), the I/O Port
(which is a DB9 connector rather than aDB25 connector) is used to connect
to wall outlet transformer power source. See installation for stand-alone
configuration.
Ill~nmda1on~configuratioQ.(3109 ..3lth~THRU.QlJtI!0.Portisnot
use&··
1.3 MRI Stand-Alone Pulse Oximeter. The 3109-3 is a Stand-Alone only Pulse Oximeter,
equipped with a Rechargable Battery and AC adapter for it's power source. It does not contain the
system ready components.
1.4
Using the Monitor
1.4.1 Patient and Probe Preparation. Operation and use of the monitor is easy, if you follow these
simple steps.
1.4.1.1 Probe and Site Preparation. Inspect the probe for foreign material such as tape or cotton.
Remove any substances which may interfere with the transmission oflight between the light source
and fiber optic photo detector. Verify that the probe opens and closes smoothly.
NOTE
.. Tbeprobe shout~be.deanedaftereachpatjentllse~thacloth,using
rnildsoapand<watetor>isopropYI.alcohoL Allow the.pfobeto dry
echnpletelybefoteretlJrriingt() use.
.
1-7
Ensure that the patient is not wearing fingernail polish, and does not have artificial or long
fingernails. These may cause a reduction in transmitted light levels resulting in low signal levels.
Remove fingernail polish before using the finger probe.
,::~:~;~~~~prg~~'~~~~!~61i~~Wi~*~I~!~.·¢~:
. . result itlinac~tirat~te@ings" andrMse hl.rmWiOlatiori.$.·• • ·.· . . . . . . . . . . " .""
Insert the patient's finger into the probe housing until it touches the raised finger stop inside the
probe. Be certain that the surface of the fingertip covers the detector window inside the probe. The
fingernail should be UP (i.e., on the same side of the probe as the four-diamond design on the outer
surface of the probe).
The patient's finger should remain motionless. Motion can cause artifact and delay the reading or
decrease its validity. To additionally secure the probe on the finger, a piece of tape (such as 3M
Transpore~') can be wound around the probe. DO NOT CUT OFF mE CIRCULATION!
1.4.1.2 Probe Positioning. Position the probe according to the instructions that follow. Check
monitoring site, reposition probe, and check ambient environment when the following messages
appear.
a. Check that the monitoring site is good and the probe properly positioned by verifying
a strong pulse signal from the Pulse-Trak Light Bar and/or the real-time pulse
waveforms.
b. The pulse bar on the 4500 MR.I or the pulse waveform on the Omni-Trak screen should
be used as an indication of interference. Normal (noise free) signals will cause a
smooth rhythmic pulse bar or waveform pattern. Excessive noise can cause erroneous
readings.
1.4.1.3 Probe Removal. If the sensor probe is removed from the patient or dislodges, Probe Off will
be shown in the SYSTEM STATUS display, and the alarm tone will sound. The alarm tone can be
silenced by pressing the CANCEL control.
1-8
1.4.1.4 Infant Extremities. The preferred site for monitoring neonates and infants is the foot.
However. the sensor may be applied on the hand or toe. The sensor can be applied at right angles
to these small appendages, use caution to support the mass of the fiber optic cable so that it doesn't
pull the sensor away from the monitoring site. When placing the sensor on the fingers or toes, verify
that the optical center of the sensor (light) directly illuminates the appendage and doesn't shine
between them.
·WA.~~G··ri·
'~$~~~i:\i;~~,~;'~~I~~~Jfr,~~~~~t~~j~~'~~$~~i~~~~reahd~i~
•. . •. 4inc1ie$t:roJl1anYQthercable;trJlepati~rihrtngerQrio¢shp\.l.ldn6tplnthe sensor close to
the Si~e.of theljore. ·•.• aesuret()inspect.aiI.equipl!le~tford.3ritage;
..
. .
~~~er~ertSpt calli~i~J.rag'le,.'h.~~liF. S~·.·~I¢~hoi#fl'l1eYet\le ·.tte~or
l>eritateXtre.IJl~aJ1g] es!oaVoi dbreakingfib¢r op(ic strands Wl thinth.e cable ..Vsepr.oper
c;~retonotpinchor step,?rtcable.TakeeXtiefuecareto lobp ·.cable neatly for storage,
alLbendsincableshollld have lwgerthanatllree(3}inchradius. Do not attempt to
disconnect .cable· frornunit..Referallservicill.stoqualifiedpersoililel.
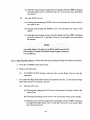
1.4.2 Operating the Monitor. To operate the monitor, perform the following steps:
a. Depress the POWER/STANDBY control.
b. Observe the following:
(l) The SYSTEM STATUS display indicates "Hello."
(2) An other front panel displays are illuminated (verifying the operation of the display
system).
(3) A short, soft tone sounds (verifying operation of the audio alarm system).
(4) The SYSTEM STATUS display indicates the current alarm values in the following
sequence:
(a)
(b)
(c)
(d)
HiSa = xxx (High Saturation Alarm Limit)
LoSa = xxx (Low Saturation Alarm Limit)
HiPR = xxx (High Pulse Rate Alarm Limit)
LoPR = xxx (Low Pulse Rate Alarm Limit)
1-9
(5) The alarm wil1 sound briefly to call special attention to any limit previously set to
"off". Thanks to the oximeter's battery-backed memory, most settings of the monitor
will remain just as they were left from the previous use. EXCEPTIONS: As a safety
feature, if the lDSa alann limit has been set to Off, it will be reset to 850/0; and if the
AlanD tone volume has been set to Off, it will be reset to 50%.
(6) If any front-panel control key is pressed, the monitor will stop the Alarm review and
the corresponding menu will shown in the SYSTEM STATUS display.
1.4.2.1 Connected Probe. If the probe is on the patient, the Pulse-Trak™ light bar will begin to
track the pulse while the alarm limits are being displayed. After four to six pulses, the oxygen
saturation value (percent of saturation) and pulse rate (beats per minute) will appear in their displays.
The time of day win be shown in the SYSTEM STATUS display.
1.4.2.2 Unconnected Probe. If the probe is not connected to the patient, ProbeOff will appear in
the SYSTEM STATUS display.
1.4.3 Setting Other Parameters. If desired, alarm limits and fi1ter mode may be set, as described
in the following sections.
1.5
System Operation Review
1.5.1 Input Power. Input power depends on whether the Pulse Oximeter is in System (3109-1) or
Stand-Alone (3109-3 {non-system ready}) Configuration.
1.5.1.1 System Configuration. When in system configuration (3109-1), the oximeter connects to
the OMNI-Trak 3100 cabling and power system.
1.5.1.2 Stand-Alone (3109-3: Non-System Ready) Configuration. When in Stand-Alone (3109-3:
Non-System Ready) Configuration, the oximeter is powered by an internal Rechargable Battery
(approximately two hours) or by a wall outlet transformer.
1.5.2 Status Display and Control. Through processor and front panel display board interaction of
control switches and status display the system responds to operator requests as well as display of
Sa0 2, Pulse rate, and pulse bar.
1.5.3 Sa02 Filter. The displayed saturation value may be selected for either 3, 6, or 12 seconds of
data averaging.
1.5.4 Pulse Output. The Pulse output from the analog board may be set for either pulse waveform
(system configutation) or sync pulse output. Through Option switch front panel selection this output
may be set for 1,3, 5, or 10 volt full scale (normally 3V for system configuration).
1.5.6 Software Revision. The software revision is displayed in the status display when selected
from the front panel option switch (last menu selection on the option switch).
1-10
1.5.7 Cold Start. The 4500 Pulse Oximeter utilizes battery backed up RAM memory to store
practically all possible settings that the operator can control. This permits an individual's unique
monitor settings to always be restored when the unit is turned on. However, whenever the battery
is removed or dead, or a cold start is initiated, default settings will be chosen by the 4500 processor
when turned on.
1.5.7.1 Cold Start Initiation. To initiate a cold start from the front panel switches, hold the upper
left blank feed and cancel switches depressed during power up. Cold Start default settings are as
follows:
Pulse Volume
Alarm Volume
High Sat Limit
Low Sat Limit
High Pulse Rate
Low Pulse Rate
RS-232
Filter Mode
Analog Out
Time and Date
LatchlNo Latch
1.6
40%
50%
Off
85
160
45
Invivo, 9600 Baud, 7 bit, even, 1 stop
6
1 V (Pulse waveform on/SYNC)
(Current year oflast revision) Jan 1, 00:00:00
No latch (Alarm status)
Alanns and Messages
The Invivo 4500 MRI Pulse Oximeter provides high and low alarm limits for both saturation and
pulse rate. The battery-backed memory insures that most of the alarm values you set are retained,
even when power is off.
1.6.1 General Operation of Menus.
The Oximeter's two menus (Alarms and Options) are accessed by pressing the appropriate control
key on the front panel. The first item of the menu is then shown in the SYSTEM STATUS display.
As a safety feature, all menus automatically time-out, and the monitor returns to normal operation,
if no controls are pressed within 60 seconds. To exit a menu at any time, simply press the CANCEL
control.
1.6.2 Setting the Alarms. To set the Alarms, select the paragraph (below) which corresponds to the
Alarm you wish to set.
1.6.2.1 HiSa Alarm. Perform the following to change the HiSa Alarm limit:
a. Press the ALARMS control.
b. Observe the following:
1-11
(1)
SYSTEM STATUS display indicates the current High Alarm Limit for
saturation.
c. To increase the HiSa Alarm Limit perform step (1); to decrease the HiSa Alarm Limit
perform step (2):
(1)
Press the UP Arrow.
(a) Pressing and releasing the UP Arrow will increase the Alarm Limit by the
value of one.
(b) Pressing and holding the UP Arrow wiJI increase the Alarm Limit rapidly.
(c) When the value reaches its upper limit, the display will show OFF, indicating
the HiSa Alarm is off. It will then "roll over" to its lowest value and repeat
the process.
(2)
Press the DOWN Arrow.
(a) Pressing and releasing the DOWN Arrow will decrease the Alarm Limit by
the value of one.
(b) Pressing and holding the DOWN Arrow will decrease the Alarm Limit
rapidly.
(c) When the value reaches its lower limit, the display will show OFF, indicating
the HiSa Alarm is off It will then "roll over" to its highest value and repeat
the process.
1.6.2.2 LoSa Alarm. Perform the following to change the LoSa Alarm limit:
a. Press the ALARMS control two times.
b. Observe the following:
(1)
SYSTEM STATUS display indicates the current Low Alarm Limit for
saturation.
c. To increase the LoSa Alarm Limit perform step (1); to decrease the LoSa Alarm Limit
perform step (2):
(1)
Press the UP Arrow.
(a) Pressing and releasing the UP Arrow will increase the Alarm Limit by the
value of one.
(b) Pressing and holding the UP Arrow will increase the Alarm Limit rapidly.
1-12
(c) When the value reaches its upper limit, the display will show OFF, indicating
the LoSa Alarm is off. It will then "roll over" to its lowest value and repeat
the process.
(2)
Press the DOWN Arrow.
(a) Pressing and releasing the DOWN Arrow will decrease the Alarm Limit by
the value of one.
(b) Pressing and holding the DOWN Arrow will Decrease the Alarm Limit
rapidly.
(c) When the value reaches its lower limit, the display will show OFF, indicating
the LoSa Alarm is off. It will then "roll over" to its highest value and repeat
the process.
. .As a·
.saf~tY feafute~ if·~osa·
•.
••
.ts.·.set·.ti• Otr;·.it··wIll·• be .• reset.!o.s.S%
. ifthemortitor is{urneg Hffandthentllrned.ofiagain; otherwise,
ids not affected. .
1.6.2.3 High Pulse Rate Alarm. Perform the following to change the High Pulse Rate Alarm limit:
a. Press the ALARMS control three times.
b. Observe the following:
(1)
SYSTEM STATUS display indicates the current High Alarm Limit for
saturation.
c. To increase the High Pulse Rate Alarm Limit perform step (1); to decrease the High
Pulse Rate Alarm Limit perform step (2):
(1)
Press the UP Arrow.
(a) Pressing and releasing the UP Arrow will increase the Alarm Limit by the
value of one.
(b) Pressing and holding the UP Arrow will increase the Alarm Limit rapidly.
(c) When the val ue reaches its upper limit, the display will show OFF, indicating
the High Pulse Rate Alarm is off. It will then "roll over" to its lowest value
and repeat the process.
1-13
(2)
Press the DOWN Arrow.
(a) Pressing and releasing the DOWN Arrow will decrease the Alarm Limit by
the value of one.
(b) Pressing and holding the DOWN Arrow will Decrease the Alarm Limit
rapidly.
(c) When the value reaches its lower limit, the display will show OFF, indicating
the High Pulse Rate Alarm is off. It will then "roll over" to its highest value
and repeat the process.
1.6.2.4 Low Pulse Rate Alarm. Perform the following to change the Low Pulse Rate Alarm limit:
a. Press the ALARMS control four times.
b. Observe the following:
(1)
SYSTEM STATUS display indicates the current Low Alarm Limit for saturation.
c. To increase the Low Pulse Rate Alarm Limit perform step (1); to decrease the Low
Pulse Rate Alarm Limit perform step (2):
(1)
Press the UP Arrow.
(a) Pressing and releasing the UP Arrow will increase the Alarm Limit by the
value of one.
(b) Pressing and holding the UP Arrow will increase the Alarm Limit rapidly.
(c) When the value reaches its upper limit, the display will show OFF, indicating
the Low Pulse Rate Alarm is off. It will then "roll over" to its lowest value
and repeat the process.
(2)
Press the DOWN Arrow.
(a) Pressing and releasing the DOWN Arrow will decrease the Alarm Limit by
the value of one.
(b) Pressing and holding the DOWN Arrow will Decrease the Alarm Limit
rapidly.
(c) When the value reaches its lower limit, the display will show OFF, indicating
the Low Pulse Rate Alarm is off. It will then "roll over" to its highest value
and repeat the process.
1.6.2.5 Alarm Limits Range.
1-14
High Saturation:
Low Saturation:
High Pulse Rate:
Low Pulse Rate:
70 to
50 to
70 to
20 to
100%
100%
250 bpm
200 bpm
1.6.3 Latching or Non-Latching Alarm Modes. To display the Alarm Mode, press the ALARMS
control five times and the Alarms display will indicate the status (latching or non-latching) of the
Alarm Mode.
1.6.3.1 Latching Mode. In the Latching Mode, when an active Alarm is violated, the Alarm tone
will continue to sound even if the parameter goes back within the Alarm Limit until CANCEL is
pressed.
1.6.3.2 Non-Latching Mode. In the Non-Latching mode, when an active Alarm is violated, the
alarm tone will sound only as long as the Alarm Limit is exceeded. If the value goes back within
the alarm limit, the alarm tone will cease. The alarm tone may be silenced at any time with the
CANCEL controL
1.6.3.3 Changing the Alarm
Mode. The UP and DOWN
Arrows toggle the Alarm Mode
between Latching and NonLatching.
Note
The pulse· tone votmne . may be accessed quickly from the
front panel. If no menu is •. currently active, pressing either
arrowkeywiUactivate the pulse vol umesetting directly.
1.6.4 Pulse Tone Volume. To
display the Pulse Tone Volume,
press the ALARMS control six
times and the Alarms display will indicate the Pulse Volume setting (pVol=xx%).
1.6.4.1 Pulse Tone Operation. When the monitor is connected to a patient, a short tone will sound
with each detected pulse. The volume of this tone may be adjusted from 0 to 100% using the arrow
keys. When the setting reaches its upper or lower limits, it will show OFF.
NOTE
an
AsasafetyfeafureUf the Alarm volume isseft() OFF. dtheI11onitor is turned
off and back on again, the volume will be automatically reset to 50%.
1.6.5 Alarm Tone Volume. To display the Alarm Tone Volume, press the ALARMS control seven
times: the Alarms display will indicate the Alarm Tone setting and the Alarm tone will begin to
sound.
1.6.5.1 Alarm Tone Adjustment. Use the UP or DOWN Arrow keys to adjust or tum off the alarm
tone. When the setting reaches its upper or lower limits, it will show OFF. When the Alarm tone
1-15
is turned off, violation of an alarm is indicated by a flashing display of the violated parameter. The
SYSTEM STATUS display will also indicate the reason for the alarm.
1.6.6 CANCEL Control. Depress the CANCEL Control to silence an alarm tone when it is
sounding. The alarm tone will be suspended for 60 seconds, regardless of interim violations.
1.6.6.1 Other Uses. The CANCEL control can also be used to prevent alarm violations for a
60-second period. For example, if you will be removing or adjusting the probe, press CANCEL as
many times as needed. Pressing CANCEL when there is no Alarm Tone (violation) current will
suspend Alarm occurance for 60 seconds.
1.6.7 Alarm & Warning Messages. There are several types of alarm/warning messages produced
by the Invivo 4500 MRI Pulse Oximeter. When one of the following conditions occur, the message
is shown in the SYSTEM STATUS display.
1.6.7.1 Initialization Messages. These messages appear when the monitor is first powered up.
RAM Bad:
System service required.
ROM Bad:
System service required.
AID-Bad:
System service required.
Ram lAst:
Auto reset to defaults.
Sys Init:
System initialized to default settings.
1.6.7.2 Problem Messages. The fol1owing list of messages will be displayed if the corresponding
condition is detected. These messages take precedence over Alarm Violation messages:
Batt Low:
Battery is low.
If this message appears on the 3109-1, the power
supplied by the 3100 is too low and service to the
3100 MRI system may be required. Also, facility
main power could be low.
If this message appears on the 3109-3, the internal
battery requires recharging. Recharge by plugging
the wall outlet transformer into rear connector and
into an AC receptacle of the correct voltage.
Bad Probe:
Probe is not functioning properly.
Can't 0:
There is a strong flashing light near the probe which is synchronized with
the probe LED strobe signal, or a hardware fail ure has occurred.
Noise:
The photo sensor is receiving extraneous optical or electrical noise.
1-16
Low Ught:
Light transmission impeded, tissue too opaque.
Probe OfT:
Sensor not viewing patient.
Probe OFF:
The sensor is receiving too much light to operate.
HiUght:
Too much light is passing through the tissue at the present probe sight.
Try an area with thicker tissue.
HiUght!:
The multi-site sensor is receiving too much light for proper operation.
Search:
Searching for good pulse.
Artifact:
Excessive artifact in signal.
LowQual:
The signal correlation between the red and infra-red light channels is too
low for accurate saturation calculation.
1.6.7.3 Alarm Violation Messages. If none of the above conditions exist, and if one or more of
the four alarm limits are violated then the SYSTEM STATUS display will indicate the alarm
violation.
If one limit is violated, its message will be displayed continuously. If several alarm limits are
simultaneously violated, each alarm violation will be displayed, one per second, on a rotating basis.
AlnnHiSa
High saturation alarm limit exceeded.
AlnnLoSa
Low saturation alarm limit exceeded.
AlnnHiPR
High pulse rate alarm limit exceeded.
AlnnLoPR
Low pulse rate alarm limit exceeded.
Ifno alarm limits are violated or no "Problem" messages are displayed, the following informational
messages will alternate with the Time in the SYSTEM STATUS display if one of these conditions
exists:
1.7
Alarm OfT:
Either the alarm-tone volume is set to Off, or allfoUT alarm limits are set
to Off.
LoSatOfT:
Low saturation alarm limit is set to Off.
Options Menus
The Options Menus are used to set the Filter Mode for saturation, Set the real-time clock and to
check the software revision number.
1-17
1.7.1
General Operation of Menus. The Pulse Oximeter's two menus (Alarms and Options) are
accessed by pressing the appropriate control key on the front panel. The first item of the menu is
then shown in the SYSTEM STATUS display. As a safety feature, all menus automatically time-out
(the monitor returns to normal operation) ifno key is pressed within 60 seconds. To exit a menu at
any time, simply press the CANCEL key.
1.7.2
Saturation Averaging. The monitor may be set to average the Saturation value over 3,6,
or 12 seconds. The faster setting allows you to track rapidly-changing saturation values. Theslower
setting allows for a more-stable display of saturation values, and may be indicated for long-term
monitoring where patient artifact is great. The saturation averaging time does not affect the Pulse
reading or Pulse-Trak light bar.
1.7.2.1
Time:
Setting the Saturation Average. Perform the following to set the Saturation Averaging
a.
Press the OPTIONS control once.
b.
Observe that the SYSTEM STATUS display indicates FiI=xxsc.
c.
Use the UP or DOWN Arrow keys to set the averaging time to 3, 6 or 12 seconds.
1.7.3
Interface Options. Two other selections on the OPTIONS menu, Analog and RS-232 are
used for setting the way in which the pulse oximeter interfaces with external devices such as other
patient monitors. Details on setting these options are contained in Appendix B.
1.7.4
Checking the Software Revision Number. When calling Invivo Customer Service or
Technical Service (toll free: (800) 331 - 3220) for assistance with a problem with your oximeter, it
is helpful to know the serial number of your monitor (found on the bottom of the monitor), and the
software revision number.
To obtain the software revision number, press the OPTIONS control seven times. The SYSTEM
STATUS display will show Rev.MXXX, where XX is the revision number.
Appendix C contains a current listing of software revisions.
1-18
SECTIONll
THEORY OF OPERATION
This section describes the operation of Invivo Research Model 4500 MRI Pulse
Oximeter.
2.
11IEORY OF OPERATION
2.1
Introduction
Pulse oximetry is the continuous, noninvasive method of measuring arterial oxygen levels in the
blood. It provides information about oxygen status. Noninvasive oximetry for the measurement of
arterial blood oxygen saturation was first described by Matthes in 1935. A Pulse Oximeter is
essentially a multiple-wavelength plethysmograph.
For a complete discussion on the theory of Pulse Oximetry, refer to paragraph 1.1.3.
2.2
ADI7 A Display Board
The Display Board provides operator interaction with the patient monitor.
The Display Board consists of I power and 8 function switches; 6 numerical LEDs and 2 bar LEDs;
and an intelligent 8 character display assembly. It provides patient parameter information, system
status messages and an interface between the operator and the oximeter system. Function switches
SWI through SW7 and SW9 form a switch matrix which is controlled and periodically monitored
by the Processor Board to determine if the system operator wants the oximeter to perform a
designated task. Low logic levels are applied to P I (pins 41, 42, 43 and 46) and routed to four
switch pairs as designated in the display schematic. RI and R2 form a pair of pull-up resistors on
the normally open contacts of two groups of four switches as shown. When the operator depresses
a switch the corresponding output will go low at PI pin 44 or PI pin 45 and the processor will
decode the input to determine what action has been requested.
System power switch SW8 receives unregulated system power from PI pin 48. When SW8 is
depressed the unregulated system power will be routed to the Power Supply Board via PI pin 50.
Numerical LEDs DS I-DS6 are used to display patient parameters during system operation.
Individual LED segments are turned on or off by the combination of the drive levels applied at the
LED segment anodes by DIGITI-DIGIT6 signals from PI (pins I through 5) and the drive levels
applied at the LED segment cathodes by the a-f and dp signals applied at PI pins 9-16. The
Processor Board controls the signal combinations to display intelligent information. Bar LEDs DS7
and DS8 are control1ed in the same manner and represent a visual, real time display of the patient
pulse waveform as measured by the oximeter system.
2-1
DS9 is an intelligent 8 character generator used to display system status information to the oximeter
system operator. It is interfaced directly to the microprocessor bus on the processor assembly as
shown. Messages are written to DS9 to inform the operator of system status during operation, the
configuration of software features (Options and Alarms), display prompts required for operator
interaction with the oximeter, and provide the operator with the current time. R4 and OS lOis
connected between the power supply unregulated DC bridge voltage and ground. LED DS I 0
provides a visua] indication to the operator when the oximeter is connected to an external power
source.
2.3
AB17B Processor Boam
The Processor Board contains the hardware necessary to control the oximeter system operation;
perform timing and measurement operations; provide data memory storage; and interface with the
display and RS232 ports. Hardware control features consists of the reset circuits, power supply
shutdown circuit, and clock circuit. Hardware pertaining to other system functions will be included
in the description of the circuit itself.
The power up reset command is generated by a RC network consisting of C3 8 and RIO and inverter
UIS (pins 3 and 4). As the + 12vdc supply rises when the power supply is turned on, C38 will be
charged toward a + 12 VDC potential at the input of UIS pin 3. The amplitude of charge will be
limited to approximately +S VDC by the rate of change of the charge and the input protection diodes
located within UIS. The +S VDC supply to UIS will rise at the same rate as the +12 VDC supply
so UIS will be fully operational when the positive going pulse is received. The positive pulse will
decay at a rate equal to the RC time constant of C38 and RIO when the + 12 VDC supply stops
rising. UIS will invert this pulse and apply it as a negative going reset pulse to microprocessor U4
pin 26, I/O ports U20 pin I, U21 pin I, U23 pin 1 and U24 pin 1, reset generator input UI5 pin 5,
and to the analog and display assemblies via 13 pin 22 and J2 pin 17. VI5 pin 6 provides the
positive going reset pulse for the UART U3 pin 21. This initializes the UART and prepares it for
setup instructions. The function of the reset pulses is to prepare the IC's receiving them for
operation and to allow the clock circuits time to stabilize. During the power down sequence the
power supply assembly provides a positive pulse named memory shutdown to 11 pin 14 which is
routed to UI5 pin 3 and causes a reset pulse to be generated.
During the power up sequence a rising positive voltage pulse will charge the RC network ofC37 and
R9 to produce a high on the input of UI5 pin 9. The amplitude and duration of this pulse will be
large enough and long enough to cause a negative going pulse with a minimum duration of 100 ms
to be output at UI5 pin 8. This allows the power supply to operate by itself for a short period of
time while the reset pulses occur and the microprocessor begins to operate. When the
microprocessor receives a power off signa] (or in the event of a malfunction) the microprocessor
stops sending pulses from U24 pin 2 to J1 pin 7 printer power control. The printer power voltage
at J4 pin 1 and C35 will discharge through Ril to 0 VDC. The high logic voltage at UI5 pin 9 and
C37 will discharge through R9 towards 0 VDC and U 15 pin 8 will send a positive pulse through P3
to 11 pin 6 to shutdown the power supply assembly.
2-2
2.3.1
Clock Circuit. The clock circuit consists of two inverter sections with negative feedback
resistors. two timing capacitors. a series connected crystal oscillator. coupling capacitor, one D flop
and two inverter drivers. The clock provides a stable 4 MHz frequency source for microprocessor
and counter-timer operations.
2.3.1.1 Clock Circuit Function. RI connects the output ofUI2 pin 2 back to its input at UI2 pin
1 so the inverter will be biased in a linear manner halfway between its high and low logic states in
a static condition. C28 is connected between the input of UI2 pin I and ground while C29 is
connected between the output ofUI2 pin 2 and ground. YI is connected between UI2 pin 1 and U12
pin 2 and acts as an LC network resonant at 8MHz. When power is applied C28 pulls the input of
U12 pin I low. The output will go to a high level and feed back to the input through the network
made up of C29, Y 1 and C28 causing the input to go high and drive the output low. The low output
will feedback to the input through C29, YI and C28 causing it to go low again and the process will
repeat at the 8 MHz resonant frequency ofYl.
The output of U12 pin 2 is coupled through C30 to the input of UI2 pin 3 which has also been
biased in a linear manner with the input at U12 pin 3 connected to the output at U12 pin 4 by R2.
U12 pin 4 will invert the input and clock one half of D flop U2 pin 3 which is connected in a divide
by two configuration. U2 pin 5 will provide a square wave 4 MHz output which is connected to a
pair of inverter drivers at U12 pin 5 and U12 pin 9. The outputs ofU12 pin 6 and UI2 pin 8 are tied
together to increase the drive current of the clock. The clock is sent to U8 (pins 9, 15 and 18), U9
(pins 9, 15 and 18), UIO (pins 9,15 and 18), U4 pin 6 and U3 pin 20.
IC's U8, U9 and UIO are identical 3 section counter timers which perform the timing and
measurement functions of the oximeter under the control of the microprocessor. U8 performs the
Stat, Red channel and IR channel measurements from the analog assembly in the following manner.
At the start of the 60.05 Hz sample/reset period the gates to U8 (pins 11, 14 and 16) are inhibited
by a low logic level pulse from U13 pin 6 to U16 (pins 2, 5 and 9). The microprocessor reads the
current values stored in U8's counters and restarts them at FFFF (hex).
The 60.05 Hz sample/reset pulse resets the comparators on the analog assembly and the Stat, Red
and IR inputs at 13 (pins 19, 20 and 21) are pulled to a high logic level by R3, R4 and R5 and at U16
(pins 1,4 and 10). The pulse from Ul3 pin 6 to U16 (pins 2, 5 and 9) is then set to a high level at
the end of the 60.05 Hz sample/reset period resulting in high logic levels at U16 (pins 3, 6 and 8)
which enable the counters at U8 (pins 11, 14 and 16).
The counters inside U8 will begin counting at a 4 MHz rate. When one of comparators on the
analog assembly sets, the corresponding logic level at the input ofU16 will go low inhibiting the
counter in U8. The count value will then be read by the microprocessor at the start of the next 60.05
Hz sample/reset period.
U9 is used as a timer. U9 pin 17 is connected to U ART U3 (pins 9 and 25) to control the baud rate.
U9 pin 10 is routed to 13 pin 23 as the P.S. Clock signal which gates the timing and control circuits
in the analog assembly. U9 pin 13 enables Gland G2 of UI 0 (pins 14 and 16). The corresponding
outputs of UI 0 (pins 13 and 17) are used to pulse width modulate the IR and Red drive signals at
13 (pins 24 and 25). U9 pin 13 also provides a clock signal to Ul3 (pins 3 and 11) to generate the
starting time of the 60.05 Hz sample/reset pulse; disable the gates of counter U8; and generate a
2-3
microprocessor interrupt. VI0 pin 10 is routed to V16 pin 12 where it is used to generate a
nonmaskable interrupt to microprocessor V4.
The microprocessor maskable interrupt V6 pin 16 is driven by a 4 input NOR V 14 pin 13. The main
timing clock V9 pin 13 toggles V 13 pin 9 driving V 14 pin 11 which generates a processor interrupt.
The software will clear this flip-flop and set the appropriate logic level on V13 pin 2 to prepare for
the next clock from V9 pin 13. The processor uses the 540 Hz clock from V9 pin 13 and VB pin
9 to generate the 60.05 Hz pulses.
There are three other interrupt sources. The VART Tx Ready V3 pin 15 and Rx Ready V3 pin 14
are used during RS232 communication. During every maskable interrupt the processor checks the
VART to see ifservice is required. The final interrupt source is J1 pin 12 (the low power interrupt).
··Nd~·<·········
. . . ~;~:~.J..~~4~*~~il~~I~:mi~J~~a;~IY~~f
doWW.yTh~·. tnicrgprq~e$so(~h\lt<i()Wngefe~t.sWitcll
(P3).·· etia.bl~sat¢chnic;ian~p~e(;lpthep()W~i
supply
10!?icltwelafl1. .6.
.....
.·.·····rtlhnil)gif• reijttired •. (ortestput$c:>ses~yforcing • ~• .low
..
.
..
... . ...
.
Memory storage for the oximeter programs and data is provided by a 32k by 8 bit ROM V 5 and 32k
by 8 bit static RAM V7. RAM or ROM selection is enabled by V14 (pins 2, 3, 4 and 5) and VI5
(pins 1 and 2) for the ROM and VI7 for the RAM. Microprocessor MReq and A 15 outputs control
RAM or ROM selection. Battery or +5 VDC power is applied to RAM V7 and decoder VI7 at all
times by the oximeter battery via J1 pin 1 or +5 VDC via D 1. This enables data storage when the
system is powered down.
Battery power is also routed to J3 pin I for use by the analog assembly clock. During a power up
or power down sequence the reset signal applied to V4 pin 26 and V17 pin 6 disables memory
selection to prevent erroneous data from being input to the RAM. R 7 inhibits RAM selection during
power off periods.
The microprocessor interfaces to the display, printer (non MRI) and RS232 ports through the data
bus and 110 ports. 110 port selection is performed by decoders VI8 and VI9. 110 ports V20, V21,
V23 and V24 are used write data to system devices. I/O port V22 is used to read data from system
inputs.
VII is a LSI IC used to control discrete LED segments on the Display Board. Data for display is
written into VII when the write line is set to a logic low between VI9 pin 15 and VII pin 8. V24
pin 5 is set high or low to determine the display mode of VII. The output lines of VII are routed
directly to LED segments on the Display Board to tum them on or off.
2-4
The data bus, address lines (AO, AI, A2, A8, A9 and AIO) and RD, WR signals are routed to the
Display Board to interface with the intelligent 8 character system status display.
The 8 function switches on the Display Board are interfaced by writing logic levels from V23 (pins
12, 15, 16 and 19) to the switches via J2 (pins 41-43 and 46) and reading the results from 12 (pins
44 and 45) to V22 (pins 2 and 4) to determine switch status. The power switch and recharge LED
signals are routed from power supply connector 11 directly to Display Board connector 12. +5 VDC
system power is routed to the Display Board via 12 (pins 35 and 36).
V ART V3 is selected by writing a low logic level from LTI8 pin 14 to V3 pin II and reading or
writing to the chip via the data bus. The VART is configured by the operator during system
operation if desired. The VART uses the multilevel interrupt to tell the microprocessor when it is
ready to transmit data (V3 pin 15 to V14 pin 10 goes high) or the receive buffer is full (V3 pin 14
goes high). The VART is interfaced to RS232 port PI by RS232 driverVI and pull-up resistorsR13
and R14. VI is configured to allow the RS232 port to operate in the full duplex mode if desired.
Microprocessor data bus and control signals are also sent to the analog assembly. The functions they
perform are described in the analog assembly theory of operation. The overload signal input from
13 pin 30 to V22 pin 17 is used to monitor the status of the analog assembly receiver circuit. RI6
and C42 insure a low logic level pulse will remain present long enough to be read by the
microprocessor. The remaining components on the Processor Board are power supply filter
capacitors.
2.4
AB17Cl Analog Board
The Analog Board provides patient input parameter measurement, timekeeping, digital to analog
signal conversion and audio alarm power. The Analog Board may be divided into two main areas:
the isolated section and the non-isolated section.
2.4.1
Isolated Section. The isolated section consists of four functional circuit elements: timing
and control, LED drive, the receiver- amplifier, and ramp comparator circuits. The timing and
control circuits perform system timing functions that maintain sychronization between the LED
drive, signal comparators and receiver demodulator circuits.
The system clock is input as a 51.29 KHz negative going rectangular pulse train from 13-23 to
optocoupler V15 pin 3. Current between VI5 pin 3 and VI5 pin 4 is limited to 5 rna by R30. The
clock signal is passed through the optocoupler and output at VI5 pin 6 to drive V31 pin I and
pull-up resistor R37. The dock output at V31 pin 2 is applied to the dock inputs of the 12 stage
counter U33 and the octal data flip-flop V22. V33 pin 9 outputs a 12.822 KHz square wave clock
to U31 pin 13 which is inverted and output at V31 pin 12. This signal is differentiated by the C92,
R75 combination and applied to the inhibit line ofV20 (this net-work prevents glitches on the LED
transmitters during high level signal switching). U33 pin 7 is a 6.411 KHz square wave which is
inverted by U31 (pin II to pin 10) and applied to the dock 1 input of V27 and the channel A (LSB)
bit of 8 channel analog multiplexer V20. V33 pin 3 is a 1603 Hz square wave applied to V22 pin
2-5
3 and the channel B input ofV20 pin 10. V33 (pins 2 and 4), and V32 (pins 1,2 and 3) form a
counter reset which resets V33 pin 11 every 96 clock pulses.
The reset circuit also clears section 2 of dual counter V21 pin 14 and is inverted by V31 (pins 3 and
4) before being applied to V32 pin 9 as part of V21 section I's counter reset circuit. Section I of
dual counter V21 divides the 12.822 KHz clock signal input at pin 4 by three by anding the outputs
of pin 5 and 6 and routing the result to pin 2. V32 (pins 4, 5 and 6) perform the AND function. V31
pin 6 inverts the signal and applies it to V32 pin 10 where it is combined with the divide by 96 reset
at V32 pin 9 and routed from V32 pin 8 to V31 pin 9 for reinversion before being applied to the reset
at V21 pin 2. By combining (logic OR) the divide by 96 reset and divide by 3 (12 clocks).
synchronous timing is maintained between counters V2I and V33. The output of V21 pin 6 is a
rectangular positive-going pulse recurring at a 4.274 KHz rate and is applied to the clock input of
V2I pin 15 (section 2) where it is divided by 2 and output as a 2.137 KHz square wave at V2I pin
13.
The 2.137 KHz square wave is routed to V20 pin 9 (Channel c,MSB) of the 8 channel multiplexer
and V22 pin 18. V22 is used to route the 2.137 and 1.603 KHz signals to V23 pin 15 (2.137 KHz
IR) and V23 pin 10 (1.603 KHz Red) to demodulate the receiver outputs for processing by the signal
low pass filters.
A system time input (50\60 Bz) is input at 13-26 where it is current limited by R29 to approximately
17 rna and applied to opto-coupler V 15 pin I. The output is inverted by UI5 at pin 7 and drives
pull-up resistor R41 and V32 pin 12. V32 pin 13 is tied to a logic high level so the output at V32
pin 11 is in phase with the input at pin 12 and is applied to VI9 (pins 1,8.9 and 16) to synchronize
the ramp reset with the comparator sample and hold functions. The pulse period of the 50\60hz
sample pulse is 60.05 Hz. The system inputs at 13 pin 27 (48B QO) and 13 pin 28 (48B QI) are
current limited by R27 and R28 to 5 rna and applied to optocoupler VI4 (pins 2 and 3) for coupling
across the isolation barrier. The noninverted outputs of V14 are routed from pins 7 and 6
respectively to two address lines (AO: pin 1 and AI: pin 16) of an 8 channel analog multiplexer V18.
R38 and R39 are pull-up resistors required for proper operation of the open collector optocoupler
outputs. System input signals 48B QO and 48B QI are used to sample the + I 0.0 VDC reference,
analog ground reference, patient input probe connection and P.S. Test signals during system
operation.
LED Drive Section: The LED drive section contains two drive level integrators. a drive signal
multiplexer and a differential drive amplifier to control the intensity of the RED and IR LEDs
contained in the patient finger probe.
a.
The RED drive signal is a negative going rectangular pulse train with a period of 540
Hz and a duty cycle corresponding to the desired RED LED intensity. The pulse
period is phase locked with the LED drive, receiver demodulator, and comparator
sampling signals to minimize transmitter modulation (noise) of the received signals.
The RED drive signal is current hmited to 7 rna by R26 and applied to optocoupler
V13 pin 2. The output is an in phase signal taken at VB pin 8 and applied to load
resistor R34. The voltage at R34 is integrated by the RC combination of R33 and
C34 into a positive DC level corresponding to the duty cycle of the applied pulse
2-6
train. This DC level is routed to an 8 channel analog multiplexer V20 (pins 4 and
12) for switching into the differential transmitter amplifier.
b.
The IR drive functions in an identical manner, applying a pulse width regulated,
negative going, rectangular pulse to VI3 pin 3 through current limiting resistor R25.
The output as taken from V13 pin 6 and across R35 is a negative pulse as is the
integrated voltage level at the junction of integrator components R36 and C35. This
negative voltage level is applied to the 8 channel analog multiplexer V20 at pins I
and 2 for switching to the differential transmitter amplifier.
c.
The 8 channel analog multiplexer V20 switches RED and IR LED drive levels to the
differential transmitter amplifier under the control of the timing and control section
as follows: during each count of 96 51.29 KHz pulses, 3 symmetrical groups of 4
positive pulses will be output at V20 pin 3. In a similar fashion, during each count
of 96 51.29 KHz pulses, 4 symmetrical groups of 3 negative pulses wil1 be output at
V20 pin 3. The two sets of pulses cannot overlap or occupy the same time slots
because of the switching action ofV20. Note that input channel pins 5, 13, 14 and
15 of V20 are tied to ground.
d.
When neither a RED nor IR drive level is selected the transmitter outputs will be
driven to a ground level to disable the transmitter. The led drive signal is applied
simultaneously to a pair of unity gain amplifiers, one inverting (+LED drive) and one
non inverting (-LED drive).
(1)
The noninverting drive signal is fed through R51 to noise filter C94 and the
positive input ofV30 pin 3. The output ofV30 pin 1 is applied to the bases
of complementary transistors Q3 and Q4 as well as speed up capacitor C95.
The output of the complementary transistors is fed back to the inverting input
of V30 pin 2 to maintain unity gain as well as being applied to the +LED
drive output through current limiting resistor R32.
(2)
The inverting signal is applied through R53 to the inverting input ofV30 pin
6. The noninverting input ofV30 pin 5 is tied to isolated ground. The output
ofV30 pin 7 is applied to the bases of complementary transistors Q7 and Q8
and speed up capacitor C96. The output of the complementary pair is taken
from the emitters and fed back to the inverting input via R52 and C93 to form
a unity gain amplifier. The output is also fed to current limiting resistor R31
and output at J4 pin 4 as the -LED drive output signal. The current limiting
resistor pair ofR31 and R321imit output drive signals to 75 rna.
Receiver Amplifier Section. The receiver amplifier consists of a two stage, high gain, bandpass
receiver amplifier followed by a pair of demodulators and 3 pole low pass filters for signal recovery
and processing. Operation is as follows:
a.
The receiver diode (located in the patient finger probe assembly) is reverse biased
by a +10.0 VDC reference voltage applied through R77 to the diode cathode at J5 pin
21. C68 is a low impedance filter for the +10.0 VDC reference. This circuit
2-7
minimizes dark current within the diode as a noise source for the receiver. The diode
anode is applied from J5 pin 1 to the inverting input ofU24 pin 2 where it functions
as a positive current source with an output proportional to received light.
b.
The sensitivity of U24 is controlled by R72 and is -2.21 VDC/ua of input current.
C61 limits the high pass frequency ofU24 to 7.0 KHz. Ql and Q2 function as an
anti-swamping network for high ambient light conditions and serve as the low pass
filter for the first receiver stage.
c.
R88 injects one microamp of current into U24 pin 2 to force U24 pin 1 to drive in a
negative direction. When the output at U24 pin 1 reaches approximately -0.65 VDC
transistor Q2 will begin to conduct current through R68 and R 73 causing the voltage
at the base of Q 1 to go positive and allowing Q 1 to conduct current through R 74 into
U24 pin 2. This current will be in an opposite direction to the current injected by
R88 and will cancel it when the amplifiers are balanced. C62 limits the high
frequency response of the anti-swamping network to 600 Hz setting the lower
frequency response of U24.
d.
The output ofU24 pin 1 is coupled through C59 and R70 into the inverting input of
the second stage amplifier U24 pin 6 where it is further amplified and output at U24
pin 7. C59 and R70 tune the low frequency response of the second stage to 625 Hz.
R69 and C58 set the amplifier gain and tune the high frequency response of the
second stage to a gain of approximately -19 maximum at a center frequency of 1960
hz and a high pass of 6.1 KHz. Filter combinations R71, C60 and R67, C57 are
amplifier power input filters.
e.
The output of U24 pin 7 is applied to one side of chopper U23 for input to the filter
networks at U23 pin 6 and U23 pin 10. R76 and C79 form a smoothing network to
prevent glitches when the analog signals are at a high level. The output of U24 pin
7 is also inverted by a unity gain amplifier consisting ofR65, R66 and U25 (pins 1,
2 and 3) and applied to the opposite side of chopper U23 at pins 1 and 8. R81 and
C90 are used to prevent high level analog glitches. The signal at this point is a
combination of 1603 Hz RED information and 2137Hz IR information modulated
on a complex high-level waveform.
f.
The RED signal channel is demodulated by chopping the waveform at the RED LED
transmitter frequency and integrating the negative waveform pulses into a negative
level representing the amount of RED light received. The IR pulses will be input as
a series of AC pulses that cancel each other. The IR information is recovered in a
similar manner except that the IR demodulator is chopped at a frequency of213 7 Hz.
g.
The filters used to recover the RED and IR information are identical 3 pole precision
low pass filters with a high frequency cutoff of 16 Hz and an AC gain of 5. R54,
R57, R59, R61, R63, C51-C53 and U27 (pins 1,2 and 3) are the IR filter elements.
R58, R60, R62, R64, C48-C50 and U27 (pins 5,6 and 7) are the RED filter elements.
2-8
h.
U25 (pins 5, 6 and 7), R82 and R83 are used to develop a -2.21 VDC offset voltage
which is used to bias the output of the filter amplifiers to a +8.84 VDC level when
no signal voltage is present. The active range of the filters is from +8.84 VDC to
approximately -9.16 VDC during signal reception. IR information is output for
sampling from U27 pin I through R55 to U19 pin 3. RED information is output for
sampling from U27 pin 7 through R56 to U19 pin 6.
Ramp Comparator Circuits: The ramp and comparator circuits consist of a precision 10.00 VDC
reference, a precision ramp generator, analog sampling switches and 3 comparators used to detect
voltage crossover levels for timing comparisons. The circuits function as follows:
a.
The precision voltage reference U34 is used to provide a 10 VDC reference for the
filter network offset bias and generation of a linear ramp with a range of +9.5 VDC
in the reset condition to -10 VDC at the most negative excursion. The voltage
divider network formed by R48-R50 sets the ramp reset voltage to 9.5 VDC at the
junction of R48, R49 and U26-5.
b.
The junction of R49 and R50 provides a test voltage of 8.45 VDC which is applied
to analog multiplexer UI8 pin 5 where it is used to check the span of the linear ramp
as one analog to digital conversion test. R45, R46, C41, UI9 (pins 9, 10 and II) and
U26 (pins 5, 6 and 7) form the elements of the linear ramp. When a positive logic
level (+5 VDC) is applied to U19 pin 9 the offset voltage of9.5 VDC at U26 pin 5
will force the output ofU26 pin 7 to drive to a +9.5 VDC level, the analog switch at
U19 (pins 10 and 11) will be closed and C41 will discharge through R45.
c.
When the logic level at U19 pin 9 goes low (0 VDC) the analog switch will open at
UI9 (pins 10 and 11) and the output at U26 pin 7 will begin to drive in a negative
direction at a rate determined by the values of C41 and R46 (nominally 1.2 V/ms)
until the ramp reaches a value of -10 VDC at which time another reset pulse will
occur and the process will repeat itself.
d.
The linear ramp is applied to the positive inputs of the three sampling comparators
at U29 pin 3 (stat), U28 pin 5 (IR) and U28 pin 3 (RED) where it is compared with
the sampled analog values at 60.05 Hz intervals. When the 60.05 Hz sample pulse
is high C46 (IR) and C45 (RED) will be charged to the voltage level present at the
output of the 16 Hz filters. C43 will be charged to a voltage level which equals the
input of UI8 which is selected by 48H QO and 48H QI.
e.
The three sampled comparator inputs will be compared with the ramp voltage present
on the other side of the comparators. When the ramp becomes more negative than
an analog input the comparator will drive from a high logic level at its output (+ 15
VDC) to a low (-15 VDC) logic level. When a comparator is at a low logic level it
will sink current through an optocoup]er input and a series resistor to cause the
optocoupler output to change logic levels from a high (+5 VDC) level to a low (0
VDC) level. The time each level is high will be monitored by a timer counter on the
processor board with a maximum count greater than 60,000 counts/sample period.
This gives a resolution of 325 microvolts/count for all high level analog signals.
2-9
f.
The comparator outputs are routed as follows. IR is output at V28 pin 7 through R43
to V16 pin 3 input. V16 pin 6 outputs to the processor assembly via 13 pin 20. RED
is output at V28 pin I through R44 to VI7 pin 2 input. VI7 pin 7 outputs to the
processor assembly via 13 pin 21. Stat outputs at V29 pin 6 through R42 to V 16 pin
2 input. VI6 pin 7 outputs to the processor via 13 pin 19. An additional comparator
is used to monitor the receiver front end amplifier.
g.
R86 and R85 form a voltage divider set to -II VDC at V26 pin 2. R84 is a high
impedance resistor connected from V24 pin I to V26 pin 3. If the voltage output at
V24 pin I exceeds -II VDC the comparator output at V26 pin I will go low sinking
current through R87 and optocoupler VI7 pin 3. The output at VI? pin 6 will switch
from a high (+5 VDC) to a low (0 VDC) logic level at 13 pin 30. This will be
monitored by the processor assembly as an overload condition.
h.
Other components in the isolated section and their functions are: R47 provides a
current source for the finger probe resistance-measuring logic between the +10.0
VDC reference and J4 pin 2~ C42 provides a low impedance current source for the
finger probe logic to prevent glitches while switching analog channels; R40 is a
current limiting resistor in series with the analog switches and the samplelhold
capacitor to protect the analog switches. All other components in the isolated section
are power supply filters.
2.4.2 Non Isolated Section. The non isolated section consists of the clock, digital to analog
conversion, audio alarm amplifier circuits and associated logic components. V9 is an octal latch
which is tied to the processor data bus and used as an output port by the processor. The timekeeping
clock is a single IC (V7) that is powered by batterylsystem power at all times. YI, C21, and C22
form a 32,768 Hz oscillator to provide an accurate time base for the clock. C23 prevents transients
on the clock chip during power up and power down conditions. Clock functions are controlled by
the microprocessor through V9. Data is output from the clock at V7 pin 9 to 13 pin 29 where it is
routed to a processor input port. R23 is a pull-up resistor required for proper logic levels on the
clock output.
VRI and components R21, R22, CI9 and C20 are a programmable voltage regulator set to provide
+9.0 VDC (±0.27 VDC) to power VIO and provide a voltage divider reference for analog
multiplexer V5. V6 is a logic level shifter to convert the 510 VDC logic level outputs of V9 into
high level 12/0 VDC logic levels required by analog multiplexers V4 and V5. R24 is a pull-up
resistor network required by the open collector outputs ofV6. V5 is used to set the voltage reference
on DAC V8 so an output span of 1.00,3.00, 5.00, or 10.00 vohs can be selected.
V3, R14, R15, Rl6 and C6 form an inverting amplifier with an adjustable gain of slightly greater
than one. This allows the voltage reference between V3 pin 7 and V8 pin 15 to reach a span of -I 0
VDC with the +9 VDC input voltage. Other voltages available from the divider network of R17,
RI8, RI9 and R20 will be amplified proportionately. R30 and C8S are a noise filter for the DAC
reference input. The DAC acts as a current source at UII pin 2 to drive the amplifier to a voltage
equal to -[(reference voltage)xN/255J where n is a number from 0 to 255 that is loaded into the DAC
by the processor. R79 and C24 are feedback components to minimize noise on the DAC output.
2-10
The output ofDAC U8 is applied to the common pin of8 channel analog multiplexer U4 for routing
to the analog output and audio amplifiers. The outputs ofU4 are routed to a charging capacitor and
the high impedance noninverting input of 5 operational amplifiers to form a series of sample and
hold inputs.
The amplifier outputs are connected back to the inverting inputs to form unity gain voltage
followers. Three of the amplifier outputs are routed through current limiting resistors and filter
capacitors to micro jack sockets for connection to external equipment. The output of UI pin I is
routed to micro jack PI and represents a scaled version of the oxygen saturation measurement. The
output of UI pin 7 is routed to micro jack P2 and represents a scaled version of the heart rate
measurement. The output of U2 pin I is routed to micro jack P3 and represents either a scaled
version of the measured signal variations (pulse waveform) or a TTL logic level pulse rate timing
pulse for external equipment synchronization. The output of U2 pin 7 is used to inject a variable
current into the audio oscillator for audio tone control. The output of U3 pin I (via D I) is used to
set the audio volume.
The rest of the audio circuit functions as follows. UIO is a 555 timer IC connected to function as
a square wave generator with components R8, R9, R13 and C9 controlling the duty cycle and
operating frequency. The output of UI 0 is taken at pin 3 and applied through R 7 to the output of
U3 pin 1 (viaDI) and the input of the audio power amplifier atR5. CI, C7, C8, Q5, Q6, R3-RS and
UII (pins 5, 6 and 7) form a unity gain audio amplifier capable of delivering 1.2 watts into an S ohm
speaker.
The filter element combinations of (C8 and R3) and (C7 and R4,R6) smooth the applied square
wave. C I is a DC blocking capacitor used to couple the audio output signal to the external speaker.
The speaker output is routed to J1 pins I and 2. VR2 is a +5.0 VDC regulator used to provide a
stable power source for the optocouplers, U8 and U9. All other Analog Board components are
power filtering devices.
2.5
AB18A Power Supply Boam
The Power Supply Board converts AC line or DC battery power into DC voltages and signals
required by the oximeter. The power supply may be divided into four functional areas: Power Input
and Battery Charger, Power Switching and Regulation, Power Output Section and Logic Control
circuits.
2.5.1
Power Input and Battery Charger. The Power Input and Battery Charger circuits provide
unregulated system power and charge the battery as required when connected to an AC power
source. The wall outlet transformer, or OMNI-TRAK 3100, provide an unregulated DC voltage of
approximately 16 to 24 VDC (depending on line voltage and system load). Surge arrestor diode D 12
protects system components from overvoltage conditions and line surges by clamping incoming
voltages above approximately 25 VDC to ground. Power is bussed to the battery charger and the
recharge LED (located on the Display Assembly via P2-S) from this point. Power is routed to the
main power supply circuits thru diode D 11.
2-11
a.
The battery charger is comprised of VR3, U3, Q3, Q6, Q7, Q8 and associated
components. Components VR3, R39, R37, R27, D35, D29, D30 and C45 form an
adjustable voltage reference which is adjusted to the maximum battery charge. The
adjustable reference has a voltage span of approximately 3 to 15 VDC. The diodes
D35, D29 and D30 are located in the reference leg ofVR3 to provide temperature
compensation for the oximeter battery. C45 provides output voltage stability for the
adjustable voltage reference output. U3 and associated components C43, C44,
D26-D28, R35, R36 and R42-R47 form a two stage voltage comparator which is
used to monitor battery voltage and control battery charger switching circuit.
b.
Resistors R46 and R47 form a voltage divider with a nominal voltage of 7.6 VDC
which represents an undervoltage battery condition and is applied to U3 pin 3.
Resistor R36 applies the battery voltage to the other side of the undervoltage
comparator at U3 pin 2. Resistor R45 connects the output of the undervoltage
comparator U3 pin 1 back to the positive input of the undervoltage comparator where
it is used to provide approximately 50 mV of hysteresis about the comparator
threshold. This results in circuit stability when the battery undervoltage cross-over
point is present. The output of the battery undervoltage comparator is low (less than
1.5 VDC) under normal battery conditions and does not affect the operation of the
second (over-voltage) comparator.
c.
When an undervoltage battery condition is detected the comparator output will be
high (greater than 10.5 VDC) and will be applied thru D27 to U3-6 where it will
override the high impedance battery input and result in the battery charger being
turned off. The present battery voltage is also applied thru R35 to U3 pin 6 as a high
impedance input. C44 filters this voltage for stability during comparator crossover
conditions.
d.
The adjustable battery reference voltage is applied to the other side of the high
battery voltage comparator at U3 pin 5 through R44. The output ofthe high battery
voltage comparator occurs at U3 pin 7 and is applied to the battery charger switching
circuit thru low impedance resistor R43 and zener diode D26. D26 serves to clamp
the output of the high battery voltage comparator to a maximum of 15 VDC
regardless of input line voltage variations. Resistor R42 provides approximately 40
mVDC of negative hysteresis for stability as the battery approaches a fully charged
condition.
e.
The output of the high battery voltage comparator at U3 pin 7 will be high when the
battery terminal voltage is between 7.6 and the battery reference voltage as set at the
output of VR3 (normally 14 VDC). Capacitor C43 is a filter at the positive power
terminalofU3. Diode D28 clamps the input at U3 pin 6 to a value no greater than
Vcc + 0.7 VDC to provide a low impedance discharge path for C44 during input
power down conditions.
f.
When the output of the battery comparators is high the battery charger switching
circuit will be turned on. A voltage of less than 11.0 VDC will be present at the
2-12
emitter of transistor Q6 and not enough current can flow through resistors R32, R33,
and across diode D25 to cause transistor Q6 to saturate.
g.
The voltage at the base of transistor Q7 will cause Q7 to conduct current through
resistors R2I, R34, R23 and across diode D22 into the battery. This will tum on
transistor QS and apply a forward bias to the base of transistor Q3, turning Q3 on.
Capacitor C46 will delay slightly the tum on (and tum off) time of transistor Q8.
When transistor Q3 is turned on current will flow into L3, C36, across resistor RI4,
through diode D22 into the battery.
h.
When approximately O.S ampere of current is flowing through resistors RI4, a
voltage large enough to turn on transistor Q5 will be developed (0.65 VDC).
Resistor R20 limits the base current ofQ5. When Q5 is saturated the voltage across
the emitter-base junction of transistor Q7 will fall below the level required for
conduction and Q7 will tum off. Transistors QS and Q3 will be turned off. Current
will continue to flow into the battery through diodeD20, L3, RI4 andD22 due to the
field collapse of coil L3. Capacitor C36 will also provide a current source at this
time. When current flowing out of coil L3 and capacitor C36 is no longer sufficient
to maintain a voltage saturating the emitter-base junction of transistor Q5, transistor
Q7 will tum on and the cycle will repeat. The cycle frequency is determined by the
LC time constant of L3 and C36 and is approximately 30 KHz.
1.
When the battery is sufficiently charged, the voltage to the battery comparators
becomes positive enough to allow the output to switch low at U3 pin 7. Enough
current then flows through R32, R33 and diode D25 to tum on transistor Q6 and
transistor Q7 is held in the cutoff condition until further charging is required.
J.
D I 0 routes battery power to the main power supply circuit when AC power is not
present. Diode D9 routes battery power to the printer power circuit (not active in the
MRI Pulse Oximeters) and resistor R9 provides a low current power source for
battery powered backup functions on the processor assembly via connector P2 pin
1.
2.5.2
Power Switching and Regulation. The Power Switching and regulation circuits consist of
the regulating pulse width modulator Ul, power FET Q2, transformer TI, turn-on switch Q4 and
associated components CIS, CI9, C24, C26, C28, C29, C3I, C34, C35, C39, C40, C4I, C47, DI5,
D16, DI7, DIS, D19, D33, D34, R7,R8, RIO, Rll, R12, R16, RI7, R24, R29 and R30. The power
switching circuit is configured in a flyback arrangement with a duty cycle of less than 50%.
Operation is as follows.
a.
System input power is present at the cathode of diodes D 10 and D 11, through fuse
FI, to power filters C 18 and Cl9, to R12 and through the primary ofTl pins 3 to 2,
through D 18 to C35 and the emitter of Q4. Q4 will be biased in the off condition at
this time (Ee=Eb) and no current will flow through TI or UI until a start pulse is
applied to tum Q4 on. Capacitor C35 will be charged to the applied DC voltage
level -0.65 VDC.
2-13
b.
When the oximeter power onloff switch is depressed system input power is routed
from P2-10 through the external power on/off switch to P2-11 through blocking
diode D17, across C3I as a positive pulse through Rll where it charges C35 to a
value approximately twice the input voltage. The negative plate of C3I is held to a
zero VDC potential by R8. Q4 will now be biased on and apply power to VI pin 13,
VI pin 15 and C34.
c.
The voltage applied to U I pin 15 will activate the internal circuits of VI. A +5.0
VDC (±I%) 50 rna voltage regulator is output at pin 16 and used to provide a
precision voltage reference for the non inverting input ofthe internal error amplifier
at pin 2, a low impedance power source via D 16 and P2-1 for system battery
powered functions (clock and memory), and a 1.6 VDC preset source for the soft
start circuitry consisting ofD33, D34 and C47. VI's on board oscillator will begin
to operate at a frequency of approximately 90 KHz as determined by the values of
R29, R30 and C39. The combination ofR29 and C39 determine the oscillator charge
time which is typically 10 micro-seconds. The combination of R30 and C39
determine the oscillator discharge time as well as the minimum amount of dead time
per pulse period (10%). Because only 112 of VI's output drivers are used, the
regulator'S operating frequency will be approximately 45 KHz with a 45% maximum
duty cycle.
d.
Output driver A of VI will not begin to operate at full power until the soft start
current source at VI pin 8 has charged capacitor C47 from zero to a high logic level
(>3.3 VDC). A minimum supply level of 8 VDC is required to ensure full tum-on
of power FET Q2 (Resistor RI6 limits inrush current due to Q2's gate capacitance
to less than 500 rna to protect V I's output driver from damage). When Q2 turns on
current will flow through the primary and secondary windings ofT!. The fields in
the secondary windings of TI will reverse bias the rectifiers in the power output
section at this time so no current will flow into the secondary circuits.
e.
When output driver A goes low Q2 will tum off, opening the primary of T I, and the
fields generated during the tum on period will collapse (reverse) causing TI's
winding voltages to flyback, forward biasing the output section rectifiers. Current
win flow into the secondary storage capacitors until the energy induced by the
tum-on pulse is depleted. C24 and C26 will charge towards a 12 VDC level at this
time. The voltage on C24 and C26 is routed to filter C40 and voltage divider
network RIO and RI7. The values of RIO and Rl7 are set where 12 VDC is applied
to RIO the voltage at VI pin I will equal 5.0 VDC (±2%).
f.
C41 acts as a high frequency noise filter. Voltage differences between VI pins 1 and
2 will cause output driver A's pulse widths to vary, thereby controlling the energy
delivered to TI and regulating the output voltages. The network of C28, C29 and R 7
form a compensation network that controls the gain of VI's internal error amplifier
at different frequencies. This network has been selected to allow maximum gain at
low frequencies and minimize response to high frequency noise. During the flyback
period a small, positive voltage is induced at T 1-2. This voltage is rectified by D 18
2-14
and stored in C35 to keep Q4 turned on when the power supply is operating. D 19
limits the voltage to Q4 to 25 VDC to protect VI.
2.5.3
Power Output Section. The Power Output Section consists of TI's secondary windings,
rectifiers D2 through D8, Dl3, D14, and D15, Capacitors CI through C16, C23 through C27, and
C30, Inductors LI and L2, and regulators VRI and VR2. Output power is divided into system
power and isolated power groups.
a.
For system power rectifier D15, Capacitors C24 and C26 rectify and filter +12 VDC
(±0.25 VDC) from TI windings I and 6. This power is used as a feedback to
regulate the power switching circuit as previously described and is output to the
system via P2 (pins 3 and 5). In a similar manner TI (pins I and 5), D14, C30 and
C27 provides -12 VDC to P2 (pins 15 and 16) and TI (pins I and 4), Dl3, C23 and
C25 provides +5 VDC to P2 (pins 2 and 4) for system use.
b.
The isolated power section provides an isolation barrier for added patient safety. All
isolated secondary windings share a common ground at TI pin 9 and are on a single
multi-tapped winding. TI pin 7, D7, C9, and CI2 rectify and filter +18 VDC as
previously described.
c.
The additional filter components of L2 and C 16 provide added filtering of high
frequency ripple. +18 VDC (±1.5 VDC is output at PI (pins 13 and 14). TI pin 11,
D2, CI, C2, LI and C3 provide a complementary -18 VDC (±1.5 VDC) output at PI
(pins I and 2). TI-8, D6, CIO and Cll provide +7.5 VDC to linear regulator VR2
which provides +5.0 VDC (±0.25 VDC) power to CI5 and PI (pins 11 and 12). TI
pin 10, D5, C7, C8, VRI and CI4 work in an identical manner to provide -5.0 VDC
(±0.25 VDC) power to PI (pins I and 2). TI pin 12, D3, C4 and C6 provide -39
VDC. RI, C5 and D8 form a parallel voltage regulator which provides -36 VDC
(±2.0 VDC) to PI (pins 3 and 4). Components R2, R3, D4, Cl3, C29 and R4 form
a divider network used to sample the the head voltage present at TI (pins 2 and 3).
This is a test output routed to PI pin 5. All isolated outputs are routed to the isolated
section of the oximeter analog board assembly via connector PI. Capacitor C 17 is
a variable high voltage trimming capacitor used to inject a small portion of the input
switching voltage to the isolated secondary for high frequency noise cancellation.
2.5.4
Control and Logic Circuits. The Control and Logic circuits are comprised of the remaining
power supply components and supply various signals required for oximeter system operation. The
circuit consisting of C32, D31, R18, R19, R25, R26 and one section of operational amplifier V2
forms a power low interrupt circuit to warn of low battery conditions so the system may be shut
down before information is lost. RI8 and RI9 form a voltage divider set to equal 5.0 VDC when
the battery voltage equals 10.4 VDC and is applied to the negative side of the comparator at V2 pin
6. The +5.0 VDC reference developed by regulator VI pin 16 is applied to the positive side of the
comparator at V2 pin 5. As long as the battery voltage remains over + 10.4 VDC the comparator
output will be low (-12 VDC). When the battery output falls below +10.4 VDC the battery
comparator will go high (+12 VDC). Operation is as follows.
2-15
The output of the battery comparator is taken at V2 pin 7, routed through a voltage divider network
ofR25 and R26 to P2-12 where it is used to generate a processor interrupt in the oximeter processor
assembly. Diode D31 is used to clamp the -12 VDC low output of the comparator to a ground level
for input to the processor logic circuits. C32 and C48 provide noise immunity at the comparator
crossover point. Note that the unregulated DC input overrides the battery input when AC line power
is applied to the oximeter. R28 and D32 are active when external power is applied to prevent
spurious low battery warnings. A microprocessor shutdown input is provided at P2 pin 6 allowing
external control of switching regulator VI pin 10. When a shutdown signal is received at P2 pin 6
it is routed through D21 to P2 pin 14 where it is used to generate hardware reset signals by the
oximeter processor. When the oximeter power switch is depressed positive voltage generated at P2
pin 11 is also routed through R6 to P2 pin 13 where it is sent to an input port on the processor
assembly. This signal is monitored periodically by the processor and when high (+5 VDC) is used
to initiate a processor controlled shutdown of the power supply. R5 is a pull-down resistor to insure
the signal is low when the external power switch is not depressed.
2-16
SECTION
m
MAINTENANCE
This section provides maintenance information of the 4500 MRI Pulse Oximeter.
3.
MAINTENANCE
3.1
Disassembly and General Service Precautions.
.
..
Ath()T()U~ ·UJld.etstariding
each· of the rollowingprecallti(msis llccessary before •attempting
topenonn any disassembly or servicepr()cedllre.. Damage to the instrument, or injury to
persOnnel, may result if theseprecauti()J1.saren()fu~ed. . .
L Use caution whenwarkingon UIllts\vith.powerapplied.
2. Avoid rough handling of all exposed chassis parts and front p~eL overlay. These
parts can be scratched causingobtfusive cosmeticdefect&
3. Paiieriiinput circuits have flolHing ground seCtions foi)patient isolation. Avoid
··handling this. section of the circuit boards as oils, sweat,clirt,etc. Call cause leakage
paths to be formed which destroythesafetyisolatiollandlorreduce performance.
4. Hand1e all printed circuit boards by .ili:eiredges.Oils,sweat,dirt,etc;caninduce
leakage paths in high impedance circuits Which impede their>operation. Such
. contamination WiII.a1so.promote cortoslonofcircuitsyieldiliga long termrellabili ty
problem.·
...
. . . . ••.
...
...
5. Assembly hardWare has been secured with a thread locking agent After several
assembly/dlsassembly cycles new lockingagelltwill be required. (Useonlylocking
agent Loctite 42540 or silTlilartypefor usenearPVCoracrylic plastics.)
6.. The Pulse Oximeter.contains a greatrrianySTATIC SENSItIVE circuits~ Proper
.•.•. handling procedures must be followed·· when touching •. any printed. circuit board as
.static volta.ges usually present on clothing and personal present great risk of damage
.to the circuits. All ..service procedures must be .done. by properly grounded personal
at static free workstations.
7 .. When cleaning the unit, do not permit liquid to enter the case; When cleaning and
handHngkeepcontaminants from printed circuit .boards. Use proper materials and
assure total dryness before pmvering back up. Be careful that cleaning fluids do not
attack· plastic or painted surfaces. Also be careful that· wiping rags do not abrade
sl.irraces.
..
3-1
3.2
Adjustment and Verification
·~!fi~~'~~~~~~rS4~YVQ1~g~i9~'b!q~;~~:~('~Wo~,tq~~a··.mb.~I\~iS6fu~e)
., .
•
•
Joeai¢d.9ntb~J?O'W~i'Stipply
•. Whenprol)i.llg.·th~vaJj.o~i~~st····
. . . . . . . .. . . . . . . . . . . . .lJo~rd,Use~xtl'eme.caxe
... .. . . . . . ...... . . .....
.. . .......... ..
.
p8hifS,~·Y:><
3.2.1 Adjustment and Verification Setup. Reference paragraphs 3.2.1.1 and 3.2.1.2 prior to
performing any Adjustment and Verification procedure.
3.2.1.1 Test EQuipment ReQuired. The following test equipment is required to perform adjustment
and verification of the 4500 Pulse Oximeter:
DVM
Os(illos(ope
4.5 digit minimum
Tek 2245 - 20 MHz Dual Channel (or better)
3.2.1.2 Power Connection. If using Pulse Oximeter Model 3109-1, refer to step
Oximeter Model 3109-3, refer to step b.
a~
if using Pulse
a. Connect DB25 power adapter cable to "IN" connector on rear panel of unit. Connect other
end to DC Power supply and set output voltage to nominal 24 volts DC. Verify recharge
LED on front display panel is ON.
b. Connect HE28B power adapter cable to "IN" connector on rear panel of unit. Plug the
other end into wall socket. Verify recharge LED on front display panel is ON.
3.3.2 Battery Reference Adjustment and Verification. The following procedure is to be used for
Adj ustment and Verification of the Pulse Oximeter Model 3109-3 only.
a. The battery reference voltage adjustment set point is determined by ambient temperature
(room temp.). Determine the ambient temperature and reference Table 3-1 for the
adjustment set point.
.
A~cess
·to·. thetestPointsc~.beJnad~frotIltbesideoftl1eP()Wer
. . ..... . ....
. .......... ... ... ..... . ....
Boara?y.usingduedlr~.
Table 3-1: Adjustment Set Point
.::"
'"".:'
:.
.......
:
:
OJ'
:.'.
,
..
. . ':
S~t:Point'
....
'".:
.
:
.:
(Vile)
':.
••••
70
21.1
14.026
72
22.2
14.018
75
23.8
14.008
77
25
14.000
80
26.6
13.990
··NOTE.
Use "a '1!... ",aU' resistoi":'lejdpushed·. into to p of. Jl
connector-to obtain a grolind.Donot liftthe
connector.
b. Connect DVM Ground to Analog board 11 pin 2 (digital ground).
c. On the Power Board, monitor TP3 (Battery Reference) and adjust R37 for SET POINT
(Table 3-1) ±0.010 volts. Adjust pot CW to decrease and CCW to increase.
3.2.3 System Power Supply Adjustment and Verification. Perform the following for adjustment
and verification of the Power Supply.
a. With monitor connected to variable power supply set to nominal 24 VDC, verify recharge
LED on front panel display is ON.
b. Connect DVM Ground lead to Analog Board 11 pin 2 (Digital Ground).
c. Press POWER STANDBY.
d. On the Processor Board, monitor J4 pin 1 (PRT V) and adjust R38 for 5.5 VDC ±0.05 V.
Adjust pot CW to decrease and CCW to increase.
e. Perform the following test to verify proper voltage levels on both the isolated and
unisolated supplies:
3-3
(1) Connect DVM Ground lead to Digital Ground (11 pin 2 of Analog board).
(2) Set PROCESSOR TEST switch (DEFEAT switch, P3 on Processor Board) to TEST
position.
(3) Using the DVM, verify the following voltages:
f.
Test Point
Voltage
Tolerance
Processor Board 14 pin 1
Processor Board C33 (+)
Analog Board C29 (+)
Analog Board C 19 (+)
Analog Board Ll-l
Analog Board L2-1
+5.5 VDC
+5.5 VDC
+5.0 VDC
+9.0VDC
+12.0VDC
-12.0 VDC
±O.IV
±0.5V
±0.5V
±0.9V
±0.6V
±2.0V
Move DVM ground lead to Analog Board 15 pin 3 (ISO Ground) and verify the following
Iso voltages:
Test Point
Voltage
Tolerance
Analog Board C78 (+)
Analog Board Q3-C
Analog Board C76 (+)
Analog Board C77 (-)
Analog Board C62 (-)
Analog Board U34 pin 6
+5.0VDC
+5.0 VDC
+15.0 VDC
-15.0 VDC
-39.0 VDC
+10.0 VDC
±0.5V
±0.5V
±0.75V
±0.75V
±3.0V
±0.2V
g. Depress POWER STANDBY switch.
h. Verify the following:
(1) Front Panel display segments go off, then back on.
(2) SYSTEM STATUS display indicates "NO Tum Off'.
1.
Set PROCESSOR TEST Switch to NORMAL position.
J.
Depress POWER switch.
k. Verify normal unit power off.
3-4
3.2,4 System Reset Verification. Perform the following procedure to verify system reset.
a. Unplug J4 connector on Processor Board.
b. Depress POWER switch.
c. Verify unit displays "Hello" then automatica1ly goes back off.
d. Reconnect connector 14.
3.2.5 Ground Noise Adjustment. Some ground noise difference may arise between the isolated and
non-isolated supply grounds. Capacitor C17 is used to minimize this difference. Such ground
difference noises can induce noise onto the pulse signa1 from the sensor. Perform the following
procedure for adj ustment of ground noise.
a.
Connect oscilloscope Ground reference to Analog Board Jl pin 2 (Digital Ground).
b. Connect oscilloscope channel 2 probe to Analog Board J5 pin 3 (ISO Gnd).
c. Set Ch 2 amplitude to O.5V per division and time base to 5 us per division.
d. Connect Ch 1 probe to leg of C17 near JMP I or test point at JMP 1 on Power Supply
Board.
e. Set Ch I amplitude to 10V per division and time base to 5 us per division.
f.
Sync on channell and view channel 2.
g. Adjust C17 for minimum step, less than 50 mY.
3.2.6 Battery Charger Circuit Test. To test the battery charger circuit on the model 3109-3 Pulse
Oximeter, perform the following:
a.
Connect a DC power supply to the battery terminals.
b. Set DC supply to 11.8 volts ±0.1 volt.
c. Press POWER STANDBY switch on unit.
3-5
d. Verify that unit does not display "Batt Low" in the SOS display.
e. Decrease DC power supply till SOS displays "Batt Low".
f.
The DC supply should be set at 11.25 volts ±{).50 volts.
g. Decrease the DC power supply till the unit shuts down.
h. The DC supply should be set at 10.70 volts ±{).50 volts.
L
Tum off DC power supply.
J.
Disconnect the DC power supply from the unit.
k. Reconnect battery.
3.2.7 Front Panel Verification. To verify Front Panel operation, perform the following:
a. Depress POWER STANDBY switch.
h. Verify normal power up.
c. Depress OPTIONS switch.
d. Verify SYSTEM STATUS display indicates 'Fil=xxsc' (xx is 3,6 or 12).
e. Depress UP Arrow switch.
f.
Verify xx increments through 3,6 and 12 each time the switch is depressed then repeats.
g. Depress DOWN Arrow switch.
h. Verify xx decrements through 12,6,3 with each time the switch is depressed then repeats.
I.
Depress CANCEL switch and verify displays return to normal.
J.
Press the OPTIONS switch five times and verify 'Rev.MX_' is indicated in SYSTEM
STATUS display.
3-6
3.2,8 Processor and Analog Verification. To verify Processor and Analog functions perform the
following:
a.
Connect frequency counter to UI5 pin 3 on Analog Board.
h. Set the frequency counter to 51.29 ±O.OI KHz.
c. Depress the ALARM SELECT switch 7 times to select the ALARM volume control.
d. Verify that SYSTEM STATUS display indicates "aVol=_".
e. Depress the UP or DOWN Arrow switches.
f.
Verify the following:
(I) Full volume range of alarm tone from 10% to 100%.
(2) The alarm is silent when OFF is selected.
g. Depress the Options switch until "Analog
All.
h. Depress the UP or DOWN Arrow switch until status displays "VOLT=10V".
1.
Depress the OPTIONS control.
J.
Verify SYSTEM STATUS display indicates "8a02 OFF'.
k. Connect DVM to Sa02 analog output at UI pin I of Analog Board.
1.
Depress the DOWN Arrow switch once.
m. Verify SYSTEM STATUS display indicates "8a02 100".
n. While monitoring DVM. adjust R15 on analog board for 10.OV ±20mv.
o. Depress the DOWN Arrow switch.
p. Verify voltage drops 100mv ±20mv with each count of one in the SYSTEM STATUS
display.
q. Depress UP or DOWN Arrow leaving Sa02 set to 100.
3-7
r.
Depress the CANCEL control.
s.
Perform the following:
(I) With the Options switch reselect "Analog 1\".
(2) Depress the DOWN Arrow switch and select the 1 volt output range (VOLT= 1V).
(3) Depress OPTIONS controL
(4) Verify SYSTEM STATUS display indicates "Sa02 100" and DVM reads 1 V ±20
mV
1.
Depress the CANCEL controL
u. Perform the following:
(1) With the Options switch rese)ect Analog 1\".
It
(2) Depress the DOWN Arrow switch and select the 3 volt output range (VOLT=3V).
(3) Depress OPTIONS control.
(4) Verify SYSTEM STATUS display indicates "Sa02100" and DVM reads 3.0 V ±60
mV
v. Depress the CANCEL control.
w. Perform the following;
(1) With the Options switch reselect "Analog 1\".
(2) Depress the DOWN Arrow switch and select the 5 volt output range (VOLT=5V).
(3) Depress OPTIONS control.
3-8
(4) Verify SYSTEM STATUS display indicates "Sa02100" and DVM reads 5.0 V ±IOO
mY.
x. Depress the OPTIONS switch twice.
y. Verify that SYSTEM STATUS display indicates "Pr Wave". (If "PrSync" is indicated on
the SYSTEM STATUS display, depress the UP or DOWN Arrow to tum it off.)
z. Depress the CANCEL switch.
aa. Move DVM connection to Pulse/Sync at U2 pin 1 of the Analog Board.
abo Depress OPTIONS switch until "Analog" is reselected in the SYSTEM STATUS display.
ac. Depress the UP Arrow to select the IOV range (VOLT=IOV).
ad. Depress OPTIONS switch three times.
ae. Verify SYSTEM STATUS display indicates "PUIBE255" (if necessary depress UP
Arrow to select 255).
af. Verify DVM reads 10.0 V ±20 mY.
ago Depress UP Arrow once.
ah. Verify SYSTEM STATUS display indicates "OFF" and DVM reads 0 V ±20 mY.
(I) Verify for each press of the UP Arrow switch that the SYSTEM STATUS display
increments by one and the DVM reading increases 40 mY.
3.2.9 System Self Test. Perform the following to accomplish System Self Test:
a. Simultaneously press BLANK switch (below OPTIONS) and ALARM switch (SW4 &
SW5) and verify the following.
(1) Oxygen Saturation & Pulse Rate displays will count from 0 - 999 then repeat and
during O's leading Os are blanked.
(2) Bargraph will increase from minimum to maximum then repeat illuminating all
segments of bargraph and audio pulses from a Hi to low tone.
(3) SYSTEM STATUS will change its display every second, indicating upper & lower
alpha, numerical and graphics characters and then will also repeat.
3-9
b. Test provides a direct display of the 16 bit AID conversion on the pulse and Sa02
displays. Each count is equal to 300 uv. Conduct the following test with probe shielded
from external light.
c. Depress upper left Blank switch and then depress Alarms switch (these switches tum off
the IR and RED transmitters). Red Amp is now selected. Verify that the Sa02 display
doesn't change more than ±10 and pulse display is 0.63 ±O.Ol.
d. Depress the UP Arrow switch. The IR Amp is now selected. Record the numbers in the
Sa02 and PULSE RATE display and verify that the Sa02 display doesn't change more
than ±10 and pulse display is 1.63 ±0.01.
e. Depress CANCEL switch. Verify unit returns to normal operation (dashes in left displays
and time alternating with NO Probe in the SYSTEM STATUS display,
3.2.10 Functional Verification. To verify proper function of the Pulse Oximeter, perform the
following:
a. Place probe on finger.
(1) Verify Sa02 display reads
~
90.
(2) Verify normal pulse rate displayed in PULSE RATE display with no "Off Cal",
"Artifact", or Low Light" in the SYSTEM STATUS display.
(3) Verify "Probe Off' in SYSTEM STATUS display when finger is removed from
probe.
b. Remove probe from finger.
(1) Open probe and apply a bright light to sensor.
(2) Verify SYSTEM STATUS displays "ProbeOFF" instead of "Probeoff' indicating an
overload condition detected.
3-10
APPENDIX A: REFERENCE DRAWINGS
Paee Number
Drawing Number
197D372
194D543
194B542
185B149
194D554
185D153
94C346
85DI07
194D555
85D154
194D556
185D155
197B427
59C084
159B133
94B367
194B568
C94C624
C97B432
C94C586
C85B167
3109·1 Process and Instructions (Packing) .. . . . . . . . . .. . ......................... A-2
4500MRI Pulse Oximeter Assembly ............................................ A-3
Power Interconnect Assembly AB40 ........................................... A-5
Power Interconnect Assembly AB40, Schematic .................................. A-6
Power Switcher Assembly AB 18A . . . . . . . . . . . . . . . . . . . . . . . . . . . . . . . . . . . . . . . . . . . . . A-7
Power Switcher Assembly AB I8A, Schematic ................................... A-8
Display Assembly AB 17A . . . . . . . . . . . . . . . . . . . . . . . . . . . . . . . . . . . . . . . . . . . . . . . . .. . A-9
Display Assembly AB17A, Schematic ........................................ A-IO
Processor Assembly AB I 7B 1 ................................................ A-11
Processor Assembly ABI7B, Schematic ....................................... A-12
Analog Assembly AB17Cl .................................................. A-14
Analog Assembly AB17Cl, Schematic ......................................... A-I5
Dual Fiber Optic Finger Sensor 9397 .......................................... A-I7
Oximeter Cable Assemblies .................................................. A-I8
Cable Assembly AC216 ..................................................... A-19
Speaker Assembly AS72 .............................................. . . . . .. A-20
Universal Battery Holder AS03A ............................................. A-21
Junction Box Subassembly, MRI Dual Fiber Optic. . . . . . . . . . . . . . . . . . . . . . . .. ...... A-22
Cable Assembly, MRI Dual Fiber Optic Sensor AC206 . . . . . . . . . . . . . . . . . . . . . . . . . . .. A-23
MRI SAT/C02 Power Interconnect Assembly AB50 .............................. A-24
MRI SAT/C0 2 Power Interconnect Schematic AB50 . . . . . . . . . . . . . . . . . . . . . . . . . . . . .. A-25
A-I
'7 ~
~:,.
I I~ "'8
'!I! ..
.. e.
I
~~
0;:;; ;~II I I
~I~ _... i~:~~
2-~
A-2
1
(4X)~
FROM AB40, J2
AB50A, J4
.15 R
(BOTH SIDES)
,/
"/~1
':::~/ ,
,
DETAIL A
9
I
Ij
'~\ !
(2X)
i~~
~
J{,,~(4X)
REMOVE ANY PAINT
OVERSPRAY IN THIS
AREA.
I
@(4X)
TO J3 ON
ANALOG BOARD.
AB17Cl
AF48A
TO J2 ON
POWER/SWITCHER
BOARD. AB18A
AF48A ADDITIONAL PARTS LIST
KEY PUG (.10)
Hoos:NG, SIl, 5 PIN (.10)
(2X) THRU BACKPAI'EL
30
FROM AB17Bl, Pl
iNTO HEATSINK ON
PO\\£R /SWITCHER
BOARD, AB18A
*
CAll, AN&OG TO SAT POYIBl IHI.
-<
11).'---_ _ _
!nEW. #1-40 X1/4' -:-i'Il__f'IHl=::..-UlC=:...I'lO:.=.....----l
ADAPTER PLATE. 009, IIIlI 0l1£IER
RED
AF48
III! SUE TOAEMOIIE PROfl:CTIYE IlACKIIIG
FROM COt«lUCTlYE ADHESIVE AREAS (2X)
(5X)
*05
34
PA186
2/1
GAm. ENI,TlF1. 25 PIN
* 55
32
NY«l9
8/6
lOCl(WA!HR. INT. TCOTH, f4
ss
31
* JO
USE "ASSURE" LOC-llTE, PIN ).IOO6/t.1OSO ON All THREADS EXCEPT
HRE NOTED O'lH£Rl\N:
*29
28
21
GAIl, ANALOG TO ?OilER INT. 80.
AC222
4/2
HS28
S/lO.OCK, FEWAlE. tH() X..llt
.ISSEI8.Y N01[S;
26
1. INSTAll. FErT, Pfll FE02 (ITEII 19) I)ITO SOTI()j (J' CHASSIS. P/H H1126A (ITEII!).
25
24
HOOI
SUDON• .4 X.35 ARROW
13
HOO9£
sunC!<•.~ x . ~ AlARWS
22
~009C
SU11I)1, .; X.45 IfTII)IS
21
H009G
2. INSTAll. SPtAI<ER ASSfIIBlY, PiN ASn (I1EM I) c»iTO 8AO<PANEl U9NG FruR (4) N'J1S, P,IN Nro; (IlEII II).
l PL\\I EIII/Rfl CI3<E1S, Pfll PAI86 (ITEW :15) ONTO 1lIl25 C(JIN£CTORS 1)1 POD INT£RCONN£CT 8OARI), P/H AB40
(ITEW 6). m ASSEW8lf BOARD TO 8ACliPANEl U~~G rOOR (4) l{)o(WASIiffiS, PIN N\\1J9 (11!.lI ll). fOOR (4)
1W£(FEW.\l£ S/lO.OCI(s, PIN HS26 (iTEII 29), lit() rim (4) NUTs, P/H HOO2 (ITEII JO~ AS ~.
4. APfU O\m.,\Y, PIN LBIJ9 (!TEll 6) TO fR(JIT OF 0iASSIS. !HAP OOTT1)15. Pfll HOOI, HOO8, H09C, E. F, "G
(ITEIIS 21-26) 1liRU lID APPRa'RlAlt HIllS IN FAa:: (F OlASSIS AS ~.
* 20
TO J2 ON ANA~OG
BOARD, AB17Cl
5. CUT OR NOTCH OUT 00 (2) OPPOSIlE SIDES (F SWITCH SHROUDS, PIN tIIol14S (11£11 32)
PER DETAIL •A'. PLACE SWITCH SHROUDS O'AER AlPPROPiA TE SWITCHES ON OiSPLAY BOARD
Pft< AB17A (lJElI 2) \IIlH NOTCHED PORnON TOWARDS TOP AS SHOlWI. ~CURE DISPLAY
BOARD TO CHASSIS USING Flvt (5) SCREWS, PIN NS04 (lJElI 10). INSTAll INSULATOR,
Pft< HIl6 (1lEJ.l 31) ONTO BACK Of DISPLY BOARD, USING lHE C£N1ER MOUNTING SCREW.
19
18
*
* 15
12
(4X)~
= AF4BA.
PER ECN NO. .l146
PER fCN NO. 2575
REF QTY. IN PARENTHESIS ( ) IN ASSY. ~EW.
PER ECH NO. 2J54
REV.
OCSCRIPllON
BY
IllS.. aoTI()j, OXIMETER
1lTY.
\IRI
.------1
INVIVO RESEARCH INC.
j:\:
4420 METRIC 001\£ SUITE A
iI1NTER PARK, flORIDA 32792
~
d·~""·tfIIf
l I f S _ I S _ I I I l _ 1 I I l IS lIE
10/90 _ < J _ _ _
IE _11l1li PMT'I.1IIIIIIm lit &11l1li 01ID
5/90 _1fIIWf _ _ <JSIIII_._
DATE
f~
IlESalIPllON
DIt.*'_
_ _ _ 1IlU
IIIIITMI$1IERIlItflQ_lIffll!!J'l)l,mATIIIf
.~.
<>
~ ASSEMBLY: AF48/AF48A
Q
FIRST NUMBER = AF4B.
CHY
SR
CHY
SP
JlH
HW2I;A
PART NO.
1
* - QUANnnES DIFFER BET\\{EN AF48 1£ AF4BA.
PER fCN NO. 3421
PCA. POlIffi/SWTCHER 'UlSE OXiIlETER. MRI
PCA. IJlSPEAYPUlSE OXIMETER
'
COMPONENTS NOT REQUIRED FOR AF48A ASSEMBLY
PCA. PRIJCESSIll PUlS< OXlWE"ER, IIRI
A816A
ABIlA
1
*-
SECOND NUMBER
---If(,lOGAllON
ABl7B1
Q
CHf.SSlS AT RlQiT
X 1.00"
ASSEMBI.Y. SPEAKER. Ol:A£TER
INTEllCl)lNECT. OXl-WRI
*•
I
(J'
16 -52
Ills.. OXlMflER. ANAlOG S1jIElO
S
BY HANJ) 10 IH':JE
5TANOOFF.
SCRE, ,HO X 7l6;-pfj'PNH ZINC I'lO
OIUllAY. 4!XlO\1R1, OXillEltR
I
IlJI1Dj
5/5
"
11. ATTAOl AQGEpTANCE I.AIIl. PIN l014 (ITEII 34) (N'!RIAllON
RI:AR, lG.OII 9'£AKER ASSEloIIiY
In\RIl AT J2 ANJ AHAI.OG BOARD AT
*10
~
INlERCI)II£CT
STij4DOFF. 16-51 X 3/4"
5
HIII4P
6
25
~S15
11
SEE DETAil »A'
I,
(2X) 24
SCH[W, /6-31 X 1.00' SL PNH NitON
I
PROGESSOR BQ,\RO AT Pl. TO PO\1Il.'R
,I
ZiNC PlD
SCREW. 16-31 X1/4" PH PNH ZINC PUl
I
fR()j
2
12-"',
sau. /6-32 X•. 00" !'Ii PNN ZINC I'lO
15
(
10. COOlCT CAlli
AT Pl
NliT. tU
NUT. f'EX. /6-32. lINC I'lO
14
I. RW1I: THE ll)lG !llACI( _ OF THE SI'LIKER ASSElIIl Y\JNJER CCIlNER (F POD;SWTCHER OO.lRll AS ~
AND C(NI[CT TO P3 c»i THAT SO.lRll. Cl)lNECT f'OII(R 1N1!RC1lIHfCT CABLE. PIN AC21. (11!.lI 20) fR()j
POIIiIR/SWTCHER BO.lRll AT ,1 TO POO INTERCONNECT BOAAD. AlSO AT JI.
9. fUll ANALOG ~. PIN HIllA? (ITEII 9) O\£R ANAlOG 1n\RIl, P/H ABlICI (ITEII 5), m SECURE lint ~.
P/H NS54 (ITEW 15) ANI) NUT. P/H NOO1 (lTEII 16). AS S1iOlIII. INSTAll. ANAI.(X; In\RIlI)ITO THE STANIXffi
(SEIlJRIO:: THE PROCESSOR OOARD) lSHC THREE (3) SCIIEY-i p/H NS02 (lTEW 13) AND 1'Ml (2) SCllWS. P/H HS53
(ITEIII4). AS 910lIl. COOlCT RIIIl(Jj CAllE fR()j PRaISSIll BOARD AT J3 TO ANALOG OOARD, AlSO AT Jl
OllNECT 9'£AKER ASSEloIIi YCAlli TO ANALOG BQ,\RO AT .n, II1Ii RED lIIR£ AT PIN 1 lOCA l1ON. IXIKCT
RIB!II)I CAlli fROII PO'tIER/SlITUHER In\RIl AT Pl. TO ANALOG 00.IRll AT J2.
I.
17
TO Jl ON PROCESSOR
BOARD, AB17Bl
6. APPlY HEAT SINK C(JIl(Uj\) TO HEATSINk 1)1 PO\1Il.'R/SMfTCIIR 1n\RIl, P/H ABl6A (ITEII j) lit() INSTAll. INTO
SOf11lj (F OiASSIS U~NG THREE (5) STANOfJ'FS, PIN HSJO (ITEW 11) ANIl11llO (2) ~. P/H NS02 (ITEllll).
AI.ICN HQIS IN HEATSINK I'IITH HOLES IN BACliPANEl ANO SECURE lITH 11110 (2) SCllWS. pIN NSOl (lTE\lU).
B. INSTIti 1'Ml (2) STANIXffi. PIN HS30 (ITEII \1) IN 00f11lj OF OlASSIS IIlIfi) OOFUY BOARO. INSTAll.
PROCESSOR BOARO. PiN AIl17B1 (;TEW ~) I)ITO 1HOSE STAIiOO'fS ANIl1l£ STAIiOO'fS SECURING 11£
POD/SlITUHER BOARO U9NG 1'Ml (2) STANOfJ'Fs, PIN HS15 (ITEW 12) .1M) 1HREE (J) STANOfJ'Fs, P/H HS.J!I
(ITEllIS). AS~. C(JINECT RImi CAlli fR()j POD/SlITtIER In\RIl AT P2 TO PROCESSOR BOARD
AT.n. Ql)lll£CT RIIIIai CAlli fR()j lJI:l'tAY BO.\Rll AT Pl. TO PROGESSOR BOARD AT J'}, RW1ING
IJOIIIi IIi:.JLATOR AT BACK Of OOFUY SOARD. INSTIti PRaI !D, P/H AW05 (lTEII 21) INTO socm AT US
lOCAllON 1)1 PROCESSIllIlOARll. CIl<HECl POIIiIR PRINlER CAll£. P/H AeHI (IlEil 28) fR()j POD/SWITOifR
00.IRll AT J2 10 1lIf PRaISS(Il BQ,\RO AT JoI.
BunC!<•. 5 x.45 BlANK
CABLE. f'OII(R lNTERCC!<NECT. OXl-\IRI
OXIMETER, 4500, MRI
~
NA
DllG.MO.
11[\'.
1940543
E
A-3
TO J1 ON POWER/SWITCHER
BOARD, AB18A
TO J3 ON POWER INTERCONNECT
BOARD, AB50A
/
39
J
/
........ REMOVE ANY PAINT OVERSPRAY IN THIS AREA.
46
(4X)
33
(4X) NO LOC- ilTE
59
®
(2X)@-·~
"~
NOT SHOWN
(NOTE ORIENTATION)
fR.,:J
I
40
(2X)
SUPPLIED
(<Xl NO lOC-"ff
W/@
TO C31 ON PROCESSOR BOARD
TO J4 ON ANALOG
BOARD, AB17Cl
TO J5 ON ANALOG
BOARD, AB17C1
USE 'ASSURE" lOCTITE, PIN 11006/1.1050 ON All ~READS EXCEPT
IIHERE NOTED O~ERWlSE,
As:nBJ HOlES
12.
C(JImrum
pIN AIJllBl
(ITEM 4) AT C31 lOCATIOIl (4 PIN STIX),
PIN L6()JA (HEM 47) ANO PlACE IN
*
~I£ (]I
C(ljPl£TED SERlAL U\BU..
lHE CENTER 00 THE BOTIOM OF CHASSIS,
15. ATTACIl HANOtf, P/N HIi01 (ll'ElI 39) TO 001£1< USING 3/8" lOCl':WASHERS,
P/N Nll)7 (HEM 10) All) !m'lJfD NUlS. I1GfIElj NUTS CARffW.Y,
EltSJIR HOT TO OI£R I1GfIElj CAlJSING SNAPPING AC1lQN IJ' 11(
IWIIllE TO BEC(lj£ NOOFUNC1l(]lAL
16, R£IIO\E PAPER BAOQNG TO DI'OS£ ADHt51VE
*
AB8REVlATED OPFJ!ATINC
llII6 (lID! 46) AND POO 00 TOP OF COI£I<,
INSIR\JC1lQN LAIlL£, PIN
CENTER£!) IN fR(l;] r:f JJNCTION BOX AREA
(]I
17, SJP IJNOCRSII)E CABlE ASSEIIlIJ[S r:f ..uNCTION BOX 9.J8-ASSElIIllY, ASI27
(ll'ElI 37) THR\J !lOn LIIl AS!IDI\N, SEaJR£ ASSElI!ll no I11f LIIl USING
f!JJR (4) ~ P/N 1617 ANIllOO<WASlfERS, PIN N¥1J9 (I1El1S
33 a JIll HOlM: THAT CROOOHC TAB \1RE fR()j OOAX ASS£IIIlY SlfOOlD
BE S£WRED TO 11( iliAS9S AS SlfOWf,
44 (2X)
*
*
*
58
57
HB03
,i
1
BAmY, :iV, 2.3AB
HIIZ6f
!
1
Bf1ACKET. ::PACER, BA1l£RY MOON!. WRI OXIIIETER
56
HS02
STANDIJ'T. HE). FIf. 16-32 X2.25"
55
HN16£
SPACER, SAntRy, IIilI OXiMElB
~Rl
OXlMmR
COMPONENTS NOT REQUIRED FOR AF48A ASSEMBLY
65
!lC07
51
H1110A
BRACKET, lJi, PQE WJNT
50
HU10
BRACKET. RH. PQE IlOONT
49
11032
11'
4B
11031
It
47
LBO.JJ,
46
45
NS63
SCREW, H2 X '/4"
44
NS19
SCR£W, #Ii-31
47 APPL Y TO BOTTOM
SIDE
CHASSIS
SEE DETAIL "e'
or
L816
rut ZINC Pt:l
HC04
BATTERY, 4,5V NEOAIXlfiA
41
ASOJA
NW07
ASSY..tlAmRY HOlDFJ!" WRI
lOCKWASHFJ!. EXITRNAL TOOTH, 3/B"
39
HH01
HANOl£. fOlDING, SPRING DrnNT
J8
NS17
SCREW, 4-10
37
AS117
9.J8-ASSY, £1 80X. WRI DUAL F,O.
:l6
HW16B
LOCATION
PART NO.
x1/1 PH PNH ZlNC PLD
CHS" CO'IER, OXlWElER FOR hIRI
orr.
_//If
w..
JII
i:m
fESIlIll
-
JII
~
ot • ..;w "" • ..;w
IBCRIPTION
INVIVO RESEARCH INC . •
4420 MElRlC DRIVE SUllE A
'II1NlER PARK, flORIDA 32792
QfMJ)
<:.
<)
ASSEMBLY: AF48/AF48A
1IS_5C1Jf11l1111lMl_ ... 5111
SEE NOTE 13
ptj
x 3/'( ptj rut ss
HBOO
.....
49
FASIDIfR. ~ BLACK r \f!I£
JlBtL SfR. NO., 15--JOV, OXl\£1lR
41
IIllZIDID
19. stIlE 001£1< OO'IIN OI£R BOTllII iliASSlS ASSEIIIlYBIlNC
9.JRE THAT SlO1TED iliANH!lS IN aMR AIlGN il!lH ffiONI
All) 8ACK PANaS IF BOTTllI iliASSIS ASSEIiBL Y. SECURE
QMR ASSEIiBL Y10 BOTTllI iliASSIS USING fOOR (4) SQlEYf;,
P/N 1m (ll'ElI .0) AS !IDI\N.
f
(NOT SHIlY!N\
43
* 10
PROTECTIVE TAPE -
18. C(H£CT 3 POS1lQN COAX HOUSING TO J5 ON IH£ ANALOG BOARD,
CONI£CT 6 POSITION HOUSINC INTO J4 r:f IH£ ANALOG BOAIlO WNONG
S1JIll: 1HAT PIN ONE POSI1lON IS TOWARD REAR r:f UNIT.
7D. IiltR C(IIPI£I1ON (J' ASSEIIIl YiJ£CK tNT FOR COSil1IC NlCl(S
All) SOOlOlS. USING AN ALC!Hl. lIP£, lHROOGU aI,IIj UNIT
All) S81T 11) FlNI.I. lEST All) iNS'EC1lQN,
CAB, SAT POII(R INlllCONk!BATTrnY, ~RI OXlWElER
9RACIIE!. 9ATTrnY.
*
11 CUT HOCIi. P/N IiOJ1 (HEll 48) ANO LOO', P/N 11032 (ITEM 49) INTO 6'
SIR1PS !'lACE 11£ HOO( STRIPS Too:1HER .111 THE LOOP STRIPS.
001£ PROl£C1I\{ TAPE fH()I HOCI( :>DE IJ' 11£ SlRlPS AND PRESS
flRIU 1l) BOTmlIJ' UNIT llf.llIIE£N INOOITA1KJfS FOR FEEl
14, JlEII(M: PAPER BACKING 10 DI'OS£
AC238
HW260
REF. QTY. IN PARENTHESIS ( ) IN ASSY. 'fEW.
BATlERY, PIN HBOO (lID! 42) IIlTO UNlIffiSAi. BAnEIlY HrulER,
PIN A!mA (I1!Jj .1) AHil stOJRE \\ITH CABlE TIE, Pi" HC04 (PEN 43),
SEW![ BATTERY ASSEIIIlY TO BOTllII CI1A~S USING 1110 (2) SOlEWS.
PIN NS15 (11!Jj 44~ iXlt£CT BATTERY C/oIllI TO PROC£ssal
f'L\(I
BOARD,
60
59
~~~------------~~~~~~~~~~~~~L_ _ _ _ IJSIIl_,1W)
,
__O_XITM_E_TE_R~,<4_5_0_0~,_M_R_1____-.--1
f--RE-V.-I-----OC-SCRI--Pll-ON-----+-B-Y -O"-lE-1:r::r:::::u
~ MtI_w:,!:..
4-:
st.\lE
NA
1940543
£
A-4
NOTE:
1. CUT PINS AT Jl-PIN 4 AND J2-PIN 1 AS INDICATED AT BOARD
ASSEMBLY AND INSPECTED AT QC LEVEL.
2. Pl AND P2 TO BE ASSEMBLED ON SOLDER SIDE AS SHOWN.
3. Bl HOOK BOTH LEADS ON INDUCTOR (T040). BJ" HOOK TWO (2)
BUS WIRES AND CONNECT TO "J" HOOKED lfADS ON INDUCTOR
(T040) AND SOLDER. USE ENOUGH 3/8" x 3/16" PIECES OF
MOOO, TAPE, (ON TOP OF ONE ANOTHER) UNTIL INDUCTOR (T040)
IS CUSHIONED AND RESTS SECURELY ON CONVERTOR (lR04).
THEN SOLDER INDUCTOR (T040) IN LOCATION L1 AS SHOVh-J.
-
I
e
e
rn e r-nl CiXiXiXiXJ) .,
•
•
•
I
I
In.n.nJ"1.l
e
e
e
0
- - -.
•
I
F
PER ECN NO.3052
CHY 10/24/91
E
PER EeN NO. 2669M
CHY
12/90
D
PER ECN NO. 2611M
SLP
10/90
/90
~
J2
PA06
1
HEADER UNSH 5 PIN .10
Jl
PA121
1
HEADER UNSH 5 PIN .156
Ul
IR04
1
CONVERTER, DC TO DC MC34063APl
CRl
D007
1
SHCOTrKY ERA B4-009
R4
ROW
1
RES., 2.7 OHM 5% .25W CF
R3
RF169
1
RES., .27 OHM, 1%. 1W, WW
R2
RF73
1
RES., 1.1K 1% .125W MF
Rl
RF93
1
RES., 12 K, 1%, .125W, MF
C2
CC3B
1
CAP., 510 pF 5% 50V COG AXIAL
Cl, C3
CA15
Pl, P2
PA181
2
FILTER. DB25 RECEPTACLE, PCB MOUNT
1
B114
1
PCB, PO'lt£R INTERCONNECT, OXJ-MRI 155N133 REV.A
LOCA TlON
PART NO.
OTY.
DESCRIPTION
I
CAP., 220 uF ±20% 35VDC AL RADIAL
D~RA~
x.. :l030
DES!
xxx • :lIXIi
OlECKED
xx. :lOIS
NIQ£S~IIIRE
<12' '" :1:1/32 >12' '" :1:1/16
.RN
2/90
2/90
12601 Research Parkway
Orlando, Florida 32826
I
•
APPROVED
, ,,'
INVIVO RESEARCH INC.
~
'
,,' TIm
PER ECN NO. 2505
C
1 - - - + - - - - - - - - - SlP
7/90 THIS /lOClIWENT IS GOOfII)[NnAi. AND PRIFRIETARY AND IS THE S(X£
ASSEMBL Y: AB40
PER ECN NO. 2484M
B
PR<FERTY (f IN'AW UAROi ~A1ED (IRI). IT IS NOT TO
POWER INTERCONNECT, OXIMETER FOR MRI
1 - - - + - - - - - - - - - - r - ---t---/:---i BE DISIlOSED TO ANY PARTY. R£PROOUCB) (It lmllN ANY OTHER 1--_ _.---_ _-.--_ _ _ _ _ _-.-----1
PER ECN NO. 2320
SlP 4 90 MANNER WlHOOT ¥RID ~SENT (f SAID <:e:IWANY. IN\M)
A
I - - - + - - - - - - - - - - t - -- +-D-A-TE--i:T:~11f ~T Jgn~Na ANY !H:ClFlCAn:, ~ ~~ SCAlI 2=1 SHEET 1-1 0\1;. NO. 1948542
REV. F
REV.
DESCRIPTION
BY
A-5
P1
INPUT
+24 VClTS
+24 VClTS
+24 VClTS
P2
OUTPUT
11
12
13
11
12
13
+_~ CJ
~
2
C2
510 pF.
3
4
~
I-
Ul
34063
8
7
'---
I
220 uFo
35VAL
6
5
R2
UK 1%
-R4
2.700M
RX
1X
lW
i
~~
ml
fRA84-009
--
R1
12.1K 1%
C2
220 uFo
35V AL
-
~
PULSE PULSE SI~Al
,RJ.27 OOM
~i
4
+
-'-
I--
L1
330 uH
INDUCTOR
1
"3
.---l5
II---
+24 VClTS
+24 V(lTS
+24 V(lTS
J1
+15 VClTS
KEY
+15 VClTS
GROONO
GROOND
POWER OUTPUT
-='--
J2
2
3
4
5
1
6
8
9
10
-
6
8
9
10
PULSE PULSE SI~AL
RX
1X
KEY
PULSE PULSE SI~Al
RX
1X
SIGNAL OUTPUT
GROOND
GROOND
GROOND
14
15
14
15
16
16
GROONO
GROOND
GROOND
-='--
-
LOCATION
C
B
A
REV.
PER ECN NO. 3052
PER EeN NO. 2669M
PER ECN NO. 2484M
DESCRIPTION
CHY 10/24/91
CHY 12/90
IN
7/90
BY
DATE
OTY.
PART NO.
UIt£SS !fECFED
llURANCES N(£
DRA~
~
2/90
x. :l0J0
xx... :lms
me
:lin)
DESlW
~
2/90
NWS~1llE
CHECKED
d1
<It .. :l:1{l2 >It .. :1:1/111
APPR<MD
"
DESCRIPTION
INVIVO RESEARCH INC.
12601 Research Parkway
Orlando, Florida 32826
TIllE
THIS DOCUIlENT IS aHlDENllAl. AND PRCfRIfTARY AND IS lHE S(l[
PR<HRlY (J' IN~VO RESEAROi ~lID (IRI). IT IS NOT TO
BE DISClOS£D TO »IY PARlY. REPROOUC£D 00 lmllN »IY om
..NINER IlHOOT ¥lRlTIEN W4SEHT (J' SAID CCIIPANY. 1N'tOO
SCAlI
MANTAINS lHE RlGIT TO CHAN(l ANY SPECIRCADS AT Nft
lIME IlHOOT PRlOO NOllCE.
DOC. NO. 10m;
SCHEMA TIC: AB40
POWER INTERCONNECT PCB, OXI-MRI
SliEET
NA
D\\C. NO.
1-1
1858149
REV.
C
A-6
r - - - - - - - - -- -- - - - - - - - - - - - . - - - - - - - - - - - - - - - - - - - - - - - - - - -
n'"
..
R21 '":
....
..
032
R2t
0004
R074
I
1
~--'-I---j,_----'RO.:.:....II-2--+-'"---I---RI!.:.::..I.~3. OHM .21W I ... CP
R30
RO"
I
ROn
AFa- ---
"21,34
Fl4a
1----------_1_--..
2
1
- -- - --
Rl!1. 470 OHM .2'W .... CP
FEB. 1181( 1-.. .121•. "
------------~
~~~-.-+---RO--22- __ ~-+-RI!--I-'-.-2...:0K----=.2~I~W:...:..I...
,~CP~------------~
R..
f - - ....
--
-
R021
ROl'
I
REI, 121t .I.W I ... CP
-,--+...:RI!:..::cI..:.• ...:,.:.:.I:.:cIll!~Q'---.2~I...:Wc...:.:5...
--CP-------------l
. .-- - - -----------------f
I
~!~~APTIYE~:"_~_~_I_-440
_ _ _ _ _ _ _--1
c----------.---+--------.
>------n- 4
w-- r _
••••;.L.... 31
035
~
~
Rl!1. I~ OHM .2'W 5 .. CI'
RO~13~-+~'_t-RE--=I..:..:..5:..'0~OHM.:..=:...=211~W~.~...~CP=_--------_1
R4I
032
DETAIL "A'
R27Jt
DIODE, GENERAL PURPOSE. lNI5U
RES. I.IK 5 .... 25W CF
Rl.12,241, '
r--":t.!.....~--
...7
_
NCO.
1tO_0_2__--t-_.,-t-:-RI!--.~
•..:.'_:..:.....:.2:.:cI:..W:....:..R:.:...::CP~______________--l
ROO 1
.1
-RI!a. lit .2'W I ... CP
R_
-
- - - - ---------------------------l
•
Rl!a, lOOK .IIW .... CP
RP14
' . a , 2K"'POT...::.._.:...:.:..:.=2::.:K'---_____________
..
-l
....-i---.!"'~.
0211
r--'!"
I
~~.!'.!..-f--~
REa,5I( POT . . . . .
Rl!1. 2.21 III!CI .IIW ,... . .
,RI!I, 4.tIIt .121W I .....
r- :~~=r- ~:-= ~~;~~.:~:-..-,. .-..
"'7
~-
DETAIL 'B'
111'20
-
I
- ----
----_._----------------1
-----------__1
-------"-!'.'
111'01
2
ReI, lit .12'W ,... . . 50PPM
___ ~__ ~•.!__ ..!.. ....._...
___'_A_ft
__T__________________--l
_~2_ ___
4PLet.
034
~
-
RES. 1.14K 1% .125W MF 50PPM
C411
CC17
CAP. 470pF 10% 100Y X7R CERA_..
_C_ _ _-I
~
~
4
INSULATOR. GlASS BEAD
___ .
_TW'1zo.
____
'!.'.!~~------------------___l
"""--'-'--.... 8LJCON POWU PAl(
goo.
•
MPUt07 A , . .
ae.l
QOOI
2
..aJ2UA ....
1
1mX • I PIN..". AHCILI .,.....
-.--- -f----t-'-.~:----------------='--------_4
YR2,/1
~"_ - - __ '
.... ,
•
------------------- ---
--
.-
ITlI[,' PIN llr ""11"'
LIII4ILAZ--.--I'08TM!-------.uTOII--------------I
+
.250
'=========~I---'
r---l~2~___t--M~00~4----f~~51~.1_t-~~.-DS~.-I-'2~"-X~.0-10~~------_____~
1-__l_l_ _--l_....:..:HI2=3_ _
BUZZ II . . . . , . ~ nT
Q4 • •
1----------+----.II
~'2'
I
RF210
I
r_--~" ___ ~c:C,,____,"- -"OO1I1uF!!' ... 100Y X7R CERWIC
DETAIL 'C'
R3
0011
-~.!..-r__-0018- I
aa
001.____,_.
@l
2
=,
DETAIL "0"
_
-+__WT.:.:..:..:.:1I7:..
I II. HEAT SHRINK. *1M" ID IILIIiCI(
CT'7--~-,-~,.--~--N~Y-.~~~~.----------·-.
1-----R44~~--t-~RPO~~7---1--,~~~~:..*-,.:.:~~.,:..21=W=,~.~----------------.
1---__-::_'____
eM
'
ASSEMBLY NOTES
1. USING WHITE INDELIBLE INK OR PAINT. CHANGE BOARD ASSEMBLY NUMBER TO READ ABIU. AS SHOWN.
2. SECURE TRANSFORMER SHIELD PIN H070 (ITEM 13) TO BOARD USING RTV ADHESIVE.
.. ,
..
,ST1X, RIMY ~::..."--,......:.....------l
____~--~--..---+--'-~-.--.w~.-I-~-.
•
HI20
I
1--__~7,___--_+---.-~'.---......,1
.
C42.1._-
...... tt
IMCeR , H\'I..ON ...._~!
1.7rt111ft lay T~
CT14
I
cat...
ern
I
~
cae
..
CIIl.
1
..........
i--------t·---
.~!~-----------4
INiCIEII, NYt..ON . . . I .,. . . . .
__
2 " NY . . . . . . .
·--~~F=-..:::.:..:.:'-=....:.....===-------
""4:t
1--__T_'__t--_TOM
_ _-+-1
__
-
~
..
r---CH
1
Nl.
~ lN47"_M
__Y_'W
________________-1
DOlI __+--~t.__t._---,.....-----.----------------....
CCM ___+-.:..'-+"=¥'s-2"'"c...:....:..
...
'--'--.::.:..:"".c..="'
. . n..c=::.::...___._--l
I
H Q l 7 1 . . , . . . . . ~~ • . -
1
....
4-
....
Illn
"'27
2
7. AT R21 REPLACE PIN R002 WITH PIN R1211.
10. AT 0211. LIFT ANODE END AND SPLICE IN PIN ROOI (RES. lK 5% .25W CF) AND PIN 0000 (SIGNAL lN4141)
AS SHOWN IN DETAIL "B".
11. AT 032. LIFT CATHODE END AND SPLICE IN PIN R155 (RES. 5.1 MEG 5% .25W CF) AS SHOWN IN DETAIL "A" .
12. AT Jl RE'LACE THE MODIFIED PIN PA121 WITH A NEW PIN PA121 AND ADD INDELIBLE WHITE INK DOT AT PIN 1.
----.
........ De
._A__________
11M
5. AT RII INSTALL PIN Rl 17.
8_ AT R25 INSTALL PIN R1211.
X".·~
~___L__.~~_+-_T'!. __1-_2-i_CO''--'--_~1~
__,---1_"
__~~
_ _A,---__________~
U
T...
___~._,~COL~~,~
____~_~.•_.___
.
---1
......
PARTS LISTED IN THIS B.O.M.
ARE FOR REFERENCE ONLY
I. AT 028 REPLACE PIN DZ03 WITH PIN DZOI.
IeCOMWIY . . . ou.TIII
f-..,~------+--------I--~I---'''-'-----
INDICATED IN THE &IDE YEW DETA ....
9. AT C32 REPLACE PIN CC12 WITH PIN CT03.
1IM7M ' "
r--~_~ __ r_--~-..
-~--1---4~~~~~.:..':.."'~-..:.."~1.~.~:..."~'--------------1
.
• ,.
3. AT Rt8 REPLACE PIN RF103 WITH PIN RF214 .
4. AT R14 REPLACE PIN R071 WITH PIN Rt811 CRIMPING THE LEADS AS REQ'O TO OBTAIN .250 HEIGHT AS
. .1,'..0 . . . . . . .
,REa, I . . a.. ..... .:.
~
._---,----,--,-----------------,
13
H070
I
SHIELD. TRANSFORMER. AB18A
R21
R155
1
RES. 5. I MEG 5% .25W CF
PARTS LISTED ARE
I----=------j-:.:..:..::.::...-+---'-+-=.=-:..::.:.:.-===--=:.:.:.---=-:------ - FOR REFERENCE ONLY ~_ ROOI
1
RES. lK 5% .25W CF
R1211
2
RES. 47K 5% .25W CF
R25. R28
Rl1
RF214
I
RES. 5.411 MEG 1% .25W MF
R14
R1811
I
RES. 1.5 OHM 5% lW M. O.
r_-----~---_1_--+---~--~--~~,~~--
------.r------r-~-~---------------.-
f--_R_II_ _ +-_R_'_1_7_--+---,'--+_R_ES--,.:..3_IIO,-,-,-K~5:..%--".2=-5_W----=C_F___ _ _
~121
Rtf4
I
a.coIMer_PlN
__-___7_4_"__
' _ _ _ _ _ _ _---t
I
RES. 200K 5% .2I1W CF
c:.r_____ _
1---_...:R.:...:..''---_+_:..ROtt='''-_+-':..'_-I...:IE.=~_ II 0... , .l8W no
Ct7
COt 1
, . . " ,.,...,. CI#' CICILIR'"
1--------- --11-------'--__t- - f - - . - .---- . - - - - - - - - . - - . -. .-
1--____
• ____
•
r'- HIOI
HIO.
_~
4
. . . .ATOII. TI~"~_. ~
__
77_-_2_ _ ___1
_
NYt..ON . . . . .7... , . _ _ _ _ _--1
Jl
PA121
1
_. _
HEADER. UNSH. RA. SR. 5 PIN (.158) ____-1
lOCAlQ
PART NO.
QIY.
IlfSClI'Q
INVIVO RESEARCH INC.
~.-.-.+__--'DO--'--'-0-0--+--'-'-+-S-IGN--A-=L-l-'-N'-'4..:.14-'-1=-------------__I
0211
C32
I
LOCATION
DZOI
CT03
Aall1
PART NO.
1
1
1
QTY
ZENER lN5245B
CAP. 3.1111' 20% 25V TANT
PCA. POWER SWITCHER. OXIMETER
OESCR.mON
L-~~~~~__l_~L~0~1I__~2~~~~.II~-~W~~~OP~MP~____________~________________l _______=BIL~L~OF~~M~ATERIAL.~A~
--
A-7
_
PZ
JZ
0-;~~'
~
II JI
I
1
01
I
'2
I
[
_._-jf~i
I
S AMP
13
TP2
~
PRINTER V
LF353
1
I
II
,
~
;;'~20
C2'+
IOu
¥
f
lr .;-,
_
,R29
,'_,·vv- 8
:
VC
llNV
Ul
O'
,
-= 'f
TRII.H;AP+
I
'"
"'-
lN4148
__
.
GNO
>1-1
I
lN4!
R8
0D
0
1:~!8
~~7
r
1~
-=
I
C3S
I
lu
I
~
I
+
rt.
I
j
~
I
.
j
,I
Ii
-C34
1£.
..
SG3525AN
T ,IU
~
RT
i
_J
6.81(
,!.
-'"
.lu L
;:;;'C12
I'"
1
Fl
J2
L3
P3
a9
R47
~
~
~
N
II
!i
I lID
.lu'
'Jti.-,---vr--~
eel 1 ~ l--~'r-=-I ~~'
I
05
SB180
~\
Cl
18 TURNJ
Ii
~
~\!
I C:;'L
('"
,\
Tl
PI
lC14
,.!'i"
TO ANALOG
.'"
I~' ,;1
I
.lu
03
IN4935
,::l
T
ZZu
SOY
R'
TP 1
.'~
RI
r
I
+LJ-
C4 -.L-
~\
nI
I
i,./l .
I
Ii
TP4
OUT
10u+T
. • Iu
I
Ii
i)
•
LM VRI
i
I, "
C6
vvv
.Iu
1.84K
1%
:, i
21( 1% •
C49
I
470PFJ-
L
CI3T
.lu
"~
I
1
.- lN4148
030
lN4148
LF353
\fl
ISO ANlG GN>
'I """ '"
~
__~ ..• ~~___________~~~OON
1-
~~~~ RESEARCH INC
C37
.lu
DOTAL GN>
0rIa"Id0 esearct' Parkwa .
• Rorida32826 Y
_........flutf'lf~,l;lIR£=-=..
-12V
SCHEMATIC; AlUlA
TP4
VR3
CI6
CIO
9 TURNS
.~
I~.
.~I
1<:·9_.
8
8 TURN
Tl
U3
+
~,t~\'i TURN~I.Ii k--* '1' - ~-, ·
~
•
~
SSSSS\S\\
- ,,'".
\'
D35
1001I-I
II '
,~
1:2~48
C21
k,t
I.
{V\/'--IK
R12
-
coo
100U
lJ
._
.......
7
,
~:: . C33 NOT USED
TO PROCESSOR
0
.'i. ,-
\1
'ei
Ti
C29
220p
LAST DESIGNATOR USED'
.
~J ,,.,.,.,!:tI'~~\,ss.\.\\\\\\\\\\\
,~:" "r- ~"
I
i
\~
.
f
l
--
ERA&4-009
I'
"""',-..,"
4141
2 I'll
~
II TURNSi
.lu 1 0 1 1 \ 7 \.
.....----J.--.J lN41 "" I
SHUTDOWN V IN p I S
4.9111< 1"'-'1
7
h
I
--,'
__.
.
~r:j~ ~~
Rl1
~Ir=-----'--~
lu
:+~+'7U' ~4,r~--i
_,~
1
-h: I
1'1{, I
±
I
C38
C4Z
-
Rt
-
-;--,V\/
/vv,J
09
Ii / *-\'1N4001::-
I
i
..
5K POT
I
015
Ilh
~ r Tc:: +T~'
dj t1~ I '"'' .,'"
~C19 I
(
l
:~ ~+~' 1 L)I~ I
Q9(~,t ~T1A I J_''''.cu~ I ~c:\'~il iii'' _ ---"- -:;t- - 'T- l' "•.
~ I =\\~-.lDTI\\\s:'s:s~\S"\\,\\\,\-n:-r~
. ,+-
IN..I48
~21~ _
R38
ERA~-009
lZTURNS'~ ~
T_--I ~~U
031
",2
.
.lu
Ctt
I'
PICOFUSE
-ri _ _
1
CZ3
SBI60
TO PROCESSOR
PER ECN NO . 3355M
,...?ESCRlPlION
_110.
__-L.:...:......~ I
185D153
A-8
------------------------------------------------------
--
----------------------------
RED STRIPE
SEE NOTE 5
- - NOTE 7
'-.
---- --.--
r--
lOT # 10 BE LOCATED ON COMPONENT SIDE.
/
50
RP1
r
91 OHWI DIP
1
C1
r::::::::J
c::::::::::I
r::::::::J
r::::::::J
c::::::J
LI'"
u:::o;s
DU
OS8
r::::::::J
Dsl
~
SW1 DS9
SW5 A2
SW3
fO) 10)
§
_
_
~ ;W2Io] SW4IQ)~
......
lol~ S~8
- - - - - - - - - - -....... -......
~
~
U.340
=.020 (SW 1-5,8)
300:1:.020 (SW 6, 7, 9)
I-=-l-~l .020
VIEW
A3
(9
1
a-a
x SIZE)
ROTATED 90 DEGREES CW
~(())D~10
BO 76
..
-+'
A4
IN VIVO PULSE OXIMETER
_-_._._-_.....
·1
10)0
DlK'1::IllD
<>i~ 55N093 REV. E
INVIVO
:::::::::=-;,:::-=:::::-:::.n.I:IOEItIA::::==~~CB:::=-=IN::.;:.C=.'---W AB 1 7 A DISPLA Y PCA
PAEClSKlN BIOMEOICAL INSTRUMENTS
B...,
1- jSW9
I
tn C·[OISW7 ~,.J
R1
c:::::::::J
{0]SW6
,.....1--,
---------~--------.--
NOTE: 7 SEGMENT DISPLAYS (DSl-6) CAN HAVE A TOLERANCE OF .015' DIFFERENCE IN HEIGHT
AND STLL MAINTAIN SUITABLE DISTANCE FROM FRONT PANEL OVERLA Y.
---
-
..
_-
_.
-
-
..
.-..
2
Hl23
8
3
HS13._--
1
. - . - - -. .-- SPACER .187 X #4 CL4003
W019
1"
9 .
_swrrCH~ ALPSKHH1'0902(sEE-N-O-T-e-6-)--l
..- - - ...
--.~.
R3
- . - ..
...-. .SWl-9
•.......... R4
---
Rl 2
RPl
S017
ROB9
1
- OS 10---- -t
R[;"~
_--_.- ------
24 GAGE #299 SOFT DRAWN BUSS
'RES, 1.SK .2SW 5" CF
i -- , . .-."".-...- - - - - - -
ROO2
,
INSUlATOR. BEAD, GLASS
..
...
; . 2 j Jl~~' 10K .25W 5" CF
1
RES. DIP 91 OHWI 8 PS"rN D"
._-------
DL19
DS78
DL06
DS9
DLOS
~"---
1. INSTALL OSl-D56 WITH PART NUMBER TOWARDS TOP OF BOARD. INSTALL DS7 & DS8
WITH PART NUMBER TOWARDS LEFT SIDE OF BOARD WITH ONE EACH HI23
® ON EACH
.. _ -
CORNER PIN, FLUSH WITH TOPS OF OS 1·DS6 AND PARALLEL WITH TOP SURFACE OF PC
BOARD WITHIN .015" .
:3 INSTALL OSlO USING SPACER@.
CAB RIBBON. 50 PIN, 3.75". OXIMETER
DESCRlPll!ll
INVIVO RESEARCH INC.
P
REV.
PER ECN #3198
DESCRIPTION
0
Ee''''
*109211,1;
C
EC~!
#1022
B
ECN #983
A
ECN #941
REV.
#AB17A DISPLAY PCA. OXIMETER
1/1
DESCRIPTION
A-9
I' I I
,
'···~~-··--··--------""""'l""""""iI~"-- - - - - - r " 1
!
11'---"'---S!H-h~ljL
H;:_¥
I
~
.t~-t-tt d~~~
IT ll'~
.eN
II
1\
I~!t
"""'
If
"""".,.&
...
7
~
M
i>.Jr
I.
7
t9
j,~t(
It<!
!
'---'
r~~
~
_{Ii
~~
..
-------~. ·-H~-.....,I_-~----··- -~-----f
.-..
-
I
I
..._
_~
_ _~_ _ _ _ _ _~_ _ _ _~..
1/
.~
._
I...
.~
______
~_
~~:"E:-------.i-t-i+H++--++--++-------...- ..- - - - - - -.... - - -..- - - - - - - - - - - - - - - - - - - .... - - - - - - - - - - - - - - --+-1-+++-+++ -H-- ,. .
~
. +~.--~.--.------ .. -.--------..~-.
'::0"
•
~;
""
~
_ ..
_~
___
.. -_.-.....- ' - - -
~_
..
~"
_H
'7 ~
... _ _ _ _ _ _ _ _
~
t& r::!1>
-i ~
_______________
~Ol
-··------·······----~--~-------~R~
-~.-------------~~--------7i(;.J~
_______~___....
~ .......... _______ ... _..____~___~______~_._~_~";.!" Dr ~lll>(
_ _ _ _ _ _ _ _ _•. ___._.. _ _ _ _ _ _ _• _ _ _ _. _ _ _ _ _ _ _ _ _ _ _ _ _-!:'1·1~D(,
---------
- - - - - - - -... - - - - - - - - -_ _ _ _ _ _ ....... _ _ .... _ _ _ _.....2B'!9.D?
-=======_-.--...--------~--.---------------444J :~
H·---·---~-···----------~----· .-.. -~---------~------~--------------~-~~ ~t
I"t
-l-H+H++_--++--f--r-- ----~--~~-----~-------.--~----- ~~----- --~------~---.-- ---_--'-'11' WP...
;---.-------++-iH-i-f++---t-t----
-----~.----.~-.----.--- ..- - . -. .~--------------------~--------------------.-,' ~~~
?""',.L.
'-1
"I~ I~"
~Irk~ .J
1I1riJJ"
~"r <I ~~ ~.:1- ~:.:.~ ... "'I" I~""
_-~I
H_~H>'
"~"-""'" .
oj
Wt",,".~II!.)
·;;~il
(""'1.10''',11:.)
!
~:~
(PI",.4_!!.!!:.)
"'?1;tJ
~~<ci ~"
<+ "., ~ -"
oj
J~IlI~"
...
..,~.1\ <:I
~
<
U?'4~.H.IO
(VI40'<H.'O
1l1'lloP-.~
HN'I"-~~I
i~4';i
J~( ~~
. . ..,iA
.t
(",,,,,,.I.HI!!.)
""."..-t~1
~
i
...
~
,,-3-
i~~I""
......
-.
....
.-lOCAQ
I
PNIT NO.
I
I orr.
,.".,
J-_
[NV!VO RESEARCH
td .. ~
"'''.1,4
mc.
12601 Research Parkway
.-.:I-tIl_
Orlando, Florida 32826
'ru
A-10
4
WIRE. PROCESSOR TO PWRISAT PWR.
-rAW140
AW141
3
,
2
WIR~~
ABHB
1
j PC,~',!ROCESS-,,~,_OXIMETER
~-~--A~-LI-ST-O-F-R-E-F-.P-A-R-T-NO-.-.---------~\
SEE NOTE S
2
PROCESSOR TO PWRIS~T PWR.'NT~GRN
rHEADE~UNSHRD,SR, RA, (.I!L
PA41
R17
R059
PI
PASI
01
OOOS
SEE NOTE 4 AND 5
+
RES, 27K 5% .25W CF
".
POOl
Ir--
..
0
0
0
0
0
0
0
0
0
0
0
0
0
0
0
SEE NOTE 7 AND 8
..
0
0
0
0
0
0
0
0
0
0
0
0
0
0
0
.,
....
..
a::
...
~ .J2
:I
~
a::
0()
I-
r
W
1:
()O
c,
f) (,
H
+C36~
""
N
SIP
0
..,:z:
74HC4002
.....,
:z:
C37
U15
~
..
ULN2003A
r- -.-;
L_
J5
J4••_
C32
PA115
p'-
-t----=-3-P-IN-,-/2-;-;033~2-,--3-~....:...::-'--~
-2'O--P-IN-0-U-A-L-'--8-1'''S-30- - -.._------1
s-n--x·.:..,
~-~L=;--~-=-:-=--=-=:...;.:'~~-;-El-:~~:S:RCMOS
L. : ':~,.f :~r- ·;:~ ~;-~-T2-AL-IN-~D-U.-\-:~ ~f.,;.F":'~-=LA-=;:"-_:~-=~-~ - ~ - 1~
U7
BIT lOOns
N07
TC55257PL-1232K X 8
IC45
14HC244N OCTAL TRI STATE BUFFER
.
I
-Ui2-I'
U22
SEE REF. NOTE 3
'.
\I
__. _______________--+
lOOK .25W 5 .. CF
....... A()8--1t-----f-
U
-U-.B.'-,',-,5!l.".
. _
,.
+
-
+-_'_~=---'-
2
I ~':~~_+;r~: t:
r
'OUF ]
I
U25
24 QAOE ~.,~_OI!AWN BUSe,S"---_ _--I
5.1K .2SW 5 .. CF
ROO3
7
MEG .25W 5'" CF
RES, 2.2 MEG .25W 5'" CF
8·
W019
Rly'_~OOO
!
i
I
;....--"
1
. .~
ULN200~l
I
I
I
x-
...
0
..,:z:,..;
ts
I
SN74HC14N
f.
N
N
0
..
2.2 MEG
C38
..,
...
0
..,...:z:
,-----~------1
ROO2
r-··
i [10UF]
zCO)
..,z
..,z
74HC74
Rll
(j
(;
W
C24
C (,
C
C,
~~!_S_TN_CF_, _ _ _ _ _ ___j
SW., SLIDe INCA-2
RES, ,
2
R125
1-_,':':':=-=-_-+_'
.
r~,
0..
CRYSTAL 8.00 MHZ
5021
1 E2 U22-.13
() (.
R.EJi_,_101(_
XC10
R128
Ril
0"
W
U
N
0
( ) {J
(j)
(j)
CD
....
~
RIO
0
--
RS02
._---
,.
E3
c
II)
'11
I
__
IC33.,_t-_+=S...:N...:1...:4.:..:H-=C.:;.04N HEX INVERTER
',.I_<::3 0.--...
C,7
3'
SN14HC14N HEX SCHMITT INVERTER
MSM82C53-5RS PRGMBLE .NT TIMER
UU-'~27~'~'3"-f~l~c6~O-;.~55--t--32--+--~C':': ~2=-:3"': : :"'0:_~. .:~C-~O"': : "':E-=~. .:~. .:~T_P-=~;=-O: . N~_:~I.:-=:::..:_E_-.--1
__
: __
__
14HC14 DUAL '0· FLIP FLOP
,------~
\/
+__1 ...........S:....IG_NAL
03
0000
C32-36
CT13
15
C2941
ceoo
2
1N4148
10uF 20.. 35V TANTALUM
--,,21pF 20'" 50V Z5U CERAMIC
.~.~
AB17Bl ASSEMBLY NOTES
88pF 10.. 50V l5U CERAMIC
CC09
(REF.) AB17B ASSEMBLY NOTES
4. REMOVE CAPACITOR (CCI2) FROM C31 LOCATION AND DISCARD.
1. JUMPER DESIGNATED PINS AT El AND E2 WITH 1" BUSS WIRE AT EACH.
1-il:1I..l..L.it~II.9.'4-_..::.C..::.C...:l:::2_+-=2:.:::...9
5. INSTALL HEADER @(PA47) AT C31 LOCATION. CUTTING THE TWO CENTER
2. C2 ANO R15 DESIGNATORS NOT LlSED.
f-_-'-_._+_-=BO:..:.:.7:..1_+--=-+:..:.:PROCESSOR PCB, OXIMETER 55N094 REV. B
PINS ON SOLDER SIDE FLUSH W.TH HEADER. PLACE iiEADER WITH THE
.as_
................1.---
3. J4. PIN 3 (AS INDICATED BY "X") TO BE CUT AT BOARD ASSEMSLY LEVEL
PINS TOWARD NEAREST EDGE OF BOARD AND 8END UPWARD APPROX.
lOCATII);
AND INSPECTED AT tIC LEVEL TO VERIFY.
45' , CUTTING THE PIN AS INDICATED BY THE 'X".
B. USING INDELIBLE WHITE INK OR PAINT, PLACE A "1" AFTER THE EXISTING NUMBER
_
LAST DESIGNATORS USED~ U25, Ri7, C42, PI, J5, Y1,.03, E2
MAKiN!l "AB1781", AS SHOWN.
0
(AWI41) AND
AND GREEN WIRE "0 PIN 3, AS SHOWN.
0
(AWI40) AT PI LOCATION, RED WIRE TO
IIliD£D
_1£1)
aEIIIl)
OlY,
INVlVO RESEARCH INC.
12601 Research Parkway
Orlando, Florida 32826
4r-lI/Ji'1ll' .........
7. REMOVE oB36 CONNECTOR (PAil) FROM PI LOCATION ANO DISCARD.
8. INSTALL WIRE ASSY
.. 111_
PART NO.
IRI.
,I"" 20.. 50V l5U CERAM.C
~IN 2
B
PER EeN NO. 3383 M
A
PER EeN #2511
REV.
DESCRIPTION
A-11
---
---==-~~-~--------------,-------
\
ro
10 OUT
P,
Z
C
<j
3
70H
1
601'io H2
12 r"fl'lD
jf.
LTA
f'lOC 2
"
~I
~
.1
pr
Vv
T
I),
Q1-. _ _
~
D"
06
i'
ct;
[6
\\
D1
---I~-"+-'_---~""""""~-;;i
H'lV
P;
(
7lftlTOOt.JW DEFcl'fT
, 5
'U'Il-'-~1'
CIJ.~
tI~"
~g511~
2._
;1. !1fC;I
pC. f!.ONTPr,t
, :~:::t
;
1
"
t V
1,4
',f
<!:UJ/T'"('J..!
-.--
~I£._------ ..
,'"
10
PuJ~. '«!,
"
P!IJI:,SI/J, (-
C+
JI
"N
()
.11'
(-i-1L
<t
~
---
,-
__:J I~~f~ .
...
---=,.j
'<0 ...
I
~----------~r~ ~it~~j
7
,
~~b
........<!"::L....
~"'4
~I/
"j,iI
f'!!:!. __
J2
n.1", A ,.,
rrD •
i
, !L
PJ=, • ~.ofL
1.~
I,
.118. __~ __ ._
111 _ _ __
1/10
>1~
II"
/1
Ii
J
]/1 __ _
,lit, __________
..< 1 ' - - - - - .ro)
________
~
wi
4-~(u) ""liZ
{JFjfl (IN:.[
TO OI'5f:f..fi'f 8olV'D
liilua -.
<;f'J ""I
iNf
NO
LOC.
""T't,
DESCRIPTION
""Q'1>
TOLERANCES
ftEO'MT
DRAWN
"'""-noilWfwl..
• pfW:ifted
.x"':t .030
.ill: ..
± .015
DEaJONED
HE)(T ASSEMIl\.,Y APPfW,)VE
CWO:, NO.
....""""
850154
o
A-13
RSOO
RP63A
RF97
"" --+--
RF96
RF95
RFa.
L43
RF92
R033
AB17Cl PARTS LIST
•
I
2
WIIITt:..
WHIT£.
SEE NOTE 9 AND 10
@)-
273N
6.811' 20'lIo 16V TANTAl..UM
I
.0088<1' 5'110 SOV POL YESlCR
------':.;...::=---i..-.~ ..- - . - - - - 2 ' III' 2'110 lOOV POLYESTER
-. -
-,-.---~
.2211'
-----
(REF.) AB17C ASSEMBLY NOTES
no !IOV POL YESn:R
...- -
--------SEE NOTE II
I. HQIiE, PRESS SPACERS ®INTO BOARD·DURING FINAL BOARD ASSEMIIL Y ON COMPONENT SIlE.
!
2. RESIS'IORS II THE f'OLlOIWING lOCATIONS _ T BE STI*FED
VIS8.£. (_1iC1 R54,R57.RSa.R78,A12. " RII3.
$0
TMAT THE TEMPEAATURI! co-£FFlCENT IS
3. CUT PIN J4-4 (1.$ INDICATED BY ·X") ARE TO BE CUT AT BOARD ASSElIIIILY LEVEL AND INSPECTED AT
QC LEVEL TO VERtFy.
4. IISTAl..L POT, AI5 WITH ITS ADJUSTING SCREW AWAY FROM VR2. LM317 AS StIOWN.
37 1.1II'2O'IIo!lOV Z!lU CERAMIC
t-_ _ _ _-t-_ _ _ _
t--_'_-l,OOpF 10% SOV ZSU.C-E!I-·-A-~-------l
_.,+_-==::=-_/-_'...
AB17Cl ASSEMBLY NOTES
7
5. RaIOVE CAPACITOR (CCO') AT e58 LOCATION AND IIISCARD.
6. INSTALL CAPACITOR PIN CC07 AT CI8 LOCATION.
7. REMOVE RESISTOR (R004) AT R69 LOCATION AND DISCARD.
.00111'
1~ !IOV XR7..:CER=Ac:;MIC='_ _ _ _- I
.0111' 10.. !IOV X7R CERAMIC
4
10pF ID'IIo 5DV Z!lU CERAMIC
2
21J1f
II
220uF -10'lI0+50'lI0 lev
--,
'-'"
. - - - - -..- - - - - 1
~D'IIo !IOV
Z!lU CERAMIC
AL~UtoI
8. INSTALL ~ESlSTOR PIN RF7S AT Re. LOCATION.
9. REMOVE PHONE JACKS (PAI20) AT PI, P2." P3 LOCATION" AND DISCARD.
10. INSTALL HEADER @(PAOe) AT P3 LOCATION, POSITIONED AS SHOWN, CUTTING THE THREE
lNVIVO RESEARCH INC.
CENTER PINS ON UNDERSIDE, FLUSH WITH HEADER. ON THE TOP SIDE. CUT THE
12601 Research Parlcway
, Orlando, Florida 32826
PIN AS INDICATED BY THE "X".
11. USING INDELIBLE WHITE INK OR PAINT. PLACE A "I" AFTER THE EXISTING
NUMBER MAKING "AlI7CI" AS SHOWN.
A
- - -... -
..
_
.. _ - - - - - - - - - - - - - - -
a:-..,....-I'Mll._
..
------t-""-t..::.L-'--1:'":'"_1Ilf
:':=-Illttr
--DESCRIPTION
___
I--+---------t-,--t-.,.-II=-~':'O
REV.
PER ECN #2513
______________________- L __~ _______
lE_lO ....
1OIItL
ASSEMBLY: AB17Cl
PCA, ANALOG. OXIMETER, 45DDMRI
__..,.__--r_ _ _ _ _ _---.-_-l
~-.Jlrw;J//IfIoj-!!!!!!+:QIf
..... _ .
2
1
i.!H£J
I
I.
_
110.
1940556
JlY,..
A
tnt
f'
.J. .
--- - ----../VV'
f~:"
t -
()II
L
-=~-.Jr~, . "'"
-
.• =u. --~~:Fi -- :::.-
--]-
--- -I-
----
HV
1-~:2
~ 1
I'E6
+12v
,
C'o
·r
".01
r
C,.,."lI?Li
vCl
{,.
..
:r
1-
f
q ~
Uli
4001'
, 4
9- ~ B
::-
VI
1,
-Iv,
va:
+12V
I If
/'11>
.'fF.
_
Rll
, .fVVc!-,
on I" oJto "
&
-/'J.~
~ 7
1.'2"~
'"II""
.1
('
II,
<~
f
+1211 Rfl:,
-=-
(."2.
-------~~:~~~I
IA
..
11 ' - -
100J2 ~
c:rr
,0,,"
r~~
~I'
;::24
O"Q,,- t;IP
,O!l-
t jl 4 If , 1
./ iCH
<..
~
10K
'1
,o~
-~-- ;~----retlu
GIlD
611
--
3'
6r/
""
-H-
~4
'----0
'"' -VI';
L
Ff"," I'P
34 P/N /:,88orJ
/.2
I'/fCj'j<j
,"
UfO
"
el
JI
L..:....---4--o-jf!~2""- __
2
L' 1
elO
~---------------+~~~~
C8
,0Ii'
,o~
-=I
ttlf6
_....
HO.
REO"D.
DESCRIPTION
MArL.
"O'MT
TOLERANCES
~
.. ou._...
,X=
-.....---------~-r"""'1r1
..
L-l.------------I-:::-t::;;1
LT.
liT
OATE
1: .osa
.xx: ± .on
.xxx: ~ .001
NEXT "SSEMBL Y APPAQVE
FRACTION.
..
OR
LeN" ± 12
IJ31
GREARA THAN
12 .. =
R£Y.
ANGLE8'" "2 OEQ
F"
E 1
o
± ,It.
A-15
I
J4
I
ISQ
fi2f" 470Sl
--,/VII'
112'~
..
,---,-
ju
.,,~
~~~1
J'!! (3<4 PIN)
II.
,II'
II!
f:7"i
NI/'l I£''E'{V'v"
U, ~ ~_!l!fp<, .Ilb
W
74HCf4
\-""
U51
•
U21
I~
-
II! .f1>
1C4'I
1.114-
;;:.J=="--~:~-:~~·l7')
~-------------+--~
1---+----'
2
1
i2!18
t\1
IL{)-'l.
==
IW'r OF
,NON-ISO
_tar;
~~~\\~\\\\\\\\\\\\\\\\
=.,
J2
( 14 PrJ)
+
'~7
I.-R " '
---,£0)
~"fQl)-)
I
II
I
£''it;
LvV\~
:,:
1%
,({,;
-4'
-!p f
Ftt'l
,J
\~-
f!7f.
-1'7V
~
i
~UL
7:i.:';
,ooK <:
1<14 ,,'
+
~~
_:1
_
.olp
.~7,'
fl>o¥l
ci>
.otp
F?
YrAf
J,
R!7
Iz
-4r;V
."y
c;:..
~
1411':'8
'i
4.~
1
1:
l'
ISO
074
C?3
,f-U
U32 '-;
l-I-j-<...,.!'O'+--,t'iu___
W
'.lK 5)0
I
B
W
037
038
NO
LOC.
1--I--···---------+-1r'1
UftIti:::I;::...
.KX
~
CHECK EO .. '" • 'PI
Of8KJNED
± .Ola
JfI(1( ~ ± .001
FRACltOfd; 12 IN
Oft LEu" ± 11»
Re;Q'MT
DRAWN
,x" ± .020
\'
MAT'L.
DESCRIPTION
REO'O.
TOLERANCES
NEXT ASII£Y8t,y APPfltQVI!O,
't.f;
~~Eftl4rlt!:
HA817C1
!~:r:·..:::r~=.':~~·~
O~.~Maw=- PCA, ANALOG, OXIMETER,
",.
thl:t it ".y not M,...
~.,~
WI
""o4ucad not' . _ , ... InfofI'MCOt
H
H UHd f« --KI"'*'O.,.,.itfWNt .ntfeft ~~ __
,.,...Ift
PO'"
""""ctl Lflborai«" ftc.
"""'0
DWtJ.MO.
1850155
....
o
A-16
NOTE 10
(2X)
NOTE 14 21
SHIELD
BLACK
ORANGE
~'38DIA'
/
NOTE 15
I
VIEW C-C
,19 DIA.
PLACE CORRUGATED TUBE
AGAINST BOSSES
DETAIL
E
--
(2X) NOTE 13
VIEW
CENTERED OVER
SHRINK TUBING
1I
BI
WIRING VIEW
\
"'
"-'
PIN NO.
1
3
4
5
6
7
8
Dr
--ORANGE
RED
- BLACK
::t.. WHITE
SHIELD
=--
B.-JL
-i.50 REF.
I.
RM12
NOTE 6b
=7==i
STRIP .125
WIRE
BLACK
SHIELD
RED
ORANGE
WHITE
NOTE 2c
ORANGE WIRE
RED WIRE
PIN END
B-B
I
L
FIBER OPTIC
END
I
r'
.......,j.50 REF.
2.00
".
STRIP &. TIN .06
(2X)
VIEW
DETAIL A
21
M088A
APE.KAPTON,.OO4 THK.,1/2" WD.RL
20
L828
LE TAG, ID/SER., DUAL FBR.OPT
19
MODOC
TAPE,CLSD.CL.FM.SS•. 12THK.x1"W
18
RM12
I RES, 42.2K. >.05W, I%, MF
17
W055 2.00 CABLE,SHD.2x2 COND.32 GA, SILCN
16
WT04
1.00 HEAT SHRINK, 3 32" 1.0. BLACK
15
WT02
1.00 HEAT SHRINK, 1 4" 1.0. BLACK
14
PAn
2 CONTACT, PIN, CRIMP, 24-20 AWG
13
H080
2 SPRING LATCH. "0" CONNECTOR
12
PC03
CLAMP, CAB. DB9, SHLD. ST EXT
11
PA76
CONN,DB9,SNAP-IN CNTCT,MTlL.SHL
10
DL23
LED ASSY,DUAL FlB-OPT,FNGR SNSR
9
AB60
PCA. MR F.O. SAT SNSR., OPTO III
8
HM15J
1 PILLOW, SILICON, PROBE w STOP
7
HM15H
PILLOW, SILICON, PROBE
6
HM15F
FINGER PROBE. TORSION SPRING
5__-+_H~M~15~D~2~~I+F~IN~G=ER~P~RO=B=E,~R~E~~~IN~E~R_T~0~P---4
HM15C2
1 FINGER PROBE, RETAINER PIN
3
HM15B3
1 FlNG. PROBE, BOT. HALF.BEIGE,MOD.
HM15A3
1 FING. PROBE. TOP HALF,BEIGE.MOD.
2
AC27 A
1 CAB.. DUAL FIB-OPT, FNGR SNSR
D-D
NOTES
FINGER PROBE END
SEE NOTE 11
1. PLACE FIBER OPTIC BLOCK AGAINST PLASTIC STOP AND GLUE IN PLACE WITH ADHESIVE, M052 &. ACTIVATOR, M019
20. PLACE ADHESIVE. M052 &. ACTIVATOR, M019 AROUND LIP TO SECURE CABLE, THEN PLACE ASSEMBLY IN FIXTURE WITH FRONT
OF FINGER PROBE AT 30' ANGLE
b. FILL REAR AREA OF FINGER PROBE WITH "EPO-TEK 302", M106. ALLOW TO DRY.
c. REMOVE BODOM OF RECESS IN PILLOW, HM15J (ITEM 8) AND SECURE PILLOW TO BODOM HALF, HM15B3 (iTEM 3) USING
RTV. MOOBA
3. PLACE TAPE, MOOOC (ITEM 20) AS SHOWN IN DETAIL E. PLACE IN TOP HALF. HM15A3 (ITEM 2) CENTERED AS SHOWN
4. PUNCH .10 DIA. HOLE IN BODOM CENTER OF RECESS OF PILLOW. HM15H (ITEM 7) AND INSERT SENSOR BLOCK THRU HOLE AS
SHOWN
5. SECURE SENSOR BLOCK TO TOP HALF. HM15A3 (ITEM 2) WITH ADHESIVE. M052 &. ACTIVATOR. M019 LOCATING ON PINS IN FINGER
PROBE
60. SECURE PILLOW, HM15H (ITEM 7) USING RTV. M008A
b. FILL PILLOW CUPS WITH AQUARIUM SEALANT. M065, AND SMOOTH SURFACE
7. ASSEMBLE TORSION SPRING. HM15F (iTEM 6) AND TOP &. BonOM ASSEMBLIES BY INSERTING PIN. HM15C2 (ITEM 4) THRU FINGER
~
PROBE HOlES
8. SECURE ASSEMBLY BY ADACHING RETAINER TOP, HM15D2 (ITEM 5) TO RETAINER PIN WITH ADHESIVE, M052 &. ACTIVATOR, M019
CONNECTOR END
9. REMOVE OUTER JACKET FROM CABLE. W055 (ITEM 17). PREPARE AS SHOWN IN DETAIL A. CRIMP &. SOLDER PINS TO 'PIN END" THEN
SOLDER WIRES (FIBER OPTIC END) TO LED ASSEMBLY (ITEM 10) AS SHOWN.
10. ALIGN REFLECTOR WITH FIBER OPTIC USE "EPO-TEK 302-. M106 TO SECURE REFLECTOR TO FIBER OPTIC BLOCK
11. ALIGN CENTERED AS SHOWN. USE "EPO- TEK 302", M106 TO SECURE PHOTODIODE TO FIBER OPTIC BLOCK
12. COVER BOTH FIBER OPTIC ENDS WITH SHRINK TUBING, WT02
13. INSERT PINS INTO CONNECTOR, PA217, PER VIEW B-B
14. PLACE TWO (2) .50 LONG STRIPS OF KAPTON TAPE, M088A, ON TOP &. BonOM BACKSHELLS AS SHOWN
15. ASSEMBLE BACKSHELL. PC03 (ITEM 12) AND SPRING LATCHES, H080 (iTEMS 13) TO CONNECTOR AND CABLE
I1EIi
I REf. [f.S.
PART III.
~
OTt.
2/JJ INVIVO RESEARCH
-- 1-'---:-1--::-:+,:-'=-13
:xx • i.Ol
BIBl
12601 RElIARCH PARKWAY
.xxx • i ,005
OOI.ANXl, FlffiIlA 32826
~=t======t=t=~N6.ES~~'t~ltr~~~ ~/.,'
A
PER ECH NO. 35<19
o"
11.£
INC.
n
~
CAB ASSY: #9397
DUAL FBR.OPT, FNGR SNSR
lEY.
197B427
A
A-17
HOUSING
PA20
WOOl
RED
TERMINAL
PT07 3 PLCS
--"I
I
4"
WHITE DOT
TERMINAL
PT15 2 PLCS
W005
BlACK
TERMINAL
PA124;:::,
W005
BLACK
HEAT SHRINK
9"
AC135-
~ER CABLE. OXIMETER
122 GAGE WFIE )
5 1/2"
HOUSNG
PA106
TERMINAL
PTOI 2 PLCS
TERMINAL
PT14
2 PLCS
AC 136 TRANSFORMER CABLE • OXIMETER
(18 GAGE WFIE )
HOUSING
PA20
TERMINAL
PT07 2 PLCS
KEY PLUG
PA12
."
HOUSING
PA20
WOOl
RED
W005
BLACK
TERMINAL
PT07 2 PLCS
KEY
KEY PLUG
PA12
AC141 -PAtlTER POWER CABLE. OXIMETER
(22 GAGE WIRE)
s""'. fflll"~
r------ ~:.:--L
TE_AL
'--..,..
...~""===========~PT11A
A W 11 0 - .GREEN / YELLOW. OXIVETER
(16 GAGE WRE )
REFER TO DWG. # 978216 FOR
CRNPNG NSTRUCTIONS .
r·_
_-1/1_
.-a __
E
0
PER ECN #2823
PER ECN '1218
B
PER ECN#IOIOM
t:..L;J ~l ~I 3-
A
ECN #968
<..'
REV.
4l'
-
.IJ,,. ,...
INVIVO RESEARCH INC.
12601 Research Parkway
JiI,fII
DESCR!PTION
A-18
~12 "-~ 12 Fles) /12Fles)
...;
11£0
L
I
c=::=
/
IlAC~
11£0
I~
~
BLACK
KEY
REO
BLACK
RED
¥EtlOWOOT
.1
S"± OVERAll
NOTES
1. USING YELLOW INDEUBl[ INK 00 PAIt'll, PUT A YEllOW DOT ON SlOE
AT PIN 1 AS SHOWt-l.
or CONNECTOR
5
11[1.1
'MJ22
IS"
PA25
1
K£Y PLUG (.156)
2
PT09
8
TERMINAl. R[CPT. REEL. 102100-6
1
PAI06
2
HOOSING, SR, 5 PIN (.156)
I REf
.xx •
DES.
~
....•
co
SR
PER [eN NO. 2532
SIP
8/90
BY
DATE
REV.
DESCRIPllON
-10/92
..
PART NO.
DIIAltl
t
()[~ED
,XXX: t
Ol[CKEO
ANGI..[S : t
A
MIlE. 18 GAGE 19 X 30 BlACK UL-143O
4
J(t£RNIC(S /I(
PER [CN NO. 33551.1
IS"
3
Uf({SS Sl'{CUD
B
'MJ17
APPI!(M]) "
WIRE. 18 GAGE 19 X 30 RID UL -1430
OTY.
9..P
1/9D
OESCRIPTION
lNVIVO RESEARCH ~
12601 Research Parkway
Orlando,
Florida 32826
~ rfl~
9..P
1/90
rj-/ ~~
nll.[
CABLE ASSEMBLY: AC216
IllS OOCUl(NTIS IDIrWHlAl NClI'I!(fI!(IIIlT NClIS THE sru
PR(J'[RTT If ItMl'O I{SUIlCH IICIl'rulAIEO (R~ 11 IS HOllO
4500
MRI POWER INTERCONNECT
II( PSClo:lO TO /,Ny PIIlI'f, RI:PROO\ICIJ) ~ ustO Ii AllY 01ll[J!
UANIO NIIDJI lRTlDI COONl f1 SolI) caFj,NY. tMIC
UAIITAIIS THE RIGlI ID CHAIIG: tHY 9'£CfltAlIONS U tHY
SCN.!
!KETtM;· NO.
lIIIE IlltWl PRO! HOlIC(.
00::. 10. I~
\:\
1 Of 1
C59B133
I
!I1£V'
B
BLACK
FED
::;...'
~--~".-""---
----
WIRE lENGTH TOlERANQE ... 1/2-
ATTACH AC 135 TO SPEAKER SCREW TERMINAL'S AS SHOWN .
APPL Y BLUE LOCTITE ON BACK SIDE OF SPEAKER SCREW
_.- "--.
--.------+----+--------------------------1
2
AC135
1
CAB SPEAKER, OXMETER
1
X004
1
SPEAKER, 2- X 3- 1/2W 23A05Za
lOCAllON
PART NO.
IJ
OTY.
DESCR/PllON
INVIVO RESEARCH IN~.
12601 Research Parkway
Orlando, Florida 32826
A-20
I' (2 PLCS)
2
I
~J\--
0
BLACK
~
h
~
[
~
50
5
J=U
(lAO(
~
0
,
,)
I
~
REO
3 4 SEE NOT[ 2
9
5.00'
OOIES;.
I. ASSEMBLE BA lTERY CUP ONIO BATlERY HOlDER
TOWARDS stACK (NEGATM:) SIDE.
2. PLACE OIOOC 5' FROM BATTERY TERMINAl AS!ilRE
THAT OIOOE PfURlTY IS POSlnONED AS SHOWN. CUT
!£ADS 1/4' ON BOlH ENDS Of 0100£. USE J-HOOf( lERUINATIOO
'M1[N ASSEI.IBUNG MIlE TO DlOilE.
Yt009
10'
8
PAI2
1
7
2
TERUINAL LOCKING CUP 87124-2
6
PTa7
PAl]
1
HOUSING, SR, 4 PIN (.IO)
5
YtOO5
10'
4
0007
I
3
2
WTtI
WT04
t"
HEAT SHRINK, 3/32" 1.0., BLACK
I
HBOI
I
HOlDER, BATTERY 400-2802-01-00-20
\--
ITEU / REf. DES.
IM!SS 5I'!.tJ1ll
Ta!RN«I:S AlII:
.xx ;
.xxx "
ANGLES'
B
PER [01 13382
SR
A
PER EeN 12543
SIP
REV.
OESCRIPTION
n GAll 7 X 30 REO UL-1429
9
22 GAll 7 X 30 BlACK UL-1429
DlOOE, SCHOTlKY, ERA84-009
HEAT SHRINK, 1/4' 1.0. CLEAR
PART NO.
gj'
:t
IISQjED
gj'
:t
:t
OlEOOD
7/'10
7/'10
INVIVO RESEARCH INC
12601 Research parkwa.::n~ Orlando, Florida 32826
tlS
'rfr.{ ri'<- Rill
lH!S IJOCI.M)If IS C(JQ)[N1W. AI(l PRtI'A(lI/lY AIfJ IS 1H£ Stl£
10/92 !'R(Jl(RTY It INIIW R1SEA11Ol NCOIfIW1IJ) (II). If IS NOT 10
8/90
BY OAlI
DESCRIPTION
OTY.
IlRAYIN
APPROVED
KEY PlUG (.10)
B£ mm to AllY PARTY, IlPRroxm IJ! ISD Ii ANY 0110
IIAHJ(R .lHWT IRIlDI CIJG)IT a: SAD £(lIPNIl'. tMW
SCAlf
IIANTAillS III[ IIIGff TO 0l1ltI ANY 9'EtfDlUtS At NIl'
11( M1IOJI PRm 1I01lt.
00: 11:1 10m!
ASSEMBLY: AS03A
UNIVERSAL BAHERY HOLDER
NONE
J~(£T
IllIG. NO.
1 Of 1
C94B568
IRCV'B
JI
PIN NO.
I
REO
ORANGE
P4
PIN NO.
PS
PIN NO.
WIRE COLOR
--
2
COAX SHIELD
5
--
2
3
3
4
5
6
7
8
YELLOW
SECll0N A-A
VIEW
9
--
B-B
(2X)~
o----CJ--
r
--
--
WIRING VIEW
<>
BLACK
RED
ORANGE
COAX
GREEN
YELLOW
---I
1
-2
--
4
3
--
6
GREEN (GND LUG)
KEY
0
P5
0
P4
0
.38 (7X)
TWIST REO &: ORANGE ¥dRES
APPROX. 1 TURN PER INCH (REf.)
BOTTOM VIEW
9
B
7
6
5
4
NOTE
t. H079 (ITEM 5) IS SUPPLIED AS A KIT OF TWO (2) EACH
3
2
1101/ RU. D£S.
...m:=.n • t
.xxx • t
1----1--------+--+--:-:-:-:-1 ANGl£S •
".
I
N
N
WTOS
WT04
PA202
NS81
H079
Ae223A
AC224
PA216
HM23A
.75
2.62
1
2
HEAT SHRINK, j 16 1.0., BLACK
HEAT SHRINK. j 32 1.0., BLACK
GASKET, EMI RfI, 9 PIN CONNECTOR
SCB, 4-40 x 6 16 LG. FlHMS-ZINC
LATCH BLOCK, CONN, .090 PANEL
CAB. ASSY, LED DRIVE, 4500 MRI, OX!
CAB. ASSY, COAX DRIVE. 4500 MRI, OXI
CONN, DB9 RCPTCL, SOLDERCUP, DE FLTR
ADAPTER BOX, DL.f6R. OPTIC, MRI OX
PMI NO.
Of'(
D£SCIlI'IlON
11R.11H
Il~
QlY 2/2/91
\\1NTER PARK, flORIOA 32792
CI((l(f])
;I:
INVIVO RESEARCH INC.
GIle 1/ 3 4420 I.IElRlC DRIVE SUITE A
~
II'I'I!O\l1)
;":'Y-t:'710:-';:::13l11SIIIXOOIGCOnIUIAl""_ MUI!( m:
I-..;:,CC4:...:PE:;.:R..;:,E:.:::C:.,;..N.c,;N,;:.:O'c...,;3;-::5,;:.:62::--EH'
.. 9' 1'II(fIIt!Y11_I£!UIO._ItDI1I>~lIlSlIOIlII
6 :-':'::-':'-I"usam 10 lH! '1Il1Y,1I[-..:tD (IlII![U lH! 01l4OI
~BC4.:..:PE::.:.:R...!E:.:::C::..N. :,:N,;:.:O.c. .,3;::.o:5c::;26:.---t=':H.;,.:.Y-t'
A PER ECN NO. 3536
SR 5 93 =.s1~1IO!':'':=M~r~:a:.~
':.
~R(.:.....V.+-':;;.:....:::.::D[.:..:.5C-R.:..IPT-,O:..;:N~---1C-8-Y+-'"D-AIf-;:::~
-:-I£lI.O.D (.oj) _ _
~
h
SUB ASSEMBLY 6A5127
JeT BOX MRI DUAL F. O.
:i= NONE H£I1 '
$CH.[
.
~
•
C9 4C62 4
IlV
C
NOT SHOWN
5
BOX. 11.25 )( 8.75 )( 5,00
NOT SHO\\t>l
4
PROCEDURE. INSTL.. 4500MRIjSFWR,
NOT SHOWN
3
PROM SET. OXIMETER. 4500IARI
2
NOTES
CAB, ASSY, DUAL Fl8, OPT, FNGR. SNSR.
JeT. BOX SUBASSY. IARI DUAL F.O.
ASI27
1. DRAWING FOR AC206 8HORE REDESIGN WAS C59D123, REV. C
IIEM / REF. DES.
i.'l[SS OIl£l'U Sl'£CHO
IflERAl«1S AI!(
.lex = t .XXX= t - -
ANGIIS : t -
PARI NO,
ORA~
CHY
DESKHD
GRe
INVIVO RESEARCH INC.
I-------I---rrl-=...-t
MOOD
Al'I'R!M:D
DESCRIPTION
alY.
12601 RESEARCH PARKWAY
ORLANDO, FLORIDA 32826
+ ___-iIUSa.caO 10 ANrPARl'(, R(I>I!(uuD M U5ID III NIl' om
.....
A
N
REV
W~
PER EeN NO. 3543
CHY 5/19/93 IIA1HR IIlIDJf lRIl1DC C!tlS(NI fJ SAID ctWANY. M1iO
_ _ _ _ _ _ _ _"'""_-+-'-'--illANllIIS II[ AlGil 10 CHAN(I ANY SPECflCAlI!Jf.i AT ANY
DESCRIPnON
BY
DATE
!l.lElIIlIDJlPOOIIIOOCL
A-\
~
It'1 ~::----------------i
,=====~-:-:::-:==,,:,~~=-,7":::-:llllt£
JllIS~NIlSmmNnAlM)I'fm(IARyM)ISII[SOC[
PROC. &. INSTR.:
Im'£RlY fJ 1H\I\1lI«SEAROIIHCCR'IJIAltO (RI~ illS 1101 ro
,..
•
IlOC.lIO.l0AIXXI·1
HAC206
CAB. ASSY., SNSR, MRI DUAL FIB. OPT
SCALE
NONE
DIIt, NO.
.
C97B432
RtV,
A
_ _ _ _ _ _ _ _ _ _ _ _ _ _ _ _ _ _~__- L_ _ _ _ _ _ _ _ _ _ _~"""~_ _ _~~~~=rn='~c=PRrr~lx~AA~[~R[~OO=crO~C~AD~O~S,~OO~NO~TX~A~l[~I_ _ _L -_ _ _L-._ _ _ _ _ _ _ _ _J-~
/'ISE'
"B125 155N148 REV. A " \
(F ARSIDE) REF.
/
NOlE'
\
J> 0,
/
2
/
SEE NOTE :5
J~AAii5iiAiiB5~AO~y+--;V.P~1It-.:-m~
~
g<5
r;:::::=11:::=:::::'
00
0000
,
l-'-~L·-"*-,y
1111
1
e e ~~
J51. .
··X
v .
::::- i5
1
J4i1J( III
Jl~ \~~J"
:
~
ii
C2.
CUT PINS R U S H V
1111
II I I I I I
AB50
3
I
AB50A
I~
I
4
01
SEE NOTE 2
5
SEE NOTE 2
6
7
1
1
1
1
1
J3
NS26
HQ02
HI01
HIO:5
NOO2
PA08
PADS
PA121
C2
Cl
01
Pl.P2
I
eT1S
CC12
IR12
PA200
9125
1
1
6
5
4
'2
J4
J5
J3
NOTES:
1. WITH PERMANENT MARKER, CROSS OUT THE
ASS'V. NUMBER THAT IS !iQl BEING BUILT,
THEN ADD CURRENT ASS"!'. REV. LETTER
P2
1
ROlO
PA08
PAOS
PA121
PA200
8125
DETAIL A
:5
J4
ROT ATED 180'
J5
1
1
1
1
1
1
RES. 2.7 OHM .25W 5% CF
HEADER. UNSHR, SR, J PIN, (.10
HEADER. UNSHR. SR. 5 PIN, (,10)
HEADER. UNSHR. SR. 5 PIN .156)
CONN. RePT. 089. RA. SlDRTAIL,OA
PCB. MRI/C02 SAT POWER INT.
lOCAlDf
2. DB9 CONNECTORS PI AND P2 ARE INSTALLED
ON SOLDER SIDE
PARI NO.
::.as"":
3. FOR AB50A VIEW ABOVE NOTE THAT THERE IS ml
4. ROTATE H002. (ITEM 6). SLIGHTLY TO CLEAR J4
1
2
1
CAP., 10uf, ±20%, 35V. TANT. RAD.
CAP., .1uF, :1:20';;, 50V, Z5U, CER
REGULATOR, +15V LM7815CT
CONN, RCPT. DB9. RA. SLDRTAIL.DA
PCB. MRI/C02 SAT POWER INT.
A850 MRI C02 PWR INT.
A850A MRI SAT PWR INT. (STAND ALONE)
REF. DESIGNATOR SILKSCREENED ON THE BOARD FOR (RI)
RESISTOR, ITE~ 2 ON BOM. THIS RESISTOR IS TO BE INSTALLED
ON COMPONENT SIDE, USING PADS 1 AND 3 (AS SHOWN) AT
01 LOCATION
1
1
1
64-40 X 3/8 LG. PHMS. ZN
HEAT SINK, LOW PRFL., T05/220
INSULA TOR, THERM. CONDUCTIVE
BUSHING. SHLDR., NYLON, .120 1.0.
f/4-40 HEX NUT, ZN
HEADER, UNSHR. SR, 3 PIN. (.10)
HEADER, UNSHR. SR, 5 PIN, (.10)
HEADER, UNSHR. SR, 5 PIN (., 56)
.n •
c peR eCH#:'40.3i~ II/q1
.m.
AN(l[S.
t -t -t
-=
"'Alii
fGQ[II
tlf.MD
-
QIY.
SIP 3/97
OCSOl'lDf
INVIVO RESEARCH INC,
H2O t.l£TRlC ORIVE SUllE A
~P9fi. .... YtlNl!:R PARK, flORIDA 32792
SIP 3/t2
1tF~
111£
B PER ECN .1.13350 GRBIO/I~/O') HSDOClIOI II_NlJ--'lRT1IfIf5K$II
t-=-"+=::-.c:-=---'"~·"-::--I=,,,t.7/,,",-:I/.":"i:::'~::' =~ ~I~
k -_ _ _ _ _ _ _ _ _ _ _ _ _ _ _ _ _ _ _ _ _ _ _ _ _ _ _ _ _ _ _ _ _ _ _ _ _ _ _ _ _ _ _ _ _ _ _ _ _ _ _ _ _ _~
A
REV.
PER ECN #3317
O[SCRIPIION
s,:o:.
GRe 8,12,92W''''IUIQn'f1JIaKiJlI0' SllDIDI'''''_ .n..
BY
DAf[
_lIIl1DfllOOIMOlllltftCftAIDtIS"""......
lIU"",,,_"'oa,
""' .. -
~h
~
PCA' A850/A850A
.
MRI
SAT/C02 POWER IN 1.
I~SKr'
11
- 110.
-2:' I Of 1
C94C586
!ll/(V.
.c.
~
0
0 ,..,
0
0
9
4
8
3
'"
7
2
VA
6
1
"(l
~'-'
r!L
5
~~
v
'"'~
9
4
,...,
"'fI.
I
"'~
'"
'sPsR
.;
GND
~
~
CR1
J
(O~
A1
~ IN
OUT
2
3
+.-l
T
GND
2
3
4
C2
KEY-{
lour
5
5P SR
GND
GND
GND
.;
GNO
1
GND
nHJ I RH. DES.
muss SP(CIfIl)
AB50
l()'!RAHC[S
IJl{
.xx :; ±
.xxx = ±
ANGl£S
B PE.~ ECtJ ~.3~O;
A
I
'3Ps'R
TO-220
~~F
1
2
KEY-C 3
01
T
N
U1
..r
j
~
»
2
3
5
8
3
7
2
6
"'()
f
KEY-( 4
5
~
~
1
1
REV.
PER EeN #3360
DESCRIPTION
~ II/q2
~
l::
PART NO.
ORAYIl
SLP 2/92
O£SlGN!D
RES 2/92
ClI£CKED
~ ~.J.. WINTER PARK, FLORIDA 32792
~ "1'1(, nllE
APPRO'4:0
llilS IlOCIIENT IS COIrOOlli1/. AMlI'RCfRfTARY NllIS
ll\[
SIll
I'R{l'ERl'I a tl~W IlSUilOi 1IDH'00A1£O (R~ IT IS NOr 10
II DISClOSED TO Nfj PAlm. R[PROOIJIID aI tr.lO tl Nf( om
@l!R~ 10/92 Ii.\lHR IllDJl ~llDi ~11J SAil WAIl¥. "~W
BY DATE
O[SCRIPllOH
ON.
1_
\iAliT.Itt.i 1\£ ItCHI TO Cli/la lilY SPECFICADiS AT ANY
III 1I!1IlOJ1 f'RII]l HOIIQ,
DOC. M1
INVlVO RESEARCH INC.
4420 METRIC DRIVE SUITE A
..A..
SCHEMATIC: AB50/AB50A
MRI SAT/C02 POWER INT. PCA
SCAlE
NONE
I
SH££1
1 or 2
lv.<;· No'
C85B167
IREe,
~
()'"'
A
()
0
9
8
.3
'"
1
KEY-C 4
5
5P"sR
~
0
,.....
()
'-',.....
0
'"
"'()
~.
2
.3
7
~r.
~
1
I
4
2
6
()'"'
~
5
GND
~
5
9
4
pRl
J
(O~
8
.3
7
1
2
j
2
6
KEY-C .3
'wsR
Rl
1
.A
~
2.7 OHM
-
.r 1
Ql
T
~
- ' - Cl
(OMm
.3
+~
(OMIT)
T
2
GND
GND
2
.3
4
KEY-C 5
C2
'5PsR
(OMIT)
GN~
GND
GND
11[1.1
AB50A
I REF. DES.
lHlSS !l{(ft])
JaWll!tS In
.xx
OCSlQ£!)
i
D£CKtO
=t
~
N'PR(Ml)
ff(J.f "
.xxx •
ANGlES
INVIVO RESEARCH INC.
RE~~ 4410 MHRt DRII1 SUIl[ A ~
SLP12/92
±
m
DESCRPDal
OlY.
PART NO.
ORA'/tH
YflNTER PARK, FLORIDA 32792
.
BTU:
SCHEM ATIC: A850 / A850A
MRI SAT I CO 2 PO WER IN T. PC A
IllS IXrut(NI
IS COOIlNlLIl H:O!Pt1IAlID
AIIlI'ROl'llfJUY
H tosru
PRa'Ull't
rr tMWlIlSUJl[H
(IRS). /II)
II ISISIIOT
II fJSO.m 10 IKr PHUY, I(1'ROOUC[D U! m II IKr om
vAltO _man \IlI1TOi cm.i£Nll'1 S1.Il ClN'Mty. II'IIWl
!'tM£
ISlIm
UAH1/1lS lit: ROIl 10 CllIIa ANY ~OOCAlKJIH11Kr
mUll«Xlll'R1(Jl 11011([.
!XX. NO, 10m
NONE 2
or
IO'M:. NO.
2
C858167
jB
REV.
APPENDIX B: SE1TING mE INTERFACE OPTIONS
This appendix provides instructions for changing the Analog and RS-232 interface options.
B.
SETI1NG mE INTERFACE OPTIONS
The Analog menu is used to set the voltages for the rear-panel analog outputs. The RS-232 menu
is used to set the options for the rear-panel I/O Port.
.' :"'. <;:<y:,:~:"
,:-,::.' ::-::::-,;:;/:::'::': ::':
These ··oplions .·Ol)ly .needto1>y~et.. itt1t!'y . . pave .• p~ .
.·.·changed ··.inadverentJy.bYtheoperatol'.'t'he ·fa~tdfy·
d~fau1t ~ett1I}g~are~qui~1I
()petaii6ri....
B.1
fdrcotreqt\4SpO ···~I
<
Setting die Analog Options
To change the Analog Options, enter the Analog Menu by pressing the OPTIONS control three
times. The SYSTEM STATUS display will indicate Analog.
To exit the Analog Menu, press the CANCEL control.
B.l.l
Setting Analog Output Volts. Perform the following to set Analog Output Volts:
a.
Press and release the OPTIONS control three times.
b.
Ensure that the SYSTEM STATUS display indicates Analog.
c.
Press one of the Arrow keys.
d.
Ensure that the SYSTEM STATUS display indicates Volt=xx V.
e.
"Volt" selects the output voltage for the analog waveform sent to the 3100 MRI and
must always be set to 1V for correct 4500 MRI operation.
f.
Press and release the CANCEL control to exit.
B.l.2 Sending a Calibration Signal. Perform the following to send a Calibration Signal:
a.
Press and release the OPTIONS control three times.
b.
Ensure that the SYSTEM STATUS display indicates Analog.
c.
Press one of the Arrow keys.
B-1
d.
Ensure that the SYSTEM STATUS display indicates Volt=xxV.
e.
Press and release the OPTIONS controL
f.
Observe that the SYSTEM STATUS display indicates Sa02 xxx. This feature has
no effect because it is not used on the 4500 MRI.
g.
Press and release the OPTIONS controL
h.
Observe that the SYSTEM STATUS display indicates Rate xxx. This feature has no
effect because it is not used on the 4500 MRI.
1.
Press and release the OPTIONS control.
J.
Ensure that the SYSTEM STATUS display indicates Pulse xx.
k.
Use the Arrow keys to set the percentage of "full scale" voltage for the Pulse/Sync
analog output.
l.
Press and release the CANCEL control to exit.
·WheIlyou • . exit.·froffi.these •.·calibratjon··.·sup;.m¢IlUs.·.·.the
. outP~tsretllritto·theirn6nnar;.':f1.ilt ..sc~~UYHltages ..
•Ea¢h()fthes~tnodesiitne()utafter60·.seconds,or may··
.beexitedbypressingtheCANCELcontroL .
R.1.3 Pulse Sync Output. The rear-panel Pulse/Sync analog output can be set to send either the
pulse waveform (the normal default) or a pulse-detect strobe. This feature must always set to PR
WAVE for the 4500 MRL
D.2
Setting the RS-232 Protocol Options
In addition to basic configuration of the I/O Port (baud rate, stop bits, etc., discussed later in this
section) four protocols or "languages" are available.
To change the Protocol Options, enter the RS-232 Menu by pressing the OPTIONS control four
times. The SYSTEM STATUS display will indicate RS-232.
To exit the RS-232 Menu, press the CANCEL controL
B-2
NtlfE
<·.···· .
·The.....pl>tioJj.QnIY.n~;.;~~1:.~f.,\~:c~~i:.ha\t~~~.
V •.
~banged>il1~dyereIltly~ythe .·QPelatQ(~TlJe ·fa,(;\9fy .
defallItsettings~e .· • . ~q..i~d<for·cQtreci4500lvfiu
. Qperation/ .
. ..
.. . .. . . . .
B.2.1
Protocol Selection. Perform the following to change any or the four protocols:
a.
Press and release the OPTIONS control four times.
b.
Ensure that SYSTEM STATUS display indicates RS-232.
c.
Press the UP or DOWN Arrow key to enter the RS-232 menu.
d.
Use the Arrow keys to toggle through the protocol selections.
(1)
(2)
(3)
(4)
e.
B.3
INVIVO: Sets I/O port to Invivo serial communication protocoL This option
must be seleded for 4500 MRL
Ohmeda: Sets the I/O port to transmit and receive the Ohmeda 3700 serial
protocol.
Nellcor 1: Sets the I/O port to emulate a Nell cor pulse oximeter with N8000
or N9000 serial communications.
Nellcor 2: Sets the I/O port to emulate the Nellcor (N- 100) fiberoptic
protocol. For interface of waveform and numeric pulse and saturation data to
external devices (e.g., SaraCap).
Press and release the CANCEL control to exit.
Setting 1he RS-232 Communications Options
To change the Communication Options, enter the RS-232 Menu by pressing the OPTIONS control
four times. The SYSTEM STATUS dispJay will indicate RS-232.
To exit the RS-232 Menu, press the CANCEL control.
B-3
B.3.l
B.3.2
B.3.3
Baud Rate Selection. Perform the following to change the Baud Rate Selection:
a.
Press and release the OPTIONS control four times.
b.
Ensure that the SYSTEM STATUS display indicates RS·232.
c.
Press the UP or DOWN Arrow key to enter the RS-232 menu.
d.
Press and release the OPTIONS control.
e.
Ensure that the SYSTEM STATUS display indicates Baudxxxx.
f.
Use the Arrow keys until the setting is 9600 Baud.
g.
Press and release the CANCEL control to exit.
Stop Bits Selection. Perform the following to change the Stop Bits Selection:
a.
Press and release the OPTIONS control four times.
b.
Ensure that the SYSTEM STATUS display indicates RS-232.
c.
Press the UP or DOWN Arrow key to enter the RS-232 menu.
d.
Press and release the OPTIONS control two times.
e.
Ensure that the SYSTEM STATUS display indicates Stop Bits = xxx.
f.
Use the Arrow keys until the setting is 2 stop bits.
g.
Press and release the CANCEL control to exit.
Parity Selection. Perform the following to change the Parity Selection:
a.
Press and release the OPTIONS control four times.
b.
Ensure that the SYSTEM STATUS display indicates RS·232.
c.
Press the UP or DOWN Arrow key to enter the RS-232 menu.
d.
Press and release the OPTIONS control three times.
e.
Ensure that the SYSTEM STATUS display indicates Par-xxx.
g.
Use the Arrow keys until the setting is OFF.
h.
Press and release the CANCEL control to exit.
B-4
B.3.4 Character Length Selection. Perform the following to change the Character Length
Selection:
a.
Press and release the OPTIONS control four times.
b.
Ensure that the SYSTEM STATUS display indicates RS-232.
c.
Press the UP or DOWN Arrow key to enter the RS-232 menu.
d.
Press and release the OPTIONS control four times.
e.
Ensure that the SYSTEM STATUS display indicates Dlamcter Length x.
f.
Use the Arrow keys until the setting is 8.
g.
Press and release the CANCEL control to exit.
B.4
110 Connection Pinouts. The following provides the signal to pin relationship for both
models of the 4500 MRI.
B.4.1
Model 3109-1 System Ready Pulse Oximeter.
Pin Number
Signal
11,12,13
+14 to 28 VDC Input
14,15,16
Ground (Power)
9
RS232 Rx
10
RS232 Tx
8
Pulse Pleth + Waveform
6
Pulse Pleth - Waveform
B.4.2 Model 3109-3 Stand Alone Pulse Oximeter.
Pin Number
4,5
6,7,8
Signal
+ 14 to 28 VDC Input
Ground
3
RS232 Rx
2
RS232 Tx
9
Pulse Pleth + Waveform
1
Pulse Gate +
B-5
APPENDIX C: SOFIWARE REVISIONS
This appendix provides software revision historical information.
C.
SOFIWARE REVISION
C.I
Obtaining SelVice
Before calling Invivo Customer Service or Technical Service for assistance with a problem with
your oximeter, your need the serial number of your monitor and the software revision number. The
serial number is located on the bottom of the monitor. To obtain the software revision number, press
the OPTIONS key seven times, and the SYSTEM STATUS display will indicate Rev.MxXX (where
XX is the revision number).
C.2
Software Revision History
(1)
MXOl:
Initial Release.
(2)
MX02:
Improved pulse detection and sensitivity.
(3)
MX03:
Improved Sa0 2 Filter (2,6,12) operation.
(4)
MX04:
Automatic reset of A to D bad detection, when caused by external
interference.
(5)
MX05:
Make pulse bar correspond with beep tone.
(6)
MX06:
Add stand-alone features for 3109-3, Low Batt warning and
automatic cutoff.
(7)
MX07:
Remove intermittent spikes on waveform output.
(8)
MX08:
Add Pulse tone modulation, save wave/sync selection, and remove
display/menu for real time clock.
(9)
MX09:
Provides improved performance with new Sa0 2 sensor.
C-l