1
replacement or timing adjustment
MAY BE necessary.
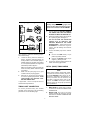
Fig. 3 Inductive Pickup Clip
Connection
INDUCTIVE
PICKUP
#1 SPARK
PLUG WIRE
8.
Press the Flash Switch. The timing light
will stop flashing.
9.
Turn the ignition off and disconnect the
timing light from the engine. BE SURE to
reconnect any vacuum hoses, etc., which
were disconnected during the timing check.
ENGINE
NOTE
If the timing light fails to operate or operates
erratically, refer to TROUBLESHOOTING to
determine the most likely cause of the problem.
3.
Start and run the engine until it reaches its
normal operating temperature.
4.
Adjust the engine's idle speed, if necessary,
to conform to manufacturer's specifications:
5.
MAKE SURE the timing light Advance
Display shows 0 (zero) degrees. Press the
Zeroing Switch if necessary to obtain 0
degree indication.
6.
Adjust the timing light barrel, as needed,
to adequately light the timing marks.
7.
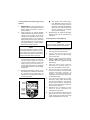
Note the position of the rotating timing
mark in relation to the reference pointer.
See Figure 4.
■
■
TIMING ADJUSTMENT
Refer to your vehicle's service manual for the
proper procedures to adjust engine timing. DO
NOT ATTEMPT TO ADJUST ENGINE TIMING
WITHOUT
THE
MANUFACTURER'S
PROCEDURES OR SPECIFICATIONS.
ADVANCE TIMING CONTROL
CHECKS
Advance and retard timing controls ensure that
ignition occurs at the proper time during the
compression stroke. These controls include:
Compare the readings obtained in
step 7 with the manufacturer's
specifications for timing. If the
readings are within the specified
tolerance (typically ±2°), ignition
timing is correct.
■
mechanical advance
■
vacuum advance
■
vacuum retard
■
electronic advance
■
electronic retard
■ electronic advance /retard
Depending on make and model, a vehicle may be
equipped with a single timing control device, or
two or more devices may be used in combination.
If the readings are not within the
manufacturer's specifications, parts
Fig. 4. Reading Timing Marks
NOTE
ROTATING
TIMING MARKS
Advance timing test procedures vary widely
from vehicle to vehicle. The following paragraphs provide general test procedures for
checking mechanical/centrifugal advance and
vacuum advance. ALWAYS make sure initial
timing and dwell are correct before checking
advance timing. ALWAYS refer to the service
manual for the vehicle under test to obtain the
proper timing procedures and specifications.
OBSERVE ALL SAFETY PRECAUTIONS.
REFERENCE
POINTERS
6