1
REPLACEMENT OF IGNITION SWITCH (Customer Sold Units/Dealer Demo Units- Only If
Inspection Shows Incorrect Routing And Unit Has Been Ridden)
New Ignition Switch Disassembly
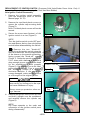
1. Remove the ignition switch assembly
from the motorcycle (refer to Service
Manual page 1H-12).
2. Remove the two black plastic covers to
access the cylinder cap mounting bolts
(Figure 5).
Note: The black plastic covers will not be
reused.
3. Secure the mount area (bottom) of the
ignition switch in a vise (Figure 6).
Figure 5
m
o
c
.
e
NOTE:
Turn the ignition switch to the OFF position and remove the key from the ignition
switch before disassembling the switch.
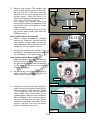
\ Remove the two "break-off"
screws from the ignition switch using the
special screwdriver. Set the stepped end
of the sleeve on the special screwdriver
facing toward the "break-off" screws
(Figure 7). Strike the special screwdriver
5 to 7 times with a hammer to produce a
deep enough groove on the screw head
for the screwdriver to work properly
(Figure 6). Pay attention not to hit other
parts with the hammer. Turn to remove
the "break-off" screws in a counterclockwise direction. If the groove becomes damaged, make another groove
at a 90o angle to the original groove.
n
o
Z
a
us
g
r
o
.
d
b
a
n
y
a
l
a
e
H
k
i
B
Figure 6
Figure 7
When striking an object with a hammer
parts can fly up, hitting you in the eyes
and cause blindness or injury.
Cylinder
Cap
Always wear eye protection when using a hammer.
4. Remove the ignition switch from the vise
and hold it upright over the workbench
and carefully remove the cylinder cap
(Figure 8).
NOTE:
Pay close attention to the order and
orientation of the ignition switch parts
during disassembly.
Figure 8
- 6/12-