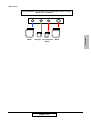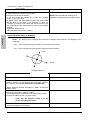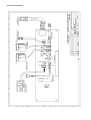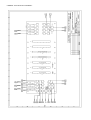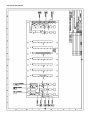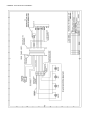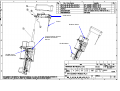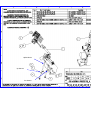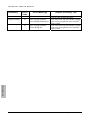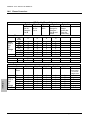
1
Service Manual (Draft Version) Clinical Chemistry Analyzer Model: CHEMIX-800 Version: Draft Version I CHEMIX-800 REVISION RECORD The latest edition supercedes any preceding ones. If you have old editions, discard them to avoid possible confusion. REV 0 DATE May 05, 2005 REVISION HIGHLIGHT Published as Technical Information. REVISION RECORD (2) CHEMIX-800 THIS PAGE IS INTENTIONALLY LEFT BLANK. REVISION RECORD (2) CHEMIX-800 COPYRIGHT OF THIS MANUAL Copyright of this document belongs to TRANSASIA BIOMEDICALS LTD. No part of this document may be reproduced, transmitted, transcribed, stored in any retrieval system, or translated into any language by any means, electronic or mechanical, including photocopying and recording, for any purpose other than the purchaser's personal use without the express written permission of TRANSASIA BIOMEDICALS LTD. TRADEMARKS / COPYRIGHT OF THIS MANUAL (1) CHEMIX-800 THIS PAGE IS INTENTIONALLY LEFT BLANK. TRADEMARKS / COPYRIGHT OF THIS MANUAL (2) CHEMIX-800 FOREWORD This clinical chemistry analyzer consists of main analyzer including software; and software on operational PC. And the analyzer is used with operational PC and printer and can interact with the host computer. With the inclusion of Barcode Readers for both Samples and Reagents, the control of Samples and Reagents becomes fully automatic, hence making the entire process of analysis automatic. Manufacturer of the Analyzer TRANSASIA BIO-MEDICALS LTD. 8, Transasia House, Chandivali studio road, Mumbai-400076, INDIA Production Facility TRANSASIA BIOMEDICALS LTD. SDF VI, PHASE I, UNIT NO.162, SEEPZ, ANDHERI-EAST, MUMBAI-400096, INDIA FOREWORDS (1) CHEMIX-800 THIS PAGE IS INTENTIONALLY LEFT BLANK. FOREWORDS (2) CHEMIX-800 SAFETY WARNINGS AND NOTICES Meanings of warning symbols WARNING ABOUT: Biohazard Electric shock High temperature Injury Action to be taken as directed by the “OPERATOR’S MANUAL” SAFTY WARNINGS (1) CHEMIX-800 WARNING LABELS The following warning labels are affixed on the places that are the potentially hazardous. WARNING ABOUT: PLACES: On the 4-piece Top Plate WARNING POTENTIAL HAND EXPOSURE TO PROBE. KEEP HANDS AWAY. WARNING ABOUT: PLACES: On the Rear Panel CAUTION DO NOT OPERATE MACHINE WITH COVER OPEN DO NOT TOUCH MOVING PARTS WHEN IN OPERATION-PERSONNEL INJURY MAY RESULT DUE TO PROBE ARM MOVEMENT TO REDUCE DAMAGE TO THE INSTRUMENT, DO NOT SPILL SAMPLE OR REAGENT ON THE MACHINE WARNING ABOUT: PLACES: WARNING THE TANK MATERIAL CONTAINS HAZARDOUS On the Biohazardows waste can (10 Lt.) On the Waste Can (20 Lt) SAFTY WARNINGS (2) CHEMIX-800 WARNING ABOUT: WASTE PLACES: On Waste Can (20 Lt) PLACES: WARNING ABOUT: CLEANING SOLUTION On Cleaning Solution Can (10 Lt) PLACES: WARNING ABOUT: DI WATER On DI water Can (20 Lt.) SAFTY WARNINGS (3) CHEMIX-800 WARNING FOR SAFE USE During operation, do not touch auto sampler unit, reagent container unit, nozzles and any other moving mechanical parts in the analyzer. During operation, shut cover all the time. Never touch patients' samples with bare hands to prevent operator from possible infection. Handle SPT nozzle, RPT nozzle, reaction cells, wash nozzles, waste nozzles and MIX paddle in the same way. Wear medical rubber gloves to keep skin from direct contact with patients' samples. Give special consideration to keep skin and mucous membrane from contact with reagents to prevent operator from possible infection. Wear medical rubber gloves, goggles, etc. to keep skin and mucous membrane from contact with reagents. Read the statements of virtues that came with reagents prior to their use. The contact with the wastes such as used reaction cells and solutions may cause infection. Handle them with gloved hands without exception. Follow the national or local laws and rules when they are thrown out. There are two kinds of liquid wastes drained from this analyzer, i.e. high- and low-concentrated wastes. The access to the conductive parts within the analyzer may cause serious electric shock. When removing parts, make sure to shut off the power supply. Leave any maintenance and repair of electrical parts inside the equipment to a qualified service personnel. Never leave reagent bottles on the working table (upper surface inside the analyzer). Careless handling of reagent bottles may cause tumble and leak. Do not make a modification to the analyzer. Exchange the halogen lamp for a new one after a lapse of 30 minutes since the power switch of the analyzer is turned off to avoid danger of burns. SAFTY WARNINGS (4) CHEMIX-800 NOTICES FOR USE (SAFETY AND PREVENTION AGAINST DANGER) The user is requested to read this instruction before he uses the analyzer for the first time and becomes acquainted with how to operate the analyzer. 1. Only qualified personnel should use the analyzer. 2. The following precautions should be taken when the analyzer is installed: 3. 1 Keep the analyzer out of the rain and any other water splash. 2 Avoid areas that are adversely affected by atmospheric pressure, temperature, humidity, ventilation, sunlight, dust, air containing salt or sulfur, etc. 3 Pay attention to inclination, vibration, shock (including shock during transportation), etc. 4 Once the analyzer is positioned at customer end then adjust the leveling bolts such that the castor wheels are just lifted above the ground level. Use level indicator for ensuring the machine is leveled properly. 5 Do not install the analyzer at the place adjacent to the storage room of chemicals or the place where any gas is likely to be generated. 6 Pay attention to frequency, voltage and permissible current (or power consumption). 7 Make sure that the analyzer is correctly and well grounded. 8 Connect the analyzer to the operational PC using accompanying LAN cable. When the other cable is used, this may cause the analyzer to suffer from disturbing noise, exert an adverse effect on its surroundings or get incorrect measurement results. The following cautions should be born in mind and exercised before the analyzer is operated: - Check the power supply frequency, voltage and current capacity (power consumption). - Ensure that the analyzer is correctly and well grounded. - Ensure that all the necessary electrical cables are correctly connected. - Check that the contact conditions of switches and indicators are appropriate and that the analyzer is ready to be activated correctly. NOTICES FOR USE (1) CHEMIX-800 4. - Extreme care must be taken not to result in misdiagnosis or pose any danger to the analyzer or human body when the analyzer in conjunction with other equipment. - Wipe the nozzle tips of SPT and RPT several times with cloth or alike with rubbing alcohol before the analyzer is used. At this time, do not forget to put medical rubber gloves or alike on. Pay attention to prevent bare skins of hands or arms from being touched by or pricked with the nozzle tip. The following cautions should be exercised when replacing the halogen lamp. - 5. 6. Replace the halogen lamp by a new one after a lapse of 30 minutes after the power switch of the analyzer is turned off, to avoid danger of burns. Keep hands away from glass part of new halogen lamp. Make sure that there is no crack or breakage in the glass part. The following cautions should be exercised during operation. - Pay attention not to exceed time and volume necessary for diagnosis. - Keep monitoring the behavior of whole system in order to detect any malfunction. - Take immediate corrective measures including shutdown of operation when any malfunction is detected in the analyzer. - Avoid possibilities of any direct access by patients. The following cautions should be exercised after the use of the analyzer. - Turn off the power after every operation so that control is restored to its pre-use state as directed. - Do not remove the line cord plugs from receptacles by pulling the cords so that no undue stress is developed in the cords. - Wipe the nozzle tips of SPT and RPT several times with cloth or alike with rubbing alcohol before the analyzer is used. At this time, do not forget to put medical rubber gloves or alike on. Pay attention to prevent bare skins of hands or arms from being touched by or pricked with the nozzle tip. - Pay attention to the storage area: a) Keep the analyzer out of the rain and any other water splash. b) Avoid areas that are adversely affected by atmospheric pressure, temperature, humidity, ventilation, sunlight, dust and air containing salt, sulfur, etc. c) Pay attention to inclination, vibration, shock (including shock during transportation), etc. NOTICES FOR USE (2) CHEMIX-800 d) Avoid areas adjacent to the storage room of chemicals or areas that are likely to generate gasses. Avoid areas that are likely to be subject to inclination, vibration and shock. - Organize and store parts and cords associated with the analyzer after they have been cleaned. - Keep the analyzer clean not to cause any inconvenience to the next use. 7. In the event of trouble, please do not fiddle with the analyzer. In case of any trouble, always ensure that the analyzer is handled by authorized service personnel. 8. Maintenance and checks - It is important for the analyzer and its associated parts to be periodically checked. - Ensure that the analyzer operates normally and correctly, when it is reused after being kept unused for some time. NOTICES FOR USE (3) CHEMIX-800 SERVICE MANUAL Contents 1 INTRODUCTION & SPECIFICATIONS 1.1 1.2 1.3 1.4 1.5 INTRODUCTION FEATURES TECHNICAL SPECIFICATIONS COMPUTER SPECIFICATIONS AND SET-UP BARCODE SPECIFICATIONS 2 PRINCIPLE OF ANALYSIS 2.1 MEASUREMENT AND PHOTOMETRY 2.2 SEQUENCE OF OPERATION 3 FUNCTIONAL DESCRIPTION 3.1 INSTRUMENT AND ACCESSORIES LAYOUT 3.2 SERVICE MENU SOFTWARE LAYOUT AND FUNCTION 4 PREINSTALLATION CHECK 4.1 4.2 4.3 4.4 4.5 ANALYSER DIMENSIONS ELECTRICAL REQUIREMENTS SITE REQUIREMENT FLOOR REQUIREMENTS CHEMIX-800 WOODEN CARTOON . 5 INSTALLATION 5.1 5.2 5.3 5.4 5.5 5.6 5.7 5.8 5.9 5.10 5.11 5.12 5.13 6 INSPECTION AND ACCESSORIES CHECKLIST UNPACKING THE ANALYSER INSTALLING THE ANALYSER PREPARING THE ANALYSER (CONNECTING EXTERNAL ACCESSORIES, AND PERIPHERAL DEVICES) COMPUTER SETTINGS SOFTWARE INSTALLATION POWERING UP THE ANALYSER VERIFYING PROPER MECHANICAL FUNCTIONS VERIFYING PROPER HYDRAULICS FUNCTIONS TEMPERATURE VERIFICATION PROCEDURE. PHOTOMETER VERIFICATION PROCEDURE. BCR Alignment Procedure ANALYTICAL CHECK PROCEDURE RELOCATION 6.1 TOOLS AND MATERIALS REQUIRED FOR PACKING THE ANALYSER 6.2 UNISTALLING AND DECONTAMINATING THE SYSTEM 6.3 PACKING THE ANALYSER 6.4 CERTIFICATE OF DECONTAMINATION Ref: CMX / VER 05/05/05 Contents: page 1 CHEMIX-800 SERVICE MANUAL 7 ELECTRONICS CIRCUIT DESCRIPTION & VERIFICATION PROCEDURE 7.1 7.2 7.3 7.4 7.5 7.6 7.7 7.8 7.9 7.10 7.11 7.12 7.13 7.14 7.15 7.16 7.17 7.18 REGULATOR PCB: ELS52014/R0 ISOLATION BOARD: ELS22030/R0 OPTO PCB: ELS22006/R0 PHOTOMETER: ELS52013/R0 LSH PCB: ELS52009/R1 LSS PCB: ELS52010/R2 BACKPLANE 1: ELS52005/R1 BACKPLANE 2: ELS52014/R1 INTERFACE PCB: ELS32002/R2 BASE BOARD 1: ELS52015/R0 BASE BOARD 2: ELS52008/R0 STIRRER PCB: ELS32006/R1 RCT: ELS52004/R0 MOTOR DRIVE: ELS52002/R0 DC DRIVE: ELS32004/R1 ISPS PCB: ELS22019/R0 AC DRIVE BOARD : ELS32003/R0 WGPT BOARD : WGPT03 8 ELECTRICAL WIRING CONNECTIONS. 9 MECHANICAL DESCRIPTION 9.0. 9.1 9.2 9.3 9.4 9.5 9.6 9.7 9.8 9.9 GENERAL SAMPLE, REAGENT 1 AND REAGENT 2 ARM ASSEMBLY SAMPLE, REAGENT 1 AND REAGENT 2 DILUTOR ASSEMBLY CUVETTE RINSING UNIT ASSEMBLY CUVETTE MIXING (STIRRER) ASSEMBLY SAMPLE TRANSPORT (ASP) ASSEMBLY REAGENT TRANSPORT ASSEMBLY REACTION TRANSPORT ( RCT) ASSEMBLY PRESSURE TANK (VESSEL) ASSEMBLY LEVEL SENSING PLATFORM ASSEMBLY 10 HYDRAULIC DESCRIPTION 10.1 10.2 10.3 HYDRAULICS SYSTEM OPERATION HYDRAULICS DIAGRAM CUVETTE RINSING UNIT 11 HYDRAULIC CALIBRATION PROCEDURE 11.1 PRESSURE TANK ADJUSTMENT PROCEDURE 11.2 LAUNDRY FLOW ADJUSTMENT PROCEDURE 11.3 R1, R2 & Sample Probe Dispense Verification 12 PREVENTIVE MAINTENANCE 12.1 SERVICING A CUSTOMER SITE 12.2 MAINTENANCE SCHEDULE Ref: CMX / VER 05/05/05 Contents: page 2 CHEMIX-800 SERVICE MANUAL 12.3 USER DAILY & WEEKLY MAINTENANCE LOG 12.4 SERVICE TECHNICIAN QUARTERLY MAINTENANCE LOG 12.5 SERVICE TECHNICIAN ANNUAL MAINTENANCE LOG 12.6 SPARES REPLACEMENT SCHEDULE . 13 ERROR CODES LIST 14 ISE MODULE 14.1 ISE MODULE MEASUREMENT, FEATURES AND BENEFITS 14.2 TECHNICAL SPECIFICATIONS 14.3 ISE MEASUREMENT THEORY 14.4 ELECTRODES 14.5 MAINTENANCE SCHEDULE 14.6 ERROR CODES LIST 14.7 REAGENT CONSUMPTION 14.8 ACCEPTABLE CALIBRATION RANGES 14.9 TROUBLESHOOTING PROCEDURES 14.10 ISE MODULE MECHANICAL ASSEMBLY 15 ACCESSORIES, SPARES AND CONSUMABLES SHORT LIST 15.1 ESSENTIAL SPARES SUGGESTED TO BE STOCKED BY THE CUSTOMER 15.2 STANDARD ACCESSORIES SUPPLIED WITH THE ANALYZER Ref: CMX / VER 05/05/05 Contents: page 3 CHEMIX-800 SERVICE MANUAL SAFETY SUMMARY The CHEMIX-800 is designed to operate safely. When you operate the system in a safe environment, in accordance with the guidelines and procedures stipulated in this manual, and there are no known operating hazards When a special condition exists you will see a WARNING, BIO HAZARDOUS, CAUTION or NOTE symbol in this service manual. The following information explains these symbols. Explaining Warnings WARNING INDICATES A HAZARDOUS CONDITION THAT IS ASSOCIATED WITH USING THE ANALYSER BIO HAZARD INDICATES A CONDITION INVOLVING INFECTIOUS BIOLOGICAL AGENTS CAUTION INDICATES AN ACTION OR CONDITION THAT CAN LEAD TO EQUIPMENT DAMAGE OR LOSS OF DATA NOTE INDICATES AN IMPORTANT GENERAL RULE THAT IS ASSOCIATED WITH OPERATING THE Ref: CMX / VER 05/05/05 ANALYSER AN ACTION OR CONDITION THAT CAN LEAD TO EQUIPMENT DAMAGE OR LOSS OF DATA Contents: page 4 CHEMIX-800 SERVICE MANUAL Abbreviations used ASP ASSY BAR CRU DET STIR MIX PCB / Pcb R/T R1PP R1PT R2PP R2PT RCT RGT RSLS SMPS SPP SPT BRPS SW U/D V V ac \ V AC V dc \ V DC PM LED w.r.t Conn FRC Ltr \ Ltrs Tx \ TX Ma PM WGPT ISO Pcb FTB1 TB OPTO SAMPLE ROTATING ASSEMBLY COMPLETE ASSEMBLY BARCODE CUVETTE RINSING UNIT DETERGENT STIRRER (Same as mixing unit) MIXER (Same as stirring unit) PRINTED CIRCUIT BOARD ROTATE REAGENT 1 PIPPETING PUMP (DILUTOR SYRINGE ASSY) REAGENT 1 PIPPETING ASSEMBLY REAGENT 2 PIPPETING PUMP (DILUTOR SYRINGE ASSY) REAGENT 2 PIPPETING ASSEMBLY REACTION TRAY REAGENT TRAY REAGENT LEVEL SENSING SWITCH MODE POWER SUPPLY SAMPLE PIPPETING PUMP (DILUTOR SYRINGE ASSY) SAMPLE PIPPETING ASSEMBLY BARCODE POWER SUPPLY SWITCH UP / DOWN VOLTS AC Voltage Voltage DC Preventive Maintenance Light Emitting Diode With Respective To (with reference to) Connector Flat Ribbon Cable (Flat cable used for carrying data) Litres Transformer Mille amps Preventive Maintenance WEIGH BRIDGE PLATFORM ( Level sensing platform) ISOLATOR board TERM INAL BLOCK FUSE (Fuse Box) TERMINAL BLOCK (Connector) OPTICAL Ref: CMX / VER 05/05/05 Contents: page 5 INTRODUCTION & SPECIFICATIONS 1 1 Introduction & Specifications 1.1 1.2 1.3 1.4 1.5 Introduction & Specifications This section consists of the following INTRODUCTION FEATURES TECHNICAL SPECIFICATIONS COMPUTER SPECIFICATIONS AND SET-UP BARCODE SPECIFICATIONS & ALLIGNMENT PROCEDURE Ref: CMX / VER 05/05/05 Page No. 1 - 1 CHEMIX-800 SERVICE MANUAL Introduction & Specifications 1.1 Introduction This manual imparts a technical understanding of SYSMEX-TRANSASIA’S, fully automated CHEMIX-800 analyser. It is meant to compliment the CHEMIX-800 operators Manual. If the reader encounters areas that are not fully explained, Please refer to the operator's manual. This manual does not intend to teach troubleshooting skills. It is designed to provide a competent service engineer trained on the CHEMIX-800, with the necessary information required to maintain the CHEMIX-800 analyser. Certain sections of this manual are subject to change. New revisions of these documents will be sent as Engineering change records / Technical bulletins to all authorised distributors of CHEMIX-800. If you come across any discrepancies or required corrections, your feed back on the same to us would be highly appreciated. Optimum performance of the analyser is guaranteed only by the use of genuine Transasia supplied parts. Transasia will not be responsible for failures associated with the use of unauthorised parts or unauthorised modifications carried out by the distributor or customer. In case of problems beyond the scope of the service engineer, Transasia is available for assistance and at the following ADDRESS PHONE Transasia Bio-Medicals Ltd. 8, TRANSASIA HOUSE, CHANDIVALI STUDIO ROAD Mumbai 400072 +91- 22 - 2857 4040 +91 - 22 - 2857 5050 +91- 22- 28575689 +91- 22- 28573030 E- M A I L tech.support @ transasia.co.in TIMINGS ¡ Monday to Saturday 9 AM to 5 PM FAX Ref: CMX / VER 05/05/05 IST Page No . 1 - 2 INTRODUCTION & SPECIFICATIONS CHEMIX-800 The robotics consist of a Sample arm, Reagent 1 arm, Reagent 2 arm, Stirrer 1, Stirrer 2, Cuvette Rinsing Unit, Sample tray, Reagent tray, Reaction tray and three Dilutors one each for sample, Reagent 1&2. The sample tray consist of two Sample Disks, one for loading routine and stat patient samples with a total of 50 positions and the other for loading the following (2 Blanks, 8 Controls, 2 ISE and 20 Calibrators). Routine samples can be loaded as primary tubes or sample cups. Both reagents and samples have a Barcode identification system. Bar coded sample tubes provides positive sample identification and minimises risk of human related errors and biological hazards. Some of the Salient technical features of the system are listed below 1. 2. 3. 4. 5. 6. 8 stage, triple probe cuvette Wash Station On board Biohazard and regular waste management. 2 Teflon coated mixer (stirrers) 2 Reagent capability 72-position hard glass moulded cuvettes. 60 position bar-coded reagent carousel capable of accommodating 20ml,and 70 ml Reagent bottles. On board reagent cooling is provided by a solid state, state of the art Peltier cooling system. 7. 50 positions bar-coded sample tray, with a detachable Standard tray for standard &Controls. 8. Throughput of up to 600 tests/hour. (360 test/hour photometric and 240 test/hour ISE) 9. Primary tube sampling with barcode identification 10. Permanent hard glass moulded cuvettes 11. Economical 180µl per test reagent consumption. 12. Low de-ionised water requirement of apprx. 13.5 Lts/hour. 13. Twelve-wavelength diffraction grating. The Chemix-800 Sample tray ...flexibility and convenience The specially designed “Twin layered” sample disk of CHEMIX-800 provides unmatched flexibility and convenience; the routine rack has positions to accommodate up to 50 routine samples. The standard rack has 20 standards, 2 blanks and 8 controls and 2 ISE positions. The sample tray can accommodates standard tube sizes of 5, 7 or 10 ml & sample cups. The Chemix-800 reagent tray offers a wide choice of on-board bottles The CHEMIX-800 offers up to 60 single reagent bottles can be loaded at any time. All reagents are refrigerated to ensure extended stability. The wide choice of on board reagents eliminates the need for sample splitting and cuts down the turn around time of reporting. The Chemix-800 economy ...quick returns without compromise The Chemix-800 uses permanent hard glass cuvettes, thereby eliminating recurring costs of disposable cuvettes. 180µl of reagent per test maximises the number of tests per rack. Deionised water requirement of just 13.5 litres/hour saves pre-installation costs of an on line de-ioniser plant. Ref: CMX / VER 05/05/05 Page No. 1 - 3 Introduction & Specifications The CHEMIX-800, designed with the needs of modern clinical laboratories in mind, it easily fits into any laboratory environment. The CHEMIX-800 analyser is a fully automated, random access, time optimised, patient sequential, discrete, computerised chemistry analyser. Once programmed, it is a true walk-away system. The analyser features user-friendly operation with minimum operator intervention. It is a highly sophisticated system and therefore it is of utmost importance that the operator and service personnel read the instructions carefully and becomes familiar with the operation theory. The working unit consist of a state of the art photometer and sophisticated robotics combined with an Operating Console and Data processing unit. This unit is connected by an RS 232 bi directional interface To the Analyser PC, the work schedule transferred from the Analyser PC to the analyser, and after executing the schedule as per the programmed sequence, the photometric results are then transferred back to the Analyser PC where the results are processed, stored and then reported. CHEMIX-800 SERVICE MANUAL The CHEMIX-800 bar code positive identification Introduction & Specifications The bar-coded reagents and sample identification minimises programming time. Bar-coded sample tubes provide positive sample identification and minimises risk of biological hazards. The CHEMIX-800 optical system.... ensures reliability of results The CHEMIX-800 uses a high resolution, flat field, optically corrected diffraction grating to ensure high degree of photometric accuracy. The user can select from 12 available wavelengths, from 340 nm - 800 nm to cover the entire clinical chemistry application range. The long life quartz halogen light source and the photodiode array complete the photometric system of the CHEMIX-800. OTHER FEATURES OF CHEMIX-800: Unique soft start and stop of all mechanical assemblies, ensures smooth operation and adds reliability. Software routines provide the user with all functions to run the analyser. The user-friendly software that continuously provides and prompts the operator assistance. The Sample, R1 & R2 probe vertical obstruction detection (VOD) system, detects obstructions there by protecting the probes from potential damage. Single probe liquid level detection by means of Capacitance sensing ensures accurate level detection and accurate alignment. Ref: CMX / VER 05/05/05 Page No . 1 - 4 INTRODUCTION & SPECIFICATIONS 1.2 Specifications Item Throughput System type Sample Measurement principle Applicable analytes Test method On board tests Programmable parameters Assay modes Sample volume Reaction volume Reaction temperature Serum information Reaction time Ref: CMX / VER 05/05/05 Description • 360 tests/hour (600 tests/hour with ISE) for a cycle time of 10 seconds • Discrete, open, automated, random access, patient prioritized, 1/2 Reagent system • Serum • Urine • Others (CSF, Plasma, etc.) • Latex Turbidimetric Immunoassay • Turbidimetric Immunoassay • Colorimetry (Rate/End Point) • Ion Selective Electrodes (optional) • Photometric assays o Enzyme, lipid, protein, sugar, nitrides, inorganic substances, complements and others • Turbidimetric assays o IgG, IgA, IgM, C3, C4, RF, CRP, ASO, Transferrin and others • Absolute measurement • Relative measurement • ISE (optional) • 60 test items maximum; 63 test items with ISE • 96 photometric tests • 40 calculation items • Serum indices • (Optional) 3 ISE tests (Na, K, Cl) • 1-Point • 2-Point • Rate-A • Rate-B • ISE (optional) • 2-70 µl (adjustable in 0.2 µl step) • 180 µl – 550 µl • 37 °C • Temperature stability: ± 0.2 °C • Degree of Lipemia, Icterus and Hemolysis can be measured and printed during Run Depends on the designated cycle time and number of reagents used • For 1 step assay (using R1) o 610 seconds (10 minutes 10 seconds) for a cycle time of 10 seconds • For 2 step assay (using R1 and R2) o 1st reaction 240 seconds (4 minutes) + 2nd reaction 370 seconds (6 minutes 10 seconds) for a cycle time of 10 seconds Page No. 1 - 5 Introduction & Specifications General specifications CHEMIX-800 SERVICE MANUAL Introduction & Specifications Test selection Calibration Dead volumes • • • • • • • • Mixers • • • Maintenance Barcode identification • • • • Water supply unit • • Quality control Stand-by • • • • • • • • • Safety mechanism Noise level Display Keyboard Auxiliary storage medium System interface Optional Ref: CMX / VER 05/05/05 Setting of tests one by one or with profile key for each sample Group order entry is possible Setting from host computer via interface (optional) Setting according to bar-code data on sample container Maximum 40 calibrators can be used 10 calibrators maximum per test Selective calibration is possible User programmable dead volumes for sample, standard and reagent positions Type: Immersion mixing by rotating mixers Two mixers (3 mixing speeds) Mixing positions o The 1st position: Right after sample dispense into the first reagent o The 2nd position: 1st reagent + sample + R2 Programmable maintenance actions: Prime, Wash, ISE maintenance Sample tube barcode ID (NW7, code 39, code 128, 2 of 5 interleaved, 2 of 5 standard, ISBT-code 128) Reagent barcode ID Automatic bar code scan performed whenever reagent tray lid is removed and kept again Water consumption: Less Than 13.5 liters/hour Manufactures and supplies: Type 2 quality (by NCCLS standards) ion exchange water (optional) 60 types of control parameters maximum (3 types per test item) 24 hours stand-by is allowed when used 30 minute warm-up time Vertical obstruction detection Capacitance based liquid level sensing Less than 65 dB 15 inch color display Standard keyboard 3.5 inch floppy disk • Analyzer – PC: RS-232C bi-directional • Touch screen monitor • Electrolyte measurement unit (for Na, K, Cl) • A4 size DeskJet color printer, Off-line • PC – Host computer: TCP/IP bi-directional • Automatic water supply from an outside DI water unit • Reagent bar-code ID Page No . 1 - 6 INTRODUCTION & SPECIFICATIONS Item Power source/ consumption Drainage Ambient temperature Relative humidity Dimensions Weight Ref: CMX / VER 05/05/05 Description • AC 220 V ± 10% 50 ± 1 Hz or (or AC 110 V ± 10%, 60 ± 1 Hz factory setting) • Power consumption: 800 VA • Used sample (concentrated waste solution) and washed sample (diluted waste) are to be drained separately • 15 – 30 °C • Variation during operation: less than ± 2 °C per hour • 40 – 80% free from water dew formation • 890 (W) x 760 (D) x 1140 (H) mm • Approximately 150 kg Page No. 1 - 7 Introduction & Specifications Installation conditions CHEMIX-800 SERVICE MANUAL Introduction & Specifications Sampling unit Item Sample container Sample placement STAT samples Sampling Pipetting mode Sampling probe Sample dilution Repeat run Sample identification Description • Blood collection tube 10 ml (16 x 100 mm), 7 ml (14.5 x 84 mm), 5 ml (13 x 75 mm) Adaptors will be provided for 5 and 7 ml tubes • Cup: Micro-cup 0.5 ml, Standard cup 2 ml • Sample cups can be placed on the 7 ml tubes • Sample tray o Inner rim: 25 routine patient samples with/without barcode o Outer rim: 25 routine patient samples with/without barcode (optional 5 positions for STAT) • Standard tray o Inner rim: 2 blanks, 8 controls & 2 ISE solutions (optional) o Outer rim: 20 positions each on Disc 1 and Disc 2 separately, for standards/STAT • Can be placed on the outer rim of Standard Tray (only during patient Run) or Sample Tray • STAT samples are measured preferentially • Interrupt permitted even during analysis • Pipetting system with plunger, driven by stepper motor • Sample volume: 2-70 µl (adjustable in 0.2 µl step) • Discharges set volume of sample into cuvette or the ISE module (optional) • Micro-pipette with level sensor • Washing solution o Outside: Preheated de-ionized water o Inside: Preheated de-ionized water • Equipped with vertical obstruction detection facility to prevent probe crash • Dilution ratio: 5 to 150 times • A cuvette is used as dilution vessel • Set amount of diluent is dispensed into a cuvette by reagent probe and set amount of sample is dispensed into it by sample probe • Dilution possible for repeat run • Direct reduced/increased volume runs are also possible • Execution by repeat run list or auto execution • Auto execution according to abnormal marking and/or range over • Reduced/increased volume repeat run also possible • Sample bar-code ID (barcode reader provided as standard) • Position ID for STAT samples Ref: CMX / VER 05/05/05 Page No . 1 - 8 INTRODUCTION & SPECIFICATIONS Reagent unit Reagent cooling temperature Reagent bottles Reagent dispensing Description • Turn table type reagent tray • Common reagent tray for reagent 1/2 • Reagent tray suitable for Hitachi bottles • 4 to 8 °C cooled with refrigeration unit • • Reagent probe • • • • Reagent steps Reagent volume • • • • Dead volume Mixing • • • Reagent identification • • • Residual volume information Reagent positions Reagent protection Carry over actions Ref: CMX / VER 05/05/05 • • • 30 positions for 20 ml and 30 positions for 70 ml Pipetting system with plunger, driven by stepping motor o R1 dispensing in the 0.5st cycle o R2 dispensing in the 25th cycle Micro-pipette with level sensor Outside washing solution: Preheated de-ionized water Inside washing solution: Preheated de-ionized water Equipped with vertical obstruction detection facility to prevent probe crash 1 step or 2 step Reagent 1: 60 – 300 µl (adjustable in 1 µl step) Reagent 2: 0, or 10 – 300 µl (adjustable in 1 µl step) User programmable dead volumes for reagents, samples and standards Type: Immersion mixing by rotating mixers Two mixers (3 variable mixing speeds) Mixing positions o The 1st position: Right after sample dispense into the first reagent o The 2nd position: 1st reagent + sample + R2 Position ID Reagent bar-code ID Calculated by count down system as well as measured by capacitance type level sensor and displayed on screen Total 60 positions which can be used for reagent 1/2 Reagent cover protection from evaporation, dust, and direct light Extra Detergent/Reagent Wash given for Carry Over Pairs Page No. 1 - 9 Introduction & Specifications Item Type Reagent tray CHEMIX-800 SERVICE MANUAL Introduction & Specifications Reaction unit Item Type Reaction tray Reaction temperature Cuvettes Reaction liquid mixing Cuvette washing Description • Turn table • Rotating tray • Number of reaction cuvettes: 72 • Temperature control: Turn table direct heating by foil heaters • 37 ± 0.2 °C • • • • • • • • • • • • • Reusable Number of reaction cuvettes: 72 Dimensions: 5 x 4.9 mm Optical path length: 5 mm (factor to be fed for 10 mm) Material: Hard glass Volume: 710 µl Reaction liquid volume: 550 µl maximum, 180 µl minimum Type: Immersion mixing by rotating mixers Two mixers (3 variable mixing speeds) Mixing positions o The 1st position: Right after sample dispense into the first reagent o The 2nd position: 1st reagent + sample + R2 Type: By the automatic washing system The reaction waste is aspirated out, then cuvette is washed by washing solution and repeatedly by DI water, finally residual liquid is removed Number of washing operation steps: 9 steps o Reaction waste removal: 1 step o Washing: 6 steps o Residual liquid removal: 2 steps • Number of washing solution application o Detergent solution: 1 o Ion exchange water: 5 • Washing solution container o Detergent: 10 liters Capacity • Reaction waste is collected into two waste cans (concentrated waste and diluted waste) by pumps • In built cuvette overflow protection Ref: CMX / VER 05/05/05 P a g e N o . 1 - 10 INTRODUCTION & SPECIFICATIONS Optical absorption measurement unit Wavelength Description • Multiple wavelength, diffraction spectrophotometer • Multi-wavelength direct measurement of light after penetration into reaction cuvette (transmitted light) • 12 Wavelengths: 340, 405, 450, 480, 505, 546, 570, 600, 660, 700, 750 and 800nm Wavelength per chemistry Measurement interval • One or two wavelength • • Total 63 points Interval depends on the cycle time o Every 10 seconds for 10 second cycle time OD range • • • • • • • • • OD 0 – 2.5 Light path calculated as 10 mm 0.0001 OD Pre-aligned Halogen lamp (12V/20W) Life expectancy 1,000 hours Concave grating Silicon photo-diode array Corrected by water blank measured after cuvette washing 180 µl Resolution Light source Grating Detector Cell blank correction Minimum reaction liquid volume Ref: CMX / VER 05/05/05 P a g e N o . 1 - 11 Introduction & Specifications Item Type Photometric system CHEMIX-800 SERVICE MANUAL Introduction & Specifications Data processing Item Calibration curve Quality control Repeat run Monitor function Calculation between items Data storage capacity Report/list format Backup Special treatment Data check Alarms and notices Diagnostic checks Password Description • K-Factor, Linear (one point, two point and multipoint), Logit-log, Spline, Exponential, Polynomial (second, third, and fourth order) • Multipoint curves up to 10 points • One point correction to multi-point calibration line is provided • Within day as well as day-to-day X and X-R control diagram • Mean, SD, %CV, R are calculated for each chemistry • Execution by repeat run list or auto execution • Auto execution according to abnormal marking or range over • Reduced/increased volume repeat run also possible • Reaction curve graphical display • Calibration curve graphical display • Operation status watching by run monitor • Cuvette blank monitor • Correlation correction factor (Y = aX + b) • Calculation by the formula defined by user o Up to 40 calculated items can be programmed o Each calculation item can include up to 3 chemistries • Recalculation of results possible after modification in Calibration Parameters or Test Parameters • Test results: 1,000,000 (with back up) • Reaction curve: 9999 tests • Report generation: Patient wise, Test wise, Date wise, Location wise, Abnormal result wise, Doctor name wise • Lists: Abnormal values list, Pending run list, Repeat run list • Backup of following data is possible: Assay parameters, Calibration data, Results, QC data, System parameters, Mechanical data, Probe Calibration and Dead Volume settings • Reagent blank correction • • • • • • Reference range check by age, sex, sample type Panic limit check Reaction linearity check Reaction mixture absorbance checks Antigen excess/prozone check (by reaction time course analysis method) Types of alarms: Erroneous operation, mechanical malfunction of analyzer, data processor hardware error, erroneous test results • Alarm level: Notice, temporary halt of analysis, suspension of analysis, system stop • Prompts on display alarms • Mechanical movements and functional performance can be checked through diagnostic menu • Ref: CMX / VER 05/05/05 Password provided to reject an access to selected menus P a g e N o . 1 - 12 INTRODUCTION & SPECIFICATIONS Ion selective electrode (ISE) unit (optional) Introduction & Specifications Item Description Type of measurement • Ion selective electrode • Direct measurement for Serum samples • Urine sample to be diluted with urine diluent (on board , on Reagent Tray) Sample types • Serum and Urine (10 times diluted on board, on Reagent Tray) Test items • Na, K, Cl Measurement cycle • Serum: 40 seconds/sample • Urine: 90 seconds/sample Accessories/Consumables Item Installation parts Consumables Ref: CMX / VER 05/05/05 Description • Standard tray (Disc 1 and Disc 2) • STAT Sample tray • Wash solution reservoir • Waste reservoirs • Water supply reservoir • Alkaline wash solution • Acidic wash solution • Detergent wash solution • Sample probe wash solution • Printer paper • Barcode labels • Sample cup/tubes • Halogen lamp • ISE electrodes • ISE calibrant and cleaning solutions • ISE pump tubes P a g e N o . 1 - 13 CHEMIX-800 SERVICE MANUAL Introduction & Specifications 1.3 Computer Specifications and Setup Minimum Computer Requirements Processor : Intel Pentium IV & above Memory : 512 MB SD RAM Hard Disk : 40 GB or higher External drive : 1.44 MB FDD & 52X CD-ROM Console : 15 inch Colour Monitor Keyboard : Standard Mouse : Standard I/O Interface : 2 X RS 232 ports Operating system : Windows XP Printer System interface Ref: CMX / VER 05/05/05 • : Epson LX-300+ dot matrix printer [Continuous stationary printer] Analyzer – PC: RS-232C bi-directional P a g e N o . 1 - 14 INTRODUCTION & SPECIFICATIONS 1.5 Barcode Specifications Specifications Type of Sample Codes read by the analyser NOTE: Sample Bar Code: Minimum 6 digits & Maximum 10 digits in length, User defined Introduction & Specifications 2/5 Interleaved Code 39 Code 128 NW7 1. Scan Resolution 0.25mm (Minimum width of the thin line) 2. Paper requirement Non-Glossy Non-smudgy 3. Label sticking Refer to the following drawings FSPXL170, FSXPL169, FSPS2857, FSXPL140 and FSXPL139 4. Print Quality Clear thin line No smearing or smudging Ref: CMX / VER 05/05/05 P a g e N o . 1 - 15 PRINCIPAL OF ANALYSIS 2 2. Principle of Analysis This section consists of the following Principle of Analysis 2.1 MEASUREMENT AND PHOTOMETRY 2.2 SEQUENCE OF OPERATION Ref: CHX VER 05/05/05 Page No . 2 - 1 CHEMIX-800 SERVICE MANUAL 2.1 MEASUREMENTS AND PHOTOMETRY The CHEMIX-800 analyzer is an automated clinical biochemistry analyser based on the principle of photometry, it measures light transmittance at various wavelengths White light as we see it, is actually composed of several colors. This becomes evident, when we pass a beam of white light trough a prism. If the light emerging from the prism on the opposite side were allowed to fall on a screen, we would see a wide spectrum of colors, beginning with red on the top and ending with violet at the bottom. The colors visible in between are in the order of, indigo, blue, green, yellow, and orange. Visible white light Red Orange Yellow Green Blue Indigo Violet Principle of Analysis Prism Incident or white light contains the entire spectrum, objects that appear colored, absorb light at a particular wavelength and reflect others, thus giving different colors. That is color is a function of its wavelength Light having a wavelength of less than 400 nm is termed Ultraviolet, where as light having a wavelength greater than 800 nm is described as Infrared, both ultraviolet and infrared lights are invisible to the human eyes. Light corresponding to wavelengths between 400 nm and 800 nm is visible to the human eye and is termed as Visible light. Holographic Grating Incident white light Light slit Spectrum Photodiode Array Ref: CMX VER 05/05/05 Page No . 2 - 2 PRINCIPAL OF ANALYSIS Principals of Absorption Photometry Beer’s Law If Light is allowed to pass trough a colored solution, the solution will absorb some light while the rest of it will be transmitted. The amount of light absorbed is proportional to the nature, concentration and color of the solution. (Light absorbed Concentration of the solution). Lambert’s Law The light absorbed by the colored solution is directly proportional to the light path of the color solution (diameter of the cuvette): that is if the cuvette diameter is doubled, the light absorbed will be doubled. Incident light (Io) Transmitted light (Ie) Meter Photo sensor Light Absorbed By the colored solution Since the total incident light = light absorbed + light transmitted, it follows that: 1 Absorbed light Transmitted light Therefore as the absorbed light (Absorbance) increases, the transmitted light will decrease As we increase the concentration of the colored solution, the light absorbed increases, and we find that the transmittance varies inversely and logarithmically with concentration. Absorbance (Absorbed light) = 1 Log Transmittance Absorbance (Absorbed light) = Log 100 100 Absorbance (Absorbed light) = Log * 1 Transmittance 100 % Transmittance Absorbance (Absorbed light) Ref: CHX VER 05/05/05 = Log 100 – Log % Transmittance Page No . 2 - 3 Principle of Analysis ` - PRINCIPAL OF ANALYSIS Concave Holographic Grating Focusing lens assembly Detector (Photodiode array) Halogen Lamp assembly CHEMIX-800 PHOTOMETER SYSTEM Ref: CHX VER 05/05/05 Page No . 2 - 5 Principle of Analysis Reaction Table CHEMIX-800 SERVICE MANUAL 2.2 SEQUENCE OF OPERATION The instrument works on the principle of light photometry and a combination of robotics and hydraulics that are computer controlled to obtain a high degree of precision and accuracy. Principle of Analysis The sample under test is pipetted into the cuvette along with the reagent, this reaction is then read at defined time interval of 10 seconds to obtain their optical densities. The entire operation can be divided into the following sequence. 1. Getting ready for Sampling 2. Cuvette rinsing (cleaning) 3. Reagent 1 Addition 4. Sample addition 5. Stirrer 1 Mixing 6. Reading 7. Reagent 2 Addition (optional) 8. Stirrer 2 Mixing (optional) 9. Reading (optional) 10. Reporting 11. Removal/empting of old biohazard reaction waste from the cuvette. Getting ready for Sampling: Once the workload is scheduled in the computer, and the START PATIENT run key is clicked, all mechanical assemblies and sub assemblies gets initialized (come to their respective HOME positions). The CRU starts the cuvette rinsing process. The washing assembly consists of 8 nozzles (nozzles 2 to 8 consist of 3 hollow probes, one for dispensing and the other two for aspirating) their operation is described below: Nozzle 1 – Aspirates the bio hazardous waste and dispenses cleaning solution. Nozzle 2 - Aspirates the cuvette contents, and dispenses deionised water Nozzle 3 - Aspirates the cuvette contents, and dispenses deionised water Nozzle 4 - Aspirates the cuvette contents, and dispenses deionised water Nozzle 5 - Aspirates the cuvette contents, and dispenses deionised water 00200220 Nozzle 6 – Aspirates the cuvette contents, and dispenses deionised water Nozzle 7 - Aspirates the cuvette contents. Nozzle 8 - Dries the reaction cuvette Cuvette number 1 is positioned under the first laundry probe where, its previous contents are emptied into the Bio Hazardous waste container, and cleaning solution is dispensed. Cuvette number 1, now advances by a single position and positions itself below the second laundry probe, where its contents are emptied into the regular waste container, and deionised water is dispensed. Cuvette number 1, now advances by a single position and positions its self below the third laundry probe, where its contents are emptied into the regular waste container, and deionised water is Ref: CMX VER 05/05/05 Page No . 2 - 6 PRINCIPAL OF ANALYSIS dispensed. Cuvette number 1, now advances by a single position and positions its self below the fourth laundry probe, where its contents are emptied into the regular waste container, and deionised water is dispensed. Cuvette number 1, now advances by a single position and positions its self below the fifth laundry probe, where its contents are emptied into the regular waste container, and deionised water is dispensed. Cuvette number 1, now advances by a single position, in this position no work is done. Cuvette number 1 now rotates to the offset position, pauses a while and then positions its self in the light path, where the cuvette blank reading (Water Reading) is measured. Cuvette number 1 now rotates to the offset position, pauses a while and then positions its self below the sixth laundry probe, where its contents are emptied into the regular waste container. Cuvette number 1 now rotates to the offset position, pauses a while and then positions its self below the seventh laundry probe, where its contents are emptied completely into the regular waste container, by the drier probe. Cuvette number 1 now rotates to the offset position, pauses a while and then positions itself in the reset position, in this position no work is done. Cuvette number 1 now rotates to the offset position, where the sampling operation starts. Reagent1 probe rinses itself both internally and externally, by activating both the R1PT & R1PP CKD valves, of both the trough, and Reagent 1 dilutor syringe. The reagent tray then rotates and positions the requested reagent at the Reagent 1 pickup position. The Reagent 1 probe then rotates, and positions its self over the reagent bottle, starts moving down, the Reagent 1 probe liquid level sensing is now active, it continues to move down until it senses the presence of reagent. Once the presence of liquid is sensed, it moves down a little further into the reagent and then stops. The reagent 1 Syringe moves down and aspirates the defined volume of reagent for that particular reagent. The reagent probe then moves up, rotates and places its self over cuvette number 1, and partially moves down over the cuvette. Reagent 1 syringe plunger then moves up, and stops when it reaches the home position, thereby dispensing its reagent contents into the cuvette. The Reagent 1 probe then moves to the trough/drain position where it rinses the probe internally by activating the R1PP CKD valve and washes the probe both internally and externally by activating both R1PT & R1PP CKD valves, of both the trough and Reagent 1 dilutor syringe. . Sample addition: The reaction tray rotates and places cuvette 1 at the sample probe dispense position Sample probe rinses its self both internally and externally, by activating both the SPT & SPP CKD valves, of both the trough and Sample dilutor syringe. The sample tray then rotates and positions the requested sample number, at the sample pickup position. The sample probe then rotates, and positions its self over the sample cup, starts moving down, the sample probe liquid level sensing is now active, it continues to move down until it senses the presence of liquid. Once the presence of liquid is sensed, it moves down further into the sample by another few millimeters and then stops. The sample Syringe moves down and aspirates the defined volume of sample for that particular sample. The sample probe then moves up, rotates and places its self over cuvette number 1. Ref: CHX VER 05/05/05 Page No . 2 - 7 Principle of Analysis Reagent 1 addition: CHEMIX-800 SERVICE MANUAL Sample syringe plunger then moves up, and stops when it reaches the home position, thereby dispensing its contents into the cuvette. The sample probe then moves to the trough/drain position where it rinses the probe internally by activating the SPP CKD valve and washes the probe both internally and externally by activating both SPT & SPP CKD valves, of both the trough and sample dilutor syringe. In the next rotation, the reaction tray rotates to the offset position, where the stirrer will perform a mixing cycle. Once the Sample is added into the cuvette, the reaction starts. Whenever the RCT rotates by one turn, all 72 cuvettes pass under the light beam and optical densities if all these 72 cuvettes are measured for the defined wavelengths. Reagent 2 addition: Principle of Analysis Reagent 2 (if present) is added in the 25th cycle. Reagent 2 probe rinses itself both internally and externally, by activating both the R2PT & R2PP CKD valves, of both the trough, and Reagent 2 dilutor syringe. The reagent tray then rotates and positions the requested reagent at the Reagent 2 pickup position. The Reagent 2 probe then rotates, and positions its self over the reagent bottle, starts moving down, the Reagent 2 probe liquid level sensing is now active, it continues to move down until it senses the presence of reagent. Once the presence of liquid is sensed, it moves down a little further into the reagent and then stops. The reagent 2 Syringe moves down and aspirates the defined volume of reagent for that particular reagent. The reagent probe then moves up, rotates and places its self over cuvette number 1, and partially moves down over the cuvette. Reagent 2 syringe plunger then moves up, and stops when it reaches the home position, thereby dispensing its reagent contents into the cuvette. The Reagent 2 probe then moves to the trough/drain position where it rinses the probe internally by activating the R2PP CKD valve and washes the probe both internally and externally by activating both R2PT & R2PP CKD valves, of both the trough and Reagent 2 dilutor syringe. Stirrer-1 The sample and the primary reagent dispensed into cuvettes are stirred by rotating the paddle. 3 types of speed are available i.e. Low, Medium and High. The user selects the appropriate speed as per the chemistry reaction. The paddle is washed in the STIRRER-1 trough with system water at 40º C and pressure of 0.8-1.2 bar. Stirrer-2 The sample and the primary reagent dispensed into cuvettes are stirred by rotating the paddle. 3 types of speed are available i.e. Low, Medium and High. The user selects the appropriate speed as per the chemistry reaction. The paddle is washed in the STIRRER-2 trough with system water at 40º C and pressure of 0.8-1.2 bar. Reporting: The optical densities are measured for each test every time the RCT rotates and the cuvette passes the light path (The cycle time for a complete rotation is 10 seconds) that is every 10 seconds the optical densities are measured for a particular cuvette, these readings are then plotted Ref: CMX VER 05/05/05 Page No . 2 - 8 PRINCIPAL OF ANALYSIS in the time course graph. After 62 rotations where in every rotation a reading is recorded and the reaction is completed, the washing process of the cuvette starts, The complete reaction graph for every cuvette, is plotted and after co relating the data from Calibration and Parameter menus, the final result is calculated and displayed. Cleaning process After the final reading, the cuvette comes under the CRU for cleaning and the entire cycle starts again. The Complete operating cycle can be described as follows. The reaction disk consists of 72 reaction cuvettes arranged in circular mode. The reaction disc is maintained at 37º C with the help of a dry incubation, the entire disk rotates in a counter clockwise direction, advancing 1 position in 10 every seconds. Each reaction tray cycle has two positions a reset and offset position. Principle of Analysis The first result is printed out in 10.5 minutes after sampling. (10 seconds a cycle X 63 cuvette readings = 630 seconds of incubation and simultaneous cuvette readings). Ref: CHX VER 05/05/05 Page No . 2 - 9 FUNCTIONAL DESCRIPTION Functional Description 3 3. Functional Description This section consists of the following. 3.1 INSTRUMENT AND ACCESSORIES LAYOUT 3.2 SERVICE MENU SOFTWARE LAYOUT AND FUNCTION Ref: CMX / VER 05/05/05 Page No. 3- 1 Functional Description CHEMIX-800 SERVICE MANUAL Ref: CMX / VER 05/05/05 Page No. 3- 2 Functional Description FUNCTIONAL DESCRIPTION Ref: CMX / VER 05/05/05 Page No. 3- 3 Functional Description CHEMIX-800 SERVICE MANUAL Ref: CMX / VER 05/05/05 Page No. 3- 4 Functional Description FUNCTIONAL DESCRIPTION Ref: CMX / VER 05/05/05 Page No. 3- 5 Functional Description FUNCTIONAL DESCRIPTION Power supply section of chemix-800 as viewed from L.H.S. Hydraulics section of chemix-800 as viewed from R.H.S. Ref: CMX / VER 05/05/05 Page No. 3- 7 Functional Description CHEMIX-800 SERVICE MANUAL Motor control section of chemix-800 as viewed from L.H.S. Ref: CMX / VER 05/05/05 Page No. 3- 8 FUNCTIONAL DESCRIPTION Functional Description Top View with the Flap Open Sample Tray Ref: CMX / VER 05/05/05 Reagent Tray Page No. 3- 9 CHEMIX-800 SERVICE MANUAL 3.2 SERVICE MENU SOFTWARE LAYOUT AND FUNCTION To Enter the Service Mode press “ Service “ Button on the Main Screen. To quit the Service mode press the go back key on the menu. NOTE Functional Description Only Authorized Technical Service Personnel should operate the Service Menu Reagent 1 arm 1) Initialization: - This command will bring R1 arm at home position (trough position) 2) Up: - If R1 arm is down at trough position, or in reagent tray, this command will l bring R1 arm at up-home position, till the up opto doesn’t cut. 3) Down: - this command can be used to check down movement of R1 arm. First give<initialize> command then give<To reagent inner> or <To Reagent outer> command, & then give <Down> command. The R1 arm will go down until the bottom of the reagent bottle. While going down if it senses liquid level in between, it will stop at that level. If liquid is not there in reagent bottle, then it will go down, will experience VOD at bottom and displays 15 - R1arm VOD error. 4) Link: - This command is used to set R1 Arm Motion Cycle continuously for validation and service check test. To execute initialized the arm first by clicking initialized button after complete initialization force link command by clicking link button once. To terminate action use stop button provided on the left hand side corner of the screen. 5) RCT offset: - For R1 arm alignment RCT should be at offset condition. Ref: CMX / VER 05/05/05 P a g e N o . 3 - 10 FUNCTIONAL DESCRIPTION This command will first initialize RCT tray, then align RCT for R1 probe. 6) Align R1 inner: - This command will first initializes RGT tray, & align reagent position 1 for R1 arm calibration. 7) Default calibration: - This command will reset the calibrated data to its default data. 1) Initialization: - This command will bring R2 arm at home position (trough position) 2) Up: - If R2 arm is down at trough position, or in reagent tray, this command will bring R1 arm at up-home position, till the up opto doesn’t cut. 3) Down: - this command can be used to check down movement of R2 arm. First give<initialize> command then give<To reagent inner> or <To Reagent outer> command, & then give <Down> command. The R2 arm will go down until the bottom of the reagent bottle. While going down if it senses liquid level in between, it will stop at that level. If liquid is not there in reagent bottle, then it will go down, will experience VOD at bottom and displays 45 – R2 arm VOD error. 4) Link: - This command is used to set R2 Arm Motion Cycle continuously for validation and service check test. To execute initialized the arm first by clicking initialized button after complete initialization force link command by clicking link button once. To terminate action use stop button provided on the left hand side corner of the screen. 5) RCT Home: - For R2 arm alignment RCT should be at Home(initialization) position. 6) Align R2 inner: - This command will first initializes RGT tray, & align reagent position 1 for R2 arm calibration. 7) Align R2 outer: - This command will first initializes RGT tray, & align reagent position 4 for R2 arm calibration. 8) Default calibration: - This command will reset the calibrated data to its default data Sample arm 7) Initialization: - This command will bring sample arm at home position (trough position) 8) Up: - If SPT arm is down at trough position, or in sample tray, this command will bring R1 arm at up-home position, till the up opto doesn’t cut. 9) Down: - this command can be used to check down movement of Sample arm. First give<initialize> command then give<To reagent inner> or <To Reagent outer> command, & then give <Down> command. The Sample arm will go down until the bottom of the reagent bottle. While going down if it senses liquid level in between, it will stop at that level. If liquid is not there in reagent bottle, then it will go down, will experience VOD at bottom and displays 75 – Sample Arm VOD error. 10) Link: - This command is used to set SP Arm Motion Cycle continuously for validation and service check test. To execute initialized the arm first by clicking initialized button after complete initialization force link command by clicking link button once. To terminate action use stop button provided on the left hand side corner of the screen. Ref: CMX / VER 05/05/05 P a g e N o . 3 - 11 Functional Description Reagent 2 arm CHEMIX-800 SERVICE MANUAL 11) RCT Home: - For sample arm alignment at cuvette side RCT should be at Home(initialization) position. 12) Sample outer: - This command will first initializes Sample tray, & align Sample position 1 for Sample arm calibration. 13) Sample inner: - Before giving this command, sample tray should be initialize by giving <Sample outer> command & then give this command. This command can be used for sample arm calibration at inner position. Functional Description 14) Default calibration: - This command will reset the calibrated data to its default data. PC Communication This command will check the communication between PC & Analyzer. Select the communication port 1,2 or 3,4 & click on check communication. If communication is OK, then pc will display “communication with instrument OK.” If communication is not OK, then pc displays “Instrument not responding”. If this happens then check the continuity of communication wire or check whether RCT has been initialized or not. Syringes In this, there are 3 syringes on screen. Select any one of them. All the following commands are available for that particular Syringe. 1) Valve on 2) Valve off 3) Syringe up 4) Syringe down 5) Initialize. SPT & R2pt syringe have fixed steps to go down. However, for R1 syringe down movement, we can change the steps from combo box. Stirrers 1) Initialization: - During initialization stirrer performs rotation as well as up/down movement. 2) Down: - for this action, RCT should be at offset condition & it should be steady. First, give <RCT Offset> command, then give<Rotate to cuvette_1> or< Rotate to cuvette_2> command. & Give Down command.( if RCT is rotating then don’t give the down command.) 3) Up:- If stirrer is down then it will go to up home position. 4) Rotate To cuvette_1: - First give <initialize> command. Then give <Rotate To cuvette_1> stirrer will rotate to cuvette 1 of RCT. 5) Rotate To cuvette_2: - First give <initialize> command. Then give <Rotate To cuvette_2> stirrer will rotate to cuvette 2 of RCT. 6) On: - Stirrer stirring action starts. 7) Off: - Stirrer stirring action stops. 8) Calibrate: - This option is not valid for stirrer. 9) Link: - First initialize stirrers, and then click on <link>. Select destination <Rotate to cuvette_1> or < Rotate to cuvette_2>. Stirrer will continuously perform the stirring action for selected destination. If RCT is not at offset position, then stirrer will not go down in cuvette It will rotate to cuvette_1 or 2,remain up & stirs & come back to trough. Ref: CMX / VER 05/05/05 P a g e N o . 3 - 12 FUNCTIONAL DESCRIPTION 1) Initialize: - Sample tray disturbs it’s home position & rotates again to achieve the home position. 2) Rotate 50: - sample tray will take one complete rotation. 3) Rotate 1 :- Sample tray will rotate one sample position. 4) Link: - Sample tray will rotate continuously, If there is any problem in ASP opto setting then rotation will stop. 6) Samp Barcode scan: - This command is used to scan all 50 barcode tubes. Reagent tray 1) Initialize: - Reagent tray disturbs it’s home position & rotates again to achieve the home position. 2) 60 Steps: - Reagent tray will take one complete rotation. 3) 1 Pulse: - Reagent tray will rotate for the one short clock pulse. This can be used to check opto alignment of the tray. 4) Link: - Reagent tray will rotate continuously, If there is any problem in RGT opto setting then rotation will stop. 5) Step :- Regent tray will rotate for one reagent position. 6) Regent Barcode scan: - This command is used to scan all 60 barcode tubes. Ref: CMX / VER 05/05/05 P a g e N o . 3 - 13 Functional Description Sample tray PREINSTALLATION 4 This section deals with the pre installation requirements for the CHEMIX-800 biochemistry analyser. It lists the following 4.1 4.2 4.3 4.4 4.5 ANALYSER DIMENSIONS ELECTRICAL REQUIREMENTS SITE REQUIREMENT FLOOR REQUIREMENTS CHEMIX-800 WOODEN CARTON DIMENSIONS & WEIGHTS Ref: CMX / VER 05/05/05 Page No.4-1 Preinstallation 4 . Preinstallation CHEMIX-800 SERVICE MANUAL 4.1 Analyzer Dimensions Preinstallation 888 Note : All dimensions are in mm. 1155 619 Ref: CMX / VER 05/05/05 Page No.4-2 PREINSTALLATION 4.2 ELECTRICAL REQUIREMENT Failure to properly ground the CHEMIX-800 bypasses important safety features and may result in an electrical hazard. A proper grounding is highly essential for safety and proper functioning of the analyser. VOLTAGE AND GROUND REQUIREMENTS Voltage & frequency Single-phase continuous stabilized AC 220 volts ± 10V, 50Hz .The CHEMIX-800 comes equipped with a three-pin power cord. The type of cord and plug depends on the source voltage for the system. . Grounding It is absolutely necessary that a perfect earthing must be provided at the power source with all applicable local requirement (Only a certified grounded, 3 pin power plug should be used.) Plug points Four 5 amp sockets must be available near the analyzer. (Four sockets are required, one each for the analyser, computer, monitor and printer. It is recommended that two extra sockets be provided near the analyzer, for use by a measuring equipment or engineering tool if required while servicing (Example Oscilloscope, Soldering iron etc.). Heavy-duty electrical devices like Air conditioners, refrigerator's, ovens etc. should not be operated on the same electrical lines as the Analyzer. NOTE Failure to properly ground the CHEMIX-800 bypasses important safety features and may result In permanent damage to the analyzer that may void the warranty it is absolutely necessary to ensure proper grounding. Ref: CMX / VER 05/05/05 Page No.4-3 Preinstallation NOTE CHEMIX-800 SERVICE MANUAL 4.3 SITE REQUIREMENT The proper location is an important consideration; a poor location can lead to malfunction of the analyzer. Please follow the following environmental and electrical suggestions to ensure the accuracy and precision of the analyzer, NOTE: This will also ensure a high level of operator and technical service personal working comfort and safety. Preinstallation ENVIROMENTAL REQUIREMENTS VERIFYING PROPER ROOM TEMPERATURE Measure the room temperature at different corners of the Laboratory, the reccomended temperature is 20 to 26 degrees celcius non condensing. There should not be a variations of more than 5 degrees in Room temperature per hour. VERIFYING PROPER VENTILATION Make sure there is at least 0.25 meters of space between the wall and the instrument on all three sides, to enable proper ventilation. There should not be any Stationary items or other objects in the vinicity that hinder proper access to the analyser. There should be no direct air from the airconditioning system on to the Analyser. VERIFYING DUST FREE ENVIROMENT Verify and ensure a dust free enviroment to the analyser, this is a small but very important concideration when installing the analyser. EXTERNAL INTERFERENCES Heavy-duty electrical devices like Air conditioners, refrigerator's, ovens, centrifuges etc. should not be operated on the same electrical lines as the Analyzer or in the close vicinity of the analyzer. The room should be free of vibrations from heavy-duty devices like Centrifuges and Compressors. The room should be free from strong magnetic fields caused by other medical equipment, like CT Scans, MRI etc. Mobile phones should not be operated close to the Analyser. Ref: CMX / VER 05/05/05 Page No.4-4 CHEMIX-800 SERVICE MANUAL 4.5: CHEMIX-800 WOODEN CARTOON DIMENSIONS & WEIGHTS WOODEN CARTOON DIMENSIONS & WEIGHT : LENGTH = 120 to 130 CENTIMETERS WIDTH = 80 to 90 CENTIMETERS HEIGHT = 130 CENTIMETERS Preinstallation NETT WEIGHT: 165.00 Kilos GROSS WEIGHT: 195.00 Kilos Ref: CMX / VER 05/05/05 Page No.4-6 INSTALLATION 5 5 . Installation This section deals with the installation of the CHEMIX-800 biochemistry analyser. 5.1 5.2 5.3 5.4 5.5 5.6 5.7 5.8 5.9 5.10 5.11 5.12 5.13 Only a trained service representative should install the Analyser. Contact your local service representative for installation and relocation of the instrument. Problems resulting from the installation and relocation of the Analyser by anyone other than a authorised service representative, will not be covered under warranty. INSPECTION AND ACCESSORIES CHECKLIST UNPACKING THE ANALYSER INSTALLING THE ANALYSER PREPARING THE ANALYSER (CONNECTING EXTERNAL ACCESSORIES, AND PERIPHERAL DEVICES) COMPUTER SETTINGS SOFTWARE INSTALLATION POWERING UP THE ANALYSER VERIFYING PROPER MECHANICAL FUNCTIONS VERIFYING PROPER HYDRAULICS FUNCTIONS TEMPERATURE VERIFICATION PROCEDURE. PHOTOMETER VERIFICATION PROCEDURE. BCR Alignment Procedure ANALYTICAL CHECK PROCEDURE Ref: CMX / VER 05/05/05 Page No.5-1 Installation NOTE CHEMIX-800 SERVICE MANUAL 5.1 INSPECTIONS AND ACCESSORIES CHECK LIST The Analyser is fully inspected before leaving the factory and carefully packed to withstand shocks in transit. On receiving the analyser, check the package externally; make sure that there is no external visible damage to the shipping container. If there is damage please make a note of it, if possible photograph it and inform Transasia immediately. Verify with the invoice, if all the boxes have arrived. Accessories check list Installation NOTE Transasia reserves the right to change without notice the accessories supplied with the CHEMIX-800 OPERATOR MANUAL SOFTWARE CD TRANSDUCER UNIT ASSY – WATER AND WASTE LEVEL SENSING PLATFORM 20 Litres CAN . FOR DI WATER 20 Litres CAN . FOR WASTE BIO HAZARD WASTE CAN - 10 Litres DETERGENT CAN - 10 Litres. CUVETTES (72 Nos. within the machine + 5 Nos extra) REAGENT TRAY ASSY REAGENT TRAY COVER SAMPLE (ROTATING) TRAY ASSY DISC (1-50) WITH STANDARD PLATE MAINS UNIT TO COMPUTER INTRFACE CABLE POWER CHORD ( 15 A, 2 PIN TOP) PVC SUPPORT FOR 20 ML REAGENT BOTTLES SAMPLE CUPS REAGENT BOTTLE (20 ml.) WITH CAPS REAGENT BOTTLE (70 ml.) WITH CAPS REAGENT BOTTLE (20 ml.) WITH CAPS AND BARCODE LABELS REAGENT BOTTLE (70 ml.) WITH CAPS AND BARCODE LABELS TEST TUBES (5 ml) WITH BARCODE LABELS TEST TUBE ADAPTORS Dia 4 X 6 Polyurethane Tube ( for connecting the DI Water can) – 1000 mm Tubing for connecting the BioHazardus waste can Tubing for connecting the waste can Tubing for connecting The detergent can PERSONAL COMPUTER WITH MAINS CORD (OPTIONAL) KEYBOARD (OPTIONAL) MOUSE (OPTIONAL) 15” MONITOR WITH MAINS CORD (OPTIONAL) EPSON LX-300 PRINTER WITH MAINS CORD AND COMMUNICATION CABLE (OPTIONAL) COMPUTER TROLLEY (OPTIONAL) INTERFACE CABLE POWER CORD (15 A, 3 PIN TOP, 3 metres.) PVC BOTTLE SUPPORT FOR REAGENT SAMPLE CUPS REAGENT BOTTLE (20 ml.) REAGENT BOTTLE (50 ml.) ADAPTER FOR SAMPLE CUPS / TUBES ADAPTER FOR SAMPLE CUPS (WITH 25 ADAPTORS FOR 20 ml BOTTLES REAGENT TRAY COVER SAMPLE (ROTATING) TRAY ASSY 51-100) (OPTIONAL) EMERGENCY SAMPLE TRAY STANDARD PLATE SAMPLE TRAY STANDARD PLATE Ref: CMX / VER 05/05/05 1 1 1 1 1 1 1 1 1 1 1 1 1 25 500 25 25 25 25 5 100 1 1 1 1 1 1 1 1 1 25 500 50 50 50 50 2 1 1 1 1 1 1 1 Page No.5-2 INSTALLATION 1 1 2 1 1 2 1 1 1 1 1 1 Installation REAGENT & SAMPLE BAR CODE LABLES P. M. KIT CONTAINING: CUVETTE DRIER CRU F1 TUBING’S CRU WASTE TUBING PHOTOMETER LAMP ASSEMBLY FUSES LAUNDRY PROBE CLEANER PLASTIC TOOL BOX UNIT UNPACKING INSTRUCTION SHEET UNIT INSTALLATION INSTRUCTION SHEET BARCODE STICKER DETAILS (7 Sheets) Ref: CMX / VER 05/05/05 Page No.5-3 CHEMIX-800 SERVICE MANUAL 5.2 UNPACKING THE ANALYSER CAUTION Unpack the Analyser carefully; otherwise you can damage accurately adjusted optical and electronic assemblies NOTE The Analyser should be unpacked only under the supervision of a SysmexTransasia factory trained Engineer Installation The CHEMIX-800 is fully tested before shipment and is packed carefully to prevent any shipping damage. It is responsibility of customer to inspect all cartons upon arrival and notify the carrier of any apparent damage. CHEMIX-800 is shipped in one wooden carton box, and an additional 1 or 2 carboard boxes; one contains the main unit and other has computer trolley and the accessories The main unit and accessories are packed in separate cartons. Reagents and other additional accessories may be packed in another carton. The representative is responsible for unpacking, installing and initial setting up of the Analyser: Remove the Nuts and Bolts that hold the side panels of the analyser and accessories box, carefully remove each of the side panels. CAUTION The instrument is shipped, mounted on “Z” brackets; the “Z” bracket and the footrest support the entire weight of the instrument. Cautiously open the bolts of the “ Z ” bracket to prevent any personal injury. Unwrap the plastic protective sheet, from the analyser The instrument is bolted down to the wooden pallet on four sides with the help of “ Z “ brackets, remove these bolts carefully with the help of a spanner, and carefully slide out the “ Z “ brackets one at a time. Rotate the footrests upwards, in order to enable the analyser to rest on all four Castors. Ref: CMX / VER 05/05/05 Page No.5-4 Installation INSTALLATION “ Z” Brackets Ref: CMX / VER 05/05/05 CHEMIX-800 with base pallet and wood cartoon Page No.5-5 CHEMIX-800 SERVICE MANUAL Nuts Top panel Analyser Installation Side Panel anel “ Z ” Bracket Pallet Base Washers Chemix-800 with base pallet and wood cartoon Ref: CMX / VER 05/05/05 Page No.5-6 INSTALLATION Gently lift or slide the analyser out of the wooden pallet, and place it on the floor. Wheel the analyser to the installation site, after position it, rotate the foot rests downwards, in order to enable the analyser to rest on the footrest only (the castors should be in mid air). After installing the analyser at he final required position, rotate downwards the footrest, the entire load of the instrument should be borne by the foot rest (The castors of the analyser should be in mid air). NOTE The analyser should be properly levelled, preferably using a sprit level to ensure: 1) Proper, and efficient drainage of condensed water within the reagent tray well. 2) Proper, and efficient drainage for various other drain line liquids ( as many of the drainages provided within the analyser are of the natural Drain type). Gently lift the top dome of the analyser and gently slide the Sample arm upwards, making sure you do not damage the Sample probe, once you have reached the top most position, rotate it and position it over the trough. Remove the protective material and any debris, from within the sample tray well. Gently slide the Reagent 1 arm upwards, making sure you do not damage the probe, once you have reached the top most position, rotate it and position it over the trough. Gently slide the Reagent 2 arm upwards, making sure you do not damage the probe, once you have reached the top most position, rotate it and position it over the trough. Remove the protective material and any debris, from within the reagent tray well. Gently slide the Mixer 1 and Mixer 2 arm upwards, making sure you do not damage the paddles, once you have reached the top most position, rotate it and position it over the trough. Remove the protective material. Gently slide the CRU arm upwards to the top most position, making sure you do not damage the probes, and remove the protective material and clean debris. Ref: CMX / VER 05/05/05 Page No.5-7 Installation 3) To obtain accurate reagent bottle dead volumes. CHEMIX-800 SERVICE MANUAL 5.3 INSTALLING THE ANALYSER To avoid a shock hazard, ground the Analyser, Computer, Printer and Monitor using a 3 pin grounded electric outlet. WARNING Do not use an adapter, as it could cause a loose contact and improper grounding. Installation Confirm that all cuvettes have been fitted properly into their respective slots on the reaction tray and none of them are jutting out. NOTE NOTE Confirm that all cuvettes have been fitted properly into their respective slots on the reaction tray and none of them are jutting out. When removing or placing the cuvettes into their slots, make sure that you grip them by their sides and top end, never let the fingers or any sharp. Objects come in contact with the optical area. Ref: CMX / VER 05/05/05 Page No.5-8 INSTALLATION Installing the Sample tray, Reagent tray and Cuvette reaction tray. Unpack the Sample tray from the accessories box Hold the sample tray with your right hand Installation Gently place the sample tray into the Sample tray well Make sure that the index pin on the Sample Transport, slides into the index hole provided on the sample tray. Place the calibration tray in position, and make sure that the index pin on the Sample transport slides into the index hole provided on the Calibration tray Unpack the Reagent tray from the accessories box Hold the Reagent tray with your right hand as shown. Gently place the Reagent tray into the reagent tray well Make sure that the index pin on the Reagent transport slides into the index hole provided on the Reagent tray. Place the Reagent tray lid over the Reagent Tray. Make sure that the index pin on the Reagent transport slides into the index hole provided on the Reagent tray. Ref: CMX / VER 05/05/05 Page No.5-9 CHEMIX-800 SERVICE MANUAL Installing the Waste can, Bio hazardous waste can, Water can and Cleaning Solution can Please refer to figure 4.30 before carrying out this installation procedure Unpack the Liquid Level Sensing Platform from the accessories box; place it behind the analyser as shown in Floor requirements, chapter 3.5 (there is a label on the Liquid Level Sensing Platform that says “ANALYSER SIDE” when installing the platform, make sure that this label faces the analyser) Connect the cable of the Liquid Level Sensing Platform to the D 9 connector located on the back panel of the instrument located, besides the mains socket. As shown in figure 4.30 From the accessory box remove the 20 litres Deionised water can, 20 litres Waste can, 10 litres Bio hazardous waste can and the10 litres Cleaning solution can, and place them on to their respective labelled slots, on the Liquid Level Sensing Platform. Installation Fill the Deionised Water can with 20 litres of fresh deionised water. Remove the tubing’s from the accessory box. Connect one end of the 1 meter. (4 x 6 mm ) Polyurethane tube to the analyser outlet marked WATER, and connect the other end into the Water can nozzle. Now connect the large diameter silicon tube to the analyser outlet marked WASTE, and connect the other end of the tubing into the 20-litre Waste can nozzle. Connect the (4 x 6 mm) 1 meter length, silicone tube to the analyser outlet marked BIO HAZARDOUS WASTE, and connect the other end to the 10 litre Bio hazardous waste can nozzle, Connect the (2 x 4 mm) 1 meter length, silicone tube to the analyser outlet marked DETERGENT, and connect the other end to the 10 litre Cleaning solution can (make sure that the White Teflon weight provided at the end of the tube, touches the bottom of the Detergent can) Fill 10 litres of working cleaning solution into the Cleaning solution Can, (to prepare Working Cleaning solution: Add 1 bottle of CHEMIXWASH KIT (Part no REKT910 4x50 ml ) to 10 litres of Deionised water.) . NOTE Take care that all the above-mentioned tubes reach their respective containers without any sharp bends or obstructions. NOTE The waste consist of a natural drain, it is very important that the large silicon waste tube from the rear of the analyser to the Waste can, be slanting downwards, there should not y bends, and should slant in the downwards direction (If not, then this could cause a back flow of waste solution, out of the SPT, R1PT, R2PT or STIRRER troughs, which would cause splutter all over the top of the analyser. Or could result in noisy un required, big gargling sounds being created by the waste lines. Ref: CMX / VER 05/05/05 P a g e N o . 5 - 10 INSTALLATION Water Detergent Bio Hazardous Waste Ref: CMX / VER 05/05/05 Installation Deionised Water can, Detergent can, Bio hazardous waste can and Waste can, connections Waste P a g e N o . 5 - 11 Figure: 5.30 CHEMIX-800 SERVICE MANUAL 5.4 PREPARING THE ANALYSER ( CONNECTING PERIPHERAL DEVICES ) Place the computer, keyboard, mouse and monitor on a trolley / table. Connecting the mouse, keyboard and monitor to the computer as mentioned in the Computer manual, which is enclosed within the computer box. For further assistance on installing the computer system you could contact your local Computer distributor, the list of Distributors / Service centres, worldwide is mentioned in the computer manual. Installation Unpack the serial inter face cable from the accessories box, and connect the D9 connector to the serial port 1 of the computer. Connect the other end to the RS 232 connector, located on rear panel of the instrument, as shown in figure 5.40 Figure: 5.40 Ref: CMX / VER 05/05/05 P a g e N o . 5 - 12 INSTALLATION 5.5 COMPUTER SETTINGS NOTE If the computer is shipped with the analyser, it comes factory set and no changes to the setting are required, at the time of installation. NOTE Changes to the computer setting other than those that have been factory set or recommended, could cause severe analyser malfunctioning. NOTE NOTE In the computer settings, the keyboard setting & regional language settings has to be set only to the United States format. There should not be any screen saver or other programmes and Software packages like games etc. loaded onto the Computer as these could severely restrain the existing resources of the computer. To prevent the CHEMIX-800 PC from getting infected by a virus it is recommended that no additional software package should be loaded and the use of the floppy drive should be restricted only to patient result and test back up only after verifying that the floppy disc are free from virus. Power on the computer and verify proper function, please verify, and make sure that the computer has the following settings. 1. In the computer settings, the keyboard setting & regional language settings has to be only set to United States. 2. There should be no screen saver or games loaded. NOTE If the computer is supplied with the analyzer, then the CHEMIX-800 software comes pre loaded, also the computer settings are factory set and no changes to the computer settings are required. Minimum Computer Requirements Processor : Intel Pentium IV , 1.7 Ghz ( NOTE this is the MINIMUM LEVEL recommended) Memory ; 512 MB SD RAM Hard Disk : 40 GB Floppy drive : 3.5” CD-ROM : 52 X Monitor : 15 inches Colour Keyboard : Standard Mouse : Standard I/O Interface : 2 X RS 232 ports Operating system : Windows XP (Service Pack 2) Ref: CMX / VER 05/05/05 P a g e N o . 5 - 13 Installation IMPORTANT CHEMIX-800 SERVICE MANUAL COMPUTER CMOS SETUP STANDARD CMOS FEATURES 1.Enter Date and Time 2.IDE Primary Master 3. IDE Primary Slave 4. IDE Secondary Master Installation 5.DRIVE A 6.Drive B 7.Flopy3 mode support 8.Video 9.Halt On : Press Enter , the next screen will appear. Select AUTO for both IDE Primary Master and IDE Access Mode. : Select NONE : Press Enter , the next screen will appear. Select AUTO for both IDE Secondary Master and IDE Access Mode. : Select 1.44MB ,3.5” : Select None : Select Disabled : Select EGA/VGA : Select ALL,BUT KEYBOARD ADVANCED BIOS FEATURES 1. 2. 3. 4. 5. 6. First Boot Device Second Boot Device Third Boot Device Boot other Device Swap Floppy Disc Security Options : Select HDD : Select CD-ROM : Select FDD : Select No : Select Disabled : Select Setup ADVANCED CHIPSET FEATURES 1. CPU clock speed : Select x8 INTEGRATED PERIPHERALS 1.USB Controller 2. USB Keyboard support 3.USB Mouse support 4. AC97 Audio 5.Power On function 6.Onboard Serial Port1 7. Onboard Serial Port2/IR 8. Onboard IR Function 9. Onboard Parallel Port 10.Parallel port mode 11.EPP Mode select 12.ECP Mode DMA 13.Game Port address 14.Midi port address 15.Midi port IRQ : Select Enabled : Select BIOS : Select OS : Select Enabled : Select KB98 : Select 3F8/IRQ4 : Select 2F8/IRQ3 : Select Disabled : Select 378/IRQ7 : Select ECP+EPP : Select EPP1.9 : Select 3 : Select 201 : Select 330 : Select 10 POWER MANAGEMENT SETUP 1.ACPI Suspend type 2.USB Device wakeup from S3 3.Wake up by PCI/LAN 4.Power On by ring 4.Force Update ECSD 5. Allocate IRQ to VGA 6. Allocate IRQ to USB Ref: CMX / VER 05/05/05 : Select S3 : Enabled : Enabled : Enabled : Auto : Enabled : Enabled P a g e N o . 5 - 14 INSTALLATION PASSWORD Do not set any passwords for User or Operator Save the values and exit. If there are any changes from above menu , use default values. 1. 2. 3. 4. 5. 6. 7. 8. 9. 10. Partition the Hard Disk Drive into two drives C and D each of approximately 20GB. Install Windows XP in drive C Install Service Pack 2.0 and above for Win XP Install printer driver Delete all temp files Install CHEMIX Application software in Drive C Copy the database in drive D Run the software and test all the features After complete testing clean the database Shut down the system through Windows SHUT DOWN menu. Ensure that the power is switched off only after proper system down. Ref: CMX / VER 05/05/05 P a g e N o . 5 - 15 Installation SOFTWARE SETUP CHEMIX-800 SERVICE MANUAL 5.6 SOFTWARE INSTALLATION Prerequisites before CHEMIX installation Verify whether CHEMIX software is installed on the computer. If yes then exit from the CHEMIX software application (CHEMIX software application should not be open). Take a back up of C:\ Program Files\ Chemix800\xl.mdb Installation Un installation Procedure Uninstall the existing CHEMIX software programme as follows. Click on the MY COMPUTER icon. Click on the CONTROL PANEL icon. Double click on the ADD \ REMOVE Program icon. Select by clicking the CHEMIX programme from list in the box. Click on the ADD \ REMOVE button. A message “Are you sure that you want to remove CHEMIX (version number) & all its components?” will be displayed. Click on the YES button. A message “Remove all shared components” will be displayed. Click on the REMOVE ALL button. Click on the OK button. A message “Un installation procedure completed” will be displayed at the end. Go to the DESK TOP screen, and right click on the CHEMIX programme icon. Click on DELETE. Click on the YES button. Delete all temp files before installation. Installation process Insert the CHEMIX software CD into the CD drive. Click START- menu and select run option. This will open a run panel. Click browse and double click on CHEMIX(version). Select set up file and click open. Click OK. Welcome message will be displayed, click OK. Then click on the computer Icon. If version conflict message is displayed, click on NO TO ALL. Installation procedure is then completed. Ref: CMX / VER 05/05/05 P a g e N o . 5 - 16 INSTALLATION 5.7 POWERING UP THE ANALYSER Voltage & frequency Single-phase continuous stabilized AC 220volts ± 10V, 50 Hz (AC 110volts ± 10V, 60 Hz factory setting).The CHEMIX-800 comes equipped with a three-pin power cord. The type of cord and plug depends on the source voltage for the system. If extreme and sudden Voltage fluctuations exists then the use of an On line Un interrupted power supply is strongly recommended. Perfect earthing must be provided at the power source with all applicable local requirements (a grounded, 3 pin power plug only should be used.) Grounding Plug points Four 5 amp sockets must be available near the analyser. It is recommended that two extra sockets be provided near the analyser, for use by a measuring equipment or engineering tool if required while servicing (Example Oscilloscope, Soldering iron etc.). Heavy-duty electrical devices like Air conditioners, refrigerator's, ovens etc. should not be operated on the same electrical lines as the Analyser. NOTE Failure to properly ground the CHEMIX-800 bypasses important safety features and may result in an electrical hazard. NOTE The 3 pin power chord plugs shipped with the analyser, computer, printer and monitor may not be compatible with the local electrical sockets of some Countries, please to have these procured from the local market prior to the installation NOTE Before powering ON the analyser verify and confirm that all ISE electrodes have been properly installed, their walls are flush against each other with the rubber “O” rings in place Ref: CMX / VER 05/05/05 P a g e N o . 5 - 17 Installation (Four sockets are required, one each for the analyser, computer monitor and printer. CHEMIX-800 SERVICE MANUAL Locate and pull open, in the direction towards you, the L.H.S door for access to ISE power supply PCB. Locate and connect, the 2 pin power connector to the ISE power supply PCB NOTE The Analyser is shipped with the 2-pin power connector, to the ISE power supply PCB disconnected. This is done in order to prevent accidentally powering on the ISE module without the Electrodes connected. Before powering up the analyser, fit all ISE electrodes, connect ISE CAL A bottle and tubes, only after doing so, connect the 2-pin power connector to the ISE power supply PCB Installation After carrying out the above-mentioned electric verifications, connect the power chord to the analyzer, computer and monitor Locate, and power ON the rear power switch on the back panel of the analyser, and confirm that the reagent cooling fan has started rotating, also touch and physically verify the cooling of the reagent tray, also verify from the sound, that the ISE pumps have started priming. Locate, and power ON the switch on the right side of the analyser, verify that the system initialises, and home all the assemblies. Power on the computer system, on the desktop menu screen, double click on the CHEMIX-800 icon, Verify that the analyser initialises its self, and home all assemblies. Please note after installing the CHEMIX software, and you activate the software by double clicking on the CHEMIX Icon, only the first time you are obligated, to enter the username and password, please enter the same username and password, as mentioned on the CD cover of the application software. Ref: CMX / VER 05/05/05 P a g e N o . 5 - 18 INSTALLATION 5.8 VERIFYING PROPER MECHANICAL FUNCTIONS VERIFY LIGHT BEAM ALIGNMENT Switch ON the machine and Initialise RCT assy. through the Service Check menu. Remove the CRU unit thumbscrew, lift up the laundry unit and gently remove the cuvette, which is the path of the light beam. Insert the Light beam, centring gauge (Part No. FSPS2723 that is supplied in the accessories box) in place of the cuvette, making sure it touches the wall of the cuvette housing on all sides. Loosen the 3 allen screws located at the centre of the RCT cuvette table, adjust its position such that the light beam falls on the centre black coloured mark on the calibration plate. Tighten the mounting screws. REMARKS/ OBSERVATIONS In the initialised or reset position the following are the positions of the cuvettes. Probe1 - cuvette position 72 Probe2 - cuvette position 71 Probe3 - cuvette position 70 Probe4 - cuvette position 69 Probe5 - cuvette position 68 Probe6 - cuvette position 67 Light path - cuvette position 66 Suction probe - cuvette position 65 Drier probe - cuvette position 64 Light beam should fall on the centre of the mark on the calibration plate NOTE: Take care that the centring is not disturbed while tightening the RCT cuvette table mounting screws. Gently put back the cuvette in its position, and fit the laundry back in place. Ref: CMX / VER 05/05/05 P a g e N o . 5 - 19 Installation ACTION CHEMIX-800 SERVICE MANUAL VERIFY PROPER LAUNDRY ALIGNMENT Installation ACTION REMARKS/ OBSERVATIONS Initialise the system, through the Service Check menu. In the initialised or reset position the following are the positions of the cuvettes. Probe1 - cuvette position 72 Probe2 - cuvette position 71 Probe3 - cuvette position 70 Probe4 - cuvette position 69 Probe5 - cuvette position 68 Probe6 - cuvette position 67 Light path - cuvette position 66 Suction probe - cuvette position 65 Drier probe - cuvette position 64 Disconnect the CRU up/down motor connector. Gently slide the Laundry vertical shaft/pillar, downwards into the cuvettes. Verify that all laundry probes are in the centre of their respective cuvettes, and that the cuvette drier (Teflon) is in the centre of the cuvette. To centre the laundry assembly, loosen the four allen mounting screws on which the laundry vertical shaft/pillar is mounted. If required you can also center the laundry assembly,by adjusting the position by the four allen screws on which the entire laundry assembly is mounted on the analyser casting. To adjust the circular angle of the laundry assembly, locate the small allen screw that is embedded inside the laundry vertical shaft/pillar top end To center the individual laundry probes in their respective cuvettes, loosen the white delrin screw caps located at the top of the probes. Verify that the cuvette drier, and suction probes touch the bottom of the cuvette , Select SERVICE CHECK >CRU & REACTION TRAY>CUVETTE RINSING UNIT > INITIALISE>DOWN> To adjust the vertical distance travelled by the laundry, loosen and adjust, the CRU-DOWN (lower opto) sensor. Ref: CMX / VER 05/05/05 1) Verify that after the cuvette drier and suction probe goes down into the cuvette, the spring loaded probe, moves up by about 2mm. ( NOTE THIS IS VERY IMPORTANT) 2) Verify that the remaining five laundry probes also touch the bottom of the cuvette slightly (NOTE: this is not very important.) P a g e N o . 5 - 20 INSTALLATION VERIFY SAMPLE ARM ALIGNMENT NOTE : The sample arm is aligned with the RCT in the reset position. NOTE : The sample arm alignment is done with respect to the sample cuvette only, and only a verification is done at the other positions. ACTION REMARKS/ OBSERVATIONS Initialise the system, through the Service Check menu. Place a sample cup filled with tap water in positions number 1, S1, & B1on the sample tray. 1. Select SERVICE CHECK >SAMPLE ARM > INITIALISE >TROUGH TO SAMPLE OUTER>SAMPLE TO CUVETTE>DOWN> The Sample probes moves down until it senses the present of liquid in the cuvette and then stops. Verify that the hollow dispense needle is in the centre of the cuvette, 2. Adjust the sample probe as follows. Lift and remove the probe plastic cover and locate the Allen screw, on the top end of the arm shaft. Slightly loosen this Allen screw, and rotate the top plate of the arm, so as to position the mean distance between the dispense needle and sensor needle, to be in the centre of the cuvette. When doing this, make sure that, only the horizontal top plate rotates and the main vertical shaft is stationary Tighten the Allen screw. Verify proper centring by repeating steps 1 to 2 Sample probe mean distance between the dispense needle and sensor needle to be at the centre of the respective cuvette NOTE: Take care that the centring is not disturbed while tightening the Allen screw. Select INITIALISE >SAMPLE OUTTER>DOWN The Sample probes moves down until it senses the present of liquid in cup number 1, and then stops. Verify that the dispense needle is at the centre of the sample (Outer), cup number1 Select INITIALISE >STANDARD OUTER>DOWN Verify that the dispense needle is at the centre of the standard (outer) cup number S1 Select INITIALISE >STANDARD INNER>DOWN Verify that the dispense needle is at the centre of the standard (inner) cup number B1. Select INITIALISE >SAMPLE OUTER>SAMPLE TO CUVETTE>CUVETTE TO DRAIN Verify that the dispense needle is at the centre of the SPT drain. Ref: CMX / VER 05/05/05 P a g e N o . 5 - 21 Installation With the help of a pipette or syringe, pipette 300 to 500 ul of tap water (As tap water has ions for conduction, Do not use deionised or distilled water) into cuvette number 50 and 42. CHEMIX-800 SERVICE MANUAL Select INITIALISE > SAMPLE OUTER>SAMPLE TO CUVETTE>CUVETTE TO DRAIN>DRAIN TO TROUGH Verify that the mean distance between the dispense needle and sensor needle is at the centre of the SPT trough. Select INITIALISE >SAMPLE OUTER >SAMPLE TO ISE Verify that the dispense needle is at the centre of the ISE sample port. Installation To align the probe to the ISE sample port, loosen the four allen screws of the ISE assembly and move the entire ISE assembly in the direction required, once properly positioned, tighten the four allen screws. Select INITIALISE > TROUGH TO DILUTION CUVETTE Verify that the dispense probe is at the centre of the Dilution. Cuvette number 42. Select INITIALISE > DILUTION CUVETTE TO CUVETTE Verify that the probe is at the centre of both the cuvettes number 42 and 50 VERIFYING PROPER SAMPLE ARM FUNCTION Initialise the system, trough the service Check menu, Select SERVICE CHECK >SAMPLE ARM > INITIALISE >LINK>TROUGH TO SAMPLE OUTER>SAMPLE TO CUVETTE. The sample arm will move over Sample cup number 1, go down till it senses the liquid. The syringe plunger moves down, aspirating sample from the cup, the arm then moves to the dispense cuvette position (cuvette number 50), goes down into the cuvette till it senses liquid Stops and then move to the drain position, where the contents of the probe is discarded, The analyser does this multiple times till the STOP button is clicked, the sample cup is empty, or an error has occurred. Ref: CMX / VER 05/05/05 P a g e N o . 5 - 22 INSTALLATION VERIFY REAGENT 2 ARM ALINGMENT NOTE : The Reagent 1 arm is aligned with the RCT in the offset position. NOTE : The Reagent 1 arm alignment is done with respect to cuvette No 52 only, and only a verification is done at the other positions. ACTION REMARKS/ OBSERVATIONS Initialise the system, through the Service Check menu. To rotate the RCT tray to the offset position, select SERVICE CHECK>CRU & REACTION TRAY>REACTION TRAY>NITIALISE >OFFSET> Installation Place a large 50 ml reagent bottle filled with tap water in position number 1 on the reagent tray (use only tap water as it has ions for conduction, Do not use deionised or distilled water) Now go to “SERVICE CHECK > REAGENT 1 ARM 1. Select INITIALISE >TO REAGENT OUTER>REAGENT TO CUVETTE The Reagent1 probes moves over to cuvette number 52. NOTE: the probe has two needles (1.Dispense needle that is hollow & 2. Sensor needle). Verify that the hollow dispense needle is in the centre of the cuvette, 2. Adjust the Reagent 1 probe as follows. Lift and remove the probe plastic cover and locate the Allen screw, on the top end of the arm shaft. Slightly loosen this Allen screw, and rotate the top plate of the arm, so as to position the dispense needle in the centre of the cuvette. When doing this, make sure that, only the horizontal top plate rotates and the main vertical shaft is stationary Tighten the Allen screw. Verify proper centring by repeating steps 1 to 2 Verify that the Reagent probe dispense needle, is at the centre of cuvette number 52. Click ALIGN REAGENT INNER Button Select INITIALISE >REAGENT INNER >DOWN The Reagent 1 probe will move down into the reagent bottle number1, until it senses liquid. Verify that the probe is at the centre of the reagent bottle at position number 1 on the reagent tray. NOTE: Take care that the centring is not disturbed while tightening the Allen screw. Click ALIGN REAGENT OUTTER Button Select INITIALISE >REAGENT OUTTER >DOWN The Reagent 1 probe will move down into the reagent bottle number4, until it senses liquid. Select INITIALISE >REAGENT INNER> REAGENT TO CUVETTE>CUVETTE TO DRAIN Verify that the probe is at the centre of the R1PT drain. Select INITIALISE > REAGENT INNER> REAGENT TO CUVETTE>CUVETTE TO DRAIN> DRAIN TO TROUGH Verify that the probe is at the centre of the R1PT trough. Ref: CMX / VER 05/05/05 P a g e N o . 5 - 23 CHEMIX-800 SERVICE MANUAL VERIFYING PROPER REAGENT 1 ARM FUNCTION Initialise the system, trough the service Check menu, To rotate the RCT tray to the offset position, select SERVICE CHECK>CRU & REACTION TRAY>REACTION TRAY>NITIALISE >OFFSET> Installation Select SERVICE CHECK >REAGENT 1 ARM > INITIALISE >LINK>REAGENT INNER>REAGENT TO CUVETTE. The Reagent arm will move over Reagent bottle number 1, go down till it senses the liquid. The syringe plunger moves down, aspirating reagent from the bottle, the arm then moves to the dispense cuvette position (cuvette number 52), pauses and then moves to the drain position, where the contents of the probe is discarded, The analyser does this multiple times till the STOP button is clicked, the reagent bottle is empty , or an error has occurred. Ref: CMX / VER 05/05/05 P a g e N o . 5 - 24 INSTALLATION VERIFY REAGENT 2 ARM ALINGMENT NOTE : The Reagent 2 arm is aligned with the RCT in the reset position. NOTE : The Reagent 2 arm alignment is done with respect to cuvette No 39 only, and only a verification is done at the other positions. ACTION REMARKS/ OBSERVATIONS Now go to “SERVICE CHECK > REAGENT 2 ARM 1. Select INITIALISE >TO REAGENT 2. INNER>REAGENT TO CUVETTE R2 The Reagent2 probes moves over to cuvette number 36. Verify that the hollow dispense needle is in the centre of the cuvette, 2. Adjust the Reagent 2 probe as follows. Lift and remove the probe plastic cover and locate the Allen screw, on the top end of the arm shaft. Slightly loosen this Allen screw, and rotate the top plate of the arm, so as to position the dispense needle in the centre of the cuvette. When doing this, make sure that, only the horizontal top plate rotates and the main vertical shaft is stationary Tighten the Allen screw. 3. Verify proper centring by repeating steps 1 to 2 Verify that the Reagent probe dispense needle, is at the centre of cuvette (R2) number 36. Select INITIALISE >REAGENT INNER >DOWN The Reagent 2 probe will move down into the reagent bottle number45, until it senses liquid. NOTE : The Reagent 2 arm verification on the reagent tray, is done only for Reagent inner at position number 45. NOTE: Take care that the centring is not disturbed while tightening the Allen screw. Verify that the probe is at the centre of the reagent bottle at position number 45 on the reagent tray. Select INITIALISE >REAGENT INNER> REAGENT TO CUVETTE R2> R2 CUVETTE TO DRAIN Verify that the probe is at the centre of the R2PT drain. Select INITIALISE > REAGENT INNER> REAGENT TO CUVETTE R2 > R2 CUVETTE TO DRAIN> DRAIN TO TROUGH Verify that the probe is at the centre of the R2PT trough. Ref: CMX / VER 05/05/05 P a g e N o . 5 - 25 Installation Initialise the system, through the Service Check menu. Place a large 50 ml reagent bottle filled with tap water in position number 1, and a small 20 ml reagent bottle, filled with tap water in position number 4, on the reagent tray (use only tap water as it has ions for conduction, Do not use deionised or distilled water) CHEMIX-800 SERVICE MANUAL VERIFYING PROPER REAGENT 2 ARM FUNCTION Initialise the system, trough the service Check menu, To rotate the RCT tray to the reset position, select SERVICE CHECK>CRU & REACTION TRAY>REACTION TRAY>NITIALISE >RESET> Installation Select SERVICE CHECK >REAGENT 2 ARM > INITIALISE >LINK>REAGENT INNER>REAGENT TO CUVETTE (R2). The Reagent arm will move over Reagent bottle number 45, go down till it senses the liquid. The syringe plunger moves down, aspirating reagent from the bottle, the arm then moves to the dispense cuvette position (cuvette number 39), pauses and then moves to the drain position, where the contents of the probe is discarded, The analyser does this multiple times till the STOP button is clicked, the reagent bottle is empty, or an error has occurred. VERIFY STIRRER ARM ALINGMENT NOTE : The Stirrer arm is aligned with the RCT in the offset position. NOTE : The Stirrer arm alignment is done with respect to cuvette No 39 for stirrer paddle No1, and cuvette No 50 for stirrer paddle No 2 and with the paddles rotating, only verification is done at the other positions. ACTION REMARKS/ OBSERVATIONS Initialise the system, through the Service Check menu. To rotate the RCT tray to the offset position, “SERVICE CHECK> STIRRERS > Click on RCT OFFSET button. 1. Select INITIALISE >ROTATE TO CUVETTE 1> DOWN> The Stirrer paddle No 1 goes into cuvette No 50 & Stirrer 2 goes into the spare hole on 5 piece top Select UP> Verify that Stirrer 1 is at the centre of the cuvette No 50 & Stirrer 2 is at centre of spare hole on 5 piece top Stirrer Paddle shaft Cuvette wall 1. Select INITIALISE > ROTATE TO CUVETTE 2> DOWN> Select the ON button to start the Stirrer paddle motors. 2. Adjust the Stirrer paddles as follows. Lift and remove the Stirrer arm plastic cover and locate the Allen screw, on the top end of the arm shaft. Ref: CMX / VER 05/05/05 Verify that the stirrer 1 is at the centre of cuvette No 39 & Stirrer2 is at the centre of cuvette No 50 NOTE: Make sure that the stirrer paddles do not touch the walls and the bottom of the P a g e N o . 5 - 26 INSTALLATION Slightly loosen this Allen screw, and rotate the top plate of the arm, so as to position the paddle No 1 in the centre of cuvette no 39 and paddle No 2 in the centre of No 50., When doing this, make sure that, only the horizontal top plate rotates and the main vertical shaft is stationary cuvette. NOTE: Take care that the centring is not disturbed while tightening the Allen screw. Tighten the Allen screw. 3. Verify proper centring by repeating steps 1 to 2 Stirrer Paddle shaft Installation Cuvette wall VERIFY SAMPLE TRAY ALINGMENT The X – axis is aligned using the Sample arm alignment procedure. The Y – axis is aligned using the Sample Tray alignment procedure. Y-axis X-axis ACTION Sample cup No 1 REMARKS/ OBSERVATIONS Initialise the system, through the Service Check menu. SERVICE CHECK >SAMPLE ARM > ALIGN SAMPLE OUTTER. Place a sample cup filled with tap water in sample positions number 1 on the sample tray and positions S1, & B1 on the standard tray. (As tap water has ions for conduction, Do not use deionised or distilled water) 1. Select SERVICE CHECK >SAMPLE ARM > INITIALISE >SAMPLE OUTER> DOWN> The Sample probes moves down until it senses the present of liquid in the Cup No 1 and then stops. Verify that the dispense needle is in the centre Ref: CMX / VER 05/05/05 Sample probe dispense needle, is at the centre of sample cup No 1. P a g e N o . 5 - 27 CHEMIX-800 SERVICE MANUAL of the cuvette, 2. Select SERVICE CHECK > INITIALISE> Adjust the sample tray as follows. 3. Lift and remove the sample tray, locate the 3 Phillips screw, on the centre shaft. 4. Slightly loosen the three Phillips screws, and slowly rotate the top plate of the shaft, in the direction in which the correction is required, when doing this, make sure that, only the horizontal top plate rotates and the main vertical shaft is stationary Tighten the Phillips screw. Place the sample tray back in position NOTE: Take care that the centring is not disturbed while tightening the Phillips screws. Installation VERIFY REAGENT TRAY ALIGNMENT NOTE : The Reagent tray is aligned with reference to Reagent bottle number1, and Reagent 1 arm Probe only. The Y – axis is aligned using the Reagent 1 arm alignment procedure. The X – axis is aligned using the Reagent Tray alignment procedure. Y-axis X-axis Reagent bottle No 1 ACTION REMARKS/ OBSERVATIONS Initialise the system, through the Service Check menu. Place a Large 50 ml Reagent bottle filled with tap water in Positions number 1 on the reagent tray (As tap water has ions for conduction, Do not use deionised or distilled water) . Select SERVICE CHECK >REAGENT 1 ARM > ALIGN RGT INNER button. 1. Select SERVICE CHECK >REAGENT 1 ARM > INITIALISE >REAGENT INNER> DOWN> The Reagent probes moves down until it senses the present of liquid in the BOTTLE No 1 and then stops. Verify that the dispense needle is in the centre of the Reagent bottle. 2. Select SERVICE CHECK > INITIALISE> Adjust the Reagent tray as follows. Ref: CMX / VER 05/05/05 P a g e N o . 5 - 28 INSTALLATION 3. Lift and remove the Reagent tray, locate the 3 Allen screw, on the centre shaft as shown in figure 9.1 4. Slightly loosen the three Allen screws, and slowly rotate the top plate of the shaft, in the direction in which the correction is required, when doing this, make sure that, only the horizontal top end rotates and the main vertical shaft is stationary Tighten the Allen screw. Place the Reagent tray back in position NOTE: Take care that the centring is not disturbed while tightening the Allen screws. Reagent tray 3 Allen screws Centre Shaft Ref: CMX / VER 05/05/05 P a g e N o . 5 - 29 Installation Figure 9.1 CHEMIX-800 SERVICE MANUAL 5.9 VERIFYING PROPER HYDRAULICS FUNCTION LOAD CELL VERIFICATION PROCEDURE ACTION OBSERVATIONS / RESULT Place the 20 Ltrs. Can with only 2 Ltrs. of water in it on the “DI water” tray. The buzzer should turn ON and the LED marked “Water” should blink. Apply slight pressure on the can. The buzzer should turn OFF and the LED marked “Water” should go OFF. The buzzer should turn ON and the LED marked “DET” should blink. Place a 10 Ltrs can with only 1.5 Ltrs of water in it, on the “ Cleaning soln” tray Installation Apply slight pressure on the can. Place the 10Ltr. can with only 7.5 Ltrs. of water in it on the “Haz. Waste” tray. The buzzer should turn OFF and the LED marked “Det” should go OFF. The buzzer should turn ON and the LED marked “Haz Waste” should blink. Remove about 0.5 Ltrs. of water from the can. The buzzer should turn OFF and LED marked “Haz. Waste” should go OFF. Place the 20 Ltr. can with only 17.5 Ltrs. of water in it on the “Waste” tray. The buzzer should turn ON and the LED marked “Waste” should blink. Remove about 1 Ltr. of water from the can. The buzzer should turn OFF and the LED marked “Waste” should go OFF. CKD VALVES VERIFICATION PROCEDURE ACTION OBSERVATIONS Locate and the pressure on the pressure gauge Pressure gauge should be between 0.8 and 0.9 bar. Go to the Service check menu, click on the pump and trough valves button, Switch ON the CKD valves for R1PT, R2PT , SPT & STIRR, one after the other. Switch ON all the switches together and keep the hydraulic assembly ON for some time, till the entire water line is primed and free of trapped air bubbles. Observe a small fountain of water in R1PT, R2PT/SPT & Stirrer troughs. Verify that the water flow should be smooth and there should be no leakages and that the pressure gauge does not fluctuate. LAUNDRY FLOW ADJUSTMENT PROCEDURE ACTION CLEANING SOLUTION FLOW ADJUSTMENT PROCEDURE Go to service check menu, and initiate a cuvette rinse cycle. OBSERVATIONS Monitor the flow of cleaning solution from the cleaning solution can to the DET pump, trough the tubing’s to the first laundry probe, and into the first cuvette, To regulate the detergent flow, remove the right side Ref: CMX / VER 05/05/05 P a g e N o . 5 - 30 INSTALLATION panel and locate the black coloured, flow regulator on the top of the detergent pump, Adjust it in order to enable the detergent flow into the first cuvette, to fill up to 3\4 of the total volume of the cuvette. Verify that there is no spillage of detergent from any of the cuvettes. Observe this carefully for multiple rinse cycles. DEIONISED WATER FLOW VERIFICATION PROCEDURE Go to service check menu, and initiate a cuvette rinse cycle. OBSERVATION Monitor the flow of deionised water from the DI water can, to the pump , to the pressure vessel, and trough the tubing’s into the cuvettes, under laundry probes 2, 3, 4 & 5; also verify a proper drain from all the cuvette. To regulate the deionised water flow open the rear panel ISE door, locate the flow regulator, this regulator is connected in line with the deionised water tubing to the laundry system. Adjust it, so that at the time of rinsing, the deionised water flow into the second, third, fourth and fifth cuvette, located under the second, third, fourth and fifth laundry probe fills to 3\4 the total volume of the cuvette. Verify that there is no spillage of deionised water from any of the cuvettes. Observe this carefully for multiple rinse cycles. VERIFY PROPER PROBE DISPENSE SAMPLE From the SERVICE CHECK menu select SAMPLE ARM, click on INITIALIZE , click on SAMPLE OUTER, click on SAMPLE TO CUVETTE, click on CUVETTE TO DRAIN, CLICK on the GO BACK button. From the SERVICE CHECK menu select SYRINGES then select SAMPLE SYRINGE, click on INITIALIZE and click on the VALVE ON. Check and confirm that a clear uninterrupted straight jet of water emerges from the probe, that is free of any trapped air bubbles. Do this till the entire tubing and probe is completely primed and free of air bubbles. REAGENT 1 From the SERVICE CHECK menu select REAGENT 1 ARM, click on INITIALIZE , click on REAGENT OUTER, click on REAGENT TO CUVETTE, click on CUVETTE TO DRAIN, CLICK on the GO BACK button. From the SERVICE CHECK menu select SYRINGES then select REAGENT 1 SYRINGE, click on INITIALIZE and click on the VALVE ON. Check and confirm that a clear uninterrupted straight jet of water emerges from the probe that is free of any trapped air bubbles. Do this till the entire tubing and probe is completely primed and free of air bubbles Ref: CMX / VER 05/05/05 P a g e N o . 5 - 31 Installation ACTION CHEMIX-800 SERVICE MANUAL REAGENT 2 From the SERVICE CHECK menu select REAGENT 2 ARM, click on INITIALIZE, click on REAGENT OUTER, click on REAGENT TO CUVETTE (R2), click on (R2) CUVETTE TO DRAIN, CLICK on the GO BACK button. Installation From the SERVICE CHECK menu select SYRINGES then select REAGENT 2 SYRINGE, click on INITIALIZE and click on the VALVE ON. Check and confirm that a clear uninterrupted straight jet of water emerges from the probe that is free of any trapped air bubbles. Do this till the entire tubing and probe is completely primed and free of air bubbles Ref: CMX / VER 05/05/05 P a g e N o . 5 - 32 INSTALLATION 5.10 TEMPERATURE VERIFICATION PROCEDURE REAGENT TEMPERATURE VERIFICATION PROCEDURE Fill a 20 ML reagent bottle, place it on the reagent tray, cover the reagent tray with the reagent tray cover, wait for about an hour, till the temperature has stabilised, Insert a sensitive thermal measuring device, into the reagent bottle and measure the temperature, Go to the SERVICE CHECK menu and click on the TEMPERATURE button, and verify the temperature of the reagent tray, displayed on the screen, the temperature displayed should be approximately 12 to 15 degrees lower than the ambient room temperature. The measured temperature and the displayed temperatures should approximately match. NOTE Reaction tray temperature should be measured only after the analyser has reached thermal stability by having completed a warm up time of at least 30 minutes After having reached thermal stability, introduce a thermistor into a cuvette no 34 filled with 180µl of cold (7deg c) DI water, make sure that the measuring device is completely inserted into the liquid wait for about 5 minutes and note down the reading, it should be 37 degrees +/- 0.2 degrees. Go to the SERVICE CHECK menu and click on the TEMPERATURE button, and verify the temperature of the Reaction tray, displayed on the screen, the temperature displayed should match the value read using thermistor. Ref: CMX / VER 05/05/05 P a g e N o . 5 - 33 Installation REACTION TEMPERATURE VERIFICATION PROCEDURE CHEMIX-800 SERVICE MANUAL 5.11 PHOTOMETER VERIFICATION PROCEDURE Photometer check procedure should be carried out only after the analyser and the lamp has reached thermal stability after having completed a warm up time of at least 30 minutes NOTE In the SERVICE CHECK menu, click on the PHOTOMETER button, and the below screen will be displayed Installation Click on the AUTO SPAN SET button and then click on the START button, the analyser will automatically start a cuvette rinse and prepare a fresh clean cuvette, fill it with deionised water and place it in the light path, and will automatically check the transmitted light from this from this cuvette, and adjust the gain of each wavelength of the photometer, to obtain an acceptable signal level for processing of individual wavelengths. Gain indicators Gain box Verify that the gains indicators show green and that none of them should show red. Also the gain values displayed in the Gain Box for a 340 nm Wavelength should be between, 70 to 125. Click on the STOP button, click on the MANUAL SPAN SET button, click on the START button , then select individual detector wavelengths by clicking on them and note down the gain values The displayed gain values in the Gain box for 505 to 660 nm Wavelength should be between 70 to 240 Go to MAINTENANCE / CUVETTE RINSE, and perform a Cuvette rinse cycle. Check and verify proper cuvette blank readings for all wavelengths in PREVIOUS DATA / CUVETTE BLANK. Ref: CMX / VER 05/05/05 P a g e N o . 5 - 34 INSTALLATION 5.12 BCR Alignment Procedure Reagent BCR: 1. Mount the ‘L’ shaped BCR clamp on the base. 2. Fix the clamp holder screw. 3. Arrange the BCR such that the distance between the BCR surface plane and the centre of the outer reagent bottle should not be less than 28.75 mm as well the distance between the centre of the inner bottle to the surface plane of the BCR should not be greater than 53.75 mm 4. Place the inner bottles, run the barcode scan and adjust the beam angle by small rotational variations so that the beam will fall on the BC as shown in the fig. Installation 5. Place the outer bottles, run the barcode scan and adjust the beam angle by small rotational variations so that the beam will fall on the BC as shown in the fig. 6. Repeat procedure pt no. 4 and 5 to get best possible alignment and barcode read. NOTE : 1.The accurate separation between the BCR surface and the bottle surface is specified in the Figures attached here with (pg.36 to 38). 2. Barcode label placement on Reagent bottles is specified in the figures attached here with (pg. 39). Ref: CMX / VER 05/05/05 P a g e N o . 5 - 35 CHEMIX-800 SERVICE MANUAL Installation BAR CODE SCANNER DIMN Ref: CMX / VER 05/05/05 P a g e N o . 5 - 36 INSTALLATION Installation BAR CODE SCANNER DIMN Ref: CMX / VER 05/05/05 P a g e N o . 5 - 37 CHEMIX-800 SERVICE MANUAL Installation BAR CODE SCANNER DIMN Ref: CMX / VER 05/05/05 P a g e N o . 5 - 38 Installation INSTALLATION Ref: CMX / VER 05/05/05 P a g e N o . 5 - 39 CHEMIX-800 SERVICE MANUAL Sample BCR: 1. Mount the ‘L’ shaped BCR clamp on the base. 2. Fix the clamp holder screw. 3. Arrange the BCR such that the distance between the BCR surface plane and the centre of the outer reagent bottle should not be less than 28.75 mm as well the distance between the centre of the inner Installation bottle to the surface plane of the BCR should not be greater than 53.75 mm 4. Place the inner Tubes, run the barcode scan and adjust the beam angle by small rotational variations so that the beam will fall on the BC as shown in the fig. 5. Place the outter Tubes, run the barcode scan and adjust the beam angle by small rotational variations so that the beam will fall on the BC as shown in the fig. 6. Repeat procedure pt no. 4 and 5 to get best possible alignment and barcode read. N.B: 1.The accurate separation between the BCR surface and the bottle surface is specified in the Figures attached here with (pg. 41 to 43). 2. Barcode label placement on Reagent bottles is specified in the figures attached here with (pg. 44). Ref: CMX / VER 05/05/05 P a g e N o . 5 - 40 INSTALLATION Installation ASP BAR CODE SCANNER DIMN Ref: CMX / VER 05/05/05 P a g e N o . 5 - 41 CHEMIX-800 SERVICE MANUAL Installation ASP BAR CODE SCANNER DIMN Ref: CMX / VER 05/05/05 P a g e N o . 5 - 42 Installation INSTALLATION ASP BAR CODE SCANNER DIMN Ref: CMX / VER 05/05/05 P a g e N o . 5 - 43 Installation CHEMIX-800 SERVICE MANUAL Ref: CMX / VER 05/05/05 P a g e N o . 5 - 44 Installation INSTALLATION Ref: CMX / VER 05/05/05 P a g e N o . 5 - 45 CHEMIX-800 SERVICE MANUAL Barcode Standards The Barcode can be generated using any of the following specifications 1. CODE 128 2. CODE 39 3. NW7 4. 2/5 INTERLEAVED The Barcode sticker layout is for the reagent (Fig. a) and for the sample (Fig. b)is shown above. The Barcode Sticker Placement: The Barcode stickers has to be placed at a distance of 20 mm from the bottom of Reagent bottle as well Installation Sample tube as shown in the figures(pg. 39 and pg. 44) above. Ref: CMX / VER 05/05/05 P a g e N o . 5 - 46 INSTALLATION 5.13 ANALYTICAL CHECK PROCEDURE ABSORBANCE TEST PROCEDURE (OPTIONAL) A solution of Potassium Dichromate is used to test the precision of the reagent and sample pipetting Preparation of Solution A Make up a 8.826 g/l solution of Potassium Dichromate as follows. Dilute 0.8826 grams of Potassium Dichromate in 100 ml of de-ionised water. This solution will be used as a sample for the sample precision test. Installation Preparation of Solution B Make up a 1 in 60 dilution of Solution A as follows: Add 59 ml of de-ionised water to 1 ml of Solution A, to make 60 ml of Solution B. Decant this into a reagent bottle for use in the reagent precision test METHOD Sample Absorbance test Use Solution A as a sample with de-ionised water as reagent A factor of 1000 is used. Reagent Absorbance test Use Solution B as a Reagent and de-ionised water as sample A factor of 1000 is used. Twenty replicates for each test should be used to facilitate meaningful and statistical analysis of the results. A Coefficient of Variation of < 1% for the reagent test and < 0.5% for the sample test should be regarded as requirement and should be met. Ref: CMX / VER 05/05/05 P a g e N o . 5 - 47 CHEMIX-800 SERVICE MANUAL CLINICAL TEST CHECK PROCEDURE Installation Date: Instrument Sr No: END POINT TEST FIXED TIME TEST KINETIC TEST GLU / CHO GLU / CHO GLU / CHO GLU / CHO GLU / CHO GLU / CHO GLU / CHO GLU / CHO GLU / CHO GLU / CHO GLU / CHO GLU / CHO GLU / CHO GLU / CHO GLU / CHO GLU / CHO GLU / CHO GLU / CHO GLU / CHO GLU / CHO MEAN SD CV% CRE / BUN CRE / BUN CRE / BUN CRE / BUN CRE / BUN CRE / BUN CRE / BUN CRE / BUN CRE / BUN CRE / BUN CRE / BUN CRE / BUN CRE / BUN CRE / BUN CRE / BUN CRE / BUN CRE / BUN CRE / BUN CRE / BUN CRE / BUN MEAN SD CV% GOT / GPT GOT / GPT GOT / GPT GOT / GPT GOT / GPT GOT / GPT GOT / GPT GOT / GPT GOT / GPT GOT / GPT GOT / GPT GOT / GPT GOT / GPT GOT / GPT GOT / GPT GOT / GPT GOT / GPT GOT / GPT GOT / GPT GOT / GPT MEAN SD CV% NOTE: % CV should not Exceed 3 % Ref: CMX / VER 05/05/05 P a g e N o . 5 - 48 RELOCATION 6 6. Relocation This section provides instructions for decontaminating, draining out the analyser, disconnecting peripherial devices and packing the analyser securely for transportation, and is intended for use by only a Transasia Biomedicals trained Field Service Engineer. NOTE NOTE WARNING CAUTION NOTE BIOHAZARD BIOHAZARD Only a trained service representative should carry out the relocation of the analyzer. Problems resulting from the relocation of the Analyzer by anyone other than a service representative will not be covered under warranty. Besides the various decontamination procedures listed out, under chapter 6.2, “UNINSTALLING AND DECONTAMINATING THE SYSTEM “. Other procedures listed out by local, State or National law/ authorities, should also be carried out, all bio hazardous items must also be disposed off in accordance with these regulations. Voltages present in the CHEMIX-800 can produce severe electrical shocks. Place the analyzer and the computer in the OFF (0) position and disconnect all line chords before attempting any maintenance procedure. Pack the Analyzer carefully; otherwise you can damage accurately adjusted optical and electronic assemblies Any Analyser/Analyser spares being shipped back, that has had Bio hazardous material run on it, must be decontaminated, and the decontamination certificate that has been included under chapter 6.4 “ CERTIFICATE OF DECONTAMINATION”, must be filled , duly signed, and attached with the shipping documents. Various Bio hazardous contaminated parts exists in a analyser that has been used, proper precaution should be taken to protect one self when relocating the analyser , as well as the decontamination procedures should be properly carried out as per the recommended procedures listed under chapter 6.2 “ UNINSTALLING AND DECONTAMINATING THE SYSTEM “. The Sample probe comes directly in contact with human sera and is highly biohazardus, please take the necessary precaution to protect yourself when carrying out this procedure. Ref: CMX / VER 05/05/05 Page No.6-1 Relocation 6.1 TOOLS AND MATERIALS REQUIRED FOR PACKING THE ANALYSER 6.2 UNINSTALLING AND DECONTAMINATING THE SYSTEM 6.3 PACKING THE ANALYSER 6.4 CERTIFICATE OF DECONTAMINATION CHEMIX-800 SERVICE MANUAL BIOHAZARD When carrying out this procedure, sufficient precaution should be taken to protect your self from potential injury or infection. To prevent contaminating yourself and others, treat all human sera as potentially Biohazards. Relocation 6.1 TOOLS AND MATERIALS REQUIRED FOR PACKING THE ANALYSER 1. 2. 3. 4. 5. 6. 7. 8. 9. 10. Base pallet with ‘ Z ” bracket and CHEMIX-800 standard wooden box. Cardboard boxes for the accessories. Protective Packing material like a bubble sheet, or foam. “ Z “ brackets with nuts, bolts and washers. CHEMIX-800 standard tool kit. Sodium hypo chloride Disposable paper tissues. Gloves. 5.25% SODIUM HYPO CHLORIDE (BLEACH SOLUTION) Four black stopper caps and a white semi transparent big cap required for the analyzer rear outlet nozzles Ref: CMX / VER 05/05/05 Page No.6-2 RELOCATION 6.2 UNINSTALLING AND DECONTAMINATING THE SYSTEM 1. From the Service Check menu perform a cuvette rinse cycle by clicking on the CUVETTE RINSE button, and then clicking on the YES button. . 2. Take a printout or a backup on a floppy, of the error log, do this by clicking on the PREVIOUS DATA button, then clicking on the RUN RECORD button, then click on the all data field then click on the SAVE ERRORS button, select the location where you require the data to be stored, and click the OK button. 4. Remove and discard, all Sample cups and Reagent bottles old and new (DO NOT SHIP THEM BACK WITH THE ANALYSER) 5. Remove the Cleaning solution and DI water cans, along with their external associated tubing’s and discard them in regulation with the local law (DO NOT SHIP THEM BACK WITH THE ANALYSER). 7. .To drain the ISE system, click on the SERVICE CHECK button, click on the ISE UNIT button, and perform a clean cycle followed by multiple PURGE cycles (approximately 15 cycles). Remove the Cal a bottle and discard its contents, perform multiple PURGE cycles (approximately 15 cycles). Remove the electrodes, dry them and pack them in their respective original boxes that were supplied with them. Place the electrodes in the accessories box. 8. Remove the Hydraulics side panel of the analyzer and locate the drain nut and tube, place the drain tube into a shallow container and open the drain nut, and allow the entire contents of the pressure vessel to drain out. After completing the draining procedure DO NOT FORGET TO CLOSE THE DRAIN NUT 9. Put the Black stopper caps onto the Biohazards waste, cleaning solution and Deionised water outlet nozzles and the white semi transparent big cap onto the waste outlet nozzle that is located on the rear of the analyzer. 10. Turn off the power to the Analyser, computer, monitor and printer. 11. Remove the Waste and Bio Hazardous waste cans, and discard them in regulation with the local law (DO NOT SHIP THEM BACK WITH THE ANALYSER). 12. Turn off the power to the Analyser, computer, monitor and printer. 13 . Disconnect all external cables and peripheral devices. Wipe the Trolley, Monitor, Computer and Keyboard external surface with a non abrasive cleaner, or a use a soft lint free clot moistened with a 0.5% dilution of a 5.25% Sodium Hypochloride (Bleach) solution to clean and decontaminate the trolley,computer, monitor and printer external surface. But before using it, make sure that you test it on a small section of the trolley and Computer, wait till it dries, see the results, only if you are satisfied that there is no damage or change of colour to plastic parts, then proceed to clean the entire Computer and Trolley with this cleaning solution. NOTE Make shure that\ no solution falls or seeps into the Computer, Monitor, Printer, or Keyboard 14. Adequately pack all the cables, Power chord, and peripheral devices into the accessories box. Ref: CMX / VER 05/05/05 Page No.6-3 Relocation 6. Drain the system as follows, Click on the SERVICE CHECK button, click on the CUVETTE RINSE button, and perform an entire cuvette rinse, repeat this cuvette rinse cycle multiple times till all the water from the Pressure Vessel and associated tubes have been drained out. CHEMIX-800 SERVICE MANUAL NOTE Relocation BIOHAZARD Do not ship any accessories that have been in contact with Bio Hazardous fluids. Due to possible spillage, the sample tray comes in contact with body fluids, To prevent contaminating yourself and others, treat all human sera as potentially Biohazards. Take the necessary precautions to protect your self from contamination and personal injury. 15 Lift and remove the Sample and reagent tray carousel, with the help of a soft brush and a lint free clot moistened in a 0.5 % dilution of a 5.25 % Sodium hypo chloride (bleach) solution clean and decontaminate the Sample and reagent tray, also remove all debris and spillage from the wells of the Sample and Reagent trays, dry and pack them individually, and appropriately into cardboard boxes. BIOHAZARD The Cuvettes comes directly in contact with human sera and is highly Biohazardus, please take the necessary precaution to protect yourself when carrying out this procedure. 16. Locate the thumb screws on top of the reaction tray, unscrew and gently lift the reaction tray cover, below the cover locate the three Allen screws, unscrew and lift the reaction tray, place it on a table. Remove each individual cuvette from their slots, making sure they do not get scratched, place them in a bowl containing a warm laboratory detergent (Recommended is a 2% solution of Extran). Rinse the cuvettes thoroughly with DI water, dry them and place them in their original boxes that were supplied with them. Clean the empty Reaction tray and incubation well with the help of a soft brush and lint free clot soaked in a diluted solution of 15% dilution of a 5.25% sodium Hypo chloride, dried them and fit the reaction tray with the cover back in place. 17. Remove the Sample , Reagent 1, and Reagent 2 Probes and place them into a beaker or test tube filled with a mild Sodium hypochloride or extran solution, the level of the solution should be such that only the lower two centimeters of the probe is in contact with the solution ( no liquid at any time should come in contact with the probe sensor wires embedded withen the probe upper half, if it does happen please rinse the probe in deionised water and thoroughly dry it before refitting ) The sample probe system comprises of two metal cocentric probes that are used for liquid level sensing. In order to clean this probe from the outside, soak a tissue paper in 5.0% dilution of a 5.25% Sodium Hypochloride (Bleach) , and wrap it around the probes upper end, then gently slide the tissue paper down towards the tip and out of the probe, repeat this cycle numerous times until you are satisfied that the probe is thoroughly cleaned . Make sure that this cleaning procedure is done only in one direction that is from top to down and not in the reverse. Repeate the same procedure with deinoised water, in order to clean the sample probe internally, gently with the help of a syringe flush the probe first with a 5.0% dilution of a 5.25% Sodium Hypochloride (Bleach) and then flush it multiple times with deionised water. Dry and adequately pack the probes with sufficient protection, in separate boxes. Ref: CMX / VER 05/05/05 Page No.6-4 RELOCATION Figure showing the Sample/Reagent1/Reagent2 NOTE When replacing the cuvettes back into their slots, make sure that you grip them by their sides and top end. Never let the fingers or any sharp object come in contact with the optical area. 18. Rotate the Sample, Reagent1 and Reagent 2 arm and lower them into the Sample and reagent tray, wells. 19. To decontaminate, the Stirrer paddles, soak a tissue paper in 5.0% dilution of a 5.25% Sodium Hypochloride (Bleach) , and wrap it around the probes upper end, then gently slide the tissue paper down towards the tip and out of the probe, repeat this cycle numerous times until you are satisfied that the probe is thoroughly cleaned . Make sure that this cleaning procedure is done only in one direction that is from top to down and not in the reverse. Repeate the same procedure with deinoised water, 20. Rotate the Stirrer arm, and lower them into the Sample and reagent tray, wells. BIOHAZARD The Cuvette rinsing unit suction probes comes directly in contact with human sera and is highly Biohazardus, please take the necessary precaution to protect yourself when carrying out this procedure. Unscrew the metal thumbscrew Located above the cuvette rinsing unit plate lift the cuvette-rinsing unit upwards And place it in a shallow tray. Clean individual probes with the help of a lint free tissue moistened with a 0.5% dilution of a 5.25% Sodium hypo chloride, rinse thoroughly with deionised water and dry. NOTE When refitting the Cuvette rinsing unit make sure that the suction probes go directly in the center of the cuvette slot, and they do not touch the walls Refit the Cuvette rinsing unit and place a buffer packing material between the top plate of the rinsing unit and the top plate of the analyzer. Ref: CMX / VER 05/05/05 Page No.6-5 Relocation Probe tip immersed in sodium Hypochloride solution CHEMIX-800 SERVICE MANUAL 6.3 PACKING THE ANALYZER NOTE CAUTION Do not ship any accessories the main analyzer box, all accessories should be shipped separately in the accessories box. Pack the Analyzer carefully; otherwise you can damage accurately adjusted optical and electronic assemblies 13. Wrap the plastic protective sheet, around the entire analyzer. CAUTION Lift or slide the analyzer onto the wooden pallet by holding the base plate of the analyzer, lifting the analyzer by its side panels can damage the analyzer. Relocation Place the base pallet just besides the right side (hydraulics side) of the analyzer, NOTE Make sure the pallet is positioned correctly, that is the analyzer will finally rest on the pallet, with the front of the analyzer facing the side marked front on the pallet Gently lift the hydraulics side of the analyzer (as it is the lighter side) and slide the wooden pallet below the side castors of the analyzer, when doing this a foot should be placed on the one or slide of the pallet to prevent it from lifting gently slide the analyzer onto the wooden pallet and position it, rotate the foot rests downwards, in order to enable the analyzer to rest on the foot rest only and the castors are in mid air, make sure that all four foot rests are adjusted to about the same height Carefully slide in the “ Z “ brackets one at a time, making sure that they fit into the groove provided on the footrest, bolt down the “Z” brackets onto the wooden pallet, as shown in figure 6.1. CAUTION The instrument must be shipped with the Castors in mid air; the “Z” bracket and the footrest should support the entire weight of the instrument. Cautiously fit the “ Z ” bracket to prevent any personal injury. Fit the side panels of the wooden box and make sure that the following markings are clearly indicated on the wooden box Indication as to which side is the top and which is the bottom of the analyzer, Fragile indication Do not tumble Do not stack on top this box Protect from sunlight and rain Precession instrument Copy of the certificate of decontamination Ref: CMX / VER 05/05/05 Page No.6-6 Relocation RELOCATION Ref: CMX / VER 05/05/05 Page No.6-7 CHEMIX-800 SERVICE MANUAL CERTIFICATE OF DECONTAMINATION TO WHOMSOEVER IT MAY CONCERN, THIS ANALYZER ALONG WITH ITS RELATED ACCESSORIES HAS BEEN INSPECTED AND DECONTAMINATED IN ACCORDANCE TO THE STIPULATED PROCEDURES LISTED OUT IN THE SERVICE MANUAL, UNDER CHAPTER “6.2 UNINSTALLING AND DECONTAMINATING THE SYSTEM” AND IN ACCORDANCE WITH LOCAL AND STATE LAWS. Relocation INSTRUMENT MODEL: SERIAL NUMBER: DISTRIBUTORS NAME: DISTRIBUTORS ADDRESS: CITY: COUNTRY: CUSTOMERS NAME: CUSTOMERS ADDRESS: CITY: PROCEDURES CARRIED OUT BY: Ref: CMX / VER 05/05/05 COUNTRY: SIGNATURE DATE Page No.6-8 ELECTRONIC CIRCUIT DESCRIPTION 7 7 Electronic Circuit Description This section deals with the electronic circuits and their functions; it gives an overview regarding the general aspect of the PCB, its location , flow of the signals. It provides the complete reference for the service personnel for diagnosis. 7.1 REGULATOR PCB: ELS52014/R0 7.2 ISOLATION BOARD: ELS22030/R0 7.3 OPTO PCB: ELS22006/R0 7.4 PHOTOMETER: ELS52013/R0 7.5 LSH PCB: ELS52009/R1 7.6 LSS PCB: ELS52010/R2 7.7 BACKPLANE 1: ELS52005/R1 7.8 BACKPLANE 2: ELS52014/R1 7.9 INTERFACE PCB: ELS32002/R2 Electronic Circuit description The section consists of the following. 7.10 BASE BOARD 1: ELS52015/R0 7.11 BASE BOARD 2: ELS52008/R1 7.12 STIRRER PCB: ELS32006/R1 7.13 RCT: ELS52004/R0 7.14 MOTOR DRIVE: ELS52002/R0 7.15 DC DRIVE: ELS32004/R1 7.16 ISPS PCB: ELS22019/R0 7.17 AC Drive Board : ELS32003/R0 7.18 WGPT BOARD : WGPT03 Ref: CMX / VER 05/05/05 Page No. 7 - 1 CHEMIX-800 SERVICE MANUAL 7.1 REGULATOR PCB: ELS52014/R0 : This PCB accepts 15-0-15 VAC from the transformer1 and delivers +-15VDC/250mA power to the Photometer board. It consists of two separate power supply section for +15V and –15V. The power supply cable goes from the regulator PCB to Baseboard1 PCB to Interface PCB to Photometer PCB. The PCB is located on the L plate behind the cardframes. 7.2 ISOLATION PCB : ELS22030/R0 : This PCB is used for isolating the TxD, RxD, gnd signals between chemix and PC. It consists of two sections of communication ports. One is the PC side and other is the equipment side. The board uses RJ45 connectors for its two ports. Two +5V power supply sections have been built on this PCB. The TxD, RxD signals are isolated using the opto isolators in the circuit. It is located on the L plate behind the cardframes. Electronic Circuit description 7.3 OPTO PCB: ELS22006/R0 It provides a logic high signal when the opto isolator is interrupted (cut by a mechanical assembly motion), provides a logic low signal when the opto isolator is uninterrupted ( not cut). The signal is interpreted by FPGA’s. The flow of signals is from opto PCBs to Baseboard1 PCB to Interface PCB. These PCBs are distributed all over the machine. 7.4 PHOTOMETER PCB: ELS52013/R0 It provides voltage signals proportional to the light intensity for 13 wavelengths. It is located inside a special box beside the RCT. The flow of signals is from photometer board to Interface board via a special shielded cable. 7.5 , 7.6 Liquid Level Sensing PCB’s The LLS circuit is divided into 2 PCBs (LSH PCB: ELS52009/R1, LSS PCB: ELS52010/R2 ) for convenience of mounting on the arm. The LLS, liquid level sensing circuit is used to detect the level of sample and reagents in the cuvettes/cups. Also it is supposed to give a signal (Vod) if the cuvette/cup is empty. In this case the probe will hit the cuvette bottom. 7.7 BACKPLANE 1 PCB: ELS52005/R1 The backplane1 PCB accommodates five stepper motor drive cards. It accepts signals from FPGA and drives the stepper motors. 7.8 BACKPLANE 2 PCB: ELS52014/R1 The backplane2 accommodates one DC drive card and one stirrer DC motor driver card. It accepts signals from FPGA and drives the Valves/Pumps, stirrer DC motors, provide +-5V power to the LLS cards, provide pressure sensor digital signal to the micro controller 7.9 INTERFACE PCB: ELS32002/R2 Its functions can be summarized as follows • generate signals to drive the Valves/Pumps, stirrer DC motors Ref: CMX / VER 05/05/05 Page No. 7 - 2 ELECTRONIC CIRCUIT DESCRIPTION • • • • • • 7.10 sense opto isolator signals read photometer card voltages, perform calculations Serial communication with RGT controller, RCT controller, Barcode scanners, PC generate 3.3V power supply program the FPGA’s and ST10 execute the program for running the machine BASE BOARD 1 PCB: ELS52015/R0 It is a passive board linking the various signals between FPGA present on Interface board and backplanes, opto pcbs, LLS PSBs. It contains signal connectors for motor drive board DC drive board, AC drive board. 7.11 BASE BOARD 2 PCB: ELS52008/R1 7.12 STIRRER PCB: ELS32006/R1 The Stirrer PCB provides driving voltage for two DC motor located on the stirrer arms, Generates +-5V power for LLS cards, Generate logic signal corresponding to tank pressure sensor. The flow of signals for stirrer DC motor driving voltage is from FPGA (gives logic signals corresponding to speed required), to Baseboard1, to Backplane2 to Stirrer card to Backplane2, to DC motors. The flow of signals for the LLS power supply is from Stirrer card to Backplane2, to the three LLS cards. 7.12 RCT PCB: ELS52004/R0 The RCT card reads the voltages proportional to the reaction tray temperature and maintains the reaction tray temperature at 37 °C, +-0.2°C. Three thermal sensors located in the RCT are the inputs to this card. The card drives three heaters located in the RCT. 7.14 MOTOR DRIVE PCB: ELS52002/R0 The Stepper Motor Drive (SMD) card consists of 4 similar sections of motor driver circuit to drive 4 stepper motors. The typical motor used by us is MAE 200 2220. The winding resistance of the motor is 11.2E. Each section requires two signals to operate viz: clock and direction. Five Motor drive card are used in CHEMIX they are located in the backplane1. The flow of the logic input signals (clock and direction) is from the Interface board to Base board1 to Backplane1 to motor Drive board. The flow of the output signals is from motor Drive board to Backplane1 to the motors. The CPLD in the motor driver card has to be programmed before using it for driving the motors. 7.15 DC DRIVE PCB: ELS32004/R1 The DC drive card accepts logic signals from FPGA to turn ON/OFF the DC valve/pump, each card is capable of driving eight valve/pump. One DC drive card is used in CHEMIX it is located in the backplane2. The flow of the logic input signals is from the Interface board to Ref: CMX / VER 05/05/05 Page No. 7 - 3 Electronic Circuit description It is a passive board linking the various signals between ST10 present on Interface board and barcode scanners, Isolation card, RCT card, RGT controller, RGT cover proximity switch. CHEMIX-800 SERVICE MANUAL Base board1 to Backplane2 to DC Drive board. The flow of the output signals is from DC Drive board to Backplane2 to the valves and pumps. 7.16 ISPS PCB: ELS22019/R0 : It’s a power supply board for the ISE module. Accept 15V DC input and generates 12V/1A supply for the ISE module. This PCB is located near the ISE module. 7.17 AC Drive PCB : ELS32003/R0: This PCB is used to drive the 110V AC valves. The board drives five such valves. The board accepts logic signal from the FPGA to turn ON/OFF the valves. The flow of the logic input signals is from the Interface board to Base board1 to AC Drive board. The flow of the output signals is from AC Drive board to valves. Electronic Circuit description 7.18 WGPT PCB : WGPT03: This PCB is used to sense the levels of liquid in various cans provided with the machine. The PCB is located inside the LOADCELL platform. If the levels of the liquid is beyond the set limit the indicator led’s mounted on the rear panel of the machine start flashing and a buzzer beeps. The PCB also provides a logic signal to indicate the liquid level limits crossover. This signal flows from the WGPT board to 9 pin d-type connector on the rear panel to baseboard2 to interface board. The loadcell platform is connected to the machine using a d-type connector. Ref: CMX / VER 05/05/05 Page No. 7 - 4 ELECTRICAL DESCRIPTION 8 8 Electrical description (WDS5001) (WDS5034) (WDS5003) (WDS5004) (WDS5005) (WDS5006) (WDS5007) (WDS5008) (WDS5009) (WDS50010) (WDS50011) (WDS50012) (WDS50013) (WDS50014) (WDS50015) (WDS50016) (WDS50017) (WDS50018) (WDS50019) (WDS50020) (WDS50021) (WDS50022) (WDS50023) (WDS50036) (WDS50025) (WDS50035) (WDS50027) (WDS50028) (WDS50029) (WDS50030) (WDS50031) (WDS50032) (WDS50033) (WDS50037) MAINS INPUT & POWER SUPPLY DISTRIBUTION TX1 TRANSFORMER ASSEMBLY 12V/18A SMPS WIRING ASSEMBLY 24 V/6.5A SMPS WIRING ASSEMBLY 48V/2A SMPS WIRING ASSEMBLY 36 V/2A SMPS WIRING ASSEMBLY 12 V/5A SMPS WIRING ASSEMBLY 15 V/3.4A SMPS WIRING ASSEMBLY 5 V/5A SMPS WIRING ASSEMBLY RGT TEMP. CONTROLLER WIRING CONNECTION XLRS232 ISOLATOR PCB WIRING ASSEMBLY REGULATOR PCB WIRING ASSEMBLY RCT HEATER PCB WIRING ASSEMBLY R1, R2 & SPT ARM OPTO ASSEMBLY TB3 (24V & 5V) TERMINAL BLOCK WIRING ASSEMBLY RCT SLIPRING ASSEMBLY & HEATER & SENSOR CONNECTOR. RGT, RCT & ASP OPTO WIRING ASSSEMBLY RGT COOLING SECTION WIRING CONNECTIONS STIR1&2 ARM OPTO ASSEMBLY SPP, R1PP & R2PP SYRINGE OPTO WIRING ASSEMBLY CRU SN1 & SN2 WIRING ASSEMBLY RCT HEATER WIRING ASSEMBLY ELS52015/R0 BASE BOARD 1 PCB WIRING ASSEMBLY ELS52008/R1 BASE BOARD 2 PCB WIRING ASSEMBLY ELS52005/R1 BACKPLANE 1 PCB WIRING ASSEMBLY ELS32010/R1 BACKPLANE 2 PCB WIRING ASSEMBLY REAR PANEL LOADCELL CONN. ASSEMBLY & WASTE MOUNTING BRACKET LED WIRING. ELS52002/R2 INTERFACE PCB WIRING ASSEMBLY RCT SENSORS (AD590) WIRING ASSEMBLY DIAGRAM SPT, R1PT & R2PT ASSEMBLY WIRING ASSEMBLY DAIGRAM SYRINGE SPP, R1PP & R2PP WIRING AND LOOPING DIAGRAM STIRRER 1 & 2 WIRING & LOOPING DIAGRAM. CRU ASSEMBLY WIRING AND LOOPING DIAGRAM. ELS32003/R0 AC DRIVE PCB WIRING ASSEMVLY Electrical description CHEMIX-800 WIRING BLOCK DIAGRAM CHEMIX-800 SERVICE MANUAL WARNING Voltages present in the CHEMIX-800 can produce severe electrical shocks. Place the Analyser and the computer in the OFF position and disconnect all line chords before attempting any replacement procedure. CAUTION Electrostatic sensitive components present on the PC boards in the CHEMIX-800 require you to ground yourself even when the Analyser is in the OFF position, otherwise damage can occur to the Analyser electro-sensitive components and PC boards. ELECTRICAL DESCRIPTION CHEMIX-800 SERVICE MANUAL ELECTRICAL DESCRIPTION CHEMIX-800 SERVICE MANUAL ELECTRICAL DESCRIPTION CHEMIX-800 SERVICE MANUAL ELECTRICAL DESCRIPTION CHEMIX-800 SERVICE MANUAL ELECTRICAL DESCRIPTION CHEMIX-800 SERVICE MANUAL ELECTRICAL DESCRIPTION CHEMIX-800 SERVICE MANUAL ELECTRICAL DESCRIPTION CHEMIX-800 SERVICE MANUAL ELECTRICAL DESCRIPTION CHEMIX-800 SERVICE MANUAL ELECTRICAL DESCRIPTION CHEMIX-800 SERVICE MANUAL ELECTRICAL DESCRIPTION CHEMIX-800 SERVICE MANUAL ELECTRICAL DESCRIPTION CHEMIX-800 SERVICE MANUAL ELECTRICAL DESCRIPTION CHEMIX-800 SERVICE MANUAL ELECTRICAL DESCRIPTION CHEMIX-800 SERVICE MANUAL ELECTRICAL DESCRIPTION CHEMIX-800 SERVICE MANUAL ELECTRICAL DESCRIPTION CHEMIX-800 SERVICE MANUAL ELECTRICAL DESCRIPTION CHEMIX-800 SERVICE MANUAL ELECTRICAL DESCRIPTION CHEMIX-800 SERVICE MANUAL CHEMIX-800 SERVICE MANUAL 9 9. Mechanical Description 9.0 9.1 9.2 9.3 9.4 9.5 9.6 9.7 9.8 9.9 GENERAL SAMPLE, REAGENT 1 AND REAGENT 2 ARM ASSEMBLY SAMPLE, REAGENT 1 AND REAGENT 2 DILUTOR ASSEMBLY CUVETTE RINSING UNIT ASSEMBLY CUVETTE MIXING ( STIRRER) ASSEMBLY SAMPLE TRANSPORT (ASP) ASSEMBLY REAGENT TRANSPORT ASSEMBLY REACTION TRANSPORT ( RCT) ASSEMBLY PRESSURE TANK (VESSEL) ASSEMBLY LEVEL SENSING PLATFORM ASSEMBLY Mechanical description This section consists of the following 9.0: GENERAL: This chapter explains the operation of each of the mechanical assemblies of the analyzer. Some of the assemblies are similar to one another. For example: R1PT, R2PT AND SPT R1PP,R2PP AND SPP RGT AND ASP 9.1: SAMPLE (SPT), REAGENT 1 (R1PT) AND REAGENT 2 (R2PT) ARM ASSEMBLY: A) FUNCTION: When the analyzer is initialized, the Sample, Reagent 1 and Reagent 2 pipettes position themselves at the respective trough position (Home positions for the Arm Assemblies). R1PT pipettes the reagent from R1 bottle placed in the Reagent Tray and dispenses in the cuvette. Then the Arm positions to the Trough position and the R1 Probe is cleaned with warm DI water internally and externally , at the trough position. Similarly, R2PT pipettes the reagent from R2 bottle placed in the Reagent Trayand dispenses in the cuvette. Then the Arm positions to the Trough position and the R2 Probe is cleaned with warm DI water internally and externally , at the trough position. In the same fashion, , SPT pipettes the Samples/Standards/ Controls placed in the Sample Tray and dispenses in the cuvette or into the ISE receptacle as the case may be. Then the Arm positions to the Trough position and the SPT Probe is cleaned with warm DI water internally and externally , at the trough position. B) Components of SPT, R1PT and R2PT Arm Assemblies: Component Up/Dn Motor Rotation Motor Probe VOD Sensor Trough Position Sensor Rotation Position Sensor Up/Dn Position sensor Function / Operation Stepper Motor. Imparts Up/Dn motion to the probe Stepper Motor. Imparts Rotation motion to the probe Aspirates / Dispenses Sample/Reagent. Respective Syringe facilitates Aspiration/Dispensing Opto Interruptor.Vertical Obstruction Detection Sensor for Probe, to prevent damage to probe Opto Interruptor. For Sensing the Home Position, i.e the Trough, in the Rotational direction Opto Interruptor. For sensing the position of probe in Rotational direction Opto Interruptor. For sensing the Home position of the pipette (Top Position) in the Vertical Direction. VOD sensor Probe Rotation Motor Trough Position Sensor Rotational Position Sensor UP/DN Motor UP/DN Home Position Sensor 9.2: SAMPLE (SPP), REAGENT 1 (R1PP) AND REAGENT 2 (R2PP) DILUTOR ASSEMBLY: A) Funtion: The SPP / R1PP / R2PP Dilutor assemblies enable the respective arm assemblies to aspirate / dispense respective liquids (i.e Air / Sample / Standard / Control / Warm DI water in the case of SPP, Air/ Reagent /Warm Di Water in the case of R1PP and R2PP). B) Components of SPP / R1PP /R2PP Dilutor Assemblies: Component Up / Down Motor Up Home Position Sensor Plunger DI water Valve Syringe Function / Operation Stepper Motor. Imparts Up / Dn motion to the Dilutor assembly. Opto Interruptor. For sensing the Home Position of the Dilutor Actuator (Up / Position) Moves up and down upon receiving appropriate command. (Not shown in the figure!) Solenoid operated valve meant for controlling the operational flow of warm DI water to the probe. In the normal operation, when the DI water valve is closed, the Sample / Standards / Controls are aspirated / dispensed by the action of the syringe. When the DI water valve is open, the syringe is in the UP position, so that the warm water from the Pressure tank flows through the syringe to the inner side of the probe, to facilitate cleaning of the inner walls of the probe. Home Position Sensor 9.3: CRU ASSEMBLY: A) Function: The Cuvettes are cleaned up through the Nine positions of the CRU (One position is NULL meant for taking out the cuvette blank readings). The sequence of the cleaning steps are as follows: • • • • • • • • • Step 1: Aspiration of Biohazard waste and dispensing of Cleaning Solution Step 2: Aspiration of waste and dispensing of DI water Step 3: Aspiration of waste and dispensing of DI water Step 4: Aspiration of waste and dispensing of DI water Step 5: Aspiration of waste and dispensing of DI water Step 6: Aspiration of waste and dispensing of DI water Step 7: NULL (Cuvette Blank Reading!) Step 8: Aspiration of left over water Step 9: Aspiration of left over water and cleaning up of cuvette. B) Components of SPP / R1PP /R2PP Dilutor Assemblies: Component Up/ Dn Motor Up Sensor Dn Sensor Function / Operation Stepper Motor. Imparts Up / Dn motion to the CRU unit Opto Interruptor. For sensing (Home) Up position of the CRU Opto interruptor. For sensing the Down position of the CRU Up/Dn Motor Up Sensor Dn Sensor 9.4: CUVETTE MIXING :STR1 (Stirrer 1) and STR2 (Stirrer 2) ASSEMBLY: A) Function: The STR! And STR2 assemblies are meant for performing the mixing operation of mixing the sample and reagent(s) in the cuvette. When R1 and R2 both are programmed, then both the units STR1 (meant for mixing R1 and Sample) and STR2 (meant for mixing R2, R1 and Sample) will operate to perform the mixing operation. When R2 is not programmed, the STR2 mixing station will be idle. To reduce the possibilities of contamination due to adherence to paddle, the paddles are coated with hydrophobic materials (e.g. Teflon). After performing the mixing operation inside the cuvette, the arm swings itself to the trough position, wherein the warm DI water from the Pressure tank cleans the wetted surface of the Teflon coated paddle. B) omponents of STR1 and STR2 assemblies: Component Up / Dn Motor Rotation Motor Arm Paddle Up Sensor Trough Position Rotation sensor Function / Operation Stepper Motor. Imparts Up and Down motion to the Arm carrying the mixing paddle. Stepper Motor. Imparts Rotation motion to the Arm carrying the mixing paddle. This element carries the mixing motor and the paddle. Stirrer paddle. Teflon Coated. Opto interruptor. For sensing the Home position of the Arm Opto Interruptor. For sensing the home position in the rotary direction. At home position, the stirrer paddle is over the trough position. Opto interruptor. For sensing the position of the arm in the rotary direction. Paddle ARM Rotation Motor Up/Dn Motor Home / Rotation Sensor UP Sensor 9.5: SAMPLES TRANSPORT (ASP) ASSEMBLY: A) Function: The Samples Transport (ASP) Assembly consists of Base Assembly and the Tray Assembly. Two Discs, namely Disc 1 and Disc 2 are provided, each accommodating 50nos of samples, numbered 1 to 50 and 51 to 100. An emergency tray containing 32 positions (20+12) is also provided. This part of the tray can easily be removed and reassembled, ensuring ease of use . For Standards and controls, a separate disc containing 32 positions (20+12) is also provided. The ASP assembly is capable of identifying the barcode labels stuck onto the sample tubes, by means of Sample Barcode Reader. B) Components of ASP assembly Component Rotation Motor Home position Sensor Position Sensor ASP Container Barcode Reader Mounting Bracket Sample Tray Assembly Function / Operation Stepper Motor. Imparts rotary motion to the ASP Opto interruptor. Senses Home position of the ASP Opto Interruptor. For sensing the rotary position of the ASP Tray. This container, which is a stationary part, houses the ASP . Contains a window to facilitate barcode reading of the samples. Meant for mounting the Barcode reader Assembly of Sample Tray Barcode reader Mounting Bracket Rotation Sensor Home position sensor Emergency Tray ASP Tray Assy 9.6: REAGENTS TRANSPORT (RGT) ASSEMBLY: A) Function: The Reagents Transport (RGT) Assembly consists of Base Assembly and the Tray Assembly. The receptacles in the tray are designed to receive 30 nos of 20ml bottles and 30 nos of 70 ml bottles of Hitachi Design. The positions of the bottles are alternately numbered w.r.t inner bottles and outer bottles. The reagent bottles meant for R1 are of 70ml and are to be accommodated in the inner ring, whereas the reagent bottles meant for R2 are of 20ml and are to be accommodated in the outer ring. The RGT assembly is capable of identifying the barcode labels stuck onto the sample tubes, by means of Reagent Barcode Reader. The reagent tray assembly is provided with thermally insulated lid, provided with an interlock by means of a proximity switch. B) Components of ASP assembly Component Reagent Tray Rotation Motor Home position sensor Rotation position sensor Barcode Reader RGT container RGT Cover Function / Operation Tray which receives the reagent bottles Stepper Motor. Imparts rotary motion to the reagent tray Opto interruptor. For sensing the home position of the reagent tray Opto Interruptor. Senses the rotational position of the Reagent Tray (Not shown in the figure!) Meant for identifying the reagents by means of barcode labels stuck on to the reagent bottles. The container which houses the Reagent base assembly and the reagent tray. Lid that covers RGT assembly to help avoiding evaporation of reagents. This lid is provided with an interlock proximity switch to sense the opening /closing of the RGT cover Rotation Motor Barcode reader Mtg bracket RGT Cover 9.7: REACTION CUVETTE TRANSPORT (RCT) ASSEMBLY: A) Function: The RCT assembly consists of base assembly, water jacket assembly and the cuvette ring set assembly. The base assembly consists of the rotating shaft and bearing assembly alongwith the slipring assembly. The Water jacket assembly is a stationary assembly meant for covering the rotating part of the rct i.e the housing and the cuvette ringset assembly. The cuvette ringset assembly consists of 72 slotted ring, outer ring, cuvette retaining spring and cuvette retaining plastic pieces alongwith the foil heater mounted at the bottom of the 72 slotted ring. The cuvette ring set assembly also houses the three thermistor assemblies meant for monitoring the temperature of the RCT. The terminals of the photometer lamp are mounted onto the water jacket assembly. B) Components of ASP assembly: Component Rotating Motor Home position sensor Rotation position sensor Cuvettes Slipring assembly Thermistor assembly Foil heater Water jacket assembly Function / Operation Stepper Motor. Imparts rotary motion to the cuvette ring set assembly Opto interruptor. For sensing the home position of the cuvette ringset assembly. Opto Interruptor. For sensing the rotation position of the cuvette ring set assembly. (not shown). Reaction cuvettes, 72 nos To supply to the foil heater and to transport the sensing signals of the thermistors. (not shown!) meant for monitoring the temperature of the cuvette ring set assembly (not shown) meant for heating the RCT table Meant for covering the cuvette ring set assembly Lamp Terminals Water jacket Rotation Motor Slipring assembly Home / Rotation Position Sensors 9.8: PRESSURE TANK (VESSEL) ASSEMBLY: C) Function: The main purpose of the pressure tank assembly is to provide warm water at constant pressure to the SPT, R1PT, R2PT Probes, CRU Laundry Section and to the troughs of SPT, R1PT and R2PT. To achieve this purpose, the pressure tank assembly is provided with a resistance heater, a pressure gauge, a thermostat , a pressure transmitter and a thermal cutoff switch. To maintain the pressure inside the pressure tank, a pressure regulator is mounted in the hydraulic line. To maintain the temperature of DI water inside the pressure tank, a thermostat is provided. And to monitor the pressure of DI water inside the pressure tank, a pressure transmitter is mounted. Component Pressure Tank Pressure Gauge Pressure transmitter Heater Thermostat Thermal cutoff switch Function / Operation Stainless Steel fabricated pressure tank to contain hot DI water at pressure (not shown!) to indicate the pressure developed inside the pressure tank Pressure sensor to monitor the pressure inside the pressure tank Resistance heater, meant for heating the DI water inside the pressure tank To control the power supplied to the heater Safety switch meant for cutting off the power supply in case of over heating (may in the case of thermostat failure!) PRESSURE TANK (VESSEL) NOTE: APPLY HEAT SINK COMPOUND ON THE SURFACE OF THE THERMOSTAT & HEATER BEFORE INSERTING IT INTO PRESSURE VESSEL 7 6 PRESSURE TRANSDUCER TOP COVER PLATE OF 5 PRESSURE TANK (REFER. FSPS2370) M3x12 PH. HD. SCREW +PW+SW (6 NOS.) USE 'O'RING ID=85. 4 THK=5.MATL=NITRILE (REFER. FSPS2370) PRESSURE TANK FSPS2370 1 PRESSURE TANK (VESSEL) ASSEMBLY Thermal Cut-off Switch THERMOSTAT HEATER A A M3x6 GRUB SCREW ( BLACK) (2 NOS.) 3 9.8: LEVEL SENSING PLATFORM ASSEMBLY: D) Function: The Bio-hazardous waste and Wastes generated in the machine are directed and collected in 10lt and 20lt cans respectively. And the inputs to the system i.e DI water and Cleaning solution are supplied to the instrument through 20lt cans and 10lt can respectively. To help monitoring whether the cans are filled up and need replacement (in case of waste containing cans) or emptied and need replacement (in case of DI water and Cleaning solution), the levels of all these cans are monitored indirectly through measuring the changes in weights of each of the cans by means of load cells associated with each can. The level sensing platform can either be placed behind the machine or by the side of the machine. To facilitate easy removal of the tubing , quick couplings (non-drip type) are provided at the rear of the instrument. Component Load cells Waste Cans Cleaning solution can DI water can Trays Function / Operation 4 nos of loadcells meant for DI water, Bio-hazardous waste, Normal Waste and Cleaning solution are provided respectively 20 lt can is for waste and 10 lt can is for biohazardous waste 10 lt can meant for containing cleaning solution 20 lt can meant for containing DI water 4 nos of trays meant for receiving the cans of DI water, Biohazardous waste, Normal Waste and Cleaning solution are provided XL600 SERVICE MANUAL M O D E L : X L - 600 / 300 D E S C R IP T IO N : T R A N S D U C E R C O M P L E T E A S S Y . 12 10 LT. C A N TR AY F S P S 1 4 5 4 ( 2 N O S .) 20 LT. C A N TR AY FSPS1453 13 20 LT. C AN TR AY FSP S1453 10 10 LT. C A N TR AY F S P S 1 4 5 4 ( 2 N O S .) 14 8 M 6x20 C SK 9 S C R E W ( 1 6 N O S .) (F O R T R A N S D U C E R ) 11 15 M 4x12 P H . H D . S C R EW P W + N W ( 4 N O S .) 7 TRANSDUCER BO TTO M P L A T E (F S P S 1 4 5 6 ) ( 4 N O S .) 3 COVER FOR TRANSDUCER FSP S1451 2 7 M 3x8 PH . H D . SC R EW + P W + N Y L O N ( 2 N O S .) RUBBER SEAL FOR TRANSDUCER (F S P S 2 4 8 1 ) COVER FOR 6 TRANSDUCER P C B (F S P S 5 0 1 3 ) Load Cells GASKET FOR TRANSDUCER P C B C O V E R (F S P S 5 0 1 2 ) 5 R E F E R D R G N O . X L A D -2 1 1 1 LOAD CELL PLATFORM ASSEMBLY CHEMIX-800 SERVICE MANUAL 10 10. Hydraulic Description This section explains the hydraulic connection diagram and the cuvette-rinsing unit. Hydraulics Description 10.1 HYDRAULIC SYSTEM OPERATION 10.2 HYDRAULICS DIAGRAM 10.3 CUVETTE RINSING UNIT CHEMIX-800 SERVICE MANUAL 10.1 HYDRAULIC SYSTEM OPERATION The hydraulic system consists of the valves, pumps tubings, pressure vessel and the laundry system, mentioned below are the functions of the various valves and pumps. Valve and Pump Functions: WATER CKD VALVE : . STIR CKD VALVE : R2PT, SPT CKD VALVE : Enables / Disables the flow of deinosed water, from from the pressure vessel to the Reagent 2 arm, and Sample arm trough. R1PT CKD VALVE : Enables / Disables the flow of deinosed water, from from the pressure vessel to the Reagent 1 arm trough. ORFL CKD VALVE After a water dispense cycle is completed by the laundry dispense probes, the WATER CKD valve is shut. The ORFL CKD valve is then enabled for a moment, this action sucks and empties the remaining water contents from withen the laundry dispense probes, there by preventing drippage from the dispense probes. Enables / Disables the flow of deinosed water, from from the pressure vessel to the Sample, Reagent 1and Reagent 2 probes. SPP/R1PP&R2PP VALVE Hydraulics Description Enables / Disables the flow of deinosed water, from from the pressure vessel to the laundry probes Enables / Disables the flow of deinosed water, from from the pressure vessel to the Stirrer troughs. Pressure Reducer/ Regulator: To regulate and mentain a steady water pressure in the tank/vessel KNF Water Suction pump: To pump De-ionized water from the water can to the pressure vessel/tank KNF detergent pump : To pump detergent solution into the first laundry probe. The pump comprise of an inbuilt regulator. To suck the waste out, from the firom the first laundry probe. KNF Bio hazardous waste pump Double head waste Suction pump: To suck the waste out, from the firom the 2,3,4,5,6&7 laundry probes. And to suck out the contents from the ORFL CKD Valve LIST OF COMPONENTS USED IN HYDRAULICS OF CHEMIX-800 Sr.No. 1.0 1.0.1 1.0.10 1.0.11 1.0.12 DESCRIPTION INLET and OUTLETS Quick Change inline coupling body, (HOSE BARB), with shut off for 3/16" ID tubing. 1/8" HB valved panel mount insert THREAD TO BARB ADAPTER FITTINGS 3/8" NPT for 3/8" ID Tubing: ELDON JAMES A6-6 WN 1/16-27 NPT Thread with 5/16" Hex to 200 Series Barb, 1/8"(3 mm) ID Tubing QTY CODE 1.00RMEBT000354NICN 1.00RMEBT000340NICN 1.00 RMEBT000362NICN 1.00RMEBT000339NICN 1.0.13 SELF LOCKING FERRULES;16 SQ MM 6.00RMEOT001101PLCN 1.0.14 SELF LOCKING FERRULES;25 SQ MM 2.00RMEOT001102PLCN 1.0.15 SELF LOCKING FERRULES;35 SQ MM 2.00RMEOT001103PLCN 1.0.2 Coupling Inserts 3/16" HB (HOSE BARB), Shutoff Coupling Insert, Pipe Thread, Shutoff 3/8" NPT for 3/8" ID (9.5mm ID) tube. 1.00RMEBT000348NICN 1.0.3 1.0.4 1.0.5 1.0.6 1.0.7 1.0.8 1.0.9 1.1 1.2 1.3 1.4 1.5 Coupling Body 3/8" HB (Hose Barb) for 3/8" ID (9.5mm) tube Quick Change inline coupling body, (HOSE BARB), with shut off for 1/8" ID tubing. Coupling Inserts 1/16" HB (HOSE BARB), Shutoff Quick Change inline coupling body, (HOSE BARB), with shut off for 1/8" ID tubing. 1/8" HB valved panel mount insert Quick Change inline coupling body, (HOSE BARB), with shut off for 1/8" ID tubing. DI WATER CAN ASP RGT WASTE CAN BIO-HAZARDOUS WASTE CAN 1.00RMEBT000346NICN 1.00RMEBT000345NICN 1.00RMEBT000353NICN 1.00RMEBT000347NICN 1.00RMEBT000353NICN 1.00RMEBT000340NICN 1.00RMEBT000353NICN 1.6 2.0 DETERGENT CAN CONTROL ELEMENTS_1 2.1 SHUTOFF VALVE 3.0 PRIME MOVERS 3.0.1 Tee Connector with Classic Series Barbs, 5/32" (4 mm) ID Tubing 1.00 RMEGI000111NIBN 3.0.2 Tee Connector with Classic Series Barbs, 1/8" (3 mm) ID Tubing 1.00RMEBT000360NICN 3.0.3 Tee Connector with Classic Series Barbs, 1/8" (3 mm) ID Tubing 1.00RMEBT000360NICN 3.1 PUMP 230V, 50Hz, 6 BAR PRESSURE 1.00RELPU000003NIAN 3.1.1 Swivel Elbow 1/8" BSPT, for tube OD 5/16" 1.00RMEBT000358NICN 3.1.2 Swivel Elbow 1/8" BSPT, for tube OD 5/16" 1.00RMEBT000358NICN 3.2 SPP SYRINGE 1/4-28 UNF Thread with 5/16" Hex to 200 Series Barb, 1/16" (1.5 mm) ID Tubing ETFE FERRULE FERRULE NUT ETFE FERRULE FERRULE NUT LOW PRESSURE STANDARD UNION ETFE FERRULE FERRULE NUT LOW PRESSURE STANDARD UNION R1PT SYRINGE 1/4-28 UNF Thread with 5/16" Hex to 200 Series Barb, 1/16" (1.5 mm) ID Tubing FERRULE P 353 FERRULE NUT P 308 FERRULE P 353 FERRULE NUT P 308 LOW PRESSURE STANDARD UNION 3.2.1 3.2.2 3.2.2 3.2.3 3.2.3 3.2.3 3.2.4 3.2.4 3.2.4 3.3 3.3.1 3.3.2 3.3.2 3.3.3 3.3.3 3.3.3 1.00RMEOT000668NLAN 1.00RMEGI000149NIBN 1.00RMEBT000350NICN 1.00RMEBT000351NICN 2.00RMEBT000350NICN 2.00RMEBT000351NICN 1.00RMEBT000352NICN 2.00RMEBT000350NICN 2.00RMEBT000351NICN 1.00RMEBT000352NICN 1.00RMEGI000149NIBN 1.00RMEOT001047PICN 1.00RMEOT001048PICN 2.00RMEOT001047PICN 1.00RMEOT001048PICN 1.00RMEBT000352NICN 3.4 3.4.2 3.4.2 3.4.3 3.4.3 3.4.3 3.4.4 3.4.4 3.4.4 3.5 R2PT SYRINGE 1/4-28 UNF Thread with 5/16" Hex to 200 Series Barb, 1/16" (1.5 mm) ID Tubing FERRULE P 353 FERRULE NUT P 308 FERRULE P 353 FERRULE NUT P 308 LOW PRESSURE STANDARD UNION FERRULE P 353 FERRULE NUT P 308 LOW PRESSURE STANDARD UNION PUMP; 24V DC, 1 BAR PRESSURE 3.6 PUMP; 24V DC, 1 BAR PRESSURE WITH REGULATOR 1.00RMEOT000882NIBN 3.7 PUMP; 100V AC, 50/60 Hz, FLOW RATE 6 lpm, MAX PRESSURE 98 kPa, MAX VACUUM -59.9 kPa. 1.00RELPU000006NIAN 3.7.1 Swivel Elbow 1/8" BSPT, for tube OD 1/4" 1.00RMEBT000357NICN 3.7.2 Swivel Elbow 1/8" BSPT, for tube OD 1/4" 1.00RMEBT000357NICN 3.7.3 Swivel Elbow 1/8" BSPT, for tube OD 1/4" 1.00RMEBT000357NICN 3.7.4 Swivel Elbow 1/8" BSPT, for tube OD 1/4" 1.00RMEBT000357NICN 4.0 CONTROL ELEMENTS_2 4.0.1 Tee Connector with Classic Series Barbs, 5/32" (4 mm) ID Tubing 1.00 RMEGI000111NIBN 4.0.10 Straight Through Reduction Connector with Classic Series Barbs, 5/32" (4 mm) and 1/16" (1.5 mm) ID Tubing 1.00RMEBT000356NICN 4.0.11 Straight Through Reduction Connector with 500 Series Barbs, 1/8" (3 mm) and 1/16" (1.5 mm) ID Tubing 1.00RMEBT000355NICN 3.4.1 1.00 RMEGI000149NIBN 1.00RMEOT001047PICN 1.00RMEOT001048PICN 2.00RMEOT001047PICN 1.00RMEOT001048PICN 1.00RMEBT000352NICN 2.00RMEOT001047PICN 1.00RMEOT001048PICN 1.00RMEBT000352NICN 1.00RELPU000005NIBN 4.0.12 Straight Through Reduction Connector with 500 Series Barbs, 1/8" (3 mm) and 1/16" (1.5 mm) ID Tubing 1.00RMEBT000355NICN 4.0.13 Elbow Connector with Classic Series Barbs, 1/8” (3 mm) ID Tubing 1.00RMEBT000349NICN 4.0.16 STRAIGHT THRU CONNECTOR WITH BARBS 3MM ID TUBING ( PART NO :- N430-1 ) 1.00RMEGI000114NIBN 4.0.2 Tee Connector with Classic Series Barbs, 5/32" (4 mm) ID Tubing 1.00 RMEGI000111NIBN 4.0.3 Straight Through Reduction Connector with Classic Series Barbs, 5/32" (4 mm) and 1/16" (1.5 mm) ID Tubing 1.00RMEBT000356NICN 4.0.4 Straight Through Reduction Connector with Classic Series Barbs, 5/32" (4 mm) and 1/16" (1.5 mm) ID Tubing 1.00RMEBT000356NICN 4.0.5 Tee Connector with Classic Series Barbs, 5/32" (4 mm) ID Tubing 1.00 RMEGI000111NIBN 4.0.6 4.0.7 Tee Reduction Connector with 200 Series Barbs, 1/16" (1.5 mm) and 1/8" (3 mm) ID Tubing Tee Reduction Connector with 200 Series Barbs, 1/16" (1.5 mm) and 1/8" (3 mm) ID Tubing 1.00RMEBT000361NICN 1.00RMEBT000361NICN 4.0.8 Tee Connector with Classic Series Barbs, 1/8" (3 mm) ID Tubing 1.00RMEBT000360NICN 4.0.9 Tee Connector with Classic Series Barbs, 1/8" (3 mm) ID Tubing 1.00RMEBT000360NICN 4.1 PULSATION DAMPER 1.00RMEGI000126NIBN 4.1.1 Swivel Elbow 3/8" BSPT, for tube OD 5/16" 1.00RMEBT000359NICN 4.1.2 Swivel Elbow 3/8" BSPT, for tube OD 5/16" 1.00RMEBT000359NICN 4.10 CKD VALVE TYPE 21-01-03A, 100V 1.00RMEVA000002NIBN 4.10.1 Thread To Barb Adapter Fittings, 1/8” Bspt 1/8” L2 1.00RMEBT000368PICN 4.10.2 Thread To Barb Adapter Fittings, 1/8” Bspt 1/8” L2 1.00RMEBT000368PICN 4.11 CKD VALVE TYPE 21-01-03A, 100V 1.00RMEVA000002NIBN 4.11.1 Thread To Barb Adapter Fittings, 1/8” Bspt 1/8” L2 1.00RMEBT000368PICN 4.11.2 Thread To Barb Adapter Fittings, 1/8” Bspt 1/8” L2 1.00RMEBT000368PICN 4.12 PRESSURE GAUGE 1.00RMEGI000093NLBN PRESSURE TRANSMITTER 1.00RMESE000001NLAN 1.00 4.3 PRESSURE TANK 1/16-27 NPT Thread with 5/16" Hex to 200 Series Barb, 1/8"(3 mm) ID Tubing 1/16-27 NPT Thread with 5/16" Hex to 200 Series Barb, 1/8"(3 mm) ID Tubing 1/16-27 NPT Thread with 5/16" Hex to 200 Series Barb, 1/8"(3 mm) ID Tubing 1/16-27 NPT Thread with 5/16" Hex to 200 Series Barb, 1/8"(3 mm) ID Tubing PRESSURE REGULATOR 4.3.1 Swivel Elbow 1/8" BSPT, for tube OD 5/16" 1.00RMEBT000358NICN 4.3.2 Swivel Elbow 1/8" BSPT, for tube OD 5/16" 1.00RMEBT000358NICN 4.4 4.5 4.6 4.7 CKD VALVE 24V DC SERIAL 4114 CKD VALVE 24V DC SERIAL 4114 CKD VALVE 24V DC SERIAL 4114 CKD VALVE TYPE 21-01-03A, 100V 1.00RMEVA000001NIAN 1.00RMEVA000001NIAN 1.00RMEVA000001NIAN 1.00RMEVA000002NIBN 4.7.1 Thread To Barb Adapter Fittings, 1/8” Bspt 1/8” L2 1.00RMEBT000368PICN 4.7.2 Thread To Barb Adapter Fittings, 1/8” Bspt 1/8” L2 1.00RMEBT000368PICN 4.8 CKD VALVE TYPE 21-01-03A, 100V 1.00RMEVA000002NIBN 4.8.1 Thread To Barb Adapter Fittings, 1/8” Bspt 1/8” L2 1.00RMEBT000368PICN 4.8.2 Thread To Barb Adapter Fittings, 1/8” Bspt 1/8” L2 1.00RMEBT000368PICN 4.9 4.9.1 CKD VALVE TYPE 21-01-03A, 100V Thread To Barb Adapter Fittings, 1/8” Bspt 1/8” L2 1.00RMEVA000002NIBN 1.00RMEBT000368PICN 4.2 4.2.3 4.2.4 4.2.5 4.2.6 1.00RMEBT000339NICN 1.00RMEBT000339NICN 1.00RMEBT000339NICN 1.00RMEBT000339NICN 1.00RMEVA000004NIBN 4.9.2 5.0 Thread To Barb Adapter Fittings, 1/8” Bspt 1/8” L2 END USE 1.00RMEBT000368PICN 5.0.1 Y Connector with 200 Series Barbs, 1/16" (1.5 mm) ID Tubing 1.00RMEGI000146NIBN 5.0.2 Y Connector with 200 Series Barbs, 1/16" (1.5 mm) ID Tubing 1.00RMEGI000146NIBN 5.0.3 Y Connector with 200 Series Barbs, 1/16" (1.5 mm) ID Tubing 1.00RMEGI000146NIBN 5.0.4 Y Connector with 200 Series Barbs, 1/16" (1.5 mm) ID Tubing 1.00RMEGI000146NIBN 5.0.5 Y Connector with 200 Series Barbs, 1/16" (1.5 mm) ID Tubing 1.00RMEGI000146NIBN 5.0.6 Y Connector with 200 Series Barbs, 1/16" (1.5 mm) ID Tubing 1.00RMEGI000146NIBN 5.1 ISE UNIT 5.1.2 Straight Through Reduction Connector with 500 Series Barbs, 1/8" (3 mm) and 1/16" (1.5 mm) ID Tubing 5.2 5.3 5.3.1 5.3.1.1 5.3.1.2 5.3.2 5.3.2.1 5.3.2.2 5.3.3 5.3.3.1 5.3.3.2 5.3.4 LAMP ASSEMBLY TROUGH UNITS SPT TROUGH M5x.8 Thread with 1/4" Hex to 200 Series Barb, 1/16" (1.5 mm) ID Tubing 1/8-27 NPT Thread with 7/16" Hex to Classic Series Barb, 1/4" (6.25 mm) ID Tubing R2PT TROUGH M5x.8 Thread with 1/4" Hex to 200 Series Barb, 1/16" (1.5 mm) ID Tubing 1/8-27 NPT Thread with 7/16" Hex to Classic Series Barb, 1/4" (6.25 mm) ID Tubing R1PT TROUGH M5x.8 Thread with 1/4" Hex to 200 Series Barb, 1/16" (1.5 mm) ID Tubing 1/8-27 NPT Thread with 7/16" Hex to Classic Series Barb, 1/4" (6.25 mm) ID Tubing STIRRER 1 TROUGH 1.00RMEBT000355NICN 1.00RMEGI000135NIBN 1.00RMEBT000344NICN 1.00RMEGI000135NIBN 1.00RMEBT000344NICN 1.00RMEGI000135NIBN 1.00RMEBT000344NICN 5.3.4.1 5.3.4.2 5.3.5 5.3.5.1 5.3.5.2 5.4 5.4.1 5.4.2 5.4.3 5.4.4 5.4.5 5.4.6 5.4.7 5.4.8 5.5 5.5.1 5.5.1.1 M5x.8 Thread with 1/4" Hex to 200 Series Barb, 1/16" (1.5 mm) ID Tubing 1/8-27 NPT Thread with 7/16" Hex to Classic Series Barb, 1/4" (6.25 mm) ID Tubing STIRRER 2 TROUGH M5x.8 Thread with 1/4" Hex to 200 Series Barb, 1/16" (1.5 mm) ID Tubing 1/8-27 NPT Thread with 7/16" Hex to Classic Series Barb, 1/4" (6.25 mm) ID Tubing WASTE MANIFOLD 1/8-27 NPT Thread Elbow with 7/16" Hex to 200 Series Barb, 1/4" (6.25 mm) ID Tubing THREAD ELBOW 3/8" NPT FOR 3/8" ID TUBING: ELDON JAMES L6-6 WN 1/8-27 NPT Thread Elbow with 7/16" Hex to 200 Series Barb, 1/4" (6.25 mm) ID Tubing 1/8-27 NPT Thread Elbow with 7/16" Hex to 200 Series Barb, 1/4" (6.25 mm) ID Tubing 1/8-27 NPT Thread Elbow with 7/16" Hex to 200 Series Barb, 1/4" (6.25 mm) ID Tubing 1/8-27 NPT Thread Elbow with 7/16" Hex to 200 Series Barb, 1/4" (6.25 mm) ID Tubing 1/8-27 NPT Thread Elbow with 7/16" Hex to 200 Series Barb, 1/4" (6.25 mm) ID Tubing 1/8-27 NPT Thread Elbow with 7/16" Hex to 200 Series Barb, 1/4" (6.25 mm) ID Tubing CRU UNIT CRU MANIFOLD_1 M5x.8 Thread with 1/4" Hex to 200 Series Barb, 1/16" (1.5 mm) ID Tubing 1.00RMEGI000135NIBN 1.00RMEBT000344NICN 1.00RMEGI000135NIBN 1.00RMEBT000344NICN 1.00RMEBT000341NICN 1.00RMEBT000363NICN 1.00RMEBT000341NICN 1.00RMEBT000341NICN 1.00RMEBT000341NICN 1.00RMEBT000341NICN 1.00RMEBT000341NICN 1.00RMEBT000341NICN 1.00RMEGI000135NIBN 5.5.1.2 QUICK CONNECTOR WITH SEALING RING "O-1/8" 1.00RMEGI000145NIBN 5.5.1.3 M5x.8 Thread with 1/4" Hex to 200 Series Barb, 1/16" (1.5 mm) ID Tubing 1.00RMEGI000135NIBN 5.5.1.4 5.5.1.5 5.5.2 5.5.2.1 5.5.2.2 5.5.2.3 5.5.2.4 5.5.2.5 5.5.3 5.5.3.1 5.5.3.2 5.5.3.3 5.5.3.4 5.5.3.5 5.6 5.6.1 5.7 5.7.1 M5x.8 Thread with 1/4" Hex to 200 Series Barb, 1/16" (1.5 mm) ID Tubing M5x.8 Thread with 1/4" Hex to 200 Series Barb, 1/16" (1.5 mm) ID Tubing CRU MANIFOLD_1 M5x.8 Thread with 1/4" Hex to 200 Series Barb, 1/16" (1.5 mm) ID Tubing QUICK CONNECTOR WITH SEALING RING "O-1/8" M5x.8 Thread with 1/4" Hex to 200 Series Barb, 1/16" (1.5 mm) ID Tubing M5x.8 Thread with 1/4" Hex to 200 Series Barb, 1/16" (1.5 mm) ID Tubing M5x.8 Thread with 1/4" Hex to 200 Series Barb, 1/16" (1.5 mm) ID Tubing CRU MANIFOLD_1 M5x.8 Thread with 1/4" Hex to 200 Series Barb, 1/16" (1.5 mm) ID Tubing QUICK CONNECTOR WITH SEALING RING "O-1/8" M5x.8 Thread with 1/4" Hex to 200 Series Barb, 1/16" (1.5 mm) ID Tubing M5x.8 Thread with 1/4" Hex to 200 Series Barb, 1/16" (1.5 mm) ID Tubing M5x.8 Thread with 1/4" Hex to 200 Series Barb, 1/16" (1.5 mm) ID Tubing RCT 1/8-27 NPT Thread Elbow with 7/16" Hex to 200 Series Barb, 1/4" (6.25 mm) ID Tubing RGT 1/8-27 NPT Thread Elbow with 7/16" Hex to 200 Series Barb, 1/4" (6.25 mm) ID Tubing 1.00RMEGI000135NIBN 1.00RMEGI000135NIBN 1.00RMEGI000135NIBN 1.00RMEGI000145NIBN 1.00RMEGI000135NIBN 1.00RMEGI000135NIBN 1.00RMEGI000135NIBN 1.00RMEGI000135NIBN 1.00RMEGI000145NIBN 1.00RMEGI000135NIBN 1.00RMEGI000135NIBN 1.00RMEGI000135NIBN 1.00RMEBT000341NICN 1.00RMEBT000341NICN 10.3 CUVETTE RINSING UNIT: The CRU consists of a eight stage laundry as shown in Fig. 10.2. the first stage, consist of three probes, the l two probes are used to aspirates the Bio hazardous waste from the cuvette and the third probe dispenses detergent into the cuvette. The next five stages having three probes each, two probes are used to aspirates the waste from cuvette, and the third probe dispenses deionized water. The seventh probe only aspirates the water that was dispensed in the fifth stage, and the eight stage is for drying the bottom of the cuvettes. Note : All probes are spring loaded, and they go right down and slightly touch the cuvette bottom. HYDRAULIC ADJUSTMENTS AND VERIFICATION PROCEDURE 11 11. Hydraulics Adjustments And Verification Procedure PRESSURE TANK ADJUSTMENT PROCEDURE LAUNDRY FLOW ADJUSTMENT PROCEDURE R1,R2 & SAMPLE PROBE DISPENSE VERIFICATION Hydraulics Adjustments & Verification 11.1 11.2 11.3 Ref: CMX/ VER 05/05/05 Page No . 11 - 1 CHEMIX-800 SERVICE MANUAL 11.1 PRESSURE TANK ADJUSTMENT PROCEDURE . ANALYSER HYDRAULICS DILUTOR DETERGENT PUMP R1 PP CKD R2 PT\SPT CKD WATER CKD PRESSURE REGULATOR R1PT CKD STIR CKD LAUNDRY CKD PRESSURE SENSOR Hydraulics Adjustments & Verification PRESSURE TANK DRAIN TAP KNF WATER PUMP ACTION OBSERVATIONS To Adjust pressure, locate the pressure regulator, located just above the pressure tank, with the help of a spanner, unlock the locking nut. With the help of an allen key, rotate and adjust the pressure regulator. Pressure gauge should be between 0.8 and 0.9 bar. Go to the Service check menu; click on the pump and trough valves button, Switch ON the CKD valves for R1PT, R2PT, SPT & STIRR, one after the other. Observe a small fountain of water in R1PT, R2PT/SPT & Stirrer troughs. Switch ON all the switches together and keep the hydraulic assembly ON for some time. Verify that the water flow should be smooth and there should be no leakages and that the pressure gauge does not fluctuate. Ref: CMX/ VER 05/05/05 Page No . 11 - 2 HYDRAULIC ADJUSTMENTS AND VERIFICATION PROCEDURE 11.2 LAUNDRY FLOW ADJUSTMENT PROCEDURE Probe 1 Probe 2 Probe 3 Probe 4 Probe 5 Aspirate Probe 6 Drier Probe Figure: 14.1 DETERGENT / CLEANING SOLUTION FLOW ADJUSTMENT PROCEDURE Go to service check menu, and initiate a cuvette rinse cycle. OBSERVATIONS Monitor the flow of cleaning solution from the cleaning solution can to the DET pump, trough the tubing’s to the first laundry probe, and into the first cuvette, To regulate the detergent flow, remove the right side panel and locate the black coloured, flow regulator on the top of the detergent pump, Adjust it in order to enable the detergent flow into the first cuvette, to fill up to 3\4 of the total volume of the cuvette. Verify that there is no spillage of detergent from any of the cuvettes. Observe this carefully for multiple rinse cycles. Ref: CMX/ VER 05/05/05 Page No . 11 - 3 Hydraulics Adjustments & Verification ACTION CHEMIX-800 SERVICE MANUAL ACTION WATER FLOW ADJUSTMENT PROCEDURE Go to service check menu, and initiate a cuvette rinse cycle. OBSERVATION Monitor the flow of deionised water from the DI water can, to the pump , to the pressure vessel, and trough the tubing’s into the cuvettes, under laundry probes 2, 3, 4 & 5; also verify a proper drain from all the cuvette. To regulate the deionised water flow open the rear panel ISE door, locate the flow regulator, this regulator is connected in line with the deionised water tubing to the laundry system. Adjust it, so that at the time of rinsing, the deionised water flow into the second, third, fourth and fifth cuvette, located under the second, third, fourth and fifth laundry probe fills to 3\4 the total volume of the cuvette. Verify that there is no spillage of deionised water from any of the cuvettes. Observe this carefully for multiple rinse cycles. Hydraulics Adjustments & Verification DEIONISED WATER FLOW ADJUSTMENT DEIONISED WATER FLOW REGULATOR Ref: CMX/ VER 05/05/05 Page No . 11 - 4 HYDRAULIC ADJUSTMENTS AND VERIFICATION PROCEDURE 11.3 R1, R2, SAMPLE PROBE DISPENSE VERIFICATION NOTE: NO ADJUSTMENTS CAN BE MADE TO CONTROL THE FLOW OF R1,R2 & SAMPLE PROBE DISPENSE, ONLY A FLOW VERIFICATION CAN BE MADE AS FOLLOWS: SAMPLE From the SERVICE CHECK menu select SAMPLE ARM, click on INITIALIZE , click on SAMPLE OUTER, click on SAMPLE TO CUVETTE, click on CUVETTE TO DRAIN, CLICK on the GO BACK button. From the SERVICE CHECK menu select SYRINGES then select SAMPLE SYRINGE, click on INITIALIZE and click on the VALVE ON. Check and confirm that a clear uninterrupted straight jet of water emerges from the probe, that is free of any trapped air bubbles. Do this till the entire tubing and probe is completely primed and free of air bubbles. REAGENT 1 From the SERVICE CHECK menu select REAGENT 1 ARM, click on INITIALIZE , click on REAGENT OUTER, click on REAGENT TO CUVETTE, click on CUVETTE TO DRAIN, CLICK on the GO BACK button. From the SERVICE CHECK menu select SYRINGES then select REAGENT 1 SYRINGE, click on INITIALIZE and click on the VALVE ON. Check and confirm that a clear uninterrupted straight jet of water emerges from the probe, that is free of any trapped air bubbles. Do this till the entire tubing and probe is completely primed and free of air bubbles REAGENT 2 From the SERVICE CHECK menu select REAGENT 2 ARM, click on INITIALIZE, click on REAGENT OUTER, click on REAGENT TO CUVETTE (R2) , click on (R2) CUVETTE TO DRAIN, CLICK on the GO BACK button. Hydraulics Adjustments & Verification From the SERVICE CHECK menu select SYRINGES then select REAGENT 2 SYRINGE, click on INITIALIZE and click on the VALVE ON. Check and confirm that a clear uninterrupted straight jet of water emerges from the probe that is free of any trapped air bubbles. Do this till the entire tubing and probe is completely primed and free of air bubbles Ref: CMX/ VER 05/05/05 Page No . 11 - 5 PREVENTIVE MAINTENANCE 12 12. Preventive Maintenance "Prevention is better than cure" 12.1 SERVICING A CUSTOMER SITE 12.2 MAINTENANCE SCHEDULE 12.3 USER DAILY & WEEKLY MAINTENANCE LOG 12.4 SERVICE TECHNICIAN QUARTERLY MAINTENANCE LOG 12.5 SERVICE TECHNICIAN ANNUAL MAINTENANCE LOG 12.6 SPARES REPLACEMENT SCHEDULE Preventive Maintenance It is always recommended that the instrument is maintained by the user with proper instructions from the service personal to get the optimum output and to avoid any possible damage to the analyser. Ref: CMX/ VER 05/05/05 Page No.12 - 1 CHEMIX-800 SERVICE MANUAL 12.1 SERVICING A CUSTOMER SITE WARNING BIOHAZARD Voltages present in the CHEMIX-800 can produce severe electrical shocks. Place the Analyser and the computer in the OFF ( 0 ) position and disconnect all line chords before attempting any maintenance procedure. To prevent contaminating yourself and others, treat all human sera as potentially Biohazards. Follow the laboratory’s safety protocol for cleaning and decontaminating the Analyser and surrounding work surface. CAUTION Do not perform any maintenance procedure other than those described in this manual. CAUTION Electrostatic sensitive components present on the PC boards in the CHEMIX-800 require you to ground yourself even when the Analyser is in the OFF ( 0 ) position, otherwise damage to the Analyser electro-sensitive components and PC boards can occur. VERIFYING PROPER ROOM TEMPERATURE Measure the room temperature at different corners of the Laboratory, the reccomended temperature is 15 to 30 degrees celcus. There should not be a variations of more than 5 degrees in Room temperature per hour. VERIFYING LINE VOLTAGE With the help of a Voltmeter Measure the following AC Voltages to the instrument. Test points Expected voltages Phase and Neutral 220 Volts Phase and Ground 220 Volts Neutral and Ground Not more than 3 Volts Preventive Maintenance VERIFYING PROPER GROUNDING NOTE Place the Analyser and the computer in the OFF ( 0 ) position and disconnect all line chords . With the help of a Ohm meter measure the continuity between all the ground points, Place one end of the probe on the AC input ground terminal of the analser and the other on the the upper chassis of the instrument it should ideally be zero ohms, repeat the same for the lower half of the instrument. Ref: CMX/ VER 05/05/05 Page No.12 - 2 PREVENTIVE MAINTENANCE VERIFYING PROPER VENTILATION Make shure there is at least 0.5 meters of space between the wall and the instrument on all three sides, to enable proper ventilation. There should not be any Stationary items or objects in the vinicity that hinder proper access to the analyser. There should not be a direct air from the airconditioning system on to the Analyser. VERIFYING EXTERNAL INTERFERENCES Heavy-duty electrical devices like Air conditioners, refrigerator’s, ovens, centrifuges etc. should not be operated on the same electrical lines as the Analyzer or in the close vicinity of the analyzer. The room should be free of any vibrations from heavy-duty devices like Centrifuges and Compressors. The room should be free from strong magnetic fields caused by other medical equipment, like CT Scans, MRI etc. Mobiles phones should not be used very close to the analyser. VERIFYING PROPER ROOM LIGHTING There should be sufficent room lighting to enable efficent operator use and clear visable access to the internal components of the instrument during serviceing VERIFYING PROPER LABORATORY CLEANLINESS (PRACTICE) The instrument and the surrounding area should be mantained clean and regularly decontaminated to prevent contaminating yourself and others. There should be no spillage of Serum, Reagents, Waste or Deionised water. Make shure that no Reagents or Samples are placed on top of the analyser or trolley as they could spill causing a permernant damage to the Analyser MANTAINING AN ERROR LOG BOOK Maintain a log book at the customer site every visit and error reported with the date should be entered make sure that this book is updated after performing the maintenance. Ref: CMX/ VER 05/05/05 Page No.12 - 3 CHEMIX-800 SERVICE MANUAL 12.2 MAINTENANCE SCHEDULE DAILY MAINTENANCE Start of the day procedure 1. EMPTY WASTE CAN. 2. EMPTY BIO HAZARDOUS WASTE CAN. 3. FILL DEIONISED WATER CAN. 4. FILL CLEANING SOLUTION CAN. 5. CHECK CAL A SOLUTION LEVEL, REPLACE BOTTLE IF NECESSARY. 6. CLEAN THE ANALYSER EXTERNAL SURFACE. 7. REPLACE PRINTER PAPER IF NECESSARY. 8. CLEAN THE COMPUTER, TROLLEY, MONITOR, KEYBOARD AND PRINTER EXTERNAL SURFACE. 9. PERFORM A CUVETTE RINSE 10. PERFORM A PHOTOMETER CHECK AND VERIFY THAT THE AUTO SPAN CHECK HAS PASSED SUCCESSFULLY. 11. VERIFY REAGENT TRAY TEMPERATURE. 12. REPLENISH OR REPLACE REAGENTS IF NECESSARY. End of the day procedure 1. REMOVE AND DISCARD ALL SAMPLE / STANDARD AND CONTROLS CUPS OR TUBES FROM THE SAMPLE TRAY. 2. PERFORM A WATER SAVE. 3. TAKE A BACK UP OF ALL PATIENT REPORTS. Preventive Maintenance Preventive Maintenance 4. TURN OFF THE POWER TO THE MAIN ANALYSER UNIT BY TURNING OFF THE POWER SWITCH LOCATED ON THE SIDE OF THE ANALYSER ( ANALYSER TO BE KEPT IN THE STAND BY MODE) Ref: CMX/ VER 05/05/05 Page No.12 - 4 PREVENTIVE MAINTENANCE WEEKLY MAINTENANCE 1. CLEAN THE WASTE CAN. 2. CLEAN THE BIO HAZARDOUS WASTE CAN. 3. CLEAN AND FILL THE DEIONISED WATER CAN. 4. CLEAN THE CLEANING SOLUTION CAN. 5. CHECK THE LEVELS OF CAL A SOLUTION REPLACE IF REQUIRED. 6. CLEAN THE ANALYSER EXTERNAL SURFACE. 7. CLEAN THE COMPUTER, TROLLEY, MONITOR, KEYBOARD AND PRINTER EXTERNAL SURFACE. 8. CLEAN THE AREA AROUND THE ANALYSER, DISARD ANY UNWANTED ITEM.( MAINTAIN PROPER ROOM CLEANLINESS. 9. CLEAN THE SAMPLE, REAGENT 1 & REAGENT 2 PROBES. 10. CLEAN THE STIRRER PADDLES. 11. CLEAN THE LAUNDRY PROBES. 12. CLEAN THE SAMPLE TRANSPORT 13. CLEAN THE REAGENT TRANSPORT. 14. CLEAN THE SAMPLE, REAGENT 1 AND REAGENT 2 SYRINGE. 15. PERFORM AN AUTO SPAN CHECK AND NOTE DOWN THE GAIN VALUES FOR 340 WAVELENGTH. 16. PERFORM A CUVETTE RINSE. 17. PERFORM A PRECISION CHECK AND NOTE DOWN THE %CV FOR AN END POINT AND KINETIC TEST. Ref: CMX/ VER 05/05/05 Page No.12 - 5 CHEMIX-800 SERVICE MANUAL QUARTERLY MAINTENANCE 1. CLEAN THE WASTE CAN. 2. CLEAN THE BIO HAZARDOUS WASTE CAN. 3. CLEAN AND FILL THE DEIONISED WATER CAN. 4. CLEAN THE CLEANING SOLUTION CAN. 5. CLEAN THE LEVEL SENSING PLATFORM. 6. CHECK THE LEVELS OF CAL A SOLUTION REPLACE IF REQUIRED. 7. CLEAN THE ANALYSER EXTERNAL SURFACE. 8. CLEAN THE COMPUTER, TROLLEY, MONITOR, KEYBOARD AND PRINTER EXTERNAL SURFACE. 9. CLEAN THE AREA AROUND THE ANALYSER, DISARD ANY UNWANTED ITEM.( MAINTAIN PROPER ROOM CLEANLINESS. 10. CLEAN THE SAMPLE, REAGENT 1 & REAGENT 2 PROBES. 11. CLEAN THE STIRRER PADDLES. 12. CLEAN THE LAUNDRY PROBES. 13. CLEAN THE SAMPLE TRANSPORT 14. CLEAN THE REAGENT TRANSPORT. 15. CLEAN THE SAMPLE, REAGENT 1 AND REAGENT 2 SYRINGE. 16. CLEAN THE ANALYSER FANS. 17. CLEAN THE BAR CODE READER. 18. PERFORM AN AUTO SPAN CHECK AND NOTE DOWN THE GAIN VALUES FOR 340 WAVELENGTH. 19. PERFORM A CUVETTE RINSE. 20. PERFORM A PRECISION CHECK AND NOTE DOWN THE %CV FOR AN END POINT AND KINETIC TEST. 21. REPLACE THE LAMP. 22. CLEAN THE ANALYSER INTERNAL SURFACE FREE OF DUST 23. PERFORM AN AUTO SPAN CHECK AND NOTE DOWN THE GAIN VALUES FOR 340 WAVELENGTH. 24. PERFORM A CUVETTE RINSE. 25. PERFORM A PRECISION CHECK AND NOTE DOWN THE %CV FOR AN END POINT AND KINETIC TEST. 26. CARRY OUT A SITE VERIFICATION FOR TEMPERATURE, LINE VOLTAGE, ELECTRICAL GROUND, VENTILATION, EXTERNAL INTERFERENCES, ROOM LIGHTING, AND LABORATORY CLEANLINESS PRACTICE, AS DESCRIBED IN CHAPTER “16.1 SERVICING A CUSTOMER SITE”. Ref: CMX/ VER 05/05/05 Page No.12 - 6 PREVENTIVE MAINTENANCE 27. MAKE A DETAILED ENTRY IN THE ERROR LOG BOOK, OF THE MAINTENANCE CARRIED OUT AND AND SITE VERIFICATIONS. Ref: CMX/ VER 05/05/05 Page No.12 - 7 CHEMIX-800 SERVICE MANUAL HALF YEARLY MAINTENANCE 1. CLEAN THE WASTE CAN. 2. CLEAN THE BIO HAZARDOUS WASTE CAN. 3. CLEAN AND FILL THE DEIONISED WATER CAN. 4. CLEAN THE CLEANING SOLUTION CAN. 5. CLEAN THE LEVEL SENSING PLATFORM. 6. CHECK THE LEVELS OF CAL A SOLUTION REPLACE IF REQUIRED. 7. CLEAN THE ANALYSER EXTERNAL SURFACE. 8. CLEAN THE COMPUTER, TROLLEY, MONITOR, KEYBOARD AND PRINTER EXTERNAL SURFACE. 9. CLEAN THE AREA AROUND THE ANALYSER, DISARD ANY UNWANTED ITEM.( MAINTAIN PROPER ROOM CLEANLINESS. 10. CLEAN THE SAMPLE, REAGENT 1 & REAGENT 2 PROBES. 11. CLEAN THE Stirrer 1 and Stirrer 2 PADDLES. 12. CLEAN THE LAUNDRY PROBES. 13. REPLACE THE LAUNDRY TUBINGS. 14. CLEAN THE SAMPLE TRANSPORT 15. CLEAN THE REAGENT TRANSPORT. 16. CLEAN, CHECK AND REPLACE IF NECESSARY THE SAMPLE, REAGENT 1 AND REAGENT 2 SYRINGE. PLUNGER TIP. 17. CLEAN THE ANALYSER FANS. 18. CLEAN THE BAR CODE READER. 19. REPLACE THE LAMP. 20. REPLACE THE ALL ISE ELECTRODES & PERFORM A ISE CLEAN AND RINSE CYCLE. 21. CHECK AND REPLACE THE ISE PUMP CASSETTES. 22. CLEAN THE ANALYSER INTERNAL SURFACE FREE OF DUST 23. PERFORM AN AUTO SPAN CHECK AND NOTE DOWN THE GAIN VALUES FOR 340 WAVELENGTH. 24. PERFORM A CUVETTE RINSE. 25. PERFORM A PRECISSION CHECK AND NOTE DOWN THE %CV FOR AN END POINT AND KINETIC TEST. 26. CARRY OUT A SITE VERIFICATION FOR TEMPERATURE, LINE VOLTAGE, ELECTRICAL GROUND, VENTILATION, EXTERNAL INTERFERENCES, ROOM LIGHTING, AND LABORATORY CLEANLINESS PRACTICE, AS DESCRIBED IN CHAPTER “16.1 SERVICING A CUSTOMER SITE”. 27. MAKE A DETAILED ENTRY IN THE ERROR LOG BOOK, OF THE MAINTENANCE CARRIED Ref: CMX/ VER 05/05/05 Page No.12 - 8 PREVENTIVE MAINTENANCE OUT AND AND SITE VERIFICATIONS. Ref: CMX/ VER 05/05/05 Page No.12 - 9 CHEMIX-800 SERVICE MANUAL ANNUAL MAINTENANCE 1. CLEAN THE WASTE CAN. 2. CLEAN THE BIO HAZARDOUS WASTE CAN. 3. CLEAN AND FILL THE DEIONISED WATER CAN. 4. CLEAN THE CLEANING SOLUTION CAN. 5. CLEAN THE LEVEL SENSING PLATFORM. 6. REPLACE EXTERNAL TUBINGS TO THE WASTE, BIO HAZARDOUS WASTE, CLEANING SOLUTION AND DEIONISED WATER CANS. 7. CHECK THE LEVELS OF CAL A SOLUTION REPLACE IF REQUIRED. 8. CLEAN THE ANALYSER EXTERNAL SURFACE. 9. CLEAN THE COMPUTER, TROLLEY, MONITOR, KEYBOARD AND PRINTER EXTERNAL SURFACE. 10. CLEAN THE AREA AROUND THE ANALYSER, DISARD ANY UNWANTED ITEM.( MAINTAIN PROPER ROOM CLEANLINESS. 11. CHECK AND REPLACE IF NECESSARY THE SAMPLE, REAGENT 1 & REAGENT 2 PROBES. 12. CHECK AND REPLACE IF NECESSARY THE STIRRER PADDLES. 13. REPLACE THE LAUNDRY PROBES. 14. REPLACE THE LAUNDRY TUBINGS. 15. CLEAN THE SAMPLE TRANSPORT 16. CLEAN THE REAGENT TRANSPORT. 17. CHECK AND REPLACE IF NECESSARY THE SAMPLE, REAGENT 1 AND REAGENT 2 SYRINGE. 18. CLEAN THE ANALYSER FANS. 19. CLEAN THE BAR CODE READER. 20. REPLACE THE LAMP. 21. REPLACE THE ALL ISE ELECTRODES & PERFORM A ISE CLEAN AND RINSE CYCLE. 22. CHECK AND REPLACE IF NECESSARY THE ISE PUMP CASSETTES. 23. CLEAN THE ANALYSER INTERNAL SURFACE FREE OF DUST 24. PERFORM AN AUTO SPAN CHECK AND NOTE DOWN THE GAIN VALUES FOR 340 WAVELENGTH. 25. PERFORM A CUVETTE RINSE. 26. PERFORM A PRECISION CHECK AND NOTE DOWN THE %CV FOR AN END POINT AND KINETIC TEST. Ref: CMX/ VER 05/05/05 P a g e N o . 1 2 - 10 PREVENTIVE MAINTENANCE 27 CARRY OUT A SITE VERIFICATION FOR TEMPERATURE, LINE VOLTAGE, ELECTRICAL GROUND, VENTILATION, EXTERNAL INTERFERENCES, ROOM LIGHTING, AND LABORATORY CLEANLINESS PRACTICE, AS DESCRIBED IN CHAPTER “16.1 SERVICING A CUSTOMER SITE”. Preventive Maintenance 28. MAKE A DETAILED ENTRY IN THE ERROR LOG BOOK, OF THE MAINTENANCE CARRIED OUT AND SITE VERIFICATIONS. Ref: CMX/ VER 05/05/05 P a g e N o . 1 2 - 11 PREVENTIVE MAINTENANCE 12.3 USER DAILY & WEEKLY MAINTENANCE LOG MONTH: Model: CHEMIX-800 Serial No.: Name of the Customer: ______________________________________ Name of the Operator: ______________________________________ DAY 1 2 3 4 5 6 7 8 9 10 11 12 13 14 15 16 17 18 19 20 21 22 23 24 25 26 27 28 29 Start of Day Empty waste can. Empty bio hazardous waste can. * Fill deionised water can. Fill cleaning solution can. * Check cal A solution level Clean the analyser external surface Replace printer paper .* Clean computer, keyboard & monitor Perform cuvette rinse & check blank Perform an auto span check Verify reagent tray temperature Replenish or replace reagents End of Day Discard Sample & Control cups/tube Perform a water save. Back up of all patient reports.* Place analyser in the stand by mode Initials of person performing Maintenance Weekly maintenance 1st week 2nd week 3rd week Clean the waste can Clean the bio hazardous waste can. Clean and fill deionised water can. Clean the cleaning solution can.* Check the levels of cal A solution Clean the analyser external surface. Clean computer, keyboard & monitor Maintain proper room cleanliness. Clean Sample,Reagent 1 & 2 probes Clean the stirrer 1 and stirrer 2 paddles Clean the laundry probes. Clean Sample & Reagent transport Clean Sample,Reagent 1&2 syringe* Perform an auto span check Perform cuvette rinse & check blank * If Necessary Ref: CMX/ VER 05/05/05 P a g e N o . 1 2 - 13 4th week 5th week 30 31 CHEMIX-800 SERVICE MANUAL 12.4 SERVICE TECHNICIAN QUARTERLY MAINTENANCE LOG Name of the Customer: ______________________________________ Name of the service technician: ______________________________________ Quarterly Maintenance First Quarter Month From: to Model: CHEMIX-800 Serial No.: Second Quarter clean the waste can. clean the bio hazardous waste can. clean and fill the deionised water can. clean the cleaning solution can. clean the level sensing platform. check the levels of cal A solution replace if required clean the analyser external surface. clean the computer, trolley, monitor, keyboard and printer external surface. maintain proper room cleanliness, clean the area around the analyse and discard any unwanted items. clean sample, reagent 1 & 2 probes clean the stirrer paddles. clean the laundry probes. clean the sample transport clean the reagent transport Clean,check and if necessary the sample, reagent 1 & 2 syringe.plunger tip clean the analyser fans. clean the bar code reader. replace the lamp. Perform an auto span check Perform cuvette rinse, check & note cuvette blanks Perform a precision check Take a back up of all necessary data, Patient results, Parameters, Calibration data, QC data, Control data ,System switch & Sequence Carry out a site verification for temperature, line voltage, electrical ground, ventilation, external interferences, room lighting and laboratory cleanliness practice as described in chapter “ 16.1 SERVICING A CUSTOMER SITE” Make a entry in the Customer error log book Ref: CMX/ VER 05/05/05 P a g e N o . 1 2 - 14 Third Quarter Fourth Quarter PREVENTIVE MAINTENANCE 12.5 SERVICE TECHNICIAN ANNUAL MAINTENANCE LOG Name of the Customer: ______________________________________ Name of the service technician: ______________________________________ Month From: to Model: CHEMIX-800 Serial No.: Annual Maintenance clean the waste can. clean the bio hazardous waste can. clean and fill the deionised water can. clean the cleaning solution can. clean the level sensing platform. check the levels of cal A solution replace if required clean the analyser external surface. clean the computer, trolley, monitor, keyboard and printer external surface. Replace external tubings to the waste , Bio hazardous waste, cleaning solution & Deionised water maintain proper room cleanliness, clean the area around the analyse and discard any unwanted items. Replace the Sample, Reagent 1 & 2 probes Replace the stirrer 1 and stirrer 2 paddles. Replace the laundry probes. Replace the laundry tubings clean the sample transport clean the reagent transport Clean and replace if necessary the Sample, Reagent 1 & 2 syringe. Clean the analyser fans. Clean the bar code reader. Replace all ISE electrodes Check and replace if necessary the the ISE pump cassette replace the lamp. perform an auto span check Perform cuvette rinse, check & note cuvette blanks perform a precision check Take a back up of all necessary data, Patient results, Parameters, Calibration data, QC data, Control data, System switch & Sequence Carry out a site verification for temperature, line voltage, electrical ground, ventilation, external interferences, room lighting and laboratory cleanliness practice as described in chapter “ 16.1 SERVICING A CUSTOMER SITE” Make a entry in the Customer error log book Ref: CMX/ VER 05/05/05 P a g e N o . 1 2 - 15 CHEMIX-800 SERVICE MANUAL 12.6 SPARES REPLACEMENT SCHEDULE Name of the Customer: ______________________________________ Name of the Operator / Service technician: ___________________________ DESCRIPTION 3 Months Month From: to Model: CHEMIX-800 6 Months Serial No: 9 Months 12 Months 9 9 9 9 9 9 9 9 9 9 SPT PROBE ASSY * R1PT PROBE ASSY * R2PT PROBE ASSY * 9 9 9 9 STIRRER PADDLES CUVETTE DRIER CHIP (TEFLON) LAUNDRY DISPENSE TUBINGS LAUNDRY ASPIRATION TUBINGS LAUNDRY PROBE ASSY ) * PHOTOMETER LAMP ASSY SAMPLE SYRINGE PLUNGER WITH TEFLON TIP (100 ul) 9 9 9 9 SAMPLE SYRINGE ASSY (100 ul) * REAGENT 1 & 2 SYRINGE (500 ul) TEFLON TIP 9 REAGENT 1 & 2 SYRINGE (500 ul) ASSY * Na ELECTRODE K ELECTRODE Cl ELECTRODE Ref: CMX/ VER 05/05/05 9 9 9 P a g e N o . 1 2 - 16 9 9 9 9 PREVENTIVE MAINTENANCE DESCRIPTION 3 Months 6 Months 9 Months 9 REF ELECTRODE 9 9 ISE BOTTLE WITH TUBE ASSY ISE PUMP CASSETTE 9 (Note quantity required 2) 9 DI WATER FILTER * If necessary Ref: CMX/ VER 05/05/05 12 Months P a g e N o . 1 2 - 17 ERROR CODES LIST 13 ERROR CODES LIST Stirrer 1 Error Code A1 A2 A3 A4 Stirrer 2 B1 B2 B3 B4 CRU C1 C2 RCT Error Message Stirrer1 up/down error during initialization Stirrer1 rotational error during initialization Stirrer1 up/down error during run Stirrer1 rotational error during run Stirrer2 up/down error during initialization Stirrer2 rotational error during initialization Stirrer2 up/down error during run Stirrer2 rotational error during run CRU Up/Down Movement Error during Initialization CRU up/down error during run E1 RCT rotational error during initialization E2 RCT Rotational Error Ref: CMX / VER 05/05/05 Trouble shooting Tips The connecters /up down motor/ upopto-sensor out put has to be checked and verified The connecters /rotational motor/ home /direction opto-sensor out put has to be checked and verified The connecters /up down motor/ upopto-sensor out put has to be checked and verified The connecters /rotational motor/ home /direction opto-sensor out put has to be checked and verified The connecters /up down motor/ upopto-sensor out put has to be checked and verified The connecters /rotational motor/ home /direction opto-sensor out put has to be checked and verified The connecters /up down motor/ upopto-sensor out put has to be checked and verified The connecters /rotational motor/ home /direction opto-sensor out put has to be checked and verified The connecters /up down motor/ upopto-sensor/down opto-sensor out put has to be checked and verified The connecters /up down motor/ upopto-sensor/down opto-sensor out put has to be checked and verified The connecters/stop opto / base opto outputs has to be verified. Consider the interlock effects while trouble shooting. The connecters/stop opto output has to be verified. Consider the interlock effects while trouble shooting. Page No. 13- 1 Error Codes List Assembly CHEMIX-800 SERVICE MANUAL Assembly Error Code Miscellaneous F1 Insufficient DI Water H1 Check Water Pressure K1 RGT cover switch closed/open 11 R1PT Arm up /down Error during initialization 12 R1PT Arm Rotational Error during initialisation R1 Arm 13 Error Message R1PT Arm Up/Down Error during run 14 R1PT Arm Rotational Error during run 15 R1PT Arm VOD Error 16 RGT 21 Reagent Absent For R1 RGT Rotational Error During Initialization 22 Error Codes List RGT Rotational Error R1 Syringe 31 32 R2 Arm 41 42 Ref: CMX / VER 05/05/05 R1 syringe up/down error during initialization R1 syringe up/down error during run R2PT up/down error during initialization R2PT Rotational Error during initialization Trouble shooting Tips Check the DI water level/ sensor output of load cell. Check the pressure unit for its functioning / any leakage/ block in the tubing Check the cover placement/ the logic levels at the base board connecters /connector connections and verify for proper functionality. The connecters /up down motor/ upopto-sensor/home opto-sensor out put has to be checked and verified The connecters /rotational motor/ upopto-sensor/home opto-sensor / direction opto-sensor out put has to be checked and verified The connecters /up down motor/ upopto-sensor/home opto-sensor out put has to be checked and verified The connecters /rotational motor/ upopto-sensor/home opto-sensor / direction opto-sensor out put has to be checked and verified The connecters / VOD opto-sensor/ placement of reagent bottles/ arm position in cuvette/ arm position in trough has to be checked and verified The connecters / LLS board has to be checked and verified The connecters/stop opto / base opto outputs has to be verified. Consider the interlock effects while trouble shooting. The connecters/stop opto output has to be verified. Consider the interlock effects while trouble shooting. The connecters /up down motor/ syring opto-sensor out put has to be checked and verified The connecters /up down motor/ syring opto-sensor out put has to be checked and verified The connecters /up down motor/ upopto-sensor/home opto-sensor out put has to be checked and verified The connecters /rotational motor/ upopto-sensor/home opto-sensor / Page No. 13- 2 ERROR CODES LIST R2 Syringe Sample Arm Error Code Error Message 43 R2PT Up/Down Error during run 44 R2PT Rotational Error during run 45 R2PT Arm VOD Error 46 Reagent 2 Absent 61 R2pt syringe up/down error during initialization 62 R2 Syringe Up/Down Error during run 71 SPT up/down error during initialisation 72 SPT rotational error during initialization 73 SPT Up/Down Movement Error during run 74 SPT Rotational Error during run 75 SPT VOD Error 76 ASP Sample Absent 81 ASP Rotational Error during Initialization 82 ASP Rotational Error during run Ref: CMX / VER 05/05/05 Trouble shooting Tips direction opto-sensor out put has to be checked and verified The connecters /up down motor/ upopto-sensor/home opto-sensor out put has to be checked and verified The connecters /rotational motor/ upopto-sensor/home opto-sensor / direction opto-sensor out put has to be checked and verified The connecters / VOD opto-sensor/ placement of reagent bottles/ arm position in cuvette/ arm position in trough has to be checked and verified The connecters / LLS board has to be checked and verified The connecters /up down motor/ syring opto-sensor out put has to be checked and verified The connecters /up down motor/ syring opto-sensor out put has to be checked and verified The connecters /up down motor/ upopto-sensor/home opto-sensor out put has to be checked and verified The connecters /rotational motor/ upopto-sensor/home opto-sensor / direction opto-sensor out put has to be checked and verified The connecters /up down motor/ upopto-sensor/home opto-sensor out put has to be checked and verified The connecters /rotational motor/ upopto-sensor/home opto-sensor / direction opto-sensor out put has to be checked and verified The connecters / VOD opto-sensor/ placement of reagent bottles/ arm position in cuvette/ arm position in trough has to be checked and verified The connecters / LLS board has to be checked and verified The connecters/stop opto / base opto outputs has to be verified. Consider the interlock effects while trouble shooting. The connecters/stop opto output has to be verified. Consider the interlock Page No. 13- 3 Error Codes List Assembly CHEMIX-800 SERVICE MANUAL Assembly Error Message 91 SPT syringe up/down error during initialization 92 SPT Syringe up/down Error during run Trouble shooting Tips effects while trouble shooting. The connecters /up down motor/ syring opto-sensor out put has to be checked and verified The connecters /up down motor/ syring opto-sensor out put has to be checked and verified Error Codes List Sample Syringe Error Code Ref: CMX / VER 05/05/05 Page No. 13- 4 ISE MODULE 14 14 ISE Module This section consists of the following ISE MODULE MEASUREMEN, FEATURES AND BENEFITS TECHNICAL SPECIFICATIONS ISE MEASUREMENT THEORY ELECTRODES MAINTENANCE SCHEDULE ERROR CODES LIST REAGENT CONSUMPTION ACCEPTABLE CALIBRATION RANGES ISE MODULE MECHANICAL ASSEMBLY ISE Module 14.1 14.2 14.3 14.4 14.5 14.6 14.7 14.8 14.9 Ref: CMX / VER 05/05/05 Page No 14 - 1 CHEMIX-800 SERVICE MANUAL 14.1 ISE MODULE MEASUREMEN, FEATURES AND BENEFITS ISE Module Features Benefits Integral sample port entry Minimal sample carry over Small sample size 60µl Electrodes mounted close to the electronics Minimal electronic noise, improves precision Sample port adjacent to ISE sensors Minimal sample size and carry over Rapid operation (30 seconds cycle time) Rapid results Easy to access sensors Simple maintenance No Membranes need to be serviced Minimum down time Easily accessed pumps Easy maintenance Two bubble detectors Reliable sample processing assured Two point calibration High accuracy and precision One point calibration with every sample With every sample the calibration is assured – high reliability of results Maintenance free electrodes - 6 months or 10,000 samples warranty Cost effective cost per test Disposable reference electrode no addition or filling solution required Minimum down time Ref: CMX / VER 05/05/05 Page No . 14 - 2 ISE MODULE 14.2 TECHNICAL SPECIFICATIONS Sample : Serum Plasma or Urine ( Urine requires dilution) Sample size : 60 µl, (3 channels) serum, 160 µl diluted urine Reproducibility : Maximum precision ( within run ) Serum Typical carry over, % (serum) Na CV< 1.5% (100-160mmol / L ) < 0.5 % K CV< 2% (3.00 -600mmol / L ) < 1.5 % Na CV< 2% (80-120mmol / L ) < 1.0 % Analysis time : Serum - 30 seconds, including one point calibration Urine – 60, including one point calibration Throughput: Serum – 120 samples per hour Urine – 60 samples per hour Power : 12V DC, 0.6A Module Size : Height 100 mm X 102 mm Width, 91 mm Depth Reagents : Calibrant A Calibrant B Cleaning Solution Urine Diluent ISE Module Maximum Environmental Temperature: 38 Degrees Centigrade Ref: CMX / VER 05/05/05 Page No 14 - 3 CHEMIX-800 SERVICE MANUAL 14.3 ISE MEASUREMENT THEORY The Electrolyte Measurement System measures Sodium, Potassium and Chloride in biological fluids, using ion selective electrode technology. A diagram of the electrode measurement system is shown in figure 2.3. The flow trough sodium electrode uses selective membrane tubing, specially formulated to be sensitive to sodium ions, the Potassium and chloride electrodes employ similar designs with appropriate selective membrane materials. The potential of each electrode is measured relative to a fixed, stable voltage established by the double junction Silver / Silver chloride reference electrode. An ion selective electrode develops a voltage that varies with the concentration of the ion to which it responds. The relationship between the voltage developed and the concentration of the sensed ion is logarithmic, as expressed by the Nernst equation: E= Eo + RT log (oc C) nF E = The potential of the electrode in sample solution Eo = The potential developed under standard conditions RT/nF = A temperature dependent “constant”, termed the slope Log = Base ten logarithm function Oc = Activity coefficient of the measured ion in the solution C = Concentration of the measured ion in the solution ISE Module Where : Ref: CMX / VER 05/05/05 Page No . 14 - 4 ISE MODULE ELECTRODE MEASUREMENT DIAGRAM Sample Port From Cal A pump Sample Tube Sample Detector Optically Detects air Bubble in Flow Sample Na Electrode Signal to processor Microprocessor measures Na+ Potential (mv) K Electrode Microprocessor measures K+ Potential (mv) Cl Electrode Microprocessor measures Cl- Potential (mv) Reference electrode body Flow-thru Membrane Assembly AgCl Coated Silver Pin High Concentration KCL Signal to the Microprocessor Sample Detector Optically Detects air Bubble in Flow Pump Tube Low Resistance Ceramic Plug Ionic contact thru High Concentration KCL Internal Filling Solution Membrane ISE Module To waste pump Ref: CMX / VER 05/05/05 Page No 14 - 5 CHEMIX-800 SERVICE MANUAL 14.4 ELECTRODES Medica electrodes are maintenance-free and are warranted on a prorated basis for up to 10,000 samples or 6 months, whichever occurs first. Cleaning Solution, aspirated from an operator designated sample cup, is used at least once a day at the end of the day in order to minimize protein buildup in the fluid lines. A two-point calibration of the ISE module is also done at least once a day at the beginning of the first sample run. If the user is running more than 50 samples a day, cleaning must be performed at 8 hours intervals by the host analyzer prior to calibration. The entire double-junction reference electrode is disposable. The reference electrode is filled with sufficient KCI so that no filling solution must be added during the lifetime of the electrode. The lifetime of the reference electrode is 6 months or 10,000 samples. No addition of internal filling solution is required for this electrode. Electrodes require celebrant sampling at 30-minute intervals for reliable operation, but this is completely controlled by the Electrolyte Measurement System without any need for control by the host analyzer or the operator. The electrodes require a 10 times sample dilution for measurement of urine. The ISE module depends on the host analyzer to perform the dilution function. ISE Module It is not necessary to regulate the electrode housing temperature provided that its environmental temperature does not exceed 30°C. Ref: CMX / VER 05/05/05 Page No . 14 - 6 ISE MODULE 14.5 MAINTENANCE SCHEDULE The Electrolyte Measurement System has been designed to require very little operator maintenance. The only daily maintenance required is to run the Cleaning Solution after the last sample of the day. All other parts and expendables are replacement items (see schedule below) Recommended Maintenance/Replacement Schedule (low volume user) Pump Cassette 9 months Na+Electrode 6 months K+Electrode 6 months Cl Electrode 6 months Reference Electrode 6 months Reagent Refill reagent as required by testing needs Recommended Maintenance/Replacement Schedule (greater than 100 samples/day Pump Cassette 6 months 10,000 samples K+ Electrode 10,000 samples Cl Electrode 10,000 samples Reference Electrode 10,000 samples Reagent Refill reagent as required by testing needs ISE Module Na+ Electrode Ref: CMX / VER 05/05/05 Page No 14 - 7 CHEMIX-800 SERVICE MANUAL 14.6 ERROR CODES LIST Byte 1 Noise or Air for Sample/ Cal B Serum, Plasma, Urine No Error Noise Na Drift or K Out Na, K Of Cl Range Na,Cl K, Cl Na,K,Cl ISE Module Error Codes Byte 2 Byte 3 Byte 4 Noise for Air for Cal A Drift in Cal A Out of Range for Sample/ Cal B and Urine Byte 4 Out of Range and/or Na Error for Urine Only 0 0 0 0 1 2 3 4 5 6 7 1 2 3 4 5 6 7 1 2 3 4 5 6 7 1 2 3 4 5 6 7 S B A - - - Byte 1 0 Byte 2 0 Byte 3 0 Byte 4 0 Byte 4 K Na K Na, K Cl Na,Cl K, Cl 1 2 3 4 5 6 1 2 3 4 5 6 1 2 3 4 5 6 1 2 3 4 5 6 L M N O P Q Na,K,Cl 7 7 7 7 R Air Urine Only ISE Module No Error Noise Drift or Out Of Range Ref: CMX / VER 05/05/05 Na urine error only, no out of range error Na Urine Error And Out of range Error Page No . 14 - 8 ISE MODULE 14.7 REAGENT CONSUMPTION Reagents Used The sample is aspirated from a sample cup and dispensed into the sample port at the top of the ISE module by the analyzer. The sample is then positioned in front of the sensors using the double detector and the Waste Pump. See Figure C. 4 reagents are needed to operate the ISE module. Used as wash solution and single-point calibrator. Calibrant A is pumped into the sample port by the Calibrant A pump and then positioned in front of the sensors. A volume of 200ul is sufficient per sample run. 2. Calibrant B : Used as the second point in two-point calibration. Calibrant B is aspirated from a cup on the analyzer at least once a day or every 8 hours, depending upon the laboratory schedule. A volume of 500 uL is sufficient for one day's requirements. This calibrant, however, should be placed on the host analyzer just before use to prevent a change in values from evaporation. 3. Cleaning Solution : Should be run once a day to prevent protein buildup or at 8 hour intervals if the ISE Module performs greater than 50 samples per day. Cleaning Solution may be aspirated from a sample cup. 500 uL is sufficient for one day's requirements. 4. Urine Diluent : This is required for urine samples. Urine samples must be diluted by a factor of 10 to perform urine measurement. The host analyzer must thoroughly mix the diluent and sample before dispensing of the diluted sample into the ISE Module. ISE Module 1. Calibrant A : Ref: CMX / VER 05/05/05 Page No 14 - 9 CHEMIX-800 SERVICE MANUAL 14.8 Acceptable Calibration Ranges The following are the acceptable calibration values displayed at the bottom of the screen after completion of an ISE calibration. ISE Module Na : Slope 50 to 63 mv/Decade K : Slope 50 to 63 mv/Decade Cl : Slope 40 to 55 mv/Decade Ref: CMX / VER 05/05/05 P a g e N o . 1 4 - 10 ISE MODULE Symptom Problem Correction System does not respond 1. RS232 cable is disconnected or damaged Reconnect or replace cable. 2. Module connector has been damaged Replace board. 3. Component failure on board Replace board 1. Misalignment of sensors Remove and replace sensor to reseat. 2. Deterioration of Calibrator solutions Replace Cal B first and retest. If still low replace Cal A and retest 3. Deterioration of sensing electrode. Replace problem sensor and test. 4. Air bubble on reference electrode membrane Remove electrode, tap to dislodge bubble, replace, and recalibrate 5. Deterioration of reference electrode Replace reference electrode and retest 6. Interaction between sensing electrodes Replace CL electrode only and retest. 7. Module or Fluid temperatures exceed 370 C Monitor temperature. Change instrument location if ambient is too great. 1. Deterioration of sensing electrode Replace problem sensor and test. 2. Electrical noise spike from environmental source a) Check for electrical noise coincident with activation. b) Component failure on module board. Replace board. Noise Error Flag Multiple electrodes 1. Deterioration of reference electrode Replace reference electrode and retest. 2. Electrical noise spike from environmental source a) Check for electrical noise coincident with activation. b) Component failure on module board. Replace board. Drift Error Flag Single Electrode 1. Deterioration of sensing electrode Replace problem sensor and test. 2. May occur when new sensor or new bottle of Cal A is installed on system Purge the Cal A and recalibrate the module. If the sensor is new it may initially drift as it rehydrates over the course of 15 minutes 1. Deterioration of reference electrode Replace reference electrode and retest. Low Slope Na or K < 45 mV/decade Cl < 35 mV/decade Or High Slope Na or K > 63 mV/decade Cl > 60 mV/decade Noise Error Flag Single electrode Drift Error Flag Ref: CMX / VER 05/05/05 P a g e N o 1 4 - 11 ISE Module 14.9 Troubleshooting CHEMIX-800 SERVICE MANUAL Symptom Problem Correction 2. Electrical spikes from environmental source a) Check for electrical noise coincident with activation. b) Component failure on module board. Replace board. 3. May occur when new sensor or new bottle of Cal A is installed on system Purge the Cal A and recalibrate the module. 1. Insufficient sample pipetted into module sample port a) Host instrument must deliver 70 µl. Increase dispense volume b) Operator must place sufficient sample in sample cup to account for all test programmed 2. Sample not positioned properly a) Pump not connected properly. b) Pump tubing obstructed or tubing length is excessive. 1. Sample and Cal A are segmented with air. a) Sensors are not properly compressed. Check compression plate, spring and seal. b) Ensure that all sensors and o-rings are in place 2. Fibrin or salt is plugging the sensor flow path. a) Use Cleaning procedure <CLEN> for module b) Disassemble module and clean or replace sensor with plugged flow path 3. Bubble detector is malfunctioning Replace bubble detector. 4. Waste pump is malfunctioning Replace Waste Pump Multiple Electrode Air in Sample Air in Sample and Cal A ISE Module Air in Cal B and Air in Cal A 1. Cal B and Cal A are segmented with air a) Sensors are not properly compressed. Check compression plate, spring and seal. b) Ensure that all sensors and o-ring are in place. 2. Fibrin or salt is plugging the sensor flow path. a) Use Cleaning procedure <CLEN> for module b) Disassemble module and clean or replace sensor with plugged flow path. 3. Bubble detector is malfunctioning Replace bubble detector. 4. Waste pump is malfunctioning Replace Waste Pump Ref: CMX / VER 05/05/05 P a g e N o . 1 4 - 12 ISE MODULE Symptom Problem Correction 1. Insufficient Cal B pipetted into module sample port a) Host instrument must deliver 70 µl. Increase dispense volume b) Operator must place sufficient sample in sample cup to account for all test programmed 2. Sample not positioned properly a) Pump not connected properly. b) Pump tubing obstructed or tubing length is excessive. 1. Cal A bottle is empty. Replace Cal A Bottle with a new one, purge and recalibrate. 2. Tubing is disconnected Reconnect or replace tubing. 3. Cal A pump is not working properly. a) Check electrical connections b) Replace pump cassette. c) Replace motor. 4. Tubing is plugged, split or crimped. Replace tubing. Air in Cal B ISE Module Air in Cal A (no “Air” errors reported for Sample or Cal B) Ref: CMX / VER 05/05/05 P a g e N o 1 4 - 13 CHEMIX-800 SERVICE MANUAL 14.10 ISE MODULE MECHANICAL ASSEMBLY ISE ASSEMBLY XLAD-202 XLAD-203 Na+ + K Cl - ISE Module Ref. Wa Pu ste mp l. Ca p m u P XLAD-201 Ref: CMX / VER 05/05/05 P a g e N o . 1 4 - 14 ISE MODULE ISE COMPLETE ASSEMBLY ISE MODULE FSPIM001 ISE Module M3x10 PH. HD. SCREW +PW+SW (4 NOS.) te as p W um P . al C mp Pu Ref: CMX / VER 05/05/05 P a g e N o 1 4 - 15