1
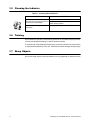
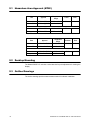
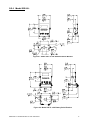
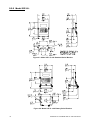
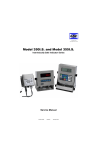
Model 350I.S. and Model 355I.S.
Instrinsically Safe Indicator Series
User Instructions
AWT35-500382
Issue AD
January 2011
© Avery Weigh-Tronix, LLC 2011. All rights reserved.
No part of this publication may be reproduced, stored in an electronic retrieval system, or transmitted in any form
or by any means, electronic, mechanical, photocopying, recording or otherwise without the prior written consent of
the copyright owner, or as permitted by law or under license. Full acknowledgment of the source must be given.
Avery Weigh-Tronix is a registered trade mark of the Avery Weigh-Tronix, LLC. This publication was correct at the
time of going to print however, Avery Weigh-Tronix, LLC reserves the right to alter without notice the specification,
design, price or conditions of supply of any product or service at any time.
All third party brands and product names used within this document are trademarks or registered trademarks of
their respective holders.
All Weigh-Tronix / GSE products bearing the Factory Mutual seal are designed and manufactured according to the
guidelines set forth by Factory Mutual Research. It is the responsibility of owners to gain approval from their
insurance company for the suitability of the Weigh-Tronix equipment and installation for their particular
environment.
Weigh-Tronix assumes no responsibility or liability either expressed or implied for the suitability of the Weigh-Tronix
equipment for the owners' specific application or environment.
Model 350 I.S. and Model 355 I.S. book
Table of Contents
Chapter 1 General information and warnings ......................................................................................... 3
About this Manual .............................................................................................................. 3
Text Conventions ........................................................................................................ 3
Special Messages ....................................................................................................... 3
Installation .......................................................................................................................... 4
Electrical Installation .......................................................................................................... 4
Pluggable Equipment .................................................................................................. 4
Permanently Wired Equipment - Isolator Requirements ............................................. 4
Safe Handling of Equipment with Batteries ................................................................. 5
Wet Conditions ............................................................................................................ 5
Routine Maintenance ......................................................................................................... 5
Cleaning the Indicator ........................................................................................................ 6
Training .............................................................................................................................. 6
Sharp Objects .................................................................................................................... 6
FCC and EMC Declarations of Compliance ....................................................................... 7
Chapter 2 Installation ................................................................................................................................ 9
Hazardous Area Approval (ATEX) ................................................................................... 10
Desktop Mounting ............................................................................................................ 10
Outline Drawings .............................................................................................................. 10
Model 350 I.S. ........................................................................................................... 11
Model 355 I.S. ........................................................................................................... 12
AC and DC Powered ........................................................................................................ 13
DC Operated ............................................................................................................. 13
AC Operated ............................................................................................................. 14
AC To DC Power Supply Extension Cable ................................................................ 14
Chapter 3 Display and Keypad ............................................................................................................... 15
Display ............................................................................................................................. 15
LED Display ............................................................................................................... 15
LCD Display .............................................................................................................. 15
Keypads ........................................................................................................................... 16
Model 350 I.S. Keypad .............................................................................................. 16
Model 355 I.S. Keypad .............................................................................................. 17
Weigh Mode Functions .............................................................................................. 19
Chapter 4 Operation ................................................................................................................................ 21
Entering a Tare Value (Model 350 I.S.) ........................................................................... 21
Entering a Tare Value (Model 355 I.S.) ........................................................................... 21
Enter an ID Number ......................................................................................................... 21
Set Time & Date ............................................................................................................... 22
Model 350 I.S. ........................................................................................................... 22
Model 355 I.S. ........................................................................................................... 22
Parts Counting ................................................................................................................. 23
Model 350 I.S. ........................................................................................................... 23
Model 355 I.S. ........................................................................................................... 24
View the average piece weight .................................................................................. 24
Percentage Checkweigh .................................................................................................. 25
Enter a Target Value ................................................................................................. 25
Start Checkweighing ................................................................................................. 26
Fill .................................................................................................................................... 26
Enter a Target Value ................................................................................................. 26
Start Fill ..................................................................................................................... 27
Fill Example ............................................................................................................... 28
Batch ................................................................................................................................ 28
Model 350 I.S. and 355 I.S. User Instructions
1
Enter a Target ........................................................................................................... 28
Start Batch ................................................................................................................. 29
Batch Example .......................................................................................................... 30
Discharge ......................................................................................................................... 30
Enter a Target ........................................................................................................... 31
Pre-acts ..................................................................................................................... 32
Start Discharge .......................................................................................................... 32
Discharge Example ................................................................................................... 33
Fill and Discharge ............................................................................................................ 33
Enter a Target ........................................................................................................... 33
Pre-acts ..................................................................................................................... 34
Activation Method ...................................................................................................... 34
Pause ........................................................................................................................ 35
Fill and Discharge Example ....................................................................................... 35
Absolute Checkweigh ...................................................................................................... 36
Enter a Target Value ................................................................................................. 36
Start Checkweighing ................................................................................................. 37
Absolute Checkweighing Example ............................................................................ 37
Target Deviation Checkweigh .......................................................................................... 37
Enter a Target Value ................................................................................................. 37
Start Checkweighing ................................................................................................. 38
Target Deviation Checkweighing Example ................................................................ 39
Batch 2 ............................................................................................................................. 39
Enter a Target ........................................................................................................... 39
Activation Method ...................................................................................................... 40
Batch2 Example ........................................................................................................ 40
Chapter 5 Troubleshooting ..................................................................................................................... 41
Operational Errors ............................................................................................................ 41
Miscellaneous Errors ....................................................................................................... 41
Hardware Errors ............................................................................................................... 42
Communication Errors ..................................................................................................... 42
Chapter 6 Specifications ......................................................................................................................... 43
2
Model 350 I.S. and 355 I.S. User Instructions
1
General information and warnings
1.1
About this Manual
This manual is divided into chapters by the chapter number and the large text at the top
of a page. Subsections are labeled as shown by the 1 and 1.1 headings shown above.
The names of the chapter and the next subsection level appear at the top of alternating
pages of the manual to remind you of where you are in the manual. The manual name
and page numbers appear at the bottom of the pages.
1.1.1 Text Conventions
Key names are shown in brackets e.g. [PRINT] and reflect the case of the key being
described. This applies to the keys on the indicator keypad.
Displayed messages appear in italic type and reflect the case of the displayed
message.
1.1.2 Special Messages
Examples of special messages you will see in this manual are defined below. The
signal words have specific meanings to alert you to additional information or the relative
level of hazard.
DANGER!
THIS IS A DANGER SYMBOL.
DANGER MEANS THAT FAILURE TO FOLLOW SPECIFIC PRACTICES
OR PROCEDURES WILL CAUSE INJURY OR DEATH.
ELECTRICAL WARNING!
THIS IS AN ELECTRICAL WARNING SYMBOL.
ELECTRICAL WARNINGS MEAN THAT FAILURE TO FOLLOW
SPECIFIC PRACTICES OR PROCEDURES MAY RESULT IN
ELECTROCUTION, ARC BURNS, EXPLOSIONS OR OTHER HAZARDS
THAT MAY CAUSE INJURY OR DEATH.
WARNING!
This is a Warning symbol.
Warnings mean that failure to follow specific practices and procedures may
have major consequences such as injury or death.
CAUTION!
This is a Caution symbol.
Cautions give information about procedures that, if not observed, could result
in damage to equipment or corruption to and loss of data.
Model 350 I.S. and Model 355 I.S. User Instructions
3
NOTE: This is a Note symbol. Notes give additional and important information, hints
and tips that help you to use your product.
1.2
Installation
DANGER: RISK OF ELECTRICAL SHOCK. NO USER SERVICEABLE
PARTS. REFER TO QUALIFIED SERVICE PERSONNEL FOR SERVICE.
1.3
Electrical Installation
CAUTION: The AC to DC Power Supply power cable must be connected to an
earth-grounded electrical outlet. The electrical supply must have a circuit
breaker with an appropriate rating to protect from over-current conditions.
For your protection, all electrical (110V or 230V) equipment used out of doors or
in wet or damp conditions should be supplied from a correctly fused power
source and protected by an approved ground fault protection device (RCD,
GFCI etc.)
IF IN DOUBT SEEK ADVICE FROM A QUALIFIED ELECTRICIAN.
1.3.1 Pluggable Equipment
Pluggable equipment must be installed near an easily accessible socket outlet.
1.3.2 Permanently Wired Equipment - Isolator Requirements
Permanently connected equipment must have a readily accessible disconnect device
incorporated in the fixed wiring such as an isolator or circuit breaker with at least 3mm
contact separation.
The isolator MUST NOT be installed into the flexible power cable supplied with the unit.
The mains supply to the weighing equipment MUST be protected by a 4000A breaking
capacity fuse of a suitable current rating (a suitable fuse is a 3A Bussmann type
TDC180). These fuses are usually of the sand filled type.
4
Model 350 I.S. and Model 355 I.S. User Instructions
1.3.3 Safe Handling of Equipment with Batteries
CAUTION: Danger of explosion if battery is incorrectly replaced. Replace only
with the same or equivalent type recommended by the manufacturer. Dispose
of used batteries according to the manufacturer’s instructions.
ATTENTION: Il y a danger d'explosion s'il y a remplacement incorrect de la
batterie, remplacer uniquement avec une batterie du même type ou d'un type
équivalent recommandé par le constructeur. Mettre au rebut les batteries
usagées conformément aux instructions du fabricant.
1.3.4 Wet Conditions
Under wet conditions, the plug must be connected to the final branch circuit via an
appropriate socket / receptacle designed for washdown use.
Installations within the USA should use a cover that meets NEMA 3R specifications
as required by the National Electrical Code under section 410-57. This allows the unit
to be plugged in with a rain tight cover fitted over the plug.
Installations within Europe must use a socket which provides a minimum of IP56
protection to the plug / cable assembly. Care must be taken to make sure that the
degree of protection provided by the socket is suitable for the environment.
1.4
Routine Maintenance
IMPORTANT: This equipment must be routinely checked for proper operation
and calibration.
Application and usage will determine the frequency of calibration required for
safe operation.
Always turn off the machine and isolate from the power supply before starting any
routine maintenance to avoid the possibility of electric shock.
Make sure that it is placed securely on a flat and level surface.
Model 350 I.S. and Model 355 I.S. User Instructions
5
1.5
Cleaning the Indicator
Table 1.1 Cleaning DOs and DON’Ts
DO
DO NOT
Wipe down the outside of standard products Attempt to clean the inside of the indicator
with a clean cloth, moistened with water and Use harsh abrasives, solvents, scouring cleaners or
a small amount of mild detergent
alkaline cleaning solutions
Spray the cloth when using a proprietary
cleaning fluid
1.6
Spray any liquid directly on to the display window
Training
Do not attempt to operate or complete any procedure on a indicator unless you have
received the appropriate training or read the instruction books.
To avoid the risk of RSI (Repetitive Strain Injury), place the indicator on a surface which
is ergonomically satisfactory to the user. Take frequent breaks during prolonged usage.
1.7
Sharp Objects
Do not use sharp objects such as screwdrivers or long fingernails to operate the keys.
6
Model 350 I.S. and Model 355 I.S. User Instructions
1.8
FCC and EMC Declarations of Compliance
United States
Table 1.2
This equipment has been tested and found to comply with the limits for a Class A digital device, pursuant to Part 15 of the FCC Rules.
These limits are designed to provide reasonable protection against harmful interference when the equipment is operated in a
commercial environment. This equipment generates, uses, and can radiate radio frequency energy and, if not installed and used in
accordance with the instruction manual, may cause harmful interference to radio communications. Operation of this equipment in a
residential area is likely to cause harmful interference in which case the user will be required to correct the interference at his own
expense.
Canada
Table 1.3
This digital apparatus does not exceed the Class A limits for radio noise emissions from digital apparatus set out in the Radio
Interference Regulations of the Canadian Department of Communications.
Le présent appareil numérique n’émet pas de bruits radioélectriques dépassant les limites applicables aux appareils numériques de
la Classe A prescrites dans le Règlement sur le brouillage radioélectrique edicté par le ministère des Communications du Canada.
European Countries
Table 1.4
WARNING: This is a Class A product. In a domestic environment, this product may cause radio interference in which the user may be
required to take adequate measures.
Model 350 I.S. and Model 355 I.S. User Instructions
7
8
Model 350 I.S. and Model 355 I.S. User Instructions
2
Installation
The Model 350/355 I.S. stainless steel enclosure meets NEMA 4X type specifications.
The encapsulant used is Dow Corning "Sylgard 170" Silicone Elastomer.
Do not allow the power supply or battery pack to be immersed in hazardous
liquid, or to be subjected to any condensation of the hazardous atmosphere.
If the power supply or battery pack is likely to be splashed with hazardous
liquid, protect it with a splash guard.
Never mount the power supply or battery pack in a position where it is
permanently subjected to hazardous atmosphere, such as in a pit, or any
closed, unventilated space. Always mount the unit in a position which
minimizes its' exposure to the hazardous gas, vapor, or dust.
The heating effect of the sun must be taken into account when installing
hazardous area equipment, especially in hot climates. If exposed to direct
sunlight, it is possible that the temperature class (T4 = 135 ºC, T3 = 200 ºC ) may
be exceeded.
Contact Avery Weigh-Tronix for further information with regard to hazard
analysis, and compatibility of equipment with hazardous materials.
WARNING: Risk of electrical shock!
WARNING! Only authorised personnel who have had appropriate product
training and hazardous area training relavent to the locattion in which the
equipment is to be sited must install and maintain this equipment. The
installation must be done in accordance with the procedures detailed in the
Service Manual. Refer to your supplier for more details.
Model 350 I.S. and Model 355 I.S. User Instructions
9
2.1
Hazardous Area Approval (ATEX)
Gas
Temperature
Range
T class
Zone
T4
1&2
T3
0, 1 & 2
Indicator
II 1 G Ex ia IIC T4
-10 °C to + 50 °C
AC mains PSU
II 2 G Ex mb[ia] IIC T4
-10 °C to + 50 °C
Indicator
II 1 G Ex ia IIC T4
-10 °C to + 50 °C
Battery pack
II 1 G Ex ia IIC T3
-10 °C to + 40 °C
Dust
2.2
Approval
Approval
Temperature
Range
Enclosure
Zone
IP6X
21 & 22
IP6X
20, 21 & 22
Indicator
II 1 D Ex iaD 20 T117 °C
-10 °C to + 50 °C
AC mains PSU
II 2 D Ex mbD 21 T64 °C
-10 °C to + 50 °C
Indicator
II 1 D Ex iaD 20 T117 °C
-10 °C to + 50 °C
Battery pack
II 1 D Ex iaD 20 T193 °C
-10 °C to + 40 °C
Desktop Mounting
The Model 350/355 I.S. includes a swivel bracket for quick adjustment for viewing the
display.
2.3
Outline Drawings
The outline drawings provide measurements needed for indicator installation.
10
Model 350 I.S. and Model 355 I.S. User Instructions
2.3.1 Model 350 I.S.
Figure 2.1 Model 350 I.S. with Standard Swivel Bracket
Figure 2.2 Model 350 I.S. with Battery Swivel Bracket
Model 350 I.S. and Model 355 I.S. User Instructions
11
2.3.2 Model 355 I.S.
Figure 2.3 Model 355 I.S. with Standard Swivel Bracket
Figure 2.4 Model 335 I.S. with Battery Swivel Bracket
12
Model 350 I.S. and Model 355 I.S. User Instructions
2.4
AC and DC Powered
2.4.1 DC Operated
Part number 24H350-3502A
The battery is enclosed in a stainless steel case and cannot be removed from the case.
The battery module is mounted on the indicator swivel bracket. The battery will operate
approximately 200 continuous hours with LCD display (backlight off, 1 load cell and no
options installed) or 100 hours with the LED display (one load cell and no options
installed). Please do not throw away old battery packs. Recycle or return to place
of purchase for recycling.
Mount the battery module in the swivel bracket:
1.
Hold the battery module in both hands. Make sure the connectors on the
battery module are facing the back of the indicator.
2.
Line up the two protrusions on each side of the battery module with the slide
rails on the swivel bracket.
3.
Push the module into the slide rails until the knobs drop into the slots in the
swivel bracket.
4.
Tighten the knobs to hold the battery module in the swivel bracket.
Battery Charging
THE BATTERY MUST BE CHARGED IN THE SAFE AREA
Connect the battery to the Avery Weigh-Tronix battery charger. Connect the battery
charger to AC power. Charging will take approximately 3.5 hours.
Low Battery Indication
The low battery annunciator will be lit when the voltage reaches a low threshold and
the low battery message (Lo Bat) is shown on the display for 1.5 seconds every 15
seconds.
Flat (Discharged) Battery Shutdown
The indicator will shutdown after five minutes of flat (discharged) battery condition.
Model 350 I.S. and Model 355 I.S. User Instructions
13
2.4.2 AC Operated
Part number 24H350-3501A
The AC- DC power supply is in a stainless steel enclosure which is remotely mounted.
Refer to Figure 2.5 for mounting dimensions.
When one power supply is used to power two indicators then the combination cannot
be used in a Zone 1 or a IIC gas group hazard.
The AC to DC supply has a conduit fitting on the bottom where the power cable is
attached to the unit. This fitting is 1" in diameter and has a 1/2" thread. Ensure that the
conduit is correctly connected using suitable ATEX approved conduit fittings and seals.
The AC power supply cable must be mechanically protected in conduit when the AC
Power Supply is installed in the hazardous area.
Figure 2.5 AC to DC Power Supply Outline Drawing
2.4.3 AC To DC Power Supply Extension Cable
The extension cable comes in either 25' or 50' length. This cable is used for mounting
the AC to DC converter away from the indicator. Fifty feet is the maximum allowed from
power supply to indicator.
14
Model 350 I.S. and Model 355 I.S. User Instructions
3
Display and Keypad
3.1
Display
The Model 350 and 355 intrinsically safe indicators are available with a six digit, 7segment red LED display, six digit, 7-segment black LCD display or 7-segment backlit
LCD display. The Model 350 and 355 I.S. will display alphanumeric data, but due to the
nature of 7-segment LED / LCD and the limitation of six digits, some information is
abbreviated.
All segments and annunciators are illuminated for a brief display test upon power up.
The current gross weight is then displayed in default units.
3.1.1 LED Display
The LED display is a six digit, 7-segment bright red LED screen with 12 annunciators
to show weight and status information.
The SP1, SP2, and SP3 annunciators are red, green, and yellow.
There is also an annunciator for a third unit of measure under kg. Place the third unit
label above the third annunciator (the third unit is available on both the LED and LCD
displays).
Figure 3.1 Model 350/355 I.S. LED Display
3.1.2 LCD Display
The LCD display is a six digit, 7-segment black LCD screen with 12 annunciators and
a bargraph to show the operational status.
Figure 3.2 Model 350 I.S. LCD Display
Model 350 I.S. and Model 355 I.S. Service Manual
15
3.2
Keypads
3.2.1 Model 350 I.S. Keypad
The Model 350 I.S. offers a sealed 5-button elastomer keypad which is used for
operator input. Each key is assigned two distinct functions. Various key combinations
are also used. Each key has secondary functions; allowing an operator to enter target
values, perform piece samples, access setup parameters, etc.
ZERO
PRINT
UNITS
TARE
SELECT
CLR
ON
OFF
Figure 3.3 Model 350 I.S. Keypad
Key Press
Weigh Mode
Count Mode
Performs a quantity zero function
Performs a gross zero function
and/or clears an entry in progress. and/or clears an entry in
Hold this key on power-up to turn progress.
on the display if in sleep mode.
Performs a print function and/or
'scrolls' through digits during
setpoint entry.
Performs a print function and/or
'scrolls' through digits during
setpoint entry.'
Toggles between 'lb' and 'kg' and/ Toggles through standard sample
or advances cursor to next entry sizes and/or begins a new
position.
sample entry.
Performs an auto-tare function (if
enabled) and/or accepts an entry
in progress.
Performs an auto-tare function
and requests a piece sample
and/or accepts an entry in
progress.
Toggles between display modes Toggles between display modes
and/or restores power to the
and/or restores power to the
indicator (if auto-shutoff enabled). indicator (if auto-shutoff enabled).
Absolute clear - clears an entry in No function.
progress and/or clears the value
of a parameter.
16
Model 350 I.S. and Model 355 I.S. Service Manual
Key Press
Weigh Mode
Count Mode
Backspace - erases the right-most Backspace - erases the rightdigit during data entry.
most digit during sample entry.
Extended gross.
Extended gross.
Reverse character scroll during
data entry.
Reverse character scroll during
sample entry.
Turn off indicator by holding key
for approximately 1 second.
Turn off indicator by holding key
for approximately 1 second.
3.2.2 Model 355 I.S. Keypad
The Model 355 I.S. keypad performs different functions in the Weigh Mode and the
Count Mode. The numeric keys make entering values such as tare or average piece
weight easier.
ON
TARGET
OFF
ZERO
PRINT
SELECT
TARE
START
UNITS
STOP
1
2
3
4
5
6
7
8
9
0
CLR
SAMPLE
ENTER
YES
NO
Figure 3.4 Model 355 I.S. Keypad
Model 350 I.S. and Model 355 I.S. Service Manual
17
Key Press
Weigh Mode
Count Mode
Performs a gross zero function and/or
clears an entry in progress.
Performs a quantity zero function and/or
clears an entry in progress.
Performs a print function and/or 'scrolls' Performs a print function and/or 'scrolls'
through digits during setpoint entry.
through digits during setpoint entry.
Toggles between 'lb' and 'kg' and/or
advances cursor to next entry position.
Toggles through standard sample sizes
and/or begins a new sample entry.
Performs an auto-tare function and
Performs an auto-tare function (if
requests a piece sample and/or accepts
enabled) and/or accepts an entry in
progress. If a tare weight is known, key an entry in progress.
in the value and press [TARE].
Toggles between display modes and/or Toggles between display modes and/or
restores power to the indicator (if auto- restores power to the indicator (if autoshutoff enabled).
shutoff enabled).
Performs a sample. If a number is keyed
Performs a sample. If a number is
keyed in before hand, it will be used as in before hand, it will be used as the
sample size.
the sample size. Accepts an entry.
CLR
NO
Clears an entry in progress. Hold this
Performs a quantity zero function and/or
key on power-up to turn on the display if clears an entry in progress.
in sleep mode.
If setpoints are enabled, causes a
process to start or resume.
If setpoints are enabled, causes a
process to start or resume.
If setpoints are enabled, causes a
If setpoints are enabled, causes a pause.
pause. Press [STOP] again to abort the Press [STOP] again to abort the process.
process.
Wake up the indicator if in sleep mode. Wake up the indicator if in sleep mode.
Turn on the indicator if power is off.
Turn on the indicator if power is off.
Access the target entry mode.
Access the target entry mode.
Turn off indicator by holding key for
approximately 1 second.
18
Turn off indicator by holding key for
approximately 1 second.
Model 350 I.S. and Model 355 I.S. Service Manual
3.2.3 Weigh Mode Functions
The Model 350 I.S. and Model 355 I.S. keypads have five primary Weigh Mode
functions:
Performs a gross zero and selects the gross mode.
Initiates data transmission out the selected communication
port.
Toggles the units of measure between lb, kg, g, lb oz, oz.
Tares any displayed weight and selects the net mode.
Toggles the display between GROSS, NET, QUANTITY and
setpoint TARGETS (if enabled).
Model 350 I.S. and Model 355 I.S. Service Manual
19
20
Model 350 I.S. and Model 355 I.S. Service Manual
4
Operation
The Model 350 I.S. and 355 I.S. provide many options for check-weighing, parts
counting and filling etc. The functions described in this section are not available until
enabled within the setup parameters. Contact your GSE distributor to configure the
indicator for a specific operation.
4.1
Entering a Tare Value (Model 350 I.S.)
If a tare value is known, it is possible to enter that value into the tare register. Follow
the steps below.
4.2
1.
From the gross mode use the [SELECT] key to scroll in the first number.
2.
Use the [PRINT] key to scroll in the first number.
3.
Press the [UNITS] key to move to the next digit.
4.
Repeat steps 2 and 3 until the desired number is showing on the display.
5.
Press the [TARE] key to accept the entered tare value.
Entering a Tare Value (Model 355 I.S.)
If a tare value is known, it is possible to enter that value into the tare register. Follow
the step below.
1.
4.3
Key in the known tare value with the numeric keys and press [TARE]. The
display will access the net mode.
Enter an ID Number
If the ID parameter has been enabled previously, a number may be entered to print on
a ticket. Follow the instructions below to enter an ID number.
1.
Press the [PRINT] key from the weigh mode. The display will show the current
ID number if one has been entered previously.
2.
Key in the desire ID number (numeric and/or alphanumeric) and press [TARE]
(Model 350 I.S.) or [ENTER] (Model 355 I.S.). This will print a ticket.
-or2a.
If the ID number shown is acceptable simply press [TARE] (Model 350 I.S.) or
[ENTER] (Model 355 I.S.). This will print a ticket which includes the entered ID
number.
Model 350 I.S. and 355 I.S. User Instructions
21
4.4
Set Time & Date
The time and date feature is stored as non-volatile (time/date setting will not be lost
when the unit power is reset).
The time and date can be accessed from the weigh mode with the [SELECT] key if the
time/date parameter has been enabled. Time and date can be accessed via the
communication port by sending 11%s.
4.4.1 Model 350 I.S.
To enter the time from the Enter~tine~00.00.00 prompt
EXAMPLE: 16.32.41 (4:32:41 P.M.)
1.
Press [PRINT] to toggle through the numbers to enter the hour. Hours must be
entered as military time.
2.
Press [UNITS] once to move the cursor. Press [PRINT] to select the next digit.
3.
Press [UNITS] twice to move the decimal point over to separate the hour from
the minutes. It is not necessary to enter a 0 before a single digit hour.
To enter the date from the Enter~date~01.01.70 prompt
EXAMPLE: 01.09.11 (January 9, 2011)
1.
Press [PRINT] to toggle through the numbers to enter the month.
2.
Press [UNITS] twice to move the decimal point over to separate the month
from the day. It is not necessary to enter a 0 before a single digit month. If it is
a double-digit entry, press [UNITS] once to move the cursor and then [PRINT]
to scroll through the digits.
3.
Press [PRINT] to toggle through the numbers to enter the day.
4.
Press [UNITS] twice to move the decimal point over to separate the day from
the year. It is not necessary to enter a 0 before a single digit month. If it is a
double-digit entry, press [UNITS] once to move the cursor and then [PRINT] to
scroll through the digits.
5.
Press [PRINT] to toggle through the numbers to enter the year.
6.
Press [UNITS] once to move the cursor and then press [PRINT] to scroll
through the digits.
7.
Press [TARE] twice to accept the entry.
4.4.2 Model 355 I.S.
To enter the time from the Enter~tine~00.00.00 prompt
EXAMPLE: 16.32.41 (4:32:41 P.M.)
22
1.
Key in the date in the following format: 16.32.41
2.
Press [ENTER] to except the time and move to the weigh mode.
Model 350 I.S. and 355 I.S. User Instructions
To enter the date from the Enter~date~01.01.70 prompt
EXAMPLE: 01.09.11 (January 9, 2011)
4.5
1.
Key in the date in the following format: 1.9.11. It is not necessary to enter a 0
before a single digit month.
2.
Press [ENTER] to except the date and move to the time entry. Press [ENTER]
again to bypass the time entry.
Parts Counting
The counting parameter must be enabled before using. Follow the instructions below
for sampling and counting parts. A new sample must be performed for each unique part
being counted. The indicator will not store the average piece weight.
4.5.1 Model 350 I.S.
Sample selectable fixed counts from the weigh mode
1.
From the weigh mode, press [SELECT] until the QTY annunciator is lit. The
display may show do APS if an average piece weight is not found. This
message is to let you know this is a new sample. Go to step 2.
2.
Press [TARE] to perform a sample. Add 10 will be displayed. If 10 is the
desired sample size, go to step 4. Otherwise go to step 3.
2a.
If a fixed sample size other than 10 is desired, press [SELECT] to toggle
through sample size choices 5, 10, 20, 50 and 100. When the desired sample
size is displayed, go to step 4.
3.
Add the pieces to be sampled and press [TARE]. After motion is stabilized, the
sampled quantity will be displayed.
4.
Continue adding parts to be counted. The display will show the number of
parts added.
4a.
If a different part needs to be counted, go to step 2.
To sample using variable counts
1.
From the weigh mode, press [SELECT] until the QTY annunciator is lit. The
display may show do APS if an average piece weight is not found. This
message is to let you know this is a new sample. Go to step 2.
2.
Press [TARE] to perform a sample. Add 10 will be displayed.
3.
Add pieces and key in the number of pieces being sampled by entering the
known sample size. First press the [PRINT] key until the first digit is displayed.
Use the [UNITS] key to move to the next digit. Continue using the [PRINT] and
[UNITS] keys until the desired sample size is displayed and press [TARE].
4.
Add the pieces to be sampled and press [TARE]. After motion is stabilized, the
sampled quantity will be displayed.
5.
Continue adding parts to be counted. The display will show the number of
parts added.
Model 350 I.S. and 355 I.S. User Instructions
23
5a.
If a different part needs to be counted, go to step 2.
View the average piece weight
1.
From the QTY mode, press [SELECT] once. The display will show APS and
then flash the last sampled average piece weight. This value cannot be altered.
2.
Press the [SELECT] key to exit the average piece weigh mode. Continue to
press [SELECT] until the desire weigh mode parameter is displayed.
4.5.2 Model 355 I.S.
To sample using selectable fixed counts from the weigh mode
1.
From the weigh mode press [ENTER]. Add 10 will be displayed.
1a.
If 10 is the desired sample size, go to step 2. Otherwise go to step 1b.
1b.
If a fixed sample size other than 10 is desired, press [SELECT] or [UNITS] to
toggle through sample size choices 5, 10, 20, 50 and 100. When the desired
sample size is displayed, go to step 3.
2.
Add the pieces to be sampled and press [ENTER]. After motion is stabilized,
the sampled quantity will be displayed.
3.
Continue adding parts to be counted. The display will show the number of
parts added.
3a.
If a different part needs to be counted, go to step 2.
To sample using variable counts
1.
From the weigh mode press [ENTER]. Add 10 will be displayed. If 10 is the
desired sample size, go to step 3. Otherwise go to step 2.
2.
Add pieces and key in the number of pieces being sampled with the numeric
keys. Press [ENTER] to accept the entry.
3.
Add the pieces to be sampled and press [ENTER]. After motion is stabilized,
the sampled quantity will be displayed.
4.
Continue adding parts to be counted. The display will show the number of
parts added.
4a.
If a different part needs to be counted, go to step 2.
4.5.3 View the average piece weight
24
1.
From the QTY mode, press [SELECT] once. The display will show APS and
then flash the last sampled average piece weight. This value cannot be altered.
2.
Press the [SELECT] key to exit the average piece weigh mode. Continue to
press [SELECT] until the desire weigh mode parameter is displayed.
Model 350 I.S. and 355 I.S. User Instructions
4.6
Percentage Checkweigh
This feature is commonly used in checkweigh applications and must be enabled before
attempting to use.
After a target weight is entered, upper and lower tolerances are entered as a
percentage of the target. Over and under tolerance values are automatically calculated
according to the percentages entered. The desired target may be based on gross
weight, net weight or quantity (if counting is enabled).
4.6.1 Enter a Target Value
Model 350 I.S.
1.
Press [SELECT] until tArG1 is displayed. If the target value shown is correct,
press [TARE] to go to the PctLo value. To change the target value, go to step 2.
2.
Press [PRINT] until the first digit of the new target is displayed. Press [UNITS]
to accept the number displayed. Continue this step until the desired number is
entered. Refer to the example below as a reference.
Example: Target of 20
2a.
Press [PRINT] four times
m
2b.
Press [UNITS] to accept the 2 that is displayed
m
2c.
DISPLAY READS > 2 .
Press [PRINT] once
m
2d.
DISPLAY READS > 2
DISPLAY READS > 20
Press [TARE] to accept the target weight as 20
m
DISPLAY READS > 20
3.
Press [TARE] to accept the entered value. Once the tare key is pressed, PctLo
will be displayed. This is where the low percentage will be entered. Enter
target percentage value in the same manner as the target weight was entered
above. If the displayed value is correct, press [TARE].
4.
Next the PctHi value will be displayed. This is target percentage value for the
high percentage. Enter this value in the same manner as the target weight was
entered above.
4a.
If the displayed value is correct press [SELECT]. The display will return to the
weigh mode.
4b.
Press [SELECT] to view the desired weigh mode parameter.
Model 355 I.S.
1.
Press [SELECT] until tArG1 is displayed.
2.
Key in the target weight with the numeric keys and press [ENTER].
Model 350 I.S. and 355 I.S. User Instructions
25
3.
The PctLo value will be displayed. Key the in target percentage value with the
numeric keys and press [ENTER].
4.
The PctHi value will be displayed. Key the in target percentage value with the
numeric keys and press [ ENTER].
5.
Press [SELECT] to select the desired weigh mode parameter.
4.6.2 Start Checkweighing
The checkweigh applications do not have a start function. Simply put the item to be
weighed onto the scale platter. An annunciator will illuminate to indicate whether the
item is within tolerance.
Annunciators
In order for the annunciators to activate, the displayed value must be at least five
graduations above zero.
4.7
Status
Annunciator
Status
Annunciator
Color (LED)
OVER
SP 1 Illuminated
Red
GOOD
SP 2 Illuminated
Green
UNDER
SP 3 Illuminated
Yellow
Fill
The fill program is used for single-speed or dual-speed filling operations. The dualspeed fill operation allows for both a fast and a slow fill mode. During a fast-fill,
setpoints 1 (SP1) and 2 (SP2) are activated. During a slow-fill or single-speed fill, only
setpoint 1 (SP1) is activated. This feature must be enabled before attempting to use.
Over filling can be prevented with the use of pre-act values (PA1 and PA2). Pre-act 1
(PA1) is used for switching the fast fill to a slow fill. Pre-act 2 (PA2) is used as a final
cutoff value.
4.7.1 Enter a Target Value
Pressing [TARE] or [SAMPLE/ENTER] alone allows access to the subsets. PA1 and
PA2 are the subsets for Targ 1.
Model 350 I.S.
26
1.
Press [SELECT] until tArG1 is displayed.
2.
Press [PRINT] until the first digit of the new target is displayed. Press [UNITS]
to accept the number displayed. Continue this step until the desired number is
entered. Refer to the example below.
Model 350 I.S. and 355 I.S. User Instructions
Example: Target of 20
2a.
Press [PRINT] four times
m
2b.
Press [UNITS] to accept the 2 that is displayed
m
2c.
DISPLAY READS > 2 .
Press [PRINT] once
m
2d.
DISPLAY READS > 2
DISPLAY READS > 20
Press [TARE] to accept the target weight as 20
m
DISPLAY READS > 20
3.
Press [TARE]. Once the tare key is pressed, it is possible that PA1 will be
displayed if the pre-act parameter is enabled.
3a.
If a value is desired, enter it in the same manner as the target weight was
entered above. When the displayed value is correct, press [TARE].
3b.
If no value is to be entered or PA1 is not displayed, press [TARE] to go to the
next screen.
3c.
If PA2 is displayed, enter the value in the same manner as the target weight
was entered above and press [TARE] to accept or press [TARE] to return to
the weigh mode. Press [SELECT] to view the desired weigh mode parameter.
Model 355 I.S.
1.
Press [SELECT] until tArG1 is displayed.
2.
Key in the desired target value with the numeric keys and press [ENTER].
3.
The PA1 value will be displayed. Key the in value with the numeric keys and
press [ENTER].
4.
The PA2 value will be displayed. Key the in value with the numeric keys and
press [ENTER].
5.
Press [SELECT] to select the desired weigh mode parameter.
4.7.2 Start Fill
Activation Method
The fill begins with the selected activation method. The method is determined by the
parameters in the setup mode.
The deactivation of the setpoints is automatic. The desired target may be based on net
or quantity (if counting is enabled).
Activation types
l
Tare key - Press the [TARE] key to start the process. A tare weight will be set
and the weight will switch to net zero.
l
Remote key - Press the remote key switch.
Model 350 I.S. and 355 I.S. User Instructions
27
l
Auto-start - The process is automatically activated. It waits for a no-motion
condition and then adds the target to the current displayed weight to achieve
a relative cutoff value.
Annunciators
Fill Status
Annunciator Status
Fast Fill
SP 1 & SP 2 Illuminated
Dribble Fill (or Single-Speed Fill)
SP 1 Illuminated
Fill Done or Pause
SP 1 & SP 2 Off
4.7.3 Fill Example
With a system set up to fill 55-gallon drums with motor oil, the following settings might
be used to achieve an accurate final fill weight of 400 lbs.:
4.8
Parameter
Setting
Actual Cutoff Value
Targ 1 = 400
Desired final weight.
Pre-act 1 = 28
400 - 28 = 372.0
Switch to dribble feed at 372.
Pre-act 2 = .5
400 - 0.5 = 399.5
Final fill valve closes at 399.5.
Comments
Batch
The standard batch program is used for batching up to three separate items.
Ingredients 1 through 3 use setpoints and pre-acts 1 through 3 respectively. Ingredients
are batched one at a time. Free falling product can be accounted for with the use of
pre-act values (PA1 - PA3). This feature must be enabled before attempting to use.
4.8.1 Enter a Target
Pressing [TARE] or [ENTER] alone allows access to the subsets. PA 1 and PA 2 are
the subsets for Targ 1.
Model 350 I.S.
1.
Press [SELECT] until tArG1 is displayed.
2.
Press [PRINT] until the first digit of the new target is displayed. Press [UNITS]
to accept the number displayed. Continue this step until the desired number is
entered.
Example: Target of 20
2a.
Press [PRINT] four times
m
2b.
28
DISPLAY READS > 2
Press [UNITS] to accept the 2 that is displayed
Model 350 I.S. and 355 I.S. User Instructions
m
2c.
Press [PRINT] once
m
2d.
DISPLAY READS > 2 .
DISPLAY READS > 20
Press [TARE] to accept the target weight as 20
m
DISPLAY READS > 20
3.
Press [TARE]. Once the tare key is pressed, it is possible that PA1 will be
displayed if the pre-act parameter is enabled.
3a.
If a value is desired, enter it in the same manner as the target weight was
entered above. When the displayed value is correct, press [TARE].
3b.
If no value is to be entered or PA1 is not displayed, press [TARE] to go to the
next screen.
4.
Repeat steps 2 and 3 until all targets and pre-acts are entered. Press [TARE]
to return to the weigh mode.
Model 355 I.S.
1.
Press [SELECT] until tArG1 is displayed.
2.
Key in the desired target value with the numeric keys and press [ENTER].
3.
The PA1 value will be displayed. Key the in value with the numeric keys and
press [ENTER].
4.
Repeat steps 2 and 3 for tArG2, PA2, tArG3 and PA3.
5.
Press [SELECT] to select the desired weigh mode parameter.
4.8.2 Start Batch
Activation Method
The batch begins with the selected activation method. The method is determined by
the parameters in the setup mode. The deactivation of the setpoints is automatic. The
desired target may be based on net or quantity (if counting is enabled).
Activation types
l
Tare key - Press the [TARE] key to start the process. A tare weight will be set
and the weight will switch to net zero.
l
Remote key - Press the remote key switch.
l
Auto-start - The process is automatically activated. It waits for a no-motion
condition and then adds the target to the current displayed weight to achieve
a relative cutoff value.
Model 350 I.S. and 355 I.S. User Instructions
29
Annunciators
Batch Status
Annunciator
Status
Setpoint Status (Requires Setpoint Option Board)
Fill 1
SP 1 Illuminated
Relay 1 Contacts Closed,Relay 2 and 3 Contacts Open
Fill 2
SP 2 Illuminated
Relay 2 Contacts Closed,Relay 1 and 3 Contacts Open
Fill 3
SP 3 Illuminated
Relay 3 Contacts Closed,Relay 1 and 2 Contacts Open
4.8.3 Batch Example
With a system set up a system to make a 50,000 lb batch with water (30,000 lbs.), corn
syrup (15,000 lbs.) and caramel color (5,000 lbs.), ingredient 1 should start with [TARE]
and subsequent ingredients should auto-start.
Parameter
Setting
Actual Cutoff Value
Target 1 = 30,000
Pre-Act 1 = 100
Desired water weight.
30,000 - 100 = 29,900
Start 1 = Tare
Start 2 = Auto
Desired corn syrup weight.
15,000 - 236 = 14,764
Start 3 = Auto
4.9
Corn syrup valve closes at 14,764 lbs. Freefall will bring weight to 15,000.
Calculated cutoff value for corn Start corn syrup when water is done and
syrup is added to current displayed motion has stopped.
weight
Target 3 = 5,000
Pre-Act 3 = 142
Water valve closes at 29,900 lbs. Free-fall
will bring weight to 30,000.
Start water with [TARE].
Target 2 = 15,000
Pre-Act 2 = 236
Comments
Desired caramel coloring weight.
5,000 - 142 = 4,858
Carmel coloring valve closes at 4,858. Freefall will bring weight to 5,000.
Calculated cutoff value for caramel Start caramel coloring when corn syrup is
done and motion has ceased.
coloring is added to current
displayed weight
Discharge
The discharge program is designed for single-speed or dual-speed dispensing of
product from a larger weigh vessel. Discharge is a loss-in-weight application similar in
operation to the fill program. When a discharge is initiated, the scale automatically tares
and comes to a net zero weight. The appropriate setpoints are activated and material
is discharged until the decreasing net weight reaches the desired target value. Free
falling product can be accounted for with the use of pre-act values (PA1 - PA3). This
feature must be enabled before attempting to use.
30
Model 350 I.S. and 355 I.S. User Instructions
4.9.1 Enter a Target
Pressing [TARE] or [ENTER] alone allows access to the subsets. PA 1 and PA 2 are
the subsets for Targ 1.
Model 350 I.S.
1.
Press [SELECT] until tArG1 is displayed.
2.
Press [PRINT] until the first digit of the new target is displayed. Press [UNITS]
to accept the number displayed. Continue this step until the desired number is
entered.
Example: Target of 20
2a.
Press [PRINT] four times
m
2b.
Press [UNITS] to accept the 2 that is displayed
m
2c.
DISPLAY READS > 2 .
Press [PRINT] once
m
2d.
DISPLAY READS > 2
DISPLAY READS > 20
Press [TARE] to accept the target weight as 20
m
DISPLAY READS > 20
3.
Press [TARE]. Once the tare key is pressed, it is possible that PA1 will be
displayed if the pre-act parameter is enabled.
3a.
If a value is desired, enter it in the same manner as the target weight was
entered above. When the displayed value is correct, press [TARE].
3b.
If no value is to be entered or PA1 is not displayed, press [TARE] to go to the
next screen.
4.
Repeat steps 2 and 3 until all targets and pre-acts are entered. Press [TARE]
to return to the weigh mode.
Model 355 I.S.
1.
Press [SELECT] until tArG1 is displayed.
2.
Key in the desired target value with the numeric keys and press [ENTER].
3.
The PA1 value will be displayed. Key the in value with the numeric keys and
press [ENTER].
4.
Repeat steps 2 and 3 until all targets and pre-acts are entered.
5.
Press [SELECT] to select the desired weigh mode parameter.
Model 350 I.S. and 355 I.S. User Instructions
31
4.9.2 Pre-acts
Pre-act 1 is used for dual-speed dispensing. Pre-act 1 specifies when the system
should switch from fast-discharge to slow-discharge. When using a single-speed
device, pre-act 1 should be set to 0 from the Setup Mode. Pre-act 2 specifies the point
where the final cutoff should occur, regardless of a single-speed or dual-speed
operation.
4.9.3 Start Discharge
Activation Method
The dispensing activation is limited to [TARE] or a remote key input. The deactivation
of the setpoints is automatic. The desired target may be based on net or quantity (if
counting is enabled).
The discharge begins with the selected activation method. The method is determined
by the parameters in the setup mode.
The deactivation of the setpoints is automatic. The desired target may be based on net
or quantity (if counting is enabled).
Activation types
l
Tare key - Press the [TARE] key to start the process. A tare weight will be set
and the weight will switch to net zero.
l
Remote key - Press the remote key switch.
Annunciators
32
Discharge Status
Annunciator Status
Setpoint Status (Requires
Setpoint Option Board)
Fast Discharge
SP 1 & SP 2 Illuminated
Relay 1 and 2 Contacts Closed
Slow (or Single-Speed) Discharge
SP 1 Illuminated
Relay 1 Contacts Closed
Fill Done or Pause
SP 1 & 2 Off
Relay 1 and 2 Contacts Open
Model 350 I.S. and 355 I.S. User Instructions
4.9.4 Discharge Example
With a system set up to dispense ball bearings from a 50,000 lb weigh-bin and the fastfeed requiring an early cutoff to slow-feed, the following settings might be used to
achieve accurate dispensing of 1000 bearings:
Parameter
Setting
Actual Cutoff Value
Comments
Targ 1 = 1000
0 - 1000 = (-1000)
Desired quantity (decreasing value from a net zero:
enter as a positive value).
Based = Qty
PA 1 = 200
Targets are compared to quantity (P170 Enabled).
1000 - 200 = 800
0 - 800 = (-800)
Start = [TARE]
PA 2 = 15
Switch to slow feed at -800 bearings (decreasing
value from a net zero: enter as a positive value).
Start discharge with [TARE].
1000 - 15 = 985
0 - 985 = (-985)
Final gate begins closing at 985 bearings. Delayed
closure brings final quantity to 1000 (decreasing
value from a net zero: enter as a positive value).
4.10 Fill and Discharge
The fill and discharge program combines a fill operation with a discharge operation.
This automates a single-speed vessel filling operation with a single-speed multiple
dispensing function. Setpoint 1 is used for filling the vessel and Setpoint 2 is used for
product discharge. Free falling product can be accounted for with the use of pre-act
values (PA1 and PA2). This feature must be enabled before attempting to use.
4.10.1 Enter a Target
1.
Press [SELECT] until tArG1 is displayed.
2.
Press [PRINT] until the first digit of the new target is displayed. Press [UNITS]
to accept the number displayed. Continue this step until the desired number is
entered.
Example: Target of 20
2a.
Press [PRINT] four times
m
2b.
Press [UNITS] to accept the 2 that is displayed
m
2c.
DISPLAY READS > 20
Press [TARE] to accept the target weight as 20
m
3.
DISPLAY READS > 2 .
Press [PRINT] once
m
2d.
DISPLAY READS > 2
DISPLAY READS > 20
Press [TARE]. Once the tare key is pressed, it is possible that PA1 will be
displayed if the pre-act parameter is enabled.
Model 350 I.S. and 355 I.S. User Instructions
33
3a.
If a value is desired, enter it in the same manner as the target weight was
entered above. When the displayed value is correct, press [TARE].
3b.
If no value is to be entered or PA1 is not displayed, press [TARE] to go to the
next screen.
4.
Repeat steps 2 and 3 until all targets and pre-acts are entered. Press [TARE]
to return to the weigh mode.
Model 355 I.S.
1.
Press [SELECT] until tArG1 is displayed.
2.
Key in the desired target value with the numeric keys and press [ENTER].
3.
The PA1 value will be displayed. Key the in value with the numeric keys and
press [ENTER].
4.
Repeat steps 2 and 3 until all targets and pre-acts are entered.
5.
Press [SELECT] to select the desired weigh mode parameter.
4.10.2 Pre-acts
Pre-act 1 is used for vessel filling. Pre-act 1 specifies the point where the final cutoff for
the fill should occur. Pre-act 2 specifies the point where the final cutoff for the material
discharge should occur.
Pre-act 1 controls setpoint 1. Pre-act 2 controls setpoint 2.
4.10.3 Activation Method
The fill and discharge functions begin with their selected activation methods. The
deactivation of the setpoints is automatic. The desired target may be based on net or
quantity (if counting is enabled).
Activation types
34
l
Tare key - Press the [TARE] key to start the process. A tare weight will be set
and the weight will switch to net zero.
l
Remote key - Press the remote key switch.
l
Auto-start - The process is automatically activated. It waits for a no-motion
condition and then adds the target to the current displayed weight to achieve
a relative cutoff value.
Model 350 I.S. and 355 I.S. User Instructions
Annunciators
Status
Annunciator Status
Setpoint Status (Requires
Setpoint Option Board)
Vessel Fill
SP 1 Illuminated
Relay 1 Contacts Closed
Vessel Discharge
SP 2 Illuminated
Relay 2 Contacts Closed
Fill Done or Pause
SP 1 & SP 2 Off
Relay 1 and Relay 2 Contacts Open
4.10.4 Pause
The Model 350/355 I.S. can pause setpoint operations. This is useful as a safety
device, for mid-cycle operator breaks, mechanical adjustments, etc. This feature must
be enabled before attempting to use.
When invoked, Pause deactivates all setpoints. The display will show: Tare= ~ Abort.
Pressing [TARE] will abort the current cycle; any other keypress will resume the cycle.
The Pause feature has four settings:
Pause Setting
Action
Keypad
350/355 Key Press
Current cycle paused - all setpoints
deactivated.
Remote Key
Remote Key Contact Closure
Current cycle paused - all setpoints
deactivated.
Both
Result
350/355 Key Press or Remote Current cycle paused - all setpoints
Key Contact Closure
deactivated.
4.10.5 Fill and Discharge Example
Parameter
Setting
Actual Cutoff
Value
Comments
Targ 1 = 2000
Desired vessel fill target.
Based = Net
Targets are compared to net weight.
PA 1 = 5
2000 - 5 = 1995
Start 1 = R-but
Fill valve closes at 1995 lbs.
Start fill with remote key closure.
Targ 2 = 45
0 - 45 = (-45)
Desired discharge target (decreasing weight from a net
zero: enter as a positive value).
PA 2 = 5
45 - 5 = 40
0 - 40 = (-40)
Discharge valve closes at (-40) lbs. (decreasing weight
from a net zero: enter as a positive value).
Model 350 I.S. and 355 I.S. User Instructions
35
4.11 Absolute Checkweigh
This program is commonly used for check-weigh applications where the accepted
tolerance will be an absolute value between and upper and lower limit.
After a target weight is entered, upper and lower tolerances are entered as absolute
values. The desired target may be based on gross weight, net weight, or quantity (if
counting is enabled). Only the annunciators will light to indicator the setpoint status. Be
sure to enter both the upper and limits. Failure to enter one of these values will cause
a setpoint error. This feature must be enabled before attempting to use.
4.11.1 Enter a Target Value
Model 350 I.S.
1.
Press [SELECT] until tArGL is displayed. The low target value will need to be
entered. Go to steip 2.
2.
Press [PRINT] until the first digit of the new target is displayed. Press [UNITS]
to accept the number displayed. Continue this step until the desired number is
entered.
Example: Target of 20
2a.
Press [PRINT] four times
m
2b.
Press [UNITS] to accept the 2 that is displayed
m
2c.
DISPLAY READS > 20
Press [TARE] to accept the target weight as 20
m
3.
DISPLAY READS > 2 .
Press [PRINT] once
m
2d.
DISPLAY READS > 2
DISPLAY READS > 20
Press [TARE]. Once the tare key is pressed, tArGH will be displayed. This is
where the high target value will be entered. Enter this value in the same
manner as the target weight was entered above. If the displayed value is
correct, press [TARE]. The display will return to the gross mode.
Model 355 I.S.
36
1.
Press [SELECT] until tArGL is displayed.
2.
Key in the low target weight with the numeric keys and press [ENTER].
3.
The tArGH value will be displayed. Key the in value with the numeric keys and
press [ENTER].
4.
Press [SELECT] to select the desired weigh mode parameter.
Model 350 I.S. and 355 I.S. User Instructions
4.11.2 Start Checkweighing
The checkweigh applications do not have a start function. Simply put the item to be
weighed onto the scale platter. An annunciator will illuminate to indicate whether the
item is within tolerance.
Annunciators
In order for the annunciators to activate, the displayed value must be at least five
graduations above zero.
Status
Annunciator
Status
Annunciator
Color (LED)
OVER
SP 1 Illuminated
Red
GOOD
SP 2 Illuminated
Green
UNDER
SP 3 Illuminated
Yellow
4.11.3 Absolute Checkweighing Example
With a system set up to check-weigh 50 lb. cement bags, the following settings might
be used check-weigh bag from 49.5 to 51.5 lbs.:
Parameter Setting
Acceptable Values
Target = 50.00
Comments
Desired bag weight.
Low Value = 49.50
0 - 49.50 lbs.
Low acceptable range = 0 to 49.50 lbs.
Target Window
49.50 - 51.50 lbs
Good light within this range
High Value = 51.50
51.50 lbs. and above
High acceptable range = 51.50 lbs. and above
4.12 Target Deviation Checkweigh
The target deviation method uses a target value in which the upper and lower
tolerances are deviated from the target. The upper and lower tolerances are fixed
values. The accept window is varied by adding the high tolerance to the target and
subtracting the low tolerance from the target. This feature is commonly used in checkweigh applications. The desired target may be based on gross weight, net weight or
quantity (if counting is enabled). The annunciators will light on the indicator display or
physical setpoints can be added. This feature must be enabled before attempting to
use.
4.12.1 Enter a Target Value
Model 350 I.S.
1.
Press [SELECT] until tArG1 is displayed. The target value will need to be
entered. Go to step 2.
2.
Press [PRINT] until the first digit of the new target is displayed. Press [UNITS]
to accept the number displayed. Continue this step until the desired number is
entered.
Model 350 I.S. and 355 I.S. User Instructions
37
Example: Target of 20
2a.
Press [PRINT] four times
m
2b.
Press [UNITS] to accept the 2 that is displayed
m
2c.
DISPLAY READS > 2
DISPLAY READS > 2 .
Press [PRINT] once
m
DISPLAY READS > 20
2d.
Press [TARE] to accept the target weight as 20
3.
Press [TARE]. Once the tare key is pressed, Lo will be displayed. This is
where the lower tolerance value will be entered. Enter this value in the same
manner as the target weight was entered above. If the displayed value is
correct, press [TARE].
4.
Press [TARE]. Once the tare key is pressed, Hi will be displayed. This is where
the upper tolerance value will be entered. Enter this value in the same manner
as the target weight was entered above. If the displayed value is correct, press
[TARE]. The display will return to the gross mode.
Model 355 I.S.
1.
Press [SELECT] until tArG1 is displayed.
2.
Key in the target weight with the numeric keys and press [ENTER].
3.
The Lo value will be displayed. Key the in value with the numeric keys and
press [ENTER].
4.
The Hi value will be displayed. Key the in value with the numeric keys and
press [ENTER].
5.
Press [SELECT] to select the desired weigh mode parameter.
4.12.2 Start Checkweighing
The checkweigh applications do not have a start function. Simply put the item to be
weighed onto the scale platter. An annunciator will illuminate to indicate whether the
item is within tolerance.
Annunciators
In order for the annunciators to activate, the displayed value must be at least five
graduations above zero.
38
Status
Annunciator
Status
Annunciator
Color (LED)
OVER
SP 1 Illuminated
Red
GOOD
SP 2 Illuminated
Green
UNDER
SP 3 Illuminated
Yellow
Model 350 I.S. and 355 I.S. User Instructions
4.12.3 Target Deviation Checkweighing Example
With a system set up to check-weigh ice cream containers, the following settings might
be used to guarantee container weights from 1.98 to 2.04 lbs.:
Parameter
Setting
Acceptable Values
Comments
Target = 10.00
Desired container weight.
Lo Value = 0.5
10.00 - 0.5 = 9.50
Low acceptable range = 9.50 to 10.00
Hi Value = 0.25
10.00 + 0.25 = 10.25
High acceptable range = 10.00 to 10.25
4.13 Batch 2
The batch 2 program is used for batching up to three separate items without using preact values. Ingredients 1 through 3 use setpoints 1 through 3 respectively. Ingredients
are batched one at a time. The target values can only be set from the weigh mode by
pressing the [SELECT] key.
After a batch is run all target values will be set back to 0. The target values will be set
to 0 after accessing the setup mode or if power is cycled. If a new batch is started when
all target values are set to 0 an error message "No Targ" will be displayed. This feature
must be enabled before attempting to use.
4.13.1 Enter a Target
Model 350 I.S.
1.
Press [SELECT] until tArG1 is displayed.
2.
Press [PRINT] until the first digit of the new target is displayed. Press [UNITS]
to accept the number displayed. Continue this step until the desired number is
entered.
Example: Target of 20
2a.
Press [PRINT] four times
m
2b.
Press [UNITS] to accept the 2 that is displayed
m
2c.
DISPLAY READS > 20
Press [TARE] to accept the target weight as 20
m
3.
DISPLAY READS > 2 .
Press [PRINT] once
m
2d.
DISPLAY READS > 2
DISPLAY READS > 20
If more than one target is enabled, press [SELECT] to advance to the next
target (e.g. tArG2). Repeat steps 2 and 3 until all values are entered.
Model 350 I.S. and 355 I.S. User Instructions
39
Model 355 I.S.
1.
Press [SELECT] until tArG1 is displayed.
2.
Key in the target weight with the numeric keys and press [ENTER].
3.
If more than one target is enabled, press [SELECT] to advance to the next
target (e.g. tArG2). Repeat steps 2 and 3 until all values are entered.
4.13.2 Activation Method
The filling of each ingredient begins when one of three selectable start functions occur.
Each ingredient may have its own start function. The deactivation of the setpoint is
automatic. The desired targets may be based on net weight or quantity (if counting is
enabled).
Annunciators
Status
Annunciator
Status
Fill 1
SP 1 Illuminated
Relay 1 Contacts Closed,
Relay 2 and 3 Contacts Open
Fill 2
SP 2 Illuminated
Relay 2 Contacts Closed,
Relay 1 and 3 Contacts Open
Fill 3
SP 3 Illuminated
Relay 3 Contacts Closed,
Relay 1 and 2 Contacts Open
Annunciator Color (LED)
4.13.3 Batch2 Example
With a system set up a system to make a 50,000 lb batch with water (30,000 lbs.), corn
syrup (15,000 lbs.) and caramel color (5,000 lbs.), ingredient 1 should start with [TARE]
and subsequent ingredients should auto-start.
40
Parameter Setting
Actual Cutoff Value
Comments
Target 1 = 30,000
Desired water weight.
Target 1 = 30,000
Based = Net
Targets are compared to net weight.
Based = Net
Start 1 = Tare
Start water with [TARE]
Start 1 = Tare
Target 2 = 15,000
Desired corn syrup weight.
Target 2 = 15,000
Start 2 = Auto
Start corn syrup when water is done and
motion has stopped.
Start 2 = Auto
Target 3 = 5,000
Desired caramel coloring weight.
Target 3 = 5,000
Start 3 = Auto
Start caramel coloring when corn syrup
is done and motion has ceased.
Start 3 = Auto
Model 350 I.S. and 355 I.S. User Instructions
5
Troubleshooting
The Model 350/355 I.S. utilizes the following types of error messages: Operational
Errors, Hardware Errors, Calibration Errors, Communication Errors, and Miscellaneous
Errors.
5.1
Operational Errors
Error Code
Description
Code02
Under Load. Input signal is less than negative full scale. Check load cell wiring.
Code03
Over load input signal is greater than positive full scale. Use same checks as "under load" above.
Funct ~ Disbl
Attempted to perform a function disabled in the Setup Mode.
Code 04
The digits on the display have exceeded the six digit display capacity.
Code 05
Zero attempted beyond the value set.
Code 08
Input signal greatly exceeds the valid range. Check the load cell connection.
Tare ~ Error
Negative tare attempted when disabled.
Tare ~ GT FS
Tare value greater than full scale capacity.
Delay
Indicates that a motion delay is in effect (zero, tare, etc.).
Delay ~ Abort
Acknowledges that a motion delayed function was aborted.
Print ~ Abort
Acknowledges that a motion delayed print request was aborted.
Add ~ Load!
If displayed after performing a count sample, this message indicates that a larger sample size is required.
Out of ~ Range
Attempted to enter a value beyond the allowable range.
Need APS
A setpoint start is initiated and the setpoint is based on quantity and no piece weight has been established
(start will not occur).
Edit Disbl
Unable to edit the time and date.
5.2
Miscellaneous Errors
Error Code
T.X.YYYY
Description
If catastrophic errors occur in the software, a trap error may occur and freeze the display with address
information (X = bank number and YYYY = the address of the trap error. Press any key five seconds after
viewing message to reboot the unit).
Model 350 I.S. and 355 I.S. User Instructions
41
5.3
Hardware Errors
Error Code
Description
Code00
An EPROM problem detected during power up.
A-D ~ Bad!
or
Code17
Problem with A/D chip detected. Disconnect any options installed and re-power the unit. Options are
connected to the same serial lines as the A/D so they may prevent it from working properly.
Deflt ~ A-D
Bad A/D calibration values.
Re- ~ Boot!
EEPROM data could not be read. Attempting power-up reset.
Code21~E2rd
Error while reading data from EEPROM.
Code21~E2sd
Error while saving data to EEPROM.
Deflt ~ Setup
An error occurred when reading setup data from the EEPROM during power-up. All parameters are set to
factory default.
Ch.XXXX
A checksum error occurred during power-up. All annunciators are lit. The EPROM integrity test failed or is
improperly seated.
E2 ~ Full!
The EEPROM setup exceeds the memory capacity.
NoSpc ~ Free!
The current setup exceeds the setup RAM capacity.
5.4
Communication Errors
Error Code
Description
Par-Er
The selected parity does not match that of the connected device.
Buf-Er
The receive buffers capacity was exceeded. This indicates a handshaking problem.
Bit-Er
The stop bit of a received character did not occur when expected.
Trans~Hold1
Data transmission is inhibited due to a deasserted handshake on communication port 1. Press [ZERO] or
[CLR] to abort transmission.
Trans~Hold2
Data transmission is inhibited due to a deasserted handshake on communication port 2. Press [ZERO] or
[CLR] to abort transmission.
Error~BaudX
The X being either comm port 1 or comm. port 2. The baud rate selected is too high for the microprocessor
rate.
42
Model 350 I.S. and 355 I.S. User Instructions
6
Specifications
Performance
Full Scale (F.S.)
Selectable 0 to 999,999
Resolution
20-bit A/D converter, 100,000d displayed, 1,000,000d internal
A/D Conversion
60 Hz
Zero Track Aperture
0 - 100% of Full Scale
Operating Temperature
-10°C to +40°C
Units of Measure
lb, kg, oz, g, lb-oz
Electrical
Power Requirement
Rechargeable battery or AC power supply
Excitation Voltage
5 VDC or optional 8V DC
Excitation Current
57 mA max. (5V EXC) or 91mA max. (8V EXC) / (4) 350Ω bridge
F.S. Signal Input
0.1 mV/V min - 10 mV/V max
Signal Connection
4 lead or 6 lead with sense
Process Control
Remote Input
Programmable, two momentary contact closure (100ms minimum) TARE, PRINT, ZERO
Communication
Comm 1
RS232 bi-directional serial port
Comm 2
TTL port for optional Fiber Optic Module
Data Output
16 selectable fixed-format transmissions or 2 custom formats (programmable via RS232)
Protocol
Selectable
Baud Rate
150 - 115200 bps
Display
LED
6-digit weight display, 0.8" (22mm) height
12 LED annunciators for operational status
LCD / LCD Backlit
6-digit weight display, 1.0" (25.4mm) height
12 LCD annunciators for operational status. Built in LCD status bargraph.
Keypad
350I.S.
Five key, durable elastomeric rubber
355I.S.
22 key, full numeric, durable elastomeric rubber
Enclosure
Material
Stainless Steel, NEMA 4X / IP66 Design
Mounting
Swivel bracket
Model 350 I.S. and 355 I.S. User Instructions
43
Safe Area Options
Fiber Optic Transceiver
Communicates with hazardous area indicator via fiber-optic cable.
Battery Charger
Charges battery in approximately 3.5 hours.
Analog Output Module
0-10 VDC/5mA, 0-20mA/10V, 4-20mA/10V, electrically isolated, 16 bit resolution with up to 10
updates per second response time, mounts internal to enclosure
Relay Output Module
Three (3) solid-state 24-280 VAC, 1A with up to 10 updates per second response time, mounts
internal to enclosure or three (3) 3- 60 VDC, 2A
Two Option Mount Kit
Mounts up to two option boards inside the stainless enclosure
Battery Power Supply Kits
Two versions: one mounts inside the stainless steel enclosure, the other mounts inside the die
cast enclosure
RS-485 Network Module
Enables the communication port to be a RS-485 network port. Multi drop capable.
20 mA Current Loop
Enables the communication port to be a digital 20 mA current loop port.
Hazardous Area Options
AC / DC Power Module
Stainless steel enclosure. Universal AC input 90-250VAC, 50/60 Hz.
Battery Module
Stainless steel enclosure, mounts to indicator swivel bracket. 200 hours continuous use with
LCD display + 1 loadcell, and 100 hours continuous use with LED display + 1 loadcell.
Dura Shield
Durable adhesive plastic that adheres to the front surface of the stainless steel enclosure model
Splash Guard
Clear plastic cover which covers the entire indicator.
Refer to page 10 for hazardous approval information.
44
Model 350 I.S. and 355 I.S. User Instructions
Avery Weigh-Tronix USA
1000 Armstrong Dr.
Fairmont MN 56031 USA
Tel:507-238-4461
Fax:507-238-4195
Email: [email protected]
www.wtxweb.com
Avery Weigh-Tronix UK
Foundry Lane,
Smethwick, West Midlands,
England B66 2LP
Tel:+44 (0) 8453 66 77 88
Fax: +44 (0)121 224 8183
Email: [email protected]
www.averyweigh-tronix.com