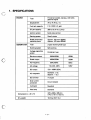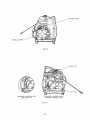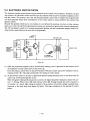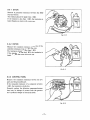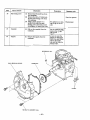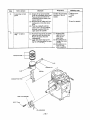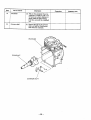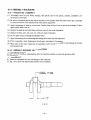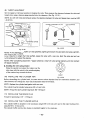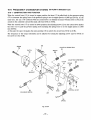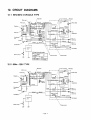
1
PUB-GS0455
Rev. 8/98
CONTENTS
Section
Title
Page
.
2.
........................................ 1
PERFORMANCECURVES . . . . . . . . . . . . . . . . . . . . . . . . . . . . . . . . 2
2-1 AC Output ........................................
2
2-2
DCOutput
........................................
2
3. FEATURES ............................................
3
4 . GENERALDESCRIPTION OF THE GENERATOR . . . . . . . . . . . . 4
4-1 Component Identification ............................
4
1 SPECIFICATIONS
4-2
5
.
.
7.
Location of Serial Number. Specification and
Specification Number . . . . . . . . . . . . . . . . . . . . . . . . . . . . . . . . 7
CONSTRUCTION AND FUNCTION OF THE GENERATOR . . . . . 8
8
5-1 Construction ......................................
5-2 Functionof Each Component . . . . . . . . . . . . . . . . . . . . . . . . . 9
12
5-3 Description of GeneratorOperation .....................
14
5-4 Electronic Ignition System ............................
................................. 15
RANGEOFAPPLICATIONS ..............................
16
........................................ 16
7-1ACOUtput
7-2 DC Output ........................................
18
8. MEASURING PROCEDURES. .............................
20
8 - 1 Measuring Instruments . . . . . . . . . . . . . . . . . . . . . . . . . . . . . . .20
8 - 2 Measuring ACOutput . . . . . . . . . . . . . . . . . . . . . . . . . . . . . . .22
8 - 3 MeasuringDC Output ...............................
22
8 - 4 Measuring Insulation Resistance ........................
22
9. CHECKING FUNCTIONAL MEMBERS ......................
24
9 - 1 Control Panel . . . . . . . . . . . . . . . . . . . . . . . . . . . . . . . . . . . . . . 24
9-2 Stator . . . . . . . . . . . . . . . . . . . . . . . . . . . . . . . . . . . . . . . . . . . .26
28
9 - 3 Rotor . . . . . . . . . . . . . . . . . . . . . . . . . . . . . . . . . . . . . . . . . . . .
29
9-4 IgnitionCoil .......................................
9-5 Condenser ........................................
29
9-6 Diode Rectifier . . . . . . . . . . . . . . . . . . . . . . . . . . . . . . . . . . . . .
29
9-7 Micro-Switch . . . . . . . . . . . . . . . . . . . . . . . . . . . . . . . . . . . . . .
30
10. DISASSEMBLY AND ASSEMBLY ..........................
31
31
10- 1 PreparationandPrecautions ...........................
10-2 Special Tools for Disassembly and Assembly . . . . . . . . . . . . . . 31
6
SAFETY PRECAUTlONS
10-3
10-4
10-5
10-6
32
DisassemblySequence ...............................
47
AssemblyProcedure .................................
Carburetor . . . . . . . . . . . . . . . . . . . . . . . . . . . . . . . . . . . . . . . . 58
61
FrequencyChangeoverSystem . . . . . . . . . . . . . . . . . . . . . . . . .
Section
.
Title
11 TROUBLESHOOTING ...................................
11 .1 Engine does not start or engine does not run normally. . . . . . .
11-2 Voltmeter does not work or pilot lamp does not turn on.
No AC output ....................................
11-3 No DCOutput .....................................
11- 4 Output voltage is normal at no.load.
but generator won't work omload.....................
Page
63
63
66
69
69
12. CIRCUIT DIAGRAMS ....................................
71
12- 1 50Hz/60Hz Variable Type . . . . . . . . . . . . . . . . . . . . . . . . . . . .71
12-2 60Hz-120VType ..................................
71
c;
1 SPECIFICATIONS
Forced air-cooled, 4-stroke, sidevalve,
ENGINE
gaso Iine engine
I
Displacement
Fuel tank capacity
Oil pan capacity
Ignition system
Starting system
.
GENERATOR
I
1
1
1
78 cc (4.76 cu.
in.)
2 lit. (0.53 U.S. gal.)
350 cc (0.75 U.S. pints)
Solid state ignition
Recoil starter
Rated continuous
operating hours
Approx. 4.5 hours (50Hz)
Approx. 4.0 hours (60Hz)
Type
2-pole revolving
typefield
Exciting system
I
Voltage regulating
system
Maximum output
Rated output
AC frequency
ACvoltage
.
DC output
Self-exciting
Condenser type
I
I
550W/650W
I
I
45OW/550W
I
I
5OHz/6OHz
I
12V-1OOW (8.3A)
-
Standard: 2 ea.
(Special: 1 ea.)
AC receptacle
~
DC terminal
Over current
protection
A couple
1I
Circuit breaker
Voltmeter
Standard
Pilot lamp
Standard
Dimensions (L x W x H)
I
370 x 265 x 345 mm
(14.6 x 10.4 x 13.6in.)
-1-
65oW
55oW
60Hz
2. PERFORMANCECURVES
2-1 AC OUTPUT
"I
Hz
E
3
W
T
62
61
60
59
K
I-
13
n
k
13
0
Hz
600
LL
52
51
50
49
f
500
1 661
2
,"
60
59
500
400
400
300
240
230
220
21 0
k
-
t;
100
0.5
1
CURRENT
1.5
2
I-
200
2
L
120
110
5
100 0
0
>
V I I I I I I I I I I I J o
0
300
.i.-
200
1
w
$
V
A
600
2.5
A
50Hz/60Hz-220V Type
OUTPUT
Max. . . . 550W/50Hz,650W/60Hz
Rated . . 450W/50Hz,550W/60Hz
0
60 Hz-1 20V Type
OUTPUT
Max. . . . . . . . . . . . . . . .650W
Rated . . . . . . . . . . . . . .550W
2-2 DC OUTPUT
V
W
>
U
I-
-2-
Rated voltage
. . . . . . . . . . . . . 12V
Rated current
............
Rated output
. . . . . . . . . . . .1OOW
8.3A
3.
Exhaust Fan Cooling System for low body temperatures, low noise, longer engine life and reliable performance.
0
Large 78 cc 4-Stroke Engine provides enough power for constant 550W (at 60 Hz) rated output.
Simple One-Touch Engine Control Switch with
into one switch.
the engine and fuel on/off levers and choke all integrated
0
Easy and Reliable Starting with pointless ignition. This generator
maintenance-free operation.
0
Simple Design for a clean appearance and easy maintenance.
0
Compact and Lightweight with an easy one-hand carrying handle grip.
power-to-weight ratio and economical operation.
0
Circuit Breaker Protection for safe operation. Replacement of fuses is not necessary in case of an overload.
0
Unique Dual Output Design so that two separate A.C. andD.C. electrical appliances canbeused
same time.
0
Frequency Changeover Switch enables changing output frequency from 50 Hz to 60 Hz.
0
Optional Oil Warning System automatically stops the engine if the oil level drops below the lower limit.
(Factory Option)
0
Resistor Spark Plug is used as standard to prevent radio frequency noise.
0
Standard Tools are attached in the base plate for easy maintenance.
0
AC Voltmeter is a standard equipment for monitoring output voltage.
-3-
is also a brush-less type generator for
This generator also offers a high
at the
4. GENERAL DESCRIPTION OF THEGENERATOR
4-1 COMPONENT IDENTIFICATION
HANDLE
MUFFLER COVER
. A I R CLEANER
MUFFLER
AIR CLEANER COVER
Fig. 4 - 1
FUEL TANK
,GENERATOR
ENGINE
Fig. 4 - 2
-4-
MUFFLER COVER
Fig.
4-3
SPARK PLUG
FREQUENCY ADJUSTING UNIT
(60Hzi120V TYPE)
FREQUENCYCHANGEOVERUNIT
(50Hz/60Hz VARIABLE TYPE)
Fig. 4 - 4
-5-
FRONT HOUSING
/
/
RECOIL STARTER
\
CARBURETOR
Fig. 4-5
RUBBER PIPE
(FOR AIR VENT)
I
BASE PLATE
Fig. 4 - 6
-6-
4-2 LOCATION OF SERIAL NUMBER, SPECIFICATION AND
SPECIFICATION NUMBER
The serial number is stamped on the crankcaseat the oppositeside of the carburetor andalso stamped on the
label stuck above the oil filler cap.
The specification and specification number are shownon the nameplatelocated on the rear cover.
Always specify these numbers when inquiring about the generator or ordering parts in order to get correct
parts and accurate service.
S E R I A L NUMBER
Fig. 4-7
-7-
5. CONSTRUCTIONANDFUNCTIONOFTHEGENERATOR
5 - 1 CONSTRUCTION
FUEL TANK
SPARK PLUG
THROUGH
BOLT
CRANKCASE
RECOIL STARTER
CRANKSHAFT
BALL BEARING
FIELD CORE
STATOR
COIL
STATOR CORE
Fig. 5- 1
-a-
COOLING
FAN
VIBRATION
ISOLATOR
5-2 FUNCTION OF EACHCOMPONENT
5-2-1 GENERATOR
(1) STATOR
The stator consists of a laminated silicon steel sheet
core,a main coil and condenser coil which are
wound in the core slots.
AC and DC output are taken out from themain coil.
(DC output is taken out from the part of main coil
which is in the middle of the main coil.)
The condenser coil excites the stator field coil which
generates AC output in the main coil.
‘IFIER
C
Fig. 5-2
(2) CONDENSER
The condenser is mounted on the rear housing and is connected to the condenser coil which is wound in the
stator. The condensercoil magnetizes the rotor which increases the densityof magnetic flux.
(3) RECTlFlCER
The rectifier is also mounted on the rear housing and it converts AC current output from the main coil to
DC current. The DC output from the diode of this rectifier is connected to the DC terminal.
(4) ROTOR
The rotor consists of a lamination silicon steel sheet
core and field coil which is wound over the core.
DC current in the filed coil magnetizesthesteel
sheet core.
Two permanent magnets are provided at 90 degrees
from the poles for the primary exciting action.
A securely mounted fan is pressure-fitted on the end
of the rotor shaft to cool the individual coils, iron
cores, rectifier, and other integral parts.
Cooling air from the fan is drawn in from the ventilationvents in the rear housing, and is discharged
from the exhaust port in the front housing.
Fig. 5-3
(5) CONTROLPANEL
The panel on the front of the housing has a receptacle with a ground terminal and AC output is taken
out with a male plug.
DC output is taken out from the red(positive, +)
and black (negative, -) terminals.
Control switch, circuit breaker, voltmeter and pilot
lamp are installed on the control panel.
I
Fig. 5-4
-9-
5-2-2 ENGINE
(1) CYLINDER and CRANKCASE
The cylinder and the crankcase of the engine are of a one-piece aluminum die-cast design. The cast iron cylinder liner is molded inside the cylinder. Both the intake and exhaust ports arepositioned at the lateral side
of the cylinder and these parts are formed by using a mold with die-cast cores. The crankcase has its joint
face located on the generator side.
(2) MAIN BEARING COVER
The main bearing cover is aluminum die-cast and is mounted on the generator side. By removing the main
bearing cover, the interior of the engine can be inspected.
(3) CRANKSHAFT
The crankshaft is constructed of forged carbon steel. The crankpin
fitted crank gear located on the generator side of the engine.
is induction-hardened and has a
press-
(4) CONNECTING ROD and PISTON
The connecting rod is constructed of forged aluminum alloy with both the large and small ends utilized as
bearings. The oil scraper and large end cap are molded together. The aluminum alloy casting piston has two
compression rings and one oil ring.
(5) CAMSHAFT
The camshaft is constructed of special cast iron and has intake and exhaust valve drive cams, each of which
engages with the cam gear. An exclusive aluminum alloy is used on each end of the camshaft in the place of
bearings.
(6)VALVE ARRANGEMENT
The intake valve is installed at the oil portside and the exhaust valve at the generator side.
(7) CYLINDER HEAD
The cylinder head is die-cast aluminum and has Ricardo type combustion chamber featuring greater volume
capacity for improved combustion efficiency. For easier spark plug maintenance, the cylinder head is positioned at an angle to allow greater access.
(8) GOVERNOR
Thecentrifugal weight type governorensures constant engine speed, regardless of load fluctuations (the
governor is mechanically linked t o the governor drive gear).
(9) EXHAUST FAN COOLINGSYSTEM (See Fig. 5-5.)
Instead of blowing outside air on the engine, the Exhaust Fan Cooling System of this generator intakes the
cool air and forces the hot air outside from one outlet.
This keeps the body temperature lower for greater safety and extends
service life.
(10) LUBRICATION SYSTEM
The moving and sliding parts inside the engine are lubricated with the oil scraper fitted on the connecting
rod. As the crankshaft rotates, the connecting rod moves up and down and the oil scraper moves in conjunction with the connecting rod movements to scrape up oil in the crankcase and splash it over the surfaces of
the moving and sliding parts.
- 10-
(1 1) IGNITION
A flywheel/magneto igntion system is employed with the ignition timing set at 23' before top dead center.
The magneto is composed of the flywheel and ignition coil with the flywheel mounted on the rotor shaft.
The ignition coil is fitted to the fronthousing.
(12) CARBURETOR
The horizontal draft type carburetor is installed so that the engine will provide excellent starting, good acceleration, low fuel consumption, and superior output. [For details concerning carburetor construction, see
the paragraph dealing with carburetor construction anddisassembly/assembly (Page 5 9 ) . ]
(13) AIR CLEANER
The air cleaner is a semi-wet type and contains a sponge element.
Fig. 5-5
- 11 -
5-3 DESCRIPTION OF GENERATOR OPERATION
INITIALEXCITATION
PERMANENTMAGNETO
\
ROTOR
/t.
I
Y - " !
I
I
'
I
DIODE
MAIN COIL
CONDENSER
COIL
A CONDENSER
I""""l
Fig. 5-6
5 - 3 - 1 GENERATION OF NO-LOAD VOLTAGE
When the generator starts turning the permanent magnetobuilt-in to the flywheel, it generates 1 to 4 V of
AC voltage in the main coil and condenser coil.
The condenser coil is connected to a condenser. So, when a voltage is generated in the condenser coil,
minimum current @ flows in the condenser coil. At this time, small flux is produced, with which the
magnetic force of the rotor's magnetic pole is intensified. When this magnetic force is intensified, the
respective voltages in the main coil and condenser coil rise. Current @ flowing in the condenser coil
increases, with the magnetic flux density of the rotor's magnetic pole increasing further. Also, the main
coil voltage and condenser coil voltage increases. These voltage continue rising as this process is repeated.
As current flows in the condenser coil, the magnetic flux density in the rotor changes. AC voltage is induced in the field coil when the magnetic flux density varies. Successively, AC current is rectified by the
rectifiers connected to both ends of the field coil, and DC current @ flows in the field coil. With this
current, the rotorcore is magnetized, allowing the generator to outputsteady voltage.
When generator speed reaches 2000 to 2300 rpm (50 Hz specification) or 3000 to 3300 rpm (60 Hz
specification), the current in the condenser coil and field coil increases rapidly. This acts to stabilize the
respective coil output voltages. If generator speed further rises to the rated value, the generator output
voltage will reach the rated value.
5 - 3 - 2 VOLTAGEFLUCTUATIONSUNDERLOAD
When load current @ flows from the generator to the electrical equipment, the magnetic flux which is produced as current @ flows in the main coil, this flux serves to increase current @ flowing in the condenser
coil. With current @ increased, the magnetic flux density across the rotor core rises. As a result, the current
flowing in the field coil increases, and the generatoroutput voltage is prevented from decreasing.
- 12-
5-3-3 DC OUTPUT
DC output is taken out from the main coil and is fed
tothe diode at which timethe output undergoes
full-wave rectification prior to being supplied to the
load connnected to the generator. The diode rectifier works to allow the current to flow in @ direction but does not allow the current to flow in (@
direction as shown in Fig. 5 -7.
Fig. 5-8 shows the DC output circuit of the generator.
DC voltage is generated in the main coil; when the
voltage in A is higher than that in Cy current @
flows in the direction shown in the
figure while no
current flows between C and B because current is
cut off by the diode D2. Contrary to the aforementioned, if the voltage in C is higher than that in A,
current @ flows in the direction as shown in the
figure, with no current flowing between A and B.
This is because thediode D l cuts off thecurrent
between A and B. As a result, voltage generated between the DC terminals
has
a
waveform with two
peaks in one cycle, as in the case of the output waveform with two peaks in one cycle, as in the case of
the output waveform shown in Fig. 5-9.
-0
-@
Fig. 5-7
+
Dl
A
MAIN B
COIL
Fig. 5-8
BETWEEN A AND B
OUTPUTWAVEFORM
BETWEEN
C
AND B
FLOWING
CURRENT
FLOWING
BETWEEN
A AND B
Fig. 5-9
- 13-
@
CURRENT
BETWEEN
C AND B
@
5-4 ELECTRONIC IGNITION SYSTEM
The electronic ignition system features a power transistoras the current control element. Therefore, the
ignition system is an electronic contact point-free type that operates with the power transistor
impulses controlling the current. This system is also called TIC (transistor igniter circuit) and is virtually freeof ignition failure which generally results from contamination of the contact points, a typical problem with contact type
ignition systems.
Because this ignition system has no contact points, itis not affected by moisture, oil, dust, or othercontamisure and positive ignition with reduced maintenance.
nants. As a result, this electronic ignition system ensures
The TIC mechanism consists of a transistor-incorporated ignition coil and a permanent magneto built-in flywheel which is press-fitted on the rotor shaft of the generator.
I
//////
IGNITIONCOIL
"
a
0
IGNITION
TIMING
DETECTING
CIRCUIT
>
a
a
a
I-
*
SPARKPLUG
FLYWHEEL
COOLINGFAN
Fig. 5 - 10
(1) When the permanenet magneto built-in flywheel starts rotating, power is generated in the primary coil of
of the ignition coil and current flows to the resistor @ .
From the resistor, current flows t o the power transistor. With this current, the power transistor turns on,
releasing current @ . This stage corresponds to the closing of contact points.
(2) As the flywheel comes to the point of ignition, the ignition timing detecting circuitis activated while the
current @ is flowing through the circuit.
When the ignition timing detecting circuitis activated, the signal transmitter transistor actuates with current d flowing. When current @ starts flowing, current @ flowing through the power transistor is
cut quickly. As a result, high voltage is produced in the secondary coil and this voltage is applied simultaneously to the spark plug which ignites for ignition. This stage corresponds to the opening of contact
points.
- 14-
6. SAFETY PRECAUTIONS
1. Use extreme caution near gasoline. A constant danger of explosion or fire exists.
Do not fill the fuel tank with gasoline while the engine is running. Do not smoke or use open flame near
the fuel tank. Be careful not to spill fuel when refueling. If spilt, wipe it and let itdry before starting the
engine.
2. Do not place inflammable materialsnear the generator.
Be careful not to put gasoline, matches, gunpowder, oil cloth, straw, trash and any other inflammables
near the generator.
0
Operate the generator at least 1 meter (4feet) away from a building or wall.
3. Do not operate the generator in a room, cave or tunnel. Always operatein a well-ventilated area.
Otherwise the engine may become overheated and also, the poisonous carbon monoxide contained in the
exhaust gases will endanger human lives. Keep the generator atleast 1 m (4 feet) away from structures or
facilities during use, and always operate it with the exhaust pipe directed toward the open-air or where
good ventilation is assured.
4. Operate the generator on a level surface.
0
Do not operate the generator on ainclined surface.
0
Do not move or carry the generator while it is running.
5. Do not operate with wet hands or in the rain.
Severe electric shock may occur. If the generator is moistened by rain or snow, wipe it and fully dry it
before starting.
0
Do not pour water over the generator directly norwash it with water.
If the generator is wet with water, the insulations will be adversely affected and may cause current leakage and electric shock.
6. Do not connect the generator to the residential power source.
This could result in a malfunction of, or damge to the generator or applianceto which it is connected or
could even lead to fire.
7. Do not cover the generator with a carton, a box or other cover while it is running.
-15-
7.
OF APPLICATIONS
7 - 1 AC OUTPUT
Generally, the rated power of an electrical appliance often refers to the amount ofwork that can be done by
it. The electric power required for operating an electrical appliance
is not always equal to the amount of
work that can be done by it. Electrical appliances generally have a label showing their rated voltage, frequency, and power consumption (input power). The power consumption
of an electrical appliance is the
power necessary for using it. When using a generator for operatingan electrical appliance, however,the power factor and starting current mustalso be taken into consideration.
Determine the capacity of your generator from the power required for operating electrical appliances referring to thefollowsings:
(1) Incandescent lamps, hot plates, etc. with a power factor 1.O
Total power consumption mustbe equal to orless than the rated output of generator.
of 500W can light five lOOW lamps.
Example: A generator with a rated output power
(2) Fluorescent lamps, mercury lamps, etc. with a smaller power factor
Select a generator with a rated output equivalent to 1.2 to 2 times the power consumption of the load.
Example: A generator with a capacityof 1OOW to 160W is necessary for lighting a 80W fluorescent lamp.
A generator with a rated output of
500W can light three to five 40W fluorescent lamps.
NOTE: Wattage of the fluorescent lamp generally does not indicate the power consumption but indicates the output of the lamp. Therefore, i f the fluorescent lamp has no special indication as to
the power consumption of input power, efficiency should be taken into accounts as explained in
Item 5 on the following page.
(3) Electric tools, etc. that are driven by a motor
1.2 to 3 times large power consumption of a motor-driven toolis required for starting.Select a generator
with a maximum output 1.2 to 3 times large to the load.
Example: A 300W motor-driven drill requires a generator with a maximum output
more.
of 400 to 9OOW or
(4) Water pumps, compressors, etc. that are driven by a motor and are initially loaded
3 to 5 times large power is necessary for starting. Select a generator with 3 to 5 times large output of
load.
Example: A water pump with apower consumption of 400W requires a generator with a maximum output of 1200 to2000W or more.
NOTE I : Motor-driven appliances mentioned in Items 3 and 4 required the aforementioned generator
capacities only when starting their motors. Once their motors are started, the appliances consume about 1.2 to 2 times their rated power consumption so that the excess power generated
by the generator can be usedfor other electrical appliances.
NOTE 2: Motor-driven appliances mentioned in Items 3 and 4 vary in their required motor starting power depending on the kind of motor and start-up load. I f it is difficult to determine the optimum generatorcapacity, select a generator with a larger capacity.
- 16 -
(5) Appliances without any indication as to power consumption
Some appliances have no indication as to power consumption; but instead the work load (output) is
indicated. In such a case, power consumption is to be worked out according to the numerical formula
mentioned below.
(Output of electrical appliance)
= (Power consumption)
(Efficiency)
Efficiencies of some electrical appliances are as follows:
Single-phase motor . . . . . . . . . . . . . . . 0.6
Oa7'
Three-phase motor . . . . . . . . . . . . . . . 0.65 0.9
0.8
Fluorescentlamp . . . . . . . . . . . . . . . . 0.7
The smaller the motor,
the
the efficiency.
--
lower
Example 1 : A 40W fluorescent lamp means that its luminousoutput is 40W. Its efficiency is 0.7 and accordingly, power consumption will be 40 + 0.7 = 57W. As explained in Item 2, multiply this
power consumption value of 57W by 1.2 2 and you will get the figure of the necessary
capacity of a generator. In other words, a generator with a rated output of 500W capacity
can light four toseven 40W fluorescent lamps.
-
Example 2: Generally speaking, a 400W motor means that its work load is 400W. Efficiency of this m e
tor is 0.7 and power consumption will be 400 + 0.7 = 570W. When this motor is used for a
motor-driven tool, the capacity of the generator should be multipled by 1.2 to 3 and 570W
as explained in the Item 3.
r
RANGE OF APPLICABLE LOADS
ELECTRIC DEVICES
50 Hz
~
60 Hz
~
Incandescent lamp, electric heater, etc.
Up to450W
Up to550W
Fluorescent lamp, mercury lamp, etc.
approx. 350W
Up to approx. 450W Up to
Motor-driven tools etc.
approx. 350W
Up to approx. 400W Up to
Pump and compressor drive motors
Up to approx. 150W
Up to approx. 180W
Table 7-1
NOTES: Wiring between generator andelectrical appliances
1. Allowable current of cable
Use a cable with an allowable current that is higher than the rated input current of the load (electrical appliance). If the input current is higher than the allowable current of the cable used, the
cable will become excessively heated anddeteriorate the insulation, possibly burins it out.
Table 7-2shows cables andtheir allowable current for your reference.
2, Cable length
I f a long cable is used, a voltage drop occurs due to the increased resistance in the conductorsso
that the input voltage to the load (electrical product) decreases. As a result, the loadcan be darnaged.
Trable 7-2shows voltage drops per100 meters of cable.
- 17 -
Table 7-2
Voltage decrease indicates as V =
-x R x I x ! ?
100
R means resistance (5211 00 m) on the above table.
I means electric current through the wire (A).
2 means the length of the wire (m).
The length of the wire indicates round length, it means twice the length from generator to electrical
tools.
7 - 2 DC OUTPUT
When the generator is employed to recharge batteries, care must be exercised about the specific gravity of
electrolyte in each battery case.
7-2-1 MEASURING THE SPECIFIC GRAVITY OF ELECTROLYTE:
The specific gravity changes with temperature; therefore, itis converted to another, corresponding to 20°C.
+ 0.0007 ( t - 20)
S20
=
S20
St
= Specific gravity corresponding to 20°C
St
where
t
= Measured value
= Temperatureat time of measurement
7-2-2 REMAINING CAPACITY ESTIMATED WITH REFERENCE TO THE
ELECTROLYTE:
SPECIFIC GRAVITY
REMAINING BATTERY
(2OOC)
(%I
1.260
100
1.240
87
1.220
75
1.200
62
1.180
50
SPECIFIC GRAVITY OF
REMARKS
Good charged condition
Charging is necessary.
Immediate charging is necessary.
1.160
37
1.140
25
Table 7-3
- 18 -
7-2-3 BATTERYCAPACITY
The battery capacity is expressed in units of ampere-hour (AH). One
providing one ampere of current for one hour.
AH
stands for the capacity capable of
7-2-4 SIMULTANEOUS USE OF THE AC/DC OUTPUT
If you use the AC/DC output simultaneously in this generator, be careful not to exceed the total power consumption.
50 Hz
60 Hz
below 250W
below 350W
NOTE: Max. output of DC is lOOW (12V x 8.3A).
- 19-
8. MEASURINGPROCEDURES
8-1 MEASURINGINSTRUMENTS
8-1-1 VOLTMETER
AC voltmeter is necessary. The approximate AC voltage ranges of the voltmeters to be used for various
types of generators are as follows:
0 to 150V : Type with an output voltage of 1 1OV
or 12OV
0 to 300V : Type with an output voltage of 220V,
230V or 240V
Fig. 8-I
8-1- 2 AMMETERS
AC ammeter is necessary. AnAC ammeter with a
range that can be changed according to the current
rating of a given generator is most desirable. (About
1OA, 20A, 1OOA)
Prepare a DC ammeter which has a scalerange of
15A.
9
Fig. 8-2
8-1-3 FREQUENCYMETER
Frequency range: About 45 to 65 Hz.
NOTE: Be careful of thefrequency meter's input
voltage range.
Fig. 8-3
- 20 -
8-1-4 CIRCUIT TESTER
Used for measuring resistance, etc.
I
,
I'
Fig. 8-4
8 - 1 - 5 MEGGER METER
Used for measuring generator insulation resistance.
Select one with testingvoltage range of 500V.
I
Fig.
8-5
8 - 1 - 6 TACHOMETER
Use a contact-less type tachometer.
CONTACTLESS TYPE
\
I
I
Fig. 8-6
- 21 -
8-2 MEASURING AC OUTPUT
TO A
With the circuit shown in Fig. 8-7 , measurment is made of the AC output of the generator.An electric heat1.O is suitable as a load for the generator.
er or an incandescent lamp with a power factor of
When the measured AC output of the generator is confirmed to be within the voltage range specified in the
table below, over itsvoltage rating, the AC output is normal.
Measurement must be made under rated load and at rated speed; sometimes, load and speed adjustments are
r
necessary.
Voltage
rating
voltage
11ov
104-107V
220v
114-127V
211-234V
240V
120v
227-253V
Table 8-7
8-3 MEASURING DCOUTPUT
SWITCH
@
DC TERMINAL
Fig. 8-8
Measurement is made of the DC output of the generator with the switch shown in the above circuit turned
on while the generator is kept running at its rated speed. TheDC output should be within 11 to 14 with the
current regulated at 8.3A by adjusting theload connected to thegenerator.
NOTE: i f a battery is connected as a load to the generator, the DC output voltage will increase by approximately 1 to 2V. Therefore, carefully observe the electrolyte level and do not overcharge the battery.
8 - 4 MEASURING INSULATION RESISTANCE
To measure insulation resistance, connect the megger tester across either one of the two output terminals of the socket and the earth terminal. When the
measuredinsulation resistance of thegenerator is
over 1 Ma,it is normal (over lOMQ at time of shipment).
(Be sure to turn on the circuit breaker when measuring insulation resistance.)
If the insulation resistance isless than I M a , disassemble thegenerator,andmeasurethe
respective
resistances of the stator, rotorand control panel.
- 22 -
Fig. 8-9
8-4- 1 STATOR
Measure the insulation resistance between the RED
lead and the core.
The resistance should be larger than I Ma.
If the resistance is less than 1 Ma, the insulation is
failed. Replace the stator with anew one.
-
Fig. 8- 10
8 - 4 - 2 ROTOR
Measure the insulation resistance across one of the
soldered terminals ofthe rotor and the core.
The resistance should be larger than 1 Ma.
If the resistance is less than 1 M a , the insulation is
failed. Replace the rotor with anew one.
Fig. 8- 1 I
8 - 4 - 3 CONTROL PANEL
Measure the insulationresistancebetween the live
parts and thegrounded part.
If the measured resistance of a component is below
1 Ma, the insulation is defective.
Promptly replace the defective component because
there may be leakage of current from the generator
and a potential danger of electrical shock.
Fig. 8-I2
- 23 -
"
9. CHECKING FUNCTIONAL MEMBERS
9-1 CONTROL PANEL
9 - 1 - 1 ENGINE SWITCH
Using a circuit tester,checkcontinuity across the
black and green top terminals of the 6P coupler.
When continuity between the terminals is confirmed
with the engine switch turned off, the switch is normal. It is also normal if there is no continuity between these terminals, when the engine switch is set
at RUN or CHOKE position.
Fig. 9- 1
9 - 1 - 2 VOLTMETER
Also check with the circuittester,thecontinuity
across the white and brown top terminals of the 6P
coupler. If continuity is confirmedbetweenthese
terminals, the voltmeter is normal.
Fig. 9-2
9 - 1 - 3 PILOTLAMP
Check the pilot lamp to be turned on by applying
specified voltage.
Pilot lamp cannot be checked with a circuit tester
because it is a light emitting diode and its resistance
is too large.
- 24 -
9 - 1 - 4 AC RECEPTACLES
Using a circuit tester, check continuity between the two terminals at the rear of the AC receptacles while the
receptacle is mounted on the control panel. When continuity is confirmed between the output terminals of
the receptacle with a wire connected across these terminals, the AC receptacle is normal. When the wire is removed and no continuity is confirmed between these terminals, the receptacles are also normal.
J
Fig. 9-3 (A)
Fig. 9-3 (B)
9 - 1 - 5 DC TERMINALS
Using a circuit tester, check continuity between the
DC terminals at the rear side of the control panel
while they are mounted on thepanel.
When continuity is confirmed between the DC terminals with a wire connected across these terminals,
the DC terminalsarenormal. When the wire is removed and no continuityis confirmed between these
terminals, theterminals are also normal.
Fig. 9 - 4
9 - 1 - 6 CIRCUIT BREAKER
Check continuity between each of two terminals at the rear of the circuit breaker while it is mounted on the
control panel. Normally, there is continuity between each of the two when the circuit breaker is on while
there is no continuity when the circuit breaker is off. I
[6P COUPLER WIRING]
GREEN/YELLOW
YELLOW
RED
BROWN
WHITE
Fig. 9-5
- 25 -
9 -2 STAT0 R
Measure the resitance of each stator coil using the circuit tester.
(R x I52 &lo%)
MAIN COIL CONDENSER COIL
50Hz A C Winding
- Blue
6P coupler 3P coupler
60Hz AC Winding
50Hz Winding
60Hz Winding
Black - Orange
Black - Pink
DC Winding
Brown - Light Blue Brown
White - Green
(Rectifier)
6P coupler 3P coupler
3P coupler
3P coupler
IOOV - 50160Hz
2.852
2.252
0.752
8.152
7.352
120V - 6OHZ
-
2,752
0.752
-
7.152
1 1OV - 50160Hz
3.552
0.752
8.152
7.352
- 50160Hz
14.552
0.752
8.152
7.352
220V
2.652
1 1 .on
240V - 50160Hz
0.752
12.052
52
15.852
7.352
8.1
(at 21'~)
Table 9- I
NOTE: If the circuit testeris not sufficientlyaccurate, it may not show the values given and may give erroneous readings.
[6P COUPLER WIRING]
GREENIYELLOW
N
YELLOW
RED
WHITE
[3P COUPLER WIRING]
B-
BLUE
ORANGE
LIGHT BLUE
PINK
WHITE
BLACK
CONDENSER COIL
MAIN COIL
- 26 -
AC COIL
Fig. 9-6
DC COIL
Fig. 9-7
CONDENSER COIL
FOR 60Hz
Fig. 9-8
I
- 27 -
9-3 ROTOR
1) Unsolder the diode and the resistor from the rotor terminal.
Unsolder one wire of each part.
Fig. 9-9
2) Check the resistance between the wire ends of
rotor winding at the terminals.
NORMAL RESISTANCE
11.552
I
W
Fig. 9-10
3) Check the diode.
Touch the positive (RED) probe of the circuit
tester to the cathode mark side of the diode, and
touch the negative (BLACK) probe to the other
side of .the diode. Normalresistance is 1652.
NORMAL RESISTANCE
!
Reverse the polarity of the circuit tester.
At this time, the resistanceis infinity.
[RemedyI
I
If the diode is defectrive, replace with a new one.
""""""""""-
1652
-CATHODE
MARK
I%
I
NORMAL RESISTANCE
I
-CATHODE
Fig. 9-1 1
- 28 -
MARK
9-4 IGNITION COIL
Using a circuit tester, measure the resistance of the ignition coil.
i
RESISTANCE VALUE
MEASUREMENT LOCATION
Primary coil
0.610
Between the core and the green cord
Secondary coil
7.5k0
Between the green cord and the high-tension cord
Table 9-2
9-5 CONDENSER
If an instrument (QC-meter or C-meter) for measuring the capacityof a condenser is available, check the capacity of the condenser.
I
I
I
NORMAL CAPACITY
I
10- IlpF
Usually the instrument is expensive and difficult
to obtain, wesuggest instead that you installa
new condenser and see if the generatorworks.
If the generator works with a new condenser, the
old one is defective.
Fig. 9-12
9 - 6 DIODERECTIFIER
Using a circuit tester,measure the resistance between
each of the two terminals of the rectifier. Therectifier is considered normal when the respective resistances have the values specified below.
GREEN
0
I
RED
I
0
0
WHITE
I
. . . 160
0
l o l o l
I
RED
. . .=a
i
. . . =0
\
I
Y
GREEN'
The polarity of the circuit tester
- 29 -
'WHITE
Fig. 9-13
9-7 MICRO-SWITCH
BUTTON
Check the micro-switchusing a circuit tester.
n
out1
0
I
I
-30-
10-1 PREPARATIONANDPRECAUTIONS
1) Be sure to remember the locations of individual parts when disassembling the generator so that the generator can be reassembled correctly. Tie tags noted with thenecessary information to facilitate easier and
smoother reassembly.
2) For more convenience, divide the parts into several groups and store them in boxes.
3) To prevent bolts and nuts from being misplaced or installed incorrectly, place them temprorarily back at
their original position.
4) Handle disassembled parts with care; clean them before reassembly using a neutral cleaning fluid.
5 ) Use all disassembly/assembly tools properly, and use the right tool for each specific job.
6) Drain fuel tank of fuel and crankcase of oil before disassembly.
10-2 SPECIAL TOOLS FOR DISASSEMBLY AND ASSEMBLY
/
Fig. 10-1
NO.
NAME
TOOL NO.
I
OF TOOL
1
DESCRIPTION
I I
1
230-95001-07
2
230-95002-07
Valve guide puller
To pull out the valve guide
3
358-95001 -07
Rotor puller
To pull out the rotor
For disassemblinganddeassembling the intake
exhaust and
valves
Valve
retainer
spring
Table 10-1
-31
-
I
I
10-3 DISASSEMBLY SEQUENCE
Step
Part to remove
Description
1
Side cover(L)and (R)
(1) Remove both left and right cover
by taking out eight M5 flange
screws.
2
Couplers (disconnection)
(1) Disconnect the (6P) coupler of
the generator from the other
(6P) extending from the control panel
Precautions
Necessary tools
@Plus screw-driver
Pull them downward
while pressing down
the retainer claws,
(See Fig. 10-2.)
1
M5 FLANGE SCREW: 8 pcs.
Fig. 10-2
- 32 -
~
Step
~~
~~
Part to remove
3
Precautions
Description
(1) Set the control switch to STOP
and disconnect the choke cable
from the lever.
(2) Disconnect the outer cable of the
choke cable from the fuel tank
bracket.
(3) Loosen the M4 screw of the
carburetor choke lever swivel to
pull out the inner wire from the
choke cable.
(1) Hold the fuel line clamp inserted
inside the strainer using pliers,
and pull it backward to remove
the fuel line from inside the
strainer.
F U E L HOSE
(See Fig. 10-3.)
Be careful not to
damage the hose.
(See Fig. 10-4.)
Fig. 10-4
- 33 -
10 mm box spanner
@Plus screw-driver
CHOKE CABLE
Fig. 70-3
Necessary tools
Pliers
Step
5
Part to remove
Fuel tankhandle
Description
Precautions
(1) Push up the end of the cover
fitted to the handle with finger.
(2) Pull out the rubber tube used as
the air vent pipe.
(3) Remove two bolts (tank), and
remove the handle.
Necessary tools
10 mm box spanner
6
Rear cover
(1) Remove the rear cover at the
opposing side of the control
panel by unscrewing the four
M6 flange bolts.
10 mm box spanner
7
Fuel tank
(1) Loosen the set screw of the
strainer shaft at the rear of the
engine control switch.
(2) Remove two M5 flange bolts
clamping the front cover and
tank bracket together, and then
remove the fuel tank.
@Plus screw-driver
(See Fig. 10-5.)
Fig. 10-5
- 34 -
10 mm box spanner
Part to remove
Description
Precautions
(1) Remove two M5 flange bolts
clamping the front cover to
the base, and remove the front
cover.
Necessary tools
10 mm box spanner
(1) Using pliers, hold the fuel lige
clamp at the fuel support joint
of the carburetor (Ljoint directed downward), and pull it aside.
Then, pull out the line.
Be careful not to
damage the fuel line.
(See Fig. 10-6.)
Electrician's pliers
(1) Insert the tip of a screwdriver
into the groove of the choke
cable blacket and turn it to
remove the choke cable.
(See Fig. 10-7.)
@Minus screwdriver
CHOKE CABLE
FRONT COVER
CLAMP
M5 FLANGE BOLT: 2 pcs.
Fig. 10-7
Fig. 10-6
-35 -
Step
11
12
Part to remove
Muffler
cover
muffler
Base plate
and
Description
Necessary tools
(1) Remove the
outer cover; this is
done by removing
seven
M5
tapping screws.
(2) Remove one M6 x 12 flange bolt
of the muffler bracket, and two
M6 nuts from themuffler flange.
Then, remove the flange.
(3) Remove four M5 x 8 lock screws
from inside inside of the muffler
and remove the inner cover,
(1) Remove one set screwthe
of
earth wire which grounds the
rear housing and base plate
together.
(2) Remove four M5 x 10 bolts from
the bottom of thebase plate.
the removed screws
down into thecoolinn
air channel.
(See Fig. 10-8.)
10 mm box spanner
@Minus screwdriver
"77
+ Plus screw-driver
8 mm box spanner
A
MUFFLER COVER (INNER)
i
MUFFLER
I
M5 TAPPING SCREW: 7 pcs.
\
L
-~
-
Fig. 10-8
- 36 -
I
Step
Part to remove
Description
Precautions
Necessary tools
13
Recoil starter
(1) Remove the recoil starter from
the rear housing by removing
three M6 x 8 flange bolts.
(See Fig. 10-9.)
10 mm box spanner
14
Starter pulley
(1) Turn the starter pulley by hand
to set the piston to the compression stroke top (where the pulley
becomes heavy). Using a hammer,
strike the box wrench set over
the head of the through-bolt to
remove the bolt. Then, remove
the pulley.
(See Fig. 10-10.)
12 mm box spanner
FLANGE
/
~
Fig. 10- 10
Fig. 10-9
- 37 -
Step
Part to remove
Stator assembly
Description
Precautions
(1) Remove three M6 x 85 bolts
clamping the rear housing of the
stator assembly and the front
housing together.
Disconnect six wires from the
micro switch on the speed control unit. (50Hz/60Hz variable
type only)
(2) Remove the stator assembly from
the front housing. The stator and
rear housing are removed together
by using a plastic hammer to lightly strike the boss of the rear
housing.
(3) Remove both the capacitor and
(See Fig. 10-11.)
diode from the rear housing by
remving two M5 x 10 screws.
(4) Remove the wiring between the
stator and rear housing. Disconconnect three wires from the
diode, two wires from the capacitor and the ground wire from the
rear housing.
Fig. 10- 1 1
- 38 -
Necessary tools
10 mm box spanner
Plastic hammer
@Plus screw-driver
Part to remove
Description
Rotor assembly
(1) Insert a rotor-puller into the
rotor shaft andtighten it until
the rotor comes loose.
Spark plug cap
(1) Remove the plug cap from the
spark plug.
(2) Remove the clamp of the hightension cord.
Front housing and
center baffle
(1) Remove the front housing and
center baffle from the engine
main bearing cover by removing
three M6 x 25 mm bolts and one
M5 x 55 mm bolt.
Precautions
Rotor puller
(See Fig. 10-12.)
10 mm box spanner
FLANGE BOLT
CAP PLUG
SPARK
Fig. 10- 12
- 39 -
Necessary tools
I
Step
l9
I
I
1
I
Part t o remove
Air
I
Description
(1) Remove the center screw of the
air cleaner cover to remove the
cleaner cover, fdter element, and
element retainer.
(2) Remove the M5 screw at the lower
right inside the element chamber.
(3) Remove two M6 nuts clamping
the air cleaner and the carburetor
together to remove the air cleaner.
Necessary tools
Precautions
@Minus screwdriver
@Plus screw-driver
10 mm box spanner
I
I
AIR CLEANER CASE
ELEMENT
CENTER SCREW
- 40 -
Step
20
Part to remove
Governor and related
parts
Necessary tools Precautions
Description
(1) Remove the governor lever from
governor shaft.
Loosen the bolt
(unnecessary to the
remove it).
10 mm box spanner
(2) Remove the governor rod, rod
spring, and governor spring.
21
Speed control unit
(1) Remove the speed control unit
from the crankcase.
(1)’ Remove the voltage changeover
unit from the crankcase.
22
Carburetor
(1) Remove the carburetor from the
crankcase.
10 mm box spanner
BOLT & WASHER: 2
GOVERNORLEV
(VOLTAGE CHANGEOVER UNIT)
BOLT & WASHER
-41
-
pa.
Step
Part to remove
Description
Precautions
23
Head cover
(1) Remove two M5 screws from the
lateral side of the head cover to
remove the head cover.
24
Cylinder baffle
(1) Remove the M5 screw from the
main bearing cover to remove
the cylinder baffle.
Necessary tools
@Plus screw-driver
10 mm box spanner
@Plus screw-driver
t
M 5 SCREW & WASHER
I
CYLINDER BAFFLE
-42
-
Step
25
Part to remove
Spark plug
Description
Precautions
(1) Remove the spark plug from the
cylinder head.
I
Necessary tools
19 mm box spanner
~
~~~
26
Cylinder head
(1) Remove the sen M6 x 32 bolts to
remove the cylinder head.
(2) Remove the head gasket.
Mark the head gasket
10 mm box spanner
with itsmounting position accurately matching the cylinder head,
also mark t h e gasket
mounting face of the
cylinder head.
27
Intake valve and
Exhaust valve
(1) Remove both the inner and outer
tappet chamber covers from the
crankcase by removing two M6 x
12 bolts.
(2) Remove both the intake and
exhaust valves.
(3) Remove the valve spring and
retainer.
Be sure to position the
notch in the spring retainer’s outside periphery to
the front and hook the
minus screw-driver
(medium size) in the
recess (lower side) of
the retainer. Then,
pull the spring retainer
backward to remove it
SPARK PLUG
-43 -
I
10 mm box spanner
@Minus screwdriver
I
Step
28
Part to remove
Main bearing cover
Description
(1) Remove the Woodruff key from
the crankshaft,
(2) Remove five M6 x 25 bolts locking the main bearing cover from
the crankcase.
(3) Using a plastic hammer or a
similar tool, strike the main
bearing cover uniformly around
its periphery to remove the cover.
Precautions
10 mm box spanner
Be careful not todamage the lip of the oil
seal.
29
Camshaft
(1) Pull out the camshaft from the
crankcase.
Set the crankcase sideways so that it will not
fall and damage the
tappets.
30
Tappets
(1) Remove the tappets from the
crankcase.
Be sure to mark the
tappets to distinguish
them from each other;
one for the intake
vale and the other for
exhaust valve.
M6 BOLT & WASHER: 5 pcs.
- 44 -
Necessary tools
Plastic hammer
~~
Step
31
32
Part to remove
Connecting rod and
piston
Piston and piston
rings
Description
(1) Scrape off the carbon deposits
from the cylinder and piston head.
Push and open the bend ofthe
connecting rod lock washer, and
remove two bolts.
(2) Remove the lock washer and connecting rod cap from the crankshaft.
(3) Turn the crankshaft until the
piston comes to its topposition,
and push the piston from the
upper part of thecylinder.
(1) Remove two clips from the piston
pin and take out the piston pin.
Remove the piston from the
connecting rod.
(2) Each of the piston rings can be
removed from the pistonby opening wide the ring joint.
~
Precautions
C o n f m the mounting
direction of the oil
scraper.
l-
Necessary tools
@Minus screwdriver
Pliers
10 mm box spanner
(1) Replace these
clips with new
ones; do not
reuse them.
(2) Be careful not to
damage the minor
rod end.
(3) Be careful not to
open the ring
joint excessively.
Step
Part to remove
Description
33
Crankshaft
(1) Pull out the crankshaft from the
crankcase. If unable to pull it out
by hand,use a plastic hammer to
gently strike the main bearing
joint face, and pull the crankshaft
out.
34
Governor shaft
(1) Remove the clip of the governor
shaft, and pull out the governor
shaft from the crankcase.
GOVERNOR SHAFT
- 46 -
Precautions
Necessary tools
10-4 ASSEMBLY PROCEDURE
10-4-1 PRECAUTIONIN ASSEMBLY
(1) Thoroughly clean each part. When cleaning, take special care for the piston, cylinder, crankshaft, con-
necting rod, and bearing.
(2) Be sure to completely remove the carbon deposits on thecylinder head and piston head. Also, thoroughly clean and remove carbon depositsfrom each pistonring groove.
(3) Apply lubricating oil to the lip of each seal. Confirm that the lip of each oil seal is not damaged. If damaged, replace with a new one.
(4) Replace the gaskets and similar items with new ones; do not
reuse old gaskets.
(5) Replace the keys, pins, bolts, nuts, etc. withnew ones if necessary.
(6) Do not apply torque exceeding the specified value.
( 7 ) Apply lubricating oil to both moving and sliding parts when they are assembled.
(8) Prior to assembly, check the clearance of each part, and adjust it if necessary.
(9) When each of the main components are assembled, turn it by hand to check for smoothnessof rotation
and unusualnoise.
10-4-2 ASSEMBLY SEQUENCE AND PRECAUTIONS
(1) GOVERNOR SHAFT
Put the governor shaftinto crankcase, then drive the clip into position to secure the governor shaft.
(2) CRANKSHAFT
a) Insert the crankshaft into theball bearings of the crankcase.
b) Fig. 10-13 shows the dimentional tolerance of the crankpin.
,
OUTSIDE
[email protected]
DIAMETER
-0.050
Width 1 7 7 "
Fig. 10- 13
- 47 -
TOLERANCE
OF NEWLY INSTALLED PARTS
0.008L
-
Top ring
0.2L
0.4L
Second ring
0.2L
Oil ring
0.05L
Top ring
0.09oL
Second ring
0.060L
Oil ring
0.01OL
Thrust directional tolerance betweenthe cylinderand piston skirt
Clearance of piston ringjoint
Clearance between piston ring
1
II
Clearance
between
rod largeendand
[
Clearance between
connecting rod small
end
and
1
Insideandoutsidediameter
connecting
clearance
crankpin clearance Side
I
I
piston pin
-
-
0.4L
-
Spare rings
0.25L
-
-
0.135L
0.105L
Spare ring
0.065 L
0.037L
-
0.1 L
0.7L
-
0.01OL
~~
0.009T
Clearance between piston pin and piston pin hole
0.047L
-
0.063L
1
0.029L
-~
~~
-~
~
0.01OL
L = Loose
Table 10-2
T = Tight
NOTE: The clearance between the piston and cylinder is checked by measuring the clearance between the
piston and cylinder skirt.
(3) PISTON and PISTON RINGS
a) If a ring expander is not available, set the ring
joint at the first land of the piston, as shown in
Fig. 10- 14 so that the ring can be slided into its
groove.
OPEN ENDS OF
PISTONRINGS
NOTE: Be careful not to twist or expand excessively each ring. The oil ring is fitted first on to
the piston, followed by the second ring and top
ring.
The top andsecondrings must be fitted with
their marked sides kept up ward.
b) The connecting rod is assembled to the piston by the piston pin.
Fig. 10- 14
NOTE: Before assembly,apply sufficient lubricating oil tothe connecting rod small end.
NOTE: Be sure to fit the clips to both sides of the piston pin.
STD EQUIPMENT
c-
\
SPARE PARTS
Top ring
Taper
Taper
Second ring
Taper
Undercut
Oil ring
Fig. 10-15
- 48 -
I
I
(4) INSTALLINGTHE CRANKCASE
The connecting rod is put into the cylinder while
holding it with the piston
ring guide, as shown in Fig.
10- 16 (in the case that a piston ringguideis not
available, press rings inward with fingers and at the
same time, strike down the piston, using a wooden
block).The connecting rod mustbemounted
in
place with its @and MA marks directed to the ball
bearing side of the crankcase.
NOTE: Apply a sufficient quantity of oil tothe piston rings, connectingrod surfaces, andcylinder.
NOTE: The top, secondand oil rings are fitted to
the piston with their ring joints arranged 90 Oo ff each
adjacent joint
Fig. 10-16
(5) INSTALLINGTHECONNECTINGROD
MAJOR END CAP
a)Manually turn thecrankshaftuntilthepiston
reaches top dead center. Gently strike down the
piston head until the connecting rod touches the
crankpin to install the connecting rodmajor end
cap.
b) The cap is installed with the oil scraper positioned right-downward. (See Fig. 10- 17.)
NOTE: Besure to use a new lock washer; and
carefully bend the washer correctly.
NOTE: When the caphasbeen
installed, turn
the crankshaft to see if the connectingrod moves
smoothly,
NOTE: The correct torque for installing the connecting rod major end cap is 60 to 80 kg-em.
NOTE: See Table 10-2 for details regardingthe clearances between the piston, piston rings, and connecting rod and their counterparts.
(6) INSTALLING THE TAPPETS AND CAMSHAFT
Install the tappets, and then the camshaft.
NOTE: Align the timing mark at the base of the cam
gear with the timing mark of the crank gear. I f the
valve timing is set incorrectly, the engine will not
run or operate properly. (See Fig. 10-18.)
NOTE: I f the intake and exhaust valves areinstalled
in reverse order, tappet clearance will be incorrect.
Fig. 10- 18
- 49 -
(7) INSTALLINGTHEMAINBEARING
COVER
Install the main bearing cover to the crankcase.
NOTE: The governor gear is already mounted to the bearing cover; therefore, it is necessary to confirm that
the governor gear is meshed with the cam gear. (See Fig. 10-19.)
If the oil seal requires replacement, press-fit the new oil seal in position before installing the main bearing
cover.
NOTE: Prior to installation, apply oil to the bearing andoil seal. Applya small amount of oil to
the cover fitting face, as specified, in preparation for installing the bearing cover packing.Place the oil seal guide over the
crankshaft so that the oil seal lip will notbe damaged during installation. Make sure the the side clearanceof
the crankshaft is within 0 to 0.2 mm. I f necessary, adjust the clearance, using the adjusting collar, (See Fig.
10-20.1
NOTE: Torque for the main bearing cover:
80
N
100 kg-cm.
I
MAIN BEARING COVER
COVER BEARING
I
MAIN
COVERNOR GEAR
Fig. 10- 19
F& 10-20
*Shown in Fig. 10-21 is the method tomeasure the
side clearance of the crankshaft. According to this
method, measure the clearance between the machined face of the crankcase and the adjusting collar. The machined face of thecrankcase is mounted
with packing so it is necessary to set the clearance
properlyby allowing fora packing thickness of
0.22 mm.
M6 x 25 mm bolt
M6 x 5 5 mm bolt
DIAL GAUGE
HINED FACE OF
CRANKCASE
. . , , , . . . . . , , . 8 pcs.
. . . . . . . . . . . . . 1 PC.
Fig. 10-21
- 50 -
(8) INSTALLING THE INTAKE AND EXHAUST VALVES
Prior to installing, remove carbon and gum deposits from the valve, valve seat, intake and exhaustports, and
valve guide.
NOTE: If the valve face is worn, replace the valve with a new one.
NOTE: i f the clearance between the valve guide and valve stem
with a new one.
is excessively large, replace the valve guide
Replace the valve guide by using a pull block and pull bolt as shown in Fig. 10-23.
VALVE FACE
A L V E GUIDE
VALUESEAT
-L.EL
V A I VF SPRINT:
Fig. 10-23
~ V A L V ERETAINER
Fig. 10-22
A: Valvefaceangle
45O
B:
45O
Valveseatangle
C. Valveguideinsidediameter
-0.020
Intake valve
D: Valvestemoutsidediameter
Clearance (clearance between C and D l
between valve guide and valve stem
I
Exhaust valve
5'59 -0.032
I
-0.056
5*5' -0.074
Intake valve
0.020L
Exhaust valve
0.056L
-
-
0.050L
0.072L
L:
LOOSE
Table 10-3
- 51 -
(9)TAPPET ADJUSTMENT
Set the tappet at the lowest position t o depress the valve. Then measure the clearance between the valve and
tappet stem, using a clearance gauge inserted into theclearance. (See Fig. 10-24.)
-
NOTE: As with the intake and exhaustvalves, the clearance between the valve and tappet stem must be0.08
0.12 mm.
~
INTAKE & EXHAUST
VALVE
VALVE
SPRING
GAUGE
I
1
Fig. 10-25
Fig. 10-24
NOTE: I f the clearance is smaller than that specified, slightly grind down the valve stem end usinga grinder,
then measure the clearance.
I f the clearance is larger than that specified, repace the valve with a new one. Spot the valve seat and use
some compound to adjust the clearance.
NOTE: After completing adjustment of tappet clearance, install the valve spring retainers, andthen recheck
the tappet clearance.
Installing the valve spring retainer
Using the special tool, place the retainer over the
valve stem with the notch in the outside
periphery
of
front.
retainer
toward
kept
the
@+
FRONT
(10) INSTALLINGTHECYLINDERHEAD
Fig. 10-26
Before reinstalling the cylinder head, be sure to remove carbon deposits from the combustion chamber, and
clean between the cooling fins. Also check the cylinderhead for levelness.
NOTE: Replace the cylinder head gasketwith a new one.
The cylinder head is installed using seven M6 x 32 mm bolts.
NOTE: Torque for each cylinder head bolt: 90
-
1 10 kg-em
(11) INSTALLING THE SPARK PLUG
Torque for sparkplug: 120
- 150 kg-cm
(12) INSTALLINGTHECYLINDERBAFFLE
The cylinder baffle is installed to the crankcase, using the M6 x 20 mm screw and to the main bearing cover,
using the M5 x 10 mm screw.
The cylinder baffle and fuelline clamp are installed together to the crankcase.
- 52 -
(13) INSTALLINGTHEHEAD
COVER
The head cover is installed over each of the left and right parts of the cylinder head, using the M5 x 10 mm
screws.
(14) INSTALLING THE GOVERNOR AND RELATED
PARTS
Model EY08D has a centrifugal weight type governor which is installed while engaged with the governor gear.
With the governor, the throttle valve of the carburetor is controlled automatically by using a lever link mechanism. Therefore, engine speed is constantly maintained even under load variations.
a) Using two M6 x 12 mm bolts, install the speed control assembly to the crankcase.
b) Temporarily install the carburetor with two M6 flange nuts.
c) Join the throttle lever and governor lever of the carburetor to thegovernor rod and rod spring.
nswt the unv~rnnrlprrpr Into thn
m-nrernot aheft
1
x
I
I
.-
e) Insert a minus screwdriver into the groove of the governor shaft, and turn the screwdriver fully in the
clockwise direction. Push the governor lever clockwise (at this time, the throttle valve is fully opened)
and fasten the governor lever with the lock bolt.
Torque for thegovernor lever: 70 90 kg-cm
Link the governor lever and speed controller with the governor spring, one of which is inserted into the
center hole (of the three) of the governor lever and the remaining end inserted into the hole of the speed
controller.
-
Fig. 10-27
Fig. 10-28 (5OHz/6OHz VARIABLE TYPE)
SPEED CONTROL
LEVER
ADJUSTING SCREW
(15) INSTALLING THE CARBURETOR AND AIR CLEANER
Place the carburetor gasket, insulator,gasket, and carburetor in the correct positions. Next, fit the air cleaner
gasket and air cleaner case, and install them, using the M6 nut and M5 x 10 mm screw. Set the element(small
type), element retainer, elementand cleaner cover, and tighten them with screws (slot head type).
Torque for installing carburetor: 90 100 kg-cm
-
NOTE: See page 59 for details concerning disassembly and assembly
of the carburetor.
(16) INSTALLING THE CENTER BAFFLE AND FRONTHOUSING
Set the dowel pin hole of the front housing to the dowel pin of the main bearing cover and assemble them
together. During assembly, place the center baffle between the main bearing cover and front housing.
Torque for the front housing:80 100 kg-cm
-
(17) INSTALLINGTHEIGNITION
COIL
a) Install the ignition coil and grommet (IG-COIL) to the front housing. Simultaneously, set temporarily
the generator rotor in position. And assemble the ignition coil and magnet together while adjusting the
air gap between the two to0.4 to 0.5 mm.
Firmly bond the grommet to the front housing ensuring that there is no residual clearance. (Use CEMEDINE 575).
b) Fit the plug cap on the spark plug.
(18) INSTALLING THE ROTORASSEMBLY
Install the rotor assembly to the taperof the crankshaftwith their keyways in line.
NOTE: Thoroughly clean the tapers (both male and female tapers)of oil or grease before assembly.
(19) INSTALLINGTHE STATORASSEMBLY
a) Install the stator correctly into therecess of the rear housing. Note the leads and their positions.
b) Install the wiring betweenthestatorand
rear
housing. Connect the wires from the stator to
the condenser (with these
wires joined to two
black top terminals). Also connectthe wires
from the stator to the rectifier (with these wires
joined to threeterminals.)
Connecttheground
cord to the rear housing,
using one M6 x 8 mm screw.
c) Install the stator assembly correctly into the recess of the front housing. If necessary, strike softly the
rear housing with aplastic hammer (be careful not tostrike the condenser and rectifier).
d) Fasten the front housing to therear housing of the stator assembly, using three M6 bolts, while the three
bosses of the front housingare set to their counterpartsof the rear housing.
Torque for each bolt:65 510 kg-cm
e) Clamp the lead of the 6P coupler and the lead from the ignition coil to the bolts specified in paragraph
d), using wire bands.
(20) INSTALLING RUBBER MOUNT (A)
a) Fit rubber mount (A) to the
bosses (two) at the lower center of the crankcase.
b) Also fit another rubber mount (A) to the
bosses at the lower part of the stator assembly of the generator.
- 54 -
(21) INSTALLING THE STARTER PULLEY
Install the starterpulley to the rotor shaft
using the rotor through bolt.
Torque for the through bolt:100 150 kg-cm
-
(22) INSTALLING THE RECOIL STARTER
Install the recoil starter to therear housing using the M 6 flange bolt.
(23) RUBBER TUBE FOR BREATHER
Connect rubber tube to theair vent jointof the carburetor.Keep this rubbertube suspended downward from
the air vent joint.
(24) INSTALLING THE BASE FRAME
a) Install the base frame with its rearside facing the
welded nut area of rubber mount (A). Match the
rubber mount (A) which is fitted to the lower
part of the engine and generator. Base plate is installed using four M5 bolts.
b) Insert rubber tube from the air vent joint of the
carburetor into thehole in the base frame.
c) Fasten the ground terminal to the
rear housing
using M 6 bolt.
Fig. 10-31
(25) INSTALLING THE MUFFLER AND MUFFLER COVER
a) Fit the gasket (for the mufflercover) to the studs of the exhaust
flange of the crankcase.
b) Using M5 screws, install the muffler cover in place.
Note: Be careful not to drop the screws into the cooling air channel.
c) Set the gasket (for the exhaust port) on the studs of the exhaust port flange. Then, mount the asbestos
to the upper and lateral sides of the muffler. The muffler is installed while secured to themuffler flange
using two M6 nuts, and also to themuffler bracket by using one M6 bolt.
d) Install the outer muffler cover in place using seven M5 tapping screws.
Torque: 70 90 kg-cm
-
(26) INSTALLING THE CHOKE CABLE
a) Insert the innerwire of the choke cable into the swivel of the choke lever.
b) Insert the outer end of the choke cable into the wire bracket of the carburetor, and temporarily tighten
the outer endso that itwill not slip out of the wire bracket.
NOTE: The inner wire is installed later. Leave it loose in the swivel.
(27) INSTALLING THE FUELLINE
a) Connect the fuel line to the inlet joint of the carburetor. Then,clamp the line with a hose clamp so that
it will not come off the line joint.
b) Secure the fuel line with the clamp of the cylinder baffle.
- 55 -
(28) INSTALLING THE FRONT COVER
Using two M6 x 8 mm flange bolts, install the front cover assembled with the control panel to the
base plate.
Keep the engine switch set at STOP.
(29) INSTALLING THE FUEL TANK
a) Keep the strainer shaft at the lower part of the fuel tank in a position that will allow the setscrews to be
tightened from the opposite direction of themuffler.
b) Insert the flexible shaft extending from the rear side of the engine switch which is mounted on the control panel into the square hole of the strainer shaft.
c) Align the mounting holes at the lateral side of the front cover with those in the bracket which are bolted
to thefuel tank. Then,install the fuel tank,using two M6 x 8mm flange bolts.
d) Make sure that the flexible shaft on the control dial side is inserted in the square hole of the strainer
shaft, then fasten the flexible shaft.
(30) INSTALLING THEREARCOVER
Align the mounting holes at the lateral side of the rear cover with those in the fuel tank bracket. Then
install
the rear cover, using two M6 x 8 mm flange bolts. Also align the holes at the lower part of the rear cover with
those in the base plate, and install therear cover by two M6 x 8 mm flange bolts.
NOTE: Pull out the fuel drain pipe of the carburetor through the hole on the rear cover. The frequency
changeover switch knob haveto be drawn out through the rubber shield.
(31) INSTALLING THE FUEL TANK HANDLE
a) Set the bolt (to secure the tank handle) in the handle and assemble the O-ring to this bolt from the o p
posite side. Then, tighten the boltto install the handle to the fuel tank.
NOTE: Be sure to direct the less slanted part of the handle toward the front cover.
b) Insert the rubber tube end over the protrusion of the bolt (for the fuel tank) and push it down to the
base of the protrusion.
NOTE: Be sure to keep the air breathe holeat the center of the rubber tube directed upward.
c) Place the handle cover over the handle.
(32.)INSTALLING THE FUELLINE
Insert the fuel line end over the fuel strainer joint (besure to push the line end down to the jointbase), and
secure it with theclamp.
(33) INSTALLING THE CHOKE CABLE
a)
b)
c)
d)
Insert the choke cable adjusting screw in its holeon the fuel tank bracket.
Secure this adjusting screw with the M6 nut and tighten to themidway point of the threaded part.
Set the dial of the control panelt o STOP, and connect the chokecable end to the lever of the panel.
Pull the inner wire of the choke cable t o clamp the wire to the choke-lever, using the setscrew.
(34) CONNECTING THE COUPLERSTOGETHER
Connect the coupler (6P) from the generator to the coupler (6P) extending from the control
panel.
Also connect the stopwire (green) as required.
- 56 -
(35) INSTALLING THE LEFT SIDECOVER
Pull out the starter handle through the cover and install the left side cover to the generator with four M5
flange screws.
(36) INSTALLING THE RIGHT SIDECOVER
Fit the foam rubber stuck inside of the right side cover to the air outlet window of the muffler cover, and
install the cover to thegenerator with four M5 flange screws.
- 57 -
10-5 CARBURETOR
10-5-1 FUNCTION AND COMPONENTS (See Fig. 10-32)
( 1 ) FLOAT SYSTEM
The float chamber is located directly under the carburetor. Float and needle valve maintain a constant fuel
level inside the float chamber.
The fuel in the tank flows into the float chamber from the needle valve. When a certain quantity of fuel
enters the chamber, the float rises. When the buoyancy of the float balances with the fuel pressure at the
needle valves, the valve closes to keep the fuel at the correctlevel.
SCHEMATIC DIAGRAM OF THE FUEL SYSTEM
'
FLOAT
MAINNEEDLE
MAINAIR
MAIN
JET
/
FLOAT
NEEDLEVALVE
JET
Fig. 10-32
- 58 -
(2) PILOT JET NOZZLE SYSTEM
The pilot jet nozzle system controls the fuel supply for engine speeds ranging from idle to low-speed running.
The system operates with the fuel flowing through the main jet nozzle and up to the pilot jet nozzle where
the fuel is measured. When the fuel is mixed with air, the volume of the air-fuel mixture is also measured
by the pilot air jet. From this stage, the mixture is supplied to the engine from the pilot outlet and bypass.
During idle, fuel is supplied mainly from the pilot outlet.
(3) MAIN JET NOZZLE SYSTEM
The main jet nozzle system supplies fuel for middle and high speed operation. The fuel flows to the main jet
nozzle where the fuel quantity is measured, and then flows to the main nozzle. Air volume, which is measured
by the main air jet, enters from the breath
hole of the main nozzle and mixes with fuel to form a gas mist.
The gas mist flows out of the main bore and is again mixed with air from the air cleaner. From this stage, the
correct air-fuel mixture is supplied to theengine.
(4) CHOKE
The choke helps in starting the engine in cold weather.
When the engine is started with the choke valve closed, negative pressure applied to the main nozzle rises,
allowing most of fuel to flow through themain nozzle.
A mixture with ahigh gasoline concentration is fed to theengine resulting in easier engine starting.
10-5-2 DISASSEMBLY AND ASSEMBLY OF CARBURETOR
The most common trouble with the carburetor is failure to provide the correct air-fuel mixture. This is generally caused by blockage in the air and fuel passages, at other times it is caused by fuel level fluctuations in
the float chamber. In order to maintain the carburetor in normal operating condition, it is vital that the air
and fuelpassages be kept clean. The following descriptions arethe procedures for carburetor disassembly and
assembly. (See Fig. 10-33.)
(1) THROTTLE MECHANISM
a) Remove Philips-head screw (27), throttle valve (28), and pull out the throttle shaft (29).
b) When removing the throttle stop screw, a spring (31) will also come off. Be careful when handling the
throttle valve to prevent the valve edge from damage.
(2) CHOKE
a) Remove Philips-head screw (22), choke valve (23), and pull out choke shaft (24).
b) Be sure t o keep the notch of the choke valve positioned forward the main air jet side when the choke
shaft is installed.
(3) PILOT JET NOZZLE
a) Remove pilot jet nozzle (21). When removing, use a proper tool so that the nozzle will not be damaged.
b) Firmly secure the jet nozzle when the carburetor is assembled. Otherwise, fuel will leak from the nozzle
and cause engine trouble.
(4) MAIN JET NOZZLE
a) Remove bolt (1 9 , and float chamber body (1 3).
b) Remove main jet nozzle (1 9) from carburetor body (9).
c) Firmly secure the main jet nozzle when assembling. Otherwise, air-fuel mixture will become excessively
rich and the engine will not operate properly.
d) Torque for bolt (1 5) is 70 kg-cm.
- 59 -
(5) FLOAT SYSTEM
Pull out float pin(1 2) and remove float (1 1) and needle valve (20).
0 Avoid using a drill or a wire to clean the fuel passages (they may damage the orifice of the pilot and main
jet nozzles). Use compressed air.
The float pin is peen-secured to the carburetor body; theneedle valve and float can be removed out from
the opposite side of the peen-secured part by lightly striking the floatpin with a thinbar-like object.
13
a
17 16
14
15
A
Fig. 10-33
- 60 -
I
18
10-6 FREQUENCY CHANGEOVER SYSTEM (50 Hd60 Hz Selectable TYP)
10-6-1 CONSTRUCTION AND FUNCTION
When the control lever (1 3) is turned t o upper position, thelever (1 2)is pulled back by the governor spring
(10) to decrease the spring force of the governor spring to set theengine speed at 3,000 rpm (50 Hz).At the
same time, the cam (1 4) combined with the controllever (1 3) releases the micro-switches (1 8) to switch the
circuits in the condenser coil and the main coil from 60 Hz to 50 Hz.
When the control lever (13) is turned to lower position, the adjusting screw (22) on the control lever pushes
the lever (12) to pull the governor spring (10) increasing the spring force to set the engine speed at 3,600
rpm (60 Hz).
At the same the cam (14) pushes the micro-switchs (18) to switch thecircuit from 50 Hz to 60 Hz.
The frequency of the output electricity
the screw (21) for 50 Hz.
can be adjusted by turning the adjusting screws (22) for 60 Hz or
23
SCREW
ADJUSTING SCREW (50Hz)
ADJUSTING SCREW
BRACKET
/
10
WJ
"2"
"/
GOVERNER SPRING
16
SPRING
Fig. 10-34
-61
-
CONTROL
LEVER
GOVERNOR
SPRING (10)
LEVER (12)
CAM (14)
CONTROL LEVER (13)
ADJUSTING SCREW (22)
(FOR 60Hz)
ADJUSTING SCREW (21)
(FOR =Hz)
MICRO-SWITCH (18)
Fig. 10-35
10-6-2 DISASSEMBLY
1) Unhook the spring ( 16) and remove the control lever (13) with knob (1
5).
2) Remove the clip (9) t o disassemble the lever (12) and cam (14).
3) Remove two screws (1 9) to detach themicro-switches (1 8).
-62
-
11 TROUBLESHOOTING
In troubleshooting the generator, you will encounter certain categories of problems.
It is important tocheck each component step by step.You
will certainly find the cause of any trouble through
a systematic Troubleshooting.
11-1 ENGINE DOES NOT START OR ENGINE DOES NOT RUN NORMALLY,
11-1-1 CHECK THE BASICS
1) The control switch should be in the “CHOKE”position. If the engine has already been warmed up, the
control switch should be in the “RUN” position.
2) There should be sufficent gasoline in the fuel tank.
3) The spark plug cap should fit snugly on the spark plug.
4) All electric appliances should either be disconnected from the generator or their switches shouldbe turned off. A generator often will not start if a load is already turned “ON” at starting.
11-1-2 CHECK THE IGNITION SYSTEM
(1) CHECKING SPARK AT SPARK PLUG
Open the spark plug cover and remove the plug cap.
Remove the spark plug and check to see that it is clean and has an adequate plug gap. Use the correct spark
plug, NGK BMR4A or CHAMPION PCJ8.
Keep the plug gap between 0.6 0.7 mm (0.02 0.03 in.).
-
-
rn
Insert the spark plug into the plug cap.
rn
Ground the metal body of thespark plug against the metal part of the generator.
rn
Set the control switch in the “RUN” position, pull the starter handle and check the spark. If the spark is
strong, the ignition system is normal. If the spark is weak, or if there is no spark at all, the ignition system
is defective.
(2) CHECKINGIGNITIONCOIL
If a strong spark is not produced at spark plug, the
next step is to check the ignition coil.
rn
Remove the side covers left and right.
rn Remove the muffler cover, muffler and the inner
muffler cover.
w Using a circuit tester, check the resistance be-
ween the green wire and the core of the ignition
coil.
NORMAL RESISTANCE
HIGH-TENSION CORD-GREEN WIRE
1
Fig. 1 1 - 1
-63 -
~
~~~~
CORE-GREEN WIRE
I
11-1-2 CHECK THE FUEL SYSTEM.
Fig. 1 1-2
(1) CHECKING THE FUEL IN THE FUEL TANK
Deteriorated fuel or the water mixed in the fuel
causes bad starting.
If the fuel is deteriorated or the water is mixed, drain the tank and carburetor completely then refuel the
fresh gasoline.
NOTE: Sometimes when a generator is stored for more than a few months, the gasoline in the tank deteriorates until it lost so much volatility that starting becomes difficult, In that case, replace the fuel with fresh
gasoline.
(2) CHECKING THE FUEL FILTER
There are two types of fuelfilter attached to the
generator.
The first type is a disposable filter put in the middle
of the fuelline.
The second type is a fine mesh filter built inthe fuel
cock.
The first type (Disposable type)
Disconnect the fuel lines and replace the fuel filter with anew one.
FUEL FILTER
rn The second type (Filter built in fuel cock)
a) Remove the fuel tank following the disassembly procedures.
Fig. 11-3
b) Remove the fuel cock from the tank.
c) Clean the
mesh
filter
(1 8).
17
d) If the gaskets (1 5) are broken, replace them with
new ones at re-assembly.
FUEL FILTER
Fig. 11-4
- 64 -
(3) CHECKING THE CARBURETOR
w Remove the carburetor from engine.
w Remove the float chamber from the carburetor and check to see if the main jet or the pilot jet has been
clogged up. (Refer to Section 10-5-2 on
page 59.)
Use a compressor andhigh-pressure air to blow the clogged dust or gum out of the jets and fuelpassage.
Remove the float pin and the float.
Check the needle valve.
If the needle valve is worn, replace it and the valve seat.
w Clean and re-assemble the carburetor.
11-1-3 CHECK THE COMPRESSION
If the engine’s starting difficulty or power drop has not been caused by a faulty ignition or fuel system, the
final step is to check the compression of the engine.
1) Check the spark plug.
Loose or broken spark plug can cause low compression. If the spark plug is broken, replace with a new
one.
2) Check the head gasket.
Remove fuel tank, head cover and cylinder head to check the head cover.
If the head gasket is broken, replace it with anew one.
3) Remove carbon deposits from the cylinder head and piston top.
4) Check and adjust the tappet clearance.
5) Check the valve system.
Remove any carbon deposits from thevalves, valve seats, intake and exhaust ports andvalve guides.
If the valve face or the valve guide is worn, replace it.
Check and adjust the tappet clearance when reassembling. (Refer to Sections 10-4-2-(8) and 10-4-249)
on pages 5 1 and 52.)
6) Check the piston and piston rings.
If the compression is still not sufficient, you’ll have to dismantle the engine and examine thepiston and
piston rings.
rn Disassemble the engine and remove the piston and piston rings.
Check the piston rings and grooves.
Clean off any carbon or gum deposits from the
piston rings and grooves.
If a piston ring is worn, replace with a new one. (Referto Section 10-4-2-(3) onpage 48.)
- 65 -
(28) INSTALLING THE FRONT COVER
Using two M6 x 8 mm flange bolts, install thefront cover assembled with the control panel to the base plate.
Keep the engine switchset at STOP.
(29) INSTALLING THE FUEL TANK
Keep the strainer shaft at the lower part of the fuel tank in a position that will allow the setscrews to be
tightened fromthe opposite direction ofthe muffler.
Insert the flexible shaft extending fromthe rear side of the engine switch whichis mounted on the control panel into the square hole ofthe strainer shaft.
Align the mounting holes at the lateral side of thefront cover with those inthe bracket which are bolted
to the fuel tank. Then, install
the fuel tank, using two M6 x 8mm flange bolts.
Make sure that the flexible shaft on the control dial side is inserted in the square hole of the strainer
shaft, then fasten the flexible shaft.
(30) INSTALLING THE REAR
COVER
Align the.mounting holes at the lateral side ofthe rear cover with those inthe fuel tank bracket. Theninstall
the rear cover, using twoM6 x 8 mm flange bolts. Also align the holesat thelower part of the rear cover with
those in the base plate, and install the rear cover by twoM6 x 8 mm flange bolts.
NOTE: Pull out the fuel drain pipe of the carburetor through the hole on the rear cover. The frequency
changeover switch knobhave to be drawn out through the tubber shield.
(31) INSTALLING THE FUEL TANK HANDLE
Set the bolt (to secure the tank handle) in the handle and assemble the O-ring to this bolt from the o p
posite side. Then, tightenthe bolt to install the handle to the fuel tank.
NOTE: Be sure to direct theless slantedpart of the handle toward the front cover.
Insert the rubber tube end over the protrusion of the bolt (for the’fuel tank) and push it down to the
base of the protrusion.
NOTE: Be sure to keep the airb k t h e hole at the center of the rubber tube dimcted upwrd.
Place the handle cover overthe handle.
(32) INSTALLING THE FUEL LINE
Insert the fuel line end over the fuel strainerjoint (be sureto push the line end downto the joint base), and
secure it with the clamp.
(33) INSTALLING THE CHOKE CABLE
a) Insert the choke cable adjusting screwin its hole on the fuel tank bracket.
b) Secure this adjusting screw withthe M6 nut and tighten to the midway point of the threaded part.
c) Set the dial of the control panelto STOP, and connectthe choke cable endto the lever of the panel.
d) Pull the inner wire of the choke cable to clamp the wire to the choke-lever, usingthe setscrew.
(34) CONNECTING THE COUPLERS TOGETHER
Connect the coupler (6P)from the generator to the coupler (6P)extending fromthe control panel.
Also connect the stop wire (green) as required.
-56-
i
3
rn Usually the instrument is expensive and difficult to obtain, we suggest instead that
denser and see if the generatorworks.
If the generatorworks with a new condenser, the old one is defective.
( 6 ) Check the rotor.
rn Disassemble the generator to remove the rotor.
rn
Unsolder the diode and the resister from the rotor
terminal. Unsolder one wire of each part.
Fig. 11-5
rn Check the resistance between the wire ends of ro-
tor winding at the terminals.
I
NORMAL RESISTANCE
I
11.5!2
I
If the resistance is muchdifferent,therotor
difective.
is
I
W
Fig. 11-6
rn Check the insulation
resistance across one of the
soldered terminals and the rotor core using a megger tester.
If the resistance is less than 1 Ma,the insulation
is faulty.
Replace the rotor with a new one.
Fig. 7 1-7
- 67 -
you install a new con-
n
Check the resistance of the resistor.
I
I
NORMAL
RESISTANCE-^
I
1552
Fig. 11-8
Check the diode.
Touchthe positive (RED)probe of thecircuit
tester to the cathode mark side of the diode, and
touch the negative (BLACK) probe to the other
side of the diode.
Normal resistance is 16s1.
Reverse the polarity of the circuit tester.
At this time, theresistance is infinity.
[ RemedyI
If the diode is defective, replace with a new one.
Fig. 11-9
I
_I
NORMAL RESISTANCE
NORMAL RESISTANCE
I
16S2
I
00
A
-
f
CATHODE MARK
Fig. 1 1 - 10
- 68 -
CATHODE MARK
11-3 NO DC OUTPUT
( 1) Check the DC circuit breaker.
rn Examine the DC circuit breaker to make sure it is in the “ON” position.
* Sometimes, when a battery with a large capacity is being charged, the charging current exceeds the maximum DC output the generatorcan produce.
This causes the circuit breaker to pop into the “OFF”position.
When this is the problem, advise your customer to use a battery charger and take the power from theAC
receptacle.
(2) Check the AC output.
rn Using a circuit tester, check the AC voltage at theAC receptacle.
If no AC voltage is being produced, check the generator following the procedure outlined in Section 1 1-2.
(3) Check the DC coil.
rn
Remove the left side cover, right side cover, front panel and the recoil starter.
rn
Disconnect the green wire and white wire from the rectifier.
Check the resistance between these wires with a circuit tester.
NORMAL RESISTANCE
GREEN-WHITE
(4) Check the diode rectifier.
Refering to Section 9-6 on page 29, check the resistance between the terminals of the rectifier with acircuit
tester.
If the rectifier is defective, replace it with a new one.
11- 4 OUTPUT VOLTAGE IS NORMAL AT NO-LOAD,
BUT GENERATOR WON‘T WORK ON-LOAD.
( 1) Check the engine speed.
-
Start the engine and check the engine speed at no-load.
Adjust the engine speed to 3,100 3,150 r.p.m. for50 Hz type, and 3,700 3,750 r.p.m. for 60Hz type.
-
(2) Check for over-load.
Check the total wattage of the load(s) applied to thegenerator.
If the generator is over-loaded, remove or turn offsome of the appliances.
(3) Check the appliances.
Check the appliances for defects. If any are defective, repair or replace them.
- 69 -
(4) Check the generator insulation.
(Stop the engine.)
Measure the insulation between thelive part (AC
receptacle) and the ground terminal.
Any part with an insulation resistance of less than
1 Mi2 has faulty insulation that could cause electric shock orleakage.
Replace any such parts.
Fig. 1 1 - 11
( 5 ) Check the generator for overheating.
Remove any obstacles that are clogging or blocking
the cooling air inlet or the cooling air outlet.
ING AIR INLET
Fig. 1 1- 12
- 70 -
12. CIRCUITDIAGRAMS
12-1 5OHd6OHz VARIABLE TYPE
4Circuit
Main coil
/Rectifier
"
"
"
breaker
Resistor
L
"
"
"
Pilot lamp
AC
receptacle
DC ( + )
terminal
DC ( - 1
terminal
Voltmeter
Spark p l u g / i
Micro.switch
Voltage
Stop-switch
110v
I
220,240V
1
white
white/green
12-2 6OHz-120V TYPE
,Rectifier
Spark plug
,Circuit breaker ,Resistor
"i-r
\
- 71 -
Stop-switch
-MEMO
MEMO-
"MEMO