1
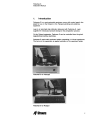
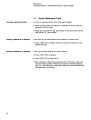
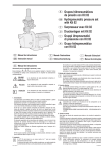
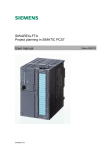
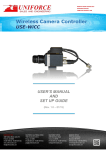
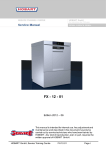
Pedemax-S
Instruction Manual
Sor~aINo.:
V/Hz:
Art.No. 14807000 Date: 21.01.1993
Pedemax-S
Instruction Manual
Pedemax-S
Safety Precaution Sheet
To be read carefully before use
1. The operator should be fully aware of the use of
the machine according to the Instruction Manual.
The machine must be placed in an adequate
working position.
4.
Do not touch the rotating parts during operation.
2. Be sure that the actual voltage corresponds to
the voltage stated on the back of the machine.
The machine must be earthed.
5.
If you observe malfunctions or hear unusual
3. The specimens must be properly fixed in the
specimen holder, e.g. using a Struers Uniforce
levelling apparatus. The specimen holder must
be mounted correctly in the quickcoupling.
6.
noises stop the apparatus and call technical service.
-
Blue lubricant: follow the current safety rules
for handling, mixing, filling, emptying and
disposal of the alcohol-based lubricant.
The apparatus/machine is designed for use with consumables
supplied by Struers. If subjected to misuse, improper installation,
alteration, neglect, accident or improper repair, Struers will take no
responsibility for damage(s) to the user or the equipment.
Dismantling of any part of the apparatus/machine, in case of service
or repair, should always be performed by a qualified technician
(electromechanical, electronic, mechanical, pneumatic, etc.).
/#SIn’ers
Pedemax-S
Instruction Manual
IMPORTANT
Always state Serial No and Voltage/frequency if you have technical questions or
when ordering spare parts. You will find
the Serial No. and Voltage on the front
cover of this manual or on an attached
label below. If in doubt consult the rating
plate of the machine itself.
We may also need the Date and Article
No of the manual. This information is
found on the front cover.
The following restrictions should be observed,
as violation of the restrictions may cause
cancellation of Struers legal obligations:
Instruction Manuals
A Struers Instruction Manual may only be used
in connection with Struers equipment covered
by the Instruction Manual.
Service Manuals
A Struers Service Manual may only be used by
a trained technician authorized by Struers. The
Service Manual may only be used in connection
with Struers equipment covered by the Service
Manual.
Struers assumes no responsibility for errors in
the manual texvillustrations. The information in
this manual is subject to changes without notice.
The manual may mention accessories or parts
not included in the present version of the
equipment.
The contents of this manual is the property of
Struers. Reproduction of any part of this manual
without the written permission of Struers is not
allowed.
All rights reserved. © Struers 1993.
Struers Tech A/S
Valhejs Allé 176
DK-2610 Radovre/Copenhagen
Denmark
~ Telephone +45 36 70 80 90
~ Fax +4531 41 6544
Table of contents
Page
1
Introduction
7
2.
Operation
8
3.
Preparation of specimens
15
4..
Maintenance
16
5.
Accessories
17
6.
Installation
18
7.
Trouble-shooting
22
8.
Spare parts and diagrams
9..
Technical data
30
10.
Index
31
11
Quick Reference Card
32
/#Slniers
.
23
Pedemax-S
Instruction Manual
1.
Introduction
Pedemax-S is a semi-automatic specimen mover with control panel, designed for use on the Rotopol or the Planopol grinding and polishing
apparatus.
Lupo is an automatic drip lubricator delivered with Pedemax-S. Lupo
supplies the necessary lubricant dosing for the preparation process.
On the Rotopol apparatus, Pedemax-S can be controlled from the grinding/polishing machine (start/stop).
Pedemax-S works with specimen holders containing 3-12 fixed specimens.
The force on the specimens is applied centrally on the specimen holder.
Pedemax-S on Planopol
Pedemax-S on Rotopol
/#Sbiers
7
Pedemax-S
Instruction Manual
2.
Operation
Page
Operation of Pedemax~S
Controls on Pedemax-S
Pedemax-S on Rotopol
Pedemax-S on Planopol
Pedemax-S modes and parameters
Change of grinding/polishing disc
9
10
11
12
12
Operation of Lupo
Controls on Lupo
Lupo control modes
Daily use of Lupo
Changing to another Lupo unit (accessory)
Changing lubricant type/refilling
8
13
13
14
14
14
Pedemax-S
Instruction Manual
\(~~1
2.1
Operation of Pedemax-S
2.1.1
Controls on Pedemax-S
Force
Adjust force up or down according to the arrows. The force is shown in the
display as Newton (N).
Time
Adjust preparation time up or down according to the arrows. The time is
shown in the display as min:sec.
Auto
Auto
Rotopol only: when Auto Mode is active, start and stop of Pedemax-S can
be controlled from Rotopol. When the Rotopol apparatus is stopped,
Pedemax-S is automatically set to “Pause”.
Start
On Rotopol: starts Pedemax-S when not in “Auto mode”.
On Planopol: starts Pedemax-S manually.
Stop
On Rotopol: stops both Pedemax-S and Rotopol.
On Planopol: stops Pedemax-S manually
Main switch
Turn the main switch on the back of the apparatus to “On”. All lights flash
and a beep is heard. “Power” and the “Stop” button light up. The word
“Pedemax-S” and the version number of the apparatus will appear on the
display for a few seconds. The display shows the default parameters:
force 120N and time 1 min:00 sec.
Locking handle
Horizontal positioning of Pedemax-S is accomplished by unlocking the
handle, i.e. raising the handle to upright position.
/#Sln’ers
9
Pedemax-S
Instruction Manual
2.1.2 Peclemax-S on Rotopol
a Place the specimen holder under the quick-coupling.
a Keep pressing the black button while leading the force tap of the
specimen holder into the coupling. Turn the specimen holder until a
click is heard. Release the black button (see photo).
a Set the necessary parameters on the front panel (see Section 2.1.4,
Pedemax-S modes and parameters and Section 3, Preparation of
specimens),
• Set Lupo (if you need lubricant) and Pedemax-S to Auto mode.
a Press WATER ON
on Rotopol (for wet grinding).
a Unlock Pedemax-S by raising the locking handle.
• Place Pedemax-S in the appropriate eccentric position in relation to the
grinding disc. Lock Pedemat by lowering the locking handle.
a Press START
on Rotopol. (If not in Auto mode, Pedemax-S will
have to be started separately).
a When the preset time expires, Rotopol, Pedemax-S and Lupo stop
automatically (in Auto mode).
a Unlock Pedemax-S by raising the locking handle.
a Keep your hand under the specimen holder and remove it from the
quick-coupling by pressing the black button on the front of the cylinder
head.
Pause
10
©,
If Podemax-S is stopped by pressing Rotopol STOP
Pedemax-S
goes into “Pause”. When you start Rotopol again, Pedemax-S and the
countdown of the preset time will continue.
Pedemax-S
Instruction Manual
2.1.3 Pedemax-S on Planopol
a Place the specimen holder under the quick-coupling.
a Keep pressing the black button while leading the force tap of the
specimen holder into the coupling. Turn the specimen holder until a
click is heard. Release the black button (see photo).
a Set the necessary parameters on the front panel (see Section 2.1.4,
Pedemax-S modes and parameters and Section 3, Preparation of
specimens),
-
a Set Lupo (if you need lubricant) to Auto mode.
a Unlock Pedemax-S by raising the locking handle.
a Place Pedemax-S in the appropriate eccentric position in relation to the
grinding disc. Lock Pedemat by lowering the locking handle.
a Activate the cooling water (wet grinding).
a Press START
on Planopol.
• Press START
on Pedemax-S.
a After the desired process time stop both Planopol and Pedemax-S
simultaneously. Lupo may stay in Auto mode, ready for the next method
step after adjustment of lubricant.
a Unlock Pedemax-S by raising the locking handle and swing Pedemax-S
to the left.
a Keep your hand under the specimen holder and remove it from the
quick-coupling by pressing the black button on the front of the cylinder
head.
/#Sbi’ers
11
Pedemax-S
Instruction Manual
2.1.4 Pedemax-S modes and parameters
The following features are available from the Pedemax-S touch pad on the
front plate:
Force on specimen holder
Adjust the force on the specimen holder. The force in N is indicated in the
display. Default force setting is 120N, with a range between 30 to 400 N.
Preparation time
Adjust the preparation time (range: 0:05 to 99:30). The time is indicated in
min:sec in the display. Default settings is 1 min:00 sec.
2.1.5 Change of grindingipolishing disc
a Stop Pedemax-S, Lupo and the grinding/polishing machine.
a Unlock Pedemax-S by raising the locking handle, and turn Pedemax-S
to the side.
a Place the disc, e.g. a Petrodisc-M or a grinding/polishing disc, onto the
turntable.
a Lock Pedemax-S again.
IMPORTANT
The spring of Pedemax-S can carry a specimen holder (including
the specimens) weighing up to 3 kg. If you need to lift heavier
specimen holders you must support Pedemax-S manually
12
Pedemax-S
Instruction Manual
~©Auto
2.2
Operation of Lupo
2.2.1
Controls on Lupo
Control Modes
Switch between Auto, Start and Stop mode.
Dosing control
Switch for step dosing of lubricant between 1 to 10. The dosing level also
depends on the lubricant level of the bottle. In order to maintain a reproducible dosing we recommend that you take the lubricant level into consideration when choosing a dosing step.
2.2.2 Lupo control modes
Auto
Auto mode
When Auto Mode is active, start and stop of Lupo can be controlled from
Pedemax-S. When Pedemax-S is started/stopped, Lupo also starts/stops.
On Rotopol: in Auto Mode Lupo is controlled direct from a Rotopol.
Start mode
Manual start of Lupo, when not in “Auto mode”, can also be used for
manual predosing.
Stop mode
Manual and auto stop of Lupo. This mode does not stop either PedemaxS or the grinding/polishing machine.
/#Slnjers
13
Pedemax-S
Instruction Manual
Dosing nozzle
2.2.3 Daily use of Lupo
Place the dosing nozzle manually over the grinding/polishing disc.
Auto mode
Having connected Lupo correctly to the connector plug and the nozzle
hose, switch to Auto mode. Lupo will now act as a slave unit and start/stop
together with Pedemax-S.
Manual mode (start/stop)
When not in Auto mode, you may start and stop the Lupo manually,
independent of Pedemax-S or the grinding/polishing machine.
2.2.4 Changing to another Lupo unit (accessory)
a Switch Lupo to STOP
position.
©
a Dismount the current Lupo.
a Place the other Lupo (accessory) with an alternative lubricant in the
connector on the supporting arm. Connect the nozzle hose to the
lubricant outlet.
2.2.5 Changing lubricant type/refilling
a Switch Lupo to STOP
© position.
a Remove Lupo from the supporting arm.
a Hold the Lupo lubricant bottle firmly and remove the top lid.
a Empty the bottle, still mounted on Lupo, of any remaining lubricant in
the original Struers lubricant bottle.
a Dismount the Lupo lubricant bottle by holding the socket cap with one
hand and unscrewing the bottle with the other hand in an anti-clockwise
direction.
IMPORTANT
Avoid turning the socket cap while unscrewing the Lupo
bottle, as the turning movement may cause damage to the
socket cap gasket
a Clean the now empty Lupo bottle with mild soapy water and remount
the bottle in the socket cap. Remember to hold back the socket cap!
a Put Lupo back on the supporting arm and be sure that the plugs and
the hose are firmly connected.
a Refill with lubricant and remount the top lid.
a Set the dosing control to max. position (10) to empty the dosing nozzle
of the previous type of lubricant.
14
Pedemax-S
Instruction Manual
3.
PG Plane Grinding
Preparation of specimens
3.1
Preparation methods
Plane Grinding (PG) may be carried out on PG-paper, SIC paper or, for
hard materials, on Diadisc.
SiC paper is used on a wet grinding disc, according to the Knuth-Rotor
principle. PG-paper or Diadisc is glued to a grinding/polishing disc.
FG Fine Grinding
Fine Grinding (FG) is carried out on a cloth with low resilience such as
DP-Plan, DP-Pan or DP-Dur, or on Petrodisc-M. SiC-Paper may also be
used.
DP Diamond Polishing
Diamond Polishing (DP) is carried out on a polishing cloth using diamond
abrasive and a lubricant. The correct choice of cloth depends on the
material.
OP Oxide Polishing
Oxide Polishing (OP) is especially suited for soft and ductile material as a
final polishing step.
3.2
Struers Metalog Guide~
Pedemax-S is designed for both grinding and polishing. In Struers Metalog
GuideTM you will find a detailed description of grinding/polishing for automated mechanical specimen preparation.
Struers Metalog GuideTM offers preparation methods for the most common
materials, based on a simple analysis of two key properties: hardness and
ductility. Finding the right method is easy, including choice of consumables. Always consult Struers Metalog GuideiM for the correct preparation method for the actual specimens.
Struers Metalog GuideTM contains 6 useful chapters:
a Metalogram: A quick and safe guide to the right preparation method.
a Metalog Methods: A complete catalogue of preparation methods, based
on Struers’ vast store of materialographic experience, and employing
Struers’ range of consumables.
a Preparation Philosophy: The basics of modern specimen preparation,
seen from a professional point of view.
a Metalog Process: The materialographic preparation process from start
to finish, logically explained.
a Metalog Master: A combined trouble-shooting guide and supply of indepth information on the processes of mechanical preparation, including
an expert system for the solving of preparation problems.
a Metalog Code: Quick access to the relevant consumables for the
chosen preparation methods.
Struers Metalog Guide~
A complete guide to materialographic specimen preparation.
Contact your local dealer for a free copy of Metalog Guidela.
/#Sbi’ers
15
Pedemax-S
Instruction Manual
4.
Maintenance
4.1
Daily
Clean all accessible surfaces of the apparatus with a moist cloth.
4.2
Weekly
The coupling for the specimen holder may need cleaning:
a Unlock Pedemax-S.
a Press START
twice. The coupling descends without rotating.
a Clean the coupling with a damp cloth. Use no strong detergents.
• Press STOP
Lupo
© and the coupling returns to start position.
To avoid clogging of the Lupo nozzle, you should clean the nozzle once a
week:
a Empty the Lupo bottle and fill it with mild soapy water.
a Press start
on Lupo.
a Set the dosing control to max. dosing (step 10) and let the water run
through the nozzle for 2-3 mm.
a Refill with lubricant according to the description in Section 2, Operation
of Lupo.
16
Pedemax-S
Instruction Manual
5.
Accessories
Code word
Specimen Holders 0 140 mm
for Mounted or Unmounted Specimens
For 6 specimens, 0 10-32 mm, aluminium
For 6 specimens, 0 10-32 mm, stainless steel
For 4 specimens, 0 10-40 mm, aluminium
For 4 specimens, 0 10-40 mm, stainless steel
Specimen Holders 0 160 mm
for Mounted Cylindrical Specimens
for 6 each 0 25 mm/i aluminium.
for 6 each 0 30 mm, aluminium.
for 6 each 0 1.1/4”, aluminium.
for 4 each 0 40 mm, aluminium.
for 4 each 0 1 .½”,
aluminium.
Specimen Holders 0 160 mm
for Mounted or Unmounted Specimens
for 6 specimens, 0 12-40 mm, stainless steel
for 6 specimens, 0 12-40 mm, aluminium
for 12 specimens, 0 10-25.5 mm, stainless.
for 6 flat specimens (max. 34x60 mm), stainless steel
for 3 flat specimens (max. 41x72 mm), stainless.
with 3 clamps for wire or plate (max. 24 x 52 mm)
stainless steel
Specimen Holders 0 160 mm without Holes
plane, solid specimen holder for adhesion of specimens or for custom-made shapes
“,
Stainless steel
Aluminium
Uniforce, Basic Model
Device for levelling of specimens in specimen holders
0 140, 160, and 200 mm
Uniforce, Advanced Model
with pressure foot for positioning the specimens
Uniforce Extension Kit
Pressure foot for positioning the specimens.
Levelling Disc for Clamping Specimens
In 0 140 mm specimen holder discs. For the older
model levelling device (MAXVA)
LUPO, optional extra drip lubricator
PEDAL
PEDST
PEDFI
PEDIS
MAXTO
MAXUM
MAXQU
MAXLI
MAXHA
MAXCY
MAXLU
MAXDU
MAXYK
MAXDI
MAXAB
MAXSO
MAXAS
MAXWI
MAXFU
MAXMO
MAXHU
PEDNY
Struers offers a comprehensive range of consumables for both
plane and fine grinding/polishing. Ask for separate leaflets.
L
/#SIn’ers
17
Pedemax-S
Instruction Manual
6.
Installation
6.1
Contents of packing
1
1
1
1
2
1
1
1
1
1
1
Pedemax-S
Lupo automatic drip lubricator
Hose connection
Pressure hose, 3 m
Hose clamps
Hose clamp
Screw M5X1O with washer
Socket spanner
Hexagon key
Instruction Manual
Template sheet
6.2
Mounting of Pedemax-S on Rotopol
Remove Pedemax-S from the transport box. Save the nut and washer
under the wooden plate to be re-used when mounting.
In the packing box a so-called “template” is enclosed, The template sheet
indicates where to punch the necessary hole for the Pedemax-S supporting column:
a Place the template on Rotopol.
a Punch out the pre-cast hole in Rotopol with a round-headed hammer,
as follows: strike the circle on the template stating “Pedemax-S” with
one or two firm blows. When the hole opens, remove the template.
a Place two working tables of equal height at a distance about half the
length of Rotopol. Balance Rotopol between the tables.
a Lead the supporting column of Pedemax-S down the support hole in the
cover plate of Rotopol. Adjust the column until the cross pin in the
bottom of the column gets caught by the guiding slots inside Rotopol.
a Fasten the nut and washer from the transportation box tightly under the
column of Pedemax-S below Rotopol. Use the enclosed socket spanner
24 mm.
WARNING!
Be careful, while adjusting the apparatus, as Pedemax-S
weighs about 25 kg!
______
18
Pedemax-S
Instruction Manual
6.3
Mounting of Pedemax-S on Planopol1
a Remove Pedemax-S from the transport box.
a Remove the left cover (about 50 mm 0) on the upper side of the Planopol cabinet.
IMPORTANT
Pedemax-S must not be mounted in the right column hole of
Planopol.
a Place two working tables of equal height at a distance about half the
length of Planopol. Balance Planopol between the tables.
a
Insert the column in the left column hole in Planopol.
a Unlock Pedemax-S.
a Swing Pedemax-S over the center of the Planopol rotating disc. Keep
the position and twist the column clock-wise as far as possible. This
enables free movement of Pedemax-S to the left of Planopol.
a Tighten the nut and washer firmly.
WARNING!
Be careful, while adjusting the apparatus, as Pedemax-S
weighs about 25 kg!
1
Pedemax-S only fits Planopol-3, from serial no. 4141096 or PlanopolN, from serial no. 4010477.
/#Sbi’ers
19
Pedemax-S
Instruction Manual
6,4
Connection of Pedemax-S (version for Rotopol)
Pedemax-S is factory mounted with electric cable, connecting wire and air
pressure hose.
Power supply
a Remove the protection bag covering the cables. Mount a plug on the
cable:
Black and brown: phase
Yellow/green: earth
IMPORTANT
Check that the mains voltage corresponds to the voltage
stated on the type plate on the back of the apparatus.
a Check that the specimen holder rotates counter-clockwise when Pede-
max-S is started. If not, switch two phases.
a Connect the plug of the connecting wire to the socket on Rotopol. Use
the screw cap.
Air pressure
a If you have your own air supply hose, you may mount the enclosed
hose connection on your hose. Use the enclosed hose clamp.
a Place the hose clamp around the quick-coupling and mount the clamp
in the upper hole on the back of Rotopol. Tighten the screw.
a Ensure that the air pressure is between 5 and 6.5 bars. If the air pressure exceeds 6.5 bars mount a reduction valve.
20
Pedemax-S
Instruction Manual
6.5
Connection of Pedemax-S (version for Planopol)
Pedemax-S is factory mounted with electric cable, connecting wire and air
pressure hose.
Power supply
a Remove the protection bag covering the cables. Mount a plug on the
cable:
Black and brown: phase
Yellow/green: earth
IMPORTANT
Check that the mains voltage corresponds to the voltage
stated on the type plate on the back of the apparatus.
a Check that the specimen holder rotates counter-clockwise when Pede-
max-S is started. If not, switch two phases. Hide the communications
cable of Pedemax-S behind the apparatus.
Air pressure
If you have your own air supply hose, you may mount the enclosed hose
connection on your hose. Use the enclosed hose clamp.
a Ensure that the air pressure is between 5 and 6.5 bars. If the air pres-
sure exceeds 6.5 bars mount a reduction valve.
6.6
Mounting of Lupo
a Remove Lupo from its box.
a Plug Lupo into the supporting arm connector on Pedemax-S and
connect the hose. Pedemax-S now supplies Lupo with 24 V.
a Hold the lubricant bottle with one hand and remove the top lid.
a Fill the Lupo bottle with lubricant to the upper edge below the rim.
a Remount the top lid and Lupo is ready for use.
/#Sbi’ers
21
Pedemax-S
Instruction Manual
7.
Display/Error
Pedemax-S
OVERLOAD
PAUSE!
OVERLOAD
PAUSE!
NO AIR
LOCK HANDLE
I
Trouble-shooting
Cause
Pedemax-S has stopped due to overload of
the motor.
Wait for the motor to cool down and for
the PAUSE/OVERLOAD message to appear in the display.
The motor has cooled down after overloading. Restart Pedemax-S.
Pedemax-S is now ready for use again.
Air pressure too low, motor stopped.
Supply correct air pressure and restart
The handle has not been pulled and Pedemax-S is not locked.
Lupo
Bad or missing dos- Dosing nozzle clogged
ing
Lubricant leaking
The bottle has not been fastened correctly
below the bottle
22
Action
Lower handle
Clean the nozzle with alcohol
Fasten tightly.
Remember to hold back the socket cap
itsett to avoid damage to the bottom gasket
Pedemax-S
Instruction Manual! Gebrauchsanweisung ! Mode d’emploi
8.
Spare parts and illustrations!
Ersatzteile und Abbildungen!
Pièces de rechange et illustrations
Table of contents
Drawings
8.1
8.2
8.3
8.4
Chassis (drawings divided in 2 parts)
Rotating head, details
Pneumatic connections
Lupo
Drawing
14800105
14800107
14800125
14820010
Diagrams
8.5
Pneumatic diagram
14800130
Some of the drawings may contain position numbers not used in
connection with this manual.
/#Sbi’ers
23
Pedemax-S
Instruction Manual / Gebrauchsanweisung / Mode d’emploi
Drawing
Pos.
Description
14800105 (1 of 2)
8.1
Chassis (drawing 1 of 2)
140
230
240
310
Pressure hose ¼”,
blue
Hose nipple 08
0-Ring 15.60-2.40 (2 pcs)
Disc, nylon M8
Coverø2l
Poly-V belt (L=508 mm)
24
Spare Part No.
2NU12403
2N F40200
21024035
2Zl20804
2GD54025
2JD30508
Pedemax-S
Instruction Manual / Gebrauchsanweisung! Mode d’emploi
Drawing
Pos.
14800105 (2 of 2)
Description
Spare Part No.
Chassis (drawing 2 of 2)
400
400
Valve block, complete
Gasket, fiber
400
3/2 solenoid valve 12VDC
430
Micro switch
550
560
650
660
Kipp-handle
670
Gasket, fiber
Cylinder pin, stainless 3m6x15
Quick release valve
Quick coupling
/#SIn’ers
14800109
2lF000lO
2YM10114
14790217
2GH30012
2ZS01315
2YH00040
2NF10012
2lF000il
25
0
0
0
0
Drawing
Pot
Description
14800105 (1 of 2)
8.1
ChassIs (drawIng 1 of 2)
Pedemax-S
Instruction Manual I l3ebrauchsanweisung I Merle demplol
Pedemax-S
Instruction Manual I Gebrauchsanweisung I Mode d’emploi
Drawing
14800105 (2 of2)
Poe.
Description
ChassIs (drawIng 2 of 2)
Pedemax-S
Instruction Manual / Gebrauchsanweisung / Mode d’emploi
Drawing
Pos.
Description
14800107
8.2
Rotating head, details
20
0-ring 68.00-2.00
Key
Pressure spring 022.1 x 0.9
Ring
Release
Pressure spring 05.2 x 0.6
K-ring
Rubber piece
30
40
50
60
70
110
130
/
/
26
/,
Spare Part No.
21020080
14790418
14790421
2ZJ20040
14790429
14790430
21K00055
14790442
Pedemax-S
Instruction Manual! Gebrauchsanweisung / Mode d’emploi
Drawing
Pos,
Description
14800125
8.3
Pneumatic connections
to
Nylon hose, superflex 08!06, 550 mm
Quick-coupling double
Spiral hose type SPF 15, 333 mm
10
10
/#Sln’ers
Spare Part No.
2NU 12508
2NF10055
2WK90015
27
Pedemax-S
Instruction Manual / Gebrauchsanweisung / Mode d’emploi
Drawing
Pos.
14820010
8.4
40
50
60
70
80
100
110
120
130
400
Description
Lupo
Nylon washer
Bottle screw
WasherO3lxl
Lupo lubricant bottle
PCB
Mode switch button
Cover
Cover with line
Dosing switch button
Hose nipple
(11.82 VDO1)
(1482V002)
28
Spare Part No.
2ZE00510
14820026
14820027
14820028
14823000
2GD12125
2GD51025
2GD02125
2GD12225
14828001
Pedemax-S
Instruction Manual! Gebrauchsanweisung / Mode d’emploi
Description
Diagram
14800130
8.5
Pneumatic diagram
Y2
Yl
Li
A
Y3
Cyi
/#Stnrnrs
BF1
29
Pedemax-S
Instruction Manual! Gebrauchsanweisung! Mode d’emploi
Drawing
Pos.
Description
14810023
8.6
Supporting plate
20
30
70
320
Hinge, center, mounted.
Buffer
Release spring
Gear
Gear motor 100-120 V
Main cable with US plug
Gear motor 200-240 V
Main cable with SCUKO
Spare parts no.
.
. .
..
..
...
26
..
14810030
13820158
14810024
14810007
14810054
2WC07503
14810055
2WC01234
Pedemax-S
Instruction Manual / Gebrauchsanweisung ! Mode d’emploi
Drawing
Pos.
Description
14820010
8.7
Lupo
50
Bottle screw
Nylon washer
Lupo lubricant bottle
PCB logical card
Screw
Dosing nozzle, complete
Hose nipple
Mode switch button
Cover
Dosing switch button
Cover with line
55
70
80
300
200
400
100
110
130
120
Spare parts no.
14820026
2ZE0051 0
14820028
14823000
14820023
14820040
14828001
2GD12125
2GD51 025
2GD1 2225
2GD02125
(11.82 VDU1}
(11.82 VDO2}
/#Slniers
27
o~
(0
TOl
CONNECTION
TO POWEREUPPLY
TEl
VOl.
IN.
POWER
IN *TJ
@1594
~1
—1094
AT
IOOV..120V
SOY DC.
2EV DC.
ROY DC,
2
LORI P
501001.13.
n~
PI.ACE .JLAIP
FARM LPI
FP13.~LEE
TO LEE
TO LP4
STill
000V—240V
VOl. —
Vol. —
VOl. —
7
POL CM 7,02
TRANBFORMSR POE
5.SVA
SQl 50113.
TO LEE
O,EEAT
~
~
L
LEO
____
~
____
1102t
I, SA 25EV
TOl
P0;
PO.4 LEE
BOOR
i.P1
L000SPAO
PLACE .JLO,IP
~
0
001
I~ov
ii ~
- l’LOIA
- LTEOIOE
Vol
3
__________
NLOIE
- LTEOIOE
002
‘Dv
003
SE,,.
COW
IEEE
t.
005
‘Vol
TANTAL
-__
‘4_SIC
LTOOIOE
~CD
I-—.
SE
DRAW.
NE,
C)
-I
o
C
0
C)
a.
5’
14013010
C
0
0)
3
0
._*
.,—.-.——
pa
1103
.__4
—
IN
—
ELOI
LPS
..,.~-
C-)
w
-ISTART
—
0902
C
C)
Cl)
5)
~THECME
LPS
STARE
CD
0’
5)
CD
Cl)
C
buns
OLE’
0
START OUT
El001Ml5.CI1
0.
CD
0,
CD
S’TRUERS A/S
V*LI’CSJS ALLE 175
Oil-SOlD POE~VRE
051349011
FEORMIN’.Sl
CIRCUIT
POWER
P I LEST
~0RCADSl4Sl21OO
M00fl
20.
lE~2
- -
SIZE
S
P0CM
-
ND
SUPPLY
B
‘O
0
0190RPM FOR FOOT
,ND POWER RELAY,
REV
OWE 137
‘14B13100
CM /
CM
SHEET
A
I
01’
0
o~ (0
~&
(4)
~0
00017
HOlE
AUTO
MODE
ON
R07
AUTO
NED,
,
0
CEE~
-
NOIC
START
ON
START OUT
FOR
START
‘-“0.
20
L~
SAMPLE
-~
(6)
C
~.
o
ON
a.
STOP
-‘
0)
STOP
DN
3
~,
5.
5)
C
5)
0
CD
0’
C
C.)
C/)
ROE
5115
-D
C)
OVERHElM
LOAD
1,01
OVERLO&O
5 ION.
LTEOIOD
109114
LOS
2004*
LTEOIOD
LTSOIOO
SEER
w
ON
2004* ,24V
5)
CD
C/)
C
NC
9.,
I
0
J~
05049
J~
CORRECT I ON’
5104
FOR LUPOI
LOS
V
START
POE 2050004
OUT OF STOCK.
IN
dO
100.,F
L
//DOS
14
CII
10041’
L
T
//004
14
I/DOS
14
015
~
J
-r
OlE
100FF
NEW EDITION.
P05 2050304—1
014
100911’
M0,l,
ES.
STRUERS A/S
VAL905J0 ALLE I7S
OIC..EOIO PO500YRE
DOIPPIIRK
0
P500/IN—SI
1/4—ES
FlLEST
S000AOS 14013100
IEEE
0.
CD
0.
CD
B
‘0
j—9..~.J
01/S—ES
109114
//DEl
14
L~J
CIRCUIT
LOUIS
SIZE
FORM
ND
OIPORAM
FOR POST
SONTROL CIRCUIT
AND EION.
11.1/OUT.
OWE ND
ROY
14813100
SCALE
CM
/ 01.1
SHSST
1
A
~
S
Diagram
14823010
30
IIi
rO
~oH1
S
11
S
0
0
S
S
Description
Circuit diagram for Lupo
0911
S
Pedemax-S
Instruction Manual! Gebrauch-sanweisung / Mode d’emploi
8.9
I.!,
~Ill
iI~
IS
S
I.
00
U):
0:
4::
S
h
0
a
J
0
F4:
9
U
UI
0
0
r
(I)
(IJ
8
It
r
U
N5
1.
cr~9
g3~
SI
SI
0
0
I’
I.
L
I
S
I
2
S
S
S
‘I
S
Pedemax-S
Instruction Manual! Gebrauchsanweisung / Mode d’emploi
9.
Voltage/frequency
Technical data
3 x 200 V, 50 Hz
3 x 220 V, 50 Hz
3 x 380 V, 50 Hz
3 x 415 V, 50 Hz
3
3
3
3
x
x
x
x
200 V,
220 V,
440 V,
480 V,
60
60
60
60
Hz
Hz
Hz
Hz
Fuse
Max. 16 A, external
Motor output
90W
Air pressure
Mm. 5 bar, max. 6.5 bar
Rotational speed
150 rpm
Direction of rotation
Co-rotation
Force on specimens
30-400 N in 10 N steps
Specimens in specimen holder
010-40 mm
Specimen height
8-35 mm
Safety standard
IEC 204/ EN 60204-1 (VDE 0113)
Dimensions
Height: 320 mm
Width: 205 mm
Depth: 450 mm
Weight
25kg
30
Pedemax-S
Instruction Manual / Gebrauchsanweisung / Mode d’emploi
10. Index
Page
9-11,13,14
Auto Mode
Force
Locking handle
Lubricant
Lupo
Main switch
.
Mode switch
Modes
Mounting of Lupo
Quick-coupling
Time
.
..
.
..
/#Stn’ers
9
9
14
13,14
9
13
13
21
10,11
9
31
Pedemax-S
Instruction Manual / Gebrauchsanweisung / Mode d’emploi
11. Quick Reference Card
Inserting a specimen holder
a
Place the specimen holder stud in the quick-coupling.
a Press the black button and adjust the coupling stud in the quick-coupling until a click is heard.
(~)touch button on the front panel. Set the
timer with the (~3touch button.
a Adjust the force with the
Starting Pedemax-S on Rotopol
a Set Lupo (if you need lubricant) and Pedemax-S to Auto mode.
a Press START
on Rotopol. After the preset time Pede max-S and
Rotopol will stop.
Starting Pedemax-S on Planopol
a Set Lupo to Auto mode (if you need lubricant).
a Press START
on Planopol.
a Press START
on Pedemax-S.
a After expiration of the preset preparation time, Pedemax-S stops and
return to starting position. Planopol is stopped by manually pressing
stop
Lupo may stay in Auto mode, ready for the next method step
after adjustment of lubricant.
©.
32