1
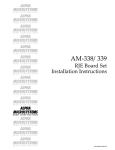
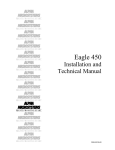
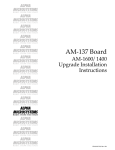
RIGHT. FROM THE START RIGHT. FROM THE START RIGHT. FROM THE START RIGHT. FROM THE START RIGHT. FROM THE START RIGHT. FROM THE START RIGHT. FROM THE START AM-137 Four-Port I/O Expansion Kit Installation Instructions RIGHT. FROM THE START RIGHT. FROM THE START RIGHT. FROM THE START RIGHT. FROM THE START RIGHT. FROM THE START RIGHT. FROM THE START RIGHT. FROM THE START PDI-00137-90, Rev. A00 1995 Alpha Microsystems REVISIONS INCORPORATED REVISION A00 DATE March 1995 AM-137 Four-Port I/O Expansion Kit Installation Instructions To re-order this document, request part number PDI-00137-90. The information contained in this manual is believed to be accurate and reliable. However, no responsibility for the accuracy, completeness or use of this information is assumed by Alpha Microsystems. This document may contain references to products covered under U.S. Patent Number 4,530,048. The following are registered trademarks of Alpha Microsystems, Santa Ana, CA 92799: AMIGOS AlphaBASIC AlphaLAN AlphaNET CASELODE AMOS AlphaCALC AlphaLEDGER AlphaPASCAL OmniBASIC Alpha Micro AlphaCOBOL AlphaMAIL AlphaRJE VER-A-TEL AlphaACCOUNTING AlphaFORTRAN 77 AlphaMATE AlphaWRITE VIDEOTRAX The following are trademarks of Alpha Microsystems, Santa Ana, CA 92799: AlphaBASIC PLUS DART inFront/am AlphaVUE ESP AM-PC MULTI AMTEC inSight/am All other copyrights and trademarks are the property of their respective holders. ALPHA MICROSYSTEMS 3511 Sunflower P.O. Box 25059 Santa Ana, CA 92799 Installation Instructions: AM-137 Four-Port I/O Expansion Kit Page i TABLE OF CONTENTS 1.0 INTRODUCTION . . . . . . . . . . . . . . . . . . . . . . . . . . . . . . . . . . . . . . . . . . . . . . . . 1 2.0 DESCRIPTION . . . . . . . . . . . . . . . . . . . . . . . . . . . . . . . . . . . . . . . . . . . . . . . . . . 1 3.0 ELECTRONIC EQUIPMENT HANDLING PRECAUTIONS . . . . . . . . . . . . . . . . 1 4.0 HARDWARE INSTALLATION . . . . . . . . . . . . . . . . . . . . . . . . . . . . . . . . . . . . . . 2 5.0 INITIAL TESTING . . . . . . . . . . . . . . . . . . . . . . . . . . . . . . . . . . . . . . . . . . . . . . . . 3 6.0 SYSTEM INITIALIZATION COMMAND FILE (EAGLE 100) . . . . . . . . . . . . . . . 4 6.1 Finishing the Installation . . . . . . . . . . . . . . . . . . . . . . . . . . . . . . . . . . . . . 6 PDI-00137-90, Rev. A00 Installation Instructions: AM-137 Four-Port I/O Expansion Kit Page 1 1.0INTRODUCTION This document describes the installation of the Eagle 100 4 port to 8 port serial I/O upgrade. It is written for the experienced Alpha Micro Service Technician, so if you do not feel comfortable performing the hardware procedures discussed below, please contact your Alpha Micro Value Added Reseller or the Alpha Micro Technical Support Group for help. 2.0DESCRIPTION The Eagle 100 base computer can be configured for either four or eight serial I/O ports. This upgrade kit contains the electronic components and cabling required to upgrade an Eagle 100 4 port configuration to the full 8 port configuration. Your AMOS Operating System Software License must be upgraded to correspond to the additional number of serial I/O ports being added. 3.0ELECTRONIC EQUIPMENT HANDLING PRECAUTIONS With the AC power cord unplugged and the top cover removed, the components inside your computer are vulnerable to damage caused by static discharge. Your body and clothing are capable of storing an electrical charge that can damage or destroy unprotected electronic components. Prior to handling any computer hardware, make sure your work area is properly protected against static discharge. There are a number of commercially available static protection devices, like the wrist strap shown below, designed specifically to protect your equipment from harmful static discharge. MC1012 Static Protection Wrist Strap PDI-00137-90, Rev. A00 Page 2 Installation Instructions: AM-137 Four-Port I/O Expansion Kit 4.0HARDWARE INSTALLATION When doing a major upgrade to your computer, you want to be absolutely sure you have a recent and complete system backup. While it is very unlikely data stored on your hard disk drive would be corrupted when upgrading your computer—you should be prepared for anything. Before you loosen the first screw or download any new software, make sure all your data is copied onto some form of backup media. You want to be absolutely sure the data on your backup media is both readable and restorable. To install your four port upgrade kit: 1.Remove the top cover to your Eagle computer system following the instructions in the appropriate manual that came with your system. Make sure you follow the safety precautions contained in your system manual. 2.Using a Phillips head screw driver, remove the cover plates on the rear panel that cover the holes which will be used to mount the 9 pin serial I/O connectors. On the deskside version of the Eagle 100, locations C1, C2, D1, and D2 will be utilized for the four additional ports. On the desktop version, locations 4, 5, 6, and 7 will be utilized. 3.Remove the integrated circuit (IC) located at U29. This IC is socketed and is located in the center of the main AM-137 logic board just to the rear of I/O Expansion Connector J6. See the Eagle Service Manual for the AM-137 board diagram. Make sure you use the proper IC removal tool so that the socket is not damaged. 4.Your upgrade kit contains eight (8) integrated circuits that must be installed in the AM-137 board as follows: IC type 1488 Line Driver 1489 Line Receiver DWP 137-01 PAL 68C94 I/O Controller Socket Location U24, U26, U27 U22, U23, U25 U29 U28* *Note: This IC may already be installed on your board. If so, do not use the new IC at U28. Make sure that ICs are oriented properly before installing them into the sockets. Pin 1 on each IC should be oriented towards the rear of the computer chassis. 5.Plug the 40-pin connector attached to one end of the I/O Expansion cable into J5 on the AM-137 board. Insure that pin 1 on the cable is oriented to match pin 1 on J5. PDI-00137-90, Rev. A00 Installation Instructions: AM-137 Four-Port I/O Expansion Kit Page 3 6.Mount the 4 9-pin connectors at the other end of the I/O Expansion Cable into the corresponding slots on the rear panel of your computer with the hardware supplied in your upgrade kit. For the deskside chassis version, arrange the connectors as follows: Cable Connector Rear Panel Location Serial I/O Port P0 P1 P2 P3 D1 D2 C1 C2 4 5 6 7 For the desktop chassis version, arrange the connectors as follows: Cable Connector P0 P1 P2 P3 Rear Panel Location 4 5 6 7 Serial I/O Port 4 5 6 7 7.This completes the hardware installation of your 4 port upgrade kit. Before re-installing the computer top cover, check to make sure that all cabling is secure and any items that you may have removed to facilitate this upgrade have been restored to their original position. Then put the cover back on and secure with the original mounting hardware. 5.0INITIAL TESTING 1.Before you boot the computer under AMOS, you should use the self test feature to verify that the hardware is working correctly. For full information on the self test, refer to the self test user’s guide shipped with the system. Perform the self test now before actually booting up the system. 2.After the self test has been successfully run, you should be ready to boot your computer under AMOS. Your system should boot just as it did before you installed this I/O expansion kit. You will need to update your AMOS32.INI to enable the four additional serial ports. PDI-00137-90, Rev. A00 Page 4 Installation Instructions: AM-137 Four-Port I/O Expansion Kit 6.0SYSTEM INITIALIZATION COMMAND FILE (EAGLE 100) Now that you have added the hardware to support a total of eight serial I/O ports, you will need to define these ports in your system initialization command file. This file, which is located in the SYS: account, is called AMOS32.INI. Within this file, serial ports are defined using an octal (base 8) numbering system. The following table shows the corresponding octal port numbers for the AM-137’s eight on board serial ports: AM-137 BOARD’S EIGHT ON-BOARD I/O PORTS OCTAL PORT NUMBERING FOUR SERIAL PORTS CONNECTED TO J4 FOUR SERIAL PORTS CONNECTED TO J5 0-3 4-7 To illustrate how serial ports are defined in the AMOS32.INI file, we’ll construct a sample system initialization command file based on a Eagle 100 configuration that includes the eight on-board serial ports. A rear panel illustration based on this example is shown below: MAIN ALT BOOT SCSI FOUR ON-BOARD SERIAL PORTS CONNECTED TO J4 ON THE AM-137 OCTAL PORT # = 0 FOUR ON-BOARD SERIAL PORTS CONNECTED TO J5 ON THE AM-137 F1 F2 E1 E2 OCTAL PORT # = 2 OCTAL PORT # = 3 D1 D2 C1 C2 OCTAL PORT # = 4 OCTAL PORT # = 5 OCTAL PORT # = 1 OCTAL PORT # = 6 FUTURE I/O EXPANSION OCTAL PORT # = 10 OCTAL PORT # = 11 OCTAL PORT # = 7 B1 B2 OCTAL PORT # = 12 OCTAL PORT # = 13 OCTAL PORT # = 14 A1 A2 OCTAL PORT # = 15 OCTAL PORT # = 16 OCTAL PORT # = 17 MC1220 Eagle 100 Deskside Rear Panel Configuration In the example above, the serial port connectors have been positioned on the rear panel based on instructions in a previous section. The octal port number assigned to each port came directly out of the table at the beginning of this section. PDI-00137-90, Rev. A00 Installation Instructions: AM-137 Four-Port I/O Expansion Kit Page 5 Now that we know the corresponding octal number for each of the serial ports in our example, we can define them in the system initialization command file. It’s never a good idea to directly modify your AMOS32.INI file; always create a test file; type: LOG SYS: RETURN COPY TEST.INI=AMOS32.INI RETURN Several areas in the TEST.INI file need to be modified: 1.You need to make sure the total number of jobs assigned to the JOBS statement is increased by the number of new serial ports being added to the computer. 2.You must also add some additional JOBALC statements. JOBALC allocates a name to each defined job. 3.Your Eagle 100 computer requires a healthy quantity of queue blocks. When you add new serial ports, you have to increase your queue block allocation. Use the following queue block formula to determine how many queue blocks you require. NEW QUEUE BLOCKS REQUIRED = OLD QUEUE BLOCKS + (13 x NUMBER OF JOBS BEING ADDED) 4.You will also need to add a TRMDEF statement to your system initialization command file for each new port. The TRMDEF statement is where the octal port number is assigned. The basic elements that make up a TRMDEF statement are shown below: TRMDEF command Assigned name Serial port driver name Octal port number TRMDEF TERM7,AM318=6:19200,ALPHA,100,100,100 BAUD rate Terminal driver name In-width buffer size In-buffer size Out-buffer size NOTE: Make sure you use AM318 as the serial port driver name for the Eagle 100. MC1221 TRMDEF Command Statement 5.Finally, you will add SETJOB statements that attach the JOBALC name to the TRMDEF name, assign memory to the job, and log the job on. PDI-00137-90, Rev. A00 Page 6 Installation Instructions: AM-137 Four-Port I/O Expansion Kit 6.1Finishing the Installation Once you have created a TEST.INI file that is applicable to your configuration, you need to verify it has been correctly modified. You do this by using the MONTST command: LOG OPR: RETURN MONTST AMOS32,TEST.INI RETURN Watch closely as the system initialization command file is executed; make sure no errors are displayed on your terminal screen. If an error does occur, take another look at your TEST.INI file; double check your octal port numbers and other statements you added to support the serial ports. After you are certain your TEST.INI file is working correctly, execute the following command: COPY AMOS32.INI = TEST.INI RETURN PDI-00137-90, Rev. A00