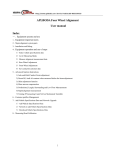
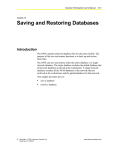
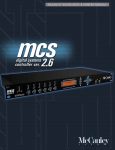
1
LP-II
Electronic Price Computing
Label/Receipt Printing Scale
REV: 2.00 Jan. 2002
®
2001, CAS (USA) CORPORATION EAST RUTHERFORD, NEW JERSEY 07073
Attention:
Copyright© 2001, by CAS Corporation. All rights reserved. No part of this publication may be
reproduced, transmitted, transcribed, stored in a retrieval system, or translated into any
language or computer language, in any form or by any means, electronic, mechanical,
magnetic, optical, chemical, manual or otherwise, without the prior expressed written permission
of this company.
Disclaimer:
This company makes no representations or warranties, either expressed or implied, with respect
to the contents hereof and specifically disclaims any warranties of merchantability or fitness for
any particular purpose. Any software describes in this manual is sold or licensed “as is”. Should
the programs prove defective following their purchase, the buyer (and not this company, its
distributors, or its dealers) assumes the entire cost of all necessary servicing, repair, and any
incidental or consequential damages resulting from any defect in the software. Further, this
company reserves the right to revise this publication and to make changes from time to time in
the contents hereof without obligation to notify any person of such revision or changes.
Brand and product names are trademarks and/or registered trademarks of their respective companies.
TABLE OF CONTENTS
PAGE
1 Network Installation.............................................................................................................................1
1.1 Installing the Network Memory Card .......................................................................................... 1
1.2 Interface........................................................................................................................................... 2
1.2.1 PC master Ethernet connection......................................................................................... 2
1.2.2 Scale master Ethernet connection with PC(RS232C)..................................................... 3
1.2.3 Scale master Ethernet connection without PC ............................................................... 4
1.3 Wire configuration .......................................................................................................................... 5
1.3.1 Ethernet wire – straight cable and crossover cable....................................................... 5
1.3.2 RS232C wire ........................................................................................................................... 5
1.4 Network Mode Settings - CAL Mode...........................................................................................6
1.5 Network Considerations ................................................................................................................ 8
1.6 Installing the Slave Scales (#2 to 32#) ........................................................................................ 8
1.7 Installing the Master Scale (#1).................................................................................................... 8
2 Network Management - Program Mode ..........................................................................................9
2.1 Network Mode ................................................................................................................................ 9
2.2 Network Copy ...............................................................................................................................12
2.3 PLU Delete......................................................................................................................................15
2.4 Lock Network.................................................................................................................................16
2.5 Unlock Network .............................................................................................................................17
2.6 Check Scale ..................................................................................................................................17
3 Floating Clerk.....................................................................................................................................18
3.1 Networked Floating Clerk Option ..............................................................................................18
3.2 Non-Networked Floating Clerk Option .....................................................................................19
3.3 VOID key in Floating Clerk Mode...............................................................................................19
APPENDIX : Network connection example........................................................................................21
ii
1 Network Installation
1 Network Installation
1.1 Installing the Network Memory Card
1. Make sure that the Main Power switch is OFF & that the scale is unplugged.
2. Remove the keyboard:
A. Remove the 2 keyboard screws on top of the upper case.
B. Lay the keyboard face down.
3. Plug the Network Card into connectors J5 & J6 on the Main PCB. Make sure that all
of the pins are aligned properly and that the 2x9 connector is facing to the rear of
the scale.
4. Attach the 2 grounding screws to the Network Card PCB. Do not over tighten.
5. Reassemble in reverse order.
1
1 Network Installation
1.2 Interface
1.2.1 PC master Ethernet connection
Slave
Slave
Slave
Slave
HUB
PC(Master)
NOTE:
Only 31 scales can be connected in this method.
PC must have Ethernet card.
Master scale number(#1) cannot be used.
1. Scale number(for slave) : 2~32
2. PC master setting : Yes
(refer to 1.4 Network Mode Settings - CAL Mode)
3. Ethernet(10BaseT) SPEC
maximum segment length : 100 meter
media : Unshielded twisted-pair cable
topology : star
2
Slave
1 Network Installation
1.2.2 Scale master Ethernet connection with PC(RS232C)
Master
Slave
Slave
PC
HUB
NOTE:
Only 32 scales can be connected in this method.
1. Scale number(for master) : 1
2. Scale number(for slave) : 2~32
3. PC master setting : No
(refer to 1.4 Network Mode Settings - CAL Mode)
4. RS232C SPEC
baud rate : 19200 bps
data length : 8 bit
parity : none
stop bit : 1 bit
5. Ethernet(10BaseT) SPEC
maximum segment length : 100 meter
media : Unshielded twisted-pair cable
topology : star
3
Slave
1 Network Installation
1.2.3 Scale master Ethernet connection without PC
Master
Slave
Slave
Slave
HUB
NOTE:
Only 32 scales can be connected in this method.
1. Scale number(for master) : 1
2. Scale number(for slave) : 2~32
3. PC master setting : No
(refer to 1.4 Network Mode Settings - CAL Mode)
4. Ethernet(10BaseT) SPEC
maximum segment length : 100 meter
media : Unshielded twisted-pair cable
topology : star
4
Slave
1 Network Installation
1.3 Wire configuration
1.3.1 Ethernet wire – straight cable and crossover cable
NOTE:
Twisted pair Category-5 (UTP) cable with RJ45 Plug
Straight connection
Crossover connection
Scale
HUB
HUB
HUB
8 7 6 5 4 3 2 1
8 7 6 5 4 3 2 1
8 7 6 5 4 3 2 1
8 7 6 5 4 3 2 1
RXRX+
RJ-45
Plug
TX+
TX-
RX+
TX-
TX+
RX-
1
2
3
4
5
6
7
8
1
2
3
4
5
6
7
8
`
TX-
RX+
TX+
RJ-45
Plug
RX-
RJ-45
Plug
1
2
3
4
5
6
7
8
1
2
3
4
5
6
7
8
1.3.2 RS232C wire
NOTE:
1
2
3
9pin
4
D-SUB
5
6
(male)
7
8
9
1,4,6,7,8,9 pin do not use.
To PC
1
2
3
4
5
6
7
8
9
9pin
D-SUB
(female)
5
RX-
TX+
`
To Scale
RX+
TX-
RJ-45
Plug
1 Network Installation
C5
Network Options
Network is Used?
(nEt )
PC master is Used?
(PC - MAS)
Clerk mode(0-2):
(FLt-Md)
This Scale is number :
(SCALE)
1.4 Network Mode Settings - CAL Mode
Enter the CAL Mode : refer to
Service manual
* IF You want to know detail
explanation about TCP/IP AND
UDP, refer to RFC 793, RFC 768 참
조
NUMERIC
< CAL: NETWORK OPTIONS >
Network Is Used?
PC Master is Used?
Clerk Mode (0-2) : [1]
This scale is number
Once at the CAL Main Menu
screen, press the 5 key for
Network Options. The Network Options screen will then appear as follows:
Network Is Used: This determines whether the scale will
communicate through the Network. This setting is independent
of Network Card Detection, so be sure to follow the Network
Installation instructions.
C5-1
(Y/N) : [Y]
(Y/N) : [N]
: [ 1]
nEt
y
C5-2
PC-MAS
PC Master is Used: This determines the master type.
y
Floating Clerk Mode: you can select Floating clerk mode from 0
to 2.
(0: no-floating clerk 1: Floating clerk 2: Standard Clerk)
C5-3
This scale is number: Enter the Scale number. Scale Master is
number 1. If you select PC master, you have to assign from
number 2 to number 32.
C5-4
6
FLt-Md
0
SCALE
1
1 Network Installation
Once at the CAL : NETWORK
OPTIONS screen, press the Y key
for PC Master Options.
The
Network Options screen will then
appear as follows:
All options have default value.
NUMERIC
( 1/ 2) < CAL: NETWORK OPTIONS >
Scale IP Address
Sub Net Mask
Gateway
PC IP Address
:[192.168.0.1
:[255.255.0.0
:[192.168.0.254
:[192.168.0.254
Scale UDP Port
Scale IP Address: you must assign Scale IP. This is used of scale and
PC networking
]
]
]
]
:[2002]
C5 - 1
S- iP
192.168.
Reply suitable answer about sub-options
Sub Net Mask:
Input subnet mask to come under your Network system
C5 – 2
MASK
255.255.
Gateway:
Input Gateway to come under your network system
C5 – 3
GAtEWA
192.168.
C5 - 4
PC IP Address: Input Master PC IP Address
PC-iP
192.168..
Scale UDP Port
: UDP port in TCP/IP to receive data from PC. Default is 2002.
7
C5 - 5
S-Port
2002..
1 Network Installation
NUMERIC
( 2/ 2) < CAL: NETWORK OPTIONS >
PC UDP Port
PC UDP Port
: UDP port in TCP/IP to receive data from scale. Default is 2001.
:[2001]
C5 - 6
PCPort
2001
1.5 Network Considerations
The LP-2 uses a special high speed network called Ethernet. This allows you to connect up to
32 scales per installation site. The network is setup as a Master/Slave network that allows you to take
consolidated reports, transmit program data remotely, and manage up to 32 departments per site.
The network conduit configuration is star-topology. With a maximum speed of 4 Mbps and a max length
of 100 meters (325 feet), the LP-2 network can handle just about any application.
Please review the following when installing a network.
1. Check the overall network size and make sure that it falls within the limits.
2. Even though Ethernet cabling can be used, the use of Twisted pair Category-3,4,5
cable is preferred.
3. The network can run with a Master scale and no Mirror Master.
4. If you run into any trouble, please contact the CAS Service Department. We have
on-staff network specialists that can assist you if you run into any trouble or need to
exceed network specifications.
1.6 Installing the Slave Scales (#2 to 32#)
1. Install slave scale in its final location.
2. (Optional) Span calibrate the scale and go to REG mode when done.
3. Follow all of the directions for section 1.1 Installing the Network Memory Card.
4. Continue for this procedure (steps 1 to 4) for all slave scales #3 to #32.
5. All scales should be OFF at this time.
1.7 Installing the Master Scale (#1)
1. Install the Master scale in its final location.
2. (Optional) Span calibrate the scale and go to REG mode when done.
3. Follow all of the directions for section 1.1 Installing the Network Memory Card.
4. The Master scale should be OFF at this time.
5. If Pc master is selected, don’t use master scale number(#1)
8
3 Floating Clerk
2 Network Management - Program Mode
Enter the Program Mode : refer to owner’s manual
When the screen is at the Main Menu Press 0, enter a level 3 password when prompted, and then the
screen will read:
< NET : NETWORK MANAGEMENT >
1.Network Mode
2.Network Copy
3.PLU Delete
P0
1
nEt
4.Lock
5.Unlock
6.Check Scale
You can see Network Management menu by using arrow key or
page Up and Page down key.
ModE
2.1 Network Mode
Once at the NET : NETWORK MANAGEMENT menu screen, press the 1 key.
screen will appear as follows:
The Scale Mode Settings
< NET: NETWORK MODE >
1.Network Setting
2.Clerk Mode Setting
3.Application
P01
1
nEt
The Network Setting option allows you to change the scale’s
number. The scale number is a unique identifier for networking.
There can only be 32 scales a CAS NET(Network). Each scale
SEttinG
must have a unique number; therefore, no two scales may share
the same id. Scale 1 is the Master scale. Scale numbers 2 through 32 are slaves. You can either
activate or deactivate the network, or you can use Floating Clerk or non-Floating Clerk.
9
3 Floating Clerk
OVR/CAPS
< NET : NETWORK MODE >
Scale mode setting menu screen,
press the 1 key.
The Clerk Mode Setting option allows
you to choose the type of clerk
system you wish to use.
Network Is Used? (Y/N): [Y]
This scale is number: [ 1]
P011- 1
NEtUSE
Select whether network is used (or not).
y
P011- 2
SCALE
After pressing enter key, assign Scale number.
1
(1/2)
< NET : CLERK MODE SETTING >
Use Custom Number?
Auto Logoff Each Transaction?
Print Label Each Transaction?
Print Total with Barcode
Print Total with Label Format
(Y/N):
(Y/N):
(Y/N):
(Y/N):
(Y/N):
[N]
[N]
[N]
[Y]
[N]
Scale mode setting menu screen,
press the 2 key.
The Clerk Mode Setting option
allows you to choose the type of
clerk system you wish to use.
(2/2)
< NET : CLERK MODE SETTING >
Timed Logoff Delay Seconds (0~255):[ 30]
Remember that you can press SAVE at any time or the ENTER key while the cursor is on the last field in
order to save the current screen contents and return to the previous menu. The ESC key exits and
returns to the previous menu. For the Scale Mode screen, simply selecting one of the four options
returns you to the previous menu.
When you choose the Floating Clerk option, the Sale Mode PLU Keyboard changes slightly. See
section The Sales Mode PLU Key Pad Configuration(Owner’s manual) for details on the keyboard
configuration for Floating Clerk. Also, for details on Floating Clerk, see section 3 Floating Clerk.
10
3 Floating Clerk
P012- 1
Use Custom Number?: If this options is selected, Custom number is
used after each transaction.
CUStoM
n
P012- 2
Auto logoff Each Transaction: If this option is selected, the clerk log
off after each transaction.
oFF-tr
y
P012- 3
Prt – tr
n
P012- 4
ttLbAr
n
P012- 5
ttLFMt
Print Total with Barcode: If this option is selected, the scale prints
the Total label with barcode.
Print Total with Label Format : if this option is selected, the scale
prints the Total label format.
y
P012- 6
Print Label Each Transaction: If this option is selected. the scale
prints a label after each transaction.
oFFSEC
30
Timed logoff Delay Seconds: This value is the waiting time when
the scale search for clerk in a network of scales. If the clerk is not
found, the scale makes new clerk data.
The Application option allows you to choose application settings.
OVR/CAPS
< NET : APPLICATION >
PLU Automatic Download?(Y/N):
P013
A-PLU
/ENG
[N]
PLU Automatic Download: for future use
y
11
3 Floating Clerk
2.2 Network Copy
Once at the NET : NETWORK MANAGEMENT menu screen, press the 2 key.
Network Copy screen as follows:
This copy function is to copy data
files from one scale to another on
a network.
This allows you to
quickly reprogram a new scale, a
replacement scale, or simply
update an outdated program file.
All files are copied from the master
to a specified scale.
< NET : COPY DATA >
1.
2.
3.
4.
5.
P02
1
All (Cloning)
PLU Data
Global Data
Speed Key
Label format
ALL
You will then see the
Network Copy Screen of the 7-segment display.
CLoninG
NUMERIC
< STR: COPY ALL DATA >
To Scale Number:
P021
[ 3] (0=ALL)
SCALE
To copy All data, press the 1 key
from the NET: COPY DATA screen.
The display will change to the
STR: COPY ALL DATA screen: Press
ESC key to exit COPY DATA.
Select Scale number to copy all master data.
3
12
3 Floating Clerk
NUMERIC
< NET: COPY PLUs >
To Scale Number:
[ 3] (0=ALL)
Start Dept Number: [ 1] Bakery Departm
PLU Number:[
1] Yellow Cake
End
Dept Number: [ 1] Bakery Departm
PLU Number:[
5] Chocolate Cake
P022 - 1
Select Scale to copy PLU data from master.
SCALE
2
P022 – 2
S dEPt
2
P022 – 3
S PLU
1
P022– 4
E dEPt
Start Department to be copied.
Start PLU to be copied.
End Department to be copied.
2
P022 – 2
To copy PLU data, press the 2 key
from the NET: COPY DATA screen.
The display will change to the
NET: COPY PLUs screen:
E PLU
2
End PLU to be copied
13
3 Floating Clerk
To copy other data, press the 3 key from the NET : COPY DATA screen.
NET : COPY PLUs screen:
The display will change to the
< NET: COPY GLOBAL DATA >
1.
2.
3.
4.
5.
All
Store Name
Departments
Scale Assignments
Users
P023 1
6.
7.
8.
9.
0.
Scroll Messages
Scroll Sequences
Sales Messages
Tax Rates
Origin
You can see all menus by using arrow key or Page-up, Page
down key.
ALL
From the Copy Global Data screen you can select what data you wish to transmit over the network.
Once you have selected an option, the screens all look very similar.
NUMERIC
< STR: COPY DEPARTMENTS >
To Scale Number:
[ 2] (0=ALL)
Start Item Number: [ 1]
End
Item Number: [ 1]
P0233-1
SCALE
Select Scale number to copy department
3
P0233-2
S-itEM
Select Start item number to copy department
1
P0233-3
E-itEM
Select End item number to copy department
32
The Start Item Number is (in this case) the starting Department and the End Item Number is the ending
department. They comprise the range of departments to be copied into the target scale listed in the
To Scale Number field. So, whether it’s Department, Store Data, or Label Formats, the Item Number
fields represent the range of that particular which you are going to copy. However, if you select ALL,
14
3 Floating Clerk
the scale will simply prompt you “Are you sure (Y/N)?” and if you press Y then all of the items from the
Master will be copied to the target scale or scales.
Once you have entered all of the required data, press the SAVE key or press the ENTER key while the
cursor is on the last field in order to initiate the data copy. Press the ESC key to exits.
To copy Speed KEY data, press the 4 key from the NET: COPY DATA screen. The display will change to
the NET: COPY SPEED KEY screen:
NUMERIC
< NET: COPY SPEED KEY >
To Scale Number:
P024
[ 3] (0=ALL)
SCALE
Enter a Scale number to copy Speed key.
2
2.3 PLU Delete
Once at the NET : NETWORK MANAGEMENT menu screen, press the 3 key.
screen will appear as follows:
The Scale Mode Settings
NUMERIC
< NET: PLU DELETE >
To Scale Number:
[ 0] (0=ALL)
Start Dept Number: [ 1] Bakery Departm
PLU Number:[
1] Yellow Cake
End
Dept Number: [ 1] Bakery Departm
PLU Number:[
10] Chocolate Cake
Delete PLUs of selected scales except master scale. If you want to delete PLUs of master scale, see
section Deleting PLUs(Owner’s manual).
P03 - 1
SCALE
Select Scale number for the PLU deletion
3
15
3 Floating Clerk
P03 - 2
S dEPt
1
P03 - 3
S PLU
Select Start Department number for the PLU deletion
Select Start PLU number for the PLU deletion
1
P03 - 4
E dEPt
Select End Department number for the PLU deletion
2
P03 - 5
E PLU
Select End PLU number for the PLU deletion
10
2.4 Lock Network
Once at the NET: NETWORK MANAGEMENT menu screen, press the 4 key. The scale will place the LOCK
command on the network queue and wait for you to return to <REG> mode. To return to <REG>
mode, press ESC until you get to <REG> mode. All the scales on the network will look as follows:
NETWORK LOCK
Any slave that is not in a sale mode will remain unlocked until the
user ESCAPES into a sale mode in which case the LOCK command
will take effect.
LoCK
16
The master will not display this
message. Also, only scale in
sales mode (REG, MGR, or RPK)
will show this message. Even if
you turn the scale OFF and ON,
or if you unplug it and plug it
from the AC power and/or the
network, the scale WILL remain
in the LOCK mode. The only
way to come out of a LOCK
condition is to issue an UNLOCK
command
from the master
scale.
3 Floating Clerk
2.5 Unlock Network
Once at the NET: NETWORK MANAGEMENT menu screen, press the 5 key. The scale will place the
UNLOCK command on the network queue and wait for you to return to <REG> mode. To return to
<REG> mode, press ESC until you get to <REG> mode.
<REG>
12:12:00 PM
WEIGHT
lb
UNIT $
/ lb TOTAL PRICE
$
◀
○
0.00
0.00
The LOCK and UNLOCK features are especially useful when you
wish to do sales reporting and you do not want anyone to register
any sales before you finish your reports
0.00
This is different from the LOCK scale option on the Main menu. The LOCK scale option of the Main
menu only locks the scale in which you select the LOCK scale option. It then requires a level 1
password to unlock as opposed to the Network Lock, which can only be locked and unlocked by the
Master scale.
If you have a scale that is Network Locked and you cannot unlock it through the master, please
contact your Authorized CAS Dealer for service. You may have a network hardware problem, or a
scale hardware problem.
Scale oneself lock/unlock : if you press ALT and 1 key in any program mode, lock command is sent
oneself. When you want to return program mode, press any key and level one password.
2.6 Check Scale
Once at the NET: NETWORK MANAGEMENT menu screen, press the 6 key. You will then see the Check
Scale screen as follows:
1
.
.
.
. 3
. .
. .
32
. 5
14 .
. .
.
.
.
.
.
.
.
.
.
.
.
.
.
20
.
P0
6
SC
1
CHECK…
The scale number means that the master was able to see that node; indicates a failure to
communicate to that node.
If you have problems with this test, please review the network installation instructions and run the test
again. If a problem persists, contact the CAS Service Department.
17
3 Floating Clerk
3 Floating Clerk
3.1 Networked Floating Clerk Option
When using floating clerk mode, make sure that the SAVE, AUTO, and PRE-PACK are off. Also, make
sure that you have not begun an ADD-UP transaction. Generating a floating clerk transaction is the
same as any sales mode transaction except that you do NOT press the PRINT key; instead you must
press one of the Clerk-Speed keys (1 through 4) or press the CLERK key and enter your password. To
total a receipt you simply press the ST/TL key and select your clerk number when requested.
For example, press the MISC By-Weight PLU key, place an item on the platter, enter a price, and then
press the CLERK 1 key. The scale will not generate a label. Go to another scale and do the same
thing. Next, go to a third scale and do the same thing. Finally, while at the third scale, press the ST/TL
key. You will see the following screen:
< Clerk Total of A Sale >
Clerk Number (1~99) [ 1]
At this point, select clerk number 1
as this is the clerk under which you
made the 3 transactions. If there
were other clerks on the network
making floating transactions, they
could be totaled from here also.
So be very careful in selecting
YOUR clerk number ONLY!
CLErK
0
After selecting clerk 1, press the PRINT key.
transactions as follows:
A screen will be displayed that shows you the status of your
Print
SEL y n
If you select YES, then a detailed
receipt will be printed and Clerk 1
transactions
for
the
current
customer will be cleared.
SubTotal of this floating sale
:<Clerk 1 ADD> 3 ITEMS, $13.68
If you select NO, then you can
continue to make floating sales
transactions for that customer.
Print total report of this sale ?(Y/N)
18
3 Floating Clerk
3.2 Networked Standard Clerk Option
When using Standard clerk mode, make sure that the SAVE, AUTO, VOID and PRE-PACK are off. Also,
make sure that you have not begun an ADD-UP transaction. Generating a floating clerk transaction is
the same as any sales mode transaction; To total a receipt you simply press the ST/TL key and select
your clerk number when requested.
CLErK
nUMbEr
0
3.3 Non-Networked Floating Clerk Option
When using floating clerk in Non-Network mode, the scale works in the same manner as mentioned
above except that you can only do transactions on one scale. Because the network is disabled for
clerk transactions, any sales transactions that you make in one scale will not be contained at any other
scale. The only advantage to using the scale in this mode, is that you can share one scale with
multiple clerks simultaneously and not have to worry about mixing-up different customer’s sales
transactions. This is true so long as the clerks use their own clerk numbers and NO ONE ELSES!
3.4 VOID key in Floating Clerk Mode
From the Sales Mode screen, press the VOID key. You will input level 2 -password and get the following
screen:
< VOID Floating Transaction >
Select your clerk number and press
the PRINT key.
Clerk Number (1~99) [ 1]
CLErK
0
After selecting your clerk number, you will see the following screen:
No:
PLU Dept Wgt/Pcs Price Scl
1:
2:
3:
<< Total
1
1
1
1
1
1
: 3 items
1.000
1.000
1.000
$13.68 >>
1.23
4.56
7.89
1
1
1
Selecting NO will return you to the
Sales Mode screen or list another
page of items if there are any.
Any items listed as number 0 are
previously VOIDed items.
Selection : Void/More (Y/N)?
19
3 Floating Clerk
However, after selecting your clerk number, item that be sold recently is voided in 7-segment VFD
version. You will see the following screen.
0.00
0.00
0.00
If you select YES in graphic version, then you will see the following screen:
Select the number of the item from
the previous screen that you wish
to VOID and then press the PRINT
key.
< Select Void Number >
Void Number ?
[ 3]
The number always defaults to the
most recent transaction.
Once you select the number of the item you wish to VOID, press PRINT. That item will appear on the
receipt in STRIKE THROUGH format. It will continue to be listed but you will see that all VOIDed items are
numbered as number 0.
Voiding any number 0 items will not do anything at all.
20
APPENDIX : Network
APPENDIX : Network connection example
PC Master Type
Crossover cable
Straignt through cable
HUB
PC(Master)
HUB
Slave
Slave
Slave
Slave
Slave
Slave
HUB
Slave
Slave
Slave
Slave
Slave
Slave
21
APPENDIX : Network
Scale Master Type with PC
Master
RS-232C cable
Straignt cable
Crossover cable
PC
HUB
HUB
Slave
Slave
Slave
Slave
Slave
Slave
HUB
Slave
Slave
Slave
Slave
Slave
Slave
22