1
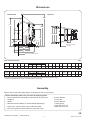
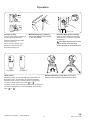
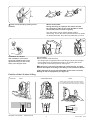
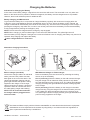
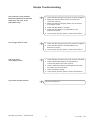
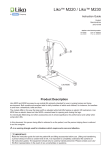
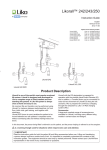
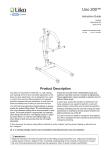
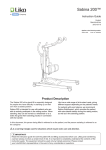
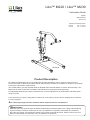
Liko™ M220 / Liko™ M230
Instruction Guide
English
7EN150106-06
2013-12-18
Applies to the following models:
Liko M220
Liko M230
Prod. no. 2050010
Prod. no. 2050015
Liko M230
Product Description
Liko M220 and M230 are easy-to-use mobile lifts primarily intended for use in nursing homes and home
environment. Both models are excellent aids for daily transfers of adults and children; for instance, for transfers
to and from a wheelchair, toilet and floor.
The models differ in the way the base width is adjusted while both lifts feature an electric lift mechanism. Liko
M230 has an electric base and Liko M220 a manual base for opening and closing the legs.
An individually fitted sling and other accessories are of utmost significance for performance and safety when
using Liko’s lifts.
In this document, the person being lifted is referred to as the patient, and the person helping them is referred
to as the caregiver.
is a warning triangle used for situations which require extra care and attention.
IMPORTANT!
Read the instruction guide for both the patient lift and lifting accessories before use. Lifting and transferring
a person always involves a certain level of risk. It is important to completely understand the contents of
the instruction guides. The equipment should only be used by trained personnel. Please contact your Liko/
Hill-Rom representative in the event of any uncertainties or questions.
Table of Contents
Safety Instructions.........................................................................2
Definitions......................................................................................3
Technical Data...............................................................................3
Dimensions....................................................................................4
Assembly.......................................................................................4
Operation.......................................................................................6
Charging the Batteries...................................................................8
Maximum Load..............................................................................9
Recommended Lifting Accessories...............................................9
Simple Troubleshooting...............................................................11
Inspection and Maintenance.......................................................12
NOTE!
This instruction guide contains important information for the user of the product.
All who use the product should review and completely understand the contents of the instruction guide.
Remember to keep the instruction guide in a place where it is always available to those using the product.
WARNING
Certain factors may limit the ability of the mobile lift to perform correctly, which may include the following: floor thresholds, multiple heights of the floor surfaces, obstacles, and extra thick pile carpet. These factors can lead to the mobile
lift not rolling as intended, possible imbalance of the mobile lift, and additional strain placed on the caregiver. If you are
uncertain if your care environment meets the intended requirements please contact your Liko/Hill-Rom representative
for further assistance.
Use the handles to maneuver the lift. Do not apply force to the lift arm or directly to the lift mast to maneuver; this may
cause a tilting hazard.
Safety Instructions
Before using, make sure that:
• the lift is assembled in accordance with the assembly instructions;
• the lifting accessories are properly attached to the lift;
• charge the batteries for at least 6 hours;
• you have read the instruction guides for the lift and lifting accessories;
• personnel using the lift are informed of the correct operation and use of the lift.
Before lifting, always make sure that:
• the lifting accessories are not damaged;
• the lifting accessories are correctly attached to the lift;
• the lifting accessories hang vertically and can move freely;
•the lifting accessories are selected appropriately, in terms of type, size, material and design, with regard
to the patient’s needs;
• the lifting accessories are correctly and safely applied to the patient in order to prevent injuries;
• the sling bar latches are intact. Missing or damaged latches must always be replaced with new ones;
• the sling’s strap loops are correctly connected to the sling bar hooks when the sling straps are stretched up
but before the patient is lifted from the underlying surface.
Unbalanced lifting poses a tipping risk and may damage the lift equipment!
Never leave a patient unattended during a lifting situation!
Liko M220 and M230 have been tested by an accredited testing institute and fulfill the requirements specified in the
Medical Device Directive 93/42/EEC, for Class I products.
Liko M220 and M230 comply with the requirements in EN ISO 10535:2006, IEC 60601-1, IEC 60601-1-2, IEC
60601-1-11, ANSI/AAMI ES60601-1, and CAN/CSA C22.2 no 60601-1.
Under no circumstances must the lift be modified. Please contact Liko/Hill-Rom for more information.
Particular care must be taken when using powerful sources of electromagnetic disturbance, so that, for example,
diathermy cables are not positioned on or near the lift. If you have any questions, please consult the responsible
assistive device technician or the supplier.
Liko M220 / Liko M230 • 7EN150106-06
2
w w w . l i k o . com
Definitions
Liko M230
3
1
2
4
20
5
BATTERY
6
19
10
7
18
8
11
EMERGENCY
12
9
ON
CHARGE
13
Forward
direction
Liko M220
17
16
15
14
21
1. Sling bar
2. Latches
3. Lift arm
4. Lift mast
5. Handles
6. Quick Reference Guide
7. Hand control with cable
8.Battery
9. Control box
10. Emergency stop
11. Electrical Emergency lowering
12.Green light - power supply
to the charger.
13. Yellow light - charging in progress!
14.Motor for electric adjustment of base
width (Liko M230)
15. Rear wheels with brake
16.Base
17. Front wheels
18. Lift motor (incl. actuator)
19. Product decal
20. Emergency Lowering (manual)
21.Foot control, manual adjustment
of the base width (Liko M220)
Technical Data
Maximum load:
182 kg (400 lbs.)
Material:
Steel
Weight:
Gross: (Liko M220) 41 kg ( 90 lbs)
(Liko M230) 41 kg ( 90 lbs)
Heaviest removable part:
(Liko M220) 21 kg ( 46 lbs)
(Liko M230) 21 kg ( 46 Ibs)
Wheels:
Front: 75 mm (3 inch.) twin wheels
Rear: 75 mm (3 inch.) twin wheels
with brakes
Turning diameter
1345 mm (53 inch.)
Emergency lowering: Mechanical and Electrical
Lifting interval:
1150 mm (45.3 inch.)
Lifting speed
(no load):
18 mm/s (0.7 inch./s)
Sound level:
42 dB(A)
Protection class:
IP X4
Operating forces
of controls:
Buttons on hand control: 4N
Electrical data:
24 V
Liko M220 / Liko M230 • 7EN150106-06
Intermittent power:
Int. Op 10/90, active operation max 2 min.
Only 10% of a given length of time may
be active, but no more than 2 min.
Battery:
In series: 2 x 12 V 2.9 Ah valve-regulated
lead-acid gel batteries. New batteries
provided by the supplier.
Battery charger:
uilt-in, 100-240 V AC, 50-60 Hz,
B
max 400 mA.
Lift motor:
24 V DC, permanent magnetic motor
with mechanical safety mechanism.
Motor for base-width
adjustment:
24 V DC, permanent magnetic motor.
Climate and
environmental
conditions during
use:
Temp. range: +15 to +40 °C
(+ 59 °F to + 104 °F)
without reduced performance.
Humidity: 10% - 95% non-condensing,
without reduced performance.
Air pressure: 70 - 106 kPa
without reduced performance.
The device is intended for use indoors.
Type B, in accordance with the electrical
shock protection class.
Class II equipment.
3
w w w . l i k o . com
Dimensions
Lateral view
Top view
Amax.
Lmax
Amin.
N
*600 mm (23.6 in)
C
O
Lmin
D
*700 mm (27.5 in)
M
D1
E
F F1
D2
Max. reach position
of lift arm
B3
B2
B1
B
Max. reach position of lift arm
Table of measurements
A max A min
1895
1330
B
B1
B2*
B3
1160
892
645
605
max
C
1020
min
max
682
970
D
min
555
D1
*D2
E
F
F1
Lmax
Lmin
900
210
1035
105
25
1720
570
(mm)
M
N
O
455
245
455
A max A min
74.6
52.4
B
B1
B2*
B3
45.7
35.1
25.4
23.8
max.
40.2
C
min.
max.
26.9
38.2
D
min.
21.9
(inch.)
D1
*D2
E
F
F1
Lmax
Lmin
35.4
8.3
40.7
4.1
1.0
67.7
22.4
M
N
O
18.0
9.6
18.0
Note: When changing to other lifting accessories check that the lift still achieves desired lifting height.
* Reference measurement according to Standard EN ISO 10535:2006
Assembly
Remove the two transport safety straps, on the sling bar and on the lift mast.
Before assembly, make sure you have the following parts:
•lift mast with lift arm and sling bar with latches, lift motor (incl.
actuator);
•handle
•base with electric (M230) or manual (M220) adjustment;
• control box, charger cable, hand control with cable;
•
instruction guide and quick reference guide with chain;
Liko M220 / Liko M230 • 7EN150106-06
4
•
4 screw M10x25,
1 screw M5,
2 screw M10x16,
1 casing (M10),
1 Allen wrench 3 mm,
2 Allen wrench 6 mm.
w w w . l i k o . com
1. Place the base on floor with wheels contacting
the floor. Lock both rear wheels.
Place the lift mast in the foot of the base.
A
2. Secure the lift mast, using
two of the M10x25 screws
and the 6 mm Allen
wrench provided. Make
sure screws are tight.
3. Place the control box in the
bracket on the lift mast. Lock
the control box in place using
the M5 screw and Allen key
3 mm provided. Do not over
tighten the screw.
B
Hand control
Lift motor
4. Install handles at the lift mast:
A: attach in the lift mast with two M10x25 screws and the 6 mm Allen wrench provided.
(Remove decal)
B: insert the casing (M10) in the forward attachment of the handles, use two M10x16 and the two 6 mm Allen wrenches provided
Make sure the handles all four screws are tight!
5. Place the quick reference
guide (use the provided
chain) and the hand control
on the handles.
Motor for base
adjustment.
(Liko M230 only)
6. Connect cables to
the control box, see
illustration. Make sure
plugs are fully seated.
”Click”
7. Connect the charger cable to the
socket under the control box.
Make sure the plug are fully seated.
Attach the cable, see illustration.
9. Reset the emergency stop by turning
8. Connect the battery and
the button in the direction of the arrows
secure it to the control box
on the button. Charge the battery, see
bracket. A click sound can
"Charging the Batteries" at page 8.
be heard when the battery is
installed correctly.
After assembly, make sure that:
• the battery of the lift is charged;
• the motion of the lift arm corresponds to the buttons
on the hand control;
Liko M220 / Liko M230 • 7EN150106-06
• the manual and electrical emergency lowering works;
• the adjustment of the base width is functional;
• the rear wheels brakes is functional.
5
w w w . l i k o . com
BATTERY
Operation
BATTERY
EMERGENCY
ON
CHARGE
EMERGENCY
ON
Emergency Stop
Use in urgent need to stop all of
the lifts electrical functions.
Activate: Press the red button
on the control box.
Reset: Turn the button in the
direction of the arrows until
the button springs out.
Liko M230
Manual Emergency Lowering
Turn in the direction of the arrows
on the red cylinder.
CHARGE
Electrical Emergency Lowering
Push a narrow object into the hole
marked on the control box (marked
Emergency).
The object used to press must
not be sharp, since this may
cause damage to the control box!
Liko M220
Manual Adjustment of the Base (Liko M220)
Press the raised pedal to adjust the base width.
Hand control
The lifting motion is operated with the push buttons on
the hand control. The direction of the arrows applies
when the hand control is held as shown in the picture.
To raise or lower the lift arm, press
or
.
The lifting motion stops when the push button is released.
For electrical adjustment of the base width (Liko M230),
push
or
.
Liko M220 / Liko M230 • 7EN150106-06
6
w w w . l i k o . com
Never move the lift by pulling on the
actuator!
Wheels with brakes
During the lifting of a patient, the wheels should
be unlocked in order for the lift to be able to center
around the patient’s center of gravity
The rear wheels can be locked against rotation
and turning. To lock the wheel, press down the lock pedal.
To release the brake, lift up the lock pedal with your foot.
Figure 2.
Figure 1.
Installation of Latches
After installation, ensure that
the spring loaded latches is taut
against the sling bar and moves
freely in the sling bar hook.
Lift correctly!
Before each lift, make sure that:
– the Sling loops at opposite sides of the Sling are at the same height
– all the Sling loops are fastened securely in to the Sling bar hooks
– the Sling bar is level during the lift, see Figure 1.
If Sling bar is not level (see Figure 2), lower the user to a firm
surface and adjust according to the Sling in use Instruction Guide.
An improper lift can be uncomfortable for the user and cause
damage to the lift equipment! (see Figure 2).
Position of the Lift when Lifting
From/To: Bed
Chair/Toilet Seat
Floor
NOTE: Place a pillow under the patient’s head
for increased performance and comfort. Always
have the wheels locked when lifting from the floor.
Liko M220 / Liko M230 • 7EN150106-06
7
w w w . l i k o . com
Charging the Batteries
Indications for Charging the Battery
In the event of low battery voltage, a signal from the control box will sound. The sound will occur only when one
button on the hand control is pushed in. When this happens, the battery must be charged as soon as possible.
However, there is still sufficient power for additional lifts.
Battery Charging and Maintenance
To get maximum battery life, it is important to charge the battery regularly. We recommend charging after use
of the lift or every night. Batteries are fully charged after approx. 6 hours. When the battery is fully charged, the
charger is switched off automatically. If the lift is not used every day, we recommend connecting it to the charger, or
pressing the emergency stop after use, in order to turn off the power and save the battery. Ensure that the battery
is fully charged before pressing the emergency stop.
NOTE: The lift cannot be charged with the emergency stop engaged.
NOTE: When charging, a yellow indicator light on the control box will illuminate. The yellow light turns off
when the battery is fully charged. If the light has not turned off after 8 hours of charging, the battery may need to be
replaced. Stop charging and replace the battery.
Never charge batteries in a wet area.
Alternative Charging Procedures
Alt. A
Alt. B
EMERGE
NCY
ON
Built-in Charger (standard):
Connect the charger cable to an electrical
outlet (100-240 V AC). Make sure that
both lights on the control box are lit. The
yellow light indicates charging and the
green light indicates that power is being
supplied to the charger. If the charger
cable is beginning to stretch, it should be
replaced in order to minimize the risk of
the cable getting caught and breaking.
NOTE: The lift cannot be used when
the charger cable is plugged into an
electrical outlet.
CHARGE
Wall-Mounted Charger or Table Charger:
Remove the battery from the control box by releasing the locking
device on top of the battery.
Alt. A. (accessory) Place the battery on the wall-mounted charger.
Plug the charger into an electrical outlet (100-240 V AC). Make
sure that both lights on the charger are lit. The yellow light indicates
charging and the green light indicates that power is being supplied
to the charger.
Alt. B. (accessory) Place the battery on the charger in the table
charger housing. Plug the charger into an electrical outlet (100-240
V AC). Make sure that both indicator lights on the charger are lit.
The yellow light indicates charging and the green light indicates that
power is being supplied to the charger.
Liko M220 and M230 comply with the Directive 2002/96/EC on waste electrical and electronic equipment.
Old batteries are to be deposited at the nearest recycling facility in accordance with local regulations or
given to personnel authorized by Liko/Hill-Rom.
Liko M220 / Liko M230 • 7EN150106-06
8
w w w . l i k o . com
Maximum Load
Different maximum loads may apply to different products on the assembled lift unit: lift, sling bar, sling and any other
accessories used. For the assembled lift unit, the maximum load is always the lowest maximum load rating for any
of the components. For example, a Liko M220/Liko M230 which is approved for 182 kg (400 lbs) can be equipped
with a sling which is approved for 200 kg (440 lbs). In this case, the maximum load of 182 kg (400 lbs) applies to the
assembled lift unit. Check the markings on the lift and lifting accessory or contact your Liko/Hill-Rom representative
if you have any questions.
Recommended Lifting Accessories
Using lifting accessories other than those approved can entail a risk.
When changing lifting accessories, the highest possible lifting height of the lift is affected. Therefore, before changing
lifting accessories you should always ensure that the lift, after change, can fulfil the desired lifting height in order
to manage the lifting situations for which the lift is to be used.
For Liko M220 and Liko M230 all slings compatible with Universal SlingBar 450 are recommended. To select suitable
slings and other lifting accessories, refer to the brochure ”Lifting accessories”. For additional guidance in selecting
a sling, refer to the instruction guides for the respective sling models. Here, you will also find guidance for combining
Liko’s sling bars with Liko’s slings.
Contact your Liko/Hill-Rom representative or visit www.liko.com for advice and information on Liko’s product range.
Head Support
Prod. No. 3651115
HeadSupport
Padded Casing Leg Support
Prod. No. 3666050
SlingBar Cover Paddy 30
Prod. No. 3607001
Scales
LikoScale can be used in combination with Liko M220, M230.
Contact your local Liko/Hill-Rom representative for more information.
Adapter Kit LikoScale Liko M220/M230
Liko M220 / Liko M230 • 7EN150106-06
Prod. No. 3156233
9
w w w . l i k o . com
Quick Reference Guide Liko M220/M230
with chain.
Prod. No. 2050100EN
Holder for Quick Reference Guide
Prod. No. 2000100
XS
Leg Protector Prod. No. 20190029
Battery Charger For wall installation or for use with
table charger housing.
Prod. No. 2004106
Table Charger Housing excl. charger.
Prod. No. 2107103
Extra Battery
Prod. No. 2006106
Liko M220 / Liko M230 • 7EN150106-06
10
S
MS
M
L
XL
XX L
w w w . l i k o . com
Simple Troubleshooting
The lift doesn’t work up/down.
Electrical adjustment of the base
width does not work, in/out
(Liko M230 only).
1. Check that the emergency stop has not been engaged.
2.Make sure that the cables to the control box are
connected correctly.
3.Make sure that the charging cable is not connected
to an electric outlet.
4. Check that the battery is charged.
5.Check that the battery’s contact plates are not
defective or broken.
6.
If the problem persists, please contact Liko/Hill-Rom.
The charger doesn’t work.
1. Check that the emergency stop has not been engaged.
2.Check that the battery’s contact plates are not
defective or broken.
3.
If the problem persists, please contact Liko/Hill-Rom.
The lift is stuck
in the high position.
1. Check that the emergency stop has not been activated.
2.Use the electrical emergency lowering device
to lower the patient onto a firm surface.
3.Use the manual emergency lowering device to lower
the patient onto a firm surface.
4. Check the battery voltage.
5. If the problem persists, please contact Liko/Hill-Rom.
If you hear unusual sounds.
Contact Liko/Hill-Rom.
Liko M220 / Liko M230 • 7EN150106-06
11
w w w . l i k o . com
Inspection and Maintenance
Care and Maintenance
For trouble-free use, certain details should be checked each day the lift is used:
• Inspect the lift and check to make sure that there is no external damage.
• Check the functionality of the latches.
• Check the integrity of the lifting motion and the base-width adjustment.
• Check to make sure that the emergency lowering (both electrical and manual) works.
• Charge the batteries each day the lift is used and make sure the charger works.
Please contact your Liko/Hill-Rom representative in the event of any uncertainties or questions.
When necessary, clean the lift with a moist cloth and check that the wheels are free from dirt. Find more
detailed information regarding cleaning and disinfection of your Liko/Hill-Rom product in the document Care and
Maintenance at our website: www.liko.com.
The lift should not be exposed to running water.
Service
Liko M220/Liko M230 should be periodically inspected at least once a year.
Periodic inspection, repair and maintenance should be performed only in accordance with the Liko
Service Manual and by personnel authorized by Liko and using original Liko spare parts.
Expected Life Time
The product has an expected life time of 10 years when correctly handled, serviced and inspected in accordance
with Liko’s instructions.
Transport and Storage
During transportation, or when the lift is not to be used for a long time, the emergency stop should be engaged.
The environment where the lift is transported and stored should have a temperature of -20 to +40 °C
(-4 °F to + 104 °F) and a relative humidity of 10 to 95 %. The air pressure should be 700–1060 hPa.
Recycling
For instructions on how to recycle your Liko product, please visit our website: www.liko.com.
Product Changes
Liko/Hill-Rom reserves the right to make product changes without prior notice. Contact your Liko/Hill-Rom
representative for advice and information about product upgrades.
Design and Quality by Liko in Sweden
Hill-Rom´s Management system are certified in accordance with ISO 9001 and its equivalent for the medical device
industry, ISO 13485. Hill-Rom´s Management system is also certified in accordance with environmental standard
ISO 14001.
www.liko.com
Manufacturer:
Liko AB
Nedre vägen 100
SE-975 92 Luleå
Sweden
© Copyright Liko AB 2013-12
Service Agreement
Liko/Hill-Rom offers the opportunity to enter into service contracts for the maintenance and regular inspection of
your Liko product.