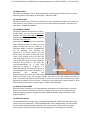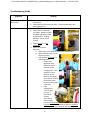
1
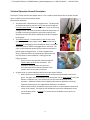
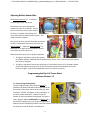
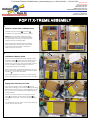
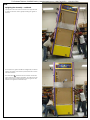
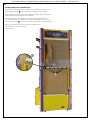
To Purchase This Item, Visit BMI Gaming | www.bmigaming.com | 1-800-746-2255 | + 1-561-391-7200 To Purchase This Item, Visit BMI Gaming | www.bmigaming.com | 1-800-746-2255 | + 1-561-391-7200 Table of Contents General Description and Play 2 Game Set Up 2 Loading Balloons 2 Technical Operation-General 3 Adjusting Balloon Sensor Wire 4 Programming Instructions 4 Default Settings 8 Troubleshooting Guide 9 1 To Purchase This Item, Visit BMI Gaming | www.bmigaming.com | 1-800-746-2255 | + 1-561-391-7200 General Description and Play Pop It Extreme is an explosive redemption game designed to create game room excitement and to yield maximum revenue. Pop It is a skill game requiring the player to stop the dial by pressing the “Play” button in a zone that awards tickets. The Jackpot value is awarded when a player pops the balloon. The balloon is popped either by hitting the Instant Win target on the dial in which case the balloon is inflated until burst all at once, or by an accumulation of air blasts awarded when a player stops the dial in an “add air” zone. Once a balloon is popped, another balloon is loaded into position and inflated so that game play may continue. Game Set Up Short Version: Carefully remove packing material from outside of machine. With a minimum of four people, stand game upright. You will need at least two people at the bottom side to keep the game from rolling away on the casters. Connect the power cord to the machine and switch the power on. Loading Balloons To reload the balloons: Open the lower cabinet door Enter ‘balloon load mode’ by pressing the balloon load button and wait for the balloon to deflate (machine should be powered on) Open the upper glass door Remove spent balloon remnants from air nipples Load new balloons by stretching them over the air nipples Be sure to pull on balloon so that rolled ring on balloon sits against barb to insure proper sealing Close upper glass door Press balloon load button to exit ‘balloon load mode’ Close lower cabinet door 2 To Purchase This Item, Visit BMI Gaming | www.bmigaming.com | 1-800-746-2255 | + 1-561-391-7200 Technical Operation-General Description The Pop It X-Treme contains two stepper motors. One is used to rotate the pointer on the dial and the other is used to increment the balloon wheel. Dial Assembly Operation The dial pointer is belt driven by a stepper motor. The belt pulley attached to the pointer contains a pin that passes through the increment opto sensor once per revolution. Since we are using a stepper motor, we know the rotational distance the pointer has traveled since passing through the opto (home position) and therefore we know the value to award when the dial is stopped by the player. The balloon wheel is incremented by a cam that is belt driven and powered by a stepper motor. The cam lifts the air connector, disengaging it from the balloon wheel, increments the balloon wheel, and then reengages the air connector. This cycle is performed upon powering the machine on and after a balloon pops during game play. It will also happen when there is a balloon load error prompted by a balloon that will not fill properly or when a balloon is missing from the inflation position. o There is a pin in the cam that passes through the inflation opto sensor each revolution. This provides a “home” position so that we can accurately control the rotational position of the stepper motor for accurate increments. An opto sensor is used to indicate a balloon burst and proper inflation. o When inflation occurs balloon sensor wire moves outward toward the side of the game. The upper end of the balloon sensor wire passes into an opto sensor when the balloon is inflated to size. The inflation will not stop immediately upon sensor activation. Additional inflation time is added to eliminate any problems created by hysteresis resulting from very slight balloon deflation or movement. o When a balloon bursts, the balloon sensor wire travels to its home position toward the center of the cabinet. The upper end of the balloon sensor wire subsequently moves out of the opto sensor. A magnet is used to secure the balloon sensor wire in its home position. 3 To Purchase This Item, Visit BMI Gaming | www.bmigaming.com | 1-800-746-2255 | + 1-561-391-7200 Adjusting Balloon Sensor Wire The balloon sensor wireis critical to consistent game play and payout. The balloon sensor wire should pivot toward the center of the balloon. Be sure that it is not bent so that it pivots toward the front or the back of the balloon and can sneak around the balloon before it pops. This could cause false Jackpots. Also, the tip of the sensor wire should be positioned so that it is between one and two inches from the balloon wheelwhen the upper glass door is tilted open at an angle so that the balloon wheel is nearest the tip of the sensor wire. When the balloon sensor wire is properly adjusted: 1. The light on the balloon sensor opto should be off when balloon is deflated and the balloon sensor wire is in the “returned” position toward the center of the game. 2. The light on the balloon sensor opto should go on if the balloon sensor wire is pivoted outward toward the side glass and remain on for the full travel outward until the balloon sensor wire touches the glass. (See Technical Operation section for pictures of sensor.) Programming the Pop It X-Treme Game Software Version: 1.2 1.) Entering Programming Mode To enter program mode, press and hold Button 3 located on the Power Distribution Board (located at the front inside of the lower cabinet of the machine). After 2 seconds, “TOTALS” will appear on the LCD Display. At this time, release the button. “COINS IN” with the number of coins received will be displayed. The game is now in Program Mode. PLEASE NOTE that Button 2 is not used for programming. Each programming option is displayed on the LCD Display (located in the lower cabinet next to the main controller board), with the functions shown for Button 1 and Button 3. 4 To Purchase This Item, Visit BMI Gaming | www.bmigaming.com | 1-800-746-2255 | + 1-561-391-7200 2.) COINS IN The total coins received through the coin mechanism are displayed. The total will rollover to zero when it reaches 1,000,000,000. Depressing button 2 will display “TICKETS OUT”. 3.) TICKETS OUT The total tickets dispensed are displayed. The total will rollover to zero when it reaches 1,000,000,000. Depressing button 2 will display “BILLS IN”. 4.) BILLS IN The total bills inserted are displayed. The total will roll over to zero when it reaches 1,000,000,000. Depressing button 2 will display one of two options: If there are tickets that have not been dispensed, the Display will show “CLEAR TICKETS OWED?”, otherwise it will display “ENTER PROGRAM MODE?” 5.) “CLEAR TICKETS OWED?” This option is displayed if there are tickets that are owed that have not been dispensed, and will show the number of tickets. Depressing Button 1 will clear these tickets from the system, and “TICKETS CLEARED” will be displayed. Depressing Button 2 will display “ENTER PROGRAM MODE?” 6.) “ENTER PROGRAM MODE?” Depressing Button 1 at this time will enter the area of Program Mode where parameters may be changed. Depressing Button 2 will return the game to Run Mode. 7.) “ENTER PASSCODE” To be able to change programming parameters or reset the counters, a 4-digit passcode must be entered. The default passcode is 0000. To enter the passcode, Depress Button 1 to change the digit from 0 to 9, then press Button 2 to move to the next digit. After all digits have been entered correctly, depressing button 2 will Display the first programming option, “CHANGE PASSCODE?”. 8.) “CHANGE PASSCODE?” Depressing Button 1 will allow for changing the passcode. Depressing Button 2 will move to “DISPLAY CONTRAST”. IMPORTANT!!! ONCE THE PASSCODE IS CHANGED, THE DEFAULT OF 0000 WILL NO LONGER WORK! BE SURE TO SAVE THE PASSCODE IN A SAFE PLACE! Entering the new passcode is accomplished in the same way that entering the passcode is done, as explained in . 9.) DISPLAY CONTRAST This option sets the contrast for the LCD Display. Depress and hold Button 1 until the desired contrast is reached, then release Button 1. Depressing Button 2 will move to the next option, “PLAY MODE VOLUME”. 10.) PLAY MODE VOLUME This option sets the speaker volume during game play. When this option is entered, the game’s background music will play continuously. Depressing Button 1 will increase/decrease the volume. As long as Button 1 is depressed, the volume will increase until the maximum is reached, then decrease 5 To Purchase This Item, Visit BMI Gaming | www.bmigaming.com | 1-800-746-2255 | + 1-561-391-7200 until the volume is off. Depress and hold Button 1 until the desired volume is reached. Depressing Button 3 will display the next option, “ATTRACTION MODE VOLUME”. 11.) ATTRACTION MODE VOLUME This option sets the speaker volume during Attraction Mode. When this option is entered, the game’s background music will play continuously. Depressing Button 1 will increase/decrease the volume. As long as Button 1 is depressed, the volume will increase until the maximum is reached, then decrease until the volume is off. Depress and hold Button 1 until the desired volume is reached. Depressing Button 2 will display the next option, “JACKPOT MODE VOLUME”. 12.) JACKPOT MODE VOLUME This option sets the speaker volume during a Jackpot Event. When this option is entered, the game’s background music will play continuously. Depressing Button 1 will increase/decrease the volume. As long as Button 1 is depressed, the volume will increase until the maximum is reached, then decrease until the volume is off. Depress and hold Button 1 until the desired volume is reached. Depressing Button 2 will display the next option, “ATTRACTION FREQUENCY”. 13.) ATTRACTION FREQUENCY This option sets the frequency at which the attraction mode occurs. The settings are from OFF to every 30 minutes. Depressing Button 1 will change the settings in 1-minute increments from OFF to 30 minutes, then back to OFF. Depressing Button 2 displays the next option, “COINS PER CREDIT”. 14.) COINS PER CREDIT This option sets the number of coins required for a credit. The settings are from 1 to 8 coins per credit. Depressing Button 1 will change the setting from 1 to 8, then back to 1. Depressing Button 2 displays the next option, “JACKPOT INCREMENT” 15.) JACKPOT INCREMENT Every time a coin is inserted into the game, the jackpot value is incremented by this amount. The setting is from an increment of 1 to 50. Depressing Button 1 will change this setting from 1 to 50, and then revert back to 1. Depressing Button 2 will display the next option, “JACKPOT START VALUE”. 16.) JACKPOT START VALUE This option sets the starting Jackpot value. Depressing Button 1 will change this setting from 100 to 900 in increments of 100, and then revert back to 100. Depressing Button 2 will display the next option, “JACKPOT MAX VALUE”. 17.) JACKPOT MAX VALUE This option sets the Maximum Jackpot value. Depressing Button 1 will change this setting from the starting value set in Option 15 to 99,999 in increments of 100. Depressing Button 2 will display the next option, “MERCY TICKET”. 6 To Purchase This Item, Visit BMI Gaming | www.bmigaming.com | 1-800-746-2255 | + 1-561-391-7200 18.) MERCY TICKET This option sets the Mercy Ticket. Depressing Button 1 will change this setting from 0 to 3 Tickets. Depressing Button 2 will display the next option, “AIR BLAST TIME”. 19.) AIR BLAST TIME This option sets the time duration for one blast of air. Depressing Button 1 adjusts the air time from 0.20 seconds to 2.30 seconds in increments of 0.05 seconds. Depressing Button 2 will display the next option, “CALIBRATE SPINNER?”. 20.) CALIBRATE SPINNER This option calibrates the spinner for accuracy. Be sure, before you start, that the opto pin located in the pointer drive pulley is located approximately 180 degress in the opposite direction of the pointer. Depressing button 1 will enter the calibration mode. Depressing Button 2 displays the next option, resetting the total for COINS IN. If Calibration Mode is entered, “CALIBRATION” will be displayed. The procedure for calibration is as follows: Depress the Play Button once. The spinner should stop at the center of the jackpot area on the dial. The calibration range is from –127 to +127. If the spinner does not stop in the center, adjust the calibration using Button 1. The value will increment/decrement by 1 with each depression of Button 1. If Button 1 is depressed and held, the value will continue to Cut Away Side View increment/decrement. Each time Button 1 is depressed and released, the direction(increment or decrement) will change. A more positive Calibration Number will move the spinner to the right, and a more negative number will move it to the left. Change the number in small increments, then depress the Play Button so that the spinner spins and then stops again. Repeat this procedure until the spinner is centered in the Jackpot Area. Depress Button 2 when finished, which will advance to the next option, “DISPLAY TICKETS OWED”. 21.) DISPLAY TICKETS OWED When this option is turned on, the Tickets Owed are displayed on the Jackpot Display, and count down as the tickets are dispensed. If there are no tickets to pay out, then the jackpot amount is displayed. Depressing Button 1 toggles this feature between ON/OFF. Depressing Button 2 will display “COINS IN”. 22.) RESETTING TOTALS The totals displayed at the beginning of Program Mode (COINS IN, TICKETS OUT, BILLS IN) may be reset to zero here. Additionally, “TOTAL BALLOON POPS” will be displayed here. The total number for each will be displayed. Depressing Button 1 will clear the total, and zero will be displayed, confirming that the count has been cleared. Depressing Button 2 will display the next total. 7 To Purchase This Item, Visit BMI Gaming | www.bmigaming.com | 1-800-746-2255 | + 1-561-391-7200 Depressing Button 2 after all of the totals have been displayed will display the next option, “RUN WHEEL TEST?” 23.) “RUN WHEEL TEST?” This option will start a test mode in which a balloon is inflated, then deflated, the wheel advances and the procedure repeats. The first balloon is designated as #1. If any balloon fails to inflate within the required time, then the failed wheel location is shown on the LCD display. This function is started if Button 1 is depressed, and cannot be stopped unless the power is turned off to the machine. This option is primarily intended for Quality Control Diagnostics before the machine leaves the factory. Depressing Button 2 will display “ENTER PROGRAM MODE?” 24.) “ENTER PROGRAM MODE?” This option gives the opportunity to re-enter program mode if it is necessary to change any options again. Depressing Button 2 leaves Program Mode and the game returns to normal, Run Mode. DEFAULT SETTINGS PASSCODE PLAY MODE VOLUME ATTRACTION MODE VOLUME JACKPOT MODE VOLUME ATTRACTION FREQUENCY COINS PER CREDIT JACKPOT INCREMENT JACKPOT START VALUE JACKPOT MAX VALUE AIR BLAST TIME MERCY TICKET CALIBRATION FACTOR DISPLAY TICKETS OWED 0000 42 21 MAX 5 Minutes 1 Coin 5 Points 900 99,999 0.90 Seconds OFF 0 ON 8 To Purchase This Item, Visit BMI Gaming | www.bmigaming.com | 1-800-746-2255 | + 1-561-391-7200 Troubleshooting Guide Symptom Solution Game Jackpots without balloon pop 1. Check sensor wire adjustment-see “Adjusting Balloon Sensor Wire” in this manual 2. Check balloon opto sensor operation. Output should switch low when light goes on. Note: it is normal for balloon to lose air over an extended period of time 1. Check balloon installation on nipples. Balloons should be pulled tight against barb as described in “Loading Balloons” section of this manual 2. Inspect O-ring on air connector 3. Check air connector alignment a. Open upper access door so that balloon wheel lowers b. Remove balloon that is in the inflation position c. Look through air nipple to check alignment. i. If there is an alignment issue, determine which direction of the Balloon leaks rapidly misalignment. If the problem is in the direction of the center of the wheel out, check to see that the balloon wheel center mounting bolt is not bent. ii. If the misalignment is left to right, or in the direction of rotation, check wheel mount height from the metal bracket it is attached to. Also check increment cam and make sure that the increment cam drive bearing is securely mounted in place 9 To Purchase This Item, Visit BMI Gaming | www.bmigaming.com | 1-800-746-2255 | + 1-561-391-7200 Game does not reward value shown on dial 1. Calibrate pointer-see “Programming the Pop It Extreme” 2. Remove dial back cover(short version only) and check drive pulleys to make sure they are secure and not slipping 3. Check operation of dial opto a. Opto pin mounted in pulley should pass through dial opto initiating a low output b. An LED should flash on the dial opto when the opto pin passes through it indicating operation. 10 To Purchase This Item, Visit BMI Gaming | www.bmigaming.com | 1-800-746-2255 | + 1-561-391-7200 (888) 538-1000 TEL (561) 588-5200 FAX (561) 493-2999 PARTS (561) 253-3311 SERVICE (561) 253-3310 PARTS/SERVICE FAX (561) 493-2990 51 Hypoluxo Road Hypoluxo, FL 33462-4501 www.benchmarkgames.com POP IT X-TREME ASSEMBLY 1. Remove contents from cardboard boxes. Carefully remove the upper 2 and lower 1 assemblies from their cardboard boxes as shown. 1 2 DO NOT remove the plastic shrink wrap that is around the glass portion of the upper assembly! This will be done once the two units have been attached and are standing upright. Note that the lower assembly has the hardware packet attached to the upper left hand corner of the cabinet. Remove that by snipping the plastic zip tie and set it aside. 2. 3 Installation of Balloon Shield. Once you have unpacked the lower assembly, locate the Balloon Shield 3 which has been carefully placed at the top of this unit. Notice that it has four (4) poles attached to it with zip ties. Using a step ladder, reach in, remove the Balloon Shield and pull the protective covering off both sides of the shield. 1 Note that the clear acrylic Balloon Shield rests on top of the four (4) poles and must be replaced inside the lower assembly 1 in the same orientation. Inspect Balloon Shield to see that it is oriented properly and is resting against the stops inside the lower assembly. 3. 4 Tipping lower assembly on its side. Take care in tipping the lower assembly 1 onto its back. Before starting, we recommend placing something like blocks of foam (as shown) or packing blankets on the floor to protect the components from being scratched during assembly. Notice in the series of pictures that the game control panel 4 is facing left, and the lower assembly 1 is being tipped to the right...away from the game control panel. You will want to have the game control panel facing up once it has been tipped over. 1 To Purchase This Item, Visit BMI Gaming | www.bmigaming.com | 1-800-746-2255 | + 1-561-391-7200 4. Tipping upper assembly on its side. Take care in tipping the upper assembly 2 onto its back. Use blocks of foam (as shown) or packing blankets on the floor to protect the components from being scratched during assembly. 6 2 Notice the shrink wrap 6 around the top portion of the upper assembly 2 . DO NOT REMOVE this shrink wrap until the entire game has been assembled and turned upright. Damage to the game, and personal injury can occur if this shrink wrap is removed too soon. You will want to have the game speakers facing up once the upper assembly has been tipped over. At this time, it is recommended that the four casters on top of the game 5 be removed. They are no longer needed once the upper assembly has been tipped onto its back and will be visible on top of the game once it has been turned upright. It’s MUCH easier to do this step now rather than later! 5 5. Orientation of the two game assembly halves. At this point of the installation, you should have both open ends of each assembly half facing one another. 7 You’ll want to slide the two halves toward one another so that the four purple edges of the outer frames line up and are approximately 4 inches apart, as shown in the photograph. This small gap will allow you to reach inside the frame assemblies and retrieve the wire harnesses that have been carefully stored inside. 7 1 2 You also need to make sure that the Balloon Shield 3 is still in place and is oriented properly. If care is not taken, it is possible for this component to fall over before the two assembly halves have been attached. 7 8 6. Connecting Wire Harnesses. Look inside the open ends of each purple colored corner post 8 and you will find the wire harnesses that have been carefully stored inside. Straighten out the wire harnesses so that they are all pointing away from the open ends of these posts. This will allow you to connect the harnesses to their corresponding mates. Match each of the harness plugs one at a time and connect them all until every harness plug has been securely attached. Make sure that all plugs have been fully engaged into their mating connectors. 8 8 To Purchase This Item, Visit BMI Gaming | www.bmigaming.com | 1-800-746-2255 | + 1-561-391-7200 7. Aligning Upper & Lower Assemblies. Once all of the wire harnesses have been connected, slowly push the upper and lower assembly halves together until all four sides are aligned and the holes in the pre-drilled and tapped mounting plates match. Take special care not to pinch any of the wire harnesses between these two assemblies while they are being pushed together. Make one last check to ensure that the Balloon Shield is still in place and is properly oriented. You will be able to move it once the two halves are mated. It is just MUCH easier to do at this stage of the assembly. 8 8 BEFORE 8 8 AFTER 8. Installing Button Head Screws. Now that the two assembly halves have been aligned and pushed together as shown in the previous step, use the supplied driver bit to fasten the button head tamper-proof machine screws into the four purple colored posts. Note that there are six (6) of the machine screws per post, twenty-four (24) total. We have supplied a few extra screws just in case. Tighten these screws securely, but don’t over tighten. 9. Inspect Assembly Before Uprighting. At this stage, the assembly should look like the image shown here. Do a thorough inspection to make sure that there are no pinched wire harnesses, that the Balloon Shield is in its proper location and orientation, that all of the machine screws have been securely fastened to each of the four posts and that the four casters on the top side of the upper assembly have been removed. We are now ready to lift the entire assembly into the vertical position. DO NOT USE A FORKLIFT DEVICE TO DO THIS! NOTE: We have found, in order to safely upright this game assembly into the vertical position, that it generally requires five (5) people. One at the foot of the game to prevent it from slipping forward, and four to actually lift the opposite end and walk it forward as the assembly is brought into the upright position. There are too many fragile parts that could be easily damaged during this procedure to use a forklift type device during this procedure. We HIGHLY recommend that you DO NOT use any type of forklift. To Purchase This Item, Visit BMI Gaming | www.bmigaming.com | 1-800-746-2255 | + 1-561-391-7200 10a. Uprighting the Assembly. Start this procedure by having one person stand at the foot of the game assembly and act as an anchor point. This person will prevent the game from slipping away from the other four who are lifting the game from the opposite end. This anchor person will become EXTREMELY important when the game is raised to the point where the two lower caster wheel assemblies make contact with the floor. Slowly raise the game assembly as shown here. Here is where the anchor man is extremely important. Go slowly and make sure that the bottom corner of the game is kept from slipping. The other four helpers are lifting and walking toward the anchor man as the game transitions into the vertical position. To Purchase This Item, Visit BMI Gaming | www.bmigaming.com | 1-800-746-2255 | + 1-561-391-7200 10b. Uprighting the Assembly - continued. One person can now come around to the opposite side to assist the anchor man in gently lowering the game to the floor. At this point, the game should be resting firmly on all four casters. The game can now be pushed around on these wheels if need be. The shrink wrap 6 should be removed from around the upper portion of the game assembly. You will need to do this now because you are going to need to get into the interior of the game for the next steps. 6 To Purchase This Item, Visit BMI Gaming | www.bmigaming.com | 1-800-746-2255 | + 1-561-391-7200 11. Installing Hardware in Front and Back Posts. For the sake of clarity, only the lower assembly is shown to illustrate the next step. 8 There are four yellow metal angle brackets 9 that protrude above the four purple colored corner posts 8 . The two yellow brackets at the back of the game have two holes that allow a bolt to pass through, into the corner post, and anchor it to the upper assembly. These bolt holes 11 are only accessible by raising the hinged panel 10 at the back of the game. Open this panel and locate the holes in the yellow angle brackets. There is one at the back left and right hand side of the game. 11 Locate the two bolts and two hex lock nuts in the hardware pack supplied. The pack is labeled “BACK SIDES”. Insert a bolt from the inside of the game into the hole and attach a hex lock nut to it. Tighten the nut to the bolt and repeat on the other side. The same two holes at the front of the game do not need nuts, and use two self-tapping screws found in the bag marked “SIDE (WHITE BRACKETS) & FRONT SIDE”. Take out two self-tapping screws from this bag and install them in the metal angle brackets at the front inside corners of the game. These are easily installed by raising the front hinged door. 9 8 FRONT OF GAME 9 9 8 8 10 BACK OF GAME To Purchase This Item, Visit BMI Gaming | www.bmigaming.com | 1-800-746-2255 | + 1-561-391-7200 12. Installing Hardware in Side Brackets. The final step in the game setup is to install the self-tapping screws into the two horizontal side brackets 12 located on the left and right side of the game. These two brackets are white in color, and are located right along the horizontal split between the two clear plastic side “windows”. We have attached the two brackets to the upper game assembly for you. You just need to finish the assembly by inserting a self-tapping screw into each one of the open holes 13 , and attach the white bracket to the plastic side panels. Tighten each screw until it’s snug, but don’t over tighten them. This completes the setup of your new Pop It X-Treme. 12 13 12 13 To Purchase This Item, Visit BMI Gaming | www.bmigaming.com | 1-800-746-2255 | + 1-561-391-7200 Programming the Pop It X-Treme Game Software Version: 1.2 1.) Entering Programming Mode To enter program mode, press and hold the lower button located on the Power Distribution Board (located at the front inside of the lower cabinet of the machine). After 2 seconds, “TOTALS” will appear on the LCD Display. At this time, release the button. “COINS IN” with the number of coins received will be displayed. The game is now in Program Mode. PLEASE NOTE that from this point forward, the lower button on the Power Distribution Board (Button 1) and the upper button on the Power Distribution Board (Button 2) are the buttons used. Each programming option is displayed on the LCD Display (located in the lower cabinet next to the main controller board), with the functions shown for Button 1 and Button 2. 2.) COINS IN The total coins received through the coin mechanism are displayed. The total will rollover to zero when it reaches 1,000,000,000. Depressing button 2 will display “TICKETS OUT”. 3.) TICKETS OUT The total tickets dispensed are displayed. The total will rollover to zero when it reaches 1,000,000,000. Depressing button 2 will display “BILLS IN”. 4.) BILLS IN The total bills inserted are displayed. The total will rollover to zero when it reaches 1,000,000,000. Depressing button 2 will display one of two options: If there are tickets that have not been dispensed, the Display will show “CLEAR TICKETS OWED?”, otherwise it will display “ENTER PROGRAM MODE?” 5.) “CLEAR TICKETS OWED?” This option is displayed if there are tickets that are owed that have not been dispensed, and will show the number of tickets. Depressing Button 1 will clear these tickets from the system, and “TICKETS CLEARED” will be displayed. Depressing Button 2 will display “ENTER PROGRAM MODE?” 6.) “ENTER PROGRAM MODE?” Depressing Button 1 at this time will enter the area of Program Mode where parameters may be changed. Depressing Button 2 will return the game to Run Mode. 7.) “ENTER PASSCODE” To be able to change programming parameters or reset the counters, a 4-digit passcode must be entered. The default passcode is 0000. To enter the passcode, Depress Button 1 to change the digit from 0 to 9, then press Button 2 to move to the next digit. After all digits have been entered correctly, depressing button 2 will Display the first programming option, “CHANGE PASSCODE?”. To Purchase This Item, Visit BMI Gaming | www.bmigaming.com | 1-800-746-2255 | + 1-561-391-7200 8.) “CHANGE PASSCODE?” Depressing Button 1 will allow for changing the passcode. Depressing Button 2 will move to “DISPLAY CONTRAST”. IMPORTANT!!! ONCE THE PASSCODE IS CHANGED, THE DEFAULT OF 0000 WILL NO LONGER WORK! BE SURE TO SAVE THE PASSCODE IN A SAFE PLACE! Entering the new passcode is accomplished in the same way that entering the passcode is done, as explained in 7.) . 9.) DISPLAY CONTRAST This option sets the contrast for the LCD Display. Depress and hold Button 1 until the desired contrast is reached, then release Button 1. Depressing Button 2 will move to the next option, “PLAY MODE VOLUME”. 10.) PLAY MODE VOLUME This option sets the speaker volume during game play. When this option is entered, the game’s background music will play continuously. Depressing Button 1 will increase/decrease the volume. As long as Button 1 is depressed, the volume will increase until the maximum is reached, then decrease until the volume is off. Depress and hold Button 1 until the desired volume is reached. Depressing Button 2 will display the next option, “ATTRACTION MODE VOLUME”. 11.) ATTRACTION MODE VOLUME This option sets the speaker volume during Attraction Mode. When this option is entered, the game’s background music will play continuously. Depressing Button 1 will increase/decrease the volume. As long as Button 1 is depressed, the volume will increase until the maximum is reached, then decrease until the volume is off. Depress and hold Button 1 until the desired volume is reached. Depressing Button 2 will display the next option, “JACKPOT MODE VOLUME”. 12.) JACKPOT MODE VOLUME This option sets the speaker volume during a Jackpot Event. When this option is entered, the game’s background music will play continuously. Depressing Button 1 will increase/decrease the volume. As long as Button 1 is depressed, the volume will increase until the maximum is reached, then decrease until the volume is off. Depress and hold Button 1 until the desired volume is reached. Depressing Button 2 will display the next option, “ATTRACTION FREQUENCY”. 13.) ATTRACTION FREQUENCY This option sets the frequency at which the attraction mode occurs. The settings are from OFF to every 30 minutes. Depressing Button 1 will change the settings in 1minute increments from OFF to 30 minutes, then back to OFF. Depressing Button 2 displays the next option, “COINS PER CREDIT”. To Purchase This Item, Visit BMI Gaming | www.bmigaming.com | 1-800-746-2255 | + 1-561-391-7200 14.) COINS PER CREDIT This option sets the number of coins required for a credit. The settings are from 1 to 8 coins per credit. Depressing Button 1 will change the setting from 1 to 8, then back to 1. Depressing Button 2 displays the next option, “JACKPOT INCREMENT” 15.) JACKPOT INCREMENT Every time a coin is inserted into the game, the jackpot value is incremented by this amount. The setting is from an increment of 1 to 50. Depressing Button 1 will change this setting from 1 to 50, and then revert back to 1. Depressing Button 2 will display the next option, “JACKPOT START VALUE”. 16.) JACKPOT START VALUE This option sets the starting Jackpot value. Depressing Button 1 will change this setting from 100 to 900 in increments of 100, and then revert back to 100. Depressing Button 2 will display the next option, “JACKPOT MAX VALUE”. 17.) JACKPOT MAX VALUE This option sets the Maximum Jackpot value. Depressing Button 1 will change this setting from the starting value set in Option 15 to 99,999 in increments of 100. Depressing Button 2 will display the next option, “MERCY TICKET”. 18.) MERCY TICKET This option sets the Mercy Ticket. Depressing Button 1 will change this setting from 0 to 3 Tickets. Depressing Button 2 will display the next option, “AIR BLAST TIME”. 19.) AIR BLAST TIME This option sets the time duration for one blast of air. Depressing Button 1 adjusts the air time from 0.20 seconds to 2.30 seconds in increments of 0.05 seconds. Depressing Button 2 will display the next option, “CALIBRATE SPINNER?”. 20.) CALIBRATE SPINNER This option calibrates the spinner for accuracy. Depressing button 1 will enter the calibration mode. Depressing Button 2 displays the next option, resetting the total for COINS IN. If Calibration Mode is entered, “CALIBRATION” will be displayed. The procedure for calibration is as follows: Depress the Play Button once. The spinner should stop at the center of the jackpot area on the dial. The calibration range is from –127 to +127. If the spinner does not stop in the center, adjust the calibration using Button 1. The value will increment/decrement by 1 with each depression of Button 1. If Button 1 is depressed and held, the value will continue to increment/decrement. Each time Button 1 is depressed and released, the direction(increment or decrement) will change. A more positive Calibration Number will move the spinner to the right, and a more negative number will move it to the left. Change the number in small increments, then depress the Play Button so that the spinner spins and then stops again. Repeat this procedure until the spinner is centered in the Jackpot Area. Depress To Purchase This Item, Visit BMI Gaming | www.bmigaming.com | 1-800-746-2255 | + 1-561-391-7200 Button 2 when finished, which will advance to the next option, “DISPLAY TICKETS OWED”. 21.) DISPLAY TICKETS OWED When this option is turned on, the Tickets Owed are displayed on the Jackpot Display, and count down as the tickets are dispensed. If there are no tickets to pay out, then the jackpot amount is displayed. Depressing Button 1 toggles this feature between ON/OFF. Depressing Button 2 will display “COINS IN”. 22.) RESETTING TOTALS The totals displayed at the beginning of Program Mode (COINS IN, TICKETS OUT, BILLS IN) may be reset to zero here. Additionally, “TOTAL BALLOON POPS” will be displayed here. The total number for each will be displayed. Depressing Button 1 will clear the total, and zero will be displayed, confirming that the count has been cleared. Depressing Button 2 will display the next total. Depressing Button 2 after all of the totals have been displayed will display the next option, “RUN WHEEL TEST?” 23.) “RUN WHEEL TEST?” This option will start a test mode in which a balloon is inflated, then deflated, the wheel advances and the procedure repeats. The first balloon is designated as #1. If any balloon fails to inflate within the required time, then the failed wheel location is shown on the LCD display. This function is started if Button 1 is depressed, and cannot be stopped unless the power is turned off to the machine. This option is primarily intended for Quality Control Diagnostics before the machine leaves the factory. Depressing Button 2 will display “ENTER PROGRAM MODE?” 24.) “ENTER PROGRAM MODE?” This option gives the opportunity to re-enter program mode if it is necessary to change any options again. Depressing Button 2 leaves Program Mode and the game returns to normal, Run Mode. DEFAULT SETTINGS PASSCODE PLAY MODE VOLUME ATTRACTION MODE VOLUME JACKPOT MODE VOLUME ATTRACTION FREQUENCY COINS PER CREDIT JACKPOT INCREMENT JACKPOT START VALUE JACKPOT MAX VALUE AIR BLAST TIME MERCY TICKET CALIBRATION FACTOR DISPLAY TICKETS OWED 0000 42 21 MAX 5 Minutes 1 Coin 5 Points 900 99,999 0.90 Seconds OFF 0 ON