1
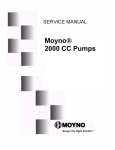
Service Manual
Moyno
AugMentor
®
Section:
MOYNO® AugMentor
Page: 1
Date: November 2000
SERVICE MANUAL
Moyno® AugMentor
pumping elements. It should be noted that
increasing the speed of the auger will not
necessarily increase the pump capacity.
1-1. INTRODUCTION
1-2. GENERAL
CAUTION: Keep hands and other objects
out of the hopper when in operation.
The Moyno AugMentor® is an accessory item
designed specifically for use with Moyno progressing
cavity pumps to improve the product feeding capabilities
of an open throat pump conveyor. The AugMentor
utilizes a vertical hopper containing a rotational auger to
force the product to be pumped into the open throat
hopper of the pump.
3-1. DISASSEMBLY
3-2. NOTE:
Turn the power OFF and
DISCONNECT the power to the AugMentor
before disassembly.
A right angle gear motor controlled by a variable
frequency AC drive controller drives the auger in a
counterclockwise rotation (from the top view). The
pump operator adjusts the rotational speed of the auger
as required to provide for the best feed rate of the pump.
Generally the motors should be wired such that the
pump motor and the auger motor will start and stop
simultaneously.
3-3. Remove the four clamp knobs (290) from the
corners of the top plate (100). This will allow you
to tilt the hopper (150) to the side, resting on the
hopper leg (350).
CAUTION: Clear area of any debris and keep
unauthorized personnel away from the unit
while tilting the hopper.
A minimum level of 6 to 8 inches of product should be
maintained in the hopper during operation. This will
help ensure that the pump remains full of product and
air is not introduced into the product.
Operator must be physically capable of lifting
fairly heavy objects. As with any lifting
activity, operator must have secure footing.
The power must be turned OFF and
DISCONNECTED before cleaning or disassembling
the unit. Always use CAUTION and keep HANDS
and OTHER OBJECTS out of the hopper when
power is connected to the unit.
An initial pull force will be required to get the
unit to start tilting with an immediate push
force as the center of gravity shifts.
2-1. OPERATION
3-4. Remove the O-Ring (250) from the bottom of
the spacer plate (230), clean, and inspect for
damage. Replace as necessary.
After any disassembly and/or cleaning operation, and
before reconnecting power to the unit, check to ensure
that the AugMentor is properly assembled and that the
auger is properly attached to the ring gear.
3-5. To remove the auger (220) from the assembly
for cleaning rotate the auger clockwise,
disengaging the auger dowel pins (210) from the
auger. Lift the auger from the hopper through the
top.
Reference Pump Manual for additional operating
instructions
Before the unit is operated, add product to the
hopper. Start the pump and AugMentor and adjust the
auger speed as necessary to provide the optimum feed
rate of the product into the pump. Depending upon the
application and control setup, the AugMentor may be
started first to ensure that the pump suction housing is
full of product and applying feed pressure to the
Care should be taken in removing the auger. It
is fairly heavy and can be awkward to handle.
While removing in a horizontal position, auger
1
spacer plate (230).
is unsupported after it has been disengaged from
the dowel pins (210).
4-3. Fit the large ring gear (200) onto the ring gear
guide (190) meshing the gear teeth with the
drive pinion (110).
3-6. Carefully remove the last two clamp knobs (300)
holding the spacer plate (230) to the top plate (100).
Remove and clean the spacer plate.
4-4. Install two O-rings (240 and 250) in the spacer
plate (230). Install the spacer plate to the top
plate (100) using the two smaller clamp knobs
(300).
The spacer plate holds several parts to the top plate
including the metal ring gear (200). The ring gear is
supported by the ring gear guide (190). Care must
be taken while removing the spacer plate so the ring
gear is not pulled off the ring gear guide, which
could cause the ring gear to fall. Internal parts are
lubricated and may be slippery to handle.
Note: Apply a small amount of Food grade
grease on the large O-rings in several
locations. The cohesive force of the
grease will keep the O-ring in its groove
on the spacer plate while assembling.
3-7. Remove the O-ring (240) from the top of the spacer
plate (230), clean and inspect for damage.
4-5. Fit the auger (220) into the hopper (150).
Locate the pins (210) in the holes in the ring
gear, turn counterclockwise locking the auger
in place in the ring gear.
3-8. Remove and clean the large ring gear (200) by
lifting it from the ring gear guide (190).
3-9. Remove and clean the drive pinion (110) along with
the seal bushing (120) and thrust plate (140).
4-6. Rotate the hopper vertically and secure it
evenly with the remaining four clamp knobs
(290).
3-10. Remove the seal bushing (120) and O-ring (130)
from the center of the drive pinion (110), inspect and
clean. Replace the O-ring as necessary.
CAUTION: Clear area of any debris and keep
unauthorized personnel away from the unit
while tilting the hopper.
4-1. ASSEMBLY
OPERATOR MUST BE PHYSICALLY CAPABLE
OF LIFTING FAIRLY HEAVY OBJECTS. AS
WITH ANY LIFTING ACTIVITY, OPERATOR
MUST HAVE SECURE FOOTING.
4-2. NOTE:
Ensure the power is OFF and
DISCONNECTED before assembling the unit.
4-3. At this point, all parts should be clean and in good
condition. Install the seal bushing (120) with O-ring
(130) in the drive pinion (110) and locate the thrust plate
(140) on the top of the drive pinion. Grease the splined
gear motor pinion shaft (10) to allow for easy assembly.
Install the drive pinion on the gear motor pinion shaft.
Grease the teeth of the drive pinion and the bottom of
the seal bushing where it will ride on the nylon spacer
plate (230).
AN INITIAL LIFTING FORCE WILL BE
REQUIRED TO GET THE UNIT TO START
TILTING UP WITH AN IMMEIDATE PULL
FORCE TO KEEP THE UNIT FROM FALLING
ONTO THE PUMP WHEN THE CENTER OF
GRAVITY SHIFTS.
NOTE: Utilize an appropriate Food Grade grease for
lubrication
OPERATOR SHOULD TAKE CARE IN HANDLING
HEAVY LUBRICATED PARTS.
4-2. Liberally grease the ring gear (200) on the gear
teeth, top groove for the ring gear guide (190), and
the bottom flat section that rides on the nylon
2
Customer’s Notes
3
Item Part Number
10
20
30
40
50
60
70
80
90
100
110
120
130
140
Description
Qty.
4240892001
6191552320
6230012430
4240890001
6191824160
4220536000
3207902158
6191734250
6230704100
4250597001
4250595001
4220537001
3207902152
4220538001
Pinion Shaft
Hex Screw
LockWasher
Adapter Flange
Socket Screw
Grease Seal
O-Ring
Hex Screw
LockWasher
Top Plate
Drive Pinion
Seal Bushing -SS Metal
O-Ring
Thrust plate
160
170
180
190
3651859000
4250583002
4220534101
6191724400
6230704080
4241103001
Hopper - 70 Gallon No Fins
Hopper - 70 Gallon
Hopper Gasket
Hex Screw
LockWasher
Ring Gear Guide
200
210
4250678001 Ring Gear
6160182410 Dowel Pin
1
4
220
4250598001 Auger Assembly - Full Auger
3651860000 Auger Assembly - Scraper
1
230
240
250
260
270
280
290
300
310
320
330
340
350
360
370
4250596001
3207903390
3207903387
4230537001
6191734250
6230704100
4220552001
4220552002
4240889001
6191734200
6230704100
4220530001
AS225221B
6160042600
4220529000
1
1
1
1
2
2
4
2
1
2
2
1
1
1
3
150
Spacer Plate - Nylon
O-Ring, Spacer Plate
O-Ring, Spacer Plate
Spacer Handle Bracket
Hex Screws
LockWasher
Clamp Knob - Long
Clamp Knob - Short
Hinge Bracket
Hex Screw
LockWasher
Hinge Pin
Hopper Leg
Clevis Pin
Hair Pin
1
1
1
1
4
1
1
4
4
1
1
1
1
1
Item Numbers Shown in Pump Manual
Item
1100
Item
6200
1
1
8
8
1
Item
Pump Suction Housing - AugMentor
Part Number
Description
4250866001 Pump Suction Hsg.- E
4250755001 Pump Suction Hsg.- F
4250784001 Pump Suction Hsg.- G
4250671001 Pump Suction Hsg.- H, J, K,
Pump Conrod Assembly - AugMentor
Part Number
Description
4250663017 E Conrod Assembly - Single Flight
4250664017 F Conrod Assembly - Single Flight
4250665017 G Conrod Assembly - Single Flight
4250463017
4250464017
4250465017
H Conrod Assembly - Single Flight
J Conrod Assembly - Single Flight
K Conrod Assembly - Single Flight
Pump Suction Housing / Stator Gasket - AugMentor
Part Number
Description
Qty.
1
Qty.
1
Qty.
See Pump Manual Suction Hsg / Stator - "E" flat gasket.
1200
See Pump Manual Suction Hsg / Stator - "F" flat gasket.
See Pump Manual Suction Hsg / Stator - "G" flat gasket.
3207903361
4
Suction Hsg / Stator- H, J, K O-Ring
1
5