1
SERIES 60 SERVICE MANUAL
NOTE:
When setting valve lash clearance or injector height, always set them to the dimension
listed in Table 12-2.
Adjust the valves and set the fuel injector heights as follows:
1. Disconnect starting power for engine.
2. Remove the engine valve rocker cover as outlined. Refer to section 1.6.2 for
one-piece, refer to section 1.6.3 for two-piece rocker cover, and refer to section 1.6.5 for
three-piece rocker cover.
3. Insert a 3/4 in. drive breaker bar or ratchet into the square hole in the center of the
crankshaft pulley.
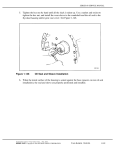
4. Bar the engine in the direction of rotation and observe the intake and exhaust valve rollers
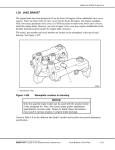
at any cylinder that is close to TDC (top dead center). See Figure 12-4. Choose a
cylinder that has the exhaust valves almost completely closed. Just as the exhaust valves
are closing, the intake valves will start to open. This is the valve overlap period.
All information subject to change without notice.
6SE483 9610 © 1996 DETROIT DIESEL CORPORATION
From Bulletin 2-60-98 Rev.
12-9
12.2 VALVE LASH, INJECTOR HEIGHT (TIMING) AND JAKE BRAKE LASH ADJUSTMENT
1. Exhaust Valve Rocker Arm Assembly
4. Rocker Arm Shaft
2. Fuel Injector Rocker Arm Assembly
5. Cylinder Head
3. Camshaft
6. Intake Valve Rocker Arm Assembly
Figure 12-4 Valve Overlap Period
12-10
From Bulletin 2-60-98 Rev.
All information subject to change without notice.
6SE483 9610 © 1996 DETROIT DIESEL CORPORATION
SERIES 60 SERVICE MANUAL
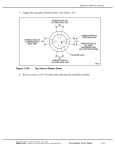
5. Stop engine rotation at the time of valve overlap. Note which cylinder this is,
and follow the sequence listed in Table 12-2a to correctly set valves and injector
heights. The timing can be started with any cylinder in valve overlap.
Cylinder with
Valve Overlap
Set Valves on
Cylinder No.
Set Injector Height
on Cylinder No.
6
1
5
2
5
3
4
3
6
1
6
2
5
2
4
3
4
1
Table 12-2a Valve Lash and Injector Height Adjustment Sequence
NOTICE:
Never set the valves and injector of the same cylinder at the
same time. Doing this will result in engine damage.
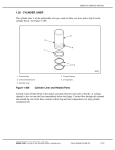
6. To adjust the intake valves, insert a 0.203 mm (.008 in.) feeler gage between the
tip of the valve stem and the valve button at the end of the rocker arm. See
Figure 12-5.
All information subject to change without notice.
6SE483 9610 © 1996 DETROIT DIESEL CORPORATION
From Bulletin 2-60-98 Rev.
12-11
12.2 VALVE LASH, INJECTOR HEIGHT (TIMING) AND JAKE BRAKE LASH ADJUSTMENT
1. Intake Valve
4. Locknut
2. Valve Button
5. Feeler Gage
3. Intake Valve Rocker Arm Assembly
6. Tip of Intake Valve
Figure 12-5 Intake Valve Adjustment
7. Loosen the locknut, and turn the adjusting set screw until the feeler gage
produces an even smooth pull between the valve stem and valve button.
8. Tighten the locknut to 41 - 47 N·m (30 - 35 lb·ft) and remove the feeler gage.
Reinsert the feeler gage to ensure that the adjustment did not change when the
locknut was tightened. Readjust as necessary.
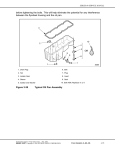
9. The exhaust valves are adjusted the same way as the intake valves, except use a
0.660 mm (.026 in.) feeler gage (1991 and later models only). Early models (pre1991 models) use 0.508 mm (.020 in.) feeler gage as listed in Table 12-2. See
Figure 12-6.
12-12
From Bulletin 2-60-98 Rev.
All information subject to change without notice.
6SE483 9610 © 1996 DETROIT DIESEL CORPORATION
SERIES 60 SERVICE MANUAL
1. Location of Identification Groove
5. Locknut
2. Valve Button
6. Exhaust Rocker Arm Assembly
3. Allen Wrench
7. Feeler Gage
4. Adjusting Screw
8. Tip of Exhaust Valve
Figure 12-6 Exhaust Valve Adjustment
NOTE:
Effective with all 1991 model year engines, a change was made to the exhaust valve
material which requires a different exhaust valve lash setting. Refer to section 1.4 for
exhaust valve identification.
10. After each set of intake and exhaust valves is adjusted, adjust the corresponding
injector listed in Table 12-2a. Injector height settings and tools are listed in Table
12-2.
11. For natural gas applications the valves are adjusted the same way as on the
diesel engine, except that a .032 in. (0.813 mm) feeler gage is used for exhaust
valves and a .011 in. (0.279 mm) feeler gage is used for intake valves.
12.
Adjust the fuel injector height for the engine models in parentheses by placing
the small end of the height gage in the hole provided in the fuel injector body,
with the flat of the gage toward the fuel injector plunger. See Figure 12-3. The
injector height settings for Series 60 engines are listed in Table 12-2.
All information subject to change without notice.
6SE483 9610 © 1996 DETROIT DIESEL CORPORATION
From Bulletin 2-60-98 Rev.
12-13
12.2 VALVE LASH, INJECTOR HEIGHT (TIMING) AND JAKE BRAKE LASH ADJUSTMENT
13. Loosen the fuel injector rocker arm locknut and turn the adjusting set screw until
the extended part (flag) of the gage will just pass over the top of the injector
follower. An accurate "feel" will be developed. The objective is to adjust all six
injectors to the same feel. See Figure 12-7.
14. Tighten the locknut to 41 - 47 N·m (30 - 35 lb·ft). Check the adjustment with the
height gage and, if necessary, readjust the set screw. Remove the height gage.
1. Height Gage Flag
4. Set Screw
2. Height Gage
5. Locknut
3. Allen Wrench (3/16")
6. Fuel Injector Follower
Figure 12-7 Fuel Injector Height Adjustment
15. Refer to the adjusting sequence listed in Table 12-2a and proceed to the next
cylinder in the adjustment sequence.
16. Bar the engine over in the direction of normal rotation until the next cylinder in
the adjustment sequence is in its valve overlap period.
17. Repeat the valve adjustment and fuel injector height adjustments procedures
until all the valves and fuel injectors have been adjusted.
18. Replace the engine rocker cover.
19. Reconnect starting power to the engine.
12-14
From Bulletin 2-60-98 Rev.
All information subject to change without notice.
6SE483 9610 © 1996 DETROIT DIESEL CORPORATION