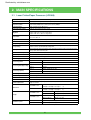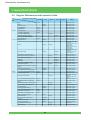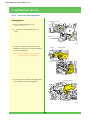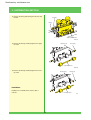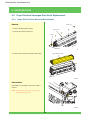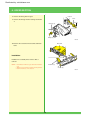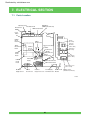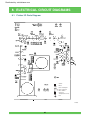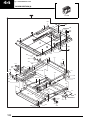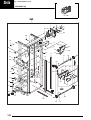
1
Distributed by: minilablaser.com
SERVICE MANUAL / PARTS LIST
DIGITAL MINILAB
FRONTIER 590
SCANNER/IMAGE PROCESSOR
SP-3000
LASER PRINTER/PAPER PROCESSOR
LP5900
Principle of Operation
Servicing and Electrical Circuit Diagram
SUPPLEMENT
PP3-C1069E
Distributed by: minilablaser.com
INTRODUCTION
This Servicing Manual outlines the maintenance and servicing procedures for the Fujifilm Digital Minilab
FRONTIER 590.
For the service information not described in this manual, refer to the following Service Manuals.
• FRONTIER 570 (SP-3000/LP5700) Principle of Operation (System Disk Ver.1.7 or later)
Ref.No.PP3-C1052E
• FRONTIER 570 (SP-3000/LP5700) Servicing and Electrical Circuit Diagram (System Disk Ver.1.7 or
later)Ref.No.PP3-C1053E
• FRONTIER 550/570 (SP-3000/LP5500/LP5700) Installation Manual (System Disk Ver.1.7 or later) Ref. No.
PP3-A1301E
This manual is a professional publication provided for qualified service personnel or persons fully trained in
equipment service procedures. All other personnel and operators are restricted from servicing the FRONTIER
590. When maintenance service is needed, be sure to contact qualified service personnel.
Precautions Generally Applying to All Serving Operations
! WARNING
When servicing internal machine parts, make sure the power switch and the main power supply on the power distribution
board are both set to the OFF position.
If the main power is left ON, electricity will flow as far as the power switch and power supply section, and this can cause
electric shocks and/or short-circuiting.
If the power is left on, there is also the possibility for the machine to be accidentally activated causing damage to the
machine and/or bodily injury.
! CAUTION
The light source section and dryer will be hot to the touch. Wait 15 minutes after turning off the power before commencing
with servicing procedures.
• Wear gloves when handling the optical system parts to keep the parts free from fingerprints.
• When mounting machine parts, take care not to sandwich any of the wires.
• Each of the connectors is provided with a symbol indicating what it is to be connected to. Make sure the connectors are
connected to the connectors, harness ends or parts bearing the corresponding symbols.
• The plastic connectors have a locking catch on the plug (male) end. To disconnect one of these connectors, loosen the
catch first; when connecting, make sure the catch engages (locks).
Service Manual Regulations
1. All rights are reserved by the Fuji Photo Film Co., Ltd. (FUJIFILM).
2. Manual usage is restricted to FUJIFILM equipment related technical and service
personnel.
3. This manual contains exclusive information relating to FUJIFILM equipment and is
therefore proprietary. Unauthorized disclosure is prohibited.
4. FUJIFILM’s prior consent is required in regard to the following.
K Manual copying in whole or in part.
K Disclosure of manual contents to unauthorized personnel.
K Manual uses for purposes other than technical service.
Distributed by: minilablaser.com
CONTENTS
1.
SAFETY ......................................................................................................................................... 5
1.1
2.
Dryer Section Caution Label................................................................................................... 5
MAIN SPECIFICATIONS ......................................................................................................... 6
2.1
2.2
Laser Printer/Paper Processor (LP5900) ............................................................................... 6
Dimensions and Weight.......................................................................................................... 7
2.2.1 Laser Printer/Paper Processor (LP5900) ..................................................................... 7
2.3 Installation Space ................................................................................................................... 8
2.4 Maintenance Schedule ........................................................................................................... 9
2.5 Regular Maintenance and Inspection Table ......................................................................... 10
3.
ERROR MESSAGE ................................................................................................................. 12
4.
MAINTENANCE MENU .......................................................................................................... 43
4.1
5.
Printer Adjustment/Maintenance (05) ................................................................................... 43
4.1.1 Printer Input Check (0525) ......................................................................................... 43
4.1.2 Printer I/O Check (0540) ............................................................................................ 44
DISTRIBUTION SECTION ..................................................................................................... 45
5.1
Outline .................................................................................................................................. 45
5.1.1 Unit Identification........................................................................................................ 45
5.1.2 Parts Location ............................................................................................................ 46
5.2 Operation Sequences........................................................................................................... 50
5.2.1 Sensors and Motors ................................................................................................... 50
5.2.2 Nip OFF/ON Operation of No. 16 Roller..................................................................... 52
5.2.3 Distribution Processing............................................................................................... 53
5.3 Distribution Entrance Unit Parts Replacement ..................................................................... 54
5.3.1 Printer Right Inner Cover Removal/Reinstallation...................................................... 54
5.3.2 Drive Gear Disengagement........................................................................................ 55
5.3.3 Distribution Entrance Unit Removal/Reinstallation..................................................... 56
5.4 Distribution Unit Parts Replacement..................................................................................... 57
5.4.1 Distribution Unit Removal/Reinstallation .................................................................... 57
5.4.2 Nip Release Motor Bracket Removal/Reinstallation................................................... 58
5.4.3 Nip Release Motor 5 (M657) Replacement ................................................................ 58
5.4.4 Nip Release Drive Gear/Belt Replacement ................................................................ 60
5.4.5 Nip Release Home Position Sensor (Front: D662/Rear: D663) Replacement ........... 62
5.4.6 Nip Roller Replacement ............................................................................................. 63
5.4.7 Distribution Home Position Sensor (D661) Replacement .......................................... 64
5.4.8 Nip Release Start Sensor (Front : D658P / Rear : D659P) Replacement .................. 65
5.4.9 Nip Release Start Sensor LED (Front : D658L / Rear : D659L) Replacement........... 66
5.4.10 Nip Release Home Position Sensor for M657 (D657) Replacement.......................... 67
5.4.11 Distribution Roller Replacement................................................................................. 68
5.4.12 Pipe Slider Replacement............................................................................................ 72
6.
DRYER SECTION .................................................................................................................... 74
6.1
6.2
Outline .................................................................................................................................. 74
Dryer Entrance Squeegee Rack Parts Replacement ........................................................... 75
6.2.1 Upper Roller Section Removal/Reinstallation ............................................................ 75
3
Distributed by: minilablaser.com
6.2.2 Upper Section Roller Replacement ............................................................................ 76
6.2.3 Lower Section Roller Replacement ............................................................................ 77
6.3 Dryer Belt Unit Parts Replacement....................................................................................... 78
6.3.1 Dryer Rack Section Rollers and Mesh Belts Replacement ........................................ 78
6.4 Dryer Rack Parts Replacement ............................................................................................ 80
6.4.1 Front Bearing Housing Disassembly/Reassembly ..................................................... 80
6.4.2 Rear Bearing Housing Disassembly/Reassembly...................................................... 81
6.5 Dryer Rack Maintenance ...................................................................................................... 82
6.5.1 Cleaning the Dryer Rack Mesh Belt ........................................................................... 82
7.
ELECTRICAL SECTION ....................................................................................................... 83
7.1
8.
ELECTRICAL CIRCUIT DIAGRAMS ................................................................................. 84
8.1
8.2
8.3
9.
Parts Location....................................................................................................................... 83
Printer I/O Parts Diagram ..................................................................................................... 84
JND23 Circuit Board Wiring Diagram ................................................................................... 89
PDA26 Circuit Board Wiring Diagram................................................................................... 91
PARTS LIST .............................................................................................................................. 93
4
Distributed by: minilablaser.com
1. SAFETY
1.1
Dryer Section Caution Label
CAUTION
HOT
G2-002
5
Distributed by: minilablaser.com
2. MAIN SPECIFICATIONS
2.1
Laser Printer/Paper Processor (LP5900)
Item
Specifications
Type
Floor-type, normal-light operation (laser printer, processor, cutter, sorter in one unit).
Exposure system
Scanning exposure system using RGB lasers.
Pixel density: 300dpi, Sub-scanning luster density: 600dpi
Scanning speed
Sub-scanning speed: 100 mm/sec.
Paper transport system
Full-auto sheet paper transport system
Magazine
Two switchable paper magazines
Paper width: 8.9 to 15.2 cm, length: 186 m
Paper width: 16.5 to 30.5 cm, length: 90 m
Paper width
8.9, 9.5, 10.2, 11.4, 11.7, 12.0, 12.7, 13.0, 15.2, 16.5, 17.8, 20.3, 21.0, 21.6, 24.0, 25.4,
27.9, 29.7, 30.5 cm
Paper
FUJICOLOR paper (silver-halide).
Print size
89 ✕ 82.5 mm to 305 ✕ 457 mm
Back printing
Two 40-character lines
Front printing
Time and date of photograph in black characters in lower right-hand corner of prints from
Advanced Photo System (IX240) cartridge film.
Index print
Color index print and normal prints can be printed from Advanced Photo System/135 (negative, positive, black and white) film.
Print condition setup
Semi-automatic calibration by AD300 densitometer
Operation panel
16 ✕ 2 lines, LCD display with 8 keys
Counter
Software-controlled counting system
Processing system
Two-line sheet transport system
Type 2
42.5 mm/sec.
Type 1
30.5 mm/sec.
Type 2
82 sec.
Type 1
116 sec.
Type 2
Approx. 2,400 prints/hr. (4R)
Type 1
Approx. 1,610 prints/hr. (4R)
Processing speed
Processing time (Dry-to-dry)
Processing capacity
Processing chemicals
New chemical system CP-49E
Rack washing
Auto-washing No.2/No.3 crossover racks, dryer entrance rack
Waste solution tank
11.2 L ✕ 1
Sorter
SU2400AY, Sorting capacity: 24 orders of C/H/P-mixed format prints
Power requirements
AC200-240V (50/60Hz) Single-phase 25A, Three-phase three-wire and four-wire 17A,
Approx. 4.8 KVA
SU1400AY sorter
1,515(W) ✕ 820(D) ✕ 1,325(H) mm/
59.65(W) ✕ 32.28(D) ✕ 52.17(H) in.
SU2400AY sorter
1,965(W) ✕ 850(D) ✕ 1,360(H) mm/
77.36(W) ✕ 33.46(D) ✕ 53.54(H) in. *1):
Dimensions
*1)
Solution-filled
520 kg (1,146 lbs)
Without solutions
470 kg (1,036 lbs)
Solution-filled
554 kg (1,221 lbs)
Without solutions
504 kg (1,111 lbs)
SU1400AY sorter
Weight
SU2400AY sorter
SU1400AY sorter
Approx. 4.2 sq. m/5.02 sq. yds.
SU2400AY sorter
Approx. 4.5 sq. m/5.38 sq. yds.
Installation space
*1): With densitometer: 1390mm (H)/54.72 in. (H)
6
Distributed by: minilablaser.com
2. MAIN SPECIFICATIONS
Laser Printer/Paper Processor (LP5900)
Dimensions
Length
Weight
1,965 mm (77.36 inches)
Width
850 mm (33.46 inches)
Height
1,360 mm (53.54 inches)
When transported
435 kg (960 lbs)
When operated (Max.)
590 kg (1,302 lbs)
850
445
820
(Unit: mm)
Densitometer
1515
820
450
1965
1360
Sorter SU2400AY
1325
2.2.1
Dimensions and Weight
1325
2.2
L2-947
7
Distributed by: minilablaser.com
2. MAIN SPECIFICATIONS
2.3
Installation Space
(Unit : mm)
2845
1515
730
100
600
820
655
450
603
420
772
615
2845
600
1515
730
480
1625
1330
955
1365
1120
1325
375
2400
65
450
640
L2-949
8
Distributed by: minilablaser.com
2. MAIN SPECIFICATIONS
2.4
Maintenance Schedule
On the day when the regular inspection is due, a message appears at the pre-operational check stage. To keep the
FRONTIER 590 operating at peak performance, conduct regular maintenance and inspections as indicated in the
table below.
Schedule
Pre-operational Post-operational
Check
Check
Item
Scanner
Scanner
Printer/
Processor
Scanner
Printer/
Processor
Printer/
Processor
Printer/
Processor
Printer/
Processor
Printer/
Processor
Printer/
Processor
Scanner
Printer/
Processor
Printer/
Processor
Printer/
Processor
Printer/
Processor
Printer/
Processor
Printer/
Processor
Printer/
Processor
Printer/
Processor
Printer/
Processor
Printer/
Processor
Printer/
Processor
Printer/
Processor
Printer/
Processor
Scanner
Printer/
Processor
Printer/
Processor
Printer/
Processor
Every Day
Diffusion Box/LED
Board Cover
Auto Film Carrier
NC100AY Feed Lanes
Control Strip
Auto Film Carrier
NC100AY Magnetic
Heads/Rollers
Waste Solution
Dryer Entrance Rack
Every 2
Days
Every
Week
Every Every 3 Every 6
Month Months Months
Every
Year
Every
Two
Years
Refer to
Section
Clean
3.2.1 *3
Clean
3.2.2 *3
Process/
Check
3.2.5 *3
Clean
6.1.1 *3
Collect
6.1.2 *3
Wash
3.2
Crossover Racks
Wash
8.3 *3
Upper Part of the P1/
P2/PS1 Processing
Racks
Dryer Entrance Roller
Clean
8.3 *3
Wash
3.3
Dryer Rack Mesh Belt
Clean
3.4
Light Source Section Air
Filter
Printer Section Air Filter
Clean
Replace 8.5 *3
Clean
8.6 *3
Printer Power Supply
Section Air Filters
Processing Solution
Cooling Fan Air Filter
Dryer Section Air Filters
Clean
8.7 *3
Clean
8.8 *3
Clean
8.9 *3
Dryer Exit Section Air
Filter
P1/P2 Circulation Filters
Clean
8.10 *3
8.11 *3
Processing Racks
Replace
*1
Wash
Auto-washing Nozzles
Clean
8.13 *3
Paper Feed Section
Rollers
Dryer Exit Section
Rollers
Dryer Roller/Dryer Rack
Mesh Belt
Exposure Section
Cooling Air Filter
Densitometer White
Board
G Laser Optimal
Temperature Setup
PS Processing
Solutions
PS Circulation Filters
Clean
8.14 *3
Clean
8.15 *3
Clean
8.16 *3
Paper Magazine
Rollers/Inside of the
Magazine
8.12 *3
Replace
8.17 *3
Clean
8.18 *3
Setup
4.6.2 *4
Replace
8.19 *3
Replace
*2
Clean (at the time of paper end)
8.20 *3
8.21 *3
*1: When printing in large quantities (average 5,000 prints par day), replace the filters every handled and fifty thousand prints.
*2: When printing in large quantities (average 2,800 prints par day), replace the filters every million prints.
*3: Basic Operating Instructions of FRONTIER 570
*4: Condition Setup and Maintenance of FRONTIER 570
9
Distributed by: minilablaser.com
2. MAIN SPECIFICATIONS
2.5
Regular Maintenance and Inspection Table
Implementation Period (Every)
Item
Lens
Scanner
6 months
year
2 Years
3 Years
Clean
Refer to
Subsection 2.3.1*
Mouse
Clean
Subsection 2.3.2*
Auto Film Carrier
Inspect
Subsection 2.3.3*
Floppy Disk Drive
Inspect
Subsection 2.3.7*
CD-ROM Drive
Inspect
Subsection 2.3.8*
Printing Functions
Inspect
Subsection 2.3.9*
Carrier Base Slider Rails
Clean
Subsection 2.3.4*
Carrier Base Slide Guides
Replace
Carrier Base Plug-in Connector
Subsection 2.3.6*
Replace
Main Control Unit Backup Battery
Power Supply Cord
Subsection 7.6.1*
Replace
Clean
Magazine Rollers
Subsection 9.3.4*
Subsection 2.3.5*
Inspect
Subsection 5.6.1*
Cutters
Inspect
Subsection 2.3.10 for
inspection*
Subsection 11.1.12 for
upper cutter
replacement*
Subsection 11.1.15 for
lower cutter
replacement*
Back Printer Head
Inspect
Replace
Registration Section Feed Rollers
Nip Release System (before exposure)
Replace
Subsection 2.3.11 for
inspection*
Subsection 2.3.12 for
replacement*
Clean
Subsection 2.3.13*
Inspect
Subsection 2.3.14*
Sub-scanning Section Rollers
Clean
Subsection 2.3.15*
Steel Belt
Replace
Subsection 12.3.3*
Rubber Belt
Replace
Subsection 12.3.7*
Cam Followers (Rubber Bearings)
Replace
Subsection 2.3.16*
Distribution Pipe Slider
Inspect
Distribution Section Nip Release System/
Rollers
Printer/
Processor
5 Years
Subsection 2.3.17*
Clean
Subsection 2.3.18*
Laser Optical Unit Air Filter
Replace
Subsection 12.2.1*
Processing Rack Helical Drive Gears
Grease
Subsection 2.3.19*
P1R, P2RA, P2RB Pump Output/Leaks
Inspect
Subsection 5.7.1*
PSR Pump Output/Leaks
Inspect
Subsection 5.7.1*
PSR Pump Bellows/Valve
Replace
Subsection 16.2.6 for
bellows*
Subsection 16.2.5 for
valve*
Crossover Rack Auto Washing Nozzle
Inspect
Subsection 2.3.20*
Dryer Entrance Rack Auto Washing
Nozzle
Inspect
Subsection 2.3.20*
Dryer Entrance Rack Soft Roller (Gray)
Replace
Section 6.2
PS Tank Separate Plate Blade/Seal
Replace
Subsection 14.3.1*
Circulation Pumps
Inspect
Subsection 2.3.21*
Processing Solution Heaters
Inspect
Subsection 2.3.22*
Processing Solution Level Sensors
Clean
Subsection 2.3.23*
Replenisher Level Sensors
Clean
Subsection 2.3.24*
PS4 Solution Concentration Sensor
Clean
Waste Solution Level Sensor
Subsection 2.3.25*
Clean
PSR Level Sensor
Subsection 2.3.26*
Inspect
Subsection 2.3.27*
Processing Solution Temperature
Sensors
Calibrate
Subsection 5.7.4*
Solution Hoses/Clamps
Inspect
Subsection 2.3.28*
Processor Drive Chain
Grease
Subsection 2.3.29*
Dryer Rack Soft Roller (Gray)
Replace
Section 6.3
Dryer Mesh Belt
Inspect
Subsection 2.3.30*
10
Distributed by: minilablaser.com
2. MAIN SPECIFICATIONS
Implementation Period (Every)
Item
Printer/
Processor
6 months
year
2 Years
3 Years
5 Years
Refer to
Drive Timing Belt Tension
(Dryer Rack, Dryer Exit and Print Sending
Units)
Inspect/
Adjust
Subsection 17.2.3 for
Dryer rack unit*
Subsection 18.1.10 for
dryer exit unit*
Subsection 18.2.2 for
print sending unit*
Print Sending Feed Belt Tension
Inspect
Subsection 18.2.3*
Sorter Drive Chain Tension
Inspect
Subsection 18.4.7 for
SU1400AY*
Subsection 18.6.8 for
SU2400AY*
SU1400AY/SU2400AY Transverse Sorter
Belt Tension
Inspect
Subsection 18.3.6 for
SU1400AY*
Subsection 18.5.8 for
SU2400AY*
SU1400AY/SU2400AY Sorter Stop
Position
Inspect
Subsection 18.4.5 for
SU1400AY*
Subsection 18.6.9 for
SU2400AY*
*: Refer to LP-5700 service manual
11
Distributed by: minilablaser.com
3. ERROR MESSAGE
No.
Message
Factor
Actions
I-2221
Data was downloaded.
Additional language loading completed.
(Causes of the error message)
Data download completed.
—
I-2222
Data was deleted.
Additional language deleting completed.
(Causes of the error message)
Data deleting completed.
—
W-2223
Downloading of files failed.
No message file was found.
Check if the message file exists
in the folder.
No additional language file
(Causes of the error message)
Message file is not in specified folder.
Copy message file to specified folder.
W-2224
Downloading of files failed.
Writing of FROM failed.
Download it again.
Additional language file writing failed.
(Causes of the error message)
Massage file writing to FROM failed.
1. Restart the system software. If the
error occurs again, reinstall the
system software.
2. Replace the GMC circuit board.
W-2225
Downloading of files failed.
Version of printer and that of
message file mismatched.
Check the version of message
file.
Language version unconformity
(Causes of the error message)
Version of message file does not meet
with printer.
Down load message file with the
same version as printer.
W-2226
Incorrect file contents.
Undefined language was
selected.
Check the message file with the
check tool.
Incorrect language ID
(Causes of the error message)
Undefined language ID is set to the
message file.
Correct the message file with the
checking tool.
W-2227
Incorrect file contents.
Unregistered special character is
used.
Check the message file with the
check tool.
Incorrect character code
(Causes of the error message)
Unregistered character is used in
message file.
Correct the message file with the
checking tool.
W-2228
Incorrect file contents.
Necessary characters are
insufficient.
Check the message file with the
check tool.
Lack of letter string
(Causes of the error message)
Lack of letter string in message file
Correct the message file with the
checking tool.
W-2229
Incorrect file contents.
Check the message file with the
check tool.
Too much letter string
(Causes of the error message)
Too much letter string of message file
Correct the message file with the
checking tool.
W-2230
Incorrect file contents.
File with 0KB size exists.
Check the file size, then
download it again.
File size is zero.
(Causes of the error message)
File with size zero exists.
Create message file again correctly.
W-2231
Too large file size.
File size exceeds 400KB.
Be sure to use the file with the
size less than 400KB.
Too large file size
(Causes of the error message)
File size exceeds 400 KB.
Reduce the file size less than 400
KB.
W-2331
Image control box cooling
fan(F620) abnormal.
After post-operational check is
completed, restart the system. If
problems persist, consult your
technical representative.
Rotation of the image control section
cooling fan (F620) is not detected.
(Causes of the error message)
1. Poorly connected or broken harness
between the image control section
cooling fan (F620) and GMC4 on the
GMC23 circuit board
2. Faulty F620
3. Faulty GMC23 circuit board
12
1. Connect the harness correctly, or
repair or replace it.
2. Replace F620.
3. Replace the GMC23 circuit board.
Distributed by: minilablaser.com
3. ERROR MESSAGE
No.
E-2332
E-2333
E-2334
Message
Image control box cooling
fan(F620) abnormal.
After post-operational check is
completed, restart the system. If
problems persist, consult your
technical representative.
Temperature in circuit
board(GMC23) abnormal.
After post-operational check is
completed, restart the system. If
problems persist, consult your
technical representative.
Communication error occurred in
printer(GMC23-CTL23).
After post-operational check is
completed, restart the system. If
problems persist, consult your
technical representative.
Factor
The temperature of the GMC23 circuit
board exceeds 45 degrees and fan
operation cannot be detected.
(Causes of the error message)
1. Blocked GMC box or exhaust port
2. Poorly connected or broken harness
between the image control section
cooling fan (F620) and GMC4 on the
GMC23 circuit board
3. Faulty F620
4. Faulty GMC23 circuit board
Although the rotation of the image
control section cooling fan (F620) is
detected, the temperature of the
GMC circuit board exceeds 45 °C.
(Causes of the error message)
1. Ventilation holes in the GMC box are
blocked by with foreign matter.
2. Faulty GMC23 circuit board
Communication timeout between the
GMC23 and CTL23 circuit boards.
(Causes of the error message)
1. Poorly connected or broken harness
between the GMC23 and CTL23
circuit boards
2. Abnormal CTL software
3. After data transmission, the GMC23
cannot receive any responses from
the CTL23.
E-2335
The backup switch is turned off.
Turn off the printer, then turn on
the backup switch, and then
restart the FRONTIER.
Backup battery switch on GPR is OFF.
(Causes of the error message)
Backup battery switch on GPR is OFF.
E-2350
Printer rear upper exhaust
fan(F600/F601/F602/F603)
abnormal.
After post-operational check is
completed, restart the system. If
problems persist, consult your
technical representative.
Fan rotation cannot be detected.
(Causes of the error message)
1. Poorly connected or broken harness
between the control section exhaust
fan (F600/F601/ F602/F603) and
PDA16 on the PDA26 circuit board
2. Faulty F600/F601/F602/F603
3. Faulty PDA26 circuit board
E-2351
Electric section cooling fan(F630) Fan rotation cannot be detected.
abnormal.
(Causes of the error message)
After post-operational check is
1. Poorly connected or broken harness
completed, restart the system. If
between the power supply cooling fan
problems persist, consult your
(F630) and PAC03 on the PAC23
technical representative.
circuit board
2. Faulty F630
3. Faulty PAC23 circuit board
13
Actions
1. Remove the foreign matter.
2. Connect the harness correctly, or
repair or replace it.
3. Replace F620.
4. Replace the GMC23 circuit board.
1. Remove foreign matter.
2. Replace the GMC23 circuit board.
1. Connect the harness correctly, or
repair or replace it.
2. Reinstall the system software.
3. Replace the CTL23 circuit board.
Turn ON the backup switch on the
GPR and restart the printer
1. Connect the harness correctly, or
repair or replace it.
2. Replace F600/F601/F602/F603.
3. Replace the PDA26 circuit board.
1. Connect the harness correctly, or
repair or replace it.
2. Replace F630.
3. Replace the PAC23 circuit board.
Distributed by: minilablaser.com
3. ERROR MESSAGE
No.
W-2412
W-2413
Message
Upper cutter operation(M600/
D601/D602) abnormal.
When a paper jam occurs in the
printer section, this problem is
solved by removing the paper.
After post-operational check is
completed, restart the system. If
problems persist, consult your
technical representative.
Lower cutter operation(M601/
D603/D604) abnormal.
When a paper jam occurs in the
printer section, this problem is
solved by removing the paper.
After post-operational check is
completed, restart the system. If
problems persist, consult your
technical representative.
Factor
Home position or close sensor does not
function during operation.
(Causes of the error message)
1. Jammed paper remains.
2. Poorly connected or broken harness
between:
1) The upper cutter open (home)
position sensor (D601) and the
JND2 on the JND23 circuit board
2) The upper cutter close (home)
position sensor (D602) and the
JND2 on the JND23 circuit board
3) The upper cutter drive motor (M600)
and the PDA4 on the PDA26 circuit
board
4) The CTL9 on the CTL23 circuit
board and the JND1 on the JND23
circuit board
5) The CTL13 on the CTL23 circuit
board and the PDA1 on the PDA26
circuit board
3. Faulty D601
4. Faulty D602
5. Faulty M600
6. Faulty PDA26 circuit board
7. Faulty CTL23 circuit board
Home position or close sensor does not
function during operation.
(Causes of the error message)
1. Jammed paper remains.
2. Poorly connected or broken harness
between:
1) The lower cutter open (home)
position sensor (D603) and the
JND3 on the JND23 circuit board
2) The lower cutter close (home)
position sensor (D604) and the
JND3 on the JND23 circuit board
3) The lower cutter drive motor (M601)
and the PDA4 on the PDA26 circuit
board
4) The CTL9 on the CTL23 circuit
board and the JND1 on the JND23
circuit board
5) The CTL13 on the CTL23 circuit
board and the PDA1 on the PDA26
circuit board
3. Faulty D603
4. Faulty D604
5. Faulty M601
6. Faulty PDA26 circuit board
7. Faulty CTL23 circuit board
14
Actions
1. Remove paper.
2. Connect the harness correctly, or
repair or replace it.
3.
4.
5.
6.
7.
Replace D601.
Replace D602.
Replace M600.
Replace the PDA26 circuit board.
Replace the CTL23 circuit board.
1. Remove paper.
2. Connect the harness correctly, or
repair or replace it.
3.
4.
5.
6.
7.
Replace the cutter unit.
Replace the cutter unit.
Replace the cutter unit.
Replace the PDA26 circuit board.
Replace the CTL23 circuit board.
Distributed by: minilablaser.com
3. ERROR MESSAGE
No.
W-2448
W-2449
Message
Initializing of upper cutter
failed(M600,D601,D602).
After post-operational check is
completed, restart the system. If
problems persist, consult your
technical representative.
Initializing of lower cutter
failed(M601,D603,D604).
After post-operational check is
completed, restart the system. If
problems persist, consult your
technical representative.
Factor
• Both the cutter open and close
sensors detect their home position.
• Cutter error flag is detected.
• The cutter close position sensor does
not function even after the specified
time has elapsed.
(Causes of the error message)
1. Poorly connected or broken harness
between:
1) D601, D602 and the JND2 on the
JND23 circuit board
2) The CTL9 on the CTL23 circuit
board and the JND1 on the JND23
circuit board
3) The M600 and the PDA4 on the
PDA26 circuit board
4) The CTL13 on the CTL23 circuit
board and the PDA1 on the PDA26
circuit board
2. Faulty upper cutter drive motor
(M600)
3. Faulty upper cutter open (home)
position sensor (D601)
4. Faulty upper cutter close position
sensor (D602)
5. Faulty PDA26 circuit board
6. Faulty CTL23 circuit board
• Both the cutter open and close sensors
detect their home position.
• Cutter error flag is detected.
• The cutter close position sensor does
not function even after the specified
time has elapsed.
(Causes of the error message)
1. Poorly connected or broken harness
between:
1) D603, D604 and the JND2 on the
JND23 circuit board
2) The CTL9 on the CTL23 circuit
board and the JND1 on the JND23
circuit board
3) The M601 and the PDA4 on the
PDA26 circuit board
4) The CTL13 on the CTL23 circuit
board and the PDA1 on the PDA26
circuit board
2. Faulty lower cutter drive motor (M601)
3. Faulty lower cutter open (home)
position sensor (D603)
4. Faulty lower cutter close position
sensor (D604)
5. Faulty PDA26 circuit board
6. Faulty CTL23 circuit board
15
Actions
1. Connect the harness correctly, or
repair or replace it.
2. Replace the upper cutter unit.
3. Replace the upper cutter unit.
4. Replace the upper cutter unit.
5. Replace the PDA26 circuit board.
6. Replace the CTL23 circuit board.
1. Connect the harness correctly, or
repair or replace it.
2. Replace the lower cutter unit.
3. Replace the lower cutter unit.
4. Replace the lower cutter unit.
5. Replace the PDA26 circuit board.
6. Replace the CTL23 circuit board.
Distributed by: minilablaser.com
3. ERROR MESSAGE
No.
W-2450
W-2451
W-2452
Message
Tilt in registration section(M641/
D641) malfunction.
After post-operational check is
completed, restart the system. If
problems persist, consult your
technical representative.
Registration section nip(M642/
D642) malfunction.
After post-operational check is
completed, restart the system. If
problems persist, consult your
technical representative.
Exposure section nip(M651/
D651) malfunction.
After post-operational check is
completed, restart the system. If
problems persist, consult your
technical representative.
Factor
Tilt home position cannot be detected.
(Causes of the error message)
1. Poorly connected or broken harness
between:
1) The tilt home position sensor (D641)
and the JND5 on the JND23 circuit
board
2) The CTL9 on the CTL23 circuit
board and the JND1 on the JND23
circuit board
3) The registration tilt motor (M641)
and the PDA10 on the PDA26 circuit
board
4) The CTL13 on the CTL23 circuit
board and the PDA1 on the PDA26
circuit board
2. Faulty tilt home position sensor (for
M641) (D641)
3. Faulty registration tilt motor (M641)
4. Faulty PDA26 circuit board
5. Faulty CTL23 circuit board
6. Faulty registration mechanism
Nip release home position cannot be
detected.
(Causes of the error message)
1. Poorly connected or broken harness
between:
1) The nip release home position
sensor (D642) and the JND5 on the
JND23 circuit board
2) The CTL9 on the CTL23 circuit
board and the JND1 on the JND23
circuit board
3) The nip release motor (M642) and
the PDA10 on the PDA26 circuit
board
4) The CTL13 on the CTL23 circuit
board and the PDA1 on the PDA26
circuit board
2. Faulty nip release home position
Sensor 1 (for M642) (D642)
3. Faulty nip release motor (M642)
4. Faulty PDA26 circuit board
5. Faulty CTL23 circuit board
6. Faulty registration mechanism
Nip home position cannot be detected.
(Causes of the error message)
1. Poorly connected or broken harness
between:
1) The soft nip home position sensor
(for M651) (D651) and the JND6 on
the JND23 circuit board.
2) The soft nip motor (M651) and the
PDA11 on the PAD23 circuit board
3) The CTL9 on the CTL23 circuit
board and the JND1 on the JND23
circuit board
4) The CTL13 on the CTL23 circuit
board and the PDA1 on the PDA26
circuit board
2. Faulty D651
3. Faulty M651
4. Faulty PDA26 circuit board
5. Faulty CTL23 circuit board
6. Faulty cam mechanism
16
Actions
1. Connect the harness correctly, or
repair or replace it.
2. Replace D641.
3.
4.
5.
6.
Replace M641.
Replace the PDA26 circuit board.
Replace the CTL23 circuit board.
Replace the registration unit.
1. Connect the harness correctly, or
repair or replace it.
2. Replace D642.
3.
4.
5.
6.
Replace M642.
Replace the PDA26 circuit board
Replace the CTL23 circuit board
Replace the registration unit.
1. Connect the harness correctly, or
repair or replace it.
2.
3.
4.
5.
6.
Replace D651.
Replace M651.
Replace the PDA26 circuit board.
Replace the CTL23 circuit board.
Replace the sub scanning unit.
Distributed by: minilablaser.com
3. ERROR MESSAGE
No.
W-2453
W-2454
Message
Sub scanning receiving section
nip(M655/D655/M656/D656)
malfunction.
After post-operational check is
completed, restart the system. If
problems persist, consult your
technical representative.
Nip in distribution section(M662/
D662/M663/D663) malfunction.
After post-operational check is
completed, restart the system. If
problems persist, consult your
technical representative.
Factor
Nip release home position cannot be
detected.
(Causes of the error message)
1. Poorly connected or broken harness
between:
1) The nip release home position
Sensor 2 (for M655)/3 (for M656)
(D655/D656) and the JND7 on the
JND23 circuit board
2) The nip release motor 2/3 (M655/
M656) and the PDA12 on the PDA26
circuit board
3) The CTL9 on the CTL23 circuit
board and the JND1 on the JND23
circuit board
4) The CTL13 on the CTL23 circuit
board and the PDA1 on the PDA26
circuit board
2. Faulty D655/D656
3. Faulty M655/M656
4. Faulty PDA26 circuit board
5. Faulty CTL23 circuit board
6. Faulty nip release mechanism
Nip release home position cannot be
detected.
(Causes of the error message)
1. Poorly connected or broken harness
between:
1) The nip release home position
Sensor 4 (front/rear) (D662/D663)
and the JND8 on the JND23 circuit
board
2) The nip release motor 4 (front/rear)
(M662/M663) and the PDA14 on the
PDA26 circuit board
3) The CTL9 on the CTL23 circuit
board and the JND1 on the JND23
circuit board
4) The CTL13 on the CTL23 circuit
board and the PDA1 on the PDA26
circuit board
5) The CTL14 on the CTL23 circuit
board and the PDA2 on the PDA26
circuit board
2. Faulty D662/D663
3. Faulty M662/M663
4. Faulty PDA26 circuit board
5. Faulty CTL23 circuit board
6. Faulty nip release mechanism
17
Actions
1. Connect the harness correctly, or
repair or replace it.
2.
3.
4.
5.
6.
Replace D655/D656.
Replace M655/M656.
Replace the PDA26 circuit board.
Replace the CTL23 circuit board.
Replace the distribution entrance
unit.
1. Connect the harness correctly, or
repair or replace it.
2.
3.
4.
5.
6.
Replace D662/D663.
Replace M662/M663.
Replace the PDA26 circuit board.
Replace the CTL23 circuit board.
Replace the distribution unit.
Distributed by: minilablaser.com
3. ERROR MESSAGE
No.
Message
Factor
W-2455
Distribution section(M661/D661)
malfunction.
After post-operational check is
completed, restart the system. If
problems persist, consult your
technical representative.
Distribution home position cannot be
detected.
(Causes of the error message)
1. Poorly connected or broken harness
between:
1) The distribution home position
sensor (for M661) (D661) and the
JND8 on the JND23 circuit board
2) The distribution slide motor (M661)
and the PDA13 on the PDA26 circuit
board
3) The CTL9 on the CTL23 circuit
board and the JND1 on the JND23
circuit board
4) The CTL13 on the CTL23 circuit
board and the PDA1 on the PDA26
circuit board
2. Faulty D661
3. Faulty M661
4. Faulty PDA26 circuit board
5. Faulty CTL23 circuit board
6. Faulty nip release mechanism
W-2464
E-2465
W-2466
W-2467
E-2501
Actions
1. Connect the harness correctly, or
repair or replace it.
2.
3.
4.
5.
6.
Replace D661.
Replace M661.
Replace the PDA26 circuit board.
Replace the CTL23 circuit board.
Replace the distribution unit.
Conditions are not set properly,
the calibration cannot be done.
Problems persist, consult your
technical representative.
Door is opened or temperature in printer
is outside the range.
(Causes of the error message)
1. Door is opened.
2. Temperature in printer is outside the
range.
Setting of sensor conditions
failed.(Err%NUM%)
Problems persist, consult your
technical representative.
Sensor calibration error
(Causes of the error message)
1. Sensor calibration error occurs.
1. Replace the sensor.
Sensor output is lowered.
Problems persist, consult your
technical representative.
Low sensor output
(Causes of the error message)
1. Low sensor output
1. Replace the sensor.
Initializing of distribution section
nip(M657/D657) failed.
Open and close magazine door. If
problems persist, consult your
technical representative.
Home position cannot detect when
initializing nip of distribution section.
(Causes of the error message)
1. Disconnected or broken harness
between nip release home position
sensor for M657 (D657) and JND8 on
JND23 circuit board
2. Disconnected or broken harness
between nip release motor (M657)
and PDA14 on PDA26 circuit board
3. Faulty D657
4. Faulty M657
5. Faulty JND23 circuit board
6. Faulty PDA26 circuit board
7. Faulty CTL23 circuit board
8. Faulty nip release mechanism
Anti-dust shutter abnormal.
After post-operational check is
completed, restart the system. If
problems persist, consult your
technical representative.
Shutter open/close sensor (D674) does
not function even if operating anti-dust
shutter at initialization.
(Causes of the error message)
1. Poorly connected or broken harness
between JROS on the laser unit and
LDD7 on the LDD23 circuit board
2. Faulty D674
3. Faulty S673
4. Faulty LDD23 circuit board
18
1. Close the door.
2. Restart the system software.
1. Reconnect, repair or replace the
harness.
2. Reconnect, repair or replace the
harness.
3.
4.
5.
6.
7.
8.
Replace the D657.
Replace the M657.
Replace the JND23 circuit board.
Replace the PDA26 circuit board.
Replace the CTL23 circuit board.
Replace the distribution unit.
1. Connect the harness correctly, or
repair or replace it.
2. Replace D674.
3. Replace S673
4. Replace the JDD23 circuit board.
Distributed by: minilablaser.com
3. ERROR MESSAGE
No.
E-2502
E-2503
E-2504
E-2505
E-2508
E-2509
E-2510
Message
Anti-dust fan malfunction.
After post-operational check is
completed, restart the system. If
problems persist, consult your
technical representative.
Polygon malfunction.
After post-operational check is
completed, restart the system. If
problems persist, consult your
technical representative.
AOM driver cooling fan
malfunction.
After post-operational check is
completed, restart the system. If
problems persist, consult your
technical representative.
LDD23 circuit board cooling fan
malfunction.
After post-operational check is
completed, restart the system. If
problems persist, consult your
technical representative.
Communication error occurred in
printer(GMC23-LDD23).
After post-operational check is
completed, restart the system. If
problems persist, consult your
technical representative.
Factor
Fan does not function (Rotating sensor
malfunction).
(Causes of the error message)
1. Poorly connected or broken harness
between JROS on the laser unit and
LDD7 on the LDD23 circuit board
2. Faulty F610/F611/F612
3. Faulty LDD23 circuit board
4. Faulty CTL23 circuit board
Mechanical polygon is abnormal
(Rotating sensor malfunction).
(Causes of the error message)
1. Poorly connected or broken harness
between JROS on the laser unit and
LDD7 on the LDD23 circuit board
2. Faulty LDD23 circuit board
3. Faulty laser unit
AOM cooling fan malfunction
(Rotating sensor malfunction).
(Causes of the error message)
1. Poorly connected or broken harness
between the AOM cooling fan
(F614A) and LDD5 on the LDD23
circuit board
2. Faulty F614A
3. Faulty LDD23 circuit board
LDD cooling fan malfunction
(Rotating sensor malfunction).
(Causes of the error message)
1. Poorly connected or broken harness
between the LDD cooling fan (F614B)
and LDD5 on theLDD23 circuit board
2. Faulty F614B
3. Faulty LDD23 circuit board
Communication error occurred between
the GMC23 and LDD23 circuit board.
(Causes of the error message)
1. Poorly connected or broken harness
between the LDD1 on the LDD23
circuit board and GMC2 on the
GMC23 circuit board
2. Poorly connected or broken harness
between the LDD2 on the LDD23
circuit board and PWR3 on the
PWR23 circuit board
3. Replace the LDD23 circuit board
4. Replace the GMC23 circuit board
Actions
1. Connect the harness correctly, or
repair or replace it.
2. Replace F610/F611/F612.
3. Replace the JDD23 circuit board.
4. Replace the CTL23 circuit board.
1. Connect the harness correctly, or
repair or replace it.
2. Replace the JDD23 circuit board.
3. Replace the laser unit.
1. Connect the harness correctly, or
repair or replace it.
2. Replace F614A.
3. Replace the JDD23 circuit board.
1. Connect the harness correctly, or
repair or replace it.
2. Replace F614B.
3. Replace the JDD23 circuit board.
1. Connect the harness correctly, or
repair or replace it.
2. Connect the harness correctly, or
repair or replace it.
3. Replace the LDD23 circuit board.
4. Replace the GMC23 circuit board.
Abnormal R laser (R-LD)
information.
The laser temperature control
stopped.
After post-operational check is
completed, restart the system. If
problems persist, consult your
technical representative.
Abnormal data read from EEPROM in
the laser unit at start-up.
(Causes of the error message)
1. Poorly connected or broken harness
between the laser unit and LDD11 on
the LDD23 circuit board
2. Faulty LDD23 circuit board
3. Faulty laser unit
1. Connect the harness correctly, or
repair or replace it.
Abnormal G laser (G-SHG)
information.
The laser temperature control
stopped.
After post-operational check is
completed, restart the system. If
problems persist, consult your
technical representative.
Abnormal data read from EEPROM in
the laser unit at start-up.
(Causes of the error message)
1. Poorly connected or broken harness
between the laser optical unit and
LDD13 on the LDD23 circuit board
2. Faulty LDD23 circuit board
3. Faulty laser optical unit
1. Connect the harness correctly, or
repair or replace it.
19
2. Replace the LDD23 circuit board.
3. Replace the laser unit.
2. Replace the LDD23 circuit board.
3. Replace the laser optical unit.
Distributed by: minilablaser.com
3. ERROR MESSAGE
No.
E-2511
Message
Factor
Actions
Abnormal B laser (B-LD)
information.
The laser temperature control
stopped.
After post-operational check is
completed, restart the system. If
problems persist, consult your
technical representative.
Abnormal data read from EEPROM in
the laser unit at start-up.
(Causes of the error message)
1. Poorly connected or broken harness
between the laser optical unit and
LDD9 on the LDD23 circuit board
2. Faulty LDD23 circuit board
3. Faulty laser optical unit
R laser (R-LD) temperature
adjustment outside specified
range.
The laser temperature control
stopped.
After post-operational check is
completed, restart the system. If
problems persist, consult your
technical representative.
Laser temperature did not converge
within a specified range during
initialization.
(Causes of the error message)
1. Poorly connected or broken harness
between the laser optical unit and
LDD11 on the LDD23 circuit board
2. Faulty LDD23 circuit board
3. Faulty laser optical unit
G laser (G-SHG) temperature
adjustment outside specified
range.
The laser temperature control
stopped.
After post-operational check is
completed, restart the system. If
problems persist, consult your
technical representative.
Laser temperature did not converge
within a specified range during
initialization.
(Causes of the error message)
1. Poorly connected or broken harness
between the laser optical unit and
LDD12/LDD14 on the LDD23 circuit
board
2. Faulty LDD23 circuit board
3. Faulty laser optical unit
B laser (B-LD) temperature
adjustment outside specified
range.
The laser temperature control
stopped.
After post-operational check is
completed, restart the system. If
problems persist, consult your
technical representative.
Laser temperature did not converge
within a specified range during
initialization.
(Causes of the error message)
1. Poorly connected or broken harness
between the laser optical unit and
LDD9 on the LDD23 circuit board
2. Faulty LDD23 circuit board
3. Faulty laser optical unit
E-2515
Abnormal R laser (R-LD)
temperature.
The laser temperature control
stopped.
After post-operational check is
completed, restart the system. If
problems persist, consult your
technical representative.
1. Laser temperature exceeds the range.
2. Thermistor error is detected.
(Causes of the error message)
1. Poorly connected or broken harness
1. Connect the harness correctly, or
between the laser optical unit and
repair or replace it.
LDD11 on the LDD23 circuit board
2. Faulty LDD23 circuit board
2. Replace the LDD23 circuit board.
3. Faulty laser optical unit
3. Replace the laser optical unit.
E-2516
Abnormal G laser (G-SHG)
temperature.
The laser temperature control
stopped.
After post-operational check is
completed, restart the system. If
problems persist, consult your
technical representative.
1. Laser temperature exceeds the range.
2. Thermistor error is detected.
(Causes of the error message)
1. Poorly connected or broken harness
1. Connect the harness correctly, or
between the laser optical unit and
repair or replace it.
LDD12/LDD14 on the LDD23 circuit
board
2. Faulty LDD23 circuit board
2. Replace the LDD23 circuit board.
3. Faulty laser optical unit
3. Replace the laser optical unit.
E-2517
Abnormal B laser (B-LD)
temperature.
The laser temperature control
stopped.
After post-operational check is
completed, restart the system. If
problems persist, consult your
technical representative.
1. Laser temperature exceeds the range.
2. Thermistor error is detected.
(Causes of the error message)
1. Poorly connected or broken harness
1. Connect the harness correctly, or
between the laser optical unit and
repair or replace it.
LDD9 on the LDD23 circuit board
2. Faulty LDD23 circuit board
2. Replace the LDD23 circuit board.
3. Faulty laser optical unit
3. Replace the laser optical unit.
E-2512
E-2513
E-2514
20
1. Connect the harness correctly, or
repair or replace it.
2. Replace the LDD23 circuit board.
3. Replace the laser optical unit.
1. Connect the harness correctly, or
repair or replace it.
2. Replace the LDD23 circuit board.
3. Replace the laser optical unit.
1. Connect the harness correctly, or
repair or replace it.
2. Replace the LDD23 circuit board.
3. Replace the laser optical unit.
1. Connect the harness correctly, or
repair or replace it.
2. Replace the LDD23 circuit board.
3. Replace the laser optical unit.
Distributed by: minilablaser.com
3. ERROR MESSAGE
No.
E-2520
E-2521
E-2522
E-2523
E-2524
E-2525
E-2529
Message
Factor
R laser (R-LD) current exceeded. LD current value limiter detection.
After post-operational check is
(Causes of the error message)
completed, restart the system. If 1. Poorly connected or broken harness
problems persist, consult your
between the laser optical unit and
technical representative.
LDD10 on the LDD23 circuit board
2. Faulty LDD23 circuit board
3. Faulty laser optical unit
G laser (G-SHG) current
exceeded.
After post-operational check is
completed, restart the system. If
problems persist, consult your
technical representative.
LD current value limiter detection.
(Causes of the error message)
1. Poorly connected or broken harness
between the laser optical unit and
LDD12 on the LDD23 circuit board
2. Faulty LDD23 circuit board
3. Faulty laser optical unit
B laser (B-LD) current exceeded.
After post-operational check is
completed, restart the system. If
problems persist, consult your
technical representative.
LD current value limiter detection.
(Causes of the error message)
1. Poorly connected or broken harness
between the laser optical unit and
LDD8 on the LDD23 circuit board
2. Faulty LDD23 circuit board
3. Faulty laser optical unit
Actions
1. Connect the harness correctly, or
repair or replace it.
2. Replace LDD23 circuit board.
3. Replace the laser optical unit.
1. Connect the harness correctly, or
repair or replace it.
2. Replace LDD23 circuit board.
3. Replace the laser optical unit.
1. Connect the harness correctly, or
repair or replace it.
2. Replace LDD23 circuit board.
3. Replace the laser optical unit.
R laser (R-LD) current
measurement value outside
specified range.
After post-operational check is
completed, restart the system. If
problems persist, consult your
technical representative.
PD current value does not converge
within a specified range.
(Causes of the error message)
1. Poorly connected or broken harness
between the laser optical unit and
LDD10 on the LDD23 circuit board
2. Faulty LDD23 circuit board
3. Faulty laser optical unit
1. Connect the harness correctly, or
repair or replace it.
G laser (G-SHG) current
measurement value outside
specified of range.
After post-operational check is
completed, restart the system. If
problems persist, consult your
technical representative.
PD current value does not converge
within a specified range.
(Causes of the error message)
1. Poorly connected or broken harness
between the laser optical unit and
LDD12 on the LDD23 circuit board
2. Faulty LDD23 circuit board
3. Faulty laser optical unit
1. Connect the harness correctly, or
repair or replace it.
B laser (B-LD) current
measurement value outside
specified range.
After post-operational check is
completed, restart the system. If
problems persist, consult your
technical representative.
PD current value does not converge
within a specified range.
(Causes of the error message)
1. Poorly connected or broken harness
between the laser optical unit and
LDD8 on the LDD23 circuit board
2. Faulty LDD23 circuit board
3. Faulty laser optical unit
1. Connect the harness correctly, or
repair or replace it.
SOS detection failed.
After post-operational check is
completed, restart the system. If
problems persist, consult your
technical representative.
SOS (Start of Scanning) is not detected.
(Causes of the error message)
1. Poorly connected or broken harness
between JROS on the laser optical
unit and LDD7 on the LDD23 circuit
board
2. Poorly connected or broken harness
between LDD1 on the LDD23 circuit
board and GEP10 on the GEP23
circuit board
3. Poorly connected connector on the
DTA23 circuit board on ROS
4. Faulty DTA23 circuit board
5. Faulty GEP23 circuit board
6. Faulty LDD23 circuit board
7. Faulty laser unit
21
2. Replace the LDD23 circuit board.
3. Replace the laser optical unit.
2. Replace the LDD23 circuit board.
3. Replace the laser optical unit.
2. Replace the LDD23 circuit board.
3. Replace the laser optical unit.
1. Connect the harness correctly, or
repair or replace it.
2. Connect the harness correctly, or
repair or replace it.
3. Connect the harness correctly, or
repair or replace it.
4. Replace the laser optical unit.
5. Replace the GEP23 circuit board.
6. Replace the LDD23 circuit board.
7. Replace the laser unit.
Distributed by: minilablaser.com
3. ERROR MESSAGE
No.
Message
E-2530
Electric power failure occurred in
the exposure and light source
sections.
After post-operational check is
completed, restart the system. If
problems persist, consult your
technical representative.
E-2534
E-2535
E-2536
E-2542
E-2544
E-2545
E-2546
E-2547
Factor
Abnormal power voltage on the LDD23
circuit board.
(Causes of the error message)
1. Poorly connected or broken harness
between LDD2/3/4 on the LDD23
circuit board and PWR3/6 on the
PWR23 circuit board
2. Faulty LDD23 circuit board
3. Faulty PWR23 circuit board
Actions
1. Connect the harness correctly, or
repair or replace it.
2. Replace the LDD23 circuit board.
3. Replace the PWR23 circuit board.
R laser (R-LD) connector
removed or temperature sensor
abnormal.
After post-operational check is
completed, restart the system. If
problems persist, consult your
technical representative.
Laser thermistor detected.
(Causes of the error message)
1. Poorly connected or broken harness
between LDR1 on the laser optical
unit and LDD11 on the LDD23 circuit
board
2. Faulty LDD23 circuit board
3. Faulty laser optical unit
G laser (G-SHG) connector
removed or temperature sensor
abnormal.
After post-operational check is
completed, restart the system. If
problems persist, consult your
technical representative.
Laser thermistor detected.
(Causes of the error message)
1. Poorly connected or broken harness
between JMH2 on the laser optical
unit and LDD12 on the LDD23 circuit
board
2. Faulty LDD23 circuit board
3. Faulty laser optical unit
B laser (B-LD) connector
removed or temperature sensor
abnormal.
After post-operational check is
completed, restart the system. If
problems persist, consult your
technical representative.
Laser thermistor detected.
(Causes of the error message)
1. Poorly connected or broken harness
between LDB1 on the laser optical
unit and LDD9 on the LDD23 circuit
board
2. Faulty LDD23 circuit board
3. Faulty laser optical unit
AOM driver temperature error
occurred.
After post-operational check is
completed, restart the system. If
problems persist, consult your
technical representative.
Abnormal temperature of AOM driver is
detected.
(Causes of the error message)
1. Faulty temperature control circuit on
the AOM driver
An error detected by R-laser (RLD) sensor.
After post-operational check is
completed, restart the system. If
problems persist, consult your
technical representative.
Laser thermistor detected.
(Causes of the error message)
1. Faulty LDD23 circuit board
2. Faulty laser thermistor
1. Replace the LDD23 circuit board.
2. Replace the laser optical unit.
An error detected by G-laser(GSHG) sensor.
After post-operational check is
completed, restart the system. If
problems persist, consult your
technical representative.
Laser thermistor detected.
(Causes of the error message)
1. Faulty LDD23 circuit board
2. Faulty laser thermistor
1. Replace the LDD23 circuit board.
2. Replace the laser optical unit.
An error detected by B-laser (BLD) sensor.
After post-operational check is
completed, restart the system. If
problems persist, consult your
technical representative.
Laser thermistor detected.
(Causes of the error message)
1. Faulty LDD23 circuit board
2. Faulty laser thermistor
1. Replace the LDD23 circuit board.
2. Replace the laser optical unit.
Fuse in exposure section blown
out.
After post-operational check is
completed, restart the system. If
problems persist, consult your
technical representative.
Blown fuse is detected.
(Causes of the error message)
1. Blown fuse on the LDD23 circuit
board
1. Replace the blown fuse on the
LDD23 circuit board.
22
1. Connect the harness correctly, or
repair or replace it.
2. Replace the LDD23 circuit board.
3. Replace the laser optical unit.
1. Connect the harness correctly, or
repair or replace it.
2. Replace the LDD23 circuit board.
3. Replace the laser optical unit.
1. Connect the harness correctly, or
repair or replace it.
2. Replace the LDD23 circuit board.
3. Replace the laser optical unit.
1. Replace the AOM driver.
Distributed by: minilablaser.com
3. ERROR MESSAGE
No.
E-2548
Message
Factor
Actions
DTA connector disconnected.
After post-operational check is
completed, restart the system. If
problems persist, consult your
technical representative.
Disconnected DTA connector is
detected.
(Causes of the error message)
1. Poorly connected or broken harness
between JROS on the laser optical
unit and LDD7 on the LDD23 circuit
board
E-2580
R-laser (R-LD) CB temperature
error occurred.
After post-operational check is
completed, restart the system. If
problems persist, consult your
technical representative.
R laser CB temperature is outside the
specified range.
(Causes of the error message)
1. Faulty CB temperature control section 1. Replace the laser optical unit.
on the LDR23 circuit board
E-2592
Exposing process failed.
Problems persist, consult your
technical representative.
Exposure timeout is detected.
(Causes of the error message)
Exposure timeout is detected.
W-2604
Sorter operation(M810/D810)
abnormal.
After post-operational check is
completed, restart the system. If
problems persist, consult your
technical representative.
Sorter malfunction.
(Causes of the error message)
1. Poorly connected or broken harness
between:
1) Sorter cable
2) The sorter tray stop position sensor
(D810) and the SWA3 on the SWA20
circuit board
3) The sorter drive motor (M810) and
the SWA2 on the SWA20 circuit
board
4) The SWA1 on the SWA23 circuit
board and the JNE6 on the JNE23
circuit board
5) The CTL10 on the CTL23 circuit
board and the JNE1 on the JNE23
circuit board
2. Faulty D810
3. Faulty M810
4. Faulty SWA20 circuit board
5. Tray and chain setting position error.
Loaded by interference.
6. Faulty CTL23 circuit board
E-2608
Communication error occurred in
printer(GMC23-CTL23).
After post-operational check is
completed, restart the system. If
problems persist, consult your
technical representative.
Communication time-out with processor
occurred.
(Causes of the error message)
1. Poorly connected or broken harness
between:
1) The GPR23 and the GMC23 circuit
boards
2) The GPR2 on the GPR23 circuit
board and the CTL1 on the CTL23
circuit board
2. Faulty CTL23 circuit board
3. Faulty GPR23 circuit board
4. Faulty GMC23 circuit board
23
1. Connect the connector, or repair or
replace the harness.
Remove remaining paper and close
the door.
If the error occurs frequently, perform
following:
1. Replace the image processing
box.
2. Replace the LDD circuit board.
1. Connect the cable correctly, or
repair or replace it.
2.
3.
4.
5.
Replace D810.
Replace M810.
Replace the SWA20 circuit board.
Install the sorter chain and trays
properly.
6. Replace the CTL23 circuit board.
1. Connect the harness correctly, or
repair or replace it.
2. Replace the CTL23 circuit board
3. Replace the GPR23 circuit board
4. Replace the GMC23 circuit board
Distributed by: minilablaser.com
3. ERROR MESSAGE
No.
E-2614
E-2615
E-2616
E-2617
E-2618
Message
P1 processing tank temperature
not rising.
The heaters (H700 to H703)
turned off.
After post-operational check is
completed, restart the system. If
problems persist, consult your
technical representative
P2 processing tank temperature
not rising.
The heaters (H700 to H703)
turned off.
After post-operational check is
completed, restart the system. If
problems persist, consult your
technical representative.
PS1/2/3 processing tank
temperatures not rising.
The heaters (H700 to H703)
turned off.
After post-operational check is
completed, restart the system. If
problems persist, consult your
technical representative.
PS4 processing tank
temperatures not rising.
The heaters (H700 to H703)
turned off.
After post-operational check is
completed, restart the system. If
problems persist, consult your
technical representative.
Dryer section temperature not
rising.
The heaters (H760 to 767) turned
off.
After post-operational check is
completed, restart the system. If
problems persist, consult your
technical representative.
Factor
Solution temperature does not rise more
than 1 °C within 30 minutes.
(Causes of the error message)
1. Abnormal heater system
2. Abnormal temperature sensor system
3. Abnormal circulation system
4. Poorly connected or broken harness
between the K4 on the power supply
unit 1 and PAC17 on the PAC23 circuit
board
5. Faulty K4
6. CP5 has tripped
Solution temperature does not rise more
than 1 °C within 30 minutes.
(Causes of the error message)
1. Abnormal heater system
2. Abnormal temperature sensor system
3. Abnormal circulation system
4. Poorly connected or broken harness
between the K2 on the power supply
unit 1 and PAC17 on the PAC23 circuit
board
5. Faulty K2
6. CP3 has tripped
Solution temperature does not rise more
than 1 °C within 30 minutes.
(Causes of the error message)
1. Abnormal heater system
2. Abnormal temperature sensor system
3. Abnormal circulation system
4. Poorly connected or broken harness
between the K4 on the power supply
unit 1 and PAC17 on the PAC23 circuit
board
5. Faulty K4
6. CP5 has tripped
Dryer section temperature does not rise
more than 1 °C in a minute at heat up.
(Causes of the error message)
1. Cover around the dryer section is
open.
2. Abnormal dryer heater system
3. Abnormal dryer temperature sensor
4. Abnormal dryer fan system
5. Poorly connected or broken harness
between the K3/K5 on the power
supply unit 1 and PAC17 on the
PAC23 circuit board
6. Faulty K3
7. Faulty K5
8. CP4 has tripped
9. CP6 has tripped
*:Refer to LP-5700 service manual.
24
Actions
1.
2.
3.
4.
(See Subsection 3.3.5)*
(See Subsection 3.3.5)*
(See Subsection 3.3.5)*
Connect the harness correctly, or
repair or replace it.
5. Replace the K2.
6. Reset CP3.
1.
2.
3.
4.
(See Subsection 3.3.5)*
(See Subsection 3.3.5)*
(See Subsection 3.3.5)*
Connect the harness correctly, or
repair or replace it.
5. Replace the K4.
6. Reset CP5.
1.
2.
3.
4.
(See Subsection 3.3.5)
(See Subsection 3.3.5)
(See Subsection 3.3.5)
Connect the harness correctly, or
repair or replace it.
5. Replace the K2.
6. Reset CP3.
1.
2.
3.
4.
(See Subsection 3.3.5)*
(See Subsection 3.3.5)*
(See Subsection 3.3.5)*
Connect the harness correctly, or
repair or replace it.
5. Replace the K4.
6. Reset CP5.
1. (See Subsection 3.3.5)*
2.
3.
4.
5.
(See Subsection 3.3.5)*
(See Subsection 3.3.5)*
(See Subsection 3.3.5)*
Connect the harness correctly, or
repair or replace it.
6.
7.
8.
9.
Replace K3.
Replace K5.
Reset CP4.
Reset CP6.
Distributed by: minilablaser.com
3. ERROR MESSAGE
No.
E-2619
E-2620
E-2621
E-2622
E-2623
Message
P1 processing tank temperature
is out of range.
The heaters (H700 to H703)
turned off.
After post-operational check is
completed, restart the system. If
problems persist, consult your
technical representative.
P2 processing tank temperature
is out of range.
The heaters (H700 to H703)
turned off.
After post-operational check is
completed, restart the system. If
problems persist, consult your
technical representative.
PS1/2/3 processing tank
temperature is out of range.
The heaters (H700 to H703)
turned off.
After post-operational check is
completed, restart the system. If
problems persist, consult your
technical representative.
PS4 processing tank temperature
is out of range.
The heaters (H700 to H703)
turned off.
After post-operational check is
completed, restart the system. If
problems persist, consult your
technical representative.
Dryer section temperature is out
of range.
The heaters (H760 to 767) turned
off.
After post-operational check is
completed, restart the system. If
problems persist, consult your
technical representative.
Factor
P1 temperature is abnormal.
(Causes of the error message)
1. Abnormal heater system
2. Abnormal temperature sensor system
3. Abnormal circulation system
4. Poorly connected or broken harness
between the K2 on the power supply
unit 1 and PAC17 on the PAC23 circuit
board
5. Faulty K2
6. CP3 has tripped
P2 temperature is abnormal.
(Causes of the error message)
1. Abnormal heater system
2. Abnormal temperature sensor system
3. Abnormal circulation system
4. Poorly connected or broken harness
between the K4 on the power supply
unit 1 and PAC17 on the PAC23 circuit
board
5. Faulty K4
6. Reset CP5.
PS1/2/3 temperature is abnormal.
(Causes of the error message)
1. Abnormal heater system
2. Abnormal temperature sensor system
3. Abnormal circulation system
4. Poorly connected or broken harness
between the K2 on the power supply
unit 1 and PAC17 on the PAC23 circuit
board
5. Faulty K2
6. CP3 has tripped
PS4 temperature is abnormal.
(Causes of the error message)
1. Abnormal heater system
2. Abnormal temperature sensor system
3. Abnormal circulation system
4. Poorly connected or broken harness
between the K4 on the power supply
unit 1 and PAC17 on the PAC23 circuit
board
5. Faulty K4
6. CP5 has tripped
Dryer section temperature is abnormal.
(Causes of the error message)
1. Abnormal dryer heater system
2. Abnormal dryer temperature sensor
system
3. Abnormal dryer fan system
4. Poorly connected or broken harness
between the K3/K5 on the power
supply unit 1 and PAC17 on the
PAC23 circuit board
5. Faulty K3
6. Faulty K5
7. CP4 has tripped
8. CP6 has tripped
*:Refer to LP-5700 service manual.
25
Actions
1.
2.
3.
4.
(See Subsection 3.3.5)*
(See Subsection 3.3.5)*
(See Subsection 3.3.5)*
Connect the harness correctly, or
repair or replace it.
5. Replace the K2.
6. Reset CP3.
1.
2.
3.
4.
(See Subsection 3.3.5)*
(See Subsection 3.3.5)*
(See Subsection 3.3.5)*
Connect the harness correctly, or
repair or replace it.
5. Replace the K4.
6. CP5 has tripped
1.
2.
3.
4.
(See Subsection 3.3.5)*
(See Subsection 3.3.5)*
(See Subsection 3.3.5)*
Connect the harness correctly, or
repair or replace it.
5. Replace the K2.
6. Reset CP3.
1.
2.
3.
4.
(See Subsection 3.3.5)*
(See Subsection 3.3.5)*
(See Subsection 3.3.5)*
Connect the harness correctly, or
repair or replace it.
5. Replace the K4.
6. Reset CP5.
1. (See Subsection 3.3.5)*
2. (See Subsection 3.3.5)*
3. (See Subsection 3.3.5)*
4. Connect the harness correctly, or
repair or replace it.
5.
6.
7.
8.
Replace the K3.
Replace the K5.
Reset CP4.
Reset CP6.
Distributed by: minilablaser.com
3. ERROR MESSAGE
No.
E-2624
E-2625
E-2626
E-2627
E-2628
Message
P1 safety thermostat (D700)
activated.
The heaters (H700 to H703)
turned off.
After post-operational check is
completed, restart the system. If
problems persist, consult your
technical representative.
P2 safety thermostat (D701)
activated.
The heaters (H700 to H703)
turned off.
After post-operational check is
completed, restart the system. If
problems persist, consult your
technical representative.
PS1/2/3 safety thermostat (D702)
activated.
The heaters (H700 to H703)
turned off.
After post-operational check is
completed, restart the system. If
problems persist, consult your
technical representative.
PS4 safety thermostat (D703)
activated.
The heaters (H700 to H703)
turned off.
After post-operational check is
completed, restart the system. If
problems persist, consult your
technical representative.
Safety thermostat in dryer section
(D760A,D760B) activated.
The heaters (H760 to 767) turned
off.
After post-operational check is
completed, restart the system. If
problems persist, consult your
technical representative.
Factor
Safety thermostat in the P1 processing
tank is activated.
(Causes of the error message)
1. Abnormal heater system
2. Abnormal temperature sensor system
3. Abnormal circulation system
4. Abnormal heater safety thermostat
system
5. Control system abnormality
Safety thermostat in the P2 processing
tank is activated.
(Causes of the error message)
1. Abnormal heater system
2. Abnormal temperature sensor system
3. Abnormal circulation system
4. Abnormal heater safety thermostat
system
5. Control system abnormality
Safety thermostat in the PS1/2/3
processing tank is activated.
(Causes of the error message)
1. Abnormal heater system
2. Abnormal temperature sensor system
3. Abnormal circulation system
4. Abnormal heater safety thermostat
system
5. Control system abnormality
Safety thermostat in the PS4 processing
tank is activated.
(Causes of the error message)
1. Abnormal heater system
2. Abnormal temperature sensor system
3. Abnormal circulation system
4. Abnormal heater safety thermostat
system
5. Control system abnormality
Safety thermostat in dryer section is
activated.
(Causes of the error message)
1. Abnormal dryer heater system
2. Abnormal dryer temperature sensor
system
3. Abnormal dryer fan system
4. Abnormal dryer heater safety
thermostat system
5. Control system abnormality
*:Refer to LP-5700 service manual.
26
Actions
1.
2.
3.
4.
(See Subsection 3.3.5)*
(See Subsection 3.3.5)*
(See Subsection 3.3.5)*
(See Subsection 3.3.5)*
5. Reinstall system software or
replace CTL23 circuit board
1.
2.
3.
4.
(See Subsection 3.3.5)*
(See Subsection 3.3.5)*
(See Subsection 3.3.5)*
(See Subsection 3.3.5)*
5. Reinstall system software or
replace CTL23 circuit board
1.
2.
3.
4.
(See Subsection 3.3.5)*
(See Subsection 3.3.5)*
(See Subsection 3.3.5)*
(See Subsection 3.3.5)*
5. Reinstall system software or
replace CTL23 circuit board
1.
2.
3.
4.
(See Subsection 3.3.5)*
(See Subsection 3.3.5)*
(See Subsection 3.3.5)*
(See Subsection 3.3.5)*
5. Reinstall system software or
replace CTL23 circuit board
1. (See Subsection 3.3.5)*
2. (See Subsection 3.3.5)*
3. (See Subsection 3.3.5)*
4. (See Subsection 3.3.5)*
5. Reinstall system software or
replace CTL23 circuit board
Distributed by: minilablaser.com
3. ERROR MESSAGE
No.
W-2641
W-2642
W-2643
Message
P1R replenisher pump (PU721)
malfunctions.
If problems persist, consult your
technical representative.
P2RA replenisher pump (PU722)
malfunctions.
If problems persist, consult your
technical representative.
P2RB replenisher pump (PU723)
malfunctions.
If problems persist, consult your
technical representative.
Factor
(Causes of the error message)
1. Pump malfunction due to bent or
clogged hose
2. Faulty replenisher pump (due to
hardened bellows, faulty rotation
sensor or motor)
3. Poorly connected or broken harness
between:
1) The PU721 and the PDB5 or the
PDB3 on the PDB23 circuit board
2) The CTL12 on the CTL23 circuit
board and the PDB1 on the PDB23
circuit board
3) The CTL10 on the CTL23 circuit
board and the JNE1 on the JNE23
circuit board
4. Faulty PDB23 circuit board
5. Faulty CTL23 circuit board
(Causes of the error message)
1. Pump malfunction due to bent or
clogged hose
2. Faulty replenisher pump (due to
hardened bellows, faulty rotation
sensor or motor)
3. Poorly connected or broken harness
between:
1) The PU722 and the PDB5 or the
PDB3 on the PDB23 circuit board
2) The CTL12 on the CTL23 circuit
board and the PDB1 on the PDB23
circuit board
3) The CTL10 on the CTL23 circuit
board and the JNE1 on the JNE23
circuit board
4. Faulty PDB23 circuit board
5. Faulty CTL23 circuit board
(Causes of the error message)
1. Pump malfunction due to bent or
clogged hose
2. Faulty replenisher pump (due to
hardened bellows, faulty rotation
sensor or motor)
3. Poorly connected or broken harness
between:
1) The PU723 and the PDB5 or the
PDB3 on the PDB23 circuit board
2) The CTL12 on the CTL23 circuit
board and the PDB1 on the PDB23
circuit board
3) The CTL10 on the CTL23 circuit
board and the JNE1 on the JNE23
circuit board
4. Faulty PDB23 circuit board
5. Faulty CTL23 circuit board
27
Actions
1. Repair or replace the hose.
2. Replace the pump.
3. Connect the harness correctly, or
repair or replace it.
4. Replace the PDB23 circuit board.
5. Replace the CTL23 circuit board.
1. Repair or replace the hose.
2. Replace the pump.
3. Connect the harness correctly, or
repair or replace it.
4. Replace the PDB23 circuit board.
5. Replace the CTL23 circuit board.
1. Repair or replace the hose.
2. Replace the pump.
3. Connect the harness correctly, or
repair or replace it.
4. Replace the PDB23 circuit board.
5. Replace the CTL23 circuit board.
Distributed by: minilablaser.com
3. ERROR MESSAGE
No.
W-2647
W-2650
W-2651
Message
PSR replenisher pump (PU724)
malfunctions.
If problems persist, consult your
technical representative.
Waste solution tank nearly full.
Collect the solution in the
recovery tank in the W2 manner.
Waste solution tank full.
Printing stopped.
Collect the solution in the
recovery tank in the W2 manner.
Factor
(Causes of the error message)
1. Pump malfunction due to bent or
clogged hose
2. Faulty replenisher pump (due to
hardened bellows, faulty rotation
sensor or motor)
3. Poorly connected or broken harness
between:
1) The PU724 and the PDB5 or the
PDB3 on the PDB23 circuit board
2) The CTL12 on the CTL23 circuit
board and the PDB1 on the PDB23
circuit board
3) The CTL10 on the CTL23 circuit
board and the JNE1 on the JNE23
circuit board
4. Faulty PDB23 circuit board
5. Faulty CTL23 circuit board
Internal waste solution sensor detects
“Solution exists”.
(Causes of the error message)
1. Waste solution tank is full.
2. Poorly connected or broken harness
between:
1) The waste solution level sensor
(FS728) and the JNE6 on the JNE23
circuit board
2) The CTL10 on the CTL23 circuit
board and the JNE1 on the JNE23
circuit board
3. Dirty FS728
4. Faulty FS728
5. Faulty CTL23 circuit board
Internal waste solution sensor detects
“Solution full”.
(Causes of the error message)
1. Waste solution tank is full.
2. Poorly connected or broken harness
between:
1) The waste solution level sensor
(FS728) and the JNE6 on the JNE23
circuit board
2) The CTL10 on the CTL23 circuit
board and the JNE1 on the JNE23
circuit board
3. Dirty FS728
4. Faulty FS728
5. Faulty CTL23 circuit board
28
Actions
1. Repair or replace the hose.
2. Replace the pump.
3. Connect the harness correctly, or
repair or replace it.
4. Replace the PDB23 circuit board.
5. Replace the CTL23 circuit board.
1. Collect waste solution
2. Connect the harness correctly, or
repair or replace it.
3. Clean FS728.
4. Replace FS728.
5. Replace the CTL23 circuit board.
1. Collect waste solution.
2. Connect the harness correctly, or
repair or replace it.
3. Clean FS728.
4. Replace FS728.
5. Replace the CTL23 circuit board.
Distributed by: minilablaser.com
3. ERROR MESSAGE
No.
Message
E-2653
Remaining replenisher abnormal.
After post-operational check is
completed, restart the system. If
problems persist, consult your
technical representative.
Factor
Status of P1R, P2RA, or P2RB level
sensor changed during standby.
(Causes of the error message)
1. Solution leakage from replenisher
tank
2. Replenisher collected or supplied
during stand-by.
3. Poorly connected or broken harness
between:
1) The solution level sensor (FS720/
FS721/FS722/FS724/FS725/FS726)
and the JNE6 on the JNE23 circuit
board
2) The CTL10 on the CTL23 circuit
board and the JNE1 on the JNE23
circuit board
4. Faulty solution level sensor (FS720/
FS721/FS722/FS724/FS725/FS726)
5. Faulty CTL23 circuit board
E-2657
P1R replenishment flow volume
or its solution level abnormal.
About 510 3R-size sheets can
still be printed without
replenishment.
Consult your technical
representative.
Accumulated output amount of solution
to P1R upper level sensor exceeds the
specified value (1998.0 ml).
(Causes of the error message)
1. Faulty P1R pump (PU721)
2. Faulty P1R stirring valve (S731)
3. Faulty P1R cartridge washing valve
(S728)
4. Faulty P1R upper level sensor
(FS720)
5. Bent or clogged P1R hose
6. Poorly connected or broken harness
between:
1) The PU721 and the PDB5 on the
PDB23 circuit board
2) The S731/S728 and the PDB8 on
the PDB23 circuit board
3) The FS720 and the JNE6 on the
JNE23 circuit board
4) The PDB1 on the PDB23 circuit
board and the CTL12 on the CTL23
circuit board
5) The JNE1 on the JNE23 circuit
board and the CTL10 on the CTL23
circuit board
7. Faulty PDB23 circuit board
8. Faulty CTL23 circuit board
*:Refer to LP-5700 service manual.
29
Actions
1. Repair solution leakage.
2. Take appropriate corrective
measures. (See Subsection
3.3.12)*
3. Connect the harness correctly, or
repair or replace it.
4. Replace FS720/FS721/FS722/
FS724/FS725/FS726.
5. Replace the CTL23 circuit board.
1. (See Subsection 3.3.8)*
2. (See Subsection 3.3.10)*
3. (See Subsection 3.3.10)*
4. (See Subsection 3.3.11)*
Take appropriate corrective
measures. (See Subsection
3.3.12)
5. Repair or replace the hose.
6. Connect the harness correctly, or
repair or replace it.
7. Replace the PDB23 circuit board.
8. Replace the CTL23 circuit board.
Distributed by: minilablaser.com
3. ERROR MESSAGE
No.
Message
Factor
E-2658
P2RA replenishment flow volume
or its solution level abnormal.
About 510 3R-size sheets can
still be printed without
replenishment.
Consult your technical
representative.
Accumulated output amount of solution
to P2RA upper level sensor exceeds the
specified value (777.0ml).
(Causes of the error message)
1. Faulty P2RA pump (PU722)
2. Faulty P2RA cartridge washing valve
(S729)
3. Faulty P2RA upper level sensor
(FS721)
4. Bent or clogged P2RA hose
5. Poorly connected or broken harness
between:
1) The PU722 and the PDB5 on the
PDB23 circuit board
2) The S731/S729 and the PDB8 on
the PDB23 circuit board
3) The FS721 and the JNE6 on the
JNE23 circuit board
4) The PDB1 on the PDB23 circuit
board and the CTL12 on the CTL23
circuit board
5) The JNE1 on the JNE23 circuit
board and the CTL10 on the CTL23
circuit board
6. Faulty PDB23 circuit board
7. Faulty CTL23 circuit board
E-2659
P2RB replenishment flow volume
or its solution level abnormal.
About 510 3R-size sheets can
still be printed without
replenishment.
Consult your technical
representative.
Accumulated output amount of solution
to P2RB upper level sensor exceeds the
specified value (777.0ml).
(Causes of the error message)
1. Faulty P2RB pump (PU723)
2. Faulty P2RB cartridge washing valve
(S730)
3. Faulty P2RB upper level sensor
(FS722)
4. Bent or clogged P2RB hose
5. Poorly connected or broken harness
between:
1) The PU723 and the PDB5 on the
PDB23 circuit board
2) The S731/S730 and the PDB8 on
the PDB23 circuit board
3) The FS722 and the JNE6 on the
JNE23 circuit board
4) The PDB1 on the PDB23 circuit
board and the CTL12 on the CTL23
circuit board
5) The JNE1 on the JNE23 circuit
board and the CTL10 on the CTL23
circuit board
6. Faulty PDB23 circuit board
7. Faulty CTL23 circuit board
*:Refer to LP-5700 service manual.
30
Actions
1. (See Subsection 3.3.8)*
2. (See Subsection 3.3.10)*
3. (See Subsection 3.3.11)*
Take appropriate corrective
measures. (See Subsection
3.3.12)*
4. Repair or replace the hose.
5. Connect the harness correctly, or
repair or replace it.
6. Replace the PDB23 circuit board.
7. Replace the CTL23 circuit board.
Distributed by: minilablaser.com
3. ERROR MESSAGE
No.
W-2668
Message
SU2400AY alignment operation
(M814/D814) abnormal.
After post-operational check is
completed, restart the system. If
problems persist, consult your
technical representative.
Factor
Abnormal print alignment
(Causes of the error message)
1. Poorly connected or broken harness
between:
1) Sorter cable
2) The print alignment motor for
SU2400AY (M812) and the PDB10
on the PDB23 circuit board
3) The print alignment stop sensor
(D814) and the JNE4 on the JNE23
circuit board
4) The PDB1 on the PDB23 circuit
board and the CTL12 on the CTL23
circuit board
5) The JNE1 on the JNE23 circuit
board and the CTL10 on the CTL23
circuit board
2. Faulty M812
3. Faulty D814
4. Faulty PDB23 circuit board
5. Increased load in the drive system for
print alignment
6. Prints are hit by a sorter tray.
7. Faulty CTL23 circuit board
E-2675
P1R replenisher cartridge
washing valve (S728) or P1R
replenisher stirring valve (S731)
malfunctions.
About 510 3R-size sheets can
still be printed without
replenishment.
Consult your technical
representative.
Accumulated output amount of solution
to P1R upper level sensor exceeds the
specified value (1998.0ml).
(Causes of the error message)
1. Faulty auto washing pump (PU720)
2. Faulty P1R stirring valve (S731)
3. Faulty P1R cartridge washing valve
(S728)
4. Faulty P1R upper level sensor
(FS720)
5. Bent or clogged P1R hose
6. Poorly connected or broken harness
between:
1) The PU720 and the PDB7 on the
PDB23 circuit board
2) The S738 and the PDB8 on the
PDB23 circuit board
3) The FS720 and the JNE6 on the
JNE23 circuit board
4) The PDB1 on the PDB23 circuit
board and the CTL12 on the CTL23
circuit board
5) The JNE1 on the JNE23 circuit
board and the CTL10 on the CTL23
circuit board
7. Faulty PDB23 circuit board
8. Faulty CTL23 circuit board
*:Refer to LP-5700 service manual.
31
Actions
1. Connect the cable correctly, or
repair or replace it.
2.
3.
4.
5.
Replace M812.
Replace D814.
Replace the PDB23 circuit board.
Repair the drive system.
6. Remove the sorter and then
reinstall it.
7. Replace the CTL23 circuit board.
1. (See Subsection 3.3.8)*
2. (See Subsection 3.3.10)*
3. (See Subsection 3.3.10)*
4. (See Subsection 3.3.11) *
Take appropriate corrective
measures.
(See Subsection 3.3.12)*
5. Repair or replace the hose.
6. Connect the harness correctly, or
repair or replace it.
7. Replace the PDB23 circuit board.
8. Replace the CTL23 circuit board.
Distributed by: minilablaser.com
3. ERROR MESSAGE
No.
E-2676
Message
P2RA replenisher cartridge
washing valve (S729)
malfunctions.
About 510 3R-size sheets can
still be printed without
replenishment.
Consult your technical
representative.
Factor
Accumulated output amount of solution
to P2RA upper level sensor exceeds the
specified value (777.0ml).
(Causes of the error message)
1. Faulty auto washing pump (PU720)
2. Faulty P2RA cartridge washing valve
(S729)
3. Faulty P2RA upper level sensor
(FS721)
4. Bent or clogged P2RA hose
5. Poorly connected or broken harness
between:
1) The PU720 and the PDB7 on the
PDB23 circuit board
2) The S729 and the PDB8 on the
PDB23 circuit board
3) The FS721 and the JNE6 on the
JNE23 circuit board
4) The PDB1 on the PDB23 circuit
board and the CTL12 on the CTL23
circuit board
5) The JNE1 on the JNE23 circuit
board and the CTL10 on the CTL23
circuit board
6. Faulty PDB23 circuit board
7. Faulty CTL23 circuit board
E-2677
P2RB replenisher cartridge
washing valve (S730)
malfunctions.
About 510 3R-size sheets can
still be printed without
replenishment.
Consult your technical
representative.
Accumulated output amount of solution
to P2RB upper level sensor exceeds the
specified value (777.0ml).
(Causes of the error message)
1. Faulty auto washing pump (PU720)
2. Faulty P2RB cartridge washing valve
(S730)
3. Faulty P2RB upper level sensor
(FS722)
4. Bent or clogged P2RB hose
5. Poorly connected or broken harness
between:
1) The PU723 and the PDB7 on the
PDB23 circuit board
2) The S730 and the PDB8 on the
PDB23 circuit board
3) The FS722 and the JNE6 on the
JNE23 circuit board
4) The PDB1 on the PDB23 circuit
board and the CTL12 on the CTL23
circuit board
5) The JNE1 on the JNE23 circuit
board and the CTL10 on the CTL23
circuit board
6. Faulty PDB23 circuit board
7. Faulty CTL23 circuit board
W-2680
Number of prints exceeds limit.
Stop printing.
Actions
1. (See Subsection 3.3.8)*
2. (See Subsection 3.3.10)*
3. (See Subsection 3.3.11)*
Take appropriate corrective
measures. (See Subsection
3.3.12)*
4. Repair or replace the hose.
5. Connect the harness correctly, or
repair or replace it.
6. Replace the PDB23 circuit board.
7. Replace the CTL23 circuit board.
1. (See Subsection 3.3.8)*
2. (See Subsection 3.3.10)*
3. (See Subsection 3.3.11) *
Take appropriate corrective
measures. (See Subsection
3.3.12)*
4. Repair or replace the hose.
5. Connect the harness correctly, or
repair or replace it.
6. Replace the PDB23 circuit board.
7. Replace the CTL23 circuit board.
Accumulated output amount of P1R
replenisher exceeds the specified range.
(Causes of the error message)
1. Error in the replenishment system has 1. Perform Menu 0123 “Error
not been solved.
Information Check” to solve the
error, and then take appropriate
corrective measures. (See
Subsection 3.3.12)*
*:Refer to LP-5700 service manual.
32
Distributed by: minilablaser.com
3. ERROR MESSAGE
No.
Message
Factor
E-2685
Error occurred in replenishment
section.
After post-operational check is
completed, restart the system. If
problems persist, consult your
technical representative.
System is started up but the
replenishment section is in an error
state.
I-2691
Solution remains in replenisher
tank.
After post-operational check is
completed, restart the system. If
problems persist, consult your
technical representative.
Replenisher tank lower level sensor
detects “Solution exists”.
(Causes of the error message)
1. At the time of installation, when
solution mixing is performed again
after error recovery, a lower level
sensor detects “Solution exists”
because solution remains in the
replenisher tank.
2. Faulty lower level sensor (FS724/
FS725/FS726)
W-2696
Switching operation in feed
lane(S770/D776) abnormal.
After post-operational check is
completed, restart the system. If
problems persist, consult your
technical representative.
Abnormal operation of the feeding path
switching guide is detected.
(Causes of the error message)
1. Foreign matter such as jammed paper
in the feeding path switching guide
section
2. Incorrectly positioned solenoid
(Solenoid dog does not reach the
sensor.)
3. Poorly connected or broken harness
between:
1) The sorter tray section solenoid
(S770) and the PDB11 on the
PDB23 circuit board
2) The feeding path switch position
sensor (D776) and the JNE3 on the
JNE23 circuit board
3) The PDB1 on the PDB23 circuit
board and the CTL12 on the CTL23
circuit board
4) The JNE1 on the JNE23 circuit
board and the CTL10 on the CTL23
circuit board
4. Faulty S770
5. Faulty D776
6. Faulty PDB23 circuit board
7. Faulty CTL23 circuit board
33
Actions
1. Perform Menu 0123 “Error
Information Check” to solve the
error, and then take appropriate
corrective measures. (See
Subsection 3.3.12)*
1. Drain solution remaining in the
replenisher tank.
2. Replace FS724/FS725/FS726.
1. Remove foreign matter.
2. Adjust the position of the solenoid.
3. Connect the harness correctly, or
repair or replace it.
4.
5.
6.
7.
Replace S770.
Replace D776.
Replace the PDB23 circuit board.
Replace the CTL23 circuit board.
Distributed by: minilablaser.com
3. ERROR MESSAGE
No.
Message
Factor
W-2699
Transversal sorter
operation(M811/D813) abnormal.
After post-operational check is
completed, restart the system. If
problems persist, consult your
technical representative.
Abnormal operation of the transversal
sorter is detected.
(Causes of the error message)
1. Poorly connected or broken cable
between the transversal sorter and
processor.
2. Poorly connected or broken harness
between:
1) The transversal sorter drive motor
(M811) and the PDB10 on the
PDB23 circuit board
2) The transversal sorter stop sensor
(D813) and the JNE4 on the JNE23
circuit board
3) The PDB1 on the PDB23 circuit
board and the CTL12 on the CTL23
circuit board
4) The JNE1 on the JNE23 circuit
board and the CTL10 on the CTL23
circuit board
3. Faulty M811
4. Faulty D813
5. Faulty PDB23 circuit board
6. Increased load in the belt drive
system
7. Faulty CTL23 circuit board
Actions
1. Connect the cable correctly, or
repair or replace it.
2. Connect the harness correctly, or
repair or replace it.
3.
4.
5.
6.
Replace M811.
Replace D813.
Replace the PDB23 circuit board.
Repair or replace the drive system.
7. Replace the CTL23 circuit board.
E-2752
Power failure in PS4 tank leak
solution sensor circuit.
After post-operational check is
completed, restart the system. If
problems persist, consult your
technical representative.
Abnormal power supply to solution
concentration detecting circuit
(Causes of the error message)
1. Poorly connected or broken harness
1. Connect the harness correctly, or
between:
repair or replace it.
1) The PS4 solution concentration
sensor (FS706) and the CTL7 on the
CTL23 circuit board
2) The JNE1 on the JNE23 circuit
board and the CTL10 on the CTL23
circuit board
2. Faulty FS706
2. Replace the FS706circuit board.
3. Faulty CTL23 circuit board
3. Replace the CTL23 circuit board
E-2761
Rotating of dryer fan (F760)
abnormal.
After post-operational check is
completed, restart the system. If
problems persist, consult your
technical representative.
Dryer fan rotation detecting function is
abnormal.
(Causes of the error message)
1. Poorly connected or broken harness
between:
1) The dryer fan (F760) and the PDB9
on the PDB23 circuit board
2) The PDB1 on the PDB23 circuit
board and the CTL12 on the CTL23
circuit board
3) The JNE1 on the JNE23 circuit
board and the CTL10 on the CTL23
circuit board
2. Faulty F760
3. Faulty PDB23 circuit board
4. Faulty CTL23 circuit board
34
1. Connect the harness correctly, or
repair or replace it.
2. Replace F760.
3. Replace the PDB23 circuit board.
4. Replace the CTL23 circuit board.
Distributed by: minilablaser.com
3. ERROR MESSAGE
No.
W-2762
W-2763
W-2764
W-2771
E-2773
Message
Thermometer abnormal.
After post-operational check is
completed, restart the system. If
problems persist, consult your
technical representative.
Hygrometer abnormal.
After post-operational check is
completed, restart the system. If
problems persist, consult your
technical representative.
Water addition data abnormal.
After post-operational check is
completed, restart the system. If
problems persist, consult your
technical representative.
Sorter operation(M810/D815)
abnormal.
After post-operational check is
completed, restart the system. If
problems persist, consult your
technical representative.
Error occurred in AD converter.
Heater(H700 to H703, H760 to
H767) was turned off.
After post-operational check is
completed, restart the system. If
problems persist, consult your
technical representative.
Factor
Thermohygrometer is faulty.
(Causes of the error message)
1. Thermohygrometer (HS760) is
covered with an obstacle.
2. Poorly connected or broken harness
between:
1) The HS760 and the CTL15 on the
CTL23 circuit board
2) The JNE1 on the JNE23 circuit
board and the CTL10 on the CTL23
circuit board
3. Faulty HS760
4. Faulty CTL23 circuit board
Abnormal sorter (SU700AY)
(Causes of the error message)
1. Poorly connected or broken harness
between:
1) Sorter Drive Motor (M810) and
SWA20 circuit board
2) Print Push Position Sensor (D815)
and SWA20 circuit board
2. Faulty M810
3. Faulty D815
4. Faulty SWA20 circuit board
5. Faulty JNE23 circuit board
6. Faulty CTL23 circuit board
7. Excessive load on drive system
Abnormal AD converter on CTL circuit
board
(Causes of the error message)
1. Disconnected CTL circuit board
connector
2. Faulty AD converter
35
Actions
1. Remove the obstacle.
2. Connect the harness correctly, or
repair or replace it.
3. Replace HS760.
4. Replace the CTL23 circuit board.
1. Remove the obstacle.
2. Connect the harness correctly, or
repair or replace it.
3. Replace HS760.
4. Replace the CTL23 circuit board.
1. Remove the obstacle.
2. Connect the harness correctly, or
repair or replace it.
3. Replace HS760.
4. Replace the CTL23 circuit board.
Restart the system software. If the
error appears again, perform the
following.
1. Connect the harness correctly, or
repair or replace it.
2.
3.
4.
5.
6.
7.
Replace M810.
Replace D815.
Replace the SWA20 circuit board.
Replace the JNE23 circuit board.
Replace the CTL23 circuit board.
Check the drive system and repair
it if necessary.
1. Reconnect the connectors on the
CTL circuit board and restart the
system.
2. Replace the CTL circuit board.
Distributed by: minilablaser.com
3. ERROR MESSAGE
No.
Message
E-2774
Error occurred in
thermometer(TS700 to TS703 or
TS760).
Heater(H700 to H703, H760 to
H767) was turned off.
After post-operational check is
completed, restart the system. If
problems persist, consult your
technical representative.
Temperature sensor detects temperature
outside conversion table.
(Causes of the error message)
1. Faulty temperature sensor
1. Replace the temperature sensor.
2. Faulty CTL circuit board
2. Replace the CTL circuit board.
E-2801
Printer rear upper exhaust
fan(F600,F601,F602,F603)
abnormal.
After post-operational check is
completed, restart the system. If
problems persist, consult your
technical representative.
Fan alarm 1 (F600 to F603)
(Causes of the error message)
1. Poorly connected following connector:
1) Control section exhaust fan 4 (F600)
2) Control section exhaust fan 1 (F601)
3) Control section exhaust fan 2 (F602)
4) Control section exhaust fan 3 (F603)
2. Faulty F600
3. Faulty F601
4. Faulty F602
5. Faulty F603
Restart the system software.
Feed section cooling
fan(F608,F609) abnormal.
After post-operational check is
completed, restart the system. If
problems persist, consult your
technical representative.
Fan alarm 2 (F608 and F609)
(Causes of the error message)
1. Poorly connected following connector:
1) Feed section cooling fan 5 (F608)
2) Feed section cooling fan 6 (F609)
2. Faulty F608
3. Faulty F609
Restart the system software.
Feed section cooling
fan(F606,F607) abnormal.
After post-operational check is
completed, restart the system. If
problems persist, consult your
technical representative.
Fan alarm 3 (F606 and F607)
(Causes of the error message)
1. Poorly connected following connector:
1) Feed section cooling fan 3 (F606)
2) Feed section cooling fan 4 (F607)
2. Faulty F606
3. Faulty F607
Restart the system software.
Control section exhaust
fan(F604) or feed section cooling
fan(F605) abnormal.
After post-operational check is
completed, restart the system. If
problems persist, consult your
technical representative.
Fan alarm 4 (F604 and F605)
(Causes of the error message)
1. Poorly connected following connector:
1) Feed section cooling fan 1 (F604)
2) Feed section cooling fan 2 (F605)
2. Faulty F604
3. Faulty F605
Restart the system software.
AC input in main DC power
source abnormal.
After post-operational check is
completed, restart the system. If
problems persist, consult your
technical representative.
The PS1 AC input is abnormal.
(Causes of the error message)
1. Poorly connected or broken harness
between the CTL11 on the CTL23
circuit board and PWR1 on the
PWR23 circuit board
2. Faulty PWR23 circuit board
3. Poorly connected AC input cable
connector in the DC power supply
E-2802
E-2803
E-2804
E-2805
Factor
4. Faulty unit (PS1) in the DC power
supply
36
Actions
1. Reconnect the fan connector.
2.
3.
4.
5.
Replace F600.
Replace F601.
Replace F602.
Replace F603.
1. Reconnect the fan connector.
2. Replace F608.
3. Replace F609.
1. Reconnect the fan connector.
2. Replace F606.
3. Replace F607.
1. Reconnect the fan connector.
2. Replace F604.
3. Replace F605.
1. Connect the harness correctly, or
repair or replace it.
2. Replace the PWR23 circuit board.
3. Connect the AC input cable
connector in the DC power supply
properly.
4. Replace the unit (PS1) in the DC
power supply.
Distributed by: minilablaser.com
3. ERROR MESSAGE
No.
E-2806
Message
AC input in main DC power
source abnormal.
After post-operational check is
completed, restart the system. If
problems persist, consult your
technical representative.
Factor
The PS2 AC input is abnormal.
(Causes of the error message)
1. Poorly connected or broken harness
between the CTL11 on the CTL23
circuit board and PWR1 on the
PWR23 circuit board
2. Faulty PWR23 circuit board
3. Poorly connected AC input cable
connector in the DC power supply
4. Faulty unit (PS2) in the DC power
supply
E-2807
E-2808
E-2809
E-2810
E-2823
Main DC power source abnormal. PS1 built-in fan alarm
After post-operational check is
(Causes of the error message)
completed, restart the system. If 1. Poorly connected or broken harness
problems persist, consult your
between the CTL11 on the CTL23
technical representative.
circuit board and PWR1 on the
PWR23 circuit board
2. Faulty PWR23 circuit board
3. Faulty unit (PS1) in the DC power
supply
Main DC power source abnormal. PS2 built-in fan alarm
After post-operational check is
(Causes of the error message)
completed, restart the system. If 1. Poorly connected or broken harness
problems persist, consult your
between the CTL11 on the CTL23
technical representative.
circuit board and PWR1 on the
PWR23 circuit board
2. Faulty PWR23 circuit board
3. Faulty unit (PS2) in the DC power
supply
DC output in main DC power
source abnormal.
After post-operational check is
completed, restart the system. If
problems persist, consult your
technical representative.
DC output in main DC power
source abnormal.
After post-operational check is
completed, restart the system. If
problems persist, consult your
technical representative.
CTL circuit board fuse blowout.
After post-operational check is
completed, restart the system. If
problems persist, consult your
technical representative.
PS1 LV (Low Voltage) abnormality
(Causes of the error message)
1. Poorly connected or broken harness
between the CTL11 on the CTL23
circuit board and PWR1 on the
PWR23 circuit board
2. Faulty PWR23 circuit board
3. Faulty unit (PS1) in the DC power
supply
PS2 LV (Low Voltage) abnormality
(Causes of the error message)
1. Poorly connected or broken harness
between the CTL11 on the CTL23
circuit board and PWR1 on the
PWR23 circuit board
2. Faulty PWR23 circuit board
3. Faulty unit (PS2) in the DC power
supply
Actions
1. Connect the harness correctly, or
repair or replace it.
2. Replace the PWR23 circuit board.
3 . Connect the AC input cable
connector in the DC power supply
properly.
4. Replace the unit (PS2) in the DC
power supply.
1. Connect the harness correctly, or
repair or replace it.
2. Replace the PWR23 circuit board.
3. Replace the unit (PS1) in the DC
power supply.
1. Connect the harness correctly, or
repair or replace it.
2. Replace the PWR23 circuit board.
3. Replace the unit (PS2) in DC
power supply.
1. Connect the harness correctly, or
repair or replace it.
2. Replace the PWR23 circuit board.
3. Replace the unit (PS1) in the DC
power supply.
1. Connect the harness correctly, or
repair or replace it.
2. Replace the PWR23 circuit board.
3. Replace the unit (PS2) in the DC
power supply.
Blown fuse for D+5V2 is detected.
(Causes of the error message)
1. Poorly connected or broken harness
1. Connect the harness correctly, or
between the CTL4 on the CTL23
repair or replace it.
circuit board and KEY1 on the
operation panel
2. Blown fuse (F111) on the CTL23
2. Replace F111 on the CTL23 circuit
circuit board caused by Item 1 above.
board.
37
Distributed by: minilablaser.com
3. ERROR MESSAGE
No.
E-2824
Message
CTL circuit board fuse blowout.
After post-operational check is
completed, restart the system. If
problems persist, consult your
technical representative.
Factor
Blown fuse for D+5Va is detected.
(Causes of the error message)
1. Disconnected or broken cable for a
printer-related sensor
2. Disconnected or broken cable for a
processor-related sensor
3. Blown fuse (F112) on the CTL23
circuit board caused by Item 1 or 2
above.
E-2825
CTL circuit board fuse blowout.
After post-operational check is
completed, restart the system. If
problems persist, consult your
technical representative.
Blown fuse for D+5Vb is detected.
(Causes of the error message)
1. Disconnected or broken cable for a
printer-related motor or solenoid
2. Disconnected or broken cable for a
processor-related motor or solenoid
3. Blown fuse (F113) on the CTL23
circuit boa
E-2826
CTL circuit board fuse blowout.
After post-operational check is
completed, restart the system. If
problems persist, consult your
technical representative.
Blown fuse for A+5Va is detected.
(Causes of the error message)
1. Disconnected or broken harness
between the CTL15 on the CTL23
circuit board and HS760
2. Blown fuse (NFB1) on the CTL23
circuit board caused by Item 1 above
Actions
1. Connect the printer-related sensor
cable correctly, or repair or replace
it. (Locate the faulty sensor by
visual inspection while referring to
the wiring diagram of the JND23
circuit board.)
2. Connect the processor-related
sensor cable correctly, or repair or
replace it. (Locate the faulty
sensor by visual inspection while
referring to the wiring diagram of
the JNE23 circuit board.)
3. Replace F112 on the CTL23 circuit
board.
1. Connect the printer-related motor/
solenoid cable correctly, or repair
or replace it. (Locate the faulty part
by visual inspection while referring
to the wiring diagram of the PDA26
circuit board.)
2. Connect the processor-related
motor/solenoid cable c
1. Connect the harness correctly, or
repair or replace it.
2. Replace NFB1 on the CTL23
circuit board.
E-2836
Ambient temperature around
electrical section in back of
printer abnormal.
After post-operational check is
completed, restart the system. If
problems persist, consult your
technical representative.
Abnormal ambient temperature around a
circuit board for mechanical control
(CTL/PDA/PDB) is detected.
(Causes of the error message)
1. Increased temperature due to dust,
1. Remove dust, foreign matter, etc.
foreign matter, etc. in the CTL/PDA/
from the inside of the CTL/PDA/
PDB circuit board bracket
PDB circuit board bracket for
proper heat radiation.
2. Faulty PDA26 circuit
2. Replace the PDA26 circuit board.
E-2851
PAC circuit board power source
abnormal.
After post-operational check is
completed, restart the system. If
problems persist, consult your
technical representative.
Abnormal PAC_MC5V power supply
(abnormal PAC23 D+5V input)
(Cause of the error message)
Poorly connected or broken harness
between the PAC01 on the PAC23 circuit
board and CTL2 on the CTL23 circuit
board
E-2852
PAC circuit board power source
abnormal.
After post-operational check is
completed, restart the system. If
problems persist, consult your
technical representative.
Abnormal PAC_+24V02 power supply
(abnormal PAC23 +24V02 input)
(Causes of the error message)
1. Poorly connected or broken harness
between the PAC15 on the PAC23
circuit board and PWR5 on the
PWR23 circuit board
2. Faulty PWR23 circuit board
3. Faulty unit
38
Connect the harness correctly, or
repair or replace it.
1. Connect the harness correctly, or
repair or replace it.
2. Replace the PWR23 circuit board.
3. Replace the unit (PS2) in the DC
power supply.
Distributed by: minilablaser.com
3. ERROR MESSAGE
No.
E-2853
E-2854
Message
PAC circuit board power source
abnormal.
After post-operational check is
completed, restart the system. If
problems persist, consult your
technical representative.
Power supply cooling fan(F630)
abnormal.
After post-operational check is
completed, restart the system. If
problems persist, consult your
technical representative.
Factor
Abnormal PAC_+24V50 power supply
(abnormal PAC23 +24V50 input)
(Causes of the error message)
1. Poorly connected or broken harness
between the PAC14 on the PAC23
circuit board and PWR8 on the
PWR23 circuit board
2. Faulty PWR23 circuit board
3. Faulty unit
Actions
1. Connect the harness correctly, or
repair or replace it.
2. Replace the PWR23 circuit board.
3. Replace the unit (PS1) in the DC
power supply.
Power supply/electrical equipment
section fan alarm
(Causes of the error message)
1. Poorly connected or broken harness
between the power supply cooling fan
(F630) and PAC03 on the PAC23
circuit board
2. Faulty Fan (F630)
Restart the system software.
1. Connect the harness correctly, or
repair or replace it.
2. Replace F630.
E-2856
Electrical section relay abnormal.
After post-operational check is
completed, restart the system. If
problems persist, consult your
technical representative.
Abnormal K1relay (main power supply
AC input) status
(Cause of the error message)
Faulty K1relay
Replace the K1 relay.
E-2859
Electrical equipment cooling
fan(F631) abnormal.
After post-operational check is
completed, restart the system. If
problems persist, consult your
technical representative.
Power supply/electrical equipment
section fan alarm
(Causes of the error message)
1. Poorly connected or broken harness
between:
1) Electrical equipment cooling fan 1
(F631A) and PAC03 on the PAC23
circuit board
2) Electrical equipment cooling fan 2
(F631
Restart the system software.
LDD circuit board power source
abnormal.
After post-operational check is
completed, restart the system. If
problems persist, consult your
technical representative.
Abnormal +24V power supply is
detected.
(Causes of the error message)
1. Poorly connected or broken harness
between the LDD4 on the LDD23
circuit board and PWR6 on the
PWR23 circuit board
2. Faulty PWR23 circuit board
3. Faulty LDD23 circuit board
E-2871
1. Connect the harness correctly, or
repair or replace it.
2. Replace F631A.
3. Replace F631B.
1. Connect the harness correctly, or
repair or replace it.
2. Replace the PWR23 circuit board.
3. Replace the LDD23 circuit board.
E-2872
LDD circuit board power source
abnormal.
After post-operational check is
completed, restart the system. If
problems persist, consult your
technical representative.
Abnormal +8V power supply is detected.
(Causes of the error message)
1. Poorly connected or broken harness
1. Connect the harness correctly, or
between the LDD4 on the LDD23
repair or replace it.
circuit board and PWR6 on the
PWR23 circuit board
2. Faulty PWR23 circuit board
2. Replace the PWR23 circuit board.
3. Faulty LDD23 circuit board
3. Replace the LDD23 circuit board.
E-2873
LDD circuit board power source
abnormal.
After post-operational check is
completed, restart the system. If
problems persist, consult your
technical representative.
Abnormal +12V power supply is
detected.
(Causes of the error message)
1. Poorly connected or broken harness
between the LDD4 on the LDD23
circuit board and PWR6 on the
PWR23 circuit board
2. Faulty PWR23 circuit board
3. Faulty LDD23 circuit board
39
1. Connect the harness correctly, or
repair or replace it.
2. Replace the PWR23 circuit board.
3. Replace the LDD23 circuit board.
Distributed by: minilablaser.com
3. ERROR MESSAGE
No.
E-2874
Message
LDD circuit board power source
abnormal.
After post-operational check is
completed, restart the system. If
problems persist, consult your
technical representative.
Factor
Abnormal -12V power supply is
detected.
(Causes of the error message)
1. Poorly connected or broken harness
between the LDD4 on the LDD23
circuit board and PWR6 on the
PWR23 circuit board
2. Faulty PWR23 circuit board
3. Faulty LDD23 circuit board
Actions
1. Connect the harness correctly, or
repair or replace it.
2. Replace the PWR23 circuit board.
3. Replace the LDD23 circuit board.
E-2875
LDD circuit board power source
abnormal.
After post-operational check is
completed, restart the system. If
problems persist, consult your
technical representative.
Abnormal +24V interlock power supply is
detected.
(Causes of the error message)
1. The magazine door opened.
1. Close the magazine door.
2. Poorly connected or broken harness
2 . Connect the harness correctly, or
between the LDD3 on the LDD23
repair or replace it.
circuit board and PWR6 on the
PWR23 circuit board
3. Faulty PWR23 circuit boar
3. Replace the PWR23 circuit board.
4. Replace the LDD23 circuit board.
E-2876
LDD circuit board power source
abnormal.
After post-operational check is
completed, restart the system. If
problems persist, consult your
technical representative.
Abnormal +12V interlock power supply is
detected.
(Causes of the error message)
1. The magazine door opened.
1. Close the magazine door.
2. Poorly connected or broken harness
2. Connect the harness correctly, or
between the LDD3 on the LDD23
repair or replace it.
circuit board and PWR6 on the
PWR23 circuit board
3. Faulty PWR23 circuit boar
3. Replace the PWR23 circuit board.
4. Replace the LDD23 circuit board.
E-2877
LDD circuit board power source
abnormal.
After post-operational check is
completed, restart the system. If
problems persist, consult your
technical representative.
Abnormal L+5V power supply is
detected.
(Cause of the error message)
Faulty LDD23 circuit board
Replace the LDD23 circuit board.
E-2878
LDD circuit board power source
abnormal.
After post-operational check is
completed, restart the system. If
problems persist, consult your
technical representative.
Abnormal L+8V power supply is
detected.
(Cause of the error message)
Faulty LDD23 circuit board
Replace the LDD23 circuit board.
E-2879
LDD circuit board power source
abnormal.
After post-operational check is
completed, restart the system. If
problems persist, consult your
technical representative.
Abnormal A+5V power supply is
detected.
(Cause of the error message)
Faulty LDD23 circuit board
Replace the LDD23 circuit board.
E-2880
LDD circuit board power source
abnormal.
After post-operational check is
completed, restart the system. If
problems persist, consult your
technical representative.
Abnormal A-5V power supply is
detected.
(Cause of the error message)
Faulty LDD23 circuit board
Replace the LDD23 circuit board.
E-2881
LDD circuit board power source
abnormal.
After post-operational check is
completed, restart the system. If
problems persist, consult your
technical representative.
Abnormal R+5V power supply is
detected.
(Cause of the error message)
Faulty LDD23 circuit board
Replace the LDD23 circuit board.
40
Distributed by: minilablaser.com
3. ERROR MESSAGE
No.
Message
Factor
E-2882
LDD circuit board power source
abnormal.
After post-operational check is
completed, restart the system. If
problems persist, consult your
technical representative.
Abnormal R-5V power supply is
detected.
(Cause of the error message)
Faulty LDD23 circuit board
E-2884
LDD circuit board fuse blowout.
After post-operational check is
completed, restart the system. If
problems persist, consult your
technical representative.
Blown fuse for D+5V power supply is
detected.
(Causes of the error message)
1. Poorly connected or broken harness
between the LDD7 on the LDD23
circuit board and JROS in the laser
optical unit.
2. Faulty laser optical unit
3. Blown fuse (F138) on the LDD2
E-2885
E-2886
E-2887
E-2888
E-2889
LDD circuit board fuse blowout.
After post-operational check is
completed, restart the system. If
problems persist, consult your
technical representative.
Blown fuse for A+5V power supply is
detected.
(Causes of the error message)
1. Poorly connected or broken harness
between the LDD7 on the LDD23
circuit board and JROS in the laser
optical unit.
2. Faulty laser optical unit
3. Blown fuse (F135) on theLDD23
LDD circuit board fuse blowout.
After post-operational check is
completed, restart the system. If
problems persist, consult your
technical representative.
Blown fuse for +24V power supply is
detected.
(Causes of the error message)
1. Poorly connected or broken harness
between:
1) LDD15 on the LDD23 circuit board
and F614A
2) LDD15 on the LDD23 circuit board
and F614B
3) LDD5 on the LDD23 circuit board
and A
LDD circuit board fuse blowout.
After post-operational check is
completed, restart the system. If
problems persist, consult your
technical representative.
Blown fuse for A+8V power supply is
detected.
(Causes of the error message)
1. Faulty laser optical unit
2. Blown fuse (F133) on the LDD23
circuit board caused by Item 1 above
3. Faulty LDD23 circuit board
LDD circuit board fuse blowout.
After post-operational check is
completed, restart the system. If
problems persist, consult your
technical representative.
Blown fuse for A+12V power supply or
abnormal A-12V voltage is detected.
(Causes of the error message)
1. Poorly connected or broken harness
between:
1) LDD5 on the LDD23 circuit board
and AOM1 on the AOM driver
2) LDD7 on the LDD23 circuit board
and JROS
LDD circuit board fuse blowout.
After post-operational check is
completed, restart the system. If
problems persist, consult your
technical representative.
Blown fuse for A-12V power supply or
abnormal A+12V voltage is detected.
(Causes of the error message)
1. Poorly connected or broken harness
between:
1) LDD5 on the LDD23 circuit board
and AOM1 on the AOM driver
2) LDD7 on the LDD23 circuit board
and JROS
41
Actions
Replace the LDD23 circuit board.
1. Connect the harness correctly, or
repair or replace it.
2. Replace the laser optical unit.
3. Replace F138.
1. Connect the harness correctly, or
repair or replace it.
2. Replace the laser optical unit.
3. Replace F135.
1. Connect the harness correctly, or
repair or replace it.
2. Replace the LDD/AOM driver
cooling fan (F614A).
3. Replace the LDD/AOM driver
cooling fan (F614B).
4. Replace the AOM driver.
5. Replace the laser optical unit.
6. Replace F132.
1. Replace the laser optical unit.
2. Replace F133.
3. Replace the LDD23 circuit board.
1. Connect the harness correctly, or
repair or replace it.
2. Replace the AOM driver.
3. Replace the laser optical unit.
4. Replace F134.
1. Connect the harness correctly, or
repair or replace it.
2. Replace the AOM driver.
3. Replace the laser optical unit.
4. Replace F136.
Distributed by: minilablaser.com
3. ERROR MESSAGE
No.
E-2890
E-2891
E-2892
Message
LDD circuit board fuse blowout.
After post-operational check is
completed, restart the system. If
problems persist, consult your
technical representative.
LDD circuit board fuse blowout.
After post-operational check is
completed, restart the system. If
problems persist, consult your
technical representative.
LDD circuit board fuse blowout.
After post-operational check is
completed, restart the system. If
problems persist, consult your
technical representative.
Factor
Blown fuse for A-12VR power supply is
detected.
(Causes of the error message)
1. Poorly connected or broken harness
between the LDD5 on the LDD23
circuit board and AOM1 on the AOM
driver
2. Faulty AOM driver
3. Blown fuse (F137) on the LDD23
circuit board
Blown fuse for IL+24V power supply is
detected.
(Causes of the error message)
1. Poorly connected or broken harness
between the LDD7 on the LDD23
circuit board and JROS in the laser
optical unit
2. Faulty fan (F670)
3. Faulty fan (F671)
4. Faulty fan (F67
Blown IL+8V power supply fuse is
detected.
(Causes of the error message)
1. Faulty laser optical unit
2. Blown fuse (F131) on the LDD23
circuit board caused by Item 1
3. Faulty LDD23 circuit board
42
Actions
1. Connect the harness correctly, or
repair or replace it.
2. Replace the AOM driver.
3. Replace F137.
1. Connect the harness correctly, or
repair or replace it.
2.
3.
4.
5.
6.
Replace F670.
Replace F671.
Replace F672.
Replace S673.
Replace F139.
1. Replace the laser optical unit.
2. Replace F131.
3. Replace the LDD23 circuit board.
Distributed by: minilablaser.com
4. MAINTENANCE MENU
4.1
4.1.1
Printer Adjustment/Maintenance (05)
Printer Input Check (0525)
This procedure displays the status of the sensors.
[Selection]
[Setup and Maintenance] → [05 Printer Adjustment/
Maintenance] → [0525 Printer Input Check]
1. Click the [Close] button.
• Operation returns to the menu screen.
↓ [Next page]
43
[Prev. page] ↑
Distributed by: minilablaser.com
4. MAINTENANCE MENU
4.1.2
Printer I/O Check (0540)
This procedure displays the status of the motors,
solenoids and sensors.
[Selection]
[Setup and Maintenance] → [05 Printer Adjustment/
Maintenance] → [0540 Printer I/O Check]
1. Click the required operation button.
• The respective motor or solenoid operates if it is
normal.
↓ [Next page]
[Prev. page] ↑
↓ [Next page]
[Prev. page] ↑
↓ [Next page]
[Prev. page] ↑
2. Click the [Close] button.
• Operation returns to the menu screen.
44
Distributed by: minilablaser.com
5. DISTRIBUTION SECTION
5.1
Outline
5.1.1
Unit Identification
The model identification color label is attached to
each printer unit.
TYPE
Model Identification Color Label
VG2-004
Identification Color List
Printer/Processor
LP-5500
LP-5700
LP-5900
Not used
Color
Red
Yellow
Blue
White
NOTE: White circle indicates label attaching position.
Example:
Blue + White: Unit for LP-5900
Yellow + Blue: Unit for LP-5700 and LP-5900
Example
Distribution Unit
Model Identification Color Label
G2-020
45
Distributed by: minilablaser.com
5. DISTRIBUTION SECTION
5.1.2
Parts Location
• Distribution Entrance Unit
Nip Release Motor 3 (M656)
Nip Release Home Position Sensor 3 (D656)
Nip Release
Motor 2 (M655)
Nip Release Home Position Sensor 2 (D655)
VG2-042
46
Distributed by: minilablaser.com
5. DISTRIBUTION SECTION
• Distribution Unit
Distribution Section
Paper Sensor LED
(Rear : D665L)
Distribution Section
Paper Sensor
(Rear : D665P)
Distribution Section
Paper Sensor
(Center : D660P)
Distribution Section
Paper Sensor
(Front : D664P)
Distribution Section
Paper Sensor LED
(Center : D660L)
Distribution Section
Paper Sensor LED
(Front : D664L)
Distribution Slide
Motor (M661)
Nip Release Home
Position Sensor
for M657 (D657)
Nip Release
Motor 5 (M657)
Feed Motor 5 (M660)
Nip Release Start
Sensor 2 LED
(Rear : D659L)
Nip Release
Start Sensor 2
(Rear : D659P)
Nip Release Start
Sensor 1 LED
(Front : D658L)
Nip Release
Start Sensor 1
(Front : D658P)
Nip Release Motor 4
(Front : M662)
Distribution Section Drive
Standby Sensor (D669)
VG2-001
47
Distributed by: minilablaser.com
5. DISTRIBUTION SECTION
Distribution Home Position
Sensor for M661 (D661)
Nip Release Home Position
Sensor for M662 (Front : D662)
Nip Release Home Position
Sensor for M663 (Rear : D663)
Nip Release Motor 4 (Rear : M663)
VG2-002
48
Distributed by: minilablaser.com
5. DISTRIBUTION SECTION
Pipe Slider
Distribution Roller
Feed Rollers
VG2-003
49
Distributed by: minilablaser.com
5. DISTRIBUTION SECTION
5.2
Operation Sequences
5.2.1
Sensors and Motors
Symbol
Name
Function
D657
Nip Release Home Position Sensor (for M657)
M657 home position detecting
D658L/P
Nip Release Start Sensor (Front)
Trigger for nipping, releasing and distribution returning
start
D659L/P
Nip Release Start Sensor (Rear)
Trigger for nipping, releasing and distribution returning
start
D660L/P
Distribution Section Paper Sensor (Center)
Trigger for distribution start and jamming monitoring
D664L/P
Distribution Section Paper Sensor (Front)
Trigger for nipping and releasing
D665L/P
Distribution Section Paper Sensor (Rear)
Trigger for nipping and releasing
D666L/P
Speed Control Section Paper Sensor (Front)
Trigger for speed control (up/down) start and jamming
monitoring
D667L/P
Speed Control Section Paper Sensor (Center)
Trigger for speed control (up/down) start and jamming
monitoring
D668L/P
Speed Control Section Paper Sensor (Rear)
Trigger for speed control (up/down) start and jamming
monitoring
D669
Distribution Section Drive Standby Sensor
Drive standby detecting
M657
Nip Release Motor 5
Nips and releases the No. 16 roller.
M661
Distribution Slide Motor
Distributes paper sheets.
50
Distributed by: minilablaser.com
5. DISTRIBUTION SECTION
D657
M657
D658L/P(F)
D659L/P(R)
Unit
Photo-transistor Sensor
Photo-interrupter Sensor
Roller with Nip Release
Roller with One Way Clutch
GIIxxx
51
Distributed by: minilablaser.com
5. DISTRIBUTION SECTION
5.2.2
Nip OFF/ON Operation of No. 16 Roller
Roller nip ON/OFF is determined according to the sheet feed length (L).
L 254.0 mm: Nip OFF
L > 254.0 mm: Nip ON
START
Is the leading end of paper detected by the
distribution section paper sensor
(Front : D658 / Rear : D659) ?
No
Yes
Nip release motor 5 (M657) turns counterclockwise
for 56 pulses to release nip.
Is the trailing end of paper detected by the
distribution section paper sensor
(Front : D664 / Rear : D665) ?
Yes
Nip release motor 5 (M657) turns clockwise for 56
pulses to nip.
END
52
No
Distributed by: minilablaser.com
5. DISTRIBUTION SECTION
5.2.3
Distribution Processing
START
Paper
Distribution Roller
The distribution section paper sensor (D660)
detects the leading end of paper.
D664
Is the distribution unit in the center position?
Yes
D660
D665
No
Is the trailing end of paper detected
by the distribution section paper
sensor (Front: D664/Rear: D665)?
Yes
Disregard
Jamming error
The distribution slide motor (M661) moves the
distribution roller to the front (or rear) position
at 2400 pps.
(Distribution is started from the front position.)
After the nip start sensor
(Front: D658/Rear: D659) detects the leading
end of paper, nip is released and the
distribution roller moves toward the center
position at 2400 pps.
D658
When the trailing end of paper is detected
by the distribution section paper sensor
(Front: D664/Rear: D665) and the
distribution roller stops at the center
position, the roller is nipped.
END
53
No
D659
Distributed by: minilablaser.com
5. DISTRIBUTION SECTION
5.3
5.3.1
Distribution Entrance Unit Parts Replacement
Printer Right Inner Cover Removal/Reinstallation
Removal
Light Shield Cover
Screws (3)
1. Open the magazine door hinge section (refer to
LP-5700 service manual).
2. Remove the left cover section (refer to LP-5700
service manual).
3. Remove the screws then the light shield cover.
L2485
4. Remove the screw then the upper knob.
Screws (4)
5. Remove the screw then the lower knob.
6. Remove the screws then the printer right inner
cover.
Screw
Upper Knob
Lower Knob
Printer Right Inner Cover
Screw
G2-011
Reinstallation
Reinstallation is essentially in the reverse order of
removal.
Upper Knob
NOTE: Adjust the upper knob position as described below.
1) Temporarily install the upper knob to the unit.
2) Turn the knob counterclockwise fully.
3) Reinstall the upper knob so its rib is in a
horizontal and tighten the screw.
Screw
G2-021
54
Distributed by: minilablaser.com
5. DISTRIBUTION SECTION
5.3.2
Drive Gear Disengagement
Disengagement
Screws (2)(Loosen)
1. Remove the printer right inner cover
(see Subsection 5.3.1).
2. Loosen the two screws and remove the two
screws.
Screws (2)
G2-013
3. Lift the motor bracket, shift the bracket on the
distribution entrance unit to the left side and then
lower the motor bracket.
Bracket
Motor Bracket
NOTE: The distribution slider is in the front, push it
toward the rear before performing Step 3.
Motor Bracket
G2-014
4. Loosen the screw securing the drive gear bracket,
then swing the bracket up and retighten it.
Drive Gear Bracket
Screw
G2-016
55
Distributed by: minilablaser.com
5. DISTRIBUTION SECTION
Engagement
Drive Gear Bracket
Screw (Loosen)
Engagement is essentially in the reverse order of
disengagement.
NOTE: Perform the gear engagement adjustment described
below.
1) Loosen the screw and remove the jig.
2) Loosen the screw securing the drive gear
bracket.
3) Install the jig between the gear shafts and tighten
the screw.
4) Remove the jig and return it to its original
position.
Jig
Jig
Screw (Loosen)
G2-019
5.3.3
Distribution Entrance Unit Removal/Reinstallation
Removal
JFKE2 Connector
1. Remove the connector cover (refer to LP-5700
service manual).
2. Disengagement the drive gear (see Subsection
5.3.2).
3. Disconnect the connectors.
jfke1 Connector
L2487
4. Remove the screws mounting the unit.
Screws (2)
5. Remove the distribution entrance unit.
Reinstallation
Reinstallation is essentially in the reverse order of
removal.
Distribution Entrance Unit
G2-017
56
Distributed by: minilablaser.com
5. DISTRIBUTION SECTION
5.4
5.4.1
Distribution Unit Parts Replacement
Distribution Unit Removal/Reinstallation
Removal
Screws (2) (Loosen)
1. Disengage the drive gear (see Subsection 5.3.2).
Spring Hook
2. Loosen the two upper screws, remove the two
lower screws then the distribution section inner
cover by shifting the spring hook.
Screws (2)
Distribution Section Inner Cover
G2-015
3. Disconnect the connectors and open the clamp.
JFKR3 Connector
JFKR4 Connector
jfut2 Connector
Clamp
jfut2 Connector
L2518
4. Remove the screws then the unit.
Screws (2)
Reinstallation
Reinstallation is essentially in the reverse order of
removal.
Distribution Unit
G2-018
57
Distributed by: minilablaser.com
5. DISTRIBUTION SECTION
5.4.2
Nip Release Motor Bracket Removal/Reinstallation
Removal
1. Remove the distribution unit (see Subsection 5.4.1).
2. Disconnect the JFUR7 connector.
JFUR7 Connector
VG2-007
3. Remove the E-ring then the bearing.
Nip Release Motor Bracket
4. Remove the nip release motor bracket.
E-ring
Bearing
Reinstallation
Reinstallation is essentially in the reverse order of
removal.
VG2-005
5.4.3
Nip Release Motor 5 (M657) Replacement
Removal
Spring
1. Remove the nip release motor bracket (see
Subsection 5.4.2).
2. Remove the spring.
3. Remove the E-ring then the nip release knob gear
and pin.
4. Remove the E-ring then the bearing.
Bearing
E-ring
Pin
E-ring
Nip Release Knob Gear
VG2-006
58
Distributed by: minilablaser.com
5. DISTRIBUTION SECTION
5. Remove the screws then the gear bracket.
Gear Bracket
Screws (2)
VG2-008
6. Disconnect the M657 connector.
M657 Connector
VG2-011
7. Remove the screws then the motor bracket.
Motor Bracket
Screws (2)
VG2-009
59
Distributed by: minilablaser.com
5. DISTRIBUTION SECTION
8. Remove the screws then the motor.
Screws (2)
Bracket
Nip Release Motor 5 (M657)
VG2-010
Reinstallation
Spring
Reinstallation is essentially in the reverse order of
removal.
NOTE: After installing the tension spring, tighten the bracket
fixing screws.
Screws (2)
VG2-012
5.4.4
Nip Release Drive Gear/Belt Replacement
Removal
Nip Release Drive Belt
Pin
Belt Flange
1. Remove the nip release motor 5 (see Subsection
5.4.3).
Gear Pulley
Bearings (2)
2. Remove the E-rings then the bearings, one way
gear, gear pulley, pin, shaft, belt flange and nip
release drive belt.
Shaft
One Way Gear
E-rings (2)
VG2-013
60
Distributed by: minilablaser.com
5. DISTRIBUTION SECTION
3. Remove the E-ring then the bearing, shaft, pin
and gear.
Pin
Shaft
Gear
E-ring
Bearing
VG2-014
4. Remove the E-rings then the gears.
Gears (3)
E-rings (3)
VG2-015
5. Remove the E-rings then the gears.
Reinstallation
Reinstallation is essentially in the reverse order of
removal.
E-rings (2)
Gears (2)
VG2-016
61
Distributed by: minilablaser.com
5. DISTRIBUTION SECTION
5.4.5
Nip Release Home Position Sensor (Front: D662/Rear: D663) Replacement
Removal
1. Remove the distribution unit (see Subsection 5.4.1).
2. Remove the screws then the sensor bracket.
Sensor Bracket
Screws (2)
VG2-017
3. Remove the screws then the sensor bracket.
Screws (2)
Sensor Bracket
L2520
4. Disconnect the connector, release the locking
tabs and remove the sensor.
Sensor (D663)
Installation
Installation is essentially in the reverse order of
removal.
Locking Tabs
Sensor (D662)
Connector
L2521
62
Distributed by: minilablaser.com
5. DISTRIBUTION SECTION
5.4.6
Nip Roller Replacement
Removal
jfur3 Connector
1. Remove the distribution unit (see Subsection 5.4.1).
2. Open the clamp then disconnect the jfur3
connector.
Clamp
VG2-018
3. Remove the screws then the nip roller bracket
assembly.
Nip Roller Bracket
Screws (4)
L2531
4. Remove the pre-turning belts.
Pre-turning Belts (2)
L2532
63
Distributed by: minilablaser.com
5. DISTRIBUTION SECTION
5. Remove each E-ring then the roller and the two
bearings.
E-rings (2)
Installation
Installation is essentially in the reverse order of
removal.
Bearings (2)
Roller
L2533
5.4.7
Distribution Home Position Sensor (D661) Replacement
Removal
1. Remove the distribution unit (see Subsection 5.4.1).
2. Remove the screws then the sensor bracket.
Sensor Bracket
Screws (2)
VG2-017
3. Disconnect the connector, release the locking
tabs and remove the sensor.
Connector
Locking
Tabs
Installation
Installation is essentially in the reverse order of
removal.
Sensor (D661)
L2534
64
Distributed by: minilablaser.com
5. DISTRIBUTION SECTION
5.4.8
Nip Release Start Sensor (Front : D658P / Rear : D659P) Replacement
Removal
1. Remove the distribution unit (see Subsection 5.4.1).
2. Remove the screws then the sensor bracket.
Sensor Bracket
Screws (2)
VG2-017
3. Disconnect the connector.
Nip Release Start Sensor 2 (D659P)
Screw
4. Remove the screw then the sensor.
D659 Connector
Installation
Installation is essentially in the reverse order of
removal.
Screw
D658 Connector
Nip Release Start Sensor 1 (D658P)
VG2-019
65
Distributed by: minilablaser.com
5. DISTRIBUTION SECTION
5.4.9
Nip Release Start Sensor LED (Front : D658L / Rear : D659L) Replacement
Removal
1. Remove the distribution unit (see Subsection 5.4.1).
2. Open the distribution section guide plate.
Distribution Section Guide Plate
VG2-020
3. Remove the screw then the sensor bracket.
Screw
Sensor Bracket
VG2-021
4. Open the clamps.
Screw
Sensor Cover
D658L Connector
5. Disconnect the connector.
6. Remove the screw then the sensor and cover.
Installation
Nip Release Start
Sensor 2 LED
(D659L)
Installation is essentially in the reverse order of
removal.
Nip Release Start
Sensor 1 LED
(D658L)
Clamps (2)
VG2-022
66
Distributed by: minilablaser.com
5. DISTRIBUTION SECTION
5.4.10 Nip Release Home Position Sensor for M657 (D657) Replacement
Removal
E-ring
1. Remove the nip release motor bracket (see
Subsection 5.4.2).
2. Remove the E-ring then slide the bearing.
Bearing
VG2-023
3. Remove the shaft assembly.
Shaft Assembly
VG2-024
4. Open the clamp then disconnect the D657
connector.
Locking Tabs (4)
D657 Connector
5. Loosen the locking tabs then remove the sensor.
Installation
Nip Release Home
Position Sensor
for M657 (D657)
Installation is essentially in the reverse order of
removal.
Clamp
VG2-025
67
Distributed by: minilablaser.com
5. DISTRIBUTION SECTION
5.4.11 Distribution Roller Replacement
Removal
Screws (3)
Distribution Bracket
1. Remove the shaft assembly (see Subsection
5.4.10).
2. Remove the screws then the distribution bracket.
Screws (3)
VG2-026
3. Remove the screws then the slide bush housing
and slide shaft.
Slide Shaft
Slide Bush Housing
Screws (2)
VG2-027
4. Remove the screws.
Screws (3)
Screws (6)
VG2-028
68
Distributed by: minilablaser.com
5. DISTRIBUTION SECTION
5. Remove the screws then the entrance guide
plates.
Entrance Guide Plates (2)
Screws (4)
VG2-029
6. Loosen the screws and remove the screws then
the pipe frame.
Pipe Frame
Screws (2)
Screws (2) (Loosen)
VG2-030
7. Remove the screws then the pipe slider cover.
Pipe Slider Cover
Screws (2)
VG2-031
69
Distributed by: minilablaser.com
5. DISTRIBUTION SECTION
8. Remove the screws then the bearing holder.
Bearing Holder
Screws (2)
VG2-032
9. Remove the E-ring then the bearing and drive
roller.
Drive Roller
Bearing
E-ring
VG2-033
10. Remove the E-ring then the gear, pin and bearing.
Pin
Gear
Bearing
E-ring
VG2-034
70
Distributed by: minilablaser.com
5. DISTRIBUTION SECTION
11. Remove the E-ring and bearing then the nip roller
bracket.
Bearing
E-ring
Nip Roller Bracket
VG2-035
12. Remove the E-rings and bearings then the upper
nip roller.
Bearings (2)
E-rings (4)
Upper Nip Roller
VG2-036
13. Remove the E-rings and bearings then the lower
nip roller.
Bearings (2)
E-rings (2)
Installation
Installation is essentially in the reverse order of
removal.
Lower Nip Roller
VG2-037
71
Distributed by: minilablaser.com
5. DISTRIBUTION SECTION
5.4.12 Pipe Slider Replacement
Removal
1. Remove the bearing holder (see Subsection 5.4.11).
2. Loosen the locking tab then remove the drive
gear.
3. Remove the E-ring then the bearing.
Bearing
E-ring
Locking Tab
Drive Gear
VG2-038
4. Remove the E-ring then the bearing.
E-ring
Bearing
VG2-039
5. Remove the screws then the distribution section.
Distribution Section
Screws (2)
VG2-040
72
Distributed by: minilablaser.com
5. DISTRIBUTION SECTION
6. Remove the pipe slider assembly.
Installation
Installation is essentially in the reverse order of
removal.
Pipe Slider Assembly
VG2-041
73
Distributed by: minilablaser.com
6. DRYER SECTION
6.1
Outline
Dryer Belt Unit
Dryer Belt
20 Soft Rollers (Gray)
20 Soft Rollers (Beige)
Dryer Entrance Squeegee Roller
74
20 Hard
Rollers
(Brown)
Distributed by: minilablaser.com
6. DRYER SECTION
6.2
6.2.1
Dryer Entrance Squeegee Rack Parts Replacement
Upper Roller Section Removal/Reinstallation
Removal
Screws (4)
1. Remove the E-ring then the gear.
Spacers (4)
2. Remove the screws and spacers.
Gear
E-ring
VG2-043
3. Remove the screws then the upper roller section.
Upper Roller Section
Screws (2)
VG2-044
Reinstallation
Reinstallation is essentially in the reverse order of
removal.
NOTE: Install the upper section to the lower section by
aligning their D-cut as shown.
D-cut
VG2-048
75
Distributed by: minilablaser.com
6. DRYER SECTION
6.2.2
Upper Section Roller Replacement
Removal
1. Remove the upper roller section (see Subsection
6.2.1).
2. Remove the E-rings then the gears.
Gears (2)
E-rings (2)
VG2-045
3. Remove the screws then the bracket, spring and
bearings.
Bearings (2)
Spring
Bracket
Screws (2)
VG2-046
4. Remove the screws then the brackets, frames,
spring, bearings and rollers.
Rollers (2)
Screws (2)
Frames (2)
Reinstallation
Reinstallation is essentially in the reverse order of
removal.
Bearings (2)
Brackets (2)
Spring
VG2-047
76
Distributed by: minilablaser.com
6. DRYER SECTION
6.2.3
Lower Section Roller Replacement
Removal
Springs (3)
1. Remove the upper roller section (see Subsection
6.2.1).
2. Remove the E-rings then the gears, springs and
bearings.
Bearings (6)
E-rings (9)
Gears (9)
VG2-049
3. Remove the springs then the bearings.
Bearings (3)
Springs (3)
VG2-050
4. Remove the rollers.
Reinstallation
Reinstallation is essentially in the reverse order of
removal.
Rollers (6)
VG2-051
77
Distributed by: minilablaser.com
6. DRYER SECTION
6.3
6.3.1
Dryer Belt Unit Parts Replacement
Dryer Rack Section Rollers and Mesh Belts Replacement
Removal
Bearings (2)
1. Remove the dryer belt unit (refer to LP-5700
service manual).
E-rings (2)
Roller 1
2. Remove the E-rings then the bearings.
3. Remove the screws then the bracket and Roller 1.
Screws (2)
Bracket
G2-023
4. Remove the springs.
Bearings (2)
Roller 2
Brackets (2)
5. Remove the E-rings then the washers, brackets,
bearings and Roller 2.
Springs (2)
Washers (2)
E-rings (4)
G2-024
6. Remove the E-rings then the bearings.
7. Remove the screws then the bracket and Roller 3.
Roller 3
Bracket
E-rings (2)
Bearings (2)
Screws (2)
VG2-025
78
Distributed by: minilablaser.com
6. DRYER SECTION
8. Remove the E-ring then the gear.
Roller 4
Gear
9. Remove the E-rings then the bearings and Roller
4.
E-ring
Bearings (2)
E-rings (2)
G2-026
10. Remove the screws then the brackets and mesh
belts.
Mesh Belt
Installation
Installation is essentially in the reverse order of
removal.
Brackets (2)
NOTE: • Install Roller 2 with its longer shaft end towards the
rear.
• Align the D-cut of Roller 2 and the bearing bracket.
• Note the thickness of the washers.
Screws (8)
G2-027
79
Distributed by: minilablaser.com
6. DRYER SECTION
6.4
6.4.1
Dryer Rack Parts Replacement
Front Bearing Housing Disassembly/Reassembly
Disassembly
Shaft
1. Remove the dryer feed roller drive belt (refer to
LP-5700 service manual).
2. Remove the E-ring then the pulley, shaft and
bearings.
Bearings (2)
Pulley
E-ring
VG2-052
3. Remove the screw then the Housing 1.
Screw
Housing 2
4. Remove the screw then the Housing 2.
Reassembly
Reassembly is essentially in the reverse order of
disassembly.
Housing 1
Screw
VG2-053
80
Distributed by: minilablaser.com
6. DRYER SECTION
6.4.2
Rear Bearing Housing Disassembly/Reassembly
Disassembly
Spring
1. Remove the dryer rack belt (refer to LP-5700
service manual).
2. Pressure the spring then loosen the hex. socket
head set screws.
Hex. Socket Head Set Screws (2)
VG2-054
3. Remove the shaft then the spacers, spring and
bearing.
Shaft
Spring
Bearing
Spacers (2)
VG2-055
4. Remove the screw then the housing and bearing.
Bearing
Reassembly
Housing
Reassembly is essentially in the reverse order of
disassembly.
Screw
VG2-056
81
Distributed by: minilablaser.com
6. DRYER SECTION
6.5
6.5.1
Dryer Rack Maintenance
Cleaning the Dryer Rack Mesh Belt
1. Remove the dryer belt unit (refer to LP-5700
service manual).
2. Wipe clean the mesh belt using a cloth moistened
with water.
3. Reinstallation the dryer belt unit (refer to LP-5700
service manual).
G2-022
82
Distributed by: minilablaser.com
7. ELECTRICAL SECTION
7.1
Parts Location
AOM Driver
Operation Panel
(AOM23 Circuit Board)
Laser Optical Unit
Densitometer
LDD23 Circuit Board
AD300
Power
Switch
PDA26
Circuit
Board
JNF23
Circuit
Board
Image Control Box
GDM23
Circuit
Board
GIE23
Circuit Board
GPR23
Circuit Board
GEP23
Circuit Board
CTL23
Circuit
Board
PDB23
Circuit
Board
Relays
(K1 to K5)
JND23
Circuit Board
ATX Power
Supply
Leakage
Breakers
(LB1 to LB3)
Capacitors
(C1 to C3)
Noise Filters
(NF1 to NF3)
GMC23 Circuit
Board
JNE23 Circuit Board
PAC23 Circuit Board
Circuit Protectors
(CP1 to CP6)
DC Power
Supply Section
PWR23
Circuit Board
Power Supply
Built-in Circuit
Electrical
Equipment Section Terminal Section Breaker
Auxiliary Power
(SPS23 Circuit Board)
L21975
83
Distributed by: minilablaser.com
8. ELECTRICAL CIRCUIT DIAGRAMS
8.1
Printer I/O Parts Diagram
M657
D658L/P
D659L/P
Switch
M
Motor
Photo-interrupter
Photo-transistor
Micro Switch
Solenoid
Temperature Sensor
Fan
L21189
84
Distributed by: minilablaser.com
8. ELECTRICAL CIRCUIT DIAGRAMS
■ Paper Supply Section
Symbol
Name
Remark
D680A
Magazine door interlock switch 1
Micro Switch
D680B
Magazine door interlock switch 2
Micro Switch
M610
Upper magazine paper supply motor
Pulse Motor
M620
Lower magazine paper supply motor
Pulse Motor
■ Paper Feeding Section
Symbol
Name
Remark
D601
Upper cutter open (home position) sensor
Photo Interrupter
D602
Upper cutter close sensor
Photo Interrupter
D603
Lower cutter open (home position) sensor
Photo Interrupter
D604
Lower shutter close sensor
Photo Interrupter
D610~D615 Upper magazine ID sensor
Micro Switch
D616
Upper magazine paper end sensor
Photo Interrupter
D617
Upper magazine open/close sensor 1
Micro Switch
D618
Upper magazine open/close sensor 2
Micro Switch
D619
Upper magazine splice sensor
LED, Photo-transistor
D620~D625 Lower magazine ID sensor
Micro Switch
D626
Lower magazine paper end sensor
Photo Interrupter
D627
Lower magazine open/close sensor 1
Micro Switch
D628
Lower magazine open/close sensor 2
Micro Switch
D629
Lower magazine splice sensor
LED, Photo-transistor
D631
Upper magazine paper sensor
Photo Interrupter
D632
Lower magazine paper sensor
Separate Type Photo Interrupter
D633
Feed section paper sensor
Photo Interrupter
D640
Registration section paper sensor
Separate Type Photo Interrupter
D641
Tilt home position sensor (for M641)
Photo Interrupter
D642
Nip release home position sensor 1 (for M642)
Photo Interrupter
D681A
Left side door interlock switch 1
Micro Switch
D681B
Left side door interlock switch 2
Micro Switch
M600
Upper cutter drive motor
DC Motor
M601
Lower cutter drive motor
DC Motor
M630/M631/
Feed motor 1 to 4
M632/M640
Pulse Motor
M641
Registration tilt motor
Pulse Motor
M642
Nip release motor 1
Pulse Motor
S630
Back printer head
S631/S632/
S640/S641
Nip release solenoid 1 to 4
85
Distributed by: minilablaser.com
8. ELECTRICAL CIRCUIT DIAGRAMS
■ Exposure Section
Symbol
Name
Remark
D650
Exposure section entrance paper sensor
LED, Photo-transistor
D651
Soft nip home position sensor (for M651)
Photo Interrupter
D653
Exposure position paper sensor
LED, Photo-transistor
D674
Shutter open/close sensor
Photo Interrupter
D684
Power switch
Switch
F608
Feed section cooling fan 4
F609
Feed section cooling fan 5
F610~F612
Anti-dust fan
F690A
AOM cooling fan
F690B
LDD cooling fan
HS760
Thermohygrometer
IC
M650
Sub-scanning feed motor
Pulse Motor
M651
Soft nip motor
Pulse Motor
S673
Shutter solenoid
TS650
Exposure point temperature sensor
IC
■ Distribution/Print Exit Section
Symbol
Name
Remark
D655
Nip release home position sensor 2 (for M655)
Photo Interrupter
D656
Nip release home position sensor 3 (for M656)
Photo Interrupter
D657
Nip release home position sensor (for M657)
Photo Interrupter
D658
Nip release start sensor (Front)
Separate Type Photo Interrupter
D659
Nip release start sensor (Rear)
Separate Type Photo Interrupter
D660
Distribution paper sensor (center)
Separate Type Photo Interrupter
D661
Distribution home position sensor (for M661)
Photo Interrupter
D662
Nip release home position sensor 4 (front) (for
M652)
Photo Interrupter
D663
Nip release home position sensor 4 (rear) (for
M653)
Photo Interrupter
D664
Distribution paper sensor (front)
Separate Type Photo Interrupter
D665
Distribution paper sensor (rear)
Separate Type Photo Interrupter
D666
Speed control section paper sensor (front)
Separate Type Photo Interrupter
D667
Speed control section paper sensor (center)
Separate Type Photo Interrupter
D668
Speed control section paper sensor (rear)
Separate Type Photo Interrupter
D669
Distribution drive standby sensor
Micro Switch
F606
Feed section cooling fan 2
F607
Feed section cooling fan 3
M655
Nip release motor 2
Pulse Motor
M656
Nip release motor 3
Pulse Motor
M657
Nip release motor 5
Pulse Motor
M660
Feed motor 5
Pulse Motor
M661
Distribution motor
Pulse Motor
M662
Nip release motor 4 (front)
Pulse Motor
M663
Nip release motor 4 (rear)
Pulse Motor
M664
Speed control motor (front)
Pulse Motor
M665
Speed control motor (rear)
Pulse Motor
86
Distributed by: minilablaser.com
8. ELECTRICAL CIRCUIT DIAGRAMS
■ Power/Electrical/Control Section
Symbol
Name
Remark
D765
Dryer heater selection switch
Switch
F600~F604
Control section exhaust fan
F605
Feed section
cooling fan 1
F620
Image control section cooling fan
F630
Power supply cooling fan
F631A/B
Electrical
equipment
cooling fan
87
Distributed by: minilablaser.com
A50 A49 A48
A1 A2 A3 A4
1618
1921
2022
232527
2426
28
293133
303234
1 3 5
A4 A3 A2 A1 B50 B49 B48
A48 A49 A50 B1 B2 B3
7 9
8 10
(RED)
(GRY)
(RED)
(GRY)
(RED)
(BLU)
(BLK)
2 4 6
7 9
8 10
1113
1214
1517
1618
1921
2022
232425
1113
1214
1517
jha1
jha1
2 4 6
7 9
8 10
1113
1214
1517
1618
jha2
jha2
1618
JND2
JND2
1921
1921
2022
232425
26
2729
313335
2830
323436
1 3
2 4
2022
232425
26
2729
313335
2830
323436
1 3
(RED)
(BLU)
(BLK)
1 3 5
(RED)
(BLU)
(BLK)
303234
(RED)
(BLU)
(BLK)
293133
(RED)
(BLK)
1416 20
171819
1 2
jha5/jha8
jha8
3 4 5
1416 20
171819
1 2
Paper Supply/Feed Section
3 4 5
(RED)
(BLU)
(BLK)
1315
(RED)
(BLK)
1012
(RED)
(BLK)
9 11
D632L
D632L
1 2
26
2729
313335
2830
323436
1 3
2 4
5 7 9
6 8 10
11121314
jfk1
jfk1
2 4
JND3
JND3
5 7 9
(RED)
(BLU)
(BLK)
jha4/jha7
jha7
Lower Magazine ID Sensor 2
Lower Magazine ID Sensor 3
Lower Magazine ID Sensor 4
Lower Magazine
Paper Sensor
Exposure Section
Entrance Paper Sensor
Exposure Position
Paper Sensor
D632L
D632P
D650L D653L
D650P
D653P
D629P
D632L
D632P
D650L D653L
D650P
D653P
1 2
1 2 3
1 3
1 2 3
1 2
1 2 3
1 2 3
jfk2
jfk2
Soft Nip Home Position
Sensor (for M651)
Exposure Position
Paper Sensor LED
Exposure Section Entrance
Paper Sensor LED
Lower Magazine
Splice Sensor
Lower Magazine
Paper Sensor LED
Lower Magazine
Splice Sensor LED
Lower Magazine
Paper End Sensor
Lower Magazine ID Sensor 6
Lower Magazine ID Sensor 5
D629P
D629L
1 2
(RED)
(BLU)
(BLK)
1315
1 2 3
(RED)
(BLK)
(RED)
(BLU)
(BLK)
Lower Magazine ID Sensor 1
Lower Magazine
Open/Close Sensor 2
Lower Cutter Close Sensor
Lower Magazine
Open/Close Sensor 1
Lower Cutter Open
(Home Position) Sensor
1 2
(RED)
(BLU)
(BLK)
1012
(RED)
(BLK)
9 11
(RED)
(BLK)
6 8
(RED)
(BLK)
5 7
(RED)
(BLU)
(BLK)
2 4
(RED)
(BLU)
(BLK)
1 3
(RED)
(BLK)
2 4 678
(RED)
(BLK)
1 3 5
(RED)
(BLU)
(BLK)
6 8
(RED)
(BLU)
(BLK)
5 7
(RED)
(BLK)
2 4
(RED)
(BLK)
1 3
(RED)
(BLK)
2 4 678
jha3/jha6
jha6
(RED)
(BLU)
(BLK)
1 3 5
(RED)
(GRY)
3 4 5
(RED)
(GRY)
1 2
(RED)
(GRY)
171819
(RED)
(BLU)
(BLK)
(RED)
(GRY)
1416
(RED)
(GRY)
1315
(RED)
(GRY)
(RED)
(GRY)
(RED)
(GRY)
1012
(RED)
(GRY)
(RED)
(GRY)
(RED)
(GRY)
Upper Magazine
Splice Sensor
Upper Magazine Paper Sensor
Upper Magazine
Splice Sensor LED
Upper Magazine
Paper End Sensor
Upper Magazine
Open/Close Sensor 2
Upper Magazine
Open/Close Sensor 1
1 2
1 2
D629L
D+5Va
D651
DGND
(DGND)
1517
1 2
D+5Va
D653P
DGND
1214
1 2
10
D+5Va
D650P
DGND
1113
2 4 6
1 2
D626
D+5Va
D653L
8 10
1 3 5
1 2
9
D+5Va
D650L
7 9
303234
D628
D+5Va
D632P
DGND
2 4 6
(RED)
(GRY)
(RED)
(GRY)
9 11
8
D+5Va
D632L
1 3 5
293133
D627
D+5Va
D629P
DGND
D
28
D628
D624 D625
D+5Va
D629L
2426
D627
D623
(DGND)
232527
7
D+5Va
D626
DGND
2022
D624 D625
D622
1 2
D628
DGND
E
1921
1 2 3
D627
DGND
1618
28
(RED)
(GRY)
2426
D621
D621
D623
D604
D620
D620
D622
D603
D625
DGND
232527
(RED)
(GRY)
2022
3 4 5
(RED)
(GRY)
1921
1 2
6
D624
DGND
1517
jha5/jha8
jha5
1 2 3
D623
DGND
1618
171819
D631
(RED)
(GRY)
1517
1416
1 2 3
D622
DGND
1214
1315
(RED)
(GRY)
jha4/jha7
jha4
1 2
(RED)
(GRY)
1113
1012
1 2 3
D621
DGND
(RED)
(GRY)
1 2
(RED)
(GRY)
1 2
D619P
(RED)
(GRY)
1 2
5
D620
DGND
1214
(RED)
(BLU)
(BLK)
1 2
(RED)
(BLU)
(BLK)
1 2
D619P
D619L
(RED)
(BLU)
(BLK)
1 2
D619L
D+5Va
D604
DGND
1113
(RED)
(BLU)
(BLK)
1 2
(RED)
(BLU)
(BLK)
1 2
D616
(RED)
(BLU)
(BLK)
D618
(RED)
(BLU)
(BLK)
8 10
9 11
4
D+5Va
D603
DGND
8 10
(RED)
(BLU)
(BLK)
D618
D617
(RED)
(BLU)
(BLK)
D617
D615
(RED)
(BLU)
(BLK)
7 9
6 8
(RED)
(BLK)
D615
D614
D+5Va
D631
DGND
(RED)
(BLK)
2 4 6
5 7
(RED)
(BLU)
(BLK)
D614
D613
(RED)
(BLU)
(BLK)
(RED)
(BLU)
(BLK)
6 8
(RED)
(GRY)
Upper Magazine ID Sensor 5
D613
D612
D+5Va
D619P
DGND
(RED)
(GRY)
5 7
(RED)
(GRY)
Upper Magazine ID Sensor 4
D612
D611
Upper Magazine ID Sensor 6
Upper Magazine ID Sensor 3
D611
D610
(DGND)
(RED)
(BLK)
7 9
3
D+5Va
D619L
(RED)
(BLU)
(BLK)
(RED)
(GRY)
2 4
(RED)
(GRY)
Upper Magazine ID Sensor 2
D610
D+5Va
D616
DGND
(RED)
(GRY)
(RED)
(GRY)
(RED)
(GRY)
1 3
(RED)
(GRY)
(RED)
(GRY)
2 4 6 78
D618
DGND
(RED)
(GRY)
2 4 6
Upper Magazine ID Sensor 1
2
D617
DGND
(RED)
(GRY)
(RED)
(GRY)
jha3/jha6
jha3
D615
DGND
(RED)
(GRY)
2 4
(RED)
(GRY)
(RED)
(GRY)
1 3 5
D614
DGND
(RED)
(GRY)
1 3 5
1 3
(RED)
(GRY)
2 4 6 78
(RED)
(GRY)
(RED)
(GRY)
1 2 3
D613
DGND
(RED)
(GRY)
1 3 5
D602
D612
DGND
(RED)
(GRY)
1 3 5
(RED)
(GRY)
1 2 3
Upper Cutter Close Sensor
Upper Cutter Open
(Home Position) Sensor
1
D611
DGND
(RED)
(GRY)
(RED)
(BLU)
(BLK)
D601
(RED)
(BLU)
(BLK)
(RED)
(BLU)
(BLK)
A
D610
DGND
(RED)
(BLU)
(BLK)
C
(RED)
(BLU)
(BLK)
B
(RED)
(BLU)
(BLK)
8.2
D+5Va
D602
DGND
D+5Va
D601
DGND
Distributed by: minilablaser.com
8. ELECTRICAL CIRCUIT DIAGRAMS
JND23 Circuit Board Wiring Diagram (1/2)
11
12
D651
3 2 1
1 2 3
1 2
1 3
2 4
1 2 3
1 3
2 4
1 2 3
jfk3
jfk3
5 7 9
6 8 10
11121314
6 8 10
11121314
JND6
JND6
Sub-scanning Section
JND23 Circuit Board (1/2)
F
JND1
JND1
B3 B2 B1
G
CTL9
CTL9
B48 B49 B50
CTL23 Circuit Board
H
8-89
Feed Section
Paper Sensor
(RED)
(BLU)
(BLK)
H
8-90
7 9
1 3 5
1 3 5
G
3 2 1
D633
D633
JND5
JND5
2 4 6
11 8 10 12
Registration Section
JND4
JND4
4 6 8 9 10
1 2 3 5 7
F
2 4 6 7 8
jin1
jin1
2 4 6 7 8
1 3 5
Distribution Entrance Section
2 4 6
JND7
JND7
7 8
1 3 5
2 4 6
7 9 11
(RED)
(BLU)
(BLK)
(RED)
(BLU)
(BLK)
1718
19 2123
JND8
JND8
2022 24
25 2729
2628 30
D+5Va
D660P
DGND
Back Print/Feed Section
JND23 Circuit Board (2/2)
Distribution Section
23 24
D
31 32
33 35
34 36
373839
1 2 3 5
4 6
7 9
(RED)
(BLU)
(BLK)
40
Paper Exit Section
D+5Va
D668P
DGND
(DGND)
DGND
D666P
D667P
D668P
D668L
1 3
D666P
1 2 3
D667P
1 2 3
D668P
1 2 3
1 2
3 4
5 6
jshu1
jshu1
7 9 11
8 10 12
13
141516
7 9 11
8 10 12
13
141516
(RED)
(BLU)
(BLK)
(RED)
(BLU)
(BLK)
5 6
(RED)
(BLU)
(BLK)
10
D+5Va
D667P
DGND
D668L
D667L
1 3
(RED)
(BLU)
(BLK)
3 4
(RED)
(BLU)
(BLK)
1 2
D+5Va
D666P
DGND
D667L
D666L
1 3
28
(DGND)
9
D+5Va
D668L
28
(RED)
(BLK)
252627
(RED)
(BLK)
Nip Release Home
Position Sensor (for M657)
Nip Release Start
Sensor LED (Rear)
Speed Control Section
Paper Sensor (Rear)
101214
Speed Control Section
Paper Sensor (Center)
252627
Speed Control Section
Paper Sensor (Front)
23 24
Speed Control Section
Paper Sensor LED (Rear)
21 22
D666L
jfur5
jfur5
(RED)
(BLK)
19 20
D+5Va
D667L
C
Speed Control Section
Paper Sensor LED (Center)
141618
9 11 13
131517
jfur2
jfur2
131517
21 22
D657
D657
1 2 3
(RED)
(BLK)
8 10 12
(RED)
(BLK)
jfur4
jfur4
CTL_CN_STG
NC
D+5Va
D666L
D669
1 2
(RED)
(BLK)
D659L
1 3
Speed Control Section
Paper Sensor LED (Front)
7 9 11
19 20
D659L
D658L
1 3
(RED)
(BLK)
5 6
141618
Nip Release Start
Sensor LED (Front)
8
(DGND)
3 4
8 10 12
(RED)
(BLK)
D669
D658L
(RED)
(BLU)
(BLK)
(RED)
(BLU)
(BLK)
Distribution Paper Sensor (Rear)
D665P
1 2 3
(RED)
(BLU)
(BLK)
Distribution Paper Sensor (Center)
D665P
D660P
1 2 3
Distribution Drive Standby Sensor
Distribution Paper Sensor (Front)
7
D+5Va
D697
DGND
(RED)
(BLK)
1 2
7 9 11
D660P
D664P
1 2 3
(RED)
(BLK)
(RED)
(BLK)
101214
5 6
D664P
D+5Va
D659L
(RED)
(GRY)
9 11 13
1 3 5
2 4 6 7 8
jfur1
jfur1
2 4 6 7 8
3 4
D661
D661
1 2 3
(RED)
(BLK)
(RED)
(BLU)
(BLK)
D665L
1 3
D+5Va
D658L
(RED)
(BLU)
(BLK)
D665L
D660L
1 3
(RED)
(GRY)
(RED)
(BLU)
(BLK)
D660L
D664L
1 3
Distribution Home Position Sensor (for M661)
D664L
D669
DGND
(RED)
(BLU)
(BLK)
Distribution Paper Sensor LED (Rear)
6
D+5Va
D665P
DGND
(RED)
(BLU)
(BLK)
14 16
D+5Va
D664P
DGND
1315
(RED)
(BLU)
(BLK)
8 1012
D+5Va
D661
DGND
(RED)
(BLK)
1 3 5
1 2
(RED)
(BLK)
D659P
1 2 3
Distribution Paper Sensor LED (Center)
D659P
Distribution Paper Sensor LED (Front)
Nip Release Start Sensor
(Rear)
D658P
D658P
1 2 3
D+5Va
D665L
(RED)
(BLK)
1 3 5
(RED)
(BLU)
(BLK)
5
(RED)
(BLK)
2 4 6 7 8
jfur3
jfur3
2 4 6 7 8
D+5Va
D660L
(RED)
(BLK)
1 3 5
(RED)
(BLK)
1 2 3
jfke2
jfke2
1 2 3
Nip Release Start Sensor
(Front)
Nip Release Home Position
Sensor 4 (Rear) (for M663)
D663
D663
1 2 3
(RED)
(BLU)
(BLK)
(RED)
(BLU)
(BLK)
Nip Release Home Position
Sensor 4 (Front) (for M662)
D662
D662
1 2 3
D+5Va
D664L
(RED)
(BLU)
(BLK)
9 10 7 8
(RED)
(BLU)
(BLK)
9 10 7 8
(RED)
(BLU)
(BLK)
(RED)
(BLU)
(BLK)
D656
D656
1 2 3
(RED)
(BLU)
(BLK)
2 4 6
jfke1
jfke1
2 4 6
(RED)
(BLU)
(BLK)
4
D+5Va
D659P
DGND
1 3 5
(RED)
(BLU)
(BLK)
11 8 10 12
Nip Release Home Position
Sensor 3 (for M656)
Registration Section
Paper Sensor
Nip Release Home
Position Sensor 1 (for M642)
3
D+5Va
D658P
DGND
2 4 6
(RED)
(BLU)
(BLK)
1 3 5
D+5Va
D663P
DGND
11 8 10 12
(RED)
(BLU)
(BLK)
2 4 6
(RED)
(BLU)
(BLK)
4 5 6
D+5Va
D662
DGND
1 2 3
D655
D655
1 2 3
NC
NC
4 5 6
(RED)
(BLU)
(BLK)
jre2
jre2
(RED)
(BLU)
(BLK)
1 2 3
D+5Va
D656
DGND
D640P
1 2 3
Nip Release Home Position
Sensor 2 (for M655)
D640P
(RED)
(BLU)
(BLK)
(RED)
(BLU)
(BLK)
D642
D642
1 2 3
(RED)
(BLU)
(BLK)
jre1
jre1
(RED)
(BLU)
(BLK)
(RED)
(BLU)
(BLK)
Registration Section
Paper Sensor LED
Tilt Home Position Sensor (for M641)
2
D+5Va
D655
DGND
1 3 5
(RED)
(BLU)
(BLK)
7 9
D+5Va
D640P
DGND
D640L
1 3
(DGND)
7 9
(RED)
(BLU)
(BLK)
1 3 5
(RED)
(BLU)
(BLK)
(RED)
(BLK)
D640L
(BLK)
D+5Va
D642
DGND
(RED)
(BLK)
1 3 5
D+5Va
D640L
D641
D641
1 2 3
D+5Va
D633
DGND
(DGND)
DGND
CTL_CN_ST5
NC
D+5Va
D630
DGND
E
(RED)
(BLU)
(BLK)
B
(RED)
(BLU)
(BLK)
1
(RED)
(BLU)
(BLK)
(RED)
(BLU)
(BLK)
D+5Va
D641
DGND
Distributed by: minilablaser.com
8. ELECTRICAL CIRCUIT DIAGRAMS
JND23 Circuit Board Wiring Diagram (2/2)
11
12
A
8 10 12
11
JND9
JND9
131517
141618 19 20
1 5 4 3 2 6
M631
M631
1 5 4 3 2 6
(ORG)
(BLK)
1 16 2 3 4 1011 12 8 9
JIN1
JIN1
1 16 2 3 4 10 11 12 8 9
5 6 7 3 4 5
1 6 2 3
4 5
5 6 7 3 4 5
1 5 4 3 2 6
M632
M632
1 5 4 3 2 6
1 6 2 3
JIN2
JIN2
4 5
4 5 6 12 13 14
JIN4
JIN4
4 5 6 12 13 14
7 8
1516
7 8
1516
S630
1 2
S631
S631
1 2
1 2
S632
S632
1 2
M632
S631
S632
PDA8
PDA8
1 2 3 4 5 6 7 8 9 10 11 1213 14 15 16 17 1819 20 21 2223 24 25 26 2728 29 30 3132 33 34 3536 37 38 3940
1 2 3 4 5 6 7 8 9 10 11 1213 14 15 16 17 1819 20 21 2223 24 25 26 2728 29 30 3132 33 34 3536 37 38 3940
JNF1
JNF1
JNF23 Circuit Board
1 2 7 8
3 4 9 10
PDA14
PDA14
5 6 11 12
1 14 2 3 4 5 6 7
PDA15
PDA15
8 9 10 11 1213
1 3 5
PDA17
PDA17
1 2
1 2
1 2 3 4 5 6 7 8 9 10 11 1213 14 15 16 17 1819 20 21 2223 24 25 26 2728 29 30 3132 33 34 3536 37 38 3940
JIN3
JIN3
1 2 3 4 5 6 7 8 9 10 11 1213 14 15 16 17 1819 20 21 2223 24 25 26 2728 29 30 3132 33 34 3536 37 38 3940
1 2
JPWA1
JPWA1
1 2
1 2
JPWA2
JPWA2
1 2
7 9 11
8 10 12
PDA16
PDA16
PDA18
PDA18
6 5 8 7 3 4
(RED)
(BLK)
(WHT)
2 4 6
(RED)
(BLK)
(WHT)
(RED)
(BLK)
(WHT)
F601
F602
F603
F604
F605
1 4 3
F600
F600
F600
4 1 2
1 4 3
F601
F601
F601
4 1 2
1 4 3
F602
F602
F602
4 1 2
1 4 3
F603
F603
F603
4 1 2
1 4 3
F604
F604
F604
4 1 2
1 4 3
F605
F605
F605
4 1 2
2 6 3 7 4 8 1 5
JPWA3
JPWA3
2 6 3 7 4 8 1 5
1 7 2 8 3 9 4 10 5 11 6 12
JPWA4
JPWA4
1 7 2 8 3 9 4 10 5 11 6 12
P+24V
GND
Feed Section Cooling Fan 6
Sensor Signal
P+24V
GND
Feed Section Cooling Fan 5
Sensor Signal
P+24V
GND
Feed Section Cooling Fan 2
Sensor Signal
10
13 15 17
14 16 18
19 21 23
20 22 24
F609
F609_rtn
F609_err
(RED)
(BLK)
(WHT)
JFAN1
JFAN1
(RED)
(BLK)
(WHT)
8 10 12
P+24V
GND
Control Section Exhaust Fan
Sensor Signal
P+24V
GND
Control Section Exhaust Fan
Sensor Signal
P+24V
GND
Control Section Exhaust Fan
Sensor Signal
P+24V
GND
Control Section Exhaust Fan
Sensor Signal
P+24V
GND
Control Section Exhaust Fan
Sensor Signal
Speed Control
Motor (Rear)
Nip Release
Motor 4 (Rear)
Speed Control
Motor (Front)
F600
F608
F608_rtn
F608_err
7 9 11
(RED)
(BLK)
(WHT)
2 4 6
F605
F605_rtn
F605_err
8 10 12
(RED)
(BLK)
(WHT)
7 9 11
(RED)
(BLK)
(WHT)
7 8 9 10 11 12
(RED)
(BLK)
(WHT)
C
2 4 6
F604
F604_rtn
F604_err
(RED)
(BLK)
(WHT)
7 8 9 10 11 12
1 3 5
To PWR11
3 4 5 8 9 10
9
+24V51
GND-24V5
+24V52
GND-24V5
+24V53
GND-24V5
+24V61
GND-24V6
+24V62
GND-24V6
+24V63
GND-24V6
Paper Supply/Back Print Section
1 3 5
(ORG)
(BLK)
(ORG)
(BLK)
(ORG)
(BLK)
(ORG)
(BLK)
(ORG)
(BLK)
(ORG)
(BLK)
Distribution Section
8 9 10 11 1213
F603
F603_rtn
F603_err
8 9 10 11 1213
1 2 3 4
1 14 2 3 4 5 6 7
JSHU1
JSHU1
1 14 2 3 4 5 6 7
(RED)
(BLK)
(WHT)
JSHU2
JSHU2
(RED)
(BLK)
(WHT)
9 10 11 12
3 4 5 8 9 10
5 6 7 8
JFUR2
JFUR2
5 6 7 8
F602
F602_rtn
F602_err
1 2 3 4
+24V41
GND-24V4
+24V42
GND-24V4
+24V43
GND-24V4
3 4 5 8 9 10
(ORG)
(BLK)
(ORG)
(BLK)
(ORG)
(BLK)
JFUR5
JFUR5
(RED)
(BLK)
(WHT)
1 2 6 7
9 10 11 12
8
To PWR10
1 2 3 4 5 6
(RED)
(BLK)
(WHT)
1 2 3 4 5 6
5 6 11 12
1 5 4 3 2 6
M665
M665
1 5 4 3 2 6
(RED)
(BLK)
(WHT)
(RED)
(YEL)
(BLU)
(ORG)
Nip Release
Motor 4 (Front)
Distribution Motor
M657
F601
F601_rtn
F601_err
(RED)
(YEL)
(BLU)
(ORG)
(RED)
(YEL)
(BLU)
(ORG)
Feed Motor 5
Nip Release Motor 5
+24V01
GND-24V0
5 6 11 12
(RED)
(BLK)
(YEL)
(BLU)
(WHT)
(ORG)
3 4 9 10
JFUR4
JFUR4
3 4 9 10
(RED)
(BLK)
(WHT)
1 2 7 8
M665
F600
F600_rtn
F600_err
(RED)
(BLK)
(YEL)
(BLU)
(WHT)
(ORG)
1 2 7 8
3 4 5 8 9 10
(RED)
(BLK)
(YEL)
(BLU)
(WHT)
(ORG)
3 4 5 8 9 10
M664
D+5V2_MC
GND-5MC
(RED)
(BLK)
(YEL)
(BLU)
(WHT)
(ORG)
(RED)
(BLK)
(YEL)
(BLU)
(WHT)
(ORG)
1 2 3 4
(RED)
(YEL)
(BLU)
(ORG)
1 2 3 4
M656
M656
1 3 4 6
(RED)
(YEL)
(BLU)
(ORG)
1 3 4 6
M655
M655
1 4 3 6
1 5 4 3 2 6
M664
M664
1 5 4 3 2 6
M665 A
M665/ACOM
M665 / A
M665 B
M665/BCOM
M665/B
PDA13
PDA13
(BLK)
(BLK)
(RED)
(BLK)
(YEL)
(BLU)
(WHT)
(ORG)
(RED)
(YEL)
(BLU)
(ORG)
JFUR1
JFUR1
(RED)
(YEL)
(BLU)
(ORG)
(RED)
(BLK)
(YEL)
(BLU)
(WHT)
(ORG)
1 4 3 6
JFUR6
JFUR6
1 4 3 6
M663
M663
1 4 3 6
7
(ORG)
(BLK)
4 5
1 4 3 6
M662
M662
1 4 3 6
M663
(CN_ST)
(CN_ST_rtn)
M664 A
M664/ACOM
M664 / A
M664 B
M664/BCOM
M664/B
1 2 6 7
(RED)
(YEL)
(BLU)
(ORG)
3 4 7 8
1 2 3 4 5 6
M661
M661
1 2 3 4 5 6
1 3 4 6
M657
M657
1 3 4 6
M663 A
M663 /A
M663 B
M663 /B
PDA12
PDA12
(RED)
(YEL)
(BLU)
(ORG)
1 2 6 7
(RED)
(YEL)
(BLU)
(ORG)
1 2 6 7
M662
M657 A
M657 /A
M657 B
M657 /B
5 6 7 8
(RED)
(YEL)
(BLU)
(ORG)
1 2 6 7
5 6 7 8
(RED)
(YEL)
(BLU)
(ORG)
5 6 7 8
(RED)
(BLK)
(YEL)
(BLU)
(WHT)
(ORG)
(RED)
(YEL)
(BLU)
(ORG)
A
6
To PWR8
PDA7
PDA7
1 6 2 3
M661
5
(RED)
(BLK)
Distribution Entrance Section
M660
M662 A
M662 /A
M662 B
M662 /B
1 2 3 4
(RED)
(YEL)
(BLU)
(ORG)
JFUR3
JFUR3
5 6 7 8
(RED)
(BLK)
(YEL)
(BLU)
(WHT)
(ORG)
(RED)
(YEL)
(BLU)
(ORG)
JFKE2
JFKE2
M661 A
M661 / ACOM
M661 / A
M661 B
M661 / BCOM
M661 / B
M660 A
M660 / A
M660 B
M660 / B
1 3 4 6
M660
M660
1 3 4 6
(CN_ST)
NC
S630_#5DRY
S630_#5COM
S630_#9DRY
S630_#9COM
S630_#3DRY
S630_#3COM
S630_#11DRY
S630_#11COM
S630_#1DRY
S630_#1COM
S630_#13DRY
S630_#13COM
S630_#15DRY
S630_#15COM
S630_#17DRY
S630_#17COM
S630_#18DRY
S630_#18COM
S630_#16DRY
S630_#16COM
S630_#2DRY
S630_#2COM
S630_#14DRY
S630_#14COM
S630_#4DRY
S630_#4COM
S630_#12DRY
S630_#12COM
S630_#6DRY
S630_#6COM
S630_#10DRY
S630_#10COM
S630_#7DRY
S630_#7COM
S630_#8DRY
S630_#8COM
NC
(CN_ST_rtn)
S632
S632_rtn
4
To PWR8
(GRY)
(GRY)
(GRY)
(GRY)
(GRY)
(GRY)
(GRY)
(GRY)
(GRY)
(GRY)
(GRY)
(GRY)
(GRY)
(GRY)
(GRY)
(GRY)
(GRY)
(GRY)
(GRY)
(GRY)
(GRY)
(GRY)
(GRY)
(GRY)
(GRY)
(GRY)
(GRY)
(GRY)
(GRY)
(GRY)
(GRY)
(GRY)
(GRY)
(GRY)
(GRY)
(GRY)
(GRY)
(GRY)
(GRY)
5 6 7 3 4 5
(CN_ST)
(CN_ST_rtn)
S631
S631_rtn
Nip Release Motor 3
M656
(GRY)
(GRY)
(GRY)
(GRY)
(GRY)
(GRY)
(GRY)
(GRY)
(GRY)
(GRY)
(GRY)
(GRY)
(GRY)
(GRY)
(GRY)
(GRY)
(GRY)
(GRY)
(GRY)
(GRY)
(GRY)
(GRY)
(GRY)
(GRY)
(GRY)
(GRY)
(GRY)
(GRY)
(GRY)
(GRY)
(GRY)
(GRY)
(GRY)
(GRY)
(GRY)
(GRY)
(GRY)
(GRY)
(GRY)
(BLK)
(BLK)
(ORG)
(BLK)
(RED)
(YEL)
(BLU)
(ORG)
3
Printing Head
F
(BLK)
JFKE1
JFKE1
(RED)
(YEL)
(BLU)
(ORG)
Nip Release Motor 2
M655
(ORG)
(BLK)
(ORG)
(BLK)
1 2 3 9 10 11
(ORG)
(BLK)
(RED)
(YEL)
(BLU)
(ORG)
1 2 5 6
Nip Release Solenoid 2
M631
M655 A
M655 / A
M655 B
M655 / B
(RED)
(YEL)
(BLU)
(ORG)
2
(ORG)
(BLK)
M632 A
M632/ACOM
M632 /A
M632 B
M632/BCOM
M632/ B
1 2 3 4
(RED)
(YEL)
(BLU)
(ORG)
1 2 3 4
Nip Release Solenoid 1
(RED)
(BLK)
(YEL)
(BLU)
(WHT)
(ORG)
(RED)
(YEL)
(BLU)
(ORG)
1 2 3 4
(RED)
(BLK)
(YEL)
(BLU)
(WHT)
(ORG)
1 2 3 9 10 11
(RED)
(BLK)
(YEL)
(BLU)
(WHT)
(ORG)
M655 A
M655 / A
M655 B
M655 / B
1
Feed Motor 3
NC
NC
PDA6
PDA6
1 16 2 3 4 1011 12 8 9
M631 B
M631/BCOM
M631/ B
B
Feed Motor 2
H
(CN_ST)
(CN_ST_rtn)
M631 A
M631/ACOM
M631/ A
E
(BLK)
(BLK)
(RED)
(BLK)
(YEL)
(BLU)
(WHT)
(ORG)
D
(RED)
(BLK)
(YEL)
(BLU)
(WHT)
(ORG)
8.3
(RED)
(BLK)
(YEL)
(BLU)
(WHT)
(ORG)
Distributed by: minilablaser.com
8. ELECTRICAL CIRCUIT DIAGRAMS
PDA26 Circuit Board Wiring Diagram (1/2)
11
12
F608
F609
1 2 3
F608
F608
1 2 3
1 2 3
F609
F609
1 2 3
13 15 17
14 16 18
19 21 23
20 22 24
13 15 17
14 16 18
19 21 23
20 22 24
Paper Exit Section
PDA26 Circuit Board (1/2)
PDA19
PDA19
2 3 7 1 9 8 11 10 6 12 4 5
JNF2
JNF2
1 2 3 4 5 6 7 8 9 10 11 1213 14 15 16 17 1819 20 21 2223 24 25 26 2728 29 30 3132 33 34 3536 37 38 3940
G
21 2223 24 25 26 2728 29 30 3132 33 34 3536 37 38 3940 1 2 3 4 5 6 7 8 9 10 11 1213 14 15 16 17 1819 20
8-91
Distributed by: minilablaser.com
8. ELECTRICAL CIRCUIT DIAGRAMS
PDA26 Circuit Board Wiring Diagram (2/2)
1
2
3
4
5
6
7
8
9
10
12
11
9 10 11 12 13 14
15 16 17 18
2 3
4 5
1 2 3 8 9
7 8 9 10 11 12
1 6
1 2 3 8 9
7 8 9 10 11 12
1 6
1 2 3 8 9
JHA1
JHA1
15 16 17 18
4 5
2 3
Lower Magazine
Paper Supply Motor
P+24V
GND
Feed Section Cooling Fan 3
Sensor Signal
P+24V
GND
Feed Section Cooling Fan 4
Sensor Signal
F606
F607
4 10 11 5 6 7 12 13 14
JFUK2
JFUK2
4 10 11 5 6 7 12 13 14
4 10 11 5 6 7 12 13 14
JFUK1
JFUK1
4 10 11 5 6 7 12 13 14
1 2 3
F607
F607
1 2 3
1 3 2 4
JMAG3
JMAG3
1 3 2 4
1 3 2 4
JMAG4
JMAG4
1 3 2 4
1 2 3
1 6 2 3 4 5
JMAG1
JMAG1
1 6 2 3 4 5
(RED)
(BLK)
(WHT)
1 3 4 6
M620
M620
1 3 4 6
1 3 4 6
M610
M610
1 3 4 6
1 2 3 4 5 6
M651
M651
1 2 3 4 5 6
1 4 3
F606
F606
F606
4 1 2
4 5 6
JFAN3
JFAN3
1 2 3
4 5 6
(RED)
(BLK)
(WHT)
5 6 7 8 9 10
2 4
M620
(RED)
(BLK)
(WHT)
(BLK)
(RED)
(ORG)
(YEL)
(BLU)
(ORG)
(BLK)
1 3
17 1819 20
M610
(RED)
(BLK)
(WHT)
11 12 13 14 15 16
9 10 11 12 13 14
7 8
1 2 3 8 9
(BLK)
(RED)
(ORG)
(YEL)
(BLU)
5 6
5 6 7 8 9 10
JHA3
JHA3
JRE1
JRE1
1 2 3 4
(RED)
(BLK)
(YEL)
(BLU)
(WHT)
(ORG)
(ORG)
(BLK)
2 4
(BLK)
7 8
1 3
1 2 3 4 5
JFUK3
JFUK3
1 2 3 4 5
1 5 4 3 2 6
M630
M630
1 5 4 3 2 6
(RED)
(BLK)
(YEL)
(BLU)
(WHT)
(ORG)
5 6
17 1819 20
(ORG)
(BLK)
1 2 3 4
11 12 13 14 15 16
(ORG)
(BLK)
(ORG)
(BLK)
7 8
(ORG)
(BLK)
5 6
(RED)
(YEL)
(BLU)
(ORG)
1 2 3 4
(RED)
(YEL)
(BLU)
(ORG)
9 10
JRE3
JRE3
9 10
(RED)
(YEL)
(BLU)
(ORG)
7 8
(RED)
(BLK)
(YEL)
(BLU)
(WHT)
(ORG)
5 6
1 2
M601
M601
1 2
(RED)
(BLK)
(YEL)
(BLU)
(WHT)
(ORG)
(ORG)
(BLK)
1 2 3 4
C
1 2
M600
M600
1 2
1 4 3 6
M641
M641
1 4 3 6
1 5 4 3 2 6
M640
M640
1 5 4 3 2 6
1 2
S641
S641
1 2
(ORG)
(BLK)
1 2
S640
S640
1 2
(RED)
(YEL)
(BLU)
(ORG)
1 4 3 6
M642
M642
1 4 3 6
M651
(RED)
(YEL)
(BLU)
(ORG)
M630
(RED)
(YEL)
(BLU)
(ORG)
Feed Motor
M601
Upper Magazine
Paper Supply Motor
Lower Cutter Driver Motor
M600
(RED)
(YEL)
(BLU)
(ORG)
Upper Cutter Driver Motor
M641
(BLK)
(RED)
(YEL)
(BLU)
(ORG)
Registration Tilt Motor
M640
Soft Nip Motor
Feed Motor
S641
(RED)
(BLK)
(YEL)
(BLU)
(WHT)
(ORG)
Nip Release Solenoid 2
S640
1 2 3 4 5
M650
M650
1 2 3 4 5
(RED)
(BLK)
(YEL)
(BLU)
(WHT)
(ORG)
Nip Release Solenoid 1
M642
M650
(BLK)
(RED)
(ORG)
(YEL)
(BLU)
Nip Release Motor 1
B
Sub-scanning
Feed Motor
A
1 3 2 4
JMAG2
JMAG2
1 3 2 4
1 2 3
4
JFAN2
JFAN2
4
1 2 3
5 6 7
5 6 7
(RED)
(BLK)
(WHT)
3 4 5
8 9 10
F607
F607_rtn
F607_err
1 2 6 7
(RED)
(BLK)
(WHT)
(RED)
(YEL)
(BLU)
(ORG)
1 6 2 3 4 5
PDA3
PDA3
F606
F606_rtn
F606_err
(BLK)
(BLK)
(RED)
(YEL)
(BLU)
(ORG)
(RED)
(BLK)
(YEL)
(BLU)
(WHT)
(ORG)
PDA20
PDA20
M620 A
M620 / A
M620 B
M620 / B
(CN_ST)
(CN_ST_rtn)
M610 A
M610 / A
M610 B
M610 / B
M651 A
M651 ACOM
M651 / A
M651 B
M651 BCOM
M651 / B
M650
M650
M650
M650
M650
Paper Supply/Feed Section
Registration Section
4 10 11 5 6 7 12 13 14
PDA11
PDA11
NC
NC
NC
(BLK)
(RED)
(ORG)
(YEL)
(BLU)
1 2 3 8 9
A
B
C
D
E
(BLK)
(BLK)
1 8
M601
M601_rtn
M600
M600_rtn
M641 A
M641 / A
M641 B
M641 / B
M640 A
M640 ACOM
M640 / A
M640 B
M640 BCOM
M640 / B
2 3 4 5 6 7
PDA5
PDA5
PDA4
PDA4
PDA9
PDA9
NC
2 4
(CN_ST)
(CN_ST_rtn)
(ORG)
(BLK)
1 3
(RED)
(BLK)
(YEL)
(BLU)
(WHT)
(ORG)
(RED)
(YEL)
(BLU)
(ORG)
7 8 9 10
M630 A
M630 ACOM
M630 / A
M630 B
M630 BCOM
M630 / B
(RED)
(BLK)
(YEL)
(BLU)
(WHT)
(ORG)
1 2 3 4 5 6
(ORG)
(BLK)
(ORG)
(BLK)
7 8 9
S641
S641_rtn
(ORG)
(BLK)
5 6
PDA10
PDA10
S640
S640_rtn
1 2 3 4
M642 A
M642 / A
M642 B
M642 / B
(RED)
(YEL)
(BLU)
(ORG)
D
Magazine Drive Section
Sub-scanning Section
E
PDA26 Circuit Board (2/2)
B1 B2 B3 B4
B47 B48 B49 B50 A1 A2 A3 A4
A47 A48 A49 A50
B1 B2 B3 B4
PDA1
PDA1
B28 B29 B30 A1 A2 A3
A28 A29 A30
PDA2
PDA2
F
A1 A2 A3 A4
CTL13
CTL13
A47 A48 A49 A50 B1 B2 B3 B4
CTL14
CTL14
B47 B48 B49 B50
A1 A2 A3 A4
A28 A29 A30 B1 B2 B3
G
CTL23 Circuit Board
H
8-92
CTL23 Circuit Board
B28 B29 B30
Distributed by: minilablaser.com
9. PARTS LIST
93
Distributed by: minilablaser.com
STANDARD MARKING SYSTEM CHART FOR METAL FASTENINGS
These screws,bolts and nuts are ISO metric screw thread.
(The table belows classifies M4 screws.For information on other screws see the guide to screw classification.)
DRAWING
REFERENCE NO.
PART NAME
PART NO
(EXAMPLE)
SYMBOL
SYMBOL USED IN FIG.
(EXAMPLE)
1
Screw,flat head
S
301S7000410
S4x10
M4x10
2
Screw,pan head
N
301S2000410
N4x10
M4x10
T
301S3000410
T4x10
M4x10
3
Screw,truss head
4
Screw,tapping,flat head
(NOTE)
STa
306S3004010
STa4x10
4x10
5
Screw,tapping,pan head
(NOTE)
NTa
306S1004010
NTa4x10
4x10
6
Screw,tapping,pan head (with flute) (NOTE)
NATa
306SA004010
NATa4x10
4x10
7
Screw,tapping,truss head
TTa
306SF004010
TTa4x10
4x10
8
Setscrew,hex socket head (cup point)
PK
303S2000410
PK4x10
M4x10
9
Setscrew,hex socket head (W point)
PW
(NOTE)
R4x10
M4x10
11 Bolt,hex socket head
Q
304S3000410
Q4x10
M4x10
12 Nut,hex
Na
305S1120004
Na4
M4
13 Nut,hex
NaA
305S1110004
NaA4
M4
14 Nut,hex
NaC
305S1130004
NaC4
M4
W
309S0120004
W4
M4
SW
309S0220004
SW4
M4
E
315S3000040
E4
Nominal diam.4
CG
315S1000040
CG4
Nominal diam.4
B
308S2000410
B4x10
M4x10, with flat and spring washer
16 Washer,spring
17 E-ring
18 External ring
19 Screw,double sems
2.
Screw,flat head
S
20 Screw,Deltight,hex head
DT
Refer to attached table
21 Screw,TP,hex head
DH
Refer to attached table
22 Screw,TP,pan head
NH
3.
Screw,pan head
N
Screw,truss head
T
5.
4.
6.
Screw,tapping,flat Screw,tapping,pan Screw,tapping,pan
head
head
head
NTa
NATa
STa
8.
9.
Screw,tapping,truss Setscrew hex socket Setscrew hex socket
head (cup point)
head (W point)
head
TTa
PK
PW
10.
11.
12.
Refer to attached table
304S1000410
15 Washer,plain
1.
7.
R
10 Bolt,hex head
SHAPE
NOTE
Bolt,hex head
R
13.
Nut,hex
NaA
16.
Bolt,hex socket head
Q
14.
Nut,hex
Na
15.
Nut,hex
NaC
17.
Washer,spring
SW
19.
Washer,plain
W
18.
External ring
CG
E-ring
E
20.
21.
Screw,double sems
B
22.
Screw,Deltight,
hex head DT
23.
Screw,TP,
pan head NH
25.
Screw,binding
head BH
26.
Screw,TP,
hex head DH
24.
Refer to attached table
23 Screw,binding head
BH
301S4410410
24 Washer,toothed
TW
309S0424104
TW4
M4
25 Bolt,cross-recessed hex head,double sems
RB
308S9410306
RB3x6
M3x6
26 Screw,tapping,hex head,for resin
JTa
BH4x10
M4x10
Bolt,cross-recessed hex head,
double sems RB
Refer to attached table
Washer,toothed
TW
Screw,tapping,hex head,
for resin JTa
MATERIAL INDICATING MARK
MATERIAL
MARK ADDED TO
PART SYMBOL
Iron Chromate Not used
SUS304
SUS316
Titanium
EXAMPLE
N4
N4
N4
N4
N4
SUS304-CSP
MATERIAL
CODE
11
00
05
80
36
MATERIAL
MARK ADDED TO
PART SYMBOL
EXAMPLE
MATERIAL
CODE
MATERIAL
N4
10
N4
12
Plastic
SWRH nickel
0
0
0
0
0
1
2
3
4
8
92
N4
41
N4
18
N4
78
N4
55
SCM black oxide
coating
SCM nickel
Shape-indicating . symbol
enclosed in a double triangle
N4
15
Shape-indicating . symbol
SWCH Zinc coating+
White chromate treatment enclosed in a double square
S
S
S
S
S
TYPE (SHAPE) CLASSIFICATION
Screw,tapping,truss head (cone,large diam)..... F
Screw,tapping,truss head (flat point) ...... G
Length
Screw,tapping,truss head (cone point)... H
Item
Nominal Diam
Screw,tapping,pan head (flat point) ....... 1
Material
Screw,tapping,pan head (cone point) .... 2
Screw,tapping,flat head (flat point) ........ 3
Type (Shape)
Screw,tapping,flat head (cone point) ..... 4
(NOTE)
Screw,tapping,pan head (with flute) ....... A
DECIPHERING THE IDENTIFICATION MARKINGS OF NOMINAL DIAMETER
Example: 3x8
Nominal diam. 3 30, Length 8 08
3.5x10 Nominal diam. 3.5 35, Length 10 10
4x10 Nominal diam. 4 40, Length 10 10
94
CP
Shape-indicating . symbol
enclosed in a double circle
Shape-indicating . symbol
enclosed in a triangle
Shape-indicating . symbol
enclosed in a triangle
DECIPHERING THE IDENTIFICATION MARKINGS OF TAPPING SCREW
Screw,tapping
MATERIAL
CODE
Brass nickel
TYPE (SHAPE) CLASSIFICATION
Screw,pan head ..................................... 2
Screw,truss head ................................... 3
Screw,binding head ............................... 4
Screw,flat head ...................................... 7
Setscrew,slotted head (flat point)............ 1
Setscrew,slotted head (cup point)............. 2
Length
Item
Setscrew,slotted
head (cone point)......... 3
Nominal Diam
Setscrew,hex socket head (flat point)..... 1
Material
Setscrew,hex socket head (cup point) .... 2
Type (Shape)
Setscrew,hex socket head (cone point).. 3
Bolt,hex head (Leguar)............................ 1
Bolt,hex head (thin) ................................ 2
Bolt,hex socket head .............................. 3
Screw,sems (small)................................. 4
Screw,sems (large) ................................ 5
DECIPHERING THE IDENTIFICATION
Screw,double sems (small)..................... 2
MARKINGS OF NOMINAL DIAMETER
Screw,double sems (large)...................... 3
Example: M2.6x8 Nominal diam. M2.6 26, Length 8 08 Bolt,hex socket head,double sems (small).... 7
M3x10 Nominal diam. M3 03, Length 10 10 Bolt,hex socket head,double sems (large).... 8
M4x10 Nominal diam. M4 04, Length 10 10 Bolt,cross-recessed hex head,double sems... 9
3
3
3
3
3
EXAMPLE
Iron (black oxide
coating)
Iron nickel
DECIPHERING THE IDENTIFICATION MARKINGS OF SCREWS
Screw
Setscrew
Setscrew
Bolt
Screw,sems
MARK ADDED TO
PART SYMBOL
Shape-indicating . symbol
enclosed in a circle
Shape-indicating . symbol
enclosed in a square
DECIPHERING THE IDENTIFICATION MARKINGS OF
WASHER. NUT AND RETANING RING
Washer
Item
DECIPHERING THE IDENTIFICATION
MARKINGS OF NOMINAL DIAMETER
Example: M2.6
M3
M4
2
3 0 9 S
Nominal Diam
Material
Shape
Type
TYPE CLASSIFICATION
Washer,plain........01
Washer,spring ......02
Washer,toothed....04
26
03
04
Nut
1 2
3 0 5 S
Nominal Diam
Material
Shape SHAPE
Item
DECIPHERING THE IDENTIFICATION
MARKINGS OF NOMINAL DIAMETER
Example: M2.6
M3
M4
26
03
04
CLASSIFICATION
1 Type............1
2 Type............2
3 Type............3
Screw Standards
Type
TYPE CLASSIFICATION
Nut,hex..................1
3 0 6 S
Ring,
retaining
3 1 5 S
0
Item
Nominal Diam
Material
DECIPHERING THE IDENTIFICATION
MARKINGS OF NOMINAL DIAMETER
Example: Nominal diam. 3
Nominal diam. 4
Nominal diam. 12
030
040
120
Type
TYPE CLASSIFICATION
C-ring,external.....1
C-ring,internal......2
E-ring................... 3
Distributed by: minilablaser.com
STANDARD MARKING SYSTEM CHART FOR METAL FASTENINGS
DRAWING
REFERENCE NO.
9
20
PART NAME
SYMBOL USED IN FIG.
NOTE
303S0102
PW3x4
M3x4
303S0104
PW3x6
M3x6
Screw,Deltight,hex head
306S0101
DT3x6
M3x6
Material : SWCH 16A
306S0102
DT3x8
M3x8
Treatment : Zinc coating +
306S0103
DT3x10
M3x10
306S0107
DT4x8
M4x8
306S0109
DT4x12
M4x12
308S0414
DH3x6
M3x6
Material : Carbon steel
308S0416
DH4x6
M4x6
Treatment : Zinc coating +
308S0417
DH3x8
M3x8
308S0418
DH3x10
M3x10
308S0419
DH3x12
M3x12
308S0422
DH3x18
M3x18
308S0423
DH3x25
M3x25
White chromate treatment
Screw,TP,hex head
White chromate treatment
21
Screw,TP,pan head
22
PART NO
Setscrew,hex socket head (W point)
Material : Alloy steel
Treatment : Zinc coating +Phosphite
Material : SUSXM-7
308S0424
DH4x8
M4x8
308S0426
DH4x12
M4x12
308S0462
NH3x6
M3x6
308S0466
NH4x6
M4x6
NH4x8
M4x8
308S0468
NH4x10
M4x10
306S0151
JTa3x6
M3x6
Material : SWCH 16A
306S0152
JTa3x8
M3x8
Treatment : Zinc coating +
306S0153
JTa3x10
M3x10
306S0154
JTa3x12
M3x12
306S0155
JTa4x8
M4x8
306S0156
JTa4x10
M4x10
306S0157
JTa4x12
M4x12
26
White chromate treatment
Setscrew hex socket
head (W point)
PW
20.
Screw,Deltight,hex head
DT
21.
308S0467
Screw,tapping,hex head,for resin
SHAPE
9.
Screw,TP,hex head
DH
22.
Screw,TP,pan head
NH
26.
Screw,tapping,hex head,for resin
JTa
95
Distributed by: minilablaser.com
INDEX
OUTPUT UNIT (LASER PRINTER/PAPER PROCESSOR LP-5900)
INDEX
15
INDEX
16
DISTRIBUTION ENTRANCE SECTION (1)
DISTRIBUTION ENTRANCE SECTION (2)
LP-5900
LP-5900
INDEX
18
DISTRIBUTION SECTION (2)
LP-5900
INDEX
20B
LP-5900
96
19
DISTRIBUTION SECTION (3)
INDEX
33
DRYING ENTRANCE RACK SECTION
INDEX
INDEX
20A
DISTRIBUTION SECTION (4)
LP-5900
INDEX
41
DRYER SECTION (1)
LP-5900
LP-5900
42
17
LP-5900
LP-5900
DISTRIBUTION SECTION (5)
INDEX
INDEX
INDEX
DISTRIBUTION SECTION (1)
43
INDEX
44
DRYER SECTION (2)
DRYER SECTION (3)
DRYER SECTION (4)
LP-5900
LP-5900
LP-5900
Distributed by: minilablaser.com
INDEX
54
INDEX
INDEX
SU2400AY (1)
LP-5900
55
SU2400AY (2)
INDEX
75
OUTPUT UNIT PARTS NO. INDEX LIST
LP-5900
The parts shown in the shaded area of each index illustration are described in the page or pages having the same index number.
97
Distributed by: minilablaser.com
15
LP-5900
DISTRIBUTION ENTRANCE SECTION (1)
LP-5900
05
03
A01
04
DT3x6
09
B3x6
E4
02
08
01
DT3x6
10
06
M655
11
E6
07
E6
B3 x10
E6
b
E6
c
DT3x6
d
b
b
a
35
a
15
a
E6
b
a
14
12
13
b
E6
b
E6
e
16
E6
17
34
f
B3 x10
31
18
E6
B4 x8
33
30
19
32
B4 x12
a
29
E6
DT3x6
20
22
26
E6
Gear Types
25
E4
24
28
27
98
JTa3x8
23
21
Symbol Drawing Ref. No.
a
36
b
37
c
38
d
39
e
40
f
41
Distributed by: minilablaser.com
15
LP-5900
DISTRIBUTION ENTRANCE SECTION (1)
Drawing
Ref. No. Part No.
Part Name
01 A 118SX204A
Motor M655
02 356D1057805C
03 356D1057477C
04 A 388D1057901B
05 348C1112182B
06 338D1057826
07 363D1057497C
08 348C1112180C
09 355C1112194B
10 327D1057837A
11 356C1112156B
12 A 334C1057788
13 A 334C1057431A
14 356D1112170A
15 356D1112181C
16 A 334D1058426
17 A 322D1058194A
18 355C1057416L
19 A 322SP214
Bracket
Bracket
Spring
Side plate ass'y
Ring
Guide
Side plate ass’y
Frame
Gear
Bracket ass'y
Roller
Roller
Bracket
Bracket
Roller
Support,shaft
Frame
Support,shaft
20 A 322D1057498A
21 319D1057525A
Support,shaft
Shaft
Qty Remarks
3 SHINANO
STP-42D2046
3
1
2
8
1
1
1
1
1
2
1
1
1
2
2
1
69 MINEBEA,DDLF168HH,NIHON
SEIKOH(NSK),
F688A-H-ZZ1
2
1
Drawing
Ref. No. Part No.
22 340D990513A
23 A 322D1057919A
24 342D1057489G
25 338D1057783B
26 A 383D1057785
27 356C1057557B
28 365D1057550E
29 356D1057779C
30 A 383D1057786A
31 309S010004
32 A 388D1057784C
33 A 388D1057526A
34 365D1057552
35 A 334C1057430
36 327S1121603A
37 327S1121604A
38 327S1122403B
39 327D1057835B
40 327S1124803
41 327D1057496A
A01 F 808C1112151
Part Name
Qty Remarks
Knob
Support,shaft
Lever
Ring
Wire
Bracket
Rail
Bracket
Wire
Washer
Spring
Spring
Rail
Roller
Gear,spur
Gear,spur
Gear,spur
Gear
Gear,spur
Gear
7 (E)
2
1
1
1
1
1
1
1
1
2
1
2
1
6
5
4
2
1
1
Distribution
entrance unit
1 INDEXES 15-A01
and 16-A01
inclusive
99
Distributed by: minilablaser.com
16
LP-5900
DISTRIBUTION ENTRANCE SECTION (2)
LP-5900
DH3x6
01
D655
02
A01
03
B4 x8
DT3x6
E4
04
07
32
E4
E4
E4
06
DT3x6
08
05
B3 x10
09
DH3x6
D656
10
11
12
E4
E4
DT3x6
13
14
31
DT3x6
30
15
M656
E4
E4
29
16
DT3x6
E4
DT4x8
21
E4
17
28
23
20
DT4x8
24
27
22
25
DT3x6
26
DT3x6
100
18
19
Distributed by: minilablaser.com
16
LP-5900
DISTRIBUTION ENTRANCE SECTION (2)
Drawing
Ref. No. Part No.
Part Name
01 356D1057485B
02 A 146S0029A
03 355C1057559A
04 319D1057542
05 316S0256
06 316S1026
07 A 323S3363
Bracket
Detector D655
Frame
Shaft
Clamp,cord
Clamp,cord
Belt,timing
08 355C1112161
09 A 146S0029A
10 356D1057486D
11 316S1076
12 356D1057482B
13 A 118SX206
Frame
Detector D656
Bracket
Tie,wire
Bracket
Motor M656
14 356C1057417B
15 A 334D1057883B
16 A 388D1057536
17 A 334C1057438B
18 A 322D1057934A
Bracket
Roller
Spring
Roller
Support,shaft
Qty Remarks
Drawing
Ref. No. Part No.
19 A 322D1057842A
1
20 341C1057414D
22 SHARP GP-1A73A
21 341C1057412D
1
22 A 334D1057532C
1
23 356D1112163A
42 NIX LES-0510
24 405D1058064
29 NIX LWS-0511Z
25 405D1058063
1 MITSUBOSHI
26 363C1057440G
B60S3M420
27 316S1245
1
28 356D1057541F
22 SHARP GP-1A73A
29 316S0260
1
19 KITAGAWA PLT 1M 30 356C1057418G
31 356C1057419D
2
32 A 323S3362
2 SHINANO
STP-59D3001
2
A01 F 808C1112151
10
8
4
16
Part Name
Qty Remarks
Support,shaft
Arm
Arm
Roller
Bracket
Label
Label
Guide ass'y
Clamp,cord
Bracket
Clamp,cord
Bracket
Bracket
Belt,timing
8
2
2
38
1
3
1
1
2 NIX LES-0505
1
52 NIX LWSM-0605
1
1
1 MITSUBOSHI
B60S3M327
Distribution
entrance unit
1 INDEXES 15-A01
and 16-A01
inclusive
101
Distributed by: minilablaser.com
17
LP-5900
DISTRIBUTION SECTION (1)
LP-5900
15
14
10
16 17
DT3x6
11
A01
12
13
E6
31
19
18
E4
32
30
29
28
20 21
E6
E8
27
E6
26
DT3x6
25
E4
01
24
23
22
E4
02
03
B3x8
B3x8
06
DH4x8
05
04
33
DH4x8
34
07
JTa3x8
09
B4 x8
08
35
B4 x8
DH3x6
102
Distributed by: minilablaser.com
17
LP-5900
DISTRIBUTION SECTION (1)
Drawing
Ref. No. Part No.
Part Name
01 386D1057963C
02 386S1087
03 350D1057932D
04 350D1112303C
05 405D1112342
06 350D1112302B
07 340D1112319C
08 327D1057925C
09 405D1057977A
10 338D1057826
11 327S1123202A
12 A 322SP224
Pad
Pad
Cover
Cover
Label
Cover
Knob
Gear
Label
Ring
Gear,spur
Support,shaft
13 A 322D1057919A
14 356D1112239B
15 316S0258
16 A 146S0080A
Support,shaft
Bracket
Clamp,cord
Detector D660/4/5L
17 350D1057800B
18 A 334C1057756B
19 363D1112240A
20 348C1112272B
Cover
Roller
Guide
Side plate ass'y
Qty Remarks
1
2
1
1
1
1
1
1
1
8
4 m=1.25 Z=32
31 MINEBEA,DDRF2280HH,NIHON
SEIKOH(NSK),
F608-H-ZZ
2
1
7 NIX LWSM-0306
3 SHINKOH
KB1242-AA14
3
2
1
1
Drawing
Ref. No. Part No.
Part Name
21 316S0258
22 A 322SP224
Clamp,cord
Support,shaft
23 318S1072
24 340D990513A
25 356D1057960F
26 342D1057818D
27 A 388D1057789B
28 327S1123202A
29 335D1057986
30 A 388D1057961C
31 327S1122403B
32 338D1057990A
33 347D1057865A
34 347D1057866C
35 347D1057900B
Bushing
Knob
Bracket
Lever
Spring
Gear,spur
Flange
Spring,torsion
Gear,spur
Ring
Plate,adjustment
Plate,adjustment
Plate,adjustment
A01 F 808C1112200
Distribution section
Qty Remarks
7 NIX LWSM-0306
31 MINEBEA,DDRF2280HH,NIHON
SEIKOH(NSK),
F608-H-ZZ
1 HEICO OCB-375
7 (E)
1
1
1
3
1
1
4
1
1
1
1
1 INDEXES 17-A01,
18-A01,19-A01,
20A-A01 and
20B-A01 inclusive
103
Distributed by: minilablaser.com
18
LP-5900
DISTRIBUTION SECTION (2)
LP-5900
A01
Clamp Types
Symbol Drawing Ref. No.
a
50
b
51
c
52
d
53
e
54
f
55
g
56
04
03
05
06
DT3x6
DT3x6
07
08
B3x6
a
01
09
10
DT3x6
M661
D661
DH3x6
14
E6
11
D665P
15
02
B3x10
b
E6
D660P
D664P
16
49
47
48
M660
B3 x10
17
12
13
c
20
21
B3x10
E6
E6
46
22
23
B4 x8
18
19
24
25
f
27
DT3x6
Na4
N4x20
f
g
a
DT3x6
B3 x6
d
41
40
D665L
c
43
42
26
E6
45
44
e
DH3x6
28
34
B3x12
39
e
b
DT4x8
D669
38
29
DT3x6
D660L
D664L
b
B2x10
b
33
30
e
E6
B3 x6
35
DH3x6
DH4x8
DH3x6
36
DH3x6
JTa3x8
32
37
e
DH3x6
104
31
Distributed by: minilablaser.com
18
LP-5900
DISTRIBUTION SECTION (2)
Drawing
Ref. No. Part No.
Part Name
01 A 118C1057772A
02 356D1057482B
03 356D1057920G
04 A 388D1057829C
05 356D1057988A
06 A 323S3367
Motor M661
Bracket
Bracket
Spring
Bracket
Belt,timing
07 A 322SP214
Support,shaft
08 A 324D1057875D
09 A 323S3368
Wheel,belt
Belt,timing
10 A 146S0029A
11 356D1057820B
12 A 324D1057878C
13 A 146S0089
14 350D1057962B
15 356D1057821H
16 319D1057520A
17 355C1057750F
18 316S1076
19 356C1057723C
20 348D1112346
21 A 322SB035
22 A 324D1057877C
23 A 323S3364
Detector D661
Bracket
Wheel,belt
Detector D660P,
D664P,D665P
Cover
Bracket
Shaft
Frame
Tie,wire
Bracket
Plate,side
Support,shaft
Wheel,belt
Belt,timing
24 A 327D1057838B
Gear
25
26
27
28
Gear
Shaft ass'y
Bracket
Tie,wire
327D1057835B
319C1057791
356D1112267B
316S1076
Qty Remarks
1 103H7126-1245
2
1
1
1
1 MITSUBOSHI
B100S5M320
69 MINEBEA,DDLF168HH,NIHON
SEIKOH(NSK),
F688A-H-ZZ1
1
1 MITSUBOSHI
B100S5M780
22 SHARP GP-1A73A
1
1
16 SHINKOH
KB1241-AA24
1
1
1
1
19
1
1
2 NMB DDL-1480ZZ
1
1 MITSUBOSHI
B60S3M246
1 OSCO
with torque limiter
2
1
1
9
Drawing
Ref. No. Part No.
Part Name
Qty Remarks
43 350D1057800A
44 350D1057936
45 356D1057930C
46 364D1057970
47 A 118SX206
Side plate ass'y
Gear,spur
Gear,spur
Clamp,cord
Detector D669
Cover
Frame
Guide
Guide
Label
Bracket
Label
Label
Detector D660L,
D664L,D665L
Cover
Cover
Bracket
Guard
Motor M660
48 356C1057984
49 A 388D1057828A
50 316S0256
51 316S0259
52 316S1033
53 316S1246
54 316S0258
55 316S1026
56 318S1072
Bracket
Spring
Clamp,cord
Clamp,cord
Clamp,cord
Clamp,cord
Clamp,cord
Clamp,cord
Clamp,cord
1
1
6
23 NIX SB-1909
1 OMRON SS-01GL2
1
1
1
1
4
1
2
2
11 SHINKOH
KB1242-AA14
11
3
1
1
2 SHINANO
STP-59D3001
1
1
42 NIX LES-0510
136 NIX LWSM-0511
49 NIX LES-1010
1 NIX SKB-100PW
7 NIX LWSM-0306
2 NIX LWS-0511Z
1
29 348C1112322A
30 327S1122003A
31 327S1121603A
32 316S0174
33 A 128C1057971B
34 350D1057972C
35 355D1057873H
36 363D1112241E
37 363D1057906B
38 405F8168C
39 356D1057824H
40 405D1058064
41 405D10580603
42 A 146S0080A
A01 F 808C1112200
Distribution section
1 INDEXES 17-A01,
18-A01,19-A01,
20A-A01 and
20B-A01 inclusive
105
Distributed by: minilablaser.com
19
LP-5900
DISTRIBUTION SECTION (3)
LP-5900
A01
01
B3 x6
M663
04
10
06
11
02
B3 x6
B3 x6
07 08
03
09
DH3x6
D663
05
12
D662
13
14
E2
E2
B3 x6
E2
15
16
17 18
E2
B3 x6
E2
E4
20
B3 x6
19
E2
B3 x6
B3 x6
21
E4
B3 x6
E2
B3 x6
22
E2
23
E4
25
E4
32
24
B3 x6
M662
E4
31
30
26
28
E4
27
29
E4
106
Distributed by: minilablaser.com
19
LP-5900
DISTRIBUTION SECTION (3)
Drawing
Ref. No. Part No.
Part Name
01 A 118SX204A
Motor M662,M663
02 A 388D1057901B
03 347D1112315A
04 356D1057805C
05 355C1112353
06 A 323S3366
Spring
Plate,adjustment
Bracket
Frame
Belt,timing
07 A 146S0029A
08 356D1057807G
09 316S0258
10 356D1112256A
11 316S1076
12 A 146S0079A
13 A 323S3365
Detector
D662,D663
Bracket
Clamp,cord
Bracket
Tie,wire
Detector D658/9P
Belt,timing
14 316S0174
15 A 388D1112259
16 334C1112304D
17 A 322D1112311C
Clamp,cord
Spring
Roller ass'y
Support,shaft
Qty Remarks
3 SHINANO
STP-42D2046
2
2
3
1
1 MITSUBOSHI
B60S3M369
22 SHARP GP-1A73A
1
7 NIX LWSM-0306
1
9
2
1 MITSUBOSHI
B60S3M405
23 NIX SB-1909
8
2
2
Drawing
Ref. No. Part No.
18 356D1112309A
19 319D1057891
20 308D1112344
21 A 334D1057883C
22 A 322D1057842B
23 341C1057716E
24 A 334D1057883C
25 A 322D1112310B
26 A 323D1057923A
27 A 324D1112329B
28 356D1057806D
29 334C1112328B
30 341C1057717C
31 A 322D1057842B
32 A 322D1057934B
A01 F 808C1112200
Part Name
Qty Remarks
Bracket
Shaft
Screw,special
Roller
Support,shaft
Arm ass'y
Roller
Support,shaft
Belt
Wheel,belt
Bracket
Roller ass'y
Arm ass'y
Support,shaft
Support,shaft
1
2
2
1
4
1
1
4
2
2
1
1
1
4
2
Distribution section
1 INDEXES 17-A01,
18-A01,19-A01,
20A-A01 and
20B-A01 inclusive
107
Distributed by: minilablaser.com
20A
LP-5900
DISTRIBUTION SECTION (4)
LP-5900
A01
01
03
02
04
05
07
06
08
10
09
A02
30
29
38
12
13
28
39 40 41
14
15
27
42
11
24
16
23
26
25
17
22
18
31
19
20
32
E3
43
33
21
44
45
46
47
34
35
36
37
108
Distributed by: minilablaser.com
20A
LP-5900
DISTRIBUTION SECTION (4)
Drawing
Ref. No. Part No.
01 A 322SB033
02 348D1057749D
03 363C1112216B
04 363C1112215B
05 356D1112243C
06 310S1952014
07 A 334C1112265B
08 A 322SP207
09 356C1112220C
10 348D1057748B
11 332D1112250A
12 327D1057834D
13 356C1112244C
14 A 388D1112255A
15 A 318S1245
16 360D1112246B
17 315S1360150
18 356D1112238B
19 345D1057804B
20 319D1112260C
21 356C1112213C
22 A 322B020
23 356D1057822C
24 A 322D816785
25 319D1057893A
26 334C1057747D
27 334C1057747D
28 319D1057892A
29 356C1112218A
Part Name
Support,shaft
Plate,side
Guide ass'y
Guide ass'y
Bracket
Pin,spring
Roller
Support,shaft
Bracket
Plate,side
Stop
Gear
Bracket
Spring
Bushing
Housing
C-ring
Bracket
Plate,shield
Shaft
Bracket
Support,shaft
Bracket
Support,shaft
Shaft
Roller ass'y
Roller ass'y
Shaft
Bracket ass'y
Qty Remarks
Drawing
Ref. No. Part No.
2 NMB DDLF-1480ZZ 30 A 322SB020
31 A 322SP214
1
1
1
2
32 356D1057722D
1 Diam.2x14
33 405D1057976A
1
34 350D1057928A
1
35 405F8168C
1
36 319D1057887E
1
37 327S1123202A
2
38 303D1057958B
1
39 338D1057908
1
40 A 318S1245
2
2
41 A 322SY325
1
4
42 369D1057858B
1
43 310D1057857B
1
44 A 322SB034
1
45 338D1057959
1
46 319D1057896C
2
47 327D1057836
1
4
A01 F 808C1112200
1
2
2
1
1
Part Name
Support,shaft
Support,shaft
Bracket
Label
Cover
Label
Shaft
Gear,spur
Screw
Ring
Bushing
Support,shaft
Tube
Pin
Support,shaft
Ring
Shaft
Gear
Distribution section
Qty Remarks
2
69 MINEBEA,DDLF168HH,NIHON
SEIKOH(NSK),
F688A-H-ZZ1
1
1
1
4
1
3
14 M3x6
1
3 NIHONBEARING
SM8-G
2 KITANIHONSEIKI
6903ZZ MG-2
1
2
2 NMB DDL-840ZZ
2
1
1
1 INDEXES 17-A01,
18-A01,19-A01,
20A-A01 and
20B-A01 inclusive
109
Distributed by: minilablaser.com
20B
LP-5900
DISTRIBUTION SECTION (5)
LP-5900
A01
02
04
03
05
06
07
08
09
01
11
32
31
10
30
12
13
14
15
16
29
19
18
17
28
27
26
25
20
21
22
24
110
23
Distributed by: minilablaser.com
20B
LP-5900
DISTRIBUTION SECTION (5)
Drawing
Ref. No. Part No.
01
02
03
04
327S1121604A
327D1112294C
356C1112257B
327D1112307A
Part Name
Gear
Gear
Bracket
Gear
05 319C1112285A
06 A 324D1112306B
07 A 323S3379
08 335D1112287
09 356D1112293D
10 310S1952014
11 327D1112283C
12 319C1112305A
13 A 322SP214
Shaft
Wheel,belt
Belt
Flange
Bracket
Pin,spring
Gear
Shaft
Support,shaft
14 A 322SP214
Support,shaft
15 A 388D1112317A
16 A 118SX206
17 356D1112281B
18 360D1112320D
19 A 322SP214
Spring
Motor M657
Bracket
Housing
Support,shaft
Qty Remarks
4
1
1
1 One-way clutch
internal
1
1
1
1
1
1 Diam.2x14
1
1
6 MINEBEA,DDLF168HH,NIHON
SEIKOH(NSK),
F688A-H-ZZ1
6 MINEBEA,DDLF168HH,NIHON
SEIKOH(NSK),
F688A-H-ZZ1
1
1
1
1
6 MINEBEA,DDLF168HH,NIHON
SEIKOH(NSK),
F688A-H-ZZ1
Drawing
Ref. No. Part No.
20 A 327D1112270C
21 A 146S0029A
Part Name
22 347D1112231B
23 316S1076
24 316S0256
25 363C1112206B
26 319C1112229B
27 A 322SP214
Gear,spur
Photo-interrupter
D662/3
Plate,adjustment
Tie,wire
Clamp,cord
Guide
Shaft
Support,shaft
28 356D1112271A
29 365D1112237B
30 A 322SY067
31 342D1112233B
32 310D1112269A
Bracket
Rail
Support,shaft
Lever
Pin
A01 F 808C1112200
Distribution section
Qty Remarks
1 m=1.25 Z=24
2 SHARP GP-1A73A
1
9
3 NIX LES-0510
1
1
6 MINEBEA,DDLF168HH,NIHON
SEIKOH(NSK),
F688A-H-ZZ1
1
1
2 OIRESU 80F-0403
1
2
1 INDEXES 17-A01,
18-A01,19-A01,
20A-A01 and
20B-A01 inclusive
111
Distributed by: minilablaser.com
33
LP-5900
DRYING ENTRANCE RACK SECTION
LP-5900
A01
A02
12
E6
13
14
15
17
B3x10
E5
E5
16
18
26
19
B3x8
20
21
25
24
23
B3x10
22
01
02
a
b
E6
E6
NTa3x8
a
b
a
c
a
03
a
a
B4x8
04
B
B
05
06
B
E6
A
B
A
112
Roller Types
Gear Types
Symbol Drawing Ref. No.
Symbol Drawing Ref. No.
A
07
B
08
a
09
b
10
c
11
Distributed by: minilablaser.com
33
LP-5900
DRYING ENTRANCE RACK SECTION
Drawing
Ref. No. Part No.
01 346C1060276
02 338D1060274A
03 363D1134360
04 A 322FY217A
05 405D1060267A
06 A 388D1061103D
07 A 334C1060026D
08 A 334C1060018D
09 A 327F1121646B
10 A 327C1024765A
11 A 327C1061257D
12 A 327F1121646B
13 A 327C1024765A
14 319C1134374
15 A 322FY217A
Part Name
Plate,brace
Ring
Guide
Support,shaft
Label
Spring,tension
Roller
Roller
Gear,spur
Gear,spur
Gear,spur
Gear,spur
Gear,spur
Shaft ass'y
Support,shaft
Qty Remarks
1
4
1
16
1
6
2
6
8
3
1
2
1
1
4
Drawing
Ref. No. Part No.
16 388D1061345A
17 345D1134381
18 345D1134379
19 345D1134380
20 347D1134377
21 355D1134371
22 348D1134372
23 A 334D1134366A
24 A 334C1134362A
25 340D1134378
26 348D1134373
A01 A 802C1134301
A02
334C1134383
Part Name
Qty Remarks
Spring,tension
Insulator,heat
Insulator,heat
Insulator,heat
Spacer
Frame
Plate,side
Roller
Roller
Handle
Plate,side
2
1
1
1
4
1
1
1
1
1
1
Drying entrance rack
section
Roller ass'y
1
1
113
Distributed by: minilablaser.com
41
LP-5900
DRYER SECTION (1)
02
LP-5900
05
03
04
01
06
JTa4x8
B4x12
NH4x6
NH4x6
A01
65
B4x12
07
69
66
68
64
A
63
62
D762
67
JTa4x8
13
NH4x6
14
F760
61
15
08
B4x12
09
16
10
12
NH4x6
H760T - H767
17
18
NH4x6
NH4x6
11
59 60
58
19
20
21
E4
56
57
A
22
55
NH4x6
NH4x6
23
24
54
29
B4x8
30
25
NH4x6
NH4x6
31
53
47
52
48
51
TS760
46
B4x8
26
27
28
45
50
49
NH4x6
32
B4x8
38
NH4x6
33
B4x8
40
44
43
42
39
41
114
NH4x6
37 36
JTa4x8
35
34
B4x12
Distributed by: minilablaser.com
41
LP-5900
DRYER SECTION (1)
Drawing
Ref. No. Part No.
Part Name
01 350D1058123C
02 C 138D1058124A
03 350D1061126C
04 C 376D1061025A
05 350D1061102B
06 350D1061112E
07 350C1061132A
08 A 119C1061076
Cover
Filter
Cover
Filter
Cover
Cover
Cover
Fan,electric F760
09 A 117C1060960
Heater
H760T-H767
Bracket
Clamp,cord
Support
Shaft
Bracket
Clamp,cord
10
11
12
13
14
15
356D1061021B
316S1031
362D1061027B
319D1062505
356D1062504B
316S1014
16 350D1062541A
17 356D1060970D
18 405F8168C
19 338D1061240
20 342D1061062D
21 356D1061063E
22 356D1061020D
23 345D1061162A
24 382D1061696
25 356D1060959A
26 356D1061060C
27 A 115C966115A
Cover
Bracket
Label
Ring
Lever
Bracket
Bracket
Insulator,heat
Tape,sponge
Bracket
Bracket
Thermistor TS760
28
29
30
31
32
33
34
Chassis
Label
Bracket
Clamp,cord
Cover
Bracket
Strap
353C1061064N
405D1134354
356D1061022B
316S1008
350D1061127C
356D1061346A
316D1061584
Qty Remarks
2
2
1
1
2
1
1
1 MATSUSHITA
ECO SYSTEMS
FW-09L4B-DC
1 HITACHI HZ203C
Drawing
Ref. No. Part No.
35
36
37
38
39
40
41
42
43
44
45
46
47
48
49
50
51
52
53
54
55
56
57
371D1060536B
350D1061127C
319C1061143A
345D1061162A
358D1134356
345D1061161
356C1061114B
350C1061026E
345D1134512
345D1061181D
319D1061071
345D1061097A
355D1061094C
355C1061093C
345D1061182B
356D1061023C
332D1061281
345D1061171A
346D1061595
345D1061097A
345D1060979A
345D1060977D
316S0028
1
45 NIX LWS-1316Z
2
2
2
5 KITAGAWA
NK-13N
3
1
1
8
1
58 316S1031
1
59 356D1061061D
1
60 316S1027
1
61 382D1061594
1
62 316S1179
2
63 316S1033
1
64 356D1061073E
1 (E)(F)FOHYU
65 356D1061010
ET-205
66 356F10134F
1
67 A 128S0740
1
1 THREE PEACE
68 A 388F2231F
4 KITAGAWA NK-6N
69 356H0071A
1
1
A01 A 128C1060969
6
Part Name
Nozzle
Cover
Shaft
Insulator,heat
Box
Insulator,heat
Bracket
Cover
Insulator,heat
Insulator,heat
Shaft
Plate,shield
Frame
Frame
Insulator,heat
Bracket
Stop
Insulator,heat
Plate,brace
Plate,shield
Insulator,heat
Insulator,heat
Clamp,cord
Clamp,cord
Bracket
Clamp,cord
Tape,sponge
Clamp,cord
Clamp,cord
Bracket
Bracket
Bracket
Switch D762
Spring,tension
Bracket
Switch ass'y
Qty Remarks
2
1
2
1
1
1
2
1
1
1
2
6
1
1
1
1
5
1
1
6
1
1
3 KITAGAWA
SB-6025
45 NIX LWS-0711Z
1
29
1
8 NIX LES-1017
49 NIX LES-1010
1
1
2 (B)
3 OMRON
V-152-1C25
3 (B)
3 (B)
2
115
Distributed by: minilablaser.com
42
LP-5900
DRYER SECTION (2)
LP-5900
A01
Roller Types
A A
Symbol Drawing Ref. No.
A
33
B
34
C
35
D
36
E
37
F
38
G
39
A
A
A
A
A
A
A
A
B
E4
E6
E6
C
40
E6
D
E6
05
01
08
07
06
E
02
03
F
09
04
18
11
19
10
20
21
NH3x6
12
32
17
31
30
13
14
15
16
E6
22
23
E6
G
29
25 24
26
E6
F
28
F
116
27
Distributed by: minilablaser.com
42
LP-5900
DRYER SECTION (2)
Drawing
Ref. No. Part No.
01 363C1134289
02 405N100027
03 340F0441
04 345D1134517
05 347D1134334C
06 A 388D1134332A
07 335D1134331
08 A 334C1134329B
09 360D1134325C
10 319D1134327
11 A 322D966245B
12 348D1134358B
13 319D1060966D
14 319D1061570C
15 319D1060965C
16 A 322D966246B
17 348D1134357B
18 319D1134326
19 A 322D966245B
20 360D1134323A
21 360D1134324A
22 324C1061015C
Part Name
Guide
Label
Knob
Insulator,heat
Plate,adjustment
Spring,compression
Flange
Roller
Housing
Shaft
Support,shaft
Plate,side
Shaft
Shaft
Shaft
Support,shaft
Plate,side
Shaft
Support,shaft
Housing
Housing
Wheel,belt
Qty Remarks
1
1
2
1
1
1
1
1
1
1
2
1
1
1
4
22 (E)(F)
1
1
2
1
1
1
Drawing
Ref. No. Part No.
23 319D1061047B
24 A 322D966245B
25 A 388D1061574B
26 A 388D1061575B
27 A 388D1061692
28 319D1061596
29 319D1060965C
30 319D1061336B
31 319D1060967A
32 319D1061183A
33 A 334D1061014F
34 A 334D1061013E
35 A 334D1134510
36 A 334D1134511
37 A 334D1061327A
38 A 334D1060994F
39 A 334D1061581A
40 890D1134348A
A01 F 808C1134321
Part Name
Shaft
Support,shaft
Spring,tension
Spring,tension
Spring,tension
Shaft
Shaft
Shaft
Shaft
Shaft
Roller
Roller
Roller
Roller
Roller
Roller
Roller
Tool
Dryer transport
section
Qty Remarks
1
24 (E)(F)DIC
2
2
2
2
4
1
4
1
10
1
1
1
1
2
1
1
1 INDEXES 42-A01
and 43-A01
inclusive
117
Distributed by: minilablaser.com
43
LP-5900
DRYER SECTION (3)
LP-5900
A01
01
02
NH4x6
Gear Types
Symbol Drawing Ref. No.
JTa4x8
39
38
03
37
a
40
b
41
c
42
d
43
e
44
f
45
g
46
h
47
i
48
04
05
06
35
09
36
34
b
B3x6
08
33
NH4x6
e
32
31
07
10 11
NH4x6
27
30
29
E6
B4x8
c
E6
NH3x6
e
E6
28
a
24
d
26
25
f
E6
E6
i
ga
a
19
12
E6
NH4x6
h
13
18
NH3x6
23
22
20
21
118
E4
b
c
17
16 14
15
Distributed by: minilablaser.com
43
LP-5900
DRYER SECTION (3)
Drawing
Ref. No. Part No.
Part Name
01 356D1060996D
02 369D1060955C
03 362D1061057F
04 369D1134343A
05 363D1134298
06 363D1061572D
07 355D1061338B
08 345D1134345B
09 356D1134344C
10 A 324D1061267A
11 A 324C1061015C
12 A 323S3361
Bracket
Duct
Support
Duct
Guide
Guide
Frame
Insulator,heat
Bracket
Wheel,belt
Wheel,belt
Belt
13 356C1060997F
14 A 324C1061016C
15 A 322SY318
16 356C1060109
17 A 388D1061054D
18 A 388D1060989H
19 319C1061007B
20 340F0441F
21 A 388D1134513
22 363C1134285
23 A 388D1134514
24 356D1061049J
25 345D1134359
26 345D1060972B
Bracket
Wheel,belt
Support,shaft
Bracket
Spring,tension
Spring,torsion
Shaft
Knob
Spring,torsion
Guide
Spring,torsion
Bracket
Plate
Insulator,heat
Qty Remarks
Drawing
Ref. No. Part No.
27 319D1061339B
1
28 319C1061007B
1
29 A 388D1060990J
4
30 A 388D1061337B
1
31 356C1061333C
1
32 A 324C1061016C
1
33 A 324C1061580B
1
34 A 323S3376
1
1
5
35 363D1061308B
12
36 363D1061573C
1 MITSUBOSHI
37 363D1061089F
B60S3M1113Ultra heat-resistant 38 363D1061088E
39 371C1061592
1
40 A 34B5591065
2
41 A 327D1061325C
2 OIRESU 77F-0606
42 A 327C1061577C
1
43 A 327C1061319C
1
44 A 324C1061328B
1
45 A 327C1061322C
1
46 A 327C1961578B
1
47 A 327D1061321D
1
48 A 327D1061698C
1
1
A01 F 808C1134321
1
1
1
Part Name
Shaft
Shaft
Spring,torsion
Spring,tension
Bracket
Wheel,belt
Wheel,belt
Belt
Guide
Guide
Guide
Guide
Nozzle
Gear,spur
Gear,spur
Gear,spur
Gear,spur
Wheel,belt
Gear,spur
Gear,spur
Gear,spur
Gear,spur
Dryer transport
section
Qty Remarks
1
1
1
1
1
1
1
1 MITSUBOSHI
B60S3M252Ultra heat-resistant
10
1
1
1
1
3 (E)(F)
3
2
1
1
1
1
1
1
1 INDEXES 42-A01
and 43-A01
inclusive
119
Distributed by: minilablaser.com
44
LP-5900
DRYER SECTION (4)
A01
LP-5900
01
03
02
04
NH4x10
05
06
07
08
09
JTa4x12
44
NH4x6
43
NH4x6
10
11
42
12
41
40
NH4x6
38
37
36
NH4x6
39
E6
NH4x6
NH4x6
13
NH4x6
14
E6
B4x8
33 32 31
35
15
NH4x6
34
16
E6
NH4x6
E6
NH4x6
E6
30
NH4x6
E6
E6
17
E6
29
20
E6
19
23
B4x8
E6
26
28
120
27
E5
18
25
24
22 21
Distributed by: minilablaser.com
44
LP-5900
DRYER SECTION (4)
Drawing
Ref. No. Part No.
01
02
03
04
05
06
07
08
345D1060980C
340D1061691A
58B7507941
345D1060974E
309D1061028A
347S0794
345D1060978C
316D1061157A
09 350D1061029E
10 345D1060975D
11 356D1134526
12
58B7507941
13 348D1134126A
14 A 322D966246B
15 345D1134143
16 A 334D1134137A
17 A 322D966246B
18 A 388D1134520
19 341D1134124
20 319D1134129
21 347D1134139B
22 A 322D1134130C
23 362D1061330B
Part Name
Insulator,heat
Handle
Label
Insulator,heat
Washer
Spacer
Insulator,heat
Catch
Cover
Insulator,heat
Bracket
Label
Plate,side
Support,shaft
Insulator,heat
Roller
Support,shaft
Spring,tension
Arm
Shaft
Spacer
Support,shaft
Support
Qty Remarks
Drawing
Ref. No. Part No.
24 A 327D1061697A
1
25 A 322C966208C
1
26 A 334D1134137A
1
27 356D1061092J
1
28 A 334D1134138A
6
6 HIROSUGI CU-404 29 A 334D1134136A
30 345D1134141
1
31 362D1134134A
1 SHIMONISHI
32 A 323D1134538
SCM-0827A
33 362D1134135A
1
34 356D1061033C
1
35 362D1061331B
1
36 356D1061332B
1
37 341D1134125
1
38 356D1134128A
1
39 348D1134384
1
40 356D1061184B
1
41 356D1134133A
2
42 356D1061034B
2
43 A 322D966246B
1
44 345D1060973C
2
2
A01 808C1134322
2
1
Part Name
Qty Remarks
Gear,spur
Support,shaft
Roller
Bracket
Roller
Roller
Insulator,heat
Guide
Belt
Guide
Bracket
Support
Bracket
Arm
Bracket
Plate,side
Bracket
Bracket
Bracket
Support,shaft
Insulator,heat
1
2
1
2
1
1
1
1
1 YUASA
1
1
1
1
1
1
1
1
1
1
1
3
Transport section
1
121
Distributed by: minilablaser.com
54
LP-5900
SU2400AY (1)
LP-5900
A01
05
06
04
T4 x8
T4 x8
07
36
03
01
02
21
20
T4 x8
E6
24
B3 x8
25
19
DH4 x8
10 35 34
DH4 x8
DH4 x8
12
26
13
09
Na8
DH4 x8
14
B4 x8
27
T4 x8
B4 x8
22
E6
DH4 x8
18
B3 x8
B4 x8
DH4 x8
17
B4 x8
DH4 x8
28
B4 x8
33
DH4 x8
29
31
32
Na8
23
DH4 x8
30
A02
122
15
DH4 x8
DH4 x8
16
Distributed by: minilablaser.com
54
LP-5900
SU2400AY (1)
Drawing
Ref. No. Part No.
Part Name
01
02
350D1061974D
318D1062033
Cover
Bushing
03
04
05
355C1134490
350D1134501
318D1062033
Frame
Cover
Bushing
06
07
08
09
10
350D1061977C
405D1061958
-------------350D1134084
318D1062034
Cover
Label
-------------Cover
Bushing
11 -------------12 304S3100835
13 356D1061957A
14 356D1061956
15 A 367S1112
16 350D1134500
17 A 316S3014
18 309S0420004
19 A 314D1061972A
20 A 316S3014
21 319D1061991
-------------Bolt,hex
Bracket
Bracket
Caster
Cover
Magnet
Washer,toothed lock
Hinge
Magnet
Shaft
Qty Remarks
1
2 SHINAGAWA
EE-32
1
1
2 SHINAGAWA
EE-32
1
1
1 (B)
2 SHINAGAWA
EE-32
1 M8x35
1
1
4 TOHKAI TX40
1
2
4
1
2
1
Drawing
Ref. No. Part No.
22
318D1062034
Part Name
Bushing
23 350G02642
24 317D1061954A
25 356C1062062B
26 A 314C1062009B
27 316S1007
28 355C1061960E
29 332D1061987B
30 367S2030
Cover
Cap
Bracket
Hinge
Clamp,cord
Frame
Stop
Foot
31 356D1061962D
32 A 314C1062009B
33 309S0420004
34 386D1061687
35 386D1061686
36 347S0874
Bracket
Hinge
Washer,toothed lock
Pad
Pad
Spacer
A01 D P SORTER
SU2400
SU2400AY
A02
Mount
357C1062060
Qty Remarks
2 SHINAGAWA
EE-32
1 (B)
1
1
2
8 KITAGAWA NK-5N
1
1
4 TOCHIGIYA
TM-204
1
2
4
2
2
2 HIROSUGI
BS-411E
1 INDEXES 53-A01,
54-A01 and 55-A01
inclusive
1
123
Distributed by: minilablaser.com
55
LP-5900
SU2400AY (2)
LP-5900
A01
06
07
08
NTa3x8
B4 x6
D810
04 05
B3 x10
M810
09
E4
02
10
03
01
DH4 x8
SWA01
11
38
12
A'
39
A
E2.5
42
32
13
45
40
E2.5
41
15
18
17
14
31
30
A'
E8
16
E12
DH4 x8
33
34
A
29
B4 x8
B3 x8
19
28
W6
Na6
Na6
B'
27
B
D811
24
26
37
36
35
25
W6
Na6
Na6
A02
DH4 x8
44
E12
DH4 x8
DH4 x8
43
20
B
23
22
124
21
B'
Distributed by: minilablaser.com
55
LP-5900
SU2400AY (2)
Drawing
Ref. No. Part No.
Part Name
Qty Remarks
35 NIX LWS-0711Z
120 NIX LWSM-0306
2
2 NTN 6902ZZNR
1
1
22 SHARP GP1A73A
08 405D1062036A
09 A 118C1062058B
Clamp,cord
Clamp,cord
Support,shaft
Support,shaft
Gear,spur
Bracket
Photo-interrupter
D810
Plate,graduated
Motor M810
10 A 327D1061967A
11 A 113G02024
12 316S0040
Gear,spur
PCB,SWA01
Strap
13 316S0258
14 356D1061989A
15 356D1061978A
16 A 326D1062048A
17 310S9034035
18 319D1134503
19 A 325C1062023A
20 319D1134502
21 A 322SF160
22 A 326D1062049A
23 363G02413
24 A 146D1061630
Clamp,cord
Bracket
Bracket
Sprocket
Pin,straight
Shaft
Chain
Shaft
Support,shaft
Sprocket
Guide
Detector D811
01 316S1027
02 316S0258
03 A 322SP223
04 A 322SF159
05 A 327D1061966B
06 356D1061955A
07 A 146S0029A
1
1 THREE PEACE
TP-3644G-KW150-A076-24
1
3
12 KITAGAWA
KGLS-6S
120 NIX LWSM-0306
1
1
2
3 Diam.4x35
1
2
1 NTN 6902ZZNR
2
2
2 (B)
1 (B)NIHON ALEPH
OS-580293-708
Drawing
Ref. No. Part No.
25 A 388D1062043A
26 304S3100680
27 316S0174
28 316S0258
29 316S1007
30 316S1033
31 316S0174
32 A 322SF159
33 362D1062047B
34 319D1062042A
35 362D1134504
36 A 388D1134192
37 A 30B7854110
38 356D1134499
39 319D1061673
40 319D1061674
41 A 334D1061675
42 356C1061670A
43 356D1061565
44 356D1061568
45 386D1061631
Part Name
Spring,compression
1
Bolt,hex
2 M6x80
Strap
23 NIX SB-1909
Clamp,cord
120 NIX LWSM-0306
Clamp,cord
8 KITAGAWA NK-5N
Clamp,cord
49 KITAGAWA NK-5N
Strap
23 NIX SB-1909
Support,shaft
2 NTN 6902ZZNR
Support
52
Shaft
52
Support
52
Spring,torsion
52
Roller
104 (B)
Bracket
1
Shaft
1
Shaft
1
Roller
1
Bracket ass'y
1
Bracket
1
Bracket
1
Pad
2
A01 D P SORTER
SU2400
SU2400AY
A02
Support
362C1134221
Qty Remarks
1 INDEXES 53-A01,
54-A01 and 55-A01
inclusive
52
125
Distributed by: minilablaser.com
75
OUTPUT UNIT PARTS NO. INDEX LIST
Part No.
Index No.- Ref. No.
Part No.
Index No.-Ref. No.
Part No.
#30B7854110
55-37A
125
316S0256
16-05
101
319D1057887E
#34B5591065
43-40A
119
316S0256
18-50
105
319D1057891
#58B7507941
44-03
121
316S0256
20B-24
111
#58B7507941
44-12
121
316S0258
17-15
113G02024
55-11A
125
316S0258
115C966115A
41-27A
115
117C1060960
41-09A
118C1057772A
Index No.-Ref. No.
20A-36
109
19-19
107
319D1057892A
20A-28
109
103
319D1057893A
20A-25
109
17-21
103
319D1057896C
20A-46
109
316S0258
18-54
105
319D1060965C
42-15
117
115
316S0258
19-09
107
319D1060965C
42-29
117
18-01A
105
316S0258
55-02
125
319D1060966D
42-13
117
118C1062058B
55-09A
125
316S0258
55-13
125
319D1060967A
42-31
117
118SX204A
15-01A
99
316S0258
55-28
125
319D1061047B
42-23
117
118SX204A
19-01A
107
316S0259
18-51
105
319D1061071
41-45
118SX206
16-13A
101
316S0260
16-29
101
319D1061183A
42-32
117
118SX206
18-47A
105
316S1007
54-27
123
319D1061336B
42-30
117
118SX206
20B-16A
111
316S1007
55-29
125
319D1061339B
43-27
119
119C1061076
41-08A
115
316S1008
41-31
115
319D1061570C
42-14
117
128C1057971B
18-33A
105
316S1014
41-15
115
319D1061596
42-28
117
128C1060969
41-A01A
316S1026
16-06
101
319D1061673
55-39
125
128S0740
41-67A
115
316S1026
18-55
105
319D1061674
55-40
125
138D1058124A
41-02C
115
316S1027
41-60
115
319D1061991
54-21
123
146D1061630
55-24A
125
316S1027
55-01
125
319D1062042A
55-34
125
146S0029A
16-02A
101
316S1031
41-11
115
319D1062505
41-13
115
146S0029A
16-09A
101
316S1031
41-58
115
319D1112260C
20A-20
109
146S0029A
18-10A
105
316S1033
18-52
105
319D1134129
44-20
121
146S0029A
19-07A
107
316S1033
41-63
115
319D1134326
42-18
117
146S0029A
20B-21A
111
316S1033
55-30
125
319D1134327
42-10
117
146S0029A
55-07A
125
316S1076
16-11
101
319D1134502
55-20
125
146S0079A
19-12A
107
316S1076
18-18
105
319D1134503
55-18
125
146S0080A
17-16A
103
316S1076
18-28
105
322B020
146S0080A
18-42A
105
316S1076
19-11
107
146S0089
18-13A
105
316S1076
20B-23
303D1057958B
115
115
20A-22A
109
322C966208C
44-25A
121
111
322D1057498A
15-20A
99
20A-38
109
316S1179
41-62
115
322D1057842A
16-19A
101
304S3100680
55-26
125
316S1245
16-27
101
322D1057842B
19-22A
107
304S3100835
54-12
123
316S1246
18-53
105
322D1057842B
19-31A
107
308D1112344
19-20
107
316S3014
54-17A
123
322D1057919A
15-23A
99
309D1061028A
44-05
121
316S3014
54-20A
123
322D1057919A
17-13A
103
309S010004
15-31
99
317D1061954A
54-24
123
322D1057934A
16-18A
101
309S0420004
54-18
123
318D1062033
54-02
123
322D1057934B
19-32A
107
309S0420004
54-33
123
318D1062033
54-05
123
322D1058194A
15-17A
99
310D1057857B
20A-43
109
318D1062034
54-10
123
322D1112310B
19-25A
107
310D1112269A
20B-32
111
318D1062034
54-22
123
322D1112311C
19-17A
107
310S1952014
20A-06
109
318S1072
17-23
103
322D1134130C
44-22A
121
310S1952014
20B-10
111
318S1072
18-56
105
322D816785
20A-24A
109
310S9034035
55-17
125
318S1245
20A-15A
109
322D966245B
42-11A
117
314C1062009B
54-26A
123
318S1245
20A-40A
109
322D966245B
42-19A
117
314C1062009B
54-32A
123
319C1057791
18-26
105
322D966245B
42-24A
117
314D1061972A
54-19A
123
319C1061007B
43-19
119
322D966246B
42-16A
117
315S1360150
20A-17
109
319C1061007B
43-28
119
322D966246B
44-14A
121
316D1061157A
44-08
121
319C1061143A
41-37
115
322D966246B
44-17A
121
316D1061584
41-34
115
319C1112229B
20B-26
111
322D966246B
44-43A
121
316S0028
41-57
115
319C1112285A
20B-05
111
322FY217A
33-04A
113
316S0040
55-12
125
319C1112305A
20B-12
111
322FY217A
33-15A
113
316S0174
18-32
105
319C1134374
33-14
113
322SB020
20A-30A
109
316S0174
19-14
107
319D1057520A
18-16
105
322SB033
20A-01A
109
316S0174
55-27
125
319D1057525A
15-21
99
322SB034
20A-44A
109
316S0174
55-31
125
319D1057542
16-04
101
322SB035
18-21A
105
126
Distributed by: minilablaser.com
OUTPUT UNIT PARTS NO. INDEX LIST
Part No.
Index No.-Ref.No.
Part No.
Index No.-Ref. No.
322SF159
55-04A
125
327D1057836
322SF159
55-32A
125
327D1057837A
20A-47
15-10
322SF160
55-21A
125
327D1057838B
18-24A
322SP207
20A-08A
109
327D1057925C
17-08
322SP214
15-19A
99
327D1061321D
43-47A
322SP214
18-07A
105
327D1061325C
322SP214
20A-31A
109
322SP214
20B-13A
322SP214
Part No.
75
Index No.-Ref. No.
109
334D1061675
55-41A
125
99
334D1134136A
44-29A
121
334D1134137A
44-16A
121
334D1134137A
44-26A
121
119
334D1134138A
44-28A
121
43-41A
119
334D1134366A
33-23A
113
327D1061697A
44-24A
121
334D1134510
42-35A
117
111
327D1061698C
43-48A
119
334D1134511
42-36A
117
20B-14A
111
327D1061966B
55-05A
125
335D1057986
17-29
103
322SP214
20B-19A
111
327D1061967A
55-10A
125
335D1112287
20B-08
111
322SP214
20B-27A
111
327D1112270C
20B-20A
111
335D1134331
42-07
117
322SP223
55-03A
125
327D1112283C
20B-11
111
338D1057783B
15-25
99
322SP224
17-12A
103
327D1112294C
20B-02
111
338D1057826
15-06
99
322SP224
17-22A
103
327D1112307A
20B-04
111
338D1057826
17-10
103
322SY067
20B-30A
111
327F1121646B
33-09A
113
338D1057908
20A-39
109
322SY318
43-15A
119
327F1121646B
33-12A
113
338D1057959
20A-45
109
322SY325
20A-41A
109
327S1121603A
15-36
99
338D1057990A
17-32
103
323D1057923A
19-26A
107
327S1121603A
18-31
105
338D1060274A
33-02
113
323D1134538
44-32A
121
327S1121604A
15-37
99
338D1061240
41-19
115
323S3361
43-12A
119
327S1121604A
20B-01
111
340D1061691A
44-02
121
323S3362
16-32A
101
327S1122003A
18-30
105
340D1112319C
17-07
103
323S3363
16-07A
101
327S1122403B
15-38
99
340D1134378
33-25
113
323S3364
18-23A
105
327S1122403B
17-31
103
340D990513A
15-22
99
323S3365
19-13A
107
327S1123202A
17-11
103
340D990513A
17-24
103
323S3366
19-06A
107
327S1123202A
17-28
103
340F0441
42-03
117
323S3367
18-06A
105
327S1123202A
20A-37
109
340F0441F
43-20
119
323S3368
18-09A
105
327S1124803
15-40
99
341C1057412D
16-21
101
323S3376
43-34A
119
332D1061281
41-51
115
341C1057414D
16-20
101
323S3379
20B-07A
111
332D1061987B
54-29
123
341C1057716E
19-23
107
332D1112250A
20A-11
109
341C1057717C
19-30
107
105
103
324C1061015C
42-22
324C1061015C
43-11A
119
334C1057430
15-35A
99
341D1134124
44-19
121
324C1061016C
43-14A
119
334C1057431A
15-13A
99
341D1134125
44-37
121
324C1061016C
43-32A
119
334C1057438B
16-17A
101
342D1057489G
15-24
99
324C1061328B
43-44A
119
334C1057747D
20A-26
109
342D1057818D
17-26
103
324C1061580B
43-33A
119
334C1057747D
20A-27
109
342D1061062D
41-20
115
324D1057875D
18-08A
105
334C1057756B
17-18A
103
342D1112233B
20B-31
111
324D1057877C
18-22A
105
334C1057788
15-12A
99
345D1057804B
20A-19
109
324D1057878C
18-12A
105
334C1060018D
33-08A
113
345D1060972B
43-26
119
324D1061267A
43-10A
119
334C1060026D
33-07A
113
345D1060973C
44-44
121
324D1112306B
20B-06A
111
334C1112265B
20A-07A
109
345D1060974E
44-04
121
324D1112329B
19-27A
107
334C1112304D
19-16
107
345D1060975D
44-10
121
325C1062023A
55-19A
125
334C1112328B
19-29
107
345D1060977D
41-56
115
326D1062048A
55-16A
125
334C1134329B
42-08A
117
345D1060978C
44-07
121
326D1062049A
55-22A
125
334C1134362A
33-24A
113
345D1060979A
41-55
115
327C1024765A
33-10A
113
334C1134383
33-A02
345D1060980C
44-01
121
327C1024765A
33-13A
113
334D1057532C
16-22A
101
345D1061097A
41-46
115
327C1061257D
33-11A
113
334D1057883B
16-15A
101
345D1061097A
41-54
115
327C1061319C
43-43A
119
334D1057883C
19-21A
107
345D1061161
41-40
115
327C1061322C
43-45A
119
334D1057883C
19-24A
107
345D1061162A
41-23
115
327C1061577C
43-42A
119
334D1058426
15-16A
99
345D1061162A
41-38
115
327C1961578B
43-46A
119
334D1060994F
42-38A
117
345D1061171A
41-52
115
327D1057496A
15-41
99
334D1061013E
42-34A
117
345D1061181D
41-44
115
327D1057834D
20A-12
109
334D1061014F
42-33A
117
345D1061182B
41-49
115
327D1057835B
15-39
99
334D1061327A
42-37A
117
345D1134141
44-30
121
327D1057835B
18-25
105
334D1061581A
42-39A
117
345D1134143
44-15
121
117
113
127
Distributed by: minilablaser.com
75
OUTPUT UNIT PARTS NO. INDEX LIST
Part No.
Index No.- Ref. No.
Part No.
Index No.-Ref. No.
Part No.
Index No.-Ref. No.
345D1134345B
43-08
119
350D1134501
54-04
123
356D1060970D
41-17
115
345D1134359
43-25
119
350G02642
54-23
123
356D1060996D
43-01
119
345D1134379
33-18
113
353C1061064N
41-28
115
356D1061010
41-65
115
345D1134380
33-19
113
355C1057416L
15-18
99
356D1061020D
41-22
115
345D1134381
33-17
113
355C1057559A
16-03
101
356D1061021B
41-10
115
345D1134512
41-43
115
355C1057750F
18-17
105
356D1061022B
41-30
115
345D1134517
42-04
117
355C1061093C
41-48
115
356D1061023C
41-50
115
346C1060276
33-01
113
355C1061960E
54-28
123
356D1061033C
44-34
121
346D1061595
41-53
115
355C1112161
16-08
101
356D1061034B
44-42
121
347D1057865A
17-33
103
355C1112194B
15-09
99
356D1061049J
43-24
119
347D1057866C
17-34
103
355C1112353
19-05
107
356D1061060C
41-26
115
347D1057900B
17-35
103
355C1134490
54-03
123
356D1061061D
41-59
115
347D1112231B
20B-22
111
355D1057873H
18-35
105
356D1061063E
41-21
115
347D1112315A
19-03
107
355D1061094C
41-47
115
356D1061073E
41-64
115
347D1134139B
44-21
121
355D1061338B
43-07
119
356D1061092J
44-27
121
347D1134334C
42-05
117
355D1134371
33-21
113
356D1061184B
44-40
121
347D1134377
33-20
113
356C1057417B
16-14
101
356D1061332B
44-36
121
347S0794
44-06
121
356C1057418G
16-30
101
356D1061346A
41-33
115
347S0874
54-36
123
356C1057419D
16-31
101
356D1061565
55-43
125
348C1112180C
15-08
99
356C1057557B
15-27
99
356D1061568
55-44
125
348C1112182B
15-05
99
356C1057723C
18-19
105
356D1061955A
55-06
125
348C1112272B
17-20
103
356C1057984
18-48
105
356D1061956
54-14
123
348C1112322A
18-29
105
356C1060109
43-16
119
356D1061957A
54-13
123
348D1057748B
20A-10
109
356C1060997F
43-13
119
356D1061962D
54-31
123
348D1057749D
20A-02
109
356C1061114B
41-41
115
356D1061978A
55-15
125
348D1112346
18-20
105
356C1061333C
43-31
119
356D1061989A
55-14
125
348D1134126A
44-13
121
356C1061670A
55-42
125
356D1062504B
41-14
115
348D1134357B
42-17
117
356C1062062B
54-25
123
356D1112163A
16-23
101
348D1134358B
42-12
117
356C1112156B
15-11
99
356D1112170A
15-14
99
348D1134372
33-22
113
356C1112213C
20A-21
109
356D1112181C
15-15
99
348D1134373
33-26
113
356C1112218A
20A-29
109
356D1112238B
20A-18
109
348D1134384
44-39
121
356C1112220C
20A-09
109
356D1112239B
17-14
103
350C1061026E
41-42
115
356C1112244C
20A-13
109
356D1112243C
20A-05
109
350C1061132A
41-07
115
356C1112257B
20B-03
111
356D1112256A
19-10
107
350D1057800A
18-43
105
356D1057477C
15-03
99
356D1112267B
18-27
105
350D1057800B
17-17
103
356D1057482B
16-12
101
356D1112271A
20B-28
111
350D1057928A
20A-34
109
356D1057482B
18-02
105
356D1112281B
20B-17
111
350D1057932D
17-03
103
356D1057485B
16-01
101
356D1112293D
20B-09
111
350D1057936
18-44
105
356D1057486D
16-10
101
356D1112309A
19-18
107
350D1057962B
18-14
105
356D1057541F
16-28
101
356D1134128A
44-38
121
350D1057972C
18-34
105
356D1057722D
20A-32
109
356D1134133A
44-41
121
350D1058123C
41-01
115
356D1057779C
15-29
99
356D1134344C
43-09
119
350D1061029E
44-09
121
356D1057805C
15-02
99
356D1134499
55-38
125
350D1061102B
41-05
115
356D1057805C
19-04
107
356D1134526
44-11
121
350D1061112E
41-06
115
356D1057806D
19-28
107
356F10134F
41-66
115
350D1061126C
41-03
115
356D1057807G
19-08
107
356H0071A
41-69
115
350D1061127C
41-32
115
356D1057820B
18-11
105
357C1062060
54-A02
350D1061127C
41-36
115
356D1057821H
18-15
105
358D1134356
41-39
115
350D1061974D
54-01
123
356D1057822C
20A-23
109
360D1112246B
20A-16
109
350D1061977C
54-06
123
356D1057824H
18-39
105
360D1112320D
20B-18
111
350D1062541A
41-16
115
356D1057920G
18-03
105
360D1134323A
42-20
117
350D1112302B
17-06
103
356D1057930C
18-45
105
360D1134324A
42-21
117
350D1112303C
17-04
103
356D1057960F
17-25
103
360D1134325C
42-09
117
350D1134084
54-09
123
356D1057988A
18-05
105
362C1134221
55-A02
350D1134500
54-16
123
356D1060959A
41-25
115
362D1061027B
41-12
128
123
125
115
Distributed by: minilablaser.com
OUTPUT UNIT PARTS NO. INDEX LIST
Part No.
Index No.-Ref.No.
Part No.
Index No.-Ref. No.
Part No.
75
Index No.-Ref. No.
362D1061057F
43-03
119
371D1060536B
41-35
362D1061330B
44-23
121
376D1061025A
41-04C
362D1061331B
44-35
121
382D1061594
41-61
362D1062047B
55-33
125
382D1061696
41-24
362D1134134A
44-31
121
383D1057785
15-26A
99
405D1057976A
20A-33
109
362D1134135A
44-33
121
383D1057786A
15-30A
99
405D1057977A
17-09
103
362D1134504
55-35
125
386D1057963C
17-01
103
405D10580603
18-41
105
363C1057440G
16-26
101
386D1061631
55-45
125
405D1058063
16-25
101
363C1112206B
20B-25
111
386D1061686
54-35
123
405D1058064
16-24
101
363C1112215B
20A-04
109
386D1061687
54-34
123
405D1058064
18-40
105
363C1112216B
20A-03
109
386S1087
17-02
103
405D1060267A
33-05
113
363C1134285
43-22
119
388D1057526A
15-33A
99
405D1061958
54-07
123
363C1134289
42-01
117
388D1057536
16-16A
101
405D1062036A
55-08
125
363D1057497C
15-07
99
388D1057784C
15-32A
99
405D1112342
17-05
103
363D1057906B
18-37
105
388D1057789B
17-27A
103
405D1134354
41-29
115
363D1061088E
43-38
119
388D1057828A
18-49A
105
405F8168C
18-38
105
363D1061089F
43-37
119
388D1057829C
18-04A
105
405F8168C
20A-35
109
363D1061308B
43-35
119
388D1057901B
15-04A
99
405F8168C
41-18
115
363D1061572D
43-06
119
388D1057901B
19-02A
107
405N100027
42-02
117
363D1061573C
43-36
119
388D1057961C
17-30A
103
802C1134301
33-A01A
113
363D1112240A
17-19
103
388D1060989H
43-18A
119
808C1112151
15-A01F
99
363D1112241E
18-36
105
388D1060990J
43-29A
119
808C1112151
16-A01F
101
363D1134298
43-05
119
388D1061054D
43-17A
119
808C1112200
17-A01F
103
363D1134360
33-03
113
388D1061103D
33-06A
113
808C1112200
18-A01F
105
363G02413
55-23
125
388D1061337B
43-30A
119
808C1112200
19-A01F
107
364D1057970
18-46
105
388D1061345A
33-16
808C1112200
20A-A01F
109
365D1057550E
15-28
99
388D1061574B
42-25A
117
808C1112200
20B-A01F
111
365D1057552
15-34
99
388D1061575B
42-26A
117
808C1134321
42-A01F
117
111
388D1061692
42-27A
117
808C1134321
43-A01F
119
388D1062043A
55-25A
125
808C1134322
44-A01
20A-14A
109
890D1134348A
42-40
19-15A
107
P SORTER SU2400
54-A01D
123
20B-15A
111
P SORTER SU2400
55-A01D
125
365D1112237B
367S1112
367S2030
20B-29
54-15A
123
388D1134513
43-21A
119
388D1134514
43-23A
119
115
388D1134520
44-18A
121
115
388F2231F
41-68A
115
115
115
113
54-30
123
388D1112255A
369D1057858B
20A-42
109
388D1112259
369D1060955C
43-02
119
388D1112317A
369D1134343A
43-04
119
388D1134192
55-36A
125
371C1061592
43-39
119
388D1134332A
42-06A
117
121
117
129
Distributed by: minilablaser.com
Distributed by: minilablaser.com
FAX : 81-3-5484-0454
Questionnaire concerning This Manual
Fujifilm’s Photo Imaging Technical Service Division would be most grateful if you would make copies of this form, then complete
and send them to us by FAX.
Your opinions will contribute greatly to an accurate assessment of the overall quality of each manual.
All questions can be answered by ticking [✓] the appropriate box(es), but in addition to these answers, please provide us with your
written comments in the lined spaces following each block of questions.
Title : FRONTIER 590
Principle of Operation, Servicing and Electrical Circuit Diagram
SERVICE MANUAL / PARTS LIST
Manual Title and Reference Number
Reference Number :
PP3-C1069E
Name :
Your Name and Company
Company :
E-mail Address :
Your E-mail Address and FAX Number
Question 1
Question 2
•
FAX Number :
How would you rate this manual overall?
(1) Very easy to use and understand
(2) Fairly easy to use and understand
(3) Slightly difficult to use
and understand
(4) Very difficult to use and understand
•
Please provide us with your reasons and comments.
•
Have you found any technical errors, errors in spelling, or missing words in this manual?
Yes
Question 3
No
•
If you have ticked (Yes), please let us know what these errors and missing words are.
•
How would you rate the writing (language, choice of words/phrases, etc.) and the illustrations/
diagrams, etc.?
(1) Clear and easy to follow
(2) Should be simplified
(3) Difficult to follow
(1)’ [Illustrations, etc.] Of adequate size
(2)’ [Illustrations, etc.] Too small
(3)’ [Illustrations, etc.] Difficult to follow
•
If you have ticked (2), (3) or (3)’, please give us your reasons.
Additional
Comments/
Requests
concerning
This Manual
Please return this questionnaire to :
FAX No. : Tokyo 81-3-5484-0454
Distributed by: minilablaser.com
Distributed by: minilablaser.com
Distributed by: minilablaser.com
FUJI PHOTO FILM CO., LTD.
26-30, Nishiazabu 2-chome, Minato-ku, Tokyo 106-8620, Japan.
Printed on Recycled Paper
Ref.No.PP3-C1069E ESD-06.2-FP Printed in Japan