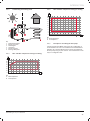
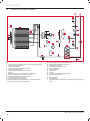
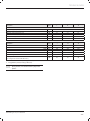
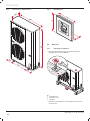
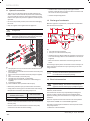
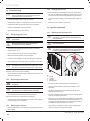
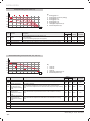
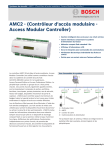
1
Installation
and Servicing
Envirosorb2 7 / 12 / 14
TABLE OF CONTENTS
I N T R ODU CT IO N
1
Instructions guidance ................................................................................................................... 3
1.1
1.2
1.3
1.4
2
Appliance description................................................................................................................... 3
2.1
2.2
2.3
2.4
2.5
3
Safety instructions ..............................................................................................7
Regulations .......................................................................................................8
Recycling ..................................................................................................................................... 8
4.1
4.2
4.3
5
Safety devices ....................................................................................................3
Data label ...........................................................................................................4
Regulation and statutory requirements.................................................................4
Concept of operation ...........................................................................................4
Hydraulic and refrigerant schematic .....................................................................6
Safety instructions and regulations ............................................................................................... 7
3.1
3.2
4
Product documentation .......................................................................................3
Associated documents .......................................................................................3
Explanation of symbols .......................................................................................3
Guarantee registration ........................................................................................3
Appliance ...........................................................................................................8
Packaging ..........................................................................................................8
Refrigerant .........................................................................................................8
Guarantee / Responsibility ........................................................................................................... 9
5.1
5.2
Detailed guarantee .............................................................................................9
Appliance use / manufacturer responsibility .........................................................9
T ECH N I CAL DATA
6
Envirosorb ................................................................................................................................. 10
I N STAL L AT I O N
7
Appliance location ..................................................................................................................... 12
7.1
7.2
7.3
Heat pump location ...........................................................................................12
Clearances .......................................................................................................13
Command unit location......................................................................................13
8
Installing the command unit........................................................................................................ 14
9
Installing the heat pump ............................................................................................................ 14
9.1
9.2
9.3
9.4
9.5
10
Scope of delivery ..............................................................................................14
Recommendations before installation ................................................................15
Dimensions ......................................................................................................15
Mounting ........................................................................................................16
Positioning the appliance ..................................................................................17
Examples of installation ............................................................................................................. 18
10.1
10.2
Installation with hydraulic module, control by control unit ...................................18
Installation with hydraulic module, DHW tank, control by control unit ...................20
11
Hydraulic connection .................................................................................................................. 22
12
Discharge of condensate ............................................................................................................ 22
-1-
TABLE OF CONTENTS
13
Electrical connection .................................................................................................................. 22
13.1
13.2
13.3
13.4
14
Commissioning .......................................................................................................................... 28
14.1
14.2
14.3
14.4
15
Filling the glycol circuit......................................................................................28
Activating the heat pump ...................................................................................28
Activating the options .......................................................................................28
Heating system test ..........................................................................................28
Specific adjustment ................................................................................................................... 28
15.1
15.2
16
Access to main board ........................................................................................23
Cable passage .................................................................................................23
Electrical wiring ................................................................................................23
Wiring diagram .................................................................................................24
Adjusting the heating circuit ..............................................................................28
Settings for the command unit ...........................................................................29
User information ........................................................................................................................ 34
MAI N T EN AN CE
17
Trouble-shooting ........................................................................................................................ 35
17.1
17.2
-2-
Fault diagnosis .................................................................................................35
Fault codes .......................................................................................................35
18
Servicing ................................................................................................................................... 36
19
Replacement of Parts .................................................................................................................. 36
20
Spare parts ................................................................................................................................ 36
INTRODUCTION
INTRODUCTION
1
Instructions guidance
1.1
Product documentation
The instructions are an integral part of the appliance and must be
handed to the user on completion of the installation in order to
comply with the current regulation.
• Carefully read the manual, to understand all the information
to enable safe installation, use and servicing. No liability can
be accepted in the event of damage for not complying with the
guidance in this instruction manual.
These instructions consist of, Installation, Servicing, Fault Finding
and Replacement of Parts. The instructions are an integral part of
the appliance and must be handed to the user on completion of
the installation.
1.2
Associated documents
- 1 Instructions for user
1.4
Guarantee registration
Thank you for installing a new Glow-worm appliance in your home.
Glow-worm appliances are manufactured to the very
highest standard so we are pleased to offer our customers a
Comprehensive Guarantee.
This product is guaranteed for 24 months from the date of
installation or 30 months from the date of manufacture,
whichever is the shorter, for parts and labour.
The second year of guarantee, from the beginning of the 13th
month onwards after installation or manufacture, is conditional
upon the heat pump having been serviced by a competent
person approved at the time by the Health and Safety Executive,
in accordance with the manufacturer’s recommendations. We
strongly recommend regular servicing of your appliance, but
where the condition is not met, any chargeable spare parts or
components issued within the applicable guarantee period still
benefit from a 12 month warranty from the date of issue by the
manufacturer.
We recommend you complete and return as soon as possible your
guarantee registration card (delivered with the hydraulic module).
If your guarantee registration card is missing you can obtain a
copy or record your registration by telephoning the Glow-worm
Customer Service number 01773 828100.
- Instructions for other system components
1.3
Explanation of symbols
a
DANGER: Risk of injuries.
e
DANGER: Risk of electric shock.
b
ATTENTION: Risk of damage to the appliance or to its
surroundings.
i
IMPORTANT: Important information.
2
2.1
Appliance description
Safety devices
- This appliance is designed for use in heating with an external
temperature of between -20°C and 30°C. Outside this range,
the heat pump stops.
- A set of security devices based on measuring the temperature
within the circuits and the current in the compressor protects
it against excess pressure in the refrigerating fluid.
- A flow detector protects the appliance as a whole.
- To prevent stagnation of the refrigerant fluid when the
compressor is stopped, a safety device is activated when the
outside temperature lowers. The compressor is then heated by
a low electrical current through the motor windings,
- A temperature sensor on exit from the compressor limits the
functioning of the heat pump when the temperature measured
by this sensor is greater than 100°C. From 117°C, the heat
pump stops.
- A temperature sensor on the finned heat exchanger and a
tachometer on the fan checks that the fan is working.
- A water flow sensor ensures the security of the water
circulation. If the flow is too low (< 420 l/h), the appliance
stops and re-starts when the flow comes within the normal
functioning range (>500l/h).
0020117819_01 - 05/11 - Glow-worm
-3-
INTRODUCTION
2.2
Data label
2.3.2
The data label certifies the country where the appliance is
intended to be installed.
Data label location:
Local regulations
Benchmark places responsibilities on both manufacturers
and installers. The purpose is to ensure that customers are
provided with the correct equipment for their needs, that it is
installed, commissioned and serviced in accordance with the
manufacturer’s instructions by a competent person approved at
the time by the Health and Safety Executive and that it meets the
requirements of the appropriate Building Regulations.
The Benchmark Checklist can be used to demonstrate compliance
with Building Regulations and should be provided to the
customer for future reference.
Installers are required to carry out installation, commissioning
and servicing work in accordance with the Benchmark Code
of Practice which is available from the Heating and Hotwater
Industry Council who manage and promote the Scheme.
• Visit www.centralheating.co.uk for more information.
1
2.4
Concept of operation
A heat pump (HP) is a thermodynamic machine which transfers
heat from one location to another. To do so, it employs the
characteristics of a refrigerant fluid.
The system is composed of the following circuits:
Key
1
Data label
- The refrigeration circuit which transfers heat to the water
circuit following the evaporation, compression, condensation
and expansion of the fluid.
2.3
- The heating circuit.
2.3.1
Regulation and statutory requirements
CE Mark
2.4.1
In heating mode
The CE mark indicates that the appliances described in this
manual are in compliance with the following directives:
- European directive n°2004-108 from the European Parliament
and Council relative to electromagnetic compatibility
- European directive n°2006-95 from the European Parliament
and Council relative to low voltage
- European directive No. 97-23 of the European Parliament and
the Council regarding pressure equipment
2
- European directive No. 2007-1494 of the Commission, dated
December 17, 2007, determining, in accordance with Directive
No. 2006-842 of the European Parliament and the Council,
the label type and the additional requirements as regards
the labelling of products and equipment containing certain
fluorinated greenhouse effect gas.
- European directive No. 2006-842 of the European Parliament
and the Council of May 17, 2006 on certain fluorinated
greenhouse gasses (OJEU of June 14, 2006)
-4-
1
3
4
5
Key
1
2
3
4
5
6
6
Finned heat exchanger
Reverse cycle valve
Ventilating fan
Compressor
Pressure regulator
Exchanger with plates
0020117819_01 - 05/11 - Glow-worm
INTRODUCTION
2.4.2
In defrosting and cooling mode
2.4.4
20
Min. and Max. temperature settings in cooling
A
18
16
14
12
2
10
8
6
1
4
3
Key
1
2
3
4
5
6
0
6
5
Finned heat exchanger
Reverse cycle valve
Ventilating fan
Compressor
Pressure regulator
Exchanger with plates
2.4.3
70
2
4
10
Key
A
Water temperature
B
Air temperature
2.4.5
Min. and Max. temperature settings in heating
0
20
30
40
46
50
B
Principle for controlling the heat pump
Control using the Glow Worm control unit. This configuration is
recommended in the case of an installation with the Glow Worm
hydraulic unit. The Glow Worm system of active management of
the heat pump using dry 12V contacts. The command unit is used
only as a configuration tool.
A
60
50
45
40
30
20
10
0
-20
-10
0
10
20
30
B
Key
A
Water temperature
B
Air temperature
0020117819_01 - 05/11 - Glow-worm
-5-
INTRODUCTION
2.5
Hydraulic and refrigerant schematic
A
B
8
2
9
3
10
4
6
5
1
7
11
12
19
22
20
23
C
13
14
17
15
21
24
18
16
Key
1
2
3
4
5
6
7
8
9
10
11
12
13
14
Fan (1 fan for the 7 kW model, 2 fans for the 12 and 14 kW models)
Outside air temperature sensor
Finned heat exchanger
Finned heat exchanger temperature sensor
4-way cycle inversion gate
Temperature sensor for compressor suction
Silencer
Expansion vessel (in this position for the 7 kW model)
Automatic purge vent for the heat pump circuit
Water flow detector for the heat pump circuit
Circulator for the heat pump circuit
Safety valve for the heat pump circuit
Expansion vessel (in this position for the 12 and 14 kW models)
Flow temperature sensor for the heat pump
-6-
15
16
17
18
19
20
21
22
23
24
Return temperature sensor for the heat pump
Draining valve for the heat pump circuit
Plate to plate exchanger
Pre-expansion temperature sensor
Anti-slugging bottle
Rotary compressor
Liquid tank
Silencer
Compressor discharge temperature sensor
Electronic expansion unit
A
B
C
Heat pump return
Heat pump flow
Evacuation from the safety valve to a container for recovering glycol
water
0020117819_01 - 05/11 - Glow-worm
INTRODUCTION
3
Safety instructions and regulations
3.1
e
Safety instructions
Incorrect installation can cause electric shock or
appliance damage.
• Never disable security devices and do not try to adjust them.
• Be sure to consider the following handling techniques and
precautions:
• Grip the appliance at its base
• Use safety clothing where appropriate, e.g. gloves, safety
footwear.
• Ensure safe lifting techniques are used:
• Keep back straight.
• Avoid twisting at the waist.
• Avoid upper body/top heavy bending.
R410A Refrigerant
b
Important: any action carried out on the refrigerant
circuit must be performed by qualified personnel.
- Use only R410A refrigerant.
• The tools used for charging, for measuring pressure, for
creating a vacuum and for the recovery of the fluid must be
compatible with and employed solely for R410A.
• Welding is to be carried out with nitrogen and the circuit’s airtightness is to be tested under pressure, with nitrogen.
• Refilling must be effected during the liquid phase.
• In case of leakage, do not add fluid: drain the remaining
fluid from the circuit and eliminate, in accordance with the
applicable regulations.
b
Evacuating refrigerant into the atmosphere is
prohibited. The refrigerant must be properly
recovered in a container suitable for recycling.
• Always grip using the palm of the hand.
• Create a vacuum in the circuit with a maximum pressure of 30
mbar (static pressure).
• Use designated hand holds.
• Bleed the circuit before any welding work.
• Keep load as close to body as possible.
• Always use assistance if required.
a
Do not smoke or light flames during the emptying
and filling of the circuit. The gases emitted during the
combustion of the refrigerant are flammable.
• Under no circumstances must the user interfere with or adjust
sealed parts.
• When assembling the connections, correctly position the seals
to avoid any leakage of water.
• This appliance contains metal parts (components) and care
should be taken when handling and cleaning, with particular
regard to edges.
The basic safety instructions must be followed before attempting
to maintain or replace spare parts:
• Stop the appliance.
• Electrically isolate the appliance from the power supply.
• Hydraulically isolate the appliance using the isolation valves if
provided.
• Should you need to replace hydraulic components, drain the
appliance.
• Protect all the electrical components from water while working
on the appliance.
• Use only original spare parts.
• Use only new O-rings and gaskets.
• After having completed work on water carrying components,
check for their tightness.
• When work on the appliance is completed, perform an
operational test and check for safety.
0020117819_01 - 05/11 - Glow-worm
-7-
INTRODUCTION
3.2
3.2.1
4
Regulations
Statutory requirements
IMPORTANT
Where no British Standards exists, materials and equipment
should be fit for their purpose and of suitable quality and
workmanship.
The installation of this appliance must be carried out by a
competent person in accordance the rules in force in the
countries of destination.
Recycling
i
4.1
On installing and commissioning the appliance you must adhere
to the technical rules, standards and provisions in effect at the
time.
Reminder of existing regulatory acts
- EC regulation No. 20372000 from the 29th of June 2000
This European regulation repeals regulation No. 3093/94
and presents the elimination schedules of CFC and HCFC. It
also deals with the collection of refrigerants, system leaks,
particularly systems containing more than 3 kg of CFC or HCFC,
as well as the minimum level of qualification required by the
technicians.
- EC regulation No. 0842/2006 from the 17th of May 2006
regarding the containment, use, collection and disposal of the
fluorinated greenhouse gases, the labelling and elimination
of the products and equipment containing these gases, the
restriction of use and banning of certain products from the
market, as well as the training and certification of personnel
and companies operating in the activities targeted by this
regulation: refrigeration, air-conditioning, heat pumps and fire
protection systems containing greenhouse gases.
3.2.2
Other regulations
Control of Substances Hazardous to Health
Under Section 6 of The Health and Safety at Work Act 1974, we
are required to provide information on substances hazardous to
health. The adhesives and sealants used in this appliance are
cured and give no known hazard in this state.
The refrigerant used in this appliance is R410a the use of which is
strictly controlled by F Gas regulation EN842/2006.
Appliance
Most of the appliance is made of recyclable materials.
This symbol indicates that this appliance must not
be disposed of with household waste, that it should
be selectively collected for energy recovery, reuse or
recycling.
Manufacturer’s instructions must not be taken as overriding
statutory requirements.
Standards
The recycling of the packaging must be carried out by
the qualified professional who installed the appliance.
The recycling of any refrigerant fluid must be carried
out by a suitably qualified refrigerant engineer.
• Take the appliance to an appropriate collection point for the
treatment, evaluation and recycling. The collection point
must accept appliances containing refrigerant fluids for their
recovery via recycling either within the elimination centre or by
an authorised service provider.
i
4.2
By complying with this directive, you will contribute
to the preservation of natural resources and the
protection of human health.
Packaging
The competent person who installed the appliance must:
• Sort the waste so as to separate those which can be recycled
(cardboard, plastics...) from those that cannot.
• Dispose of the waste in compliance with regulations in force.
4.3
a
Refrigerant
The appliance contains R410A refrigerant. The
refrigerant should only be handled by an approved
specialist. Avoid all contact with skin and eyes.
R410A fluorinated greenhouse gases are contained within a fully
sealed system (Kyoto Protocol PES 1975).
Under normal use and conditions, the refrigerant is not
dangerous.
Degassing refrigerant fluid into the atmosphere is prohibited,
except when necessary to ensure personal safety.
Prior to disposing of the appliance, the refrigerant must be
properly recovered in a container suitable for recycling.
The personnel approved for this recuperation must have an
appropriate certification according to the regulations in force.
-8-
0020117819_01 - 05/11 - Glow-worm
INTRODUCTION
5
5.1
Guarantee / Responsibility
Detailed guarantee
Thank you for installing a new Glow-worm appliance in your
home.
Glow-worm appliances are manufactured to the very
highest standard so we are pleased to offer our customers a
Comprehensive Guarantee.
This product is guaranteed for 24 months from the date of
installation or 30 months from the date of manufacture,
whichever is the shorter, for parts and labour.
The second year of the parts guarantee, from the beginning
of the 13th month onwards after installation or manufacture,
is conditional upon the heat pump having been serviced by
a competent person approved at the time by the Health and
Safety Executive, in accordance with the manufacturer’s
recommendations. We strongly recommend regular servicing
of your appliance, but where the condition is not met, any
chargeable spare parts or components issued within the
applicable guarantee period still benefit from a 12 month
warranty from the date of issue by the manufacturer.
5.2
b
Appliance use / manufacturer responsibility
The guarantee detailed above is applicable on the
condition that:
- The appliance is installed by a competent person in
accordance with installation instructions.
- The appliance is used for normal domestic purposes and
in accordance with the manufacturer’s operating and
maintenance instructions.
- The appliance is serviced, maintained, by a competent person.
- The repair or replacement of parts during the guarantee period
does not have the effect of extending the period.
b
The manufacturer has no responsibility whatsoever for
any damage resulting from:
- Any defects or damage resulting from incorrect or poor
installation, inadequate servicing, or maladjustment.
- Any defects in the system to which the appliance is connected.
- Tout défaut résultant d’une protection antigel non adaptée.
- Any deterioration or maladjustment following changes in
the nature or pressure of the water used, or a change in the
characteristics of the electrical supply voltage.
• For further details, refer to your Terms and Conditions.
a
This appliance is intended to be installed only within
the designated countries displayed on the type plate.
This appliance is not designed to be used by persons (including
children) with physical, sensory or mental restrictions, or a
lack of experience or knowledge. To ensure the safety of these
persons, they must seek help from and be guided by persons who
are competent to explain the usage of this appliance.
• Make sure that children do not play with this appliance.
0020117819_01 - 05/11 - Glow-worm
-9-
TECHNICAL DATA
TECHNICAL DATA
i
6
This technical data is valid for a new appliance with its
own heat exchangers.
Envirosorb
Description
Unit
7
12
14
Min. operating outside temperature (in heating)
°C
-20
-20
-20
Max. operating outside temperature (in heating)
°C
30
30
30
Heating output
kW
7.4
12.95
14
Power input
kW
2.34
4.3
4.36
A
10
18.7
19
3.16
3.01
3.21
11.9
14.5
Specifications, with radiators
(flow : 45°C, return : 40°C, outside dry temperature (wet) 7 (6)°C)
Rated electrical current
COP* A7(6) W45-40
Specifications, with underfloor heating
(flow : 35°C, return : 30°C, outside dry temperature (wet) : 7 (6)°C)
Heating output
kW
7.2
Power input
kW
1.84
3.04
3.57
A
8
13.2
15.6
3.91
3.91
4.06
2.485
3.385
Rated electrical current
COP* A7(6) W35-30
Refrigerant circuit
Type of refrigerant
Quantity of refrigerant
kg
1.81
Type of compressor
Rotary
Type of oil
Polyolester
Type of regulator
Electronic
Fan speed
Maximum operating pressure (PS)
rpm
1000
805
bar
45
45
1050
45
Pa
45 x 105
45 x 105
45 x 105
Heat pump circuit
bar
3
3
3
Pa
3 x 10⁵
3 x 10⁵
3 x 10⁵
Min. supply pressure
bar
Pa
0.5
50 x 103
0.5
50 x 103
0.5
50 x 103
Nominal water flow rate in heating mode
l/h
1200
2100
2500
Flow rate detection threshold
l/h
500
500
500
Min. volume of the installation
l
28
42
49
Max volume of heat pump circuit, without auxiliary tank, for a water outlet
temperature of 35°C
l
65
95
95
Minimum flow temperature setting (in heating)
°C
20
20
20
Maximum flow temperature setting (in heating)
°C
60
60
60
l
1.2
2.3
2.3
Max. supply pressure.
Volume of water in the heat pump
- 10 -
0020117819_01 - 05/11 - Glow-worm
TECHNICAL DATA
Description
Unit
7
12
14
Electrical
Supply voltage/frequency
V/Hz
Fuse
Maximum absorbed power (P max)
kW
Maximum absorbed current (I max)
A
1/N/PE 230V 50Hz
15 type B
25 type D
25 type D
2.7
5.1
5.1
14
23
20
IPX4
IPX4
IPX4
1
1
1
Unit
7
12
14
Height
mm
821
1363
1363
Width
mm
908
908
908
Depth
mm
326
326
326
"
1
1
1
kg
71
105
130
dBA
64
67
68
Index of electrical protection
Electrical classification
Description
Dimensions
Ø Water circuit connections
Nett total weight
Sound power level : overall exterior noise
(according to EN 12102 and EN ISO 9614-1)
*
**
Coefficient Of Performance (according to EN 14511)
Energy Efficiency Ratio (according to EN 14511)
i
Fluorinated greenhouse gases as identified in the
Kyoto protocol, are contained within a fully sealed
system.
0020117819_01 - 05/11 - Glow-worm
- 11 -
INSTALLATION
INSTALLATION
i
7
• Do not place near to stale air extraction fans.
• Allow room for electricity cables (high and low voltage).
All the drawings dimensions are shown in mm.
• Explain these requirements to the appliance user.
7.1.2
Discharge of condensates
Appliance location
7.1
7.1.1
Heat pump location
Instructions
• Before choosing a site for the appliance, carefully read the
safety warnings and installation manual.
• Ensure there is sufficient space available for the appliance,
taking care that minimum clearances are adhered to ensure
that the connections to the water, gas and flue can be
accessed and inspected (see chapter Clearances).
• Observe current regulations.
• Install the appliance outside.
• Do not install the appliance:
- near a heat source,
m
0m
>10
- near flammable materials,
- near the ventilation points of adjacent buildings
- beneath deciduous trees.
• Take into account the following when installing the heat pump:
- prevailing winds,
- the noise generated by the fan and the compressor
- the visual impact on the surrounding neighbourhood.
• Make allowance for a condensate discharge circuit.
7.1.3
Regulations
• Please ensure that all correct permissions have been obtained
from the local planning office, prior to siting the appliance.
• Avoid areas exposed to strong winds directed against the
appliance’s air outlet.
• Set the appliance on one of the following supports:
- concrete slabs,
- crane beam,
- concrete blocks.
• Do not install the fan facing the nearby windows. If necessary,
install a noise barrier.
• To avoid transmission of vibrations to the surrounding
buildings:
- use hoses for water connections,
- install anti-vibration pads.
• Ensure that the appliance is protected from water and from
snow.
• Do not expose the heat pump to corrosive or dusty
atmospheres (near to dirt roads, for example).
- 12 -
0020117819_01 - 05/11 - Glow-worm
INSTALLATION
7.2
Clearances
- Respect the minimum dimensions shown in the drawing
above in order to ensure a correct air flow and to facilitate
maintenance operations.
- Make sure that the available space is sufficient for the
installation of the water system piping.
7.3
Command unit location
• Install the command unit in a room protected from frost
0020117819_01 - 05/11 - Glow-worm
- 13 -
INSTALLATION
8
Installing the command unit
• Make sure that the materials used for performing the
installation are compatible with those of the appliance.
1
• Determine the place of assembly. See the chapter "Location".
2
3
2
3
1
4
1
Key
1
Command unit
2
Wall support
• Assemble the command unit (1) on the wall support (2).
9
Key
1
2
3
4
9.1
Installing the heat pump
Scope of delivery
Mounting screw
Wall support
Rawlplug
Electric terminal block
2
2.1
2.2
1
• Separate the command unit from the wall support (3).
2.4
• Pass the electrical connection cables through the hole on the
left of the connector and connect them onto terminal (4). See
the chapter "Installation examples".
2.3
• Position the support (3) on a wall.
3
• Drill holes for the fixing screws in accordance with the 2 fixing
holes on the wall support (3).
3.1
2.4
• Insert the rawlplugs (2) in the holes.
2.3
• Fix the support (3) with the fixing screws (supplied).
2.2
3.2
4
Key
1
Heat pump
2
2.1
2.2
- 14 -
(x1)
Packet of accessories
Condensate connection
Leak-tight seal for passing mains and low-voltage
cables
(x1)
(x1)
(x2)
0020117819_01 - 05/11 - Glow-worm
INSTALLATION
2.3
Protection against the sharp edges of the sheet metal
for the cable passage (if necessary)
Leak-tight seal for the cable passage (if necessary)
2.4
(x1)
(x1)
3
3.1
3.2
Packet of documents
Installation manual
Instructions for use
(x1)
(x1)
(x1)
4
Command unit
(x1)
• Check the contents of the package.
9.2
9.2.1
Recommendations before installation
Design of the heating circuit
The heat emitters may be either low temperature (underfloor
heating, etc.), or medium temperature (warm radiator, etc.).
b
We recommend that you provide sufficient flow for the
temperature difference between flow and return to
be equal to 7 C for a underfloor heating and 15 C for
radiators.
The route of the piping will be designed to take all measures necessary to avoid air pockets and facilitate the permanent venting
of the installation. Vents must be provided at each high point of
the pipes, and on all the radiators.
b
Always leave a radiator open.
9.2.2
Design of the heat pump circuit
Installation pipework must be designed and installed to ensure
venting of air from the system is possible.
b
Ensure that the water flow rate of the water circuit
corresponds to the nominal water flow rate of the
appliance (see ¨Technical data¨ chapter).
• Install the following components on the rear section of the
heat pump:
- a filter,
- a ¼ shut –off valve on each side of the filter,
- a drain valve,
- an air separator (if necessary)
- a sludge deposit (if necessary).
• Install a ¼ turn shutoff valve in the flow of the heat pump.
i
In order to avoid the transmission of vibrations to
surrounding structures, use flexible hoses for the
hydraulic connections at least 1 metre from the heat
pump.
b
Insulate the pipes with a UV- and hightemperatureresistant insulation.
9.3
9.3.1
We recommend installing a drainage valve at the lowest point of
the installation.
Dimensions
Envirosorb 7
326
In the case of the use of thermostatic valves, it is imperative not
to fit to all radiators, taking care to fit these valves in rooms with
high input and never in rooms where the room thermostats are
installed.
908
- If it is an old installation, it is essential to rinse the radiator
circuit before installing the new appliance and to add an antisludge filter.
- If a component of the system is not to be installed
immediately, protect the various connections so plaster
and paint cannot compromise the seal on the subsequent
connection.
• Install the following components on the heating circuit return:
- a heating filter,
- 2 quarter-turn shut-off valves (1 each side of the filter),
- an air separator (if necessary),
- an anti-sludge filter (if necessary).
• In the case of a underfloor heating, install a security device to
prevent overheating, with manual reset (55°C) on the heating
circuit flow. Connect the overheating security device to the
glycol pump of the heat pump.
821
150
600
150
0020117819_01 - 05/11 - Glow-worm
- 15 -
INSTALLATION
9.3.2
Envirosorb 12, Envirosorb 14
9.3.3
Command unit
326
132
908
132
1
2
3
4
5
6
7
27
136
3
9.4
9.4.1
Mounting
Unpacking the appliance
• Carefully remove the packaging and protections without
damaging the parts of the appliance.
150
2
600
3
150
1
1
Key
1
Transport pallet
2
Attachment screws
3
Heat pump
• Remove the screws from the transport pallet at the front and
rear of the unit.
- 16 -
0020117819_01 - 05/11 - Glow-worm
INSTALLATION
9.4.2
i
Transportation of the appliance
With regards to the Manual Handling Operations,
1992 Regulations, the following lift operation exceeds
the recommended weight for a one man lift.
9.5
i
Positioning the appliance
With regards to the Manual Handling Operations,
1992 Regulations, the following lift operation exceeds
the recommended weight for a one man lift.
2
1
1
a
Warning! Two people at minimum are necessary to
move the appliance.
b
Warning! Do not lean the appliance more than
45° during transportation as this may damage the
refrigeration circuit which could lead to a complete
system failure.
i
We recommend that you move the appliance with a
trolley or with suitable handling equipment.
1
Key
1
Concrete block
2
Mounting screw
• Fix the heat pump onto the concrete blocks (1) using the fixing
screws.
If you move the appliance with a two-wheeled trolley, respect the
following regulations:
• Only lift the appliance from the back.
• Attach the appliance to the two-wheeled trolley with a strap.
• Protect surfaces in contact with the trolley to avoid scratching
or damaging the appliance.
• Use a sufficiently solid ramp to lower the appliance from the
pallet.
• Move the appliance to the installation site.
0020117819_01 - 05/11 - Glow-worm
- 17 -
INSTALLATION
10 Examples of installation
10.1
Installation with hydraulic module, control by control unit
4
F
E
3
230V
2
5
1
6
B
H
A
4
L5
1
230V
3
- 18 -
2
0020117819_01 - 05/11 - Glow-worm
INSTALLATION
Key
1
2
3
4
5
6
A
B
E
F
H
(*)
Heat pump
Power supply and electrical protection for the heat pump (*)
Command unit for the heat pump
Glow Worm control unit (*)
Glow Worm hydraulic module (*)
Anti-sludge filter (*)
Flow heat pump circuit
Return heat pump circuit
Return heating circuit
Flow heating circuit
Discharge from the safety valve to a container for recovering glycol
water solution
Not delivered with the appliance
Application conditions
- Command unit used as configuration tool (see the chapter
"Location of the appliance"),
- Installation with underfloor heating (< 53°C) or lowtemperature radiator (<60°C),
i
For the dimensioning of the cables and the electrical
protection on the appliances, see the chapter
"Electrical connection".
Minimum volume of the installation (l)
Max volume of heat pump circuit, without
additional vessel, for a water outlet temperature
of 35°C (l)
Volume of water in the heat pump
Nominal water flow rate (m³/h)
7
28
Envirosorb
12
14
42
49
65
95
95
1.2
1.2
2.3
2.1
2.3
2.5
Adjusting the heat pump's command unit
• To find out the description of each function,
see the chapter "Specific adjustment".
i
Menu
100
101
112
114
117
122
123
124
125
126
146
147
148
155
The setting of codes 112, 114, 117, 122, 123,
124, 125, 126 must be identical on the heat pump
command unit and the systempro control unit.
Name of the function
Type of system regulation
Configuration of the command unit
External calibrated adjustment graphs
ECO heating mode
External calibrated adjustment graphs for cooling
Maximum reference exterior temperature
Exterior temperature from which the heat pump stops in cooling mode
Minimum temperature of water in the installation in cooling mode
Maximum temperature of water in the installation in cooling mode
Configurations exterior sensor
Configuration for stopping the heat pump if control by S1 contact input
Configuration of the output between terminal channels 5 and N
Limit exterior temperature (T0)
Functioning of main circulator
Value
Factory setting
2
0
7 - 12 (*)
1 - 20°C (*)
0 (*)
24 - 46°C (*)
0 - 30°C (*)
4 - 20°C (*)
4 - 20°C (*)
2
1
1
-20°C
0
2
0
8
5°C
2
40°C
22°C
4°C
12°C
2
2
1
-20°C
1
(*) Refer to the system installation manual for pairing the settings of these codes.
0020117819_01 - 05/11 - Glow-worm
- 19 -
INSTALLATION
10.2
Installation with hydraulic module, DHW tank, control by control unit
2
3
230V 230V
5
4
F
6.1
E
6
7
6.2
1
9
B
H
A
8
4
6.2
R6.1
L5
8
1
230V 230V
5
2
3
6.1
- 20 -
0020117819_01 - 05/11 - Glow-worm
INSTALLATION
Key
1
Heat pump
2
Power supply and electrical protection for the heat pump (*)
3
Power supply and electrical protection for the booster heating (*)
4
Glow Worm control unit (*)
5
Command unit for the heat pump
6
Domestic hot water tank (option) (*)
6.1 Electrical booster element
6.2 Temperature sensor for hot water tank
7
Glow Worm hydraulic module (*)
8
3-way valve (with return spring) for the domestic hot water tank (*)
9
Anti-sludge filter (*)
R6.1 Additional electrical heater relay
A
Flow heat pump circuit
B
Return heat pump circuit
E
Return heating circuit
F
Flow heating circuit
H Discharge from the safety valve to a container for recovering glycol
water solution
(*) Not delivered with the appliance
b
If the "Domestic hot water tank" option is chosen,
it must be connected electrically to the systempro
control unit (see the installation manual for the
system).
Application conditions
- Command unit used as configuration tool (see the chapter
"Location of the appliance"),
- Installation with underfloor heating (< 53°C) or lowtemperature radiator (<60°C),
- Control unit for the system not included.
i
For the dimensioning of the cables and the electrical
protection on the appliances, see the chapter
"Electrical connection".
Minimum volume of the installation (l)
Max volume of heat pump circuit, without
additional vessel, for a water outlet temperature
of 35°C (l)
Volume of water in the heat pump
Nominal water flow rate (m³/h)
7
28
Envirosorb
12
14
42
49
65
95
95
1.2
1.2
2.3
2.1
2.3
2.5
Adjusting the heat pump's command unit
• To find out the description of each function,
see the chapter "Specific adjustment".
i
Menu
100
101
112
117
122
123
124
125
126
146
147
148
153
155
The setting of codes 112, 117, 122, 123, 124, 125,
126 must be identical on the heat pump command
unit and the systempro control unit.
Name of the function
Type of system regulation
Configuration of the command unit
External calibrated adjustment graphs
External calibrated adjustment graphs for cooling
Maximum reference exterior temperature
Exterior temperature from which the heat pump stops in cooling mode
Minimum temperature of water in the installation in cooling mode
Maximum temperature of water in the installation in cooling mode
Configurations exterior sensor
Configuration for stopping the heat pump if control by S1 contact input
Configuration of the output between terminal channels 5 and N
Limit exterior temperature (T0)
Mode of activation hot-water demand contact S5
Functioning of main circulator
Value
Factory setting
2
0
7 - 12 (*)
0 (*)
24 - 46°C (*)
0 - 30°C (*)
4 - 20°C (*)
4 - 20°C (*)
2
1
1
-20°C
1
0
2
0
8
2
40°C
22°C
4°C
12°C
2
2
1
-20°C
1
1
(*) Refer to the system installation manual for pairing the settings of these codes.
0020117819_01 - 05/11 - Glow-worm
- 21 -
INSTALLATION
• Do not use any solvent products, due to the risk of damaging
the circuit.
• Only use original seals supplied with the appliance.
b
Make sure that mechanical connections are not
overtightened.
b
Insulate the pipes (between the heat pump and the
installation including those underground) with an UVand high-temperature-resistant insulation.
• Insulate all exposed pipework.
12 Discharge of condensate
When the appliance is operational, it will produce condensation
that needs to be drained off.
150
150
37
1
430
2
5
4
600
363
• Take care to clean the pipes before assembly removing any
debris or burrs. Grease and oils may need to be removed they
are not possible to remove by cleansing and flushing. Foreign
bodies in the system may enter the appliance and interrupt its
operation.
• Install the filter on the heat pump return pipe. Install it
between 2 shut-off valves in order to be able to remove if from
the circuit and clean it periodically.
400
11 Hydraulic connection
6
Key
1
Evacuation bend for condensates
2
Holes pre-cut in the base of the heat pump
4
3
2
1
8
7
1m
n.
• Make sure that the condensates evacuation pipe does not
freeze.
mi
key
1
Heat pump flow circuit ¼ turn shut-off valve in the direction of the
building (not included) (*)
2
Return circuit ¼ turn shut-off valve in the direction of the heat pump
(not included) (*)
3
Return circuit hose in the direction of the heat pump (not supplied)
4
Cap
5
Return connection (Ø1 ") to the heat pump
6
Flow heat pump connection (Ø1 ") to the building
7
Flow heat pump circuit hose in the direction of the building (not
supplied))
8
Insulation (not supplied)
(*) To be installed as close as possible to the heat pump
• Remove the protection caps (4) located on the connections.
• Comply with the values given in the table below when making
the hydraulic connections of the heat pump circuit.
Max linear distance (without elbows or
additional pressure drops)
Tubes to be installed
≤ 20 m
¾" or Ø internal = 20 mm
≤ 30 m
1" or Ø internal = 26 mm
• Connect a hose and a shut-off valve to the return connection to
the heat pump.
• Connect a hose and a shut-off valve to the flow heat pump
connection in the direction of the building.
- 22 -
• Install the bend (1) delivered with the appliance and connect it
to an evacuation pipe with an internal diameter of 16 mm (not
supplied).
The discharge capacity of the condensate increases if the pre-cut
holes (2) present in the base are open. Open the pre-cut holes
using a hammer.
i
If you choose to open the pre-cut holes (2) present in
the base, take the necessary precautions to recover
the condensates and stop them freezing.
13 Electrical connection
e
Incorrect installation can cause electric shock or
appliance damage. The electrical connection of the
appliance must be made only by a qualified engineer.
The appliance must be connected directly to an accessible, fixed,
switched, electrical outlet.
The manufacturer declines any responsibility for damages to
persons or others caused by the incorrect installation of the
appliance earthing. This includes failure to comply with current
standards.
Electrical components have been tested to meet the equivalent
requirements of BSEN 7671 and the BEAB regulations.
The cables connecting the installation's electrical panel and the
heat pump must be:
- Suitable for a fixed installation.
0020117819_01 - 05/11 - Glow-worm
INSTALLATION
13.2
- weather resistant.
- equipped with wires adapted to appliance’s power rating.
• Connect the heat pump to an electrical panel via an
independent protection system (differential breaker with at
least 3 mm between each contact). See the table below.
e
Cable passage
The low and mains voltage cables must be inserted in
different sleeves.
Additional protection may be required during installation to
ensure buffer category II.
The power supply cut-off devices must allow complete
disconnection of the power under the conditions required for
over-voltage category III.
Description
Unit
Electricity supply
Acceptable voltage range
Maximum power absorbed
Maximum current
Power fuse (gL)
Maximum current in glycol
pump
13.1
7
12
2
14
V-phHz
V
kW
A
A
207/254
2.7
5.1
5.1
14
23
20
15 Type B 25 Type D 25 Type D
A
2
1
230 - 1 - 50
Key
1
Mains-voltage cable passage
2
Low-voltage cable passage
• Insert the electrical power cables in passages (1) and (2)
provided for this purpose.
• Make sure that the electrical cables are not in contact with the
compressor and the hot pipes.
Access to main board
• Fix the electrical cables with the clamps installed inside the
heat pump.
13.4
1
Electrical wiring
2
A
2
3
C
B
1
A
A
Key
1
Terminal blocks for 230 V and 12 V connection
2
Front panel
• Remove the fastening screws (A).
• Slide the front panel (2) downwards (B) and pull it towards
yourself (B) using the handle.
Key
1
230 V power cable
2
12 V cable
230 V cable (outputs 2A
3
maximum)
Connection cable for the
4
command unit
4
Recommended cable section
H07RN-F 3 x 2.5 mm²
0.75 mm²
0.75 mm²
4 x 0.75 mm²
• To close the appliance, carry out the operations in reverse order.
0020117819_01 - 05/11 - Glow-worm
- 23 -
INSTALLATION
ʎPP
ʎPP
ʎPP
ʎPP
• Attach the electrical cables using the cable pass-through
located in the electrical box in order to ensure good resistance
to pulling (for the 14kW model, use the anti-wrench connector
supplied with the appliance).
13.5
13.5.1
Wiring diagram
Command board 7kW, 12kW, 14kW
1T
1LWT
1TR 1EWT
1FS
1PCB
1PS
Key
1PS
1LWT
1TR
1EWT
1FS
1T
1PCB
- 24 -
Circulator
Flow temperature sensor for heat pump circuit
Temperature sensor for detecting the end of defrost
Temperature sensor for flow of heat pump circuit
Flow detector
Transformer
Command board
0020117819_01 - 05/11 - Glow-worm
INSTALLATION
Board of power 7kW
R
1
2
3
7CM 1
2
3
40CF
W
P04
P05
C
3
1P.C.BOARD
CN300
P06
Y
P25
Y
P23
A
P21
Y
P35
P24
1
1
6
6
C
W
2
CN700
P22
4
2
1
P34
P19
CN502
P11
1
8CM 2
1
41CF
1R
1R
b
1FM
1
42CF
W
3
R
C
45CF
2
1
9CM 2
1
44CF
F7
2
3
P03 P10 P02
C
O
43CF
1
2
3
CN806
1
49CF
1TO
1
3
50CF
1TD
2
1
2
1
51CF
1TE
1
W
C
3R
W
1RV
R
S
C
1
V
C
6CM
P31 P30
P33 P32
2
W
R
R
1
1
CN701
1
1TS
1
2
CN500
CN805
1
48CF
2
CN501
P08
1
3
1
P18
2
1PMV
3
P20
1
47CF
5
CN503
R
46CF
2
2R
1
1F
2
R
1
Y/G
Y/G
1MCC1530
1TB
C
1
N
3
L
N
PE
A
Key
1FM
1PMV
1TS
1TO
1TD
1TE
1RV
1R
2R
6CM
1F
/2.08 / J1.1
/2.03 / J3.1
/2.10 / J4.1
N
L
230V 1~ 50Hz
13.5.2
Fan motor
Electronic expansion unit
Temperature sensor for compressor suction
Exterior temperature sensor
Compressor discharge temperature sensor
Temperature sensor for plate to plate exchanger
4-way cycle inversion gate
Filtering coil 1
Filtering coil 2
Compressor engine
Fuse
0020117819_01 - 05/11 - Glow-worm
- 25 -
INSTALLATION
13.5.3
Board of power 12kW
+
R
R
E'
7CM
4C)
2
3
2
3
W
8CM
4C)
W
P08
2
3
2
3
G
P09
O
A
C
Y
G
P2
P3
P2
P24
P28
P29
B
P9 P20
P7 P8
CN09
CN
CN03
CN3
42C)
2
CN0
3
4
R
1RV
46C)
C
2
CN06
49C)
CN
2
3
4
2C)
P R BW C
O
CN04
2
Y
CN600
C
CN0
PCBOAR'
CN02
1TH
C)
2
1TD
3
1TS
43C)
2
2
CN700
C)
3
4
47C)
2
0C)
CN04
CN0
2
3
4
3C)
CN800
1TO
B
W
R
1TE
6C)
3
2
CN03
2
8C)
3
9C)
2
CN60
CN600
6C)
2
CN604
3
2
CN60
3
C)
W
2PCBOAR'
2
3
CN02
4
CN702
44C)
2
3
4
CN303
6
48C)
2
CN302
3
C)
2
3
CN30
4
4C)
2
3
7C)
R
R
1PVM
1FM
)
L
2
3
4
60C)
O
CN00
O
CN606
C
2
2
2T
1CM
7+ERMO67A7
)ORbCOMPRE66OR
N
C
6
R
R
W
3
N
C
B
A
L
W
Y/G
PE
2FM
C
2
CN300
-4b/b/20
-3b/b/203
-b/b/208
N
9bbabb+]
Key
1RV
1TH
1TD
1TS
1TE
1TO
1CM
1FM
2FM
1PVM
- 26 -
4-way cycle inversion gate
Temperature sensor for the finned heat exchanger
Compressor discharge temperature sensor
Temperature sensor for compressor suction
Temperature sensor for plate to plate exchanger
Exterior temperature sensor
Compressor
Fan 1
Fan 2
Electronic expansion unit
0020117819_01 - 05/11 - Glow-worm
INSTALLATION
13.5.4
Board of power 14kW
1R
2R
1CM
10CM
63CF
1
2
1
2
11CM
64CF
1
2
1
2
R
1
1FM
2
3
V
U
65CF
CN400
(WHITE)
P04
P05
P06
CN200
P07
C
W
W
CN201
CN202
75CF
1
2
3
2FM
2
68CF
1TD
1TO
1TE
1
2
3
CN603
(WHITE)
69CF
1
2
CN602
(YELLOW)
2
F01
T25A,250V~
RY704
F03
T10A,250V~
SW802
70CF
1
L/F
SW803
CN604
(WHITE)
1 2 3 4
1
1
2
3
CN600
(WHITE)
72CF
C
P09
CN601
(WHITE)
CN704
(BLUE)
71CF
1TS
SW800
1 2 3 4
ON
CN610
(YELLOW)
67CF
1TL
SW801
SW804
ON
1
CN609
(BLUE)
1 2 3 4
1
ON
2
CONTROL P.C. BOARD
MCC1571
66CF
2
49C
CN300
(WHITE)
CN710
(WHITE)
1
2
3
4
5
6
CN04
(WHITE)
CN701
(WHITE)
73CF
1
2
3
4
1
74CF
2
3
4
5
P01
6
P02
W
G
R
W
2TB
1
2
1TB
3
L
C
B
A
Key
1RV
1TL
1TD
1TS
1TE
1TO
1CM
1FM
2FM
1R
2R
1PVM
J4.1 / /2.10
N
N
J3.1 / /2.03
J1.1 / /2.08
L
230V 1~ 50Hz
1PVM
R
1RV
4-way cycle inversion gate
Temperature sensor for the finned heat exchanger
Compressor discharge temperature sensor
Temperature sensor for compressor suction
Temperature sensor for plate to plate exchanger
Exterior temperature sensor
Compressor
Fan 1
Fan 2
Filtering coil 1
Filtering coil 2
Electronic expansion unit
0020117819_01 - 05/11 - Glow-worm
- 27 -
INSTALLATION
14 Commissioning
i
At the time of commissioning, complete all relevant
sections of the Benchmark Checklist located on the
inside back pages of this document.
14.4
Heating system test
• Ensure that there is a heating demand to the control unit. In
the case of a multi-zone configuration, perform the test zone
by zone and ensure that the appropriate zone gets warmer.
• Check that the differential breaker is installed.
• Ensure that all the heating circuit’s thermostatic valves are
open.
• Check that the hydraulic and electrical connections are correct.
• Balance the heat emitters, if necessary.
• Check that the filter on the heat pump return is installed.
• Check the airtightness of the connections.
15 Specific adjustment
• Open all the hydraulic circuits’ valves.
14.1
Filling the glycol circuit
b
Warning! Do not dispose of glycol into drains and the
environment.
b
We recommend that you use propylene glycol
enriched with corrosive inhibitors.
• Mix 1 part propylene glycol with 2 parts water. This 30%
mixture ensures antifreeze protection down to an exterior
temperature of -15 °C.
15.1
Adjusting the heating circuit
b
The maximum heating output temperature must be
adjusted in accordance with the characteristics of
your installation.
b
Ensure that the heating curve setting is compatible
with the installation.
b
Make sure that the functioning mode for the boiler's
circulator is not in permanent mode, but synchronised
with heating demand (with the room thermostat).
• Use an antifreeze test kit to ensure accurate dosing.
• Make sure that the hydraulic circuit is purged.
3
2
• In order to drain the glycol circuit after filling, use a fill pump.
4
• Put the heat pump circuit under pressure between 1.5 and 2 bars.
i
1
The level of glycol may decrease during the first month
following the commissioning of the installation. It may
also vary in accordance with the outdoor temperature.
Any residue of glycol solution should be kept in an appropriate
container to be re-used for the next filling.
• Ensure any leftover glycol solution is left with the end user and
retained in a safe place.
14.2
Activating the heat pump
e
Make sure that all the electrical connections have
been made.
b
Make sure that the setting for the maximum temperature
at heating flow is compatible with the installation.
• Position the circuit breaker located on the electrical circuit box
and connected to the heat pump to the ON position.
The main screen for the command unit is displayed.
• See the chapter "Example installation" to enter all the settings
corresponding to your installation.
14.3
Activating the options
• See the instructions for each option to activate them and enter
their settings.
- 28 -
Key
1
2
3
4
Speed I
Speed II
Speed III
Speed selector
• Turn the circulator's speed selector to choose speed I.
• Open all the thermostatic valves on the radiators to the
maximum.
• Adjust the temperature to the maximum on all the room
thermostats in your home.
• Put your installation into service by forcing a heating request
when the circulator should start.
• Wait 10 to 15 min and measure the difference in temperature
between flow and return of the heat pump (temperatures can
be displayed using parameters 137 (return) and 138 (flow)).
The difference should be between 5 and 6°C.
• If the difference is greater than 6°C, select a higher pump
speed or reduce the circuit pressure drops.
0020117819_01 - 05/11 - Glow-worm
INSTALLATION
Envirosorb 7 flow/pressure curves
60
50
40
30
20
10
0
Key
1
2
3
A
B
4
5
6
7
8
9
10
11
12
13
14
A
3
2
1
720
1440
2160
2880
B
Display
Scroll up
Scroll down
Validation
Temperature Night
Temperature Eco
Temperature Comfort
Setting day/time/minute
Programme: time when time interval begins
Programme: choice of time interval
Programme: group of days
15.2.2
i
Speed I
Speed II
Speed III
Available pressure (kPa)
Flow in the circuit (l/h)
Appliance configuration parameters
If the parameters are changed, it is important to leave
the control box connected for at least 10 seconds so
that the change is properly saved.
• Press simultaneously on the button ( ) and (M) for 3
seconds. The parameter number is displayed and its value
blinks.
Envirosorb 12, Envirosorb 14 flow/pressure curves
• Press the button (
80
70
60
50
40
30
20
10
0
Key
1
2
3
A
B
A
• Press the button (M). The value of the parameter flashes.
3
2
) to access the parameter "302".
Description of parameter 302
1
0 = Cooling only
1 = Heating + cooling
2 = Heating only
• Press the buttons (
Setting
Min
Max
0
Factory
setting
2
2
) to modify the value.
• Press the button (M) to confirm the parameter setting.
720
1440
2160
2880
Speed I
Speed II
Speed III
Available pressure (kPa)
Flow in the circuit (l/h)
15.2
15.2.1
B
i
The other parameters 301, 303, 304, 305 and 306
must not be modified.
• Press the button (OK) to exit the menu and validate the
settings.
15.2.3
Parameters set by the installer
This menu lets you enter the settings intended for the final user.
Settings for the command unit
) and (
) for 3
• Press simultaneously on buttons (
seconds. The parameter number is displayed and its value
blinks.
Overall view
• Press the button (M) to access the parameter. The value of the
parameter flashes.
3
5
1
2
3
4
6
5
6
7
1
7
10
) to modify the value.
• Press the button (M) to confirm the parameter setting.
4
2
• Press the buttons (
9
8
11
• Press the buttons (
) to move to the next parameter.
• Perform the previous operations again for the other
parameters.
• Press the button (OK) to exit the menu and validate the
settings.
14 13 12
Key
1
Selection of “standby” mode in the weekly programming
2
Hold the selected temperature or runs the scheduled program
3
Choice of functioning mode
0020117819_01 - 05/11 - Glow-worm
- 29 -
INSTALLATION
Code Function
1
2
3
4
5
6
7
8
9
10
11
12
13
14
15
16
17
18
19
20
21
22
23
Description
Choose the default functioning mode for the heat pump:
0 = Stopped
2 = Cooling
3 = Heating
Function to protect the installation against frost when the heat pump is stopped.
Protection against frost 1 = Deactivated
2 = Activated
Temperature triggering Choose the ambient temperature of the dwelling from which the installation's
protection against frost protection against frost is activated.
This parameter lets you correct the heat pump's temperature setting by
Correction of the
increasing or reducing the temperature of the water in the installation to improve
ambient temperature
the adjustment of the ambient temperature of the room.
This mode lets you reduce the noise emitted by the heat pump (at night, for
example), by reducing the frequency at which the compressor functions.
Silent mode
1 = Deactivated
2 = Activated
Compressor frequency
This parameter defines the percentage reduction of the compressor frequency.
reduction
This parameter displays the current temperature level:
Temperature of the
1 = Temperature Comfort
dwelling
2 = Temperature Night
3 = Temperature Eco
Ambient temperature
This parameter displays the ambient temperature setting when you press one of
setting
the buttons "Comfort", "Night" and "Eco".
This parameter displays the ambient temperature of the room measured by the
Ambient temperature
sensor installed in the command unit.
This parameter displays the rate of humidity of the room measured by the sensor
Humidity rate
installed in the command unit.
Exterior temperature
This parameter displays the exterior temperature measured by the heat pump.
Not used
Correction to the
ambient temperature
This parameter corrects the measurement of the ambient temperature following
(command unit
an error in positioning the command unit.
position)
Choose the number of time intervals available for weekly programming:
Programme time
2 = 2 time intervals
intervals
4 = 4 time intervals
6 = 6 time intervals
"Comfort" heating
Choose the ambient temperature in heating mode for the "Comfort" temperature.
temperature
"Comfort" cooling
Choose the ambient temperature in cooling mode for the "Comfort" temperature.
temperature
"Night" heating
Choose the ambient temperature in heating mode for the "Night" temperature.
temperature
"Night" cooling
Choose the ambient temperature in cooling mode for the "Night" temperature.
temperature
"Eco" heating
Choose the ambient temperature in heating mode for the "Eco" temperature.
temperature
"Eco" cooling
Choose the ambient temperature in cooling mode for the "Eco" temperature.
temperature
Ambient temperature
This parameter displays the ambient temperature of the room where the
setting
command unit is installed.
Displaying fault codes This parameter displays the last occurring fault code.
Fault history
Every 4 seconds, this parameter displays the latest fault codes that appear.
Default functioning
mode
15.2.4
Factory
setting
Modifiable
parameter
0
3
0
Yes
1
2
1
Yes
6°C
12°C
6°C
Yes
-5°C
+5°C
0°C
Yes
1
2
1
Yes
50%
100%
75%
Yes
1
3
-
No
12°C
38°C
-
No
-20°C
50°C
-
No
0
100
-
No
-30°C
90°C
-
No
-5°C
+5°C
0°C
Yes
2
4
6
Yes
12°C
38°C
20°C
Yes
12°C
38°C
24°C
Yes
12°C
38°C
18°C
Yes
12°C
38°C
26°C
Yes
12°C
38°C
15°C
Yes
12°C
38°C
28°C
Yes
12°C
38°C
-
No
-
-
-
No
No
Reinitialisation of parameters
This function is used to reinitialise the control box parameters
(factory settings).
b
Setting
Min
Max
The return to factory settings is irreversible. All the
personalised settings of the control box will be lost.
• Press the 2 buttons (
) and (M) for 10 seconds.
When selecting for the first time, the figure 999 appears in the
temperature display area and the figure 10 appears in the time
display area.
• Hold down the ( ) button until 0 is displayed on the screen.
The message “FD” is displayed in the temperature area.
The control box then restores the factory default parameters.
• Restart the entire system to complete the restore.
- 30 -
0020117819_01 - 05/11 - Glow-worm
INSTALLATION
15.2.5
After-sales service parameters
This menu lets you make adjustments to the following functions
according to the appliances connected, and reset all these
parameters.
• Press the buttons (
• Press simultaneously on button ( ) and ( ) for 3 seconds.
The parameter number is displayed and its value blinks.
• Perform the previous operations again for the other
parameters.
• Press the button (M) to access the parameter. The value of the
parameter flashes.
• Press the button (OK) to exit the menu and validate the
settings.
• Press the buttons (
Code Function
100
Type of system
regulation
101
Configuration of the
command unit
102
103
104
105
106
107
108
109
110
111
Updates to the
command unit
software
Version of the
command unit's
software
Test modes
Reset the counter
for the circulator
functioning time
Configuration of
the output between
terminal channels 4
and N
Humidity rate
threshold
Configuration of
the output between
terminal channels 11
and N
• Press the button (M) to confirm the parameter setting.
) to move to the next parameter.
) to modify the value.
Description
1 = Not used
2 = Regulation with system of management by contact
3 = Not used
4 = Not used
5 = Not used
6 = Not used
7 = Not used
0 = Command unit used as configuration tool
1 = Not used
2 = Not used
Setting
Min
Max
Factory
setting
Modifiable
parameter
1
7
2
Yes
0
2
0
Yes
This parameter displays the latest update to the software that is made on the
heat pump's command unit.
-
-
-
No
This parameter displays the version of the heat pump's command unit software
-
-
-
No
By activating these various test modes, you can trigger special functions on the
appliance.
0 = No test
1 = Force the circulator
2 = Force output between terminals 5 and N (code 147)
3 = Force output between terminals 4 and N (code 106)
4 = Force output between terminals 11 and N (code 108)
5 = Force output between terminals 12 and N (code 156)
6 = Force the 3-way gate
7 = Not used
8 = Not used
0
9
0
Yes
This parameter resets, to zero, the functioning time counter for the heat pump's
circulator.
000
(no)
165
(yes)
000
(no)
Yes
1
2
1
Yes
20%
100%
50%
Yes
1
2
2
Yes
0°C
6°C
0°C
Yes
000
(no)
165
(yes)
000
(no)
Yes
-
-
-
No
Configuration of the booster heating
1 = Command booster heating
2 = Not used
This parameter defines the humidity rate threshold from which the dehumidifier
is switched on.
Configuration of dehumidifier
1 = Not used
2 = Dehumidifier command
This parameter defines the temperature level of the installation's water from
Threshold for protection
which protection against frost is activated. This threshold corresponds to the set
against frost
temperature to which you should add 3°C.
Reset the counter
This parameter resets, to zero, the functioning time counter for the heat pump's
for the compressor's
compressor.
functioning time
This parameter lets you check the state of the water flow detector
Status of water flow
1 = Sufficient water flow detected
detector
0 = No water flow or insufficient flow
0020117819_01 - 05/11 - Glow-worm
- 31 -
INSTALLATION
Predefined heating curves (code 112)
60
A
9
10
11
12
-5
0
5
Key
7
8
9
10
11
12
A
B
8
50
7
40
30
20
-20
-15
-10
Code Function
112
114
116
117
10
15
20
Heating graph n°7
Heating graph n°8 (factory setting)
Heating graph n°9
Heating graph n°10
Heating graph n°11
Heating graph n°12
Heating flow temperature (°C)
Exterior temperature (°C)
B
Setting
Min
Max
Description
Predefined heating
curves
ECO heating mode
ECO cooling mode
0 = Personalised graph (see codes 118 to 121)
1 to 6 = Not used
7 to 12 = Pre-defined graphs (see above graphs)
Reduction offset for the installation's water temperature setting in heating mode.
Increase offset for the installation's water temperature setting in cooling mode.
Not used
Factory
setting
Modifiable
parameter
1
12
8
Yes
1°C
1°C
20°C
10°C
5°C
5°C
Yes
Yes
Factory
setting
Modifiable
parameter
Personalised heating curves (codes 118, 119, 120, 121)
A
60
4
50
40
30
20
10
0
-20 -15
1
3
-10
-5
Code Function
118
119
120
121
122
123
124
125
- 32 -
Minimum reference
exterior temperature
Exterior temperature
from which the heat
pump stops in heating
mode
Minimum temperature
of water in the
installation in heating
mode
Maximum temperature
of the water in the
installation in heating
mode
0
2
5
10
15
20
B
Key
1
2
3
4
A
B
Code 118
Code 119
Code 120
Code 121
Heating flow temperature (°C)
Exterior temperature (°C)
Description
Setting codes 118 to 121 is necessary only if code 112 = 0.
Choose the minimum reference exterior temperature for the region where the
heat pump is installed.
Setting
Min
Max
-20°C
10°C
-7°C
Yes
When the exterior temperature reaches the input value, heat pump stops.
Choose the exterior temperature from which the heat pump must stop in heating
mode.
10°C
30°C
20°C
Yes
Choose the minimum temperature of the water in the installation in heating
mode.
20°C
60°C
40°C
Yes
Choose the maximum temperature of the water in the installation in heating
mode.
20°C
60°C
55°C
Yes
Not used
Not used
Not used
Not used
0020117819_01 - 05/11 - Glow-worm
INSTALLATION
Code Function
126
Configurations
exterior sensor
127
Exterior temperature
128
129
130
131
132
133
134
135
136
137
138
139
140
141
142
143
144
145
Temperature of
the cooling circuit
battery
Compressor suction
temperature
Compressor
discharge
temperature
Description
Choose the type of exterior-temperature sensor:
1 = Remote sensor (connected onto terminal block 23 and 24)
2 = Sensor installed on the heat pump.
This parameter displays the external temperature measured by the sensor
installed in the heat pump.
Setting
Min
Max
Factory
setting
Modifiable
parameter
1
2
2
Yes
-
-
-
No
This parameter displays the temperature of the heat pump's cooling circuit battery.
-
-
-
No
This parameter displays the compressor's suction temperature.
-
-
-
No
This parameter displays the compressor's discharge temperature.
-
-
-
No
-
-
-
No
-
-
-
No
-
-
-
No
-
-
-
No
-
-
-
No
-
-
-
No
-
-
-
No
-
-
-
No
-
-
-
No
-
-
-
No
-
-
-
No
-
-
-
No
-
-
-
No
-
-
-
No
-
-
-
No
This parameter displays the functioning state of the heat pump:
0 = Stopped
2 = Cooling mode
Functioning state of
the heat pump
3 = Heating mode
4 = Fault
5 = Defrost mode
Maximum frequency This parameter displays the maximum frequency of the compressor allowed by the
of compressor
heat pump's command board.
Required compressor This parameter displays the compressor frequency required by the heat pump's
frequency
command board.
Real compressor
This parameter displays the real frequency of the compressor variator.
frequency
Counter that times
This parameter displays the number of hours during which the compressor has
the functioning of the
functioned since first activation.
compressor
Capacity of the heat
This parameter displays the capacity of the heat pump.
pump
Return temperature
of the heat pump
This parameter displays the return temperature of the heat pump's circuit.
circuit
Flow temperature
of the heat pump's
This parameter displays the flow temperature of the heat pump's circuit.
circuit
Temperature of
the cooling fluid in
This parameter displays the temperature of the cooling fluid in the plate to plate
the plate to plate
exchanger
exchanger
This parameter displays the state of functioning of the system:
0 = Stopped
1 = Standby mode
2 = Cooling mode
3 = Heating mode
4 = Booster heating functioning
5 = Booster cooling functioning
State of functioning
4 = Nominal heating
of the system
5 = Nominal cooling
8 = Frost protection mode
9 = Defrost
10 = Protection against overheating
11 = Guard interval
12 = System fault
Fault codes
This parameter displays the fault codes for the heat pump.
Version of the heat
This parameter displays the version of the heat pump's software.
pump's software
Update to the heat
This parameter displays the latest update made to the heat pump's software.
pump's software
Counter that times
This parameter displays the number of hours during which the circulator has
the functioning of the
functioned since first activation.
circulator
Temperature setting
This parameter displays the temperature setting for the installation's water
calculated for the
calculated by the command board according to climatic graphs.
installation's water
0020117819_01 - 05/11 - Glow-worm
- 33 -
INSTALLATION
Code Function
146
Configuration for
stopping the heat
pump if control by S1
contact input
147
Configuration of
the output between
terminal channels 5
and N
148
149
150
151
152
153
154
155
156
157
158
Description
1 = Immediate halt (as soon as contact S1 moves into the open position, the heat
pump stops).
2 = Gradual halt (as soon as contact S1 opens, the speed of the compressor
gradually reduces. This configuration is used to delay the shutdown of the
compressor after contact S1 switches to the open position and to limit the number
of compressor cycles per hour to 3.
1 = Unit alarm
2 = Ambient temperature setting reached
Setting
Min
Max
Factory
setting
Modifiable
parameter
1
2
2
Yes
1
2
1
Yes
This parameter defines the exterior temperature that is the functioning limit and where
the heat pump stops. In this configuration, only the booster heating functions. See the -20°C 65°C
-20°C
chapter "Configuring the booster heating".
1 = Ambient temperature
2 = Temperature of water leaving the installation
Choice of display in
3 = Temperature of water returning to the installation
the command unit's
4 = Temperature of the cooling fluid in the plate to plate exchanger
1
7
1
temperature zone
5 = Compressor suction temperature
6 = Compressor discharge temperature
7 = Exterior temperature
This temperature defines the external temperature from which the power of the
Exterior temperature heat pump alone is not sufficient to meet the needs of the installation. Below this
30°C -20°C
0°C
bivalence point (T1)
temperature, the booster heating and the heat pump can function together. See
the chapter "Configuring the booster heating".
Delays for switching This parameter defines the period from which the booster heating is switched on
20
1
60
on booster heating
when: T0 < exterior T° < T1.
minutes
This parameter defines the differential between the installation's water
Differential stop/
temperature setting and the water temperature from which the booster heating
1°C
20°C
5°C
start booster heating
switches on when: T0 < exterior T° < T1.
Mode of activation
1 = Always active (demand for hot water is always met)
hot-water demand
2 = Activated only in heating and cooling modes (demand for hot water is met only in
1
2
1
contact S5
heating or cooling mode)
This parameter defines the functioning of the booster heating when: exterior T° < T0.
0 = Continuous functioning
Booster heating
1 = ON/OFF functioning depends on the ambient temperature.
1
2
1
functioning
In case of a thermostat fault, switch to mode 3.
2 = ON/OFF functioning depends on the installation's water temperature.
This parameter defines the functioning mode for the main circulator for an external
temperature < T0 (code 148)
Functioning of main
0 = Stopped
0
2
1
circulator
1 = ON/OFF cycle identical to the booster heating
2 = Continuous operation
Configuration of the output (connection between terminal channels 12 and N)
0 = Not used
Configuration of
1 = ON/OFF cycle identical to the main pump The water pump works continuously
0
2
2
the output between
in case of demand for hot water.
terminals 12 and N
2 = ON/OFF cycle identical to the main pump The pump is halted in case of demand
for hot water.
This parameter defines the functioning mode for the additional circulator for an
external temperature < T0 (code 148)
Functioning of the
0 = Stopped
0
2
1
additional circulator
1 = ON/OFF cycle identical to the booster heating
2 = Continuous operation
Differential on the
This parameter defines the differential on the ambient temperature setting in the
+/+/temperature setting case where the parameter 100 is configured to 4 (regulation with the command
+/- 0.3°C
0.2°C 1°C
from the ambient air unit used as the room thermostat).
Limit exterior
temperature (T0)
Yes
Yes
Yes
Yes
Yes
Yes
Yes
Yes
Yes
Yes
No
16 User information
At the end of the installation, the installer must:
- explain the operation of the appliance and its safety devices to
the user, if necessary provide a demonstration and answer any
questions;
- hand over to the user all the required documentation,
- fill in the documents where necessary;
- 34 -
- advise the user of the precautions necessary to prevent
damage to the system, appliance and the building;
- remind the user to service the appliance annually.
- The user shall not interfere with or adjust sealed components.
- All servicing must be carried out by a competent person
approved at the time by the Health and Safety Executive.
0020117819_01 - 05/11 - Glow-worm
MAINTENANCE
MAINTENANCE
i
Code Description
Any work carried out on the refrigerant circuit must be
conducted by qualified engineers.
The faults described in this chapter require the services
of a qualified professional and, if necessary, a Glow-worm
Groupservice engineer.
17 Trouble-shooting
17.1
Fault diagnosis
The following checks should be performed before proceeding
onto specific diagnostics:
10
Outside air temperature greater than the maximum in heating
(parameter 119)
11
Air temperature higher than the maximum value for heating
12
Outside air temperature greater than the maximum in cooling
(parameter 123)
14
Loss of compressor signal
15
Heat pump outlet temperature sensor fault (n°14)
17
Outside air temperature sensor fault (n°2)
18
Protection against short-circuits in G-Tr variator
20
Error in controlling the position of the compressor rotor
21
Error in current variator sensor
22
Fin exchanger (n°4) or compressor intake (n°6) temperature
sensor fault
23
Compressor outlet temperature sensor fault (n°23)
• Make sure that the electricity supply has not been interrupted
and that the appliance is connected correctly.
24
Outside fan fault
26
Other outside faults
• Ensure that the isolating valves are open.
27
Compressor blocked
• Check that all external controls are connected correctly.
17.2
Fault codes
i
17.2.1
The faults described in this chapter should be
carried out by a qualified engineer or a Glow-worm
Groupservice engineer.
Fault codes accessible from the install menu
When the symbol “a” blinks at the bottom left of the control box,
the appliance has a fault. You should access parameters 22 (last
fault code) and 23 (history of last 4 faults) on the installer menu.
) and (
) buttons for 3
• Simultaneously press the (
seconds, the parameter number is displayed and its value
blinks.
• Press the buttons (
) until parameter 22 or 23 is displayed.
• Press the (M) button to access the parameter, the value of the
parameter blinks.
• Press the (
28
Compressor outlet temperature error
29
Compressor breakdown
30
Low pressure switch
31
Over-pressure valve
17.2.2
Specific faults shown on the control box main
screen
The faults listed below are identified directly on the control box
main screen.
Fault
Description
Control box ambient
temperature sensor
fault
In the case of an anomaly in the temperature
sensor measurement, the temperature
display is replaced by “--“.
Control box ambient
humidity sensor fault
In the case of an anomaly in the humidity
sensor measurement, the ambient humidity
display is replaced by “--“.
Control box EEPROM
fault
If the control box non-volatile memory
(EEPROM) is defective, the code “E4” is
displayed in the control box temperature
display area. If the power is cut after this
fault is displayed, the installer and aftersales parameters will be restored to their
default values and the installation-specific
parameters will be erased. This fault can
result in poor operation of the installation. In
the case of an “E4” fault, replace the control
box.
Communications fault
If communication between the control box
and the heat pump control circuit board
is disturbed, error “E3” is displayed in
the ambient temperature display area. In
this case, check the communication cable
between the control box and the heat pump.
) buttons to modify the value.
• Press the (M) button to confirm the parameter setting.
• Press the (OK) button to exit the menu and confirm the settings.
• Refer to the “Hydraulic and refrigerant schematic” chapter to
identify the sensor positions.
Code Description
3
Heat pump return temperature sensor fault (n°15)
4
Pre-regulator temperature sensor fault (n°18)
5
Remote outside air temperature sensor fault
6
Loss of communication with the command unit
7
Control box ambient air temperature sensor fault
8
Power matching fault between the electronic control circuit board
and the appliance
9
Water flow rate (n°10) or circulator pump (n°11) sensor fault
0020117819_01 - 05/11 - Glow-worm
- 35 -
MAINTENANCE
18 Servicing
19 Replacement of Parts
To ensure the continued efficient and safe operation of the
appliance it is recommended that it is checked and serviced as
necessary at regular intervals. The frequency of servicing will
depend upon the particular installation conditions and usage.
• Do not use reconditioned or copy parts, only use original parts
supplied by Glow-worm.
• Servicing/maintenance should be carried out by a competent
person approved at the time by the Health and Safety
Executive in accordance with the rules in force in the countries
of destination.
• Please quote the name and serial number of the appliance,
this information will be on the data plate on the side of the
appliance.
• To obtain service, please call your installer or Glow-worm’s
own service organisation.
• After servicing, complete the relevant Service Interval Record
section of the Benchmark Checklist located on the inside back
pages of this document.
b
IMPORTANT: any action carried out on the refrigerant
circuit must be performed by qualified authorised
personnel.
The refrigerant fluid contains gases that, when released into the
atmosphere, may affect the environment by depleting the ozone
layer, contributing to the greenhouse effect and an increase in
temperature. The risk of leakage cannot be excluded for devices
intended to operate for many years and subject to the effects of
the environment.
• See the "Safety instructions" chapter for a list of operations to
be performed prior to the maintenance of the application.
• Once the maintenance operations have been completed,
consult the ¨Start Up¨ chapter to restart the appliance.
Annual Maintenance
• Check the proper functioning of safety devices.
• Check the pressure of the water system.
• If a part is required, contact the Glow-worm service organisation.
• If in doubt seek advice from the local gas company or
Glowworm’s own service organisation.
a
19.2.1
e
Replacement of parts must be carried out by a
competent person approved at the time by the Health
and Safety Executive.
Mains supply cable
The main supply cable must be replaced by a
qualified and competent electrician.
• If the main supply cable is damaged, replace it refering to the
chapter "Electrical connection".
20 Spare parts
In order to guarantee the safe and prolonged life of the product,
manufacturers genuine spare parts must be used.
i
This appliance displays a CE Mark of conformity. Only
use the manufacturer’s genuine, new spare parts.
• Ensure that spare parts are correctly mounted in the right
position and direction. After fitting any spare part or servicing,
the appliance must be tested for its safe operation.
• Check that there are no traces of rust or oil around the cooling
circuit’s components.
• Ensure that the appliance’s components are neither worn nor
broken.
• Check that the wires are firmly attached to the electrical
terminals.
• Check the appliance’s earthing.
• Check the starting temperature of the heat pump and the
adjustment points.
• Check for any ice in the compressor.
• Remove any dust from the power supply.
• Clean the air / refrigerant battery and make sure that air
circulates between the fins and around the unit.
• Check that the fan rotates freely.
• Check the pressure of the expansion vessel.
- 36 -
0020117819_01 - 05/11 - Glow-worm
AIR TO WATER HEAT PUMP COMMISSIONING CHECKLIST
This Commissioning Checklist is to be completed in full by the competent person who commissioned the heat pump and associated equipment as a means of
demonstrating compliance with the appropriate Building Regulations and then handed to the customer to keep for future reference.
Failure to install and commission this equipment to the manufacturer’s instructions will invalidate the warranty but does not affect statutory rights.
Customer Name
Address
Telephone Number
Heat Pump Make and Model
Heat Pump Serial Number
Commissioned by (print name)
Certified Operative Reg. No. [1]
Company Name & Address
Commissioning Date
Telephone No.
Building Regulations Notification Number (if applicable) [2]
CONTROLS - SYSTEM AND HEAT PUMP Tick the appropriate boxes if applicable
1. Time & Temperature
Control to Heating
Room Thermostat &
Programmer/Timer
Programmable
Roomstat
2. Time & Temperature
Control to Hot Water
Load/Weather
Compensation
Optimum Start
Control
Cylinder Thermostat &
Programmer/Timer
Combined with Heat
pump main controls
3. Heating Zone Valves (including underfloor loops)
Fitted
Not Required
4. Hot Water Zone Valves
Fitted
Not Required
5. Thermostatic Radiator Valves
Fitted
Not Required
6. Heat Pump Safety Interlock [3]
Built In
Provided
7. Outdoor Sensor
Fitted
Not Required
8. Automatic Bypass System
Fitted
9. Buffer Vessel Fitted
Yes
Not Required
No
If YES,
Volume
Litres
ALL SYSTEMS
The heating system has been filled and pressure tested
Yes
Expansion vessel for heating is sized, fitted & charged in accordance with manufacturer’s instructions
Yes
The heat pump is fitted on a solid/stable surface capable of taking its weight
Yes
The system has been flushed and cleaned in accordance with BS7593 and heat pump manufacturer’s instructions
Yes
What system cleaner was used?
What inhibitor was used?
Qty
Is the system adequately frost protected?
Yes
litres
OUTDOOR UNIT
Are all external pipeworks insulated?
Yes
Is the fan free from obstacles and operational?
Yes
Has suitable consideration been made for waste water discharge?
Yes
CENTRAL HEATING MODE
Heating Flow Temperature
DOMESTIC HOT WATER MODE
°C
Heating Return Temperature
°C
Measure and Record
Is the heat pump connected to a hot water cylinder?
Hot water has been checked at all outlets
Yes
Unvented
Vented
Thermal Store
Not Connected
Have Thermostatic Blending Valves been fitted?
Yes
Not required
ADDITIONAL SYSTEM INFORMATON
Additional heat sources connected:
Gas Boiler
Oil Boiler
Electric Heater
Solar Thermal
Other
ALL INSTALLATIONS
The heating, hot water and ventilation systems complies with the appropriate Building Regulations
Yes
All electrical work complies with the appropriate Regulations
Yes
The heat pump and associated products have been installed and commissioned in accordance with the manufacturer’s instructions
Yes
The operation of the heat pump and system controls have been demonstrated to the customer
Yes
The manufacturer’s literature, including Benchmark Checklist and Service Record, has been explained and left with the customer
Yes
Commissioning Engineer’s Signature
Customer’s Signature
(To confirm demonstration of equipment and receipt of appliance instructions)
Notes: [1] Installers should be members of an appropriate Competent Persons Scheme. [2] All installations in England and Wales must be
notified to Local Area Building Control (LABC) either directly or through a Competent Persons Scheme. A Building Regulations Compliance
Certificate will then be issued to the customer. [3] May be required for systems covered by G3 Regulations
© Heating and Hotwater Industry Council (HHIC)
www.centralheating.co.uk
Service Record
It is recommended that your heating system is serviced regularly and that the appropriate Service Interval Record is completed.
Service Provider
Before completing the appropriate Service Interval Record below, please ensure you have carried out the service as described in the
manufacturer’s instructions.
Always use the manufacturer’s specified spare part when replacing controls.
Service 1
Date:
Service 2
Date:
Engineer Name:
Engineer Name:
Company Name:
Company Name:
Telephone No.
Telephone No.
Operative ID No.
Operative ID No.
Comments:
Comments:
Signature:
Signature:
Service 3
Date:
Service 4
Date:
Engineer Name:
Engineer Name:
Company Name:
Company Name:
Telephone No.
Telephone No.
Operative ID No.
Operative ID No.
Comments:
Comments:
Signature:
Signature:
Service 5
Date:
Service 6
Date:
Engineer Name:
Engineer Name:
Company Name:
Company Name:
Telephone No.
Telephone No.
Operative ID No.
Operative ID No.
Comments:
Comments:
Signature:
Signature:
Service 7
Date:
Service 8
Date:
Engineer Name:
Engineer Name:
Company Name:
Company Name:
Telephone No.
Telephone No.
Operative ID No.
Operative ID No.
Comments:
Comments:
Signature:
Signature:
Service 9
Date:
Service 10
Date:
Engineer Name:
Engineer Name:
Company Name:
Company Name:
Telephone No.
Telephone No.
Operative ID No.
Operative ID No.
Comments:
Comments:
Signature:
Signature:
Subject to engineering changes
0020117819_01 - 05/11
GLOW-WORM
Nottingham Road,
Belper, Derbyshire.
DE56 1JT
www.glow-worm.co.uk
Because of our constant endeavour for
improvement, details may vary slightly
from those shown in these instructions.