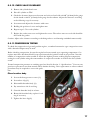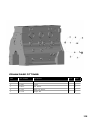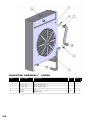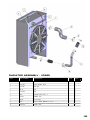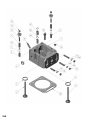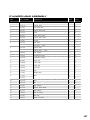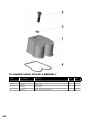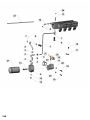
1
© July 2010 1 2 SAFETY PRECAUTIONS 8 BODILY PROTECTION 8 EXHAUST GASES 8 ENGINE FUELS 8 POSITIVE FUEL SHUT OFF 8 SAFETY GUARDS 8 IGNITION SYSTEMS 8 COOLING SYSTEM PRESSURE CAPS AND CONNECTIONS 9 GENERATOR SETS 9 ENGINE AND EQUIPMENT REPAIR AND SERVICE 9 HOUSEKEEPING 9 ENGINE FAN BLADES 10 ENGINE STORAGE CHEMICALS 10 FIRE PROTECTION 10 WELDING EQUIPMENT 11 GROUNDING PRECAUTIONS WHEN WELDING 11 LEAD ACID BATTERIES 11 Precautions When Using Booster Batteries And Cables 11 Negative Grounded Battery or Batteries 11 SODIUM FILLED VALVES 12 Cautions 12 1 Specifications 15 VR260 Specifications 15 VR380 Specifications 17 2 Engine Accessory Specifications 22 2.1 ATB Series Integral Throttle Body Actuator 22 2.2 CD-1 Ignition System 22 2.3 ESD2400 Series Speed Control Unit 23 2.4 L-Series Woodward Controller (Optional) 24 3 Engine Construction 3.1 sectional and exterior views of engine 28 28 3.1.1 Longitudinal Section 29 3.1.2 Cross Section 31 3.1.3 External View (Starter Side) 33 3.1.4 External View (Intake/Exhaust Manifold Side) 35 3.2 Cylinder block 36 subassembly 36 3.3.1 Flywheel 38 3.3.3 Connecting rod 39 3.3.4 Main Bearing 39 3.3.5 Crankshaft 39 3.3.6 Vibration damper 39 3.4 Gear Train 40 3.5 Cylinder head & valve system 40 3.5.1 Cylinder head 40 3.5.2 Valve guide 41 3.5.3 Valve System 41 3.5.4 Valve 41 3 3.6 Fuel Supply System 3.6.1 ESD2400 Speed Control Unit 42 3.6.2 ATB Series Integral throttle body actuator 42 3.6.3 Arrow 100 Carburetor 43 3.7 Ignition 43 3.8 Lubricating system 44 3.9 Cooling System 45 3.9.1 Water pump 45 3.9.2 Water outlet pipe 45 3.9.3 Thermostat 45 3.9.4 Radiator and fan 45 3.10 Intake exhaust system 46 3.10.1 Intake 46 3.10.2 Exhaust 46 3.10.3 Turbocharger 47 3.11 Electrical system (Typical) 48 3.12 Main bolts tightening torque 49 4 Installation 4.1 Cooling System 51 52 4.1.1 Cooling System Design 52 4.1.2 Cooling System Inhibitor 53 4.1.3 Cooling System Installation Recommendations 53 4.2 Fuel system 54 4.3 AIR INTAKE SYSTEM 55 4.4 EXHAUST SYSTEM 55 4.5 FLYWHEEL, HOUSING RUN OUT & CRANKSHAFT ENDPLAY 56 4.6 LIFTING requirement 58 5 Operation 5.1 Preparation before the start 59 60 5.1.1 Filling The Engine With Oil 60 5.1.2 Filling with cooling fluid 60 5.1.3 Attaching Gas Line 60 5.2 Start UP 61 5.2.1 Before Starting 61 5.2.2 Start 61 5.2.3 Quick Trouble Check Chart 61 5.2.4 Break-In Procedure 62 5.2.5 Exercise of Stand-By Unit 62 5.2.6 Engine Warm-Up 63 5.2.7 Governor Speed Setting 63 5.3 stopping the engine 63 6 Maintenance 65 6.1 Time table for Maintenance 4 42 66 6.1.1 Engine Performance Record 67 6.1.2 Fuels 67 6.2 Maintenance Procedures 68 6.2.1 Air Filter 68 6.2.2 Check connection bolt 68 6.2.3 Tighten cylinder head bolts 68 6.2.4 Check and tension the V belt 68 6.2.5 Cooling System 69 6.2.5 Water Pump 71 6.2.6 Lubrication Guide 72 6.2.7 Oil Filter 75 6.2.8 Oil Pump Inlet Screen 76 6.2.9 Valves 76 6.2.10 Check valve clearance 77 6.2.11 Compression Testing 77 6.2.12 MANIFOLD VACUUM TEST 78 6.2.13 Spark Plug Adjustments 78 6.2.15 OIL COOLER Cleaning 79 6.2.16 Adjusting the carburetor 79 6.2.17 Speed Control Unit 79 6.2.18 Integral throttle body actuator 80 6.2.19 Cleaning Intercooler and Turbocharger 80 7 Engine Storage 81 7.1 Storing New Engines 83 7.2 Storing Engines That Have Been In Service 84 7.3 PRESERVATIVE OIL 84 8 PREPARING ENGINE FOR OPERATION AFTER STORAGE 85 9 Wear Limits of Parts of the engine 10 Troubleshooting 87 91 10.1 OPERATING CONTROLS 92 10.2 ELECTRICAL SYSTEM 92 10.3 Cooling System 92 10.4 AIR INTAKE SYSTEM 92 10.5 EXHAUST SYSTEM 93 10.6 GOVERNING SYSTEMS 93 10.6.1 ESD2400 Speed Control Unit 93 10.7 Integral throttle body actuator 97 10.8 Troubleshooting Chart 98 11 Metric Conversions 12 Parts 103 105 Crankcase Assembly 107 Rear Oil Seal Cover Assembly 108 Flywheel Housing Assembly 109 Gear Cover - VR380 111 Gear Cover - VR260 113 Cover plate 114 Crankcase Fittings 115 Crankcase Breather - VR380 117 Crankcase Breather - VR260 119 5 Crankshaft Assembly 121 Fan Assembly 123 Radiator Assembly - VR380 124 Radiator Assembly - VR260 125 Cylinder Head Assembly 127 Cylinder Head Cover Assembly 128 Rocker Arm Bracket Assembly 129 Piston Assembly 130 Connecting Rod Assembly 131 Camshaft Assembly 132 Lubricating Oil Line Assembly 133 OIL Cooling System Assembly 135 Lubricating Oil Pump Assembly 136 Oil Pan Assembly 137 Oil Level Indicator - Optional 139 Alternator and Bracket Assembly - VR380 141 Alternator and Bracket Assembly - VR260 143 Open Unit Air Filter Assembly - VR380 144 Open Unit Air Filter Assembly - VR260 145 ENCLOSED Unit Air Filter Assembly - VR380 146 ENCLOSED Unit Air Filter Assembly - VR260 147 Intake/Exhaust System - VR380 149 Intake/Exhaust System - VR260 151 Ignition, coil and spark plugs 153 Arrow 100 Carburetor 154 Governor 155 Mass Balancer Assembly VR260 Only 156 Starter Assembly 157 Speed Control Unit 158 Control Panel 159 Skids 161 Enclosure 163 Engine Feet 164 eNGINE wARRANTY 6 165 Safety precautions 7 SAFETY PRECAUTIONS The safety precautions written in this manual are published for your information. Arrow Engine Company does not, by the publication of these precautions, imply or in anyway represent that these published precautions are the sum of all dangers present near industrial engines. If you are operating industrial engines it is your responsibility to ensure that such operation is in full accordance with all applicable safety requirements and codes. All requirements of the United States Federal Occupational Safety and Health Administration Act must be met when Arrow engines are operated in areas that are under the jurisdiction of that United States department. Engines operated in countries other than the United States of America must be installed operated and serviced in accordance and compliance with any and all safety requirements of that country which may be applicable. Details on safety rules and regulations in the United States, contact your local Occupational Safety and Health Administration (OSHA.) BODILY PROTECTION Wear OSHA approved bodily sight hearing and respiratory system protections. Never wear loose clothing jewelry or loose, long hair around an engine. EXHAUST GASES Engine exhaust products are toxic and may cause injury or death if inhaled. All engine installations must have an exhaust discharge pipe so that exhaust gases are delivered into the outside air. A closed building or shelter must be adequately vented to provide a steady supply of fresh air. ENGINE FUELS Engine fuels are highly combustible and may ignite or explode. DO NOT SMOKE anywhere near the engine. The natural gas fuel the engine uses is highly explosive and its lubricating oil is flammable. Fuels must be conducted to the engine with proper piping free from leaks and designed to resist breakage from vibration. POSITIVE FUEL SHUT OFF Some means of positive fuel shut off should be provided for emergency use. Pressurized fuels natural gas, liquefied petroleum gas etc. should have another positive shut off valve preferably automatic other than those in carburetor or the gas pressure regulation equipment. It is the final responsibility of the engine owner to ensure that the installation is free from fuel or exhaust leakage and such installation meets all applicable codes. SAFETY GUARDS Engines must be provided with guards to protect people or structures from rotating or heated parts. It is the responsibility of the engine owner to specify or provide such protection. IGNITION SYSTEMS Ignition systems can cause electrical shocks. Avoid contacting ignition units and wiring. The plug will ignite any gas that has accumulated in that cylinder. The crankshaft and driven equipment may rotate possibly causing personal injury or damage to equipment. Gas that has accumulated in the exhaust system may also be ignited. 8 COOLING SYSTEM PRESSURE CAPS AND CONNECTIONS Do not remove the pressure caps while the engine is operating or while coolant is hot. The cooling system is under pressure and severe burns could result from the hot coolant spewing out when the cap is removed. Wait until the engine and coolant have cooled down before removing the radiator or surge tank caps. Always replace weak hoses lines and fittings. GENERATOR SETS The voltage produced by a generator sets is dangerous. Severe, possibly fatal, shock may result from contact. Make sure the generator set is grounded before operation. Be extremely careful when the unit or surrounding area is damp or wet. When servicing any part of the electrical system or making any connections, make sure the main power switch is OFF. Clean or service generator set only when engine is shut down. In case of an accident from electrical shock shut down the generator set at once. If it cannot be shut down, free the victim from the live conductor. Avoid direct contact with the victim. Use a dry board, dry rope or any nonconducting implement to free the victim. If the victim is unconscious, apply artificial respiration and get medical help. Do not operate the generator set with the ammeter circuit open. Voltage dangerous to both equipment and personnel can be generated in an open secondary circuit of a current transformer. If the generator set is stopped by operation of safety devices, do not attempt to operate it until the cause has been eliminated. When the generator set is shut down after operation, disconnect all line switches to all external power load and parallel circuits. ENGINE AND EQUIPMENT REPAIR AND SERVICE Always stop the engine before cleaning servicing or repairing the engine or driven equipment. Place all controls in OFF position to prevent accidental restarting. If possible, lock all controls in the OFF position and take the key. Put a sign on the instrument panel warning that the engine is being serviced. Before restarting, make sure that all tools and other material are removed from the engine and equipment. Proper service and repair are important to the safe, reliable operation of engines and related equipment. The procedures recommended by Arrow in this manual are effective methods for performing service and repair operations. Some of these procedures require the use of specially designed tools These special tools should be used when and as recommended. Anyone who uses a service repair or installation procedure not recommended by Arrow Engine Company must first thoroughly insure that their safety will not be jeopardized by the service methods they select. HOUSEKEEPING Good housekeeping results in a clean, safe work area. An orderly work area with clean walkways and neatly arranged tools and equipment is a major factor in accident prevention. 9 ENGINE FAN BLADES 1. Do not operate the engine with a fan which has been bent, mutilated, modified or in any way damaged. 2. Do not operate the engine if the fan contacts or strikes any engine accessory or the radiator shroud or core. 3. Do not rebalance the fan. Contact the fan supplier if rebalancing is required. 4. Ensure that all bolts attaching the fan are securely installed to a torque specified by the engine or vehicle manufacturer. 5. Install the fan so the word front stamped on the fan faces the radiator. 6. Perform all required maintenance on the subassembly to which the fan is attached, water pump fan drive etc. See operator service manual. 7. Do not modify or substitute any parts of the engine without the approval of Arrow Engine Company. Take special care not to make modifications which will increase the operating speed of the fan. 8. Install the fan only if the engine has been approved for fan installation. Likewise, install a subassembly to which the fan is attached (water pump, fan drive, etc.) only if approved or specified for use on the engine. 9. If the fan or fan drive contains any plastic or rubber component, have the fan and drive inspected by a qualified mechanic after operation at or exposure to excessively high temperatures above 250°F (120°C) air temperature. 10.Replace the fan if indications of excessive corrosion or erosion appear in the fan. 11.For reversible or adjustable pitch fans, make sure the blades are correctly locked in the proper position prior to operation. Also inspect the fan prior to operation to ensure that ice and dirt have not accumulated on the fan to cause potential unbalance of the fan. 12.Be sure all fans, fan drives and belts are properly shielded. ENGINE STORAGE CHEMICALS Preservative oil contains a petroleum distillate which is harmful or fatal if swallowed. Avoid contact with skin. Vapor is harmful and causes irritation of eyes, nose, throat and skin. Use only with adequate ventilation. Avoid prolonged or repeated breathing of vapor. Avoid contact with eyes and clothing. Do not take internally. Keep container closed and away from heat. Always read and observe the CAUTION labels on the containers. Do not destroy the labels on the containers. Generally, heating of preservative compounds is confined to 200°F (93°C) or less. These temperatures are easily reached by placing the preservative container in heated water. If this is done, the container must be vented or opened to reduce the danger of explosion. Direct heating presents a dangerous and unnecessary fire hazard. FIRE PROTECTION Locate fire extinguishers so that they are easily accessible if a fire starts. Carefully maintain records of extinguisher inspection and recharging to ensure the fire extinguishing capabilities when required. Consult your fire extinguisher supplier or insurance engineer for recommendations on the type, size and quantity of fire extinguishers required. Select and post alternate routes of escape from any engine installation. Design installation to meet all applicable fire codes. 10 Use approved cleaning solvents in a well ventilated area. Avoid breathing fumes - some vapors can be fatal. Keep away from open flames or sparks. Do not use gasoline, paint thinners or other highly volatile fluids for cleaning. Always read and observe the CAUTION labels on containers. Do not destroy the labels on he containers. Cleaning solvents can cause various types of skin irritations. WELDING EQUIPMENT Disconnect battery and use proper grounding. GROUNDING PRECAUTIONS WHEN WELDING When using an electric welder on an engine, clip the ground lead as close to the welding site as possible. Putting the ground lead too far from the welding site may result in arcing across the main bearings and fusing them to the crankshaft. LEAD ACID BATTERIES Always disconnect the battery ground connection from batteries before performing any work on the engine or equipment. This will prevent sparks or burns when accidently shorting an electrical connection. Never expose batteries to open flame or electric spark. Battery action generates a flammable explosive gas. Do not allow battery fluid to contact skin, eyes, fabrics or painted surfaces. Battery fluid is a sulfuric acid solution which could cause serious personal injury or property damage. Wear eye protection when working with batteries. Precautions When Using Booster Batteries And Cables Do not attempt to jump start an engine having a frozen battery. The battery may rupture or explode. Before starting examine all fill vents on the battery. If ice can be seen or if the electrolyte fluid cannot be seen do not attempt to start with jumper cables. Batteries should be treated carefully when using jumper cables. The following procedures assist in reducing sparks and explosion hazards always present in both batteries when connecting charged batteries to discharged batteries. Turn off all electrical loads. Remove vent caps and lay a damp cloth over open vent wells of each battery. The charged booster battery or batteries must have the same voltage capacity as the discharged battery or batteries. The positive post is identified by a “+”, pos. and red color and is larger in diameter than the negative post. The negative post is identified by a “-”, neg. and gray color. Negative Grounded Battery or Batteries First, connect one jumper cable from the positive post on the charged battery or batteries to the positive post on the discharged battery or batteries. If more than one battery is connected in series or parallel, connect the jumper cable to the positive post that has the cable leading to the starting motor. Second, connect the other jumper cable from the negative post on the charged battery or batteries to a good ground on the engine. When removing jumper cables always disconnect the ground jumper cable from the engine before disconnecting the other jumper cable. 11 SODIUM FILLED VALVES When handling sodium filled valves, always wear approved safety goggles, a hat or cap, long sleeves and gloves. If refacing of sodium filled valves, do not exert undue force at the grinding wheel as this could crack the hollow valve stem and allow the sodium to escape. Do not handle broken sodium filled valves with bare hands. Sodium or sodium residue can cause severe burns. Sodium burns are of the same nature as caustic burns. Wash burns with large volumes of cold water then neutralize with vinegar. The affected parts should then be treated as a burn and medical attention sought. If a broken valve should ignite, smother the flames in dry soda ash or dry sand. Water, carbon dioxide in any form or carbon tetrachloride should never be used on sodium fires since these materials react violently with hot sodium. The smoke and fumes are irritating, adequate ventilation should be provided and inhalation or contact with the smoke and fumes avoided. Broken sodium filled valves may be stored prior to disposal in moisture free clean oil or kerosene. Unserviceable sodium filled valves must be disposed of in accordance with local state and or federal regulations as applicable. Cautions 1. The operator should familiarize him or herself with the manual before attempting to operate the engine. 2. A new engine will require a 50 hour run-in during which no overload operation is allowed. 3. When cold starting the engine, the speed should be increased slowly. Do not run the engine at a high speed suddenly nor let it idle for an extended period. Do not bring the engine to a dead stop after running it under a load - allow the engine to idle for 5 - 10 minutes. 4. If the ambient temperature is lower than freezing (32F - 0C) and no antifreeze is used in the coolant system, the engine should be stopped and the cooling system drained. If the engine is to resume running, the cooling system should be refilled with an antifreeze mixture. 5. Do not run the engine without the air filter. 6. Lubricating oil must be of the proper weight and clean. 7. Assembly and maintenance of the engine must be done by properly trained personnel 8. Check to assure that the coolant and lubricating oil are full before starting the engine. 9. It may take up to one year for the engine to seal the oil retainers. If a retainer or retainers continue to leak after one year, then it will need to be repaired. 12 1 Specifications 13 14 1 Specifications VR260 Specifications Displacement Bore Stroke Speed Range Maximum Continuous Horsepower Normal Oil Pressure Oil Temperature Normal Coolant Temperature Dry Weight Number of Cylinders Compression Ratio Firing Order Number of Main Bearings Engine Length Engine Width Engine Height Crankcase capacity (Including Filter) Valve Clearance, Cold (Intake) Valve Clearance Cold (Exhaust) Flywheel Housing 253 cubic inches (4.2 liters) 4.134” (105mm) 4.724” (120mm) 1,000-1,800 rpm 47 Bhp @ 1,800 rpm 70 psi @ 1,800 rpm (average) 45 psi @ 1,800 rpm (minimum) 180°F (82.25°C) Full Load STD Day 180°F (82.25°C) Full Load STD Day 1,234lbs. (560kg.) 4 9:1 1, 3, 4, 2 5 39 3/8” (100cm) 27 5/16” (69.37cm) 37 3/4” (95.88cm) 13.5 qts. (12.77 l) 0.2mm (0.008”) see page 37 for more details 0.3mm (0.012”) see page 37 for more details SAE 3 15 16 VR380 Specifications Displacement Bore Stroke Speed Range Maximum Continuous Horsepower Normal Oil Pressure Oil Temperature Normal Coolant Temperature Dry Weight Number of Cylinders Compression Ratio Firing Order Number of Main Bearings Engine Length Engine Width Engine Height Crankcase capacity (Including Filter) Valve Clearance, Cold (Intake) Valve Clearance Cold (Exhaust) Flywheel Housing 380.8 cubic inches (6.24liters) 4.134” (105mm) 4.724” (120mm) 1,000-1,800 rpm, 1,000-2,000 intermittent duty 80.4 Bhp @ 1,800 rpm 70 psi @ 1,800 rpm (average) 45 psi @ 1,800 rpm (minimum) 180°F (82.25°C) Full Load STD Day 180°F (82.25°C) Full Load STD Day 1,851lbs. (840kg.) 6 9:1 1,5,3,6,2,4 7 63 1/2” (161.3cm) 28 1/4” (71.75cm) 48” (121.9cm) 20qts. (19liters) 0.2mm (0.008”) see page 37 for more details 0.3mm (0.012”) see page 37 for more details SAE 3 17 VR260 175 170 165 165 160 160 164 I 159 155 150 150 150 145 Torque LB-FT 145 145 C 140 138 135 130 800 65 1,000 1,200 1,400 1,600 1,800 2,000 2,200 2,200 RPM 60 55 50 48.5 47.2 45 43.8 40 39.9 Brake Horsepower 37.8 35 I 44.1 34.4 30.4 30 C 27.6 25 20 15 800 1,000 1,200 1,400 1,600 1,800 2,000 1,000 1,200 1,400 1,600 1,800 2,000 Fuel Economy (BTU/BHP-HR) RPM 12,000 11,000 10,000 9,000 8,000 7,000 6,000 800 RPM 18 VR380 275 269.9 270 266.6 265 267.4 I 260 259.1 258.1 255 250 245.4 Torque LB-FT 245 242.4 240 243.1 241.4 C 235.6 235 234.6 230 800 1,000 1,200 1,400 1,600 1,800 2,000 2,200 2,000 2,200 RPM 120 110 100 81.5 80 72 Brake Horsepower 70 49.3 50 I 80.4 74.1 65.4 60.9 60 55.4 44.9 C 40 30 20 800 Fuel Economy (BTU/BHP-HR) 91.9 88.5 90 9,500 1,000 1,200 1,400 1,600 1,800 RPM 9,000 8,500 8,268 8,000 8,020 8,140 7,956 7,916 7,500 7,000 6,500 800 1,000 1,200 1,400 1,600 1,800 2,000 RPM 19 20 2 Accessory Specifications 21 2 Engine Accessory Specifications 2.1 ATB Series Integral Throttle Body Actuator Performance Maximum Throttle Plate Rotation Power Input Operating Voltage Normal Operating Current Maximum Current - Continuously Rated Environmental Operating & Storage Temperature Range Relative Humidity Salt Spray All Surface Finishes Reliability Vibration Shock Testing Rated Life 65° ±I degree 12 or 24 VDC 2 Amps @ 12 VDC 1 Amp @ 24 VDC 6 Amps @ 12 VDC 3 Amps @ 24 VDC -40° to +200° F (-40° to +95° C) SAE J1455 ASTM B 117-97 Fungus and Corrosion Resistant 25 to 100 Hz, ±4g 20g, 11 msec. 100 % Functionally Tested >40 million cycles 2.2 CD-1 Ignition System Number of Cylinders Power Required Maximum Voltage Output Spark Duration Timing Adjustment 22 1-8 12 VDC, 1.0 Amp 24 VDC, 0.5 Amp 40 KV 300-600 microseconds 8 Position Switch 2.3 ESD2400 Series Speed Control Unit Performance Isochronous Operation/Steady State Stability Speed Range/Governor Continuous Speed Drift with Temperature Speed Trim Range Idle Range Environmental Ambient Operating Temperature Range Relative Humidity (Non-condensing) All Surface Finishes Input Power Supply Polarity Power Consumption Maximum Actuator Current at 77°F (25°C) Speed Sensor Signal Reliability Vibration Testing Physical Dimensions Weight Mounting ± 0.25% or Better I kHz - 7.5 KHz ±%I Maximum ±250Hz Typical <±0-3% Typical -40°F to +180°F (-40°C to +85”C) Up to 100% Fungus Proof & Corrosion Resistant -12; 8-20Vdc, -24; 16-32Vdc (Transient and Reverse Voltage Protected) Negative Ground (Case Isolated) 60mA Continuous plus actuator current 10 Amps Continuous 0.50 VAC - 50 VAC RMS 5G @ 20-500Hz Functionally Tested See Diagram Above 12oz (347g) Any Position (Vertical Preferred) *Reverse voltage is protected against by a parallel diode. A 15A fuse must be installed in the positive battery lead. See Diagram. 23 2.4 L-Series Woodward Controller (Optional) Power Supply Power Consumption Envelope Travel Torque 12/24 V systems (10–32 Vdc) reverse polarity protection 32 W maximum 2.618” x 2.618” x 2.540” (66.50 x 66.50 x 64.52 mm) 60 ±2 degrees Nominal: 0.34 Nm (0.25 lb-ft) Minimum Transient (up to 105 °C): 0.28 Nm (0.21 lb-ft) Minimum Continuous (up to 105 °C): 0.20 Nm (0.15 lb-ft) 425 g (15 oz) PWM (5–32 V, 300–1500 Hz), CAN, or Analog (0–5 V) 0.75 V (full ccw) to 4.25 V (full cw) Optional Run Enable Low side output driver; software configurable Programmable with Windows® GUI software (9927-1222) and harness (8923-1061) Mass/Weight Command Input Position Feedback Output Discrete Input Discrete Output Programming Port Performance Positioning Accuracy ±2% at 25 °C ±4% (analog), ±3.6% (PWM) , ±3% (CAN)—over temp. range Slew Time 10%–90% 33 ms, 1% overshoot, 10 ms settling time Roll-off 32 Hz (–6 dB at ±0.5% Input), 8 Hz (–3 dB at ±2% input) Environment Operating Temperature –40 to +105 °C (–40 to +221 °F) Storage Temperature –40 to +125 °C (–40 to +257 °F) EMC EN61000-6-2: Immunity for Industrial Environments EN61000-6-4: Emissions for Industrial Environments SAE J1113-21: Radiated Immunity (100 V/m) SAE J1113-11: Conducted Transient Immunity – Pulse 5b, Suppressed Load Dump (45 V) Humidity US MIL-STD 810E, Method 507.3, Procedure III Shock MS1-40G 11ms sawtooth Vibration Random: 0.3 G²/Hz, 10–2000 Hz (22.1 Grms) 3 h/axis Sine: 5 G 2.5 mm peak-to-peak, 5–2000 Hz, 3 h/axis, 90 min dwells, 1 octave/min Thermal Shock SAE J1455, Paragraph 4.1.3.2 Fluid Resistance IP56 per EN60529 Compliance CSA Class I, Division 2, Groups A, B, C, D T3C CE Compliant with EMC Directive 89/336/EEC Other Compliant as a component with Machinery Directive 98/37/EC Technical Manual 26237 (standard) or 26289 (w/ CAN) Please consult your Arrow Engine representative for a complete Woodward Instruction Manual. 24 25 26 3 Engine Construction 27 3 Engine Construction 3.1 sectional and exterior views of engine 28 3.1.1 Longitudinal Section 1 2 3 4 5 6 7 8 9 10 11 12 13 14 15 16 17 18 19 20 21 22 Oil Pan Cradle Balancer Strainer Engine Oil Pipe to Secondary Balance Mechanism Oil Gauge Front Cover Lubricating Oil Pump Crankshaft Pulley Fan Crankcase Ventilation Device Water Pump Cylinder Head Rocker Arm Valve Cover Intake Valve Exhaust Valve Piston Cylinder Liner Connecting Rod Rear Oil Seal Cover Flywheel Flywheel Housing 29 30 3.1.2 Cross Section 1 2 3 4 5 6 7 8 9 10 11 12 13 14 15 16 17 18 19 20 Oil Pan Strainer Secondary Balance Mechanism Engine Body Crankshaft Camshaft Tappet Push Rod Exhaust Manifold Intake Manifold Rocker Arm Cylinder Head Cover Intake/Exhaust Valve Cylinder Head Piston Connecting Rod Dip Stick Lubricating Oil Filter Oil Pressure Safety Valve Drain Plug 31 32 3.1.3 External View (Starter Side) 1 2 3 4 5 6 7 8 9 10 11 12 13 14 15 16 17 18 19 20 21 Air Cleaner Pre Cleaner Carburetor Electronic Governor (GAC) Control Panel Ignition Valve Cover Spark Plug Wire Coil Crankcase Breather Alternator Fan Secondary Oil Pressure Safety Switch Engine Oil Cooler Lubricating Oil Filter Oil Pan Drain Plug Oil Pan Electric Starter Solenoid Governor Control Box (GAC) Flywheel 33 34 3.1.4 External View (Intake/Exhaust Manifold Side) 1 2 3 4 5 6 7 8 9 10 11 12 13 14 Fan Intake Manifold Exhaust Manifold Exhaust Magnetic Pick-Up Sensor Oil Pan Crankcase Breather Tube Sensor Timing Pickup Crankshaft Pulley Belt Water Pump Lube Oil Filler Coolant Inlet Coolant Outlet 35 3.2 Cylinder block subassembly Cylinder block subassembly consists of the cylinder block, liner, gear case, rear oil seal cover, flywheel housing and oil sump 1 Gear case front cover 2 Cylinder block 3 Cylinder liner 4 Flywheel housing 5 Rear oil seal cover 6 Main bearing cap 7 Oil sump 8 Seal strip 9 Seal plate When A structure is adopted, coat seal glue on D joint face. When B structure is adopted, coat seal glue on both D and E joint faces. Cylinder block is made of high strength cast iron for strength and rigidity. The VR260 has 4 cylinders and 5 main bearings, while the VR380 has 6 cylinders and 7 main bearings. The thrust ring is fitted on the first main bearing on the flywheel end. The main bearing cap is tightened by M14-10.9, the torque is 51.63 ft. lbs. (70Nm) and then the cap is turned for an additional 90°. Tightening order is shown in fig 2. First tighten the main middle bearing then tighten the bearing on both ends. For the camshaft bearing holes in cylinder block, only the last one (free end) is fitted with the bronze camshaft bushing. There are two holes in the bushing - one of them is aimed at the oil hole in the cylinder block, the other should be facing upwards fig 3. The turbocharged engine will have a nozzle for cooling the piston on the right side of the engine body (watching from the flywheel end. 36 The VR260 and VR380 engines uses a wet cylinder liner. In order to guarantee sealing after assembling, there are two rubber seal rings on the upper and lower locating positions of the liner respectively. The lower seal ring is set up in the seal groove on cylinder block and the upper one is set up in the seal groove on the upper end of cylinder liner. Before mounting, coat the seal rings with lubricating grease. See fig 4. When mounting the gearbox cover on the rear oil seal cover, coat the contact surfaces of the cover and cylinder block with Loctite 5910 sealant (or alternative silicone sealant resistant to engine oil and with a good ability to withstand high joint movement.) The gear housing bolts (M88.8) should be tightened to 14.75-18.44 ft. lbs. (20-25Nm.) The both the 4 and 6 cylinder engines use the SAE3 flywheel housing. There is a observation window on the top of the flywheel casing (fig 5) for viewing the graduation on the flywheel and defining the ignition timing. The flywheel is fastened to the cylinder block with (MI0-12.9) bolts tightened to 59±3.69 ft. lbs. (80±5Nm) and (M12-12.9) bolts tightened to 103.26±3.69 ft. lbs. (140±5Nm.) The oil sump has two structural forms: a cast part and a punched steel part. The connecting positions of the oil sump and the cylinder block gear case cover and lower bottom surface of rear seal cover are coated with Loctite 5910. It is fastened with (M8-8.8) bolts. A dust proof plate is fitted between the oil sump and flywheel housing. 37 3.3 Crankshaft and connecting rod ASSEMBLY The crankshaft and connecting rod assemblies primary components are the crankshaft, flywheel, piston, connecting rod, vibration damper and a balancer on the 4 cylinder engine. 3.3.1 Flywheel The flywheel is fitted on the rear end of the crankshaft with six (M16-10.9) bolts which are pre-tightened to 51.63 ft. lbs.. (70Nm) and turned an additional 90°. The scale plate is attached to the side surface of flywheel and crankshaft. See fig 6. When the OT mark on the flywheel aligns with the pointer installed on the flywheel housing, it indicates the upper dead center of cylinders 1 and 6. For some models, the OT top center mark and scale is marked on the flywheel circumference and the inspection window is left on the flywheel side perimeter. 3.3.2 Balancer (VR260 only) The balancer balances the reciprocating inertia force of the piston and the connecting rod subassembly and decreases vibration. The drive gear ring (1) of the transmitting balancer is mounted on the crankshaft it should be heated to 482°F (250°C) when mounting. The “0-0” mark on the gear should be marked, if not already, on the specified position. See fig 7. The mark “1” on the balancing shaft gear (2) of two stage balancing transmitting mechanism should be matched with the mark “1-1” on gear (3) The balancer is mounted on the main bearing cap. When mounting the mark “0-0” on gear ring should be matched with the mark on gear (2) of the balancing shaft. The gear side clearance is 0.00787” (0.2mm). See fig 8. The oil circuit should be unobstructed when mounting so as to ensure the lubrication of the balancer bearing. 38 3.3.3 Connecting rod The connecting rod is mold forged and composed of the connecting rod body, connecting rod cap, small end bushing and connecting rod bolt. The big end is at a 45° angle and the mating face has a 60° tooth. There are two connecting rod bolts (M14 xl.5-12.9.) When mounting, tighten them with a torque of 22.13 ft. lbs.. (30Nm) and then turn 60° once more. Caution: The connecting rod bolt can be used only once. Attempting to re-use it may fracture the bolt leading to damage of the engine or injury. The connecting rod body is machined with the cap and they are not interchangeable. There are mating marks on the body and cap. See fig 9. The connecting rod bearing shell is made of lead copper with a steel back. The alloy surface is plated with a three part alloy. 3.3.4 Main Bearing The main bearing shell is made of lead-copper with a steel back. The alloy surface is plated with a three part alloy. There are oil grooves on the upper half of the bearing shell. The main bearing shell has a spring pin. The lower half of this shell is quad alloy plated (optional.) 3.3.5 Crankshaft The crankshaft is precision ground from a heat-treated steel forging. The crankshaft has flame-hardened main bearing journals which run in steel backed, alloy bearing shells. Connecting rod bearings are of similar construction for maximum serviceability. The timing gear fits tightly on the front end of the crankshaft. Heat the timing gear to 482°F (250°C) and mount it so that the timing gear is aimed at the crankshaft dowel pin. The hub is fitted on the front of the gear with (M16-10.9) bolts and torqued at 177.01±7.37 ft. lbs. (240±10Nm) or (M16-12.9) bolts torqued to 221.27±7.37 ft. lbs. (300±10Nm.) Lubricate the face of the crankshaft and mount the crankshaft front oil seal between the gear case and the hub. You may also press the timing gear case and crankshaft directly onto the hub. 3.3.6 Vibration damper The vibration damper and pulley are fitted on the hub which is on the front end of the crankshaft. They are fastened with (Ml0-8.8) bolts at a force of 32.45±3.69 lb. per sq. ft. (45±5Nm) or (Ml0-10.9) bolts may be tightened to 47.94±3.69 ft. lbs. (65±5Nm.) 39 3.4 Gear Train When the piston of the first cylinder (counting from the flywheel end) is at the upper center, mark “0” pn the crankshaft gear corresponding with the mark “0-0” on the camshaft timing gear - see figure 12. Use four hexagon socket cap head M10 * 1.25-12-9 screws to fix camshaft gear tightly on the camshaft. The uneven distribution of bolt holes is used to assure the proper allignment of the cam and the gear mark. Tighten the bolts to 62.69+3.69 ft. lbs. (85+5Nm.) 3.5 Cylinder head & valve system 3.5.1 Cylinder head The VR260 and VR380 have individual cylinder heads incorporating one intake and one exhaust valve each. The intake/exhaust ports are on the same side of the head. There are seat rings on both the intake and exhaust ports. The intake/exhaust valve seat angles are both 45° on the naturaly aspirated engines. The turbocharged engine intake valve seat seat is 60°, while the exhaust valve seat surface is 45°.See fig 13. The width of the valve seat face is 0.055”-0.078”(1.4-2.0mm) on naturally aspirated engines and 0.079’-0.106” (2.0-2.7mm) on turbocharged engines. There are two water outlet ports available - one is on the top face of cylinder head and the other is at the intake exhaust port flange. The relationship of cylinder heads and engines are as follows: Cylinder head part # 12214114-260 15040081-380 40 Water outlet position Intake/exhaust port flange Intake valve included angle 90° Engine structure Natural aspiration air intake pipe and water outlet pipe are integral cast. 3.5.2 Valve guide The valve guides are made of phosphor cast iron with a phosphate coating. Intake valve guide length is 2.283” (58mm), exhaust valve guide length is 2.027” (51.5mm.) The mounting position of the valve guides is shown in fig 13. There are grooves and a rubber seal ring on the inner wall of guide to prevent oil from entering into cylinder. 3.5.3 Valve System The valve system is composed of camshaft, tappet, push rod, rocker arm, rocker arm bracket, valve, valve spring and some accessories. The oil inlet to the valve system is shown in fig 14. The oil coming from cylinder block enters into the tappet and the spherical surface of push rod through the ring groove on the tappet, and then into the hollow push rod, the rocker arm adjusting screw, the rocker arm and arm shaft to lubricate the surfaces of the rocker arm and valve. Cold clearance of valve: Inlet valve clearance 0.008” (0.2mm); exhaust valve clearance 0.012” (0.3mm) Coat the surface of camshaft hole in cylinder block with some clean oil before mounting the camshaft. The fan like stop plate for the camshaft should be mounted. The stop plate is secured with two (M812.9) bolts tightened to 40.56±3.69 ft. lbs. (55±5Nm.) Coat the surfaces of the rocker arm and rocker arm shaft with some oil when mounting. The rocker arm bracket is fixed with a (Ml0-8.8) bolt tightened to 29.5±3.69 ft. lbs. (40±5Nm.) Lock up the rocker arm adjusting screw (M9xl) with a nut at 14.75±3.69 ft. lbs. (20±5Nm.) 3.5.4 Valve All valve rods are chrome plated. Valves for the turbocharged engine are made of different materials than those used in the naturally aspirated engine, and they must not be interchanged. After the cylinder heads are mounted on the cylinder block, all intake/ exhaust flanges must be on one plane to ensure the sealing of the intake/exhaust manifold. Cylinder heads are secured with four (M1412.9) bolts coated with oil (please do not use molybdenum disulfide.) The bolts should be tightened according to the sequence in fig 15 three times in turn. First, tighten up to 22.13 ft. lbs. (30Nm), then turn the bolts an additional 120°, and then turn the bolts through another 120°. Caution: The cylinder head bolt will be elongated by 0.00787”-0.0236” (0.2-0.6mm.) If the length from the end of the bolt to the support face is up to 6.31” (160.5mm), the bolt must be changed. 41 3.6 Fuel Supply System 3.6.1 ESD2400 Speed Control Unit The speed control unit is located in an enclosed box on the side of the flywheel housing. Basic electrical connections are illustrated in the above diagram. Actuator and battery connections to terminal F, G, H, and J are #16 AWG (1.3 mm sq.) or larger. Long cables require and increased wire size to minimize voltage drops. The battery positive (+) input, Terminal F, is fused for 15 amps, as illustrated. Magnetic speed sensor wires connected to Terminals D and E are twisted or shielded for their entire length. The shield is insulated to insure no part of the shield may come in contact with the engine ground so that no stray speed signals are introduced into the speed control unit. 3.6.2 ATB Series Integral throttle body actuator The Actuator is located on the side of the carburetor, on the top of the intake manifold. The ATB SERIES integral throttle body electric actuator is designed to control the air/fuel mixture to the engine. The actuator is used to control the engine by working in tandem with the carburetor. The design baseline for the ATB SERIES incorporates fast response, multi-voltage usage, and proven reliability to allow for efficient and more precise control. The ATB SERIES actuator directly drives the throttle plate. Two internal return springs provide for a normally closed valve for fail-safe operation. This insures that the throttle plate returns to the minimum fuel position when the actuator becomes de-energized. ATB SERIES actuators are also designed to accept system battery voltages of either 12 or 24 VDC and are available with a throttle position feedback sensor. 42 ATB Series actuators are proportional electromagnetic devices designed for precise, efficient metering of airflow to a gaseous-fueled engine. When coupled with a speed control unit and speed sensor, a basic closed-loop governor system is established. Operation of this closed loop governor system is as follows: The magnetic speed sensor, mounted strategically on the engine, will generate real-time electrical pulses, which are directly proportional to engine RPM. The electronic speed control unit monitors these pulses and compares them to a preset engine speed setting. If these pulses differ from the preset engine speed setting, the speed control unit will initiate a calculated response. This response is an increase or decrease in current flow to the actuator, which in turn changes the throttle plate’s positioning. As the throttle plate’s position changes, the amount of air and fuel is increased or decreased as necessary to cause the engine speed to return to the preset engine speed setting. The throttle plate’s shaft rotation is proportional to the amount of actuator current and is counterbalanced by the internal return springs. The ATB SERIES design uses steel, precision grade radial ball bearings to provide low friction support to the throttle shaft. Therefore, no maintenance is necessary. The results are a rapid, proportional response to actuator positional changes and outstanding reliability. 3.6.3 Arrow 100 Carburetor The VR 260 and VR380 use the Arrow 100 carburetor which is suitable for use with natural gas or liquefied petroleum gas (LPG.) It is a demand carburetor which will allow only the amount of fuel to flow into the engine that the load demands. The Arrow 100 carburetor is structurally simple, consisting of a main body with a conventional butterfly throttle valve and a diaphragm operated gas metering valve. The amount of air going to the engine is measured by an airflow measuring valve. This valve rises in direct proportion to the air volume passing through it. The gas metering valve is mechanically fixed to the air metering valve. As the air rises, the gas valve rises with it, thus opening the gas passage proportionally to the amount of air entering the engine. This establishes and hold a definite fuel/ air ratio throughout the engine operating range. 3.7 Ignition CD1 is a capacitor-discharge, electronic microcircuit based ignition system for 1 to 8 cylinder industrial engines. It may be powered by either 12 or 24 VDC, and has no moving parts. It works with the step-up coils (one per cylinder.) Engine timing should be set to 24° BTDC. Employing digital circuitry, the CD1 unit processes signal from a magnetic pickup, sensing drilled reference holes or protrusions. This provides accurate and consistent timing referenced directly to the crankshaft or camshaft. The CD1 uses high energy, capacitor-discharge principle which provides maximum engine performance and can extend spark plug life three to five times when compared to an inductive system. Indicating LED’s convey whether proper pickup signals are being received and if the corresponding output signals are correct. 43 3.8 Lubricating system The schematic diagram for lubricating system: The lubricating system consists of the strainer, oil pump, oil cooler, oil filter and pressure limiting valve. The strainer is the intake opening of the oil pump. The connection between the strainer and the inlet of oil pump is sealed by an O ring and special attention should be taken to avoid leakage during installation of the connector otherwise the air sucked into the oil pump will influence oil supply and may result in serious damage to the bearings and engine. The oil from the oil pump enters into the filter seat which has a safety valve opening pressure of 78-109psi (540 - 750kPa.) The oil will be vented to the oil sump when the pressure of oil pumped from the oil pump exceeds the opening pressure value of the safety valve. There are sockets on the filter seat for the pressure sensor and oil cooler. The oil cooler is connected in series with the oil filter at the filter seat. The oil enters the oil cooler from filter seat through the oil filter and returns to the filter seat and then enters the main oil passage. Each finned oil cooler has nine cooling chips. The spin on oil filter may only be used only once. In the lubricating system, pressure lubrication is adopted for the main bearing, connecting rod bearing, cam bearing, two stage balance mechanism bearing, turbocharger and rocker bearing while splash lubrication is adopted for the connecting rod small end, gear train, piston and cylinder liner. 44 3.9 Cooling System Besides becoming kinetic energy to do work, the heat energy produced by the fuel burning in the combustion chamber also heats up the cylinder head, liner, and so forth. Coolant is used to prevent the engine from overheating. Schematic drawing of the cooling system 3.9.1 Water pump The VR260 and VR380 engines uses a centrifugal type water pump. The vortex passage of water pump is at the intermediate gasket. The water pump is integrated with the intermediate gasket and mounted at the front end face of cylinder block. The cooling water enters into cylinder block through intermediate gasket. The impeller diameter of water pump is 3.38” (86mm.) 3.9.2 Water outlet pipe The structure of water outlet pipe has two structural components: one is the welded part and the other is the cast part connected with intake manifold. The water outlet of the cylinder head is located at the flange surface of the intake and exhaust ports and the built in thermostat inside the water outlet pipe. There is a vent pipe (ø0.23” [ø6mm]) at the top of the water outlet. This pipe should be connected with the expansion tank or the upper cavity of the radiator. This allows gas in the cooling system to be released and thereby prevent the water from overheating due to air resistance. 3.9.3 Thermostat The VR260 and VR380 use an outboard thermostat. The thermostats opening temperature is 167°F (75°C.) When the outlet temperature of the cooling water is lower than the opening temperature of the thermostat, the cooling water enters into the water pump via the outlet for minor circulation of the thermostat and the temperature of the cooling water is quickly raised to reach the water temperature which the engine needs for normal operation. When the temperature of outlet water is higher than the opening temperature, the thermostat opens fully allowing entirely or partially cooled water to enter the cooler and be cooled before it goes on to the water pump. 3.9.4 Radiator and fan The sheet metal fan is mounted on water pump. Suction and pusher fans are available for all models. 18.35” (466mm) 21.25” (540mm) 23.6” (600mm) VR260 VR380 VR380TA (turbocharged) 45 3.10 Intake exhaust system This system includes air cleaner, intake manifold, exhaust manifold, exhaust, muffler, turbocharger and intercooler (when present) and connecting pipes. 3.10.1 Intake The intake air for the engine should be clean, therefore the intake air must be filtered and resistance in the intake pipeline should be as absolutely minimal. A dry type paper element air cleaner is supplied with the engine. An alternative air filter may be use depending upon the dust content of the ambient air at the installation site. The dry type paper element filter usually has a primary filter, (that can make the air produce a swirling flow) paper cartridge and safety element as well as an auto dust extracting valve or exhaust arresting device installed after the primary filter to remove the dust from filtering. The resistance of the air cleaner should not be too great: the allowable max resistance under normal operating conditions is 0.43psi (3kPa) and that under overload conditions is 0.75psi (5kPa.) There is a maintenance indicator mounted at the vent port of air cleaner. The red signal indicates that maintenance or replacement should be take place very soon otherwise the performance and service life of the engine will be impacted. When mounting the air cleaner and connecting pipe, users should pay special attention to its proper sealing. An inadequately sealed air filtration system can lead to greatly increased oil consumption, crankcase blow-by, decreased engine power and black smoke in the exhaust. When the filter loses its effectiveness the engine becomes subject to early wear and considerable shortening of its service life. Inadequate sealing may even cause serious wear of the cylinder liner and piston ring, breakage of piston ring as well as cylinder scuffing. The intake manifold of the engine is cast by aluminum alloy. Where the intake manifold is mounted to the cylinder head, a compound material gasket is used. The stainless steel gasket should be mounted with its convex surface facing to the cylinder head. The tightening torque for the nuts on the intake manifold is 33.19±3.69 ft. lbs. (45±5Nm.) 3.10.2 Exhaust The VR260 and VR380 engines use a unitary exhaust manifold. The joint between exhaust manifold and cylinder bead is sealed with a stainless steel gasket the convex surface of which should face to the cylinder head. The torque for tightening the nuts is 33.19±3.69 ft. lbs. (45±5Nm.) The exhaust resistance should be as small as possible therefore the exhaust manifold must have sufficient diameter or area and with as few bends as possible because the performance of engine will be influenced if the exhaust resistance exceeds a certain value. The combined resistance of the exhaust main and muffler should not be more than 1psi (7.5kPa.) In order to lower the surface temperature of exhaust manifold, the exhaust manifold should be wrapped with heat proof material, covered with armor plate and have a “High Temperature - Caution” sign. Because of the very high surface temperatures of the rear exhaust pipe, muffler and expansion joint, external protection measures should be provided. The exhaust gas of the engine contains nitrogen oxides and carbon monoxide, among other impurities that may be present in wellhead gas. These exhaust gases can be harmful or fatal when inhaled - the exhaust should be properly vented to minimize exposure to people and other animals. 46 3.10.3 Turbocharger The Turbocharged VR 380 engines use a radial flow type exhaust gas turbine turbocharger (12270137). Oil for the turbocharger comes from the mail oil duct and returns via the lower part of the engines crankcase. Turbochargers operate at high speed and temperature. To prevent damage to the turbocharger, start and run the engine for 3-5 minutes with no load before gradually adding load. Do not stop an engine running at high speed and/or load - gradually reduce the load and speed for 5-10 minutes before stopping the engine. If the turbocharger is removed or replaced, apply some clean engine oil to the oil inlet before securing. The exhaust-driven turbine and its attached compressor are not connected to the working parts of the engine in any physical manner with the exception of the exhaust and intake manifolds and the oil lines. The turbocharger will not be troubled by gear train, belt, or other mechanical drive engine troubles. Moreover, since the supply of hot gases under high velocity supplied to the exhaust turbine is a reflection of the engine speed and load, the turbocharger output is closely matched to the engine air requirements. The high speed compressor driven by the exhaust turbine provides additional air for the combustion process and thus materially boosts the power output of the engine. The exhaust back pressure is actually very slight since it is the velocity of the gas and its unused energy that is put to work. The turbine or driving member of the unit is made of a special heat resisting alloy. It is surrounded by a housing which directs the flow of exhaust gases onto the turbine blades. On the opposite end of the same shaft, which supports the compressor, the precision-made aluminum alloy impeller operates within a surrounding diffuser housing. Both turbine and compressor turn at the same speed. The full load speed of the two units together with their shaft is approximately 90,000 rpm. For this reason, these parts must be in a close to perfect balance as possible. Not even the slightest filing, scraping, sandblasting, drilling, cleaning or repair procedure that could conceivably remove or add metal can be permitted. A very small amount of unbalance can cause severe damage at the speeds involved. The possibility of excessive muffling or unusually restrictive exhaust pipe installations should always be considered when checking turbocharger efficiency. In general, the turbocharger is an effective muffling device. When additional muffling is required, contact your distributor or Arrow Engine. Intercooler The intercooler is used to reduce the intake air temperature after it passes through the turbocharger. The air is cooled by at least 108-122°F (42-50°C.) The VR380 uses an air-air type intercooler mounted on the front of the radiator. 47 3.11 Electrical system (Typical) 48 3.12 Main bolts tightening torque NAME OF BOLT SPECIFICATION Cylinder head bolt M14-12.9 M14-10.9 Main bearing bolt M14-10.9 Connecting rod bolt M12-1.5-12.9 Fastening bolt of the mounting gear at the oil injector camshaft M18-1.5 M14-1.5 M16-10.9 M16-12.9 M16-10.9 M14-1.5 M12-1.5 M14 M12-12.9 M12-10.9 M10-12.9 M10-10.9 M12-8.8 M10-10.9 M10-8.8 M10-10.9 M8-10.9 M10-10.9 M10-8.8 M10-1.25-10.9 Durlok M8-12.9 M10-10 M10-8.8 M10-8.8 M9-1 Durlok M8-12.9 M8-8.8 M8-10.9 M8-8.8 M8-8.8 M8 Flywheel pipe Fastening boss of crankshaft boss Fastening bolt of high pressure fuel pipe Fastening bolt of AC generator pulley Fastening bolt of the flywheel housing and other fastening bolt and stud bolt Fastening bolt of the pulley on the boss Fastening bolt of hydraulic pump Fastening bolt of the dampener Tightening bolt of the camshaft gear and the fastening bolt of camshaft gear and fuel injection pump gear Tightening nut of intake pipe and exhaust pipe Fastening bolt of two stage balancing mechanism Construction bolt of rocker arm support Adjusting nut of rocker arm Fastening bolt of oil pump and the stud bolt with self locking nut Fastening bolt of oil pan hexagon cylinder head bolt for bearing the oil pan Fastening bolt of cylinder head housing Fastening nut of oil injector Fastening support for tightening the oil injection pump delivery valve MAXIMUM TIGHTENING TORQUE Ft. lbs. (NM) Pre-tighten with a torque of 22.13 (30Nm,) turn 120°, then again turn 120° Pre-tighten with a torque of 51.63(70Nm) turn 90° Pre tighten with a torque of 22.13(30Nm,) turn 60° 81.13(110Nm) 73.76(100Nm) 217.58(295Nm) 228.64(310Nm) 184.39(250Nm) 18.44(25Nm) 18.44(25Nm) 29.5(40Nm) 106.95(145Nm) 88.51(120Nm) 62.69(85Nm) 47.94(65Nm) 66.38(90Nm) 51.63(70Nm) 36.88(50Nm) 47.94(65Nm) 25.81(35Nm) 51.63(70Nm) 36.88(50Nm) 66.38(90Nm) 44.25(60Nm) 36.88(50Nm) 29.5(40Nm) 33.19(45Nm) 18.44(25Nm) 29.5(40Nm) 18.44(25Nm) 25.81(35Nm) 18.44(25Nm) 11.06(15Nm) 11.06(15Nm) 27.29(37Nm) 49 50 4 Installation 4 Installation 51 4.1 Cooling System 4.1.1 Cooling System Design Premature engine component failures and abnormal operating and maintenance conditions can often be traced to improper design or sizing of radiators or other coolers. Arrow Engine Company will not be responsible for engine or component failure when the following cooling system design and application recommendations are not followed. Our recommendations for specifying a radiator or other cooler design for continuous duty operation: 1. Use 180°F (82.23°C) engine water outlet temperature. On compressor applications, use 180°F (82.23°C) engine water outlet temperature to agree with A.P.I. Standard 11K. 2. Base water flow and temperature rise across radiator core or cooler on jacket. 3. Pressure drop through radiator core or cooler with full water flow at rated speed must not exceed 3 to 5 psi (20.68 - 34.47kPa) 4. Allow 15% reserve for variations in application and environmental conditions, i.e., wind direction, dirt and debris. This is in addition to normal design fouling factors. 5. When possibility of using 50-50 solution of ethylene glycol exists, radiator core or cooler area should be sized 15% larger since there is a 15% reduction in heat transfer coefficient for ethylene glycol when compared with water. 6. Select radiator or cooler for highest ambient temperature that will be experienced in operation. For radiators, allowance must be made for air temperature rise across engine with pusher fan, or in engine room, if suction fan is used. 7. Radiators and surge tanks must have 10 psi (69 kPa) pressure caps. 8. Provision must be made for de-aeration of coolant, such as divided top tank or separate surge tank. 9. Provision must be made for balance line connection to engine pump suction to prevent pump cavitation. 10.Adequate expansion volume for complete cooling system must be provided in radiator or separate surge tank. 11.Maximum back pressure feeding into radiator or cooler should not exceed 5 psi (34.47 kPa) at 1,800 RPM. 12.Maximum inlet head to jacket water pump is 20 feet (6.069M) of water. Our recommendations for specifying a radiator or other cooler design for intermittent or standby operation: (Same as for continuous duty operation, except...) 1. Use 200°F (93.34°C) (instead of 180°F [82.23°C]) engine outlet temperature. 2. Allow 5% instead of 15% reserve for variations in application and environmental conditions. Recommendation for specifying a radiator or other cooler design for torque converter application: When the engine cooler is used for cooling a torque converter in addition to the engine, the core or cooler surface should be at least 30% larger than the core required for the engine alone. 52 4.1.2 Cooling System Inhibitor To prevent rust when using water alone, either use a recommended corrosion preventive or inhibitor or add one ounce (29.57ml) of soluble oil for every gallon (3.785l) of coolant in the cooling system. 4.1.3 Cooling System Installation Recommendations After the cooler installation is completed and prior to filling the cooling system, clean all dirt and welding spatter from low points in the system. Flush accessible sections of the piping and cooler to eliminate as much dirt as possible prior to operation of the engine. After filling the system, check closely for leaks. Tighten all clamps and fittings prior to engine start up to avoid loss of time at start up. The following installation suggestions are offered to improve cooling system performance and make future maintenance easier and less time consuming. 1. Mount all cooling system components, such as water inlet connections, control valves and raw water pumps, with at least enough clearance to permit normal maintenance and removal and replacement of accessories at the front of the engine without major disruption of the cooling system. 2. Use suitable couplings so large portions of the piping and valves and raw water pump complex may be disconnected and moved aside as a unit for engine repair and maintenance. This avoids removal of individual pieces of pipe and working backwards to reach a given threaded connection. 3. Provide convenient drainage points to remove water from both fresh water and raw water systems. 4. Provide easily opened air vents to remove air blocks from cooling system piping and allow immediate priming of system. 5. Mount all belt driven water pumps so belts may be tightened easily while operating. Locate pump couplings and drive pulleys so packing can be removed and replaced without major disassembly or pump removal. 6. Keep the system clean 7. Avoid electrolysis; use zinc anodes or other cathodic protection. 53 4.2 Fuel system Generally, natural gas is supplied by utility owned lines that run to the installation site. The major components in the natural gas fuel system are the regulators, piping and the carburetor. Pressure regulators are designed to control the pressure of the gas as it enters the engine. Through an arrangement of a diaphragm and springs, the pressure of the natural gas coming to the engine is lowered and controlled. This supplies a constant steady supply of gas to the carburetor. There are two types of pressure regulators in the fuel system: a high pressure line, or “Big Joe”, regulator mounted near the main fuel line, and a low pressure engine regulator. The line regulator brings the pressure in the lines leading to the engine regulator to 5-10 psi (.35 - .70 kg/cm2). The engine regulator sets the gas pressure to the carburetor at 5” + ½” (127 + 13 mm) of water column (less than 1 psi). From the engine mounted regulator the gas flows into the carburetor. Air is mixed with the gas, and it flows into the engine to be burned. Gas pressure to this engine regulator must be 5-10 psi (.35 - .70 kg/cm2). Low gas pressure will starve the engine of fuel and reduce engine output. High pressures could damage the regulator, allowing excessive fuel to flood the cylinders. This could lead to detonation and serious engine damage. It possible, avoid fueling any gas operated equipment off of the supply line between the line regulator and the engine regulator. The supply pressure to the engine could be disrupted. If there is no way to avoid such an installation, add a second line regulator close to the engine and increase the pressure from the first line regulator by 10 psi (.70 kg/cm2) to compensate for the pressure loss. Regulators must be spaced according to the inner diameter of the pipe used. For a general rule of thumb, the maximum allowable distance between regulators is eight times the pipe ID. [For example, with a 2” pipe, the maximum distance between the regulators is 16” (406.4 mm)]. Regulators must be mounted in an upright position. The maximum pressure drop across a line regulator is generally 50-75 psi (3.5-5.3 kg/cm2). Consult the regulator manufacturer for specific information. 54 4.3 AIR INTAKE SYSTEM Huge quantities of combustion air are required for all internal combustion engines. Combustion air requirements for the VR260 and VR380 engines may be obtained from your Arrow sales engineer. The following factors must be considered to ensure an adequate clean supply of combustion air for internal combustion engines... 1. Combustion air required for engines installed in heated and/or air conditioned buildings may upset heating and ventilating calculations unless it is supplied via an external air intake. 2. If an external air intake is required, it must be suitably designed to supply intake air of the proper temperature range (high intake air temperature results in power loss while extremely cold intake air may hinder starting of automatic standby units.) An external air intake must also prevent pick up of exhaust gas materials or exhaust from other industrial equipment prevent pick up of flammable vapors and prevent entry of rain and water. 3. All ducting, as well as air cleaner to manifold connections, must be airtight to avoid the intake of unfiltered air. 4. Restriction of the air intake system must be kept to a minimum. Restricted inlets, sharp or numerous bends and undersized ducting will all decrease air flow to the engine. 5. Engine heat radiation will affect ambient air temperatures in building installations. Properly located intake and exhaust fans will be required in warmer climates or seasons to ventilate engine rooms. 4.4 EXHAUST SYSTEM The huge quantities of combustion air consumed by internal combustion engines must be properly exhausted after combustion occurs. Therefore, every possible provision must be made to minimize restriction with resulting back pressure of an exhaust system. Some of the adverse effects of excessive back pressure are loss of power, poor fuel economy, excessive valve temperatures and engine coolant overheating. If exhaust back pressure is found to be excessive, check for undersized piping, an undersized or inefficient silencer or muffler or excessive bends or restrictions in the exhaust line. Correct any deficiencies. Exhaust pipes must be adequately sized and supported. A condensate trap and drain must be provided at some low point ahead of the engine exhaust manifold. The back pressures caused by overuse of elbows and other pipe bends prohibit their use in a well designed exhaust system. Always use long radius elbows - the radius of the turn should be at least 4-5 times the pipe diameter to prevent exhaust restriction. Multiple exhaust connections to a common header are not recommended as this can result in erratic operation and damage. Sometimes, pulsing effects can set up interferences in a single sight pipe thus making it advantageous in every installation to locate the silencer as close to the engine as possible. Attention must be given to adequate silencing of the engine as unnecessary noise is objectionable and may, over time, damage the hearing of the operator and is a public nuisance. Objectionable noise is unnecessary today with the available mufflers which can be used for silencing. Exhaust flow requirements for the VR260 and VR380 engines may be obtained from your Arrow sales engineer. CAUTION - Maximum distortion of flexible exhaust connector, due to connected exhaust piping is ± ¼ inch (6.35mm) offset and ± ¼ inch (6.35mm) axial deflection. 55 4.5 FLYWHEEL, HOUSING RUN OUT & CRANKSHAFT ENDPLAY Even with the best maintenance, an engine can encounter trouble if such things as proper mounting, alignment with other equipment, flywheel and housing run out and sufficient crankshaft endplay are disregarded in the initial installation or in subsequent relocations of the engine. Although flywheel and housing run out and crankshaft endplay are firmly established within limits at the factory, such things as rough handling or improper installation of power takeoffs or clutches may adversely affect these clearances and lead to serious engine damage. These items should be checked prior to operation. A major factor in obtaining long service life from any engine and clutch or power takeoff assembly is the proper alignment of the flywheel housing, flywheel and pilot bearing bore. Distortion or lack of a common center on either of these parts will set up forces sure to be destructive to bearings, crankshaft, clutch and the driven equipment. In addition, because of normal manufacturing tolerances, when an engine is installed in a mounting formerly occupied by another engine, it is not safe to assume that the drive shaft of the power take off will automatically line up with a coupling located for the previous engine. In such circumstances, either the engine mounts must be shimmed or adjusted or the driven mechanism must be relocated and adjusted a few thousandths to bring the engine drive line from crankshaft bearing to driven shaft coupling into good alignment. Make the following check for flywheel housing bore concentricity: 1. Support a dial indicator in the same general manner as shown and check the runout of the housing bore all the way around. 2. If the flywheel housing is out of alignment, loosen all of the flywheel housing bolts and proceed as follows ... 3. Use a small bar inserted in a bolt hole to correct misalignment until the runout does not exceed 0.008” (0.2mm) total indicator reading. 4. Tighten bolts partially, working back and forth across the housing. Recheck bore concentricity with dial indicator. Relocate the dial indicator as shown to indicate the flywheel housing face. 1. Housing face run out should not exceed 0.008” (0.2mm) total indicator reading. If correction is required, it should be done with a cutting tool mounted on a radius arm and firmly attached to the flywheel. Thus, by rotating the crankshaft by means of a suitable drive, the cutting tool will dress the housing face into a plane in alignment with the camshaft flange. 56 2. When making the above inspection, it is very important not to be misled by end movement of the crankshaft. To prevent this, use a pry bar to bring the shaft into full forward position at each point where the indicator reading is taken. Mount a dial indicator on the flywheel housing as shown and check the runout of the pilot bearing bore. Run out should not exceed 0.005” (0.127mm) total indicator reading. Remount the dial indicator as shown to measure the runout of the flywheel face. Again it is emphasized that each reading must be taken with the crankshaft moved all the way forward to contact the thrust bearing. Unless handling has somehow distorted the wheel or crankshaft flange, maximum runout should not exceed 0.008” (0.2mm) total indicator reading. Measure crankshaft endplay with a dial indicator mounted on the crankcase. Use a small pinch bar to move the crankshaft fully forward. Set the indicator at zero and use the bar to thrust the shaft to fully rearward. Check endplay reading on dial indicator with the tolerance given in Section 9. CAUTION - The importance of correct crankshaft endplay cannot be overstressed. Operation of an engine having insufficient or excessive crankshaft endplay can result in serious damage. Insufficient clearance will prevent proper lubrication of the thrust surfaces causing the main bearings to overheat and lock on the shaft. 57 4.6 LIFTING requirement Inappropriate lifting might damage the engine while moving. It is inappropriate to use a chain and a triangle to sling the engine up. In a triangle sling, the cylinder head bolt and the swinging ring are not kept in a line. The cylinder head bolt could be damaged or even fractured which may eventually lead to the failure of the engine. 58 5 Operation 5 Operation 59 5.1 Preparation before the start The engine should not be started until it is properly installed in its final position. Check for free rotation - if the engine has not been rotated for some time, oil it through the spark plug openings and check for rotation by hand before attempting to start the engine. Any resistance to free cranking should be thoroughly checked out; rust and corrosion can cause the engine to seize. Check the connections for proper battery polarity. Pour acid into dry batteries and assure that the battery plates are covered with solution. Connect the batteries to the control wires. When a dry cell battery is used, the battery should be charged prior to use. 5.1.1 Filling The Engine With Oil The oil must be of the proper weight and clean - see section 6.2.6 Lubricating Guide. 1. Make sure the oil drain plug is installed and properly tightened. 2. Open the oil cap and fill the case with oil until the oil reaches the full level on the dipstick. The oil should be poured through a filter. 3. Making sure that the engine is level, pull and check the dipstick. Fill the oil till it reaches the upper limit marked on the oil dipstick. 4. Replace the oil filler cap. Check the oil level every time the engine is started. 5.1.2 Filling with cooling fluid The cooling fluid is a mix of softened clean water and an anti-corrosive or antifreeze. Please follow the antifreeze manufacturers recommended process and quantities. NOTE: Frequent water adding and water changing might result in encrustation. Leaking of the cooling system should be repaired as soon as possible Add clean soft water if at all possible and avoid changing the cooling fluid if possible. The cooling fluid drained from the water tank may be recycled after being filtered through fabric and a fine mesh. Fill the cooling fluid into the water inlet of the radiator or heat exchanger and discharge the air of the cooling system. Refer to section 6.2.5 for more detailed information on the cooling fluid. The cooling fluid level must be checked every time the engine is started. 5.1.3 Attaching Gas Line When starting the engine for the first time, purge air from the gas line. This will clear air and any foreign matter from the gas line and provide fuel for starting immediately. CAUTION - Natural gas is highly explosive. 60 5.2 Start UP 5.2.1 Before Starting 1. Be sure the main clutch, circuit breaker, or other power transmission device is disengaged. 2. Trace through the external cooling system to make sure all control valves are properly opened and the drain cocks closed. Check the coolant level. 3. Inspect drive belts water pump alternator and other equipment. Examine for good condition and correct tension. 4. Make certain all guards are secure on engine and driven equipment. 5. Check the air restriction indicator, if engine is so equipped. Clean air filter element and dust cap if indicator shows red. Check oil bath type air cleaner daily. 6. Check the oil level as indicated on the oil dipstick prior to starting engine. Stop engine and recheck oil level after 5 to 10 minutes of operation at a low idle. Add oil as required to bring level to full mark. 7. If the engine has been standing idle for some time, bar it over by hand to be sure it is free. 8. On the speed control unit, make sure the GAIN, Stability and (if applicable SPEED TRIM CONTROL are set to the mid position. 5.2.2 Start Crank the engine with DC power applied to the governor system. The actuator will energize to the maximum fuel position until the engine starts. The governor system should control the engine at a low idle speed. If the engine is unstable after starting, turn the “Gain” and “Stability” adjustments counterclockwise until the engine is stable. 5.2.3 Quick Trouble Check Chart Check Controls Follow starting steps, re-setting safety controls. Remote or automatic operation engines have special procedures. Check Fuel System Be sure fuel is getting to the engine. Check to assure that the valves are open. Check the possibility of water, rust or pipe scale. Check the Cooling System Check the coolant level and assure that the system is not air locked. Check that the radiator is not blocked by trash, that the shutter is open and the fan is operating. Check that the water valves are open to the heat exchanger. Check the Intake/Exhaust Sys- Check to see if the air filter is dirty and check the air restriction indicator. Make sure the air intem for Blockages take or exhaust outlet is not capped. Check Mechanical Components Check the throttle and governor control linkage for freedom from sticking and interference. Examine the condition and tension of the accessory drive belts. If the cranking speed seems low, check the batteries condition. Check Ignition on Gas Engine See if there is water on the ignition parts and wires. Check for signs of corrosion at the wire terminals or for broken wires. Check to see if the spark plugs poorly gapped or worn out. If these checks do not solve the problem, refer to the Troubleshooting section. 61 5.2.4 Break-In Procedure New or overhauled engines should receive a break-in run. This operation can be performed with the lube oil weight specified in 6.2.6 Lubricating Guide. After a warm up of approximately 30 minutes, proceed with a load and unload cycle. Repeated loading (minimum of half load, maximum full load) with equal idle periods in 5 minute intervals for a period of two hours, results in a rapid break-in and quick seating of piston rings. Never idle for more than 15 minutes during the break in or for the first 100 hours of operation. NOTE: Stand by generator engines should follow this procedure using a load bank. 5.2.5 Exercise of Stand-By Unit It is recommended that a generator set or other stand by unit be exercised once each week. A record should be maintained of performance, incidental servicing and output of both the engine and driven equipment. Always operate the engine long enough to stabilize oil and water temperatures at the normal operating level expected under load. Do not operate under no load conditions for other than very brief periods. Loads of at least one third up to the normal rated capacity are recommended. Ordinarily, an exercise run of one to one and one half hours will be needed to stabilize temperatures. If the engine cannot be loaded it should not be exercised for more than 10 minutes each exercise period. It is recognized that some types of driven equipment cannot be operated without fairly extensive procedures to put them on line. Examples are hospital generators in some types of switching configurations; air conditioning compressors which can only be loaded by changing over to chilled water from heating water circulation; and pumps which are not set up for waste discharge or recirculation. In such cases, weekly exercise periods may have to be reduced, where possible, to operational periods long enough only to prove the engines ability to crank and start or checkout of starting circuitry and safety equipment with the starter disabled. In this event, special attention must be taken to prevent internal corrosion, sticking and gumming of fuel controls and deteriorated starting batteries. In all cases, arrangements should be made to run the engine and driven equipment under load at least every 90 days. Light Load Operation We recommend the following maintenance schedule for VR260 and VR380 engines that are consistently run at 25% or less of the continuous duty rating. This schedule is to be followed in addition to standard maintenance procedures. 1. Maintain engine jacket coolant temperature between 180°F and 190°F (82.25°C - 87.75°C) 2. Air cleaner elements should be checked periodically. Clean and replace as required. 3. At 50 operating hour intervals, run engine at a 50% load or better to clean carbon off valves and pistons. 4. Inspection and overhaul schedule of cylinder heads should be updated to allow for a 25% reduction in hours between servicings. 5. Change lube oil every 500 hours. When operating above 25% of continuous duty rating, follow normal maintenance schedule. When applicable, we suggest running fewer engines per site to increase the load on each engine. 62 5.2.6 Engine Warm-Up Proper engine warm up is important for long engine life. A warm up period allows for an even thermal expansion of engine components. Also, the lubricant warms up and attains normal viscosity during warm up. Oil pressure is also built up assuring proper oil distribution and lubrication of vital engine parts. NOTE: Stand by units that require immediate full load pick up can be equipped to maintain a constant oil pressure and engine temperature. Consult your Arrow distributor for further information. To warm the engine up, run the engine at a medium engine speed with no load. Warm up engine until oil pressure stabilizes and coolant temperature reaches at least 100°F - 120°F (37.78°C-48.89°C.) Caution: If adequate oil pressure is not indicated within 25 to 30 seconds shut the engine down at once and determine the cause. Never operate an engine without adequate oil pressure readings in the hope that a faulty gauge or cold oil is responsible. The problem could be something else and serious engine damage would result. 5.2.7 Governor Speed Setting The Speed set point is increased by clockwise rotation of the “Speed” rotation pot. Once the engine is at operating speed and at no load, the following governor performance adjustment may be made... 1. Rotate the “Gain” clockwise until instability develops. Gradually move the adjustment counterclockwise until stability returns. Move the adjustment one division further counterclockwise to insure stable performance (270°pot.) 2. Rotate the “Stability” clockwise until instability develops. Gradually move the adjustment counterclockwise until stability returns. Move the adjustment one division further counterclockwise to insure stable performance (270°pot.) 3. “Gain” and “Stability” adjustments may require minor changes after engine load is applied. Normally, adjustments made with no load achieves satisfactory performance. A strip chart recorder can be used to further optimize the adjustments. If instability cannot be corrected or further performance improvements are required, refer to the Troubleshooting section. 5.3 stopping the engine Do not try to stop the engine with a full load. Decrease the speed before stopping the engine and let it run idly for another 5 to 10 minutes. . Shut the power off after the engine is stopped Any engine whose cooling fluid does not contain anti freeze must have the cooling fluid drained off after the engine is stopped so as to prevent the engine from being damaged. 63 64 6 Maintenance 6 Maintenance 65 6.1 Time table for Maintenance Regular Maintenance Schedule: WORKING ITEMS OPERATING TIME IN HOURS 1000 ANNUALLY DAILY WEEKLY 250 500 x Check air restriction indicator and clean filter if the indicator is red Check oil and coolant levels x Check fan belts for tension and condition. Make sure guards are secure. Check electrolyte level in battery and fill as required. Inspect terminals for corrosion. A specific gravity of between 1.2501.285 with all cells within 0.010 and 0.015 of each other indicates a well charted battery Clean the air filter element* Check and tension the V belt Clean up the crankcase breather** Spark Plugs - Inspect - gap 0.025” (0.635mm) Replace Change the oil and oil filter element Clean oil cooler Check valve clearance Check anti-freeze concentration Oil system - remove the filter plugs and flush out the entire unit with a suitable solvent. Carburetor - Inspect diaphragm and replace if cracked or deteriorated Lubricate clutch at the manufactures recommended intervals. x x x x x x x x x x x x x * The change should be made earlier in a dusty location. Wet air filter should be cleaned at least every 200 hours. ** Only under circumstances where the crankcase ventilation mechanism does not intake the air. If the engine does not operate for weeks, it must be sealed up. See Section 7. Maintenance Schedule for Standby Usage. TIME PERIOD Every month 6 months After 12 months 66 REQUIREMENT Trial running with load - see section 5.2.10 If the running time does not reach 500 hours after 6 months, carry out the required maintenance. If the running time does not reach 1000 hours after 12 months, carry out the required maintenance. 6.1.1 Engine Performance Record Engine operating information, recorded during regular inspections is necessary to apply proper Preventive Maintenance schedules. Accurate records help control costs by avoiding unnecessary servicing, ensuring needed servicing and provide trend information on the general engine condition. We recommend keeping a record of the following information, selecting items applying to your engine: Hour Meter Reading Tachometer rpm Fuel Meter Reading Engine Oil Pressure Engine Oil Temp Coolant Temperature Gas Pressure at the Carburetor Intake Manifold Vacuum Crankcase Pressure pos/neg Unusual Noise(s) Or Vibration Oil Leaks Coolant Leaks Alternator Output 6.1.2 Fuels Arrow VR260 and VR380 gas engines are designed to burn natural gas. All power ratings are based on natural gas with a heat value of 900 BTU/cu. ft. (LHV) Required fuel conditions: 1. Octane rating of at least 85. 2. Maximum liquid fuel hydrocarbons at the coldest expected engine mounted regulator fuel outlet temperature is 2% or less by gaseous volume. 3. Maximum total orgainic halide content, expressed as chlorine concentration (TOHC1), is 60 micrograms/liter. 4. Maximum permissible free hydrogen is 12% by volume. 5. Maximum solid particle size is 5 microns. 6. No liquid water is permitted at the outlet of the engine mounted fuel regulator at the coldest expected temperature. 67 6.2 Maintenance Procedures 6.2.1 Air Filter Follow the directions attached to the cleaner if any are present. If no directions are visible, examine the cleaner to determine whether it is an oil bath type or dry type. Oil bath cleaners have an oil reservoir which traps the dirt as a thick sludge. Wipe or wash out such accumulations and replenish the reservoir to the indicated level with clean engine oil. Oil in the cleaner should be changed at each engine oil change. Both oil bath and screen type cleaners have a metal wool or mesh through which the air passes. Ordinarily the unit containing this material should be washed clean in a non-volatile cleaning solvent, allowed to drain, then dipped in light oil and allowed to drain again at each cleaning of the filter. An air restriction indicator device mounted in the piping from the circular style air filter serves as positive evidence when air filter service is necessary. CAUTION: Unless the signal is locked in view indicating a clogged air cleaner, it will return to a normal setting upon engine shut down. Normally the element is serviced long before the gauge indicates a need but the operator is cautioned to check the gauge every day while the engine is running. After the element has been serviced, the reset button on the restriction indicator should be depressed to re-set it. The VR260 and VR380 engines use a circular style air cleaner. This style cleaner is has a pre-cleaner built into each assembly. Dirt trapped by this pre cleaner will be collected in a dust cup or the end of the filter. When removing dust cup and filter element, be careful not to spill any dirt on the engine. 6.2.2 Check connection bolt Check the bolts of the engine, generator and intake/exhaust manifold and the connections of bolts and hoses and retighten them if necessary. 6.2.3 Tighten cylinder head bolts Loosen the cylinder head bolts about 1/4 of a rotation when the engine is warm and then tighten with a force of 147.51 ft. lbs. (200±l0Nm) immediately according to the sequence in figure 15. 6.2.4 Check and tension the V belt Press the V belt - if the distortion is more than 3/8”-5/8” (10-15mm) the belt should be replaced. To tighten the belt through the alternator, loosen the bolt (1), pull the alternator outwards, then tighten the bolt and check the belt by hand. 68 6.2.5 Cooling System The cooling water of the engine must be soft water mixed with an anticorrosive (in warmer climates) or anti freeze (in cooler climates.) Anti freeze The cooling system of the bare engine holds about 10 quarts (9.46) of water (12-13 quarts [11.35l12.3l] with a radiator) without provision for other equipment. When adding antifreeze compounds on a percentage basis remember to include the coolant volume of the radiator and other external parts of the cooling system. The following table may be used as a guide. Please refer to the anti freeze manufacturers instructions for the mixing ratio of long acting anti freeze fluid... Glycol content - % Density at 60°F (15.6°C) Radiator Glycerine (GPA) Boiling point Freezing point Min temperature appropriate 25% 33% 1.05 55% 70% 220.1±2°F (104.5±1°C) 10±2°F (-12.2±1°C) -0.4±2°F (-18±1°C) 23°F(-5°C) 14°F(-10°C) 50% 1.074 100% 227.3±2°F (108.5±1°C) -32.8±2°F (-36±l°C) -14.8°F(-26°C) 56% 1.082 100% 230±2°F (110.0±1°C) -49±2°F (-45±1°C) -31°F(-35°C) The concentration of the anti freeze should be checked once every 1,000 hours or once every season. The anti freeze should be changed every two years to avoid corrosion. Anticorrosive agent Never fill the cooling system with only water if the engine is to be exposed to sub freezing temperatures. If it is planned to leave the coolant in the engine at the next shutdown, mix the proper proportion of antifreeze and water before filling the engine. Cooling water The composition of the cooling water is as following: Water quality PH value The content of chloride ion mg/dm3 Content of carbonate mg/dms Content of overall anion mg/dms Degree of hardness when using the anti freezing agent Degree of hardness of the carbonate Degree of hardness when using chemical anticorrosive agent. Note the manufacturers instructions. min 6 5 3 3 0 max 8 5 100 100 150 12 10 69 Thermostat Under normal conditions the heat sensitive thermostat in the water outlet will maintain temperatures within the desired limits. CAUTION: it must be remembered that if the engine is to be operated with the thermostat removed, and this is not recommended except in case of emergency, provision must be made to block off the by pass passage or water will continue to recirculate without passing through the radiator or other external cooling system. Shutters or other means will be required to maintain the temperature at the desired level. Thermostat Removal and Testing Ordinarily, thermostats will seldom need replacement in the field. They should be checked from time to time however and are quickly accessible by removing the thermostat housing at the forward end of the cylinder head. The steps necessary to accomplish this are simply the removal of the water outlet connection hose, and the cap screws securing the housing. Thermostats damaged by corrosion or other causes are not repairable and must be replaced. Thermostats should be tested in hot water for proper opening. A bucket or other container should be filled with sufficient water to cover the thermostats and fitted with a good quality thermometer suspended in the water so that the sensitive bulb portion does not rest directly on the bucket bottom or side. A stove or torch is used to bring the water to a heat range of 180°F (82.2°C) while the thermostat is submerged in the water. Stir the water for even heating. As the temperature passes the 175°F-180°F (79.4°C-82.2°C) range the thermostat should start to open, and should be completely open when the temperature has risen to 200°F-202°F (93.3°C-94.4°C) Lifting the thermostat into the colder temperature of the surrounding air should cause a pronounced closing action and the unit should close entirely within a short time. A large thermostat is used in order to ensure adequate reserve circulation for heavy operation and to pass large volumes of cooling water. Use care to seat the thermostat squarely and concentrically to avoid interference with the thermostatic action. Be certain the thermostat housing seal is in place. Please note that the preceding test applies to the typical water temperature gauge used on Arrow engines. If engines contain special controls, test procedures may be obtained from Arrow Engine Company Customer Service Department. Cleaning the Cooling System When clean soft water is used as a coolant and when the proper inhibitors or antifreeze solutions are used, radiator and cooling passage accumulations will not be excessive. About once each year, however, the engine will benefit if the cooling system is cleaned of sludge and sediment. It is recognized that a number of excellent commercial cooling system cleaners are available ARROW ENGINE COMPANY SUGGESTS, HOWEVER, THAT AN OPERATOR CONSIDERING THE USE OF SUCH A CLEANER FIRST INVESTIGATE ITS POSSIBLE REACTION WITH THE COPPER AND BRONZE PARTS IN THE ENGINE. If such a cleaner is used, follow the manufacturers recommendations carefully. 70 6.2.5 Water Pump The belt driven water pump requires no special packing or attention during its service life. An internal seal used in combination with a permanently lubricated integral ball bearing and pump shaft provides a durable ruggedly constructed water pump. For service purposes, the entire shaft bearing and seal must be disassembled from the pump body and new parts installed. Since an arbor press is required for this purpose, field repairs are not recommended unless such equipment is readily available. The sealing member of the pump consists of a smooth carbon washer riding against a polished surface. NOTE: Change the belt if it is damaged or oily. Treating of waste oil and coolant Both used oil and used anti-freeze are quite toxic. Both should be stored in labeled containers, never mixed with other substances, and sent in for recycling. In the US, each state will have it’s own requirements - for a listing of state and regional regulatory agencies, go to: www.epa.gov/epaoswer/osw/comments.htm or call the EPA RCRA hotline at 1-800-424-9346. Please take care to avoid skin contact or ingestion of either used oil or coolant. 71 6.2.6 Lubrication Guide Lubrication intervals listed are for normal operation and should coincide with other preventive maintenance services, however under unusual conditions, intervals should be shortened if there is evidence of dirt, sludge or breakdown of lubricant. The following precautions should be observed when lubricating the engine. 1. Keep all lubricants in closed containers and store them in a clean dry place away from heat. Always protect the lubricants from dust, dirt or moisture. Keep lubrication equipment clean and ready for use at all times. 2. Before lubricating, wipe surrounding areas clean to prevent dirt or other foreign matter from entering the lubrication system. Use a cloth moistened with solvent to remove any old or hardened lubricants. After lubricating, remove any excess lubricant and wipe any spilled lubricant from parts not requiring lubrication. Lubricating Oils The performance of a lubricant, like that of any manufactured product, is the responsibility of the refiner and producer. Also, the engine operator, to a large degree, controls the oil’s performance, for the operator is the one who must make decisions on oil changes, filter changes, loads, general maintenance and operating conditions. Synthetic lubricating oils are not recommended by Arrow. Service Conditions Oil performance will reflect engine load, temperature, fuel quality, atmospheric dirt, moisture and maintenance. If oil performance problems arise or are anticipated, the oil supplier should be consulted. Extended oil change intervals should be utilized with caution on any engine using highly dispersant oils, The dispersants function by absorption of particles of contaminants; however, when dispersant saturation is reached, these oils tend to “dump out” all of the suspended contaminants in a relatively short period of time. Laboratory analysis will not predict the “dump out” point precisely; consequently, closer operator attention to engine conditions is required when establishing an extended oil change interval. Engines operating with gaseous fuel containing over 30 ppm hydrogen sulfide should use oil compounded to a TBN (total base number) of 8 or higher, so that the oil can adequately counteract the acids formed in the combustion of such fuels. When fuel is burned in an engine combustion chamber, any sulfur it contains is converted to sulfur oxides, which will combine with water vapor to form acids. These acids can cause serious corrosive damage to engine components. The engine oil should be compounded to neutralize thee acids and inhibit corrosion. This is done by building alkalinity into the oil via the additive formulation. The commonly used measure of relative alkalinity is termed Total Base Number (TBN). The higher this number, the greater the reserve alkalinity or acid neutralizing capacity of an oil. 72 Lube oil suppliers will supply information about the TBN levels of their products. An oil analysis program will keep the user informed of the TBN level of his oil in service so that adequate corrosion protection is maintained. Since low operating temperatures promote condensation of acid-bearing fumes in the crankcase, engine coolant temperatures should also be maintained at 185° F. (85° C.) minimum when using such fuels Selecting Oil Viscosity The correct lubricating oil viscosity, often referred to as weight, must be determined with the engine operating under its normal loaded speed and temperature using SAE 30 oil. 1. Start and load engine as described under 5.2 Start Up. 2. After oil and coolant temperatures stabilize, note the temperature of the oil in the oil pan. Use an accurate temperature gauge. Compare this temperature with the following chart. The correct oil viscosity will be found in the right hand column. OIL TEMPERATURES METHOD Oil Pan Operating Temperatures 210°F - 250°F (99°C - 121°C) 160°F - 210°F (71°C - 99°C) 130°F - 160°F (54°C - 70°C) SAE Viscosity Numbers 40 30 20 Engines operating with low oil temperatures - below 160°F (71.1°C) - can be expected to show excessive sludging and wear. Engines operating with high oil temperatures - above 230°F (110°C) - may experience lacquering and ring sticking due to oil oxidation. If oil temperatures cannot be corrected to the normal operating range, more frequent oil changes may help in extending engine life. When the actual operating oil temperature is not known, an estimate of the SAE oil grade to use can be made by assuming the oil pan operating temperature will be 120°F (48.9 ° C) degrees above the ambient air temperature in heavy duty service. For example, at an ambient air temperature of 70°F (21.1°C), estimated oil pan operating temperature would be 190°F (87.7°C). Use SAE 30 as indicated in the above table. NOTE: This is only an estimate since the type of installation determines the amount of air circulation for cooling around the oil pan. Actual oil pan operating temperatures should be measured whenever possible. NOTE: Multi-viscosity oils, 1OW30 for example, should be used only when cold starting conditions make it absolutely necessary. Oil change periods should be reduced by 50% for engines using multi-viscosity oil because multi-viscosity oils may rapidly lose their highest viscosity rating in industrial service. 73 Oil Consumption Oil consumption should range from 0.0005 to 0.004 pounds per horsepower hour as determined by the following formula: LBS HP HR= 1.82 x Quarts of oil used Operating HP x total hours of operation Oil Changes The oil level and condition should be checked prior starting the engine each morning. Replace oil at any time it is plainly diluted, broken down, thickened by sludge or otherwise deteriorated. Remember that some modern oils cannot be judged on the basis of color alone because the additives are intended to hold carbon particles in suspension. The standard filters supplied will not remove these particles. The dark appearance of the oil is not necessarily an indication that the oil should be changed. Whenever oil is changed the filters must be serviced. Oil performance will reflect engine load, temperature, fuel quality, atmospheric dirt, moisture and maintenance. Where oil performance problems arise or are anticipated, the oil supplier should be consulted. Recommended oil change intervals for engines receiving normal maintenance are as follows: Hours 500 200 500 300 For continuous duty operation at continuous duty rating. Clean environment with oil sump temperature of 230°F (110°C) For engines operated in excess of continuous duty rating. For engines operated consistently at 25 or less of continuous duty rating (light load operation). For engines in stand by service. If stand by service is less annually than hourly intervals listed, change oil annually. Extended oil change intervals should be utilized with caution on any engine using highly dispersant oils. The dispersants function by absorption of particles of contaminants; however when dispersant saturation is reached, these oils tend to “dump out” all of the suspended contaminants in a relatively short period of time. Laboratory analysis will not predict the dump out point precisely. Consequently, close attention to engine conditions by the operator is required when establishing an extended oil change interval. When using an engine oil with which you have no previous operating experience, a well monitored maintenance program should be conducted to observe the engines performance and interval condition for the first years usage. This procedure will help in determining if the new oil is compatible to your type of operation. CAUTION - The use of some types of oil, as well as dusty environment, marginal installation, internal engine condition and/or operating the engine with malfunctioning carburetion equipment may require more frequent oil changes. We suggest the lubricating oil be monitored with a good oil analysis program. Contact your local Arrow Distributor for periodic engine maintenance. 74 Oil Change Procedure 3 1. Start the engine and stop it after reaching the operating temperature. 2. Place an oil pan under the engine. 3. Screw out the drainage screw plug, (1), paying attention the seal ring on the screw plug. 4. Drain off all the oil. 5. Replace the screw plug (1) with seal ring Replace the oil filter element. a. Remove the oil filter (2) with band strap wrench. b. Coat some oil on the seal ring (3) and tighten on the new oil filter element by hand. 7. Fill with clean oil up to the full mark on the dipstick. 8. Operate the engine for a few minutes in order to circulate the oil throughout the system. Check the tightness of the new oil filter element while the engine is running. 9. Stop the engine and check to see if any additional oil is required - bring the engine to the “full” mark. Not all oils in every type of engine will give maximum service. Therefore be careful to examine the oil after the first draining to determine whether it is standing up in service. Trial periods of 10 hours are suggested. At the end of such periods make a careful inspection of the oil depth gauge for sludging, frothing and emulsification. Such conditions call for more frequent changes or a different oil. In cold weather operation, low oil temperatures - below 160°F (71.1°C) - are particularly likely to cause sludge formation. Temperature control devices such as curtains or shutters should be used if needed in order to hold the oil temperature around 180°F (82.2°C). 6.2.7 Oil Filter Full flow filters are an integral part of the lubrication system. Never block off the filter even temporarily when running the engine. ALL OIL GOING TO THE ENGINE MUST PASS THROUGH THE FILTER. For this reason it is very important when changing oil that the element be changed and the filter parts thoroughly washed to prevent clogging or blocking of the oil flow to the engine. Where filter neglect or an unusually rapid accumulation of sludge clogs the filter element the engine will be starved of oil. It is very important to remember that the dirty oil that brought about the filter element clogging is now bypassing the filter and going through the engine itself. Dirty oil may reduce engine life considerably. No particular difficulties are involved in replacing element although for the sake of cleanliness it is suggested that the filter be drained of the accumulation of sludge and oil before removing the element. About once a year, it is good practice to remove the filter plugs and flush out the entire unit with a suitable solvent. At the same time, the by pass valve should be examined for freedom of movement and proper operation. To ensure a clean job without leaks it is important that the filter seal gasket be handled carefully and replaced at the same time as the element. 75 6.2.8 Oil Pump Inlet Screen The inlet of the oil pump is protected by a wire screen designed to protect the pump and engine from the introduction of foreign material. If any indications of low or fluctuating oil pressure appear, it is recommended that the pump screen be very thoroughly washed in a suitable solvent. 6.2.9 Valves Accurate valve clearance settings materially prolong engine life and aid performance. In addition to impairing performance, excessive clearances are detrimental to cams and tappets. On the other hand when clearances are too tight, timing is disturbed and the possibility of burned valves becomes much greater. Valve clearances specified in Section 3.5.3 Cylinder Head and Valve System and on the engine timing plate are for normal room temperatures, NOT FOR HOT ENGINES. The prime consideration during valve adjustment is the accurate positioning of the camshaft in relation to the valve being adjusted. Valve clearance must be set only when the cam follower is on the base circle of the camshaft - that is to say the cam follower must not be on any part of the camshaft lobe. Referring to the below illustration of the cam-lobe relationship, notice that if the cam followers of number three cylinder are at the transition point (between closing exhaust and opening intake) the number two followers will be on the base circle. Conversely, when number two is at the transition point, number three is on the base circle. The same relationship holds true for all complimentary cylinders as shown. When setting the valve clearance, it is permissible to start at any cylinder as long as the complimentary cylinder is placed at that valve transition point. The least confusing method is to start at number two cylinder and then proceed in the firing order, which in this case is 1-3-4-2 for the VR260 and 1-5-3-6-2-4 for the VR380. The best way to determine this transition point is to slowly rotate the engine crankshaft until both push rods of the complimentary cylinder can be rotated by hand after the exhaust valve closes. In summary, put cylinder three in the valve transition position and set the intake and exhaust valve clearance on two. Put cylinder four in the valve transition position and set cylinder one until all valves are set to specified tolerance. Refer to the following section for valve setting procedures. 76 6.2.10 Check valve clearance 1. Remove the cylinder head cover. 2. Place #1 cylinder at TDC. 3. Check the clearance between rocker arm and valve rod end with a 0.008” (0.2mm) feeler guage for the intake or 0.012” (0.3mm) feeler gauge for the exhaust. Adjust the clearance according to the following steps if necessary. 4. Loosen nut and adjust the clearance with screw. 5. Holding the position of screw and tighten nut. 6. Repeat steps 1-5 for each cylinder. 7. Replace the rocker arm cover and tighten the screws. The rocker arm cover seal side should be faced with the gasket. Caution: Adjust valve clearance according to the firing order to avoid turning crankshaft unnecessarily. 6.2.11 Compression Testing To check the compression of gas and gasoline engines, a standard automotive type compression tester with a threaded adaptor may be used. Before checking compression, be sure the engine has been warmed up to operating temperature. Gas engines must have the throttle held in open position and the ignition switch in off position. Note the number of compression strokes needed to obtain the highest pressure reading. Repeat compression testing for each cylinder using the same number of compression strokes as used for the first cylinder tested. Normal compression pressures at cranking speed are listed in Section 1, “Specifications.” Uneven compression or pressures lower than normal call for further checking, Valve replacement or other overhaul procedures may be required to correct the problem. Clean breather body 1. Loosen the hexagon nut or screw (1.) 2. Loosen hose clip (2.) 3. Disassemble breather body (3.) 4. Pay attention to the O seal ring. 5. Clean the breather body in solvent. 6. Mount the breather body, replace O seal ring if necessary. 7. Tighten the hose clip (2.) 77 8. Tighten the hexagon nut or screw (1.) 6.2.12 MANIFOLD VACUUM TEST Operate the engine until it is at normal operating temperature. Connect vacuum gauge to the intake manifold and test with engine operating at idle speed with no load. See tables below... GAUGE READINGS ENGINE CONDITION 18”-19” Hg (457-483mm) at Idle Speed (apx.) High and Steady Good Low and Steady Loss of power in all cylinders possibly caused by late ignition or valve timing, or loss of compression due to leakage around the rings. Very Low Manifold, carburetor or cylinder head gasket leak Needle fluctuates steadily as speed increases A partial or complete loss of power in one or more cylinders caused by: a leaking valve, cylinder head or intake manifold gasket leak, a defect in the ignition system or a weak valve spring. Gradual drop in reading at engine idle Excessive back pressure in the exhaust system. Intermittent Fluctuation An occasional loss of power possibly caused by a defect in the ignition system or a sticking valve. Slow fluctuation or drifting of the needle Improper idle mixture adjustment, or carburetor, spacer, or intake manifold gasket leak. 6.2.13 Spark Plug Adjustments Misfiring or erratic operation may be due to faulty spark plugs caused by carbon accumulations and burning of the electrodes. They should be cleaned, inspected and the gaps checked approximately every 250 hours of operation or more often if the engine idles for prolonged periods. After 500 hours, it is advisable to replace the entire set when any spark plug is defective. Deposits on the electrodes and insulator may be removed by commercial abrasive cleaners. Scraping the insulator is not recommended since the resulting scratches increase the tendency of carbon deposits to form. After the spark plug has been cleaned, adjust the gap with a round wire gauging tool to 0.025” (0.635mm) by bending the outer electrode. As the spark plugs will have a tendency to burn the electrodes and widen the gap, it is important that gap be checked whenever the plugs are removed from the engine. Missing at low speeds is very often due to a wide spark plug gap. Examine for cracked porcelain, leakage, burned electrodes, deposits on center insulator, correct gap, good washers and clean threads and seating surface. Remember a plug may appear satisfactory and still miss. NOTE - When replacing spark plugs, use new gaskets. Proper seating of the gasket is necessary for sealing the combustion chamber and transferring heat from the plug. Use spark plug tap to clean 78 threads, allowing for proper heat transfer. 6.2.15 OIL COOLER Cleaning Maintenance of the oil cooler unit on the VR260 and VR380 engines consists largely of periodic cleaning and inspection for clogging, corrosion or an inoperative by pass valve. Improper or fluctuating oil pressure or an undesirable increase in oil temperature may indicate the need for servicing the cooler more frequently. In general, the cooler should be removed from the engine, disassembled and cleaned after each 500 hours of operation. Long service or expediency may make it more practical to replace the inner cooler core with a new unit. All rust and lime deposits should be removed from the water passage area of the cooler at this time The sludge deposits within the cooler core may be cleaned out by several solvents and methods but in all cases it is recommended that cleaning take place as quickly as possible after removing the cleaner from the engine. Ordinarily, a cleaning solvent or a commercial sludge and carbon remover will be effective if pumped vigorously through the cooler plates. Observe fire and safety precautions. 6.2.16 Adjusting the carburetor To adjust the carburetors, take the following steps: 1. Open the gas regulating valve at the carburetor fuel inlet. With the dial cock open, the engine will hit and run. 2. With the engine at desired speed and load, adjust the dial cock so the engine runs the smoothest and easiest, with no knocking, deceleration, or fluctuation of speed. 3. Gradually close the fuel regulating valve at the carburetor inlet to a point where the engine just begins to fluctuate, opening it back up to where the engine just smooths out again. Then open the dial cock all the way. 4. Open the throttle all the way by hand to assure the engine will pick up load without hesitation or missing. If it does not, open the fuel regulating valve to a point where the engine will speed up smoothly. Proper fuel adjustments are important to insure efficient operation, full-rated power, and longest life. 6.2.17 Speed Control Unit The governed speed set point is increased by clockwise rotation of the SPEED adjustment pot. To adjust the performance of the governor, please take the following steps: 1. Bring the engine to it’s normal operating speed with no load 2. Rotate the GAIN adjustment clockwise until instability develops. Gradually move the adjustment counterclockwise until stability returns. Move the adjustment one division further to insure stable performance (270° pot.) 3. Rotate the STABILITY adjustment clockwise until instability develops. Gradually move the adjustment counterclockwise until stability returns. Move the adjustment one division further to insure stable performance (270° pot.) 4. GAIN and STABILITY adjustments may require minor changes after engine load is applied. Normally, adjustments made at no load provide satisfactory performance. A strip chart recorder can be used to further optimize the adjustments. 79 If instability cannot be corrected or further performance improvements are required, please refer to Troubleshooting Section 10.6 Governing Systems. Idle Speed Setting After the governor speed setting has been adjusted, place the optional external selector switch in the IDLE position. The idle speed set point is increased by the clockwise rotation of the IDLE adjustment control. When the engine is at idle speed, the speed control unit applied droop to the governor system to insure stable operation. 6.2.18 Integral throttle body actuator Idle Adjustment An adjustable Idle Stop setscrew is provided to set a fixed fuel opening, if desired. Using the appropriate Hex wrench, you must completely remove the first “locking” setscrew. This will give you access to the inner Idle Adjustment setscrew for adjustment using the same Hex wrench. Turning the wrench clockwise will increase the fixed throttle opening. Typically, the engine speed should be set by unplugging the actuator or by turning off the governor power once the engine is running and then setting the engine speed to the desired setting. Adjustment is complete once you have replaced the locking setscrew. The locking setscrew should only be tightened to snug plus a 1/4 turn. Wiring All throttle body actuators are pre-wired for either 12 or 24 VDC systems. Use the included wire harness to connect the actuator to the speed control unit’s output terminals. Prior to connecting the actuator cable, twist it so that there is about one complete twist per inch (2.5 cm) along the entire length of the cable. This will substantially reduce EMI effects on the control system. For applications where EMI is still a concern, shielded cable for the actuator is recommended. 6.2.19 Cleaning Intercooler and Turbocharger If the resistance within the intercooler increases beyond 5.5 kPa or it fails to cool the air more than 108F (42C) then then intercooler should be cleaned. A loss of pressure or temperature could indicate that the turbocharge-intercooler piping system has developed a leak or loose connection. All air duct and gasket connections should be routinely checked for tightness and leaks. Repair loose or leaking connections immediately. Ingestion of dirt into the compressor can cause severe wear and damage to the turbocharger as well as the engine. Excessive dirt buildup in the compressor can also cause a considerable loss of power and overheating. Remove the air inlet connection at the compressor to inspect for dirt accumulation on the compressor surfaces. If dirt is found, never scrape away such material with a screwdriver, dirty rag, sandpaper, or emery or steel wool. Such techniques are certain to damage the compressor. Clean with a clean, soft brush and non-caustic solvent. Cleaning must be complete and even all the way around. Observe scheduled lube oil change intervals to ensure normal service life of the turbocharger bearings. Use the recommended lube oil and genuine Arrow replacement filters. Turbocharged engines should be idled for several minutes after starting and before shutdown to prevent “oil lag” failures to turbocharger bearings. This is particularly important during cold weather or when the equipment has not been in use for extended periods. 80 Because the turbine side of the turbocharger can flex when it is hot, care should be taken to ensure that the weight of the exaust system is not carried by the turbocharger. The muffler and it’s piping should be supported independently and connected to the turbocharger by a flexible coupling. 7 Engine Storage 7 Engine Storage 81 Preservation of engines and generators in storage involves several basic requirements. For new engines and generators, these are as follows: 1. Protection of machined metal surfaces, cylinders, valves, bearings and so on, from the effects of both dampness and salt or other corrosive substances in the atmosphere. 2. Protection of openings into the engine against the entrance of dirt, abrasive material and foreign matter of all types. 3. Protection of accessory equipment including carburetors, gas regulators, ignitions, starters, alternators and fan belts against corrosion, dirt, moisture saturation and progressive deterioration. 4. Protection of cooling system intercoolers and LPG vaporizers against freezing, rusting or seizure of water pump seals. 5. Protection of a general nature against the elements - rain, snow and extremes of temperature. 6. Protection of batteries by disconnecting and removing them to a slow charging station where they can be kept fully charged. If this is neglected, the plates may be damaged or ruined by becoming sulfated. 7. Protection of the alternator by covering all openings to prevent the entry of dust, moisture, dirt and rodents. A heavy craft paper will serve this purpose, Where these openings are in the form of screened or louvered guards or covered plates, the protective paper should be placed under these removable parts. If this is not possible, a pressure sensitive tape can be used to hold the paper in position. Do not use masking tape - it is not suitable for this type of service and will be very difficult to remove after extended use. Application of protective paper should be on both inside and outside of large fixed louvered surfaces. Large open areas should have a corrugated cardboard backing for the paper. 8. Protect switchboards in the same manner as the alternators. In the case of engines previously operated, additional items must be considered... 9. Protection of interior engine parts - particularly bearings, cylinder walls and valves against corrosion by the products of combustion combined with atmospheric moisture and corrosion by lubricating oil contaminants. The extent of the attention given to each of the foregoing points of possible damage depends on the judgement of the person in charge of the equipment. Generally speaking, the following factors should be taken into consideration before deciding how much or how little preservation is required... 1. The period of time the equipment is likely to be inoperative. 2. The severity of the weather and atmospheric conditions at the point of storage. The problems of storing equipment in a high humidity area, for example, differ greatly from storage problems in a location where the air is very dry and dusty. 3. The accessibility of the equipment for periodic inspection and attention. An engine on a showroom floor that may be turned over occasionally and given periodic oiling requires less extensive treatment than engines crated and stocked in a warehouse. CAUTION - VR260 and VR380 engines received from the factory are internally protected for up to six months for storage indoors. If the storage period exceeds six months, the engine should receive additional storage preservatives. Engine stored outdoors or in a humid environment may require more frequent re-preservation. 82 7.1 Storing New Engines Engines recently received from the factory and not intended to be used for an indefinite period may be stored successfully in the following manner. Engines stored outdoors or in a humid environment may require more frequent re-preservation. Circumstances may compel omitting some steps, while on the other hand, special conditions may point to greater emphasis on other steps. Engine in Operable Condition 1. Mix an inhibitive type preservative oil with the engine lubricating oil in the proportions recommended by the manufacturer of the preservative oil. Operate engine until oil is hot. Cooling water used in this run should have inhibitor added in accordance to manufacturers instructions. 2. Remove air cleaners of gas engines With manually operated sprayer, squirt can or other means, inject preservative oil of a suitable type into the air intake while the engine is running. Approximately one minute is ordinarily adequate. If possible, stop engine by slugging enough oil through intake to stall. Continue injecting oil until the engine stops turning. 3. Drain oil and water while hot. If extra protection is desired, the rocker arm covers may be removed and a quantity of preservative oil poured over the rocker arm and valve mechanisms. 4. For gas engines not stopped by slugging, remove spark plugs and squirt or spray several teaspoons of preservative oil into each combustion chamber. Coat spark plugs and reinstall. 5. Wipe engine clean and dry. Apply wax type masking tape or like material to all openings such as intake openings in air cleaners, exhaust outlets, breathers and open line fittings. 6. Relieve tension on belts. This is important because continual tension on belts without the working action that occurs in normal operation causes deterioration of the rubber. 7. Apply a coating of heavy preservative compound with brush to all exposed machined surfaces such as flywheels. Engines treated in accordance with these instructions will normally be protected for one year or longer. Continual inspection, however, is the only way to determine if protection is adequate. If possible, crank the engine by hand for one or two turns about once a month. This helps prevent seizure of water pump seals. If this is done, however, it is usually best to add more preservative oil to each cylinder. Some types of preservative oil are not well suited to periodic engine rotation because they are scraped from the cylinder walls which are then unprotected. Other oils are not scraped away and for this reason the operator should carefully investigate the characteristics of the preservative oil used. When Engine is Not Operable 1. Open drains as required to remove oil and water. 2. Remove the spark plugs and pour or squirt about a teaspoon of preservative oil into each cylinder. 3. With hand or mechanical operated atomizing spray (do not use ordinary compressed air) inject preservative oil into each cylinder. Crank engine in normal direction about one quarter turn and spray each cylinder again. Do this about eight times or until engine has been turned through two complete revolutions. The purpose of this procedure is to bring each valve into an exposed position so the preservative oil will coat it. 83 4. Depending on the judgement of the operator as to the severity of storage conditions, open valve rocker covers, gear cover plates and as many points as possible where oil may be sprayed, poured or squirted over the interior parts. Replace all plugs and covers. 5. Remaining steps may be the same as listed in 5 and 6 for an operable engine. 7.2 Storing Engines That Have Been In Service In the course of normal engine operation, residues of various combustion products, such as sulphur, accumulate in the combustion area and in the lubricating oil. Portions of these residues combine with atmospheric moisture to form corrosive compounds of a destructive nature. The following treatment will help reduce the damage from this source... 7.2.1 Engine in operable condition 1. Run engine until the original oil is hot. Drain. 2. If practical, run the engine with a good flushing oil in crankcase and drain oil and water while still hot. 3. Refill crankcase with preservative oil or with the proper grade of lube oil to which an inhibitive type preservative oil has been added in the proportion recommended. 4. Carry out previous instructions 5 and 6 as the circumstances indicate. 7.2.2 When engine is not operable 1. Carry out instructions as for an inoperable new engine. 2. If the judgement of the operator and storage conditions warrant, the engine should be disassembled for treatment as a new engine. Ordinarily this last procedure is unnecessary except in cases where fuels containing considerable sulphur have been used or where extremely bad climatic conditions prevail. 7.3 PRESERVATIVE OIL The following preservative oils are of a type that has been found satisfactory. Other equally good oils are certainly available and their omission from this listing does not necessarily mean they are not acceptable. In main, the properties making an oil suitable for preservative requirements are good aging stability; high resistance to gumming, oxidation and polymerization; low pour point and viscosity; freedom from acids, asphalts, resins, tars and water. SUPPLIER American Oil Company Gulf Oil Corporation Mobil Oil Company Shell Oil Company Atlantic Richfield Co Texaco Inc PRESERVATIVE OIL Amoco Anti Rust Oil 4-V No rust Engine Oil, Grade 1 Mobile Arma 522 Donax t-6 Dexron No 800 Regal Oil A (R O) NOTE Dexron automatic transmission fluid may be used if none of the above preservative oils are available. 84 8 8 PREPARING ENGINE FOR OPERATION AFTER STORAGE Preparing the Engine for operation after storage 85 The steps needed to bring an engine into active service after storage in accordance with these instructions are about the same as those normally carried out on any new engine. These are inspection, checking for free rotation, adequate cooling water or antifreeze, ample lubricating oil of the correct type and viscosity and proper adjustments. In addition, accumulated dust and dirt should be wiped or washed from the exterior before removing the covers over the engine openings. Removal of installed protection should occur upon normal inspection of the engine generator and switch gear interiors prior to start up. Partial removal may be necessary in the course of installation but this should be kept at a minimum. Engines that have not been rotated for some time should be oiled through the spark plug openings and cranked by hand or with the starting equipment before actually running. Any resistance to free cranking should be investigated - rust and corrosion can cause severe seizure that cannot be forced clear without engine damage. CAUTION All generators and switch gear which have been stored must be checked for installation resistance with a “Megger” prior to being put into service. The megger used should produce 500 V.D.C. Disconnect voltage regulator, rotating diodes, suppressors and any other solid state devices which may be connected to the Starter or rotor windings The megger value should be: operating voltage ÷ 1000+1 (ie, machine voltage of 480 V.A.C.÷1000=0.480+1=1.480 megohms.) If any circuit to ground measures less than calculated value, consult the Arrow Engine Customer Service Department for any corrective measures as may be necessary. Never attempt to start an engine that has been stored without first cranking it over with the spark plugs out. Spurting oil, water or preservative compound from these openings indicates possible hydraulic lock if an attempt had been made to operate. Continue to crank engine with starter until liquid is no longer ejected from openings. Inspect intake passages and manifolds for thickened preservative oil. Oil accumulated in this condition may melt when the engine warms up and cause a runaway. SPECIFICATIONS FOR PROTECTIVE MATERIALS Internal Surfaces - Cylinders, etc. U.S. Army Spec 2-126, available as SAE 10 or SAE 30 86 External Surfaces U.S. Army Spec 2-121 (Waxy Coating) Army Ordinance Spec AXS 673 (Harder Black Coating) 9 9 Wear Limits of Parts of the engine Wear Limits 87 NO PART NAME MEASURING POINT DIMENSION - INCHES (MM) Limit on New pARTS MAX MIN 1 Crankshaft Dia of main journal 2.755”(69.97mm) 2.754”(69.951mm) Dia of conrod journal 2.479”(62.97mm) 2.478”(62.951mm) Length of thrust main journal 1.419”(36.05mm) 1.417”(36.00mm) Axial clearance measured after 0.008” (0.20) 0.002” (0.05mm) mounting 2 Main bearing 3 Conrod bearing 4 5 6 7 8 9 10 11 88 Thickness of crankshaft thrust washer Dia. of conrod small end bushing Piston pins external cylindrical surface - Outside dia. of piston pin Piston assembly 1st ring groove trapezoid 2nd ring groove 3rd ring groove Piston pin bore Contact surface of piston skirt End clearance of piston ring all 1st piston ring trapezoid ring Clearance of 2nd piston ring in groove Clearance of 3rd piston ring oil ring in groove Cylinder liner Inside diameter Honing surface MAX WEAR LIMIT 2.753”(69.93mm) 2.477”(62.93mm) 36.07”(36.07mm) 0.015”(0.38mm) All the two bearings must be replaced if the plated trimetal layer or guard alloy layer is worn down 0.137”(3.47mm) 0.135”(3.42mm) 1.381”(35.08mm) 1.3779”(35.0mm) 1.379”(35.03mm) 1.3777”(34.994mm) 1.384”(35.15mm) Replace if there is scoring 1.3775” (34.99mm) 0.0807”(2.05mm) 0.1591”(4.04mm) Replace if there is wear 0.083”(2.10mm) 0.162”(4.11mm) Replace if there is evident clearance Replace if there is vertical scoring Replace if there is vertical scoring Replace if there is wear on inclined end face of the ring 0.079”(2.00mm) 0.0079” (0.20mm) 0.0815”(2.07mm) 0.1598”(4.06mm) 0.0059”(0.15mm) 4.1347”(105.022mm) 4.1338”(105.00mm) Valve and valve guide 0.3531”(8.970mm) Dia. of valve stem 0.3549”(9.015mm) Dia of valve guide bore Height between valve bottom face 0.0559”(1.42mm) and cylinder head face Rocker seat Dia of rocker shaft 0.6292”(15.984mm) Dia of rocker bearing bore 0.6306”(16.018mm) 0.3524”(8.952mm) 0.3543”(9.000mm) 4.1437”(105.250mm) Replace if vertical scoring exceeds 0.002”(0.05mm) 0.3522”(8.945mm) 0.3567”(9.060mm) 0.0405”(1.03mm) 0.0708”(1.80mm) 0.6286”(15.966mm) 0.6299”(16.000mm) 0.6279”(15.950mm) 0.6315”(16.040mm) NO PART NAME MEASURING POINT DIMENSION - INCHES (MM) Limit on New pARTS MAX MIN 12 Camshaft Intake exhaust cam face Dia of camshaft journal 1.9669”(46.960mm) 1.9661”(46.940mm) Width of camshaft locating slot 0.2831”(7.190mm) 0.2795”(7.10mm) Axial clearance of camshaft after mounting 13 Dia of camshaft bearing bore on cylinder block Bore with bearing mounted in 1.8522”(47.045mm) 1.85”(46.990mm) gear end Bore without bearing mounted in 1.8514”(47.025mm) 1.8504”(47.000mm) Inside dia of tappet hole on cyl- 0.6897”(17.518mm) 0.689”(17.500mm) inder block 14 Thick of tooth sector for camshaft 0.2758”(7.005mm) 0.2697”(6.850mm) location 15 Outside dia of tappet 0.6887”(17.494mm) 0.6883”(17.483mm) 16 Two stage balance shaft assembly Dia of balance shaft journal 1.3376”(33.975mm) 1.3366”(33.950mm) Axial clearance of balance shaft assembly after mounting 17 Inside dia of balance shaft bear- 1.3405”(34.050mm) 1.339”(34.010mm) ing bushing 18 Thick of balance shaft thrust 0.1398”(3.55mm) 0.1358”(3.45mm) washer MAX WEAR LIMIT Replace if there is wear 1.8472”(46.920mm) 0.2842”(7.220mm) Axial clearance 0.015 7”(0.40mm) 1.8527”(47.060mm) 1.8524”(47.050mm) 0.6901”(17.530mm) 0.2657”(6.750mm) 0.688”(17.475mm) 1.3362”(33.940mm) Axial clearance 0.019 7”(0.5mm) 1.3417”(34.080mm) after mounting 0.1319”(3.35mm) 89 90 10 Troubleshooting 10 Troubleshooting 91 Good trouble shooting methods determine the cause or causes of unsatisfactory operation and point out the action needed to correct the problem. Knowledge of how engine systems work together with the trouble shooting chart in this unit and current indications from the engine instrument panel provide the best background information. 10.1 OPERATING CONTROLS Most VR260 and VR380 engines are equipped with the following operating controls 1. 2. 3. 4. 5. Water temperature gauge Oil pressure gauge Throttle Starter switch Ignition switch 10.2 ELECTRICAL SYSTEM The engine electrical system consists of a heavy duty starter and alternator, switches and circuits. The engine is started by closing a circuit from battery to starter with the instrument panel switch that actuates the magnetic switch. Positive engagement of the pinion before cranking commences is accomplished by the starting motor solenoid. After cranking is completed and the engine starts, the alternator replenishes energy expended by the battery. Cutouts and regulators control the alternators output and protect the system from reverse currents and excessive charging rates. Arrow Engine Company supplies engines with negatively grounded electrical equipment only. This standardization of electrical system polarity is standard practice for most equipment manufacturers and thus increases compatibility between Arrow supplied electrical equipment and that supplied by the equipment builder. The engines electrical system is available in either 12 or 24 volts. 10.3 Cooling System The cooling system used on the VR260 and VR380 is of the pressure circulating type. The water enters the water pump inlet on the right side of the engine. The centrifugal pump pulls this supply of cool water through the pump body and into a passage leading directly into the engine cylinder jacket. The water enters the engine in the area of the cylinder sleeve lower ends. From here, the water flow is directed about the cylinder sleeves in an even manner until it passes upward from the crankcase and into the cored passages in the cylinder heads. These passages are carefully designed to allow cooling water access to all areas around the valves. Water is collected from the cylinder head and enters a thermostat housing at the forward end. The thermostat controls the exit temperature of the water. Back pressure at the water outlet must not exceed 5 pounds per square inch (34.474 kPa). 10.4 AIR INTAKE SYSTEM With the exception of adequate supplies of clean oil and water, probably no other single service item contributes so much to engine life as a properly working air cleaner. This is particularly true under dusty and agricultural operating conditions, but surprising amounts of abrasive dirt are present in most atmospheres. When carried into the engine through the air inlet, such abrasives rapidly wear away cylinder walls, valve stems, bearings and other working parts. Because the dust particles are so small, yet possess the ability to cause great damage, it is absolutely mandatory that air inlet connections be kept in tight condition to avoid taking in unfiltered air. Although various installations will have differences in air cleaner types and arrangements, it is impor92 tant for the operator to realize that the common purpose of all air cleaners is to collect dirt and grit. Thus the cleaner itself must be cleaned as often as dirt accumulations start to build up. Sometimes this may be several times each day if conditions are especially dusty. 10.5 EXHAUST SYSTEM Proper disposal of the exhaust of an engine is a very critical problem when you visualize its breathing function. An engine consumes an incredible amount of air and after combustion takes place the air and exhaust gases must be pushed out of the cylinders manifolds and exhaust piping. Every possible provision must be made to minimize the restriction or back pressure on an exhaust system. Some of the adverse effects of excessive back pressure are... 1. 2. 3. 4. Loss of power. Poor fuel economy. Excessive valve temperatures and premature wear. Jacket water overheating. The exhaust system of an engine with a particularly long exhaust pipe can accumulate quite a bit of condensed moisture. If allowed to run back through the piping into the engine after it is shut down the obvious rusting and sticking of valves rings etc. and the possibility of a hydraulic “lock” become serious. Always provide a condensate trap and drain at some low point ahead of the engine manifolds. 10.6 GOVERNING SYSTEMS 10.6.1 ESD2400 Speed Control Unit The engine’s standard equipment includes the EDS2400 Series Speed Control Unit and the ATB Series Electronic Governor. The speed control unit is factory set at approximately engine idle speed (1,000 Hz., speed sensor signal. System Inoperative If the engine governing system does not function, the fault may be determined by performing the voltage tests described in Steps 1-4. Positive (+) and negative (-) refer to meter polarity. Should normal values be indicated during troubleshooting steps, the fault may be with the actuator of the wiring to the actuator. Tests are performed with battery power on and the engine off, except where noted. See the Actuator section with in the Troubleshooting section for information on it’s testing procedure. STEP TERMINALS NORMAL READING 1 F(-) & G(+) Battery Supply Voltage (12,24, or 32 VDC) 2 3 4 B(+) & C(-) 0-2.7 with speed trim 4.8-5.4 without speed trim D(+) & E(-) 1.0 VAC RMS min. while cranking J(-) & F(+) 0.5-1.5 V while cranking PROBABLE CAUSE OF ABNORMAL READING 1) DC Battery power not connected. Check for a blown fuse. 2) Low battery voltage. 3) Wiring error. 1) Speed trim shorted or mis-wired. 2) Defective unit. 1) Gap between speed sensor and gear teeth too great. Check the gap. 2) Improper or defective wiring to the speed sensor. Resistance should be between 30 to 1200 ohms. 3) Defective speed sensor. 1) Wiring error to actuator. 2) Defective speed control unit. 3) Defective actuator. 93 Unsatisfactory Performance If the governing system functions poorly, perform the following steps... SYMPTOM Engine Overspeed Actuator does not energize fully when cranking Engine remains below desired governed speed TEST 1) Do not crank. Apply DC power to the governor system. PROBABLE FAULT Actuator goes to full fuel. Disconnect the speed sensor wires. If the actuator is still at full fuel, the speed control unit is defective. If the actuator is at minimum fuel position, then there is an erroneous speed signal. Check the speed sensor cable. 2) Manually hold the engine at the de1) If the voltage reading is 0.5 to 1.5 VDC, sired running speed. Measure the DC volt- a) Speed” adjustment is set above the desired speed. age between terminal J(-) & F(+) on b) Defective Speed Control Unit. the speed control unit. 2) If the voltage reading is above 1.5VDC, the actuator or linkage is binding. 3) Set point of overspeed shutdown is set too low. 4) If the voltage reading is below 0.5VDC, defective speed control unit. 1) Measure the DC voltage between ter- 1) Replace battery if weak or undersized. minal J(-) & F(+) on the speed control 2) Actuator wiring incorrect. unit. Should be 0.8 to 1.5 volts. 3) If voltage is below 1.5V, “Speed” set too low if not... 1) Actuator or battery wiring in error. 2) Momentarily connect terminal F & J. 2) Actuator or linkage binding. The actuator should move to the full fuel 3) Defective actuator. position. Measure the actuator output, terminals H & 1) If voltage measured is within 1.5 volts or more J, while running under governor control. of the battery supply voltage level, then fuel control restricted from reaching the full fuel position. Possibly due to mechanical governor, carburetor spring or linkage interference. 2) If not, increase speed setting. Insufficient Magnetic Speed Signal A strong magnetic speed sensor signal will eliminate the possibility of missed or extra pulses. The speed control unit will govern well with 0.5 volts RMS speed sensor signal. A speed sensor signal of 3 volts RMS or greater at governed speed is recommended. Measurement of the signal is made at Terminals D and E. The amplitude of the speed sensor signal can be raised by reducing the gap between the speed sensor tip and the engine ring gear. The gap should not be any smaller than 0.020 in (0.45 mm). When the engine is stopped, back the speed sensor out by ¾ turn after touching the ring gear tooth to achieve a satisfactory air gap. Electromagnetic Compatibility (EMC) EMI SUSCEPTIBILITY - The governor system can be adversely affected by large interfering signals that are conducted through the cabling or through direct radiation into the control circuits. All GAC speed control sensors contain filters and shielding designed to protect the units sensitive circuits from moderate external interfering sources. 94 Although it is difficult to predict levels of interference, applications that include magnetos, solid sate ignition systems, radio transmitters, voltage regulators or battery chargers should be considered suspect as possible interfering sources. If it is suspected that external fields, either those that are radiated or conducted, are or will affect the governor systems operation, it is recommended to use shielded cable for all external connections. Be sure that only one end of the shields, including the speed sensor shield, is connected to a single point on the case of the speed control unit. Mount the speed control to a grounded metal back plate or place it in a sealed metal box. Radiation is when the interfering signal is radiated directly through space to the governing system. To isolate the governor system electronics from this type of interference source, a metal shield or a solid metal container is usually effective. Conduction is when the interfering signal is conducted through the interconnecting wiring to the governor system electronics. Shielded cables and installing filters are common remedies. In severe high-energy interference locations such as when the governor system is directly in the field of a powerful transmitting source, the shielding may require to be a special EMI class shielding. For these conditions, contact Governor America Corp. application engineering or Arrow Engine for specific recommendations. Instability Instability in a closed loop speed control system can be categorized into two general types. PERIODIC appears to be sinusoidal and at a regular rate. NON-PERIODIC is a random wandering or an occasional deviation from a steady state band for no apparent reason. The PERIODIC type can be further classified as fast or slow instability. Fast instability is a 3 Hz. or faster irregularity of the speed and is usually a jitter. Slow periodic instability is below 3 Hz., can be very slow, and is sometimes violent. If fast instability occurs, this is typically the governor responding to engine firings. Raising the engine speed increases the frequency of instability and vice versa. In this case, cutting the jumper from El to E2 will reduce this tendency. In extreme cases, the removal of the El to E2 jumper may not take all the jitter out of the system. A second jumper, E4 to E5, may be removed to further stabilize the system. Post locations are illustrated in Diagram 1. Interference from powerful electrical signals can also be the cause. Turn off the battery chargers or other electrical equipment to see if the system instability disappears. Slow instability can have many causes. Adjustment of the GAlN and STABILITY usually cures most situations by matching the speed control unit dynamics. If this is unsuccessful, the dead time compensation can be modified. Add a capacitor from posts E2 to E3 (negative on E2). Post locations are illustrated in Diagram 1. Start with 10 mfds. and increase until instability is eliminated. The control system can also be optimized for best performance by following this procedure. 95 If slow instability is unaffected by this procedure, evaluate the fuel system and engine performance. Check the fuel system linkage for binding, high friction, or poor linkage. Be sure to check linkage during engine operation. Also look at the engine fuel system. Irregularities with carburetion can change engine power with a constant throttle setting. This can result in speed deviations beyond the control of the governor system. Adding a small amount of droop can help stabilize the system for troubleshooting. NON-PERIODIC instability should respond to the GAlN control. If increasing the gain reduces the instability, then the problem is probably with the engine. Higher gain allows the governor to respond faster and correct for disturbance. Look for engine misfirings, an erratic fuel system, or load changes on the engine generator set voltage regulator. If the throttle is slightly erratic, but performance is fast, removing the jumper from E4 to E5 will tend to steady the system. If unsuccessful in solving instability, contact Governor America Corp. application engineering or Arrow Engine for assistance. 96 10.7 Integral throttle body actuator These tests are to check for proper operation of the actuator only. If the actuator passes these tests, the problem is more than likely elsewhere in the system. Refer to the previous Section - 10.6 Speed Control Unit. If the governor system fails to operate, the following test can be performed. Shut engine down, disconnect the actuator cable and measure the resistance through the wires while rotating the throttle plate. Next, check resistance from each wire to actuator housing again while rotating the throttle plate (See table below). The resistance will fluctuate when you manually rotate the plate, but the reading should settle back to a fixed value based on the table below. This test is only to insure that there is no obstruction, wire breakage or metal-on-metal contact inside the throttle body. Measure the resistance from: Red to White (I2 VDC) ................................. 2 Ohms Red to White (24 VDC) ................................. 8 Ohms Red to Actuator Housing .....................< 5 Mega ohms White to Actuator Housing .................. < 5 Mega ohms Make sure to reconnect the actuator cable. Next, energize the actuator to fill fuel (follow steps in the speed control publication) and manually move the actuator throttle plate to the de-energized position. You should feel no binding or sticking of the throttle plate 97 10.8 Troubleshooting Chart SYMPTOM Crankshaft cannot be barred over - Caution - Do not attempt to rotate the crankshaft with the starter. PROBABLE CAUSE Seized piston. Coolant or obstruction in the cylinder. Cracked head. Cracked sleeve. Blown head gasket. Bearings to tight: 1) High spot on bearings. 2) Improper torque. 3) Main bearing caps installed out of location. Engine will crank but not start. 98 REMEDY Replace piston assembly and possibly sleeve. Determine cause of the seizure - insufficient ring gap, insufficient lubrication, inadequate cooling or overload. Remove spark plugs and crank engine to vent cylinders of accumulated coolant. Replace head. Replace sleeve. Replace head gasket. Replace bearings. Loosen bearing caps and re-torque. Check each bearing cap, place in proper location. Disengage load. Load not disengaged from the engine. Insufficient cranking speed: 1) Run down battery or electric starter malfunction. Charge or replace battery; check the starter system. 2) Lube oil viscosity is too high. Change to a lower viscosity oil. Poor compression: 1) Worn rings. Renew rings. 2) Leaking valves. Recondition head and valves. 3) Leaking head gasket. Replace head gasket. Fuel system inoperative: 1) Insufficient fuel supply Check gas pressure and carburetor adjustments. 2) Ruptured line pressure regulator. Replace diaphragm. 3) Stiff carburetor diaphragm or worn air-gas valve Replace air-gas assembly. assembly. 4) Bent line pressure regulator control rod. Replace control rod. Clogged intake air filter. Remove and clean or replace. Safety shut-down control not re-set. Re-set safety shut-down control. SYMPTOM Engine stops suddenly. PROBABLE CAUSE Fuel: 1) Insufficient fuel supply. 2) Loose fuel control linkage. 3) Clogged fuel supply line. Obstructed exhaust manifold. Clogged intake air filter. Engine overspeed causes safety control to shut down engine. Excessive load causes engine to stall. Piston seizure: 1) Insufficient ring gap (applicable only immediately after overhaul.) 2) Insufficient lubrication. 3) Insufficient cooling. Engine power loss. Seizure of bearing, main connecting rod, piston pin or camshaft. Dirt in lubricating oil. Obstruction in cylinder. Low oil pressure causes safety control to shut the engine down. High coolant temperatures causes safety control to shut down the engine. Low compression pressure: 1) Leaking head gasket 2) Leaking exhaust-intake valves. 3) Worn rings (excessive blow-by.) 4) Worn piston/liner. 5) Cracked piston. 6) Cracked cylinder head. 7) Maladjusted intake and exhaust valves (if recently overhauled.) 8) Intercooler, Turbo or duct work dirty. 9) Restriction in intake and/or exhaust system. 10) Insufficient warm up period. Insufficient fuel: 1) Cracked fuel lines. 2) Low gas pressure. Excessive exhaust system back pressure. Dirty air intake. REMEDY Check gas pressure. Readjust and tighten. Replace line. Determine obstruction and remedy. Remove and clean. Determine and correct cause of overspeed. Determine and correct cause of overload. Replace scored piston, sleeve and rings. Adjust ring gap. Replace scored piston, sleeve and rings. Clean oil passages and/or determine cause of lack of lubrication. Replace scored piston, sleeve and rings. Clean and/or fill the cooling system. Replace bearings - clean up or replace crankshaft, camshaft or piston pins as required. Check lubricating oil filter. Replace all parts that failed. Inspect the lubricating oil system and components and correct the cause. Inspect cooling system and components and correct the cause. Replace head gasket - inspect for warped cylinder head and/or crankcase - replace if necessary. Recondition head and valves. Replace rings. Replace as necessary. Replace. Replace. Adjust valves. Check and clean. Check for obstruction. Follow recommended procedures. Replace cracked line. Check gas fuel system. Correct as required. Remove and clean or replace. 99 SYMPTOM Engine will not reach rated speed. PROBABLE CAUSE Engine overload. Tachometer inaccurate. Insufficient fuel supply. Governor maladjusted or faulty. Restricted air intake. Engine hunts or surges. Governor maladjusted or faulty. Low or fluctuating lu- Insufficient oil. bricating oil pressure. Gauge inaccurate. - Caution - shut down Oil gauge line plugged. engine Immediately. Engine operated at angles in excess of maximum safe tilt angles. Crankcase oil pressure relief valve relieves at low pressure. REMEDY Determine and correct cause of the overload. Calibrate or replace tachometer. Check fuel supply system. Measure the actuator output, terminals H & J, while running under governor control. If the voltage measurement is within 1.5 volts of the battery supply voltage level, the fuel control restricted from reaching full fuel position. Possibly due to mechanical governor, carburetor spring or linkage interference. If not, increase speed setting. Correct cause. Reprogram or replace the governor. Add oil as required. Compare to master gauge - replace gauge. Renew gauge line. Operate within maximum safe tilt angles. Replace relief valve spring and or shim it to increase pressure to 25-30psi (172.36-206.84 kPa) Lubricating oil pressure regulating valve stuck in the Free valve. open position. Lubricating oil filter plugged (full flow only.) Change the element and clean the filter. Worn lubricating oil pump. Repair or replace the pump. Worn bearing (connecting rod, main and crankReplace worn bearings. shaft.) Lubricating oil dilution. Change oil and filter element. Determine and correct the source of dilution. Cracked or leaking lubricating oil. Repair or replace the piping. Low oil viscosity. Change to a higher viscosity oil, as recommended in Lubricating Oil section. Lubricating oil foaming. Use oil grade recommended in Lubricating Oil section. Clogged oil inlet screen. Remove and clean screen. High lubricating oil Gauge inaccurate. Compare to the master gauge and replace as pressure. needed. Oil temperature too low. Raise temperature. Oil pressure regulating valve stuck in closed posi- Free valve. tion. Oil viscosity is to high. Change to a lower viscosity oil as recommended in the Lubricating Oil section. Low cooling water tem- Gauge inaccurate. Compare to master gauge - replace as perature. needed. Inoperative thermostat. Replace thermostat. 100 SYMPTOM PROBABLE CAUSE High cooling water Gauge inaccurate. temperature - Caution - Cool wa- Cooling system is air bound. ter slowly. Low coolant level. Worn water pump. Frozen coolant. High lubricating oil consumption. Poor coolant circulation. Blown head gasket Insufficient circulation of air. Cracked head. Cracked sleeve. Inoperative thermostat. Late ignition timing. Oil leaks in lubricating oil system. Improper viscosity. Leaking oil seal/s - rear and/or front. Worn intake valve guides. Stuck or worn piston rings. One or more pistons with rings upside down (if recently overhauled.) Excessive connecting rod bearing running clearance. Crankcase breather plugged. Lubricating oil contami- Lubricating Oil Contaminated With Water: nated. 1) Sleeve seals leaking or sleeve cracked. - Note - Change oil before running the 2) Cracked crankcase. engine. Lubricating oil contaminated with dirt: 1) Lubricating oil filter by-pass valve opening because the element is plugged. 2) Lubricating oil filter element punctured. 3) Air intake punctured. Foundation bolts: Excessive vibration - Note - Stop the 1) Loose. engine at once to in2) Cracked. vestigate the cause. Crankshaft: 1) Cracked. 2) Main bearing bolt loose. Loose flywheel. REMEDY Compare to master gauge - replace as needed. Purge air from the cooling system. Fill cooling system. Replace or overhaul the water pump. Completely thaw the cooling system before starting the engine. Check entire coolant system. Replace head gasket. Correct as required. Replace head. Replace sleeve. Replace thermostat. Re-time. Change to recommended viscosity. Change seal/s. Change head/renew guides or valve stem seals. Renew rings. Remove piston and correct the position of the rings. Replace bearings. Clean. Replace sleeve and/or rings. Replace the crankcase. Yes, really. Replace the element. Replace element. Replace the air intake filter. Torque. Replace and torque all bolts. Replace and conduct a complete investigation of the entire engine. Replace the main bearing bolts. Determine reason for loosening, and carefully check the entire lower crankcase before torquing and subjecting the engine to use. Replace and/or torque as required. 101 SYMPTOM High lubricating oil temperature. PROBABLE CAUSE Gauge inaccurate. Engine overload. High cooling water temperature. Knocking or unusual noises. Excessive fuel consumption. Low gas pressure. High gas pressure. 102 Low lubricating oil pressure. Engine overload. Overly advanced ignition timing. Loose bearings (failed.) Loose piston pins (failed.) Damaged or excessively worn accessory drives. Excessive crankshaft end play. Excessive valve clearance. Sticking valves or rocker arms. Misfitted or excessively worn timing gears. Leaks in the fuel system. Late ignition timing. Engine overload. Poor compression. Improper matching of torque convertor to engine and load. Incorrectly adjusted gas regulator. Insufficient line pressure. Incorrect orifice and/or spring in the gas regulator. Undersize gas regulator. Undersize piping. Gas regulator mounted too far from engine. Incorrectly adjusted gas regulator. Readjust. Incorrect orifice and/or spring in the gas regulator. Excessive line pressure. REMEDY Compare to master gauge - replace as needed. Determine and correct the cause of the overload. See High Cooling Water Temperature section of the chart. Low Lubricating Oil Pressure causes. Determine and correct cause of overload. Re-time. Replace bearings. Replace piston pins and/or pin bushings as required. Repair and replace components as required. Replace main thrust bearing. Readjust valve clearance. Free up or replace. Replace. Repair as required. Re-time. Determine and correct causes of overload. Determine causes and repair. Replace torque convertor. Readjust. Increase line pressure. Replace orifice and/or spring. Replace with gas regulator of adequate size. Replace with piping of adequate size. Remount gas regulator as close to the carburetor as possible. Replace orifice and/or spring. Reduce line pressure. 11 Metric Conversions 11 Metric Conversions 103 Less Than One (1) Inch to Millimeters Fraction in Decimal x 25.4 Example: 15/16” = .9375” x 25.4 = 23.8125mm More Than One (1) Inch to Millimeters Inches and Decimal Fraction x 25.4 Example: 2-5/8” = 2.625” x 25.4 = 66.675mm Cubic Inches to Liters Cubic Inches x 0.01639 Example: 9388 Cubic Inches = 9388 x 0.01639 = 153.8 Liters Ounces to Grams Ounces x 28.35 Example: 21oz. x 28.35 = 595.35grams Pounds to Kilograms Lbs x 0.4536 Example: 22,550lb. x 0.4536 = 10,228Kg Inch Pounds to Newton meters Inch Lb. x 0.11298 Example: 360In.Lb. x 0.11298 = 40.67 Nm Foot Pounds to Newton meters Foot Lb x 1.3558 Example: 145Ft.Lb. x 1.3558 = 196.6Nm PSI to kPa (kilopascal) PSI x 6.89476 for kPa kPa x .145038 for PSI PSI to KG per Sq. Centimeter PSI x 0.0703 Example: 45 PSI x 0.0703 = 3.16 KG per Sq Centimeter Ounces (fluid) to Cubic Centimeters Ounces x 29.57 Example: 8Ounces x 29.57 = 236.56cc Gallons to Liters Gallons x 3.7853 Example: 148gallons x 3.7853 = 560 Liters Degree Fahrenheit to Degrees Centigrade Degrees Fahrenheit -32 x 0.555555 Example: 212°F - 32 x 0.55555 = 180 x 0.5555556 = 100°C 104 12 Parts 12 Parts 105 106 Crankcase Assembly ITEM PART NUMBER DESCRIPTION 1 2 3 4 5 6 7 8 9 10 11 12 13 14 15 16 17 18 19 20 21 22 23 24 25 26 27 28 29 30 31 32 33 12273360 12273340 12151365 12273515 12273557 12159599 01153348 12167053 01116958 01220356 01221356 01118707 01118664 12167057 12160117 12160129 01177981 01151498 01153869 01152717 13024173 01153805 01153804 01113477 01139401 12163182 01152752 01117867 12200620 12200621 12165568 01115413 01105156 13033415 01118952 12159445 13020212 Engine Block Freeze Plug Freeze Plug Freeze Plug Camshaft Bushing Stud Screw Fitting Ball Compression Spring VR380 VR260 1 7 2 2 1 1 1 1 1 1 8 2 2 1 1 1 1 1 O-Ring Acorn Nut Manifold Retaining Plate Spring Lock Washer Cheese Head Screw O-Seal Cover Cylinder Liner O-Seal O-Seal Stud Hexagon Nut Plain Washer Tooth Lock Washer Cylinder Head Bolt Cylinder Head Stud Plain Washer Straight Pin Parallel Pin Parallel Pin Hexagon Bolt Sleeve Eye Bolt 1 1 1 1 1 1 1 5 6 12 12 4 4 4 4 16 6 24 7 3 2 2 1 2 1 1 1 1 1 1 1 3 4 8 8 4 4 4 4 10 4 16 5 2 4 2 1 2 107 Rear Oil Seal Cover Assembly 108 ITEM PART NUMBER DESCRIPTION VR380 VR260 1 2 3 4 5 12272177 01016240 01112331 01107281 12189888 Rear Oil Seal Cover Sealer Hexagon Bolt Spring Washer Rear Seal 1 N/A 10 10 1 1 N/A 10 10 1 Flywheel Housing Assembly ITEM PART NUMBER DESCRIPTION VR380 VR260 1 2 3 4 5 6 7 8 9 10 11 12 13 14 15 16 17 13024241 01157512 01097624 13022205 01139338 01153777 01178940 01112551 01112427 01178365 13021291 01112226 01107095 01178307 130215931 MSP-675 MSP-3298 7910151 Flywheel Housing Rubber Strip Plug Hexagon Bolt Hexagon Bolt Hexagon Bolt Hexagon Bolt Hexagon Bolt Hexagon Bolt Spring Lock Washer Cover Hexagon Bolt Plain Washer Spring Lock Washer Finger Mag Pick Up Mag Pick Up 1 1 1 2 10 2 2 4 3 3 1 3 3 3 1 1 1 1 1 1 2 10 2 2 4 3 3 1 3 3 3 1 1 1 109 110 Gear Cover - VR380 ITEM PART NUMBER DESCRIPTION VR380 1 2 3 4 5 6 7 8 9 10 11 12 13 14 15 16 17 18 19 20 21 22 23 13025151 12158431 01161340 01111096 12188100 01113472 13021999 01152752 01117867 01111151 01111184 01111195 01177981 12159859 01177981 12165572 01161340 13022333 13022341 01112331 13022340 01151567 01118641 Crankcase End Cover Housing/Case O-Seal Hex Bolt Front Seal Stud Hex Nut Plain Washer Tooth Lock Washer Hex Bolt Hex Bolt Hex Bolt Spring Lock Washer Sealing Ring Washer Plug O-Seal Shield Gasket Hex Bolt Shield Hex Bolt Washer 1 1 1 1 1 4 4 4 4 5 4 1 21 1 21 1 1 1 1 8 1 3 3 VR260 111 112 Gear Cover - VR260 ITEM PART NUMBER DESCRIPTION 1 2 3 4 5 6 7 8 9 10 11 12 13 14 15 16 17 18 19 20 21 22 23 13021714 12158431 01161340 01111096 12190581 06214722 12188100 13020243 01112331 01137083 01112416 01139584 01111151 01111184 01118647 01151462 01177981 12165572 01152711 7910151 208512-MP-A42 M8x20mm M08WS Crankcase End Cover House/Case O-Seal Hexagon Bolt Flanged Bush O-Seal Rotary Shaft Seal Shield Hexagon Bolt Hexagon Bolt Hexagon Bolt Hexagon Bolt Hexagon Bolt Hexagon Bolt Seal Ring Cheese Head Screw Spring Lock Washer Lube Oil Filler Cover Magnetic Pick-Up for Ignition Sensor Bracket Bolt Washer VR380 VR260 1 1 1 1 1 2 1 1 1 1 1 1 5 6 1 1 11 1 1 1 1 2 2 113 Cover plate 114 ITEM PART NUMBER DESCRIPTION VR380 VR260 1 2 2 3 4 5 6 12166808 01112331 01112339 01111198 01177981 01118654 12189678 Cover Hexagon Bolt Hexagon Bolt Hexagon Bolt Spring Lock Washer Seal Ring Gasket 1 1 1 2 4 1 1 1 1 2 4 1 1 Crankcase Fittings ITEM PART NUMBER DESCRIPTION VR380 VR260 1 2 3 4 5 12273763 01166001 12164637 01177981 01151569 Nozzle O-Seal Plain Washer Spring Lock Washer Hexagon Bolt 6 6 6 6 6 4 4 4 4 4 115 116 Crankcase Breather - VR380 ITEM PART NUMBER DESCRIPTION VR380 1 2 3 4 5 6 7 8 9 10 11 12 13 14 15 16 17 18 12270387 12270388 01396634 01137412 01112339 01177981 12270389 208843-3 01112405 01152752 M08NF 12158431 13021714 01137412 13022800 01177986 02404201 0117083 Oil and Gas Separator Airiness Tie-In Hose Host Clip Hexagon Bolt Spring Lock Washer Spring Bracket Hexagon Bolt Plain Washer Nut Housing Case Crankcase End Cover Clip Hose Hose Clip Washer Bolt 1 1 1 2 1 1 1 1 1 1 1 1 1 2 1 1 1 1 VR260 117 118 Crankcase Breather - VR260 ITEM PART NUMBER DESCRIPTION 1 2 3 4 5 6 7 8 9 10 11 12 13 14 15 16 17 18 19 12270387 12270388 13031745 01137412 01112339 01177981 12270389 13024068 01112405 01152752 M08NF 12158431 1321714 01137412 13022806 12151721 M08WF M08x20 M08WS Oil and Gas Separator Airiness Tie-In Hose Host Clip Hexagon Bolt Spring Lock Washer Spring Bracket Hexagon Bolt Plain Washer Nut Housing/Case Front Cover Clip Hose Hose Clip Washer Bolt Split Washer VR380 VR260 1 1 1 2 1 1 1 1 2 1 1 1 1 1 1 1 1 1 1 119 120 Crankshaft Assembly ITEM PART NUMBER DESCRIPTION VR380 1 12272497 12272491 13022334 12273248 01115416 12151364 12160569 12160535 13029794 12160595 12160534 1302795 13022503 12166719 13023261 13023261 01110843 01112682 01152870 01110847 13021520 01110659 01178365 01125638 12166718 13022924 12272805 216013PB 7A-5/1618X11/4 Crankshaft 1 2 3 4 5 6 7 8 9 10 11 12 13 14 15 16 17 18 19 20 21 VR260 1 Timing Gear Dowel Pin Plug Main Bearing Thrust Pieces Hub Plain Washer V-Grooved Pulley Gear Rim Flywheel 1 1 6 7 2 1 1 1 1 1 1 1 4 5 2 1 1 1 1 1 Cheese Head Screw 6 6 Hexagon Bolt 4 4 Hexagon Bolt Spring Lock Washer Straight Pin Mass Balancer Gear Rim Adaptor Vibration Damper Pilot Bearing Housing Bolt 9 6 1 1 1 1 ? 6 6 1 1 1 ? 121 VR260 VR380 122 Fan Assembly ITEM PART NUMBER DESCRIPTION VR380 1 13023426 13020583 13023061 12273212 12200650 12270869 13023052 13020577 12158513 01111151 01139584 01112331 01111166 01151500 01152347 01177981 13020587 01118960 13023360 13021535 209027-A62 13021367 209027-A42 12159208 13024404 13024832 13024407 13024406 13020581 13024408 01152752 01132562 01178365 01152752 V-Grooved Pulley 1 2 3 4 5 6 7 8 9 10 11 12 13 14 15 16 17 18 n/s 19 n/s n/s 22 23 VR260 1 Centrifugal Pump 1 1 Pump Gasket 1 1 Adapter Pump Gasket Hexagon Bolt Hexagon Bolt Hexagon Bolt Chess Head Screw Chess Head Screw Spring Lock Washer Flange Hexagon Bolt Sealing Ring Pusher Fan Sucker Fan Pusher Fan Sucker Fan Shaped Flange 1 1 5 1 1 4 6 2 4 2 17 1 14 1 1 1 1 1 1 1 1 1 Shaped Flange Hexagon Bolt Adapter Hexagon Bolt Gasket Gasket Spring Lock Washer Gasket 1 4 4 1 4 6 4 6 6 123 Radiator Assembly - VR380 124 ITEM PART NUMBER DESCRIPTION VR380 1 2 3 4 5 13021903 208773-380 208774-380 HC-64 207945 Radiator Upper Radiator Hose Lower Radiator Hose Clip Radiator Cap 1 1 1 4 1 VR260 Radiator Assembly - VR260 ITEM PART NUMBER DESCRIPTION 1 2 3 4 5 6 7 8 9 10 13021988 13021980 13021981 HC-64 01133878 H461 207945 118224 H146 13022596 Radiator Upper Radiator Hose Inlet Pipe Clip Clip Overflow Drain Hose, 3’ Radiator Cap Hose Clamp Hose to Water Manifold, 5/16’ D Rubber Hose VR380 VR260 1 1 1 4 6 1 1 2 1 2 125 126 Cylinder Head Assembly ITEM PART NUMBER DESCRIPTION 1 2 3 4 5 6 7 8 13024736 13024729 13021182 13021183 01152710 13026871 13026872 01153857 13021203 9 13021204 10 11 12 13 14 15 16 17 18 19 12167040 01222051 01222009 12164645 12164698 01104736 01152538 01152500 01112445 01113465 01113472 13032347 13020378 12163182 12273265 12167216 12188750 12151665 12200327 20 21 22 23 24 25 26 27 Entire Assembly Cylinder Head Inlet Valve Seat Exhaust Valve Seat Cover Intake Valve Guide Exhaust Valve Guide O-Seal Inlet Valve Inlet Valve - Turbo Exhaust Valve Exhaust Valve - Turbo Plain Washer Compression Spring Compression Spring Spring Cap Valve Collet Screw Plug Hose Clip Stud Hexagon Bolt Stud Stud Nut Plain Washer Cylinder Head Gasket Plain Washer Pipe Connection Host Clip Tubing Connection VR380 VR260 6 6 6 24 6 6 12 6 6 6 6 12 12 12 12 24 6 12 12 12 12 4 4 4 12 4 4 8 4 12 30 12 6 4 8 8 8 8 16 8 8 4 8 8 8 20 8 4 12 6 12 6 127 Cylinder Head Cover Assembly 128 ITEM PART NUMBER DESCRIPTION VR380 VR260 1 2 3 4 12159819 01139584 13023857 12270879 Cylinder Head Cover Hexagon Bolt Sealing Ring Gasket, Cylinder Head Cover 6 6 6 6 4 4 4 4 Rocker Arm Bracket Assembly ITEM PART NUMBER DESCRIPTION VR380 VR260 1 2 3 4 5 6 7 8 9 12159630 12165314 01107724 12159194 12273399 12214103 12159522 12159526 01116947 Rocker Arm Bracket Spring Lock Washer C-Clips Push rod Tappet Rocker Arm Adjusting Screw Hexagon Nut Ball 6 24 12 12 12 12 12 12 12 4 16 8 8 8 8 8 8 8 129 Piston Assembly ITEM PART NUMBER DESCRIPTION VR380 VR260 1 13020922 G-907-152 13022348 13022349 13022351 01154078 12151395 Piston Complete Set Set of Piston Set of Piston Set of Piston Piston Pin Spring Clip 6 4 6 6 6 6 12 4 4 4 4 8 2 3 4 5 6 130 of Piston Rings - Items 2, 3 & 4 Rings Rings Rings Connecting Rod Assembly ITEM PART NUMBER DESCRIPTION VR380 VR260 1 2 3 4 5 6 12273053 12273054 12167047 01154162 12159598 13025625 13024279 12273939 Connecting Rod Connecting Cover Big End Bolt Straight Pin Wristpin Bushing Connecting Rod Bearings (upper and lower) Connecting Rod Bearings (upper) Connecting Rod Bearings (lower) 6 6 12 6 6 6 6 6 4 4 8 4 4 4 4 4 131 Camshaft Assembly ITEM PART NUMBER DESCRIPTION VR380 1 13031471 13024219 12189556 13024211 12189557 12159721 12189558 12160109 12190248 01157293 01157294 01137083 01177981 01139989 Camshaft 1 2 3 4 5 6 7 8 9 10 11 12 132 Camshaft Drive Gear Oil Pump Drive Gear Quadrant/Plate Shaped Flange Shaped Flange Gasket Locking Screw Locking Screw Hexagon Bolt Spring Lock Washer Hexagon Bolt 1 1 1 1 1 1 4 2 2 2 4 VR260 1 1 1 1 1 1 1 4 2 2 2 4 Lubricating Oil Line Assembly ITEM PART NUMBER DESCRIPTION VR380 1 12159895 12189078 12160163 01214459 01112331 01153874 01153868 01177981 01112829 12166701 12166832 Lubricating Oil Line Assembly 1 2 3 4 5 6 7 8 9 Angle Plate Plain Washer Hexagon Bolt O-Seal Spring Lock Washer II-Hexagon Nut Threaded Joint Lubricating Oil Suction Pipe 1 2 2 1 2 2 VR260 1 1 2 2 1 2 2 1 1 133 134 OIL Cooling System Assembly POSITION PART NUMBER DESCRIPTION VR380 VR260 1 2 3 4 12270761 12188448 01137412 13024128 12273290 13024225 01119254 13023364 01177986 01154103 13024257 13020586 12151721 13020659 13021317 12273021 13023358 01112331 12273107 01136431 01139277 01107284 162709-A62 162709A 12270878 13023186 13023187 60356 PF3-1/8 PF1-8x2 Cooling Water Line Rubber Syphon Tube Clip Oil Cooler 1 1 4 1 1 1 4 5 6 7 8 9 10 11 12 13 14 15 16 17 18 19 20 21 22 23 24 25 26 27 Cooling Water Line Hollow Screw Sealing Ring Tube Clip Rubber Tube Upper Bypass Hose Tube Clip Tube Tie-In Hexagon Bolt Connecting Bolt Bush Sealing Ring Hexagon Bolt Oil Cooler Seat Cheese Head Screw Cheese Head Screw Spring Washer Spin-On Filter Sealing Gasket Rubber Tube Spring Clip Oil Sensor 1/8” Tee Pipe 1/8”x2” Nipple Pipe 1 2 4 2 1 1 1 1 1 1 1 1 1 1 2 3 1 1 1 1 1 1 1 1 1 2 4 2 1 1 1 1 1 1 1 1 1 1 2 3 1 1 1 1 1 1 1 135 Lubricating Oil Pump Assembly ITEM PART NUMBER DESCRIPTION VR380 1 12159765 12166779 01156339 01157293 12151228 12159468 Gear, Oil Pump 1 2 3 4 5 136 Locking Screw Locking Screw Nut Plain Washer 1 1 1 1 VR260 1 1 1 1 1 Oil Pan Assembly ITEM PART NUMBER DESCRIPTION VR380 1 13022882 12274896 13032641 13023364 01133632 13023362 12270457 12270444 12190556 13020273 01214459 01137083 01112339 13022863 12270876 Oil Pan 1 2 3 4 5 6 7 8 9 10 11 Screw Plug Seal Ring Screw Plug Seal Ring Oil Gauge 1 1 1 1 1 VR260 1 1 1 1 1 1 Tube Plain Washer Hexagon Bolt Hexagon Bolt Oil Pan Gasket 1 33 7 26 1 1 25 7 18 1 137 138 Oil Level Indicator - Optional 1 2 3 4 5 6 7 8 9 10 11 12 13 14 15 16 17 18 19 20 21 22 23 24 25 26 27 28 29 30 31 PART NUMBER 208512-A62G 208512-A62 M10x20 M10WS PF1-1x2 PF3-1 ASP-3-FM PF9-1x1/2 118224 7/16 Rubber Hose PF5-1/2x7/16 PF6-1/2x5/8 PF2-3/8 512-12 OLR-BRKT-A62 M14WS M14x30 PF-5090 PF9-3/4x1/2 KCN-1/2 M10WF 3/4” Rubber Hose 118224 PF3-1/2 PF5-1/2 PF4-1/2 PF2-1/2 OLR-ADPT-A42 M10x25 M10WS DESCRIPTION VR380 Crankcase End Cover Gasket, Gov Block Off Plate, Gov Block Off 10mm x 20mm Hex Bolt 10mm Split Washer Pipe Nipple Pipe Tee Water Filler Pipe Bushing Hose Clamp .69-1.25 Hose Breather Elbow, Standard 90° Plated Bell Reducer Nipple Close Oil Level Controller with #12 Oil Level Regulator Bracket 1 1 1 4 4 1 1 1 1 2 1 2 1 1 1 1 2 2 1 1 2 2 3 2 1 2 1 1 1 2 2 Connector, Liquid Tight 90° 3/4 x 1/2 Pipe Bushing Nipple 3/4” Rubber Hose (H131) Hose Clamp .69-1.25 1/2” T #150 1/2” ST N:N 1/2” Plug Nipple Close Oil Level Regulator Adapter Hex Bolt Split Washer VR260 IN DEVELOPMENT ITEM 139 15 140 Alternator and Bracket Assembly - VR380 ITEM PART NUMBER DESCRIPTION VR380 1 13020748 12903819 69753A 24V ALT 12200613 12200614 12200615 12165765 13020949 01139584 01112339 01113397 01110618 01177981 01112829 01152752 13021432 199094-D 13024457 12V Closed Unit Alternator 24V Closed Unit Alternator 12V Open Unit Alternator 24 V Open Unit Alternator Bracket Bracket Bushing Plain Washer Connecting Plate Hexagon Bolt Hexagon Bolt Hexagon Bolt Cheese Head Screw Spring Washer Hexagon Nut Plain Washer Bracket Connecting Plate for Open Unit Narron V-Belt 1 2 3 4 5 6 7 8 9 10 11 12 13 14 15 VR260 1 1 1 1 1 4 2 1 1 7 4 1 1 2 141 15 142 Alternator and Bracket Assembly - VR260 ITEM PART NUMBER DESCRIPTION 1 2 3 4 5 6 7 8 9 10 11 12 13 12270276 12190551 01110618 01139584 01177981 01112829 13021990 13020949 01152752 01112405 01155765 00111166 13020748 13026381 69753A 24V ALT 199094-D 13020641 Bracket Bush Cheese Head Screw Hexagon Bolt Spring Washer Hexagon Nut Spacer Connecting Plate Plain Washer Hexagon Bolt Plain Washer Hexagon Bolt 12V Colsed Unit Alternator 24V Closed Unit Alternator 12V Open Unit Alternator 24 V Open Unit Alternator Connecting Plate for Open Unit Narron V-Belt 14 VR380 VR260 1 1 1 2 3 1 1 1 1 1 1 1 1 1 1 143 13 Open Unit Air Filter Assembly - VR380 144 ITEM PART NUMBER DESCRIPTION VR380 1 2 3 4 5 6 7 8 9 10 11 12 13 13020720 M8x20 13024892 208860-380 HC-64 M08WS 153789 13022519 13020714 01152752 01178365 01139401 41236A 13023273 Air Filter Mounting Band Hexagon Head Capscrew, mm Air Cleaner and Pre-Cleaner Assembly Hose Hose Clamp 8mm Split Lockwasher, Zinc Plated American Air Filter Gauge Bracket Hex Bolt Plain Washer Lock Washer Nut Hose Clamp Air Filter Element with Pre-Cleaner Filter 2 4 1 1 2 4 1 2 4 4 4 4 1 VR260 Open Unit Air Filter Assembly - VR260 ITEM PART NUMBER DESCRIPTION 1 2 3 4 5 6 7 8 9 10 13020720 M8x20 13022962 208860-260 HC-64 M08WS 13022959 13022462 01143995 153789 13023207 Air Filter Mounting Band Hexagon Head Capscrew, mm Air Cleaner and Pre-Cleaner Assembly Hose Clip 8mm Split Lockwasher, Zinc Plated Bracket Hex Bolt Nut American Air Filter Gauge Air Filter Element with Pre-Cleaner Filter VR380 VR260 1 4 1 1 2 4 1 2 2 1 1 145 ENCLOSED Unit Air Filter Assembly - VR380 146 ITEM PART NUMBER DESCRIPTION VR380 1 2 3 4 5 5.5 6 7 8 9 10 11 12 13020720 M8x20 13024892 208860-A62 41236A HC-64 M08WS 153789 13022519 13020714 01152752 01178365 01139401 13023273 Air Filter Mounting Band Hexagon Head Capscrew, mm Air Cleaner and Pre-Cleaner Assembly Hose Hose Clamp Hose Clamp 8mm Split Lockwasher, Zinc Plated American Air Filter Gauge Bracket Hex Bolt Plain Washer Lock Washer Nut Air Filter Element with Pre-Cleaner Filter 2 4 1 1 1 1 4 1 2 4 4 4 4 1 VR260 ENCLOSED Unit Air Filter Assembly - VR260 ITEM PART NUMBER DESCRIPTION 1 2 3 4 5 6 7 8 9 10 13020720 M8x20 13022962 208860-A42 HC-64 M08WS 13022959 13022462 01143995 153789 13023207 Air Filter Mounting Band Hexagon Head Capscrew, mm Air Filter Assembly Hose Clip 8mm Split Lockwasher, Zinc Plated Bracket Hex Bolt Nut American Air Filter Gauge Replacement Air Filter with Prefilter VR380 VR260 1 4 1 1 2 4 1 2 2 1 1 147 148 Intake/Exhaust System - VR380 ITEM PART NUMBER DESCRIPTION 1 2 3 4 5 6 7 8 9 10 11 12 13 14 15 16 17 18 19 20 21 22 23 24 25 26 27 28 29 30 155938T 199454A 168094-A62 208878NS 208878-1 M10NF 208878G M10x11/2 13024733 13026791 13024731 13026792 12188124 12272783 12190460 13031425 13021132 12270944 01177981 01112829 01151397 12188750 13021317 00111873 01125789 01118730 13024007 13024455 208643-A42 159884-A42 M08x25 M08WS Rain Cap Muffler Muffler Clamp Muffler Adaptor Air Inlet Elbow Crush Nut Gasket Stud Exhaust Manifold, 1 Turbo Exhaust Manifold, 1 Exhaust Manifold, 2 Turbo Exhaust Manifold, 2 O-Ring Gasket Gasket Intake Manifold Thermostat Thermostat Cover Lock Washer Hex Nut Stud Pipe-Joint Screw Plug Seal Ring Screw Plug Seal Ring End Cap Manifold End Cap Gasket, Block Off Plate Asymmetrical Gasket Hex Bolt Split Washer VR380 VR260 1 1 1 1 1 4 1 4 1 1 1 6 1 1 1 1 2 2 2 1 1 1 1 1 2 1 2 1 12 12 149 150 Intake/Exhaust System - VR260 ITEM PART NUMBER DESCRIPTION 1 2 3 4 5 6 7 8 9 10 11 12 13 14 15 16 17 18 19 20 21 22 23 24 25 26 27 28 29 30 31 32 33 155938T 199454A 168094-A62 208878NS 208878-1 M10NF 208878G M10x11/2 13026070 13021317 00111873 M08x25 M08WS 12190460 12270944 12188750 13021132 13020834 01151397 01177981 01112829 12272783 12190460 13024455 01112331 01177981 159884-A42 13024007 208643-A42 01125789 01118730 13022827 13022921 Rain Cap Muffler Muffler Clamp Muffler Adaptor Air Inlet Elbow Crush Nut Gasket Stud Exhaust Manifold Screw Plug Seal Ring Bolt Washer Gasket Thermostat Cover Pipe-Joint Thermostat Intake Manifold Stud Lock Washer Hex Nut Gasket Gasket Cover Plate Hex Bolt Lock Washers Asymmetrical Gasket Cover Plate Gasket Screw Plug Sealing Ring Screw Plug Square Toes Bolt VR380 VR260 1 1 1 1 1 4 1 4 1 1 1 8 8 1 1 1 1 1 2 2 2 4 4 1 4 4 1 1 1 1 1 1 1 151 152 Ignition, coil and spark plugs ITEM PART NUMBER DESCRIPTION VR380 VR260 1 2 3 7910106 217067-A42 208391-A62 208391-A42 330-2-A1-46 330-18-A42 14195-67602 7930486 7910151 208512MP-A42 M8x20mm M08WS M6x20 M8x40 217067CD-S-A42 M8x25 M08WS 12/25BCHS M12WS M08WS CD1 Ignition Ignition Mounting Plate Coil Bracket 1 1 1 1 1 4 5 6 7 8 9 10 11 12 13 14 15 16 17 18 Coil Spark Plugs Spark Plug Wire Wiring Harness for the Ignition Magnetic Pick-Up for the Ignition Bracket for the Magnetic Pick-Up Bolt Washer Screw Bolt Spacer Bolt Lock Washer Bolt Lock Washer Flat Washer 6 6 6 1 1 1 2 2 4 1 1 3 4 1 1 4 1 4 4 4 1 1 1 2 2 4 1 1 2 3 1 1 3 153 10 Arrow 100 Carburetor 154 ITEM PART NUMBER DESCRIPTION VR380 VR260 1 2 3 4 5 6 7 8 9 10 G1-11 646-A-46 BV1-14 R1-19 D1-17-2 P2-22 S1-22 S2-85 C1-17 AV1-14-3 Throttle to Body Gasket Vortox Mounting Bracket Valve Air Valve Ring Silicone Diaphragm Back-Up Plate Screw Air Valve Spring Cover Diaphragm Assembly (Items 3-7) 1 1 1 1 1 1 8 1 1 1 1 1 1 1 1 1 8 1 1 1 Governor ITEM PART NUMBER DESCRIPTION VR380 VR260 1 2 3 4 5 6 7 8 9 10 11 12 13 14 n/s 15 199097A N00-4097A 8404G 6321 261-106 6321-ADAPTOR 8404-2008 8404-A42 6343G 12E-1224x1 B291 IC-3/8 208643-A42 G1-11 B1331F-A42 8404-ADAPTOR Arrow 100 Carburetor Carb to Governor Adaptor GAC Governor Carb to Governor Gasket GAC ATB Integral Throttle Body Governor, 45mm Governor to Intake Manifold Gasket Governor Adaptor Woodward Governor, 43mm Carb to Governor Adaptor for Woodward Governor Adaptor Gasket Screw Stud 3/8-24 x 3/8-16 Star Washer Gasket Gasket Gasket Adaptor 1 1 1 1 1 1 1 1 1 4 2 3 1 1 1 1 1 1 1 1 1 1 1 1 1 4 2 3 1 1 1 1 155 Mass Balancer Assembly VR260 Only 156 ITEM PART NUMBER DESCRIPTION 1 2 3 4 5 6 7 8 9 10 11 12 13 14 13031232 12200346 12200347 12200348 12200351 12200352 12200353 12158826 12158759 01153236 01118664 01121214 12160137 12159449 13021979 Mass Balancer Assembly Mass Balancer Lining Shaft Driving Gear Driven Gear Thrust Pieces Lubricant Oil Pipe Tie-In Hollow Screw Seal Ring Hexagon Bolt Shim Localizer Hexagon Bolt VR380 VR260 1 4 2 1 1 4 1 1 1 4 2 6 2 2 Starter Assembly ITEM PART NUMBER DESCRIPTION VR380 VR260 1 13022233 12153838 01169029 12V Starter 24V Starter Protecting Cap 1 1 1 1 2 157 Speed Control Unit 158 ITEM PART NUMBER DESCRIPTION VR380 VR260 1 2 3 4 5 6 7 8 9 n/s n/s 6321 with 3 AS1-1-P 208435-1 6321-CB AS1-A42 PF-5090 M8x25 M08WS M08NF 117428 ESD2400 Speed Control Unit Screw Mounting Plate for Speed Control Unit Toggle Switch Push Button Box Fitting for Wiring Bolt Washer Nut Spacer 1 1 1 1 1 1 1 4 4 4 4 1 1 1 1 1 4 4 4 4 Control Panel ITEM PART NUMBER DESCRIPTION 1 2 3 4 120843-H 120844 868-A-255 Water Temperature Gauge Oil Pressure Gauge Ignition Key Control Panel Bracket n/s 208843-A42 OL-A62 OL-A42 VR380 VR260 1 1 1 1 1 Oil Line 1 1 159 160 Skids ITEM PART NUMBER DESCRIPTION VR380 1 209015-A62-TA 209015-A62 209014NS 209020NS 209019NS 209018NS 209015-G-A62 209014NS-1 M12x30 M12WS M12WF M12NF M14x30 M14WF M14NF M18x45 M18WS M12x30mm M12WS Engine Skid 1 (Turbo) 1 2 3 4 5 6 7 8 9 10 11 12 13 14 15 16 Rear Bracket Front Left Bracket Front Right Bracket Genset Skid Bolt Lock Washer Flat Washer Nut Bolt Washer Nut Bolt Washer Bolt Washer 2 1 1 1 4 4 4 4 4 4 4 4 4 8 8 VR260 1 2 1 1 1 4 4 4 4 4 (2 genset) 4 (2 genset) 4 (2 genset) 4 4 8 8 161 162 Enclosure ITEM PART NUMBER DESCRIPTION VR380 1 A208777-A62-TA A208777-A62 A208778NS A208749-A62-TA A208749-A62 A208749-A42 A208751-A62 A208751-A42 A208753-A62 A208753NS A208754-A62 A208754NS A209016-A62 A209016NS A209017-A62 A209017NS 208772 M10NF M10FW M10WS M10x30 Hood 1(turbo) 1 2 3 4 5 6 7 8 9 10 12 13 VR260 1 Radiator Shell 1(turbo) 1 1 Optional Side Door 2 2 Instrument Panel 1 1 Upper Rear Panel 1 1 Right Hand Support Bracket 2 2 Left Hand Support Bracket Door Latch Nut Washer Washer Bolt 2 8 2 8 163 Engine Feet ITEM PART NUMBER DESCRIPTION VR380 VR260 1 2 13021906 13021907 13022070 13022652 01151548 01178366 Front Feet Back Feet 2 2 2 3 4 5 164 Hex Bolt Hex Bolt Spring Lock Washer 6 8 8 2 6 8 8 VR Continuous Duty ENGINE WARRANTY CONTINUOUS DUTY DEFINITION: The highest load and speed which can be applied, subject to Arrow Engine Company’s ratings in effect at time of sale. Please contact Customer Service if you need the Stand-By Duty Warranty I. TERMS OF EXPRESS LIMITED WARRANTY Arrow Engine Company warrants that it will repair or replace, at its election and expense, any part of an engine, or product (hereinafter referred to as “Products”) manufactured by Arrow Engine Company, which proves to have had a defect in material or workmanship. There are no other warranties express or implied. II. TERM LIMITATIONS OF EXPRESS LIMITED WARRANTY A. This coverage shall commence upon initial new Products start-up date and shall expire upon the earlier of the following: 1. 1 year after the initial new Products start-up date; or 2. 18 months after the original shipment date of the covered Products by Arrow Engine Company. III. ARROW ENGINE COMPANY’S RESPONSIBILITIES UNDER THE EXPRESS LIMITED WARRANTY Arrow Engine Company shall be responsible for: A. The repair or replacement, at Arrow Engine Company’s election of covered defective parts and all reasonable labor required (at Arrow Engine Company’s specified labor rates and repair times) regarding a warranted failure during the express limited warranty and term. All such labor shall be provided by Arrow Engine Company’s authorized contractor or distributor. B. Reasonable and necessary travel (total mileage not to exceed 300m) and documented expenses incurred by Arrow Engine Company’s authorized contractor or distributor, at it’s sole discretion. C. Replacement of lubricating oil, coolant, filter elements, or other normal maintenance items for the products that are contaminated and/or damaged as a direct result of a warranted failure. NOTWITHSTANDING THE FOREGOING, ARROW ENGINE COMPANY SHALL NOT BE RESPONSIBLE FOR ADDITIONAL OR INCIDENTAL LABOR OR OTHER COSTS ASSOCIATED WITH WARRANTY CLAIMS. IV. OWNER/DISTRIBUTOR’S RESPONSIBILITIES UNDER THE EXPRESS LIMITED WARRANTY Owner shall be responsible for: A. The operation and maintenance of the Products within the guidelines established by Arrow Engine Company. B. Making the Products available to Arrow Engine Company’s authorized contractors or distributors for any warranty repair, during normal business hours. C. All additional costs incurred for premium or overtime labor, should owner request that repairs be made on a premium overtime schedule. D. All costs incurred as the result of removal or reinstallation of the Products as may be required to effect any warranted repair. E. All administrative costs and expenses resulting from a warranted failure. F. Any costs of transportation, towing, repair facilities, or associated costs. G. Loss of revenue and loss of/or damage to real and/or personal property. H. Compliance with all local, state and federal laws. V. LIMITATION OF ARROW ENGINE COMPANY’S OBLIGATIONS The obligations of Arrow Engine Company under this express limited warranty shall be waived and voided, and Arrow Engine Company shall not, thereafter, be responsible for: A. Any failure resulting from owner or operator abuse or neglect, including but not by way of limitation, any operation, use, installation, application, or maintenance practice not in accordance with guidelines or specifications established by Arrow Engine Company; or B. Any failure resulting from unauthorized modifications or repairs of the Products or; C. Any failure resulting from overload, overspeed, overheat, accident, improper storage; or D. Failure of owner to promptly provide notice of a claimed defect - all warranty claims must be authorized, documented, and submitted within 30 days of the failure date while under the warranty period; or E. Failure of Products for which Arrow Engine Company did not receive properly completed start-up reports; or F. Repairs of a covered failure performed with non-genuine Arrow Engine Company parts; or G. Repairs of a covered failure performed by non-authorized contractors or distributors; or H. Failure to make Products available to Arrow Engine Company or its authorized representatives, or I. Failure to supply documents such as drawing and specifications relating to the specific application of the Products. VI. APPLICABILITY AND EXPIRATION The warranties set out above are extended to all owners in the original chain of distribution. The warranties and obligations of Arrow Engine Company shall expire and be of no further effect upon the dates of expiration of the applicable warranty periods. The foregoing sets forth Arrow Engine Company’s only obligations and owners’ exclusive remedy for breach of warranty, whether such claims are based on breach of contract, tort (including negligence and strict liability), or other theories, and the foregoing is expressly in lieu of other warranties whatsoever expressed, implied, and statutory, including without limitation, the IMPLIED WARRANTIES OF MERCHANTABILITY AND FITNESS. Notwithstanding the preceding, in no event shall Arrow Engine Company be liable for any direct, special, incidental or consequential damages (whether denominated in contract, tort, strict liability, negligence or other theories) arising out of this Agreement or the use of any Products provided under this Agreement. Any action arising hereunder or relating hereto, whether based no breach of contract, tort (including negligence and strict liability), or other theories must be commenced within one (1) year after the cause of action accrues or it shall be barred. Febuary 2008 185 165 166